NovaSeq 6000 Sequencing System Guide (1000000019358)
84
NovaSeq 6000 Sequencing System Guide Document # 1000000019358 v14 Material # 20023471 September 2020 ILLUMINA PROPRIETARY For Research Use Only. Not for use in diagnostic procedures.
Transcript of NovaSeq 6000 Sequencing System Guide (1000000019358)

NovaSeq 6000Sequencing System Guide
Document # 1000000019358 v14 Material # 20023471
September 2020
ILLUMINA PROPRIETARY
For Research Use Only. Not for use in diagnostic procedures.

This document and its contents are proprietary to Illumina, Inc. and its affiliates ("Illumina"), and are intended solely forthe contractual use of its customer in connection with the use of the product(s) described herein and for no otherpurpose. This document and its contents shall not be used or distributed for any other purpose and/or otherwisecommunicated, disclosed, or reproduced in any way whatsoever without the prior written consent of Illumina. Illuminadoes not convey any license under its patent, trademark, copyright, or common-law rights nor similar rights of any thirdparties by this document.
The instructions in this document must be strictly and explicitly followed by qualified and properly trained personnel inorder to ensure the proper and safe use of the product(s) described herein. All of the contents of this document must befully read and understood prior to using such product(s).
FAILURE TO COMPLETELY READ AND EXPLICITLY FOLLOW ALL OF THE INSTRUCTIONS CONTAINED HEREIN MAYRESULT IN DAMAGE TO THE PRODUCT(S), INJURY TO PERSONS, INCLUDING TO USERS OR OTHERS, AND DAMAGETO OTHER PROPERTY, AND WILL VOID ANY WARRANTY APPLICABLE TO THE PRODUCT(S).
ILLUMINA DOES NOT ASSUME ANY LIABILITY ARISING OUT OF THE IMPROPER USE OF THE PRODUCT(S)DESCRIBED HEREIN (INCLUDING PARTS THEREOF OR SOFTWARE).
© 2020 Illumina, Inc. All rights reserved.
All trademarks are the property of Illumina, Inc. or their respective owners. For specific trademark information, seewww.illumina.com/company/legal.html.
Document # 1000000019358 v14 Material # 20023471
For Research Use Only. Not for use in diagnostic procedures.ii
NovaSeq 6000 Sequencing System Guide
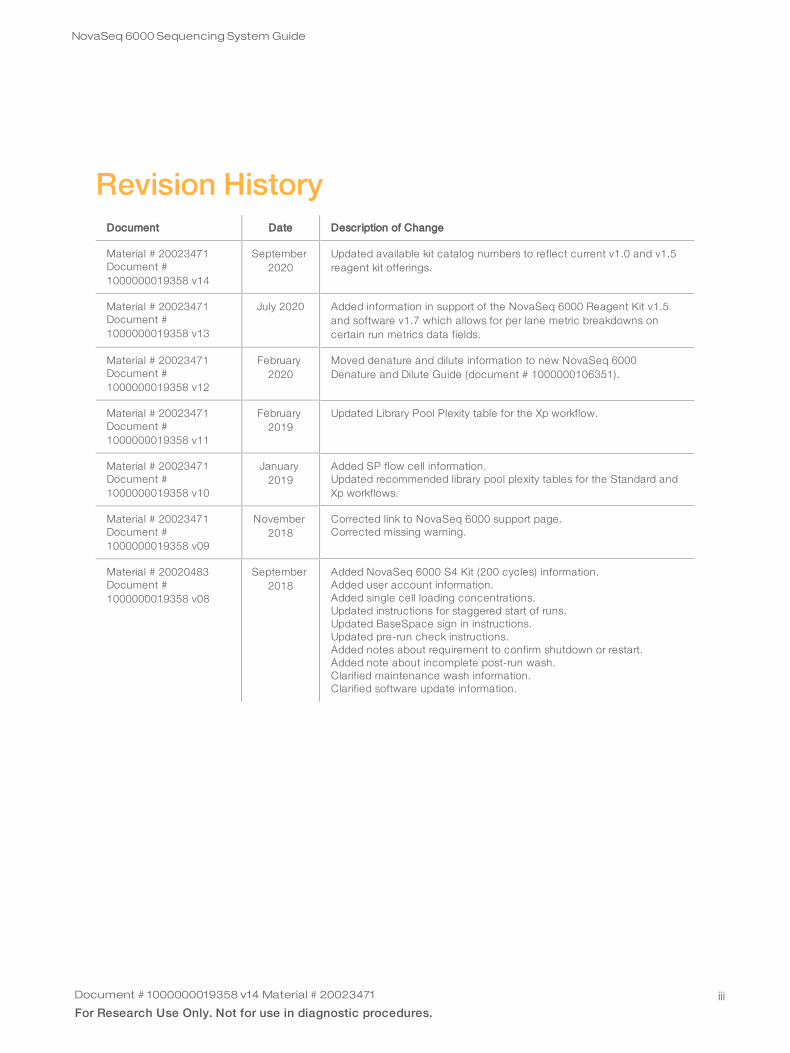
Revision HistoryDocument Date Description of Change
Material # 20023471Document #1000000019358 v14
September2020
Updated available kit catalog numbers to reflect current v1.0 and v1.5reagent kit offerings.
Material # 20023471Document #1000000019358 v13
July 2020 Added information in support of the NovaSeq 6000 Reagent Kit v1.5and software v1.7 which allows for per lane metric breakdowns oncertain run metrics data fields.
Material # 20023471Document #1000000019358 v12
February2020
Moved denature and dilute information to new NovaSeq 6000Denature and Dilute Guide (document # 1000000106351).
Material # 20023471Document #1000000019358 v11
February2019
Updated Library Pool Plexity table for the Xp workflow.
Material # 20023471Document #1000000019358 v10
January2019
Added SP flow cell information.Updated recommended library pool plexity tables for the Standard andXp workflows.
Material # 20023471Document #1000000019358 v09
November2018
Corrected link to NovaSeq 6000 support page.Corrected missing warning.
Material # 20020483Document #1000000019358 v08
September2018
Added NovaSeq 6000 S4 Kit (200 cycles) information.Added user account information.Added single cell loading concentrations.Updated instructions for staggered start of runs.Updated BaseSpace sign in instructions.Updated pre-run check instructions.Added notes about requirement to confirm shutdown or restart.Added note about incomplete post-run wash.Clarified maintenance wash information.Clarified software update information.
Document # 1000000019358 v14 Material # 20023471
For Research Use Only. Not for use in diagnostic procedures.iii
NovaSeq 6000 Sequencing System Guide
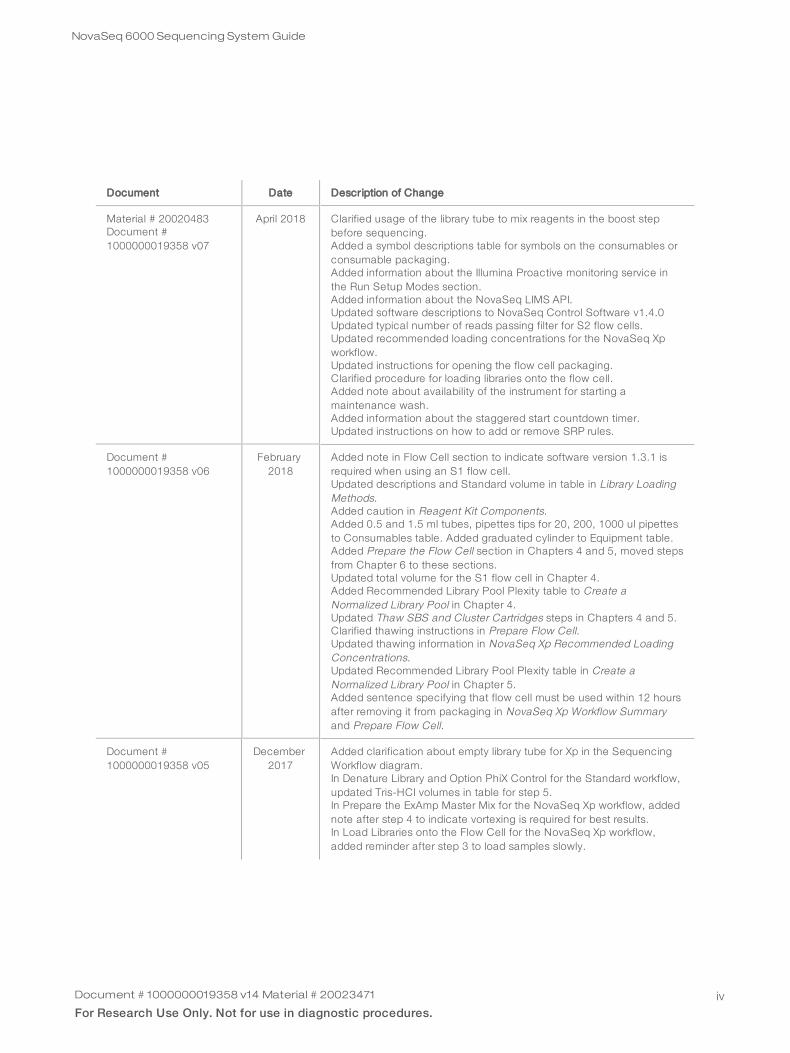
Document Date Description of Change
Material # 20020483Document #1000000019358 v07
April 2018 Clarified usage of the library tube to mix reagents in the boost stepbefore sequencing.Added a symbol descriptions table for symbols on the consumables orconsumable packaging.Added information about the Illumina Proactive monitoring service inthe Run Setup Modes section.Added information about the NovaSeq LIMS API.Updated software descriptions to NovaSeq Control Software v1.4.0Updated typical number of reads passing filter for S2 flow cells.Updated recommended loading concentrations for the NovaSeq Xpworkflow.Updated instructions for opening the flow cell packaging.Clarified procedure for loading libraries onto the flow cell.Added note about availability of the instrument for starting amaintenance wash.Added information about the staggered start countdown timer.Updated instructions on how to add or remove SRP rules.
Document #1000000019358 v06
February2018
Added note in Flow Cell section to indicate software version 1.3.1 isrequired when using an S1 flow cell.Updated descriptions and Standard volume in table in Library LoadingMethods.Added caution in Reagent Kit Components.Added 0.5 and 1.5 ml tubes, pipettes tips for 20, 200, 1000 ul pipettesto Consumables table. Added graduated cylinder to Equipment table.Added Prepare the Flow Cell section in Chapters 4 and 5, moved stepsfrom Chapter 6 to these sections.Updated total volume for the S1 flow cell in Chapter 4.Added Recommended Library Pool Plexity table to Create aNormalized Library Pool in Chapter 4.Updated Thaw SBS and Cluster Cartridges steps in Chapters 4 and 5.Clarified thawing instructions in Prepare Flow Cell.Updated thawing information in NovaSeq Xp Recommended LoadingConcentrations.Updated Recommended Library Pool Plexity table in Create aNormalized Library Pool in Chapter 5.Added sentence specifying that flow cell must be used within 12 hoursafter removing it from packaging in NovaSeq Xp Workflow Summaryand Prepare Flow Cell.
Document #1000000019358 v05
December2017
Added clarification about empty library tube for Xp in the SequencingWorkflow diagram.In Denature Library and Option PhiX Control for the Standard workflow,updated Tris-HCI volumes in table for step 5.In Prepare the ExAmp Master Mix for the NovaSeq Xp workflow, addednote after step 4 to indicate vortexing is required for best results.In Load Libraries onto the Flow Cell for the NovaSeq Xp workflow,added reminder after step 3 to load samples slowly.
Document # 1000000019358 v14 Material # 20023471
For Research Use Only. Not for use in diagnostic procedures.iv
NovaSeq 6000 Sequencing System Guide

Document Date Description of Change
Material # 20023471Document #1000000019358 v04
October2017
Added individual lane loading to the list of instrument features.Consumables - added the NovaSeq Xp 2-Lane Kit and NovaSeq Xp 4-Lane kit. Added NovaSeq Xp 2-Lane Manifold Pack and NovaSeq 4-Lane Manifold Pack.Equipment - added the NovaSeq Xp Flow Cell Dock and P200 Pipettefor NovaSeq Xp WorkflowAdded a Preparing Consumables chapter for the NovaSeq Xp workflowMoved Empty Used Reagent Bottles from the Sequencing chapter tothe beginning of the NovaSeq Standard Workflow and NovaSeq XpWorkflow chapters.Updated Pooled Library Concentration table and RecommendedLoading Concentration table for the Standard workflow.
Material # 20020483Document #1000000019358 v03
September2017
Updated software descriptions to NovaSeq Control Software v1.2,which includes support for the S1 and S4 flow cells.Added disk space requirements for a dual flow cell run for S1 and S4flow cells.Specified the naming requirement for certain *.json files.Reorganized kit overview information in a Kits and Accessorieschapter. This chapter covers configurations, components, andcompatibility labeling for the reagent and library loading kits.Added the NovaSeq 6000 Reagent Kit to the user-suppliedconsumables.Updated pool and denature library instructions to include informationfor S1 and S4 flow cells.Updated the instructions for thawing reagent cartridges to require a 2-hour water bath for S1 and S2, and a four-hour water bath for S4.Updated descriptions of the library tube, reagent cartridges, and flowcells to include S4 components.Added section on automatic software updates in the Maintenancechapter.Replaced the reference to Reducing Whole-Genome Data StorageFootprint (Pub. No. 970-2012-013) with NovaSeq Series and HiSeq XTen Data Quality Comparison (Pub.No.770-2017-010).Added note to step 3 in Enter Run Parameters in Chapter 6.Updated Flow Cell Tiles section to include S1 and S4 tile information.
Document # 1000000019358 v14 Material # 20023471
For Research Use Only. Not for use in diagnostic procedures.v
NovaSeq 6000 Sequencing System Guide

Document Date Description of Change
Material # 20018871Document #1000000019358 v02
April2017
Added the following information:• Illumina-supplied consumables required for a run.• Storage conditions of reagent kit components.• Recommendations for library loading concentration.• NaOH dilution for two flow cells.• Step to bring the flow cell to room temperature before loading.• Glove-changing step after emptying the used reagent bottles.• Configuration of LIMS output for third-party LIMS systems.• Naming convention for sample sheets.• Process Management icons and troubleshooting.• Appendix containing Windows security features and configuration
instructions.• Contact information for technical assistance.Increased reagent cartridge thaw time to 4 hours.Updated PhiX spike-in instructions to change 1% PhiX spike-in volumeto 0.9 µl and use 10 mM Tris-HCl, pH 8.5 to dilute 10 nM PhiX.Updated instructions to clean the flow cell and flow cell stage onlywhen particulate is visible.Updated maintenance wash frequency to every 14 days.Reorganized and consolidated consumable preparation instructions toimprove continuity.Renamed the French doors to the liquid compartment doors.
Material # 20018406Document #1000000019358 v01
March2017
Corrected the name of a column on the Process Management screento Sequencing.
Material # 20015871Document #1000000019358 v00
February2017
Initial release.
Document # 1000000019358 v14 Material # 20023471
For Research Use Only. Not for use in diagnostic procedures.vi
NovaSeq 6000 Sequencing System Guide

Table of Contents
Chapter 1 Overview 1
Introduction 1
Additional Resources 2
Sequencing Overview 2
Sequencing Workflow 3
Instrument Components 5
Chapter 2 Kits and Accessories 10
Kits Overview 10
Reagent Kit Components 11
NovaSeq Xp Kit Components 15
NovaSeq Xp Flow Cell Dock 15
Symbol Descriptions 16
Chapter 3 Getting Started 18
Start the Instrument 18
Configure Settings 19
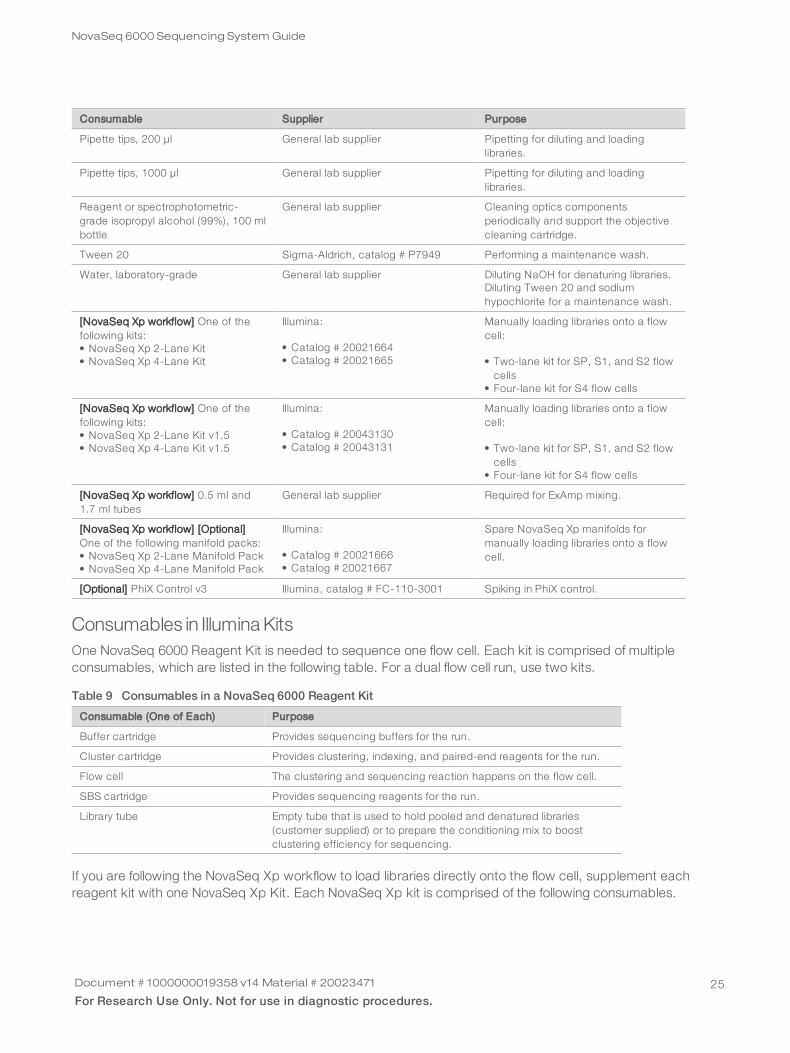
User-Supplied Consumables and Equipment 24
Chapter 4 Standard Workflow: Preparing Consumables 27
Methods 27
Thaw SBS and Cluster Cartridges 27
Empty Used Reagent Bottles 28
Prepare Flow Cell 30
Pool and Denature Libraries for Sequencing 30
Chapter 5 NovaSeq Xp Workflow: Preparing Consumables 31
NovaSeq Xp Workflow Summary 31
Methods 32
Thaw SBS and Cluster Cartridges 32
Empty Used Reagent Bottles 33
Prepare Flow Cell 35
Thaw ExAmp Reagents 35
Pool, Denature, and Load Libraries for Sequencing 35
Document # 1000000019358 v14 Material # 20023471
For Research Use Only. Not for use in diagnostic procedures.vii
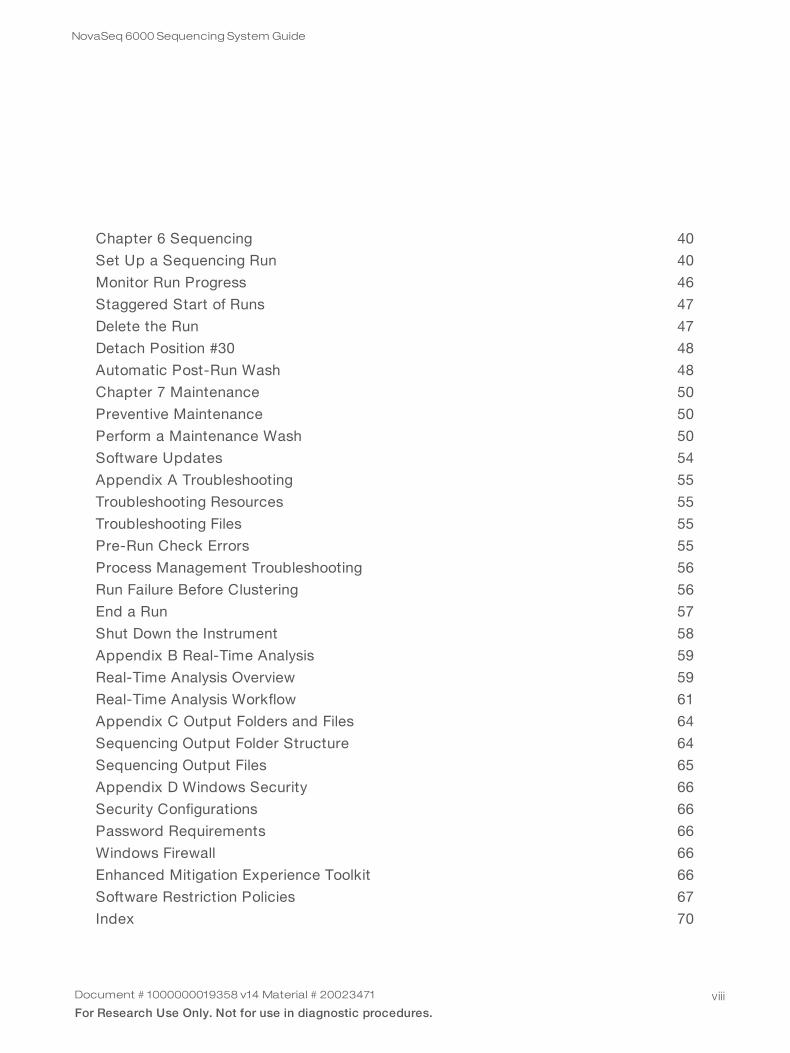
Chapter 6 Sequencing 40
Set Up a Sequencing Run 40
Monitor Run Progress 46
Staggered Start of Runs 47
Delete the Run 47
Detach Position #30 48
Automatic Post-Run Wash 48
Chapter 7 Maintenance 50
Preventive Maintenance 50
Perform a Maintenance Wash 50
Software Updates 54
Appendix A Troubleshooting 55
Troubleshooting Resources 55
Troubleshooting Files 55
Pre-Run Check Errors 55
Process Management Troubleshooting 56
Run Failure Before Clustering 56
End a Run 57
Shut Down the Instrument 58
Appendix B Real-Time Analysis 59
Real-Time Analysis Overview 59
Real-Time Analysis Workflow 61
Appendix C Output Folders and Files 64
Sequencing Output Folder Structure 64
Sequencing Output Files 65
Appendix D Windows Security 66
Security Configurations 66
Password Requirements 66
Windows Firewall 66
Enhanced Mitigation Experience Toolkit 66
Software Restriction Policies 67
Index 70
Document # 1000000019358 v14 Material # 20023471
For Research Use Only. Not for use in diagnostic procedures.viii
NovaSeq 6000 Sequencing System Guide

Technical Assistance 74
Document # 1000000019358 v14 Material # 20023471
For Research Use Only. Not for use in diagnostic procedures.ix
NovaSeq 6000 Sequencing System Guide

Chapter 1 OverviewIntroduction 1Additional Resources 2Sequencing Overview 2Sequencing Workflow 3Instrument Components 5
IntroductionThe Illumina® NovaSeq™ 6000 Sequencing System packages scalable throughput and flexible sequencingtechnology into a production-scale platform with the efficiency and cost-effectiveness of a benchtop system.
Featuresu Scalable sequencing—The NovaSeq 6000 scales up to production-level sequencing with high-quality
data for a broad range of applications.
u Adjustable output—The NovaSeq 6000 is a dual flow cell system with a broad output range. Sequenceone flow cell, or sequence two flow cells with different read lengths simultaneously. Mix and match fourtypes of flow cells and different read lengths.
u Patterned flow cell—A patterned flow cell generates tightly spaced clusters. The reduced spacingbetween nanowells increases cluster density and data output.
u Onboard ExAmp mixing—The NovaSeq 6000 mixes the ExAmp reagents with library, amplifies the library,and performs cluster generation for a streamlined sequencing workflow.
u Individual lane loading—The NovaSeq Xp flow cell dock allows preloading of libraries into individual lanesof the flow cell and reduces the library loading volume.
u High-throughput line scanning—The NovaSeq 6000 uses one camera with bidirectional scanningtechnology to quickly image the flow cell in two color channels simultaneously.
u Real-Time Analysis (RTA)—The NovaSeq 6000 uses an implementation of RTA called RTA3. Thisintegrated software analyzes images and calls bases.
u BaseSpace™ Sequence Hub integration—The sequencing workflow is integrated with BaseSpaceSequence Hub, the Illumina genomics computing environment for data analysis, storage, andcollaboration. As the run progresses, output files are streamed to the environment in real time.
u BaseSpace Clarity LIMS ready—Improve operational efficiency with end-to-end tracking of samples andreagents, automated workflows, and integrated instrument operation.
Document # 1000000019358 v14 Material # 20023471
For Research Use Only. Not for use in diagnostic procedures.1

Additional ResourcesThe NovaSeq 6000 Sequencing System support pages on the Illumina website provide additional systemresources. These resources include software, training, compatible products, and the followingdocumentation. Always check support pages for the latest versions.
Resource Description
Custom ProtocolSelector
A wizard for generating customized end-to-end documentation that is tailored to the library prepmethod, run parameters, and analysis method used for the sequencing run.
NovaSeq Series SitePrep Guide(document #1000000019360)
Provides specifications for laboratory space, electrical requirements, and environmental andnetwork considerations.
NovaSeq SeriesSafety andCompliance Guide(document #1000000019357)
Provides information about operational safety considerations, compliance statements, andinstrument labeling.
RFID ReaderCompliance Guide(document #1000000002699)
Provides information about the RFID reader in the instrument, including compliancecertifications and safety considerations.
NovaSeq SeriesCustom PrimersGuide (document #1000000022266)
Provides information about replacing Illumina sequencing primers with custom sequencingprimers.
NovaSeq 6000Denature and DiluteGuide (document #1000000106351)
Provides instructions for denaturing and diluting prepared libraries for a sequencing run, andpreparing optional PhiX control.
Sequencing Overview
Cluster GenerationDuring cluster generation, single DNA molecules are bound to the surface of the flow cell and simultaneouslyamplified to form clusters. For the Standard workflow, the ExAmp master mix is mixed with the librariesonboard the instrument before cluster generation. For the NovaSeq Xp workflow, the ExAmp reagents andlibraries are mixed and delivered to the flow cell outside of the instrument. Volumes vary by flow cell type andworkflow.
SequencingClusters are imaged using bidirectional scanning and two-channel sequencing chemistry. The camera usessensors that detect red and green light to image each swath and simultaneously generate red and greenimages of the whole swath. After imaging, base calling is performed for clusters within each tile based on theratio of red to green signal for each cluster, which is based on location determined by the patterned flow cell.This process is repeated for each cycle of sequencing.
Document # 1000000019358 v14 Material # 20023471
For Research Use Only. Not for use in diagnostic procedures.2
NovaSeq 6000 Sequencing System Guide
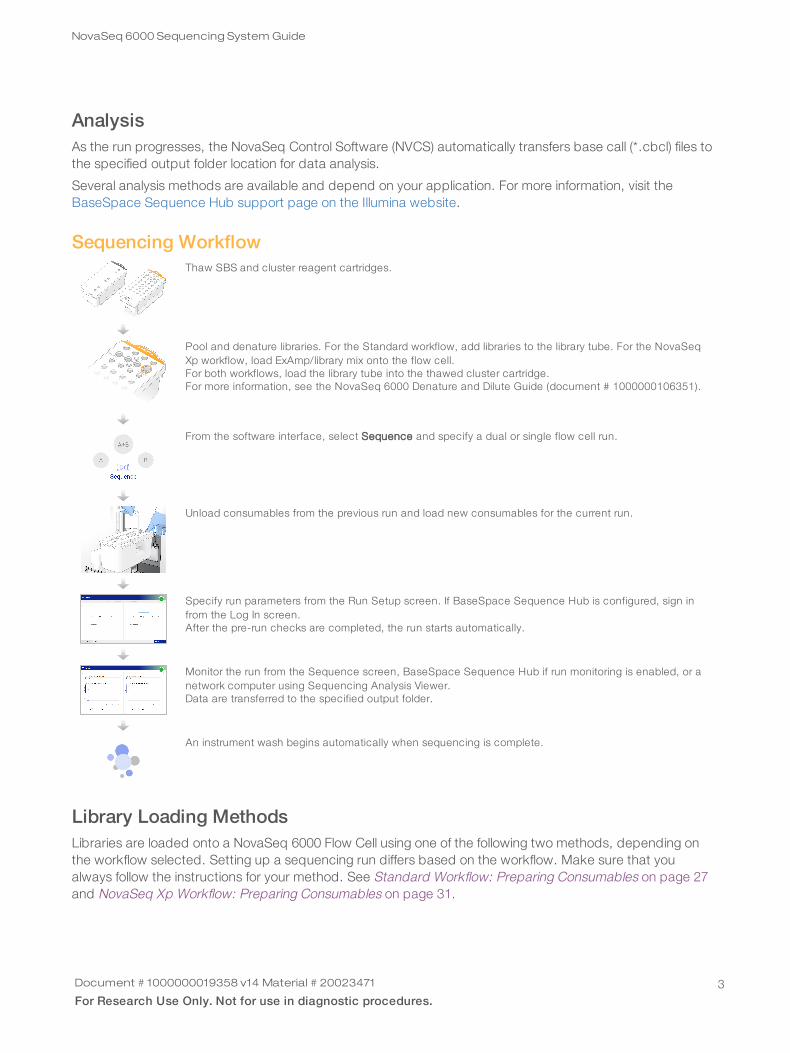
AnalysisAs the run progresses, the NovaSeq Control Software (NVCS) automatically transfers base call (*.cbcl) files tothe specified output folder location for data analysis.
Several analysis methods are available and depend on your application. For more information, visit theBaseSpace Sequence Hub support page on the Illumina website.
Sequencing WorkflowThaw SBS and cluster reagent cartridges.
Pool and denature libraries. For the Standard workflow, add libraries to the library tube. For the NovaSeqXp workflow, load ExAmp/library mix onto the flow cell.For both workflows, load the library tube into the thawed cluster cartridge.For more information, see the NovaSeq 6000 Denature and Dilute Guide (document # 1000000106351).
From the software interface, select Sequence and specify a dual or single flow cell run.
Unload consumables from the previous run and load new consumables for the current run.
Specify run parameters from the Run Setup screen. If BaseSpace Sequence Hub is configured, sign infrom the Log In screen.After the pre-run checks are completed, the run starts automatically.
Monitor the run from the Sequence screen, BaseSpace Sequence Hub if run monitoring is enabled, or anetwork computer using Sequencing Analysis Viewer.Data are transferred to the specified output folder.
An instrument wash begins automatically when sequencing is complete.
Library Loading MethodsLibraries are loaded onto a NovaSeq 6000 Flow Cell using one of the following two methods, depending onthe workflow selected. Setting up a sequencing run differs based on the workflow. Make sure that youalways follow the instructions for your method. See Standard Workflow: Preparing Consumables on page 27and NovaSeq Xp Workflow: Preparing Consumables on page 31.
Document # 1000000019358 v14 Material # 20023471
For Research Use Only. Not for use in diagnostic procedures.3
NovaSeq 6000 Sequencing System Guide

WorkflowLibrary Pool Loading and ExAmpMixing Method
Individual Lane Addressability and DataAnalysis
Loading Volume*
SP/S1–S2–S4Modes (µl)
Standard A single library pool is loaded into thelibrary tube, mixed onboard in the librarytube with the ExAmp reagents, andautomatically delivered to the flow cellfor clustering and sequencing. A booststep before sequencing uses reagentsin the cluster cartridge and the librarytube to create a conditioning mix thathelps increase clustering efficiency.
A single library pool is distributed, andsequenced, across all lanes of the flowcell. Reads from all lanes are analyzedin aggregate.
150–225–465 µl(entire flow cell)
NovaSeq Xp One or more libraries (the numbercorresponds to the number of flow celllanes) are manually mixed with ExAmpreagents outside of the instrument anddirectly loaded into individual lanes ofthe flow cell using the NovaSeq Xp flowcell dock. The filled flow cell is thenloaded onto the instrument forclustering and sequencing. A booststep before sequencing uses the emptylibrary tube to mix reagents from thecluster cartridge to create aconditioning mix that helps increaseclustering efficiency.
Each library is loaded into a separatelane of the flow cell, which is thensequenced. Different pools, aliquots ofthe same pool, or arbitrarycombinations can be used. Reads fromthe different lanes are analyzedindividually or in aggregate,accordingly.
27–33–45 µl(individual lane)
Table 1 Library Loading Methods
*The NovaSeq Xp workflow requires a 25–50% lower concentration of denatured libraries compared to the Standard workflow.
Document # 1000000019358 v14 Material # 20023471
For Research Use Only. Not for use in diagnostic procedures.4
NovaSeq 6000 Sequencing System Guide

Instrument ComponentsThe NovaSeq 6000 Sequencing System comprises a touch screen monitor, a status bar, a power button withadjacent USB ports, and three compartments.
Figure 1 External Components
A Touch screen monitor—Displays the NVCS interface for system configuration and run setup and monitoring.B Optics compartment—Contains the optical components that enable dual surface imaging of flow cells.C Liquids compartment—Contains reagent and buffer cartridges, and bottles for used reagents.D Flow cell compartment—Holds the flow cells.E Status bar—Indicates flow cell status as ready to sequence (green), processing (blue), or needs attention
(orange).F Power and USB ports—Provides access to the power button and USB connections for peripheral
components.
Flow Cell CompartmentThe flow cell compartment contains the flow cell stage, which holds flow cell A on the left and flow cell B onthe right. Each side has four clamps that automatically position and secure the flow cell.
An optical alignment target mounted on the flow cell stage diagnoses and corrects optical problems. Whenprompted by the NVCS, the optical alignment target realigns the system and adjusts camera focus toimprove sequencing results.
Document # 1000000019358 v14 Material # 20023471
For Research Use Only. Not for use in diagnostic procedures.5
NovaSeq 6000 Sequencing System Guide

Figure 2 Flow Cell Stage
A Side A flow cell holderB Side B flow cell holderC Flow cell clamp (one of four per side)D Optical alignment target
The software controls the opening and closing of the flow cell compartment door. The door opensautomatically to load a flow cell for a run or maintenance wash. After loading, the software closes thecompartment door, moves the flow cell into position, and engages the clamps and vacuum seal. Sensorsverify the presence and compatibility of the flow cell.
Document # 1000000019358 v14 Material # 20023471
For Research Use Only. Not for use in diagnostic procedures.6
NovaSeq 6000 Sequencing System Guide
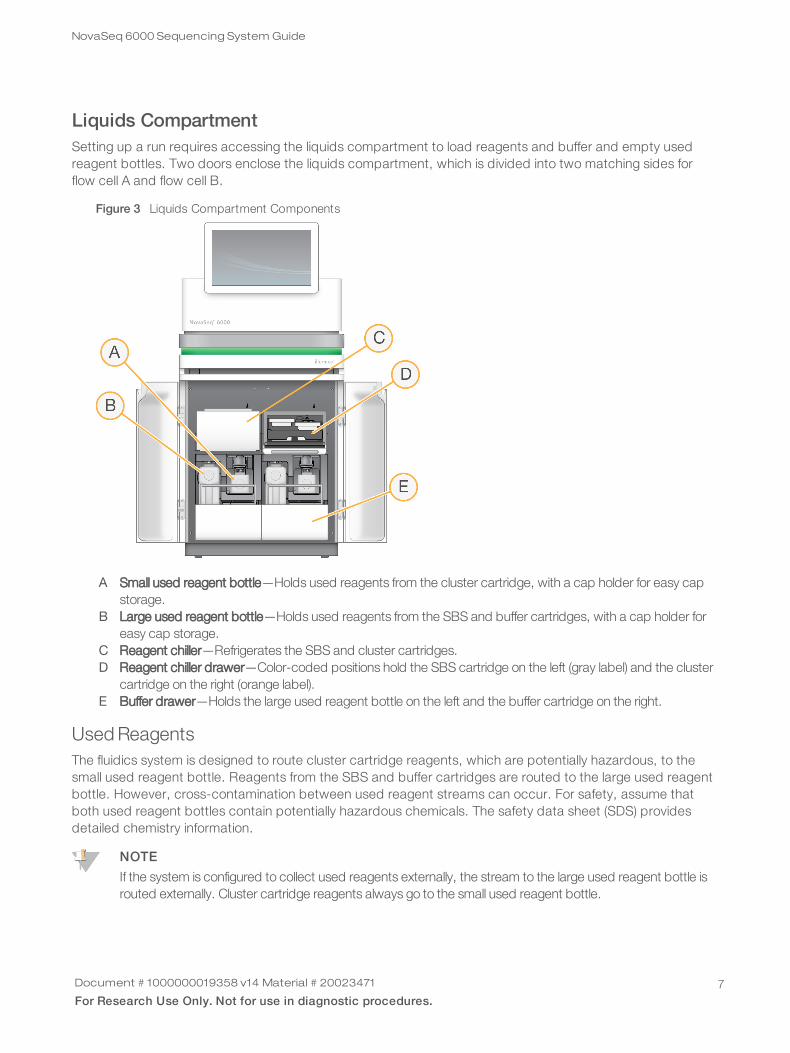
Liquids CompartmentSetting up a run requires accessing the liquids compartment to load reagents and buffer and empty usedreagent bottles. Two doors enclose the liquids compartment, which is divided into two matching sides forflow cell A and flow cell B.
Figure 3 Liquids Compartment Components
A Small used reagent bottle—Holds used reagents from the cluster cartridge, with a cap holder for easy capstorage.
B Large used reagent bottle—Holds used reagents from the SBS and buffer cartridges, with a cap holder foreasy cap storage.
C Reagent chiller—Refrigerates the SBS and cluster cartridges.D Reagent chiller drawer—Color-coded positions hold the SBS cartridge on the left (gray label) and the cluster
cartridge on the right (orange label).E Buffer drawer—Holds the large used reagent bottle on the left and the buffer cartridge on the right.
Used ReagentsThe fluidics system is designed to route cluster cartridge reagents, which are potentially hazardous, to thesmall used reagent bottle. Reagents from the SBS and buffer cartridges are routed to the large used reagentbottle. However, cross-contamination between used reagent streams can occur. For safety, assume thatboth used reagent bottles contain potentially hazardous chemicals. The safety data sheet (SDS) providesdetailed chemistry information.
NOTE
If the system is configured to collect used reagents externally, the stream to the large used reagent bottle isrouted externally. Cluster cartridge reagents always go to the small used reagent bottle.
Document # 1000000019358 v14 Material # 20023471
For Research Use Only. Not for use in diagnostic procedures.7
NovaSeq 6000 Sequencing System Guide

System SoftwareThe instrument software suite includes integrated applications that perform sequencing runs, on-instrumentanalysis, and related functions.
u NovaSeq Control Software (NVCS)—Guides you through the steps to set up a sequencing run, controlsinstrument operations, and displays statistics as the run progresses. To demonstrate proper unloadingand loading of consumables, NVCS plays instructional videos during run setup.
u Real-Time Analysis (RTA)—Performs image analysis and base calling during a run. NovaSeq 6000 usesRTA3, which incorporates architecture, security, and other feature enhancements to optimizeperformance. For more information, see Real-Time Analysis on page 59.
u Universal Copy Service (UCS)—Copies output files from RTA3 and NVCS to the output folder throughout arun. If applicable, the service also transfers data to BaseSpace Sequence Hub. If the Universal CopyService is interrupted during a run, the service makes multiple attempts to reconnect and automaticallyresume data transfer.
Status IconsA status icon on the NVCS interface indicates run status. A number on the icon indicates the number ofconditions for a status.
When a run status changes, the icon blinks to alert you. Select the icon to view a description of the condition.Select Acknowledge to clear the message, and then Close to close the dialog box.
Status Icon Status Name Description
Status okay System is normal.
Processing System is processing.
Warning A warning has occurred and attention is required.Warnings do not stop a run or require action before proceeding.
Error An error has occurred.Errors require action before proceeding with the run.
Table 2 NVCS Status Icons
Process ManagementThe Process Management screen provides access to the Compute Engine (CE) and hard drive (C:\). Use thescreen to monitor run progress, delete runs, and otherwise manage disk space. Never delete files and foldersdirectly from C:\.
Process Management displays available disk space, space used on CE and C:\, and the status of runs usingdisk space. Run Date and Name columns identify each run. Run Status, BaseSpace, and Network columnsshow the status of each process for a run.
Document # 1000000019358 v14 Material # 20023471
For Research Use Only. Not for use in diagnostic procedures.8
NovaSeq 6000 Sequencing System Guide

Process Icon Description
Run Status The run is in progress.
The run has completed sequencing.
Network Files are being copied to the output folder on the network.
All files are copied to the output folder on the network.
Not applicable because the run is not configured to upload to a network output folder orthe upload status is unknown.To troubleshoot, see Process Management Troubleshooting on page 56.
BaseSpace Files are being uploaded to BaseSpace Sequence Hub.
All files are uploaded to BaseSpace Sequence Hub.
Not applicable because the run is not configured to upload to BaseSpace SequenceHub or the upload status is unknown.To troubleshoot, see Process Management Troubleshooting on page 56.
Table 3 Process Management Status Icons
Before a flow cell run can begin, the minimum space requirements for CE and C:\ must be met.
NOTE
For single flow cell runs, the minimum space requirements are half of those shown in the following table.
Flow cell CE Space per cycle C:\ Space per flow cell pair
SP .5 Gb 5 Gb
S1 1.35 Gb 20 Gb
S2 2.7 Gb 20 Gb
S4 4.3 Gb 40 Gb
Table 4 Minimum Space Requirements for CE and C:\ For Dual Flow Cell Runs
To calculate the total space required in the CE for the run, multiply the value under 'CE Space per cycle' bythe sum of the Read 1, Read 2, Index 1, and Index 2 length values (see Enter Run Parameters on page 43).For example, for a paired-end 150 cycle, dual flow cell S4 run with both indexes 8 bases long, the spacerequired on the CE is ( 151 * 2 + 8 * 2 ) * 4.3 = 1.37 Tb.
For information on clearing disk space, see Delete the Run on page 47.
Document # 1000000019358 v14 Material # 20023471
For Research Use Only. Not for use in diagnostic procedures.9
NovaSeq 6000 Sequencing System Guide
Chapter 2 Kits and AccessoriesKits Overview 10Reagent Kit Components 11NovaSeq Xp Kit Components 15NovaSeq Xp Flow Cell Dock 15Symbol Descriptions 16
Kits OverviewPerforming a run on the NovaSeq 6000 requires a NovaSeq 6000 Reagent Kit. The NovaSeq Xp workflowalso requires a NovaSeq Xp Kit. These kits are available in the following configurations.
Select the appropriate kit size for your experiment design. Illumina recommends using the 500 cycle kits onlyfor run lengths of greater than 300 cycles.
For a complete list of items needed for a run, see User-Supplied Consumables and Equipment on page 24.
Kit Namev1.0 ReagentsIllumina Catalog #
v1.5 ReagentsIllumina Catalog #
NovaSeq 6000 S4 Reagent Kit (300 cycles) – 40 pack 20039236 N/A
NovaSeq 6000 S4 Reagent Kit (300 cycles) – 20 pack 20039234 N/A
NovaSeq 6000 S4 Reagent Kit (300 cycles) – 10 pack 20039233 N/A
NovaSeq 6000 S4 Reagent Kit (300 cycles) 20012866 20028312
NovaSeq 6000 S4 Reagent Kit (200 cycles) 20027466 20028313
NovaSeq 6000 S4 Reagent Kit (35 cycles) N/A 20044417
NovaSeq 6000 S2 Reagent Kit (300 cycles) 20012860 20028314
NovaSeq 6000 S2 Reagent Kit (200 cycles) 20012861 20028315
NovaSeq 6000 S2 Reagent Kit (100 cycles) 20012862 20028316
NovaSeq 6000 S1 Reagent Kit (300 cycles) 20012863 20028317
NovaSeq 6000 S1 Reagent Kit (200 cycles) 20012864 20028318
NovaSeq 6000 S1 Reagent Kit (100 cycles) 20012865 20028319
NovaSeq 6000 SP Reagent Kit (500 cycles) 20029137 20028402
NovaSeq 6000 SP Reagent Kit (300 cycles) 20027465 20028400
NovaSeq 6000 SP Reagent Kit (200 cycles) 20040326 20040719
NovaSeq 6000 SP Reagent Kit (100 cycles) 20027464 20028401
NovaSeq Xp 2-Lane Kit 20021664 20043130
NovaSeq Xp 4-Lane Kit 20021665 20043131
Table 5 Kit Configurations
Compatibility LabelingTo identify compatible kit components, flow cells and cartridges are labeled with symbols that show the kitmode: SP, S1, S2, or S4. NovaSeq Xp manifolds support multiple modes and are labeled either 2-lane (forSP, S1, and S2 flow cells) or 4-lane (for S4 flow cells).
Components with different modes cannot be used in the same run. For example, do not pair S1 cartridgeswith an S2 flow cell.
Mixing v1.0 SBS/CPE cartridges and v1.5 cartridges is not permitted and will result in an error message.
Document # 1000000019358 v14 Material # 20023471
For Research Use Only. Not for use in diagnostic procedures.10

Kit ModeMarkingon Label
Description
SP kitcomponents
SP flow cell generates 650 to 800 million single reads passing filter, with output up to 250Gb at 2 x 150 bp and output up to 400 Gb at 2 x 250 bp.
S1 kitcomponents
S1 flow cell generates up to 1.6 billion single reads passing filter with output up to 500 Gb at2 x 150 bp. The S1 kit provides fast sequencing of fewer samples for most high throughputapplications.
S2 kitcomponents
S2 flow cell generates up to 4.1 billion single reads passing filter with output up to 1250 Gbat 2 x 150 bp. The S2 flow cell provides fast sequencing for most high-throughputapplications, with a greater number of reads than an S1 flow cell for more sequencingoutput.
S4 kitcomponents
S4 flow cell generates up to 10 billion single reads passing filter with output up to 3000 Gb at2 x 150 bp. It is a 4 lane version of the flow cell designed for maximum output. It enablescost-effective whole-genome sequencing across a range of species and depths ofcoverage.
The NovaSeq Reagent Kits product page on the Illumina website provides detailed specifications for eachmode.
Reagent Kit ComponentsEach NovaSeq 6000 Reagent Kit contains the following components. Each component uses radio-frequencyidentification (RFID) for accurate consumable tracking and compatibility.
When you receive your kit, promptly store components at the indicated temperature to ensure properperformance.
Quantity Kit Component Storage Temperature
1 Library tube 15°C to 30°C
1 Flow cell 2°C to 8°C
1 Buffer cartridge 15°C to 30°C
1 Cluster cartridge -25°C to -15°C
1 SBS cartridge -25°C to -15°C
Table 6 Kit Components
CAUTION
Avoid dropping cartridges. Injury may occur if dropped. Skin irritation may occur if reagents leak fromcartridges. Inspect cartridges for cracks before use.
Library TubeThe NovaSeq 6000 library tube is a 16 mm tube that fits into position #8 of the cluster cartridge. Position #8 islabeled Library Tube and circled in orange for easy identification. The tube has a threaded cap that allowsstorage of libraries when necessary. Ensure that the cap has been removed before loading into the clustercartridge.
Document # 1000000019358 v14 Material # 20023471
For Research Use Only. Not for use in diagnostic procedures.11
NovaSeq 6000 Sequencing System Guide

Figure 4 Library Tube
The library tube is used one of two ways, depending on workflow:
u Standard—Pooled and denatured libraries are added to the library tube, which is then loaded uncappedinto the cluster cartridge. After the run begins, the instrument mixes the libraries with ExAmp reagents inthe library tube, which are then transferred automatically to the flow cell.
u NovaSeq Xp—The empty, uncapped library tube is loaded into the cluster cartridge. During the run,reagents are mixed in the library tube before distribution to the flow cell.
Flow CellThe NovaSeq 6000 flow cell is a patterned flow cell encased in a cartridge. The flow cell is a glass-basedsubstrate containing billions of nanowells in an ordered arrangement, which increases the number of outputreads and sequencing data. Clusters are generated in the nanowells from which sequencing is thenperformed.
Each flow cell has multiple lanes for sequencing pooled libraries. The SP, S1,and S2 flow cells have two laneseach, and the S4 flow cell has four. Each lane is imaged in multiple swaths, and the software then divides theimage of each swath into smaller portions called tiles. For more information, see Flow Cell Tiles on page 60.
NOTE
If you are using an S1 flow cell, make sure to use NVCS v1.3.1, or later. If you are using an SP flow cell, makesure to use NVCS v1.6 or later.
Figure 5 Flow Cells
A Flow cell cartridgeB Four-lane flow cell (S4)C Two-lane flow cell (SP, S1, and S2)
Document # 1000000019358 v14 Material # 20023471
For Research Use Only. Not for use in diagnostic procedures.12
NovaSeq 6000 Sequencing System Guide

The underside of each flow cell has four gaskets. Libraries and reagents enter the flow cell lanes through thegaskets on the inlet end of the flow cell. Used reagents are expelled from the lanes through the gaskets at theoutlet end.
NOTE
Avoid touching the gaskets when handling the flow cell.
Figure 6 Inverted Flow Cell
A Outlet endB Inlet endC Gasket (one of four)
Buffer, Cluster, and SBS CartridgesThe NovaSeq 6000 buffer, cluster, and SBS cartridges have foil-seal reservoirs prefilled with reagents,buffers, and wash solution. One of each cartridge type is included with the reagent kit.
The cartridges load directly onto the instrument, and are color-coded and labeled to reduce loading errors.Guides in the reagent chiller and buffer drawers ensure proper orientation.
The label for a cartridge includes the supported modes, such as S1/S2 or SP/S1/S2. Cartridges can only beused for modes that are listed on the label.
Cartridge Description
NovaSeq 6000 buffer cartridge Prefilled with sequencing buffers and weighs up to 6.8 kg (15 lbs). A plastic handlefacilitates carrying, loading, and unloading. Indentations in the top plate allowcartridges to be stacked.
NovaSeq 6000 cluster cartridge Prefilled with clustering, indexing, and paired-end reagents as well as washsolution. Includes a designated position for the library tube. Orange labelingdistinguishes the cluster cartridge from the SBS cartridge.
Table 7 Reagent Cartridges
Document # 1000000019358 v14 Material # 20023471
For Research Use Only. Not for use in diagnostic procedures.13
NovaSeq 6000 Sequencing System Guide

Cartridge Description
NovaSeq 6000 SBS cartridge Prefilled with sequencing reagents at volumes specific to the number of cycles thekit supports (500, 300, 200, 100, or 35). Each of the three reagent positions has anadjacent position reserved for the automatic post-run wash. Gray labelingdistinguishes the SBS cartridge from the cluster cartridge.
Cluster Cartridge Reservoirs
Removable ReservoirA denaturation reagent in position #30 contains formamide, which is an organic amide and reproductive toxin.To facilitate safe disposal of any unused reagent after the sequencing run, this reservoir is removable.
NOTE
Do not stack the SBS cartridge on top of the cluster cartridge, which can disengage position #30.
Reserved ReservoirsThree reservoirs are reserved for custom primers and an empty position is reserved for the library tube. Forsample traceability, the library tube is loaded into the cluster cartridge during run setup and remains with thecartridge through the end of the run.
Figure 7 Numbered Reservoirs
Position Reserved For
5, 6, and 7 Optional custom primers
8 Library tube
For more information on custom primers, see the NovaSeq Series Custom Primers Guide (document #1000000022266).
Document # 1000000019358 v14 Material # 20023471
For Research Use Only. Not for use in diagnostic procedures.14
NovaSeq 6000 Sequencing System Guide

NovaSeq Xp Kit ComponentsEach NovaSeq Xp Kit is single-use and contains the following components. When you receive your kit,promptly store components at the indicated temperature to ensure proper performance.
NOTE
The DPX1 and DPX2 consumables may be labeled as JPX1 and JPX2. Either are compatible with v1.0 orv1.5 reagent kits.
Quantity Kit Component Storage Temperature
1 DPX1/JPX1 -25°C to -15°C
1 DPX2/JPX2 -25°C to -15°C
1 DPX3 -25°C to -15°C
1 NovaSeq Xp Manifold Leave with the kit, or store at room temperature.
Table 8 NovaSeq Xp Kit Components
Xp Kit ReagentsDPX1/JPX1, DPX2/JPX2, and DPX3 are ExAmp reagents provided in individual tubes for the NovaSeq Xpworkflow. Combining these reagents creates the ExAmp master mix that is mixed with library pools beforeloading onto the flow cell.
NovaSeq Xp ManifoldThe NovaSeq Xp manifold is placed onto the NovaSeq Xp flow cell dock to enable direct loading of the librarypools into the individual flow cell lanes. Arms on either side of the NovaSeq Xp manifold are designed for easyplacement on the dock.
NovaSeq Xp manifolds are provided in two-well and four-well configurations to match the two-lane and four-lane flow cells. Each well corresponds to a flow cell lane. Because the flow cell is loaded into the NovaSeq Xpflow cell dock upside-down, wells are numbered right to left to match the lane numbering of an inverted flowcell.
Figure 8 NovaSeq Xp Manifolds With Numbered Wells
NovaSeq Xp Flow Cell DockThe NovaSeq Xp flow cell dock is a reusable accessory for loading libraries directly onto a flow cell. The flowcell is inverted and loaded into the dock, and the NovaSeq Xp manifold is fitted over the flow cell.
Two overhangs (under the bracket) and two springs guide flow cell insertion and ensure proper orientation.Cutouts hold the NovaSeq Xp manifold arms in the proper orientation, and evenly seated. A magnetic clamprotates 180° to secure the NovaSeq Xp manifold over the flow cell.
Document # 1000000019358 v14 Material # 20023471
For Research Use Only. Not for use in diagnostic procedures.15
NovaSeq 6000 Sequencing System Guide

Figure 9 NovaSeq Xp Flow Cell Dock
A Overhangs (under the bracket) to guide loadingB Springs to align the flow cellC Cutouts to hold the NovaSeq Xp manifold armsD Clamp to secure the flow cell and NovaSeq Xp manifold
Symbol DescriptionsThe following table describes the symbols on the consumable or consumable packaging.
Symbol Description
The date the consumable expires. For best results, use the consumable before this date.
Indicates the manufacturer (Illumina).
The intended use is Research Use Only (RUO).
Indicates the part number so that the consumable can be identified.¹
Indicates the batch code to identify the batch or lot that the consumable wasmanufactured in.¹
Indicates the serial number.
Indicates that protection from light or heat is required. Store away from sunlight.
Document # 1000000019358 v14 Material # 20023471
For Research Use Only. Not for use in diagnostic procedures.16
NovaSeq 6000 Sequencing System Guide

Symbol Description
Indicates a health hazard.
Indicates a hazard warning.
Storage temperature range in degrees Celsius. Store the consumable within the indicatedrange.²
¹ REF identifies the individual component, while LOT identifies the lot or batch the component belongs to.
² Storage temperature can differ from shipping temperature.
Document # 1000000019358 v14 Material # 20023471
For Research Use Only. Not for use in diagnostic procedures.17
NovaSeq 6000 Sequencing System Guide

Chapter 3 Getting StartedStart the Instrument 18Configure Settings 19User-Supplied Consumables and Equipment 24
Start the Instrument1 Switch the toggle power switch on the back of the instrument to the | (on) position.
Figure 10 Power Switch Location
2 Wait until the power button on the right side of the instrument glows blue, and then press it.
Figure 11 Power Button Location
User AccountsIn NVCS v1.5, and newer versions, there are two types of accounts: administrator and user. Permissions foreach type are shown in the following table.
Permissions Administrator User
Set up, start, monitor sequencing runs X X
Download and update software X
See status for active run started by other user X
Terminate unresponsive UCS process X
Application data files are stored in C:/ProgramData. Applications are installed in C:/Program Files. The NVCSis launched as a full screen app for both types of accounts.
Document # 1000000019358 v14 Material # 20023471
For Research Use Only. Not for use in diagnostic procedures.18

Log On to the System1 When the operating system is loaded, log on to Windows using the user name and password for your
site.
2 Open the NVCS.The software is launched and initializes the system. When initialization is complete, the Home screenappears.
The NVCS is launched as a user app. If you attempt to use a feature that requires administrator permissions,such as Software Update, and you are not logged in as an administrator, you will be prompted to login as anadministrator.
To stay informed about the progress of a sequencing run, remain logged in while the NVCS is running andwhile a sequencing run is in progress.
Configure SettingsThe NVCS includes settings for the following:
u Run Mode (manual or file-based)
u NovaSeq Xp workflow
u BaseSpace Sequence Hub
u Software Updates
NOTE
Before configuring Workflow Selection or Automatic Checks for Software Updates, make sure that ModeSelection has been configured.
Run Setup Modesu Manual—The default mode that sends data to a specified output folder for later analysis.
u File-Based—An alternative mode that uses files from BaseSpace Clarity LIMS or other LIMS system todefine run parameters. For more information, see Configure LIMS Output on page 20.
When configuring the run setup mode, be sure to specify an existing location for the run setup folder. Thisfolder is required, and an invalid location message indicates that the specified location does not exist.
Both run setup modes include the option to send data to BaseSpace Sequence Hub for analysis.
Configure ManualMode1 From the Main Menu, select Settings.
The Settings screen opens to the Mode Selection tab.
2 Select Manual.
3 [Optional] Enter or browse to a preferred network location for the output folder.Do not specify a location on the C:\, D:\, or Z:\ drives. Doing so causes an invalid drive error.This setting is the default location. The output folder location can be changed on a per-run basis.
4 [Optional] Select Send Instrument Performance Data to Illumina to enable the Illumina Proactivemonitoring service. The name of the setting in the software interface might be different from the name inthis guide, depending on the version of NVCS in use.
Document # 1000000019358 v14 Material # 20023471
For Research Use Only. Not for use in diagnostic procedures.19
NovaSeq 6000 Sequencing System Guide

With this setting turned on, instrument performance data are sent to Illumina. This data helps Illuminatroubleshoot more easily and detect potential failures, enabling proactive maintenance and maximizinginstrument uptime. For more information on the benefits of this service, see Illumina Proactive TechnicalNote (document # 1000000052503).This service:u Does not send sequencing datau Requires that the instrument be connected to a network with internet accessu Is turned on by default. To opt out of this service, disable the Send Instrument Performance Data to
Illumina setting.
5 Select Save.
Configure File-Based Mode1 From the Main Menu, select Settings.
The Settings screen opens to the Mode Selection tab.
2 Select File-Based.
3 Enter or browse to a preferred network location for the run setup folder, which contains LIMS files.Make sure that the appropriate LIMS files are added to the run setup folder before setting up a run.During run setup, the software uses the library tube ID or the flow cell ID to locate the files for the currentrun.
4 [Optional] Enter or browse to a preferred network location for the output folder.Do not specify a location on the C:\, D:\, or Z:\ drives. Doing so causes an invalid drive error.The output folder location can be changed on a per-run basis.
5 [Optional] Select Send Instrument Performance Data to Illumina to enable the Illumina Proactivemonitoring service. The name of the setting in the software interface might be different from the name inthis guide, depending on the version of NVCS in use.With this setting turned on, instrument performance data are sent to Illumina. This data helps Illuminatroubleshoot more easily and detect potential failures, enabling proactive maintenance and maximizinginstrument uptime. For more information on the benefits of this service, see Illumina Proactive TechnicalNote (document # 1000000052503).This service:u Does not send sequencing datau Requires that the instrument be connected to a network with internet accessu Is turned on by default. To opt out of this service, disable the Send Instrument Performance Data to
Illumina setting.When enabled, this option requires an external internet connection.
6 Select Save.
Configure LIMS OutputIf your system is configured for file-based mode and you are using LIMS software other than BaseSpaceClarity LIMS, configure LIMS to generate a run setup file in *.json format. For the Standard workflow, the filename must match the library tube ID. The flow cell ID field in the file can be left blank. For the NovaSeq Xpworkflow, the file name must match the flow cell ID, and the flow cell ID and the library ID must be specified inthe file. The file name and values are not case-sensitive.
External LIMS software can use the NovaSeq LIMS API to interact with the NovaSeq 6000. Contact IlluminaTechnical Support for more information on the API endpoints.
Document # 1000000019358 v14 Material # 20023471
For Research Use Only. Not for use in diagnostic procedures.20
NovaSeq 6000 Sequencing System Guide

Field Name Value
run_name A preferred run name, which can contain alphanumeric characters, hyphens,and underscores
run_mode One of the following modes:• SP• S1• S2• S4
workflow_type NoIndex, SingleIndex, or DualIndex
librarytube_ID The RFID of the library tube
rehyb* True or False
sample_loading_type NovaSeqStandard or NovaSeqXp
Flowcell_ID The ID of the flow cell
paired_end True or False
read1 A value up to 251 (additional cycles of UMI reads possible to 259)
read2 A value up to 251 (additional cycles of UMI reads possible to 259)
index_read1 Any value
index_read2 Any value
output_folder The path to the output folder with two backslashes for an escape sequence
samplesheet The path to a sample sheet or other file in *.csv format with two backslashes foran escape sequence
use_basespace True or False
basespace_mode RunMonitoringOnly or RunMonitoringAndStorage
use_custom_read1_primer True or False
use_custom_read2_primer True or False
use_custom_index_read1_primer True or False
use_custom_index_read2_primer True or False
* Rehybridization is not available in NVCS v1.4.0, or earlier.
Example *.json file named H6655DMXX.json:
{"run_name": "2x151_PhiX","run_mode": "S2","workflow_type": "NoIndex","sample_loading_type": "NovaSeqXp","librarytube_ID": "NV1236655-LIB","flowcell_ID": "H6655DMXX","rehyb": false,"paired_end": true,"read1": 151,"read2": 151,"index_read1": 0,"index_read2": 0,"output_folder": "\\\\sgnt-prd-isi01\\NovaSEQ\\SeqRuns","attachment": "\\\\sgnt-prd-isi01\\NVSQ\\SampleSheet.csv","use_basespace": false,
Document # 1000000019358 v14 Material # 20023471
For Research Use Only. Not for use in diagnostic procedures.21
NovaSeq 6000 Sequencing System Guide

"basespace_mode": null,"use_custom_read1_primer": false,"use_custom_read2_primer": false,"use_custom_index_read1_primer": false
}
Configure Default Index CyclesYou can configure the default number of index cycles for the Standard workflow as follows.
1 From the Main Menu, select Settings.The Settings screen opens to the Mode Selection tab.
2 Select the Workflow Selection tab.
3 Enter the default number of index cycles in the Index Cycles text box.
4 Select Save.
NovaSeq Standard and NovaSeq Xp WorkflowsThe NovaSeq Standard and NovaSeq Xp workflows both use Illumina proprietary ExAmp chemistry.
u Standard Workflow
The NovaSeq Standard workflow automates two crucial steps of Illumina proprietary ExAmp clusterchemistry onboard the instrument.
u Preparation of ExAmp Master Mix
u Delivery of Master Mix to the flow cell
Onboard preparation and delivery of the Master Mix minimizes user interaction and reduces variability inthe prepared mix.
As part of the run setup for the Standard workflow, a library tube containing the denatured andneutralized library pool at recommended concentration is inserted into position #8 of the cluster cartridge.For more information on recommended concentrations, see NovaSeq 6000 Denature and Dilute Guide(document # 1000000106351). After run initiation, subsequent steps occur onboard the instrument andrequire no user interaction. This includes transfer of ExAmp reagents from the cluster cartridge to thelibrary tube, preparation of reagents and library pool mix, and delivery of the prepared mix to all lanes ofthe flow cell.
After onboard clustering, a series of steps common to both workflows is carried out. These steps includeapplication of a conditioning mix to the clustered flow cell and additional chemistry steps to prepare theclusters for sequencing by synthesis. The conditioning mix is prepared during the clustering process usingreagents in the cluster cartridge and the library tube inserted during run set up. The conditioning mixhelps boost the efficiency of clustering on the NovaSeq instrument.
u NovaSeq Xp Workflow
The NovaSeq Xp workflow enables loading of different libraries or library pools onto individual lanes of theNovaSeq flow cell using the NovaSeq Xp flow cell dock and a flow cell –specific consumable kit (NovaSeqXp 2-Lane Kit or NovaSeq Xp 4-Lane Kit). The NovaSeq Xp Kit contains ExAmp reagents that areneeded for clustering and the NovaSeq Xp manifold that is needed for lane loading.
Document # 1000000019358 v14 Material # 20023471
For Research Use Only. Not for use in diagnostic procedures.22
NovaSeq 6000 Sequencing System Guide

The ExAmp/library mix is prepared and loaded onto individual lanes of the flow cell using the NovaSeq Xpflow cell dock and the NovaSeq Xp manifold. An automated liquid handler can be used for preparation ofthe ExAmp/library mix and delivery to the manifold for flow cell self-filling. When flow cell sample loading iscompleted, an empty library tube is inserted in position #8 of the cluster cartridge, the flow cell is placedon the instrument, and the sequencing run is initiated.
After the run is initiated, a series of steps common to both workflows is carried out. These steps includeapplication of a conditioning mix to the clustered flow cell and additional chemistry steps to prepare theclusters for sequencing by synthesis. The conditioning mix is prepared during the clustering process usingreagents in the cluster cartridge and mixed in the empty library tube inserted during run set up. Theconditioning mix helps boost the efficiency of clustering on the NovaSeq instrument.
Configure NovaSeq Xp Workflow1 From the Main Menu, select Settings.
The Settings screen opens to the Mode Selection tab.
2 Select the Workflow Selection tab.
3 To enable the NovaSeq Xp Workflow, select Enable Workflow Selection.
4 [Optional] To make NovaSeq Xp the default workflow, select NovaSeq Xp.
5 Select Save.
Configure BaseSpace Sequence HubUse the following instructions to configure the default settings for BaseSpace Sequence Hub. During runsetup, you can disable BaseSpace Sequence Hub for the current run or change settings for run monitoringand storage. Connecting to BaseSpace Sequence Hub requires an internet connection.
1 From the Main Menu, select Settings.The Settings screen opens to the Mode Selection tab.
2 Select the BaseSpace Sequence Hub checkbox.
3 Select a Configuration option:u Run Monitoring and Storage—Sends run data to BaseSpace Sequence Hub for remote monitoring
and data analysis. This option requires uploading a sample sheet with the run.u Run Monitoring Only—Sends InterOp, log, and other non-CBCL run files to BaseSpace Sequence
Hub so runs can be monitored remotely.
4 From the Hosting Location drop-down menu, select EU (Frankfurt) or USA (N. Virginia).This option determines where data are uploaded to.
5 If you are a BaseSpace Enterprise subscriber:
a Select the Private Domain checkbox.b Enter the domain named used for single sign-on to BaseSpace Sequence Hub.
6 Select Save.
Sample Sheet NameWhen running NVCS v1.3.1, or earlier, a sample sheet used for a NovaSeq 6000 run and uploaded toBaseSpace Sequence Hub must be named SampleSheet.csv (case-sensitive). If the sample sheet isincorrectly named and Run Monitoring and Storage is enabled, BaseSpace Sequence Hub flags the run for
Document # 1000000019358 v14 Material # 20023471
For Research Use Only. Not for use in diagnostic procedures.23
NovaSeq 6000 Sequencing System Guide

attention. A flagged run can be queued for FASTQ generation by selecting More | Fix Sample Sheet andRequeue and then entering the appropriate sample sheet. Until the sample sheet is provided, sequencingdata cannot be converted into FASTQ files.
If you are running NVCS v1.4 or later, there are no limitations on sample sheet names.
If you are using bcl2fastq2 Conversion Software v2.19, or later, to convert data to FASTQ files locally, you canuse the command line option --sample-sheet to specify any CSV file in any location. The command lineallows the use of any file name.
Configure Software UpdatesAutomatic checking for software updates is enabled by default. You can disable, or enable, automaticchecking for updates from Settings.
1 From the Main Menu, select Settings.
2 Select Software Update.
3 Select the If enabled, the instrument will display a notification when a Software Update is availablecheckbox.
4 Select Save.
User-Supplied Consumables and EquipmentThe following user-supplied consumables and equipment are used for consumable preparation, sequencing,and system maintenance.
Consumables
Consumable Supplier Purpose
1 N NaOH General lab supplier Diluting to 0.2 N for denaturinglibraries.
Centrifuge bottle, 500 ml General lab supplier Diluting Tween 20 for a maintenancewash.
Centrifuge tube, 30 ml General lab supplier Diluting NaOCl for a maintenancewash.
Disposable gloves, powder-free General lab supplier General purpose.
Isopropyl alcohol wipes, 70%orEthanol alcohol wipes, 70%
VWR, catalog # 95041-714, orequivalentGeneral lab supplier
Cleaning components before a runand general purpose.
Lab tissue, low-lint VWR, catalog # 21905-026, orequivalent
Drying the flow cell stage and generalpurpose.
Microcentrifuge tube, 1.5 ml VWR, catalog # 20170-038, orequivalent
Combining volumes when dilutingNaOH and library.
Reagent grade NaOCl, 5% Sigma-Aldrich, catalog # 239305 Performing a maintenance wash.
NovaSeq 6000 Reagent Kit Illumina, see Kits Overview on page10
Performing a sequencing run.
Pipette tips, 20 μl General lab supplier Pipetting for diluting and loadinglibraries.
Document # 1000000019358 v14 Material # 20023471
For Research Use Only. Not for use in diagnostic procedures.24
NovaSeq 6000 Sequencing System Guide
Consumable Supplier Purpose
Pipette tips, 200 μl General lab supplier Pipetting for diluting and loadinglibraries.
Pipette tips, 1000 μl General lab supplier Pipetting for diluting and loadinglibraries.
Reagent or spectrophotometric-grade isopropyl alcohol (99%), 100 mlbottle
General lab supplier Cleaning optics componentsperiodically and support the objectivecleaning cartridge.
Tween 20 Sigma-Aldrich, catalog # P7949 Performing a maintenance wash.
Water, laboratory-grade General lab supplier Diluting NaOH for denaturing libraries.Diluting Tween 20 and sodiumhypochlorite for a maintenance wash.
[NovaSeq Xp workflow] One of thefollowing kits:• NovaSeq Xp 2-Lane Kit• NovaSeq Xp 4-Lane Kit
Illumina:
• Catalog # 20021664• Catalog # 20021665
Manually loading libraries onto a flowcell:
• Two-lane kit for SP, S1, and S2 flowcells
• Four-lane kit for S4 flow cells
[NovaSeq Xp workflow] One of thefollowing kits:• NovaSeq Xp 2-Lane Kit v1.5• NovaSeq Xp 4-Lane Kit v1.5
Illumina:
• Catalog # 20043130• Catalog # 20043131
Manually loading libraries onto a flowcell:
• Two-lane kit for SP, S1, and S2 flowcells
• Four-lane kit for S4 flow cells
[NovaSeq Xp workflow] 0.5 ml and1.7 ml tubes
General lab supplier Required for ExAmp mixing.
[NovaSeq Xp workflow] [Optional]One of the following manifold packs:• NovaSeq Xp 2-Lane Manifold Pack• NovaSeq Xp 4-Lane Manifold Pack
Illumina:
• Catalog # 20021666• Catalog # 20021667
Spare NovaSeq Xp manifolds formanually loading libraries onto a flowcell.
[Optional] PhiX Control v3 Illumina, catalog # FC-110-3001 Spiking in PhiX control.
Consumables in Illumina KitsOne NovaSeq 6000 Reagent Kit is needed to sequence one flow cell. Each kit is comprised of multipleconsumables, which are listed in the following table. For a dual flow cell run, use two kits.
Consumable (One of Each) Purpose
Buffer cartridge Provides sequencing buffers for the run.
Cluster cartridge Provides clustering, indexing, and paired-end reagents for the run.
Flow cell The clustering and sequencing reaction happens on the flow cell.
SBS cartridge Provides sequencing reagents for the run.
Library tube Empty tube that is used to hold pooled and denatured libraries(customer supplied) or to prepare the conditioning mix to boostclustering efficiency for sequencing.
Table 9 Consumables in a NovaSeq 6000 Reagent Kit
If you are following the NovaSeq Xp workflow to load libraries directly onto the flow cell, supplement eachreagent kit with one NovaSeq Xp Kit. Each NovaSeq Xp kit is comprised of the following consumables.
Document # 1000000019358 v14 Material # 20023471
For Research Use Only. Not for use in diagnostic procedures.25
NovaSeq 6000 Sequencing System Guide

NOTE
The DPX1 and DPX2 consumables may be labeled as JPX1 and JPX2. Either are compatible with v1.0 orv1.5 reagent kits.
Consumable (One of Each) Purpose
DPX1/JPX1 Preparing the ExAmp Master Mix.
DPX2/JPX2
DPX3
NovaSeq Xp manifold Loading libraries onto the flow cell.
Table 10 Consumables in a NovaSeq Xp Kit
Guidelines for Laboratory-Grade WaterAlways use laboratory-grade water or deionized water to perform instrument procedures. Never use tapwater. Use only the following grades of water or equivalents:
u Deionized water
u Illumina PW1
u 18 Megohms (MΩ) water
u Milli-Q water
u Super-Q water
u Molecular biology grade water
Equipment
Item Source
Freezer, -25°C to -15°C General lab supplier
Graduated cylinder, 500 ml, sterile General lab supplier
Ice bucket General lab supplier
Pipette, 20 µl General lab supplier
Pipette, 200 µl General lab supplier
Pipette, 1000 µl General lab supplier
Refrigerator, 2°C to 8°C General lab supplier
Tub, water baths* General lab supplier
[NovaSeq Xp workflow] NovaSeq Xp Flow Cell Dock Illumina, catalog # 20021663
* Use a tub that can accommodate two reagent cartridges and the appropriate water level. For example, (61 cm × 91.4 cm × 25.4 cm)(24 in × 36 in
× 10 in).
Document # 1000000019358 v14 Material # 20023471
For Research Use Only. Not for use in diagnostic procedures.26
NovaSeq 6000 Sequencing System Guide

Chapter 4 Standard Workflow: PreparingConsumablesMethods 27Thaw SBS and Cluster Cartridges 27Empty Used Reagent Bottles 28Prepare Flow Cell 30Pool and Denature Libraries for Sequencing 30
MethodsBefore beginning preparation of samples or consumables, make sure that the NVCS version satisfies theminimum software requirements listed in the following table.
Flow cellv1.0 Reagent KitMinimum Software
Version
v1.5 Reagent KitMinimum Software
Version
SP 1.6 1.7
S1 1.3.1 1.7
S2 All 1.7
S4 1.2.0 1.7
Table 11 Minimum Software Requirements
u Make sure that you have the required consumables and equipment. See User-Supplied Consumablesand Equipment on page 24.
u Always check the label when you prepare consumables to ensure compatibility between components.Do not mix and match SP, S1, S2, and S4 components.
u Do not mix reagent kit versions.u v1.0 SBS & CPE cartridges should only be paired together.u v1.5 SBS & CPE cartridges should only be paired together.
u Follow the instructions in the order shown, using the specified volumes, concentrations, temperatures,and durations.
u Unless a stopping point is specified in the instructions, proceed immediately to the next step.
Thaw SBS and Cluster Cartridges1 If a sequencing run is in progress, make sure that both sides of the instrument will be available when the
thaw is complete.
2 Remove the SBS and cluster cartridges from -25°C to -15°C storage.
Document # 1000000019358 v14 Material # 20023471
For Research Use Only. Not for use in diagnostic procedures.27
NovaSeq 6000 Sequencing System Guide

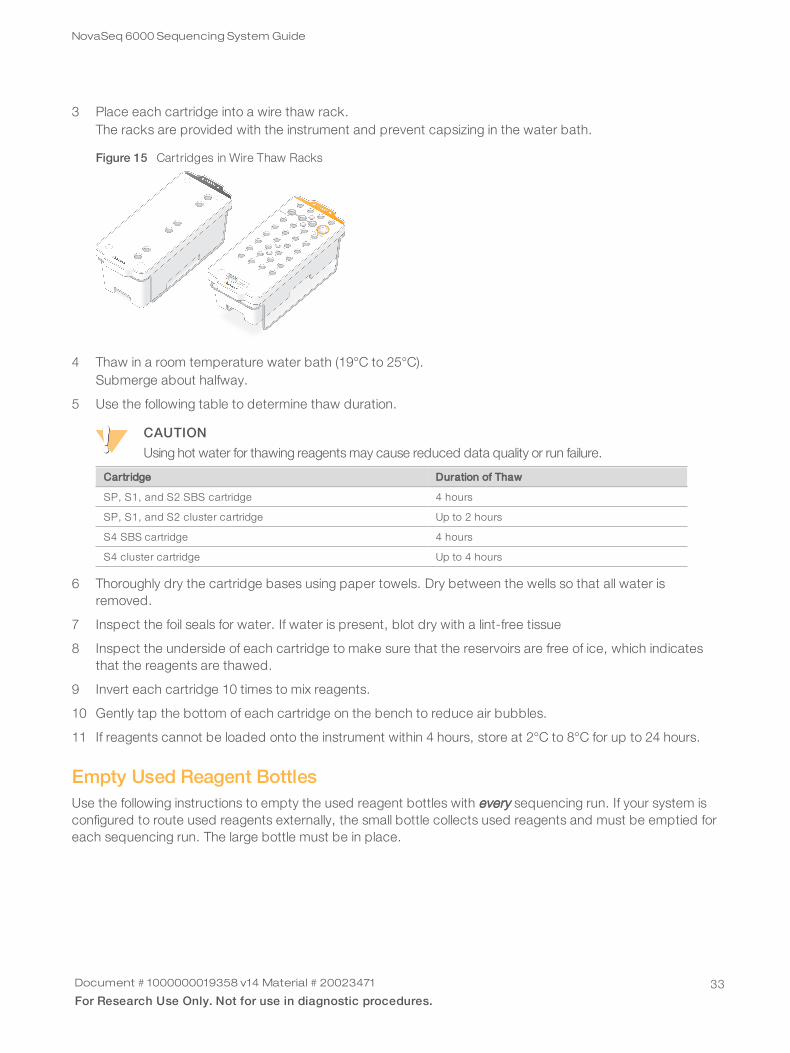
3 Place each cartridge into a wire thaw rack.The racks are provided with the instrument and prevent capsizing in the water bath.
Figure 12 Cartridges in Wire Thaw Racks
4 Thaw in a room temperature water bath (19°C to 25°C).Submerge about halfway.
5 Use the following table to determine thaw duration.
CAUTION
Using hot water for thawing reagents may cause reduced data quality or run failure.
Cartridge Duration of Thaw
SP, S1, and S2 SBS cartridge 4 hours
SP, S1, and S2 cluster cartridge Up to 2 hours
S4 SBS cartridge 4 hours
S4 cluster cartridge Up to 4 hours
6 Thoroughly dry the cartridge bases using paper towels. Dry between the wells so that all water isremoved.
7 Inspect the foil seals for water. If water is present, blot dry with a lint-free tissue
8 Inspect the underside of each cartridge to make sure that the reservoirs are free of ice, which indicatesthat the reagents are thawed.
9 Invert each cartridge 10 times to mix reagents.
10 Gently tap the bottom of each cartridge on the bench to reduce air bubbles.
11 If reagents cannot be loaded onto the instrument within 4 hours, store at 2°C to 8°C for up to 24 hours.
Empty Used Reagent BottlesUse the following instructions to empty the used reagent bottles with every sequencing run. If your system isconfigured to route used reagents externally, the small bottle collects used reagents and must be emptied foreach sequencing run. The large bottle must be in place.
Document # 1000000019358 v14 Material # 20023471
For Research Use Only. Not for use in diagnostic procedures.28
NovaSeq 6000 Sequencing System Guide

WARNING
This set of reagents contains potentially hazardous chemicals. Personal injury can occur through inhalation,ingestion, skin contact, and eye contact. Wear protective equipment, including eye protection, gloves, andlaboratory coat appropriate for risk of exposure. Handle used reagents as chemical waste and discard inaccordance with applicable regional, national, and local laws and regulations. For additional environmental,health, and safety information, see the SDS at support.illumina.com/sds.html.
1 Remove and empty the small used reagent bottle as follows.
a Raise the lever and remove the small used reagent bottle from the alcove. Grasp the bottle by thesides.
b Remove the threaded cap from the cap holder on the front of the bottle.c Seal the bottle opening with the cap to prevent spills.d Keeping the contents separate from the contents of the other bottle, discard in accordance with
applicable standards.e Return the uncapped bottle to the alcove, and then lower the lever. Store the cap on the cap holder.
2 Remove and empty the large used reagent bottle as follows.
a Using the top handle, remove the large used reagent bottle from the left side of the buffer drawer.b Remove the threaded cap from the cap holder on the front of the bottle.c Seal the bottle opening with the threaded cap to prevent spills.d Discard the contents in accordance with applicable standards. Grip both handles when emptying.e Return the uncapped bottle to the buffer drawer. Store the cap on the cap holder.
Figure 13 Returning the Empty Bottle
3 Put on a new pair of powder-free gloves to avoid contaminating the surface of the instrument.
4 Close the buffer drawer, and then close the liquid compartment doors.
WARNING
Failure to empty the used reagent bottles can result in a terminated run and overflow, which damagesthe instrument and poses a safety risk.
Document # 1000000019358 v14 Material # 20023471
For Research Use Only. Not for use in diagnostic procedures.29
NovaSeq 6000 Sequencing System Guide

Prepare Flow Cell1 Remove a new flow cell package from 2°C to 8°C storage.
2 Set the sealed flow cell package aside for 10-15 minutes to allow the flow cell to reach room temperature.Use the flow cell within 12 hours of removing it from the package.
Pool and Denature Libraries for SequencingLoading concentration can vary depending on library preparation, quantification, and normalization methods.For instructions, see the NovaSeq 6000 Denature and Dilute Guide (document # 1000000106351). Once yourpooled library is ready proceed to Prepare SBS and Cluster Cartridges on page 38.
CAUTION
Store the library tube only if necessary. Long-term storage at -25°C to -15°C can increase duplicates, whichdecreases yield.
Prepare SBS and Cluster Cartridges1 Inspect the underside of each cartridge to make sure that the reservoirs are free of ice, which indicates
that the reagents are thawed.
2 Invert each cartridge 10 times to mix reagents.
3 Gently tap the bottom of each cartridge on the bench to reduce air bubbles.
Prepare Custom PrimersIf your library requires custom primers, prepare them by following the instructions in the NovaSeq SeriesCustom Primers Guide (document # 1000000022266).
Load Library Tube1 Without disturbing the library at the bottom, insert the uncapped library tube containing the denatured
and diluted library pool into the Library Tube position (#8) of the cluster cartridge.
Figure 14 Uncapped Library Tube Loaded Into Position #8
Document # 1000000019358 v14 Material # 20023471
For Research Use Only. Not for use in diagnostic procedures.30
NovaSeq 6000 Sequencing System Guide

Chapter 5 NovaSeq Xp Workflow: PreparingConsumablesNovaSeq Xp Workflow Summary 31Methods 32Thaw SBS and Cluster Cartridges 32Empty Used Reagent Bottles 33Prepare Flow Cell 35Thaw ExAmp Reagents 35Pool, Denature, and Load Libraries for Sequencing 35
NovaSeq Xp Workflow SummaryBefore beginning preparation of samples or consumables, make sure that the NVCS version satisfies theminimum software requirements listed in the following table.
Flow cellv1.0 Reagent KitMinimum Software
Version
v1.5 Reagent KitMinimum Software
Version
SP 1.6 1.7
S1 1.3.1 1.7
S2 All 1.7
S4 1.2.0 1.7
Table 12 Minimum Software Requirements
NOTE
The NVCS supports staggered start of new runs. See Staggered Start of Runs on page 47.
Make sure that you complete all the steps in the NovaSeq Xp workflow, in the specified order.
NOTE
Steps 1 through 4 can be completed in parallel, and must be completed before proceeding to step 5.
1 Thaw the SBS and cluster cartridges.
2 Empty used reagent bottles.
3 Set the sealed flow cell package aside for 10–15 minutes to allow the flow cell to reach roomtemperature. Use the flow cell within 12 hours of removing it from the package.
4 Normalize and pool libraries and optionally add PhiX control according to the appropriate protocol foryour libraries in the NovaSeq 6000 Denature and Dilute Guide (document # 1000000106351).
NOTE
Complete steps 5 through 11 in the specified order.
5 Thaw the ExAmp reagents.
6 Prepare a fresh dilution of NaOH according to the NovaSeq 6000 Denature and Dilute Guide (document #1000000106351).
Document # 1000000019358 v14 Material # 20023471
For Research Use Only. Not for use in diagnostic procedures.31
NovaSeq 6000 Sequencing System Guide
7 Denature and neutralize library pool according to the NovaSeq 6000 Denature and Dilute Guide(document # 1000000106351).
8 Prepare the flow cell and dock.
9 Prepare the ExAmp master mix.
10 Load ExAmp/library mix onto the flow cell.
11 Load an empty library tube into position #8 of the cluster cartridge.
Methodsu Make sure that you have the required consumables and equipment. See User-Supplied Consumables
and Equipment on page 24.
u Make sure that the instrument is turned on and has sufficient storage space for the run. See ProcessManagement on page 8.
u Make sure the automatic post-run wash on both sides of the instrument is finished before starting theThaw the ExAmp reagents step of the NovaSeq Xp Workflow Summary on page 31.
u Always check the label when you prepare consumables to ensure compatibility between components.Do not mix SP, S1, S2, and S4 components or two-lane and four-lane components, on one side of theinstrument.
u Do not mix reagent kit versions.u v1.0 SBS & CPE cartridges should only be paired together.u v1.5 SBS & CPE cartridges should only be paired together.
u Follow the instructions in the order shown, using the specified volumes, temperatures, and durations.
u When not actively mixing, place all reagents and libraries on ice.
u Unless a stopping point is specified in the instructions, proceed immediately to the next step.
u To successfully start sequencing for a two-lane flow cell, both lanes must be filled. To successfully startsequencing for a four-lane flow cell, one lane can be partially filled or empty.
u The most common causes for variations in results when mixing the ExAmp reagents manually areinaccurate delivery of ExAmp component volumes and insufficient mixing. Do not undermix.
NOTE
Start the sequencing run immediately after loading libraries onto the flow cell, preferably within 30 minutes.
Thaw SBS and Cluster Cartridges1 If a sequencing run is in progress, make sure that both sides of the instrument will be available when the
thaw is complete.
2 Remove the SBS and cluster cartridges from -25°C to -15°C storage.
Document # 1000000019358 v14 Material # 20023471
For Research Use Only. Not for use in diagnostic procedures.32
NovaSeq 6000 Sequencing System Guide
3 Place each cartridge into a wire thaw rack.The racks are provided with the instrument and prevent capsizing in the water bath.
Figure 15 Cartridges in Wire Thaw Racks
4 Thaw in a room temperature water bath (19°C to 25°C).Submerge about halfway.
5 Use the following table to determine thaw duration.
CAUTION
Using hot water for thawing reagents may cause reduced data quality or run failure.
Cartridge Duration of Thaw
SP, S1, and S2 SBS cartridge 4 hours
SP, S1, and S2 cluster cartridge Up to 2 hours
S4 SBS cartridge 4 hours
S4 cluster cartridge Up to 4 hours
6 Thoroughly dry the cartridge bases using paper towels. Dry between the wells so that all water isremoved.
7 Inspect the foil seals for water. If water is present, blot dry with a lint-free tissue
8 Inspect the underside of each cartridge to make sure that the reservoirs are free of ice, which indicatesthat the reagents are thawed.
9 Invert each cartridge 10 times to mix reagents.
10 Gently tap the bottom of each cartridge on the bench to reduce air bubbles.
11 If reagents cannot be loaded onto the instrument within 4 hours, store at 2°C to 8°C for up to 24 hours.
Empty Used Reagent BottlesUse the following instructions to empty the used reagent bottles with every sequencing run. If your system isconfigured to route used reagents externally, the small bottle collects used reagents and must be emptied foreach sequencing run. The large bottle must be in place.
Document # 1000000019358 v14 Material # 20023471
For Research Use Only. Not for use in diagnostic procedures.33
NovaSeq 6000 Sequencing System Guide
WARNING
This set of reagents contains potentially hazardous chemicals. Personal injury can occur through inhalation,ingestion, skin contact, and eye contact. Wear protective equipment, including eye protection, gloves, andlaboratory coat appropriate for risk of exposure. Handle used reagents as chemical waste and discard inaccordance with applicable regional, national, and local laws and regulations. For additional environmental,health, and safety information, see the SDS at support.illumina.com/sds.html.
1 Remove and empty the small used reagent bottle as follows.
a Raise the lever and remove the small used reagent bottle from the alcove. Grasp the bottle by thesides.
b Remove the threaded cap from the cap holder on the front of the bottle.c Seal the bottle opening with the cap to prevent spills.d Keeping the contents separate from the contents of the other bottle, discard in accordance with
applicable standards.e Return the uncapped bottle to the alcove, and then lower the lever. Store the cap on the cap holder.
2 Remove and empty the large used reagent bottle as follows.
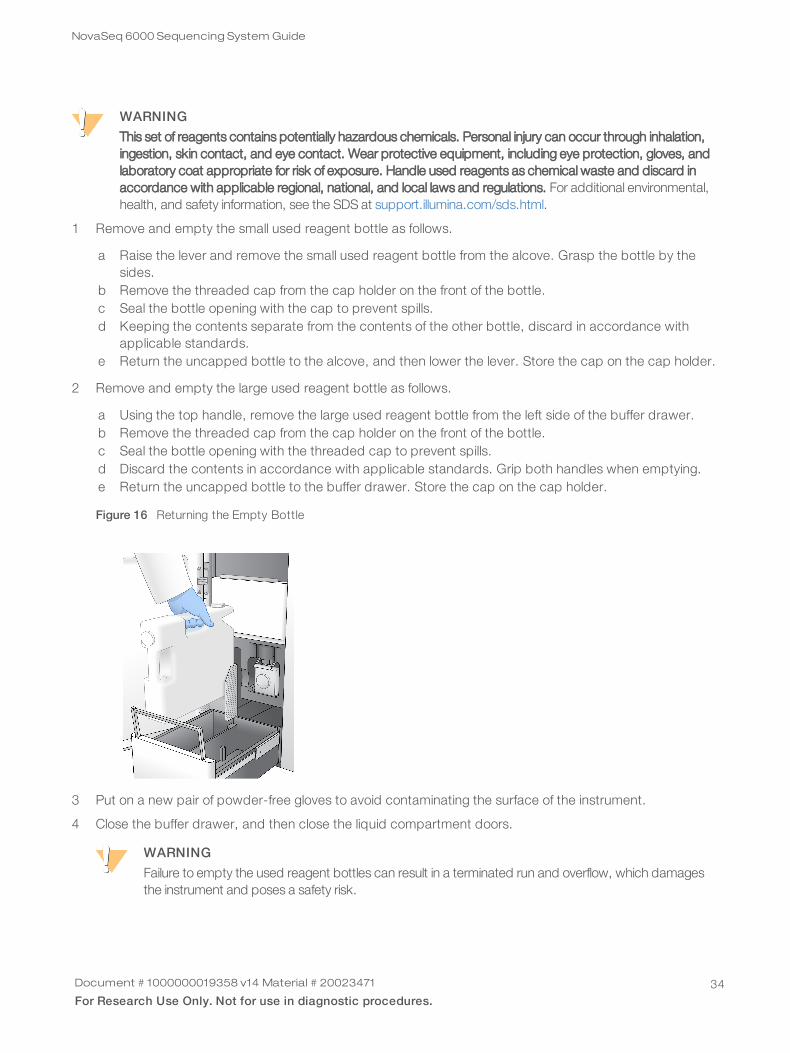
a Using the top handle, remove the large used reagent bottle from the left side of the buffer drawer.b Remove the threaded cap from the cap holder on the front of the bottle.c Seal the bottle opening with the threaded cap to prevent spills.d Discard the contents in accordance with applicable standards. Grip both handles when emptying.e Return the uncapped bottle to the buffer drawer. Store the cap on the cap holder.
Figure 16 Returning the Empty Bottle
3 Put on a new pair of powder-free gloves to avoid contaminating the surface of the instrument.
4 Close the buffer drawer, and then close the liquid compartment doors.
WARNING
Failure to empty the used reagent bottles can result in a terminated run and overflow, which damagesthe instrument and poses a safety risk.
Document # 1000000019358 v14 Material # 20023471
For Research Use Only. Not for use in diagnostic procedures.34
NovaSeq 6000 Sequencing System Guide

Prepare Flow Cell1 Remove a new flow cell package from 2°C to 8°C storage.
2 Set the sealed flow cell package aside for 10-15 minutes to allow the flow cell to reach room temperature.Use the flow cell within 12 hours of removing it from the package.
Thaw ExAmp Reagents1 Remove one tube each of DPX1/JPX1, DPX2/JPX2, and DPX3 from -25°C to -15°C storage.
2 Thaw at room temperature for 10 minutes.
3 Set aside on ice.
NOTE
If you must refreeze unopened ExAmp reagents, do so immediately after thawing. ExAmp reagents can berefrozen one time only. Residual reagents cannot be frozen or combined.
Pool, Denature, and Load Libraries for SequencingLoading concentration can vary depending on library preparation, quantification, and normalization methods.For instructions, see the NovaSeq 6000 Denature and Dilute Guide (document # 1000000106351). Once yourpooled library is ready proceed to Prepare the Flow Cell and Dock on page 35.
Prepare the Flow Cell and Dock1 Place the NovaSeq Xp flow cell dock on a flat surface. Keep the flow cell level until it is loaded onto the
instrument.
2 Inspect the dock and make sure that it is free from particulate.
3 Put on a new pair of powder-free gloves to avoid contaminating the glass surface of the flow cell.
4 With the flow cell foil package over a flat surface, peel open the foil from the corner tab.
5 Remove the clear plastic retainer covering the flow cell.
6 Remove the flow cell from the package. Grasp the flow cell by the sides to avoid touching the glass or theunderside gaskets.
7 If particulate is visible on either of the glass surfaces, clean the applicable surface with a lint-free alcoholwipe and dry with a low-lint lab tissue.
8 Discard the package appropriately.
NOTE
Some scratches and other minor cosmetic defects on the flow cell are normal and not expected tocompromise data quality and yield. Illumina recommends using these flow cells as per normal.
9 Invert the flow cell so that the top surface faces downward.
10 Slip the outlet end of the flow cell under the bracket and place it onto the dock. See Flow Cell on page 12and NovaSeq Xp Flow Cell Dock on page 15.
Document # 1000000019358 v14 Material # 20023471
For Research Use Only. Not for use in diagnostic procedures.35
NovaSeq 6000 Sequencing System Guide

Figure 17 Flow Cell Placement
11 With the wells facing up, load the NovaSeq Xp manifold over the inlet end of the flow cell. Make sure thatthe NovaSeq Xp manifold arms fit securely into the dock cutouts.
Figure 18 NovaSeq Xp Manifold Placement
A NovaSeq Xp manifold wells facing upB NovaSeq Xp manifold arms placed in dock cutouts
12 Close the clamp to secure the flow cell and NovaSeq Xp manifold and seal the gaskets.
13 Discard the NovaSeq Xp manifold after loading library pools into the flow cell.The NovaSeq Xp manifold is single use only.
Prepare the ExAmp Master MixWhen preparing ExAmp master mix, use a microcentrifuge tube that holds at least twice the required volume:
u For two-lane flow cell, use a 0.5 ml or 1.7 ml tube.
u For four-lane flow cell, use a 1.7 ml tube.
The most common causes of variation in results when manually mixing ExAmp reagents are inaccuratedelivery of volumes and insufficient mixing. Do not undermix.
NOTE
The DPX1 and DPX2 consumables may be labeled as JPX1 and JPX2. Either are compatible with v1.0 orv1.5 reagent kits.
1 Invert or vortex briefly to mix DPX1/JPX1 and DPX2/JPX2.
2 Briefly vortex DPX3 to mix.ExAmp reagents might have separated in storage. They are viscous, especially DPX2/JPX2 and DPX3.DPX3 does not mix easily when inverted due to its high viscosity.
3 Briefly centrifuge DPX1/JPX1, DPX2/JPX2, and DPX3.
4 Combine the following volumes in a suitable microcentrifuge tube in the order specified.
Document # 1000000019358 v14 Material # 20023471
For Research Use Only. Not for use in diagnostic procedures.36
NovaSeq 6000 Sequencing System Guide

AdditionOrder
Reagent*Volume for Two-Lane Flow Cell (SP/S1/S2)
(µl)Volume for Four-Lane Flow Cell (S4)
(µl)
1 DPX1/JPX1 126 315
2 DPX2/JPX2 18 45
3 DPX3 66 165
*DPX/JPX reagent tube caps may be color coded (red, yellow, and blue for DPX1/JPX1, DPX2/JPX2, and DPX3, respectively). Make sure that
color coding is preserved when replacing tube caps.
These volumes result in 210 µl ExAmp master mix for SP, S1, or S2 mode, or 525 µl Master Mix for S4mode. These volumes are sufficient for the applicable mode. Extra volume is included to account forpipetting errors when loading libraries onto the flow cell.
5 Pipette and dispense slowly to avoid bubbles and make sure that entire volume is expelled from the tip.
6 Vortex for 20–30 seconds, or until thoroughly mixed.
NOTE
The ExAmp master mix is stable to vortexing.
The mixture might appear cloudy, which is normal.
7 Centrifuge at up to 280 × g for up to 1 minute.
8 For the best sequencing performance, immediately proceed to the next step. If necessary, ideal storageof the master mix is up to 1 hour on ice. Use within 30 minutes if storing at room temperature.
Load Libraries Onto the Flow CellFor best results, do the following:
u Maintain the loaded flow cell at room temperature. Do not refrigerate or place on ice.
u Prolonged incubation might reduce the percentage of clusters passing filter (%PF).
u Start the run within 30 minutes after loading library pools on the flow cell.
u Immediate use of the ExAmp/library mix yields best results.
1 Add ExAmp Master Mix to each denatured library pool as follows, and then vortex for 20–30 seconds tomix.If using tube strips, pipette to mix until homogenous.
Mode Denatured Library Pool (µl) ExAmp Master Mix (µl) Resulting Volume (µl)
SP/S1 27 63 90
S2 33 77 110
S4 45 105 150
2 Centrifuge at up to 280 × g for up to 1 minute.
3 Using a p200 µl pipette, add the appropriate volume of ExAmp/library mixture to each NovaSeq Xpmanifold well.u To avoid creating bubbles, load samples slowly.u Make sure that you add the library pool mixture to the well that corresponds to the intended lane.u Avoid contact with the filter at the bottom of the well when pipetting.u It is not necessary to wait for a lane to fill completely before adding mixture to the remaining manifold
wells.
Document # 1000000019358 v14 Material # 20023471
For Research Use Only. Not for use in diagnostic procedures.37
NovaSeq 6000 Sequencing System Guide

Mode Library/ExAmp Mixture per Well (µl)
SP/S1 80
S2 95
S4 130
The numbered NovaSeq Xp manifold wells match the number of the flow cell lane. When the flow cell isinverted, the lane numbering is reversed.
Figure 19 Inverted Lane Numbering
4 After adding the ExAmp/library mixture to all manifold wells, wait approximately 2 minutes for the mixtureto reach the opposite end of each lane.A small air bubble at the outlet end of the lane is normal. A small volume of the mixture may remain in themanifold wells after the lane is filled.
CAUTION
Do not tilt the flow cell when trying to determine if lanes are filled or bubbles are present. Tilting cancause the ExAmp/library mixture to leak from the flow cell. If a lane does not fill completely, do notattempt to correct it. Data yield from the partially filled lane might be reduced. Do not attempt to retrievethe sample from the flow cell.
NOTE
Do not tilt the flow cell when transporting it.
Prepare SBS and Cluster Cartridges1 Inspect the underside of each cartridge to make sure that the reservoirs are free of ice, which indicates
that the reagents are thawed.
2 Invert each cartridge 10 times to mix reagents.
3 Gently tap the bottom of each cartridge on the bench to reduce air bubbles.
Prepare Custom PrimersIf your library requires custom primers, prepare them by following the instructions in the NovaSeq SeriesCustom Primers Guide (document # 1000000022266).
Document # 1000000019358 v14 Material # 20023471
For Research Use Only. Not for use in diagnostic procedures.38
NovaSeq 6000 Sequencing System Guide
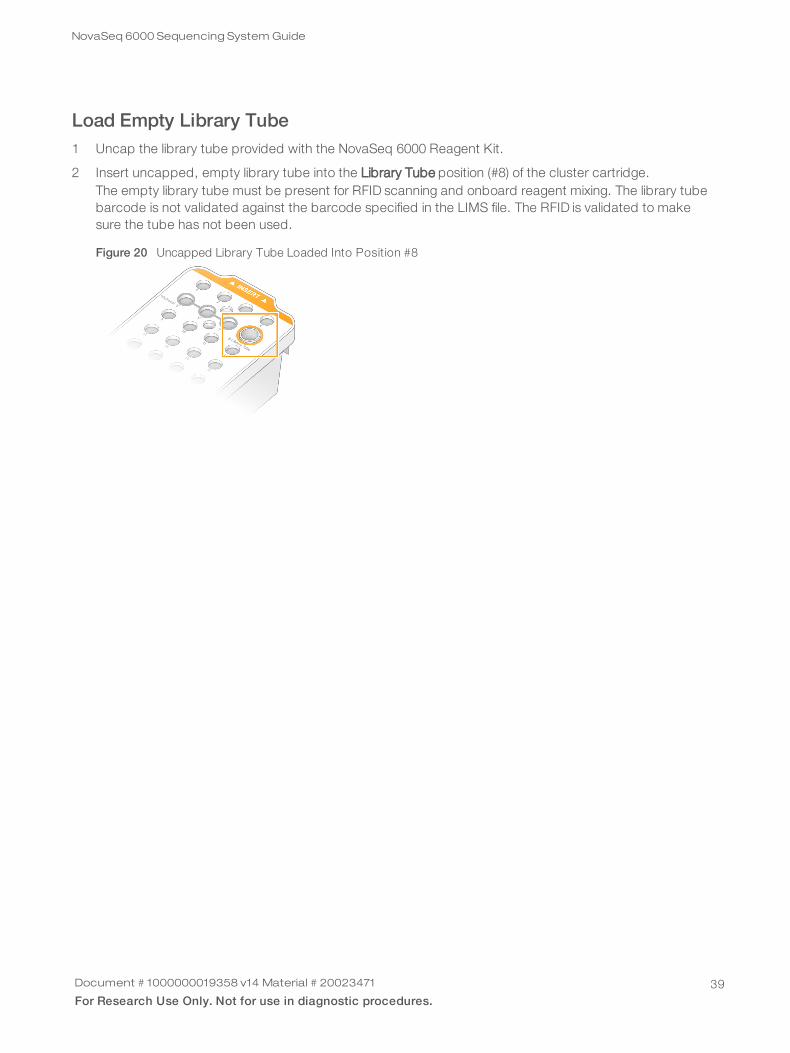
Load Empty Library Tube1 Uncap the library tube provided with the NovaSeq 6000 Reagent Kit.
2 Insert uncapped, empty library tube into the Library Tube position (#8) of the cluster cartridge.The empty library tube must be present for RFID scanning and onboard reagent mixing. The library tubebarcode is not validated against the barcode specified in the LIMS file. The RFID is validated to makesure the tube has not been used.
Figure 20 Uncapped Library Tube Loaded Into Position #8
Document # 1000000019358 v14 Material # 20023471
For Research Use Only. Not for use in diagnostic procedures.39
NovaSeq 6000 Sequencing System Guide

Chapter 6 SequencingSet Up a Sequencing Run 40Monitor Run Progress 46Staggered Start of Runs 47Delete the Run 47Detach Position #30 48Automatic Post-Run Wash 48
Set Up a Sequencing RunIllumina recommends that you remain logged in while the NVCS is running and while a sequencing run is inprogress.
1 Remove any items from the surface of the instrument.Keep the surface clear during the sequencing run and avoid leaning on the instrument. Pressure to theflow cell door can cause it to open, which stops the run. Stopped runs cannot be resumed.
NOTE
Staggered start of new runs is supported. The staggered start timer indicates when a staggered run canbe started. For more information, see Staggered Start of Runs on page 47.
2 From the Home screen, select Sequence, and then select a single or dual flow cell run:u A+B—Set up a dual flow cell run.u A—Set up a single flow cell run on side A.u B—Set up a single flow cell run on side B.The software initiates the series of run setup screens, starting with Load.
3 Select OK to acknowledge the warning and open the flow cell door.
Load the Flow Cell Onto the Instrument1 If present, remove the flow cell from the previous run.
2 If particulate is visible on the flow cell stage, clean the entire stage, including the fluidic interface and theglass surface of the optical alignment target, with an alcohol wipe. Dry with a lint-free tissue.
Figure 21 Flow Cell Stage
3 [Standard workflow] Remove the flow cell from the packaging as follows.
a Put on a new pair of powder-free gloves to avoid contaminating the glass surface of the flow cell.b With the package over a flat surface, peel open the foil from the corner tab.c Remove the clear plastic retainer covering the flow cell.
Document # 1000000019358 v14 Material # 20023471
For Research Use Only. Not for use in diagnostic procedures.40

d Remove the flow cell from the package. Grasp the flow cell by the sides to avoid touching the glass orthe underside gaskets.
e If particulate is visible on either of the glass surfaces, clean the applicable surface with a lint-freealcohol wipe and dry with a low-lint lab tissue.
f Discard the package appropriately.
NOTE
Some scratches and other minor cosmetic defects on the flow cell are normal and not expected tocompromise data quality and yield. Illumina recommends using these flow cells as per normal.
4 [NovaSeq Xp workflow] Unload the flow cell from the dock as follows.
a Open the clamp that secures the flow cell and manifold.b Without allowing liquid to drip onto the flow cell, carefully remove and discard the manifold.c If liquid drips onto the flow cell, clean with a lint-free alcohol wipe and dry with a lint-free lab tissue.d Grasp the sides of the flow cell to remove it from the dock. Keep the flow cell level.e If there is residual material on the gaskets, blot the four flow cell gaskets with a lint-free tissue to dry.
Do not touch the gaskets.f Invert the flow cell around the long axis so that the top surface faces up.
Figure 22 Invert Flow Cell Around Long Axis
g Before returning the dock to storage, inspect it and make sure that it is free from particulate.
5 Align the flow cell over the four raised clamps and place it on the flow cell stage.
Figure 23 Loaded Flow Cells Aligned Over Clamps
6 Select Close Flow Cell Door.The flow cell door closes, the sensors and RFID are checked, and the flow cell ID appears on the screen.
Document # 1000000019358 v14 Material # 20023471
For Research Use Only. Not for use in diagnostic procedures.41
NovaSeq 6000 Sequencing System Guide
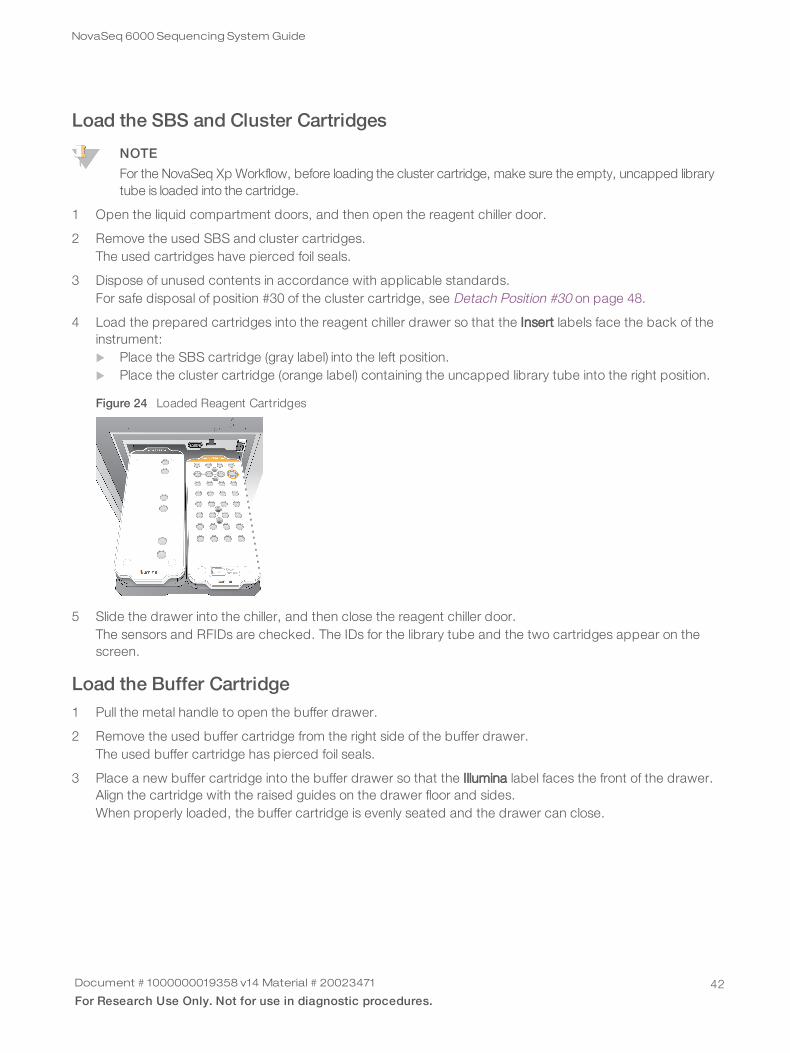
Load the SBS and Cluster Cartridges
NOTE
For the NovaSeq Xp Workflow, before loading the cluster cartridge, make sure the empty, uncapped librarytube is loaded into the cartridge.
1 Open the liquid compartment doors, and then open the reagent chiller door.
2 Remove the used SBS and cluster cartridges.The used cartridges have pierced foil seals.
3 Dispose of unused contents in accordance with applicable standards.For safe disposal of position #30 of the cluster cartridge, see Detach Position #30 on page 48.
4 Load the prepared cartridges into the reagent chiller drawer so that the Insert labels face the back of theinstrument:u Place the SBS cartridge (gray label) into the left position.u Place the cluster cartridge (orange label) containing the uncapped library tube into the right position.
Figure 24 Loaded Reagent Cartridges
5 Slide the drawer into the chiller, and then close the reagent chiller door.The sensors and RFIDs are checked. The IDs for the library tube and the two cartridges appear on thescreen.
Load the Buffer Cartridge1 Pull the metal handle to open the buffer drawer.
2 Remove the used buffer cartridge from the right side of the buffer drawer.The used buffer cartridge has pierced foil seals.
3 Place a new buffer cartridge into the buffer drawer so that the Illumina label faces the front of the drawer.Align the cartridge with the raised guides on the drawer floor and sides.When properly loaded, the buffer cartridge is evenly seated and the drawer can close.
Document # 1000000019358 v14 Material # 20023471
For Research Use Only. Not for use in diagnostic procedures.42
NovaSeq 6000 Sequencing System Guide

Figure 25 Load the Buffer Cartridge
4 If both used reagents bottles have been emptied, select the checkbox acknowledging that both usedreagent bottles are empty.
WARNING
Failure to empty the used reagent bottles can result in a terminated run and overflow, which damagesthe instrument and poses a safety risk.
5 Select the available button:u Log In—Opens the Log In screen to sign in to BaseSpace Sequence Hub. Proceed to Sign In to
BaseSpace Sequence Hub.u Run Setup—Skips BaseSpace Sequence Hub and opens the Run Setup screen to enter run
parameters. Proceed to Enter Run Parameters on page 43.Which button is available depends on whether the system is configured for BaseSpace Sequence Hub.
Sign In to BaseSpace Sequence HubWhen you open NVCS, your default workgroup from BaseSpace Sequence Hub is selected as yourworkgroup. If you did not specify a default, your personal workgroup is selected.
1 [Optional] Update BaseSpace Sequence Hub settings for the current run:u To disable BaseSpace Sequence Hub, clear the BaseSpace Sequence Hub checkbox and then
select Run Setup to proceed without signing in.u To send run data to BaseSpace Sequence Hub for remote monitoring and data analysis, select Run
Monitoring and Storage. This option requires a sample sheet.u To send InterOp files, runinfo.xml, and runParameters.xml to BaseSpace Sequence Hub to monitor
the run remotely, select Run Monitoring Only.
2 Enter your BaseSpace Sequence Hub username and password, and then select Sign In.
3 If prompted, select a workgroup to upload run data to, and then select Run Setup.You are prompted only if you belong to multiple workgroups.
Enter Run Parameters1 If the NovaSeq Xp workflow is enabled, select a workflow type.
Document # 1000000019358 v14 Material # 20023471
For Research Use Only. Not for use in diagnostic procedures.43
NovaSeq 6000 Sequencing System Guide

u If you select NovaSeq Xp, make sure that an empty library tube is loaded.u If you select NovaSeq Standard, make sure that the sample is loaded in the library tube.
2 In the Run Name field, enter a name of your preference to identify the current run.The run name can contain alphanumeric characters, hyphens, and underscores.
3 Enter the number of cycles for each read and index length in the sequencing run.There is no maximum number of index cycles, but the sum of the read cycles and index cycles must beless than the number of cycles for the kit.u Read 1—Enter a value up to 151 cycles for v1.0 300 cycle kits, or up to 251 for v1.0 500 cycle kits.
Enter a value up to 159 cycles for v1.5 300 cycle kits, or up to 259 for v1.5 500 cycle kits.u Index 1—Enter the number of cycles for the Index 1 (i7) primer.u Index 2—Enter the number of cycles for the Index 2 (i5) primer.u Read 2—Enter a value up to 151 cycles for v1.0 300 cycle kits, or up to 251 for v1.0 500 cycle kits.
Enter a value up to 159 cycles for v1.5 300 cycle kits, or up to 259 for v1.5 500 cycle kits. This value istypically the same as the Read 1 value.
NOTE
The number of cycles analyzed in Read 1 and Read 2 is one cycle less than the value entered. For example,to perform a paired-end 150-cycle run (2 × 150 bp run), enter the value of 151 cycles for Read 1 and Read2.
For v1.0 kits, the sum of the four values entered can exceed the indicated number of cycles for the selectedreagent kit by up to 23 cycles for paired-end runs, and 30 cycles for single-read runs.
For v1.5 kits, the sum of the four values entered can exceed the indicated number of cycles for the selectedreagent kit by up to 38 cycles for both paired-end and single-read runs.
The S4 35 cycle kit contains a total of 72 sequencing cycles. The sum of the four values can exceed theindicated number by a maximum of 37 cycles. The default read values are editable and the number ofcycles can be distributed across the 4 reads, e.g.: 36, 10, 10, 0.
4 Expand Advanced Options to apply settings for the current run.These settings are optional unless otherwise indicated.u v1.0 Custom Primers—Select the Custom Primers checkbox, and then select the appropriate
checkboxes. Illumina DNA PCR-Free Prep, Tagmentation libraries require custom Read 1 (VP10)sequencing primer if using v1.0 kits. See NovaSeq Series Custom Primers Guide (document #1000000022266) for details.u Read 1—Use custom primer for Read 1.u Read 2—Use custom primer for Read 2.u Custom Index—Use custom primer for Index 1.
u v1.5 Custom Primers—Select the Custom Primers checkbox, and then select the appropriatecheckboxes. Illumina DNA PCR-Free Prep, Tagmentation libraries do not require custom primer ifusing v1.5 kits. See NovaSeq Series Custom Primers Guide (document # 1000000022266) for details.u Read 1—Use custom primer for Read 1.u Read 2—Use custom primer for Read 2.u Custom Index—Use custom primer for both Index 1 and Index 2 reads.
u Output Folder—Select Browse to change the output folder for the current run. An output folder isrequired when the run is not connected to BaseSpace Sequence Hub for storage.
u Samplesheet—Select Browse to upload a sample sheet, which is required when using BaseSpaceSequence Hub for run monitoring and storage, or other CSV file. The CSV file is copied to the outputfolder and does not affect run parameters. Ensure uploaded sample sheet is in the appropriate
Document # 1000000019358 v14 Material # 20023471
For Research Use Only. Not for use in diagnostic procedures.44
NovaSeq 6000 Sequencing System Guide

format (Index Read 2 adapter direction) based on v1.0 and v1.5 workflows which utilize differentstrategies. Forward strand workflow is performed with v1.0 reagent kits. Reverse complementworkflow is performed with v1.5 reagent kits.
u Custom Recipe—Select Custom Recipe, then Browse to use a custom recipe in XML format for thisrun. Custom recipes for v1.0 will not be compatible for v1.5. Contact Illumina Technical Support formore information.
NOTE
Modifying the clustering steps in a custom recipe is not supported.
5 Select Review.The software confirms that the specified parameters are appropriate for the recipe.
Confirm Run Parameters1 Confirm the run parameters displayed on the Review screen.
2 [Optional] Select Back to return to the Run Setup screen and edit run parameters.
3 Select Start Run.The pre-run checks are started automatically.
Review Pre-Run Checks1 Wait about 5 minutes for the pre-run check to complete.
The run starts automatically after successful completion.
NOTE
To avoid overfilling the hard drive, do not copy any data to C:\ after the run starts.
2 If pre-run checks fail due to a sensor error, such as flow cell not detected, you must exit and restart theworkflow.
3 For other pre-run check failures, select Retry to restart the failed check or Retry All to restart all checks.Errors require resolution before the run can start. See Pre-Run Check Errors on page 55 fortroubleshooting information.
4 Select the Error icon to see error details.
5 If the alignment check fails, resolve the error as follows.
a Select Reload, and then select OK to confirm returning to the Load screen.b Remove any items from the top of the instrument, and then select OK.c Reload the flow cell, and then select Run Setup.d Proceed through each screen to reread each RFID and return to the Pre-Run Checks screen.e Redo the check.
Document # 1000000019358 v14 Material # 20023471
For Research Use Only. Not for use in diagnostic procedures.45
NovaSeq 6000 Sequencing System Guide

Monitor Run Progress1 Monitor run progress, intensities, and quality scores as metrics appear on the screen.
For more information on run metrics, see Real-Time Analysis on page 59.
Figure 26 Sequencing Run Progress and Metrics
A Time to completion—The run completion date and time (yyyy-mm-dd hh:mm).B Run progress—The current run step. The size of the progress bar is not proportional to the run rate of each
step.C Q-scores—The distribution of quality scores (Q-scores).D Intensity—The value of cluster intensities of the 90th percentile for each tile. Plot colors indicate the red and
green channels.E Clusters passing filter (%)—The percentage of clusters passing filter.F Projected Total Yield (Gb)—The projected yield for the FC run. If the per lane metrics are selected (H) the
numbers displayed are the current yield per lane, and will update per cycle throughout the run.G Q30—The percentage of base calls for the run that have a Q-score of ≥ 30.H Per lane breakdown Selecting the values in items E, F, and G will display a per lane breakdown of data for
each of those fields.
NOTE
If a shutdown or restart is initiated while the NVCS is running, the user must confirm this action before theshutdown or restart can proceed.
Run MetricsThe software displays metrics generated during the run. Metrics appear in the form of plots, graphs, andtables based on data generated by RTA3 and written to InterOp files.
Clustering takes about 2 hours, then sequencing begins with cycle 1. Metrics are updated as sequencingprogresses. Clusters passing filter, yield, and quality scores are available after cycle 26. Prior to cycle 26, novalues are populated and are designated as N/A.
Document # 1000000019358 v14 Material # 20023471
For Research Use Only. Not for use in diagnostic procedures.46
NovaSeq 6000 Sequencing System Guide
Processing StatusThe Process Management screen lists the status of each run. From the Main Menu, select ProcessManagement.
For each run name, Process Management lists the status of the following processes:
u Run Status—Based on the processing of CBCL files.
u Network—Based on file transfer using Universal Copy Service.
u BaseSpace—Based on file upload to BaseSpace Sequence Hub, if applicable.
When a process is complete, a green checkmark appears. For more information, see Process Managementon page 8.
Staggered Start of RunsYou can set up and start a run on the idle side of the instrument while a run is in progress on the other side,which is referred to as a staggered start. Staggered runs are set up at specific times during a run, asindicated by the following start countdown timer states.
u Run Start: Available—Staggered start is currently available. The date and time show when staggeredstart will become unavailable. Select Sequence to start a new staggered run after the current cycle iscomplete.
u Run Start: Unavailable—Staggered start is currently unavailable. The date and time show whenstaggered start will be available on the other side of the instrument.
u Waiting...—If a new run is attempted when staggered start is unavailable, the state changes to Waitingand the date and time show the approximate time that the instrument will be ready for the new run. Theinstrument will proceed to run setup when staggered start is available.
When you set up the new run, the software automatically pauses and resumes the run on the adjacent flowcell as needed. The system is placed in a safe state when paused.
Procedure1 From the Home screen, select Sequence, and then select A or B.
The selected side must be the currently idle side.
2 Wait for the run on the adjacent flow cell to pause. To cancel the new run and prevent pausing, selectCancel.If the adjacent run is performing cluster generation, paired-end resynthesis, imaging, or washing, thesoftware completes the current step before pausing.
3 When the adjacent run is paused and the flow cell door opens, set up the new run.When the new run is started, the paused run is automatically resumed and then the new run begins.
Delete the RunAfter data transfer is complete, you can delete the current run from Process Management to clear space for asubsequent run. Deleting the run clears CE and C:\ without removing system maintenance files, affecting thenetwork, or affecting the BaseSpace Sequence Hub copy. Runs that are sequencing cannot be deleted.
1 From the Main Menu, select Process Management.
Document # 1000000019358 v14 Material # 20023471
For Research Use Only. Not for use in diagnostic procedures.47
NovaSeq 6000 Sequencing System Guide

2 [Optional] Make sure that each process for the run displays a green checkmark, which indicates thatdata transfer is complete.You can delete a run that has not completed transfer to a network or BaseSpace Sequence Hub, but allrun data are lost.
3 Select Delete Run, and then select Yes to confirm.
4 Select Done.
Detach Position #30The reservoir in position #30 of the cluster cartridge contains formamide. It is removed from the used clustercartridge and discarded separately.
WARNING
This set of reagents contains potentially hazardous chemicals. Personal injury can occur through inhalation,ingestion, skin contact, and eye contact. Wear protective equipment, including eye protection, gloves, andlaboratory coat appropriate for risk of exposure. Handle used reagents as chemical waste and discard inaccordance with applicable regional, national, and local laws and regulations. For additional environmental,health, and safety information, see the SDS at support.illumina.com/sds.html.
1 While wearing gloves, push the white plastic tab labeled Detach after use to the right.
2 Place a hand or solid surface under the reservoir and press the clear plastic tab toward the Illumina labelto release the reservoir from under the cluster cartridge.
NOTE
Avoid stacking cluster cartridges when storing. Stacking may cause accidental detachment of thereservoir.
Figure 27 Removable Position #30
A White plastic tab to detachB Clear plastic tab to release
3 Dispose of the reservoir in accordance with applicable standards.
Automatic Post-Run WashWhen sequencing is complete, the software initiates an automatic post-run wash that takes about 80minutes. The system pumps 0.24% sodium hypochlorite (NaOCl) from position #17 and dilutes it to 0.12%.The 0.12% NaOCl is pumped to the ExAmp reagent and library positions, through the flow cell, and then tothe used reagent bottles. The wash flushes template from the system to prevent cross-contamination.
Document # 1000000019358 v14 Material # 20023471
For Research Use Only. Not for use in diagnostic procedures.48
NovaSeq 6000 Sequencing System Guide

When the wash is complete, the system is placed in a safe state and the Home button becomes active.Leave consumables in place until the next run. After the wash, the sippers remain in the SBS and clustercartridges to prevent air from entering the system. The sippers in the buffer cartridge are raised so the usedreagent bottles can be emptied.
NOTE
If an error occurs during an automatic post-run wash, and the post-run wash is incomplete, a maintenancewash is required.
Document # 1000000019358 v14 Material # 20023471
For Research Use Only. Not for use in diagnostic procedures.49
NovaSeq 6000 Sequencing System Guide

Chapter 7 MaintenancePreventive Maintenance 50Perform a Maintenance Wash 50Software Updates 54
Preventive MaintenanceIllumina recommends that you schedule a preventive maintenance service each year. If you are not under aservice contract, contact your Territory Account Manager or Illumina Technical Support to arrange for abillable preventive maintenance service.
Perform a Maintenance WashThe software prompts for a maintenance wash at the following times:
u When there has not been a 4-lane run with a post-run wash within the last 14 days
u When there has not been a maintenance wash within the last 14 days
u When a post-run wash fails or is incomplete.
The maintenance wash flushes the system with user-supplied dilutions of Tween 20 and NaOCl. The dilutionsare pumped from the wash cartridges to the flow cell, used reagent bottles, and each cartridge reservoir towash all sippers. Wash duration is about 80 minutes.
A maintenance wash requires a used buffer cartridge and the SBS wash cartridge, cluster wash cartridge,and four-lane wash flow cell provided with the instrument (or a used four-lane flow cell). Like the reagentcartridges, the wash cartridges are color-coded to prevent loading errors. The SBS wash cartridge has acenter well for the Tween 20 dilution. The NaOCl dilution is added to a reservoir on the cluster wash cartridge.
Figure 28 SBS Wash Cartridge (Left) and Cluster Wash Cartridge (Right)
Prepare Wash Solution1 Add 400 ml laboratory-grade water to a 500 ml centrifuge bottle.
2 Add 0.2 ml 100% Tween 20 to result in at least 400 ml 0.05% Tween 20 wash solution.Using a freshly prepared dilution of Tween 20 limits the introduction of biocontaminants into the fluidicssystem.
Document # 1000000019358 v14 Material # 20023471
For Research Use Only. Not for use in diagnostic procedures.50

3 Invert to mix.
4 Remove the lid from the center well of the SBS wash cartridge.
5 Add wash solution to the center well. Fill to the fill line, which indicates the minimum required volume.The other reservoirs remain empty.
Figure 29 Center Well Filled to MIN FILL VOLUME Line
6 Combine the following volumes in a 30 ml centrifuge tube to prepare 20 ml of 0.25% reagent gradeNaOCl:u 5% reagent grade NaOCl (1 ml)u Deionized water (19 ml)
CAUTION
Only use reagent grade NaOCl. Avoid general purpose bleach products as these can contain ammoniacompounds, which may lead to runs with low percentage passing filter reads.
7 Invert to mix.
8 Add 5 ml 0.25% reagent grade NaOCl to the cluster wash cartridge.The location is marked Fill and has an orange circle around it. All other reservoirs remain empty.
Document # 1000000019358 v14 Material # 20023471
For Research Use Only. Not for use in diagnostic procedures.51
NovaSeq 6000 Sequencing System Guide

Figure 30 Position for 0.25% NaOCl
Load the Wash Flow Cell1 Remove any items from the surface of the instrument.
Keep the surface clear during the maintenance wash and avoid leaning on the instrument. Pressure tothe flow cell door can cause it to open, which stops the wash.
2 From the Home screen, select Wash, and then select which side to wash:u A+B—Wash both sides simultaneously.u A—Wash side A only.u B—Wash side B only.The software initiates the series of wash screens.
NOTE
A maintenance wash for a single side can only be started when the other side is either idle or performing SBSread cycles. The NVCS staggered start time indicates the instrument's availability for starting a new run or awash. See Staggered Start of Runs on page 47.
3 Select OK to acknowledge the warning and open the flow cell door.
4 If a wash flow cell, or a used 4-lane flow cell, is not already present, load one.
5 Select Close Flow Cell Door.The door closes, the sensors and RFID are checked, and the flow cell ID appears on the screen.
Load the Wash CartridgesWash cartridges are required for a maintenance wash. Do not use the used SBS and cluster cartridges.
1 Open the liquid compartment doors, and then open the reagent chiller door.
Document # 1000000019358 v14 Material # 20023471
For Research Use Only. Not for use in diagnostic procedures.52
NovaSeq 6000 Sequencing System Guide
2 Remove the used SBS and cluster reagent cartridges. Dispose of unused contents in accordance withapplicable standards.For safe disposal of position #30 of the cluster cartridge, see Detach Position #30 on page 48.
3 Load the wash cartridges into the reagent chiller drawer so that the Insert labels face the back of theinstrument:u Place the SBS cartridge (gray label) into the left position.u Place the cluster cartridge (orange label) into the right position.
4 Slide the drawer into the chiller, and then close the reagent chiller door.The sensors are checked and the RFID for each cartridge is scanned and displayed on the screen.
5 Open the buffer drawer.
6 If not already present, load a used buffer cartridge.
Empty Used Reagent BottlesUse the following instructions to empty the used reagent bottles with every maintenance wash. Even if yoursystem is configured to route used reagents externally, the small bottle collects used reagents and the largebottle must be in place.
WARNING
This set of reagents contains potentially hazardous chemicals. Personal injury can occur throughinhalation, ingestion, skin contact, and eye contact. Wear protective equipment, including eyeprotection, gloves, and laboratory coat appropriate for risk of exposure. Handle used reagents aschemical waste and discard in accordance with applicable regional, national, and local laws andregulations. For additional environmental, health, and safety information, see the SDS atsupport.illumina.com/sds.html.
1 Remove the small used reagent bottle and discard the contents in accordance with applicablestandards. Keep the contents separate from the contents of the other bottle.
2 Return the small used reagent container to the alcove.
3 Remove the large used reagent bottle and discard the contents in accordance with applicablestandards.
4 Return the large used reagent bottle to the buffer drawer.
5 Put on a new pair of powder-free gloves.
6 Close the buffer drawer, and then close the liquid compartment doors.The sensors and RFIDs are checked. The ID of each wash component appears on the screen.
Start the Wash1 Select the checkbox acknowledging that both used reagent bottles are empty, and then select Start
Wash.The wash starts and the estimated time of wash completion is displayed.
WARNING
Failure to empty the used reagent bottles can result in a terminated wash and overflow, which damagesthe instrument and poses a safety risk.
2 When the wash is complete, select Home.
Document # 1000000019358 v14 Material # 20023471
For Research Use Only. Not for use in diagnostic procedures.53
NovaSeq 6000 Sequencing System Guide

3 Leave the consumables in place until the next run.The sippers remain in the SBS and cluster cartridges to prevent air from entering the system. The sippersin the buffer cartridge are raised so that the used reagent bottles can be emptied.
Software UpdatesSoftware updates are available for NVCS v1.4 or later. Software updates can be downloaded and installedfrom NVCS. Automatic checking for software updates is enabled by default. You can enable or disableautomatic updates from Settings.
NOTE
The NovaSeq 6000 must be connected to the internet to check for software updates and todownload updates.
The automatic check for updates is performed every 24 hours. A notification is displayed on the Main Menuwhen an update is available. The update notification is visible to all users, but only an administrator candownload and install updates.
For the NovaSeq Xp workflow, make sure that the NVCS version satisfies the minimum software requirementslisted in the following table before beginning preparation of samples or consumables.
Flow cellv1.0 Reagent KitMinimum Software
Version
v1.5 Reagent KitMinimum Software
Version
SP 1.6 1.7
S1 1.3.1 1.7
S2 All 1.7
S4 1.2.0 1.7
Table 13 Minimum Software Requirements
NOTE
You cannot update the software if a sequencing run, wash, run setup, or file transfer to output folder or toBaseSpace Sequence Hub is in progress. If a NovaSeq Xp workflow is in progress, wait to update thesoftware until the libraries have been loaded onto the flow cell and sequencing has completed.
To manually check for updates, or to download and install an update, do the following:
1 From the Main Menu, select Software Update.The Software Update screen is displayed, which provides release notes for the available update. Ifautomatic checking for software updates is not enabled, you can manually check for updates, or enableautomatic checking.
2 To download and install the update, select the checkbox to acknowledge that the download andinstallation takes approximately 30 minutes.
3 Select Download and Install.When the download is finished, NVCS closes and the installer is launched. Follow the installer instructionsto complete the installation.If errors occur during download or installation, contact Illumina Technical Support.
Document # 1000000019358 v14 Material # 20023471
For Research Use Only. Not for use in diagnostic procedures.54
NovaSeq 6000 Sequencing System Guide

Appendix A TroubleshootingTroubleshooting Resources 55Troubleshooting Files 55Pre-Run Check Errors 55Process Management Troubleshooting 56Run Failure Before Clustering 56End a Run 57Shut Down the Instrument 58
Troubleshooting ResourcesFor technical questions, visit the NovaSeq 6000 Sequencing System support page on the Illumina website.The support page provides access to documentation, downloads, and frequently asked questions. Foraccess to support bulletins, sign in to your MyIllumina account.
For run quality or performance problems, contact Illumina Technical Support. See Technical Assistance onpage 74. To facilitate troubleshooting, consider sharing a link to the run summary in BaseSpace SequenceHub with Illumina Technical Support.
Troubleshooting Files
Key File Folder Description
Run information file(RunInfo.xml)
Root folder Contains the run settings:• Number of cycles in the run• Number of reads in the run• Whether the read is indexed• Number of swaths and tiles on the flow cell
Run parameters file(RunParameters.xml)
Root folder Contains the run name and information about run parameters and runcomponents, including the following RFID information: serial numbers, lotnumbers, expiration dates, and catalog numbers.
InterOp files (*.bin) InterOp Binary reporting files used for Sequencing Analysis Viewer.InterOp files are updated throughout the run.
Log files Logs Log files describe each step performed by the instrument for each cycle,including which reagent is used, and list software and firmware versions usedwith the run. The file named [InstrumentName]_CurrentHardware.csv lists theserial numbers of instrument components.
Pre-Run Check ErrorsIf an error occurs during the pre-run checks, use the following actions to resolve it. If you are setting up a dualflow cell run and one side fails, you can cancel the failed side and proceed with the side that passed.
When a pre-run check fails, the RFIDs for the flow cell, reagents, and buffers are not locked so theconsumables can be used for a subsequent run. When the run is started, the sippers pierce the foil seals onthe reagent cartridges and all RFIDs are locked.
Document # 1000000019358 v14 Material # 20023471
For Research Use Only. Not for use in diagnostic procedures.55

System Check Reason for Failure Recommended Action
Sensors A compartment door is open, a consumable isnot properly loaded, or at least one sensor isnot functional.
Select Retry and follow the onscreen promptsto resolve the error.
Disk Space Disk space is insufficient because thespecified location of the output folder is full.
Use the Process Management screen to cleardisk space from the specified output folderlocation.
System Connectivity The connection to RTA3, the fluidics system,or other connection has been interrupted.
Select Retry and follow the onscreen promptsto resolve the error.
Alignment The position of the flow cell prevents imaging. Follow the onscreen prompts to reload theflow cell.
Leak TrayA leak tray is built into the base of the instrument to collect leaked reagents or coolant and collect overflowfrom the used reagent bottles. Under normal conditions, the leak tray is dry. Leakage indicates a problemwith the instrument, and overflow occurs when the used reagent bottles are not regularly emptied.
During the pre-run check, sensors detect whether the leak tray contains any liquids:
u If the leak tray contains liquid but is not full, the run can proceed but you must contact Illumina TechnicalSupport. See Technical Assistance on page 74.
u If the leak tray is full, the run cannot proceed and you must contact Illumina Technical Support.
WARNING
Empty the used reagent bottles with every run. Runs are stopped if either of the used reagent bottles is full.Overflow from either of the used reagent bottles damages the instrument, requires a site visit from anIllumina representative, and poses a safety risk.
Process Management TroubleshootingThe following table provides troubleshooting options for the N/A icon on the Process Management screen:
u The N/A icon is displayed in the BaseSpace column and the run is configured to upload to BaseSpaceSequence Hub.
u The N/A icon is displayed in the Network column and the run is configured to upload an output folder onthe network.
Run Status Troubleshooting Action
A run is in progress Close the Process Management screen, wait about 5 minutes, and then reopen the screen.
A run is not inprogress
Shut down and restart the instrument, and then reopen the Process Management screen.
If the N/A icon is still displayed after the troubleshooting action is complete, contact Illumina TechnicalSupport. See Technical Assistance on page 74.
Run Failure Before ClusteringIf the software fails the run before clustering starts, you can save the reagent cartridges, library tube (includingsample), and, if reused immediately, the flow cell, for a new run. When clustering starts, sippers pierce the foilseals and reagents are transferred to the library tube and flow cell, so the consumables and libraries cannotbe used for another run.
Document # 1000000019358 v14 Material # 20023471
For Research Use Only. Not for use in diagnostic procedures.56
NovaSeq 6000 Sequencing System Guide

You have two options for setting up a new run using the reagent cartridges, library tube, and flow cell savedfrom the failed run:
u Set up a new run immediately—Set up the new run within 4 hours of the failed run. The reagentcartridges, library tube, and flow cell remain loaded.
NOTE
For optimal results for a NovaSeq Xp workflow, start the new run as soon as possible.
u Set up a new run later—Set up the new run within three weeks of the failed run. The reagent cartridgesand library tube are unloaded from the instrument and stored. The saved consumables should be labeledwith the date and stored under original conditions.
NOTE
The flow cell cannot be reused and must be discarded. Contact Illumina Technical Support to obtain areplacement flow cell.
Set Up a New Run ImmediatelyIf a failed run used the NovaSeq Xp workflow, start the new run as soon as possible for optimal results.
1 When the run fails and the other side of the instrument is idle, reboot the instrument. Otherwise, selectHome.
2 Set up a new run.
3 Leave the current flow cell in place.
4 Open and close the reagent chiller door and the buffer drawer to prompt the NVCS to reread the reagentcartridge RFIDs.The cartridges, library tube, and flow cell can remain in the instrument for up to 4 hours after the failedrun.
5 Empty the used reagent bottles, if needed, and return them to the instrument.
6 Proceed with run setup.
Set Up a New Run Later1 When the run fails, select Home.
2 Set up a new run or a maintenance wash to release the consumables from the instrument.
3 When prompted, remove and store the following consumables:u Cap the library tube and store at -25°C to -15°C for up to three weeks.u Return the SBS and cluster cartridges to -25°C to -15°C storage.u Return the buffer cartridge to room temperature storage protected from light.If not pierced, the cartridges can be reused in a new run.
4 Select End to cancel the run or maintenance wash, and then select Yes to confirm the command.You can let the maintenance wash complete instead of canceling it.
End a RunEnding a run on the NovaSeq 6000 system is final. The software cannot resume the run or save sequencingdata, and consumables cannot be reused.
Document # 1000000019358 v14 Material # 20023471
For Research Use Only. Not for use in diagnostic procedures.57
NovaSeq 6000 Sequencing System Guide

1 Select End, and then select Yes to confirm the command.If the run was ended after Read 1, the software initiates the automatic post-run wash.
2 If prompted, select from the following wash options:u End Run Without Wash—End the run and initiate a maintenance wash.u End Run and Wash—End the run and perform an automatic post-run wash.u Cancel—Continue with the current run.If the run is ended between clustering completion and Read 1 completion, the software displays thewash options. Otherwise, the software initiates the automatic post-run wash.
3 If you selected End Run Without Wash, follow the software prompts to set up a maintenance wash.
Shut Down the InstrumentShutting down the instrument safely shuts down all software and systems, and turns off instrument power.The status bar fades from green to white, indicating that the shutdown is in progress.
Under normal circumstances, shutting down the instrument is unnecessary.
A full instrument shutdown and power up should be performed any time a software crash event occurs.
If a shutdown or restart is initiated while the NVCS is running, the user must confirm this action before theshutdown or restart can proceed.
1 From the Main Menu, select Shutdown Instrument.
2 After the screen goes blank, switch the toggle power switch on the back of the instrument to the offposition.
3 Wait at least 60 seconds before turning on the instrument again.
CAUTION
Do not relocate the instrument. Improper moving can affect optical alignment and compromise dataintegrity. For relocation assistance, contact your Illumina representative.
Document # 1000000019358 v14 Material # 20023471
For Research Use Only. Not for use in diagnostic procedures.58
NovaSeq 6000 Sequencing System Guide
Appendix B Real-Time AnalysisReal-Time Analysis Overview 59Real-Time Analysis Workflow 61
Real-Time Analysis OverviewThe NovaSeq 6000 Sequencing System runs RTA3, an implementation of Real-Time Analysis software, on theinstrument Compute Engine (CE). RTA3 extracts intensities from images received from the camera, performsbase calling, assigns a quality score to base calls, aligns to PhiX, and reports data in InterOp files for viewingin Sequencing Analysis Viewer.
To optimize processing time, RTA3 stores information in memory. If RTA3 is terminated, processing does notresume and any run data being processed in memory is lost.
RTA3 InputsRTA3 requires tile images contained in local system memory for processing. RTA3 receives run informationand commands from the NVCS.
RTA3 OutputsImages for each color channel are passed in memory to RTA3 as tiles. From these images, RTA3 outputs aset of quality-scored base call files and filter files. All other outputs are supporting output files.
File Type Description
Base call files Each tile that is analyzed is included in a concatenated base call (*.cbcl) file. Tiles from thesame lane and surface are aggregated into 1 *.cbcl file for each lane and surface.
Filter files Each tile produces a filter file (*.filter) that specifies whether a cluster passes filters.
Cluster location files Cluster location (*.locs) files contain the X,Y coordinates for every cluster in a tile. A clusterlocation file is generated for each run.
Output files are used for downstream analysis in BaseSpace Sequence Hub. Alternatively, use bcl2fastqconversion software for FASTQ conversion and third-party analysis solutions. NovaSeq files require bcl2fastq2Conversion Software v2.19, or later. For the latest version of bcl2fastq2, visit the bcl2fastq downloads pageon the Illumina website.
RTA3 provides real-time metrics of run quality stored as InterOp files, which are a binary output containingtile, cycle, and read-level metrics. Viewing real-time metrics using Sequencing Analysis Viewer requiresInterOp files. For the latest version of Sequencing Analysis Viewer, visit the Sequencing Analysis Viewerdownloads page on the Illumina website.
Error HandlingRTA3 creates log files and writes them to the Logs folder. Errors are recorded in a text file in *.log file format.
The following log files are transferred to the final output destination at the end of processing:
u info_00000.log summarizes important run events.
u error_00000.log lists errors that occurred during a run.
u warning_00000.log lists warnings that occurred during a run.
Document # 1000000019358 v14 Material # 20023471
For Research Use Only. Not for use in diagnostic procedures.59

Flow Cell TilesTiles are small imaging areas on the flow cell. The camera takes one image of each swath, which the softwaredivides into tiles for RTA3 processing. The total number of tiles depends on how many lanes, swaths, andsurfaces are imaged on the flow cell.
u SP flow cells have a total of 312 tiles.
u S1 flow cells have a total of 624 tiles.
u S2 flow cells have a total of 1408 tiles.
u S4 flow cells have a total of 3744 tiles.
Flow CellComponent
SP S1 S2 S4 Description
Lanes 2 2 2 4 A lane is a physical channel with input and output ports.
Surfaces 1 2 2 2 The S1, S2, and S4 flow cells are imaged on two surfaces: the topand bottom. The top surface of a tile is imaged first. The SP flowcell is imaged on the bottom surface only.
Swaths perlane
2 2 4 6 A swath is a column in a flow cell lane that the camera capturesas one image.
Tiles per swath 78 78 88 78 A tile is a portion of a swath and depicts an imaged area on theflow cell.
Total tilesgenerated
312 624 1408 3744 Lanes × surfaces × swaths × tiles per swath equals the totalnumber of tiles.
Table 14 Flow Cell Tiles
Tile NamingThe tile name is a five-digit number that represents the tile position on the flow cell. For example, tile name1_1205 indicates lane 1, top surface, swath 2, tile 5.
u The first digit is the lane number:u 1 or 2 for an SP, S1, or S2 flow cell.u 1, 2, 3, or 4 for an S4 flow cell.
u The second digit represents the surface: 1 for top or 2 for bottom.
For the SP flow cell, the second digit is always 2 because this flow cell only has a bottom surface.
u The third digit represents the swath number:u 1 or 2 for an SP or S1 flow cell.u 1, 2, 3, or 4 for an S2 flow cell.u 1, 2, 3, 4, 5, or 6 for an S4 flow cell.
u The last two digits represent the tile number. The numbering starts with 01 at the outlet end of the flowcell through 88 or 78 at the inlet end.u 01 through 78 for an SP, S1, or S4 flow cell.u 01 through 88 for an S2 flow cell.
Document # 1000000019358 v14 Material # 20023471
For Research Use Only. Not for use in diagnostic procedures.60
NovaSeq 6000 Sequencing System Guide

Real-Time Analysis WorkflowRegistration Records the location of each cluster on the patterned flow cell.
Intensity extraction Determines an intensity value for each cluster.
Phasing correction Corrects the effects of phasing and prephasing.
Base calling Determines a base call for every cluster.
Quality scoring Assigns a quality score to every base call.
RegistrationRegistration aligns an image to the hexagonal array of nanowells on the patterned flow cell. Because of theordered arrangement of nanowells, the X and Y coordinates for each cluster in a tile are predetermined.Cluster positions are written to a cluster location (s.locs) file for each run.
If registration fails for any images in a cycle, no base calls are generated for that tile in that cycle. UseSequencing Analysis Viewer to identify which images failed registration.
Intensity ExtractionAfter registration, intensity extraction calculates an intensity value for each nanowell in a given image. Ifregistration failed, the intensity for that tile cannot be extracted.
Phasing CorrectionDuring the sequencing reaction, each DNA strand in a cluster extends by one base per cycle. Phasing andprephasing occurs when a strand becomes out of phase with the current incorporation cycle.
u Phasing occurs when a base falls behind.
u Prephasing occurs when a base jumps ahead.
Figure 31 Phasing and Prephasing
A Read with a base that is phasingB Read with a base that is prephasing.
RTA3 corrects the effects of phasing and prephasing, which maximizes the data quality at every cyclethroughout the run.
Document # 1000000019358 v14 Material # 20023471
For Research Use Only. Not for use in diagnostic procedures.61
NovaSeq 6000 Sequencing System Guide

Base CallingBase calling determines a base (A, C, G, or T) for every cluster of a given tile at a specific cycle. The NovaSeq6000 Sequencing System uses two-channel sequencing, which requires only two images to encode the datafor four DNA bases, one from the red channel and one from the green channel.
A no call is identified as N. No calls occur when a cluster does not pass filter, registration fails, or a cluster isshifted off the image.
Intensities for each cluster are extracted from the red and green images and compared against each other,which results in four distinct populations. Each population corresponds to a base. The base calling processdetermines which population each cluster belongs to.
Figure 32 Visualization of Cluster Intensities
Base Red Channel Green Channel Result
A 1 (on) 1 (on) Clusters that show intensity in both the red and green channels.
C 1 (on) 0 (off) Clusters that show intensity in the red channel only.
G 0 (off) 0 (off) Clusters that show no intensity at a known cluster location.
T 0 (off) 1 (on) Clusters that show intensity in the green channel only.
Table 15 Base Calls in 2-Channel Sequencing
Clusters Passing FilterDuring the run, RTA3 filters raw data to remove reads that do not meet the data quality threshold.Overlapping and low-quality clusters are removed.
For two-channel analysis, RTA3 uses a population-based system to determine the chastity (intensity puritymeasurement) of a base call. Clusters pass filter (PF) when no more than one base call in the first 25 cycleshas a chastity below a fixed threshold. PhiX alignment is performed at cycle 26 on a subset of tiles for clustersthat passed filter. Clusters that do not pass filter are not base called and not aligned.
Quality ScoresA quality score (Q-score) is a prediction of the probability of an incorrect base call. A higher Q-score impliesthat a base call is higher quality and more likely to be correct. After the Q-score is determined, results arerecorded in base call (*.cbcl) files.
The Q-score succinctly communicates small error probabilities. Quality scores are represented as Q(X),where X is the score. The following table shows the relationship between a quality score and error probability.
Document # 1000000019358 v14 Material # 20023471
For Research Use Only. Not for use in diagnostic procedures.62
NovaSeq 6000 Sequencing System Guide

Q-Score Q(X) Error Probability
Q40 0.0001 (1 in 10,000)
Q30 0.001 (1 in 1000)
Q20 0.01 (1 in 100)
Q10 0.1 (1 in 10)
Quality Scoring and ReportingQuality scoring calculates a set of predictors for each base call, and then uses the predictor values to look upthe Q-score in a quality table. Quality tables are created to provide optimally accurate quality predictions forruns generated by a specific configuration of sequencing platform and version of chemistry.
NOTE
Quality scoring is based on a modified version of the Phred algorithm.
RTA3 assigns each base call one of three quality scores based on the confidence of the base call. This Q-score reporting model reduces storage space and bandwidth requirements without affecting accuracy orperformance.
For more information on quality scoring, see NovaSeq™ 6000 System Quality Scores and RTA3 Software(Pub.No.770-2017-010).
Document # 1000000019358 v14 Material # 20023471
For Research Use Only. Not for use in diagnostic procedures.63
NovaSeq 6000 Sequencing System Guide

Appendix C Output Folders and FilesSequencing Output Folder Structure 64Sequencing Output Files 65
Sequencing Output Folder StructureThe NVCS generates the output folder name automatically.
Config—Configuration settings for the run.
Logs—Log files describing operational steps, instrument analytics, and RTA3 events.
Data
Intensities
BaseCalls
L00[X]—Base call files (*.cbcl) aggregated in one file per lane, surface, and cycle.
s.locs—The cluster locations file for the run.
InterOp—Binary files used by Sequencing Analysis Viewer.
Recipe—Run-specific recipe file.
Thumbnail Images—Thumbnail images for every 10th tile.
LIMS—The run setup file (*.json), if applicable.
RTA3.cfg
RunInfo.xml
RunParameters.xml
RTAComplete.txt
CopyComplete.txt
SampleSheet.csv—Sample sheet or other attached file, if applicable.
SequenceComplete.txt
Document # 1000000019358 v14 Material # 20023471
For Research Use Only. Not for use in diagnostic procedures.64

Sequencing Output Files
File Type File Description, Location, and Name
Base call files Each cluster analyzed is included in a base call file, aggregated in one file per cycle, lane, andsurface. The aggregated file contains the base call and encoded quality score for every cluster.The base call files are used by BaseSpace Sequence Hub or bcl2fastq2.Data\Intensities\BaseCalls\L001\C1.1L[lane]_[surface].cbcl, for example L001_1.cbcl
Cluster location files For each flow cell, a binary cluster location file contains the XY coordinates for clusters in a tile. Ahexagonal layout that matches the nanowell layout of the flow cell predefines the coordinates.Data\Intensitiess_[lane].locs
Filter files The filter file specifies whether a cluster passed filters. Filter files are generated at cycle 26 using25 cycles of data. For each tile, one filter file is generated.Data\Intensities\BaseCalls\L001s_[lane]_[tile].filter
InterOp files Binary reporting files used for Sequencing Analysis Viewer. InterOp files are updated throughoutthe run.InterOp folder
Run information file Lists the run name, number of cycles in each read, whether the read is an Index Read, and thenumber of swaths and tiles on the flow cell. The run info file is created at the beginning of therun.[Root folder], RunInfo.xml
Thumbnail files When enabled, a thumbnail image for every 10th tile in each color channel (red and green).Thumbnail_Images\L001\C[X.1]—Files are stored in a subfolder for each cycle.s_[lane]_[tile]_[channel].jpg—The thumbnail image includes the tile number.
Document # 1000000019358 v14 Material # 20023471
For Research Use Only. Not for use in diagnostic procedures.65
NovaSeq 6000 Sequencing System Guide
Appendix DWindows SecuritySecurity Configurations 66Password Requirements 66Windows Firewall 66Enhanced Mitigation Experience Toolkit 66Software Restriction Policies 67
Security ConfigurationsThe Windows operating system that runs the instrument control computer includes security configurationsthat prevent unwanted software from running. The information in this appendix describes the configurationsand how to customize them to meet your needs.
Under normal circumstances. changing the default security configurations is not necessary. If it is necessary,make sure that an experienced administrator manages the change after careful planning.
CAUTION
Because these configurations affect system performance and can compromise security, contact IlluminaTechnical Support when it is unclear whether a setting needs editing or the impact is unknown.
Password RequirementsThe following table identifies the required password policies for the control computer. The software promptsfor a password change at the first logon.
Policy Security Setting
Enforce password history 5 passwords remembered
Maximum password age 180 days
Minimum password age 0 days
Minimum password length 10 characters
Password must meet complexity requirements Disabled
Store passwords using reversible encryption Disabled
Table 16 Default Password Policies
Windows FirewallThe Windows firewall protects the control computer by filtering incoming traffic to remove potential threats.The firewall is enabled by default to block all inbound connections. Keep the firewall enabled and allowoutbound connections. For more information on outbound connections, see the NovaSeq Series Site PrepGuide (document # 1000000019360).
Enhanced Mitigation Experience ToolkitThe Enhanced Mitigation Experience Toolkit (EMET) prevents the exploitation of software vulnerabilities andprovides the Certificate Trust feature. The feature detects and stops attacks that use malicious certificates.
Document # 1000000019358 v14 Material # 20023471
For Research Use Only. Not for use in diagnostic procedures.66

Software Restriction PoliciesWindows Software Restriction Policies (SRP) use rules to allow only specified software to run. For theNovaSeq 6000, SRP rules are based on certificates, file names and extensions, and directories.
By default, SRP is turned on to prevent unwanted software from running on the control computer. AnIT representative or system administrator can add and remove rules to customize the security level. If thesystem is added to a domain, the local Group Policy Object (GPO) might automatically modify the rules andturn off SRP.
CAUTION
Turning off the software restriction policy prevents the protection it provides. Changing the rules overrides thedefault protections.
Allowed SRP RulesOn the NovaSeq 6000 Sequencing System, SRP defaults to allowing the following rules.
CertificatesDigitalSystemsIllumina, Inc.NovaSeq
Executable FilesPortmon.exeProcmon.exeProcmon64.exeTcpview.exe
File Extensions*.bin*.cbcl*.cfg*.config*.csv*.dat*.focus*.imf1*.ims*.jpg*.json*.lnk*.locs*.log*.manifest*.sdf*.tif*.txt*.xml
Directories%HKEY_LOCAL_MACHINE\SOFTWARE\Microsoft\Windows\CurrentVersion\ProgramFilesDir%%HKEY_LOCAL_MACHINE\SOFTWARE\Microsoft\Windows NT\CurrentVersion\SystemRoot%C:\CrashDumps\*C:\Illumina\*C:\Illumina Maintenance Logs\*
Document # 1000000019358 v14 Material # 20023471
For Research Use Only. Not for use in diagnostic procedures.67
NovaSeq 6000 Sequencing System Guide
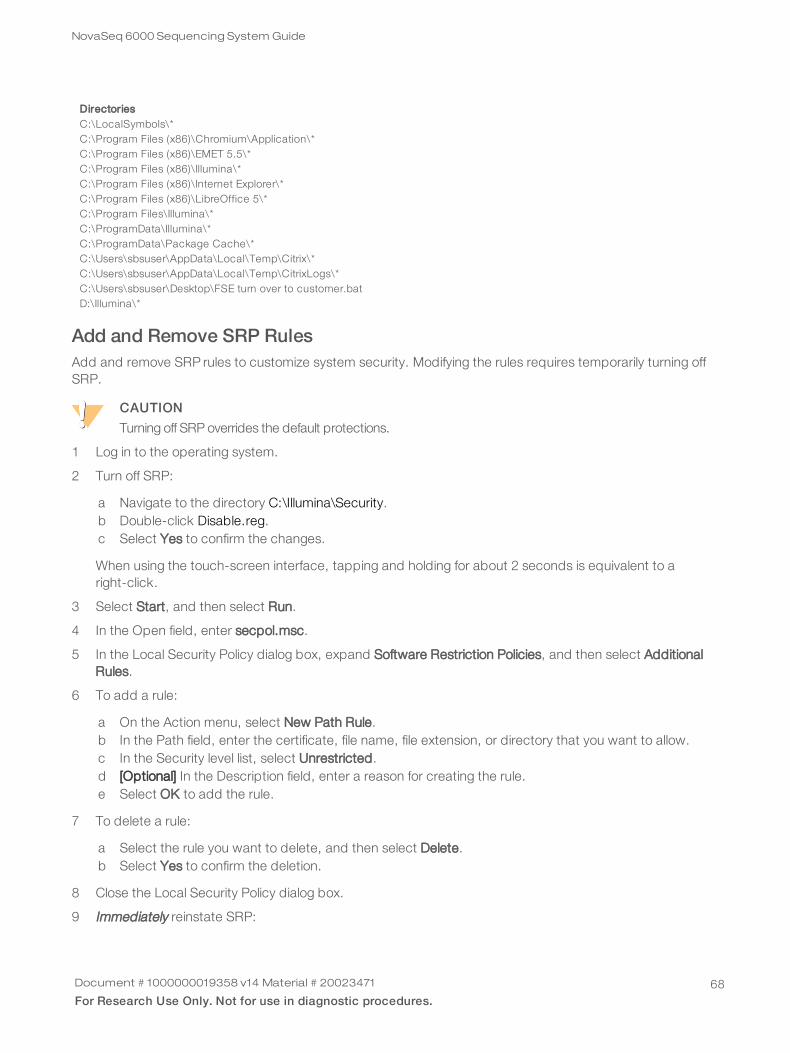
DirectoriesC:\LocalSymbols\*C:\Program Files (x86)\Chromium\Application\*C:\Program Files (x86)\EMET 5.5\*C:\Program Files (x86)\Illumina\*C:\Program Files (x86)\Internet Explorer\*C:\Program Files (x86)\LibreOffice 5\*C:\Program Files\Illumina\*C:\ProgramData\Illumina\*C:\ProgramData\Package Cache\*C:\Users\sbsuser\AppData\Local\Temp\Citrix\*C:\Users\sbsuser\AppData\Local\Temp\CitrixLogs\*C:\Users\sbsuser\Desktop\FSE turn over to customer.batD:\Illumina\*
Add and Remove SRP RulesAdd and remove SRP rules to customize system security. Modifying the rules requires temporarily turning offSRP.
CAUTION
Turning off SRP overrides the default protections.
1 Log in to the operating system.
2 Turn off SRP:
a Navigate to the directory C:\Illumina\Security.b Double-click Disable.reg.c Select Yes to confirm the changes.
When using the touch-screen interface, tapping and holding for about 2 seconds is equivalent to aright-click.
3 Select Start, and then select Run.
4 In the Open field, enter secpol.msc.
5 In the Local Security Policy dialog box, expand Software Restriction Policies, and then select AdditionalRules.
6 To add a rule:
a On the Action menu, select New Path Rule.b In the Path field, enter the certificate, file name, file extension, or directory that you want to allow.c In the Security level list, select Unrestricted.d [Optional] In the Description field, enter a reason for creating the rule.e Select OK to add the rule.
7 To delete a rule:
a Select the rule you want to delete, and then select Delete.b Select Yes to confirm the deletion.
8 Close the Local Security Policy dialog box.
9 Immediately reinstate SRP:
Document # 1000000019358 v14 Material # 20023471
For Research Use Only. Not for use in diagnostic procedures.68
NovaSeq 6000 Sequencing System Guide

a Navigate to the directory C:\Illumina\Security.b Double-click Enable.reg.
10 If SRP rules were modified for the first time, log off and then log on again for the rules to take effect.
Document # 1000000019358 v14 Material # 20023471
For Research Use Only. Not for use in diagnostic procedures.69
NovaSeq 6000 Sequencing System Guide

Index
%
%PF 62
A
administrator account 68alignment failure 55amplification 2analysis 23analysis methods 3analysis settings 19applications 1automated checks 55
B
base call files 59, 65BaseSpace Enterprise 23BaseSpace Sequence Hub 1, 23
connecting and disconnecting 43support 3
batch code 16bcl2fastq2 23, 59blinking icons 8bubbles 37buffer cartridge 42, 52buffer compartment 42
C
cameras 1, 5, 60cap holders 28, 33cartridges
stacking 14catalog numbers 10
user-supplied consumables 24CBCL files 3, 47, 62CE 8, 59Certificate Trust 66chastity filter 62chiller 7clamps, flow cell 5cluster cartridge 11cluster intensities 61cluster locations 59, 65clustering duration 46clusters passing filter 46compartments 5
Compute Engine 8, 47, 59consumables
laboratory-grade water 26maintenance washes 50packaging 16unloading 48, 53
control computer 66control software 8cross-contamination 7, 48custom primers 2, 14, 44customer support 74cycle numbers 46
D
data quality 62data transfer 8, 47default settings 19, 23diagnostics 5disk space 8, 55dock 35, 40
components 15documentation 2, 74domain, BaseSpace Sequence Hub 23DPX reagents, storing 15DPX/JPX reagents, compatibility 15drip tray 56durations
automatic post-run wash 48cluster generation 46maintenance wash 50sequencing run 46
E
EMET 66error logs 59errors 8, 55
probability 62-63ExAmp Master Mix 2, 37ExAmp reagents 11, 36
mixing methods 3storing 15thawing 35
expiration dates 16
F
FASTQ conversion 23, 59
Document # 1000000019358 v14 Material # 20023471
For Research Use Only. Not for use in diagnostic procedures.70

filesrun-specific 55
filter files 59, 65filtering clusters 62firewalls 66flow cell holder 40flow cell stage 5, 40flow cells
cleaning 35, 40labeling 10scratches 35, 40specifications 10storing 11, 35
fluidics problems 56fluidics system 7, 50formamide disposal 14, 48four-lane flow cells 12freezer specifications 26
G
gaskets 12, 35, 40gaskets, overflowing 37gloves, changing 28, 33, 53GPO 67green channel 62Group Policy Object 67
H
hard drive 8, 19-20, 47hazardous chemicals 7, 16health data 19-20help 55
documentation 2help, technical 74hosting locations 23
I
icons 8, 16icons, blinking 8Illumina Proactive monitoring service 19-20images 59imaging 2, 12, 59-60inbound connections 66Index Reads 44individually addressable lanes 3, 15initialization 18input wells 15
instrument performance data 19-20instrument relocation 58intensity values 61InterOp files 8, 55, 59, 65
J
JPX reagent, storing 15
K
kit components 25kit configurations 10
L
labels, kit components 10laboratory-grade water guidelines 26lane numbering 15, 37lanes 12, 60leaks 56libraries
storing 57library tubes 14, 56
incartridge storage 57storing 11, 57
light bar 5, 58LIMS 1, 19LIMS setup 20liquids compartment 13loading concentration 2loading volume 2log files 55, 59lot numbers 16
M
maintenance washesconsumables 24, 50wash solutions 50
maintenance, preventive 50manufacturer 16modes 10moving instruments 58
N
nanowells 61NaOCl 48, 50no calls 61-62
Document # 1000000019358 v14 Material # 20023471
For Research Use Only. Not for use in diagnostic procedures.71
NovaSeq 6000 Sequencing System Guide

NovaSeq Xp dock 35, 40NovaSeq Xp manifold wells, numbering 15NovaSeq Xp manifolds 35
storing 15NovaSeq Xp workflow 22NovaSeq Xp, defined 3nucleotides 62number of cycles 44numbering, wells 15
O
online training 2operating system 18, 66optical alignment target 5, 40optics 5outbound connections 66output folder 19-20output folder name 64overflow 28, 33, 56
P
part numbers 16passing filter (PF) 62password policies 66patterned flow cells 1, 12pausing runs 47phasing and prephasing 61PhiX
alignment 59catalog number 24
Phred algorithm 63pipettes 26plot colors 46position #30 48, 52post-run activities 48power 18powering down 58pre-run checks 55preventive maintenance 50privileges, administrator account 68Process Management 47
Q
Q-scores 46, 62-63quality tables 63
R
Read 1 57reads, number of 10reagent cartridges
labeling 10, 13preparing 27, 32storing 11, 56unloading 42
reagent chiller 7Real-Time Analysis 1, 8red channel 62refrigerator specifications 26registration failures 61rehybridization 20restarting after shutdown 58resuming runs 57RFID 11, 55run duration 46run modes 19run parameters, LIMS 20run settings 19run setup folder 19-20RunInfo.xml 55, 65runs
deleting 8metrics 46, 59monitoring 23, 43pausing 47resuming 57staggering 47
S
safety data sheets 7sample sheet format 23sample sheets 23, 43-44sample tracking 14saving library tubes 57saving reagent cartridges 56scanning 2scratches, flow cells 35, 40security 67
customizing 68security settings 66sensors 5, 53, 55Sequencing Analysis Viewer 59, 61sequencing consumables 24sequencing cycles 46
Document # 1000000019358 v14 Material # 20023471
For Research Use Only. Not for use in diagnostic procedures.72
NovaSeq 6000 Sequencing System Guide

sequencing runsdeleting 47
Sequencing screen 46sequencing steps 2settings, security 66single-read runs 44sipper positions 48, 53site prep 2, 66sodium hypochlorite 48, 50software suite 8specifications 10SRP defaults 67stacking cartridges 14Standard workflow 22Standard, defined 3status bar 5, 58storage conditions 16storing data 43storing reagent kits 11, 15suppliers 24support bulletins 55support pages 55surface numbering 60swaths 2, 12, 60system connectivity 55
T
technical assistance 74template generation 61thaw racks 27, 32third-party LIMS 20thumbnails 65tile numbering 60tiles 2, 12, 59turning on 18Tween 20 50two-channel sequencing 2, 62two-lane flow cells 12
U
Universal Copy Service 8, 47unloading reagent cartridges 42USB ports 5used reagent disposal 7used reagents 7, 28, 33, 42
W
warnings 8wash cartridges 50, 52wash flow cell 50wash solution 13washes
duration 48, 50frequency 50
water baths 27, 32website, support 55well numbering 37white papers 63whitelist, SRP 67Windows
security 67wire racks 27, 32workflow 22
Y
yield 46
Document # 1000000019358 v14 Material # 20023471
For Research Use Only. Not for use in diagnostic procedures.73
NovaSeq 6000 Sequencing System Guide

Technical AssistanceFor technical assistance, contact Illumina TechnicalSupport.Website: www.illumina.comEmail: [email protected]
Illumina Customer Support Telephone Numbers
Region Toll Free Regional
North America +1.800.809.4566
Australia +1.800.775.688
Austria +43 800006249 +43 19286540
Belgium +32 80077160 +32 34002973
China 400.066.5835
Denmark +45 80820183 +45 89871156
Finland +358 800918363 +358 974790110
France +33 805102193 +33 170770446
Germany +49 8001014940 +49 8938035677
Hong Kong, China 800960230
Ireland +353 1800936608 +353 016950506
Italy +39 800985513 +39 236003759
Japan 0800.111.5011
Netherlands +31 8000222493 +31 207132960
New Zealand 0800.451.650
Norway +47 800 16836 +47 21939693
Singapore +1.800.579.2745
South Korea +82 80 234 5300
Spain +34 911899417 +34 800300143
Sweden +46 850619671 +46 200883979
Switzerland +41 565800000 +41 800200442
Taiwan, China 00806651752
United Kingdom +44 8000126019 +44 2073057197
Other countries +44.1799.534000
Safety data sheets (SDSs)—Available on the Illumina website at support.illumina.com/sds.html.
Product documentation—Available for download from support.illumina.com.
Document # 1000000019358 v14 Material # 20023471
For Research Use Only. Not for use in diagnostic procedures.74

Il lumina
5200 Illumina Way
San Diego, California 92122 U.S.A.
+1.800.809.ILMN (4566)
+1.858.202.4566 (outside North America)
www.illumina.com
For Research Use Only. Not for use in diagnostic procedures.
© 2020 Illumina, Inc. All rights reserved.
Document # 1000000019358 v14
Material # 20023471


![[XLS]mahatmaphulecorporation.commahatmaphulecorporation.com/wp-content/uploads/2017/04/... · Web view1 2 3 4 5 6 7 8 9 10 11 12 13 14 15 1 6000 6000 12000 6000 5/11/2000 2 6000 6000](https://static.fdocuments.us/doc/165x107/5ab6cc437f8b9a6e1c8e217a/xlsmah-view1-2-3-4-5-6-7-8-9-10-11-12-13-14-15-1-6000-6000-12000-6000-5112000.jpg)