Notes at Using IJ Primer PR-100 - Mimaki Global · Notes at Using IJ Primer PR-100 This document...
6
Notes at Using IJ Primer PR-100 This document explains notes when applying primer and the setting method. By using primer, you can take better printing result. Please read and fully understand this document before using primer. IJ Primer PR-100 possibilities Items required for applying primer Printer UJF-3042FX, JFX series Ink LH-100 ink, LF-140 ink Ink set C, M, Y, K, W (or Cl), P *1 *1:C=C=Cyan, M=Magenta, Y=Yellow, K=Black, W=White, Cl=Clear, P=Primer RIP software RasterLinkPro5IP/SG Ver2.41 and later • The following results have been achieved by Mimaki and are not guaranteed. Depending on the material type, ink adhesion becomes not enough. Please test your intended materials beforehand. Primer With/Without LF-140 LH-100 Primer With/Without LF-140 LH-100 Media Without With Without With Media Without With Without With Simple-adhesion-pro- cessed PET Good Good SUS Bad Good Bad Bad Aluminum Bad Good Bad Good PC Good Good Brass Bad OK Bad OK Soft PVC Good Good Copper Bad Good Bad Good Tarpaulin Good Good Epoxy Bad Good Bad OK Acrylic Bad Good Bad Good Nylon Bad Good Bad OK Untreated PET Bad Good Bad Good PP / PE Bad Bad Bad Bad Glass Bad Good Bad Good
Transcript of Notes at Using IJ Primer PR-100 - Mimaki Global · Notes at Using IJ Primer PR-100 This document...
Notes at Using IJ Primer PR-100This document explains notes when applying primer and the setting method.By using primer, you can take better printing result.Please read and fully understand this document before using primer.
IJ Primer PR-100 possibilities
Items required for applying primer
Printer UJF-3042FX, JFX series
Ink LH-100 ink, LF-140 ink
Ink set C, M, Y, K, W (or Cl), P *1
*1:C=C=Cyan, M=Magenta, Y=Yellow, K=Black, W=White, Cl=Clear, P=Primer
RIP software RasterLinkPro5IP/SG Ver2.41 and later
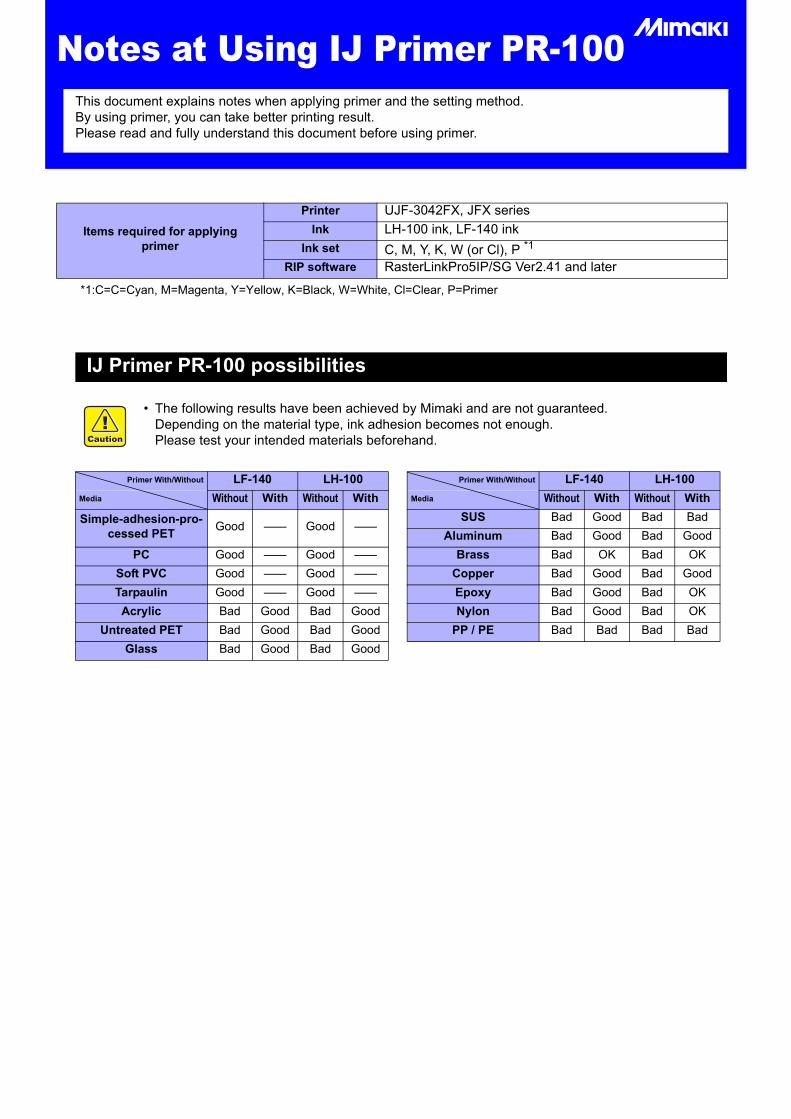
• The following results have been achieved by Mimaki and are not guaranteed. Depending on the material type, ink adhesion becomes not enough. Please test your intended materials beforehand.
Primer With/Without LF-140 LH-100 Primer With/Without LF-140 LH-100
Media Without With Without With Media Without With Without With
Simple-adhesion-pro-cessed PET
Good Good SUS Bad Good Bad Bad
Aluminum Bad Good Bad Good
PC Good Good Brass Bad OK Bad OK
Soft PVC Good Good Copper Bad Good Bad Good
Tarpaulin Good Good Epoxy Bad Good Bad OK
Acrylic Bad Good Bad Good Nylon Bad Good Bad OK
Untreated PET Bad Good Bad Good PP / PE Bad Bad Bad Bad
Glass Bad Good Bad Good

- 2 -
Printing method on Raster Link Pro 5
Take the method when printing primer white color in this order as anexample.
1. Prepare an image for Primer separately from the Image for color.
• Create the image for primer along the shape of the image for color.• Create the image for primer with a single color and even density.
2. Make RasterLinkPro5 read the image for color and the image for primer in.
3. Open the Job Editor of the image for primer.
• Perform setting of the image for primer.
4. Open [Print Condition]-[Print Mode] tab.
• Set the printing conditions of the image for primer.
5. Open [Print Condition]-[UV Mode] tab.
• Set UV Illumination of primer.
Image for color Image for primer
(2) For UJF-3042FX, set to 24pass and more, and for JFX series, set to 8pass and more.
(1) Select a colorset of primer (whose name has “P” in it) depending on the printer status.
(1) Select User Definition.
(2) For UJF-3042FX, set to 120%, and for JFX series, set to 100%.
- 3 -
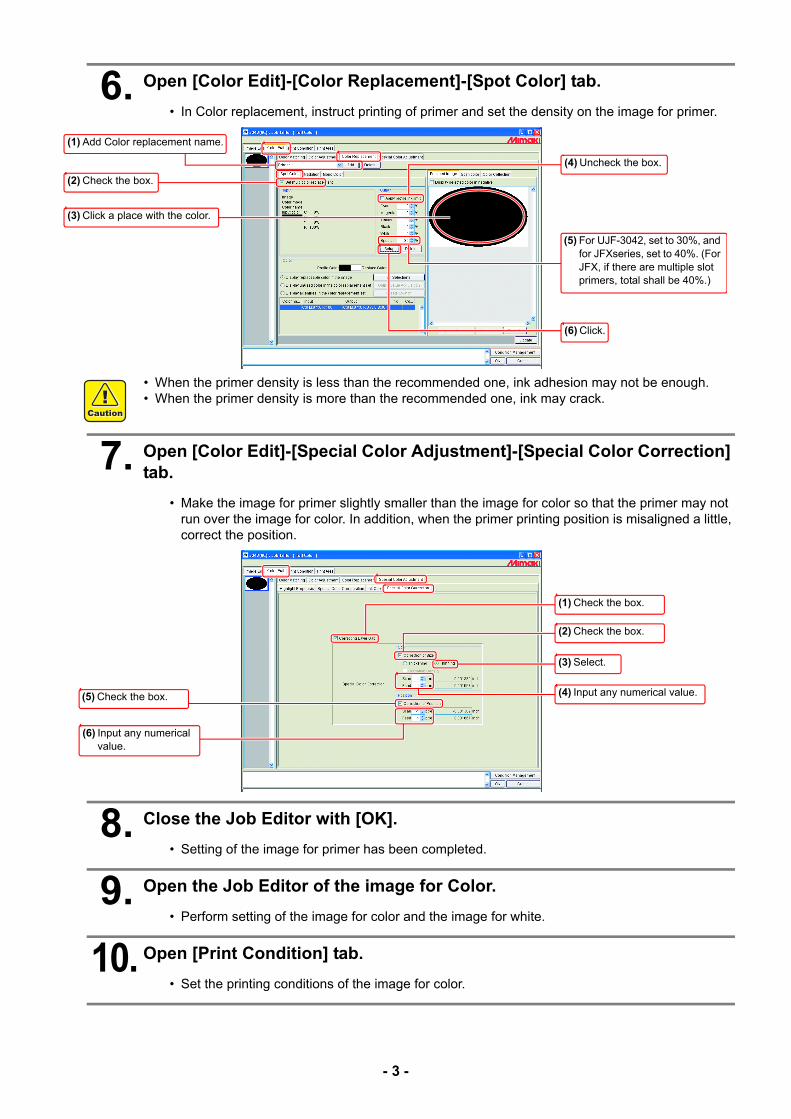
6. Open [Color Edit]-[Color Replacement]-[Spot Color] tab.
• In Color replacement, instruct printing of primer and set the density on the image for primer.
7. Open [Color Edit]-[Special Color Adjustment]-[Special Color Correction] tab.
• Make the image for primer slightly smaller than the image for color so that the primer may not run over the image for color. In addition, when the primer printing position is misaligned a little, correct the position.
8. Close the Job Editor with [OK].
• Setting of the image for primer has been completed.
9. Open the Job Editor of the image for Color.
• Perform setting of the image for color and the image for white.
10. Open [Print Condition] tab.
• Set the printing conditions of the image for color.
• When the primer density is less than the recommended one, ink adhesion may not be enough.• When the primer density is more than the recommended one, ink may crack.
(2) Check the box.
(1) Add Color replacement name.
(6) Click.
(5) For UJF-3042, set to 30%, and for JFXseries, set to 40%. (For JFX, if there are multiple slot primers, total shall be 40%.)
(4) Uncheck the box.
(3) Click a place with the color.
(1) Check the box.
(2) Check the box.
(3) Select.
(5) Check the box.
(6) Input any numerical value.
(4) Input any numerical value.

- 4 -
11. Set [Color Edit]-[Special Color Adjustment]-[Special Color Composition] tab.
• Perform setting to create the image for white from the image for color automatically.
12. Close the Job Editor with [OK].
13. After specifying printing of the image for primer, specify printing of the image for color.
(3) Set White to 100% and other slot to 0%.
(1) Check the box.(4) Select.
(2) Select.
(1) First print the image for primer.
(2) Then, print the image for color.

- 5 -

D202302-10-16112011© MIMAKI ENGINEERING CO., LTD.2011 NH