NorthStar Corn Stove Model # CS550 (Item #173780): A ...custom.buyitsellit.com/18938/Guides/Corn...
16
1 Proven Performance MSTOVEF NorthStar Corn Stove Model # CS550 (Item #173780): A freestanding room heater that burns shelled feed corn. Manufactured by the skilled workforce at: Northern Tool & Equipment Mfg. 2050 Airtech Rd. Faribault, MN 55021 NorthStar Parts and Service 1-800-270-0810 Quick Facts : Installation: Before installing your NorthStar Corn Stove, please read and follow all instructions contained in this manual. A fire hazard may result if installed incorrectly. Consult local building and fire codes for additional requirements. Removal or reinstallation costs are not covered by this product’s warranty. Before cutting holes in your wall, make sure the stove is placed where you want it and check for electrical wires and plumbing pipes. Cut holes between studs. Use a stud finder to check for studs. Use a long 1/4 drill bit to drill a center point through both walls. Use this center point to make sure the inside and outside wall holes line up. Buying Corn: Use cleaned shelled feed corn with 14% or less moisture content only. Buy corn in bulk or bagged from feed stores, elevators or direct from a farmer. Corn with 11-12% moisture content works best. Mix 1 to 2 handfuls of oyster shells (North Star #PD366991 or available at feed stores) with each hopperful of corn. Starting: 1.) Fill hopper with corn. 2.) Set damper to first notch (see page 7). 3.) Rotate Heat Setting to #1. 4.) Place Mode Selector to Start. 5.) Place crumbled fire starter blocks in corn pot, light with match and close the door. 6.) Use Feed Control to manually prime the corn into the fire pot. 7.) When the Corn Stove warms up, the room blower and automatic corn feed will start. After this point place Mode Selector switch to Run. 8.) Rotate Heat Setting to desired setting. 9.) Adjust damper to achieve cleanest burn. 10.) The first time the stove is operated, oils will burn out of the fire chamber and create an odor and possibly some smoke. This will stop after the first 15 minutes of operation. Stopping: 1.) Rotate Heat Setting to OFF position. Maintenance: Unplug the Corn Stove before servicing. Oil blower motors annually. 5-10 drops SAE 20 non-detergent oil. Check/Clean exhaust piping weekly. Clean combustion chamber weekly. SAVE THESE INSTRUCTIONS ™
-
Upload
hoanghuong -
Category
Documents
-
view
237 -
download
1
Transcript of NorthStar Corn Stove Model # CS550 (Item #173780): A ...custom.buyitsellit.com/18938/Guides/Corn...
1
Proven Per formance
MSTOVEF
NorthStar Corn Stove Model # CS550 (Item #173780): A freestanding room heater that burns shelled feed corn.
Manufactured by the skilled workforce at: Northern Tool & Equipment Mfg.
2050 Airtech Rd. Faribault, MN 55021
NorthStar Parts and Service 1-800-270-0810 Quick Facts: Installation: Before installing your NorthStar Corn Stove, please read and follow all instructions contained in this manual.
A fire hazard may result if installed incorrectly. Consult local building and fire codes for additional requirements. Removal or reinstallation costs are not covered by this product’s warranty.
Before cutting holes in your wall, make sure the stove is placed where you want it and check for electrical wires and plumbing pipes. Cut holes between studs. Use a stud finder to check for studs. Use a long 1/4 drill bit to drill a center point through both walls. Use this center point to make sure the inside and outside wall holes line up.
Buying Corn: Use cleaned shelled feed corn with 14% or less moisture content only. Buy corn in bulk or bagged from
feed stores, elevators or direct from a farmer. Corn with 11-12% moisture content works best. Mix 1 to 2 handfuls of oyster shells (North Star #PD366991 or available at feed stores) with each
hopperful of corn. Starting: 1.) Fill hopper with corn. 2.) Set damper to first notch (see page 7). 3.) Rotate Heat Setting to #1. 4.) Place Mode Selector to Start. 5.) Place crumbled fire starter blocks in corn pot, light with match and close the door. 6.) Use Feed Control to manually prime the corn into the fire pot. 7.) When the Corn Stove warms up, the room blower and automatic corn feed will start. After this point
place Mode Selector switch to Run. 8.) Rotate Heat Setting to desired setting. 9.) Adjust damper to achieve cleanest burn. 10.) The first time the stove is operated, oils will burn out of the fire chamber and create an odor and
possibly some smoke. This will stop after the first 15 minutes of operation. Stopping: 1.) Rotate Heat Setting to OFF position. Maintenance: Unplug the Corn Stove before servicing. Oil blower motors annually. 5-10 drops SAE 20 non-detergent oil. Check/Clean exhaust piping weekly. Clean combustion chamber weekly.
SAVE THESE INSTRUCTIONS
™
2
Table of Contents
Quick Facts 1 Operation Instructions 7 Unpacking the Stove 2 Maintenance Instructions 8 Buying Corn 3 Troubleshooting 9-10 Oyster Shells 3 Parts Breakdowns 11-14Installation Instructions 4-6 Electrical schematic 15 Additional Requirements for Mobile Home Installations
6 Thermostat Installation 16
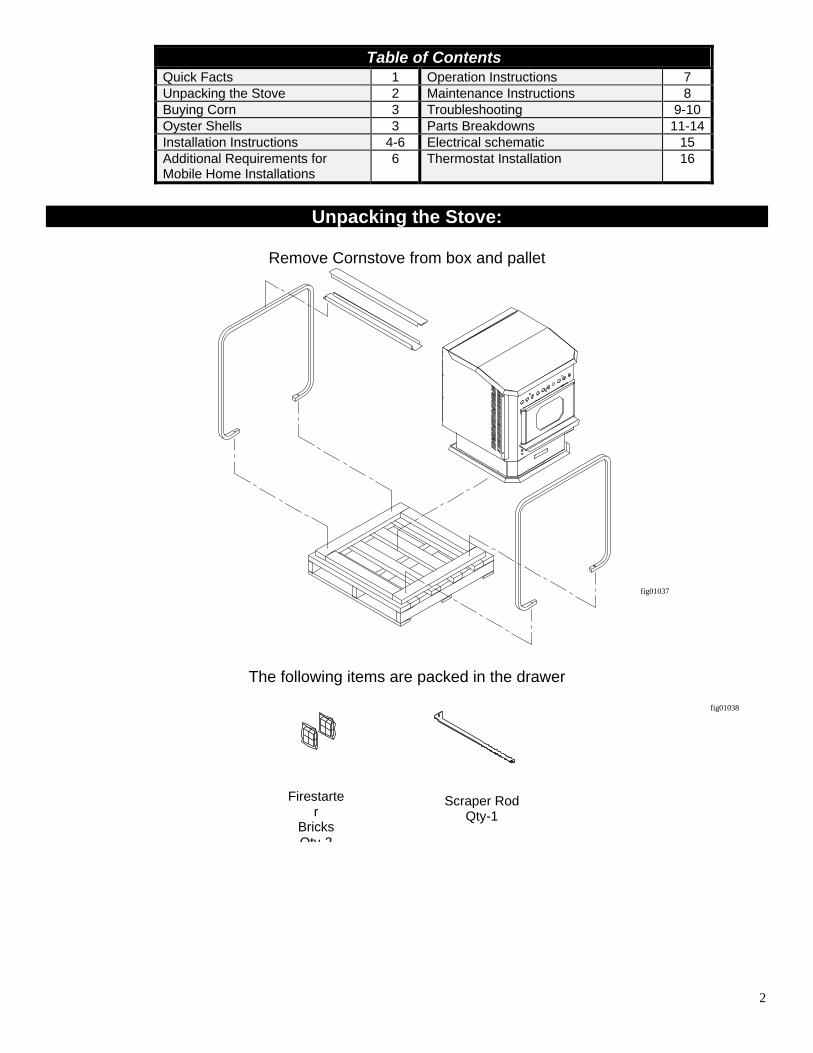
Unpacking the Stove:
Remove Cornstove from box and pallet
The following items are packed in the drawer
Firestarter
Bricks Qty 2
Scraper Rod Qty-1
fig01037
fig01038
3
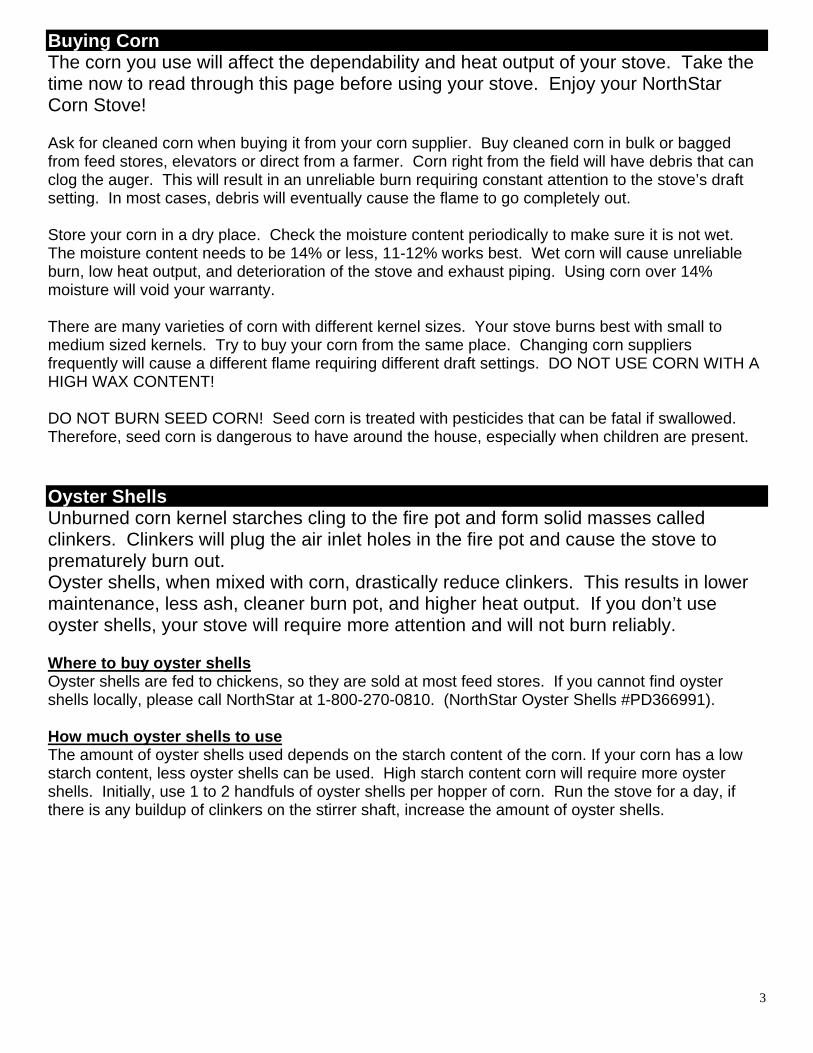
Buying Corn The corn you use will affect the dependability and heat output of your stove. Take the time now to read through this page before using your stove. Enjoy your NorthStar Corn Stove! Ask for cleaned corn when buying it from your corn supplier. Buy cleaned corn in bulk or bagged from feed stores, elevators or direct from a farmer. Corn right from the field will have debris that can clog the auger. This will result in an unreliable burn requiring constant attention to the stove’s draft setting. In most cases, debris will eventually cause the flame to go completely out. Store your corn in a dry place. Check the moisture content periodically to make sure it is not wet. The moisture content needs to be 14% or less, 11-12% works best. Wet corn will cause unreliable burn, low heat output, and deterioration of the stove and exhaust piping. Using corn over 14% moisture will void your warranty. There are many varieties of corn with different kernel sizes. Your stove burns best with small to medium sized kernels. Try to buy your corn from the same place. Changing corn suppliers frequently will cause a different flame requiring different draft settings. DO NOT USE CORN WITH A HIGH WAX CONTENT! DO NOT BURN SEED CORN! Seed corn is treated with pesticides that can be fatal if swallowed. Therefore, seed corn is dangerous to have around the house, especially when children are present. Oyster Shells Unburned corn kernel starches cling to the fire pot and form solid masses called clinkers. Clinkers will plug the air inlet holes in the fire pot and cause the stove to prematurely burn out. Oyster shells, when mixed with corn, drastically reduce clinkers. This results in lower maintenance, less ash, cleaner burn pot, and higher heat output. If you don’t use oyster shells, your stove will require more attention and will not burn reliably. Where to buy oyster shells Oyster shells are fed to chickens, so they are sold at most feed stores. If you cannot find oyster shells locally, please call NorthStar at 1-800-270-0810. (NorthStar Oyster Shells #PD366991). How much oyster shells to use The amount of oyster shells used depends on the starch content of the corn. If your corn has a low starch content, less oyster shells can be used. High starch content corn will require more oyster shells. Initially, use 1 to 2 handfuls of oyster shells per hopper of corn. Run the stove for a day, if there is any buildup of clinkers on the stirrer shaft, increase the amount of oyster shells.
4
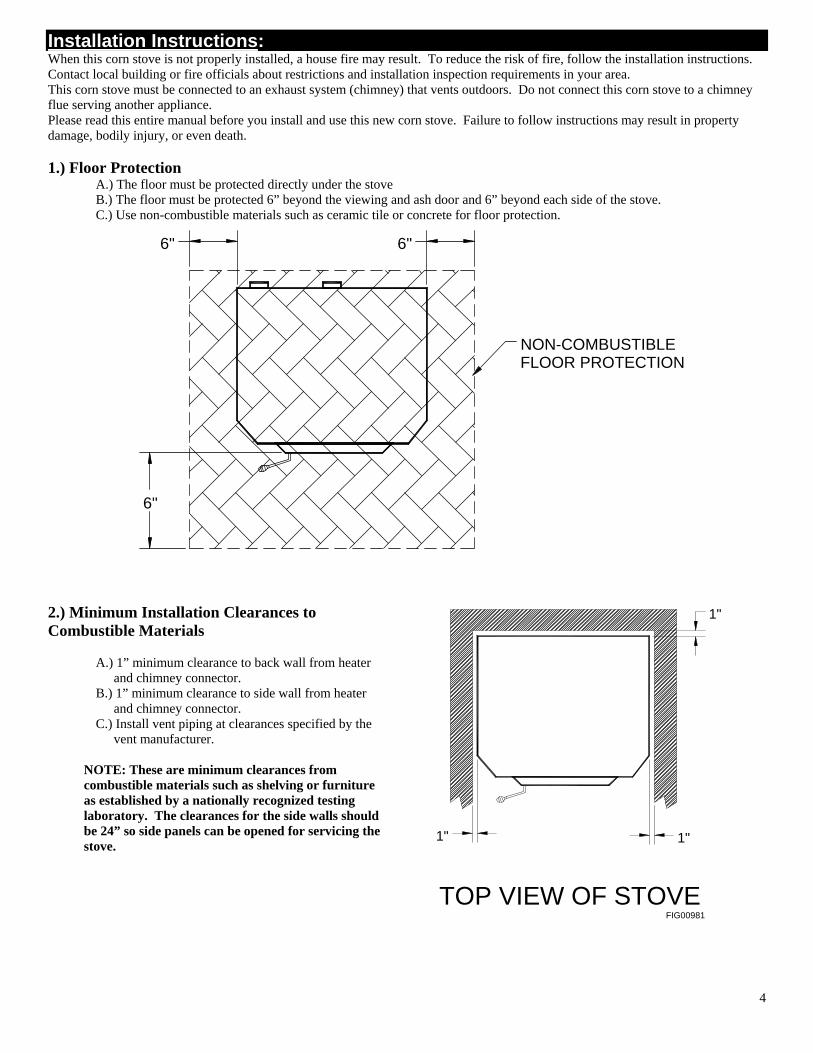
Installation Instructions: When this corn stove is not properly installed, a house fire may result. To reduce the risk of fire, follow the installation instructions. Contact local building or fire officials about restrictions and installation inspection requirements in your area. This corn stove must be connected to an exhaust system (chimney) that vents outdoors. Do not connect this corn stove to a chimney flue serving another appliance. Please read this entire manual before you install and use this new corn stove. Failure to follow instructions may result in property damage, bodily injury, or even death. 1.) Floor Protection
A.) The floor must be protected directly under the stove B.) The floor must be protected 6” beyond the viewing and ash door and 6” beyond each side of the stove. C.) Use non-combustible materials such as ceramic tile or concrete for floor protection.
6"6"
6"
NON-COMBUSTIBLEFLOOR PROTECTION
2.) Minimum Installation Clearances to Combustible Materials
A.) 1” minimum clearance to back wall from heater and chimney connector.
B.) 1” minimum clearance to side wall from heater and chimney connector.
C.) Install vent piping at clearances specified by the vent manufacturer.
NOTE: These are minimum clearances from combustible materials such as shelving or furniture as established by a nationally recognized testing laboratory. The clearances for the side walls should be 24” so side panels can be opened for servicing the stove.
FIG00981TOP VIEW OF STOVE
1"1"
1"
5
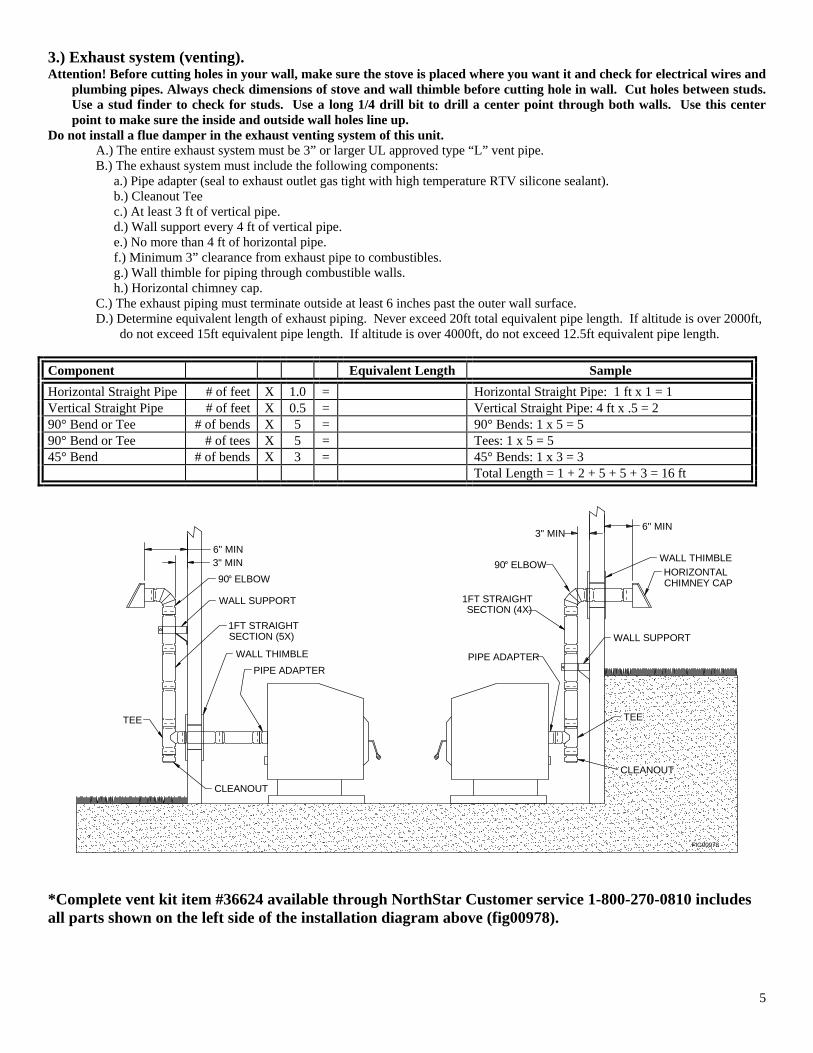
3.) Exhaust system (venting). Attention! Before cutting holes in your wall, make sure the stove is placed where you want it and check for electrical wires and
plumbing pipes. Always check dimensions of stove and wall thimble before cutting hole in wall. Cut holes between studs. Use a stud finder to check for studs. Use a long 1/4 drill bit to drill a center point through both walls. Use this center point to make sure the inside and outside wall holes line up.
Do not install a flue damper in the exhaust venting system of this unit. A.) The entire exhaust system must be 3” or larger UL approved type “L” vent pipe. B.) The exhaust system must include the following components:
a.) Pipe adapter (seal to exhaust outlet gas tight with high temperature RTV silicone sealant). b.) Cleanout Tee c.) At least 3 ft of vertical pipe. d.) Wall support every 4 ft of vertical pipe. e.) No more than 4 ft of horizontal pipe. f.) Minimum 3” clearance from exhaust pipe to combustibles. g.) Wall thimble for piping through combustible walls. h.) Horizontal chimney cap.
C.) The exhaust piping must terminate outside at least 6 inches past the outer wall surface. D.) Determine equivalent length of exhaust piping. Never exceed 20ft total equivalent pipe length. If altitude is over 2000ft,
do not exceed 15ft equivalent pipe length. If altitude is over 4000ft, do not exceed 12.5ft equivalent pipe length. Component Equivalent Length Sample Horizontal Straight Pipe # of feet X 1.0 = Horizontal Straight Pipe: 1 ft x 1 = 1 Vertical Straight Pipe # of feet X 0.5 = Vertical Straight Pipe: 4 ft x .5 = 2 90° Bend or Tee # of bends X 5 = 90° Bends: 1 x 5 = 5 90° Bend or Tee # of tees X 5 = Tees: 1 x 5 = 5 45° Bend # of bends X 3 = 45° Bends: 1 x 3 = 3 Total Length = 1 + 2 + 5 + 5 + 3 = 16 ft
6" MIN
6" MIN
HORIZONTALCHIMNEY CAP
90° ELBOW
1FT STRAIGHTSECTION (4X)
WALL SUPPORT
TEE
CLEANOUT
90° ELBOW
WALL SUPPORT
1FT STRAIGHTSECTION (5X)
WALL THIMBLE
WALL THIMBLE PIPE ADAPTERPIPE ADAPTER
TEE
CLEANOUT
3" MIN
3" MIN
FIG00978
*Complete vent kit item #36624 available through NorthStar Customer service 1-800-270-0810 includes all parts shown on the left side of the installation diagram above (fig00978).
6
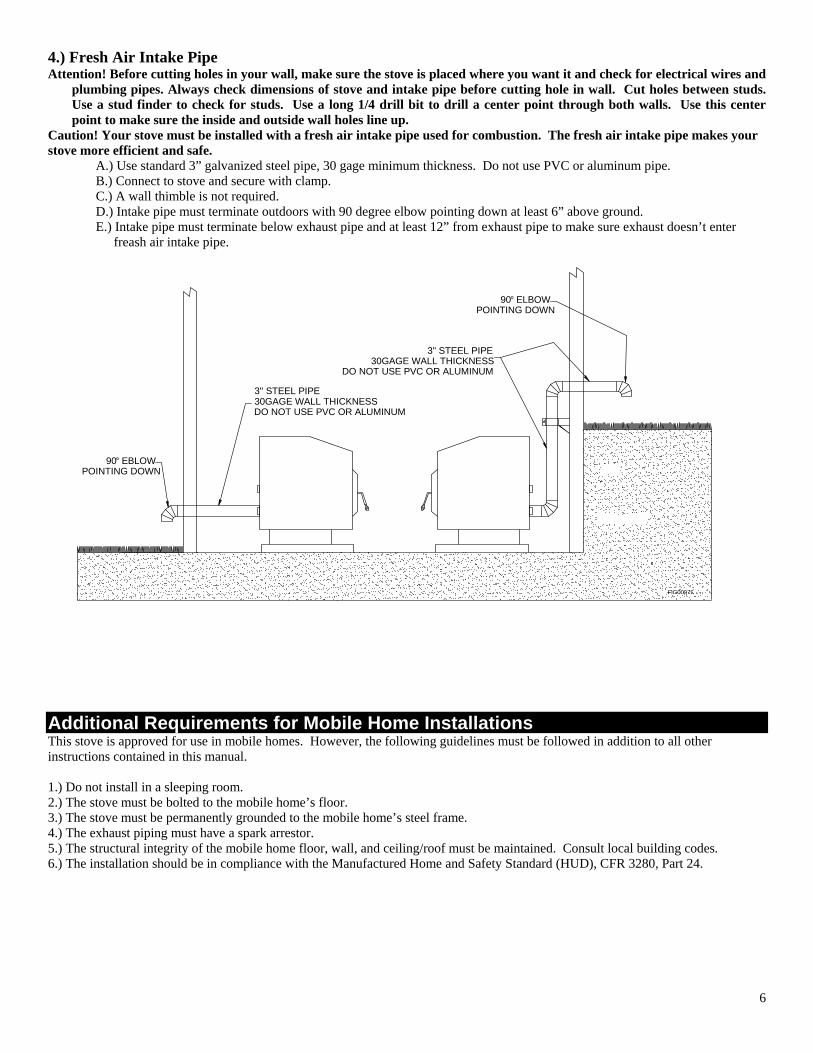
4.) Fresh Air Intake Pipe Attention! Before cutting holes in your wall, make sure the stove is placed where you want it and check for electrical wires and
plumbing pipes. Always check dimensions of stove and intake pipe before cutting hole in wall. Cut holes between studs. Use a stud finder to check for studs. Use a long 1/4 drill bit to drill a center point through both walls. Use this center point to make sure the inside and outside wall holes line up.
Caution! Your stove must be installed with a fresh air intake pipe used for combustion. The fresh air intake pipe makes your stove more efficient and safe.
A.) Use standard 3” galvanized steel pipe, 30 gage minimum thickness. Do not use PVC or aluminum pipe. B.) Connect to stove and secure with clamp. C.) A wall thimble is not required. D.) Intake pipe must terminate outdoors with 90 degree elbow pointing down at least 6” above ground. E.) Intake pipe must terminate below exhaust pipe and at least 12” from exhaust pipe to make sure exhaust doesn’t enter
freash air intake pipe.
FIG00979
3" STEEL PIPE30GAGE WALL THICKNESSDO NOT USE PVC OR ALUMINUM
3" STEEL PIPE30GAGE WALL THICKNESS
DO NOT USE PVC OR ALUMINUM
90° ELBOWPOINTING DOWN
90° EBLOWPOINTING DOWN
Additional Requirements for Mobile Home Installations This stove is approved for use in mobile homes. However, the following guidelines must be followed in addition to all other instructions contained in this manual. 1.) Do not install in a sleeping room. 2.) The stove must be bolted to the mobile home’s floor. 3.) The stove must be permanently grounded to the mobile home’s steel frame. 4.) The exhaust piping must have a spark arrestor. 5.) The structural integrity of the mobile home floor, wall, and ceiling/roof must be maintained. Consult local building codes. 6.) The installation should be in compliance with the Manufactured Home and Safety Standard (HUD), CFR 3280, Part 24.
7
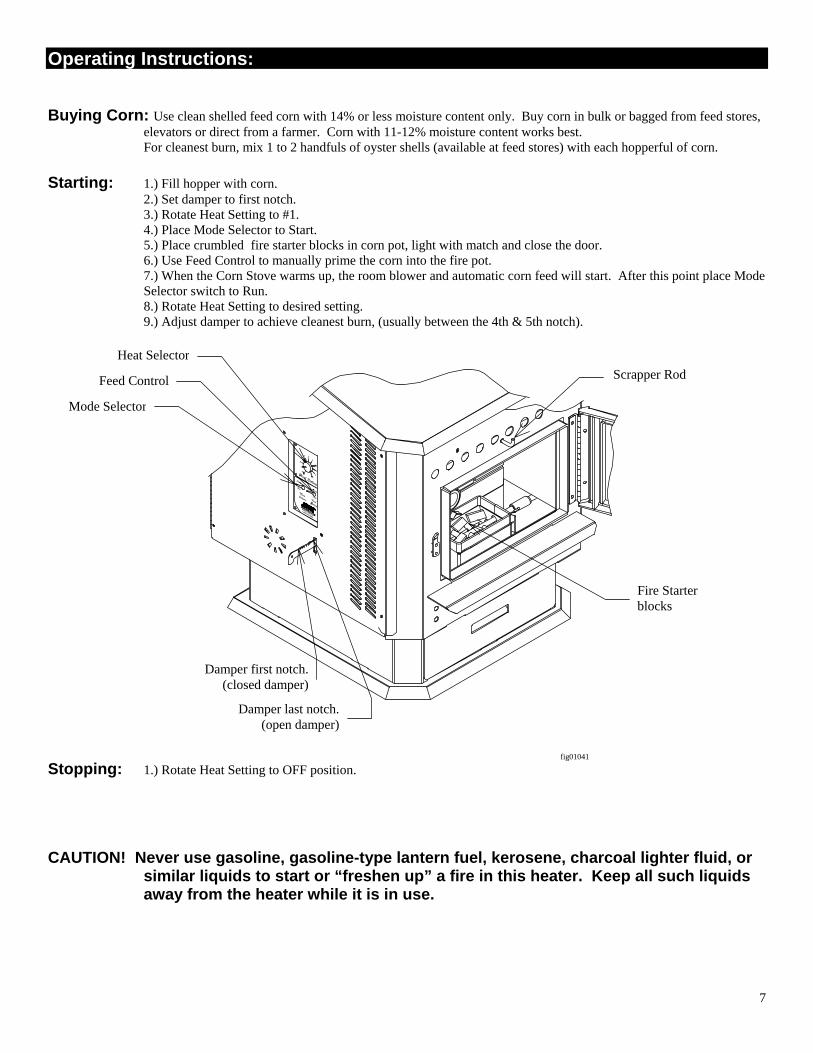
Operating Instructions: Buying Corn: Use clean shelled feed corn with 14% or less moisture content only. Buy corn in bulk or bagged from feed stores,
elevators or direct from a farmer. Corn with 11-12% moisture content works best. For cleanest burn, mix 1 to 2 handfuls of oyster shells (available at feed stores) with each hopperful of corn. Starting: 1.) Fill hopper with corn. 2.) Set damper to first notch. 3.) Rotate Heat Setting to #1. 4.) Place Mode Selector to Start. 5.) Place crumbled fire starter blocks in corn pot, light with match and close the door. 6.) Use Feed Control to manually prime the corn into the fire pot. 7.) When the Corn Stove warms up, the room blower and automatic corn feed will start. After this point place Mode
Selector switch to Run. 8.) Rotate Heat Setting to desired setting. 9.) Adjust damper to achieve cleanest burn, (usually between the 4th & 5th notch).
Stopping: 1.) Rotate Heat Setting to OFF position. CAUTION! Never use gasoline, gasoline-type lantern fuel, kerosene, charcoal lighter fluid, or
similar liquids to start or “freshen up” a fire in this heater. Keep all such liquids away from the heater while it is in use.
Damper last notch.(open damper)
Damper first notch.(closed damper)
Heat Selector
Feed Control
Mode Selector
Fire Starter blocks
fig01041
Scrapper Rod
8
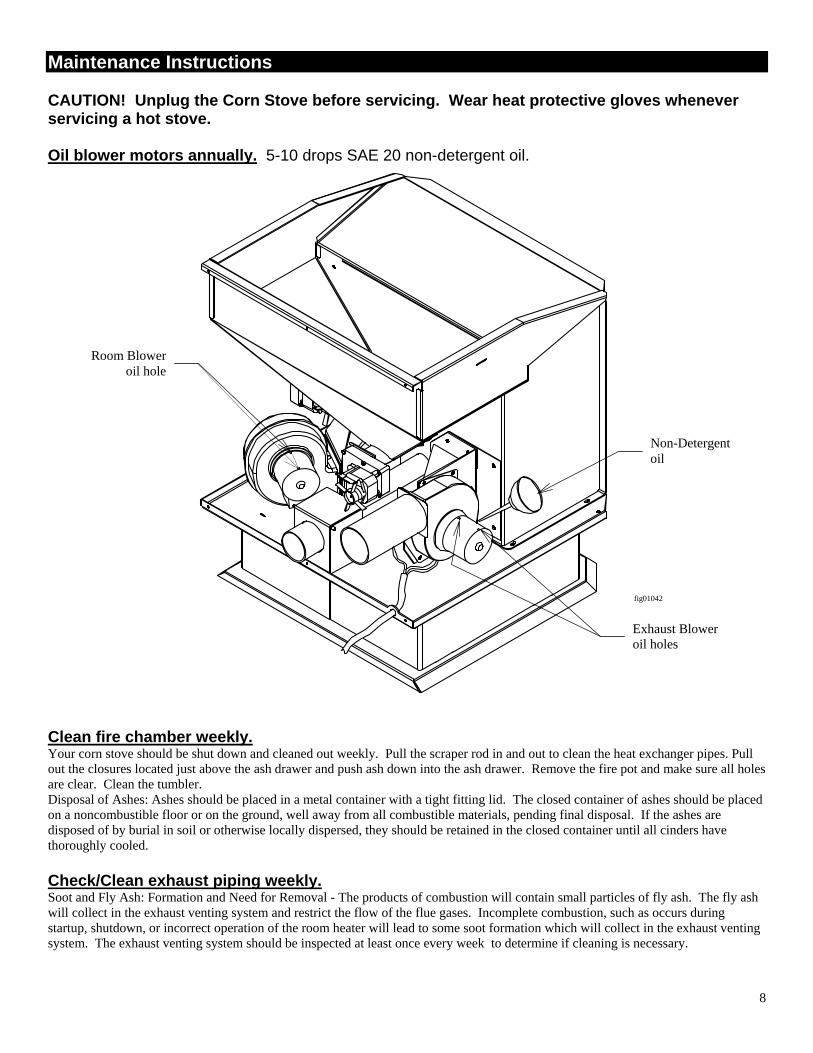
Maintenance Instructions CAUTION! Unplug the Corn Stove before servicing. Wear heat protective gloves whenever servicing a hot stove. Oil blower motors annually. 5-10 drops SAE 20 non-detergent oil.
Clean fire chamber weekly. Your corn stove should be shut down and cleaned out weekly. Pull the scraper rod in and out to clean the heat exchanger pipes. Pull out the closures located just above the ash drawer and push ash down into the ash drawer. Remove the fire pot and make sure all holes are clear. Clean the tumbler. Disposal of Ashes: Ashes should be placed in a metal container with a tight fitting lid. The closed container of ashes should be placed on a noncombustible floor or on the ground, well away from all combustible materials, pending final disposal. If the ashes are disposed of by burial in soil or otherwise locally dispersed, they should be retained in the closed container until all cinders have thoroughly cooled. Check/Clean exhaust piping weekly. Soot and Fly Ash: Formation and Need for Removal - The products of combustion will contain small particles of fly ash. The fly ash will collect in the exhaust venting system and restrict the flow of the flue gases. Incomplete combustion, such as occurs during startup, shutdown, or incorrect operation of the room heater will lead to some soot formation which will collect in the exhaust venting system. The exhaust venting system should be inspected at least once every week to determine if cleaning is necessary.
Room Bloweroil hole
Exhaust Blower oil holes
Non-Detergent oil
fig01042
9
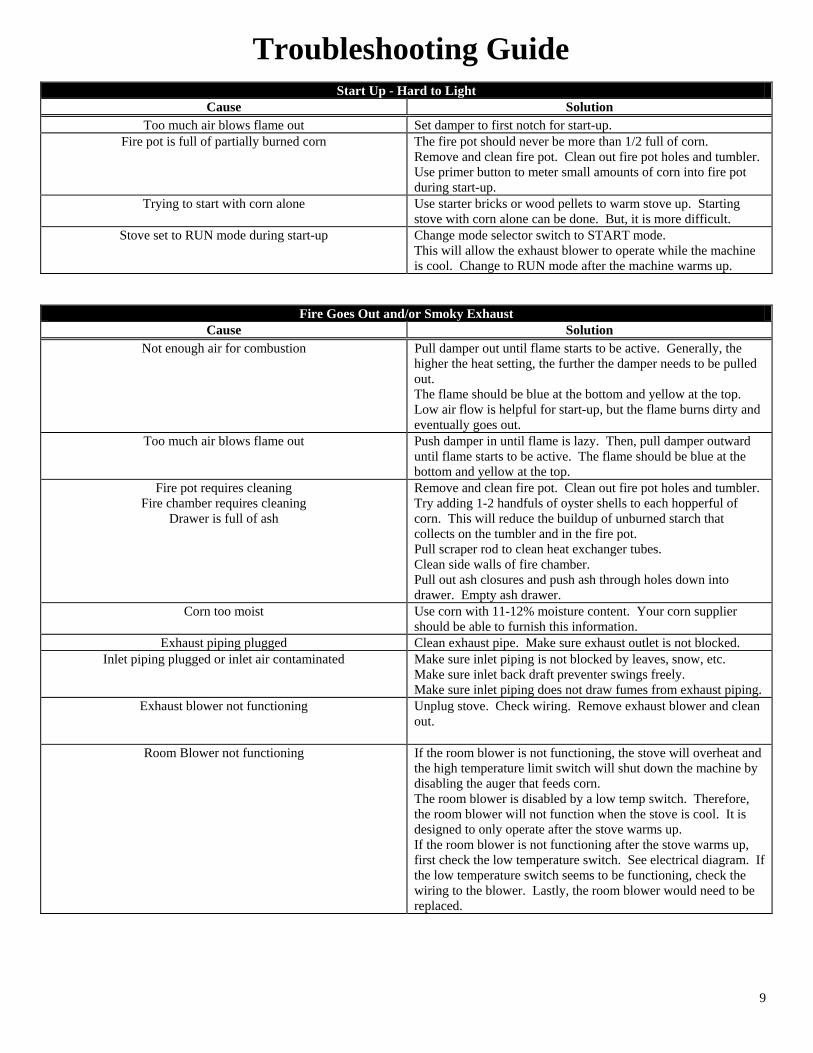
Troubleshooting Guide
Start Up - Hard to Light Cause Solution
Too much air blows flame out Set damper to first notch for start-up. Fire pot is full of partially burned corn The fire pot should never be more than 1/2 full of corn.
Remove and clean fire pot. Clean out fire pot holes and tumbler. Use primer button to meter small amounts of corn into fire pot during start-up.
Trying to start with corn alone Use starter bricks or wood pellets to warm stove up. Starting stove with corn alone can be done. But, it is more difficult.
Stove set to RUN mode during start-up Change mode selector switch to START mode. This will allow the exhaust blower to operate while the machine is cool. Change to RUN mode after the machine warms up.
Fire Goes Out and/or Smoky Exhaust Cause Solution
Not enough air for combustion Pull damper out until flame starts to be active. Generally, the higher the heat setting, the further the damper needs to be pulled out. The flame should be blue at the bottom and yellow at the top. Low air flow is helpful for start-up, but the flame burns dirty and eventually goes out.
Too much air blows flame out Push damper in until flame is lazy. Then, pull damper outward until flame starts to be active. The flame should be blue at the bottom and yellow at the top.
Fire pot requires cleaning Fire chamber requires cleaning
Drawer is full of ash
Remove and clean fire pot. Clean out fire pot holes and tumbler. Try adding 1-2 handfuls of oyster shells to each hopperful of corn. This will reduce the buildup of unburned starch that collects on the tumbler and in the fire pot. Pull scraper rod to clean heat exchanger tubes. Clean side walls of fire chamber. Pull out ash closures and push ash through holes down into drawer. Empty ash drawer.
Corn too moist Use corn with 11-12% moisture content. Your corn supplier should be able to furnish this information.
Exhaust piping plugged Clean exhaust pipe. Make sure exhaust outlet is not blocked. Inlet piping plugged or inlet air contaminated Make sure inlet piping is not blocked by leaves, snow, etc.
Make sure inlet back draft preventer swings freely. Make sure inlet piping does not draw fumes from exhaust piping.
Exhaust blower not functioning Unplug stove. Check wiring. Remove exhaust blower and clean out.
Room Blower not functioning If the room blower is not functioning, the stove will overheat and the high temperature limit switch will shut down the machine by disabling the auger that feeds corn. The room blower is disabled by a low temp switch. Therefore, the room blower will not function when the stove is cool. It is designed to only operate after the stove warms up. If the room blower is not functioning after the stove warms up, first check the low temperature switch. See electrical diagram. If the low temperature switch seems to be functioning, check the wiring to the blower. Lastly, the room blower would need to be replaced.
10
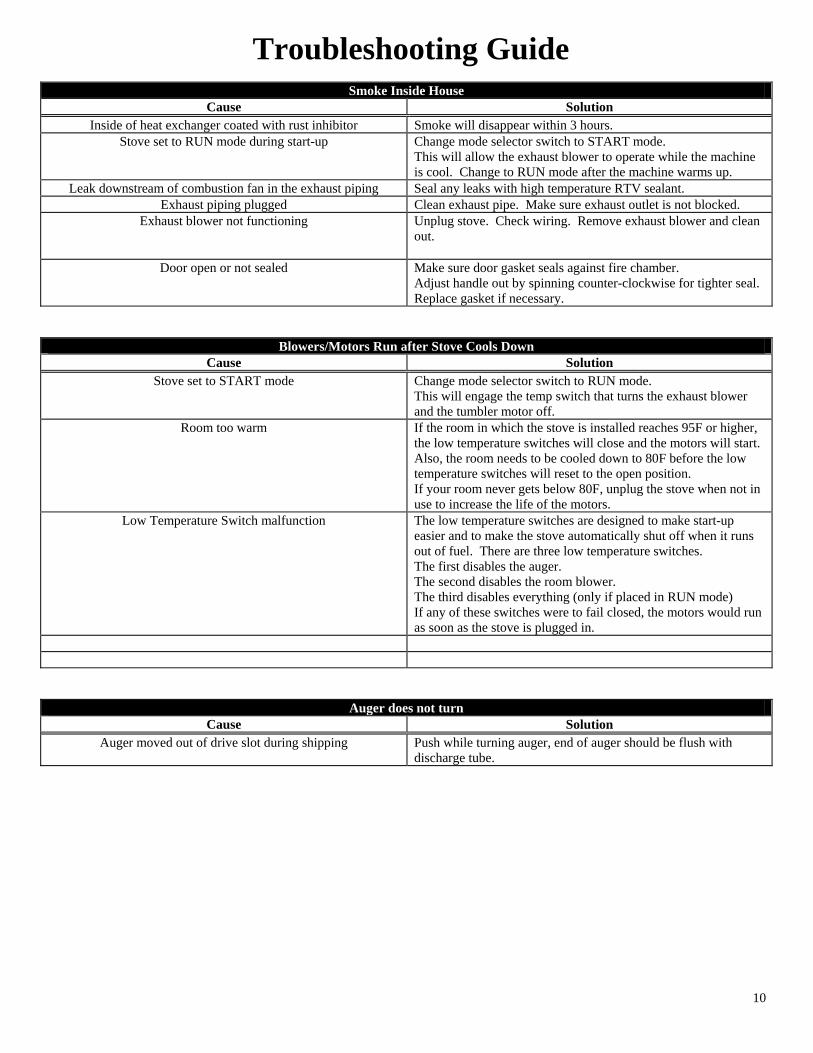
Troubleshooting Guide
Smoke Inside House Cause Solution
Inside of heat exchanger coated with rust inhibitor Smoke will disappear within 3 hours. Stove set to RUN mode during start-up Change mode selector switch to START mode.
This will allow the exhaust blower to operate while the machine is cool. Change to RUN mode after the machine warms up.
Leak downstream of combustion fan in the exhaust piping Seal any leaks with high temperature RTV sealant. Exhaust piping plugged Clean exhaust pipe. Make sure exhaust outlet is not blocked.
Exhaust blower not functioning Unplug stove. Check wiring. Remove exhaust blower and clean out.
Door open or not sealed Make sure door gasket seals against fire chamber. Adjust handle out by spinning counter-clockwise for tighter seal. Replace gasket if necessary.
Blowers/Motors Run after Stove Cools Down Cause Solution
Stove set to START mode Change mode selector switch to RUN mode. This will engage the temp switch that turns the exhaust blower and the tumbler motor off.
Room too warm If the room in which the stove is installed reaches 95F or higher, the low temperature switches will close and the motors will start. Also, the room needs to be cooled down to 80F before the low temperature switches will reset to the open position. If your room never gets below 80F, unplug the stove when not in use to increase the life of the motors.
Low Temperature Switch malfunction The low temperature switches are designed to make start-up easier and to make the stove automatically shut off when it runs out of fuel. There are three low temperature switches. The first disables the auger. The second disables the room blower. The third disables everything (only if placed in RUN mode) If any of these switches were to fail closed, the motors would run as soon as the stove is plugged in.
Auger does not turn Cause Solution
Auger moved out of drive slot during shipping Push while turning auger, end of auger should be flush with discharge tube.
11
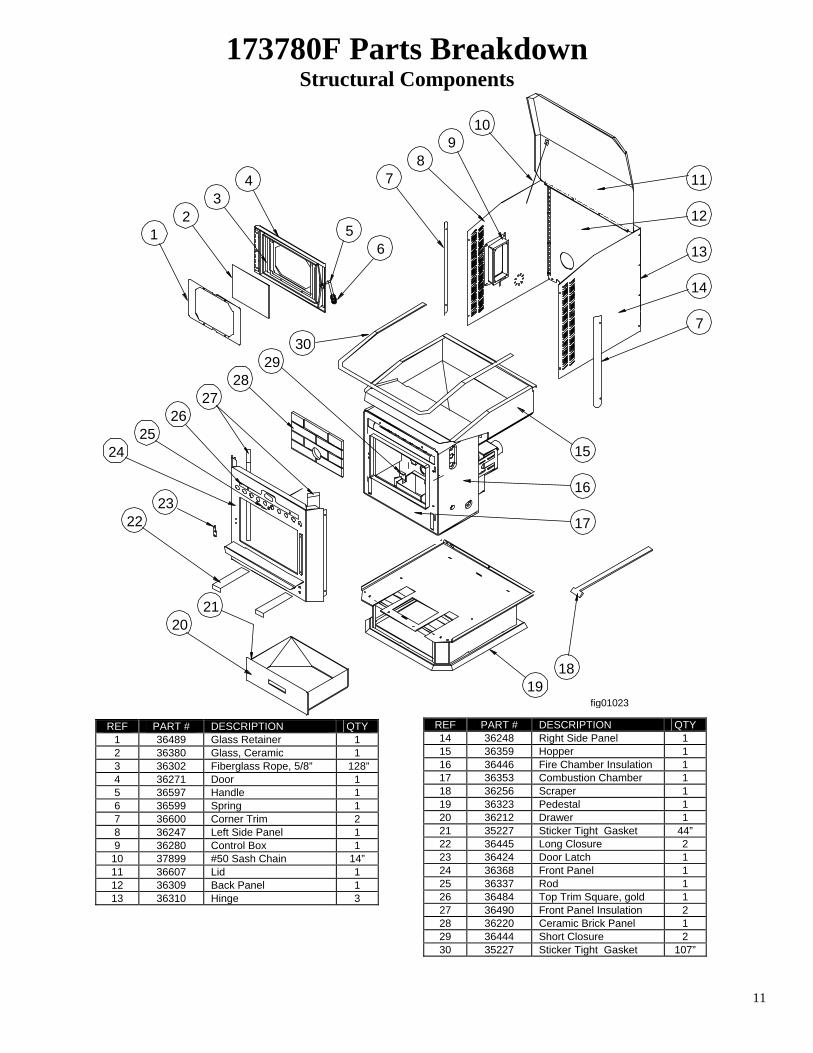
173780F Parts Breakdown Structural Components
10
20
23
21
21
3
27
30
28
65
4 7
98
19fig01023
16
17
15
7
13
14
12
11
22
26
29
2425
18
REF PART # DESCRIPTION QTY 1 36489 Glass Retainer 1 2 36380 Glass, Ceramic 1 3 36302 Fiberglass Rope, 5/8” 128” 4 36271 Door 1 5 36597 Handle 1 6 36599 Spring 1 7 36600 Corner Trim 2 8 36247 Left Side Panel 1 9 36280 Control Box 1
10 37899 #50 Sash Chain 14” 11 36607 Lid 1 12 36309 Back Panel 1 13 36310 Hinge 3
REF PART # DESCRIPTION QTY 14 36248 Right Side Panel 1 15 36359 Hopper 1 16 36446 Fire Chamber Insulation 1 17 36353 Combustion Chamber 1 18 36256 Scraper 1 19 36323 Pedestal 1 20 36212 Drawer 1 21 35227 Sticker Tight Gasket 44” 22 36445 Long Closure 2 23 36424 Door Latch 1 24 36368 Front Panel 1 25 36337 Rod 1 26 36484 Top Trim Square, gold 1 27 36490 Front Panel Insulation 2 28 36220 Ceramic Brick Panel 1 29 36444 Short Closure 2 30 35227 Sticker Tight Gasket 107”
TrenaW
Cross-out
TrenaW
Cross-out
TrenaW
Cross-out
TrenaW
Cross-out
TrenaW
Cross-out
TrenaW
Cross-out
TrenaW
Cross-out
TrenaW
TextBox
Not used on the 173780F
12
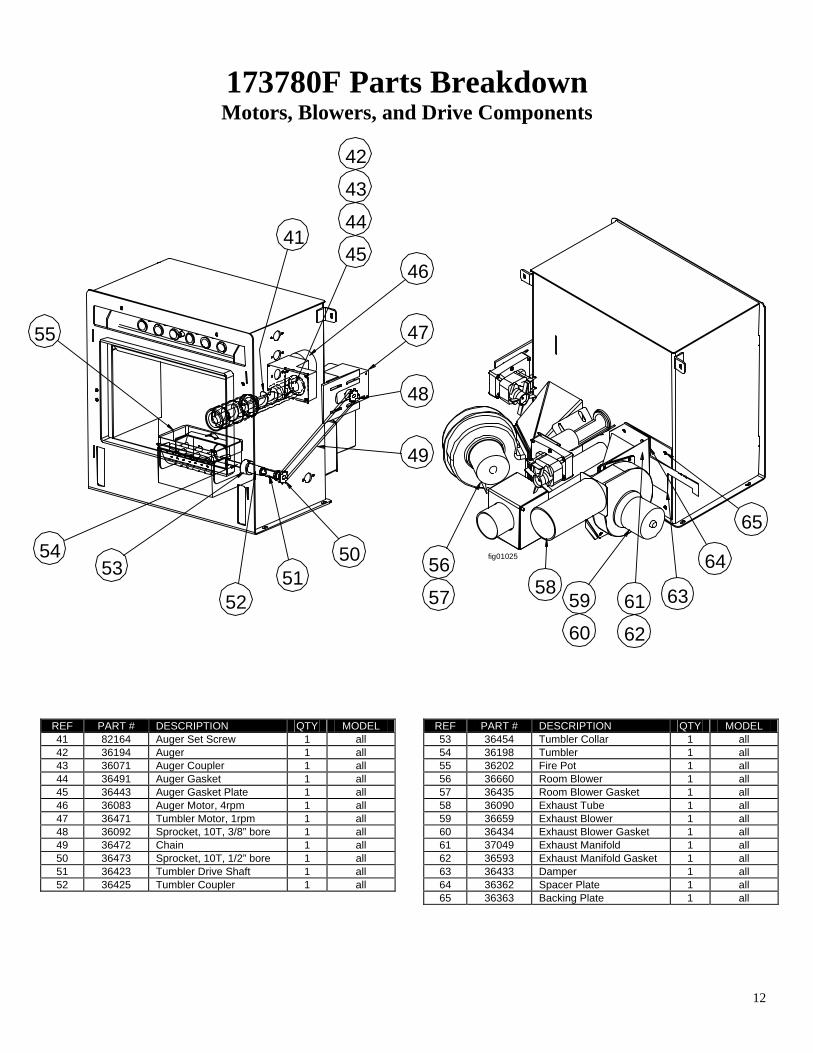
173780F Parts Breakdown Motors, Blowers, and Drive Components
REF PART # DESCRIPTION QTY MODEL 41 82164 Auger Set Screw 1 all 42 36194 Auger 1 all 43 36071 Auger Coupler 1 all 44 36491 Auger Gasket 1 all 45 36443 Auger Gasket Plate 1 all 46 36083 Auger Motor, 4rpm 1 all 47 36471 Tumbler Motor, 1rpm 1 all 48 36092 Sprocket, 10T, 3/8” bore 1 all 49 36472 Chain 1 all 50 36473 Sprocket, 10T, 1/2” bore 1 all 51 36423 Tumbler Drive Shaft 1 all 52 36425 Tumbler Coupler 1 all
REF PART # DESCRIPTION QTY MODEL 53 36454 Tumbler Collar 1 all 54 36198 Tumbler 1 all 55 36202 Fire Pot 1 all 56 36660 Room Blower 1 all 57 36435 Room Blower Gasket 1 all 58 36090 Exhaust Tube 1 all 59 36659 Exhaust Blower 1 all 60 36434 Exhaust Blower Gasket 1 all 61 37049 Exhaust Manifold 1 all 62 36593 Exhaust Manifold Gasket 1 all 63 36433 Damper 1 all 64 36362 Spacer Plate 1 all 65 36363 Backing Plate 1 all
5354
5251
55
5957 58
60
56
62
fig01025
61
50
49
48
47
4645
44
43
41
63
42
65
64
13
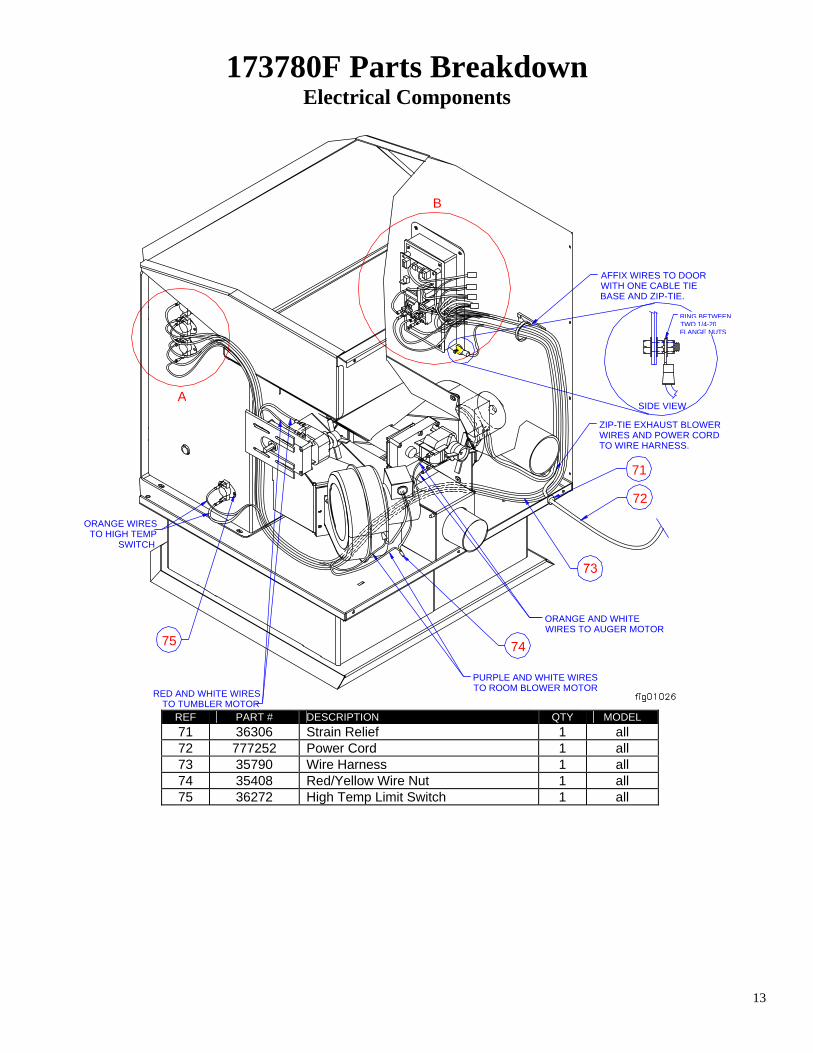
173780F Parts Breakdown Electrical Components
ZIP-TIE EXHAUST BLOWERWIRES AND POWER CORDTO WIRE HARNESS.
SIDE VIEW
ORANGE WIRESTO HIGH TEMP
SWITCH
A
PURPLE AND WHITE WIRESTO ROOM BLOWER MOTOR
ORANGE AND WHITEWIRES TO AUGER MOTOR
RED AND WHITE WIRESTO TUMBLER MOTOR
B
RING BETWEENTWO 1/4-20FLANGE NUTS
AFFIX WIRES TO DOORWITH ONE CABLE TIEBASE AND ZIP-TIE.
71
72
7475
REF PART # DESCRIPTION QTY MODEL 71 36306 Strain Relief 1 all 72 777252 Power Cord 1 all 73 35790 Wire Harness 1 all 74 35408 Red/Yellow Wire Nut 1 all 75 36272 High Temp Limit Switch 1 all
14
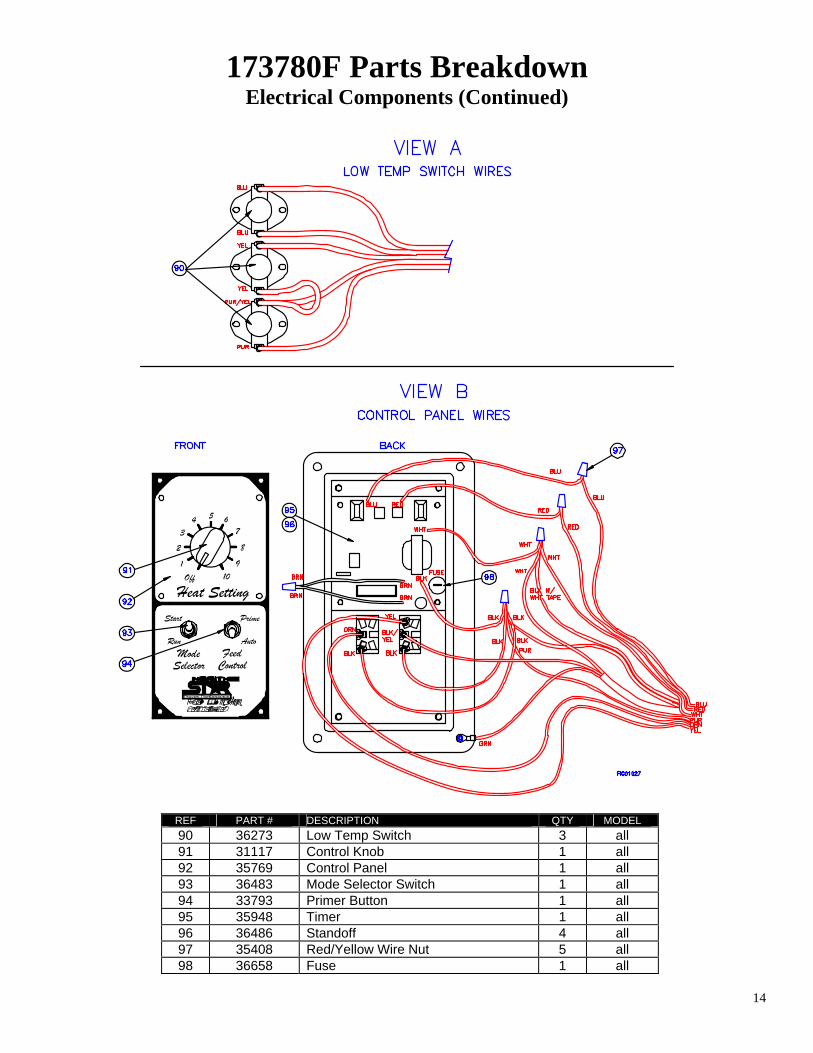
173780F Parts Breakdown Electrical Components (Continued)
Heat SettingStart
FeedControl
ModeSelector
Run
Prime
Auto
5
10
6
Off1
43
2
9
7
8
REF PART # DESCRIPTION QTY MODEL 90 36273 Low Temp Switch 3 all 91 31117 Control Knob 1 all 92 35769 Control Panel 1 all 93 36483 Mode Selector Switch 1 all 94 33793 Primer Button 1 all 95 35948 Timer 1 all 96 36486 Standoff 4 all 97 35408 Red/Yellow Wire Nut 5 all 98 36658 Fuse 1 all
15
16
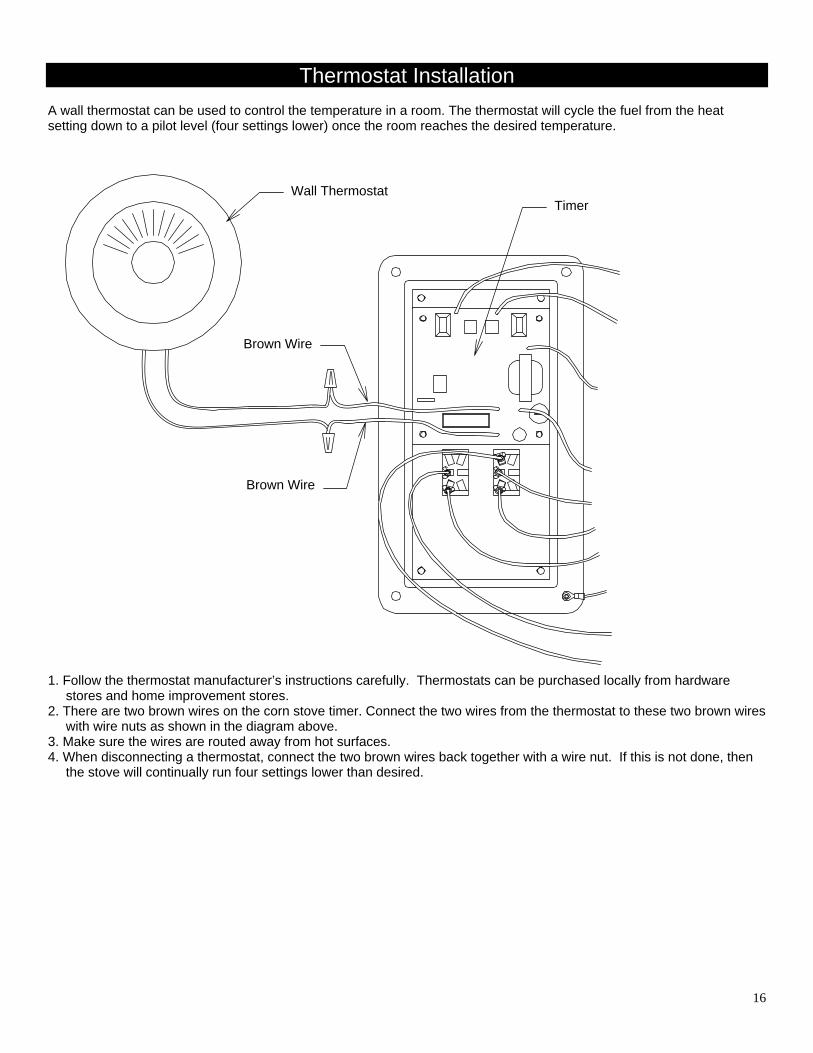
Thermostat Installation A wall thermostat can be used to control the temperature in a room. The thermostat will cycle the fuel from the heat setting down to a pilot level (four settings lower) once the room reaches the desired temperature.
1. Follow the thermostat manufacturer’s instructions carefully. Thermostats can be purchased locally from hardware
stores and home improvement stores. 2. There are two brown wires on the corn stove timer. Connect the two wires from the thermostat to these two brown wires
with wire nuts as shown in the diagram above. 3. Make sure the wires are routed away from hot surfaces. 4. When disconnecting a thermostat, connect the two brown wires back together with a wire nut. If this is not done, then
the stove will continually run four settings lower than desired.
Wall Thermostat
Brown Wire
Brown Wire
Timer