Nootka Saunas - Barrel Sauna Assembly Overview
18
Nootka Saunas - Barrel Sauna Assembly Overview Definitions: Dados/Dado Cuts: the partial depth cuts that the front and back walls of the sauna sit into. Staves: The boards that run front to back to make the barrel Required Tools For Assembly: • Drill/Electric Screwdriver (Square #2 Bit and Phillips bit) • Wrench and/or socket set • Mallet • Hammer • A level • A small step ladder • 20+ ft ratchet strap or strong rope (recommended) • Reciprocating saw or jigsaw (for wood fired model) Required Tools/Parts For Electrical Connection: • Wire Strippers • Small Flat Head Screwdriver • A disconnect box • ½” PVC pipe and connectors (to connect PVC pipe to Junction box) • A step bit for drilling hole into junction box and connecting the disconnect • 8 AWG wiring to connect from Disconnect box to junction box • 1x TECK connector for 8-3 Wiring for sauna heater
Transcript of Nootka Saunas - Barrel Sauna Assembly Overview

Nootka Saunas - Barrel Sauna Assembly Overview
Definitions:
Dados/Dado Cuts: the partial depth cuts that the front and back walls of the sauna sit into.
Staves: The boards that run front to back to make the barrel
Required Tools For Assembly:
• Drill/Electric Screwdriver (Square #2 Bit and
Phillips bit)
• Wrench and/or socket set
• Mallet
• Hammer
• A level
• A small step ladder
• 20+ ft ratchet strap or strong rope
(recommended)
• Reciprocating saw or jigsaw (for wood fired
model)
Required Tools/Parts For Electrical Connection:
• Wire Strippers
• Small Flat Head Screwdriver
• A disconnect box
• ½” PVC pipe and connectors (to connect PVC
pipe to Junction box)
• A step bit for drilling hole into junction box
and connecting the disconnect
• 8 AWG wiring to connect from Disconnect
box to junction box
• 1x TECK connector for 8-3 Wiring for sauna
heater

The typical install takes one of our trained technicians about 5 hours. If you haven’t assembled a barrel sauna
before, you should budget about 7-8 hours for assembly. Although assembly can be done with one person,
working with two people will make the process much faster and more enjoyable.
Step 1: Start by laying out the feet down,
ensuring that they are level.
Lay a stave across the feet to measure the
distance between the feet. The front and
back feet should be inset from the front
and back ends of the sauna by 8” and the
middle foot should be centered between
them.
(smaller 5ft and 6ft models only have two
feet, larger units have 3 feet).
TIP: Add a stave on both sides of the feet
and make sure your measurements line up
on both sides to help ensure the feet are
square.

Step 2: Mount the staves to the feet with
one screw into each foot. As you add each
stave, ensure the dado cuts line up
properly and that the staves are snugged
together (use a mallet to tap them tighter
if needed).
Add 9 staves until you’ve made the cradle
as shown in the photo.

Step 3: Now, we’ll mount the front and
back panels into the cradle.
Start by placing the back center panel into
the dado cut groove and ensuring that it’s
vertically level.
Mount the front center panel and also
ensure it is level.
Temporarily connect a stave between the
tops of the front and back panels to secure
the setup (as shown in the photo).
Now that you have the center panels
mounted, we’ll add the left and right
panels for the front/back walls. These are
labelled as follows (from the perspective of
standing in front of the sauna and looking
at the sauna).
F.L = Front Left
F.R = Front Right
B.L = Back Left
B.R = Back Right
TIP: If working alone, use a 2-3 ft piece of
lumber with 45 degree cuts as a support
stick. Simply tack two screws into it (one
into the floor and one into the center of the
back wall). This will ensure the panel stays
secure and vertical while you mount the
front center panel.
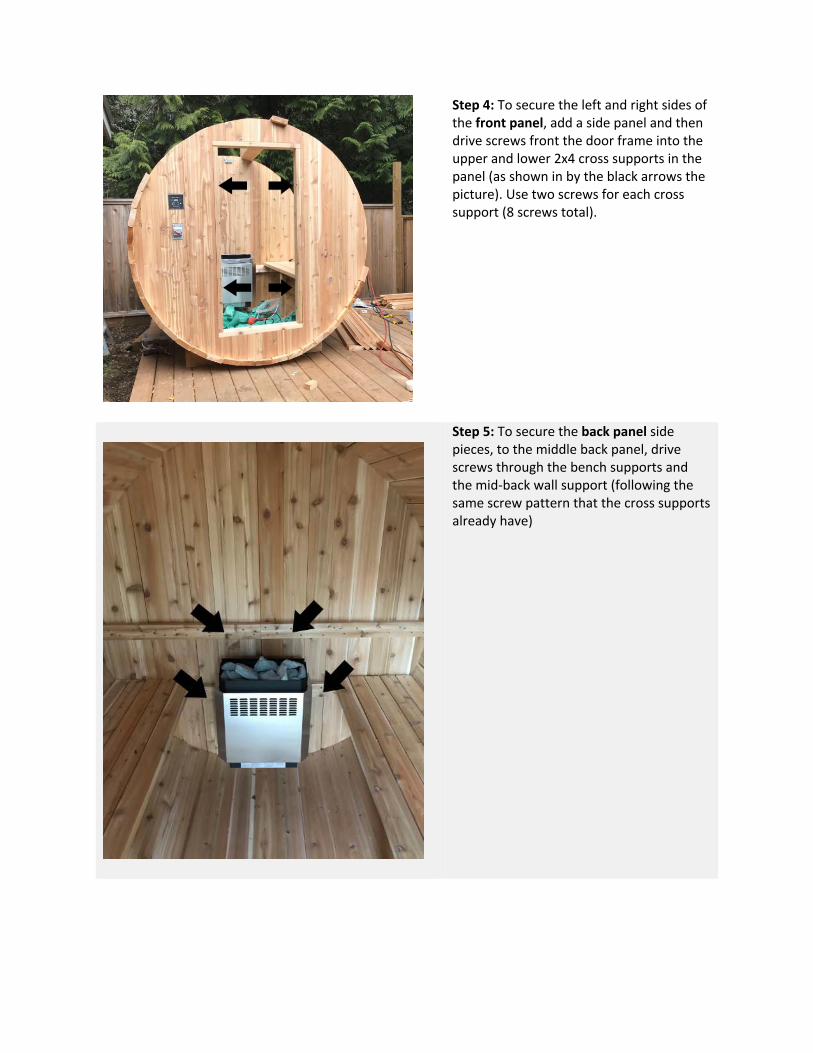
Step 4: To secure the left and right sides of
the front panel, add a side panel and then
drive screws front the door frame into the
upper and lower 2x4 cross supports in the
panel (as shown in by the black arrows the
picture). Use two screws for each cross
support (8 screws total).
Step 5: To secure the back panel side
pieces, to the middle back panel, drive
screws through the bench supports and
the mid-back wall support (following the
same screw pattern that the cross supports
already have)
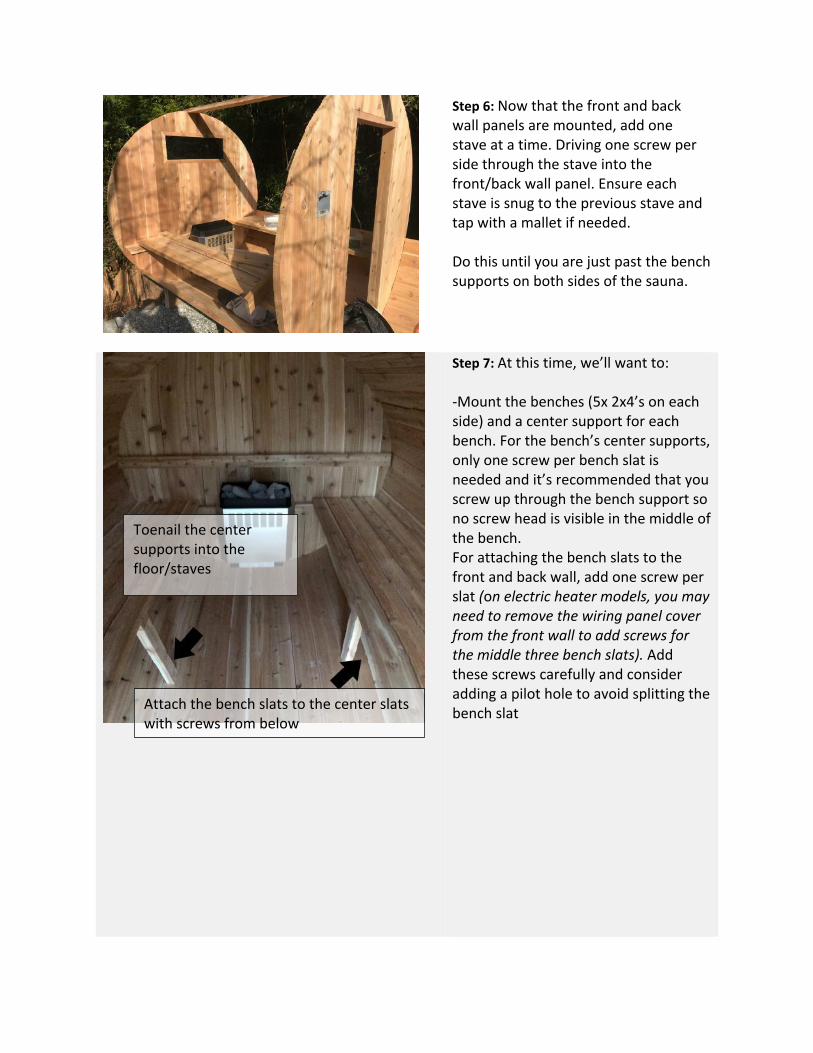
Step 6: Now that the front and back
wall panels are mounted, add one
stave at a time. Driving one screw per
side through the stave into the
front/back wall panel. Ensure each
stave is snug to the previous stave and
tap with a mallet if needed.
Do this until you are just past the bench
supports on both sides of the sauna.
Step 7: At this time, we’ll want to:
-Mount the benches (5x 2x4’s on each
side) and a center support for each
bench. For the bench’s center supports,
only one screw per bench slat is
needed and it’s recommended that you
screw up through the bench support so
no screw head is visible in the middle of
the bench.
For attaching the bench slats to the
front and back wall, add one screw per
slat (on electric heater models, you may
need to remove the wiring panel cover
from the front wall to add screws for
the middle three bench slats). Add
these screws carefully and consider
adding a pilot hole to avoid splitting the
bench slat
Toenail the center
supports into the
floor/staves
Attach the bench slats to the center slats
with screws from below
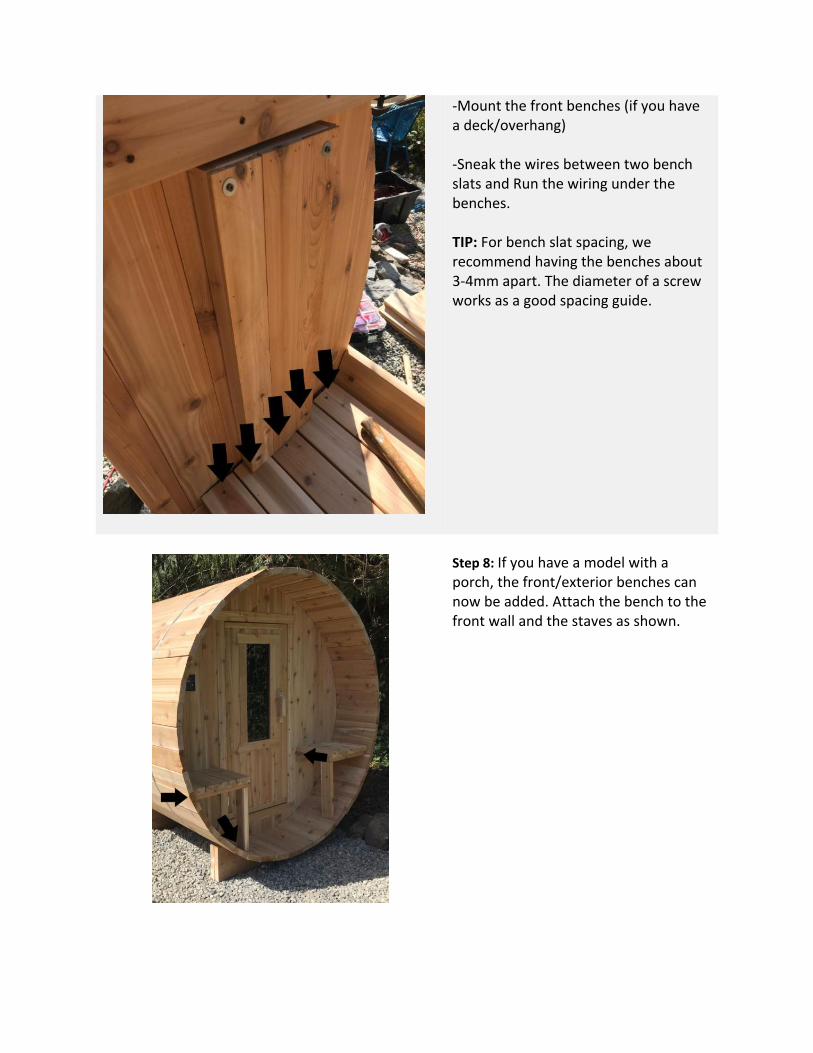
-Mount the front benches (if you have
a deck/overhang)
-Sneak the wires between two bench
slats and Run the wiring under the
benches.
TIP: For bench slat spacing, we
recommend having the benches about
3-4mm apart. The diameter of a screw
works as a good spacing guide.
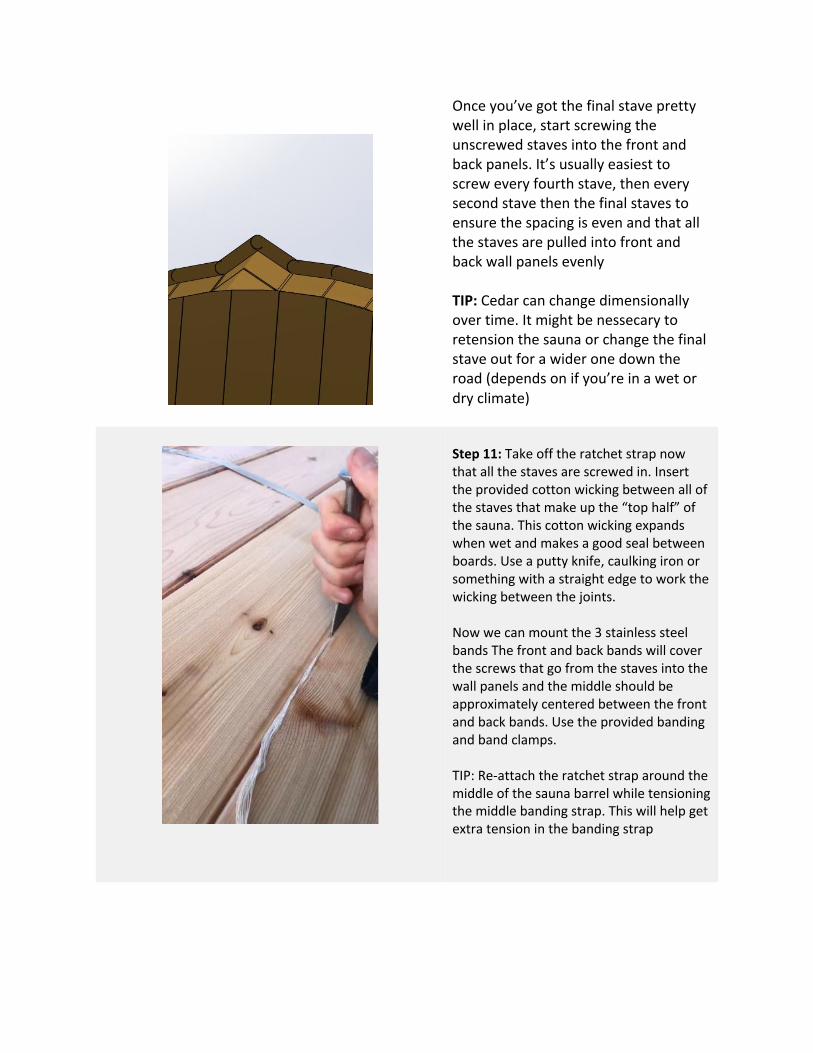
Step 8: If you have a model with a
porch, the front/exterior benches can
now be added. Attach the bench to the
front wall and the staves as shown.

Step 9: Now simply continue adding
staves to both sides of sauna until you
meet in the middle at the top of the
sauna. IMPORTANT: Once you pass the
half way point on either side of the
sauna, stop screwing the staves into
the front/back wall panels… When the
left side staves and the right side staves
meet at the top, we’ll need to squeeze
in that final stave and the positioning of
several staves will move slightly in
doing so.
Step 10: You’ll notice that among the
staves you’ve been provided, there are
two staves that are narrower in width.
These can be used if the final gap
where the left and right side staves
meet can’t accept a full width stave
between them.
IMPORTANT: To get the best fit and
ensure there aren’t gaps between the
staves which would allow hot air to
escape and rain water in after install,
select a final stave that creates a
moderate “tent” (ie: doesn’t fit
immediately). Put a ratchet strap
around the middle of the sauna and
secure it as tight as possible.
Systematically take your mallet and tap
all of the unscrewed top half staves to
slowly work the final stave into place.
Don’t panic if it looks like the final stave
won’t fit at first. This process can take a
bit of time but it’s time worth spending
to ensure you’ve got a very well built
unit.
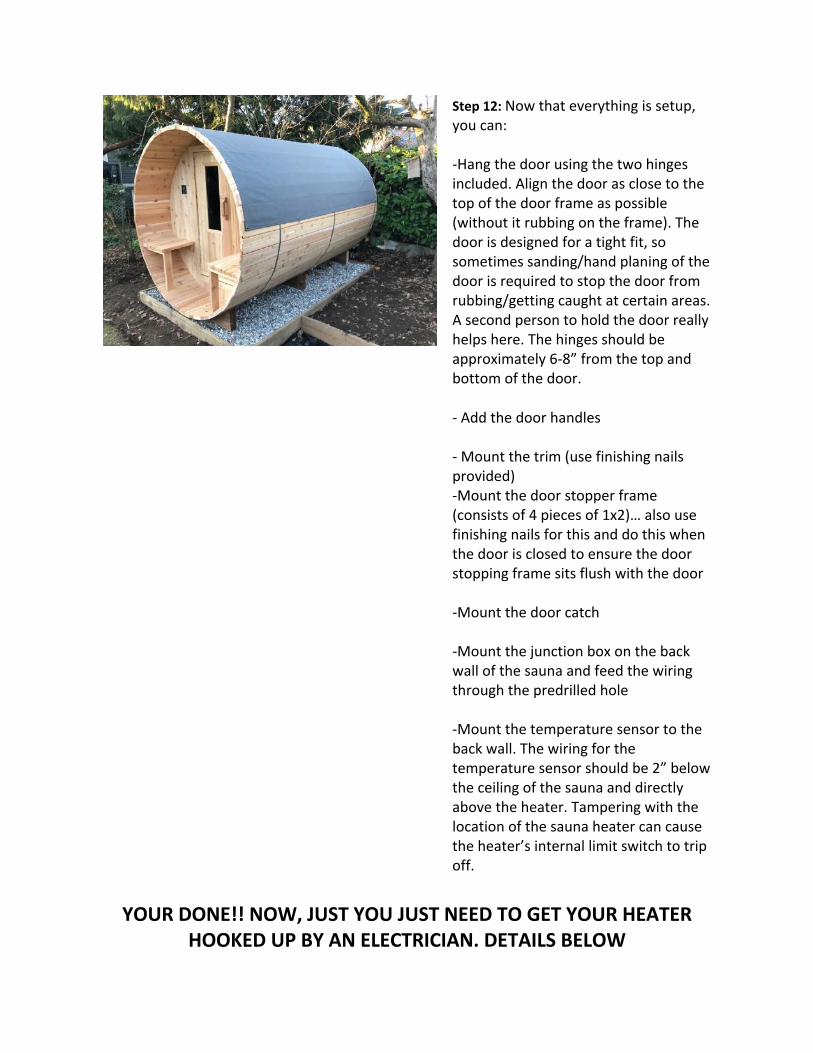
Once you’ve got the final stave pretty
well in place, start screwing the
unscrewed staves into the front and
back panels. It’s usually easiest to
screw every fourth stave, then every
second stave then the final staves to
ensure the spacing is even and that all
the staves are pulled into front and
back wall panels evenly
TIP: Cedar can change dimensionally
over time. It might be nessecary to
retension the sauna or change the final
stave out for a wider one down the
road (depends on if you’re in a wet or
dry climate)
Step 11: Take off the ratchet strap now
that all the staves are screwed in. Insert
the provided cotton wicking between all of
the staves that make up the “top half” of
the sauna. This cotton wicking expands
when wet and makes a good seal between
boards. Use a putty knife, caulking iron or
something with a straight edge to work the
wicking between the joints.
Now we can mount the 3 stainless steel
bands The front and back bands will cover
the screws that go from the staves into the
wall panels and the middle should be
approximately centered between the front
and back bands. Use the provided banding
and band clamps.
TIP: Re-attach the ratchet strap around the
middle of the sauna barrel while tensioning
the middle banding strap. This will help get
extra tension in the banding strap
Step 12: Now that everything is setup,
you can:
-Hang the door using the two hinges
included. Align the door as close to the
top of the door frame as possible
(without it rubbing on the frame). The
door is designed for a tight fit, so
sometimes sanding/hand planing of the
door is required to stop the door from
rubbing/getting caught at certain areas.
A second person to hold the door really
helps here. The hinges should be
approximately 6-8” from the top and
bottom of the door.
- Add the door handles
- Mount the trim (use finishing nails
provided)
-Mount the door stopper frame
(consists of 4 pieces of 1x2)… also use
finishing nails for this and do this when
the door is closed to ensure the door
stopping frame sits flush with the door
-Mount the door catch
-Mount the junction box on the back
wall of the sauna and feed the wiring
through the predrilled hole
-Mount the temperature sensor to the
back wall. The wiring for the
temperature sensor should be 2” below
the ceiling of the sauna and directly
above the heater. Tampering with the
location of the sauna heater can cause
the heater’s internal limit switch to trip
off.
YOUR DONE!! NOW, JUST YOU JUST NEED TO GET YOUR HEATER
HOOKED UP BY AN ELECTRICIAN. DETAILS BELOW
Electrical Sauna Heater Installation
The Homecraft sauna heater comes with a 1 year manufacturer warranty through Homecraft
(not through Nootka saunas). For warranty questions/assistance, please contact: 1-800-870-
7544 or [email protected]
The below manual shows the wiring setup for 5kW, 6kW and 7.5kW heaters. All of these
heaters (including 7.5kW) can run on a 40A breaker.
A couple important things to note:
1. Most jurisdictions require a disconnect box to be installed on the sauna next to the
junction box. This is a $20-$25 device (photo below) and allows you to safely disconnect
the sauna from the power source without relying on the breaker panel.
2. Wiring must be done by a certified electrician and in accordance to the manual. Use the
below reference table for connecting the 4 conductor and 2 conductor cables to the
junction box and the temp sensor respectively.
4 Conductor 18AWG Cable
Cable Conductor Color Connection on Front wall Control
Panel (pre-wired)
Connection in Plastic Junction Box
(terminal strip)
Red 24V AC RED
Black 24V AC RED
White CONTROL YELLOW
Grey CONTROL YELLOW
2 Conductor 18AWG Cable
Cable Conductor Color Connection on Front wall Control
Panel (pre-wired)
Connection to
White PROBE Connect with twist on
cap/connector to temp sensor.
Black PROBE Connect with twist on cap/connector
to temp sensor.
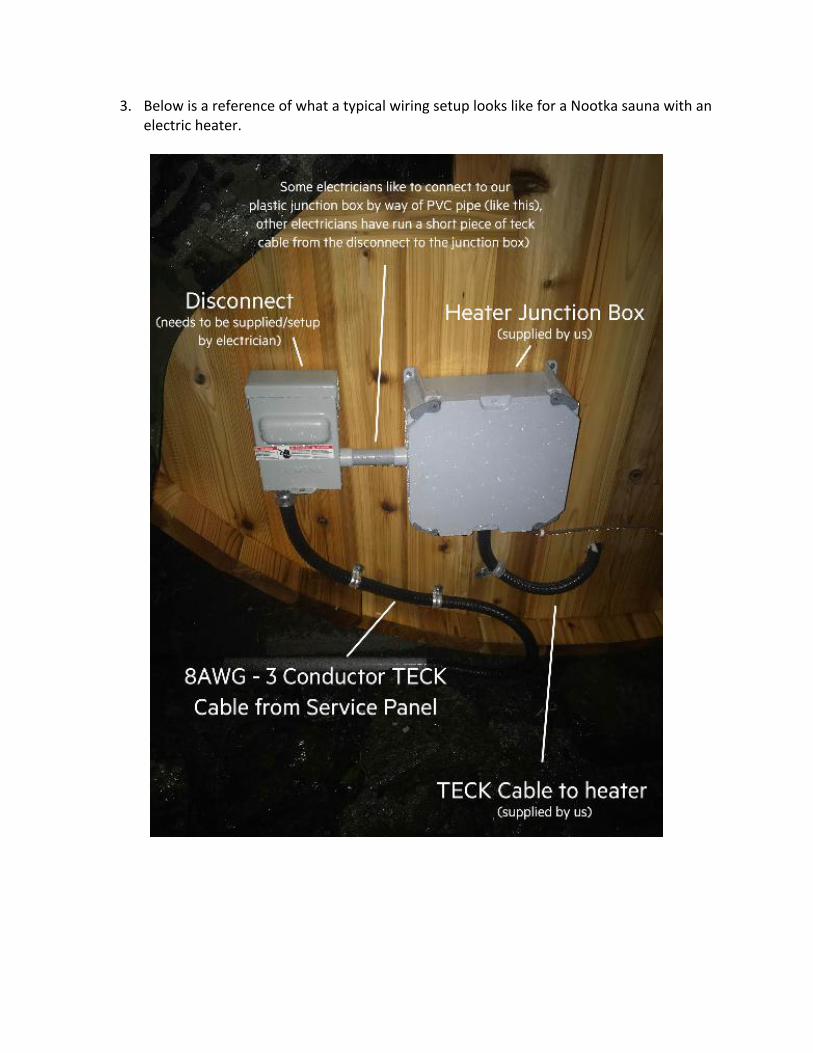
3. Below is a reference of what a typical wiring setup looks like for a Nootka sauna with an
electric heater.
Last edited January 6, 2005
!"#$%&'()*
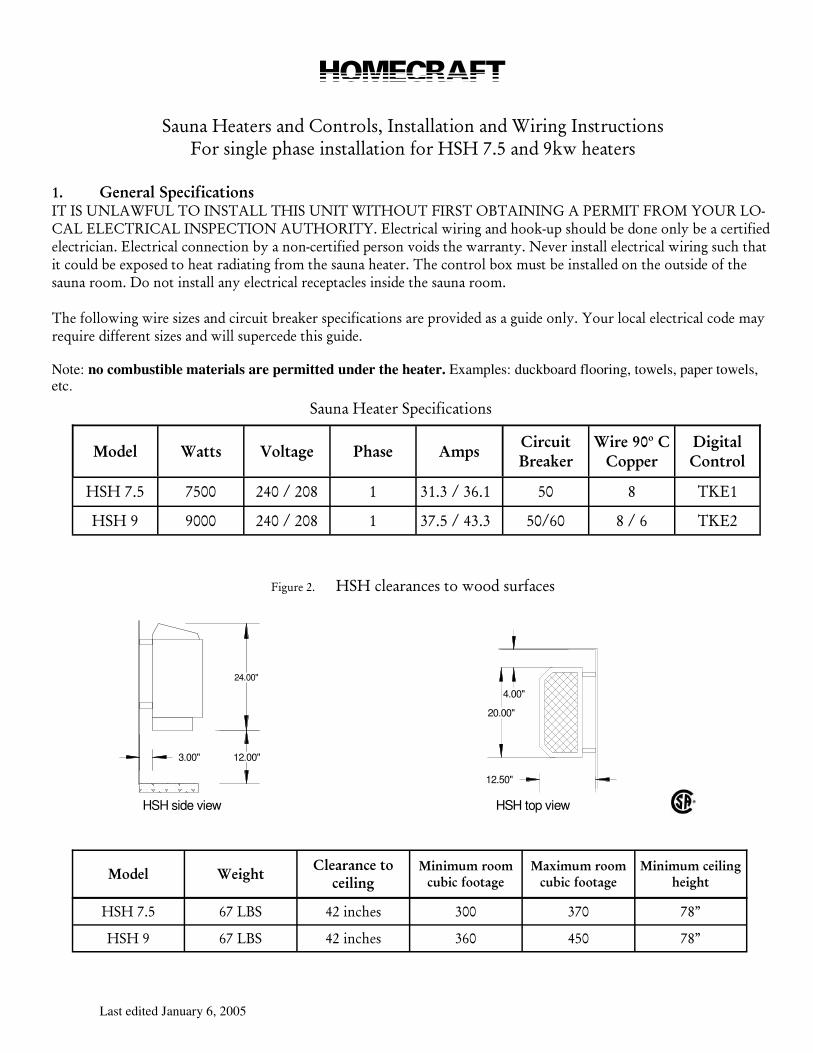
*!"#$"%&'"(')*%"$+%,-$()-.*/%0$*(".."(1-$%"$+%21)1$3%0$*()#4(1-$*%5-)%*1$3.'%67"*'%1$*(".."(1-$%8-)%&!&%9:;%"$+%<=>%7'"(')*%
%!"# $%&%'()#*+%,-.-,(/-0&1#0?%0!% !"#25 "%?$%0!!?#""%?&0!% !0?%20?&$ ?%50%!?%$&?#0!0!'%#%()%*0?%5%$*%+$ %%"$,,#"%)"),?%0,#"%0!!(),?0$!%# ?&$%0?+:%).'4()14".%>1)1$3%"$+%7--=,#6%*7-#.+%-'%+-$'%-$..%-'%"%4')(181'+%'.'4()141"$:%).'4()14".%4-$$'4(1-$%-.%"%$-$,4')(181'+%6')*-$%/-1+*%(7'%>"))"$(.:%!'/')%1$*("..%'.'4()14".%>1)1$3%*#47%(7"(%1(%4-#.+%-'%'06-*'+%(-%7'"(%)"+1"(1$3%8)-1%(7'%*"#$"%7'"('):%?7'%4-$()-.%--0%1#*(%-'%1$*("..'+%-$%(7'%-#(*1+'%-8%(7'%*"#$"%)--1:%2-%$-(%1$*("..%"$.%'.'4()14".%)'4'6("4.'*%1$*1+'%(7'%*"#$"%)--1:%%?7'%8-..->1$3%>1)'%*13'*%"$+%41)4#1(%-)'"=')%*6'41814"(1-$*%")'%6)-/1+'+%"*%"%3#1+'%-$..:%+-#)%.-4".%'.'4()14".%4-+'%1".%)'4#1)'%+188')'$(%*13'*%"$+%>1..%*#6')4'+'%(71*%3#1+':%
Note: no combustible materials are permitted under the heater. Examples: duckboard flooring, towels, paper towels, etc.
%%
513#)'%5:%%%%%&!&%4.'")"$4'*%(-%>--+%*#)8"4'*%%%
203%)# 4(//1# 50)/(6%# 78(1%# 9:+1#;-',<-/#='%(>%'#
4-'%#? 0#;#;0++%'#
!-6-/()#;0&/'0)#
&!&%9:;% 9;66% 576%8%569% :% ;::;%8%;<::% ;6% 9% ?=):%
&!&%<% <666% 576%8%569% :% ;9:;%8%7;:;% ;68<6% 9%8%<% ?=)5%
!"#$"%&'"(')%!6'41814"(1-$*%
24.00"
12.00"3.00"
HSH side view
4.00"
20.00"
12.50"
HSH top view
&!&%9:;% <9%"&!% 75%1$47'*% ;66% ;96% 99>%
&!&%<% <9%"&!% 75%1$47'*% ;<6% 7;6% 99>%
203%)# 4%-68/#;)%('(&,%#/0#
,%-)-&6#2-&-:<:#'00:#,<"-,#.00/(6%#
2(#-:<:#'00:#,<"-,#.00/(6%#
2-&-:<:#,%-)-&6#8%-68/#
Last edited January 6, 2005
%513#)'%;:%%%%%%&'"(')%"-4"(1-$%% % %%%%%
5:% *(<&(#$%(/%'#%&1/())(/-0&%!-('?%)'1-/'%6."*(14%6)-('4(1/'%4-"(1$3%-$%-#(*1+'%-8%7'"(')%"8(')%4-16.'('%1$*(".."(1-$%-#(%-'8-)'%*(")(,#6:%#
%&-1'4)"8(%*"#$"%7'"(')*%4-1'%8#...%"**'1-.'+:%*-#$(1$3%7")+>")'%1*%1$%(7'%7'"(')%4")(-$:%%%&1/())(/-0&#*/%+1&#%% 5#:%!4)'>%(7'%>"..%1-#$(1$3%-)"4='(*%(-%% (7'%>"..%"*%*7->%1$%513#)'%;:%%
%5&:%"".%(7'%7'"(')%-$%(7'%8.--)%"$+%)'1-/'%(7'%--((-1%6."(':%$6'$%(7'%"66)-6)1"('%=$-4=,-#(%"$+%1$*("..%(7'%*'".(137(%4-$$'4,(-):%,-$$'4(%(7'%>1)1$3%"*%*7->$%1$%(7'%>1),1$3%3#1+':%%'6."4'%(7'%--((-1%6."(':%%%5,:%&"$3%(7'%7'"(')%1$%6."4'%-$%(7'%>"..%1-#$(1$3%-)"4='(*%"$+%*'4#)'%(7'%.->')%7'"(')%*#66-)(%-)"4='(%(-%(7'%>"..%>1(7%(7'%*4)'>*%*#66.1'+:%51..%(7'%7'"(')%)-4=%-"*='(%>1(7%(7'%*"#$"%)-4=*%%6)-/1+'+: !-('?%(7'%*"#$"%7'"(')%*7-#.+%$-(%-'%-6')"('+%>1(7-#(%(7'%)'4-11'$+'+%4#"$(1(.%-8%)-4=*:%%)!! %)%(%$()%%#0%5"$2%#%$ !2%?&)%%$,=!:%%%52:%?7'%(7')1-*("(%('16')"(#)'%*'$*-)%*7-#.+%-'%1-#$('+%1$*1+'%(7'%*"#$"%"(%(7'%"66)-6)1"('%.-4"(1-$%*7->$:%08%(7'%*'$*-)%-#.-%1*%$-(%6-*1(1-$'+%4-))'4(../%()1661$3%-8%(7'%7137%.111(%*>1(47%1$*1+'%(7'%7'"(')%>1..%-44#):%%%%5)"#'%:0(%#/8%#+)(1/-,#+'0/%,/-(%#,0(%'#0..#/8%#8%(/%':%%?7'%3#")+%)"1.%*7->$%1$%513#)'%<%4"$%$->%-'%1$*("..'+:%%%55:%#8(')%(7'%7'"(')%"$+%4-$()-.%7"/'%-''$%1$*("..'+/%(7'%7'"(')%*7-#.+%-'%(#)$'+%-$%7137%8-)%-$'%7-#)%(-%@*'((.'>%1$%(7'%7'"(')%"$+%(7'%)-4=*:%2#)1$3%(71*%(11'%"$.%6)-('4(1/'%4-"(1$3%)'1"1$1$3%-$%(7'%'.'1'$(*%>1..%-#)$%-88%"*%>'..:%?71*%1*%$-)1".:%2-%$-(%%'$(')%(7'%*"#$"%)--1%+#)1$3%(71*%1$1(1".%*(")(,#6:%%
%%%
513#)'%7:%% % %
TemperatureSensor
Wall Control
From BreakerPanel
Relay ControlBox
Suggested position,Refer to note #7
&!&%>"..%-)"4='(%6-*1(1-$%
Sensor position2-1/2" below ceiling
7"21"
29"
23" from wall maximum

Last edited January 6, 2005
%
;:# *(<&(#)-68/1%!"#$"%.137(*%*7-#.+%-'%"66)-/'+%8-)%(71*%#*'%"$+%1$%"%*'".(137(%/"6-),6)--8%7-#*1$3:%!"#$"%.137(*%1#*(%-'%"(%.'"*(%:5%1$47'*%+1*("$4'%7-)13-$("...%8)-1%(7'%'+3'%-8%(7'%*"#$"%7'"('):%!>1(47'*%8-)%*"#$"%.137(*%1#*(%-'%.-4"('+%"$+%-6')"('+%8)-1%-#(,*1+'%(7'%*"#$"%)--1:%2-%$-(%1$*("..%.137(*%-/')%(7'%*"#$"%7'"('):%$6(1-$"...%"%*'6")"('%+111')%*>1(47%8-)%'"47%.137(%4"$%-'%#*'+%(-%4-$()-.%(7'%1$('$*1(.%-8%'"47%.137(%1$%(7'%*"#$"%)--1:%?7'%'.'4()14".%*#66..%8-)%(7'%.137(*%1*%:56%/-.(*%"$+%1*%*'6")"('%8)-1%(7'%7'"(')%'.'4()14".%*#66..:%%
7:% 2(&<()#*(.%/*#*+-/,8%#..%&-1'4)"8(%*"#$"%7'"(')*%7"/'%"%(7')1".%*"8'(.%*>1(47%(-%6)'/'$(%-/')7'"(1$3%.-4"('+%1$%(7'%8)-$(%-8%(7'%'.'1'$(%--0%A#*(%-'.->%(7'%8)-$(%*7)-#+:%08%(7'%*"#$"%7'"(')%*>1(47'*%-88%+#'%(-%*-1'%"-$-)1".%4-$+1(1-$/%.'(%(7'%7'"(')%4--.%+->$%"$+%(7'$%)'*'(%(7'%*"8'(.%*>1(47%-.%6)'**1$3%(7'%*"8'(.%*>1(47%*('1%.-4"('+%1$%(7'%*1"..%7-.'%-$%(7'%8)-$(%8"4'%-8%(7'%7'"(')/%+->$%$'")%(7'%--((-1%-8%(7'%7'"('):%08%(7'%@)'*'(%*"8'(.%*>1(47>%()16*%8)'4#'$(../%6.'"*'%4-$("4(%'1(7')%"%4#".181'+%*')/14'1"$%-)%4-$("4(%&-1'4)"8(%+1)'4(..:%%
;:% *80+%'#$%(31 !'/')%1$*("..%*7->')%7'"+*%-)%>"(')%*6)".%'4#161'$(%"--/'%"%*"#$"%7'"('):%#.>".*%#*'%"%*"#$"%-#4='(%"$+%."+.'%(-%6#(%>"(')%-$%(7'%*"#$"%)-4=*:%%
%<:% $%(/%'#$<('3#'(-)##%>--+'$%3#")+%)"1.%1"+'%-8%2'*(')$%%'+%,'+")%*7-#.+%-'%1$*("..'+%")-#$+%.-#)%*"#$"%7'"('):%?71*%3#")+%)"1.%1*%1'"$(%(-%6)'/'$(%"$.-$'%-)#*71$3%#6%"3"1$*(%(7'%*1+'%-8%(7'%7'"('):%!6'4181'+%4.'")"$4'*%-'(>''$%(7'%7'"(')%"$+%(7'%3#")+%)"1.%1*%7>%11$11#1%-$%"..%*1+'*%B'04'6(%8-)%-$'%*1+'%-8%(7'%,&!&%7'"(')C:%%+-#%*7-#.+%#*'%'1(7')%:>%D%7>%-)%5>%D%7>%1"(')1".%'$*#)1$3%(7'%3#")+%1*%*'4#)'..%"$47-)'+%(-%(7'%>"..%"$+%4"$$-(%-'%1$"+/')('$(..%1-/'+:%
%%
513#)'%<:%%%%%%%%&!&%7'"(')%3#")+%4.'")"$4'*%
%%
4.00"
4"
4"
28.75"
16.50"
4"
Last edited January 6, 2005
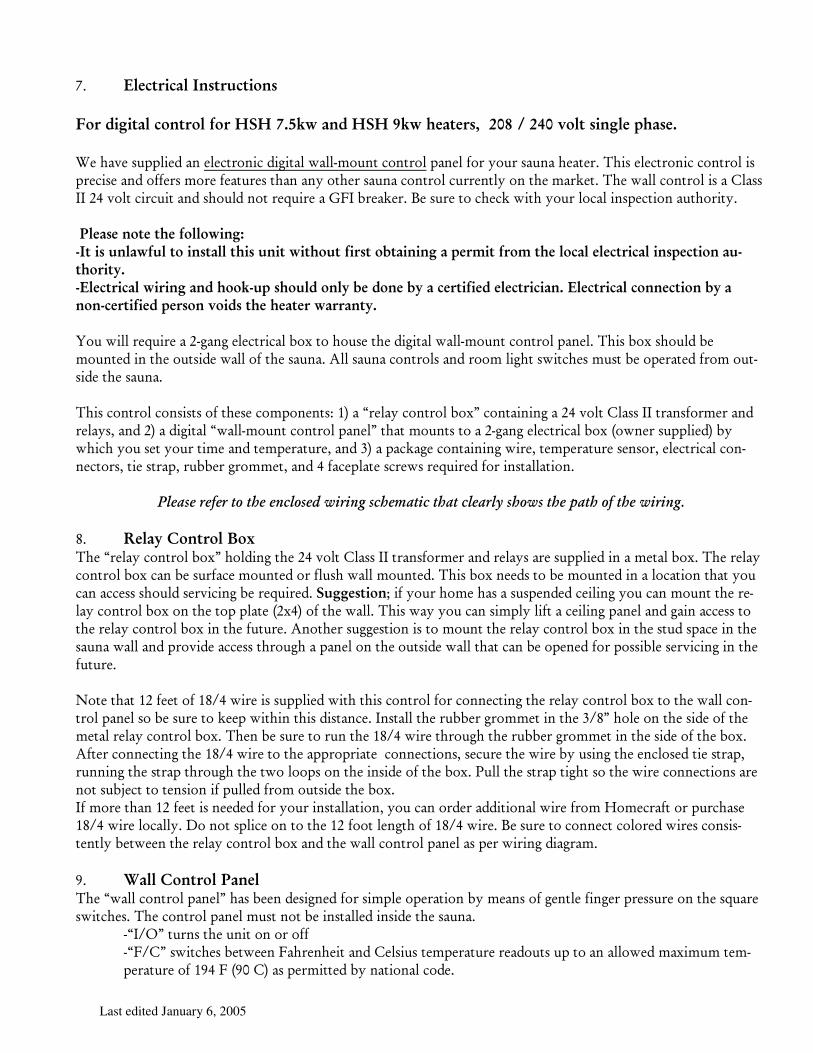
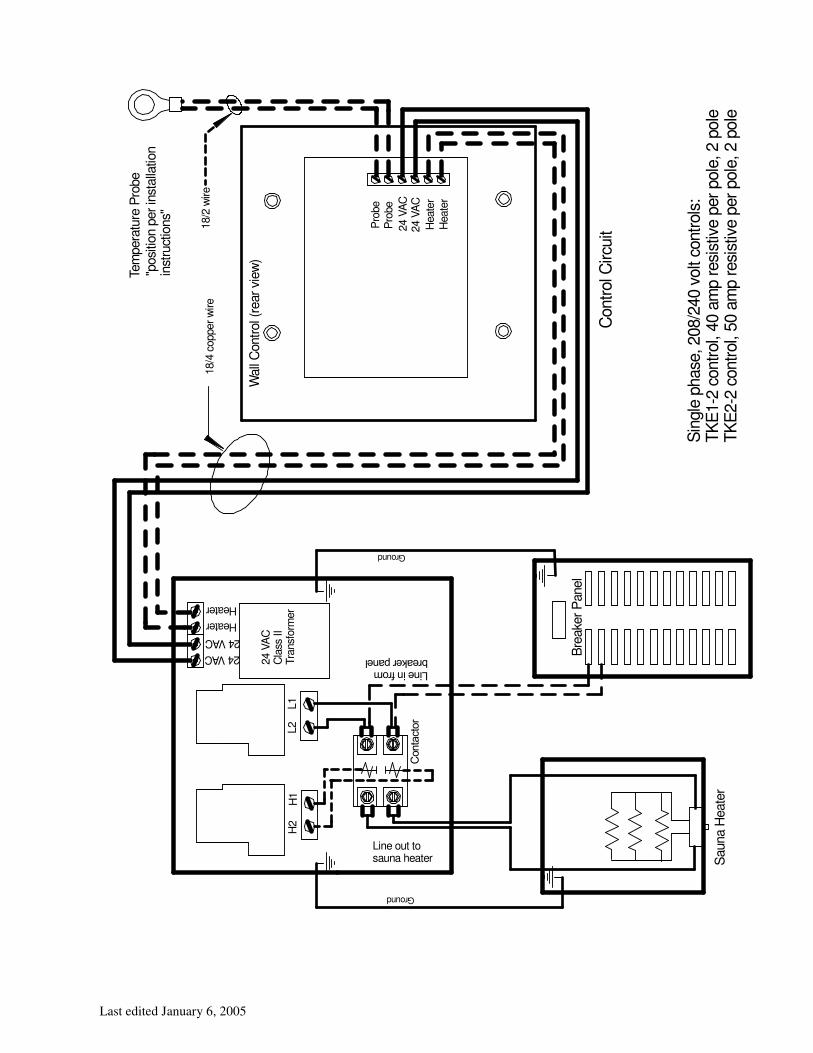
9:% ,)%,/'-,()#%&1/'<,/-0&1##-0'#3-6-/()#,0&/'0)#.0'#$*$#."/>+#(&3#$*$#?>+#8%(/%'10##1 2#3#14 #(0)/#1-&6)%#+8(1%"#%2'%7"/'%*#66.1'+%"$%'.'4()-$14%+131(".%>"..,1-#$(%4-$()-.%6"$'.%8-)%.-#)%*"#$"%7'"('):%?71*%'.'4()-$14%4-$()-.%1*%6)'41*'%"$+%-88')*%1-)'%8'"(#)'*%(7"$%"$.%-(7')%*"#$"%4-$()-.%4#))'$(..%-$%(7'%1")='(:%?7'%>"..%4-$()-.%1*%"%,."**%00%57%/-.(%41)4#1(%"$+%*7-#.+%$-(%)'4#1)'%"%'50%-)'"='):%&'%*#)'%(-%47'4=%>1(7%.-#)%.-4".%1$*6'4(1-$%"#(7-)1(.:%%%7)%(1%#&0/%#/8%#.0))0+-&6%/#-1#<&)(+.<)#/0#-&1/())#/8-1#<&-/#+-/80</#.-'1/#0"/(-&-&6#(#+%':-/#.'0:#/8%#)0,()#%)%,/'-,()#-&1+%,/-0&#(<5/80'-/*"#5,)%,/'-,()#+-'-&6#(&3#800>5<+#180<)3#0&)*#"%#30&%#"*#(#,%'/-.-%3#%)%,/'-,-(&"#,)%,/'-,()#,0&&%,/-0&#"*#(#&0&5,%'/-.-%3#+%'10&#(0-31#/8%#8%(/%'#+(''(&/*"#%+-#%>1..%)'4#1)'%"%5,3"$3%'.'4()14".%--0%(-%7-#*'%(7'%+131(".%>"..,1-#$(%4-$()-.%6"$'.:%?71*%--0%*7-#.+%-'%1-#$('+%1$%(7'%-#(*1+'%>"..%-8%(7'%*"#$":%#..%*"#$"%4-$()-.*%"$+%)--1%.137(%*>1(47'*%1#*(%-'%-6')"('+%8)-1%-#(,*1+'%(7'%*"#$":%%?71*%4-$()-.%4-$*1*(*%-8%(7'*'%4-16-$'$(*?%:C%"%@)'.".%4-$()-.%--0>%4-$("1$1$3%"%57%/-.(%,."**%00%()"$*8-)1')%"$+%)'.".*/%"$+%5C%"%+131(".%@>"..,1-#$(%4-$()-.%6"$'.>%(7"(%1-#$(*%(-%"%5,3"$3%'.'4()14".%--0%B->$')%*#66.1'+C%-.%>7147%.-#%*'(%.-#)%(11'%"$+%('16')"(#)'/%"$+%;C%"%6"4="3'%4-$("1$1$3%>1)'/%('16')"(#)'%*'$*-)/%'.'4()14".%4-$,$'4(-)*/%(1'%*()"6/%)#--')%3)-11'(/%"$+%7%8"4'6."('%*4)'>*%)'4#1)'+%8-)%1$*(".."(1-$:%%
%!"#$%#&'#(#'&)*&)+#&#,-"*%#.&/0'0,1&%-+#2$)0-&)+$)&-"#$'"3&%+*/%&)+#&4$)+&*(&)+#&/0'0,15&%
9:% '%)(*#;0&/'0)#=0##?7'%@)'.".%4-$()-.%--0>%7-.+1$3%(7'%57%/-.(%,."**%00%()"$*8-)1')%"$+%)'.".*%")'%*#66.1'+%1$%"%1'(".%--0:%?7'%)'.".%4-$()-.%--0%4"$%-'%*#)8"4'%1-#$('+%-)%8.#*7%>"..%1-#$('+:%?71*%--0%$''+*%(-%-'%1-#$('+%1$%"%.-4"(1-$%(7"(%.-#%4"$%"44'**%*7-#.+%*')/141$3%-'%)'4#1)'+:%*<66%1/-0&E%18%.-#)%7-1'%7"*%"%*#*6'$+'+%4'1.1$3%.-#%4"$%1-#$(%(7'%)',.".%4-$()-.%--0%-$%(7'%(-6%6."('%B507C%-8%(7'%>"..:%?71*%>".%.-#%4"$%*116..%.18(%"%4'1.1$3%6"$'.%"$+%3"1$%"44'**%(-%(7'%)'.".%4-$()-.%--0%1$%(7'%8#(#)':%#$-(7')%*#33'*(1-$%1*%(-%1-#$(%(7'%)'.".%4-$()-.%--0%1$%(7'%*(#+%*6"4'%1$%(7'%*"#$"%>"..%"$+%6)-/1+'%"44'**%(7)-#37%"%6"$'.%-$%(7'%-#(*1+'%>"..%(7"(%4"$%-'%-6'$'+%8-)%6-**1-.'%*')/141$3%1$%(7'%8#(#)':%%!-('%(7"(%:5%8''(%-8%:987%>1)'%1*%*#66.1'+%>1(7%(71*%4-$()-.%8-)%4-$$'4(1$3%(7'%)'.".%4-$()-.%--0%(-%(7'%>"..%4-$,()-.%6"$'.%*-%-'%*#)'%(-%=''6%>1(71$%(71*%+1*("$4':%0$*("..%(7'%)#--')%3)-11'(%1$%(7'%;89>%7-.'%-$%(7'%*1+'%-8%(7'%1'(".%)'.".%4-$()-.%--0:%?7'$%-'%*#)'%(-%)#$%(7'%:987%>1)'%(7)-#37%(7'%)#--')%3)-11'(%1$%(7'%*1+'%-8%(7'%--0:%#8(')%4-$$'4(1$3%(7'%:987%>1)'%(-%(7'%"66)-6)1"('%%4-$$'4(1-$*/%*'4#)'%(7'%>1)'%-.%#*1$3%(7'%'$4.-*'+%(1'%*()"6/%)#$$1$3%(7'%*()"6%(7)-#37%(7'%(>-%.--6*%-$%(7'%1$*1+'%-8%(7'%--0:%(#..%(7'%*()"6%(137(%*-%(7'%>1)'%4-$$'4(1-$*%")'%$-(%*#-A'4(%(-%('$*1-$%18%6#..'+%8)-1%-#(*1+'%(7'%--0:%08%1-)'%(7"$%:5%8''(%1*%$''+'+%8-)%.-#)%1$*(".."(1-$/%.-#%4"$%-)+')%"++1(1-$".%>1)'%8)-1%&-1'4)"8(%-)%6#)47"*'%:987%>1)'%.-4"...:%2-%$-(%*6.14'%-$%(-%(7'%:5%8--(%.'$3(7%-8%:987%>1)':%&'%*#)'%(-%4-$$'4(%4-.-)'+%>1)'*%4-$*1*,('$(..%-'(>''$%(7'%)'.".%4-$()-.%--0%"$+%(7'%>"..%4-$()-.%6"$'.%"*%6')%>1)1$3%+1"3)"1:%%
<:% 4())#;0&/'0)#7(&%)%?7'%@>"..%4-$()-.%6"$'.>%7"*%-''$%+'*13$'+%8-)%*116.'%-6')"(1-$%-.%1'"$*%-8%3'$(.'%81$3')%6)'**#)'%-$%(7'%*4#")'%*>1(47'*:%?7'%4-$()-.%6"$'.%1#*(%$-(%-'%1$*("..'+%1$*1+'%(7'%*"#$":%% ,@08$>%(#)$*%(7'%#$1(%-$%-)%-88%
,@58,>%*>1(47'*%-'(>''$%5"7)'$7'1(%"$+%,'.*1#*%('16')"(#)'%)'"+-#(*%#6%(-%"$%"..->'+%1"011#1%('1,6')"(#)'%-8%:<7%5%B<6%,C%"*%6')11(('+%-.%$"(1-$".%4-+':%

Last edited January 6, 2005
,%(11'%"$+%('16')"(#)'%")'%'"*1..%"+A#*('+%-.%6)'**1$3%(7'%"66)-6)1"('%-#((-$%8-)%;%*'4-$+*:%?11'%4"$%-'%*'(%#6%(7'%1"011#1%"..->'+/%<6%11$#('*:%
% ,(-#471$3%"$.%-#((-$%>1..%+1*6.".%(7'%4#))'$(%*("(#*:%%,.'"$1$3?%#*'%"%+"16%4.-(7:%2-%$-(%#*'%@21$+'0>%-)%"11-$1"%-"*'+%4.'"$')*:%#%11.+%*-"6%*7-#.+%-'%*#88141'$(:%%%
:6:% 6%:+%'(/<'%#*%&10'#?7'%('16')"(#)'%*'$*-)%1*%"(("47'+%>1(7%(7'%*#66.1'+%4-$$'4(-)*%(-%(7'%.'$3(7%B:5%8''(C%-8%:985%>1)':%08%.-#%)',4#1)'%"%.-$3')%+1*("$4'%-'(>''$%(7'%*'$*-)%"$+%(7'%>"..%4-$()-.%6"$'.%-#.%"%$'>%4-$(1$#-#*%.'$3(7%-8%:985%>1)'%"$+%"(("47%(7'%*'$*-)%(-%1(:%2-%!$?%*6.14'%-$(-%(7'%:5%8--(%.'$3(7%-8%>1)':%&'%*#)'%(-%)#$%(7'%:985%1$*1+'%
(7'%1$*#."('+%*(#+%*6"4'%1$%(7'%*"#$"%>"..:%%7%&'%*#)'%(-%.'"/'%"%.1((.'%*."4=%1$%(7'%:985%>1)'%1$%(7'%*(#+%>"..:%!()16%"--#(%<>%8)-1%(7'%0</%'#,(1-&6%-8%(7'%:985%6"1)/%.'"/1$3%(7'%6)-('4(1/'%4"*1$3%-$%(7'%1$+1/1+#".%.'"+*:%?71*%>1..%1"='%1(%'"*1')%(-%"(("47%(7'%:985%>1)'*%(-%(7'%*'$*-)%.'"+*/%"$+%31/'*%1-)'%8.'01-1.1(.%>7'$%6#*71$3%"$.%'04'**%>1)'%-"4=%1$(-%(7'%>"..:%?7'%%*'$*-)%>1)'%*7-#.+%4-1'%-#(%-8%(7'%>"..%1$(-%(7'%*"#$"%)--1%(7)-#37%"%;89>%+1,"1'(')%7-.'%*-%(7'%*'$*-)%1*%6-*1(1-$'+%-/')%(7'%7'"(')%"44-)+1$3%(-%(7'%7'"(')%1$*()#4(1-$*%B*''%813#)'%7C:%%2-%$-(%71+'%-)%-#).%(7'%*'$*-)%-'71$+%"%4-/')%-(7')%(7"$%(7'%-$'%*#66.1'+%>1(7%(71*%4-$()-.:%0$4-))'4(%1$*("..",(1-$%-8%(7'%*'$*-)%>1..%$'3"(1/'..%116"4(%(7'%7'"(')%-6')"(1-$/%4"#*'%$#1*"$4'%7137%.111(%()1661$3%B*"8'(.%+'/14'%1$%(7'%7'"(')C/%"$+%4-16)-11*'%6')*-$".%"$+%81)'%*"8'(.:%%
:::% #*%&10'#;0(%'% *1$3%(7'%*#66.1'+%F9%>--+%*4)'>/%8"*('$%(7'%*'$*-)%(-%(7'%*"#$"%>"..%-/')%(7'%*"#$"%7'"(')%1$%(7'%6)'*4)1-'+%6-*1(1-$%5,:85>%-'.->%(7'%4'1.1$3:%&'%*#)'%(-%)'1-/'%(7'%6)-('4(1/'%6."*(14%81.1%8)-1%(7'%*("1$.'**%*(''.%*'$*-)%4-/')%B513#)'%9C%:%!'0(/%8"*('$%(7'%*'$*-)%4-/')%(-%(7'%>"..%#*1$3%(7'%*#66.1'+%7%%,%%F<%>--+%*4)'>*/%4-/')1$3%(7'%*'$*-)%"$+%("=1$3%4")'%$-(%(-%$14=%-)%4#(%(7'%>1)'*%.'"+1$3%(-%(7'%*'$*-):%?7'%*'$*-)%4-/')%1*%+'*13$'+%(-%"..->%8-)%"+'4#"('%"1)8.->:%0(%"++*%"%$14'%81$1*7'+%.--=%(-%(7'%*'$*-)%"$+%".*-%6)-('4(*%(7'%*'$*-)%8)-1%("16')1$3:%%%%%% % % %
513#)'%9:%
%%%
!"#$%&'() 2(&<.(,/<' -&6# # #;0'+0'(/-0&###F5:<,<<;7,:<5$+%!()''(%!#))'./%&:,:/%,"$"+"/%G7!%7,<%(-..%8)''?%%:,966,996,9;77%%%%%%%%%%%%%%%%%%%%%%%%%%%67-$'?%%<67,999,;76;%%%%%%%%%%%%%%%%%%%%%%%%%%%%%%%%%%8"0?%%<67,999,;;:9%%:(-)&##1(<&(18/%)<1"&%/#################################################################+%"1-/%&##+++"80:%,'(./"",",(#
7#9:6,#:9#%9*69))96%:9#%9#9#7;=)%;#*9;99"#!-1'%8"41.1(1'*%7"/'%'06')1'$4'+%/"$+".1*1%-8%(7'%4-$()-.%*'$*-):%?7'%&-1'4)"8(%*'$*-)%4-/')%1*%+'*13$'+%(-%31/'%1"011#1%*'4#)1(.%"3"1$*(%/"$+".1*1:%08%(7'%*'$*-)%$''+*%(-%-'%)'6."4'+/%1(%1".%-'%$'4'**").%(-%@81*7>%(7'%:985%>1)'%-"4=%(7)-#37%(7'%7-.':%?71*%1*%>7.%>'%*#33'*(%.'"/,1$3%"(%.'"*(%<%1$47'*%-8%*."4=%-$%(7'%.'"+%>1)'%-$%(7'%:985%4"-.':%&'%*#)'%>7'$%1-#$(1$3%(7'%:985%>1)'%1$%(7'%*"#$"%>"..%(7"(%(7'%4"-.'%>1..%$-(%8"..%+->$%"$+%">".%8)-1%(7'%7-.'%"$+%(7"(%(7')'%1*%'$-#37%*."4=%(-%6#..%(7'%.'"+*%(7)-#37:%0$%(7'%'/'$(%(7'%*'$*-)%1*%/"$+".13'+%(7'%*"8'(.%8'"(#)'%-8%(7'%4-$()-.%>1..%+1*"-.'%(7'%7'"(')%8)-1%-6')"(1$3:%%;9;6%:9�$%"%6#-.14%*"#$"%(7'%*'$*-)%*7-#.+%-'%%/1*#"...%1$*6'4('+%'/').%+".%(-%'$*#)'%(7')'%")'%$-%--*()#4(1-$*%"$+%(7"(%"1)%8.->*%8)''..%")-#$+%(7'%*'$*-):%
Last edited January 6, 2005
Pro
be
Pro
be
24 V
AC
24 V
AC
Heate
r
Heate
r
24 V
AC
Cla
ss II
Tra
nsf
orm
er
H2
H1
L2
L1
Bre
ake
r P
anel
Sauna H
eate
r
24 VAC
24 VAC
Heater
Heater
Sin
gle
phase
, 208/2
40 v
olt
contr
ols
:T
KE
1-2
contr
ol,
40 a
mp r
esi
stiv
e p
er
pole
, 2 p
ole
TK
E2-2
contr
ol,
50 a
mp r
esi
stiv
e p
er
pole
, 2 p
ole
Tem
pera
ture
Pro
be
"posi
tion p
er in
stalla
tion
inst
ruct
ions"
Wall
Contr
ol (
rear
view
)
Contr
ol C
ircu
it
18/4
copper
wire
Ground
Ground
18/2
wire
!"#$%"#%&'()*'$+,$'%-+#$.
Line out tosauna heater
/(#0+
10('