NOBTS Registration Procedures
22
NOBTS Registration Procedures
Transcript of NOBTS Registration Procedures

NOBTS Registration Procedures

*Go To Selfserve.nobts.edu
*At the Login page – use your current username and password to login

After Logging in, left click on the “Register” tab.

Left click on the “Registration for Credit Classes” menu item.

Please take a minute to update your “Personal Information”, “Address
Information”, and “Phone Numbers” using the links on the left hand menu.
Choose the Year/Term listed on the “Registration” window for which you
would like to register. The Year/Terms that are open for registration will
appear. The Status column indicates if you are eligible to register for that
Year/Term .

Use the “Section Search” to locate sections being offered in
that Year/Term.

The “Advanced Search” tab will offer more detailed fields
for you to use. Remember, the more fields you use the
fewer courses will be located.

If you are an extension center student, you may want to use the
“Advanced Search” field, “College” to narrow down the sections to
only those that are offered at your center.

When you have located a course for which you would like to register,
use the “Add” button on the right hand side of the screen to “Add”
the course to your registration cart.

You should receive a “Course Added” pop-up window
which will allow you to “View Cart” or “Proceed to
Registration”.
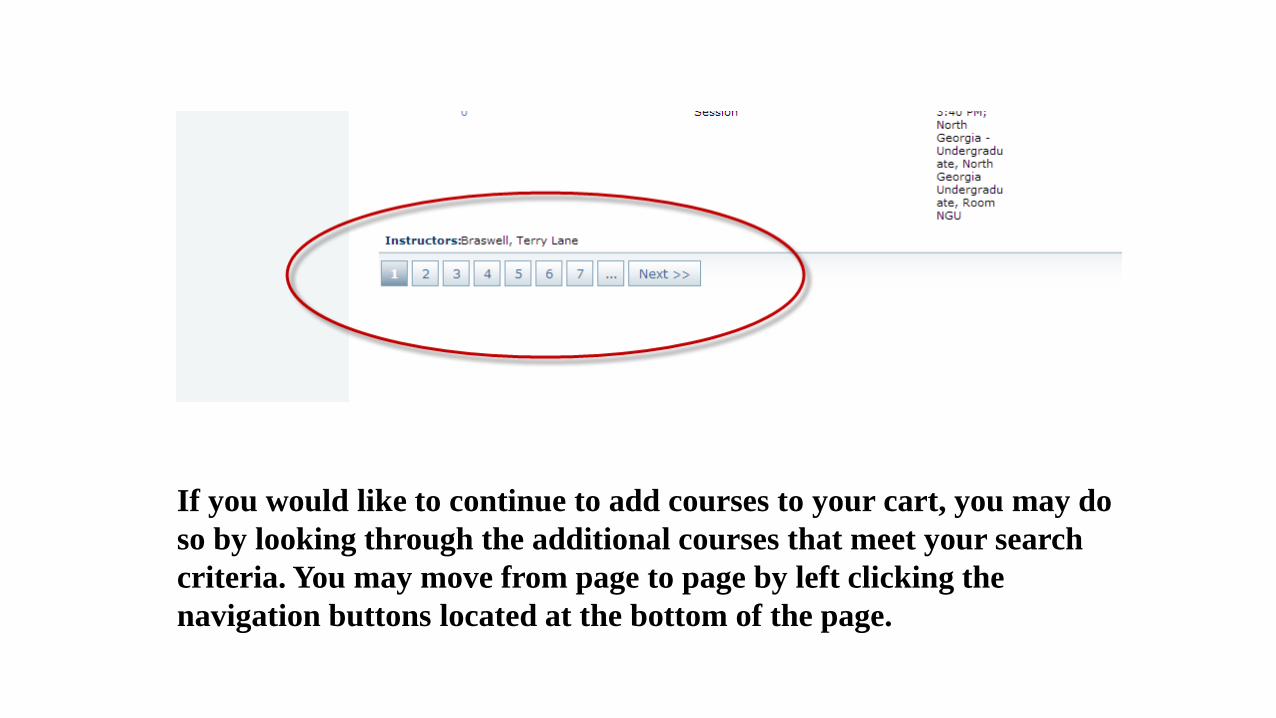
If you would like to continue to add courses to your cart, you may do
so by looking through the additional courses that meet your search
criteria. You may move from page to page by left clicking the
navigation buttons located at the bottom of the page.

If you would like to change your criteria, left click on the
“Refine Search” button located on the left hand menu and change
your search preferences.

When you have completed your selections, left click on “Proceed to
Registration,” and you will be taken to your cart for one final review
of your course selections. If you need to remove a course, left click
on the “Remove” button on the right hand side of the screen.

Your courses will be assessed, and you will be given the opportunity to pay
for your classes at this time. If you choose not to pay now, please be aware
that there is a payment deadline for each term. Please check the academic
calendar / academic catalog for the appropriate date.

To drop a class, left click on “Register” and then “Registration.” As long as the year
and term for which you previously registered shows as “OK to Register,” you may
make changes to your schedule without any “Drop/Add” fees. Left click on the year
and term for which you previously registered. Your registered courses should
appear with a checkbox to the left labeled “Drop.” Click in the box beside the course
you wish to drop, and then click on “Next.” The course will be dropped and the fees
reversed off your account.

Registration FAQ’s
What if I forget my password for SelfServe?
If you have set up a SelfServe security question you can use the “Forgot My
Password” feature located on the login screen of SelfServe.NOBTS.edu to
reset it. The system will email you a temporary password that you can use
to login. Watch for the email in your inbox (or sometimes it gets placed in
your Spam folder). If you did not set up a security question, email
[email protected] for assistance. Don’t forget to change your password
to something you can remember after you login!
What if I forget my user name for SelfServe?
You can get help by emailing [email protected].

Am I Eligible to register? How do I know if I am?
After you login to SelfServe.nobts.edu you will need to go to the “Register” Tab and click on the
“Registration” link. The Year/Term periods currently open for registration are listed with your status off to
the right. If you see “OK to Register” beside a term you may click on the Year/Term link to begin registration
for that period. If you see “Not OK to Register” beside a term you will be prevented from registering for
that Year/Term.
Why would my status be “Not OK to register” or “Not eligible to register”?
Look at the status column on the right hand side of the window for more information. There are various reasons that
this situation might occur:
·You might need to talk with and be cleared by your advisor.
·You might have a “Stop” on your account - placed by an office needing to talk with you (information located center
of page). Contact the office listed for instructions on getting this cleared.
·You might need to talk with your degree office (Leavell College or Registrar’s Office) to determine the reason and
get it cleared up. Do this soon so you can register.

Will I have to register for more than one Year/Term?
Possibly. If you plan on taking an online course you will need to register in the term designated as
the “Internet” term. If you plan on taking a hybrid course you will need to register in the term
designated as the “Hybrid” term. If you plan on taking a traditional semester course you will need to
register in the appropriate term not designated as “Internet” or “Hybrid.”
What if I do not see the Year/Term period I want to register for?
The Year/Term might not be open for registration at that time. Consult the Academic Calendar for the
appropriate registration dates, or contact the Registrar’s or Leavell College Office for clarification.
How do I find the courses that I want to register for?
After you have logged into SelfServe (selfserve.nobts.edu), select the Register tab (located at the top left
hand portion of the window) and the Registration option (located on the top left hand portion of the window
below tabs). Click on the year and term for which you wish to register (located in the center portion of the
window).

Be sure the year and term for which you wish to register is displayed in the Period box.
Search for the course/section you want by using one of these methods:
1) COURSE CODE: If you know your course code (example: NTEN5300), type it into the Course Code box without any spaces or dashes and click on Search. Do not include the section number in this box.
2) KEYWORDS: If you do not know your course code, you may be able to find the course by typing in a portion of the course name in this box (example: New Testament).
3) COLLEGE CODE: To find all offerings for the specific location you attend, leave the COURSE CODE and KEYWORDS boxes blank, and click on Advanced Search. Click on the dropdown box that is labeled “College,” and select the location where the course is being offered. Once you have found your course, click on the Add button (located on right hand side of window - you may need to scroll right to see it).
** Be sure you choose the section taught at the location you are interested in. You can find the location in the "Schedule" column for the section.
To add another, simply click on View Cart and Add Section

How do I finalize the online registration process for the courses I select?
After you add a course to your cart, you can choose to "View Cart" or "Proceed to Registration." If
you have no other courses to add for the term you have selected, click on "Proceed to Registration"
and then click on "NEXT." When your fees are displayed, you may select your payment method to
complete the process.
If you have additional courses to add for the term, click on "View Cart" and then "Add Section."
Once you have added all your courses, click on link called "REGISTER" and then click on "NEXT."
When your fees are displayed, you may select your payment method to complete the process.
**Note: “Bill me later” means that you will be mailing your payment in to the Business Office before
the final payment date for the term.
TIP: When you see the screen that gives you the charges for the term you are registering for, you will
know that you have finalized the process.

How do I pay my account balance?
1. Online:
Pay your account balance via Self Serve, the academic and financial tool available to
NOBTS students. This is a secure and convenient means of paying an outstanding balance.
You can access Self Serve at selfserve.nobts.edu. Follow the instructions to input your
account information. Once on your account homepage, click the “Finances” tab from the
row of folders across the top of the page. Select “Balance” under the main tabs on the left
hand side. From the drop down box showing semesters, select “All;” then select “Balance
Summary,” and click on “Change.” Look for the amount you owe to be on the right hand
side. Finally, scroll down to the “Make a Payment” input bar at the bottom left of your
screen.
**In order for this to work, you must turn OFF your pop-up blocker. Once an amount is
input into the bar, click “Make a Payment,” and follow the instructions to complete the
transaction.

2. Telephone Operating System:
This system allows you to pay your account through a secure phone line. Our ‘IVR’ system is convenient,
able to be used anywhere a phone call can be placed, and utilizes the phone’s keypad to take information. To
utilize this payment option, make sure you are connected to a land line OR have a clear enough signal to
make a call from your cell phone. Have your card information and student identification number at hand.
Dial 1-866-606-8235 and follow the instructions that are given by the interactive voice system. Be prepared
to verify the information you input after each step once it is read back to you with "yes" or “no,” or you will
not be able to complete the transaction.
3. Business Office Window:
Last, but not least, you can come into the business office located in the Hardin Student Center at NOBTS,
Monday through Friday 8:15am – 4:00pm. If you choose to mail your payment to the Business Office, it
must be RECEIVED by the last day of payment for the term for which you have registered. We have two
convenient payment options available via Self Serve and IVR. We highly encourage you to utilize one of
these two options. If it is more convenient for you to stop by our window or mail your payment, you are
more than welcome! Call 504-282-4455 if you have any questions pertaining to payments and account
information.