No 'I' in Team: Creating a Collaborative Team Environment
16
Whitepaper No “I” in Team Creating a Collaborative Team Environment in LISTSERV® Maestro August 25, 2010 Copyright © 2010 L-Soft international, Inc.
Transcript of No 'I' in Team: Creating a Collaborative Team Environment

Whitepaper
No “I” in Team
Creating a Collaborative Team Environment in LISTSERV® Maestro
August 25, 2010 Copyright © 2010 L-Soft international, Inc.

Information in this document is subject to change without notice. Companies, names, and data used for examples herein are fictitious unless otherwise noted. Some screen captures have been cropped and/or edited for emphasis or descriptive purposes.
Permission is granted to copy this document, at no charge and in its entirety, if the copies are not used for commercial advantage, the source is cited, and the present copyright notice is included in all copies. Recipients of such copies are equally bound to abide by the present conditions. Prior written permission is required for any commercial use of this document, in whole or in part, and for any partial reproduction of the contents of this document exceeding 50 lines of up to 80 characters, or equivalent.
L-Soft invites comments on its documentation. Please feel free to send your comments by email to: [email protected]
Copyright © 2010, L-Soft international, Inc. All Rights Reserved Worldwide. LISTSERV is a registered trademark licensed to L-Soft Sweden and L-Soft international, Inc. All other trademarks, both marked and not marked, are the property of their respective owners.

Introduction No matter how big or small your organization, one of the biggest challenges is creating a collaborative team environment to streamline productivity when creating your email communication strategy. Because of this, LISTSERV Maestro has explicitly designed a set of team collaboration features that allow any number of users to work on similar or varying email job components. This multi-user, collaborative environment can save you time, help you control the final sending authorization, and unify the look and feel of an organization’s electronic communication.
Whether there are two or twenty people involved in the process of your organization’s email communication strategy, LISTSERV Maestro has the solution for defining and restricting each team member to the roles assigned, and yet the flexibility to allow workers with several roles to easily move back and forth between them.
FAQs
What is Team Collaboration?
Team Collaboration is based on user account settings, specifically the assignment of a user "group". User accounts can be assigned to a group, or they can exist as stand-alone accounts. User accounts that have been assigned to a group automatically share any target groups, sender profiles, and drop-in content elements that have been created by any account within the group. User accounts in the same group can also use Team Collaboration settings to share some or all of the rights to a job definition, including selecting recipients, creating content, testing, sending the final message, and creating or viewing reports. Stand-alone accounts have no group assignment, and therefore, lack the ability to share anything with other accounts.
How many groups can a user belong to?
There is no limit to the number of groups a user can belong to.
What if I have a user that is part of several accounts and/or groups? Will this particular user have to log in and out to work in each account/group?
No. By establishing an identity for that user, they can access each group without logging in and out of LISTSERV Maestro. An identity is a collection of several accounts that belong to one and the same "identity", usually a person. By collecting all accounts of one person into an identity, LISTSERV Maestro knows that these accounts all belong together. As a result, the user is then allowed to switch between the accounts in the identity without having to perform an actual logout and login. In other words, if a user logs in with one account that belongs to an identity, he can then switch over to all other accounts in the same identity without having to first logout the old account and then login again with the new account (he does not even have to provide the password of the new account). Identities are useful in cases where one and the same person was assigned several accounts for different purposes. The user can then simply log in with one account and perform some tasks necessary under this account, then easily switch to any of his other accounts and perform some tasks there. For details on creating an identity, see the Creating a New Identity section.
I only want one person to finalize and send email jobs. Is this possible?
Yes. When a user belongs to a group, the LISTSERV Maestro administrator can restrict what areas of a job a user can access by defining whether or not a user has the right to define recipients, job content, tracking, or job scheduling; authorize delivery; or use a particular job in
L- Soft Whitepaper Team Collaboration | 1

reports. For details, see the Assigning Job Rights section. For an example of this, see the Executive Editor scenario.
I’m the LISTSERV Maestro administrator for my organization and I need help. Can I create a user that has certain administrative privileges but not all of them?
Yes. As the administrator you can easily setup specific user rights for any other user account. You can decide whether or not a user can create jobs or reports; administer sender profiles, drop-ins, content templates, target groups, or datasets; or create a link between the LISTSERV Maestro datasets and LISTSERV. For details, see the Assigning User Rights section.
What happens to the data associated with a user account if it is deleted?
When a user account is deleted, the administrator can decide whether or not to keep or delete the data associated with that particular account. If the administrator decides to keep the data associated with that user, then they can reassign it to different users or delete the data individually at a later time.
Important: If the user belongs to a group, then how the data is handled will affect the group as well. For details, see the Deleting a User Account section.
Can a group be deleted? If so, what happens to users that belong to it?
Yes, a group can be deleted. When the administrator deletes a group, LISTSERV Maestro lets them decide whether to keep or delete the jobs, reports, and other data associated with the users in that groups. If the administrator decides to keep the data associated with that group, then they can reassign it to different users or groups or delete the data individually at a later time. For details, see the Deleting a Group section.
Can an identity be deleted? If so, what happens to users that belong to it?
Yes, an identity can be deleted. When the administrator deletes an identity, it is completely removed from LISTSERV Maestro and the users that once belonged to it will no longer be associated with it. For details, see the Deleting an Identity section.
Team Collaboration Scenarios In order to illustrate more fully the power of using LISTSERV Maestro to create a collaborative team environment, three scenarios are described in the sections below. Each scenario uses team collaboration and user settings in different ways to control work flow, standardize electronic communication, and make the best use of employee talent.
An Executive Editor Organization ABC has a very centralized structure. They want to ensure that all electronic communication from them to their recipients is reviewed by an executive editor. This editor will make sure that each job meets ABC's standard format and uses the organization's policies for external communication.
In order to achieve this practice, ABC creates a group called "email". Within this group, several accounts are created. Every account for this group must be given the right to create jobs and reports. (For details, see the Assigning User Rights section.)
One account in the “email” group is named “editor”, and it is this account that will own all the jobs created by all the other accounts in the group. The "editor" account must establish default team collaboration settings before any of the other accounts can create new jobs, sharing at least one job right with the other accounts. If this is not done, the other users will not be able to
L- Soft Whitepaper Team Collaboration | 2
create new jobs. (To set the default team collaboration settings for new email jobs for the "editor" account, see the Assigning Job Rights section for more details.)
Because the executive editor has the final say over whether a job is delivered, all the job rights for normal accounts are selected except for the Delivery right. The accounts within the “email” group can create new jobs by defining recipients, content, tracking, scheduling, and testing, but they cannot authorize a job for delivery; only the editor account has that right. By setting up user accounts in this fashion, Organization ABC can have a single editorial review process before any external electronic communication is sent to recipients.
Table 1: Breakdown of Default Job Rights Set for the “Email” Group at ABC
Recipients Definition
Content Definition
Tracking Scheduling Testing Delivery Use in
Reports
Manage Variants
Executive Editor
X X X X X X X X
Normal Accounts
X X X X X X X
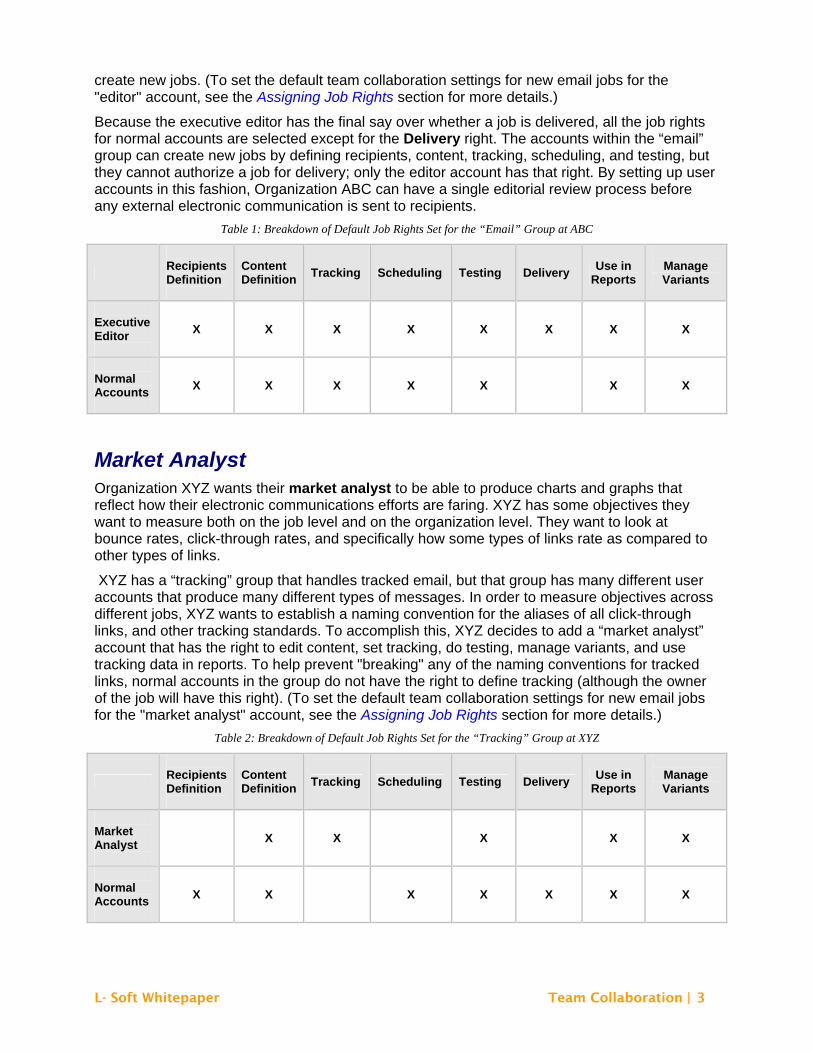
Market Analyst Organization XYZ wants their market analyst to be able to produce charts and graphs that reflect how their electronic communications efforts are faring. XYZ has some objectives they want to measure both on the job level and on the organization level. They want to look at bounce rates, click-through rates, and specifically how some types of links rate as compared to other types of links.
XYZ has a “tracking” group that handles tracked email, but that group has many different user accounts that produce many different types of messages. In order to measure objectives across different jobs, XYZ wants to establish a naming convention for the aliases of all click-through links, and other tracking standards. To accomplish this, XYZ decides to add a “market analyst” account that has the right to edit content, set tracking, do testing, manage variants, and use tracking data in reports. To help prevent "breaking" any of the naming conventions for tracked links, normal accounts in the group do not have the right to define tracking (although the owner of the job will have this right). (To set the default team collaboration settings for new email jobs for the "market analyst" account, see the Assigning Job Rights section for more details.)
Table 2: Breakdown of Default Job Rights Set for the “Tracking” Group at XYZ
Recipients Definition
Content Definition
Tracking Scheduling Testing Delivery Use in
Reports
Manage Variants
Market Analyst
X X X X X
Normal Accounts
X X X X X X X
L- Soft Whitepaper Team Collaboration | 3

Dividing Work among Specialists Some organizations may have many specialists that they would like to utilize when creating their email communication strategy.
For instance, let’s say that your organization has an executive editor/manager who will manage and review the entire job process and make sure that each job meets their standard format and uses the organization's policies for external communication. The editor will need total access to all user and job rights. The editor account must establish default team collaboration settings before any of the other accounts can create new jobs, sharing at least one job right with the other accounts. If this is not done, the other users will not be able to create new jobs. Since the executive editor has the final say over whether a job is delivered, all the job rights for normal accounts are selected except for the Delivery right, which is exclusive to the executive editor.
In addition, your organization has a template/content specialist who you want to design and create your messages. This specialist will need the ability to create jobs and reports, and administer drop-ins and content templates. In addition, they’ll need to be able to define the jobs content and access to the job for reports.
Your organization also has a data specialist to create and manage your target groups and datasets. This specialist will need the ability to administer sender profiles, target groups, datasets, and the ability to link your LISTSERV Maestro and LISTSERV datasets, if applicable. In addition, you can assign any job rights that you feel the data specialist should have access to; although, these rights are not necessary for successful data administration duties.
Finally, a market analyst is needed to test how your audience responds to specific design and contextual elements in your email jobs. This analyst will need the ability to create jobs and reports, and they’ll need to be able to edit content, set tracking, do testing, manage variants, and use job data in reports.
Table 3: Breakdown of User Rights Set for Several Specialists
Create Jobs
Create Reports
Admin Sender Profiles
Admin Drop-Ins
Admin Content
Templates
Admin Target Groups
Admin Datasets
Link
Datasets and WA
Executive Editor/ Manager
X X X X X X X X
Template/ Content Manager
X X X X
Data Specialist
X X X X
Market Analyst
X X
Normal Accounts
X X
For details on accessing and enabling user rights, see the Assigning User Rights section.
L- Soft Whitepaper Team Collaboration | 4

Table 4: Breakdown of Default Job Rights Set for Several Specialists
Recipients Definition
Content Definition
Tracking Scheduling Testing Delivery Use in
Reports
Manage Variants
Executive Editor
X X X X X X X X
Template Content Manager
X X
Data Specialist
X X X
Market Analyst
X X X X X
Normal Accounts
X X X X X X X
For details on accessing and enabling job rights, see the Assigning Job Rights section.
Setting Up Your Collaborative Team Environment This section gives you step-by-step instructions for creating and managing your user account, groups, and identities in order to create a successful collaborative team environment.
Creating User Accounts, Groups, and Identities A user account is used for the actual login to LISTSERV Maestro. To be able to login, a user must supply a valid account name (and the account's group name, unless the account does not belong to a group), together with the account's password. Each user account is associated with a certain set of user rights that allow or disallow different actions in LISTSERV Maestro while you are logged in with this account.
If the new account will be part of a group, a group name is also assigned. New accounts can be added to an existing group where they will automatically share existing sender profiles, drop-in content elements and target groups. Existing accounts can have their group changed, or they can be withdrawn from any group.
A user can have multiple LISTSERV Maestro accounts as long as the combination of user name and group is unique. For example, the user name "jsmith" can exist in the group "sales", in the group "marketing", and as a stand-alone account with no group name. Users with multiple accounts within different groups cannot share resources or jobs across groups, but they can participate in work shared by the individual groups their accounts reside in.
An identity is a collection of several accounts which belong to one and the same "identity", usually a person. By collecting all accounts of one person into an identity, LISTSERV Maestro knows that these accounts all belong together. As a result, the user is then allowed to switch L- Soft Whitepaper Team Collaboration | 5

between the accounts in the identity without having to perform an actual logout and login. In other words, if a user logs in with one account that belongs to an identity, he can then switch over to all other accounts in the same identity without having to first logout the old account and then login again with the new account (he does not even have to provide the password of the new account).Identities are useful in cases where one and the same person was assigned several accounts for different purposes. The user can then simply log in with one account and perform some tasks necessary under this account, then easily switch to any of his other accounts and perform some tasks there.
Notes: Because of this switching between accounts in the identity, it is important not to add any accounts to one and the same identity, between which such a switching should not be allowed.
Deleting groups causes specific, irreversible actions. Be sure to familiarize yourself with the Deleting a User Account, Identity, or Group section before you delete an account, group, or identity.
The Administer User Accounts and Identities screen in the Administration HUB displays a list of all defined user accounts and identities.
Figure 1: Administer User Accounts and Identities
Each user name is a link that opens the Define User Account screen, and each identity name is a link that opens the Define Identity screen. Links on the Define User Account screen lead to user settings that can be changed for only that single user account. If the user is a member of a group, the group name is a link that opens the Group Settings screen, containing settings that can be changed for the entire group.
From the Administer User Accounts and Identities screen it is possible to:
Add a new user account or identity
Assign users to a group or identity
Edit existing user account and group settings, including deleting the accounts, identities, or groups
L- Soft Whitepaper Team Collaboration | 6

Creating a New User Account To create a new user account, click the [Add User Account] button on the Administer User Accounts and Identities screen. The Define User Account screen opens.
Figure 2: Defining a User Account
Enter data for a new user account:
User – Fill in a user name. User names are not case sensitive, and can be composed of letters, numbers, and symbols. User names can also contain spaces. User names must be unique if users are not assigned to a group. Users assigned to different groups may have the same user name as long as the combination of user name and group name is unique.
Group – Assign the user to a group, if desired. Groups are optional and can be left blank. However, users must be assigned to a group in order to use the team collaboration features. Only members of the same group can collaborate on email jobs. The combination of user name and group name must be unique. There cannot be two users with the same name in the same group, although there may be two users with the same name in different groups.
Identity – Assign the user to an identity, if desired. Identities are optional and can be left blank.
Password – Assign a password. All passwords are case sensitive, and must be at least five characters long.
Confirm Password – Retype the password to confirm it.
Check The user is allowed to change his password if you want to grant the user permission to change his or her password. Uncheck this option to revoke this privilege. Click [Save] to save the account information and continue. Alternatively, click [Cancel] and the new user will not be created.
Note: If the user is allowed to change his/her password, then the Change Password option on the Utility menu in the LISTSERVE Maestro User Interface will be available.
L- Soft Whitepaper Team Collaboration | 7

Creating a New Identity To create a new identity, click the [Add Identity] button on the Administer User Accounts and Identities. The Define Identity screen opens.
Figure 3: Defining an Identity
Enter the identity’s name in the Name field, and then select the accounts that are in the identity.
To add an account to the identity, select it in the Available Accounts list and click the [->] button. This will move the identity into the Accounts in Identity list.
To remove an account from the identity, select it in the Accounts in Identity list and click the [<-] button. This will move the identity into the Available Accounts list.
Click [OK] to submit your changes, or click [Cancel] to exit without submitting your changes.
Important: LISTSERV Maestro interprets all accounts in an identity as related and allows a user to switch between these accounts without providing the login information for each account. In other words, if a user logs in with one of the accounts in the identity, then this user can switch to all other accounts in the same identity without having to know the passwords of these other accounts. Because of this, it is very important that you do not combine accounts into one identity that should not be accessed by the same user.
Assigning User Rights To define the Maestro User Interface user rights for the accounts in the currently selected group, click the User Rights Management for Maestro User Interface link on the Administer User Accounts and Identities screen (see Figure 1). The User Rights Management for Maestro User Interface screen opens.
L- Soft Whitepaper Team Collaboration | 8

Figure 4: User Rights Management Screen
From this screen, you can assign user rights for the entire group or for a specific user in that group.
Tip: You can also click on a specific account in the Administer User Accounts and Identities screen and change the Maestro User Interface rights for the selected account only. For more information, see Section 7.4 Editing Account Information and Assigning Single User Settings in the LISTSERV Maestro Administrator’s Manual.
The following user rights can be assigned or unassigned:
Create Jobs – Grants the right to create new jobs. If the user is a member of a group with the right to create new jobs, it is necessary to also define who owns the jobs that are created by this account. Jobs can be owned by the account that creates them or by another group member selected from the Designated Job Owner drop-down menu. If jobs created by one account are owned by another group member, when the user creates a new job, the ownership will be set to the other group member and the team collaboration default preferences of that account are applied.
Important: If the owner account of a job that another account tries to create has not given that account at least one right in their team collaboration default settings, then the creating account will not be able to start a new job, and an error message will appear on the Start New Job screen.
Create Reports – Grants the right to create new reports. Existing reports are available for all members in a group.
Admin Sender Profiles – Grants the right to create new sender profiles. Existing sender profiles are available for all members in a group.
Admin Drop-Ins – Grants the right to create new drop-in content elements. Existing drop-ins are available for all members in a group.
Admin Content Templates – Grants the right to create, edit, and delete message templates. Enabled templates are available for all members in a group.
Admin Target Groups – Grants the right to administer existing target groups and to create new recipient target groups using the Recipients Target Groups Wizard.
Admin Datasets – Grants the right to administer recipient datasets in the recipient warehouse. This includes creating, editing, and deleting datasets, hosted lists, and individual subscribers. It also grants the right to administer target groups.
Link Datasets & WA – If granted, the user may create a link between any recipient dataset and the LISTSERV Web Interface of the LISTSERV instance that the user is connected to. For a dataset that is linked, the membership area of the dataset will
L- Soft Whitepaper Team Collaboration | 9

automatically provide links that allow the subscribers to directly access the list archive pages of the LISTSERV Web Interface.
By clicking on the User link, every member of the group will be granted every user right. In addition, by clicking on the name of the user right (e.g. Create Jobs), then every member of the group will be granted that specific user right.
Assigning Job Rights Accounts that are allowed to own jobs may give other account holders in the same group rights to work on parts of an individual job definition. (See the Dividing Work among Specialists scenario.) Granting job rights is done on a per job basis by clicking on the Team Collaboration button within each job to be shared. In situations where the team arrangements tend to be the same from job to job, the customary team collaboration settings can be saved in an account’s preference settings, to be applied automatically to each new job owned by that account.
To assign job rights for a specific job, go to the LISTSERV Maestro Web Interface, open the Job Details screen for the job, click on the Mail Job menu, and then select Team Collaboration. The Team Collaboration screen opens.
Figure 5: Team Collaboration Screen for a Single Job
To assign job rights in the account’s preference settings, go to the LISTSERV Maestro Web Interface, click on the Preferences menu, select Mail Job, and then select New Mail Job. The Job Definition Preferences screen opens. In the Default Team Collaboration section, click the Edit link. The Team Collaboration screen opens.
Figure 6: Team Collaboration Screen for Mail Job Preferences
L- Soft Whitepaper Team Collaboration | 10

Team collaboration options are displayed in a table listing all the accounts within the group and all the available rights for that job. Each group member may be granted any or all rights to a job. The following rights are available for each job:
Recipients Definition – When granted, the account may define recipients for the job.
Content Definition – When granted, the account may create or edit content for the job.
Tracking – When granted, the account may define tracking for the job, selecting the type of events to be measured, assigning link aliases, and determining the level of tracking to be performed.
Scheduling – When granted, the account may define the job’s delivery schedule, setting a date and time as well as setting recurring deliveries.
Testing – When granted, the account may perform delivery tests on the job in preparation for final delivery authorization.
Delivery – When granted, the account may authorize a job for final delivery, or may revoke delivery for a job awaiting a scheduled date and time in the Outbox.
Use in Reports – When granted, the account may use tracking data from the job in the creation of reports.
Manage Variants – When granted, the account may manage the variant jobs in an A/B-split job. This option is only available when setting the mail job preferences.
Assigning job rights is the second "tier" of controlling how accounts interact with each other and share work assignments and tracking data. No job rights are granted by default and must be granted deliberately by the owner either through user settings or individually for each job.
Deleting a User Account, Identity, or Group Deleting a User Account To delete a user account, select the user from the Administer User Accounts and Identities screen. The Define User Account screen opens.
Figure 7: The Delete User Option
Click on the Delete User option. The Delete User Account screen opens.
L- Soft Whitepaper Team Collaboration | 11

Figure 8: Deleting a User Account
This screen allows you to delete the currently selected user account. Depending on what kind of a user account is currently selected one of the following options pairs will be available:
Account not in a group:
Keep data owned by the account: Only the account itself and its personal settings will be deleted. The other data that is owned by the account will not be deleted but will remain in the system as "ownerless". The administrator can then later assign ownership of this data to a different user account or group or can delete the data separately.
Delete the account with all owned data and personal settings: Together with the user account, all data and settings that are owned by or associated with this account will also be deleted.
Group-account, with other accounts existing in the same group:
Keep data owned by this account: Only the account itself and its personal settings will be deleted. The other data that is owned by the account will not be deleted but will remain in the system as "ownerless". The administrator can then later assign ownership of this data to a different user account or group or can delete the data separately. All group owned data will not be deleted either.
Delete the account with all owned data and personal settings: Together with the user account, all data that is owned by or associated with this account will also be deleted. Any group owned data will not be deleted.
Group-account, last account in the group:
Keep data owned by the account or group: Only the account itself and its personal settings will be deleted. The other data that is owned by the account or its group will not be deleted but will remain in the system as "ownerless". The administrator can then later assign ownership of this data to a different user account or group or can delete the data separately. The group specific settings will also not be deleted.
Delete the account with all owned data and personal settings: Together with the user account, all data that is owned by the account or its group will be deleted, as well as the personal settings of the account and the group specific settings.
Click [Delete] to delete the currently selected account with the selected option, or click [Cancel] to leave the page without deleting the account.
Any jobs, reports, sender profiles, and drop-in content elements owned by that user become “orphaned” and need to be reassigned. See Section 8 Special Administrative User Account.
Deleting an Identity To delete an identity, select the identity from the Administer User Accounts and Identities screen, and then click the [Delete] button. This only deletes the identity (the relationship between accounts) not the accounts belonging to the identity.
L- Soft Whitepaper Team Collaboration | 12

Figure 9: Deleting an Identity
Deleting a Group To delete an entire group, select the group from the Administer User Accounts and Identities screen, and then select Delete Group from the Group Settings screen. The Delete Group screen opens.
Figure 10: Deleting a Group
This screen allows you to delete the currently selected group using one of the following options:
Keep data owned by the group and its accounts: Only the group specific settings and the accounts in the group with their personal settings will be deleted. The other data that is owned by the group or its accounts will not be deleted but will remain in the system as "ownerless".
This option gives the administrator the chance to later assign ownership of this data to a different user account or group or can delete the data separately.
Delete the group and all group accounts, with all owned data and settings: Together with the group and all user accounts in it, all data and settings that are owned by or associated with this group or its accounts will also be deleted.
Click [Delete] to delete the currently selected group with the selected option, or click [Cancel] to leave the page without deleting the group.
L- Soft Whitepaper Team Collaboration | 13

L- Soft Whitepaper Team Collaboration | 14
Conclusion The challenge of creating a successful, collaborative team environment in LISTSERV Maestro where account holders can work together to share resources, and organizations can standardize content and report on objectives, is met by employing user account settings and job related settings in combination. By limiting the rights of accounts in a group, organizations can work towards standardizing recipient definitions, content, and tracking. Users who have specialized talent can be employed to create parts of shared resources such as target groups and drop-in content without having to be responsible for the entire email job or campaign.
In a multi-user environment, permitting users to share components of a job and other settings can save time, unify the look and feel of an organization's electronic communication, and control final sending authorization. Sharing the rights of certain job related settings can help organizations deploy the talents of specialists across many jobs and groups. Shared rights can impose editorial control and assist with producing reports that can compare tracking data across jobs. The scenarios in this document are only a small example of the many ways that account rights and job related rights can be used and combined to meet any organization's policies and procedures with regard to their email communication strategies.
Reference
The LISTSERV Maestro Administrator’s Manual The LISTSERV Maestro User’s Manual
http://www.lsoft.com/resources/manuals.asp