NIRSC ICOM IC-A6 POCKET CARD Radio Pocket Cards.pdf · NIRSC ICOM IC-A6 POCKET CARD Basic Operation...
5
NIRSC ICOM IC-A6 POCKET CARD Basic Operaon RECEIVING 1. Press and hold the “PWR” soſtkey for 3 seconds to turn the power “ON”. 2. Select a valid AM frequency from one of the memory locaons or direct enter a valid AM frequency via the keypad. (See Manual Frequency Entry) 3. Adjust the volume by turning the Volume Knob to desired level. 4. Adjust the Squelch by pushing the “SQL” soſtkey, then rotate the tuning dial to desired squelch level (00 - 24). (See Seng Squelch Level) Note: If the squelch control is set too high, squelch may not open with weak signals. 4. Push the “ANL” side buon to reduce pulse noise caused by engine ignions or other outside interference. (See ANL Funcon) 5. The radio is ready to RECEIVE on that current frequency. TRANSMITTING 1. Set the desired frequency. 2. Press and hold the “PTT” to transmit. 3. Speak into the microphone at a normal voice level. 4. Release “PTT” to receive any incoming transmissions. Note: Try to shield the microphone from wind and other loud background noises. Note: Once the frequency is set, the radio operates on this frequency on both TX and RX. IC-A6 SETTINGS & OPTIONS MANUAL FREQUENCY ENTRY USING THE KEYPAD: • Press and Hold the “PWR” soſtkey for 3 seconds unl the power turns “ON”. • Push the “CLR” soſtkey to select frequency mode. • Enter a valid 5 digit AM frequency and press the “ENT” key. (118.000 through 136.975) Note: Programming over a memory channel also clears the programmed contents. Memory channel 1 cannot be cleared. MANUAL FREQUENCY ENTRY USING THE TUNING DIAL: • Press and Hold the “PWR” soſtkey for 3 seconds unl the power turns “ON”. • Push the “CLR” soſtkey to select frequency mode. • Rotate the tuning dial to set the desired frequency. (Scroll 118.000 through 136.975) KEYPAD LOCK FUNCTION: To Enable Key Lock, press the “ F “ key, then press the “ 7 “ key (Key Lock). To Disable Key Lock, repeat the process. (LCD displays “ “ when enabled) Note: The lock funcon prevents accidental frequency changes & accidental funcon acvaon. SETTING SQUELCH LEVEL: To Set Squelch Level, push the “SQL” soſtkey, then rotate the tuning dial to desired squelch level (00 - 24). Note: “SQL -- 0” is open squelch and “SQL -- 24” is ght squelch. (NIRSC suggested SQL level is 20) If the squelch is set too high, squelch may not open with weak signals. AUTOMATIC NOISE LIMITER (ANL) FUNCTION: To Enable ANL, press the “ANL “ soſtkey. • (LCD dispalys an “ANL” icon in the lower part of the LCD indicang ANL is enabled) To Disable ANL, press the “ANL” soſtkey. Note: The ANL funcon reduces pulse noise or other outside interference. NIRSC ICOM IC-A6 POCKET CARD Basic Operaon RECEIVING 1. Press and hold the “PWR” soſtkey for 3 seconds to turn the power “ON”. 2. Select a valid AM frequency from one of the memory locaons or direct enter a valid AM frequency via the keypad. (See Manual Frequency Entry) 3. Adjust the volume by turning the Volume Knob to desired level. 4. Adjust the Squelch by pushing the “SQL” soſtkey, then rotate the tuning dial to desired squelch level (00 - 24). (See Seng Squelch Level) Note: If the squelch control is set too high, squelch may not open with weak signals. 4. Push the “ANL” side buon to reduce pulse noise caused by engine ignions or other outside interference. (See ANL Funcon) 5. The radio is ready to RECEIVE on that current frequency. TRANSMITTING 1. Set the desired frequency. 2. Press and hold the “PTT” to transmit. 3. Speak into the microphone at a normal voice level. 4. Release “PTT” to receive any incoming transmissions. Note: Try to shield the microphone from wind and other loud background noises. Note: Once the frequency is set, the radio operates on this frequency on both TX and RX. IC-A6 SETTINGS & OPTIONS MANUAL FREQUENCY ENTRY USING THE KEYPAD: • Press and Hold the “PWR” soſtkey for 3 seconds unl the power turns “ON”. • Push the “CLR” soſtkey to select frequency mode. • Enter a valid 5 digit AM frequency and press the “ENT” key. (118.000 through 136.975) Note: Programming over a memory channel also clears the programmed contents. Memory channel 1 cannot be cleared. MANUAL FREQUENCY ENTRY USING THE TUNING DIAL: • Press and Hold the “PWR” soſtkey for 3 seconds unl the power turns “ON”. • Push the “CLR” soſtkey to select frequency mode. • Rotate the tuning dial to set the desired frequency. (Scroll 118.000 through 136.975) KEYPAD LOCK FUNCTION: To Enable Key Lock, press the “ F “ key, then press the “ 7 “ key (Key Lock). To Disable Key Lock, repeat the process. (LCD displays “ “ when enabled) Note: The lock funcon prevents accidental frequency changes & accidental funcon acvaon. SETTING SQUELCH LEVEL: To Set Squelch Level, push the “SQL” soſtkey, then rotate the tuning dial to desired squelch level (00 - 24). Note: “SQL -- 0” is open squelch and “SQL -- 24” is ght squelch. (NIRSC suggested SQL level is 20) If the squelch is set too high, squelch may not open with weak signals. AUTOMATIC NOISE LIMITER (ANL) FUNCTION: To Enable ANL, press the “ANL “ soſtkey. • (LCD dispalys an “ANL” icon in the lower part of the LCD indicang ANL is enabled) To Disable ANL, press the “ANL” soſtkey. Note: The ANL funcon reduces pulse noise or other outside interference.
Transcript of NIRSC ICOM IC-A6 POCKET CARD Radio Pocket Cards.pdf · NIRSC ICOM IC-A6 POCKET CARD Basic Operation...
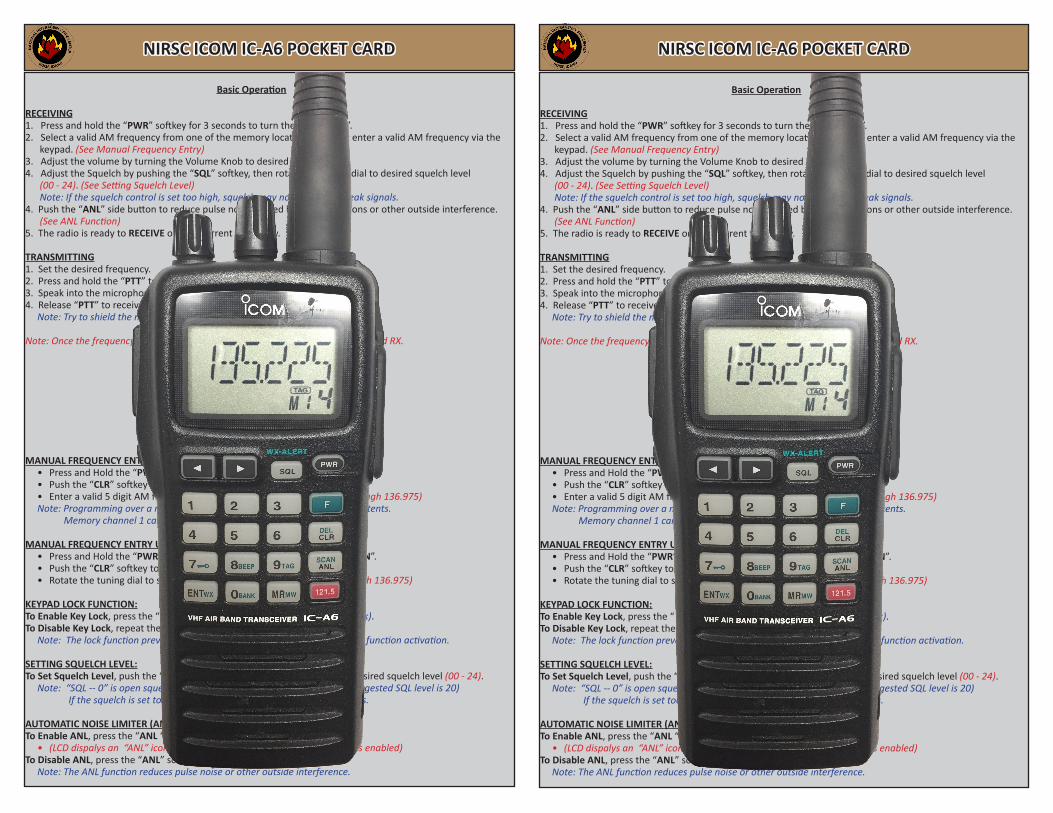
NIRSC ICOM IC-A6 POCKET CARD
Basic Operation
RECEIVING1. Press and hold the “PWR” softkey for 3 seconds to turn the power “ON”.2. Select a valid AM frequency from one of the memory locations or direct enter a valid AM frequency via the keypad. (See Manual Frequency Entry)3. Adjust the volume by turning the Volume Knob to desired level.4. Adjust the Squelch by pushing the “SQL” softkey, then rotate the tuning dial to desired squelch level (00 - 24). (See Setting Squelch Level) Note: If the squelch control is set too high, squelch may not open with weak signals.4. Push the “ANL” side button to reduce pulse noise caused by engine ignitions or other outside interference. (See ANL Function)5. The radio is ready to RECEIVE on that current frequency.
TRANSMITTING1. Set the desired frequency.2. Press and hold the “PTT” to transmit.3. Speak into the microphone at a normal voice level.4. Release “PTT” to receive any incoming transmissions. Note: Try to shield the microphone from wind and other loud background noises.
Note: Once the frequency is set, the radio operates on this frequency on both TX and RX.
IC-A6 SETTINGS & OPTIONS
MANUAL FREQUENCY ENTRY USING THE KEYPAD:• Press and Hold the “PWR” softkey for 3 seconds until the power turns “ON”.• Push the “CLR” softkey to select frequency mode.• Enter a valid 5 digit AM frequency and press the “ENT” key. (118.000 through 136.975)
Note: Programming over a memory channel also clears the programmed contents. Memory channel 1 cannot be cleared.
MANUAL FREQUENCY ENTRY USING THE TUNING DIAL:• Press and Hold the “PWR” softkey for 3 seconds until the power turns “ON”.• Push the “CLR” softkey to select frequency mode.• Rotate the tuning dial to set the desired frequency. (Scroll 118.000 through 136.975)
KEYPAD LOCK FUNCTION:To Enable Key Lock, press the “ F “ key, then press the “ 7 “ key (Key Lock).To Disable Key Lock, repeat the process. (LCD displays “ “ when enabled) Note: The lock function prevents accidental frequency changes & accidental function activation.
SETTING SQUELCH LEVEL:To Set Squelch Level, push the “SQL” softkey, then rotate the tuning dial to desired squelch level (00 - 24). Note: “SQL -- 0” is open squelch and “SQL -- 24” is tight squelch. (NIRSC suggested SQL level is 20) If the squelch is set too high, squelch may not open with weak signals.
AUTOMATIC NOISE LIMITER (ANL) FUNCTION:To Enable ANL, press the “ANL “ softkey.
• (LCD dispalys an “ANL” icon in the lower part of the LCD indicating ANL is enabled)To Disable ANL, press the “ANL” softkey. Note: The ANL function reduces pulse noise or other outside interference.
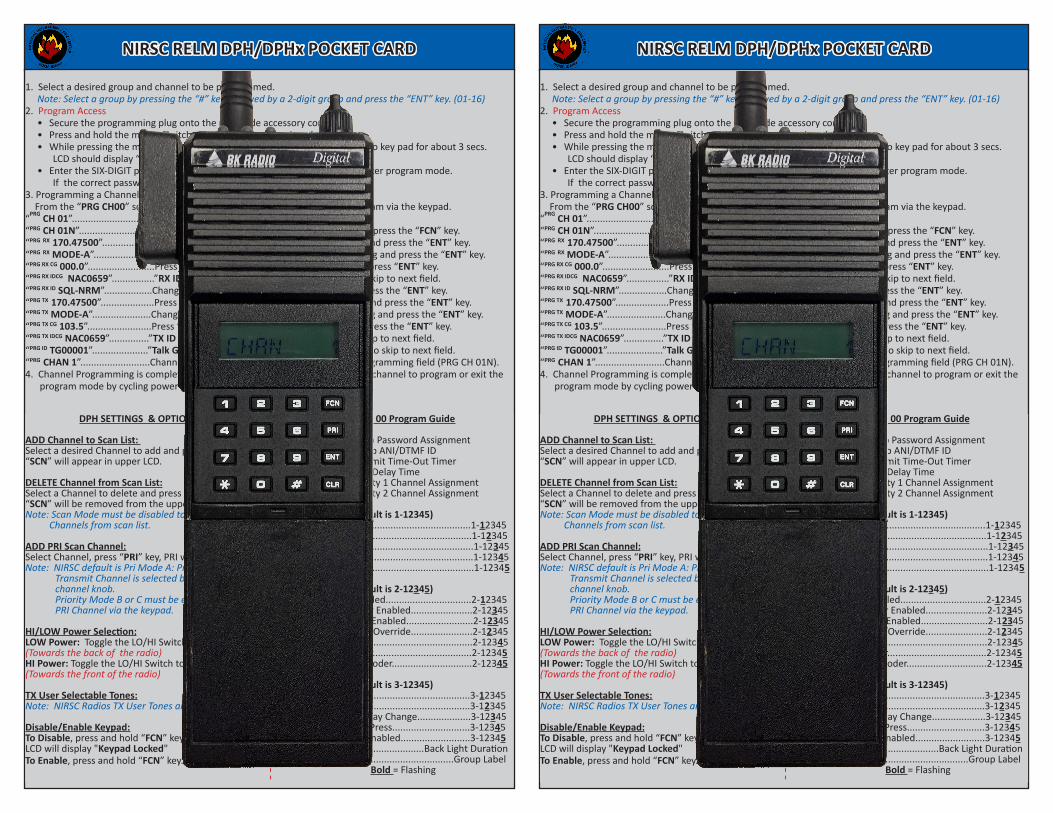
NIRSC RELM DPH/DPHx POCKET CARD
1. Select a desired group and channel to be programmed. Note: Select a group by pressing the “#” key followed by a 2-digit group and press the “ENT” key. (01-16)2. Program Access
• Secure the programming plug onto the radio side accessory connector.• Press and hold the master switch on top of the programing plug.• While pressing the master switch, press and hold the “FCN” key on the radio key pad for about 3 secs.
LCD should display “-- -- --ID”. (NIRSC radio password is “000000”)• Enter the SIX-DIGIT password via the keypad and press the “ENT” key to enter program mode.
If the correct password was entered, the LCD will display “PRG CH 00”.3. Programming a Channel (ANALOG ONLY) From the “PRG CH00” screen, press a desired 2-digit channel number to program via the keypad. “PRG CH 01”...............................Channel 01 Settings is currently selected.“PRG CH 01N”............................Press # to toggle between Narrow/Wide Band and press the “FCN” key.“PRG RX 170.47500”...................Press “CLR” and enter new valid “RX Frequency” and press the “ENT” key.“PRG RX MODE-A”......................Change “RX Mode” with “PRI’ key to “A” for Analog and press the “ENT” key.“PRG RX CG 000.0”.........................Press “CLR” and enter new “RX Code Guard” and press “ENT” key.“PRG RX IDCG NAC0659”................”RX ID CG”, DIGITAL ONLY, press the “ENT” key to skip to next field.“PRG RX ID SQL-NRM”..................Change “Squelch” with “PRI” key to “NRM” and press the “ENT” key.“PRG TX 170.47500”....................Press “CLR” and enter new valid “TX Frequency” and press the “ENT” key.“PRG TX MODE-A”......................Change “TX Mode” with “PRI’ key to “A” for Analog and press the “ENT” key.“PRG TX CG 103.5”........................Press “CLR” and enter new “TX Code Guard” and press the “ENT” key.“PRG TX IDCG NAC0659”...............”TX ID CG”, DIGITAL ONLY, press the “ENT” key to skip to next field.“PRG ID TG00001”.....................”Talk Group ID”, DIGITAL ONLY, press the “ENT” key to skip to next field.“PRG CHAN 1”..........................Channel Label, press “ENT” to bring up the first programming field (PRG CH 01N).4. Channel Programming is complete. At this point the user may select another channel to program or exit the program mode by cycling power to the radio.
NIRSC DPH CH 00 Program Guide
“P000000”..........Group Password Assignment“0000000”...........Group ANI/DTMF ID“120 SEC”...........Transmit Time-Out Timer“2.0SEC”..............Scan Delay Time“PR1 OFF”...........Priority 1 Channel Assignment“PR2 OFF”...........Priority 2 Channel Assignment
Group 1: (NIRSC Default is 1-12345)Battery Saver Disabled.....................................1-12345Group Scan.......................................................1-12345TX ON PRI 1.......................................................1-12345Priority Key Lockout..........................................1-12345Scan List Lockout...............................................1-12345
Group 2: (NIRSC Default is 2-12345)User Code Guard Enabled................................2-12345Busy Channel Indicator Enabled.......................2-12345Busy Channel Lockout Enabled.........................2-12345Busy Channel Lockout/Override.......................2-12345ANI Enabled......................................................2-12345Manual DTMF Encoder.....................................2-12345Manual DTMF/ANI Encoder..............................2-12345
Group 3: (NIRSC Default is 3-12345)Reserved..........................................................3-12345Reserved..........................................................3-12345LCD Backlight ON Display Change....................3-12345LCD Backlight ON Key Press.............................3-12345Alphanumeric Mode Enabled..........................3-12345“LITE OFF”.......................................Back Light Duration“GROUP XX”...............................................Group Label
Bold = Flashing
DPH SETTINGS & OPTIONS
ADD Channel to Scan List: Select a desired Channel to add and press the “ENT” key. “SCN” will appear in upper LCD. DELETE Channel from Scan List:Select a Channel to delete and press the “CLR” key.“SCN” will be removed from the upper LCD.Note: Scan Mode must be disabled to add/delete
Channels from scan list.
ADD PRI Scan Channel:Select Channel, press “PRI” key, PRI will appear in LCD.Note: NIRSC default is Pri Mode A: Pri Channel and
Transmit Channel is selected by the active channel knob.Priority Mode B or C must be enabled to change PRI Channel via the keypad.
HI/LOW Power Selection:LOW Power: Toggle the LO/HI Switch to the up position. (Towards the back of the radio)HI Power: Toggle the LO/HI Switch to the down position. (Towards the front of the radio)
TX User Selectable Tones:Note: NIRSC Radios TX User Tones are Disabled.
Disable/Enable Keypad:To Disable, press and hold “FCN” key.LCD will display "Keypad Locked"To Enable, press and hold “FCN” key.

NIRSC RELM KNG-P150s POCKET CARD
1. Turn on the radio and access the Program Mode.• Press the “Menu” softkey, highlight “Keypad Prog” and press the “ENT” softkey.• Highlight “Keypad Prog” and press the “ENT” softkey again.• Enter the 7-digit NIICD radio password and press the “ENT” softkey. (NIRSC Radio default is 0000000)
2. Highlight “Channels’ and press the “ENT” softkey.3. Highlight and select desired Zone/Group and press the “ENT” softkey.4. Highlight and select desired Channel to program and press the “ENT” softkey.5. Highlight “RX Freq” and press “ENT”, then press “CLR” and enter a valid RX Frequency and press “ENT”.6. Highlight “RX Mode” and press “ENT” select “Analog” and press the “ENT” softkey.
Note: “RX NAC” is a Digital function and should be skipped when programming an Analog Channel.Note: “Squelch Mode” cannot be changed while programming and Analog Channel.
7. Highlight “RX Guard” and press “ENT”, press “CLR” and enter a valid RX Tone and press “ENT”.8. Highlight “TX Freq” and press “ENT”, press “CLR” and enter a valid TX Frequency and press “ENT”.9. Highlight “TX Mode” and press “ENT”, select “Analog” and press the “ENT” softkey.10. Highlight “Bandwidth” and press “ENT”, select “12.5Khz” and press the “ENT” softkey.11. Highlight “TX Guard” and press “ENT”, press “CLR” and enter a valid TX Tone and press “ENT”.
Note: “TX NAC” and “TGID” are digital functions and should be skipped when programming an Analog Channel.
12. Highlight “Secure Mode” and press “ENT”, select “Clear” and press the “ENT” softkey.Note: “Key” and “Key Lock” are for Encryption only and should be skipped when programming an Analog Channel.
13. Highlight “Low Pow Lock” and press “ENT”, select “OFF” and press the “ENT” softkey.Note: Selecting “ON” will enable low power at all times for that particular channel.
14. Highlight “Plist Disable” and press “ENT”, select “OFF” and press the “ENT” softkey.15. Press “ESC” once and select another channel to program repeating steps 4 through 14, or press “ESC” several times to exit the programming mode.
Changing Groups/Zones:Select a group by pressing the “ZONE” softkey, then scroll to the desired zone using the “Down/Up” sofkeys, press the “ENT” softkey to enable that desired zone.
HI/LOW Power Selection:Low Power - Press the “LPW” softkey. Once enabled a black background around the “LPW” softkey will be displayed on the LCD.High Power - Press the “LPW” softkey once to disable low power.
Locking Keypad:To Lock Keypad - Press the “Menu” softkey, scroll down to and select “Keypad Lock” using the “Down/Up” softkeys and press the “ENT” softkey. Select “Locked” using the “Down/Up” softkeys and press “ENT”.Press “ESC” to return to normal operation.To Unlock Keypad - Repeat process and select “Unlocked” from the Keypad Lock Menu.
Adding/Deleting Channels from Scan List:Press the “Menu” softkey, scroll down to “Scan List” using the “Down/Up” softkeys and press the “ENT” softkey.Select the Channel to scan using the “Arrow” softkey and press the “+/-” softkey to add or delete from the scan list.Note: An “+” indicates the channel is in the scan list.Press “ESC” softkey twice to return to normal operation.
Enabling/Disabling Scan:To Enable Scan - Toggle the top “Scan Toggle” switch towards the front of the radio.Display will indicate the radio is in scan mode by displaying “SCN” icon on the LCD.To Disable Scan - Toggle the top “Scan Toggle” switch towards the back of the radio.
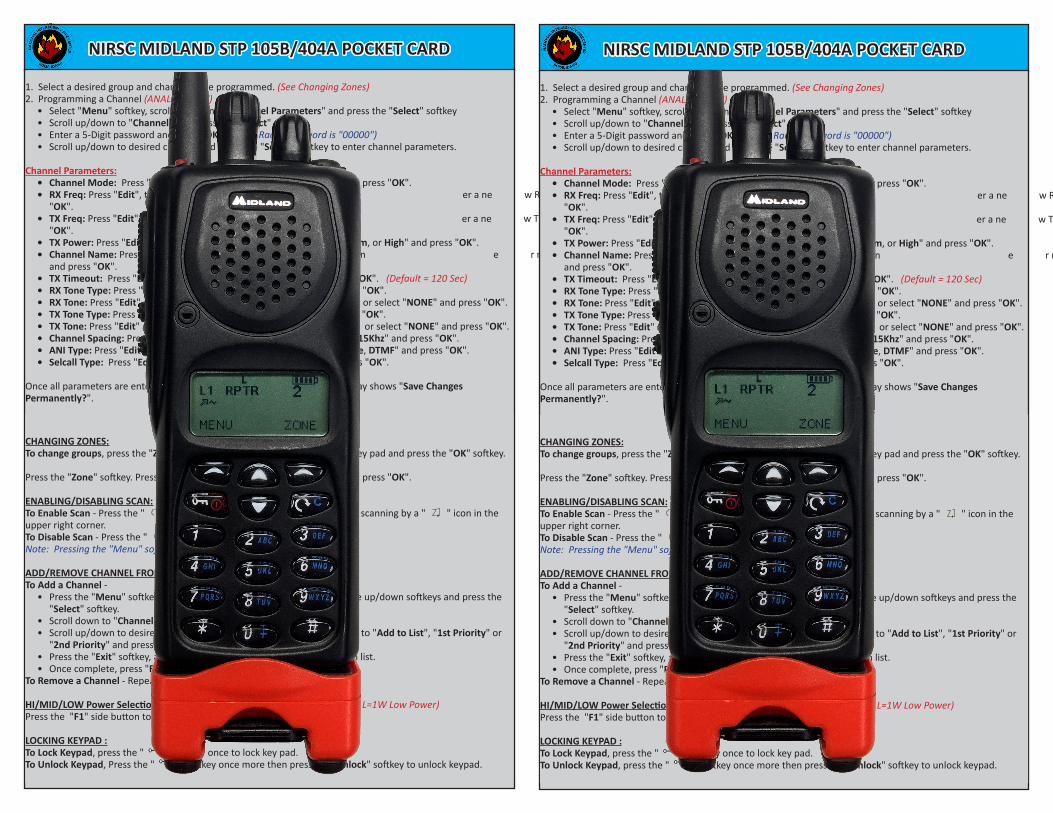
NIRSC MIDLAND STP 105B/404A POCKET CARD
1. Select a desired group and channel to be programmed. (See Changing Zones)2. Programming a Channel (ANALOG ONLY)
• Select "Menu" softkey, scroll up/down to "Channel Parameters" and press the "Select" softkey• Scroll up/down to "Channel" and press the "Select" softkey. • Enter a 5-Digit password and press "OK". (NIRSC Radio Password is "00000")• Scroll up/down to desired channel and press the "Select" softkey to enter channel parameters.
Channel Parameters:• Channel Mode: Press "Edit" and scroll up/down to select "Analog" and press "OK".• RX Freq: Press "Edit", then press " C " several times to clear and enter a new RX Frequency and press
"OK".• TX Freq: Press "Edit", then press " C " several times to clear and enter a new TX Frequency and press
"OK".• TX Power: Press "Edit" and scroll up/down to select either "Low, Medium, or High" and press "OK".• Channel Name: Press "Edit", then press " C " several times to clear and enter new name via the keypad
and press "OK".• TX Timeout: Press "Edit" and scroll up/down to select "Yes" and press "OK". (Default = 120 Sec)• RX Tone Type: Press "Edit" and scroll up/down to select "CCS" and press "OK".• RX Tone: Press "Edit" and scroll up/down to select desired tone from list or select "NONE" and press "OK".• TX Tone Type: Press "Edit" and scroll up/down to select "CCS" and press "OK".• TX Tone: Press "Edit" and scroll up/down to select desired tone from list or select "NONE" and press "OK".• Channel Spacing: Press "Edit" and scroll up/down to select "12.5Khz or 15Khz" and press "OK".• ANI Type: Press "Edit" and scroll up/down to select either "None, 5-Tone, DTMF" and press "OK".• Selcall Type: Press "Edit" and scroll up/down to select "None" and press "OK".
Once all parameters are entered, press the "Exit" key. Press "Yes" when display shows "Save Changes Permanently?".
MIDLAND SETTINGS AND OPTIONS
CHANGING ZONES:To change groups, press the "Zone" softkey. Enter the zone number via the key pad and press the "OK" softkey. ORPress the "Zone" softkey. Press the UP/Down keypad keys to desired zone and press "OK".
ENABLING/DISABLING SCAN:To Enable Scan - Press the " C " softkey. The LCD will indicate the radio is scanning by a " " icon in the upper right corner.To Disable Scan - Press the " C " softkey.Note: Pressing the "Menu" softkey while scanning will also disable scanning.
ADD/REMOVE CHANNEL FROM SCAN LIST:To Add a Channel -
• Press the "Menu" softkey, scroll down to "Channel Parameter" using the up/down softkeys and press the "Select" softkey.
• Scroll down to "Channel Scan" and press the "Select" softkey.• Scroll up/down to desired channel and press the "Select" softkey. Scroll to "Add to List", "1st Priority" or
"2nd Priority" and press the "OK" softkey.• Press the "Exit" softkey, and continue adding more channels to the scan list.• Once complete, press "Exit" twice to close scan edit list.
To Remove a Channel - Repeat the process and select "Remove".
HI/MID/LOW Power Selection: (H= 5W High Power, M= 2W Medium Power, L=1W Low Power)Press the "F1" side button to cycle between HI/MID/LOW power settings. LOCKING KEYPAD :To Lock Keypad, press the " " softkey once to lock key pad.To Unlock Keypad, Press the " " softkey once more then press the "Unlock" softkey to unlock keypad.
NIRSC MIDLAND STP 105B/404A POCKET CARD
1. Select a desired group and channel to be programmed. (See Changing Zones)2. Programming a Channel (ANALOG ONLY)
• Select "Menu" softkey, scroll up/down to "Channel Parameters" and press the "Select" softkey• Scroll up/down to "Channel" and press the "Select" softkey. • Enter a 5-Digit password and press "OK". (NIRSC Radio Password is "00000")• Scroll up/down to desired channel and press the "Select" softkey to enter channel parameters.
Channel Parameters:• Channel Mode: Press "Edit" and scroll up/down to select "Analog" and press "OK".• RX Freq: Press "Edit", then press " C " several times to clear and enter a new RX Frequency and press
"OK".• TX Freq: Press "Edit", then press " C " several times to clear and enter a new TX Frequency and press
"OK".• TX Power: Press "Edit" and scroll up/down to select either "Low, Medium, or High" and press "OK".• Channel Name: Press "Edit", then press " C " several times to clear and enter new name via the keypad
and press "OK".• TX Timeout: Press "Edit" and scroll up/down to select "Yes" and press "OK". (Default = 120 Sec)• RX Tone Type: Press "Edit" and scroll up/down to select "CCS" and press "OK".• RX Tone: Press "Edit" and scroll up/down to select desired tone from list or select "NONE" and press "OK".• TX Tone Type: Press "Edit" and scroll up/down to select "CCS" and press "OK".• TX Tone: Press "Edit" and scroll up/down to select desired tone from list or select "NONE" and press "OK".• Channel Spacing: Press "Edit" and scroll up/down to select "12.5Khz or 15Khz" and press "OK".• ANI Type: Press "Edit" and scroll up/down to select either "None, 5-Tone, DTMF" and press "OK".• Selcall Type: Press "Edit" and scroll up/down to select "None" and press "OK".
Once all parameters are entered, press the "Exit" key. Press "Yes" when display shows "Save Changes Permanently?".
MIDLAND SETTINGS AND OPTIONS
CHANGING ZONES:To change groups, press the "Zone" softkey. Enter the zone number via the key pad and press the "OK" softkey. ORPress the "Zone" softkey. Press the UP/Down keypad keys to desired zone and press "OK".
ENABLING/DISABLING SCAN:To Enable Scan - Press the " C " softkey. The LCD will indicate the radio is scanning by a " " icon in the upper right corner.To Disable Scan - Press the " C " softkey.Note: Pressing the "Menu" softkey while scanning will also disable scanning.
ADD/REMOVE CHANNEL FROM SCAN LIST:To Add a Channel -
• Press the "Menu" softkey, scroll down to "Channel Parameter" using the up/down softkeys and press the "Select" softkey.
• Scroll down to "Channel Scan" and press the "Select" softkey.• Scroll up/down to desired channel and press the "Select" softkey. Scroll to "Add to List", "1st Priority" or
"2nd Priority" and press the "OK" softkey.• Press the "Exit" softkey, and continue adding more channels to the scan list.• Once complete, press "Exit" twice to close scan edit list.
To Remove a Channel - Repeat the process and select "Remove".
HI/MID/LOW Power Selection: (H= 5W High Power, M= 2W Medium Power, L=1W Low Power)Press the "F1" side button to cycle between HI/MID/LOW power settings. LOCKING KEYPAD :To Lock Keypad, press the " " softkey once to lock key pad.To Unlock Keypad, press the " " softkey once more then press the "Unlock" softkey to unlock keypad.
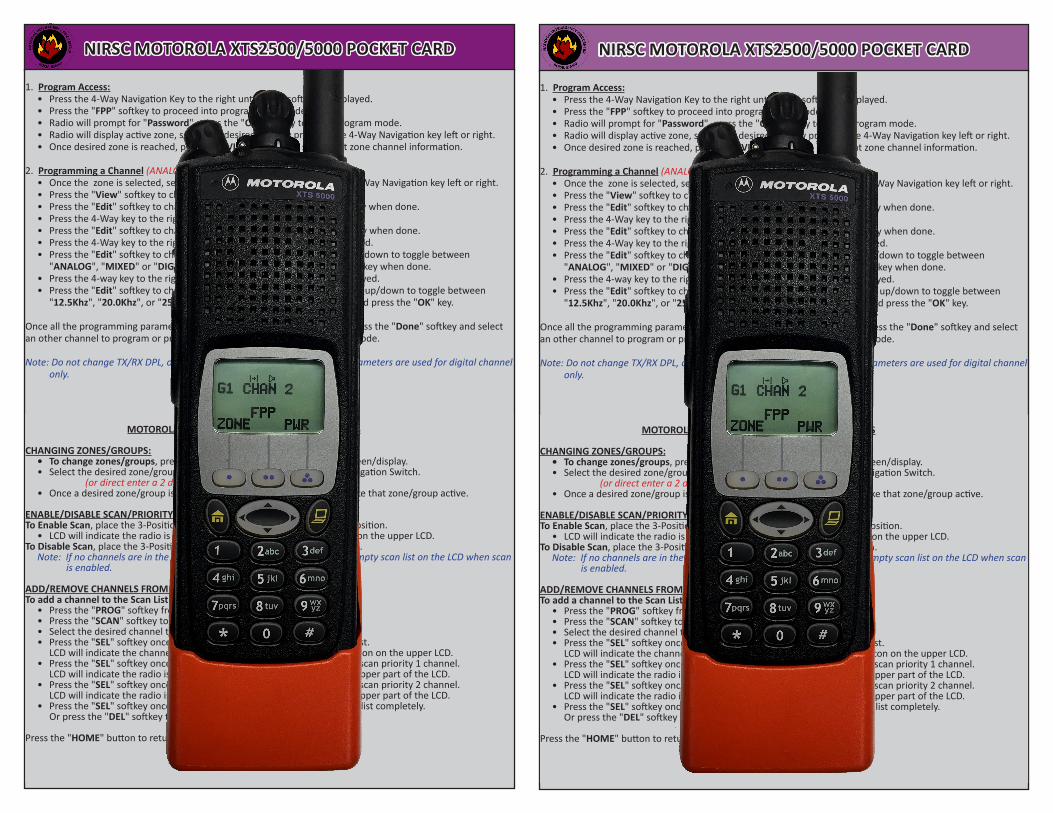
NIRSC MOTOROLA XTS2500/5000 POCKET CARD
1. Program Access:• Press the 4-Way Navigation Key to the right until "FPP" softkey is displayed.• Press the "FPP" softkey to proceed into programming mode.• Radio will prompt for "Password", press the "OK" softkey to enter program mode.• Radio will display active zone, select the desired zone by pressing the 4-Way Navigation key left or right.• Once desired zone is reached, press the "VIEW" softkey to select that zone channel information.
2. Programming a Channel (ANALOG Only)• Once the zone is selected, select the desired channel, by pressing the 4-Way Navigation key left or right.• Press the "View" softkey to change that particular channel information.• Press the "Edit" softkey to change the "TX frequency", press the "OK" key when done.• Press the 4-Way key to the right to enter the RX frequency.• Press the "Edit" softkey to change the "RX frequency", press the "OK" key when done.• Press the 4-Way key to the right several times until "RX Type" is displayed.• Press the "Edit" softkey to change the "RX type", press the 4-way key up/down to toggle between
"ANALOG", "MIXED" or "DIGITAL", select "ANALOG" and press the "OK" key when done.• Press the 4-way key to the right several times until "Bandwidth" is displayed.• Press the "Edit" softkey to change the "Bandwidth", press the 4-Way key up/down to toggle between
"12.5Khz", "20.0Khz", or "25.0Khz", select "12.5Khz" for narrow-band and press the "OK" key.
Once all the programming parameters have been entered for that channel, press the "Done" softkey and select an other channel to program or press the "HOME" key to exit programming mode.
Note: Do not change TX/RX DPL, or TX/RX NAC for analog channels, these parameters are used for digital channel only.
MOTOROLA XTS 2500/5000 SETTINGS AND OPTIONS
CHANGING ZONES/GROUPS:• To change zones/groups, press the "ZONE" softkey from the default screen/display.• Select the desired zone/group by scrolling right/left with the 4-Way Navigation Switch.
(or direct enter a 2 digit zone/group number via the key)• Once a desired zone/group is selected, press the "HOME" button to make that zone/group active.
ENABLE/DISABLE SCAN/PRIORITY SCAN:To Enable Scan, place the 3-Position Rotary/Toggle Switch to the "B" or "C" position.
• LCD will indicate the radio is in scan mode, by displaying an ( ) icon on the upper LCD.To Disable Scan, place the 3-Position Rotary/Toggle Switch to the "A" position. Note: If no channels are in the Scan List, the radio will beep and indicate empty scan list on the LCD when scan is enabled.
ADD/REMOVE CHANNELS FROM SCAN/PRIORITY LIST:To add a channel to the Scan List:
• Press the "PROG" softkey from the default screen/display. • Press the "SCAN" softkey to enter into the scan list programming mode.• Select the desired channel to scan with the top 16 Channel Select Knob.• Press the "SEL" softkey once to enter that selected channel in the scan list. LCD will indicate the channel is in the scan list, by displaying an ( ) icon on the upper LCD.• Press the "SEL" softkey once more to enter that selected channel as the scan priority 1 channel. LCD will indicate the radio is PRI 1 by displaying an ( . ) icon on the upper part of the LCD.• Press the "SEL" softkey once more to enter that selected channel as the scan priority 2 channel. LCD will indicate the radio is PRI 2 by displaying an ( . ) icon on the upper part of the LCD.• Press the "SEL" softkey once more to remove the channel from the scan list completely. Or press the "DEL" softkey to remove the channel from the scan list.
Press the "HOME" button to return to the main screen.