Nimsoft Monitor dirscan...
42
dirscan Guide v3.0 series Nimsoft® Monitor™
Transcript of Nimsoft Monitor dirscan...

dirscan Guide v3.0 series
Nimsoft® Monitor™

Legal Notices Copyright © 2013, CA. All rights reserved.
Warranty
The material contained in this document is provided "as is," and is subject to being changed, without notice, in future editions. Further, to the maximum extent permitted by applicable law, Nimsoft LLC disclaims all warranties, either express or implied, with regard to this manual and any information contained herein, including but not limited to the implied warranties of merchantability and fitness for a particular purpose. Nimsoft LLC shall not be liable for errors or for incidental or consequential damages in connection with the furnishing, use, or performance of this document or of any information contained herein. Should Nimsoft LLC and the user have a separate written agreement with warranty terms covering the material in this document that conflict with these terms, the warranty terms in the separate agreement shall control.
Technology Licenses
The hardware and/or software described in this document are furnished under a license and may be used or copied only in accordance with the terms of such license.
No part of this manual may be reproduced in any form or by any means (including electronic storage and retrieval or translation into a foreign language) without prior agreement and written consent from Nimsoft LLC as governed by United States and international copyright laws.
Restricted Rights Legend
If software is for use in the performance of a U.S. Government prime contract or subcontract, Software is delivered and licensed as "Commercial computer software" as defined in DFAR 252.227-7014 (June 1995), or as a "commercial item" as defined in FAR 2.101(a) or as "Restricted computer software" as defined in FAR 52.227-19 (June 1987) or any equivalent agency regulation or contract clause. Use, duplication or disclosure of Software is subject to Nimsoft LLC’s standard commercial license terms, and non-DOD Departments and Agencies of the U.S. Government will receive no greater than Restricted Rights as defined in FAR 52.227-19(c)(1-2) (June 1987). U.S. Government users will receive no greater than Limited Rights as defined in FAR 52.227-14 (June 1987) or DFAR 252.227-7015 (b)(2) (November 1995), as applicable in any technical data.
Trademarks
Nimsoft is a trademark of CA.
Adobe®, Acrobat®, Acrobat Reader®, and Acrobat Exchange® are registered trademarks of Adobe Systems Incorporated.
Intel® and Pentium® are U.S. registered trademarks of Intel Corporation.
Java(TM) is a U.S. trademark of Sun Microsystems, Inc.
Microsoft® and Windows® are U.S. registered trademarks of Microsoft Corporation.
Netscape(TM) is a U.S. trademark of Netscape Communications Corporation.
Oracle® is a U.S. registered trademark of Oracle Corporation, Redwood City, California.
UNIX® is a registered trademark of the Open Group.
ITIL® is a Registered Trade Mark of the Office of Government Commerce in the United Kingdom and other countries.
All other trademarks, trade names, service marks and logos referenced herein belong to their respective companies.
For information on licensed and public domain software, see the Nimsoft Monitor Third-Party Licenses and Terms of Use document at: http://docs.nimsoft.com/prodhelp/en_US/Library/index.htm?toc.htm?1981724.html.

Contact CA Nimsoft
Contact CA Support
For your convenience, CA Technologies provides one site where you can access the information that you need for your Home Office, Small Business, and Enterprise CA Technologies products. At http://ca.com/support, you can access the following resources:
■ Online and telephone contact information for technical assistance and customer services
■ Information about user communities and forums
■ Product and documentation downloads
■ CA Support policies and guidelines
■ Other helpful resources appropriate for your product
Providing Feedback About Product Documentation
Send comments or questions about CA Technologies Nimsoft product documentation to [email protected].
To provide feedback about general CA Technologies product documentation, complete our short customer survey which is available on the CA Support website at http://ca.com/docs.


Contents 5
Contents
Chapter 1: General Overview 7
Installation Notes ......................................................................................................................................................... 9
Chapter 2: Probe Deployment 11
Prerequisites and System Requirements ................................................................................................................... 11
Prerequisites ....................................................................................................................................................... 11
Supported Platforms ........................................................................................................................................... 11
System Requirements ......................................................................................................................................... 11
Software Requirements ...................................................................................................................................... 12
Monitoring System Requirements ...................................................................................................................... 12
Probe Deployment Information ................................................................................................................................. 12
Chapter 3: Configuration 13
Probe Configuration Interface .................................................................................................................................... 13
Probe GUI ................................................................................................................................................................... 14
Probe Configuration ................................................................................................................................................... 16
General Setup ..................................................................................................................................................... 16
Creating a Profile ................................................................................................................................................. 22
Creating an Integrity Profile ................................................................................................................................ 30
Launching the Message Pool Manager ............................................................................................................... 33
Chapter 4: Example 35
Chapter 5: QoS Threshold Metrics 41
dirscan QoS Metrics ................................................................................................................................................... 41
dirscan Alert Metrics Default Settings ........................................................................................................................ 41

Chapter 1: General Overview 7
Chapter 1: General Overview
This description applies to dirscan probe version 3.0.
The dirscan probe monitors files in specific directories. Alarms can be sent on number of files, age of files, and space used by files.
The probe is configured by defining one or more profiles. Each of these profiles can monitor a particular directory,
■ checking that the directory exists,
■ checking that particular files or file types are located in the directory, and
■ checking that the size and age of the files do not exceed expected values
The probe can also check if one or more specific files have changed. Alarm messages are generated when the files found are not as expected. (When conditions specified under dirscan Configuration (see page 16) are not met).
Some search properties may also be transmitted as quality of service messages.
This section contains the following topics:
Documentation Changes (see page 8) Installation Notes (see page 9)
Installation Notes
8 dirscan Guide
Documentation Changes
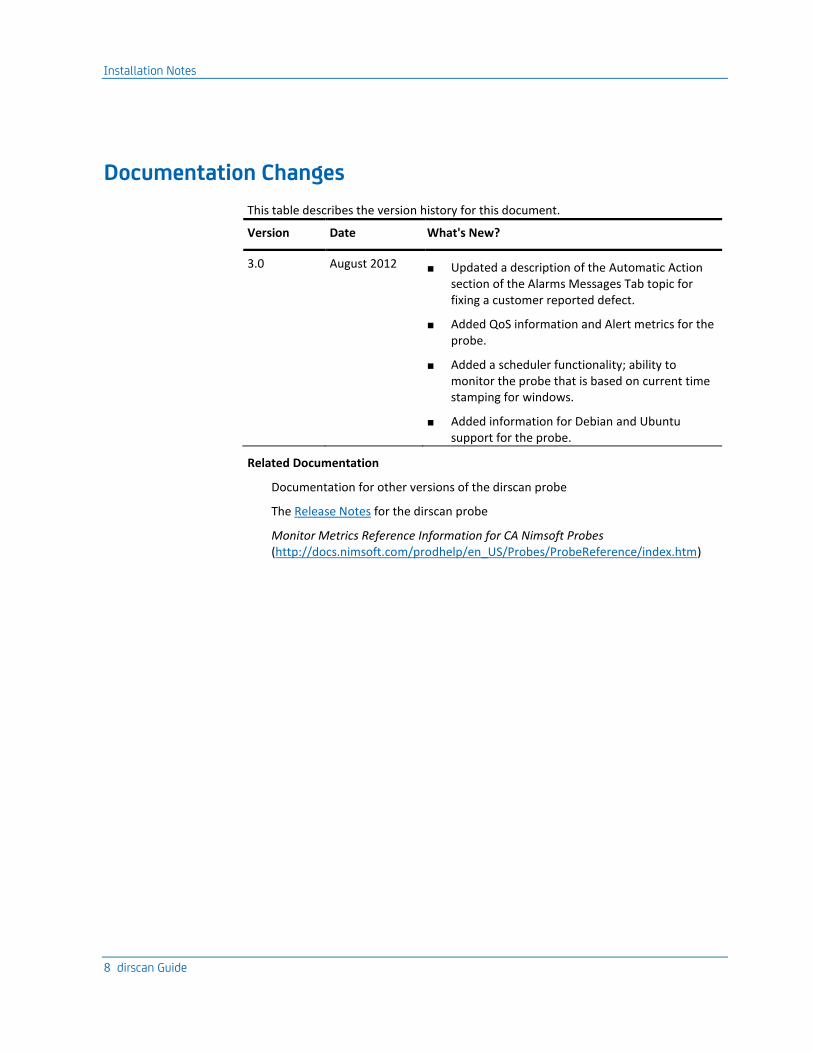
This table describes the version history for this document.
Version Date What's New?
3.0 August 2012 ■ Updated a description of the Automatic Action section of the Alarms Messages Tab topic for fixing a customer reported defect.
■ Added QoS information and Alert metrics for the probe.
■ Added a scheduler functionality; ability to monitor the probe that is based on current time stamping for windows.
■ Added information for Debian and Ubuntu support for the probe.
Related Documentation
Documentation for other versions of the dirscan probe
The Release Notes for the dirscan probe
Monitor Metrics Reference Information for CA Nimsoft Probes (http://docs.nimsoft.com/prodhelp/en_US/Probes/ProbeReference/index.htm)
Installation Notes
Documentation Changes 9
Installation Notes
Version 2.22 implemented a new layout of the message pool. If upgrading from a version prior to 2.22 you need to modify the dirscan.cfx file in the package. The steps to modify the file are as follows:
1. Get the latest version of the probe from the Internet Archive
2. Double-click the dirscan package in the Archive node of the Infrastructure Manager.
3. Select the tab for your platform and click on dirscan.cfx
4. Right-click and select Edit file.
5. Locate the <messages> section and add the 'clear' keyword after the closing bracket. Click OK.
6. Repeat for each platform you intend to distribute the updated probe to
7. Distribute the update to all systems running v2.22 or older.
Please note that all custom messages will be cleared and default messages in the new format will be inserted.
The description of the QoS for file age, QOS_DIR_AGE was previously defined as Age of oldest/newest matching file. In version 2.22 this has been changed to Age of matching file.

Chapter 2: Probe Deployment 11
Chapter 2: Probe Deployment
Successful distribution of the dirscan probe package relies on the Java package installed with the Nimsoft Management Server.
This section contains the following topics:
Prerequisites and System Requirements (see page 11) Probe Deployment Information (see page 12)
Prerequisites and System Requirements
This section contains the prerequisites and system requirements for the dirscan probe.
Prerequisites
The prerequisites to run the dirscan probe are stated below:
■ Infrastructure Manager
■ Nimsoft Robot v3.00 (or higher)
Supported Platforms
The dirscan probe supports the same set of operating systems and databases as supported by the Nimsoft Server solution. Please refer to the Nimsoft Compatibility Support Matrix for the latest information on supported platforms.
See also the Support Matrix for Nimsoft Probes, for additional specific information on the dirscan probe.
System Requirements
The dirscan probe should be installed on systems with the following minimum resources:
■ Memory: 2-4 GB of RAM. Probe's OOB configuration requires 256 MB of RAM.
■ CPU: 3GHz dual-core processor, 32-bit or 64-bit.

Probe Deployment Information
12 dirscan Guide
Software Requirements
The dirscan probe requires the following software environment:
■ Nimsoft Monitor Server 5.1.1 or later
■ Nimsoft Robot 3.00 or later
■ Java Virtual Machine 1.6 or later (typically installed with NMS 5.0 or above)
Note: For SOC functionality, NM server 5.6 or later and UMP 2.5.2 or later is required.
Monitoring System Requirements
The dirscan probe supports targeting the following environments:
■ It monitors number of files, age of files, space used by files, size of file, and response time for files and checks for directory age and its existence for directories.
Probe Deployment Information
There are three ways to distribute archive packages. You can distribute the package within the web-based Admin Console (for supported probes), from within Infrastructure Manager, or use the standalone Nimsoft Distribution application.See Probe Deployment for more information on deploying probes.

Chapter 3: Configuration 13
Chapter 3: Configuration
This section describes the configuration concepts and procedures for setting up the dirscan probe. This probe is configured to monitor a particular directory,
■ Checking that the directory exists,
■ Checking that particular files or file types are located in the directory, and
■ Checking that the size and age of the files do not exceed expected values
This section contains the following topics:
Probe Configuration Interface (see page 13) Probe GUI (see page 14) Probe Configuration (see page 16)
Probe Configuration Interface
The dirscan probe configuration interface is installed when the dirscan probe is deployed.

Probe GUI
14 dirscan Guide
Probe GUI
The GUI consists of four tool buttons located at the top and a list of profiles. All defined monitoring profiles appear in the list.
The Profile List
The probe GUI contains a list of profiles. The default configuration contains two example profiles, and as soon as you define a new monitoring profile, it will appear in the list. Right-clicking the window makes the following menu options available:
■ New Profile
Create a new directory scan profile.
■ New Integrity Profile
Create a new file integrity profile.
■ Edit
Edit the currently selected profile.
■ Delete
Remove the currently selected profile.
■ Copy
Makes a copy of the selected profile. This is convenient when you want to create a profile with almost the same properties as an existing one.
Probe GUI
Chapter 3: Configuration 15
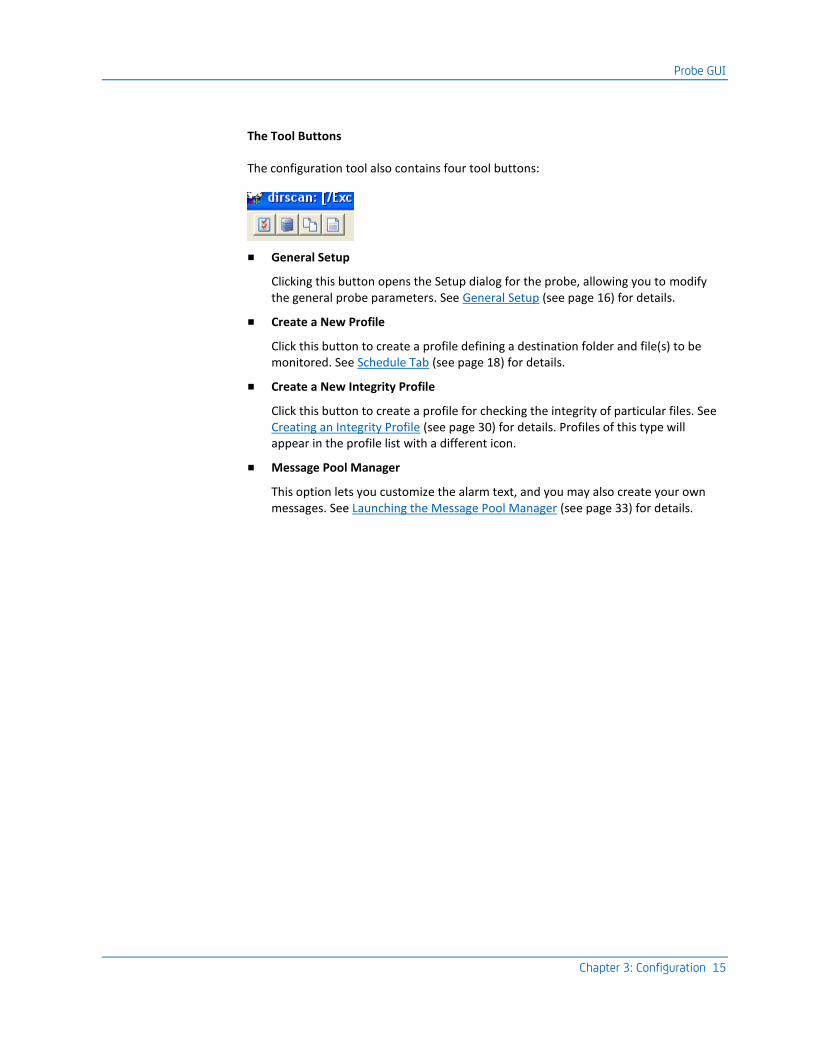
The Tool Buttons
The configuration tool also contains four tool buttons:
■ General Setup
Clicking this button opens the Setup dialog for the probe, allowing you to modify the general probe parameters. See General Setup (see page 16) for details.
■ Create a New Profile
Click this button to create a profile defining a destination folder and file(s) to be monitored. See Schedule Tab (see page 18) for details.
■ Create a New Integrity Profile
Click this button to create a profile for checking the integrity of particular files. See Creating an Integrity Profile (see page 30) for details. Profiles of this type will appear in the profile list with a different icon.
■ Message Pool Manager
This option lets you customize the alarm text, and you may also create your own messages. See Launching the Message Pool Manager (see page 33) for details.
Probe Configuration
16 dirscan Guide
Probe Configuration
This section contains specific configuration information for the dirscan probe.
The dirscan probe is configured by defining one or more profiles, each identifying a particular directory and the file(s) to search for. There are seven different parameters that can be checked, which all can generate alarm messages if the specified threshold is breached:
■ Number of files
The number of files found in the specified directory matching the specified pattern.
■ Age of file
The age of the files found in the specified directory matching the specified pattern.
■ Space used by files
The space used by all files found in the specified directory matching the specified pattern.
■ Size of files
The size of the files found in the specified directory matching the specified pattern.
■ Read response time
The time taken to read the specified file.
■ Directory check
Checks if the specified directory is present.
■ Directory age
Checks for directory changes.
A file integrity profile can be created with the following check:
■ File integrity
Checks if one or more of the files specified under the File Integrity tab on the profile properties dialog has changed.
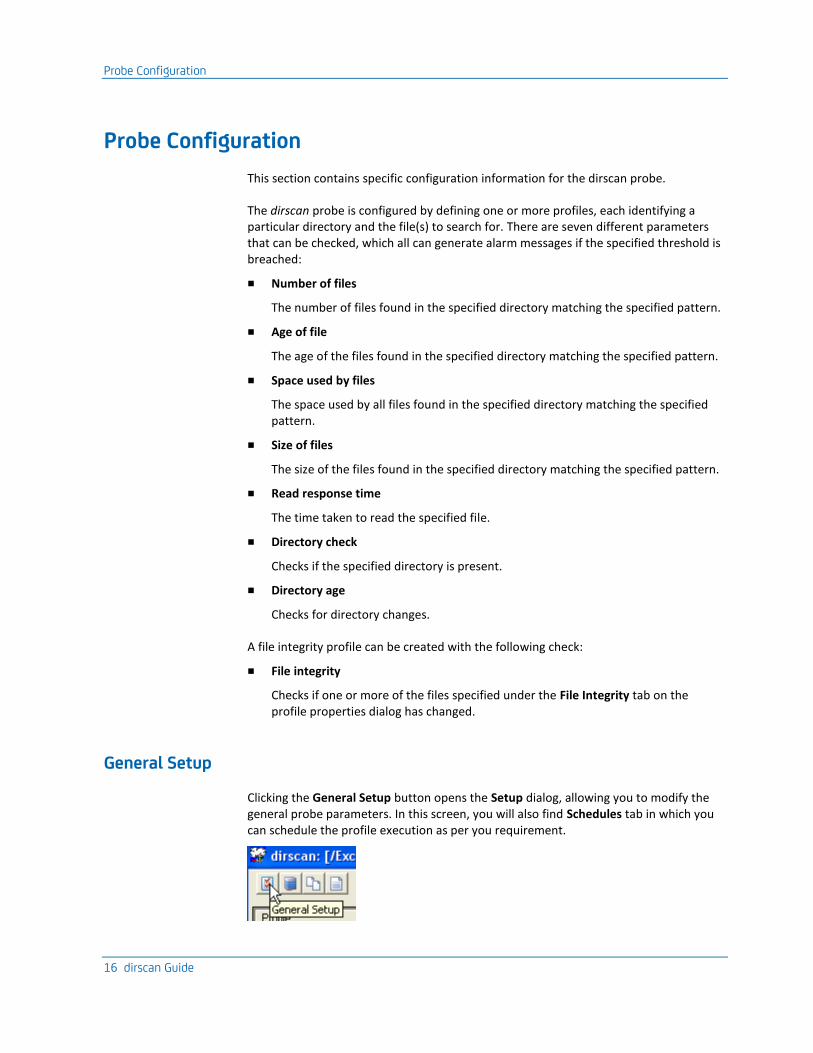
General Setup
Clicking the General Setup button opens the Setup dialog, allowing you to modify the general probe parameters. In this screen, you will also find Schedules tab in which you can schedule the profile execution as per you requirement.
Probe Configuration
Chapter 3: Configuration 17
General Tab
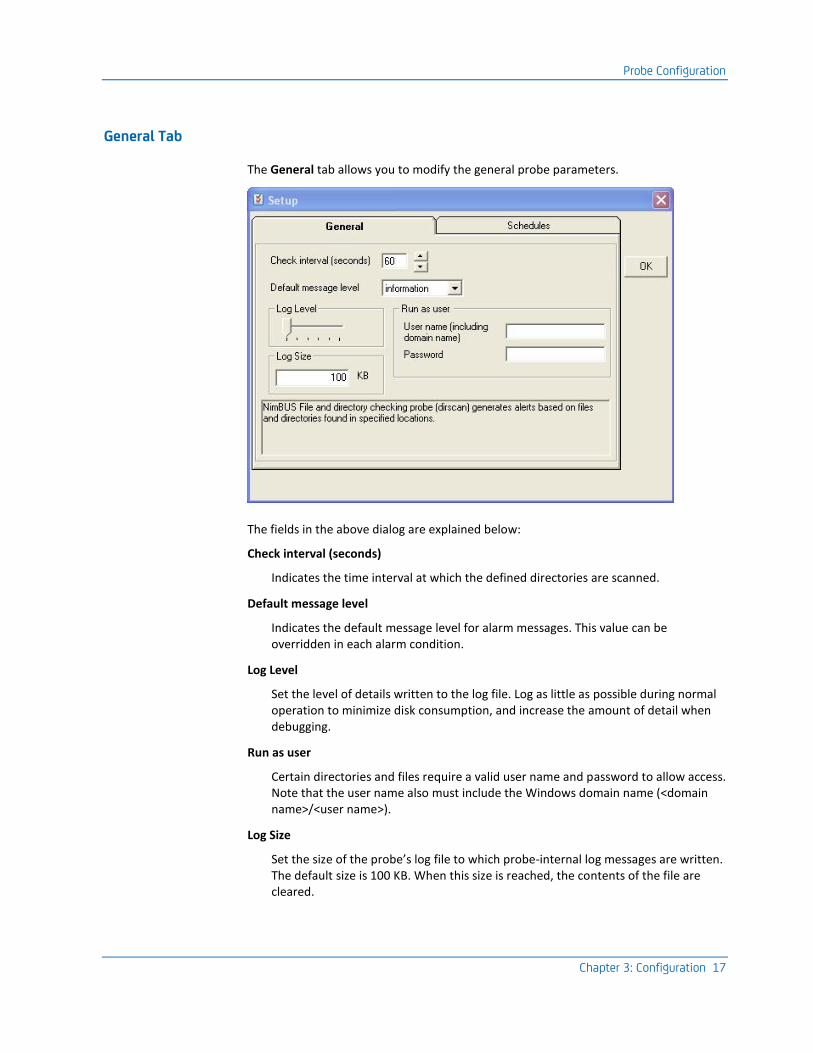
The General tab allows you to modify the general probe parameters.
The fields in the above dialog are explained below:
Check interval (seconds)
Indicates the time interval at which the defined directories are scanned.
Default message level
Indicates the default message level for alarm messages. This value can be overridden in each alarm condition.
Log Level
Set the level of details written to the log file. Log as little as possible during normal operation to minimize disk consumption, and increase the amount of detail when debugging.
Run as user
Certain directories and files require a valid user name and password to allow access. Note that the user name also must include the Windows domain name (<domain name>/<user name>).
Log Size
Set the size of the probe’s log file to which probe-internal log messages are written. The default size is 100 KB. When this size is reached, the contents of the file are cleared.

Probe Configuration
18 dirscan Guide
Schedule Tab
The Schedules tab enables you to specify the time duration in which alarms and QoS for the monitored process should be generated.
Adding a Schedule
This functionality allows you to add a schedule.
Follow these steps:
1. In the Setup dialog, click the Schedules tab.
2. Right-click in the empty portion and select Add option from context-menu.
Probe Configuration
Chapter 3: Configuration 19
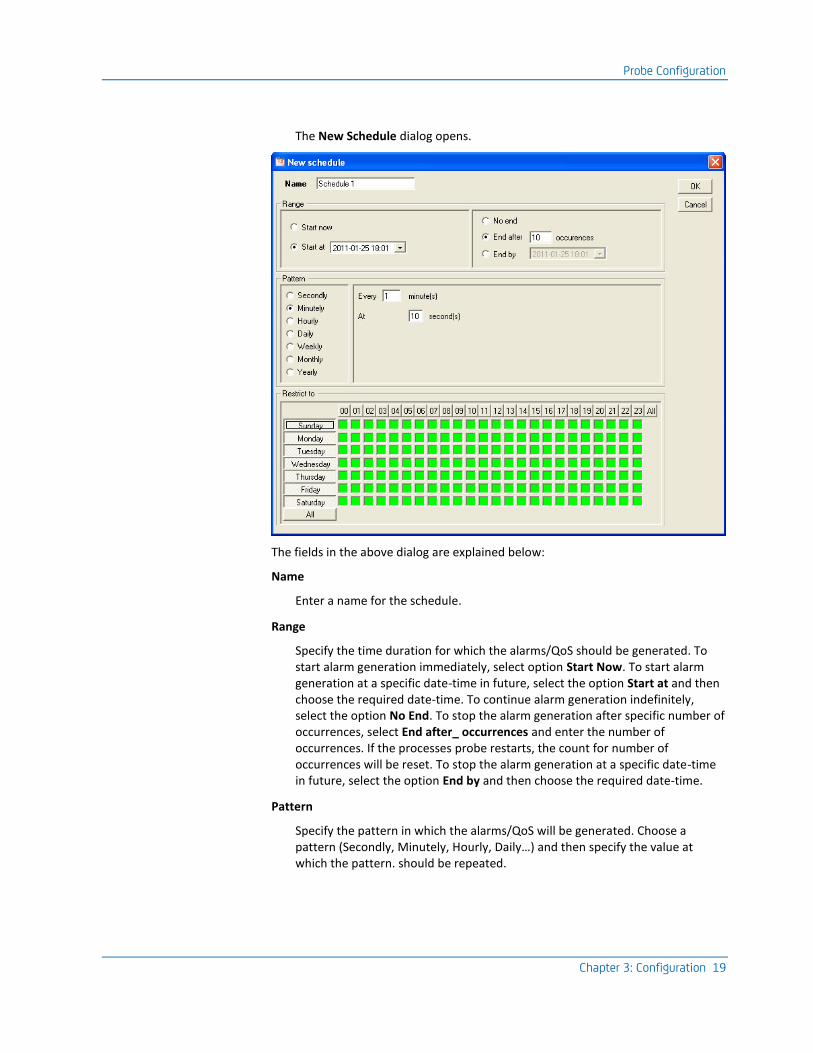
The New Schedule dialog opens.
The fields in the above dialog are explained below:
Name
Enter a name for the schedule.
Range
Specify the time duration for which the alarms/QoS should be generated. To start alarm generation immediately, select option Start Now. To start alarm generation at a specific date-time in future, select the option Start at and then choose the required date-time. To continue alarm generation indefinitely, select the option No End. To stop the alarm generation after specific number of occurrences, select End after_ occurrences and enter the number of occurrences. If the processes probe restarts, the count for number of occurrences will be reset. To stop the alarm generation at a specific date-time in future, select the option End by and then choose the required date-time.
Pattern
Specify the pattern in which the alarms/QoS will be generated. Choose a pattern (Secondly, Minutely, Hourly, Daily…) and then specify the value at which the pattern. should be repeated.
Probe Configuration
20 dirscan Guide
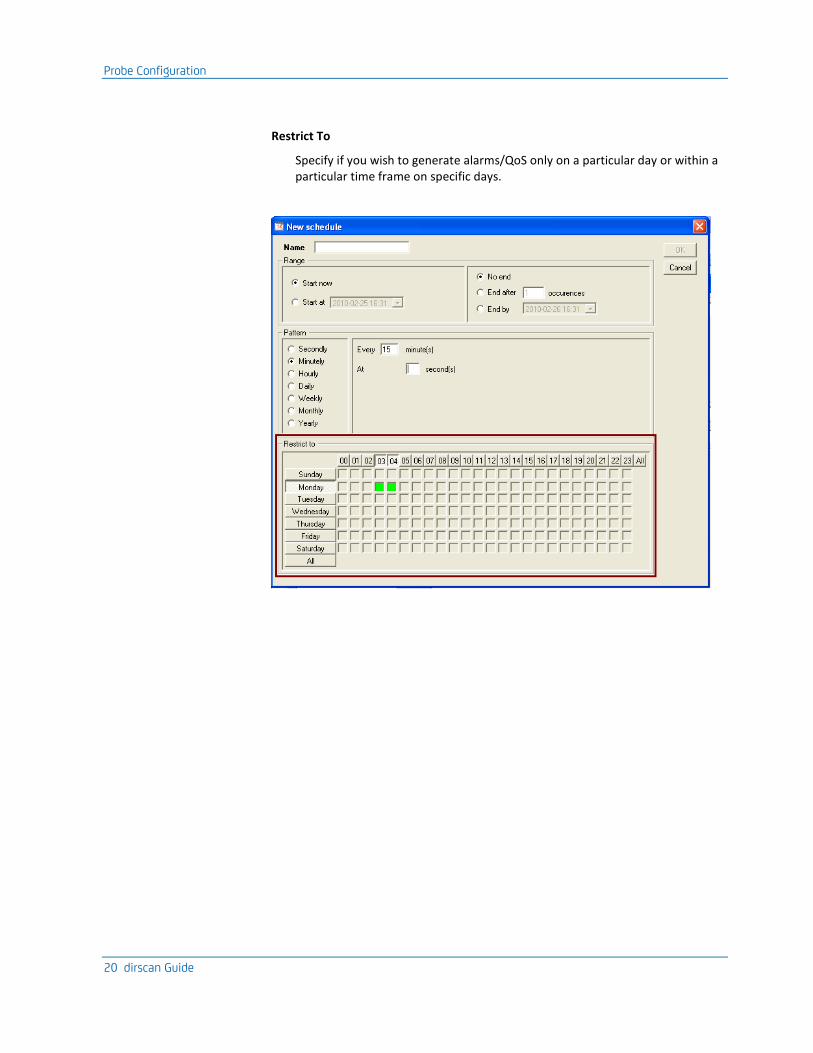
Restrict To
Specify if you wish to generate alarms/QoS only on a particular day or within a particular time frame on specific days.

Probe Configuration
Chapter 3: Configuration 21
The above figure shows a schedule that will only generate alarms/QoS between 3:00 AM to 4:59 AM on Monday.
The following points need to be taken into consideration while choosing the appropriate time range for the alarms/QoS:
■ If you choose Start Now option and set Restrict To settings to a later day/time, the alarms/QoS will only be generated on the day/time specified in Restrict To field.
■ If you set Restrict To option to, say 3:00 AM to 4:59 AM, and set Start at option to a later time (say 4:00 PM for same day), then the alarms/QoS will be generated from 4:00 PM.
■ If you choose End at option at, say 11:00 AM and set Restrict To settings to an earlier time (say, 10:30 AM), then alarms/QoS will not be generated after 10:30 AM.
■ If you choose End at option at, say 5:30 PM, and set Restrict To settings to a later time (say, 6:30 PM), then alarms/QoS will not be generated after 5:30 PM.
■ In short, the shortest time frame, based on the combination of all the filters applied, will be taken into consideration for generating alarms/QoS messages.
3. After configuring the schedule, click OK.
Editing a Schedule
Follow these steps:
1. Right-click in Schedules tab and select the Edit option from context menu.
The Edit Schedule dialog opens.
2. Make the necessary changes and click OK to save the modifications.
Deleting a Schedule
Follow these steps:
1. Right-click in Schedules tab and select the Remove option from context menu.
A message appears asking for confirmation to delete the schedule.
2. Click Yes to delete the schedule.
Note: If a schedule is attached to at least one profile, it cannot be deleted.

Probe Configuration
22 dirscan Guide
Creating a Profile
This functionality allows you to create a new profile. Clicking the Create a new Profile button opens the New Profile dialog.
The dialog contains some general properties and three main tabs - Scan Directory, Alarm Messages, Quality of Service messages.
The Profile Properties
When creating or editing a profile, the following values must be specified:
■ Name
The profile name.
■ Active
Determine if the profile should be active or not.
■ Description
A short description of the profile.
■ Schedule
Select the Schedule when profile is to be executed.
Probe Configuration
Chapter 3: Configuration 23
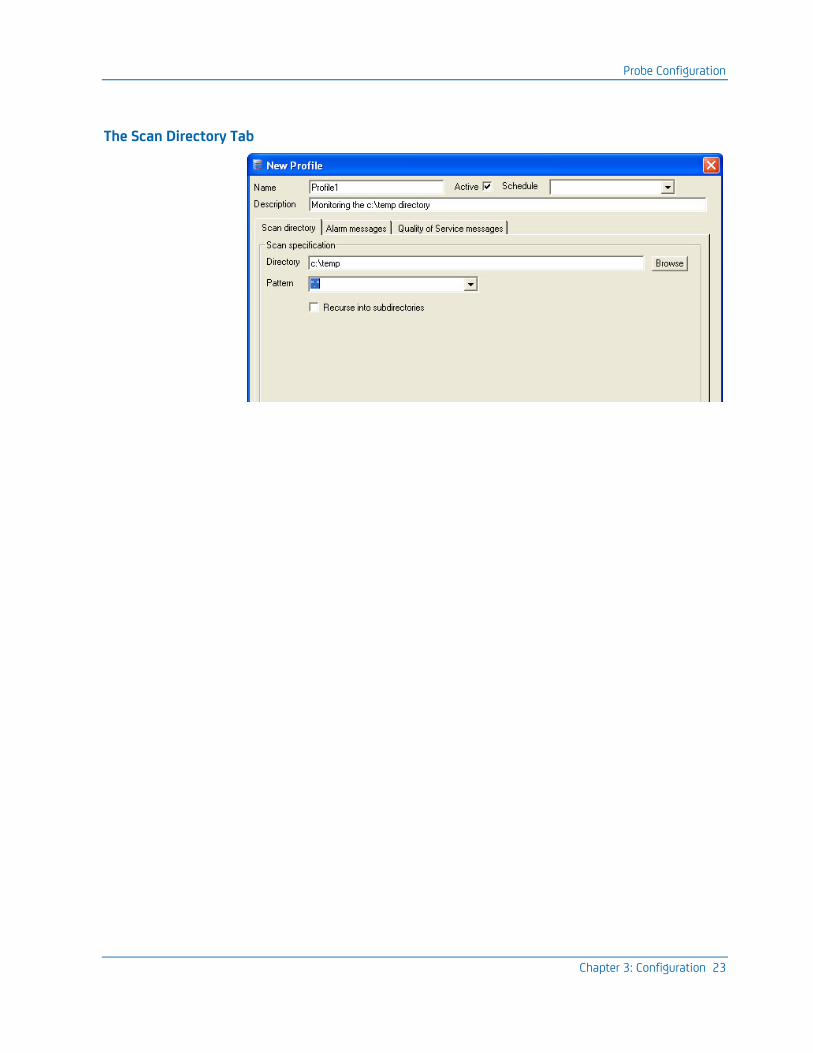
The Scan Directory Tab

Probe Configuration
24 dirscan Guide
■ Directory
The directory that will be scanned.
Note that you may also specify a directory name (or parts of a directory name) using special time-formatting primitives.
The path may be constructed by a combination of text and special primitives used by the system-call strftime.
■ %a - Abbreviated weekday name.
■ %A - Full weekday name.
■ %b - Abbreviated month name.
■ %B - Full month name.
■ %c - Date and time representation appropriate for locale.
■ %d - Day of month as decimal number (01 – 31).
■ %H - Hour in 24-hour format (00 – 23).
■ %I - Hour in 12-hour format (01 – 12).
■ %j - Day of year as decimal number (001 – 366).
■ %m - Month as decimal number (01 – 12).
■ %M - Minute as decimal number (00 – 59).
■ %p - Current locale’s A.M./P.M. indicator for 12-hour clock.
■ %S - Second as decimal number (00 – 59).
■ %U - Week of year as decimal number, with Sunday as first day of week (00 – 53).
■ %w - Weekday as decimal number (0 – 6; Sunday is 0).
■ %W - Week of year as decimal number, with Monday as first day of week (00 – 53).
■ %x - Date representation for current locale.
■ %X - Time representation for current locale.
■ %y - Year without century, as decimal number (00 – 99).
■ %Y - Year with century, as decimal number.
■ %z, %Z - Time-zone name or abbreviation; no characters if time zone is unknown.
■ %% - Percent sign.
Probe Configuration
Chapter 3: Configuration 25
Examples:
■ %y/%m/%d
■ This entry will locate a directory name such as 05/10/22.
■ %B
■ This entry will locate a directory name such as January.
■ %B %Y
■ This entry will locate a directory name such as January 2005.
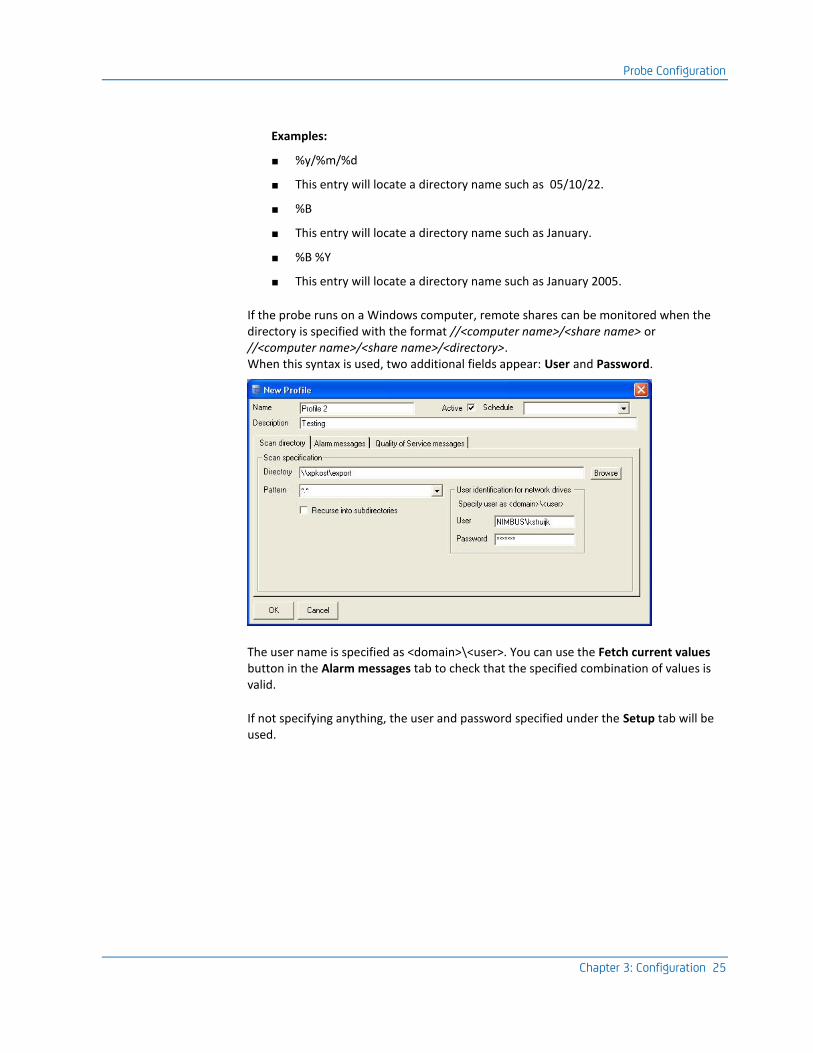
If the probe runs on a Windows computer, remote shares can be monitored when the directory is specified with the format //<computer name>/<share name> or //<computer name>/<share name>/<directory>. When this syntax is used, two additional fields appear: User and Password.
The user name is specified as <domain>\<user>. You can use the Fetch current values button in the Alarm messages tab to check that the specified combination of values is valid.
If not specifying anything, the user and password specified under the Setup tab will be used.
Probe Configuration
26 dirscan Guide
For advanced users, several directories can be specified separated with a ';' sign. Note that:
■ Remote shares should be placed first, to be able to specify user and password.
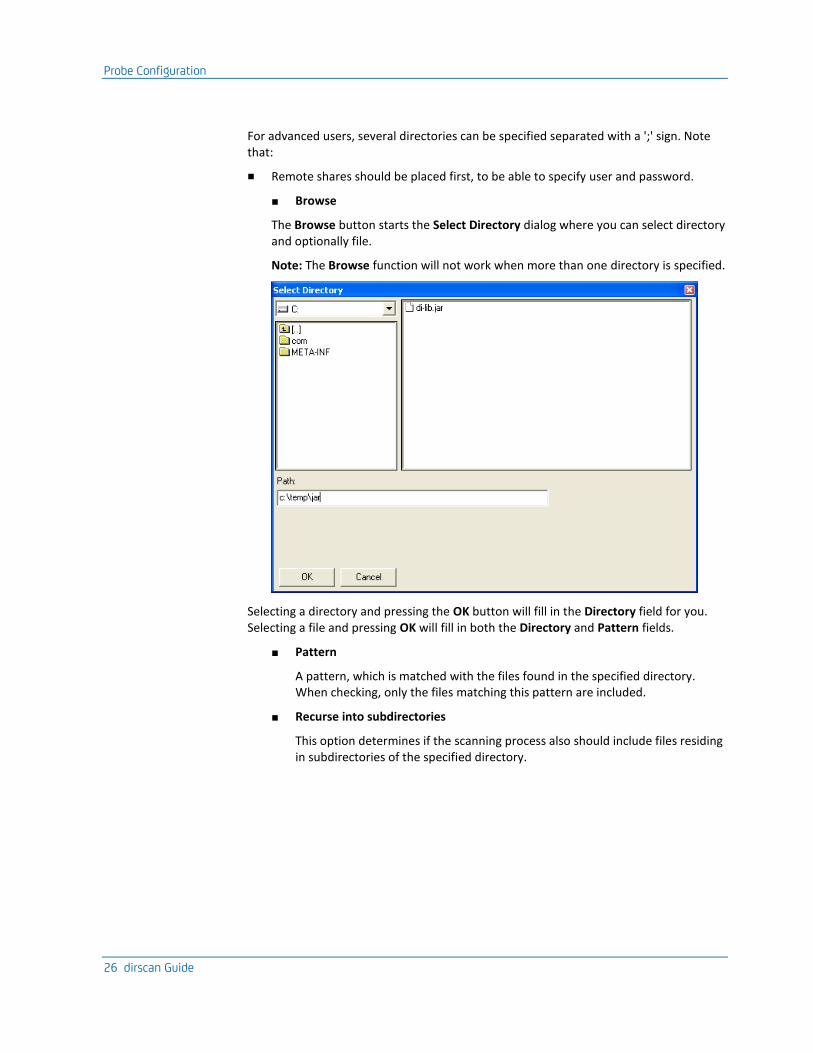
■ Browse
The Browse button starts the Select Directory dialog where you can select directory and optionally file.
Note: The Browse function will not work when more than one directory is specified.
Selecting a directory and pressing the OK button will fill in the Directory field for you. Selecting a file and pressing OK will fill in both the Directory and Pattern fields.
■ Pattern
A pattern, which is matched with the files found in the specified directory. When checking, only the files matching this pattern are included.
■ Recurse into subdirectories
This option determines if the scanning process also should include files residing in subdirectories of the specified directory.
Probe Configuration
Chapter 3: Configuration 27
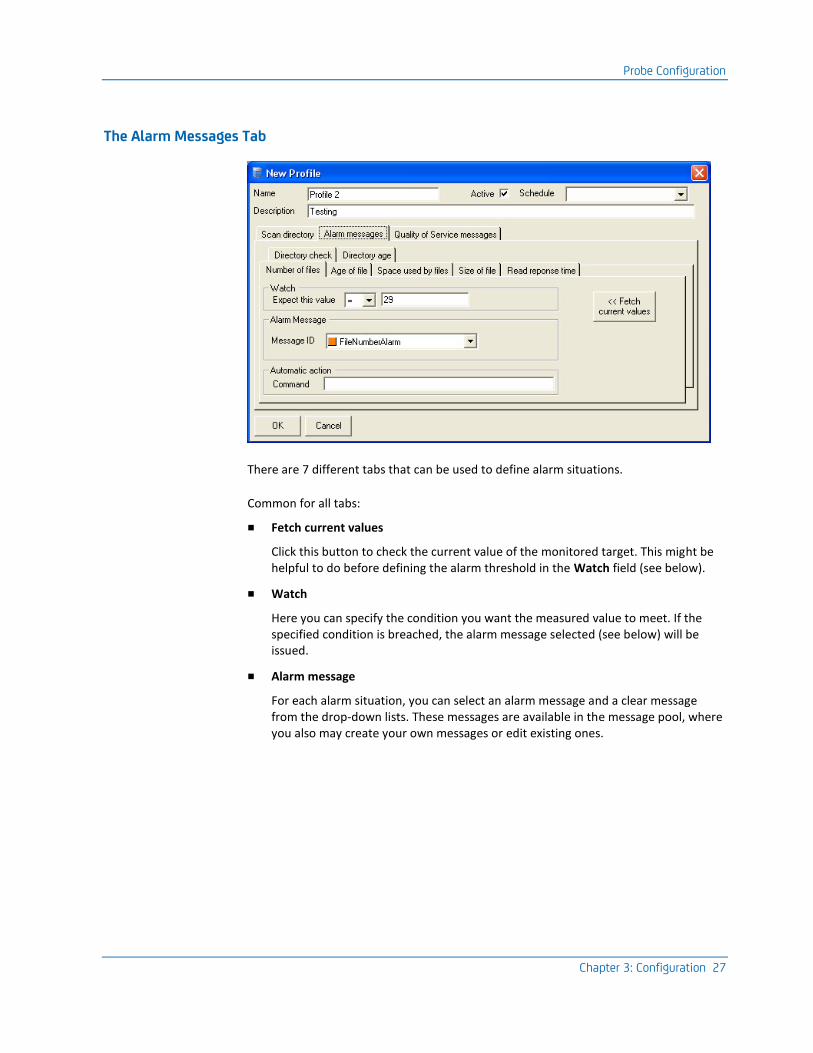
The Alarm Messages Tab
There are 7 different tabs that can be used to define alarm situations.
Common for all tabs:
■ Fetch current values
Click this button to check the current value of the monitored target. This might be helpful to do before defining the alarm threshold in the Watch field (see below).
■ Watch
Here you can specify the condition you want the measured value to meet. If the specified condition is breached, the alarm message selected (see below) will be issued.
■ Alarm message
For each alarm situation, you can select an alarm message and a clear message from the drop-down lists. These messages are available in the message pool, where you also may create your own messages or edit existing ones.

Probe Configuration
28 dirscan Guide
■ Automatic action
You can specify a command, which the probe executes when the alarm threshold value is breached. You can specify the arguments of the command which can include the following variables:
■ $watcher: Returns the name of the monitoring profile.
■ $description: Returns the description of the monitoring profile.
■ $file: Returns the name of the file or the file name pattern, which the probe is monitoring in the monitoring profile. If there are more than one file, it returns the array of file names and the probe executes the command for that number of times.
■ $size: Returns the size of the file or directory, which the probe is monitoring. If there are more than one file, it returns the array of file size and the probe executes the command for that number of times.
■ $unit: Returns the unit of file size, which is configured in the monitoring profile of the probe. This variable also converts the size of the file or directory in this unit. For example, you are monitoring the file greater than 100 bytes and the probe identifies a file of 1 KB. In this case, the probe returns the file size as 1024 Bytes.
■ $limit: Returns the threshold limit of the file or directory size, which is configured in the monitoring profile.
■ $directory: Returns the complete path of the directory, which is configured in the monitoring profile of the probe.
In addition, note that Age of file can be configured to use the age of the newest file, the oldest file or each individual file found when more than one file match the pattern. Note also that for Size of file similarly the smallest file, largest file or each individual file is checked.
For Read response time the shortest, longest or each individual response time is used.
Further, the different tabs are defined below:
■ Number of files
The number of files found in the specified directory matching the specified pattern.
■ Age of file
The age of the files found in the specified directory matching the specified pattern. Here, if you select On creation time option, then creation time of the file is used while defining threshold.
■ Space used by files
The space used by all files found in the specified directory matching the specified pattern. You can also generate alarms for any changes made to the file size.
Probe Configuration
Chapter 3: Configuration 29
■ Size of individual file
The size of the largest file found in the specified directory matching the specified pattern.
■ Read response time
The time taken to check the specified file.
Note: When specifying read response time, the response time is calculated from reading the first one Mb of the file. If no file specified, the largest file in the directory will be read for the quality of service response time.
■ Directory check
Checks if the specified directory is present.
■ Directory age
Checks if the directory has changed between each scan. Such a change would happen if a file is created or removed from the directory.
Note: This option will only check the specified directory even if the Recurse into subdirectories option is set.
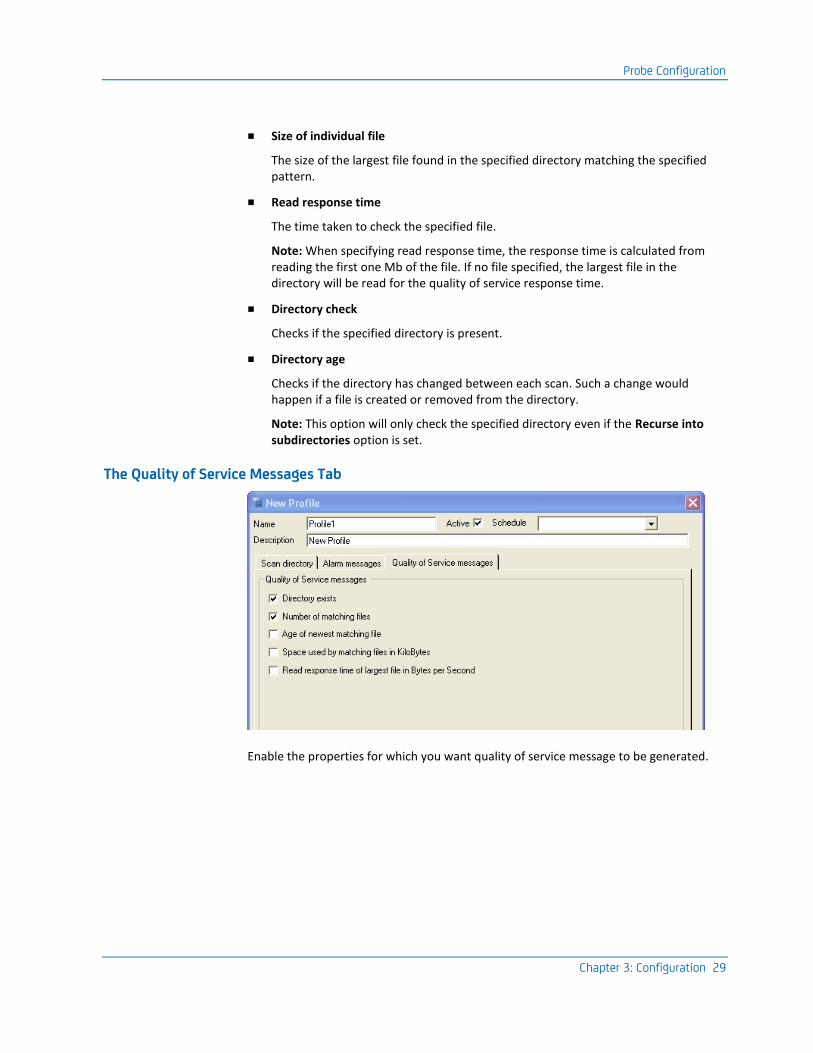
The Quality of Service Messages Tab
Enable the properties for which you want quality of service message to be generated.

Probe Configuration
30 dirscan Guide
The following values can be checked:
■ Directory exists
■ Number of matching files
■ Age of the matching files (oldest or newest file, depending on your Age of setting in the Age of file tab).
■ Space used by matching files in KiloBytes
■ Read response time of largest file in Bytes per Second
Attaching a Schedule to Profile
This functionality allows you to attach a previously configured schedule to a profile.
Follow these steps:
1. In the New Profile dialog, select the required schedule from the Schedule field. This field contains the list of already configured schedules.
2. Enter / Select the required values in other fields and tabs and click OK.
The selected schedule gets attached to the profile.
Creating an Integrity Profile
This functionality allows you to create a new integrity profile. Clicking the Create a new Integrity Profile button opens the New Integrity Profile dialog.

Probe Configuration
Chapter 3: Configuration 31
The dialog contains some general properties and three main tabs - File Integrity, Alarm message, Quality of Service message:
The File Integrity Tab
This tab lets you specify one or more files to be monitored, checking if any changes have taken place. Right clicking in the list opens a browser enabling you to you add or delete files to be monitored. If one of the files defined here is modified, an alarm message will be sent.
Clicking the Recalculate checksum button calculates and sets the checksum of the file. This value will be used when monitoring the file. If the checksum of the file becomes different from this value, an alarm message will be sent.
Probe Configuration
32 dirscan Guide
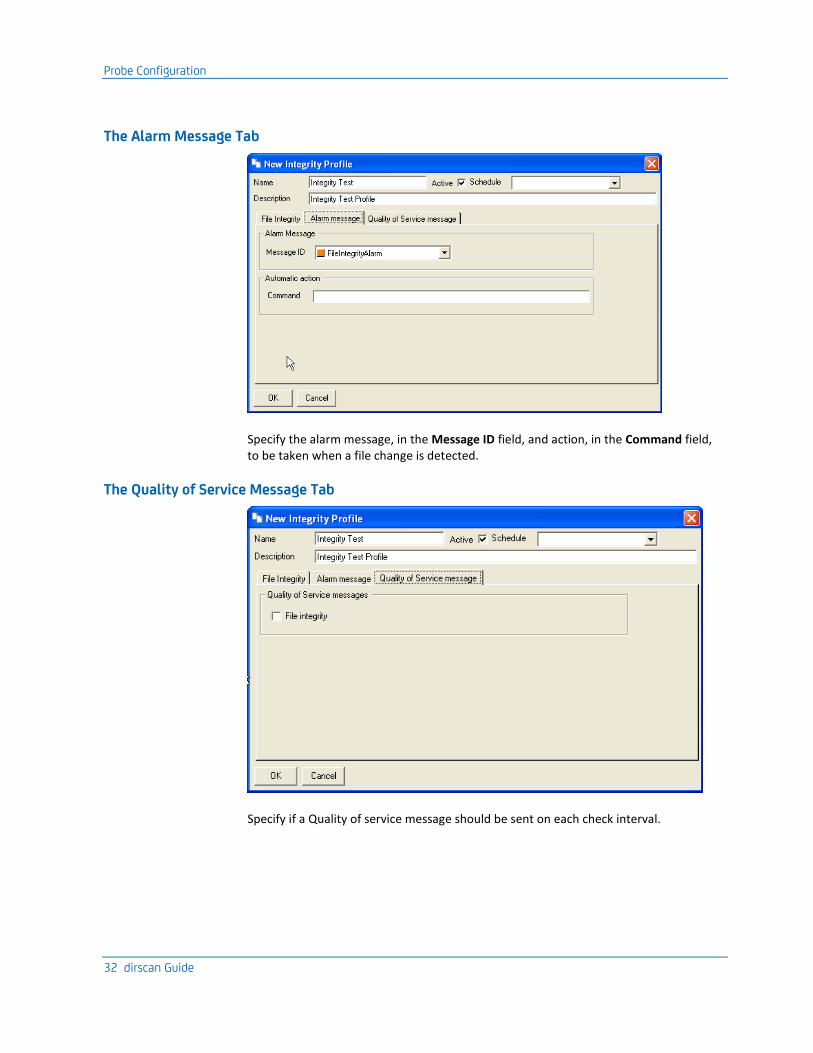
The Alarm Message Tab
Specify the alarm message, in the Message ID field, and action, in the Command field, to be taken when a file change is detected.
The Quality of Service Message Tab
Specify if a Quality of service message should be sent on each check interval.
Probe Configuration
Chapter 3: Configuration 33
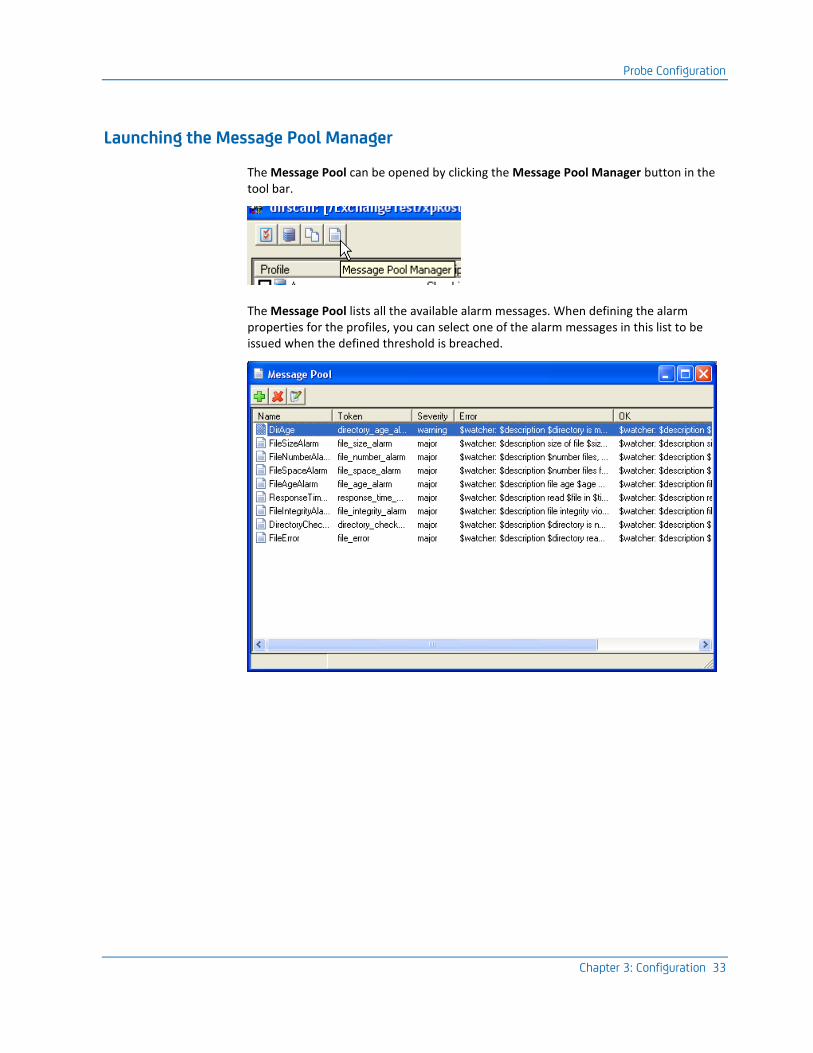
Launching the Message Pool Manager
The Message Pool can be opened by clicking the Message Pool Manager button in the tool bar.
The Message Pool lists all the available alarm messages. When defining the alarm properties for the profiles, you can select one of the alarm messages in this list to be issued when the defined threshold is breached.

Probe Configuration
34 dirscan Guide
Using the three tool buttons located in the upper left corner of the Message Pool dialog, or right-clicking in the list, you can select to add, edit or delete alarm messages.
The fields in the above dialog are explained below:
Identification Name
The identification name of the alarm message. This name will appear in the pull-down list when selecting an alarm message on the Alarm Messages tab in the Profiles dialog.
Token
The message token refers to the checkpoint. It is pre-set by the probe and is therefore not modifiable.
Error Alarm text
This is the text of the alarm message.Typing $ in this field, all valid variables will be listed.
Clear Alarm text (OK)
This is the text of the clear message. A Clear message will be issued if Alarm messages on breached thresholds have previously been issued, and the newly measured value is now within the threshold. Typing $ in this field, all valid variables will be listed.
Error Severity
The severity of the alarm (clear, information, warning, minor, major or critical).
Subsystem string/id
The ID of the subsystem being the source of this alarm. This id is managed by the nas.

Chapter 4: Example 35
Chapter 4: Example
Suppose you want to define a profile for the dirscan probe to monitor the directory C:/history and send an alert when detecting files greater than 25 Kb.
1. Double-click the dirscan probe in Infrastructure Manager to bring up the dirscan configuration dialog. You may use the default values in the Setup tab:
■ Check interval is changed to 30 seconds.
■ Message level is left at information.
■ Log Level is set to a middle value.
■ Log Size left at 100 KB.
Probe Configuration
36 dirscan Guide
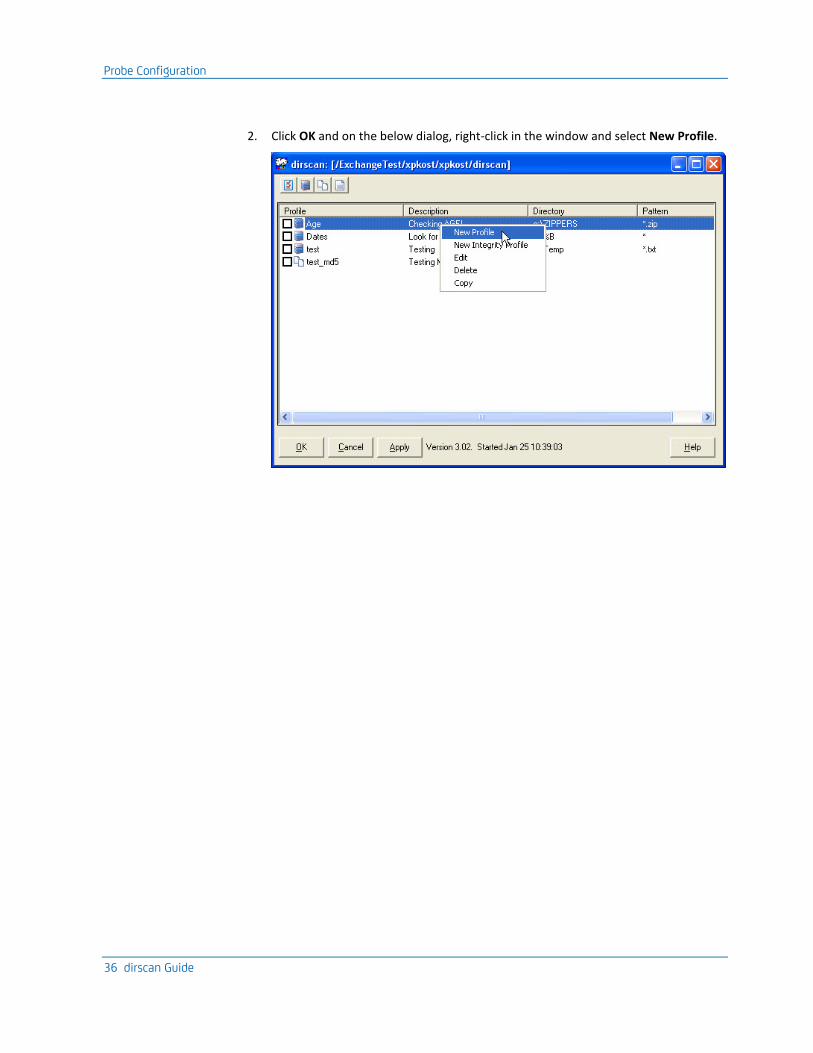
2. Click OK and on the below dialog, right-click in the window and select New Profile.

Probe Configuration
Chapter 4: Example 37
3. When the New Profile dialog appears on the screen, specify the following:
■ A profile name (e.g. History)
■ A short description of the profile
■ Click the Active option to enable the profile
■ Specify which directory to check (C:\history).
■ Select pattern (* means checking all files in the C:\history directory)
■ Check the option Recurse into subdirectories. The scanning process will also include files residing in subdirectories of the C:\history directory.
4. Select the Alarm messages tab and check the option Check existence of directory.
Alerts will be generated if the directory does not exist or is deleted.
Probe Configuration
38 dirscan Guide
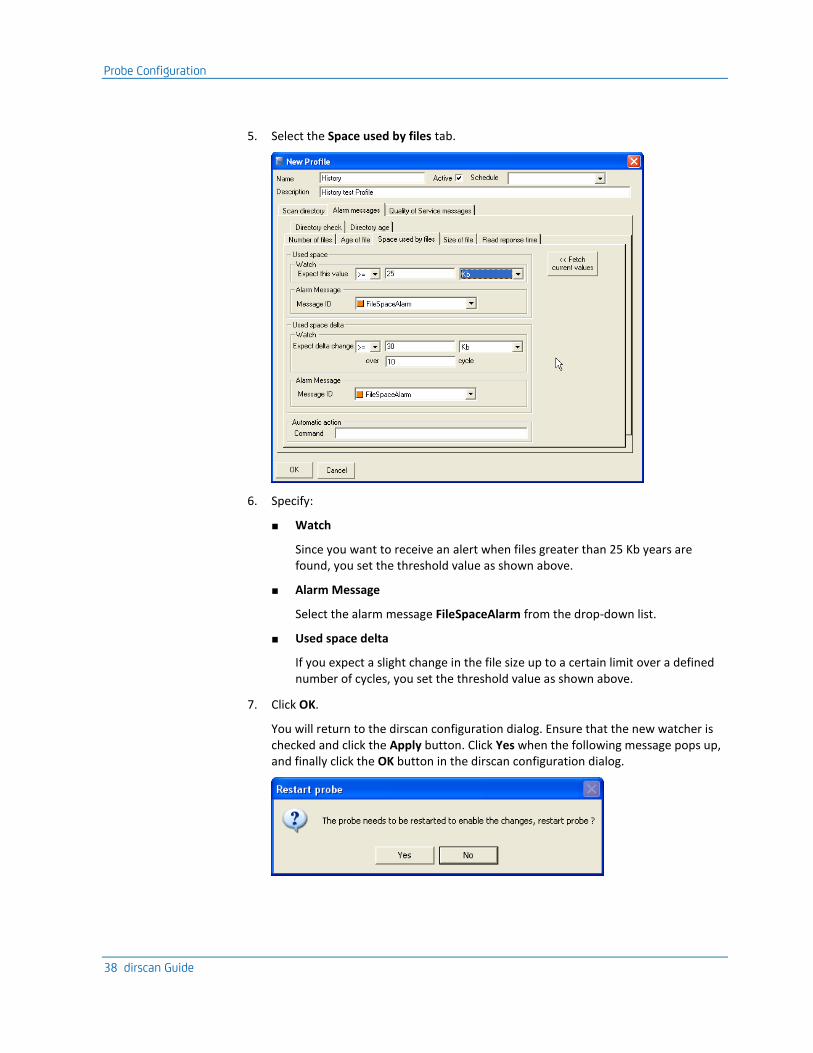
5. Select the Space used by files tab.
6. Specify:
■ Watch
Since you want to receive an alert when files greater than 25 Kb years are found, you set the threshold value as shown above.
■ Alarm Message
Select the alarm message FileSpaceAlarm from the drop-down list.
■ Used space delta
If you expect a slight change in the file size up to a certain limit over a defined number of cycles, you set the threshold value as shown above.
7. Click OK.
You will return to the dirscan configuration dialog. Ensure that the new watcher is checked and click the Apply button. Click Yes when the following message pops up, and finally click the OK button in the dirscan configuration dialog.

Probe Configuration
Chapter 4: Example 39
You may now check that the profile works by:
■ Ensuring that the folder C:\history exists and contains files greater than 25 Kb.
Or
■ Ensuring that the folder C:\history does not exist.
You will then observe that an alarm like the one shown below will appear in the Alarm Window:

Chapter 5: QoS Threshold Metrics 41
Chapter 5: QoS Threshold Metrics
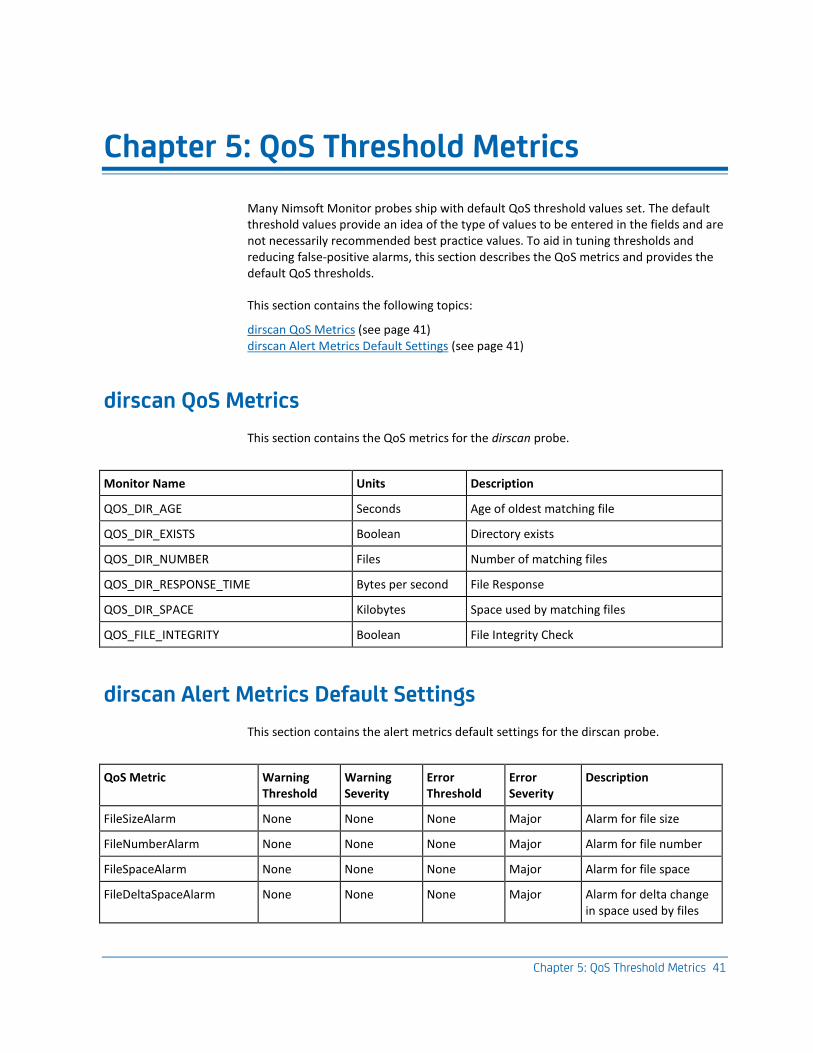
Many Nimsoft Monitor probes ship with default QoS threshold values set. The default threshold values provide an idea of the type of values to be entered in the fields and are not necessarily recommended best practice values. To aid in tuning thresholds and reducing false-positive alarms, this section describes the QoS metrics and provides the default QoS thresholds.
This section contains the following topics:
dirscan QoS Metrics (see page 41) dirscan Alert Metrics Default Settings (see page 41)
dirscan QoS Metrics
This section contains the QoS metrics for the dirscan probe.
Monitor Name Units Description
QOS_DIR_AGE Seconds Age of oldest matching file
QOS_DIR_EXISTS Boolean Directory exists
QOS_DIR_NUMBER Files Number of matching files
QOS_DIR_RESPONSE_TIME Bytes per second File Response
QOS_DIR_SPACE Kilobytes Space used by matching files
QOS_FILE_INTEGRITY Boolean File Integrity Check
dirscan Alert Metrics Default Settings
This section contains the alert metrics default settings for the dirscan probe.
QoS Metric Warning Threshold
Warning Severity
Error Threshold
Error Severity
Description
FileSizeAlarm None None None Major Alarm for file size
FileNumberAlarm None None None Major Alarm for file number
FileSpaceAlarm None None None Major Alarm for file space
FileDeltaSpaceAlarm None None None Major Alarm for delta change in space used by files

dirscan Alert Metrics Default Settings
42 dirscan Guide
FileAgeAlarm None None None Major Alarm for file age
ResponseTimeAlarm None None None Major Alarm for response time
FileIntegrityAlarm None None None Major Alarm for file integrity
DirectoryCheckAlarm None None None Major Alarm for Directory existence
FileError None None None Major Alarm for File existence
DirAge None None None Major Alarm for File Age