Nikon D60 User Manual En
204
User’s Manual DIGITAL CAMERA En
-
Upload
tangakatanga -
Category
Documents
-
view
248 -
download
0
Transcript of Nikon D60 User Manual En

7/31/2019 Nikon D60 User Manual En
http://slidepdf.com/reader/full/nikon-d60-user-manual-en 1/204
User’s Manual
DIGITAL CAMERA
En

7/31/2019 Nikon D60 User Manual En
http://slidepdf.com/reader/full/nikon-d60-user-manual-en 2/204
Trademark Information
• Microsoft and Windows Vista are either registered trademarks or trademarks of Microsoft
Corporation in the United States and/or other countries.
• Macintosh, Mac OS, and QuickTime are trademarks of Apple Inc.
• Adobe and Acrobat are registered trademarks of Adobe Systems Inc.
• The SD logo is a trademark of the SD Card Association.
• The SDHC logo is a trademark.• PictBridge is a trademark.
• All other trade names mentioned in this manual or the other documentation provided
with your Nikon product are trademarks or registered trademarks of their respective
holders.

7/31/2019 Nikon D60 User Manual En
http://slidepdf.com/reader/full/nikon-d60-user-manual-en 3/204i
Introduction
First Steps
Basic Photography
, , , and Modes
Changing Shooting Settings
More on Playback
Connecting to a Computer, Printer, or TV
Menu Guide
Optional Accessories
Maximizing the Life of the Camera
Technical Notes

7/31/2019 Nikon D60 User Manual En
http://slidepdf.com/reader/full/nikon-d60-user-manual-en 4/204ii
For Your Safety
To prevent damage to your Nikon product or injury to yourself or to others, read thefollowing safety precautions in their entirety before using this equipment. Keep thesesafety instructions where all those who use the product will read them. The consequences that could result from failure to observe the precautions listed in thissection are indicated by the following symbol:
WARNINGS
This icon marks warnings. To prevent possible injury, read all warnings before using thisNikon product.
Keep the sun out of the frameKeep the sun well out of the frame whenshooting backlit subjects. Sunlight focused intothe camera when the sun is within, or close to,the frame could cause a fire.
Do not look at the sun through theviewfinderViewing the sun or other strong light sourcethrough the viewfinder could cause permanentvisual impairment.
Using the viewfinder diopter controlWhen operating the viewfinder diopter controlwith your eye to the viewfinder, care should betaken not to put your finger in your eyeaccidentally.
Turn off immediately in the event of
malfunctionShould you notice smoke or an unusual smellcoming from the equipment or AC adapter(available separately), unplug the AC adapterand remove the battery immediately, takingcare to avoid burns. Continued operation couldresult in injury. After removing the battery, takethe equipment to a Nikon-authorized servicecenter for inspection.
Do not disassemble
Touching the product’s internal parts couldresult in injury. In the event of malfunction, theproduct should be repaired only by a qualifiedtechnician. Should the product break open asthe result of a fall or other accident, remove thebattery and/or AC adapter and then take theproduct to a Nikon-authorized service center forinspection.
Do not use in the presence of flammablegasDo not use electronic equipment in the
presence of flammable gas, as this could resultin explosion or fire.
Keep out of reach of childrenFailure to observe this precaution could result ininjury.
Do not place the strap around the neck of an infant or childPlacing the camera strap around the neck of aninfant or child could result in strangulation.
Observe proper precautions whenhandling batteriesBatteries may leak or explode if improperlyhandled. Observe the following precautionswhen handling batteries for use in this product:• Only use a Rechargeable Li-ion Battery EN-EL9
(supplied). Use the Quick Charger MH-23(supplied) to charge the battery.
• Do not short or disassemble the battery.• Be sure the product is off before replacing the
battery. If you are using an AC adapter, be sureit is unplugged.
• Do not attempt to insert the battery upsidedown or backwards.
• Do not expose the battery to flame or toexcessive heat.
• Do not immerse in or expose to water.• Replace the terminal cover when transporting
the battery. Do not transport or store thebattery with metal objects such as necklacesor hairpins.
• Batteries are prone to leakage when fullydischarged. To avoid damage to the product,be sure to remove the battery when nocharge remains.
• When the battery is not in use, attach theterminal cover and store in a cool, dry place.
• The battery may be hot immediately after useor when the product has been used onbattery power for an extended period. Beforeremoving the battery turn the camera off andallow the battery to cool.
• Discontinue use immediately should younotice any changes in the battery, such as
discoloration or deformation.

7/31/2019 Nikon D60 User Manual En
http://slidepdf.com/reader/full/nikon-d60-user-manual-en 5/204iii
For Your Safety/Notices
Notices
Observe proper precautions whenhandling the quick charger• Keep dry. Failure to observe this precaution
could result in fire or electric shock.• Dust on or near the metal parts of the plug
should be removed with a dry cloth.Continued use could result in fire.
• Do not handle the power cable or go near thecharger during lightning storms. Failure toobserve this precaution could result in electricshock.
• Do not damage, modify, or forcibly tug orbend the power cable. Do not place it underheavy objects or expose it to heat or flame.Should the insulation be damaged and thewires become exposed, take the power cableto a Nikon-authorized service representativefor inspection. Failure to observe this
precaution could result in fire or electric shock.• Do not handle the plug or charger with wethands. Failure to observe this precautioncould result in electric shock.
Use appropriate cablesWhen connecting cables to the input andoutput jacks, use only the cables provided orsold by Nikon for the purpose to maintaincompliance with product regulations.
CD-ROMsCD-ROMs containing software or manuals
should not be played back on audio CDequipment. Playing CD-ROMs on an audio CDplayer could cause hearing loss or damage theequipment.
Observe caution when using the flashDo not operate the flash with the flash windowtouching a person or object. Failure to observethis precaution could result in burns or fire.
Using the flash close to the subject’s eyes couldcause temporary visual impairment. Particularcare should be observed when photographinginfants, when the flash should be no less thanone meter (39in.) from the subject.
Avoid contact with liquid crystalShould the monitor break, care should be taken to avoid injury due to broken glass and to prevent theliquid crystal from the monitor touching the skin or entering the eyes or mouth.
• No part of the manuals included with this productmay be reproduced, transmitted, transcribed,stored in a retrieval system, or translated into anylanguage in any form, by any means, withoutNikon’s prior written permission.
• Nikon reserves the right to change thespecifications of the hardware and softwaredescribed in these manuals at any time andwithout prior notice.
• Nikon will not be held liable for any damagesresulting from the use of this product.
• While every effort has been made to ensure thatthe information in these manuals is accurate andcomplete, we would appreciate it were you tobring any errors or omissions to the attention of the Nikon representative in your area (addressprovided separately).
Notices for Customers in the U.S.A.
Federal Communications Commission (FCC) Radio Frequency Interference Statement This equipment has been tested and found to comply
with the limits for a Class B digital device, pursuant to
Part 15 of the FCC rules. These limits are designed to
provide reasonable protection against harmful
interference in a residential installation. This equipment
generates, uses, and can radiate radio frequency energy
and, if not installed and used in accordance with the
instructions, may cause harmful interference to radio
communications. However, there is no guarantee that
interference will not occur in a particular installation. If
this equipment does cause harmful interference toradio or television reception, which can be determined
by turning the equipment off and on, the user is
encouraged to try to correct the interference by one or
more of the following measures:
• Reorient or relocate the receiving antenna.
• Increase the separation between the equipment and
receiver.
• Connect the equipment into an outlet on a circuit
different from that to which the receiver is connected.
• Consult the dealer or an experienced radio/television
technician for help.
D60

7/31/2019 Nikon D60 User Manual En
http://slidepdf.com/reader/full/nikon-d60-user-manual-en 6/204iv
Notices
CAUTIONS
Modifications
The FCC requires the user be notified that any changes
or modifications made to this device that are not
expressly approved by Nikon Corporation may void the
user’s authority to operate the equipment.
Interface Cables
Use the interface cables sold or provided by Nikon foryour equipment. Using other interface cables may
exceed the limits of Class B Part 15 of the FCC rules.
Notice for Customers in the State of CaliforniaWARNING: Handling the cord on this product may expose
you to lead, a chemical known to the State of California to
cause birth defects or other reproductive harm. Wash
hands after handling.
Nikon Inc., 1300 Walt Whitman Road, Melville, New York 11747-3064, U.S.A. Tel.: 631-547-4200
Notices for Customers in Canada
CAUTION
This Class B digital apparatus complies with CanadianICES-003.
ATTENTION
Cet appareil numérique de la classe B est conforme à lanorme NMB-003 du Canada.
Symbol for Separate Collection in European Countries
This symbol indicates that this product is to be collected separately.
The following apply only to users in European countries:
• This product is designated for separate collection at an appropriate collection point. Do not dispose
of as household waste.
• For more information, contact the retailer or the local authorities in charge of waste management.
Notice Concerning Prohibition of Copying or Reproduction
Note that simply being in possession of material that has been digitally copied or reproduced by means of a
scanner, digital camera, or other device may be punishable by law.
• Items prohibited by law from being copied or
reproduced
Do not copy or reproduce paper money, coins,securities, government bonds, or local government
bonds, even if such copies or reproductions are
stamped “Sample.”
The copying or reproduction of paper money, coins,
or securities which are circulated in a foreign country
is prohibited.
Unless the prior permission of the government has
been obtained, the copying or reproduction or
unused postage stamps or post cards issued by the
government is prohibited.
The copying or reproduction of stamps issued by thegovernment and of certified documents stipulated by
law is prohibited.
• Cautions on certain copies and reproductions
The government has issued cautions on copies or
reproductions of securities issued by privatecompanies (shares, bills, checks, gift certificates, etc.),
commuter passes, or coupon tickets, except when a
minimum of necessary copies are to be provided for
business use by a company. Also, do not copy or
reproduce passports issued by the government,
licenses issued by public agencies and private groups,
ID cards, and tickets, such as passes and meal
coupons.
• Comply with copyright notices
The copying or reproduction of copyrighted creative
works such as books, music, paintings, woodcuts,
prints, maps, drawings, movies, and photographs is
governed by national and international copyright
laws. Do not use this product for the purpose of
making illegal copies or to infringe copyright laws.

7/31/2019 Nikon D60 User Manual En
http://slidepdf.com/reader/full/nikon-d60-user-manual-en 7/204v
Table of Contents
For Your Safety ...........................................................................................................................................ii
Notices......................................................................................................................................................... iii
Introduction..........................................................................................1
About This Manual ................................................................................................................................... 1Information and Precautions .................................................................................................... ........... 2
Getting to Know the Camera................................................................................................................ 4
Camera Body................................................................................................................................................................. 4
The Mode Dial .............................................................................................................................................................. 6
The Power Switch ...................................................................................................................................................... 6
The Viewfinder Display ........................................................................................................................................... 7
The Shooting Information Display .................................................................................................................. 8
The Command Dial .................................................................................................................................................10
Multi Selector..............................................................................................................................................................12 The Shutter-Release Button...............................................................................................................................13
N (Help) Button ........................................................................................................................................................13
The Camera Strap AN-DC1.................................................................................................................................14
First Steps............................................................................................15
Charging and Inserting the Battery .................................................................................................16
The Quick Charger MH-23 ..................................................................................................................................16
The Rechargeable Li-ion Battery EN-EL9 ...................................................................................................16Attaching a Lens .....................................................................................................................................18
Detaching Lenses.....................................................................................................................................................19
Vibration Reduction Mode (VR) .......................................................................................................................20
Setting Display Language, Date and Time....................................................................................21
Reset the Clock ..........................................................................................................................................................21
Inserting Memory Cards.......................................................................................................................23
Inserting Memory Cards.......................................................................................................................................23
Formatting Memory Cards .................................................................................................................................24
Adjusting Viewfinder Focus (Diopter Adjustment)....................................................................26
Basic Photography .............................................................................27
“Point-and-Shoot” Photography (e (Auto) Mode)..................................................................28
Step 1 Turn the Camera On and Select Shooting Mode.............................................................28
Step 2 Frame a Photograph..........................................................................................................................30
Step 3 Focus and Shoot...................................................................................................................................32
Step 4 Viewing Photographs/Deleting Photographs...................................................................34

7/31/2019 Nikon D60 User Manual En
http://slidepdf.com/reader/full/nikon-d60-user-manual-en 8/204vi
Table of Contents
Shooting Particular Scenes..................................................................................................... ............ 36
Taking Pictures .......................................................................................................................................................... 36
Features of f, g, h, i, j, k, and l Modes...........................................................................36
Getting Good Results with Autofocus ........................................................................................................38
a, b, c, and d Modes......................................................................39Shooting in a, b, c, and d Modes.............................................................................................. 40
Shooting in a Mode (Programmed Auto).................................................................................... 41
Shooting in b Mode (Shutter-Priority Auto)................................................................................ 42
Shooting in c Mode (Aperture-Priority Auto)............................................................................ 43
Shooting in d Mode (Manual) ......................................................................................................... 44
Changing Shooting Settings .............................................................47
The Quick Settings Display ..................................................................................................... ............ 48Image Quality and Size......................................................................................................... ................ 49
Image Quality.............................................................................................................................................................50
Image Size ....................................................................................................................................................................50
White Balance.......................................................................................................................................... 52
ISO Sensitivity .......................................................................................................................................... 53
Releasing the Shutter .......................................................................................................... ................. 54
Release Mode............................................................................................................................................................. 54
Continuous Mode ...................................................................................................................................................54
Self-Timer and Remote Control Modes ..................................................................................................... 55Focus........................................................................................................................................................... 57
Focus Mode................................................................................................................................................................. 57
AF-Area Mode............................................................................................................................................................ 58
Focus Point Selection............................................................................................................................................59
Focus Lock ...................................................................................................................................................................60
Manual Focus ............................................................................................................................................................. 61
Exposure.................................................................................................................................................... 62
Metering........................................................................................................................................................................62
Autoexposure Lock ................................................................................................................................................63
Using the Built-in Flash ........................................................................................................................ 64
Changing the Flash Mode..................................................................................................................................65
Exposure Compensation ..................................................................................................................... 67
Flash Compensation ............................................................................................................................. 68
Active D-Lighting ................................................................................................................................... 69
Two-Button Reset................................................................................................................................... 70

7/31/2019 Nikon D60 User Manual En
http://slidepdf.com/reader/full/nikon-d60-user-manual-en 9/204vii
Table of Contents
More on Playback ...............................................................................71
Viewing Photographs in Full-Frame Playback............................................................................. 72
Full-Frame Playback ...............................................................................................................................................72
Photo Information................................................................................................................................................... 73
Viewing Multiple Photographs: Thumbnail Playback............................................................... 76
Taking a Closer Look: Playback Zoom ............................................................................................ 77Protecting Photographs from Deletion ......................................................................................... 78
Connecting to a Computer, Printer, or TV ........................................79
Connecting to a Computer................................................................................................................. 80
Before Connecting the Camera...................................................................................................................... 80
Connecting the USB Cable ................................................................................................................................81
Connecting to a Printer........................................................................................................................ 83
Printing Via Direct USB Connection ................................................................................................ 84Connecting the Printer ........................................................................................................................................85
Printing Photographs One at a Time...........................................................................................................86
Printing Multiple Photographs........................................................................................................................88
Creating an Index Print ........................................................................................................................................ 89
Creating a DPOF Print Order: Print Set ........................................................................................... 90
Viewing Photographs on TV............................................................................................................... 92
Menu Guide.........................................................................................93Using Camera Menus............................................................................................................................ 94
Playback Options: The Playback Menu .......................................................................................... 96
Delete..............................................................................................................................................................................96
Playback Folder ......................................................................................................................................................... 97
Rotate Tall.....................................................................................................................................................................98
Slide Show.................................................................................................................................................................... 98
Stop-Motion Movie ................................................................................................................................................99
Shooting Options: The Shooting Menu .......................................................................................100
Optimize Image..................................................................................................................................................... 101Customizing Image Enhancement Options: Custom.................................................................... 102
White Balance ......................................................................................................................................................... 103
Fine-Tuning White Balance ............................................................................................................................ 104
Preset Manual ......................................................................................................................................................... 105
Noise Reduction .................................................................................................................................................... 108

7/31/2019 Nikon D60 User Manual En
http://slidepdf.com/reader/full/nikon-d60-user-manual-en 10/204viii
Table of Contents
Custom Settings ...................................................................................................................................109
R Reset ......................................................................................................................................................................... 110
01 Beep ....................................................................................................................................................................... 110
06 No Memory Card?.......................................................................................................................................... 110
07 Image Review................................................................................................................................................... 111
09 AF-assist ............................................................................................................................................................... 111
10 ISO Auto............................................................................................................................................................... 11111 F / G Button.................................................................................................................................................. 112
12 AE-L/AF-L ............................................................................................................................................................ 113
13 AE Lock................................................................................................................................................................. 113
14 Built-in Flash/Optional Flash Unit ........................................................................................................ 113
15 Auto off Timers................................................................................................................................................ 114
16 Self-Timer............................................................................................................................................................ 114
17 Remote on Duration .................................................................................................................................... 115
18 Date Imprint...................................................................................................................................................... 115
19 Rangefinder ....................................................................................................................................................... 116
Basic Camera Settings: The Setup Menu .....................................................................................117
CSM/Setup Menu ................................................................................................................................................. 118
Choosing Menu Items for My Menu......................................................................................................... 119
Info Display Format ............................................................................................................................................. 120
Auto Shooting Info .............................................................................................................................................. 122
Shooting Info Auto off....................................................................................................................................... 123
LCD Brightness ....................................................................................................................................................... 123
Video Mode.............................................................................................................................................................. 123Language................................................................................................................................................................... 123
Image Comment................................................................................................................................................... 124
Folders ......................................................................................................................................................................... 125
File No. Sequence................................................................................................................................................. 126
Clean Image Sensor ............................................................................................................................................ 126
Mirror Lock-Up........................................................................................................................................................ 126
Firmware Version .................................................................................................................................................. 126
Dust off Ref Photo ................................................................................................................................................ 127
Auto Image Rotation .......................................................................................................................................... 128

7/31/2019 Nikon D60 User Manual En
http://slidepdf.com/reader/full/nikon-d60-user-manual-en 11/204ix
Table of Contents
Creating Retouched Copies: The Retouch Menu......................................................................129
Creating Retouched Copies........................................................................................................................... 130
Creating Retouched Copies in Full-frame Playback........................................................................ 131
Quick Retouch ........................................................................................................................................................ 132
D-Lighting ................................................................................................................................................................. 132
Red-Eye Correction.............................................................................................................................................. 133
Trim................................................................................................................................................................................ 134Monochrome .......................................................................................................................................................... 134
Filter Effects .............................................................................................................................................................. 135
Small Picture ............................................................................................................................................................ 136
Image Overlay......................................................................................................................................................... 138
NEF (RAW) Processing........................................................................................................................................ 140
Stop-motion Movie ............................................................................................................................................. 141
Before and after (Making a Side-by-Side Comparison)................................................................. 143
Optional Accessories........................................................................145
Compatible Lenses ..............................................................................................................................146
Optional Flash Units (Speedlights) ................................................................................................150
Other Accessories.................................................................................................................................155
Connecting the Power Connector and the AC Adapter.............................................................. 157
Approved Memory Cards..................................................................................................................158
Maximizing the Life of the Camera .................................................159Caring for the Camera ........................................................................................................................159
Storage........................................................................................................................................................................ 159
Cleaning ..................................................................................................................................................................... 159
Caring for the Optical Low-Pass Filter...................................................................................................... 160
Caring for the Camera and Battery: Cautions ............................................................................164
The Camera and Lens ........................................................................................................................................ 164
The Battery ................................................................................................................................................................ 166

7/31/2019 Nikon D60 User Manual En
http://slidepdf.com/reader/full/nikon-d60-user-manual-en 12/204 x
Table of Contents
Technical Notes ................................................................................167
Troubleshooting...................................................................................................................................167
Display ......................................................................................................................................................................... 167
Shooting..................................................................................................................................................................... 168
Playback...................................................................................................................................................................... 170
Others .......................................................................................................................................................................... 171Camera Error Messages and Displays ...........................................................................................172
Appendix.................................................................................................................................................176
Available Settings and Defaults ................................................................................................................... 176
Memory Card Capacity and Image Quality/Size .............................................................................. 178
Exposure Program (Mode P).......................................................................................................................... 178
Flash Control............................................................................................................................................................ 179
Shutter Speeds Available with the Built-in Flash .............................................................................. 179
Aperture, Sensitivity, and Flash Range .................................................................................................... 179
Specifications.........................................................................................................................................180Supported Standards ......................................................................................................................................... 186
Index .........................................................................................................................................................187
7/31/2019 Nikon D60 User Manual En
http://slidepdf.com/reader/full/nikon-d60-user-manual-en 13/2041
I n t r o d u c t i on
Introduction
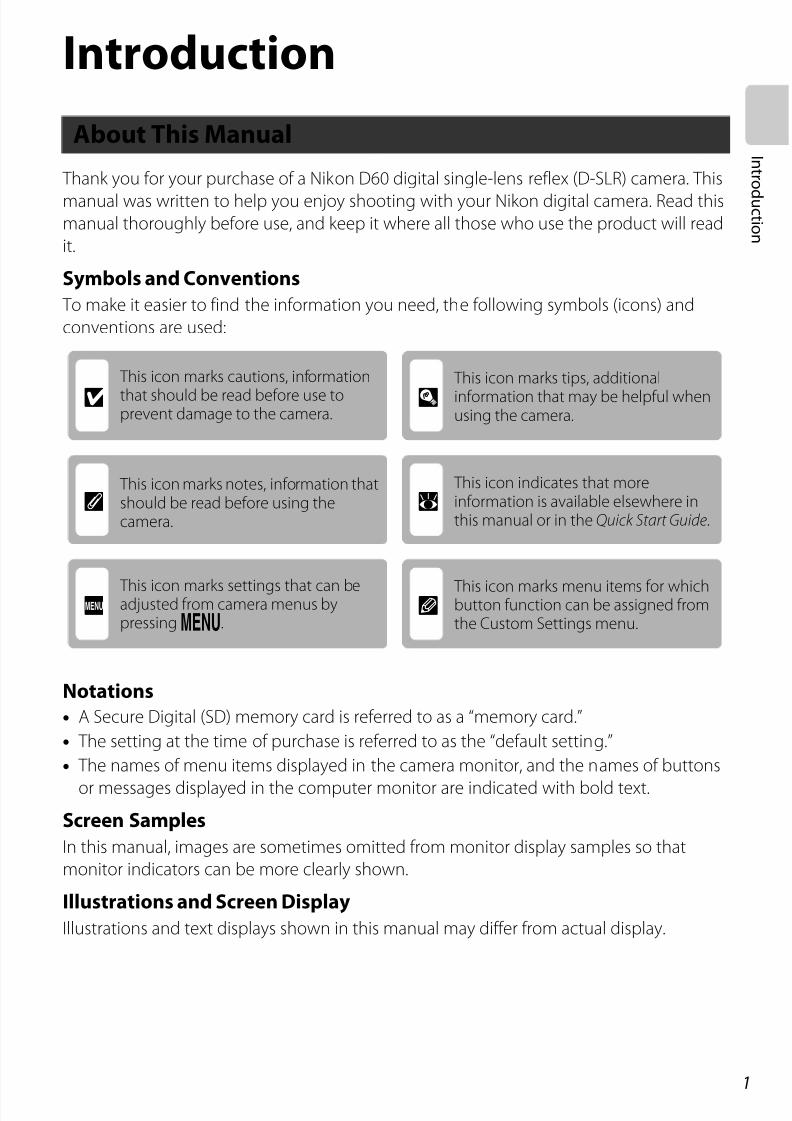
About This Manual
Thank you for your purchase of a Nikon D60 digital single-lens reflex (D-SLR) camera. This
manual was written to help you enjoy shooting with your Nikon digital camera. Read thismanual thoroughly before use, and keep it where all those who use the product will read
it.
Symbols and Conventions
To make it easier to find the information you need, the following symbols (icons) and
conventions are used:
Notations
• A Secure Digital (SD) memory card is referred to as a “memory card.”
• The setting at the time of purchase is referred to as the “default setting.”
• The names of menu items displayed in the camera monitor, and the names of buttons
or messages displayed in the computer monitor are indicated with bold text.
Screen Samples
In this manual, images are sometimes omitted from monitor display samples so that
monitor indicators can be more clearly shown.
Illustrations and Screen Display
Illustrations and text displays shown in this manual may differ from actual display.
This icon marks cautions, information
that should be read before use toprevent damage to the camera.
B
This icon marks tips, additional
information that may be helpful whenusing the camera.
D
This icon marks notes, information thatshould be read before using thecamera.
C This icon indicates that moreinformation is available elsewhere inthis manual or in the Quick Start Guide.
A
This icon marks settings that can beadjusted from camera menus bypressing O.
E This icon marks menu items for whichbutton function can be assigned fromthe Custom Settings menu.
F

7/31/2019 Nikon D60 User Manual En
http://slidepdf.com/reader/full/nikon-d60-user-manual-en 14/204

7/31/2019 Nikon D60 User Manual En
http://slidepdf.com/reader/full/nikon-d60-user-manual-en 15/2043
Information and Precautions
I n t r o d u c t i on
About the Manuals
• No part of the manuals included with this product may be reproduced, transmitted,transcribed, stored in a retrieval system, or translated into any language in any form, byany means, without Nikon’s prior written permission.
• Nikon reserves the right to change the specifications of the hardware and softwaredescribed in these manuals at any time and without prior notice.
• Nikon will not be held liable for any damages resulting from the use of this product.• While every effort was made to ensure that the information in these manuals is accurate
and complete, we would appreciate it were you to bring any errors or omissions to theattention of the Nikon representative in your area (address provided separately).
Notice Concerning Prohibition of Copying or Reproduction
Note that simply being in possession of material that was digitally copied or reproduced
by means of a scanner, digital camera or other device may be punishable by law.
• Items prohibited by law from being copied or reproduced
Do not copy or reproduce paper money, coins, securities, government bonds or localgovernment bonds, even if such copies or reproductions are stamped “Sample.” Thecopying or reproduction of paper money, coins, or securities which are circulated in aforeign country is prohibited. Unless the prior permission of the government wasobtained, the copying or reproduction of unused postage stamps or post cards issuedby the government is prohibited. The copying or reproduction of stamps issued by thegovernment and of certified documents stipulated by law is prohibited.
• Cautions on certain copies and reproductions The government has issued cautions on copies or reproductions of securities issued by
private companies (shares, bills, checks, gift certificates, etc.), commuter passes orcoupon tickets, except when a minimum of necessary copies are to be provided forbusiness use by a company. Also, do not copy or reproduce passports issued by thegovernment, licenses issued by public agencies and private groups, ID cards and tickets,such as passes and meal coupons.
• Comply with copyright notices The copying or reproduction of copyrighted creative works such as books, music,paintings, woodcut prints, maps, drawings, movies and photographs is governed bynational and international copyright laws. Do not use this product for the purpose of
making illegal copies or to infringe copyright laws.Disposing of Data Storage Devices
Please note that deleting images or formatting data storage devices such as memory
cards or built-in camera memory does not completely erase the original image data.
Deleted files can sometimes be recovered from discarded storage devices using
commercially available software, potentially resulting in the malicious use of personal
image data. Ensuring the privacy of such data is the user’s responsibility.
Before discarding a data storage device or transferring ownership to another person, erase
all data using commercial deletion software, or format the device and then completelyrefill it with images containing no private information (for example, pictures of empty sky).
Be sure to also replace any pictures selected for the Preset manual white balance setting
(A 105) and Wallpaper (A 120). Care should be taken to avoid injury or damage to
property when physically destroying data storage devices.

7/31/2019 Nikon D60 User Manual En
http://slidepdf.com/reader/full/nikon-d60-user-manual-en 16/2044
I n t r o d u c t i on
Getting to Know the Camera
Take a few moments to familiarize yourself with camera controls and displays. You may
find it helpful to bookmark this section and refer to it as you read through the rest of the
manual.
Camera Body
2
3
4
56
87
9
12
13
14
18
19
20
1
15
17
16
101010
111111
1 Infrared receiver...................................................... 56
2 Power switch ...............................................................6
3 Shutter-release button....................................... 13
4
A (exposure compensation) button....... 67
B (aperture) button........................................... 44
Flash compensation button............................ 68
5C (Active D-Lighting) button .....................69
A (reset) button...................................................... 70
6
AF-assist illuminator ............................................. 57
Self-timer lamp........................................................ 56
Red-eye reduction lamp....................................65
7 Focal plane mark ....................................................61
8 Mode dial .......................................................................6
9 Built-in flash ............................................................... 64
10 Accessory shoe cover ....................................... 150
11Accessory shoe(for optional flash unit) .................................... 150
12
D (flash mode) button ....................................... 64
E (flash compensation) button ..............68
13 Eyelet for camera strap.......................................14
14 Connector cover..................................... 81, 85, 92
15 Video connector .....................................................92
16 Reset switch............................................................ 167
17 USB connector .................................................81, 85
18F (self-timer) button.................................. 54, 55
G FUNC. button ................................................ 11219 Lens release button ..............................................19
20 Lens mounting index..........................................18

7/31/2019 Nikon D60 User Manual En
http://slidepdf.com/reader/full/nikon-d60-user-manual-en 17/204

7/31/2019 Nikon D60 User Manual En
http://slidepdf.com/reader/full/nikon-d60-user-manual-en 18/2046
I n t r o d u c t i on
Getting to Know the Camera
The Mode DialUse the mode dial to change the shooting mode. Rotate the mode
dial so that shooting mode icon is aligned with the indicator.
Advanced Modes (Exposure Modes)Select these modes for full control over camera settings.
Point-and-Shoot Modes (Digital Vari-Programs)
Selecting a Digital Vari-Program automatically optimizes settings to suit the selected
scene, making creative photography as simple as rotating the mode dial.
The Power Switch The power switch is used to turn the camera on and off.
a — Programmed auto:A 41 c — Aperture-priority auto:A 43
b — Shutter-priority auto:A 42 d — Manual:A 44
e — Auto:A 28 i — Child:A 37
f — Auto (flash off):A 36 j — Sports:A 37
g — Portrait:A 36 k — Close up:A 37
h — Landscape:A 37 l — Night portrait:A 37
On Off

7/31/2019 Nikon D60 User Manual En
http://slidepdf.com/reader/full/nikon-d60-user-manual-en 19/2047
Getting to Know the Camera
I n t r o d u c t i on
The Viewfinder Display
Actual display varies with current shooting mode and camera settings.
C The Viewfinder The response time and brightness of the viewfinder may vary with temperature. This is normal and
does not indicate a malfunction.
1
2 3 4 5 6 7 8 9 10 11
12 13 14 15 16
1 Focus points...............................26, 30, 58, 59, 60
2 Focus indicator ................................................ 32, 61
3Focus point display................26, 30, 58, 59, 60
AF-area mode........................................................... 58
4 Autoexposure (AE) lock...................................... 63
5 Flexible program indicator............................... 41
6 Shutter speed...................................................39–46
7 Aperture (f-number).....................................39–46Noise reduction indicator.............................. 108
8Flash compensationindicator.............................................................68, 113
9 Exposure compensation indicator.............. 67
10
Number of exposures remaining...... 28, 178
Number of shots remaining beforememory buffer fills ..................................... 55, 178
Preset white balance recordingindicator....................................................................106
Exposure compensation value...................... 67
Flash compensation value ............................... 68
Active D-Lighting indicator ............................. 69
PC connection indicator .................................... 82
Dust off ref photo mode indicator........... 127
11 Flash-ready indicator ...........................................33
12 Battery indicator .....................................................29
13
Electronic analog exposure display............ 45
Exposure compensation....................................67
Rangefinder ............................................................ 116
14 ISO auto indicator ....................................... 53, 112
15 “K” (appears when memory remains forover 1000 exposures) ..........................................29
16 Warning indicator ....................................... 13, 172

7/31/2019 Nikon D60 User Manual En
http://slidepdf.com/reader/full/nikon-d60-user-manual-en 20/2048
I n t r o d u c t i on
Getting to Know the Camera
The Shooting Information DisplayWhen the camera is turned on, the Shooting information display
will be shown in the monitor. Shooting information such as shutter
speed, aperture, and number of exposures remaining, as well as
the settings currently applied, can be confirmed.
The display changes, in the following order, each time K (L) is
pressed:
* Frequently used shooting settings can be adjusted from the Quick settings display (A 48).
C Tuning on and off Shooting Information Display
At default settings, shooting information also turns off as indicated below.
• When no operations are performed for about eight seconds.
• When the eye sensor is activated by looking through the viewfinder (A 31, 123).• While the shutter-release button is held down.
When the Shooting information display is off, the Shooting information display is also shown as
indicated below.
• When pressing halfway and releasing the shutter-release button (A 31).
• When M or C is pressed.
• When F / G is pressed, unless White balance is selected for Custom setting 11 (F / G button;
A 112) in e, f, g, h, i, j, k, or l mode.
• When D is pressed in any mode other than f Auto (flash off) mode.
• When A is pressed in a, b, or c mode.
D Information Display Format
The format for information display is selected from the Info display format option (A 120) in the
setup menu.
Image quality
Move OK Of f
Set
Shooting information display
Quick settings display* Monitor off

7/31/2019 Nikon D60 User Manual En
http://slidepdf.com/reader/full/nikon-d60-user-manual-en 21/2049
Getting to Know the Camera
I n t r o d u c t i on
The information displayed in the monitor varies depending upon shooting mode and shooting
conditions. The information included above may vary with current camera settings.
D The Shutter-Speed and Aperture Displays These displays provide a visual indication of shutter speed and aperture.
Graphic displays of the shutter speed and aperture are shown when the mode dial is rotated.
SetSet
21
27281
2
3
1
22
84
5
67
8
9
10
26
25 242322
20191817
1615
14
11 12 13 17 16 18
2728 26 25 24 23
7
21
9
20
1910
2
3
12
6
11
15
14
13
“Wide” (Landscape) Orientation “Tall” (Portrait) Orientation
1 Shooting mode..........................................................6
2 Shutter speed...................................................40–46
3 Aperture (f-number).....................................40–46
4 Shutter-speed display5 Aperture display
6Electronic analog exposure display............ 45Exposure compensation ................................... 67
7 Flash compensation value ............................... 68
8 Flash sync mode..................................................... 65
9 Exposure compensation value...................... 67
10 Help indicator........................................................... 13
11 Active D-Lighting indicator ............................. 69
12
Number of exposures remaining.......28, 178Preset white balance recordingindicator....................................................................106Capture mode indicator .................................... 82
13“K” (appears when memory remains forover 1000 exposures) ..........................................29
14 Metering mode ....................................................... 62
15 AF-area mode...........................................................58
16 Focus mode............................................................... 57
17 Release mode...........................................................54
18 ISO sensitivity............................................................5319 White balance mode ......................52, 103, 104
20 Image size................................................................... 50
21 Image quality............................................................50
22Focus point display................26, 30, 58, 59, 60AF-area mode...........................................................58
23 Battery indicator .....................................................29
24 “Beep” indicator.................................................... 110
25 Optimize image indicator.............................. 101
26 ISO auto indicator ....................................... 53, 112
27Manual flash control indicator.................... 113Flash compensation indicatorfor optional Speedlight................................... 153
28 Date imprint indicator...................................... 115
Slow shutter speed, small aperture(large f-number)
Fast shutter speed, large aperture(small f-number)

7/31/2019 Nikon D60 User Manual En
http://slidepdf.com/reader/full/nikon-d60-user-manual-en 22/20410
I n t r o d u c t i on
Getting to Know the Camera
The Command DialRotate the command dial alone or use the command dial with other buttons to adjust the
following settings. Changes to shooting settings can be viewed in the viewfinder and the
monitor’s Shooting information display as settings are adjusted.
Function Operation Display
Flexible program (a mode;
A 41)
Choose a shutter speed (b
and d modes; A 42, 44).
Set aperture (c mode;
A 43).
Set aperture (d mode;
A 44).
Set exposure compensation
(a, b, and c modes;A 67).
Set
Set
Set
+
Set
Set
Exposure comp.

7/31/2019 Nikon D60 User Manual En
http://slidepdf.com/reader/full/nikon-d60-user-manual-en 23/20411
Getting to Know the Camera
I n t r o d u c t i on
Choose a flash mode (e,
g, i, k, l, a, b, c and
d modes;A 65).
Set flash compensation (a,
b, c and d modes;A 68).
Active D-Lighting (A 69)
Release mode (A 54)(Set to single frame,continuous, self-timer,
delayed remote, or quick-response remote mode.)
Image quality/size (A 49)
ISO sensitivity (A 53)
White balance (A 52)
+Set
Flash mode
+ + Set
Flash compensation
+Set
Active D–Lighting
When F /G (Custom Setting 11
F /G button;A 112) is set to any
of the options indicated at right,
the setting can be changed usingthe command dial.
+
Set
Release mode
Set
Image quality/size
Set
ISO sensitivity
Set
White balance
7/31/2019 Nikon D60 User Manual En
http://slidepdf.com/reader/full/nikon-d60-user-manual-en 24/20412
I n t r o d u c t i on
Getting to Know the Camera
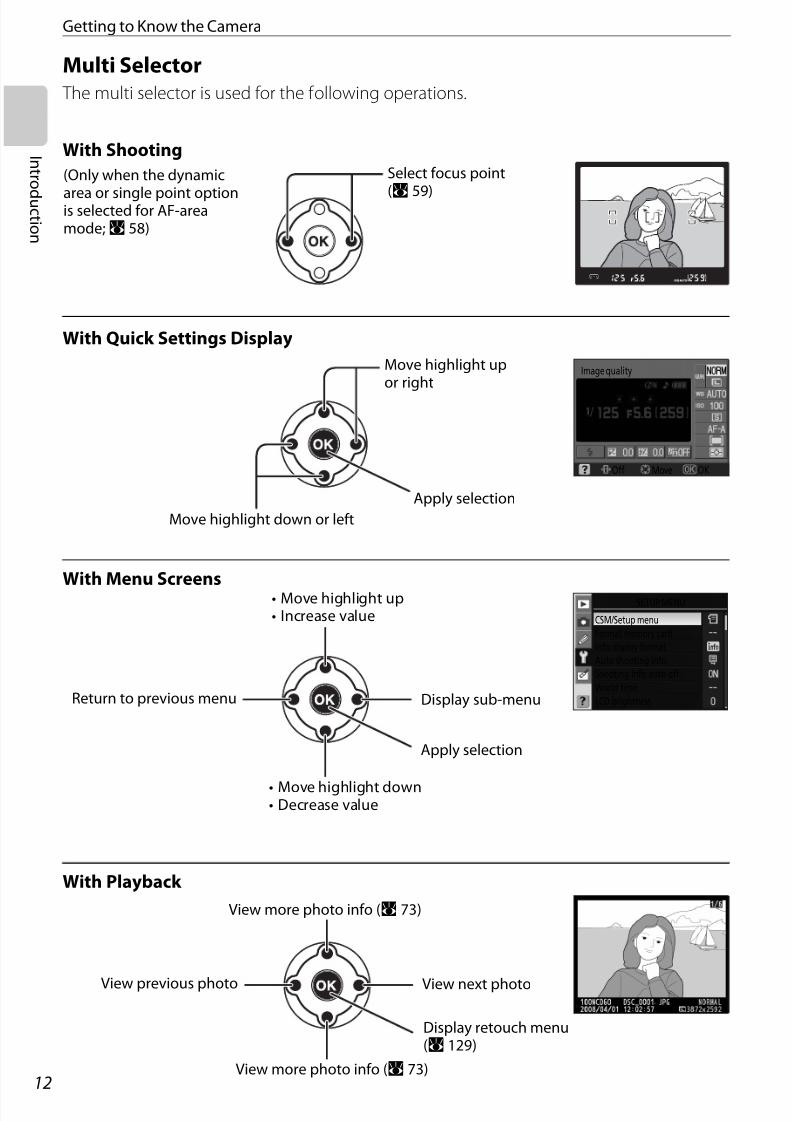
Multi Selector The multi selector is used for the following operations.
With Shooting
With Quick Settings Display
With Menu Screens
With Playback
Select focus point
(A 59)
(Only when the dynamic
area or single point optionis selected for AF-areamode;A 58)
Image quality
Move OKOff
Apply selection
Move highlight down or left
Move highlight upor right
SETUP MENU
CSM/Setup menu
Format memory card
Info display format
Auto shooting info
Shooting info auto off
World time
LCD brightnessDisplay sub-menu
• Move highlight up• Increase value
Return to previous menu
Apply selection
• Move highlight down• Decrease value
View next photo
View more photo info (A 73)
View previous photo
View more photo info (A 73)
Display retouch menu(A 129)

7/31/2019 Nikon D60 User Manual En
http://slidepdf.com/reader/full/nikon-d60-user-manual-en 25/20413
Getting to Know the Camera
I n t r o d u c t i on
The Shutter-Release Button The camera is equipped with a two-stage shutter-release button. To focus, press the
shutter-release button halfway, stopping when you feel resistance. Focus will lock* while
the shutter-release button is held in this position. To release the shutter and shoot, press
the shutter-release button the rest of the way down.* Focus will not lock, nor will the beep indicating that the subject is in focus sound, if Focus
mode (A 57) is set to Continuous-servo AF, or if Continuous-servo AF is automaticallyapplied with Auto-servo AF selected for moving subjects.
N (Help) ButtonWhile M (N) is held down, information on current
shooting conditions, and help for menus, are
displayed in the monitor; to scroll the display, press
the multi selector up or down. A blinkingF icon in
the monitor or a blinking L (warning indicator) in the
viewfinder indicates that help on an error or other
problem can be viewed in the monitor by pressing M (N).
Focus Take photograph
Optimize image
Choose how pictures will beprocessed according to the typeof subject and how the pictureswill be used.
7/31/2019 Nikon D60 User Manual En
http://slidepdf.com/reader/full/nikon-d60-user-manual-en 26/20414
I n t r o d u c t i on
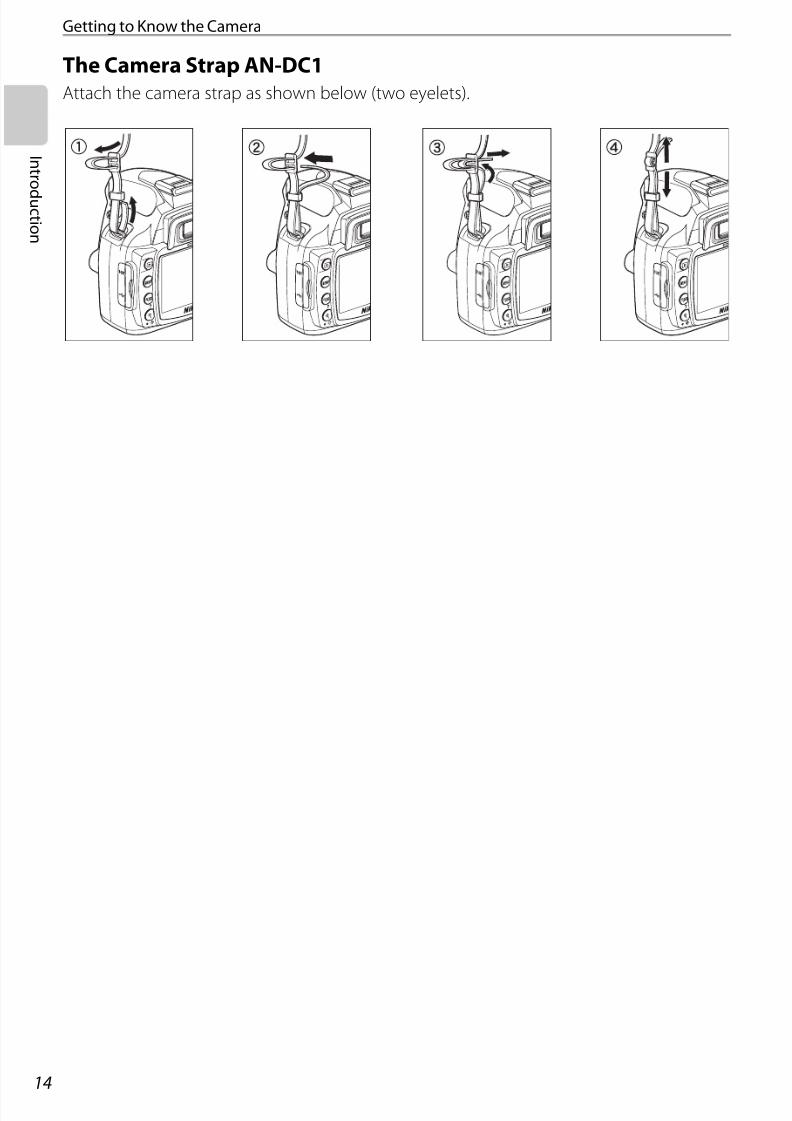
Getting to Know the Camera
The Camera Strap AN-DC1Attach the camera strap as shown below (two eyelets).

7/31/2019 Nikon D60 User Manual En
http://slidepdf.com/reader/full/nikon-d60-user-manual-en 27/20415
First Steps This chapter explains the procedures necessary to prepare for shooting, includingcharging and inserting the battery, instructions for mounting lenses, setting the date
and time, using memory cards.
E N - E L 9 7 . 4 V 1 0 0 0 m A h
2008 04 01
12 00 00
World time
OK
Y M D
H M S
Set
Date
A 16
A 18
A 21
A 23

7/31/2019 Nikon D60 User Manual En
http://slidepdf.com/reader/full/nikon-d60-user-manual-en 28/20416
F i r s t S t e p s
Charging and Inserting the Battery
Use the supplied Quick Charger MH-23 to charge the supplied Rechargeable Li-ion Battery
EN-EL9 before first use, or when the battery runs low.
The Quick Charger MH-23 The MH-23 is for use with the supplied Rechargeable Li-ion Battery EN-EL9.
The Rechargeable Li-ion Battery EN-EL9 The EN-EL9 is for use with the D60.
1 Charge the battery.
1.1 Remove the terminal cover from the battery.
1.2 Connect the power cord to the charger and plug it in.
1.3 Place the battery in the charger. The CHARGE lamp will blink as
the battery charges. About 90 minutes are required for an
exhausted battery to fully charge.
AC inlet Wall plug (shape varies with country of sale)
CHARGE lampAC adapter plug
E N - E L 9 7 . 4 V 1 0 0 0 m A h
Terminal coverPositive terminal
Signal contact
Negative terminal
E N - E L 9 7 . 4 V 1 0 0 0 m A h
Terminalcover
E N - E L 9 7 . 4 V 1 0 0 0 m A h

7/31/2019 Nikon D60 User Manual En
http://slidepdf.com/reader/full/nikon-d60-user-manual-en 29/20417
Charging and Inserting the Battery
F i r s t S t e p s
1.4 Charging is complete when the CHARGE lamp stops blinking.
Remove the battery from the charger and unplug the charger.
2 Insert the battery.
2.1 After confirming that the power switch is in
the off position, open the battery chamber
cover.
2.2 Insert a fully charged battery as shown at
right. Close the battery chamber cover.
s
B Removing the Battery
Turn the camera off and confirm that the memory card access lamp is off before removing thebattery.
B The Battery and Charger
• Read and follow the warnings and cautions on pages ii –iii and 164–166 of this manual, together with
any warnings and instructions provided by the battery manufacturer.
• Do not use the battery at ambient temperatures below 0 °C (32 °F) or above 40 °C (104 °F). During
charging, the temperature should be in the vicinity of 5–35 °C (41–95 °F). For best results, charge
the battery at temperatures above 20 °C (68 °F). Battery capacity may drop if the battery is charged
or used at lower temperatures.
• The battery may be hot immediately after use. If so, wait for the battery to cool down before
charging.
• Replace the supplied terminal cover after removing the battery from the camera or the quick
charger to avoid shorting the battery.
• Unplug the quick charger when it is not in use.
E N - E L 9
7 . 4 V 1 0 0 0 m A h
CHARGE lamp
1
2
- E L 9
Be sure that thebattery contacts arefacing down.

7/31/2019 Nikon D60 User Manual En
http://slidepdf.com/reader/full/nikon-d60-user-manual-en 30/20418
F i r s t S t e p s
Attaching a Lens
Care should be taken to prevent dust from entering the camera when exchanging lenses.
1 Turn the camera off and remove the body
cap.
Remove the rear lens cap from the lens.
2 Keeping the mounting index on the lens
aligned with the mounting index on thecamera body, position the lens in the
camera’s bayonet mount and rotate the lens
in the direction shown until it clicks into
place.
If the lens is equipped with an A-M or M/A-M switch, select A
(autofocus) or M/A (autofocus with manual priority).
C Lenses for Autofocus
Autofocus with this camera is supported only by AF-S and AF-I lenses. AF-S and AF-I lenses are
equipped with an autofocus motor. Autofocus is not possible when any other type of lens is
mounted, regardless of the autofocus capabilities of the lens itself.

7/31/2019 Nikon D60 User Manual En
http://slidepdf.com/reader/full/nikon-d60-user-manual-en 31/20419
Attaching a Lens
F i r s t S t e p s
C Lens
An AF-S DX NIKKOR 18-55mm f/3.5-5.6G VR lens (A 185) is used in this manual for illustrative
purposes. The AF-S DX Zoom NIKKOR 18-55mm f/3.5-5.6G ED II lens can be used in the same
manner, but it is not equipped with the vibration reduction (VR) function. When using the other
lenses, refer to the User’s Manual provided with the lens.
* The AF-S DX Zoom NIKKOR 18-55mm f/3.5-5.6G ED II lens is not equipped with vibration reduction ON/ OFF switch.
C Aperture Ring
If the lens is equipped with an aperture ring, lock aperture at the minimum setting (highest
f-number). Refer to the User’s Manual provided with the lens for details.
Detaching LensesBe sure the camera is off when removing or
exchanging lenses. To remove the lens, press and
hold the lens-release button (1) while turning the
lens clockwise (2). After removing the lens, replacethe camera body cap and rear lens cap.
1 Lens cap
2 Focus ring .................................................................. 61
3 Zoom ring.................................................................. 30
4 Vibration reduction ON/OFF switch* ........20
5 A-M mode switch.......................................... 18, 61
6 CPU contacts............................................................ 62
7 Rear lens cap
8 Focal length scale
9 Focal length scale index10 Mounting index ..................................................... 18
1 2 3 4 5 6 7
8
109

7/31/2019 Nikon D60 User Manual En
http://slidepdf.com/reader/full/nikon-d60-user-manual-en 32/20420
F i r s t S t e p s
Attaching a Lens
Vibration Reduction Mode (VR)An AF-S DX NIKKOR 18-55mm f/3.5-5.6G VR lens is equipped with vibration reduction (VR)
function.
Enabling vibration reduction (VR) allows for shooting at shutter speeds
approximately three stops* slower (at a focal length of 55mm) than when
vibration reduction is disabled. Panning is also supported.* Based on results achieved under Nikon measurement conditions. The effects of
vibration reduction may vary depending on individual and shooting conditions.
• Set the vibration reduction ON/OFF switch to ON to turn the vibration reduction on.
• Camera shake is reduced when the shutter-release button is pressed halfway. Autofocus
and manual focusing, as well as precise framing of the subject, are simplified because
camera shake visible through the viewfinder is also reduced.
• To disable vibration reduction, set the vibration reduction ON/OFF switch to OFF.
B Using Vibration Reduction
• If the camera is panned in a wide arc, compensation for camera shake in the panning direction is
not performed. For example, with horizontal panning only vertical camera shake is reduced,
making smooth pans much easier.
• Due to the characteristics of the vibration reduction mechanism, the image in the viewfinder may
be blurred after the shutter is released. This is not a malfunction.
• Do not turn the camera off or remove the lens from the camera while vibration reduction is
operating. Failure to observe this note could result in the lens sounding and feeling as if an internal
component is loose or broken when it is shaken. This is not a malfunction. Turn the camera on
again to correct this. Vibration reduction does not function while the built-in flash is charging.
• When the camera is mounted on a tripod, set the vibration reduction ON/OFF switch to OFF.
However, set the switch to ON when using a tripod without securing the tripod head, or when
using a monopod.
D Picture Angle and Focal Length
The size of the area exposed by a 35mm
camera is 36 × 24 mm. The size of the
area exposed by the D60, in contrast, is
23.6 × 15.8 mm, meaning that the
picture angle of a 35mm camera is
approximately 1.5 times that of the D60.
The approximate focal length of lenses
for the D60 in 35mm format can be
calculated by multiplying the focal
length of the lens by about 1.5 (for
example, the effective focal length of a
24mm lens in 35mm format would be
36mm when mounted on the D60).
Lens
Picture size (35mm format)
(36 × 24 mm)
Picture diagonal
Picture size (D60)
(23.6 × 15.8 mm)Picture angle (35mm format)
Picture angle (D60)

7/31/2019 Nikon D60 User Manual En
http://slidepdf.com/reader/full/nikon-d60-user-manual-en 33/20421
F i r s t S t e p s
Setting Display Language, Date and Time
The first time the camera is turned on, the language selection dialog shown in step 1 will
be displayed in the monitor. Follow the steps below to choose a language and set the
time and date. No photographs can be taken until the camera clock has been set.
1 Turn camera on.
Language selection dialog is displayed.
2 Select language.
Map of world time zones will be displayed.
UTC field shows time difference between selected
time zone and Coordinated Universal Time (UTC), in
hours.
3 Select local time zone.
Daylight saving time options will be displayed.
4 Highlight On if daylight saving time is in
effect.
Date menu is displayed.
5 Press the multi selector left or right to select
item, up or down to change. To complete the settings, press Q.
When the settings are applied, display will return to
shooting mode and shooting information will be
shown.
Reset the Clock Use the World time option in the setup menu to reset the camera clock.
1 Turn the camera on and pressO.
Menu screen is displayed in the monitor. If menu item
is already highlighted, press the multi selector left to
highlight icon for current menu in yellow.
Language
Language
Time zone
OK
World time
Daylight saving time
Off
On
2008 04 01
12 00 00
World time
OK
Y M D
H M S
Set
Date
SHOOTING MENU
Optimize image
Image quality
Image size
White balance
ISO sensitivity
Noise reduction
Active D–Lighting

7/31/2019 Nikon D60 User Manual En
http://slidepdf.com/reader/full/nikon-d60-user-manual-en 34/20422
F i r s t S t e p s
Setting Display Language, Date and Time
2 HighlightD and press the multi selector
right to highlight World time.
World time screen is displayed.
3 Highlight Time zone, Date, Date format,
or Daylight saving time.
Press the multi selector right to proceed to the next
set of options.
Monitor display returns to the world time screen each
time date and time settings are applied.
When using the daylight saving time option, turn
Daylight saving time on before applying other date and time settings.
C The Clock Battery
The camera clock is powered by the clock battery. The clock battery charges when the main batteryis inserted, or the optional AC Adapter EH-5a with Power Connector EP-5 (A 156) is connected, and
can provide a month of backup power after about three days of charging. When the message, Clock not set. is displayed in the monitor, the camera clock has been initialized and the shooting date andtime will not be recorded correctly. Set the time and date again.
D Changing Display Language
The language menu is only displayed automatically the first time the camera is turned on. To changethe display language, use the Language option (A 123) in the setup menu (A 117).
Time zone
Choose the time zone. The camera clock will automaticallybe reset to the time in the selected zone. See step 3 of thesection, “Setting Display Language, Date and Time” (A 21).
Date
Set the camera clock. See step 5 of the section, “Setting Display Language, Date and
Time” (A 21). Reset the clock regularly for accurate time keeping.Date format
Choose the order in which the month, day, and year aredisplayed and press Q.
Daylight saving time
Turn Daylight saving time on when daylight saving timebegins to automatically advance the camera’s clock onehour. Turn Daylight saving time off (default setting) whendaylight saving time ends.
SETUP MENU
CSM/Setup menu
Format memory card
Info display format
Auto shooting info
Shooting info auto of f
World time
LCD brightness
World time
Time zone
Date
Date format
Daylight saving time
Time zone
OK
World time
Date format
Year/month/day
Month/day/year
Day/month/year
World time
Daylight saving time
Off
On

7/31/2019 Nikon D60 User Manual En
http://slidepdf.com/reader/full/nikon-d60-user-manual-en 35/20423
F i r s t S t e p s
Inserting Memory Cards
The camera records photographs on Secure Digital (SD) memory cards (available
separately). See “Approved Memory Cards” (A 158) for details.
Inserting Memory Cards
1 Before inserting or removing memory cards, turn the
camera off and open the memory card slot cover.
2 Slide the memory card in as shown at right until it clicks
into place.
The memory card access lamp will light for about a few seconds.
Close the memory card slot cover.
If a particular memory card will be used with this camera for the first
time, proceed to “Formatting Memory Cards” (A 24).
Removing Memory Cards
Confirm that the access lamp is off.
Turn the camera off and open the memory card slot cover.
Press the card in to partially eject (1). The card can then be
removed by hand (2).
Front

7/31/2019 Nikon D60 User Manual En
http://slidepdf.com/reader/full/nikon-d60-user-manual-en 36/20424
F i r s t S t e p s
Inserting Memory Cards
Formatting Memory CardsMemory cards must be formatted in the camera before first use. Note that formatting
memory cards permanently deletes all photographs and other data they may contain.
Be sure all data you wish to keep have been copied to another storage device before
formatting the card.
1 Turn camera on.
2 Display menus.
If menu item is already highlighted, press the multi
selector left to highlight icon for current menu inyellow.
3 HighlightD.
4 Position cursor in setup menu.
5 Highlight Format memory card.
6 Display options.
SHOOTING MENU
Optimize image
Image quality
Image sizeWhite balance
ISO sensitivity
Noise reduction
Active D–Lighting
SETUP MENU
CSM/Setup menu
Format memory card
Info display format
Auto shooting info
Shooting info auto off
World time
LCD brightness
SETUP MENU
CSM/Setup menu
Format memory card
Info display format
Auto shooting info
Shooting info auto off
World time
LCD brightness
SETUP MENU
CSM/Setup menu
Format memory card
Info display format
Auto shooting info
Shooting info auto off
World time
LCD brightness
Format memory card
All pictures onmemory card willbe deleted. OK?
No
Yes

7/31/2019 Nikon D60 User Manual En
http://slidepdf.com/reader/full/nikon-d60-user-manual-en 37/20425
Inserting Memory Cards
F i r s t S t e p s
7 Highlight Yes.
8 Format card. Do not turn camera off or
open the battery-chamber cover or
memory card slot cover until formatting is
complete and setup menu is displayed.
B Memory Cards
• Format memory cards in the camera before first use.• Do not perform the following during formatting, while data is being written to or deleted from the
memory card, or during data transfer to a computer. Failure to observe this precaution could result
in the loss of data or in damage to the camera or memory card:
- Take out the battery or memory card
- Turn off the camera
- Disconnect the AC adapter
• Do not touch the card terminals with your fingers or metal objects.
• Do not apply force to the card casing. Failure to observe this precaution could damage the card.
• Do not bend, drop, or subject to strong physical shocks.• Do not expose to heat, water, high levels of humidity, or direct sunlight.
B Formatting Memory Cards
Use the camera Format memory card option to format memory cards. Performance may drop if
cards are formatted in a computer.
D The Write Protect Switch
Memory cards are equipped with a write protect switch to prevent
accidental loss of data. When this switch is in the “LOCK” position,photos cannot be recorded or deleted and the memory card cannot be
formatted.
Unlock by sliding the switch to the “write” position.
Format memory card
All pictures onmemory card willbe deleted. OK?
No
Yes
Format memory card
All pictures onmemory card willbe deleted. OK?
No
Yes
Formatting memory card.
Write-protect switch

7/31/2019 Nikon D60 User Manual En
http://slidepdf.com/reader/full/nikon-d60-user-manual-en 38/20426
F i r s t S t e p s
Adjusting Viewfinder Focus (Diopter Adjustment)
Photographs are framed in the viewfinder. Before shooting, make
sure that the display in the viewfinder is in clear focus. The
viewfinder can be focused by removing the lens cap and sliding
the diopter adjustment control up and down until the focus points
are in sharp focus. When operating the diopter adjustment controlwith your eye to the viewfinder, be careful not to put your fingers
or fingernails in your eye.
Focus points

7/31/2019 Nikon D60 User Manual En
http://slidepdf.com/reader/full/nikon-d60-user-manual-en 39/20427
Basic Photography This chapter explains basic operations, from shooting to playback, in four steps whenthe mode dial is set to e (auto). It also covers Digital Vari-Programs, in which simplify
shooting for particular scenes.
As the four basic steps described here apply to all forms of shooting and playback, a
general knowledge of these operations is required before progressing to more
advanced operations.

7/31/2019 Nikon D60 User Manual En
http://slidepdf.com/reader/full/nikon-d60-user-manual-en 40/20428
B a s i c P h o t o gr a ph y
“Point-and-Shoot” Photography (e (Auto) Mode)
This section uses shooting in e (auto) mode to explain basic procedures.
e (auto) mode is an automatic “point-and-shoot” mode in which the majority of settings
are controlled by the camera in response to shooting conditions.
Step 1 Turn the Camera On and Select Shooting Mode
1 Turn the camera on.
Remove the lens cap and turn the camera on.
The image sensor cleaning in progress screen will be displayed, and
then shooting information will be displayed in the monitor.
Looking through the viewfinder turns the monitor off and the
viewfinder display will light.
2 Rotate the Mode Dial to e (Auto) Mode.
The camera enters e (auto) mode.
3 Check the battery level.
Check the battery level in the Shooting information display
in the monitor (A 29).If the monitor is off, press K (L) to display shooting
information again.
When the battery is exhausted, the shooting information
cannot be displayed. Charge or replace the battery.
4 Check the number of exposures remaining.
The number of photographs that can be recorded on the
memory card is shown in the Shooting information display or
viewfinder.
If there is not enough memory to store additional photographs
at current settings, the display will flash as shown at right. No
further photographs can be taken until the memory card has been
replaced or photographs have been deleted (A 34, 96).
Set
Set
Set
Card is full

7/31/2019 Nikon D60 User Manual En
http://slidepdf.com/reader/full/nikon-d60-user-manual-en 41/20429
“Point-and-Shoot” Photography (e (Auto) Mode)
B a s i c P h o t o gr a ph
y
C Image Sensor Cleaning
Each time the camera is turned on or off, the function that removes dirt or
dust from the low-pass filter, which protects the image sensor, is activated
(A 162). Choose whether cleaning is performed automatically when the
camera is turned on or off from the Clean image sensor option in the
setup menu (A 126).
C Battery Level
C Large-Capacity Memory Cards
When enough space remains on the memory card to record a thousand
or more photographs at the current settings, the number of exposures
remaining will be displayed in units of thousands rounded down to the
nearest hundred, with “K“ displayed above the number. For example, if
1,160 shots are possible, the number of exposures remaining will show
“K 1.1.“
D Image Quality and Image Size
At default settings, Image quality is set to JPEG normal, and Image
size is set to Large. These settings can be changed to suit intent (A 49)
and the amount of space remaining on the memory card (A 49).
Monitor Viewfinder Description
U — Battery fully charged.
V — Battery partially discharged.
W D Low battery. Prepare to charge or replace battery.
W
(blinks)
D
(blinks) Shutter release disabled. Charge or replace battery.

7/31/2019 Nikon D60 User Manual En
http://slidepdf.com/reader/full/nikon-d60-user-manual-en 42/20430
B a s i c P h o t o gr a ph y
“Point-and-Shoot” Photography (e (Auto) Mode)
Step 2 Frame a Photograph
1 Hold the camera as shown.
Holding the Camera
Hold the handgrip in your right hand and cradle the camera body or
lens with your left. Keep your elbows propped lightly against yourtorso for support and place one foot half a pace ahead of the other to
keep you upper body stable.
2 Frame a photograph in the viewfinder.When looking through the viewfinder, the monitor will turn off and
the viewfinder display will turn on.
Photographs cannot be framed using the monitor.
Shooting information such as shutter speed, aperture, and number of
exposures remaining can be confirmed in the viewfinder. When the
viewfinder display turns off, press the shutter-release button halfway
to reactivate the display.
Position the main subject inside any of the three focus points, within which the camera focuses.
Using a Zoom Lens
Use the zoom ring to zoom in on the subject so that it fills a
larger area of the frame, or zoom out to increase the area visible
in the final photograph (select longer focal lengths to zoom in,
shorter focal lengths to zoom out).
Focus point
Zoom in
Zoom out

7/31/2019 Nikon D60 User Manual En
http://slidepdf.com/reader/full/nikon-d60-user-manual-en 43/20431
“Point-and-Shoot” Photography (e (Auto) Mode)
B a s i c P h o t o gr a ph
y
C Diopter Adjustment
For more information on adjusting viewfinder focus, see “Adjusting Viewfinder Focus (Diopter
Adjustment)” (A 26).
C Exposure Meters On/Off and Auto Meter-Off
This camera is equipped with exposure meters, which meter the brightness of the subject. Exposure
meters are activated with the following situations:• When the camera is turned on
• When the shutter-release button is pressed halfway while the camera is on
• When K (L) is pressed while the camera is on
When exposure meters are on, the viewfinder display, or Shooting information display, will turn on,
and shooting information such as shutter speed, aperture, and number of exposures remaining can
be confirmed (A 7, 9).
Exposure meters turn off automatically in conjunction with the Auto meter-off setting (A 114).
Auto meter-off is a function that reduces the drain on the battery. At default settings, exposure
meters turn off if the shutter-release button is not pressed, even halfway, and no operations areperformed for eight seconds. The length of time before exposure meters turn off can be adjusted
using Custom Setting 15 (Auto off timers;A 114). Exposure meters are also active whenever the
monitor is on with operations other than shooting, such as playback and when navigating camera
menus (Playback/menus), or with image review immediately after a photograph is shot (Image
review). However, exposure meters turn off when the monitor turns off, as specified with the auto
off timers setting.
C Shooting Info Auto Off
The eye sensor under the viewfinder is activated when your face comes closer to the viewfinder with
shooting while the exposure meters are on, and turns the Shooting information display off (defaultsetting) to reduce the drain on the battery. When the camera is lowered, or otherwise distanced
from your face, the viewfinder display turns off and the Shooting information display turns on again.
This option can be disabled using the Shooting info auto off option in the setup menu (A 123).
However, the Shooting information display will turn off when auto meter off is activated, regardless
of the option selected for Shooting info auto off .
Set
When looking throughthe viewfinder/
pressing the shutter-release button halfway
When not looking throughthe viewfinder

7/31/2019 Nikon D60 User Manual En
http://slidepdf.com/reader/full/nikon-d60-user-manual-en 44/20432
B a s i c P h o t o gr a ph y
“Point-and-Shoot” Photography (e (Auto) Mode)
Step 3 Focus and Shoot
1 Press the shutter-release button halfway.
The camera will automatically select the focus point containing the
main subject closest to the camera and focus on this subject.
When the focus operation is complete, a beep will sound, and the in-
focus indicator (A) will appear in the viewfinder. The selected focus
point will be highlighted in red in the viewfinder.
If the in-focus indicator (A) in the viewfinder display blinks, the
subject is not in focus. Recompose the shot and press the shutter-
release button halfway to try focusing again.
When shooting the subject with which autofocus does not perform
well (A 38), the camera may be unable to focus on the subject using
autofocus. The number of exposures that can be recorded in the memory buffer (A 55) isshown in the viewfinder display while the shutter-release button is pressed halfway. “r” is
displayed in front of the number.
If the subject is dark, the AF-assist illuminator may light to assist the
focus operation and the flash may pop up.
2 Smoothly press the shutter-release button the rest of the
way down to release the shutter and record the
photograph.
The memory card access lamp will light.
Do not open the memory card slot cover or battery-chamber cover,
or remove or disconnect the power source until the memory card
access lamp has gone out and recording is complete.
Photographs will be played back in the monitor for a few seconds
after they are taken.Press the shutter-release button halfway to immediately enable
shooting, even when playing photographs back.
Rotate the power switch to turn the camera off when you have
finished taking pictures.

7/31/2019 Nikon D60 User Manual En
http://slidepdf.com/reader/full/nikon-d60-user-manual-en 45/20433
“Point-and-Shoot” Photography (e (Auto) Mode)
B a s i c P h o t o gr a ph
y
C Shutter-Release Button
For more information on the two-stage shutter-release button, see “The Shutter-Release Button”
(A 13).
C Beep
• When Focus mode (A 57) is set to Continuous-servo AF, or if the subject is judged to bemoving in Auto-servo AF (default setting) and Continuous-servo AF is automatically applied, a
beep indicating that the subjects is in focus will not sound.
• This option can be disabled from Custom Setting 01 (Beep;A 110).
C The Built-in Flash
When shooting a dimly lit, or backlit, subject in e (auto) mode, the built-in flash will pop up
automatically when the shutter-release button is pressed halfway. When using the flash, remove the
lens hood to prevent its shadow from appearing in photographs.
If the flash is required, picture can only be taken while the flash-ready
indicator (J) is displayed. If the flash-ready indicator is not displayed,
the flash is charging and pictures cannot be taken even if the flash is up. Wait until D is displayed.
In e (auto) mode with auto flash mode enabled, the flash will not fire, even if it has popped up
automatically, if the subject is already sufficiently lit. Pictures can also be taken when D is not
displayed.
Select f Auto (flash off) mode (A 36) to prevent the flash from firing when lighting is poor.
For more information on using the flash, see “Using the Built-in Flash” (A 64).
Flash range varies with aperture and ISO sensitivity (A 179).
When the flash is not in use, return it to its closed position by pressing it
gently downward until it clicks into place.
C Changing Shooting Settings
In addition to Image quality (A 50) and Image size (A 50), a variety of other shooting settings
can be modified in e (auto) mode, including the manners in which the shutter is released
(Release mode;A 54), the manner in which the camera focuses (A 57), ISO sensitivity (A 53),
and Active D-Lighting (A 69).
D Image Review
Custom Setting 07 (Image review:A 111) can be set so that photographs are not automatically
displayed in the monitor after they are taken.

7/31/2019 Nikon D60 User Manual En
http://slidepdf.com/reader/full/nikon-d60-user-manual-en 46/20434
B a s i c P h o t o gr a ph y
“Point-and-Shoot” Photography (e (Auto) Mode)
Step 4 Viewing Photographs/Deleting Photographs
Viewing Photographs
While shooting information is displayed or the monitor is off after
shooting, press P to display the most recent photograph in the
monitor.
Additional photographs can be displayed by rotating thecommand dial or pressing the multi selector left or right.
Shooting information on the photograph currently displayed in
the monitor can be viewed by pressing the multi selector up or
down (A 35, 73).
To return to shooting mode, press the shutter-release button
halfway, or press P.
Deleting Photographs
Follow the procedure described below to delete unwanted photographs.
1 Press J to delete the photograph currently displayed in
the monitor.
2 When the confirmation dialog is displayed, press J again
to delete the image and return to playback. To exit
without deleting the photograph, press P.
1 / 6
J
Delete?
Yes
Cancel

7/31/2019 Nikon D60 User Manual En
http://slidepdf.com/reader/full/nikon-d60-user-manual-en 47/20435
“Point-and-Shoot” Photography (e (Auto) Mode)
B a s i c P h o t o gr a ph
y
C Full-Frame Playback
C Displaying Photo Information
Press the multi selector up or down to change the display in the following order. Detailed
information on the photograph can be viewed (A
73).
C Photograph Playback
• When photographs are automatically displayed in the monitor after they
are taken, the battery level and number of exposures remaining is also
clearly displayed.
• The length of time before the monitor automatically turns off can be
modified from Custom Setting 15 (Auto off timers;A 114).
D Deleting Multiple Photographs
Multiple photographs can be deleted from the Delete option in the playback menu (A 94, 96).
Option Use Description
Zoom in onphotograph
K Zoom in on current photograph (A 77).
View thumbnails M View multiple photographs (A 76).
Retouch photograph Q Create retouched copy of current photograph (A 129).
Exit to shootingmode
or P To return to shooting mode, press the shutter-releasebutton halfway or press P.
Highlight
File information Shooting data, page1 Shooting data, page2
Histgram Highlights Active D-Lighting andretouch history
Highlights blink.
6 / 6

7/31/2019 Nikon D60 User Manual En
http://slidepdf.com/reader/full/nikon-d60-user-manual-en 48/20436
B a s i c P h o t o gr a ph y
Shooting Particular Scenes
Digital Vari-Programs offer the following shooting modes, in addition to e (auto) mode.
Selecting a program automatically optimizes settings to suit the selected scene, making
creative photography as easy as rotating the mode dial.
Taking Pictures
1 Rotate the mode dial to select a shooting mode.
2 Frame a photograph in the viewfinder,focus, and shoot.
Features of f, g, h, i, j, k, and l Modes
Mode dial Mode Description
f Auto (flash off) For pictures that do not use the flash.
g Portrait For portraits.
h Landscape For natural and man-made landscapes.
i Child For pictures of children.
j Sports For moving subjects.
k Close up For close up shots of flowers, insects, and other small objects.
l Night portrait For portraits shot under low light.
f Auto (Flash Off)
The built-in flash turns off. Use where flash photography isprohibited, to photograph infants without using the flash, or to
capture natural lighting under low light. The camera selects the
focus point containing the closest main subject; the AF-assist
illuminator will light to assist the focus operation when lighting is
poor.
g Portrait
Use for portraits with soft, natural-looking skin tones. The camera
selects the focus point containing the closest main subject. If thesubject is far from the background or a telephoto lens is used,
background details will be softened to lend the composition a
sense of depth.

7/31/2019 Nikon D60 User Manual En
http://slidepdf.com/reader/full/nikon-d60-user-manual-en 49/20437
Shooting Particular Scenes
B a s i c P h o t o gr a ph
y
D The Built-in Flash
If additional lighting is required for correct exposure in g, i, k, orl mode, the built-in flash will
pop up automatically when the shutter-release button is pressed halfway, just as it does in e (auto)
mode (A 64). The flash mode can be changed (A 65).
h Landscape
Use for vivid landscape shots. The camera selects the focus point
containing the closest main subject; the built-in flash and AF-assist
illuminator turn off automatically.
i Child
Use for snapshots of children. Clothing and background details are
vividly rendered while skin tones are given a soft, natural finish.
The camera selects the focus point containing the closest main
subject.
j Sports
High shutter speeds freeze motion for dynamic sports shots in
which the main subject stands out clearly. The camera focuses
continuously while the shutter-release button is pressed halfway,
tracking the subject in the center focus point. If the subject leaves
the center focus point, the camera will continue to focus based on
information from the other focus points. The starting focus point
can be selected by pressing the multi selector left or right (A
59). The built-in flash and AF-assist illuminator turn off automatically.
k Close Up
Use for close-up shots of flowers, insects, and other small objects.
The camera automatically focuses on the subject in the center
focus point; a different focus point can be selected by pressing the
multi selector left or right. Use of a tripod is recommended to
prevent blur.
l Night Portrait
Use for a natural balance between the main subject and the
background in portraits shot under low light. The camera selects
the focus point containing the closest main subject. Use of a
tripod is recommended to prevent blur.

7/31/2019 Nikon D60 User Manual En
http://slidepdf.com/reader/full/nikon-d60-user-manual-en 50/20438
B a s i c P h o t o gr a ph y
Shooting Particular Scenes
Getting Good Results with Autofocus
Autofocus does not perform well under the conditions listed below. The shutter
release may be disabled if the camera is unable to focus under these conditions,
or the in-focus indicator (A) may be displayed and the camera may sound a
beep, allowing the shutter to be released even when the subject is not in focus. In
these cases, use manual focus (A 61) or use focus lock (A 60) to focus onanother subject at the same distance and then recompose the photograph.
There is little or no
contrast between
the subject and the
background (e.g., the
subject is the same
color as the background).
The focus point
contains objects at
different distances
from the camera (e.g.,
the subject is inside a
cage).
The subject isdominated by
regular geometric
patterns (e.g., a row
of windows in a
skyscraper).
The focus pointcontains areas of
sharply contrasting
brightness (e.g., the
subject is half in the
shade).
Background objects
appear larger than
the subject (e.g.,
focus point contains
both foreground
subject and distant buildings).
The subject contains
many fine details
(e.g., a field of flowers
or other subjects that
are small or lack
variation in brightness).
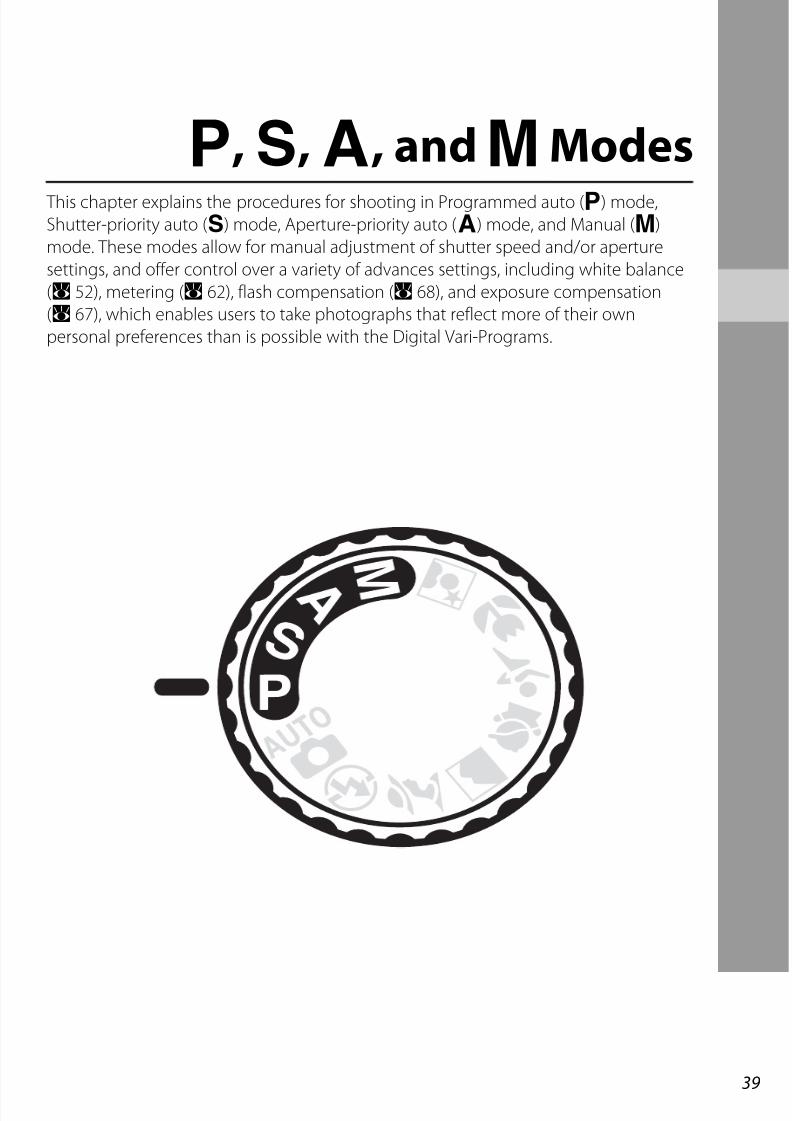
7/31/2019 Nikon D60 User Manual En
http://slidepdf.com/reader/full/nikon-d60-user-manual-en 51/20439
a, b, c, and d Modes This chapter explains the procedures for shooting in Programmed auto (a) mode,Shutter-priority auto (b) mode, Aperture-priority auto (c) mode, and Manual (d)
mode. These modes allow for manual adjustment of shutter speed and/or aperture
settings, and offer control over a variety of advances settings, including white balance
(A 52), metering (A 62), flash compensation (A 68), and exposure compensation
(A 67), which enables users to take photographs that reflect more of their own
personal preferences than is possible with the Digital Vari-Programs.

7/31/2019 Nikon D60 User Manual En
http://slidepdf.com/reader/full/nikon-d60-user-manual-en 52/20440
a , b , c , a n d d M o d e s
Shooting in a, b, c, and d Modes
a, b, c, and d modes offer a differing degrees of control over shutter speed and
aperture. Choose the mode best suited to the situation.
Shutter Speed and Aperture
The same exposure can be achieved with different combinations of shutter speed and
aperture, allowing you to freeze or blur motion and control depth of field. The following
figure shows how shutter speed and aperture affect exposure.
If the ISO sensitivity setting is changed (A 53, 111), the range of shutter speed and
aperture settings that will achieve optimal exposure also changes.
C Lens Aperture Ring
When using a CPU lens equipped with an aperture ring, lock the aperture ring at the minimum
aperture (highest f-number). Type G lenses are not equipped with an aperture ring. When a CPU
lens is mounted, adjust the aperture from the camera.
Mode Description
a Programmed auto (A 41)Camera sets shutter speed and aperture for optimal exposure.Recommended for snapshots and in other situations in whichthere is little time to adjust camera settings.
b Shutter-priority auto (A 42)User chooses shutter speed; camera selects aperture for bestresults. Use to freeze or blur motion.
c Aperture-priority auto(A 43)
User chooses aperture; camera selects shutter speed for bestresults. Use to blur background or bring both foreground andbackground into focus.
d Manual (A 44)User controls both shutter speed and aperture. Set shutterspeed to “bulb” for long time-exposures.
Shutter speed Aperture
Fast shutter speed1 /1,600 s
Small aperture (large f-number)f/36
Slow shutter speed1 s
Large aperture (small f-number)f/3

7/31/2019 Nikon D60 User Manual En
http://slidepdf.com/reader/full/nikon-d60-user-manual-en 53/20441
a , b , c , a n d d M o d e s
Shooting in a Mode (Programmed Auto)
In this mode, the camera automatically adjusts shutter speed and aperture for optimal
exposure in most situations. This mode is recommended for snapshots and other
situations in which you want to leave the camera in charge of shutter speed and aperture.
1 Rotate the mode dial to a.
2 Frame a photograph, focus, and shoot.
D Flexible Program
In a mode, different combinations of shutter speed and aperture can
be selected by rotating the command dial (“flexible program”). While
flexible program is in effect, B (R) indicators are shown in the viewfinder and Shooting information
display.
Rotate the command dial to the right for large apertures
(small f-numbers) that blur background details or fast shutter
speeds that “freeze” motion. Rotate the command dial to the
left for small apertures (large f-numbers) that increase depth
of field or slow shutter speeds that blur motion. All
combinations produce the same exposure. To restore default
shutter speed and aperture settings, rotate the command dial
until the indicators are no longer displayed, choose another mode, or turn the camera off.
Set

7/31/2019 Nikon D60 User Manual En
http://slidepdf.com/reader/full/nikon-d60-user-manual-en 54/20442
a , b , c , a n d d M o d e s
Shooting in b Mode (Shutter-Priority Auto)
In shutter-priority auto mode, you choose the shutter speed while the camera
automatically selects the aperture that will produce the optimal exposure. Use slow
shutter speeds to suggest motion by blurring moving subjects, high shutter speeds to
“freeze” motion (A 40).
1 Rotate the mode dial to b.
2 Rotate the command dial to choose the desired shutter
speed.
Shutter speed displayed in the viewfinder will change.Set shutter speed to the desired value between 1 / 4,000 s
and 30 s.
Shutter speed can also be displayed in the Shooting
information display by pressing K (L).
3 Frame a photograph, focus, and shoot.
D Shutter Speed and Camera Shake
To reduce or prevent blur caused by camera shake, the shutter speed should be faster than the
inverse of lens focal length in seconds. For example, when using a lens with a focal length of
300mm, choose a shutter speed faster than 1 / 300 s. A tripod is recommended when shooting at
slower shutter speeds. To reduce blur, try increasing shutter speed by increasing ISO sensitivity
(A 53), using the built-in flash (A 64) or an optional Speedlight (A 150), or by mounting the
camera on a tripod, or using a vibration reduction (VR) lens (A 20).
Set

7/31/2019 Nikon D60 User Manual En
http://slidepdf.com/reader/full/nikon-d60-user-manual-en 55/20443
a , b , c , a n d d M o d e s
Shooting in c Mode (Aperture-Priority Auto)
In aperture-priority auto mode, you choose the aperture while the camera automatically
selects the shutter speed that will produce the optimal exposure. Small apertures (high
f-numbers) increase depth of field, bringing both the main subject and background into
focus. Large apertures (low f-numbers) soften background details (A 40).
1 Rotate the mode dial to c.
2 Rotate the command dial to choose the desired
aperture.
Aperture displayed in the viewfinder will change. Set
aperture to the desired value.
The minimum and maximum apertures available vary
depending upon the lens.
Aperture can also be displayed in the Shooting
information display by pressing K (L).
3 Frame a photograph, focus, and shoot.
Set

7/31/2019 Nikon D60 User Manual En
http://slidepdf.com/reader/full/nikon-d60-user-manual-en 56/20444
a , b , c , a n d d M o d e s
Shooting in d Mode (Manual)
In manual exposure mode, you control both shutter speed and aperture. This mode can
also be used for longer exposures, with which the shutter can be held open indefinitely
(“Bulb” and “Time“;A 46), necessary for shooting fireworks and stars.
1 Rotate the mode dial to d.
2 Watch the electronic analog exposure display (A 45) while rotating the
command dial to set shutter speed and aperture.
Shutter speed displayed in the viewfinder will change
as the command dial is rotated. Set shutter speed to thedesired value between 1 / 4,000 s and 30 s or “Bulb”
(“bulb” is displayed in the viewfinder).
Shutter speed of “Bulb” is used for long time-exposure
photographs (A 46).
Aperture displayed in the viewfinder will
change as the command dial is rotated
while A (B) is pressed. Set aperture tothe desired value.
The maximum and minimum apertures
available vary depending upon the lens.
Adjust shutter speed and aperture settings
as necessary to achieve the desired
exposure.
Shutter speed and aperture can also be displayed in the Shooting information display by
pressing K (L).
3 Frame a photograph, focus, and shoot.
Set
Setting shutter speed
Set
Setting aperture
+

7/31/2019 Nikon D60 User Manual En
http://slidepdf.com/reader/full/nikon-d60-user-manual-en 57/20445
Shooting in d Mode (Manual)
a , b , c , a n d d M o d e s
D Electronic Analog Exposure Display
If a CPU lens (A 146) is attached and a shutter speed other than “Bulb” (A 46) is selected, the
electronic analog exposure displays in the viewfinder and Shooting information display show
whether the photograph would be under- or over-exposed at current settings. If the limits of the
exposure metering system are exceeded, the displays will flash.
When On is selected for Custom Setting 10 (ISO auto;A 111), ISO sensitivity is automatically
adjusted to compensate for changes in aperture and shutter speed, with the result that changes to
shutter speed and aperture will not affect the electronic analog exposure display.
Display Description
Optimal exposure.
If indicator is to right of 0, photograph will be underexposed. Display at leftindicates that photograph will be underexposed by 1 / 3EV.
If indicator is to left of 0, photograph will be overexposed. Display at leftindicates that photograph will be overexposed by more than 2EV.

7/31/2019 Nikon D60 User Manual En
http://slidepdf.com/reader/full/nikon-d60-user-manual-en 58/20446
Shooting in d Mode (Manual)
a , b , c , a n d d M o d e s
Long Time-Exposures
Shutter speeds of “Bulb” and “Time” can be used for long time-exposure photographs of
moving lights, the stars, night scenery, or fireworks. To prevent blurring caused by camera
shake, use a tripod or an optional Wireless Remote Control ML-L3.
To prevent loss of power before the exposure is complete, use a fully charged battery or
an optional AC Adapter EH-5a with a Power Connector EP-5 (A 156). Note that noise may
be present in long exposures; before shooting, choose On for the Noise reduction
option (A 108) in the shooting menu.
Bulb
Shutter remains open while the shutter-release button is held down, and closes when theshutter-release button is released. This option is available when shooting in d mode at a shutter speed of “Bulb” (“bulb”is displayed in the viewfinder) (A 44).
Time
The optional Wireless Remote Control ML-L3 is required. The shutter can remain open for up to 30 minutes without holding down the shutter-release button. Follow the instructions below to take pictures at a shutter speed of “Time“.1 Set shutter speed to “Bulb“ (“bulb“ is displayed in the viewfinder) in d mode (A 44).2 Set Release mode to Delayed remote or Quick-response remote (A 54).
• “Time“ will be displayed for shutter speed (“ww“ is displayed in the viewfinder).3 Press the shutter-release button on the remote control.
• Shutter opens immediately after, or two seconds after, the shutter-release button ispressed.
4 Press the shutter-release button on the remote control a second time to close theshutter.• Shutter closes automatically after 30 minutes has passed.
35 s, f/25

7/31/2019 Nikon D60 User Manual En
http://slidepdf.com/reader/full/nikon-d60-user-manual-en 59/20447
Changing Shooting Settings This chapter explains the application and adjustment of camera functions, to suitshooting conditions and personal intent, using the Quick settings display. Note that
some functions are not available in some shooting modes.
• Most of the functions explained in this chapter can be applied, or adjusted, from the
shooting menu (A 100) or Custom Settings (A 109).
OK
Image quality
Off Move
Image quality (A 50)
Image size (A 50)
White balance (A 52)
ISO sensitivity (A 53)
Release mode (A 54)
Focus mode (A 57)
AF-area mode (A 58)
Metering (A 62)
Flash mode(A 65)
Exposurecompensation(A 67)
Flash compensation(A 68)
Active D-Lighting(A 69)

7/31/2019 Nikon D60 User Manual En
http://slidepdf.com/reader/full/nikon-d60-user-manual-en 60/20448
C h a n gi n g S h o o t i n
g S e t t i n g s
The Quick Settings Display
Switch the display in the monitor to the Quick settings display tochange shooting settings.
When the Shooting information display (A 8) is shown, press K (L) to switch to the Quick settings display.
Each timeK (L) is pressed, the display changes in the following order:
Shooting information display➝ Quick settings display➝monitoroff ➝ Shooting information display (A 8).
When playing photographs back, press P to exit playback mode.
Adjusting a Setting
1 Highlight desired setting.
Settings not available in current mode are grayed out
and cannot be selected.
2 Display options for highlighted setting.
3 Highlight desired option.
Press the multi selector left to return to step 1.
Press K (L) to turn the monitor off without
modifying setting.
1
2
3
4
5
6
78
9 12
Image quality
MoveOff OK
10 11
1 Image quality............................................................50
2 Image size................................................................... 50
3 White balance .......................................................... 52
4 ISO sensitivity............................................................ 53
5 Release mode...........................................................54
6 Focus mode............................................................... 57
7 AF-area mode...........................................................58
8 Metering......................................................................62
9 Flash mode ................................................................ 65
10 Exposure comp. ......................................................67
11 Flash compensation............................................. 68
12 Active D-Lighting................................................... 69
Move OKOff
Image size
Move OK
Image size
Move OK
Image size

7/31/2019 Nikon D60 User Manual En
http://slidepdf.com/reader/full/nikon-d60-user-manual-en 61/20449
The Quick Settings Display/Image Quality and Size
C h a n gi n g S h o o t i n
g S e t t i n g s
4 Select option.
The option selected in step 3 is applied, and the
screen shown in step 1 will be displayed.
Repeat steps 1–4 to change other settings.
Press the shutter-release button halfway or K (L) to
complete the setting.
Image Quality and Size
Together, image quality (the amount of compression) and size determine how much
space each photograph occupies on the memory card. Before shooting, choose image
quality and image size according to how you plan to use the photograph and the capacityof the memory card. Larger, higher quality images can be printed at larger sizes but also
require more memory, meaning that fewer such images can be recorded on the memory
card.
The approximate maximum file size of individual photographs and
the total number of photographs that can be recorded at theselected setting are also shown in the Quick settings display while
image quality or size options are displayed. Use the display only as
a guide. Typical file sizes are listed in “Memory Card Capacity and
Image Quality/Size” (A 178).
Image size
Move OKOff
Image Quality and SizeLarge file size
Small file size Small Medium Large
JPEG Basic
JPEG Normal
JPEG Fine
Hi gh
<
I m a g e q u al i t y
>
L ow
Small < Image size > Large
Image quality
Move OK

7/31/2019 Nikon D60 User Manual En
http://slidepdf.com/reader/full/nikon-d60-user-manual-en 62/20450
Image Quality and Size
C h a n gi n g S h o o t i n
g S e t t i n g s
Image QualitySelect Image quality from the Quick settings display to adjust the setting (A 48).
The camera supports the following image quality options (the first four are listed in
descending order by image quality and file size).
Image SizeSelect Image size from the Quick settings display to adjust the setting (A 48).
Image size is measured in pixels. The following options are available. Choose an image size
according to the size at which photos will be printed.
Note that the option selected for image size does not affect the size of NEF (RAW) images.
When viewed on a computer, NEF images are 3,872×2,592 pixels in size.
Option Format Description
U NEF
Compressed raw data from the image sensor are saveddirectly to memory card. Choose for images that will beprocessed or retouched on a computer to control imagedegradation. To print these images, use JPEG-format copiesprocessed from NEF (RAW) photographs using the Quick retouch option (A 132) or the NEF (RAW) processing option (A 140) in the retouch menu, or use software thatsupports the NEF format on a computer.
V
JPEG
Images are compressed less thanV, producing higher-quality images. Compression ratio: approx. 1:4.
V(default setting)
Best choice in most situations. Compression ratio: approx. 1: 8.
WSmaller file size suited to e-mail or the website. Compressionratio: approx. 1 :16.
X NEF+JPEG Two images are recorded: one NEF (RAW) image and onebasic-quality JPEG image.
Image size Size (pixels) Approximate size when printed at 200 dpi
w (default setting) 3,872×2,592 49.2×32.9 cm (19.4×13.0 in.)
x 2,896×1,944 36.8×24.7 cm (14.5×9.7 in.)
y 1,936×1,296 24.6×16.5 cm (9.7×6.5 in.)

7/31/2019 Nikon D60 User Manual En
http://slidepdf.com/reader/full/nikon-d60-user-manual-en 63/20451
Image Quality and Size
C h a n gi n g S h o o t i n
g S e t t i n g s
C NEF (RAW)/NEF (RAW)+JPEG Basic
To play back NEF (RAW) photographs on devices other than this camera, the files must first be
processed to another format. NEF (RAW) photographs can be processed using NEF (RAW)
processing (A 140) in the retouch menu. Use JPEG photographs created using the NEF (RAW)
processing option in the retouch menu to print photographs from most professional print services,
or via direct USB connection to a printer.
NEF (RAW) photographs can be viewed on a computer using software, such as Capture NX (availableseparately;A 156) or ViewNX (supplied), which supports the NEF format. When photographs taken
atX are viewed on the camera, only the JPEG image will be displayed. Note that when
photographs taken at this setting are deleted, both NEF and JPEG images will be deleted.
Install ViewNX from the supplied Software Suite CD.
Be sure to update to the latest version of Capture NX. Nikon Message Center automatically checks
for updates if an Internet connection is detected at startup.
D File Names
Photographs are recorded as image files with names of the form “DSC_nnnn.xxx,” where nnnn is afour-digit number between 0001 and 9999 assigned automatically in ascending order by the
camera, and xxx is one of the following three letter extensions: “NEF” for NEF (RAW) images, “JPG” for
JPEG images, or “AVI” for movie files (A 99). Files containing image dust off reference data have the
extension “.NDF” (A 127). The NEF and JPEG files recorded at a setting of X have the same file
names but different extensions. Small copies created with the small picture option
(A 136) in the retouch menu have file names beginning with “SSC_” and ending with the extension
“.JPG” (e.g., “SSC_0001.JPG”), while images recorded with the other options (A 129) in the retouch
menu have file names beginning with “CSC” (e.g., “CSC_0001.JPG”). Movie files created with the stop-
motion movie option (A 99) in the retouch menu have the file names beginning with “ASC_” and
ending with the extension ”.AVI” (e.g., ”ASC_0001.AVI”). Images recorded at a Optimize Image>Custom>Color Mode setting of II (AdobeRGB) (A 102) have names that begin with an
underscore (e.g., “_DSC0001.JPG”), however, files containing image dust off reference data have
names that begin without an underscore (e.g., “DSC_nnnn”) regardless of Color Mode setting.
E Image Quality/Size
Image quality and size can also be set using the Image quality and Image size options in the
shooting menu (A 100).
F 11 — F/G Button (A 112)
Image quality and size can also be set using the command dial.

7/31/2019 Nikon D60 User Manual En
http://slidepdf.com/reader/full/nikon-d60-user-manual-en 64/20452
C h a n gi n g S h o o t i n
g S e t t i n g s
White Balance
Select White balance from the Quick settings display to adjust the setting (A 48).
White balance ensures that colors are unaffected by the color of the light source. Auto
(default setting) is recommended for most light sources; if necessary, other values can be
selected according to the type of source. The following options are available in a, b, c,
and d modes (Auto is automatically selected in e, f, g, h, i, j, k, and l modes).
E White Balance (A 103)
White balance can also be set from the shooting menu (A 100). The White balance option in the
shooting menu can be used to choose a specific type of fluorescent lighting or to fine tune whitebalance.
F 11 — F/G Button (A 112)
White balance can also be set using the command dial.
K Auto (default setting)
Camera sets white balance automatically. Recommended for most situations.
f Incandescent
Use under incandescent lighting.
g Fluorescent
Use under fluorescent lighting. The specific type of fluorescent lighting can be specifiedfrom White balance (A 103) in the shooting menu.
h Direct sunlight
Use with subjects lit by direct sunlight.
J Flash
Use with built-in flash or optional Nikon flash units.
i Cloudy
Use in daylight under overcast skies.
j ShadeUse in daylight with subjects in the shade.
k Preset manual
Use gray or white object or existing photograph as reference for white balance. See“Preset Manual” for details (A 105).

7/31/2019 Nikon D60 User Manual En
http://slidepdf.com/reader/full/nikon-d60-user-manual-en 65/20453
C h a n gi n g S h o o t i n
g S e t t i n g s
ISO Sensitivity
Select ISO sensitivity from the Quick settings display to adjust the setting (A 48).
Photographs taken at slow shutter speeds are prone to blurring. If ISO sensitivity is raised
above the base setting of ISO 100, the same exposures can be achieved at faster shutter
speeds, preventing blur. ISO sensitivity can be set to values between ISO 100 and ISO 1600
in steps of 1EV, with a further high sensitivity setting of Hi 1 available for an ISO equivalentof approx. 3200.
Digital Vari-Program modes also offer an Auto setting that allows the camera to
automatically raise sensitivity when lighting is poor or lower sensitivity when lighting is
bright.
B High Sensitivity Setting of Hi 1
Photographs taken at a sensitivity setting of Hi 1 are prone to be grainy and exhibit mottling.
C ISO Sensitivity Setting
Rotating the mode dial from a, b, c, or d to a Digital Vari-Program mode automatically restores
the default ISO sensitivity of Auto.
C ISO Auto
Use Custom Setting 10 (ISO auto;A 111) to enable automatic ISO sensitivity control in a, b, c,
and d modes. When Hi 1 is selected, automatic ISO sensitivity control is disabled.
C More Information
For more information about reduce noise at high sensitivities, see Noise reduction in the shooting
menu (A 108).
D Sensitivity
ISO sensitivity is the digital equivalent of film speed. The higher the ISO sensitivity, the less light
needed to make an exposure, allowing higher shutter speeds or smaller apertures. Just as higher
speed films tend to be “grainy,” photographs taken at high ISO sensitivities are prone to mottling.
E ISO Sensitivity
ISO sensitivity can also be set using the ISO sensitivity option in the shooting menu (A 100).
F 11 — F/G Button (A 112)
ISO sensitivity can also be set using the command dial.
e, f, g, h,
i, j, k, lAuto (default setting), 100–1600, Hi 1
a, b, c, d 100 (default setting)–1600, Hi 1

7/31/2019 Nikon D60 User Manual En
http://slidepdf.com/reader/full/nikon-d60-user-manual-en 66/20454
C h a n gi n g S h o o t i n
g S e t t i n g s
Releasing the Shutter
Release ModeSelect Release mode from the Quick settings display to adjust the setting (A 48).
E 04 — Release Mode
Release mode also can be set in the custom settings menu (A 109).
F 11 — F/G Button (A 112)
At default settings, self-timer mode can be applied by simply pressing F / G. The
release mode can be changed by holding down F / G and rotating the command
dial if Release mode is selected for Custom Setting 11 (F / G button;A 112).
Continuous Mode
1 Highlight Release mode in the Quick settings display
(A 48) and highlightb (Continuous).
2 Shoot.
Photographs are shot continuously while the shutter-release button is held
down.
a Single frame (default setting)
Camera shoots one photograph each time the shutter-release button is pressed.
b Continuous (burst mode) A 54
Camera records photographs at up to about three frames per second while theshutter-release button is pressed. The fastest frame rates can be achieved bychoosing manual focus (A 61), rotating the mode dial to b or d and selecting ashutter speed of 1 / 250s or faster (A 42, 44), and using defaults for all other settings.
c Self-timer A 55
Use for self-portraits or to reduce blurring caused by camera shake. Shutter isreleased about ten seconds after the shutter-release button is pressed.
d Delayed remote A 55
Optional Wireless Remote Control ML-L3 required. Use for self-portraits. Shutter isreleased about two seconds after the shutter-release button on the remote controlis pressed.
e Quick-response remote A 55
Optional Wireless Remote Control ML-L3 required. Use to reduce blurring causedby camera shake. Shutter is released immediately after the shutter-release buttonon the remote control is pressed.
Release mode
Move OK

7/31/2019 Nikon D60 User Manual En
http://slidepdf.com/reader/full/nikon-d60-user-manual-en 67/20455
Releasing the Shutter
C h a n gi n g S h o o t i n
g S e t t i n g s
C Continuous Mode
When shooting conditions demand firing of the flash, continuous shooting is disabled even when
b (Continuous) is selected for Release mode. Select f or change flash mode (A 65) to turn the
flash off.
D The Number of Shots Remaining before Memory Buffer Fills
The approximate number of images that can be recorded to thememory buffer, while maintaining the maximum frame rate, is shown
in the viewfinder’s number of shots remaining before memory buffer
fills display while the shutter-release button is held down. The example
at right shows that at least 11 more images can be recorded without interruption. In continuous
mode, shooting will continue to a maximum of 100 shots, although the frame rate will drop when
Ir00J is displayed in the exposure-count display. The number of exposures remaining displayed is
approximate. The number may vary depending upon shooting conditions. See “Memory Card
Capacity and Image Quality/Size” (A 178) for more information regarding the number of
photographs that can be recorded in the memory buffer.
Self-Timer and Remote Control Modes The self-timer or optional Wireless Remote Control ML-L3 can be used for self-portraits.
1 Mount the camera on a tripod or place the camera on a stable, level surface.
2 Highlight Release mode in the Quick settings display (A 48) and select one of
the following release modes.At default settings, Self-timer is selected for Custom Setting 11 (F / G button;A 112), and
the length of the self-timer delay can be changed by simply pressing F / G.
3 Frame the photograph.
If the remote control is used with the camera in autofocus mode, press the shutter-release
button halfway to focus. The shutter will not be released.
Release mode Description
c Self-timerShutter released about ten seconds after camera hasfocused. The length of self-timer delay can be changed(A 114).
d Delayed remoteShutter released about two seconds after camera hasfocused.
e Quick-response remote Shutter released when camera focuses.

7/31/2019 Nikon D60 User Manual En
http://slidepdf.com/reader/full/nikon-d60-user-manual-en 68/20456
C h a n gi n g S h o o t i n
g S e t t i n g s
Releasing the Shutter
4 Shoot.
Self-timer: Press the camera shutter-release button
halfway to focus, then press it the rest of the way
down to start the self-timer. The self-timer lamp will
start to blink, stopping two seconds before the
photograph is shot.
The release mode is set to Single frame or
Continuous after the shutter is released.
Remote control: From a distance of 5m (16ft.) or less, aim the
transmitter on the ML-L3 at the infrared receiver on the camera and
press the shutter-release button on the ML-L3. In delayed remote
mode, the self-timer lamp will light for about two seconds before the
shutter is released. In quick-response remote mode, the self-timer
lamp will flash after the shutter has been released.
C Eyepiece Cap
Attach the eyepiece cap to the viewfinder
eyepiece with remote shooting. Remove
Rubber Eyecup DK-20 and insert the
supplied Eyepiece Cap DK-5 as shown atright. This prevents light entering via the
viewfinder interfering with exposure. Hold the camera steady when removing
the rubber eyecup.
Remove the Rubber Eyecup DK-20 when attaching other viewfinder eyepiece accessories (A 155).
C Turning off the Self-Timer
The self-timer mode is turned off when the camera is turned off. Single-frame or continuous release
mode is automatically restored when self-timer mode ends.
C More Information
For more information about changing the length of time the camera will wait for a signal from the
remote before canceling delayed or quick-response remote modes, see Custom Setting 17 (Remote
on Duration;A 115)
Eyepiece Cap DK-5Rubber Eyecup DK-20

7/31/2019 Nikon D60 User Manual En
http://slidepdf.com/reader/full/nikon-d60-user-manual-en 69/20457
C h a n gi n g S h o o t i n
g S e t t i n g s
Focus
Focus ModeSelect Focus mode from the Quick settings display to adjust the setting (A 48).
Choose how the camera focuses.b andc are available only in a, b, c, and d
modes.
B Continuous-Servo AF
Priority is given to shutter response, meaning that shutter is released in wider range of focus than
when single-servo AF is selected. Shutter may sometimes be released before in-focus indicator (A)is displayed in viewfinder. The same operation is performed when focus mode automatically
switches from auto-servo AF to continuous-servo AF.
C Manual Focus
Whend is selected for Focus mode in any shooting mode, switching to another shooting mode
does not affect the focus mode setting.
C More Information
For more information about the subject with which autofocus does not perform well, see “Getting
Good Results with Autofocus” (A 38).
D The AF-Assist Illuminator
If the subject is poorly lit, the AF-assist illuminator will light automatically to
assist the autofocus operation when the shutter-release button is pressed
halfway. The AF-assist illuminator will not light in continuous-servo AF or
manual focus mode, in h, or j mode, or if the center focus point is not
selected or if Off has been selected for Custom Setting 9 (AF assist;
A 111). The illuminator has a range of about 0.5–3.0 m (1 ft. 8 in.–9 ft.
10 in.); when using the illuminator, use a lens with a focal length of 24mmto 200mm and remove the lens hood.
E 2 — Focus Mode
Focus mode can also be selected from the Custom Settings menu (A 109).
a Auto-servo AF (default setting)
Camera automatically selects single-servo autofocus when subject is judged to bestationary, continuous-servo autofocus when subject is judged to be moving.
b Single-servo AF
For stationary subjects. Focus locks when the shutter-release button is pressed halfway.
c Continuous-servo AF
For moving subjects. Camera focuses continuously while the shutter-release button ispressed halfway.
d Manual focus
User focuses manually (A 61).

7/31/2019 Nikon D60 User Manual En
http://slidepdf.com/reader/full/nikon-d60-user-manual-en 70/20458
C h a n gi n g S h o o t i n
g S e t t i n g s
Focus
AF-Area ModeSelect AF-area mode from the Quick settings display to adjust the setting (A 48).
The D60 is equipped with three focus points (areas in which the camera focuses). Choose
how the focus point is selected in autofocus mode.
C Viewfinder Display
AF-area mode is shown in the viewfinder as follows:
C More Information
For more information about the subject with which autofocus does not perform well, see “Getting
Good Results with Autofocus” (A 38).
C AF Area Mode
Whend is selected for Focus mode (A 57), AF-area mode cannot be changed.
The AF-area mode selected in Digital Vari-Program modes is restored when the mode dial is rotated
to another shooting mode.
E 3—AF-Area Mode
AF-area mode can also be selected from the Custom Settings menu (A 109).
N Closest subject
Camera automatically selects focus point containing subject closest to camera. Default fora, b, c, and d modes; selected automatically when mode dial is rotated to e, f, g,
h, i, or l.
O Dynamic area
User selects focus point manually, but if subject leaves selected focus point even briefly,camera will focus based on information from other focus points. Use with erraticallymoving subjects. Selected automatically when the mode dial is rotated to j.
P Single point
User selects focus point using the multi selector; camera focuses on subject in selectedfocus point only. Use with stationary subjects. Selected automatically when the mode dialis rotated to k.
Closest subject Dynamic area Single point

7/31/2019 Nikon D60 User Manual En
http://slidepdf.com/reader/full/nikon-d60-user-manual-en 71/20459
Focus
C h a n gi n g S h o o t i n
g S e t t i n g s
Focus Point Selection The focus point can be selected manually for composing photographs in which the main
subject is not positioned at the center of the frame.
1 Highlight AF-area mode in the Quick settings display (A 48).
2 To enable manual focus selection in these modes, selectP (single point) orO (dynamic area) for AF-area
mode (A 58) in the Quick settings display.
At default settings,N (Closest subject) is selected automatically in
e, f, g, h, i, l, a, b, c, and d modes.
3 Press the multi selector left or right to
highlight the focus point in the viewfinder.
The selected focus point is highlighted again when
the shutter-release button is pressed halfway.
The selected focus point is also shown in the Shooting
information display or viewfinder.
AF–area mode
Move OK
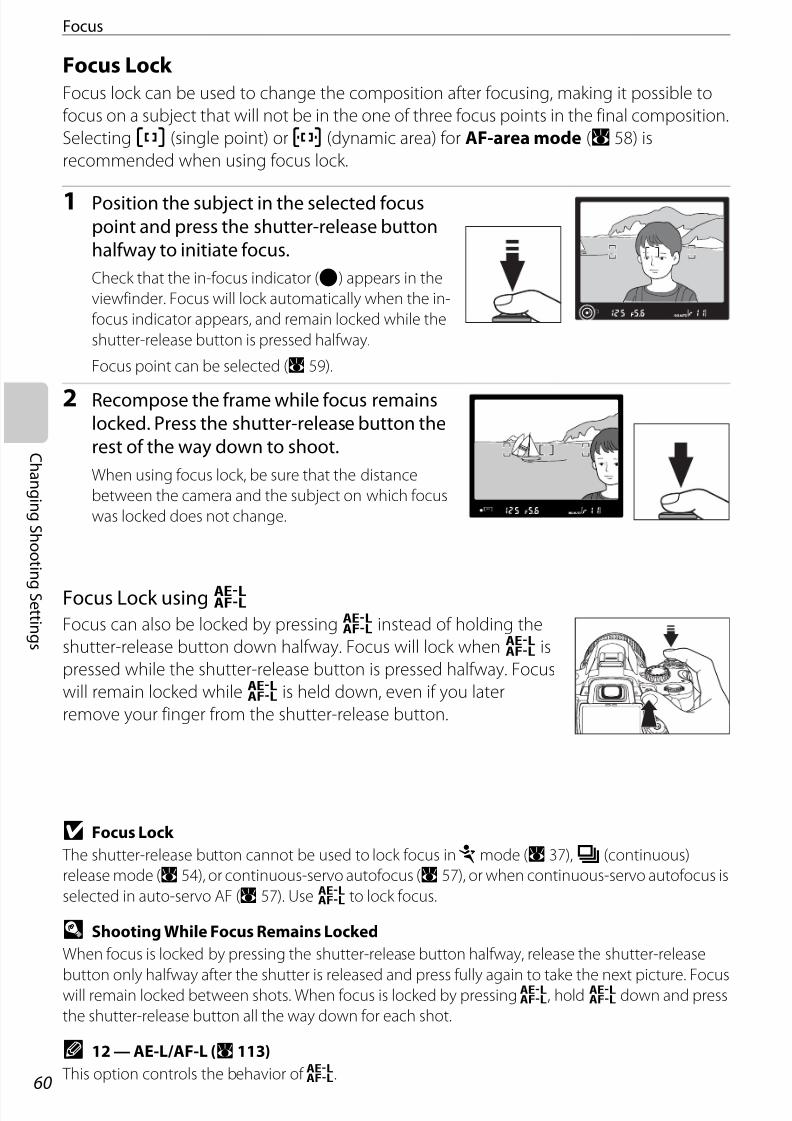
7/31/2019 Nikon D60 User Manual En
http://slidepdf.com/reader/full/nikon-d60-user-manual-en 72/20460
C h a n gi n g S h o o t i n
g S e t t i n g s
Focus
Focus Lock Focus lock can be used to change the composition after focusing, making it possible to
focus on a subject that will not be in the one of three focus points in the final composition.
SelectingP (single point) orO (dynamic area) for AF-area mode (A 58) is
recommended when using focus lock.
1 Position the subject in the selected focuspoint and press the shutter-release button
halfway to initiate focus.
Check that the in-focus indicator (A) appears in the
viewfinder. Focus will lock automatically when the in-
focus indicator appears, and remain locked while the
shutter-release button is pressed halfway.
Focus point can be selected (A 59).
2 Recompose the frame while focus remainslocked. Press the shutter-release button the
rest of the way down to shoot.
When using focus lock, be sure that the distance
between the camera and the subject on which focus
was locked does not change.
Focus Lock using HFocus can also be locked by pressing H instead of holding the
shutter-release button down halfway. Focus will lock when H is
pressed while the shutter-release button is pressed halfway. Focus
will remain locked while H is held down, even if you later
remove your finger from the shutter-release button.
B Focus Lock
The shutter-release button cannot be used to lock focus in j mode (A 37),b (continuous)
release mode (A 54), or continuous-servo autofocus (A 57), or when continuous-servo autofocus is
selected in auto-servo AF (A 57). Use H to lock focus.
D Shooting While Focus Remains Locked
When focus is locked by pressing the shutter-release button halfway, release the shutter-release
button only halfway after the shutter is released and press fully again to take the next picture. Focuswill remain locked between shots. When focus is locked by pressing H, hold H down and press
the shutter-release button all the way down for each shot.
F 12 — AE-L/AF-L (A 113)
This option controls the behavior of H.

7/31/2019 Nikon D60 User Manual En
http://slidepdf.com/reader/full/nikon-d60-user-manual-en 73/20461
Focus
C h a n gi n g S h o o t i n
g S e t t i n g s
Manual FocusUse this option to focus manually or when the camera is unable to
focus correctly using autofocus. To focus manually, display the
Quick settings display and choose Focus mode (A 48) and select
d (manual focus) for Focus mode (A 57).
Adjust the lens focusing ring until the image displayed on the clear
matte field in the viewfinder is in focus. Photographs can be taken
at any time, even when the image is not in focus.
When using a lens that offers A-M selection, select M when focusing manually. With lenses
that support M/A (autofocus with manual priority), focus can be adjusted manually with
the lens set to M or M/A. See the documentation provided with your lens for details.
D The Electronic Rangefinder
If the lens has a maximum aperture of f/5.6 or faster, the viewfinder focus
indicator can be used to confirm whether the portion of the subject in the
selected focus point is in focus. After positioning the subject in the active
focus point, press the shutter-release button halfway and rotate the lens
focusing ring until the in-focus indicator (A) is displayed. Use Custom
Setting 19 (Rangefinder;A 116) to display rangefinder, a scale indicating
the focus distance for shooting in manual focus mode. Note that if thesubject is one for which autofocus does not perform well (A 38), the in-focus indicator (A) may be
displayed even when the subject is not in focus. Confirm that the image in the viewfinder is in focus
before shooting.
D Focal Plane Position
To determine the distance between your subject and the camera, measure
from the focal plane mark (R) on the camera body. The distance
between the lens mounting flange and the focal plane is 46.5 mm (1.83 in.).
E 2 — Focus Mode
Focus mode can also be selected from the Custom Settings menu (A 109).

7/31/2019 Nikon D60 User Manual En
http://slidepdf.com/reader/full/nikon-d60-user-manual-en 74/20462
C h a n gi n g S h o o t i n
g S e t t i n g s
Exposure
MeteringSelect Metering from the Quick settings display to adjust the setting (A 48).
The metering method determines how the camera sets exposure. The following options
are available when the mode dial is rotated to a, b, c, or d (matrix metering is always
used in e, f, g, h, i, j, k, l modes).
C Metering
Metering is available with CPU lenses only. In matrix metering, exposure is set using a 420-pixel RGB
sensor. Use a type G or D lens for results that include range information (3D color matrix metering II ).
With other CPU lenses, 3D range information is not included (color matrix metering II ).
E 5 — Metering
Metering can also be selected from the Custom Settings menu (A 109).
p Matrix (default setting)
Recommended in most situations. Camera meters a wide area of the frame and instantlysets exposure according to distribution of brightness, color, distance, and composition fornatural results.
q Center-weighted
Camera meters entire frame but assigns greatest weight to center area. Classic meter forportraits.
r SpotCamera meters exposure in active focus point only (if N (Closest subject) is selectedfor AF-area mode (A 58), camera will meter center focus point). Ensures that subject willbe correctly exposed, even when background is much brighter or darker.

7/31/2019 Nikon D60 User Manual En
http://slidepdf.com/reader/full/nikon-d60-user-manual-en 75/20463
Exposure
C h a n gi n g S h o o t i n
g S e t t i n g s
Autoexposure Lock If the subject is not in the metered area when center-weighted or spot metering is used,
exposure will be based on lighting conditions in the background and the main subject
may not be correctly exposed. This can be prevented by using autoexposure lock.
Available in a, b, and c modes.
1 Select mode a, b, or c and chooseq (center-weighted) orr (spot) forMetering (exposure lock has no effect in mode d).
p (matrix) is not recommended as AE lock may not be sufficiently effective.
2 Position the subject in the selected focus point. Keeping
the shutter-release button pressed halfway and the
subject positioned in the selected focus point, press
H to lock exposure.
Exposure is locked. While H is pressed, exposure is locked at thevalue metered in the selected focus point whenr (spot) is
selected, or at the value metered in the center area whenq (center-weighted) is selected.
Recomposing the frame does not affect the exposure.
While exposure lock is in effect, an E indicator will appear in the
viewfinder. When autofocus is used, focus will be also locked.
Confirm that the in-focus indicator (A) appears in the viewfinder
when the shutter-release button is pressed.
3 Keeping H pressed, recompose the
photograph and shoot.
D Adjusting Shutter Speed and Aperture
While exposure lock is in effect, the following settings can be adjusted by rotating the command dial
without altering the metered value for exposure.
Note that the metering method cannot be changed while exposure lock is in effect.
F 12— AE-L/AF-L (A 113)
This option controls the behavior of H.
F 13—AE Lock (A 113)
This option controls whether the shutter-release button locks exposure.
Programmed auto Shutter speed and aperture (flexible program;A 41)
Shutter-priority auto Shutter speed
Aperture-priority auto Aperture

7/31/2019 Nikon D60 User Manual En
http://slidepdf.com/reader/full/nikon-d60-user-manual-en 76/20464
C h a n gi n g S h o o t i n
g S e t t i n g s
Using the Built-in Flash
The camera supports a variety of flash modes for photographing poorly lit or backlit
subjects.
Note that the built-in flash cannot be used, nor can the flash mode be changed, in j, f,
or h mode.
Using the Built-in Flash: e, g, i, k, and l Modes
1 Rotate the mode dial to e, g, i, k, or l.
2 Confirm or change the current flash mode (A 65).
Select f to prevent the flash from firing.
3 Frame a photograph and shoot.
The flash will pop up as required when the subject is
poorly lit or backlit.
The flash mode can be changed after the flash pops
up.
Press the shutter-release button all the way down to
shoot.
4 Lower the flash when it is no longer needed.
Using the Built-in Flash: a, b, c, and d Modes
1 Rotate the mode dial to a, b, c, or d.
2 Press D to raise the flash.
The flash will fire whenever a photograph is taken. To
prevent the flash from firing, lower the flash.
3 Confirm or change the current flash mode (A 65).
4 Choose a metering method (A 62), adjust exposure, frame the photograph,
and shoot.
Lowering the Built-in Flash
To save power when the flash is not in use, press it gently
downward until the latch clicks into place.
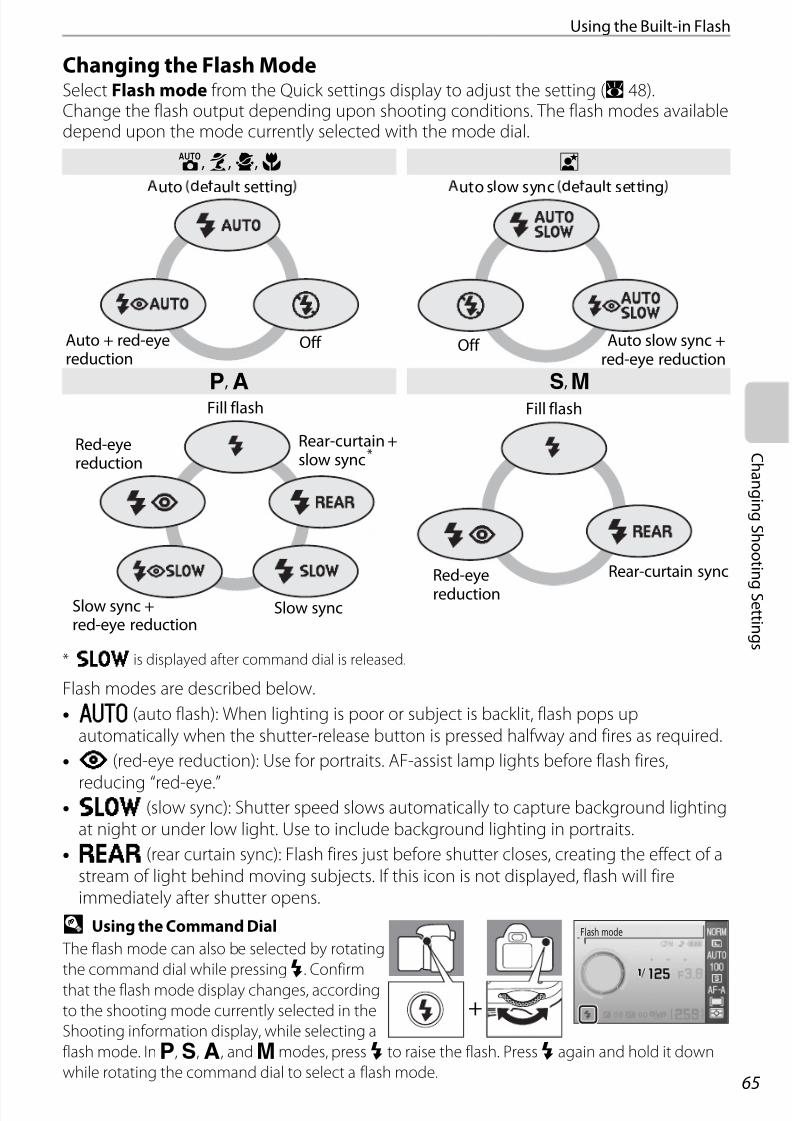
7/31/2019 Nikon D60 User Manual En
http://slidepdf.com/reader/full/nikon-d60-user-manual-en 77/20465
Using the Built-in Flash
C h a n gi n g S h o o t i n
g S e t t i n g s
Changing the Flash ModeSelect Flash mode from the Quick settings display to adjust the setting (A 48).Change the flash output depending upon shooting conditions. The flash modes availabledepend upon the mode currently selected with the mode dial.
* M is displayed after command dial is released.
Flash modes are described below.
• K (auto flash): When lighting is poor or subject is backlit, flash pops upautomatically when the shutter-release button is pressed halfway and fires as required.
• L (red-eye reduction): Use for portraits. AF-assist lamp lights before flash fires,
reducing “red-eye.”• M (slow sync): Shutter speed slows automatically to capture background lighting
at night or under low light. Use to include background lighting in portraits.
• N (rear curtain sync): Flash fires just before shutter closes, creating the effect of astream of light behind moving subjects. If this icon is not displayed, flash will fireimmediately after shutter opens.
D Using the Command Dial
The flash mode can also be selected by rotating
the command dial while pressing D. Confirm
that the flash mode display changes, according
to the shooting mode currently selected in the
Shooting information display, while selecting a
flash mode. In a, b, c, and d modes, press D to raise the flash. Press D again and hold it down
while rotating the command dial to select a flash mode.
e, g, i, k l
a, c b, d
uto e au t sett ng
Auto + red-eyereduction
Off
uto s ow sync e au t sett ng
Auto slow sync +red-eye reduction
Off
Fill flash
Red-eyereduction
Rear-curtain +slow sync*
Slow syncSlow sync +red-eye reduction
Fill flash
Rear-curtain syncRed-eye
reduction
Flash mode
+

7/31/2019 Nikon D60 User Manual En
http://slidepdf.com/reader/full/nikon-d60-user-manual-en 78/20466
C h a n gi n g S h o o t i n
g S e t t i n g s
Using the Built-in Flash
B The Built-in Flash
Use with CPU lenses with focal lengths of 18mm to 300mm or non-CPU lenses with focal lengths of
18mm to 200mm. Restrictions on focal length and shooting distance may apply with some lenses.
See “Optional Accessories” (A 145) for details. Remove lens hoods to prevent shadows. The flash has
a minimum range of 60cm (2 ft.) and cannot be used in the macro range of macro zoom lenses.
If the flash fires in continuous release mode (A 54), only one photograph will be taken each time
the shutter-release button is pressed. The shutter release may be briefly disabled to protect the flash after it has been used for several
consecutive shots. The flash can be used again after a short pause.
For information on optional flash units (Speedlights), see “Optional Flash Units (Speedlights)”
(A 150).
In a, b, c, and d modes, flash output is controlled using flash compensation (A 68). Output of
the built-in flash can be adjusted manually from Custom Setting 14 (Built-in flash;A 113).
C Flash Mode Setting
The default flash setting for Digital Vari-Program modes is automatically restored when the modedial is rotated to a new setting or the camera is turned off.
D Rear-Curtain Sync
Normally the flash fires as the shutter opens (“front curtain sync”; see below at left). In rear-curtain
sync, the flash fires just before the shutter closes, creating the effect of a stream of light behind
moving subjects.
C More Information
For more information about auto ISO control, see “ISO Auto” (A 112).
For more information about flash control options, see Custom Setting 14 (Built-in flash / Optional
flash unit;A 113).
Front-curtain sync Rear curtain sync
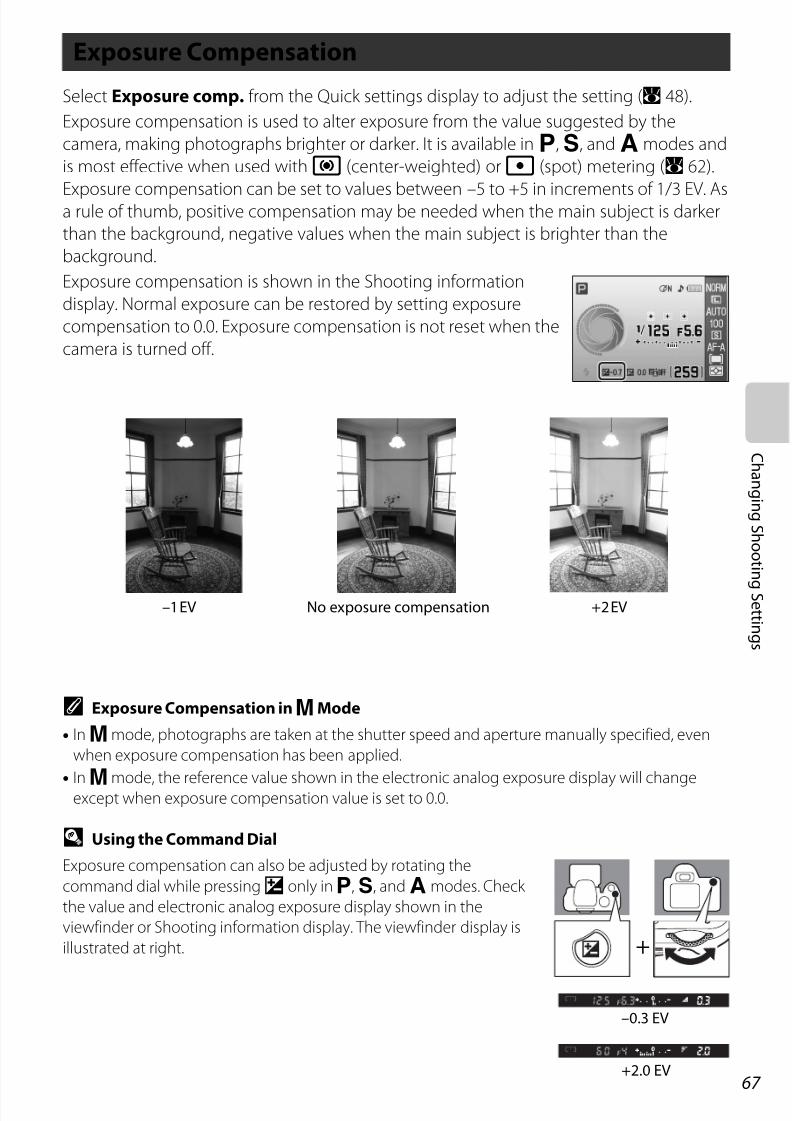
7/31/2019 Nikon D60 User Manual En
http://slidepdf.com/reader/full/nikon-d60-user-manual-en 79/20467
C h a n gi n g S h o o t i n
g S e t t i n g s
Exposure Compensation
Select Exposure comp. from the Quick settings display to adjust the setting (A 48).
Exposure compensation is used to alter exposure from the value suggested by the
camera, making photographs brighter or darker. It is available in a, b, and c modes and
is most effective when used withq (center-weighted) orr (spot) metering (A 62).
Exposure compensation can be set to values between –5 to +5 in increments of 1/3 EV. Asa rule of thumb, positive compensation may be needed when the main subject is darker
than the background, negative values when the main subject is brighter than the
background.
Exposure compensation is shown in the Shooting information
display. Normal exposure can be restored by setting exposure
compensation to 0.0. Exposure compensation is not reset when the
camera is turned off.
C Exposure Compensation in d Mode
• In d mode, photographs are taken at the shutter speed and aperture manually specified, even
when exposure compensation has been applied.
• In d mode, the reference value shown in the electronic analog exposure display will changeexcept when exposure compensation value is set to 0.0.
D Using the Command Dial
Exposure compensation can also be adjusted by rotating the
command dial while pressing A only in a, b, and c modes. Check
the value and electronic analog exposure display shown in the
viewfinder or Shooting information display. The viewfinder display is
illustrated at right.
–1EV No exposure compensation +2EV
–0.3 EV
+2.0 EV
+
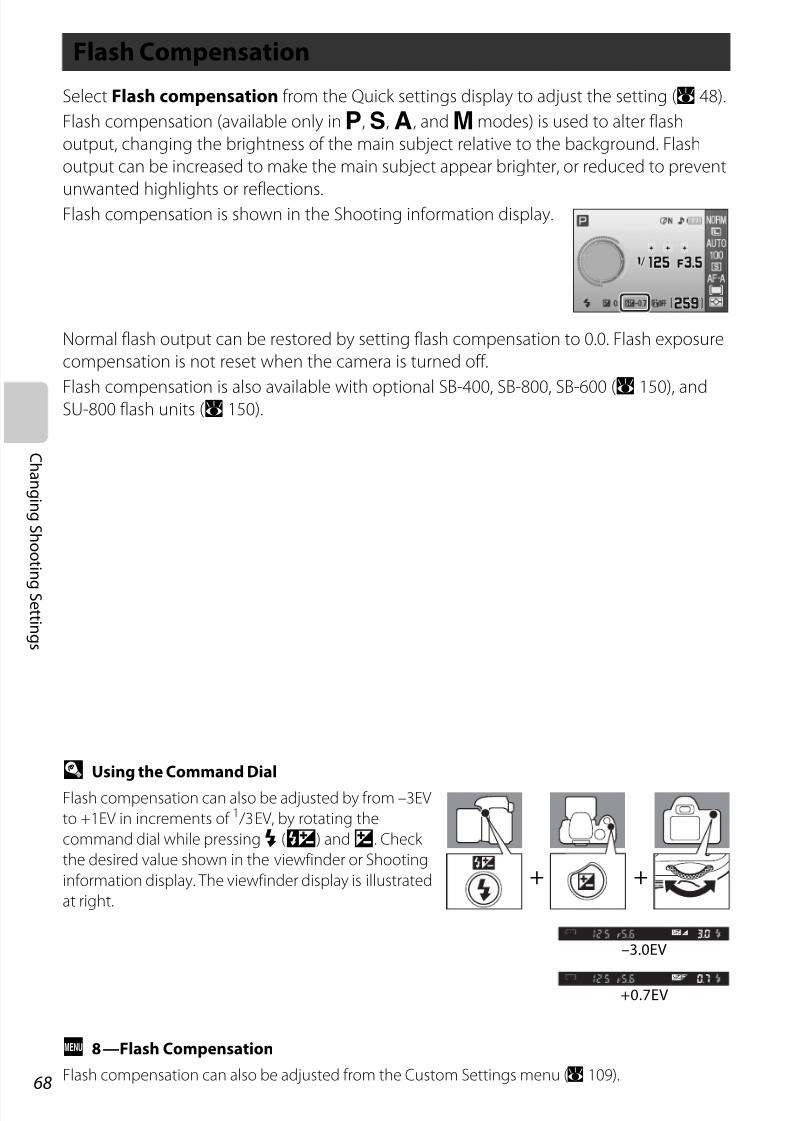
7/31/2019 Nikon D60 User Manual En
http://slidepdf.com/reader/full/nikon-d60-user-manual-en 80/20468
C h a n gi n g S h o o t i n
g S e t t i n g s
Flash Compensation
Select Flash compensation from the Quick settings display to adjust the setting (A 48).
Flash compensation (available only in a, b, c, and d modes) is used to alter flash
output, changing the brightness of the main subject relative to the background. Flash
output can be increased to make the main subject appear brighter, or reduced to prevent
unwanted highlights or reflections.Flash compensation is shown in the Shooting information display.
Normal flash output can be restored by setting flash compensation to 0.0. Flash exposure
compensation is not reset when the camera is turned off.
Flash compensation is also available with optional SB-400, SB-800, SB-600 (A 150), andSU-800 flash units (A 150).
D Using the Command Dial
Flash compensation can also be adjusted by from –3EV
to +1EV in increments of 1 /3EV, by rotating the
command dial while pressing D (E) and A. Check
the desired value shown in the viewfinder or Shooting
information display. The viewfinder display is illustrated
at right.
E 8—Flash Compensation
Flash compensation can also be adjusted from the Custom Settings menu (A 109).
–3.0EV
+0.7EV
+ +

7/31/2019 Nikon D60 User Manual En
http://slidepdf.com/reader/full/nikon-d60-user-manual-en 81/20469
C h a n gi n g S h o o t i n
g S e t t i n g s
Active D-Lighting
Select Active D-Lighting from the Quick settings display to adjust the setting (A 48).
When Active D-Lighting is enabled before shooting, the camera automatically applies
Active D-Lighting compensation, which preserves details in highlights and shadows,
creating photographs with natural contrast. Use for high contrast scenes, for example
when shooting brightly lit outdoor scenery through a door or window or shooting of shaded subjects on a sunny day.
C Active D-Lighting
• Additional time is required to record images when Active D-Lighting is on.
• When Active D-Lighting is enabled, the camera evaluates various aspects of the scene and applies
the appropriate processing. Exposure is first reduced with shooting, and then highlights, shadows,and mid-tones are adjusted, prior to recording, to achieve optimal brightness.
C Metering
When Active D-Lighting is used in a, b, c, or d mode, select Matrix (default setting) for
Metering (A 62).
C “Active D-Lighting” versus “D-Lighting”
The Active D-Lighting option in the shooting menu adjusts exposure before shooting to optimize
the dynamic range, while the D-Lighting option (A 132) in the retouch menu optimizes dynamicrange in images after shooting.
D Using the Command Dial
Active D-Lighting is enabled or disabled by rotating the command dial
while pressing C. Check the Active D-Lighting indicator shown in
the viewfinder or Shooting information display. The viewfinder display
is illustrated at right.
E Active D-Lighting
The Active D-Lighting option can also be set in the shooting menu
(A 100).
ONOFF
+
ON
OFF

7/31/2019 Nikon D60 User Manual En
http://slidepdf.com/reader/full/nikon-d60-user-manual-en 82/20470
C h a n gi n g S h o o t i n
g S e t t i n g s
Two-Button Reset
Flexible program and the camera settings that can be changed
from the Quick settings display can be restored to default
values by holding K and C down together for more than two
seconds (these buttons are marked by a green dot). The
monitor turns off briefly while settings are reset.
* Fine-tuning (A 104) reset to 0 and the fluorescent option to cool-white fluorescent.
D Default Settings
See the Appendix for a list of default settings (A 176).
Image quality (A 50) JPEG normal Metering (A 62) Matrix
Image size (A 50) Large Flash mode (A 64)
White balance (A 52)* Auto e, g, i, k Auto
ISO sensitivity (A 53) l Auto slow sync
e, f, g, h, i,
j, k, lAuto a, b, c, d Fill flash
a, b, c, d 100Exposurecompensation (A 67)
0.0
Release mode (A 54) Single frameFlash compensation(A 68)
0.0
Focus mode (A 57) AF-A Active D-Lighting(A 69)
Off
AF-area mode (A 58)Flexible program(A 41)
Off
e, f, g, h, i,
l, a, b, c, dClosest subject
j Dynamic area
k Single point
+

7/31/2019 Nikon D60 User Manual En
http://slidepdf.com/reader/full/nikon-d60-user-manual-en 83/20471
More on Playback This chapter explains photograph playback in the camera monitor, and protection of photographs from accidental deletion.
Photographs can be edited from the retouch menu (A 129) during playback and
recorded as separate files. The color tone of photographs can be modified, and
multiple photographs can also be combined to create and play back a movie file.

7/31/2019 Nikon D60 User Manual En
http://slidepdf.com/reader/full/nikon-d60-user-manual-en 84/20472
M or e o
nP l a y b a c k
Viewing Photographs in Full-Frame Playback
Full-Frame Playback To view photographs in the monitor, press P.
Photographs taken in “tall” (portrait) orientation are
displayed in tall orientation as shown at right.
The following operations can be performed in full-
frame playback.
C More Information
For more information about controlling whether photographs taken in “tall” orientation are rotated
for display in the monitor during playback, see Auto image rotation in the playback menu (A 128)
and Rotate tall in the setup menu (A 98).For more information about choosing whether to display photographs as they are taken, see
Custom Setting 07 (Image review;A 111).
For more information about choosing how long the monitor remains on before turning off
automatically to reduce the drain on the battery, see Custom Setting 15 (Auto off timer;A 114).
Option Use Description
View additionalphotographs
or
Press the multi selector to right or rotate thecommand dial right to view photographs inorder recorded. Press the multi selector left or
rotate the command dial left to viewphotographs in reverse order.
View photoinformation
Press the multi selector up or down to viewinformation about current photograph (A 73).
Zoom in onphotograph
K Zoom in on current photograph (A 77).
Delete photograph J Delete current photograph (A 34).
Protect photograph H (I) Protect current photograph (A 78).
View thumbnails M View multiple photographs (A 76).
Retouch photograph Q
Display the retouch menu (A 129).When a movie file created from the Stop-motion movie option (A 141) is displayed, themovie can be played back by pressing Q. Thesame operations available during stop-motionplayback (A 99) can be performed.
Exit to shootingmode
or P To return to shooting mode, press the shutter-release button halfway or press P.
View menus O View menus (A 94).

7/31/2019 Nikon D60 User Manual En
http://slidepdf.com/reader/full/nikon-d60-user-manual-en 85/20473
Viewing Photographs in Full-Frame Playback
M or e o
nP l a
y b a c k
Photo InformationPhoto information is superimposed on images displayed in full-frame playback. Press the
multi selector up or down to cycle through the following information.
File Information
Shooting Data, Page 1
1 Retouch indicator................................................129
2 Protect status ............................................................78
3 Frame number/total number of images
4 Folder name............................................................125
5 File name .....................................................................51
6 Image quality ............................................................50
7 Date of recording ...................................................21
8 Time of recording...................................................21
9 Image size ...................................................................50
1 Retouch indicator................................................129
2 Protect status ............................................................78
3 Camera name
4 Metering method...................................................62
5 Shutter speed................................................... 40–46
6 Aperture..............................................................40–467 Exposure mode.......................................................... 6
8 Exposure compensation....................................67
9 Focal length ...............................................................19
10 Flash mode...................................................113, 150
11 Frame number/total number of images
File Information Shooting Data Page 1 Shooting Data Page 2
Histogram Highlights Active D-Lighting
and Retouch History
1 2 3
7
4 6
8 5 9
1 2
3
5
79
4
6810
11

7/31/2019 Nikon D60 User Manual En
http://slidepdf.com/reader/full/nikon-d60-user-manual-en 86/20474
M or e o
nP l a y b a c k
Viewing Photographs in Full-Frame Playback
Shooting Data, Page 2
1. Displayed in red if ISO sensitivity was modified from selected value by the ISO auto option when On isselected for Custom Setting 10 (ISO auto;A 111).
2. Though comments can be up to 36 characters in length, only the first 15 characters are displayed.
Active D-Lighting and Retouch History
* “AUTO” will be displayed for photographs taken when Active D-Lighting is on.
1 Retouch indicator................................................129
2 Protect status ............................................................78
3 Image optimization............................................101
4 ISO sensitivity1 ..........................................................53
5
White balance................................................52, 103
white balance fine tuning..............................1046 Image size/image quality..................................50
7 Tone compensation...........................................102
8 Sharpening..............................................................102
9 Color mode/hue ..................................................102
10 Saturation.................................................................102
11 Image comment2 ................................................124
12 Frame number/total number of images
1 Retouch indicator................................................129
2 Protect status ............................................................78
3 Active D-Lighting* .................................................69
4Retouch history: Lists changes made to imageusing options in retouch menu (A 129),
starting with most recent change.
5 Frame number/total number of images
1 2
3
57
911
4
68
10
12
1 2
4
3
5

7/31/2019 Nikon D60 User Manual En
http://slidepdf.com/reader/full/nikon-d60-user-manual-en 87/20475
Viewing Photographs in Full-Frame Playback
M or e o
nP l a
y b a c k
Highlights
The brightest portions of the image (highlights) blink. Details may be lost (“washed out”) in
areas of highlights that are overexposed. Use highlights as a guide when setting exposure.
Histogram
A graph showing the distribution of tones in the image (histogram) is displayed*. Thehorizontal axis corresponds to pixel brightness, with dark pixels at the left and bright pixels
at the right. The vertical axis shows the number of pixels of each brightness in the image.
Some sample histograms are shown below:
• If the image contains objects with a wide range of
brightnesses, the distribution of tones will be
relatively even.
• If the image is dark, tone distribution will be shifted tothe left.
• If the image is bright, tone distribution will be shifted
to the right.
Increasing exposure compensation shifts tone distribution to the right. Tone distribution
shifts to the left when exposure compensation is decreased. If bright ambient lighting
makes it difficult to see the display in the monitor, the histogram can be used to get anidea of overall exposure.
* Note that camera histograms are intended as a guide only and may differ from those displayed inimaging applications.
1 Retouch indicator................................................129
2 Protect status ............................................................78
3 Highlights (indicated by flashing border)
4 Frame number/total number of images
1 Retouch indicator................................................129
2 Protect status ............................................................78
3 Frame number/total number of images
4 Histogram
Highlight
1 2 3
4
1 2
43

7/31/2019 Nikon D60 User Manual En
http://slidepdf.com/reader/full/nikon-d60-user-manual-en 88/20476
M or e o
nP l a y b a c k
Viewing Multiple Photographs: Thumbnail Playback
To display images in “contact sheets” of four or nine
images, press M in full-frame playback (A 72).
The following operations can be performed while thumbnails are displayed.
Option Use Description
Display more imagesper page
M Increase number of images displayed from one(full-frame playback) to four or from four to nine.
Display fewer imagesper page
K Decrease number of images displayed from nineto four or from four to one (full-frame playback).
View photo Q View highlighted photograph full frame.
Highlightphotographs
orUse the multi selector or the command dial tohighlight photographs.
Delete photograph J Delete highlighted photograph (A 34).
Protect photograph H (I) Protect highlighted photograph (A
78).
Exit to shootingmode
or P To return to shooting mode, press the shutter-release button halfway or press P.
View menus O View menus (A 94).

7/31/2019 Nikon D60 User Manual En
http://slidepdf.com/reader/full/nikon-d60-user-manual-en 89/20477
M or e o
nP l a
y b a c k
Taking a Closer Look: Playback Zoom
Press K to zoom in to maximum of approximately 25×
(large images), 19× (medium images) or 13× (small
images) on a photograph in full-frame playback
(A 72). The following operations can be performed.
Option Use Description
Zoom in K Press K to zoom in.
Navigation window isdisplayed for a fewseconds when zoomratio is altered; areacurrently visible inmonitor is indicated byyellow border. Press K,M, or the multiselector to displaynavigation window
again.
Zoom out M Press M to zoomout.
View other areas of image
While photo iszoomed in, press themulti selector up,down, left, or right toview areas of imagenot visible in monitor.Keep the multiselector pressed toscroll rapidly to otherareas of frame.
View other imagesRotate command dial to view same location inother images at current zoom ratio.
Cancel zoom Q Return to full-frame playback.
Delete photograph J Delete current photograph (A 34).
Protect photograph H (I) Protect current photograph (A 78).
Exit to shootingmode
or P To return to shooting mode, press the shutter-release button halfway or press P.
View menus O View menus (A 94).

7/31/2019 Nikon D60 User Manual En
http://slidepdf.com/reader/full/nikon-d60-user-manual-en 90/20478
M or e o
nP l a y b a c k
Protecting Photographs from Deletion
In full-frame, zoom, and thumbnail playback, H (I) can be used to protect
photographs from accidental deletion. Protected files cannot be deleted using J or the
Delete option in the playback menu.
Note that protected files will be deleted when the memory card is formatted (A 24).
1 Choose a photograph.
Display the desired photograph in full-frame, or use the multi selector to highlight it in the
thumbnail list.
2 Press H (I) to protect the photograph
currently displayed.
The photograph will be marked with a M icon.
To remove protection from the photograph so that it can
be deleted, press H (I) again.
D File Attribute
Protected files have DOS “read-only” status when viewed on a Windows computer.
I

7/31/2019 Nikon D60 User Manual En
http://slidepdf.com/reader/full/nikon-d60-user-manual-en 91/20479
Connecting to a Computer, Printer, or TV This chapter explains connection of the camera to external devices such as computers,printers, or televisions using the supplied USB cable and the optional video cable.
Photographs can be transferred to a computer for viewing, editing, and printing, or
displayed on a TV screen, expanding the ways in which photographs are enjoyed.
A 80
A 84 A 92

7/31/2019 Nikon D60 User Manual En
http://slidepdf.com/reader/full/nikon-d60-user-manual-en 92/20480
C onn e c t i n g t o a C om p u t er ,P r i n t er , or T V
Connecting to a Computer
When the camera is connected to a computer using the supplied USB cable, photographs
recorded with the camera can be copied (transferred) to the computer for storage using
the Nikon Transfer software.
Before Connecting the CameraInstalling the Software
Before connecting the camera to a computer, software, including Nikon Transfer and
ViewNX for viewing the transferred photographs, must be installed from the supplied
Software Suite CD.
For more information on installing the software, refer to the Quick Start Guide.
Operating Systems Compatible with D60Windows
Preinstalled versions of Windows Vista (32-bit Home Basic/Home Premium/Business/
Enterprise/Ultimate editions), Windows XP Service Pack 2 (Home Edition/Professional)
If your computer is running Windows 2000 Professional, use a card reader or similar device
to transfer pictures stored on the memory card to the computer (A 82).
Macintosh
Mac OS X (version 10.3.9, 10.4.10)
Refer to the Nikon website for the latest information on operating system compatibility.
B Notes on Power Source
When connecting the camera to a computer or printer, use batteries with adequate charge
remaining to prevent the camera from turning off unexpectedly. To power the camera continuously
for extended periods, use an optional AC Adapter EH-5a with Power Connector EP-5 (A 156).

7/31/2019 Nikon D60 User Manual En
http://slidepdf.com/reader/full/nikon-d60-user-manual-en 93/20481
Connecting to a Computer
C onn e c t i n g t o a C om p u t er ,P r i n t er , or T V
Connecting the USB Cable
1 Start the computer to which Nikon Transfer has been installed.
2 Turn the camera off.
3Connect the camera to the computer using the supplied USB cable.
4 Turn the camera on.
Windows VistaWhen the AutoPlay dialog is displayed, select Copy pictures to a
folder on my computer using Nikon Transfer. Nikon Transfer will
start. To bypass this dialog in the future, check Always do this for
this device:.
Windows XP
When the AutoPlay dialog is displayed, select Nikon Transfer Copy pictures to a folder on
my computer and click OK. Nikon Transfer will start. To bypass this dialog in the future, check
Always use this program for this action.
Mac OS X
Nikon Transfer will start automatically if Yes was selected in the Auto-Launch setting dialog
when Nikon Transfer was first installed.
5 Transfer photographs using Nikon Transfer.
For more information on using Nikon Transfer, refer to help information contained in Nikon
Transfer.
When transfer is complete, ViewNX will start automatically.
6 Turn the camera off and disconnect the USB cable when transfer is complete.
B Connecting the USB Cable
• Be sure that the connectors are oriented correctly, and do not use force, to connect the USB cable.
When disconnecting the USB cable, do not pull the connector at an angle.
• Connection may not be recognized when the camera is connected to a computer via a USB hub.
B During Transfer
Do not turn the camera off or disconnect the USB cable while transfer is in progress.
C Viewing Online Help
To view online help for Nikon Transfer or ViewNX, select Nikon Transfer help, or ViewNX help,
from the application’s Help menu.

7/31/2019 Nikon D60 User Manual En
http://slidepdf.com/reader/full/nikon-d60-user-manual-en 94/20482
C onn e c t i n g t o a C om p u t er ,P r i n t er , or T V
Connecting to a Computer
D Camera Control Pro 2
Camera Control Pro 2 (available separately;A 156) can be used to operate the camera from a
computer. When Camera Control Pro 2 is running, “PC” will appear in the viewfinder and Shooting
information display.
Nikon Message Center automatically checks for updates if an Internet connection is detected at
startup. Be sure to update to the latest version.
For Users of Windows 2000 Professional
Use a card reader or similar device to transfer the photographs stored on the memory
card to the computer. Refer to the Quick Start Guide for details.
If the memory card has a capacity greater than 2 GB, or is SDHC-compliant, the
intended device must support these features of the memory card.
• Do not connect the camera to the computer. If the camera is connected to the
computer, the Found New Hardware Wizard dialog will be displayed. Select
Cancel, close the dialog, turn the camera off, and disconnect the camera from thecomputer.

7/31/2019 Nikon D60 User Manual En
http://slidepdf.com/reader/full/nikon-d60-user-manual-en 95/20483
C onn e c t i n g t o a C om p u t er ,P r i n t er , or T V
Connecting to a Printer
Photographs can be printed by any of the following methods:
• Connect the camera to a printer and print JPEG photographs directly from the camera
(A 84).
• Insert the camera memory card in a printer equipped with a card slot (see the printer
manual for details). If the printer supports DPOF (A 186), photographs can be selectedfor printing using Print set (DPOF) (A 90).
• Take the camera memory card to a developer or digital printer center. If the center
supports DPOF (A 186), photographs can be selected for printing using Print set
(DPOF) (A 90).
• Transfer photographs (A 80) and print them from a computer. For more information
about how to print photographs from a computer, refer to the documentation provided
with your printer and the software.
B Printing NEF (RAW) PhotographsNEF (RAW) photographs (A 51) cannot be printed in the methods described above. Use JPEG-
format copies created from NEF (RAW) photographs using Quick retouch or NEF (RAW)
processing in the retouch menu (A 129), or transfer them to a computer and print them using
ViewNX (supplied) or Capture NX (available separately;A 156).

7/31/2019 Nikon D60 User Manual En
http://slidepdf.com/reader/full/nikon-d60-user-manual-en 96/20484
C onn e c t i n g t o a C om p u t er ,P r i n t er , or T V
Printing Via Direct USB Connection
JPEG photographs can be printed directly from a camera connected to a PictBridge printer
(A 186). When shooting photographs for printing via direct USB connection in a, b, c,
and d modes, choose Ia (sRGB) or IIIa (sRGB) for the Optimize image>Custom>
Color mode option (A 102) in the shooting menu.
B Printing NEF (RAW) Photographs
Direct printing of NEF (RAW) photographs (A 50) is not possible. Use JPEG-format copies created
from NEF (RAW) photographs using Quick retouch or NEF (RAW) processing in the retouch
menu (A 129) to print via direct USB connection.
B Notes on Power Source
When connecting the camera to a computer or printer, use batteries with adequate charge
remaining to prevent the camera from turning off unexpectedly. To power the camera continuously
for extended periods, use an optional AC Adapter EH-5a with Power Connector EP-5 (A 156).
Shoot
Connect camera to printer (A
85)
Disconnect USB cable
Select photographs for printingusing Print set (DPOF) (A 90)
Print multiplephotographs (A 88)
Print photographsone at a time (A 86)
Create index prints (A 89)

7/31/2019 Nikon D60 User Manual En
http://slidepdf.com/reader/full/nikon-d60-user-manual-en 97/20485
Printing Via Direct USB Connection
C onn e c t i n g t o a C om p u t er ,P r i n t er , or T V
Connecting the Printer
1 Turn the printer on.
2 Turn the camera off.
3 Connect the camera to the printer using the supplied USB cable.
4 Turn the camera on.
When connected correctly, the PictBridge startup screen 1 will be
displayed in the camera monitor. Then the PictBridge playback display
will be shown 2.
B Connecting the USB Cable
Be sure that the connectors are oriented correctly, and do not use force, to connect the USB cable.
When disconnecting the USB cable, do not pull the connector at an angle.
Setup1 2
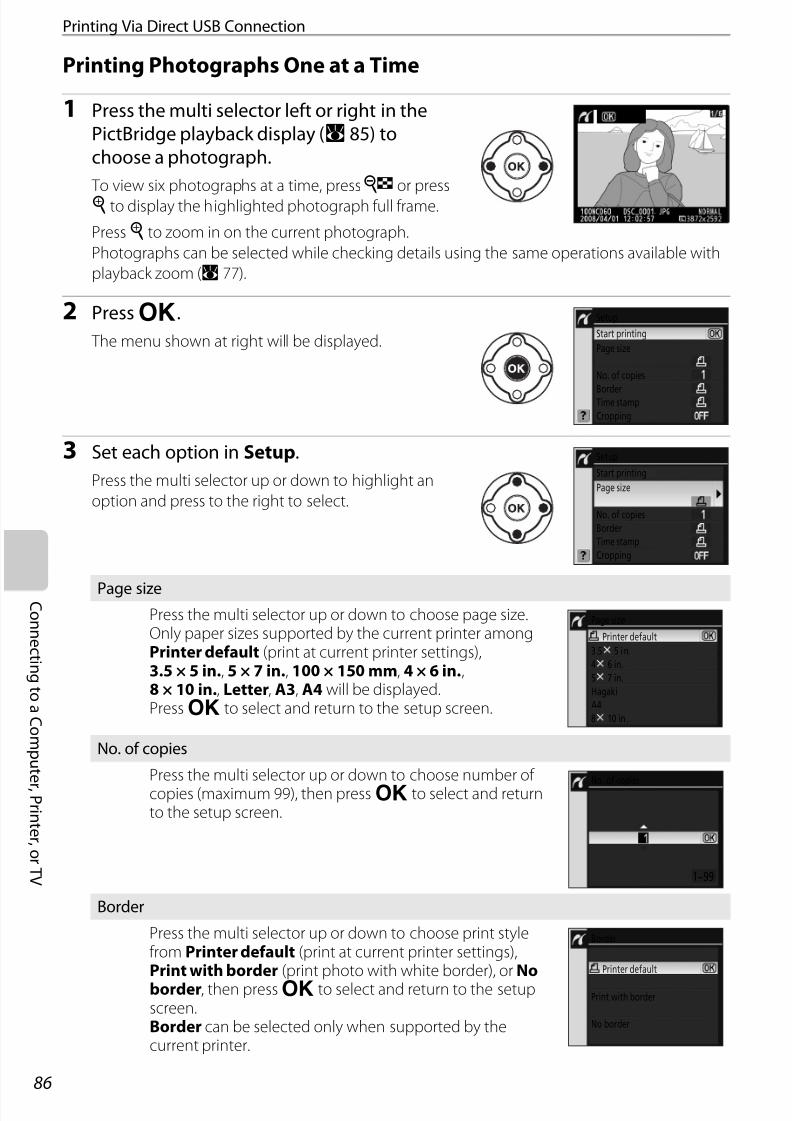
7/31/2019 Nikon D60 User Manual En
http://slidepdf.com/reader/full/nikon-d60-user-manual-en 98/20486
C onn e c t i n g t o a C om p u t er ,P r i n t er , or T V
Printing Via Direct USB Connection
Printing Photographs One at a Time
1 Press the multi selector left or right in the
PictBridge playback display (A 85) to
choose a photograph.
To view six photographs at a time, press M or press
K to display the highlighted photograph full frame.
Press K to zoom in on the current photograph.
Photographs can be selected while checking details using the same operations available with
playback zoom (A 77).
2 Press Q.
The menu shown at right will be displayed.
3 Set each option in Setup.
Press the multi selector up or down to highlight an
option and press to the right to select.
Page sizePress the multi selector up or down to choose page size.Only paper sizes supported by the current printer amongPrinter default (print at current printer settings),3.5 × 5 in., 5 × 7 in., 100 × 150 mm, 4 × 6 in.,8 × 10 in., Letter, A3, A4 will be displayed.Press Q to select and return to the setup screen.
No. of copies
Press the multi selector up or down to choose number of copies (maximum 99), then press Q to select and returnto the setup screen.
Border
Press the multi selector up or down to choose print stylefrom Printer default (print at current printer settings),Print with border (print photo with white border), or Noborder, then press Q to select and return to the setupscreen.Border can be selected only when supported by thecurrent printer.
Setup
Page size
No. of copies
BorderTime stamp
Cropping
Setup
Start printing
Page size
No. of copies
Border
Time stamp
Cropping
Setup
Start printing
3.5 5 in.
4 6 in.
5 7 in.
Hagaki
A4
8 10 in.
Page size
Printer default
1~99
No. of copies
Print with border
No border
Border
Printer default

7/31/2019 Nikon D60 User Manual En
http://slidepdf.com/reader/full/nikon-d60-user-manual-en 99/20487
Printing Via Direct USB Connection
C onn e c t i n g t o a C om p u t er ,P r i n t er , or T V
4 Highlight Start printing and press Q.
Printing can be canceled by pressing Q while printing is in
progress. The screen shown in step 1 will be displayed when printing
is complete.
B Cropping Photographs
Photographs printed at a size larger than they actually are will likely appear coarse or grainy.
B Printing Date
Note the following when printing photographs on which the date has been imprinted using
Custom Setting 18 (Date imprint;A 115).
• Select No time stamp for Setup>Time stamp. When Print time stamp is selected, the date willbe printed twice.
• When No border is selected for Border, or depending upon the Cropping setting, the date
printed may extend beyond the edge of the paper.
B Printing Error
If an error occurs during printing, the camera will display the dialog shown
at right. After checking the printer, press the multi selector up or down to
highlight Continue and press Q to resume printing. Select Cancel to
exit without printing the remaining pages. Printing cannot be resumed
with some errors.
C Printing at Printer Default
When specifying the Page size, Border, or Time stamp setting, choose Printer default to print at
current printer settings.
Time stamp
Press the multi selector up or down to choose Printerdefault (print at current printer settings), Print time stamp (print time and date of recording on photo), or No timestamp, then press Q to select and return to the setupscreen.
Cropping
To exit without cropping photograph, highlight Nocropping and press Q. To crop photograph, highlightCrop and press the multi selector right.
If Crop is selected, dialog shown at right will be displayed.
Press M to create larger crops or K to create smaller
crops. Use the multi selector up, down, left, or right to
choose position of crop. Press Q to return to the setup
screen.
Time stamp
Printer default
Print time stamp
No time stamp
Crop
No cropping
Cropping
Cropping
OK
Page size
No. of copiesBorder
Time stamp
Cropping
Setup
Start printing
PRINT ERROR
OUT OF PAPER.
Continue
Cancel

7/31/2019 Nikon D60 User Manual En
http://slidepdf.com/reader/full/nikon-d60-user-manual-en 100/20488
C onn e c t i n g t o a C om p u t er ,P r i n t er , or T V
Printing Via Direct USB Connection
Printing Multiple Photographs To print multiple photographs, press O in the PictBridge
playback display (A 85). The PictBridge menu shown at right will
be displayed.
Selecting Photographs for Printing
Choosing Print select and then pressing the multi selector right displays the menushown in step 1.
1 Scroll through photographs.
To display current photograph full screen, press and
hold K.
2 Select current photograph and set number
of prints (up to 99).
Selected photographs are marked withm and a
numeral indicating the number of copies to be
printed.
To deselect photograph, press the multi selector
down when the number of prints indicated is one.
3 Repeat steps 1–2 to select additional
photographs.
4 Display print options. Choose page size,
border, and time stamp options as
described in “Printing Photographs One at a
Time” (A 86). To start printing, highlightStart printing and press Q. PictBridge
menu will be displayed when printing is
complete.
To cancel printing while printing is in progress, pressQ.
Print select
Print selected photographs.Print (DPOF)
Print photographs for which a DPOF print order has been createdfrom the Print set (DPOF) option (A 90) in the playback menu.
Index print
Create index print of all JPEG photographs.
Pictbridge
Print select
Print (DPOF)
Index print
9 10 11
12 13 14
Print select
Zoom OKSet
9 10 11
12 13 14
01m
Print select
Zoom OKSet
9 10 11
12 13 14
01m02m
04m 02m
Print select
Zoom OKSet
Page size
BorderTime stamp
Setup
Start printing
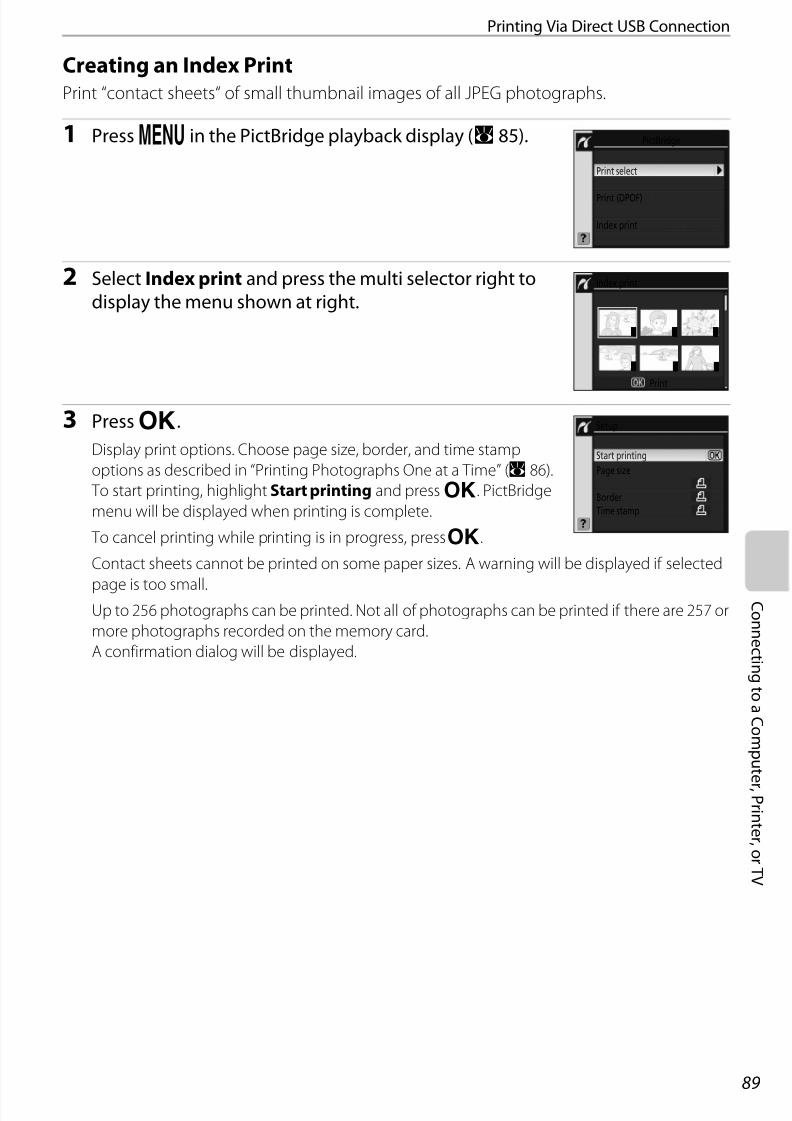
7/31/2019 Nikon D60 User Manual En
http://slidepdf.com/reader/full/nikon-d60-user-manual-en 101/20489
Printing Via Direct USB Connection
C onn e c t i n g t o a C om p u t er ,P r i n t er , or T V
Creating an Index PrintPrint “contact sheets“ of small thumbnail images of all JPEG photographs.
1 Press O in the PictBridge playback display (A 85).
2 Select Index print and press the multi selector right to
display the menu shown at right.
3 Press Q.
Display print options. Choose page size, border, and time stamp
options as described in “Printing Photographs One at a Time” (A 86).
To start printing, highlight Start printing and press Q. PictBridge
menu will be displayed when printing is complete.
To cancel printing while printing is in progress, pressQ.
Contact sheets cannot be printed on some paper sizes. A warning will be displayed if selected
page is too small.Up to 256 photographs can be printed. Not all of photographs can be printed if there are 257 or
more photographs recorded on the memory card.
A confirmation dialog will be displayed.
PictBridge
Print select
Print (DPOF)
Index print
1 2 3
64 5
Index print
Page size
Border
Time stamp
Setup
Start printing

7/31/2019 Nikon D60 User Manual En
http://slidepdf.com/reader/full/nikon-d60-user-manual-en 102/20490
C onn e c t i n g t o a C om p u t er ,P r i n t er , or T V
Creating a DPOF Print Order: Print Set
When printing from a memory card inserted in the printer’s card slot or directly from the
camera connected to a printer (A 84), or when having photographs printed by a
professional developer or digital print center, photographs can be printed as indicated in
the DPOF print order you have created for your photographs on the memory card. Note
that the printer and digital print center must support the DPOF standard.
1 Selecting Print set (DPOF) from the playback menu
(A 96).
See “Using Camera Menus” (A 94) for more information on using the
camera menus.
Highlight Select / set.
2 Display selection dialog.
3 Scroll through photographs.
To display current photograph full screen, press and
hold K.
4 Select current photograph and set number
of copies (up to 99).
Selected photographs are marked withm and a
numeral indicating the number of copies to be
printed. To deselect photograph, press the multi
selector down when the number of print indicated is
one.
5 Repeat steps 3-4 to select additional
photographs.
Once the number of copies has been specified for all
selected photographs, proceed to step 6.
C Printing NEF (RAW) Photographs
Direct printing of NEF (RAW) photographs (A 50) is not possible. Create a DPOF print order of JPEG-
format copies created from NEF (RAW) photographs using Quick retouch or NEF (RAW)
processing in the retouch menu (A 129).
Print set (DPOF)
Select / set
Deselect all?
Print set (DPOF)
Select / set
Zoom OKSet
9 10 11
12 13 14
Print set (DPOF)
Select / set
Zoom OKSet
9 10 11
12 13 14
Print set (DPOF)
Select / set
Zoom OKSet
9 10 11
12 13 14
01m
Print set (DPOF)
Select / set
Zoom OKSet
9 10 11
12 13 14
01m
02m 03m

7/31/2019 Nikon D60 User Manual En
http://slidepdf.com/reader/full/nikon-d60-user-manual-en 103/20491
Creating a DPOF Print Order: Print Set
C onn e c t i n g t o a C om p u t er ,P r i n t er , or T V
6 Display options. Highlight option and press
the multi selector right.
• Data imprint: Print shooting information (shutterspeed and aperture) on all photographs in printorder.
• Imprint date: Print date of recording on all
photographs in print order. To complete print order and exit, highlight Done and pressQ.
Canceling the Print Orders To remove all photographs from the print order, select Deselectall? in the print set (DPOF) screen shown in step 1 and pressQ. The dialog shown at right will be displayed and display will returnto the playback menu.
Printing the Current Print Order When the Camera is Connected to a PictBridgePrinter
1 Connect the camera to a printer (A 83). PressO in the
PictBridge playback display.
2 Select Print (DPOF) and press the multi selector right.
3 Follow the steps in “Selecting Photographs for Printing” to modify and print the
current order (A 88).
DPOF date and data imprint options are not supported when printing via direct USB
connection; to print the date of recording on photographs in the current print order, use
the PictBridge Time stamp option.
B Date Imprint
• When Custom Setting 18 (Date imprint;A 115) is enabled, the date and time can be imprintedon photographs printed from printers that do not normally support the printing of date and time.Only the Date imprint date and time will be printed, regardless of whether or not Print set
(DPOF) is enabled for printing the shooting date and photo information (except when printingwith direct connection of the camera to a printer).
• When printing photographs, on which date and time have been imprinted, with direct connectionof the camera to a PictBridge-compatible printer, select No time stamp for Time stamp (A 87).
B Print Set
• The Print set (DPOF) option cannot be used if there is not enough space on the memory card tostore the print order.
• Print orders may not print correctly if images are deleted using a computer after the print order iscreated.
Done
Date imprint
Imprint date
Print set (DPOF)
Print set (DPOF)
Deselect all?
Marking removed fromall images.
PictBridge
Print select
Print (DPOF)
Index print

7/31/2019 Nikon D60 User Manual En
http://slidepdf.com/reader/full/nikon-d60-user-manual-en 104/20492
C onn e c t i n g t o a C om p u t er ,P r i n t er , or T V
Viewing Photographs on TV
A Video Cable EG-D100 (available separately;A 156) can be used to connect the camera
to a television or VCR for playback or recording.
1 Turn the camera off. Always turn the camera off before
connecting or disconnecting the video cable.
2 Connect the camera to the TV using the video cable.
3 Tune the television to the video channel.
4 Turn the camera on.
Press P to begin playback. During playback, images will be
displayed on the television or recorded to video tape.
Use the same operations for playing images back in the camera
monitor to play them back on a television.
The camera monitor will remain off.
B Notes on Power Source
When connecting the camera to a computer or printer, use batteries with adequate charge
remaining to prevent the camera from turning off unexpectedly. To power the camera continuously
for extended periods, use an optional AC Adapter EH-5a with Power Connector EP-5 (A 156).
B Connecting the USB Cable
Be sure that the connectors are oriented correctly, and do not use force, to connect the USB cable.When disconnecting the USB cable, do not pull the connector at an angle.
B Video Mode
Be sure that the camera’s video mode setting conforms to the standard used by your television. The
video mode setting is an option set in the setup menu>Video mode (A 123).
Connect tovideo device
Connect to camera

7/31/2019 Nikon D60 User Manual En
http://slidepdf.com/reader/full/nikon-d60-user-manual-en 105/20493
Menu Guide This chapter explains the details and specification of five camera menus.
A Playback Options:The Playback Menu (A 96)
Delete (A 96)Playback folder (A 97)Rotate tall (A 98)Slide show (A 98)Print set (DPOF) (A 90)
Stop-motion movie (A 99)B Shooting Options:
The Shooting Menu (A 100)
Optimize image (A 101, 102)Image quality (A 50)Image size (A 50)White balance (A 52, 103, 104, 105)ISO sensitivity (A 53)Noise reduction (A 108)
Active D-Lighting (A 69)C Custom settings (A 109)
R Reset (A 110)01 Beep (A 110)02 Focus mode (A 57)03 AF-area mode (A 58)04 Release mode (A 54)05 Metering (A 62)06 No memory card? (A 110)
07 Image review (A 111)08 Flash compensation (A 68)09 AF-assist (A 111)10 ISO auto (A 111)11 F / G button (A 112)12 AE-L/AF-L (A 113)13 AE lock (A 113)14 Built-in flash/
optional flash unit (A 113)
15 Auto off timers (A
114)16 Self-timer (A 114)17 Remote on duration (A 115)18 Date imprint (A 115)19 Rangefinder (A 116)
D Basic Camera Settings:The Setup Menu (A 117)
CSM/setup menu (A 118)Format memory card (A 24)Info display format (A 120)Auto shooting info (A 122)Shooting info auto off (A 123)
World time (A 21)LCD brightness (A 123)Video mode (A 123)Language (A 123)Image comment (A 124)Folders (A 125)File no. sequence (A 126)Clean image sensor (A 126)Mirror lock-up (A 126)Firmware version (A 126)Dust off ref photo (A 127)Auto image rotation (A 128)
E Creating Retouched Copies:The Retouch Menu (A 129)
Quick retouch (A 132)D-Lighting (A 132)Red-eye correction (A 133) Trim (A 134)Monochrome (A 134)Filter effects (A 135)Small picture (A 136)Image overlay (A 138)NEF (RAW) processing (A 140)Stop-motion movie (A 141)Before and after (A 143)

7/31/2019 Nikon D60 User Manual En
http://slidepdf.com/reader/full/nikon-d60-user-manual-en 106/20494
M en u G ui d e
Using Camera Menus
To view the menus, press O.
The multi selector is used to navigate the camera menus. See the following page for basic
instructions on navigating camera menus.
A Playback A 96
Adjust playback settings and manage photographs.
B Shooting A 100
Adjust shooting settings.
C Custom Settings A 109Personalize camera settings.
D Setup A 117
Format memory cards and perform basic camera setup.
E Retouch A 129
Create retouched copies of existing photographs.
SETUP MENU
CSM/Setup menu
Format memory card
Info display format
Auto shooting info
Shooting info auto of f
World time
LCD brightness
If F icon is displayed, help for the currentitem can be viewed by pressing M
There are five major groups of menus.
Slider indicates that thecurrent menu contains twoor more pages
Current setting for each optionis shown by icon
A list of menu options for the iconhighlighted at far left is displayedMenu items that are displayed ingray are not currently available.
Display sub-menu
• Move cursor up• Increase value
Return to previous menu
• Move cursor down• Decrease value
Make selection

7/31/2019 Nikon D60 User Manual En
http://slidepdf.com/reader/full/nikon-d60-user-manual-en 107/20495
Using Camera Menus
M en u G ui d e
1 Display menus.
2 Highlight icon in yellow for current menu.
When a menu item is highlighted, the menu icon can
be selected by pressing O.
3 Select one of the five menus.
Choose fromA (playback),B (shooting),C (Custom Settings),D (Setup), orE (retouch)
menu.
4 Position cursor in selected menu.
5 Highlight menu item.
6 Display options for the selected item.
7 Highlight option and press Q to make
selection.
Setting completes and the monitor returns to step 5.Press the multi selector left to return to the previous
list of menu items without making selection.
Press the shutter-release button halfway to exit the
menus and return to shooting mode. The monitor will turn off.
SETUP MENU
CSM/Setup menu
Format memory card
Info display format
Auto shooting info
Shooting info auto off
World time
LCD brightness
SETUP MENU
CSM/Setup menu
Format memory card
Info display format
Auto shooting info
Shooting info auto off
World time
LCD brightness
SHOOTING MENU
Optimize image
Image qualityImage size
White balance
ISO sensitivity
Noise reduction
Active D–Lighting
SHOOTING MENU
Image quality
Image size
White balance
ISO sensitivity
Noise reductionActive D–Lighting
Optimize image
SHOOTING MENU
Optimize image
Image quality
White balance
ISO sensitivity
Noise reduction
Active D–Lighting
Image size
Large3872 × 2592; 10. 0 MP
Medium2896 × 1944; 5. 6 MP
Small1936 × 1296; 2. 5 MP
Image size
Image size
Large3872 × 2592; 10. 0 MP
Medium2896 × 1944; 5. 6 MP
Small1936 × 1296; 2. 5 MP

7/31/2019 Nikon D60 User Manual En
http://slidepdf.com/reader/full/nikon-d60-user-manual-en 108/20496
M en u G ui d e
Playback Options: The Playback Menu
The playback menu contains the following options.
See “Using Camera Menus” (A 94) for more information on using
the menus.
* Can be selected only when the memory card contains one or more movie files.
Only selected options for My menu (A 119) will be displayed if My menu is selected for
the CSM/Setup menu option (A 118) in the setup menu.
DeleteDelete selected photographs or all photographs. Photographs marked with the M icon
are protected (A 78) and cannot be deleted.
If the number of photographs to be deleted is very large, some time may be needed to
complete the operation.
Delete A 96
Delete all or selected photographs.
Playback folder A 97
Choose folder for playback.
Rotate tall A 98
Rotate “tall” (portrait-orientation) photographs during playback.
Slide show A 98
Play photographs back in automatic slide shows.
Print set (DPOF) A 90
Select photographs for printing and number of copies for each.
Stop-motion movie* A 99
View movie files created with the Stop-motion movie option (A 141) from the retouchmenu.
g Selected A 97
Delete selected photographs.
h All
Delete all photographs in the folder currently selected for playback.
PLAYBACK MENU
Delete
Playback folder
Rotate tall
Slide show
Print set (DPOF)
Stop-motion movie

7/31/2019 Nikon D60 User Manual En
http://slidepdf.com/reader/full/nikon-d60-user-manual-en 109/20497
Playback Options: The Playback Menu
M en u G ui d e
Selecting Multiple Photographs for Deletion
1 Highlight photograph.
Press and hold K to enlarge display of the selected
photograph.
2 Select highlighted photograph.
Selection shown byi icon.
To deselect photograph marked withi icon,
highlight and press the multi selector up or down.
Repeat steps 1-2 to select additional photographs.
3 Confirmation dialog for deleting selectedphotographs will be displayed. Highlight
Yes and press Q. To exit without
deleting the photographs, highlight No and
press Q.
Playback FolderSelect the folder from which images will be played back.
B Playback Folder
• When a new picture is taken, Current is automatically selected even if All was previously selected.
Select All again to play back photographs from all folders.
• To select the folder to which new photographs will be recorded, use the Folders option (A 125)
in the setup menu.
• If a different memory card is inserted after Current is selected, a message stating that the folder
contains no images will be displayed if P is pressed before any photographs have been taken
and recorded to the current memory card. Select All to begin playback.
Current (default setting)
Only photographs in the folder currently selected for Folders in the setup menu aredisplayed during playback.
All
Play back photographs in all folders on the memory card.
7 8 9
10 11 12
Delete
Selected
Zoom OKSet
7 8 9
10 11 12
J
J J
Delete
Selected
Zoom OKSet
Selected
No
Yes
Delete?3 images

7/31/2019 Nikon D60 User Manual En
http://slidepdf.com/reader/full/nikon-d60-user-manual-en 110/20498
M en u G ui d e
Playback Options: The Playback Menu
Rotate TallSelect On to rotate “tall” (portrait-orientation) photographs for display in the camera
monitor. Default setting is On. Photographs taken with Off selected for Auto image
rotation (A 128) in the setup menu will be displayed in “wide” (landscape) orientation.
Slide ShowCreate a slide show of the photographs in the current playback
folder.
The following operations can be performed during a slide show.
The dialog shown at right is displayed when the show ends or
when Q is pressed to pause playback. Select Restart and press
Q to restart the show or Exit and press Q to return to theplayback menu.
Start
Start slide show.
Frame interval
Choose how long each photograph will be displayed.
Option Use Description
Skip back/skip aheadPress the multi selector left to return to previous frame, rightto skip to next frame.
View photoinformation
Display and change photo information (A 73).
Pause slide show Q Pause slide show.
Return to playback menu
O End slide show and return to playback menu.
Return to playback mode
P End slide show and return to full-frame (A 72) or thumbnailplayback (A 76).
Return to shootingmode
Press the shutter-release button halfway or K to return toshooting mode.
Slide show
Start
Frame interval
Pause after restart
or
K
Restart
Frame interval
Exit
1 / 6

7/31/2019 Nikon D60 User Manual En
http://slidepdf.com/reader/full/nikon-d60-user-manual-en 111/20499
Playback Options: The Playback Menu
M en u G ui d e
Stop-Motion Movie
View movie files created with the Stop-motion movie option
(A 141) from the retouch menu. A thumbnail list of existing stop-
motion movies only is displayed in the monitor. Press the multi
selector left or right to choose a file and pressQ to play back.
Press the multi selector left or right during playback to choose a
control at the bottom of the monitor, then pressQ to perform
the selected operation. The following operations are available.
* If no operations are performed for three minutes while movie is paused,playback ends and the monitor returns to the screen displayed just beforeplayback starts.
C Stop-Motion Movies
The Stop-motion movie option cannot be selected when the memory card contains no stop-
motion movie files.
Option Use Description
RewindRewind movie. Playback resumes whenQ is released.
AdvanceAdvance movie. Playback resumes whenQ
is released.
Pause
Pause playback*. While paused, use the multiselector to advance or rewind the stop-motion movie. The following operations canbe performed while playback is paused.
Rewind movie by one frame. Rewindcontinues whileQ is pressed.
Advance movie by one frame. Advancecontinues whileQ is pressed.
Resume playback.
End
End playback and return to a thumbnail list of stop-motion movies. Return to full-frameplayback when stop-motion movie wasplayed from full-frame playback mode.
13 46
PlayZoom
Stop–motion movie
Pausing
During playback

7/31/2019 Nikon D60 User Manual En
http://slidepdf.com/reader/full/nikon-d60-user-manual-en 112/204100
M en u G ui d e
Shooting Options: The Shooting Menu
The shooting menu contains the following options.
See “Using Camera Menus” (A 94) for more information on using
the menus.
* Available in a, b, c, and d modes only.
Only selected options for My menu (A 119) will be displayed if My menu is selected for
the CSM/Setup menu option (A 118) in the setup menu.
Optimize image* A 101, 102
Optimize images according to scene.
Image quality A 50
Choose image quality and file format.
Image size A 50
Choose image size.
White balance* A 52, 103, 104, 105
Adjust colors according to the light source. Fine tune white balance or choose a specifictype of fluorescent lighting from the shooting menu.
ISO sensitivity A 53
Raise sensitivity when lighting is poor.
Noise reduction A 108
Reduce noise at high ISO sensitivities and slow shutter speeds.
Active D-Lighting A 69
Preserve details in highlights and shadows, creating photographs with natural contrast.
SHOOTING MENU
Optimize image
Image quality
Image size
White balance
ISO sensitivity
Noise reduction
Active D–Lighting

7/31/2019 Nikon D60 User Manual En
http://slidepdf.com/reader/full/nikon-d60-user-manual-en 113/204101
Shooting Options: The Shooting Menu
M en u G ui d e
Optimize ImageOptimize contrast, sharpening, and other settings according to how photographs will be
used or the type of scene.
C Optimize Image
• Use a type G or D lens for best results. Results are optimized for current shooting conditions and
vary with exposure and the position of the subject in the frame.
• For consistent results over a series of photographs, select Custom and choose a setting other than
Auto for image sharpening, tone compensation, and saturation.
• Settings other than Custom use the sRGB color space.
A Normal (default setting)
Recommended for most situations.
B Softer
Softens outlines, producing natural results suitable for portraits or retouching on acomputer.
C Vivid
Enhances saturation, contrast, and sharpness to produce vivid images with vibrant reds,greens, and blues.
D More vivid
Maximizes saturation, contrast, and sharpness to produce crisp images with sharp
outlines.E Portrait
Lowers contrast while lending natural texture and rounded feel to skin of portraitsubjects.
F Black-and-white
Shoot in black-and-white.
G Custom
Customize image optimization settings (A 102).

7/31/2019 Nikon D60 User Manual En
http://slidepdf.com/reader/full/nikon-d60-user-manual-en 114/204102
M en u G ui d e
Shooting Options: The Shooting Menu
Customizing Image Enhancement Options: CustomSelect Custom to make separate adjustments to the following
options. After adjusting settings, highlight Done and press Q.
Image sharpening
Choose how much outlines are sharpened during shooting from Auto, Normal, Low,Medium low, Medium high, High, or None. Choose high settings for sharp outlines, lowsettings for softer outlines. Default setting is Auto.
Tone compensation
Choose the level of contrast control from Auto, Normal, Less contrast, Medium low,Medium high, More contrast, or Custom. Lower settings prevent loss of detail in
highlights under harsh lighting or in direct sunlight. Higher settings preserve detail in mistylandscapes and other low-contrast subjects. Default setting is Auto. Choose Custom toselect a user-defined tone curve created using Camera Control Pro 2 (available separately;A 156). See the documentation provided with Camera Control Pro 2 for details.
Color mode
Specify the way in which colors are reproduced from the following.Ia (sRGB)
Photographs taken in this mode are adapted to the sRGB color space and are suited toprinting or use “as is”, with no further modification. Choose this option for portrait.
II (Adobe RGB)
Photographs taken in this mode are adapted to Adobe RGB color space, which supports awider gamut of colors than sRGB. This option is the preferred choice for photographs thatwill be extensively processed or retouched.
IIIa (sRGB) (default setting)Photographs taken in this mode are adapted to the sRGB color space and are suited toprinting or use ”as is”, with no further modification. Choose this option for nature andlandscape shots.
Saturation
Choose the level of saturation (color intensity) from Auto, Normal, Moderate, orEnhanced. Choose Moderate for less saturated colors, Enhanced for more vivid colors.Default setting is Auto.
Hue adjustment
Hue can be adjusted between –9° to +9° in increments of 3° (the degrees refer to the “colorwheel” often used to express hue). Positive values make reds more orange, greens moreblue, and blues more purple. Negative values make reds more purple, blues more green, andgreens more yellow. Default setting is ±0.
Optimize image
Custom
Done
Image sharpening
Tone compensation
Color mode
Saturation
Hue adjustment

7/31/2019 Nikon D60 User Manual En
http://slidepdf.com/reader/full/nikon-d60-user-manual-en 115/204103
Shooting Options: The Shooting Menu
M en u G ui d e
C Color Mode
• Modes Ia and IIIa are recommended for photos that will be printed without modification or viewed
in applications that do not support color management.
• If the application supports color management, choose the Adobe RGB color space when opening
photos taken in mode II. See the documentation provided with the application for details.
DColor Space
The color space determines the gamut of colors available for color reproduction. sRGB is for general
use, while Adobe RGB is used in publishing and commercial printing.
D Hue Adjustment
Color consists of three elements, saturation, hue, and brightness. The Hue adjustment option is for
adjusting one of these elements, hue. As color wheels are often used to express hue, with the
degree of rotation of the color wheel indicating the level of hue adjustment, angular degrees are the
units used.
White Balance
Change the white balance setting (A 52). In addition to the
options available from the Quick settings display detailed in “White
Balance“, a specific type of fluorescent lighting can be specified.
White balance can also be fine tuned (A 104). If fine tuning is not
necessary, set the fine tuning value to 0 and press Q.
Specifying Fluorescent LightingSelect Fluorescent to specify a specific fluorescent lighting from the following options.
l Sodium-vapor lamps
For shooting under sodium-vapor lamps, such as those used in stadiums or gymnasiums.
m Warm-white fl.
For shooting under warm-white fluorescent lighting.
n White fluorescent
For shooting under white fluorescent lighting.
o Cool-white fluorescent
For shooting under cool-white fluorescent lighting.
p Day white fluorescent
For shooting under daylight white fluorescent.
q Daylight fluorescent
For shooting under daylight fluorescent.
r Mercury-vapor lamps
For shooting under mercury-vapor lamps.
White balance
Auto
Incandescent
Fluorescent
Direct sunlight
Flash
Cloudy
Shade

7/31/2019 Nikon D60 User Manual En
http://slidepdf.com/reader/full/nikon-d60-user-manual-en 116/204104
M en u G ui d e
Shooting Options: The Shooting Menu
C Color Temperature
The perceived color of a light source varies with the viewer and other conditions. Color temperatureis an objective measure of the color of a light source, defined with reference to the temperature towhich an object would have to be heated to radiate light in the same wavelengths. While lightsources with a color temperature in the neighborhood of 5,000– 5,500K appear white, light sourceswith a lower color temperature, such as incandescent light bulbs, appear slightly yellow or red. Light
sources with a higher color temperature appear tinged with blue.Approximate color temperatures for each white balance setting are given below (when fine tunedwhite balance setting is ±0). Values may differ from color temperatures given by photo color meters.
Fine-Tuning White BalanceUnless Preset manual is selected, white balance can be “fine tuned” to compensate forvariations in the color of the light source or to introduce a deliberate color cast into animage.
1 Select a white balance option except Presetmanual.
Select White balance in the shooting menu, thenhighlight a white balance option and press the multiselector right. If Fluorescent is selected, highlight alighting type and press the multi selector right.
2 Fine tune white balance.
Use the multi selector to finetune white balance. White
balance can be fine tuned on the amber (A)–blue (B) axisand the green (G)–magenta (M) axis. The horizontal(amberblue) axis corresponds to color temperature, witheach increment equivalent to about 5 mired. The vertical(greenmagenta) axis has the similar effects to thecorresponding color compensation (CC) filters.
White balanceColor
temperatureWhite balance
Colortemperature
K Auto 3,500 K~8,000 K q Daylight fluorescent 6,500 K
f Incandescent 3,000 K r Mercury-vapor lamps 7,200 K
l Sodium-vapor lamps 2,700 K h Direct sunlight 5,200 K
m Warm-white fl. 3,000 K J Flash 5,400 K
n White fluorescent 3,700 K i Cloudy 6,000 K
o Cool-white fluorescent 4,200 K j Shade 8,000 K
p Day white fluorescent 5,000 K
White balance
Auto
Incandescent
Fluorescent
Direct sunlight
Flash
Cloudy
Shade
White balance
Incandescent
OKAdjust
Adjustment
Coordinates
Blue (B) Amber (A)
Magenta (M)
Green (G)Increase green
Increase magenta
Increase blue Increase amber

7/31/2019 Nikon D60 User Manual En
http://slidepdf.com/reader/full/nikon-d60-user-manual-en 117/204105
Shooting Options: The Shooting Menu
M en u G ui d e
3 Press Q.
Press Q to select and return to the shooting menu.
At settings other than ±0, “s“ will appear next to the white balance icon in the Shooting
information display.
B White Balance Fine Tuning
The colors on the fine-tuning axes are relative, not absolute. For example, moving the cursor to B
(blue) when a “warm” setting such asf (incandescent) is selected for white balance will make
photographs slightly “colder” but will not actually make them blue.
C “Mired”
Any given change in color temperature produces a greater difference in color at low color
temperatures than it would at higher color temperatures. For example, a change of 1,000 K produces
a much greater change in color at 3,000 K than at 6,000 K. Mired, calculated by multiplying the
inverse of the color temperature by 106, is a measure of color temperature that takes such variation
into account, and as such is the unit used in color-temperature compensation filters. E.g.:• 4,000 K–3,000 K (a difference of 1,000 K)=83 mired
• 7,000 K–6,000 K (a difference of 1,000 K)=24 mired
Preset ManualPreset manual can be used when the desired results cannot be achieved at other settings
or to match white balance manually to the value used in an existing photograph. Two
methods are available for setting preset white balance.
Measuring a Value for Preset White BalanceNote that only one photograph can be selected at a time as the white balance source for
preset manual.
Be aware that each time new preset white balance data is measured by the camera,
existing preset data is overwritten.
1 Place a neutral gray or white object under the lighting that will be used in the
final photograph. A standard gray card can be used as a reference in studio
settings.
2 Display the shooting menu and select White balance>Preset manual, and then press the multi selector right.
Measure
Neutral gray or white object is placed under lighting that will be used in final photographand white balance is measured directly by camera.
Use photo
White balance is copied from existing photograph on memory card.
White balancePreset manual
Measure
Use photo

7/31/2019 Nikon D60 User Manual En
http://slidepdf.com/reader/full/nikon-d60-user-manual-en 118/204106
M en u G ui d e
Shooting Options: The Shooting Menu
3 Highlight Measure and press the multi selector right.
The screen shown at right will be displayed; highlight Yes and press
Q.
4 The message, Take photo of white or gray object
filling viewfinder under lighting for shooting. will
be displayed.
When the message clears from the display, the viewfinder and
shooting information white balance displays will flash as shown at
right.
5 Frame the reference object so that it fills the viewfinder
and press the shutter-release button all the way down.
White balance can be measured even when the camera is not in focus.
6 If the camera was able to measure a value for white
balance, the message Data acquired. will be
displayed.
White balance will automatically be set to the measured value.
If the warning shown at right is displayed, the camera was unable
to measure white balance. Return to step 2 and measure white
balance again.
B Measuring Value
• Note that if a new value is measured for white balance, white balance will be set to the measured
value even if Use photo is currently selected.
• Use a standard “gray card“, or other reflectivity card intended for white balance measurement, with
18% reflectivity (available separately) to measure a precise white balance value.
• Do not alter exposure from the value selected by the camera; when shooting in mode d, use the
electronic analog exposure display to select optimum exposure.
C Other Ways to Measure a Value
The following methods can also be used to measure a value for preset white balance.
• To proceed directly to step 4 without displaying the shooting menu, select Preset manual for
white balance in the Quick settings display (A 52) and press Q for a few seconds.
• If White balance is selected for Custom Setting 11 (F / G button;A 112), pressing G for a few
seconds when preset manual is in effect will display the indicators shown in step 4.
Measure
Overwrite existingpreset data?
Yes
No
Data acquired.
Set
Unable to measurepreset white balance.Please try again.

7/31/2019 Nikon D60 User Manual En
http://slidepdf.com/reader/full/nikon-d60-user-manual-en 119/204107
Shooting Options: The Shooting Menu
M en u G ui d e
Copying White Balance from a Photograph
A white balance value copied from an existing photograph can be used for preset manual.
Note that only one photograph can be selected at a time as a source for preset manual.
Each time new preset data is acquired with Use photo, the existing preset data will be
overwritten.
1 Select White balance>Preset manual in the shooting menuand press the multi selector right.
2 Highlight Use photo and press the multi selector right.
To use the current source photograph as preset data, highlight This
image and press the multi selector right. The setting will be applied. To choose a new photograph, highlight Select image and press the
multi selector right. Proceed to step 3.
3 Press the multi selector up or down to highlight the
folder containing the desired source photograph.
4 Press the multi selector right.
Images in the selected folder will be displayed.
5 Press the multi selector left or right to highlightphotograph.
Press and hold K to enlarge display of the selected photograph.
Press Q to apply the setting. The display will return to shooting
menu.
B Source for Preset Manual
Images displayed may include those created with other cameras, but only photographs created
with D60 can be used as source for preset manual.
White balance
Preset manual
Measure
Use photo
White balance
Use photo
This image
Select image
White balance
Select image
7 8 9
10 11 12
White balance
Select image
Zoom OK
7 8 9
10 11 12
White balance
Select image
Zoom OK

7/31/2019 Nikon D60 User Manual En
http://slidepdf.com/reader/full/nikon-d60-user-manual-en 120/204108
M en u G ui d e
Shooting Options: The Shooting Menu
Noise ReductionPhotographs taken at high sensitivities or at shutter speeds of eight soconds or slower can
be processed to reduce “noise” in the form of mottling or randomly-spaced, brightly-
colored pixels. Choose from the following options.
Off (default setting)
Noise reduction turns off at ISO sensitivities of 800 or less. Minimal noise reduction isstill performed at ISO sensitivities over 800.
On
Photographs taken at ISO sensitivities over ISO 400 or at shutter speeds of about eightseconds or slower are processed to reduce noise. In continuous release mode, framerates will slow and the capacity of the memory buffer will drop. (At shutter speeds of eight seconds or slower, job nr will blink at the bottom of the viewfinder for aperiod of time approximately equal to the current shutter speed. New photographscan be taken when job nr is no longer displayed. Noise reduction will not beperformed if the camera is turned off while job nr is blinking in the viewfinderbefore processing is complete.)

7/31/2019 Nikon D60 User Manual En
http://slidepdf.com/reader/full/nikon-d60-user-manual-en 121/204109
M en u G ui d e
Custom Settings
The Custom Setting menu contains the following options.
See “Using Camera Menus” (A 94) for more information on using
the menus.
To display the following options, select Full for CSM/Setup menu (A 118) in the setup
menu.
R Reset A 110
Restore all Custom Settings to default values.
01 Beep A 110
Turn on or off the beep that sounds when the camera focuses or when the self- timer orremote control is used.
02 Focus mode A 57
Choose the focus mode.
03 AF-area mode A 58
Choose how the camera selects the focus point.
04 Release mode A 54
Choose the manner in which the shutter is released.
05 Metering1 A 62
Choose how the camera sets exposure.
06 No memory card? A 110
Enable or disable the shutter-release button when no memory card is inserted in thecamera.
07 Image review A 111
Choose whether photographs are displayed immediately after they are taken.
08 Flash compensation1 A 68
Adjust flash level.
09 AF-assist2 A 111
Enable or disable the AF-assist illuminator.
10 ISO auto1 A 111
Choose the maximum ISO value used for auto sensitivity control.
11 F /G button A 112
Choose the function assigned to F / G.
12 AE-L/AF-L A 113
Choose the function performed by H.
13 AE lock A 113
Choose if exposure locks when the shutter-release button is pressed halfway.
14 Built-in flash/Optional flash unit1 A 113
Choose a flash control option for the built-in flash or optional SB-400 Speedlight.
CUSTOM SETTING MENU
Reset
Beep
Focus mode
AF–area mode
Release mode
Metering
No memory card?

7/31/2019 Nikon D60 User Manual En
http://slidepdf.com/reader/full/nikon-d60-user-manual-en 122/204

7/31/2019 Nikon D60 User Manual En
http://slidepdf.com/reader/full/nikon-d60-user-manual-en 123/204111
Custom Settings
M en u G ui d e
07 Image ReviewIf On (default setting) is selected, photographs will automatically be displayed in the
monitor after shooting. The length of time photographs are displayed depends on the
option selected for Custom Setting 15 (Auto off timers;A 114). If Off is selected,
photographs can be displayed in the monitor by pressingP.
09 AF-assistIf On (default setting) is selected and the subject is poorly lit, the AF-assist illuminator will
light when required to assist the focus operation (A 57). Choose Off to disable the AF-
assist illuminator. Note that when the illuminator is off, the camera may not be able to
focus on poorly-lit subjects using autofocus.
10 ISO Auto
Choose whether the camera automatically adjusts ISO sensitivity
when optimal exposure cannot be achieved at ISO sensitivity
selected by the user. ISO auto can be used with the flash. Available
ina,b,c, anddmodes.
Off (default setting)
ISO sensitivity will remain fixed at the value selected by the user (A 53).
On
ISO sensitivity will automatically be adjusted if optimal exposure cannot be achieved atthe selected value (flash level is adjusted appropriately).
Max. sensitivity
Photographs taken at higher ISO sensitivities often appear “grainy“.Choose the maximum ISO sensitivity to prevent ISO auto from increasing the ISO
sensitivity setting too much. ISO auto will not raise ISO sensitivity above the selectedvalue.
Min. shutter speed
Choose the shutter speed at which ISO auto takes effect in modesa andc. In modesa andc, sensitivity will only be adjusted if underexposure would result at the shutterspeed selected for this option (slower shutter speeds may be used if optimal exposurecannot be achieved at the value selected for maximum sensitivity).
(Displayed When Full Is Selected; 118)
(Displayed When Full Is Selected; 118)
(Displayed When Full Is Selected; 118)
Off
On
Max. sensitivity
Min. shutter speed
ISO auto
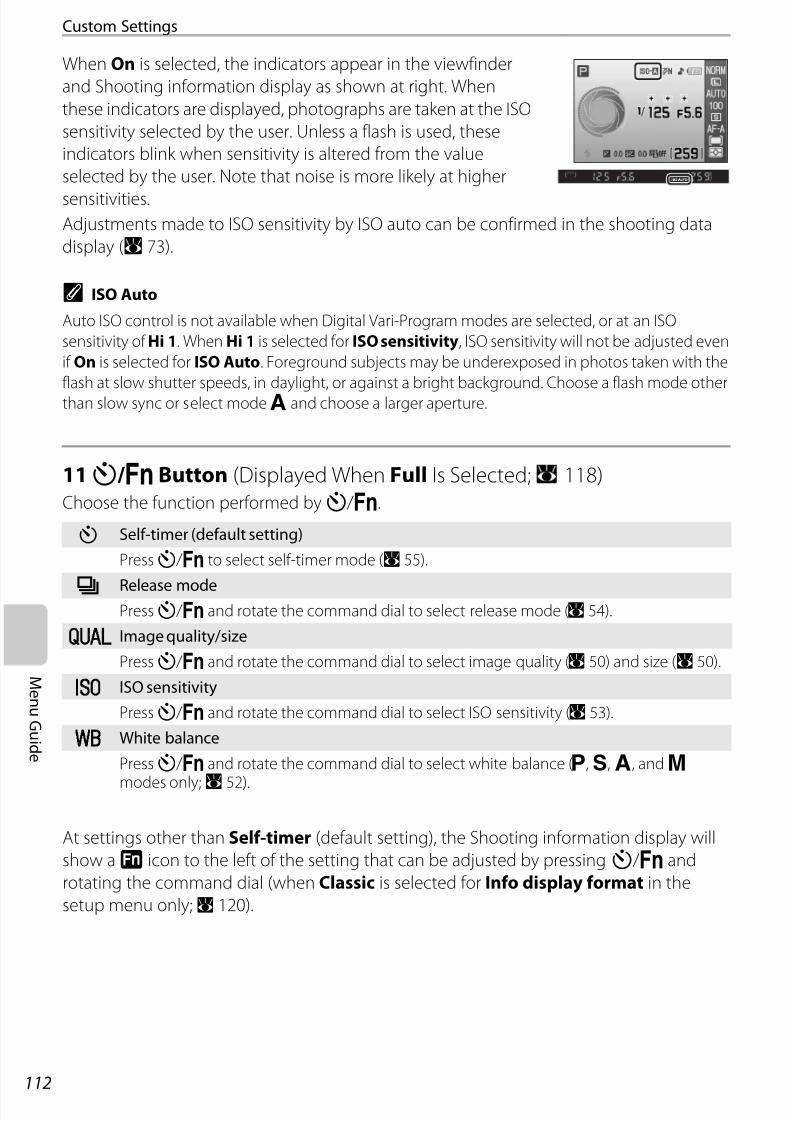
7/31/2019 Nikon D60 User Manual En
http://slidepdf.com/reader/full/nikon-d60-user-manual-en 124/204112
M en u G ui d e
Custom Settings
When On is selected, the indicators appear in the viewfinder
and Shooting information display as shown at right. When
these indicators are displayed, photographs are taken at the ISO
sensitivity selected by the user. Unless a flash is used, these
indicators blink when sensitivity is altered from the value
selected by the user. Note that noise is more likely at higher
sensitivities.Adjustments made to ISO sensitivity by ISO auto can be confirmed in the shooting data
display (A 73).
C ISO Auto
Auto ISO control is not available when Digital Vari-Program modes are selected, or at an ISO
sensitivity of Hi 1. When Hi 1 is selected for ISO sensitivity, ISO sensitivity will not be adjusted even
if On is selected for ISO Auto. Foreground subjects may be underexposed in photos taken with the
flash at slow shutter speeds, in daylight, or against a bright background. Choose a flash mode other
than slow sync or select modec and choose a larger aperture.
11F/G ButtonChoose the function performed byF / G.
At settings other than Self-timer (default setting), the Shooting information display will
show am icon to the left of the setting that can be adjusted by pressingF / G and
rotating the command dial (when Classic is selected for Info display format in the
setup menu only;A 120).
F Self-timer (default setting)
PressF / G to select self-timer mode (A 55).
b Release modePressF / G and rotate the command dial to select release mode (A 54).
j Image quality/size
PressF / G and rotate the command dial to select image quality (A 50) and size (A 50).
k ISO sensitivity
PressF / G and rotate the command dial to select ISO sensitivity (A 53).
l White balance
PressF / G and rotate the command dial to select white balance (a,b,c, andd
modes only;A 52).
(Displayed When Full Is Selected; 118)

7/31/2019 Nikon D60 User Manual En
http://slidepdf.com/reader/full/nikon-d60-user-manual-en 125/204113
Custom Settings
M en u G ui d e
12 AE-L/AF-LChoose the function performed byH.
13 AE Lock If Off (default setting) is selected, pressing the shutter-release button halfway does not
lock exposure (A 63). If On is selected, exposure will lock when the shutter-release button
is pressed halfway.
14 Built-in Flash/Optional Flash Unit
(Displayed When Full Is Selected;A 118)Choose a flash control mode for the built-in flash or the optional SB-400 Speedlight.
Available ina,b,c, anddmodes.
When an optional SB-400 Speedlight is attached, Custom Setting 14 is used to choose the
flash control mode for the SB-400 and the name changes to Optional flash unit.
AE icon flashes in the viewfinder and Shooting information
display when Manual is selected.
K AE/AF lock (default setting)
Both focus and exposure lock whileH is pressed (A 60, 63).
L AE lock only
Exposure locks whileH is pressed. Focus is unaffected (A 63).M AF lock only
Focus locks whileH is pressed. Exposure is unaffected (A 60).
N AE lock hold
Exposure locks whenH is pressed and remains locked until the button is pressed againor the exposure meters turn off (A 63).
O AF-ON
H initiates autofocus. The shutter-release button cannot be used to focus (A 60).
R TTL (default setting)
Flash output is adjusted automatically in response to shooting conditions.
S Manual
The flash fires at the level selected in the menu shown at right. Atfull power, the built-in flash has a Guide Number of 13/43 (ISO100, m/ft., 20°C/68°F).
(Displayed When Full Is Selected; 118)
(Displayed When Full Is Selected; 118)
Built–in flash
Manual
Full power

7/31/2019 Nikon D60 User Manual En
http://slidepdf.com/reader/full/nikon-d60-user-manual-en 126/204114
M en u G ui d e
Custom Settings
15 Auto off TimersIf no operations are performed for the selected length of time, the monitor and the
viewfinder will turn off to reduce the drain on the battery. Choose the time allowed to
elapse before the monitor and exposure meters turn off.
The monitor and exposure meters turn off automatically in conjunction with auto meter-
off.
When On (default setting) is selected for Custom Setting 07 (Image review;A 111), the
monitor and exposure meters will turn off in conjunction with the time specified for Auto
off timers>Custom>Image review. When a remote control is used (A 55), the monitor
and exposure meters remain on for the length of time selected for Custom Setting 17(Remote on duration;A 115).
C Auto Off
• The longer the monitor and exposure meters remain on, the sooner the battery will be exhausted.
• Regardless of the setting chosen, the exposure meters do not turn off automatically when the
camera is powered by an optional AC Adapter EH-5a with a Power Connector EP-5 (A 156).
• Monitor and viewfinder display do not turn off automatically when the camera is connected to a
computer (A 80) or PictBridge printer (A 83).
16 Self-TimerChoose the length of the shutter-release delay in self-timer mode (A 55) from 2 s, 5 s,
10 s (default setting), or 20 s.
U Short
Monitor will turn off when no operations are performed for eight seconds duringplayback and while menus are displayed. Photographs are displayed in the monitor forfour seconds after shooting. Exposure meters will turn off after four seconds.
V Normal (default setting)
Monitor will turn off when no operations are performed for 12 seconds during playback orwhile menus are displayed. Photographs are displayed in the monitor for four secondsafter shooting. Exposure meters will turn off after eight seconds.
W Long
Monitor will turn off when no operations are performed for 20 seconds during playback orwhile menus are displayed. Photographs are displayed in the monitor for 20 seconds aftershooting. Exposure meters will turn off after one minute.
X Custom
Time settings for the following options can be specified individually. Once the setting hasbeen specified, highlight Done and pressQ to apply the setting.
Playback/menus: Choose how long the monitor remains on for menus and playback
from 8 s, 12 s, 20 s, 1 min., or 10 min.Image review: Choose how long photographs are displayed in the monitor after
shooting from 4 s, 8 s, 20 s, 1 min., or 10 min.
Auto meter-off : Choose the length of time before the exposure meters turn off from4 s, 8 s, 20 s, 1 min., or 30 min.
(Displayed When Full Is Selected; 118)
(Displayed When Full Is Selected; 118)

7/31/2019 Nikon D60 User Manual En
http://slidepdf.com/reader/full/nikon-d60-user-manual-en 127/204115
Custom Settings
M en u G ui d e
17 Remote on DurationChoose how long the camera will wait for a signal from the remote before cancelling
delayed or quick-response remote modes (A 55) from 1 min. (default setting), 5 min.,
10 min., or 15 min.
Remote control mode is cancelled if the length of time selected elapses without no
photographs have been taken after selection of the remote control mode.
18 Date ImprintDate and time of recording can be imprinted on photographs.
At settings other than Off ,z appears in the Shooting
information display.
Date is imprinted on photographs as shown below.
B Date Imprint
• Imprinted dates form a permanent part of image data and cannot be deleted.
• The date is recorded using the format selected in Date item (A 21).
• Date and time cannot be imprinted on photographs taken at image quality settings (A 50) of
U orX.
C Date Imprint and Print Set
When printing from DPOF-compatible printers which support printing of shooting date and photo
information, the date and information can be printed on photographs without date and time
imprinted on them, using options in the Print set menu (A 90).
Off (default setting)
Date and time are not imprinted on photographs.
w Date
Date is imprinted on the bottom right corner of photographs taken while this option is ineffect.
x Date and time
Date and time are imprinted on the bottom right corner of photographs taken while thisoption is in effect.
y Date counter (A 116)
Time stamp shows number of days between date of recording and selected date.
(Displayed When Full Is Selected; 118)
(Displayed When Full Is Selected; 118)
2008.04.01 2008.04.012008.04.01
Photographs taken in “tall” (portrait) orientationwith On selected for Auto image rotation (A 128)

7/31/2019 Nikon D60 User Manual En
http://slidepdf.com/reader/full/nikon-d60-user-manual-en 128/204116
M en u G ui d e
Custom Settings
Date Counter
Photographs taken while this option is in effect are imprinted with
the number of days remaining until, or the number of days elapsed
since a specified date. Use it to track the growth of a child or count
down the days until a birthday or wedding.
Once the setting for each option has been selected, highlight Done and pressQ toapply the setting.
Sample date counter time stamps are shown below.
19 RangefinderIn all shooting modes exceptd, selecting On with manual focus mode (A 61) enabledcauses the electronic analog exposure display in the viewfinder to switch to the
rangefinder display, a scale indicating focus distance. This option is useful when focusingmanually.Available when lens with maximum aperture of f/5.6 or faster is used.Not available indmode.When shooting a subject with which autofocus does not perform well (A 38), therangefinder may be unable to accurately measure focus distance.
Choose date
When the date counter is applied for the first time, or the multi selector ispressed right after one of the three options has been selected, the Setdate screen will be displayed. Enter a date (A 21, step 5), and pressQ. Up to three dates can be recorded. To select a different date,choose an option and pressQ.
Display options
Choose Number of days, Years and days, or Years, months, anddays and pressQ.
Display Description Display Description
Subject inside the selectedfocus point is in focus.
Indicates focus on a pointslightly behind the subject.
Indicates focus on a pointslightly in front of thesubject.
Indicates focus on a pointquite a distance behind thesubject.
Indicates focus on a pointquite a distance in front of the subject.
Focus error. Unable tofocus.
Done
Choose date
Display options
Date imprint
Date counter
2008. 04. 23
22/2008. 04. 01
2008. 04. 23
2009. 02. 05
Date imprint
Choose date
OKSet
Number of days
Years and days
Years, months, and days
Date imprint
Display options
Two days remaining Two days elapsed
(Displayed When Full Is Selected; 118)

7/31/2019 Nikon D60 User Manual En
http://slidepdf.com/reader/full/nikon-d60-user-manual-en 129/204117
M en u G ui d e
Basic Camera Settings: The Setup Menu
The setup menu contains the following options.
See “Using Camera Menus” (A 94) for more information on using
the menus.
To display the following additional options, select Full for CSM/Setup menu (A 118).
CSM/Setup menu A 118–119
Choose the options displayed in the menus.
Format memory card A 24
Format memory card.
Info display format A 120–122
Choose a Shooting information display format.
Auto shooting info A 122Display shooting information when the shutter-release button is pressed halfway andreleased.
Shooting info auto off A 123
Shooting information display will turn off automatically when looking through theviewfinder.
World time A 21
Set camera clock and choose home and destination time zones.
LCD brightness A 123Adjust the brightness of the monitor.
Video mode A 123
Adjust settings necessary for connection to television.
Language A 123
Choose the language used for camera monitor display.
Image comment A 124
Add a comment to photographs as they are taken.
Folders A 125
Create or choose the folder in which new photographs will be recorded.
File no. sequence A 126
Choose how the camera names files.
Clean image sensor A 126
Remove dust from the image sensor.
Mirror lock-up A 126
Lock the mirror in the up position when inspecting or cleaning the low-pass filter.
Firmware version A 126
Display camera firmware version.
SETUP MENU
CSM/Setup menu
Format memory card
Info display format
Auto shooting info
Shooting info auto off
World time
LCD brightness

7/31/2019 Nikon D60 User Manual En
http://slidepdf.com/reader/full/nikon-d60-user-manual-en 130/204118
M en u G ui d e
Basic Camera Settings: The Setup Menu
Only selected options for My menu (A 119) will be displayed if My menu is selected forthe CSM/Setup menu option.
CSM/Setup MenuChoose the options displayed in the menus.
Dust off ref photo A 127
Acquire reference data for the Image Dust Off option in Capture NX (available separately).
Auto image rotation A 128
Choose whether to record camera orientation with new photographs.
A Simple (default setting)
Display only basic options in the Custom Settings (A 109) and setup menus (A 117). Othermenus list all options.
B Full
Display all options.
C My menu
Display only selected options.
CSM/Setup menu
Full
My menu
Simple

7/31/2019 Nikon D60 User Manual En
http://slidepdf.com/reader/full/nikon-d60-user-manual-en 131/204119
Basic Camera Settings: The Setup Menu
M en u G ui d e
Choosing Menu Items for My Menu
1 Highlight My menu and press the multi selector right.
A list of menu names will be displayed.
2 Highlight a menu name and press the multi selector right.
The items in the selected menu will be listed as shown at right (the
illustration shows the items listed when the playback menu is
selected).
3 Press the multi selector up or down to highlight itemsand then press to the right to select or deselect.
Selected items are indicated by a check mark (w). When the item is
deselected, the check mark will be deleted (x).
The CSM/Setup menu item in the setup menu cannot be selected.
4 Highlight Done and press Q to return to the list of
menu names shown in step 1.
Repeat steps 2–3 to edit additional menus.
5 Highlight Done in the list of menu names and press Q
to return setup menu.
CSM/Setup menu
My menu
Done
Playback menu
Shooting menu
Custom setting menu
Setup menuRetouch menu
Select items
Done
Delete
Playback folder
Rotate tall
Slide show
Print set (DPOF)
Stop–motion movie
Back
Select items Back
Set
Done
Delete
Playback folder
Rotate tall
Slide show
Print set (DPOF)Stop–motion movie
Select items
Done
Delete
Playback folderRotate tall
Slide show
Print set (DPOF)
Stop–motion movie
Back
CSM/Setup menu
My menu
Done
Playback menu
Shooting menu
Custom setting menu
Setup menu
Retouch menu

7/31/2019 Nikon D60 User Manual En
http://slidepdf.com/reader/full/nikon-d60-user-manual-en 132/204120
M en u G ui d e
Basic Camera Settings: The Setup Menu
Info Display FormatChoose one of the following Shooting information display (A 8) formats for Digital Vari-
Program (e, f, g, h, j, i, k, and l) modes and a, b, c, and d modes.
Choose from the three formats, Classic, Graphic, or Wallpaper.
Setting the Information Display Format
1 Highlight Digital Vari-Program or P, S, A, M and press
the multi selector right.
2 Highlight a Shooting information display format.
3 Highlight a background color or a font color and press Q.
When Graphic is selected, the background color can be selected from White, Black , or
Orange.
When Classic is selected, the background color can be selected from Blue, Black , or Orange.
When Wallpaper is selected, the font color can be selected from Dark on light or Light on
dark .
Classic (A 121) Graphic (A 8) Wallpaper (A 122)
Set
Programmed auto
Set Set
Info display format
Digital Vari–Program
P, S, A, M
Select wallpaper
Info display format
Digital Vari–Program
Classic
Graphic
Wallpaper

7/31/2019 Nikon D60 User Manual En
http://slidepdf.com/reader/full/nikon-d60-user-manual-en 133/204121
Basic Camera Settings: The Setup Menu
M en u G ui d e
Classic
The information displayed in Classic format is shown below.
2514
13
24
23
1
111
18
222115
1916
17
Programmed auto
Set
20
13
14
15 16
25
24
23
22
21
20191817
Programmed auto
Set
2
103
4
5 6 7 8 9
12
“Wide” (Landscape) Orientation “Tall” (Portrait) Orientation
1 Shooting mode ..........................................................6
2 Shutter speed .................................................. 40–46
3 ISO auto indicator ...............................................111
4 Date imprint indicator......................................115
5Focus point display............... 26, 30, 58, 59, 60
AF-area mode...........................................................58
6 Optimize image indicator.............................. 101
7 Battery indicator......................................................28
8 “Beep” indicator....................................................110
9
Number of exposures remaining...... 28, 178
Preset white balance recording indicator........................................................................................ 106
PC mode indicator.................................................81
10
Manual flash control indicator ....................113
Flash compensation indicator foroptional Speedlight...........................................150
11Electronic analog exposure display............ 45
Exposure compensation....................................67
12 Aperture (f-number).....................................40–46
13 Flash sync mode..................................................... 65
14 Exposure compensation value......................67
15 Help indicator...........................................................13
16 Flash compensation value ............................... 68
17 Active D-Lighting indicator ............................. 69
18 Metering mode .......................................................62
19 AF-area mode........................................................... 58
20 Focus mode............................................................... 57
21 Release mode........................................................... 54
22 ISO sensitivity............................................................ 53
23 White balance mode ......................52, 103, 104
24 Image size................................................................... 50
25 Image quality............................................................50

7/31/2019 Nikon D60 User Manual En
http://slidepdf.com/reader/full/nikon-d60-user-manual-en 134/204122
M en u G ui d e
Basic Camera Settings: The Setup Menu
Wallpaper
The design of the Wallpaper format is the same
as the Graphic display except that a user-
selected photograph is displayed in the
background. The shutter speed and aperture
displays, and the graphic display of the shooting
mode (A 9) do not appear.
To choose a photograph for the Wallpaper format:
1 Highlight Select wallpaper in the Info display format
screen (A 120, step 1) and press the multi selector right.
The photographs on the memory card will be displayed.
2 Press the multi selector left or right to highlight a
photograph.
Press and hold K to enlarge display of the selected photograph.
3 PressQ to select the highlighted photograph and return to the setup menu. The camera will record the new wallpaper and use it in the shooting display whenever
Wallpaper is selected. Only one image is recorded for wallpaper. Any existing wallpaper
(including the default image provided with the camera) is deleted when a new image is
selected and cannot be restored. Wallpaper cannot be viewed during playback or copied to a
memory card.
Auto Shooting InfoSelect On to automatically display shooting information after the shutter-release button is
released. If Custom Setting 7 (Image review) is off, shooting information will also be
displayed after a photograph is taken. Turn Auto shooting info on if you find yourself
frequently checking camera settings.
If Off is selected, the Shooting information display is not shown by pressing the shutter-
release button halfway.
Available in Digital Vari-Program (e, f, g, h, i, j, k, and l) modes or a, b, c,
and d modes. Note that even if On is selected, the monitor will turn off while the shutter-
release button is pressed.
Set
Set
7 8 9
10 11 12
Zoom OK
Info display format
Select wallpaper
7 8 9
10 11 12
Info display format
Select wallpaper
Zoom OK

7/31/2019 Nikon D60 User Manual En
http://slidepdf.com/reader/full/nikon-d60-user-manual-en 135/204123
Basic Camera Settings: The Setup Menu
M en u G ui d e
Shooting Info Auto off
LCD BrightnessAdjust monitor brightness.
Video ModeChoose NTSC when connecting the camera to an NTSC television or VCR. Choose PAL
when connecting the camera to a PAL video device.
LanguageChoose one of 15 languages for display of camera menus and
messages.
On (default setting)
The eye sensor under the viewfinder is activated when your face comes closer to theviewfinder while the exposure meters are on, turning the Shooting informationdisplay off and the viewfinder display on. The viewfinder display remains off while
shooting information is displayed.Off
The eye sensor function is disabled, and the viewfinder display remains on whileshooting information is displayed.
LCD brightness
Choose from seven monitor brightness levels between –3 (darkest) and +3(brightest). Default setting is 0.
Auto dim
When On (default setting) is selected, monitor brightness dims gradually whileshooting information is displayed.
De German Pt Portuguese
En English Ru Russian
Es Spanish Sv Swedish
Fi Finnish Traditional Chinese
Fr French Simplified ChineseIt Italian Japanese
Nl Dutch Korean
Pl Polish
Language

7/31/2019 Nikon D60 User Manual En
http://slidepdf.com/reader/full/nikon-d60-user-manual-en 136/204124
M en u G ui d e
Basic Camera Settings: The Setup Menu
Image CommentCreate a comment beforehand and attach it to new photographs
as they are taken. Comments can be viewed in Capture NX
(available separately;A 156) or ViewNX.
Done
Save changes and return to the setup menu.
Input comment
The following dialog will be displayed. Input a comment up to 36 characters in length, andpress K to save.
The input comment will begin at the current cursor position in the comment area. Commentscan be up to 36 characters long. Any additional characters will be deleted. To delete thecharacter at the current cursor position, press J. Press O to exit without changing thecomment.
Attach comment
The comment is added to all photographs taken while this option is checked (w). Highlightthis option and press the multi selector right to toggle the check mark on or off. Select Done and press Q to apply the setting.
Done
Input comment
Attach comment
Image comment
Input comment
Input SetCursor
Keyboard areaUse the multi selector tohighlight letters, press Q toselect.
Comment areaComment appears here. Tomove cursor, rotate thecommand dial.

7/31/2019 Nikon D60 User Manual En
http://slidepdf.com/reader/full/nikon-d60-user-manual-en 137/204125
Basic Camera Settings: The Setup Menu
M en u G ui d e
FoldersCreate new folders on the memory card and choose the folder to
which new photographs will be recorded.
Folder names are comprised of a three-digit folder number and a
five-digit folder name (e.g., “100NCD60“). Folder numbers are
assigned automatically by the camera and folder names can be
created by the user.
C Folder Names
Each folder can contain up to 999 photographs. During shooting, photographs are recorded in the
highest-numbered folder for the selected name. For example, if the folder NCD60 is selected for
Select folder and there are two folders named “101NCD60“ and “102NCD60“, photographs are
recorded in “102NCD60“. If a photograph is taken when the current folder is full or contains a
photograph numbered 9999, the camera will create a new folder by adding one to the current
folder number (e.g., “101NCD60“).
Select folder
Choose the folder in which subsequent photographs will be recorded.
* When the current folder is deleted using the Delete option, or a different memory card insertedin the camera, that folder will continue to be displayed as the current folder. If a picture is takenwith this folder selected, a new folder with the same name will be created.
New
Create a new folder and name it. Press K to save changes and return to the setup menu.
Rename
Select a folder from the list and rename it in the rename screen. Rename folders in the samemanner with which new folders are named. The default folder cannot be renamed.
Delete
Delete all empty folders on the memory card.
(Displayed When Full Is Selected; 118)
Select folder
New
Rename
Delete
Folders
Folders
Select folder
NCD60 (default folder)
Current folder*
Other folders(in alphabetical order)
New
Input SetCursor
Keyboard areaUse the multi selector tohighlight letters, press Q to select.
Name areaFolder name appears here.
To move cursor, rotate thecommand dial.
The input comment will begin at the current cursor position in the name area. Folder namescan be up to five characters long. Any additional characters will be deleted. To delete thecharacter at the current cursor position, press J. Press O to exit without creating a newfolder or changing the folder name.

7/31/2019 Nikon D60 User Manual En
http://slidepdf.com/reader/full/nikon-d60-user-manual-en 138/204126
M en u G ui d e
Basic Camera Settings: The Setup Menu
File No. SequenceChoose how the camera names files.
C File Numbering
If the current folder is numbered 999 and contains 999 photographs or a photograph numbered
9999, the shutter release will be disabled and the message Card is full will be displayed in the
monitor and ful will blink in the viewfinder. Select Reset for File no. sequence and format the
memory card or insert another memory card in the camera.
Clean Image Sensor The camera automatically removes dust from the low-pass filter protecting the imagesensor. See “Caring for the Optical Low-Pass Filter” (A 160) for details.
Mirror Lock-UpLock the mirror in the up position when inspecting or cleaning the low-pass filter that
protects the camera image sensor. See “Cleaning the Low-Pass Filter Manually” (A 162)
for details.
Firmware VersionView the current camera firmware version.
Off (default setting)
File numbering is reset to 0001 when a new folder is created, the memory card is formatted, ora new memory card is inserted.
OnFile numbering continues by adding one to the last number used after a new folder is created,the memory card is formatted, or a new memory card is inserted. The last file number is storedeven when file numbering is switched from On to Off , and file numbering continues byadding one to the last number stored the next time file numbering is set to On. If aphotograph is taken when the current folder contains a photograph numbered 9999, a newfolder will be created and file numbering will begin again from 0001 regardless of the optionselected.
Reset
As for On, except that file numbering is reset to 0001 with the next photograph taken (if thecurrent folder already contains photographs, a new folder will be created).
(Displayed When Full Is Selected; 118)
(Displayed When Full Is Selected; 118)
(Displayed When Full Is Selected; 118)
(Displayed When Full Is Selected; 118)
Firmware version
X.XX
X.XX
Done

7/31/2019 Nikon D60 User Manual En
http://slidepdf.com/reader/full/nikon-d60-user-manual-en 139/204127
Basic Camera Settings: The Setup Menu
M en u G ui d e
Dust off Ref Photo
Acquire reference data for the Image Dust Off option in Capture NX
(available separately;A 156). Image Dust Off is used to reduce the
effects of dust in NEF (RAW) photographs. For more information,
see the documentation provided with Capture NX.
Acquiring Image Dust Off Reference Data
1 Highlight Start or Clean sensor, then start and press
Q.
When acquiring image dust off reference data after photographs
have been taken, select Start. The message shown at right will be
displayed.
When taking photographs after acquiring image dust off referencedata, select Clean sensor, then start. The message shown at right
will be displayed after the image sensor is cleaned (A 160).
“ref” will appear in the viewfinder.
PressO to exit without acquiring image dust off reference data.
2 With the lens ten centimeters (four inches) from a well-
lit, featureless white object, frame the object so that it
fills the viewfinder and then press the shutter-release
button halfway.In autofocus mode, focus will automatically be set to infinity; in
manual focus mode, set focus to infinity manually.
3 Press the shutter-release button the rest of the way
down to acquire image dust off reference data.
The monitor turns off when the shutter-release button is pressed.
If the reference object is too bright or too dark, the camera may be
unable to acquire image dust off reference data and the message
shown at right will be displayed. Choose another reference object and
repeat the process from step 1.
B Notes on Image Sensor Cleaning
If photographs that will be processed with Image Dust Off have already been recorded, DO NOT
clean the image sensor before acquiring image dust off reference data. If the image sensor is
cleaned after photographs are taken, but before image dust reference data are acquired, Image Dust
Off will be unable to locate dust and remove its effects. This camera automatically cleans the image
sensor when the camera is turned on and off (default setting). Selecting Cleaning off for Clean
image sensor>Clean at (A 161) in the setup menu is recommended when acquiring image dust
off reference data.
(Displayed When Full Is Selected; 118)
Start
Clean sensor, then start
Dust off ref photo
Dust off ref photo
Take photo of brightfeatureless white object10 cm from lens.Focus will be setto infinity.
Take photo of brightfeatureless white object10 cm from lens.Focus will be setto infinity.
Exposure settings arenot appropriate.Change exposuresettings and try again.
Dust off ref photo

7/31/2019 Nikon D60 User Manual En
http://slidepdf.com/reader/full/nikon-d60-user-manual-en 140/204128
M en u G ui d e
Basic Camera Settings: The Setup Menu
C Image Dust Off
Dust off ref photo is available with CPU lenses only. A lens with a focal length of at least 50mm is
recommended (A 146). If using a zoom lens, zoom all the way in.
The same reference image can be used for photographs taken with
different lenses or at different apertures. Reference images cannot be
viewed using computer imaging software. A grid pattern is displayed
when reference images are viewed on the camera; histograms andhighlights are not displayed.
Auto Image RotationChoose whether to record camera orientation with new photographs.
Photographs taken while On (default setting) is selected contain information on camera
orientation, allowing them to be rotated automatically during playback (A 72) or when
viewed in ViewNX or Capture NX (available separately;A 156). The following orientations are recorded:
In continuous mode (A 54), orientation recorded for first shot applies to all images in
same burst, even if camera orientation is changed during shooting.
When photographs are taken with the lens pointing up or down, camera orientationinformation may not be accurately recorded.
Camera orientation is not recorded when Off is selected. With playback, photographs are
always displayed in “wide“ (landscape) orientation.
Image dust off data
2 / 2
(Displayed When Full Is Selected; 118)
Camera rotated 90°clockwise
Landscape (wide)orientation
Camera rotated 90°counter-clockwise

7/31/2019 Nikon D60 User Manual En
http://slidepdf.com/reader/full/nikon-d60-user-manual-en 141/204129
M en u G ui d e
Creating Retouched Copies: The Retouch Menu
The options available in the retouch menu can be used to create
cropped, resized, or retouched copies of photographs, or to create
JPEG-format copies of NEF (RAW) photographs stored on the
memory card.
Copies created using options in the retouch menu are recorded asseparate files. The retouch menu contains the following options.
See “Using Camera Menus” (A 94) for more information on using the menus.
Only selected options for My menu (A 119) will be displayed if My menu is selected for
the CSM/Setup menu option (A 118) in the setup menu.
Quick retouch A 132
Create retouched copies in which contrast and saturation have been enhanced.
D-Lighting A 132
Brighten dark or backlit subjects or produce effects similar to the flash after photographs aretaken.
Red-eye correction A 133Correct “red-eye” caused by the flash.
Trim A 134
Create cropped copies of existing photographs.
Monochrome A 134
Copy photographs in black-and-white, sepia, or cyanotype.
Filter effects A 135
Create copies with color filter effects.
Small picture A 136
Create small copies of existing photographs.
Image overlay A 138
Combine two RAW photographs into a single image.
NEF (RAW) processing A 140
Create JPEG-format copies of NEF (RAW) photographs recorded at an image quality setting of U orX (A 51).
Stop-motion movie A 141Create a stop-motion movie from photographs on the memory card.
Before and after A 143
Compare a retouched copy to the source image by displaying them side-by-side. This optionis displayed only when Q is pressed while a retouched copy, or the source image for aretouched copy, is displayed in full-frame playback.
Quick retouch
D–Lighting
Red–eye correction
Trim
Monochrome
Filter effects
Small picture
RETOUCH MENU

7/31/2019 Nikon D60 User Manual En
http://slidepdf.com/reader/full/nikon-d60-user-manual-en 142/204130
M en u G ui d e
Creating Retouched Copies: The Retouch Menu
C Retouching Copies
• The options in the retouch menu can each be applied once to existing copies, although this mayresult in loss of quality. Note the following:- The same option cannot be applied to the same copy more than once.- Copies created with Quick retouch cannot be further modified using D-Lighting.- Copies created with D-Lighting cannot be further modified using Quick retouch.- Copies created with Trim or Small picture cannot be further modified.- Quick retouch, D-Lighting, Red-eye correction, and Filter effects other than Cross screen
cannot be applied to monochrome copies.- Copies created with any Filter effects option other than Cross screen cannot be further
modified with Filter effects other than Cross screen.- Copies created with NEF (RAW) processing>Optimize image>Black-and-white cannot be
further modified using Quick retouch, D-Lighting, Red-eye correction, Monochrome, orFilter effects other than Cross screen.
• Quick retouch, D-Lighting, Red-eye correction, Monochrome, and Filter effects other thanCross screen cannot be applied to photographs taken with Black-and-white selected forOptimize image (A 101).
• The D60 may be unable to display or retouch photographs that were created with other models of camera or that have been modified using a computer or other device.
• If no operations are performed for 12 seconds (default setting) while creating a retouched copy,the monitor will turn off and a retouched copy will not be saved. To increase the amount of timeallowed to pass, select Long for Custom Setting 15 (Auto off timers; A 114), or select Custom and specify a longer time for Playback/menus.
Creating Retouched Copies
1 Display the retouch menu and highlightmenu item (A 94).
2 Display selection screen.
3 Highlight photograph.
Press and holdK to enlarge display of the selected
photograph.
Quick retouch
D–Lighting
Red–eye correction
Trim
Monochrome
Filter effects
Small picture
RETOUCH MENU
9
12
10 11
13 14
Monochrome
Zoom OK
Black–and–white
9
12
10 11
13 14
Zoom OK
Monochrome
Black–and–white

7/31/2019 Nikon D60 User Manual En
http://slidepdf.com/reader/full/nikon-d60-user-manual-en 143/204131
Creating Retouched Copies: The Retouch Menu
M en u G ui d e
4 Display retouch options.
The screen specific to each retouch option will be
displayed. See the section for each retouch option for
further details.
To exit to full-frame playback mode without creating
modified copy, pressP.
Creating Retouched Copies in Full-frame Playback Except in the case of Image overlay, retouched copies can also be created by pressing
Q after selecting photographs in full-frame playback.
1 Select photograph in full-frame playback
(A 72).
2 Display retouch menu items.
3 Highlight menu item.
Image overlay is not available during full-frame
playback.
4 Display retouch options.
The screen specific to each retouch option will be
displayed. See the section for each retouch option for
further details. To exit to full-frame playback withoutcreating modified copy, pressP.
Black–and–white
Cancel Save
1 / 6
Quick retouch
Cancel
D–Lighting
Red–eye correction
Trim
Monochrome
Filter effects
Cancel
Trim
MonochromeFilter effects
Small picture
NEF (RAW) processing
Before and after
1 / 6Small picture
Cancel

7/31/2019 Nikon D60 User Manual En
http://slidepdf.com/reader/full/nikon-d60-user-manual-en 144/204132
M en u G ui d e
Creating Retouched Copies: The Retouch Menu
Quick RetouchEasily create retouched copies in which contrast and saturationhave been enhanced.
The camera automatically creates copies in which dark or backlitsubjects are brightened using the D-Lighting option and thecontrast and saturation (vividness) are enhanced. Press the multiselector up or down to choose the amount of enhancementperformed from High, Normal, or Low. The effects of enhancement can be previewed in the edit display.
PressQ to create a retouched copy and exit to full-frame playback.
C Image Quality and Size
Retouched copies are recorded at the same image quality and size settings as those of the source
images. However, if the source image was taken at an image quality setting of U orX,
copies have an image quality of JPEG Fine and an image size of 3,872 × 2,592.
D-Lighting
D-lighting brightens shadows, making it
ideal for dark or backlit photographs.
Use the multi selector to choose the amount of enhancement
from High, Normal, or Low while viewing effects in the preview
display. PressQ to copy the photograph and exit to full-frame
playback.
C Image Quality and Size
Retouched copies are recorded at the same image quality and size settings as those of the source
images. However, if the source image was taken at an image quality setting of U orX,
copies have an image quality of JPEG Fine and an image size of 3,872 × 2,592.
Quick retouch
Normal
SaveCancel Zoom
Before After
D–Lighting
Normal
ZoomCancel Save

7/31/2019 Nikon D60 User Manual En
http://slidepdf.com/reader/full/nikon-d60-user-manual-en 145/204133
Creating Retouched Copies: The Retouch Menu
M en u G ui d e
Red-Eye Correction The camera automatically detects “red eye” in photographs taken
using the flash, and creates copies in which this phenomenon is
reduced.
Selecting this option displays a preview image as shown below.
Red-eye correction is available only with photographs taken usingthe flash.
No copy will be created if the camera is unable to detect red eye.
Confirm the effects of red-eye correction and create a corrected copy as described in the
following table. Note that red-eye correction may not always produce the expected
results and may in very rare circumstances be applied to portions of the image that are not
affected by red eye; check the preview thoroughly before proceeding.
C Image Quality and Size
Retouched copies are recorded at the same image quality and size settings as those of the source
images. However, if the source image was taken at an image quality setting of U orX,
copies have an image quality of JPEG Fine and an image size of 3,872 × 2,592.
Option Use Description
Zoom in K Press K to zoom in.
Navigation window isdisplayed for a few secondswhile K / M or the multi
selector is pressed; areacurrently visible in monitoris indicated by yellowborder. Press K, M, or themulti selector to displaynavigation window again.
Zoom out M Press M to zoom out.
View other areas of image
While photo is zoomed in,press the multi selector up,down, left, or right to viewareas of image not visible inmonitor. Keep the multiselector pressed to scrollrapidly to other areas of frame.
Cancel zoom Q Press Q to cancel zoom.
Create copy QIf the camera detects red eye in the selected photograph,a copy will be created that has been processed to reduceits effects and exit to full-frame playback.
Red–eye correction
Cancel Zoom Save
Red–eye correction
Back

7/31/2019 Nikon D60 User Manual En
http://slidepdf.com/reader/full/nikon-d60-user-manual-en 146/204134
M en u G ui d e
Creating Retouched Copies: The Retouch Menu
TrimCreate cropped copies of selected photographs.
A preview of the portion of the photograph to be copied is
displayed. The following operations can be performed.
C Image Quality and Size
Copies created from NEF (RAW) or NEF (RAW) + JPEG photographs have an image quality (A 50) of
JPEG Fine; cropped copies created from JPEG photographs have the same image quality as the
source images. Depending on the size of the crop, the copy may be 2,560 × 1,920, 1,920 × 1,440,
1,280 × 960, 960 × 720, or 640 × 480 pixels in size (A 50).
MonochromeChoose from Black-and-white, Sepia, and Cyanotype (blue and white monochrome).
Selecting Sepia or Cyanotype displays a preview of the selected
image; press the multi selector up to increase color saturation,
down to decrease. Press Q to create a monochrome copy and
return to full-frame playback.
C Image Quality and Size
Retouched copies are recorded at the same image quality and size settings as those of the source
images. However, if the source image was taken at an image quality setting of U orX,
copies have an image quality of JPEG Fine and an image size of 3,872 × 2,592.
Option Use Description
Reduce the portionto be copied
K Each time K is pressed, the portion to be copiedis reduced in the preview image.
Increase the portionto be copied
M Each time M is pressed, the portion to becopied is increased in the preview image.
View other areas of image
While photo is zoomed in, press the multi selectorup, down, left, or right to view areas of image not
visible in the monitor.
Create copy Q Save the area currently visible in the monitor as aseparate file and exit to full-frame playback.
Black-and-white
Create black-and-white copies of selected photographs.
Sepia
Create sepia copies of selected photographs.
Cyanotype
Create blue-tinted monochrome copies of selected photographs.
1920×1440
Save
Cancel
Cancel
Darker Lighter Save
Sepia

7/31/2019 Nikon D60 User Manual En
http://slidepdf.com/reader/full/nikon-d60-user-manual-en 147/204135
Creating Retouched Copies: The Retouch Menu
M en u G ui d e
Filter EffectsChoose from the following options.
The effect is displayed in the monitor together with red, green, and blue histogramsgiving the distribution of tones in the copy (A 75).
After adjusting filter effects, press Q to copy the photograph and return to full-frameplayback.
C Image Quality and Size
Retouched copies are recorded at the same image quality and size settings as those of the sourceimages. However, if the source image was taken at an image quality setting of U orX,copies have an image quality of JPEG Fine and an image size of 3,872 × 2,592.
Skylight
Creates the effect of a sky light filter, making the photograph less blue.
Warm filter
Creates a copy with warm tone filter effects, giving the copy “warm” red cast.
Red intensifier
Intensifies reds.
Green intensifier
Intensifies greens.
Blue intensifier
Intensifies blues.
Cross screen
Just as with a cross screen filter, this produces a star pattern withlines radiating outward from bright objects. The following optionscan be adjusted.
Number of points: Choose number of cross points from threeoptions.
Filter amount: Choose amount of filtering from three options.
Filter angle: Choose cross angle from three options.Length of points: Choose length of cross points from three options.
When you complete the setting, highlight Confirm and press Q to confirm the effect of the settings in the preview image. Highlight Save and press Q to create a copy and exit tofull-frame playback.
Color balance
The monitor displays as shown at right. Press the multi selector up,down, left, or right to modify color balance as described below.
Filter effects
Skylight
Warm filter
Red intensifier
Green intensifier
Blue intensifier
Cross screen
Color balance
Cross screen
Confirm
Save
OK ZoomCancel
Cancel OK
More green
More blue
More pink
More red

7/31/2019 Nikon D60 User Manual En
http://slidepdf.com/reader/full/nikon-d60-user-manual-en 148/204136
M en u G ui d e
Creating Retouched Copies: The Retouch Menu
Small PictureCreate a small copy of the selected photograph. Copies have an image quality of JPEG
Fine. The following sizes are available.
The small picture option can be used during full-frame playback as described in “Creating
Retouched Copies in Full-frame Playback” (A 131). The procedure for selecting
photographs after choosing Small picture from the retouch menu, however, differs.
Instead of selecting a single photograph and then choosing a photograph size, the user
selects a photograph size first and then selects one or more photographs to copy at theselected size.
Selecting Small picture from the retouch menu displays the menu shown in step 1.
Follow the steps below to create small copies of multiple photographs.
1 Highlight Choose size.
2 Display options.
3 Highlight desired photograph size.
4 Make selection and the menu shown at
right will be displayed.
o 640×480
Suited to television playback.
p 320×240
Suited to display on website.
q 160×120
Suitable for e-mail.
Small picture
Select picture
Choose size
Small picture
Choose size
Small picture
Choose size
Small picture
Select picture
Choose size

7/31/2019 Nikon D60 User Manual En
http://slidepdf.com/reader/full/nikon-d60-user-manual-en 149/204137
Creating Retouched Copies: The Retouch Menu
M en u G ui d e
5 Highlight Select picture.
6 Display selection screen.
7 Press the multi selector left or right to select
photograph, and up or down to mark theselected photograph withr.
Press the multi selector up or down to deselect the
photograph.
To view the highlighted photograph full frame, press
and hold K.
8 Confirmation dialog displayed.
9 Highlight Yes and press Q.
Copy photos and exit to full-frame playback.
To select different photographs, highlight No and
press Q. Monitor display returns to that shown in
step 7. PressO to exit to retouch menu without
creating copies.
B Date Imprint
If the small picture option is applied to photographs on which the date has been imprinted using
Custom Setting 18 (Date imprint;A 115), the date may be difficult to read.
C Viewing Small Pictures
• Small pictures are indicated by a gray border during full-frame playback, thumbnail playback, and
when a photograph selection dialog is displayed.
• Playback zoom is not available when small pictures are displayed.
Small picture
Select picture
Choose size
10 11
12 13 14
9
Small picture
Select picture
Set OKZoom
10 11
12 13 14
9
Small picture
Select picture
Set OKZoom
2 images
Small picture
Create smallpicture?
Yes
No

7/31/2019 Nikon D60 User Manual En
http://slidepdf.com/reader/full/nikon-d60-user-manual-en 150/204138
M en u G ui d e
Creating Retouched Copies: The Retouch Menu
Image OverlayImage overlay combines two existing RAW photographs to create a single photograph
that is saved separately from the source images. Adjust image quality (A 50) and image
size (A 50), to suit intent, from the Quick settings display (A 48), or from the shooting
menu (A 100), before selecting Image overlay in the retouch menu. Image created
using this option can be saved at the image quality and size settings applied from the
Quick settings display, or the shooting menu, when creating overlay copies.
When an overlay image is saved at an image quality setting of U, it can be combined
with another NEF (RAW) photograph to create a new overlay image.
1 Highlight Image overlay in the retouch
menu and press the multi selector right.
The preview dialog shown at right will be displayed
with Image 1 highlighted.
2 Press Q.
A photograph selection dialog will be displayed.
3 Press the multi selector left or right tohighlight the first photograph in the
overlay.
Press and hold K to enlarge display of the selected
photograph.
4 Press Q to select the highlighted image
and return to the preview display.
The selected image will appear as Image 1.
+
Image1 Image2 Preview
OverlaySave
Image overlay
SelectZoom
1211 13
14 15 16
Image overlay
Image1
OKZoom
1211 13
14 15 16
Image overlayImage1
OKZoom
Image overlay
Image1 Image2
OverlaySave
Zoom Select
Preview

7/31/2019 Nikon D60 User Manual En
http://slidepdf.com/reader/full/nikon-d60-user-manual-en 151/204139
Creating Retouched Copies: The Retouch Menu
M en u G ui d e
5 Optimize exposure for the overlay by
pressing the multi selector up or down to
select the gain for image 1 from between
0.1 and 2.0.
The default value is 1.0; selecting 0.5 cuts gain in half,
while selecting 2.0 doubles gain. The effects of gainare visible in the Preview column.
6 Press the multi selector left or right to
highlight Image 2.
Press Q to display a photograph selection dialog
again.
Repeat steps 3–5 to select the second photograph
and adjust gain.
7 Press the multi selector left or right to
highlight the Preview column.
When Overlay is selected and Q is pressed, a
preview of the overlay image will be displayed.
Proceed to step 8.
When Save is selected and Q is pressed, the
overlay image will be saved without a preview having been displayed.
8 Check the preview image and press Q.
The overlay image will be saved and the monitor
display will exit to full-frame playback.
C Image Overlay
• Only RAW photographs created with the D60 can be selected for image overlay. Other images are
not displayed on the selection screen.
• The overlay has the same photo info (including date of recording, metering, shutter speed,
aperture, exposure mode, exposure compensation, focal length, and image orientation) and values
for white balance and optimize image as the photograph selected for Image 1.
Image overlay
Image1 Image2
OverlaySave
Zoom Select
Preview
Image overlay
Image1 Image2
OverlaySave
Zoom Select
Preview
OK
Image overlay
Zoom
Image1 Image2 Preview
OverlaySave

7/31/2019 Nikon D60 User Manual En
http://slidepdf.com/reader/full/nikon-d60-user-manual-en 152/204140
M en u G ui d e
Creating Retouched Copies: The Retouch Menu
NEF (RAW) ProcessingCreate JPEG-format copies of NEF (RAW) photographs stored at image quality setting of
U orX (A 51).
1 Highlight NEF (RAW) processing in the retouch menu
and press the multi selector right.
A photograph selection dialog will be displayed.
2 Press the multi selector left or right to highlight the NEF
(RAW) photograph.
PressQ to select the highlighted photograph.
3 Adjust the Image quality, Image size, White balance,
Exposure comp., and Optimize image options as
desired.
Image quality: Choose image quality from JPEG fine, JPEG
normal, or JPEG basic (A 50).
Image size: Choose image size fromw (large),x (medium),
ory (small) (A 50).
White balance: Choose white balance setting.- White balance settings:A 52
- Specifying types of fluorescent lighting:A 103
- Fine tuning white balance:A 104, step 2
Preset white balance values for NEF (RAW) photographs taken at a white
balance setting of Preset manual can be fine tuned from the Preset
manual option.
Exposure comp.: Adjust brightness from –3 to +3 EV.
Optimize image: Choose an optimize image option (A 101).
Highlight EXE when all settings have been adjusted.
4 PressQ.
JPEG-format copy will be saved and display will exit to full-frame playback.
PressO orP to exit without creating a copy.
B NEF (RAW) Photographs
• The D60 can only create JPEG-format copies of NEF (RAW) photographs taken with the D60.
• NEF (RAW) processing>White balance>Preset manual cannot be selected for photographs
taken at a white balance setting other than Preset manual.
• White balance cannot be selected for photograph created using the Image overlay option.
• Exposure comp. cannot be selected for photograph taken when On is selected for Active D-
Lighting.
• White balance and Optimize image cannot be selected for photograph taken ine,f,g,
h,i,j,k, andlmodes.
1211 13
14 15 16
NEF (RAW) processing
OKZoom
12
1211 13
14 15 16
NEF (RAW) processing
OKZoom
EXE
NEF (RAW) processing
Cancel Zoom OK
Image quality

7/31/2019 Nikon D60 User Manual En
http://slidepdf.com/reader/full/nikon-d60-user-manual-en 153/204141
Creating Retouched Copies: The Retouch Menu
M en u G ui d e
Stop-motion Movie
Create a stop-motion movie from photographs taken with the D60
and record as a movie file.
Creating a Stop-motion Movie
1 Highlight Create movie in the Stop-motion moviescreen and pressQ.
The screen shown at right will be displayed.
2 Press the multi selector left or right to highlight the
starting image.
Hold down the multi selector to scroll rapidly through thumbnails.
PressQ to select the highlighted photograph.
3 Press the multi selector left or right to highlight the
ending image.
Hold down the multi selector to scroll rapidly through thumbnails.
The starting image, ending image, and all images in between will be
markedy.
Up to 100 images can be used in a stop-motion movie.
4 PressQ.
To create a stop-motion movie without editing or previewing the file,
proceed to step 6.
To remove unwanted images, or edit the starting or ending images,
select Edit and pressQ to proceed to step 5.
Create movie
Choose the photographs for stop-motion movie and create a
movie file.Frame size
Choose the frame size from 640 × 480, 320 × 240, or 160 × 120.
Frame rate
Choose the frame rate from 15 fps, 10 fps, 6 fps, or 3 fps.
640 480
15 fps
Stop–motion movie
Create movie
Frame size
Frame rate
21
Stop–motion movie
Zoom
Edit Save
OK
Starting image
3 4 5
Stop–motion movie
Zoom
Edit Save
OK
Starting image
31 32 33
Stop–motion movie
Zoom
Edit Save
OK
End image
31 32 33
Stop–motion movie
Edit Save
OK
Create movie

7/31/2019 Nikon D60 User Manual En
http://slidepdf.com/reader/full/nikon-d60-user-manual-en 154/204142
M en u G ui d e
Creating Retouched Copies: The Retouch Menu
5 Highlight Starting image, Middle image, or End image
and pressQ.
When Starting image is selected, repeat step 2 to select the starting
image. After the starting image is changed, the monitor will return to
display shown in step 4.
When End image is selected, repeat step 3 to select the endingimage. After the ending image is changed, the monitor will return to display shown in step 4.
When Middle image is selected, unwanted images can be removed from the stop-motion
movie. Highlight unwanted images and press the multi selector up or down. They icon is
removed. After unwanted images have been removed, pressQ. The monitor will return to
the display shown in step 4.
When creating a stop-motion movie without editing, highlight Cancel and pressQ.
6 Highlight Save and pressQ.
Select Save in the display shown at right and pressQ to createand save the movie file. Once the movie file is saved, the starting
image will be displayed in full-frame playback.
Select Preview to play back the stop-motion movie with settings
applied before the file was saved. While previewing the movie, the
same operations available with stop-motion playback, including pausing, rewinding, and
advancing, can be applied (A 99).
Highlight Frame rate to change the rate at which the stop-motion movie is played back.
Highlight Edit to return to step 5.
B Stop-Motion Movies
Photographs taken with cameras other than the D60, and copies created using the Trim and Small
picture options, cannot be selected.
CPlaying Back Stop-Motion Movies
•S is displayed in full-frame or thumbnail playback mode. Stop-motion movie files can be played
back by pressingQ in full-frame playback, or using the Stop-motion movie option in the
playback menu (A 99).
• For more information on stop-motion movie file names, see “File Names” (A 51).
Edit
Starting image
Middle image
End image
Cancel
OK
Stop–motion movie
Save
Preview
Frame rate
Edit
Create movie

7/31/2019 Nikon D60 User Manual En
http://slidepdf.com/reader/full/nikon-d60-user-manual-en 155/204143
Creating Retouched Copies: The Retouch Menu
M en u G ui d e
Before and after (Making a Side-by-Side Comparison)Compare a retouched copy to the source image by displaying them side-by-side. This
option is displayed only whenQ is pressed while a retouched copy, or the source
image for a retouched copy, is displayed in full-frame playback (A131).
1 Select a source image or a retouched copy in full-frame
playback mode and pressQ.
Retouch menu items will be displayed.
2 Press the multi selector up or down to highlight Before
and after.
This option is only available with retouched copies and source
images for retouched copies.
3 PressQ.
The source image is displayed on the left, the retouched copy on the
right, with the options used to create the copy listed at the top of the
display.
Press the multi selector in the direction indicated by the arrow
adjacent to the image highlighted with a yellow border (,,, or
) to switch between the source image and the retouched copy.
- Press the multi selector left or right to switch between the source
image and the retouched copy.
- If multiple retouched copies have been created from the same
source image, select the retouched copy and press the multi selector up or down to display
other retouched copies.
- If the copy was created from two images using Image overlay, press the multi selector up or
down to view the other source image.
To view the highlighted photograph full frame, press and holdK. To exit to full-frame playback mode with the highlighted image displayed, pressQ.
Quick retouch
Cancel
D–Lighting
Red–eye correction
Trim
Monochrome
Filter effects
Cancel
Trim
Monochrome
Filter effects
Small picture
NEF (RAW) processing
Before and after
Before and after
D-Lighting
ZoomM ove Done
Options used tocreated copy
Sourceimage
Retouchedcopy

7/31/2019 Nikon D60 User Manual En
http://slidepdf.com/reader/full/nikon-d60-user-manual-en 156/204144
M en u G ui d e
Creating Retouched Copies: The Retouch Menu

7/31/2019 Nikon D60 User Manual En
http://slidepdf.com/reader/full/nikon-d60-user-manual-en 157/204145
Optional Accessories This chapter introduces the optional accessories available for the D60, as well ascovering handling instructions.
• See our websites or product catalogs for up-to-date information on accessories for
the D60.
B Use Only Nikon Brand Electronic Accessories
Only Nikon brand accessories certified by Nikon specifically for use with your Nikon digital
camera are engineered and proven to operate within its operational and safety requirements. T HE
USE OF NON-NIKON ACCESSORIES COULD DAMAGE YOUR CAMERA AND MAY VOID YOUR NIKON WARRANTY.
E N
- E L 9
7 . 4 V 1 0 0 0 m A h
Flash units (Speedlights) (A 150)
Viewfinder accessories (A 155)Wireless Remote ControlML-L3 (A 156)
Batteries (A 155)Lenses (A 146)
AC adapters (A 156, 157)
Software (A 156) Power connectors
(A 156, 157)
Filters (A 155)

7/31/2019 Nikon D60 User Manual En
http://slidepdf.com/reader/full/nikon-d60-user-manual-en 158/204146
O p t i on a l A c c e s s or i e s
Compatible Lenses
1 IX-NIKKOR lenses can not be used.
2 Vibration Reduction (VR) supported with VR lenses.
3 Spot metering meters selected focus point (A 62).
4 The camera’s exposure metering and flash control systems do not work properly when shifting and/or
tilting the lens, or when an aperture other than the maximum aperture is used.5 Electronic rangefinder can not be used with shifting or tilting.
6 Can be used with AF-S and AF-I lenses only (A 148).
7 With maximum effective aperture of f/5.6 or faster.
8 When focusing at minimum focus distance with AF 80-200mm f/2.8, AF 35-70mm f/2.8, AF 28-85mm f/ 3.5-4.5, or AF 28-85mm f/3.5-4.5 <NEW> lens at maximum zoom, in-focus indicator may be displayedwhen image on matte screen in viewfinder is not in focus. Adjust focus manually until image inviewfinder is in focus.
9 With maximum aperture of f/5.6 or faster.
10 Some lenses can not be used (A 147).
Camera setting
Lens/accessory
Focus mode Shooting mode Metering system
AFM (with
electronic
rangefinder)
M
DigitalVari-
Programs,
a,b,c
d
pq
r3D Color
C P U
l en s e s 1
AF-S, AF-I NIKKOR2 —
3
Type G or D AF NIKKOR2 — — 3
PC Micro 85mm f/2.8D4 — 5
— — 3
AF-S/AF-I Teleconverter6
7
7 —
3
Other AF NIKKOR(except lenses for F3AF)
— 8
— 3
AI-P NIKKOR — 9 — 3
N on- C P U
l en
s e s 1 0
AI- or AI-modified NIKKORand Nikon Series-E 11 —
9 —
12 — — —
Medical-NIKKOR 120mmf/4 (IF)
— — 13 — — —
Reflex-NIKKOR — — — 12 — — —
PC-NIKKOR — 5
— 12 — — —
AI-type Teleconverter14 — 7
— 12 — — —
Bellows FocusingAttachment PB-6 15 —
7 —
12 — — —
Auto extension rings(PK-series 11A, 12, or 13;PN-11)
— 7
— 12 — — —

7/31/2019 Nikon D60 User Manual En
http://slidepdf.com/reader/full/nikon-d60-user-manual-en 159/204147
O p t i on a l A c c e s s or i e s
Compatible Lenses
11 Range of rotation for AI 80-200mm f/2.8 ED tripod mount is limited by camera body. Filters can not beexchanged while AI 200-400mm f/4 ED is mounted on camera.
12 Electronic analog exposure display is not available.
13 Can be used in manual exposure modes at shutter speeds slower than 1 / 125 s. Electronic analogexposure display is not available.
14 Exposure compensation required when used with AI 28-85mm f/3.5-4.5, AI 35-105mm f/3.5-4.5, AI 35-135mm f/3.5-4.5, or AF-S 80-200mm f/2.8D. See teleconverter manual for details.
15 Hold the camera in “tall” (portrait) orientation when attaching the Bellows Focusing Attachment PB-6.Once the PB-6 is attached, the camera can be repositioned in “wide” (landscape) orientation if necessary.
• Reprocopy Outfit PF-4 requires Camera Holder PA-4.
B Incompatible Accessories and Non-CPU Lenses
The following accessories and non-CPU lenses can NOT be used with the D60:
C Lenses for Autofocus
Autofocus with this camera is supported only by AF-S and AF-I lenses. AF-S and AF-I lenses are
equipped with an autofocus motor. Autofocus is not possible when any other type of lens is
mounted, regardless of the autofocus capabilities of the lens itself.
C Lens f-number The f-number included at the end of lens names (e.g., f/2.8 or f/3.5-5.6) is the maximum aperture of
the lens.
C Recognizing CPU and Type G and D Lenses
CPU lenses can be identified by the presence of CPU contacts, type G and D lenses by a letter on the
lens barrel.Type G lenses are not equipped with a lens aperture ring.
• AF Teleconverter TC-16A
• Non-AI lenses
• Lenses that require the Focusing Unit AU-1 (400mm
f/4.5, 600mm f/5.6, 800mm f/8, 1200mm f/11)
• Fisheye (6mm f/5.6, 7.5mm f/5.6, 8mm f/8, OP 10mm
f/5.6)
• 2.1cm f/4
• Extension Ring K2
• 180-600mm f/8 ED (serial numbers 174041-174180)
• 360-1200mm f/11 ED (serial numbers 174031-174127)
• 200-600mm f/9.5 (serial numbers 280001-300490)
• Lenses for the F3AF (AF 80mm f/2.8,
AF 200mm f/3.5 ED, AF Teleconverter
TC-16)
• PC 28mm f/4 (serial number 180900 or
earlier)
• PC 35mm f/2.8 (serial numbers 851001-
906200)
• PC 35mm f/3.5 (old type)
• Reflex 1000mm f/6.3 (old type)
• Reflex 1000mm f/11 (serial numbers
142361-143000)
• Reflex 2000mm f/11 (serial numbers
200111-200310)
CPU contacts
CPU lens Type G lens Type D lens
Aperture ring

7/31/2019 Nikon D60 User Manual En
http://slidepdf.com/reader/full/nikon-d60-user-manual-en 160/204148
Compatible Lenses
O p t i on a l A c c e s s or i e s
C The AF-S/AF-I Teleconverter
The AF-S/AF-I teleconverter can be used with the following AF-S and AF-I lenses:
1 Autofocus not supported.
2 Autofocus not supported when used with Teleconverter TC-17E II/TC-20 E II.
C CPU Lens Aperture Ring
Lock the aperture ring on CPU lenses (except type G lenses) at the minimum aperture (highest f-
number).
C Non-CPU Lenses
Non-CPU lenses can be used only in d mode. Aperture can be confirmed and adjusted manually via
the lens aperture ring. Exposure meters do not function. Flash photography in i-TTL mode is not
supported.
C Notes on AF-Assist Illuminator
The AF-assist illuminator has a range of about 0.5-3.0 m (1 ft. 8 in.-9 ft. 10 in.). When using the AF-
assist illuminator, use a lens with a focal length of 24-200mm.
AF-assist illuminator is not available with the following lenses:
At ranges under 1m (3ft. 3in.), the following lenses may block the AF-assist illuminator and interferewith autofocus when lighting is poor:
C Red-Eye Reduction
Lenses that block the subject’s view of the AF-assist illuminator can interfere with red-eye reduction
(A 65).
• AF-S VR 70-200mm f/2.8G ED
• AF-S 80-200mm f/2.8D ED
• AF-S VR Micro 105mm f/2.8G ED1
• AF-S VR 200mm f/2G ED
• AF-S VR 200-400mm f/4G ED2
• AF-S VR 300mm f/2.8G ED
• AF-S 300mm f/2.8D ED II
• AF-S 300mm f/2.8D ED
• AF-I 300mm f/2.8D ED
• AF-S 300mm f/4D ED2
• AF-S NIKKOR 400mm f/2.8G ED VR
• AF-S 400mm f/2.8D ED II
• AF-S 400mm f/2.8D ED
• AF-I 400mm f/2.8D ED
• AF-S NIKKOR 500mm f/4G ED VR2
• AF-S 500mm f/4D ED II2
• AF-S 500mm f/4D ED2
• AF-I 500mm f/4D ED2
• AF-S NIKKOR 600mm f/4G ED VR2
• AF-S 600mm f/4D ED II2
• AF-S 600mm f/4D ED2
• AF-I 600mm f/4D ED2
• AF-S VR 70-200mm f/2.8G ED
• AF-S VR 300mm f/2.8G ED
• AF-S 80-200mm f/2.8D ED
• AF-S VR 200-400mm f/4G ED
• AF-S VR 200mm f/2G ED
• AF-S NIKKOR 14-24mm
f/2.8G ED
• AF-S VR 24-120mm f/3.5-5.6G ED
• AF-S DX 17-55mm f/2.8G ED
• AF-S 17-35mm f/2.8D ED
• AF-S 28-70mm f/2.8D ED
• AF-S DX VR 18-200mm
f/3.5-5.6G ED
• AF-S NIKKOR 24-70mm f/2.8G ED • AF-S VR Micro 105mm f/2.8G ED
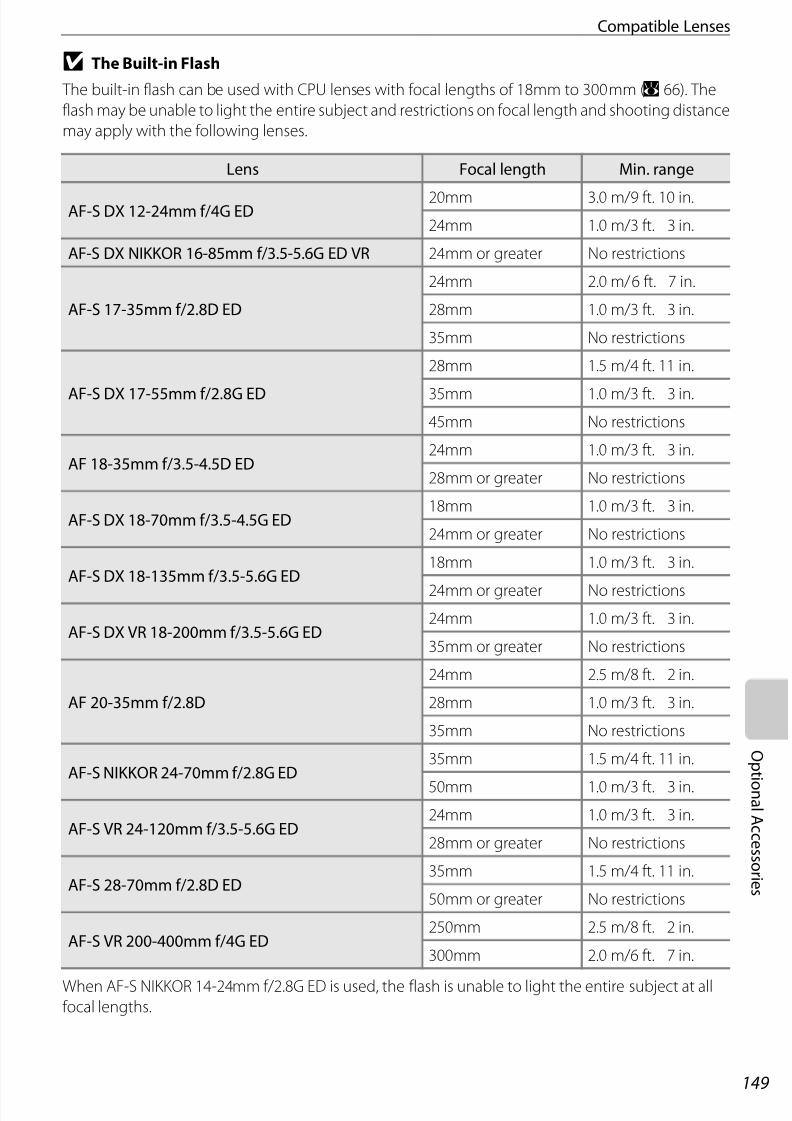
7/31/2019 Nikon D60 User Manual En
http://slidepdf.com/reader/full/nikon-d60-user-manual-en 161/204149
O p t i on a l A c c e s s or i e s
Compatible Lenses
B The Built-in Flash
The built-in flash can be used with CPU lenses with focal lengths of 18mm to 300mm (A 66). The
flash may be unable to light the entire subject and restrictions on focal length and shooting distance
may apply with the following lenses.
When AF-S NIKKOR 14-24mm f/2.8G ED is used, the flash is unable to light the entire subject at allfocal lengths.
Lens Focal length Min. range
AF-S DX 12-24mm f/4G ED20mm 3.0 m/9 ft. 10 in.
24mm 1.0 m/3 ft. 3 in.
AF-S DX NIKKOR 16-85mm f/3.5-5.6G ED VR 24mm or greater No restrictions
AF-S 17-35mm f/2.8D ED
24mm 2.0 m/6 ft. 7 in.
28mm 1.0 m/3 ft. 3 in.
35mm No restrictions
AF-S DX 17-55mm f/2.8G ED
28mm 1.5 m/4 ft. 11 in.
35mm 1.0 m/3 ft. 3 in.
45mm No restrictions
AF 18-35mm f/3.5-4.5D ED24mm 1.0 m/3 ft. 3 in.
28mm or greater No restrictions
AF-S DX 18-70mm f/3.5-4.5G ED18mm 1.0 m/3 ft. 3 in.
24mm or greater No restrictions
AF-S DX 18-135mm f/3.5-5.6G ED18mm 1.0 m/3 ft. 3 in.
24mm or greater No restrictions
AF-S DX VR 18-200mm f/3.5-5.6G ED24mm 1.0 m/3 ft. 3 in.
35mm or greater No restrictions
AF 20-35mm f/2.8D
24mm 2.5 m/8 ft. 2 in.
28mm 1.0 m/3 ft. 3 in.
35mm No restrictions
AF-S NIKKOR 24-70mm f/2.8G ED35mm 1.5 m/4 ft. 11 in.
50mm 1.0 m/3 ft. 3 in.
AF-S VR 24-120mm f/3.5-5.6G ED24mm 1.0 m/3 ft. 3 in.
28mm or greater No restrictions
AF-S 28-70mm f/2.8D ED35mm 1.5 m/4 ft. 11 in.
50mm or greater No restrictions
AF-S VR 200-400mm f/4G ED250mm 2.5 m/8 ft. 2 in.
300mm 2.0 m/6 ft. 7 in.

7/31/2019 Nikon D60 User Manual En
http://slidepdf.com/reader/full/nikon-d60-user-manual-en 162/204150
O p t i on a l A c c e s s or i e s
Optional Flash Units (Speedlights)
The accessory shoe allows SB-series Speedlights, including the
SB-400, SB-800, SB-600, SB-80DX, SB-28DX, SB-28, SB-27, SB-23,
SB-22S, and SB-29S to be mounted directly on the camera without
a sync cable. It is equipped with a safety lock for Speedlights with a
locking pin, such as the SB-800 and SB-600, which prevents theSpeedlight from falling off accidentally. Before attaching an
optional flash unit, remove the accessory shoe cover. The built-in flash will not fire when
an optional Speedlight is attached.
When used with compatible flash units such as the optional SB-400, SB-800, and SB-600
Speedlights, the D60 supports the advanced Nikon Creative Lighting System (CLS)*, which
offers a number of features, including i-TTL flash control and Flash Color Information
Communication. When the optional SB-800 Speedlight or SU-800 Wireless Speedlight
Commander is mounted on the camera, the optional SB-600, a second SB-800 Speedlight,
or the SB-R200 Wireless Remote Speedlight can be fired remotely. See the documentationprovided with the Speedlight or wireless Speedlight commander for details.* CLS is the latest flash control system for use with Nikon Speedlights and cameras. Various features are
supported, including Flash Color Information Communication, with which flash output colortemperature information is automatically transmitted to the camera for use in tuning white balance toachieve optimal results.
Nikon Speedlight SB-400
• The SB-400 is a high-performance flash unit with a guide number of 21/69 (ISO 100, m/
ft, 20°C /68°F).• The flash head can be rotated through 90° above the horizontal for bounce-flash
photography.
Nikon Speedlight SB-800
• The SB-800 is a high-performance flash unit with a guide number of 38/125 (at the
35mm zoom-head position; ISO 100, m/ft, 20°C/68°F).
• The flash head can be tilted 90° up, 7° down, 180° to the left, and 90° to the right for
bounce-flash or close-up photography.• The SB-800 supports auto power zoom (24-105 mm), ensuring that the angle of
coverage is adjusted in accordance with lens focal length, and has a built-in wide-flash
adapter that increases the angle of coverage to match that of a 14mm or 17mm lens.
• The monitor and all buttons are illuminated to simplify operation in dark surroundings.
• Custom settings can be used to enable, disable, or adjust a variety of functions.

7/31/2019 Nikon D60 User Manual En
http://slidepdf.com/reader/full/nikon-d60-user-manual-en 163/204151
O p t i on a l A c c e s s or i e s
Optional Flash Units (Speedlights)
Nikon Speedlight SB-600
• The SB-600 is a high-performance flash unit with a guide number of 30/98 (ISO 100, m/
ft) (at the 35mm zoom-head position, 20°C/68°F).
• The flash head can be tilted 90° up, 180° to the left, and 90° to the right for bounce-flash
or close-up photography.
• The SB-600 supports auto power zoom (24-85mm), ensuring that the angle of coverage
is adjusted in accordance with lens focal length, and has a built-in wide-flash adapter
that increases the angle of coverage to match that of a 14mm lens.
• The monitor and all buttons are illuminated to simplify operation in dark surroundings.
• Custom settings can be used to enable, disable, or adjust a variety of functions.
Nikon Wireless Remote Speedlight SB-R200
This high-performance wireless remote Speedlight has a guide number of 10/32 (ISO 100,
m/ft, 20°C /68°F). Although it cannot be mounted directly on the accessory shoe, it can becontrolled using an optional SB-800 Speedlight or SU-800 Wireless Speedlight
Commander. The SB-R200 can be hand-held, placed on the AS-20 Speedlight Stand, or
attached to the front of the camera lens using the SX-1 Attachment Ring for remote
control and close-up i-TTL photography.
Nikon Wireless Speedlight Commander SU-800
The SU-800 can be used as a commander unit for wireless remote triggering of the SB-800,
SB-600, or SB-R200 flash units. The SU-800 itself is not a flash.
D Guide Number
The guide number indicates the amount of light generated by the flash. The larger the number, the
greater the flash output.
To calculate the range of the flash at full power, divide the Guide Number by the aperture. For
example, at ISO 100 the SB-400 has a Guide Number of 21 m or 69 ft.; its range at an aperture of f/5.6
is 21 ÷ 5.6 or about 3.7 meters (or in feet, 69 ÷ 5.6 = 12 ft. 4 in.). For each twofold increase in ISO
sensitivity, multiply the Guide Number by the square root of two (approximately 1.4). For example,
when the SB-400 is used with the D60 at a sensitivity setting of ISO 200, the range of the SB-400, at
an aperture of f/5.6 is 21 ÷ 5.6 × 1.4 = 5.3 meters, or 69 ÷ 5.6 × 1.4 = 17 ft. 5 in. (at ISO 200, 20°C/68°F,
the angle of coverage is sufficient to light the picture angle of an 18mm lens).

7/31/2019 Nikon D60 User Manual En
http://slidepdf.com/reader/full/nikon-d60-user-manual-en 164/204152
Optional Flash Units (Speedlights)
O p t i on a l A c c e s s or i e s
The following features are available with CLS-compatible flash units.
1 Only available when SU-800 is used to control other flash units. The SU-800 itself is not equipped with aflash.
2 CPU lens required.
3 Not available with spot metering. Standard i-TTL fill-flash for digital SLR is applied.
4 Can be selected from camera Custom Settings menu (A 113).
5 Select flash mode from the Speedlight’s custom settings. Non-TTL auto is selected automatically when anon-CPU lens is attached.
6 Auto aperture is automatically applied when a CPU lens is mounted, regardless of the option selected in
the Speedlight’s custom settings. Non-TTL auto is selected automatically if non-CPU lens is attached.
Speedlight
Flash mode/feature
Single flash unitAdvanced Wireless Lighting
Commander Remote
SB-400 SB-800 SB-600 SB-800 SU-8001
SB-800 SB-600 SB-R200
i-TTL2i-TTL Balancedfill-flash for digital SLR 3, 4 3 3 5
Standard i-TTLfill-flash for digital SLR
— — — — —
AA Auto aperture2 — 5 —
6
6
6 — —
A Non-TTL auto — 5 —
6 — 6 — —
GNDistance-prioritymanual
— — — — — — —
M Manual
4
RPT Repeating flash — — —
AF-assist for multi-area AF2 — — — —
Flash Color InformationCommunication
— — — —
REAR Rear-curtain sync
L Red-eye reduction — — — —
Auto zoom — — — — —
Auto ISO (Custom Setting 10) — — — — —

7/31/2019 Nikon D60 User Manual En
http://slidepdf.com/reader/full/nikon-d60-user-manual-en 165/204153
O p t i on a l A c c e s s or i e s
Optional Flash Units (Speedlights)
The following Speedlights can only be used in non-TTL auto and manual modes at shutter
speeds of 1 / 200s or slower. Flash charge state is shown by the Speedlight flash-ready
indicator. In TTL mode, the shutter-release button will lock and no photographs can be
taken.
1 In a, b, c, and d modes, lower built-in flash and use optional Speedlight only. To prevent the built-inflash from popping up automatically when lighting is poor, do not select Digital Vari-Program modes.
2 When mounted on D60, flash mode is automatically set to TTL and shutter release is disabled. SetSpeedlight to A (non-TTL auto) mode.
3 Autofocus is available only with AF-S VR Micro 105mm f/2.8G ED lense.
4 Available when camera is used to select flash mode.
B ISO Auto
When the SB-400, SB-800, or SB-600 is used, the camera automatically adjusts ISO sensitivity to
achieve optimal flash output if On is selected for Custom Setting 10 (ISO auto) or Auto is selected
for ISO sensitivity in Digital Vari-Program modes. However, foreground subjects may be
underexposed (A 111).
C e, g, h, i, j, k, and l Modes
When an optional Speedlight is attached, the built-in flash turns off.
• Auto flash mode is canceled, and the optional Speedlight will fire whenever a photograph is taken.
If the flash mode is set to off, fill flash is automatically applied .
• When using an optional Speedlight in h or j mode, flash mode is automatically set to fill flash.
Red-eye reduction mode can also be selected.• When flash output is compensated using SB-800 or SB-600 Speedlight, or SU-800 Wireless
Speedlight Commander, E (flash compensation indicator for optional Speedlight) will be
displayed at the top of Shooting information display.
• The optional Speedlight will not fire when the mode dial is rotated tof.
B Use Only Nikon Flash Accessories
Use only Nikon Speedlights. Negative voltages or voltages over 250 V applied to the accessory shoe
could not only prevent normal operation, but damage the sync circuitry of the camera or flash.
Before using a Nikon Speedlight not listed in this section, contact a Nikon-authorized service
representative for more information.
D The Sync Terminal Adapter AS-15
When the Sync Terminal Adapter AS-15 (available separately) is mounted on the camera accessory
shoe, flash accessories can be connected via a sync cable.
Speedlight
Flash mode
SB-80DX,SB-28DX
SB-50DX1
SB-28,SB-26,SB-25,SB-24
SB-30,
SB-272
,SB-22S,SB-22,SB-20,SB-16B,SB-15
SB-23,SB-293,SB-21B3,SB-29S3
A Non-TTL auto — —
M Manual
O Repeating flash — — —
REAR Rear-curtain sync4
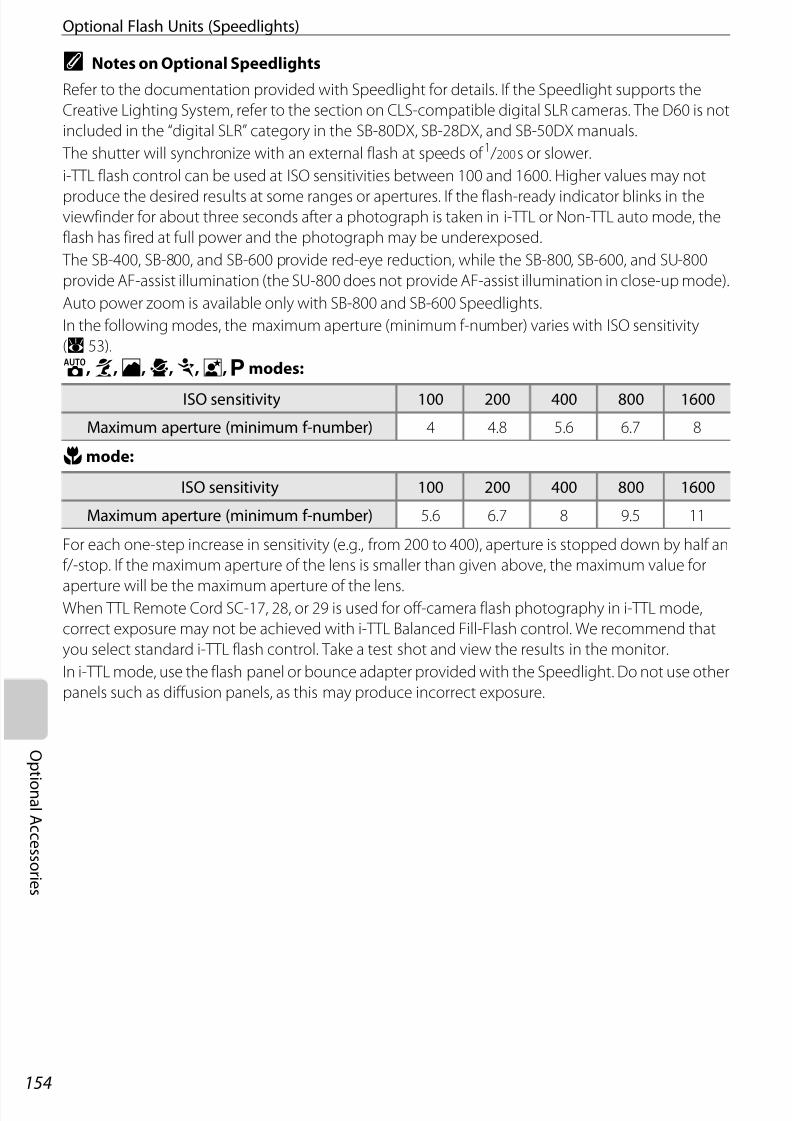
7/31/2019 Nikon D60 User Manual En
http://slidepdf.com/reader/full/nikon-d60-user-manual-en 166/204154
Optional Flash Units (Speedlights)
O p t i on a l A c c e s s or i e s
C Notes on Optional Speedlights
Refer to the documentation provided with Speedlight for details. If the Speedlight supports the
Creative Lighting System, refer to the section on CLS-compatible digital SLR cameras. The D60 is not
included in the “digital SLR” category in the SB-80DX, SB-28DX, and SB-50DX manuals.
The shutter will synchronize with an external flash at speeds of 1 / 200s or slower.
i-TTL flash control can be used at ISO sensitivities between 100 and 1600. Higher values may not
produce the desired results at some ranges or apertures. If the flash-ready indicator blinks in theviewfinder for about three seconds after a photograph is taken in i-TTL or Non-TTL auto mode, the
flash has fired at full power and the photograph may be underexposed.
The SB-400, SB-800, and SB-600 provide red-eye reduction, while the SB-800, SB-600, and SU-800
provide AF-assist illumination (the SU-800 does not provide AF-assist illumination in close-up mode).
Auto power zoom is available only with SB-800 and SB-600 Speedlights.
In the following modes, the maximum aperture (minimum f-number) varies with ISO sensitivity
(A 53).
e, g, h, i, j, l, a modes:
k mode:
For each one-step increase in sensitivity (e.g., from 200 to 400), aperture is stopped down by half an
f/-stop. If the maximum aperture of the lens is smaller than given above, the maximum value for
aperture will be the maximum aperture of the lens.When TTL Remote Cord SC-17, 28, or 29 is used for off-camera flash photography in i-TTL mode,
correct exposure may not be achieved with i-TTL Balanced Fill-Flash control. We recommend that
you select standard i-TTL flash control. Take a test shot and view the results in the monitor.
In i-TTL mode, use the flash panel or bounce adapter provided with the Speedlight. Do not use other
panels such as diffusion panels, as this may produce incorrect exposure.
ISO sensitivity 100 200 400 800 1600
Maximum aperture (minimum f-number) 4 4.8 5.6 6.7 8
ISO sensitivity 100 200 400 800 1600
Maximum aperture (minimum f-number) 5.6 6.7 8 9.5 11

7/31/2019 Nikon D60 User Manual En
http://slidepdf.com/reader/full/nikon-d60-user-manual-en 167/204155
O p t i on a l A c c e s s or i e s
Other Accessories
Viewfinder eyepiece accessories
Remove the viewfinder eyepiece cup before attaching viewfinder eyepiece accessories. See“Eyepiece Cap“ (A 56) for more information on removing the rubber eyecup.
• Diopter adjustment viewfinder lenses: This feature is helpful for those who are far-
sighted or short-sighted. Lenses can be exchanged easily by inserting to the eyepiece.Lenses are available with diopters of –5, –4, –3, –2, 0, +0.5, +1, +2, and +3m–1 (when theD60 diopter adjustment control is at the –1m–1 position). Use diopter adjustment lensesonly if the desired focus cannot be achieved with the built-in diopter adjustment control(–1.7 to +0.5m–1). Test diopter adjustment lenses before purchase to ensure that thedesired focus can be achieved. The rubber eyecup cannot be attached when diopteradjustment viewfinder lenses used.
• Eyepiece Magnifier DG-2: Magnify the scene displayed in the center of the viewfinder forclose-up photography, copying, telephoto lenses, and other tasks that require addedprecision. Eyepiece adapter required (available separately). When the Eyepiece MagnifierDG-2 is attached, the eye sensor does not respond appropriately. If necessary, select Off for Shooting info auto off (A 123) in the setup menu.
• Eyepiece Adapter DK-22: Attach the Eyepiece Magnifier DG-2 to the D60.• Right-angle Viewing Attachment DR-6: The DR-6 attaches at a right angle to the
viewfinder eyepiece, allowing the image in the viewfinder to be viewed from above whenthe camera is in portrait orientation. When the Right-angle Viewing Attachment DR-6 isattached, the eye sensor does not respond appropriately. If necessary, select Off forShooting info auto off (A 123) in the setup menu.
Filters
• Nikon filters can be divided into three types: screw-in, slip-in, and rear-interchange. Use
Nikon filters; other filters may interfere with autofocus or electronic range finding.• The D60 cannot be used with linear polarizing filters. Use the C-PL circular polarizing filter
instead.• The NC and L37C filters are recommended for protecting the lens.• Moiré may occur if a filter is used when the subject is framed against a bright light or when
a bright light source is in the frame. Taking pictures without a filter is recommended.• Center-weighted metering (A 62) is recommended with filters with exposure factors
(filter factors) over 1× (Y48, O56, R60, X0, X1, C-PL, ND4S, ND8S, A2, A12, B2, B8, B12). Whenmatrix metering is selected, enough effect may not be expected. See the documentationprovided with filters for details.
Batteries• Rechargeable Li-ion Battery EN-EL9: Additional EN-EL9 batteries are available from local
retailers and Nikon service representatives.

7/31/2019 Nikon D60 User Manual En
http://slidepdf.com/reader/full/nikon-d60-user-manual-en 168/204156
Other Accessories
O p t i on a l A c c e s s or i e s
Up to date information is available at Nikon websites or from our latest product catalogs.
AC Adapter EH-5a/Power Connector EP-5
• Power Connector EP-5• AC Adapter EH-5a
Use the AC Adapter EH-5a to power the camera for extended periods. The PowerConnector EP-5 is required (available separately) to connect the AC adapter to the D60. The AC Adapter EH-5 can be used in place of the EH-5a. For more information about
connecting the AC adapter to the camera using power connector, see “Connecting thePower Connector and the AC Adapter” (A 157).
Body Cap BF-1A
The BF-1A keeps the mirror, viewfinder screen, and low-pass filter free of dust when a lens isnot in place.
Video Cable
• Video Cable EG-D100: View photographs on TV or record them to video tape byconnecting to television or VCR using video cable.
Wireless Remote Control ML-L3
Use as a remote shutter release for self-portraits or to prevent blur caused by camera shake. The ML-L3 uses a 3V CR2505 battery.
Replacing the Battery
Software
• Capture NX: A complete photo editing package offering support for RAW images, as wellas a variety of enhancement features, including those for editing white balance andapplying Color Control Points. Be sure to update to the latest version.*
• Camera Control Pro 2: Control the camera from a computer and save photographs todisk. Be sure to update to the latest version.*
* Nikon Message Center automatically check for updates if an Internet connection is detected atstartup.
1 2 3 4 5

7/31/2019 Nikon D60 User Manual En
http://slidepdf.com/reader/full/nikon-d60-user-manual-en 169/204157
O p t i on a l A c c e s s or i e s
Other Accessories
Connecting the Power Connector and the AC Adapter Turn off the camera before connecting the power connector and the AC adapter.
1 Open the battery-chamber 1 and power-connector 2
covers.
2 Insert the Power Connector EP-5 into the battery
chamber as shown at right, making sure the “+” and “–”
terminals are in the correct orientation.
3 Guide the power cord into the opening left by the
power connector cover and close the battery-chamber
cover.
4 Connect the AC Adapter EH-5a plug to the AC inlet on the AC adapter 3 and
the EH-5a DC plug to the EH-5 DC in connector 4. When the camera is
powered by the AC adapter, the battery-level indicator in the monitor will
showX.

7/31/2019 Nikon D60 User Manual En
http://slidepdf.com/reader/full/nikon-d60-user-manual-en 170/204158
O p t i on a l A c c e s s or i e s
Approved Memory Cards
The following memory cards have been tested and approved for use in the D60. All cards
of the designated make and capacity can be used, regardless of speed.
1 If the memory card will be used with a card reader or similar device, check that device supports 2GBcards.
2 SDHC compliant. If the memory card will be used with a card reader or similar device, check that device supports SDHC.
Operation is not guaranteed with other makes of card. Contact the manufacturer for
details on the above cards.
SanDisk 64MB, 128MB, 256MB, 512MB, 1GB, 2GB1, 4GB2
Toshiba 64MB, 128MB, 256MB, 512MB, 1GB, 2GB1, 4GB2
Panasonic 64MB, 128MB, 256MB, 512MB, 1GB, 2GB1, 4GB2, 8GB2
Lexar128MB, 256MB, 512MB, 1GBPlatinum II: 512MB, 1GB, 2GB1, 4GB2
Professional:1GB, 2GB1

7/31/2019 Nikon D60 User Manual En
http://slidepdf.com/reader/full/nikon-d60-user-manual-en 171/204159
M a x i mi z i n
g t h eL i f e of t h e C a m er a
Maximizing the Life of the
CameraCaring for the Camera
StorageWhen the camera will not be used for an extended period, turn the camera off, remove
the battery, and store the battery in a cool, dry area with the terminal cover in place. To
prevent mold or mildew, store the camera in a dry, well-ventilated area. Do not store the
camera with naphtha or camphor moth balls or in locations that:
• are poorly ventilated or subject to humidities of over 60%
• are next to equipment that produces strong electromagnetic fields, such as televisions
or radios• are exposed to temperatures above 50°C/122°F (for example, near a space heater or in a
closed vehicle in a hot day) or below –10°C (14°F)
Cleaning
B The Monitor
Should the monitor break, care should be taken to avoid injury caused by broken glass and to
prevent liquid crystal from the monitor from entering your eyes or mouth.
B Servicing the Camera and Accessories
The D60 is a precision device and requires regular servicing. Nikon recommends that the camera be
inspected by the original retailer or Nikon service representative once every one to two years, andthat it be serviced once every three to five years (note that fees apply to these services). Frequent
inspection and servicing are particularly recommended if the camera is used professionally. Any
accessories regularly used with the camera, such as lenses or optional Speedlights, should be
included when the camera is inspected or serviced.
Camera body
Use a blower to remove dust and lint, then wipe gently with a soft, dry cloth. After using thecamera at the beach or seaside, wipe off sand or salt with a cloth lightly dampened in
distilled water and dry thoroughly. Important: Dust or other foreign matter inside the cameramay cause damage not covered under warranty.
Lens, mirror, and viewfinder
These elements are made of glass and are easily damaged. Remove dust and lint with ablower. If using an aerosol blower, keep the can vertical to prevent the discharge of liquid. To remove fingerprints and other stains, apply a small amount of lens cleaner to a soft clothand clean with care.
Monitor
Remove dust and lint with a blower. When removing fingerprints and other stains, wipe the
surface lightly with a soft cloth or chamois leather. Do not apply pressure, as this could resultin damage or malfunction.
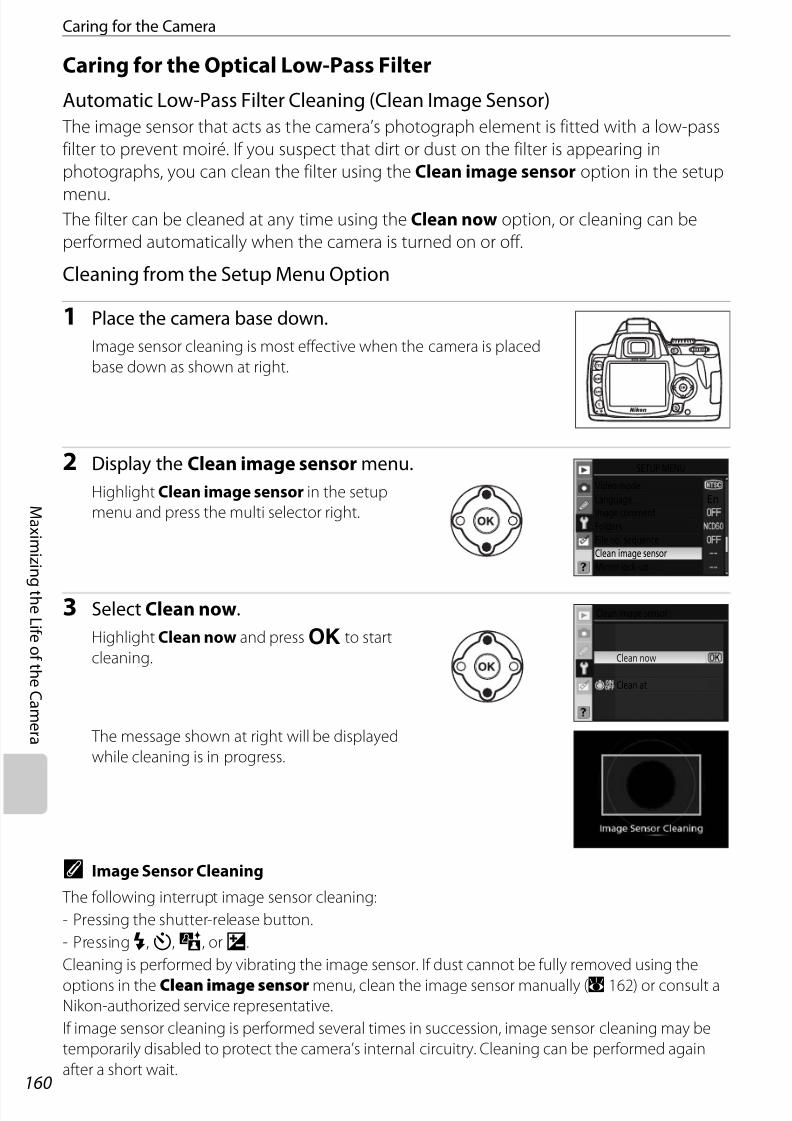
7/31/2019 Nikon D60 User Manual En
http://slidepdf.com/reader/full/nikon-d60-user-manual-en 172/204160
Caring for the Camera
M a x i mi z i n
g t h eL i f e of t h e C a m er a
Caring for the Optical Low-Pass Filter
Automatic Low-Pass Filter Cleaning (Clean Image Sensor)
The image sensor that acts as the camera’s photograph element is fitted with a low-pass
filter to prevent moiré. If you suspect that dirt or dust on the filter is appearing in
photographs, you can clean the filter using the Clean image sensor option in the setup
menu. The filter can be cleaned at any time using the Clean now option, or cleaning can be
performed automatically when the camera is turned on or off.
Cleaning from the Setup Menu Option
1 Place the camera base down.
Image sensor cleaning is most effective when the camera is placed
base down as shown at right.
2 Display the Clean image sensor menu.
Highlight Clean image sensor in the setup
menu and press the multi selector right.
3 Select Clean now.
Highlight Clean now and press Q to start
cleaning.
The message shown at right will be displayed
while cleaning is in progress.
C Image Sensor Cleaning
The following interrupt image sensor cleaning:
- Pressing the shutter-release button.
- PressingD, F, C, or A.
Cleaning is performed by vibrating the image sensor. If dust cannot be fully removed using the
options in the Clean image sensor menu, clean the image sensor manually (A 162) or consult aNikon-authorized service representative.
If image sensor cleaning is performed several times in succession, image sensor cleaning may be
temporarily disabled to protect the camera’s internal circuitry. Cleaning can be performed again
after a short wait.
SETUP MENU
Video mode
Language
Image comment
Folders
File no. sequence
Clean image sensor
Mirror lock-up
En
Clean now
Clean at
Clean image sensor

7/31/2019 Nikon D60 User Manual En
http://slidepdf.com/reader/full/nikon-d60-user-manual-en 173/204161
Caring for the Camera
M a x i mi z i n
g t h eL i f e of t h e C a m er a
Cleaning at Startup/Shutdown
1 Select Clean at.
Display the Clean image sensor menu as
described in step 2 of “Cleaning from the Setup
Menu Option” (A 160).
Highlight Clean at and press the multi selector
right.
2 Select an option.
Highlight one of the following options and press
Q.
G Startup
The image sensor is automatically cleaned
each time the camera is turned on.H Shutdown
The image sensor is automatically cleanedduring shutdown each time the camera isturned off.
I Startup and shutdown (default setting)
The image sensor is cleaned automaticallyat startup and shutdown.
J Cleaning off
Automatic image sensor cleaning off.
Clean image sensor
Clean now
Clean at
Startup
Shutdown
Startup and shutdown
Cleaning off
Clean image sensor
Clean at

7/31/2019 Nikon D60 User Manual En
http://slidepdf.com/reader/full/nikon-d60-user-manual-en 174/204162
Caring for the Camera
M a x i mi z i n
g t h eL i f e of t h e C a m er a
Cleaning the Low-Pass Filter Manually
If image sensor cleaning (A 160) is unable to completely remove dirt or dust from the
filter, you can clean the filter as described below. Note, however, that the filter is extremely
delicate and easily damaged. Nikon recommends that the filter be cleaned only by Nikon-
authorized service personnel. To prevent the camera from powering off while the mirror is
raised, use a fully-charged battery or an optional AC Adapter EH-5a with a Power
Connector EP-5 (A 156).
1 Turn the camera off and remove the lens, and turn the camera on.
Do not turn the camera on until after the lens has been removed.
2 Select Mirror lock-up from the setup menu.
Note that this option is not available at battery levels of W or below.
3 Highlight On and press OK.
The message shown at right will be displayed. To restore normaloperation without inspecting the low-pass filter, turn the camera off.
4 Press the shutter-release button all the way down.
The mirror will be raised and the shutter curtain will open, revealing
the low-pass filter.
5 Holding the camera so that light falls on the low-pass
filter, examine the filter for dust or lint.
If no foreign objects are present, proceed to step 7.
B Use a Reliable Power Source
The shutter curtain is delicate and easily damaged. If the camera turns off with the mirror raised, the
curtain will close automatically. To prevent damage to the curtain, observe the following
precautions:
• Do not turn the camera off until cleaning or inspection is complete. Do not remove or disconnectthe power source while the mirror is raised.
• If the battery runs low while the mirror is raised, a beep will sound and the AF-assist illuminator will
blink to warn that the shutter curtain will close and the mirror will be lowered after about two
minutes. End cleaning or inspection immediately.
Mirror lock–up
When shutter buttonis pressed, the mirrorlifts and shutter opens.To lower mirror, turncamera off.

7/31/2019 Nikon D60 User Manual En
http://slidepdf.com/reader/full/nikon-d60-user-manual-en 175/204163
Caring for the Camera
M a x i mi z i n
g t h eL i f e of t h e C a m er a
6 Remove any dust and lint from the filter with a blower.
Do not use a blower-brush, as the bristles could damage the filter.
Dirt that cannot be removed with a blower can only be removed by
Nikon-authorized service personnel. Under no circumstances should
you touch or wipe the filter.
7 Turn the camera off.
The mirror will be lowered and the shutter curtain will close. Replace the lens or body cap.
B Foreign Matter on the Low-Pass Filter
Nikon takes every possible precaution to prevent foreign matter from coming into contact with the
low-pass filter during production and shipping. The D60, however, is designed to be used with
interchangeable lenses, and foreign matter may enter the camera when lenses are removed or
exchanged. Once inside the camera, this foreign matter may adhere to the low-pass filter, where it
may appear in photographs taken under certain conditions. To protect the camera when no lens is
in place, be sure to replace the body cap provided with the camera, being careful to first remove all
dust and other foreign matter that may be adhering to the body cap.
Should foreign matter find its way onto the low-pass filter, clean the filter as described above, or
have it cleaned by authorized Nikon service personnel. Photographs affected by the presence of
foreign matter on the filter can be retouched using Capture NX (available separately;A 156) or the
clean image options available in some third-party imaging applications.

7/31/2019 Nikon D60 User Manual En
http://slidepdf.com/reader/full/nikon-d60-user-manual-en 176/204164
M a x i mi z i n
g t h eL i f e of t h e C a m er a
Caring for the Camera and Battery: Cautions
The Camera and LensDo not drop: The product may malfunction if subjected to strong shocks or vibration.
Keep dry: This product is not waterproof, and may malfunction if immersed in water or
exposed to high levels of humidity. Rusting of the internal mechanism can causeirreparable damage.
Avoid sudden changes in temperature: Sudden changes in temperature, such as
occur when entering or leaving a heated building on a cold day, can cause condensation
inside the device. To prevent condensation, place the device in a carrying case or plastic
bag before exposing it to sudden changes in temperature.
Keep away from strong magnetic fields: Do not use or store this device in the vicinity
of equipment that generates strong electromagnetic radiation or magnetic fields. Strong
static charges or the magnetic fields produced by equipment such as radio transmitters
could interfere with the monitor, damage data recorded on the memory card, or affect theproduct’s internal circuitry.
Do not leave the lens pointed at the sun : Do not leave the lens pointed at the sun or
other strong light source for an extended period. Intense light may cause the image
sensor to deteriorate or produce a white blur effect in photographs.
Do not touch the shutter curtain: The shutter curtain is extremely thin and easily
damaged. Under no circumstances should you exert pressure on the curtain, poke it with
cleaning tools, or subject it to powerful air currents from a blower. These actions could
scratch, deform, or tear the curtain.Handle all moving parts with care: Do not apply force to the battery-chamber, card-
slot, or connector covers. These parts are especially susceptible to damage.
Lens contacts: Keep the lens contacts clean.
Turn the product off before removing or disconnecting the power source: Do not
unplug the product or remove the battery while the product is on or while images are
being recorded or deleted. Forcibly cutting power in these circumstances could result in
loss of data or in damage to product memory or internal circuitry. To prevent an accidental
interruption of power, avoid carrying the product from one location to another while the
AC adapter is connected.
Cleaning: When cleaning the camera body, use a blower to gently remove dust and lint,
then wipe gently with a soft, dry cloth. After using the camera at the beach or seaside,
wipe off any sand or salt using a cloth lightly dampened in pure water and then dry the
camera thoroughly.
The lens and mirror are easily damaged. Dust and lint should be gently removed with a
blower. When using an aerosol blower, keep the can vertical to prevent discharge of
liquid. To remove fingerprints and other stains from the lens, apply a small amount of lens
cleaner to a soft cloth and wipe the lens carefully.See “Cleaning the Low-Pass Filter Manually” (A 162) for information about cleaning the
low-pass filter.

7/31/2019 Nikon D60 User Manual En
http://slidepdf.com/reader/full/nikon-d60-user-manual-en 177/204165
Caring for the Camera and Battery: Cautions
M a x i mi z i n
g t h eL i f e of t h e C a m er a
Storage: To prevent mold or mildew, store the camera in a dry, well-ventilated area. If the
product will not be used for an extended period, remove the battery to prevent leakage
and store the camera in a plastic bag containing a desiccant. Do not, however, store the
camera case in a plastic bag, as this may cause the material to deteriorate. Note that
desiccant gradually loses its capacity to absorb moisture and should be replaced at regular
intervals.
To prevent mold or mildew, take the camera out of storage at least once a month. Turnthe camera on and release the shutter a few times before putting it away.Store the battery in a cool, dry place. Replace the terminal cover before putting the battery away.
Notes on the monitor: The monitor may contain a few pixels that are always lit or that do
not light. This is common to all TFT LCD monitors and does not indicate a malfunction.
Images recorded with the product are unaffected.
Images in the monitor may be difficult to see in a bright light.
Do not apply pressure to the monitor, as this could cause damage or malfunction. Dust or
lint on the monitor can be removed with a blower. Stains can be removed by wipinglightly with a soft cloth or chamois leather. Should the monitor break, care should be taken
to avoid injury from broken glass and to prevent liquid crystal from the monitor touching
the skin or entering the eyes and mouth.

7/31/2019 Nikon D60 User Manual En
http://slidepdf.com/reader/full/nikon-d60-user-manual-en 178/204166
Caring for the Camera and Battery: Cautions
M a x i mi z i n
g t h eL i f e of t h e C a m er a
The BatteryDirt on the battery terminals can prevent the camera from functioning and should be
removed with a soft, dry cloth before use. After removing the battery from the camera, be
sure to replace the terminal cover.
Charge the battery before use. When taking photographs on important occasions, ready a
spare EN-EL9 battery and keep it fully charged. Depending on your location, it may be
difficult to purchase replacement batteries on short notice.
On cold days, the capacity of batteries tends to decrease. Be sure the battery is fully
charged before taking photographs outside in cold weather. Keep a spare battery in a
warm place and exchange the two as necessary. Once warmed, a cold battery may
recover some of its charge.
Continuing to charge the battery after it is fully charged can impair battery performance.
Batteries may leak or explode if improperly handled. Observe the following precautions
when handling batteries:
• Turn the product off before replacing the battery.
• The battery may become hot when used for extended periods. Observe due caution
when handling the battery.
• Use only batteries approved for use in this equipment.
• Do not expose the battery to flame or excessive heat.
• After removing the battery from the camera, replace the terminal cover.
Used batteries are a valuable resource. Please recycle used batteries in accord with local
regulations.

7/31/2019 Nikon D60 User Manual En
http://slidepdf.com/reader/full/nikon-d60-user-manual-en 179/204167
T e c h ni c a l N o t e s
Technical Notes
Troubleshooting
If the camera fails to function as expected, check the list of common problems below
before consulting your retailer or Nikon representative. Refer to the page numbers in theright-most column for more information.
Display
C A Note on Electronically-Controlled Cameras
In extremely rare instances, a strong external static charge
may cause the camera to stop functioning. Turn the
camera off, remove and replace the battery (note that the
battery may be hot) or disconnect and reconnect the AC
adapter, and turn the camera on again. If the problem
persists, turn the camera off and press the reset switch (see
right; note that this resets the clock). Note that any data
not recorded to the memory card at the time the problem
occurred may be deleted. In the event of continued
malfunction, contact your retailer or a Nikon-authorized service representative.
Problem Solution A
Viewfinder is out of focus.
Adjust viewfinder focus or use optional diopter adjustmentlenses.
26, 155
Displays turn off
without warning.
Choose a longer auto off delay in the auto off timers option in
the Custom Settings menu. 114
Shooting informationdisplay will not turnon.
• Shooting information is not displayed when the shutter-release button is pressed halfway and then released when Off is selected for Auto shooting info.
• Shooting information is not displayed while the shutter-release button is pressed halfway.
• The Shooting info auto off function is on and the eye sensorhas been activated.
• When On is selected for Custom Setting 07 (Image review),the monitor will turn off and shooting information is not
displayed when no operations are performed while thephotograph is displayed after shooting.
• The battery is exhausted.
122
30
123
111
16
Camera stopsfunctioning.
See “A Note on Electronically-Controlled Cameras,” below. —
Display in viewfinderis unresponsive anddim.
The response times and brightness of the viewfinder displayvaries with temperature.
—
Viewfinder display willnot turn on.
The viewfinder display turns off when shooting information is
displayed if On is selected for Shooting info auto off and theeye sensor is activated. Select Off to turn on the viewfinderdisplay when shooting information is displayed.
123
Reset switch
Connectorcover

7/31/2019 Nikon D60 User Manual En
http://slidepdf.com/reader/full/nikon-d60-user-manual-en 180/204168
Troubleshooting
T e c h ni c a l N o t e s
Shooting
All shooting modes
Problem Solution A
Camera takes time to
turn on.
Delete files or folders. —
Shutter release isdisabled.
• Memory card is full, locked, or not inserted.
• Flash is charging.• Camera is not in focus.• CPU lens with aperture ring attached without locking aperture
at highest f-number.• Non-CPU lens is attached: rotate camera mode dial to d.
23, 25,283357
19, 40
146
Final photo is largerthan area shown in
viewfinder.
Viewfinder horizontal and vertical frame coverage is
approximately 95%.
—
Image in viewfinder isnot in focus.
• Manual focus selected: if AF-S or AF-I lens is attached, chooseautofocus mode. Otherwise focus manually.
• Camera unable to focus using autofocus: use manual focus orfocus lock.
• Lens is not AF-S or AF-I: use manual focus.
61
38, 60,61
61, 146
Menu item is notdisplayed.
Select Full for CSM/Setup menu. 118
Image size cannot be
changed. Select an image quality setting other thanU orX. 50
Cannot select focuspoint.
• Closest subject selected for AF-area mode: choose anothermode.
• Press the shutter-release button halfway to activate exposuremeters.
• Focus point cannot be selected when playing back photographs or displaying the menus.
58
33
—
Camera is slow torecord photos.
• Turn Active D-Lighting off.• Turn noise reduction off.
69108

7/31/2019 Nikon D60 User Manual En
http://slidepdf.com/reader/full/nikon-d60-user-manual-en 181/204169
Troubleshooting
T e c h ni c a l N o t e s
a, b, c, and d modes
Randomly-spacedbright pixels (“noise”)appears inphotographs.
• Lower ISO sensitivity or use noise reduction.• Shutter speed is slower than 8s: use noise reduction.
53, 108108
AF-assist illuminatordoes not light.
• Mode dial rotated to h or j: select another mode.• AF-assist lamp does not light for manual focus, continuous-
servo autofocus, or when focus mode automatically switchesfrom auto-servo AF to continuous-servo AF. Chooseb.
• Center focus point is not selected: select center focus point• Choose On for Custom Setting 9 (AF-assist).• Illuminator has turned off automatically. Illuminator may
become hot with continued use; wait for lamp to cool down.
6,36–3757
59111—
No photo taken when
remote controlshutter-releasebutton is pressed.
• Replace battery in remote control.• Choose remote control mode.• Flash is charging.• Time selected for Custom Setting 17 (Remote on duration)
has passed: reselect remote control mode.• Extreme backlighting may interfere with remote control
shooting.
1565533
115
—
Dirt or dust appears inphotographs.
Clean lens and low-pass filter. 159, 162
Menu item cannot beselected.
Rotate mode dial to another setting or insert memory card. 6, 23
Date cannot beimprinted.
Date cannot be imprinted on photographs taken whenU or
X is selected for Image quality in the shooting menu. 50
Problem Solution A
Shutter release isdisabled.
• Non-CPU lens is attached: rotate camera mode dial to d.
• Mode dial rotated to b after shutter speed of “bulb” or “time“
selected in mode d: choose new shutter speed.
44, 146
42, 44
Problem Solution A

7/31/2019 Nikon D60 User Manual En
http://slidepdf.com/reader/full/nikon-d60-user-manual-en 182/204170
Troubleshooting
T e c h ni c a l N o t e s
Playback
Reddish areas appearin photos.
Reddish areas may appear in long time-exposures. Turn noisereduction on when taking pictures at shutter speeds of “bulb” or“time”.
46, 108
Full range of shutterspeeds not available.
Flash in use. 179
Focus does not lock when shutter-releasebutton is pressedhalfway.
Use H to lock focus inc autofocus mode or whenphotographing moving subjects ina mode.
57, 60
Colors are unnatural• Adjust white balance to match light source.
• Adjust Optimize image settings.
52, 103,104, 105
101
Cannot measurewhite balance.
Subject is too dark or too bright. 105
Image cannot beselected as source forpreset manual.
Image was not created with D60. 107
Inconsistent resultswith a series of photographs.
Select Custom in Optimize image and choose a setting otherthan Auto for image sharpening and tone compensation.
102
Metering cannot bechanged.
Autoexposure lock in effect. 63
Only one shot takeneach time shutter-release button ispressed in continuousrelease mode.
Continuous shooting is not available when built-in flash isrequired.
54, 64,66
Problem Solution A
RAW image is notplayed back.
When photo was taken at image quality of NEF+ JPEG, only theJPEG image will be played back.
50
Some photos are notdisplayed duringplayback.
Select All for Playback folder. Note that Current willautomatically be selected when next photo is taken.
97
Flashing areas appearin images.
Photo information, “Highlights” is displayed. 73, 75
Shooting data appear
on images.
Photo information, “Shooting data“ is displayed. 73, 74
A graph appearsduring playback.
Photo information, “Histogram“ is displayed. 73, 75
Problem Solution A

7/31/2019 Nikon D60 User Manual En
http://slidepdf.com/reader/full/nikon-d60-user-manual-en 183/204171
Troubleshooting
T e c h ni c a l N o t e s
Others
“Tall” (portrait)orientation photosare displayed in“wide” (landscape)orientation.
• Select On for Rotate tall.• Photo was taken with Off selected for Auto image rotation.• Camera orientation was changed while the shutter-release
button was pressed in continuous release mode.• Camera was pointed up or down when photo was taken.
98128128
128
Cannot delete photo.Photo is protected: remove protection.Slide write-protect switch to “write” position.
7825
Message displayedstating that noimages are availablefor playback.
Select All for Playback folder. Note that Current willautomatically be selected when next photo is taken.
97
Image not displayedafter shooting.
Select On for Image review in Custom Settings menu. 111
Cannot retouchphoto.
• Some retouch options cannot be applied to copies.• Photo created or modified with other device. 130
Cannot change printorder.
Memory card is full or locked. 25, 28
Cannot select photofor printing.
• Photo is in RAW (NEF) format. Create JPEG-format copy fromNEF (RAW) photo using Quick retouch or NEF (RAW)processing in the retouch menu.
• Transfer to computer and print using ViewNX or Capture NX.
140
80, 83
Photo is not displayedon TV.
Choose correct video mode. 92, 123
Cannot transferphotographs to acomputer.
If your computer is running Windows 2000 Professional, cameracannot be connected to the computer.
82
Cannot open imageswith Capture NX.
Update software to latest version. 51, 156
Cannot use CameraControl Pro 2.
Update software to latest version. 156
Problem Solution A
Date of recording isnot correct.
Set camera clock. 21
Cannot select someitems displayed in themenu screen.
Some menu items are not available depending on the currentcamera settings.
176
Menu item is notdisplayed. Select Full for CSM/Setup menu. 118
Problem Solution A

7/31/2019 Nikon D60 User Manual En
http://slidepdf.com/reader/full/nikon-d60-user-manual-en 184/204172
T e c h ni c a l N o t e s
Camera Error Messages and Displays
This section lists common warning indicators and error messages that appear in the
viewfinder and monitor.
D Help
A blinkingF is displayed in the monitor or a blinking L (warning indicator) displayed in the
viewfinder indicates that a description of the current problem can be viewed by pressing M.
Message Viewfinder Solution A
Lock lens aperture ring atminimum aperture (largest
f-number).Fee
(blinks)Lock ring at minimum aperture (largest f-number).
19, 40
Lens not attached.Fww / L(blinks) • No lens attached: attach lens.
• Attached lens is not CPU lens: select moded.
1840, 44,62, 146Attach a lens.
Fww / J(blinks)
Shutter release disabled.Recharge battery.
D(blinks)
Turn camera off and recharge battery orreplace with fully-charged spare battery.
16, 28
This battery cannot be used.Choose battery designated
for use in this camera.
D(blinks)
Insert EN-EL9 battery. 16–17
Initialization error. Turncamera off and then on
again.
D(blinks)
Turn camera off, remove and reinsertbattery, and then turn camera on again.
6, 16–17
Battery level is low.Complete operation and
turn cameraoff immediately.
—End cleaning or inspection of low-pass filterand turn camera off immediately.
162
Clock not set.L
(blinks)Set camera clock. 21
No SD card inserted. IwewJ Insert memory card. 23–24
—A
(blinks)Subject is not in focus. Recompose or focusmanually.
61
Memory card is locked.Slide lock to “write” position.
Cha(blinks)
Slide card write-protect switch to “write”position.
23

7/31/2019 Nikon D60 User Manual En
http://slidepdf.com/reader/full/nikon-d60-user-manual-en 185/204
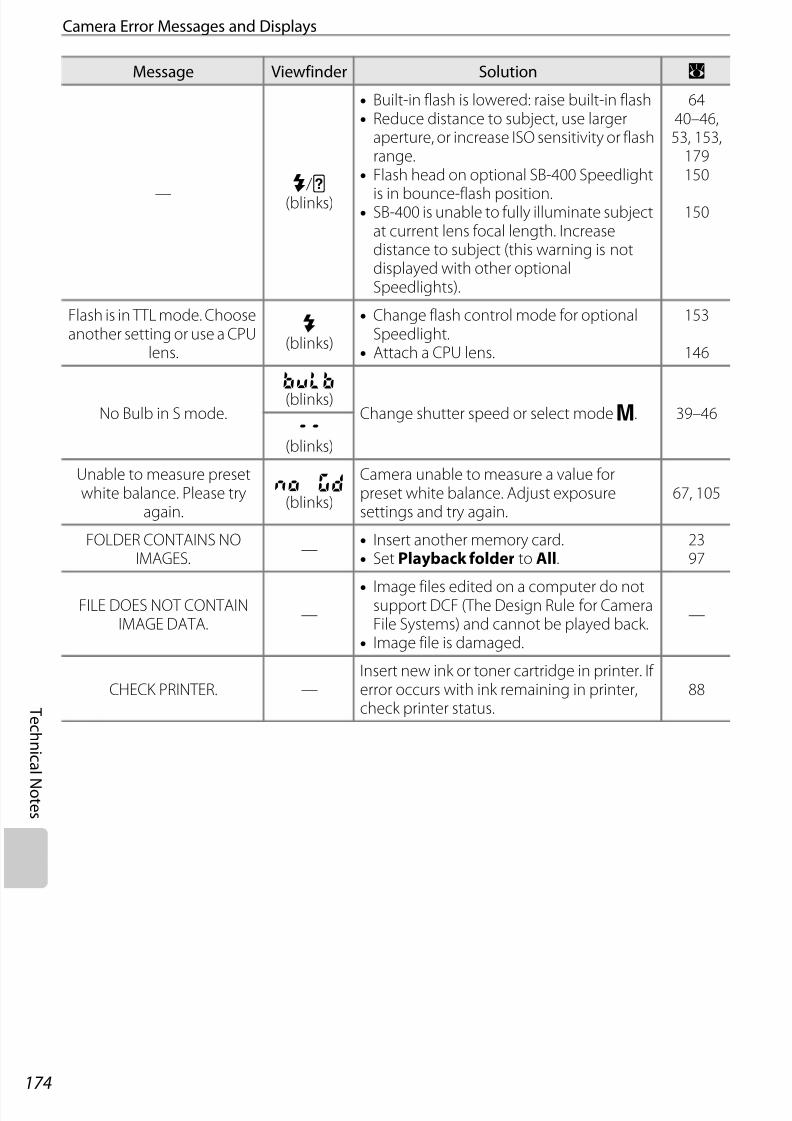
7/31/2019 Nikon D60 User Manual En
http://slidepdf.com/reader/full/nikon-d60-user-manual-en 186/204174
Camera Error Messages and Displays
T e c h ni c a l N o t e s
—J / L
(blinks)
• Built-in flash is lowered: raise built-in flash• Reduce distance to subject, use larger
aperture, or increase ISO sensitivity or flashrange.
• Flash head on optional SB-400 Speedlight
is in bounce-flash position.• SB-400 is unable to fully illuminate subject
at current lens focal length. Increasedistance to subject (this warning is notdisplayed with other optionalSpeedlights).
6440–46,53, 153,
179150
150
Flash is in TTL mode. Chooseanother setting or use a CPU
lens.
J(blinks)
• Change flash control mode for optionalSpeedlight.
• Attach a CPU lens.
153
146
No Bulb in S mode.
bulb(blinks)
Change shutter speed or select mode d. 39–46ww
(blinks)
Unable to measure presetwhite balance. Please try
again.
no gd(blinks)
Camera unable to measure a value forpreset white balance. Adjust exposuresettings and try again.
67, 105
FOLDER CONTAINS NOIMAGES.
—• Insert another memory card.• Set Playback folder to All.
2397
FILE DOES NOT CONTAINIMAGE DATA.
—• Image files edited on a computer do not
support DCF (The Design Rule for CameraFile Systems) and cannot be played back.
• Image file is damaged.
—
CHECK PRINTER. —Insert new ink or toner cartridge in printer. If error occurs with ink remaining in printer,check printer status.
88
Message Viewfinder Solution A

7/31/2019 Nikon D60 User Manual En
http://slidepdf.com/reader/full/nikon-d60-user-manual-en 187/204175
Camera Error Messages and Displays
T e c h ni c a l N o t e s
Error. Press shutter releasebutton again.
err(blinks)
Press shutter-release button again. If errorpersists, consult with Nikon-authorizedservice representative.
32–33
Initialization error. ContactNikon-authorized service
representative.
err
(blinks)
Contact Nikon-authorized service
representative.
Message Viewfinder Solution A

7/31/2019 Nikon D60 User Manual En
http://slidepdf.com/reader/full/nikon-d60-user-manual-en 188/204176
T e c h ni c a l N o t e s
Appendix
Available Settings and Defaults The following defaults are restored with Custom Setting R (Reset).
1 Reset with two-button reset (A 70).
2 Reset when the mode dial is rotated to new setting in e, f, g, h, i, j, or k mode.
Defaults for other settings are listed below.
Custom settings e f g h i j k l a b c d
01 Beep On
02 Focus mode1 AF-A (Set to MF with some lenses)
03 AF-area mode1, 2 Closest subjectDynamicarea
Single
pointClosest subject
04 Release mode1 Single frame
05 Metering1 Matrix (fixed) Matrix
06 No memory card? Release locked
07 Image review On
08 Flash compensation1 — 0.0
09 AF-assist OnOff
(fixed)On
Off (fixed)
On
10 ISO auto — Off
11 F / G button Self-timer
12 AE-L/AF-L AE/AF lock
13 AE lock Off 14 Built-in flash — TTL
15 Auto off timers Normal
16 Self-timer 10 s
17 Remote on duration 1 min.
18 Date imprint Off
19 Rangefinder Off
Playback menu e f g h i j k l a b c d
Playback folder Current
Rotate tall On
Slide show >
Frame interval
2 s

7/31/2019 Nikon D60 User Manual En
http://slidepdf.com/reader/full/nikon-d60-user-manual-en 189/204

7/31/2019 Nikon D60 User Manual En
http://slidepdf.com/reader/full/nikon-d60-user-manual-en 190/204178
Appendix
T e c h ni c a l N o t e s
Memory Card Capacity and Image Quality/Size The following table shows the approximate number of photographs that can be recordedon a 1GB memory card at different image quality and size settings1.
All figures are approximate; actual file size and memory card capacity may vary with scenerecorded and make of memory card.
1 When Panasonic PRO HIGH SPEED memory card is used.
2 All figures are approximate and assume average file size.
3 Maximum number of photographs that can be taken before shooting stops. Actual number of framesmay vary with make of memory card. Additional photographs can be taken as soon as enough memoryis available in memory buffer.
4 Combined NEF (RAW) and JPEG file sizes.
Exposure Program (Mode P) The exposure program for mode P is shown in the following graph.
The maximum and minimum values for EV vary with ISO sensitivity; the above graph
assumes an ISO sensitivity of ISO 100. When matrix metering is used, values over 161 / 3 EV
are reduced to 16 1 / 3 EV.
Image quality Image size File size (MB)2 Number of images Buffer capacity3
RAW — 9.0 79 6
FINE
L 4.8 129 100
M 2.7 225 100
S 1.2 487 100
NORMAL
L 2.4 251 100
M 1.3 431 100
S 0.6 888 100
BASICL 1.2 487 100M 0.7 839 100
S 0.3 1500 100
RAW+BASIC —/L 10.14 70 6
f (lens focal length)≤55mm135mm≥ f>55mmf>135mm
A p er t ur e
Shutter speed

7/31/2019 Nikon D60 User Manual En
http://slidepdf.com/reader/full/nikon-d60-user-manual-en 191/204179
Appendix
T e c h ni c a l N o t e s
Flash ControlFlash output is adjusted using one of the following systems when a CPU lens is used in
combination with the built-in flash or optional SB-400, SB-800, or SB-600 Speedlights.
Standard i-TTL flash control is used with spot metering (A 62) or when selected with the
optional Speedlight. i-TTL balanced fill-flash for digital SLR is used in all other cases.
Shutter Speeds Available with the Built-in Flash
Aperture, Sensitivity, and Flash Range
Flash range varies with sensitivity (ISO equivalency) and aperture.
i-TTL Balanced Fill-Flash for Digital SLR
Flash output is adjusted for a natural balance between the main subject and the
background.Standard i-TTL Fill-Flash for Digital SLR
Flash output is adjusted for the main subject; the brightness of the background is not takeninto account. Recommended for use with exposure compensation, for shots in which themain subject is emphasized at the expense of background details.
Mode Shutter speed Mode Shutter speed
e, g, i, a, c 1 / 200–1 / 60s b 1 / 200–30s
k 1 / 200–1 / 125s d 1 / 200–30s, Bulb
l 1 / 200–1s
ISO equivalentRange (m/ft.)
100 200 400 800 1600
A p
er t ur e
1.4 2 2.8 4 5.6 1.0–8.5 (3ft. 3 in.–27ft. 11in.)
2 2.8 4 5.6 8 0.7–6.0 (2ft. 4in.–19ft. 8in.)
2.8 4 5.6 8 11 0.6–4.2 (2ft.–13ft. 9in.)
4 5.6 8 11 16 0.6–3.0 (2ft.–9ft. 10in.)
5.6 8 11 16 22 0.6–2.1 (2ft.–6ft. 11in.)
8 11 16 22 32 0.6–1.5 (2ft.–4ft. 11in.)
11 16 22 32 — 0.6–1.1 (2ft.–3ft. 7 in.)
16 22 32 — — 0.6–0.7 (2ft.–2ft. 4in.)

7/31/2019 Nikon D60 User Manual En
http://slidepdf.com/reader/full/nikon-d60-user-manual-en 192/204180
T e c h ni c a l N o t e s
Specifications
Nikon D60 Digital Camera
Type
Type Single-lens reflex digital camera
Lens mount Nikon F mount (with AF contacts)
Effective picture angle Approx. 1.5 × lens focal length (Nikon DX format)
Effective pixels 10.2 million
Image sensor
Image sensor 23.6 × 15.8 mm CCD sensor
Total pixels 10.75 million
Dust-reduction SystemImage sensor cleaning, Image Dust Off reference data(optional Capture NX software required)
Storage
Image size (pixels) • 3,872 × 2,592• 2,896 × 1,944• 1,936 × 1,296
File format
• NEF (RAW): 12-bit compressed• JPEG: JPEG-Baseline compliant with fine (approx. 1 : 4), normal
(approx. 1 : 8), or basic (approx. 1 : 16) compression• NEF (RAW)+JPEG: Single photograph recorded in both NEF
(RAW) and JPEG formats
Media SD (Secure Digital) memory cards, SDHC-compliant
File system
DCF (Design Rule for Camera File System) 2.0, DPOF (Digital Print
Order Format), Exif 2.21 (Exchangeable Image File Format for DigitalStill Cameras), PictBridge
Viewfinder
Viewfinder Eye-level penta-Dach mirror single-lens reflex viewfinder
Frame coverage Approx. 95 % horizontal and 95 % vertical
Magnification Approx. 0.80 × (50mm f/1.4 lens at infinity, –1.0 m-1)
Eyepoint 18 mm (–1.0 m-1)
Diopter adjustment –1.7 – +0.5 m-1
Focusing screen Type B BriteView Clear Matte screen Mark V
Reflex mirror Quick return
Lens aperture Instant return, electronically controlled

7/31/2019 Nikon D60 User Manual En
http://slidepdf.com/reader/full/nikon-d60-user-manual-en 193/204181
Specifications
T e c h ni c a l N o t e s
Lens
Compatible lenses
• AF-S and AF-I NIKKOR: All functions supported• Type G or D AF NIKKOR not equipped with an autofocus
motor: All functions supported except autofocus.• Non-Type G or D AF NIKKOR not equipped with an autofocus
motor: All functions supported except 3D color matrix metering IIand autofocus.
• IX-NIKKOR and AF-NIKKOR for F3AF: Not supported.• Type D PC NIKKOR: All functions supported except some
shooting modes.• AI-P NIKKOR: All functions supported except 3D color matrix
metering II• Non-CPU: Autofocus not supported. Can be used in exposure
mode d, but exposure meter does not function.• Lens with maximum aperture of f/5.6 or faster: Electronic
rangefinder can be used.
Shutter
Type Electronically-controlled vertical-travel focal-plane shutter
Speed1 / 4000-30 s in steps of 1 / 3 EV, Bulb, Time (optional Wireless RemoteControl ML-L3 required)
Flash sync speed X=1 / 200 s; synchronizes with shutter at 1 / 200 s or slower
Release
Release modeSingle frame, ContinuousSelf-timer, Remote control (optional Wireless Remote Control ML-L3required)
Frame advance rate
Up to 3 fps (by selecting Manual focus mode, rotating the mode
dial to Shutter-priority auto or Manual mode, selecting a shutterspeed of 1 / 250s or faster, and using defaults for all other settings).
Self-timer Can be selected from 2, 5, 10, and 20 s duration
Exposure
Metering TTL exposure metering using 420-segment RGB sensor
Metering method
• Matrix: 3D color matrix metering II (type G and D lenses); colormatrix metering II (other CPU lenses)
• Center-weighted: Weight of 75 % given to 8-mm circle in centerof frame
• Spot: Meters 3.5-mm circle (about 2.5 % of frame) centered onselected focus point (on center focus point when non-CPU lens isused)
Range (ISO 100, f/1.4lens, 20°C/68°F)
• Matrix or center-weighted metering: 0–20 EV • Spot metering: 2–20 EV
Exposure metercoupling
Combined CPU
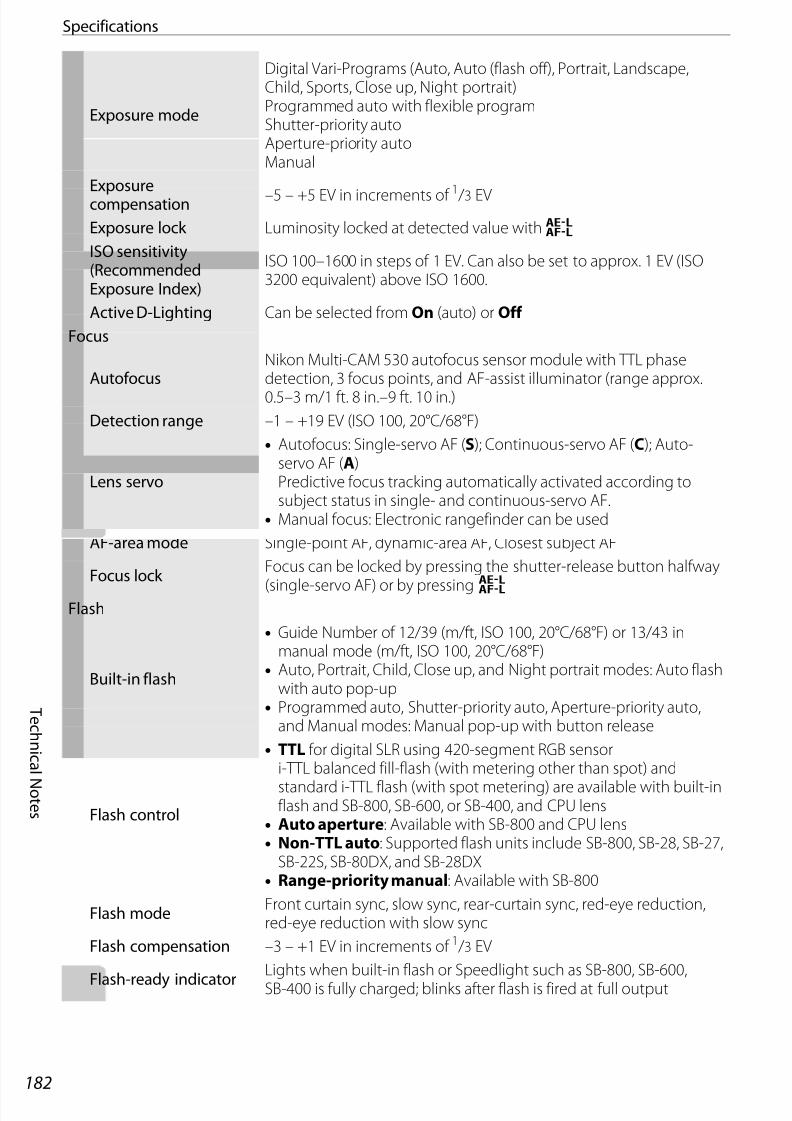
7/31/2019 Nikon D60 User Manual En
http://slidepdf.com/reader/full/nikon-d60-user-manual-en 194/204182
Specifications
T e c h ni c a l N o t e s
Exposure mode
Digital Vari-Programs (Auto, Auto (flash off), Portrait, Landscape,Child, Sports, Close up, Night portrait)Programmed auto with flexible programShutter-priority autoAperture-priority autoManual
Exposurecompensation –5 – +5 EV in increments of 1 / 3 EV
Exposure lock Luminosity locked at detected value with HISO sensitivity(RecommendedExposure Index)
ISO 100–1600 in steps of 1 EV. Can also be set to approx. 1 EV (ISO3200 equivalent) above ISO 1600.
Active D-Lighting Can be selected from On (auto) or Off
Focus
AutofocusNikon Multi-CAM 530 autofocus sensor module with TTL phasedetection, 3 focus points, and AF-assist illuminator (range approx.
0.5–3 m/1 ft. 8 in.–9 ft. 10 in.)
Detection range –1 – +19 EV (ISO 100, 20°C/68°F)
Lens servo
• Autofocus: Single-servo AF (S); Continuous-servo AF (C); Auto-servo AF (A)Predictive focus tracking automatically activated according tosubject status in single- and continuous-servo AF.
• Manual focus: Electronic rangefinder can be used
AF-area mode Single-point AF, dynamic-area AF, Closest subject AF
Focus lock Focus can be locked by pressing the shutter-release button halfway
(single-servo AF) or by pressing HFlash
Built-in flash
• Guide Number of 12/39 (m/ft, ISO 100, 20°C/68°F) or 13/43 inmanual mode (m/ft, ISO 100, 20°C/68°F)
• Auto, Portrait, Child, Close up, and Night portrait modes: Auto flashwith auto pop-up
• Programmed auto, Shutter-priority auto, Aperture-priority auto,and Manual modes: Manual pop-up with button release
Flash control
• TTL for digital SLR using 420-segment RGB sensori-TTL balanced fill-flash (with metering other than spot) and
standard i-TTL flash (with spot metering) are available with built-inflash and SB-800, SB-600, or SB-400, and CPU lens
• Auto aperture: Available with SB-800 and CPU lens• Non-TTL auto: Supported flash units include SB-800, SB-28, SB-27,
SB-22S, SB-80DX, and SB-28DX• Range-priority manual: Available with SB-800
Flash modeFront curtain sync, slow sync, rear-curtain sync, red-eye reduction,red-eye reduction with slow sync
Flash compensation –3 – +1 EV in increments of 1 / 3 EV
Flash-ready indicatorLights when built-in flash or Speedlight such as SB-800, SB-600,SB-400 is fully charged; blinks after flash is fired at full output

7/31/2019 Nikon D60 User Manual En
http://slidepdf.com/reader/full/nikon-d60-user-manual-en 195/204183
Specifications
T e c h ni c a l
N o t e s
• Unless otherwise stated, all figures are for a camera with a fully-charged batteryoperating at an ambient temperature of 20 °C (68 °F).
C Specifications
Nikon reserves the right to change the specifications of the hardware and software described in this
manual at any time and without prior notice. Nikon will not be held liable for damages that may
result from any mistakes that this manual may contain.
Accessory shoe Standard ISO 518 hot-shoe contact with safety lock
Nikon CreativeLighting System (CLS)
• Flash Color Information Communication supported with built-inflash and Nikon Creative Lighting System compatible Speedlight
• Advanced Wireless Lighting supported with SB-800, or SU-800 ascommander
Sync terminal Hot Shoe Sync Terminal Adapter AS-15 (available separately)
White balance8 modes (when AUTO is selected, TTL white-balance with mainimage sensor and 420-segment RGB sensor is available); fine-tuningpossible
Monitor2.5-in., approx. 230k-dot, low-temperature polysilicon TFT LCD,brightness adjustment, and automatic off via eye sensor possible
Playback Full-frame and thumbnail (four or nine images) playback withplayback zoom, slide show, histogram display, highlights, auto imagerotation, and stop-motion movies created with the D60
Interface
USB Hi-Speed USBData transfer protocol: MTP, PTP
Video output Can be selected from NTSC and PAL
Supported languagesChinese (Simplified and Traditional), Dutch, English, Finnish, French,German, Italian, Japanese, Korean, Polish, Portuguese, Russian,Spanish, Swedish
Power source
Battery One EN-EL9 Rechargeable Li-ion Battery (supplied)
AC adapterAC Adapter EH-5a (used with Power Connector EP-5) (availableseparately)
Tripod socket 1 / 4 in. (ISO 1222)
Dimensions/weight
Dimensions(W × H × D)
Approx. 126 × 94 × 64 mm (5.0 × 3.7 × 2.5 in.)
Weight Approx. 495 g (1lb. 1oz.) without battery, memory card, or body cap
Operating environment
Temperature 0–40 °C (32–104 °F)
Humidity Less than 85 % (no condensation)

7/31/2019 Nikon D60 User Manual En
http://slidepdf.com/reader/full/nikon-d60-user-manual-en 196/204184
Specifications
T e c h ni c a l N o t e s
Quick Charger MH-23
Rechargeable Li-ion Battery EN-EL9
C Battery Life
Battery life varies with charge state and shooting conditions. The number of shots that can be takenwith a fully-charged EN-EL9 battery (1000mAh) is indicated below.
• AF-S DX NIKKOR 18-55mm f/3.5-5.6G ED II
Approximately 520 shots in single-frame release mode
Approximately 2,000 shots in continuous release mode
• AF-S DX NIKKOR 18-55mm f/3.5-5.6G VR with vibration reduction (VR) on
Approximately 500 shots in single-frame release mode
Approximately 1,850 shots in continuous release mode
Battery life for single-frame release mode is measured according to CIPA standards: lens cycled from
infinity to minimum range and shutter released at default settings once every 30 s; flash fired with
every other shot. Battery life for continuous release mode is measured with image quality set to JPEG
Basic, an image size of x, a shutter speed of 1 / 250s, the shutter release pressed halfway for three
seconds and focus then cycled from infinity to minimum range three times; after six shots, the
monitor is turned on for five seconds and the camera not touched for six seconds after the monitor
turns off; the cycle is repeated once exposure meters have turned off.
To ensure maximum battery performance:
• Keep the battery contacts clean. Soiled contacts can reduce battery performance.
• Use batteries immediately after charging. Batteries will lose their charge if left unused.
• The battery level displayed by the camera may vary with changes in temperature.
Rated input AC 100–240 V (50/60 Hz)
Rated output DC 8.4 V, 0.9 A
Supported batteries Rechargeable Li-ion Battery EN-EL9
Charging time Approx. 90 minutes when battery is fully discharged
Operating temperature 0–40 °C (32–104 °F)Dimensions (W× H × D) Approx. 82.5 × 28 × 65 mm (3.2 × 1.1 × 2.6 in.)
Length of cord Approx. 1.8 m (5 ft. 11 in.)
Weight Approx. 80 g (2.8 oz.), excluding power cable
Type Rechargeable lithium-ion battery
Rated capacity 7.4 V, 1000 mAh
Dimensions (W× H × D) Approx. 36 × 56 × 14 mm (1.4 × 2.2 × 0.6 in.)
Weight Approx. 51 g (1.8 oz.), excluding terminal cover
• Using the monitor
• Keeping the shutter-release button pressed
halfway
• Repeated autofocus operations
• Taking NEF (RAW) photographs
• Slow shutter speeds
• Using vibration reduction with VR lenses

7/31/2019 Nikon D60 User Manual En
http://slidepdf.com/reader/full/nikon-d60-user-manual-en 197/204185
Specifications
T e c h ni c a l N o t e s
Lens
* The minimum aperture available when these lenses are used with the D60 is f/36.
C Specifications
Nikon reserves the right to change the specifications of the hardware and software described in this
manual at any time and without prior notice. Nikon will not be held liable for damages that may
result from any mistakes that this manual may contain.
AF-S DX Zoom-NIKKOR18-55mm f/3.5-5.6G ED II Lens
AF-S DX NIKKOR 18-55mmf/3.5-5.6G VR Lens
Type of lensG-type AF-S DX Zoom-NIKKOR lens with built-in CPU and Nikonbayonet mount (Specially designed for use with Nikon digital-SLR—
Nikon DX-format—cameras)Focal length 18–55mm
Maximum aperture f/3.5–5.6
Lens construction7 elements in 5 groups (including1 ED glass element and 1aspherical element)
11 elements in 8 groups (1aspherical lens element)
Picture angle 76°–28° 50´
Focal length scale 18, 24, 35, 45, 55mm
Distance information Output to camera body
Zoom control Manually via separate zoom ring
Focusing Autofocus using a Silent Wave Motor; manually via separate focus ring
Closest focus distance 0.28m (11in.) at all zoom settings
No. of diaphragm blades 7-blade (rounded)
Aperture range f/3.5 to f/22 (at 18mm), f/5.6 to f/38 (at 55mm)*
Exposure measurement Via full-aperture method
Attachment size 52mm (P=0.75mm)
DimensionsApprox. 70.5 × 74 mm(2.8×3.0 in.) (extension from thecamera’s lens-mount flange)
Approx. 73 × 79.5 mm (2.9 × 3.1in.) (extension from the camera’slens-mount flange)
Weight Approx. 205 g (7.2 oz.) Approx. 265 g (9.4 oz.)
Lens hood(available separately)
HB-45 (attaches as shown below)

7/31/2019 Nikon D60 User Manual En
http://slidepdf.com/reader/full/nikon-d60-user-manual-en 198/204186
Specifications
T e c h ni c a l N o t e s
Supported Standards• DCF Version 2.0: The Design Rule for Camera File Systems (DCF) is a standard widely
used in the digital camera industry to ensure compatibility among different makes of
camera.
• DPOF: Digital Print Order Format (DPOF) is an industry-wide standard that allows
pictures to be printed from print orders stored on the memory card.
• Exif version 2.21: The D60 supports Exif (Exchangeable Image File Format for Digital
Still Cameras) version 2.21, a standard in which information stored with photographs is
used for optimal color reproduction when the images are output on Exif-compliant
printers.
• PictBridge: A standard developed through cooperation with the digital camera and
printer industries, allowing photographs to be output directly to a printer without first
transferring them to a computer.

7/31/2019 Nikon D60 User Manual En
http://slidepdf.com/reader/full/nikon-d60-user-manual-en 199/204187
T e c h ni c a l N o t e s
Index
Symbolse (auto) 28f Auto (flash off) 36g Portrait 36
h Landscape 37i Child 37j Sports 37k Close up 37l Night portrait 37a 41
b 42
c 43
d 44
A (exposure compensation) button 4, 67, 68
B (aperture) button 4, 44C (Active D-Lighting) button 4, 69, 70D (flash mode) button 4, 64, 65, 68E (flash compensation) button 4, 68F (self-timer) button 4, 54, 55G FUNC. button 4, 112F / G Button 112H (AE-L/AF-L) button 5, 60, 63, 78, 113I (protect) button 5, 78
J (delete) button 5, 34K (playback zoom) button 5, 8, 48, 70, 77L (Information display/Quick settings display)
button 5M (thumbnail/playback zoom out) button 5,13, 76N (help) button 5, 13O (menu) button 5, 94P (playback) button 5, 34, 72A (reset) button 4, 5, 70
AAC adapter 156, 157Accessories 155Accessory shoe 4, 150
cover 4, 150Active D-Lighting 69
indicator 9Active D-Lighting and retouch history 74
AE-L/AF-L button 113AF-area mode 7, 9, 58AF-assist 111AF-assist illuminator 4, 57Aperture 7, 9, 40, 44
display 9ring 40
Aperture-priority auto 43Auto image rotation 128Auto meter off 31Auto off timers 114Auto shooting info 122Autoexposure (AE) lock 7, 63, 113Autofocus 18AVI 51
BBattery 155, 166
charging 16
indicator 7, 9, 28inserting 16level 29
Battery-chamber cover 5, 17latch 5, 17
Beep 110indicator 9
Before and after 143Black-and-white 134
Blue intensifier 135Body Cap BF-1A 156Border 86Built-in flash 4, 33, 64, 113Bulb 46
CCamera Control Pro 2 82, 156Capture NX 127, 156CHARGE lamp 17
Clean image sensor 126, 160Closest subject 58Color
balance 135mode 102, 103space 103temperature 104
Command dial 5, 10Connector cover 4, 167
Continuous 54mode 54Cool-white fluorescent 103Cropping 87Cross screen 135

7/31/2019 Nikon D60 User Manual En
http://slidepdf.com/reader/full/nikon-d60-user-manual-en 200/204188
Index
T e c h ni c a l N o t e s
CSM/setup menu 118full 118my menu 119simple 118
Custom settings 109Cyanotype 134
DDate
counter 116imprint 115
Date and time 21Date imprint
indicator 9Day white fluorescent 103Daylight fluorescent 103
Daylight saving time 21, 22Default setting 70, 176Delete 96
current images 34Diopter adjustment 26
control 5, 26D-Lighting 132DPOF 186Dust off ref photo 127
indicator 7Dynamic area 58
EElectronic analog exposure display 7, 9, 45Electronic rangefinder 61Exif version 2.21 186Exposure 40Exposure compensation 7, 9, 67
indicator 7value 7, 9
Eye sensor 5, 123Eyelet for camera strap 4, 5Eyepiece cap 56
FFile Information 73File Names 51File no. sequence 126
Filter 155Filter effects 135Firmware version 126Flash
control 179
manual 113mode 65optional unit 113range 149, 179rear curtain sync 65, 66red-eye reduction 65slow sync
65sync mode 9 TTL 113
Flash compensation 68button 4indicator 7, 9value 7, 9
Flash-ready indicator 7Flexible program 41
indicator 7
f-number 40, 44, 148Focal
length 20plane mark 4, 61
Focus 57indicator 7, 32, 38, 60, 61lock 38, 60points 7, 26, 30, 58, 59, 60
Focus mode 9auto-servo AF 57continuous-servo AF 57manual 38, 57, 61single-servo AF 57
Focus point display 9, 26, 30, 58, 59, 60Folders 125Frame interval 98
GGreen intensifier 135
Guide number 151
HHelp indicator 9, 172Highlights 75Histogram 75Hue adjustment 102
I
Imageoverlay 138quality 9, 50, 178size 9, 50, 178
Image comment 124

7/31/2019 Nikon D60 User Manual En
http://slidepdf.com/reader/full/nikon-d60-user-manual-en 201/204189
Index
T e c h ni c a l N o t e s
Image review 111Index print 89Info display format 120
classic 121wallpaper 122
Infrared receiver 4, 56ISO auto
53, 111indicator 7, 9ISO sensitivity 9, 53
Hi 1 53i-TTL balanced fill-flash for digital SLR 179
JJPEG 50, 140JPG 51
LLanguage 123LCD brightness 123Lens 19, 146, 149, 185
attaching 18CPU 40, 62, 128, 146, 148mounting index 4, 18non-CPU 146, 147release button 4, 19
Long time-exposures 46Low-pass filter 160, 162
MManual 44Manual flash control indicator 9Max. sensitivity 111Memory capacity 7, 9, 28, 55, 178
large 7, 9, 29Memory card 23, 28, 158, 178
access lamp 5, 23, 32formatting 24inserting 23removing 23slot cover 5, 23
Mercury-vapor lamps 103Metering 62
center-weighted 62matrix 62
mode 9spot 62
Min. shutter speed 111Mired 105Mirror lock-up 126, 162
Mode dial 4, 6Monitor 5, 8, 72, 123, 159, 165Monochrome 134Multi selector 5, 12
N
NDF 51NEF 51NEF (RAW) 51NEF (RAW) processing 140Nikon Transfer 80No memory card? 110No. of copies 86Noise reduction 108
OOptimize image 101
indicator 9
PPage size 86PC connection indicator 7PC mode indicator 9Photo Information 73PictBridge 84, 85, 186
Picture angle 20Playback
folder 97full-frame 72thumbnail 76zoom 77
Playback menu 96Power connector 156, 157
cover 5, 157Power switch 4, 6Preset manual 105
recording indicator 7, 9Print (DPOF) 88Print set (DPOF) 83, 90Printer 84, 85Programmed auto 41Protecting photographs 78
QQuick Charger MH-23 16, 184Quick retouch 132Quick settings display 48

7/31/2019 Nikon D60 User Manual En
http://slidepdf.com/reader/full/nikon-d60-user-manual-en 202/204190
Index
T e c h ni c a l N o t e s
RRangefinder 7, 116RAW+B 51Rechargeable Li-ion Battery EN-EL9 16, 184Red intensifier 135Red-eye
correction 133reduction lamp 4, 65
Release mode 9, 54Remote
Control ML-L3 55, 56, 156control mode 55delayed 54, 55quick-response 54, 55
Remote on duration 115Reset 110Reset switch 4, 167Retouch menu 129Rotate tall 98Rubber eyecup 56
SSaturation 102Self-timer 54, 55, 114
lamp 4, 56
mode 55Sepia 134Setup menu 117Shooting data
page 1 73page 2 74
Shooting info auto off 123Shooting information display 48Shooting menu 100Shutter speed 7, 9, 40, 44, 179
display 9Shutter-priority auto 42Shutter-release button 4, 13, 32
half press 13Single frame 54Single point 58Skylight 135Slide show 98Small picture 136
Sodium-vapor lamps 103Software Suite 80Speedlight 113, 150, 152, 153Standard i-TTL fill-flash for digital SLR 179Stop-motion movie (creation) 141
Stop-motion movie (playback) 99Strap 14
T Terminal cover 16 Time 46
Time stamp 87 Tone compensation 102 Trim 134 Two-button reset 70
UUSB cable 80, 81, 85, 92USB connector 4
VVibration reduction (VR) 20Video cable 92Video connector 4Video mode 123Viewfinder 7, 159
eyepiece 5, 26eyepiece accessories 155
ViewNX 80
WWarm filter 135Warm-white fl. 103Warning indicator 7, 13, 172White balance 52, 103
cloudy 52direct sunlight 52fine-tuning 104flash 52
fluorescent 52incandescent 52mode 9preset manual 52shade 52
White fluorescent 103World time 21Write protect switch 25
ZZoom
ring 30

7/31/2019 Nikon D60 User Manual En
http://slidepdf.com/reader/full/nikon-d60-user-manual-en 203/204191
Index
T e c h ni c a l N o t e s

7/31/2019 Nikon D60 User Manual En
http://slidepdf.com/reader/full/nikon-d60-user-manual-en 204/204