Nick Thomas February 8, 2009 - WordPress.com · mixing electronic music has to be a guide to mixing...
56
Guide to Mixing v1.0 Nick Thomas February 8, 2009
Transcript of Nick Thomas February 8, 2009 - WordPress.com · mixing electronic music has to be a guide to mixing...

Guide to Mixing v1.0
Nick Thomas
February 8, 2009

This document is a guide to the essential ideas of audio mixing, targetedspecifically at computer-based producers. I am writing it because I haven’tbeen able to find anything similar freely available on the Internet. The Internethas an incredible wealth of information on this subject, but it is scattered acrossa disorganized body of articles and tutorials of varying quality and reliability.My aim is to consolidate all of the most important information in one place, allof it verified and fact-checked.
This guide will not tell you about micing techniques or how to track vocalsor what frequency to boost to make your guitars really kick. There’s plenty ofstuff written already on mixing live-band music. This guide is specifically forcomputer-based electronic musicians, and so it is tailored to their needs.
On the other hand, this guide does not assume that you are making club-oriented dance music. Certainly the advice in here is applicable to mixing electrohouse or hip-hop, but it is equally applicable to mixing ambient or IDM.1 On theother hand, dance music does pose special mixing challenges, such as the tuningof percussion tracks and the achievement of loudness, and these challenges aregiven adequate time, since they are relevant to many readers.
In this document, I assume only very basic prior knowledge of the concepts ofmixing. You should know your way around your DAW. You should know whata mixer is, and what an effect is, and how to use them. You should probablyhave at least heard of equalization, compression, and reverb. You should havedone some mixdowns for yourself, so that you have the flavor of how the wholeprocess works. But that’s really all you need to know at this point.
I do not claim to be an expert on any of this material. I have, however,had this guide peer-reviewed by a number of people, many of them more knowl-edgable about mixing than I. Therefore, I think it’s fair to say that at the veryleast it does not contain many gross inaccuracies. I thank them for their effort.
If you have questions, comments, or complaints of any kind about anythingI’ve written here, please write [email protected].
1Indeed, the advice in here is applicable to, though not sufficient for, mixing even liveband music. The defining characteristic of electronic music, other than being made withelectronics, is that it has no defining characteristics. It can be anything, and so a guide tomixing electronic music has to be a guide to mixing anything.
1
Contents
1 Sounds 51.1 Frequency Domain . . . . . . . . . . . . . . . . . . . . . . . . . . 51.2 Patterns of Frequency Distribution . . . . . . . . . . . . . . . . . 8
1.2.1 Tones . . . . . . . . . . . . . . . . . . . . . . . . . . . . . 81.2.2 The Human Voice . . . . . . . . . . . . . . . . . . . . . . 81.2.3 Drums . . . . . . . . . . . . . . . . . . . . . . . . . . . . . 91.2.4 Cymbals . . . . . . . . . . . . . . . . . . . . . . . . . . . . 9
1.3 Time Domain . . . . . . . . . . . . . . . . . . . . . . . . . . . . . 101.4 Loudness Perception . . . . . . . . . . . . . . . . . . . . . . . . . 101.5 Digital Audio . . . . . . . . . . . . . . . . . . . . . . . . . . . . . 12
1.5.1 Clipping . . . . . . . . . . . . . . . . . . . . . . . . . . . . 131.5.2 Sampling Resolution . . . . . . . . . . . . . . . . . . . . . 141.5.3 Dynamic Range . . . . . . . . . . . . . . . . . . . . . . . . 141.5.4 Standard Sampling Resolutions . . . . . . . . . . . . . . . 151.5.5 Sampling Rate . . . . . . . . . . . . . . . . . . . . . . . . 15
2 Preparation 172.1 Monitors . . . . . . . . . . . . . . . . . . . . . . . . . . . . . . . . 172.2 Volume Setting . . . . . . . . . . . . . . . . . . . . . . . . . . . . 172.3 Plugins . . . . . . . . . . . . . . . . . . . . . . . . . . . . . . . . 182.4 Ears . . . . . . . . . . . . . . . . . . . . . . . . . . . . . . . . . . 182.5 Sound Selection . . . . . . . . . . . . . . . . . . . . . . . . . . . . 19
3 Mixer Usage 203.1 Leveling . . . . . . . . . . . . . . . . . . . . . . . . . . . . . . . . 20
3.1.1 Input Gain . . . . . . . . . . . . . . . . . . . . . . . . . . 213.1.2 Headroom . . . . . . . . . . . . . . . . . . . . . . . . . . . 213.1.3 Level Riding . . . . . . . . . . . . . . . . . . . . . . . . . 22
3.2 Effects and Routing . . . . . . . . . . . . . . . . . . . . . . . . . 223.2.1 Inserts . . . . . . . . . . . . . . . . . . . . . . . . . . . . . 223.2.2 Auxiliary Sends . . . . . . . . . . . . . . . . . . . . . . . . 233.2.3 Busses . . . . . . . . . . . . . . . . . . . . . . . . . . . . . 233.2.4 Master Bus . . . . . . . . . . . . . . . . . . . . . . . . . . 243.2.5 Advanced Routing . . . . . . . . . . . . . . . . . . . . . . 24
2

4 Equalization 254.1 Purposes . . . . . . . . . . . . . . . . . . . . . . . . . . . . . . . . 25
4.1.1 Avoiding Masking . . . . . . . . . . . . . . . . . . . . . . 254.1.2 Changing Sound Character . . . . . . . . . . . . . . . . . 26
4.2 Using a Parametric Equalizer . . . . . . . . . . . . . . . . . . . . 264.2.1 Setting the Frequency . . . . . . . . . . . . . . . . . . . . 274.2.2 Setting the Q and Gain . . . . . . . . . . . . . . . . . . . 284.2.3 Evaluating Your Results . . . . . . . . . . . . . . . . . . . 284.2.4 High Shelf/Low Shelf Filters . . . . . . . . . . . . . . . . 294.2.5 Highpass/Lowpass Filters . . . . . . . . . . . . . . . . . . 29
4.3 Typical EQ Uses . . . . . . . . . . . . . . . . . . . . . . . . . . . 304.3.1 General . . . . . . . . . . . . . . . . . . . . . . . . . . . . 304.3.2 Kick Drums . . . . . . . . . . . . . . . . . . . . . . . . . . 314.3.3 Basslines . . . . . . . . . . . . . . . . . . . . . . . . . . . 314.3.4 Snare Drums . . . . . . . . . . . . . . . . . . . . . . . . . 314.3.5 Cymbals . . . . . . . . . . . . . . . . . . . . . . . . . . . . 314.3.6 Instruments . . . . . . . . . . . . . . . . . . . . . . . . . . 314.3.7 Vocals . . . . . . . . . . . . . . . . . . . . . . . . . . . . . 32
5 Compression 335.1 Purposes . . . . . . . . . . . . . . . . . . . . . . . . . . . . . . . . 33
5.1.1 Reducing Dynamics . . . . . . . . . . . . . . . . . . . . . 335.1.2 Shaping Percussive Sounds . . . . . . . . . . . . . . . . . 345.1.3 Creating Pumping Effects . . . . . . . . . . . . . . . . . . 345.1.4 When Not to Use Compression . . . . . . . . . . . . . . . 34
5.2 How It Works . . . . . . . . . . . . . . . . . . . . . . . . . . . . . 345.2.1 Threshold, Ratio, and Knee . . . . . . . . . . . . . . . . . 355.2.2 Attack and Release . . . . . . . . . . . . . . . . . . . . . . 355.2.3 Compressor Parameters . . . . . . . . . . . . . . . . . . . 36
5.3 Procedure for Setup . . . . . . . . . . . . . . . . . . . . . . . . . 365.4 More Compression . . . . . . . . . . . . . . . . . . . . . . . . . . 38
5.4.1 Limiters . . . . . . . . . . . . . . . . . . . . . . . . . . . . 385.4.2 Serial Compression . . . . . . . . . . . . . . . . . . . . . . 385.4.3 Parallel Compression . . . . . . . . . . . . . . . . . . . . . 395.4.4 Sidechain Compression . . . . . . . . . . . . . . . . . . . . 395.4.5 Gates . . . . . . . . . . . . . . . . . . . . . . . . . . . . . 405.4.6 Expanders . . . . . . . . . . . . . . . . . . . . . . . . . . . 415.4.7 Shaping Percussive Sounds . . . . . . . . . . . . . . . . . 415.4.8 Creating Pumping Effects . . . . . . . . . . . . . . . . . . 425.4.9 Multiband Compression . . . . . . . . . . . . . . . . . . . 42
6 Space Manipulation 446.1 Panning . . . . . . . . . . . . . . . . . . . . . . . . . . . . . . . . 446.2 Stereo Sounds . . . . . . . . . . . . . . . . . . . . . . . . . . . . . 45
6.2.1 Phase Cancellation . . . . . . . . . . . . . . . . . . . . . . 466.2.2 Left/Right Processing . . . . . . . . . . . . . . . . . . . . 47
3

6.2.3 Mid/Side Processing . . . . . . . . . . . . . . . . . . . . . 476.3 Delays . . . . . . . . . . . . . . . . . . . . . . . . . . . . . . . . . 486.4 Reverb . . . . . . . . . . . . . . . . . . . . . . . . . . . . . . . . . 49
6.4.1 Purposes . . . . . . . . . . . . . . . . . . . . . . . . . . . 506.4.2 How It Works . . . . . . . . . . . . . . . . . . . . . . . . . 506.4.3 Convolution Reverb . . . . . . . . . . . . . . . . . . . . . 516.4.4 Mixing With Reverb . . . . . . . . . . . . . . . . . . . . . 51
7 Conclusion 537.1 Putting It All Together . . . . . . . . . . . . . . . . . . . . . . . 537.2 Final Thoughts . . . . . . . . . . . . . . . . . . . . . . . . . . . . 54
4
Chapter 1
Sounds
Before diving into the details of mixing, we need to look at some properties ofsounds in general. This section is background information, but it is necessary tounderstand its contents in order to grasp a lot of the basic principles of mixing.
A sound is a pressure wave traveling through the air. Any action which putsair into motion will create a sound. Our auditory system systematically groupsthe pressure waves that hit our ears into distinct sounds for ease of processing,much how our vision groups the photons that hit our eyes into objects.
But, just like our vision can divide visual objects into smaller objects (a“person” can be divided into “arms,” “legs,” a “head,” etc.), our brains cananalytically divide sounds into smaller sounds (for instance the spoken word“cat” can be divided into a consonant ‘k’, a vowel ‘ahh’, and another consonant’t’). Similarly, just as our vision can group collections of small objects into largerobjects (a collection of “persons” becomes a “crowd”), our brains can groupcollections of sounds into larger sounds (a collection of “handclaps” becomes“applause”).
1.1 Frequency Domain
If you continue to subdivide physical objects into smaller and smaller pieces, youwill eventually arrive at atoms, which cannot be further subdivided. There is asimilarly indivisible unit of sound, and that is the “frequency.” All sounds canultimately be reduced to a bunch of frequencies. The difference is that, wherean object may be composed of billions of atoms, a sound typically consists ofno more than thousands of frequencies. So, frequencies are a very practical wayof analyzing sounds in the everyday context of electronic music.
What is a frequency, anyway? A frequency is simply a sine-wave shapeddisturbance in the air; an oscillation, in other words. They are typically consid-ered in terms of the rate at which they oscillate, measured in cycles per second(Hz). Science tells us that the human ear can hear frequencies in the approx-imate range of 20Hz to 20,000Hz, though many people seem to be able hear
5

somewhat further in both directions. In any case, this range of 20Hz-20,000Hzcomfortably encompasses all of the frequencies that we commonly deal with inour day to day lives.
Unsurprisingly, different frequencies sound different, and have different ef-fects on the human psyche. There is a continuum of changing “flavor” as you goacross the frequency range. 60Hz and 61Hz have more or less the same flavor,but by the time you get up to 200Hz, you are in quite different territory indeed.
It is worth noting that we perceive frequencies logarithmically. In otherwords, the difference between 40Hz and 80Hz is comparable to the differencebetween 2,000Hz and 4,000Hz. This power-of-two difference is called an “oc-tave.” Humans can hear a frequency range of approximately ten octaves.
I will now attempt to describe the various flavors of the different frequencyranges. As I do, bear in mind that words are highly inadequate for this job.First, because we do not have words to refer to the flavors of sounds, so I mustsimply attempt to describe them and hope that you get my drift. Second,because, as I have said previously, all of these flavors blend into each other;there are no sharp divisions between them.1 With all that in mind, here we go.
20Hz-40Hz “subsonics”: These frequencies, residing at the extremes ofhuman hearing, are almost never found in music, because they require extremelyhigh volume levels to be heard, particularly if there are other sounds playing atthe same time. Even then, they are more felt than heard. Most speakers can’treproduce them.
That said, subsonics can have very powerful mental and physical effectson people. Even if the listener isn’t aware that they’re being subjected tothem, they can experience feelings of unease, nausea, and pressure on the chest.Subsonics can move air in and out the lungs at a very rapid rate, which canlead to shortness of breath. At 18Hz, which is the resonant frequency of theeyeball, people can start hallucinating. It is suspected that frequencies in thisrange may be present at many allegedly “haunted” locales, since they createfeelings of unease. Furthermore, frequencies around 18Hz may be responsiblefor many “ghost” sightings. Incidentally, many horror movies use subsonics tocreate feelings of fear and disorientation in the audience.
40Hz-100Hz “sub-bass”: This relatively narrow frequency range marksthe beginning of musical sound, and it is what most people think of when theythink of “bass.” It accounts for the deep booms of hip-hop and the hefty powerof a kick drum. These frequencies are a full-body experience, and carry theweight of the music. Music lacking in sub-bass will feel lean and wimpy. Musicwith an excess of sub-bass will feel bloated and bulky.2
100Hz-300Hz “bass”: Still carrying a hint of the feeling of the sub-bassrange, this frequency range evokes feelings of warmth and fullness. It is body,
1This also implies that the precise frequency ranges given for each flavor are highly inexactand really somewhat arbitrary.
2It is a common beginner mistake to mix with far too much sub-bass. To do so mayproduce a pleasing effect in the short term, but in the long term it will become apparent thatthe excess of sub-bass is hurting the music by destroying its sense of balance and making ittiring to listen to.
6

stability, and comfort. It is also the source of the impact of drums. An ab-sence of these frequencies makes music feel cold and uneasy. An excess of thesefrequencies makes music feel muddy and indistinct.
300Hz-1,000Hz “lower midrange”: This frequency range is rather neu-tral in character. It serves to anchor and stabilize the other frequency ranges;without it, the music will feel pinched and unbalanced.
1,000Hz-8,000Hz “upper midrange”: These frequencies attract atten-tion. The human ear is quite sensitive in this range, and so it is likely to payattention to whatever you put in it. These frequencies are presence, clarity, andpunch. An absence of upper midrange makes music feel dull and lifeless. Anexcess of upper midrange makes music feel piercing, overbearing, and tiring.
8,000Hz-20,000Hz “treble”: Another extreme in the human hearingrange. These frequencies are detail, sparkle, and sizzle. An absence of tre-ble makes music feel muffled and boring. An excess of treble makes music harshand uncomfortable to listen to.
These frequencies, by their presence of absence, make music exciting or re-laxing. Music that is meant to be exciting, such as dance music, contains largeamounts of treble; music that is meant to be relaxing contains low amounts oftreble. As people age, they gradually lose their ability to hear frequencies inthis range.
So now we understand the effects of invidiual frequencies on the humanpsyche. But sounds rarely consist of single frequencies; they are composed ofmultitudes of frequencies, and the way in which said frequencies are organizedalso has an effect on the human psyche.
When multiple frequencies occur simultaneously in the same frequency range,their conflicting wavelengths cause periodic oscillations in volume known as“beating.” Beating is more noticeable in lower frequencies than in higher fre-quencies. In the sub-bass range, any beating at all becomes quite dominatingand often disturbing, while in the treble range, frequencies are typically quitedensely packed to no ill effect.
Beating is also the underlying principle of the formation of musical chords.Combinations of tones which produce subtle beating are considered “conso-nant,” while combinations of tones which produce pronounced beating are con-sidered “dissonant.” When considering chords in terms of beating, it is impor-tant to note that beating occurs not only between the fundamental frequenciesof the tones involved, but also their harmonics. Thus, for instance, while twoindividual frequencies a major ninth apart will not produce beating, two tonesa major ninth apart will, because their harmonics will produce beating.
Beating also contributes to the character of many non-tonal sounds. Forinstance, the sound of a cymbal is partially due to the beating of the countlessfrequencies which it contains. Similarly, the “thumpy” sound of the body of anacoustic kick drum is partially due to the beating of bass frequencies.
7

1.2 Patterns of Frequency Distribution
Having considered in general the psychological effects of individual frequenciesand combinations of frequencies, let us now examine the specific frequency dis-tribution patterns of common sounds. Obviously, it would be impossible todescribe the frequency distribution patterns of every possible sound. Indeed,every frequency distribution describes one sound or another. So, in this section,we will simply examine the frequency distribution patterns of the sounds mostcommonly found in music. We will only examine four categories of sounds, butthey cover a surprisingly large amount of ground; with them, we will be able toaccount for the majority of sounds found in most music.
1.2.1 Tones
The simplest frequency organization structure is the tone. Tones are very com-mon in nature, and our brains are specially built to perceive them. A tone is aseries of frequencies arranged in a particular, mathematically simple, pattern.The lowest frequency in the tone is the called fundamental, and the frequenciesabove it are called harmonics. The first harmonic is twice the frequency of thefundamental; the second harmonic is three times the frequency; and so forth.This extension could theoretically go on to infinity, but because the harmonicsof a tone typically steadily fall in volume with increasing frequency, in practicethey peter out eventually.
The character of a particular tone, often called its “timbre,” is partiallydetermined by the relative volumes of the harmonics; these differences are abig part of what differentiates a clarinet from a violin, for instance. The reedy,hollow tone of a clarinet is partially due to a higher emphasis on the odd-numbered harmonics, while a violin tone gets its character from a more evendistribution of harmonics. The bright tone of a trumpet is due to the highvolume of its treble-range upper harmonics, while the mellower tone of a frenchhorn has much more subdued upper harmonics.
Tones are the bread and butter of much music. All musical instruments,except for percussion instruments, primarily produce tones. Synthesizers alsomostly produce tones.
1.2.2 The Human Voice
The human voice produces tones, and thus could justifiably be lumped into theprevious section. But there is a lot more to it than that, and since the humanvoice is such an important class of sound, central to so much music, it is worthexamining more closely.
The human voice can make a huge variety of sounds, but the most importantsounds for music are those that are used in speech and singing: specifically,vowels and consonants.
A vowel is a tone. The specific vowel that is intoned is defined by the relativevolumes of the different harmonics; the difference between an ‘ehh’ and an ‘ahh’
8

is a matter of harmonic balance. In speech, vowel tones rarely stay on onepitch; they slide up and down. This why speech does not sound “tonal” to us,though it technically is. Singing is conceptually the same as speaking, with thedifference being that the vowels are held out at constant pitches.
A consonant is a short, non-tonal noise, such as ‘t’, ‘s’, ‘d’, or ‘k.’ Theyare found in the upper midrange. The fact that consonants carry most of theinformation content of human speech may well account for the human brain-ear’s bias towards the upper midrange.
So, we can see that the human voice, as it is used in speech and singing, iscomposed of two parts: tonal vowels, and non-tonal consonants. That said, thehuman voice is very versatile, and many of its possible modes of expression arenot covered by these two categories of sound. Whispering, for instance, replacesthe tones of vowels with breathy, non-tonal noise, with consonants producedin the normal manner. Furthermore, many of the noises that are made, forinstance, by beatboxers, defy analysis in terms of vowels and consonants.
1.2.3 Drums
So far we have examined tones and the human voice. The human voice is quitetonal in nature, so in a certain sense we are still looking at tones. Now we willlook at drum sounds, which, though not technically tones, are still somewhattonal in nature.
A “drum” consists of a membrane of some sort stretched across a resonatingbody. It produces sound when the membrane is struck. A drum produces acomplex sound, the bulk of which resides in the bass and the lower midrange
This lower component of the sound, which I call the “body,” does not tech-nically fit the frequency arrangement of a tone, but usually bears a greater orlesser resemblance to such an arrangement, and thus the sound of a drum issomewhat tonal.
In addition to the body component of the sound, which is created by thevibration of the membrane, part of the sound of a drum is created by the impactbetween the membrane and the striking object. This part of the sound, whichI will refer to as the “beater sound,” has energy across the frequency spectrum,but is usually centered in the upper midrange and the treble.
1.2.4 Cymbals
Now, having examined tones in general, the human voice, and drums, we come tothe first (and only) completely non-tonal sounds that we will examine: cymbals.Cymbals are thin metal plates that are struck, like drums, with beaters. Thevibrations of the struck plates create extremely complex patterns of frequencies,hence the non-tonal nature of cymbals.
Cymbals have energy throughout the entire frequency spectrum, but the bulkof said energy is typically in the treble range, or in the midrange in the case oflarge cymbals such as gongs. There is also reason to believe that cymbals havesignificant sonic energy above the range of human hearing, since their energy
9

shows no signs of petering out near 20kHz. In any case, because cymbals haveso much treble energy, they are a very exciting type of sound.
1.3 Time Domain
Thus far we have analyzed sounds in terms of frequencies, and indeed thistype of analysis, called “frequency domain” analysis, is a very useful way toanalyze them. But there is another way to analyze sounds that is importantto understand for the purposes of mixing, which is in terms of their waveforms.This type of waveform-based analysis is called “time domain” analysis.
Time domain analysis essentially means looking at a sound not in terms ofthe sine waves that make it up, but in terms of the patterns of disturbance thatit causes in whatever medium it is traveling through: air molecules, a humaneardrum, a speaker cone, or the electrical signal in an audio cable, for instance.The intensity of the disturbance that the sound causes at any given instant iscalled its amplitude. The sound of a sound is determined by its patterns ofchanging amplitude; its waveform, in other words.
When you combine two sounds (i.e., play them simultaneously through thesame medium), their time-domain disturbances are added together; the instan-taneous amplitude of the resulting sound at any given time is a simple math-ematical sum of the instantaneous amplitudes of the separate sounds. This iswhy the final stage of mixing (i.e., combining the separate mixer tracks into one“master” track) is sometimes called “summing.” It literally is just a matter oftaking the sum of everything.
It is important to understand that any sound can be analyzed both in thefrequency domain and the time domain. You can look at a sound as a collectionof sine waves, or you can look at it as a pattern of disturbance in a medium.Both perspectives are useful for different things.
1.4 Loudness Perception
Since loudness is such an important topic in mixing, it seems appropriate atthis point to talk about the perception of loudness in general.
Loudness is measured in decibels (dB). Decibels are a relative, logarithmicmeasurement.
Decibels are a logarithmic measurement in that amplitude increases expo-nentially with decibel value. Specifically, every 10dB increase or decrease ofdecibel value corresponds to a factor of ten increase or decrease in amplitude.In other words, increasing a sound’s amplitude by 10dB multiplies its ampli-tude by ten. Increasing a sound’s loudness by 20dB multiplies its amplitude bya hundred. Decreasing a sound’s loudness by 30dB multiplies its amplitude byone thousandth. And so forth.
Decibels are a relative measurement in that a measurement of decibels doesnot tell you precisely how loud a sound is; it can only tell you how loud it is
10
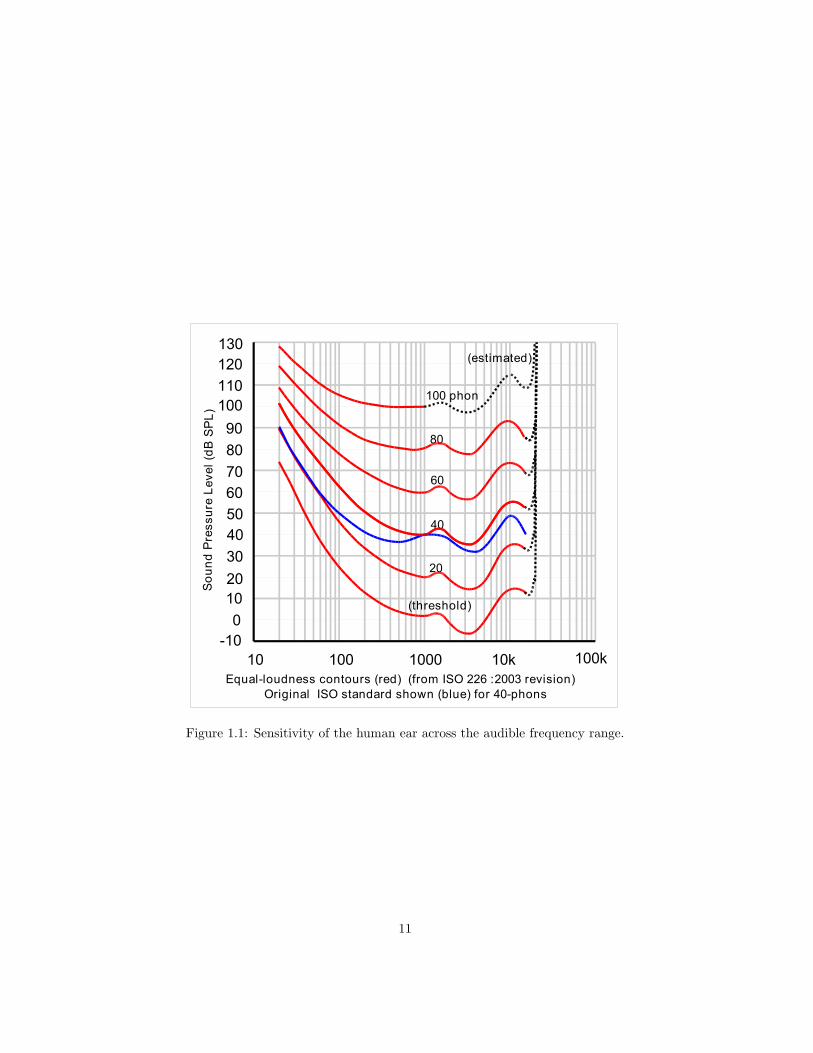
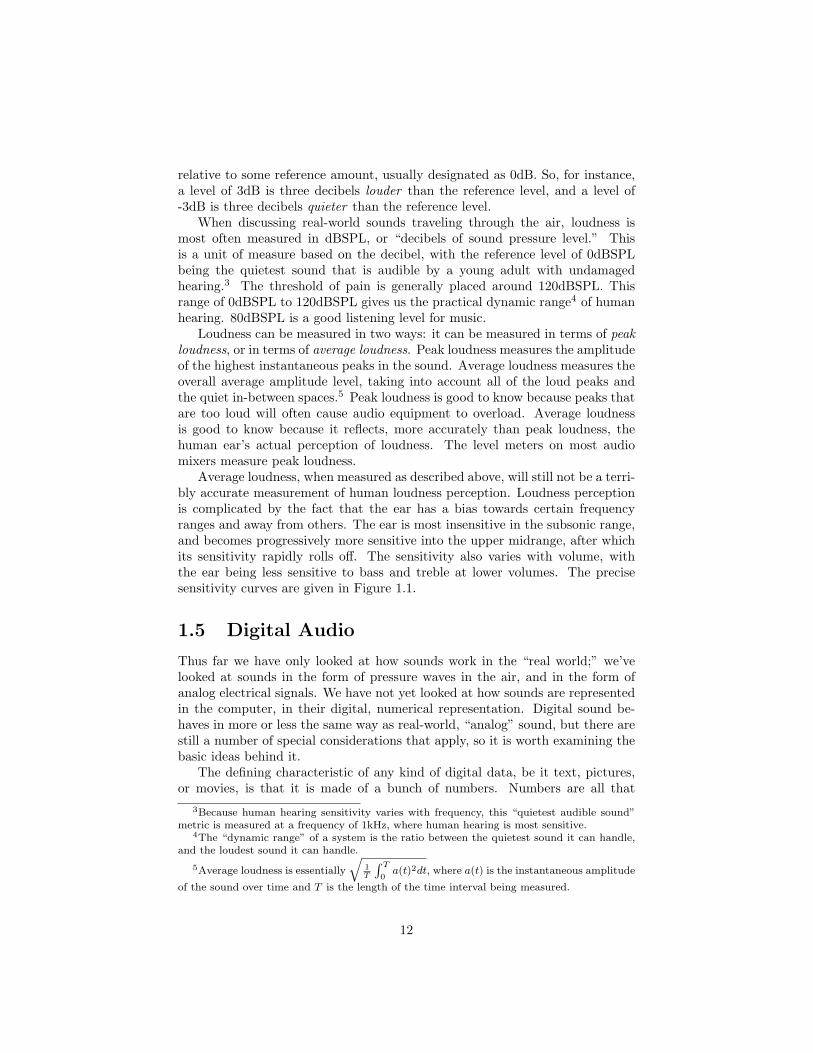
Figure 1.1: Sensitivity of the human ear across the audible frequency range.
11
relative to some reference amount, usually designated as 0dB. So, for instance,a level of 3dB is three decibels louder than the reference level, and a level of-3dB is three decibels quieter than the reference level.
When discussing real-world sounds traveling through the air, loudness ismost often measured in dBSPL, or “decibels of sound pressure level.” Thisis a unit of measure based on the decibel, with the reference level of 0dBSPLbeing the quietest sound that is audible by a young adult with undamagedhearing.3 The threshold of pain is generally placed around 120dBSPL. Thisrange of 0dBSPL to 120dBSPL gives us the practical dynamic range4 of humanhearing. 80dBSPL is a good listening level for music.
Loudness can be measured in two ways: it can be measured in terms of peakloudness, or in terms of average loudness. Peak loudness measures the amplitudeof the highest instantaneous peaks in the sound. Average loudness measures theoverall average amplitude level, taking into account all of the loud peaks andthe quiet in-between spaces.5 Peak loudness is good to know because peaks thatare too loud will often cause audio equipment to overload. Average loudnessis good to know because it reflects, more accurately than peak loudness, thehuman ear’s actual perception of loudness. The level meters on most audiomixers measure peak loudness.
Average loudness, when measured as described above, will still not be a terri-bly accurate measurement of human loudness perception. Loudness perceptionis complicated by the fact that the ear has a bias towards certain frequencyranges and away from others. The ear is most insensitive in the subsonic range,and becomes progressively more sensitive into the upper midrange, after whichits sensitivity rapidly rolls off. The sensitivity also varies with volume, withthe ear being less sensitive to bass and treble at lower volumes. The precisesensitivity curves are given in Figure 1.1.
1.5 Digital Audio
Thus far we have only looked at how sounds work in the “real world;” we’velooked at sounds in the form of pressure waves in the air, and in the form ofanalog electrical signals. We have not yet looked at how sounds are representedin the computer, in their digital, numerical representation. Digital sound be-haves in more or less the same way as real-world, “analog” sound, but there arestill a number of special considerations that apply, so it is worth examining thebasic ideas behind it.
The defining characteristic of any kind of digital data, be it text, pictures,or movies, is that it is made of a bunch of numbers. Numbers are all that
3Because human hearing sensitivity varies with frequency, this “quietest audible sound”metric is measured at a frequency of 1kHz, where human hearing is most sensitive.
4The “dynamic range” of a system is the ratio between the quietest sound it can handle,and the loudest sound it can handle.
5Average loudness is essentially
√1T
∫ T
0a(t)2dt, where a(t) is the instantaneous amplitude
of the sound over time and T is the length of the time interval being measured.
12

Figure 1.2: Analog to digital conversion.
Figure 1.3: Digital clipping.
computers know how to work with. When computers work with audio, thesituation is no different: they must figure out how to take the continuous time-domain waveform of a sound and reduce it to a series of numbers.
They accomplish this by “sampling” the waveform. What this means isthat, when you record an audio signal into your computer, it captures it bymeasuring the instantaneous amplitude of the waveform at regular intervals.These individual measurements are called “samples.” This process of samplingturns the continuous, analog waveform into a numeric, “digital” approximationthat looks a lot like a staircase. Figure 1.2 illustrates the effect.
1.5.1 Clipping
The numeric value of a sample represents its amplitude. One of the limitationsof digital systems is that they have a sharp, absolute limit on the maximumamplitude of the signals that can be represented; the computer will only countso high. Any amplitudes that are higher than the maximum countable amplitudewill simply be “clipped” off, as shown in Figure 1.3.
As you might guess, digital clipping generally sounds quite bad, and it is
13

to be avoided in most circumstances.6 Whenever you are working with digitalaudio, you must make sure that it never exceeds the maximum digital amplitude.
1.5.2 Sampling Resolution
Besides clipping, the process of analog to digital conversion can have a numberof other detrimental effects on the quality of audio. Furthermore, processingaudio when it is in digital form can further degrade the quality, due to roundingerrors in the numerical digital processing algorithms.
There are two attributes of a digital audio system that determine its fi-delity: sampling rate7 and sampling resolution. If both of these attributes aresufficiently good, then digital recording and processing will create little or noaudible degradation of the sound quality.
The sampling resolution of a system is the numeric accuracy of the individualsamples. The more possible numeric values for a sample, the higher the samplingresolution is. Because computers work in binary, sampling resolution is typicallydescribed in terms of “bits.” A 4-bit digital system has 16 possible numericvalues for each sample.8 An 8-bit system has 256 possible values. A 16-bitsystem has 65,536 possible values, and a 24-bit system has 16,777,216 possiblevalues. In general, an n-bit system has 2n possible numeric values for eachsample.
A low sampling resolution will degrade the quality of the audio by introduc-ing “quantization noise.” Quantization noise is the audible artifact that resultsfrom the “rounding errors” inherent in analog to digital conversion, as seen inFigure 1.2. It usually9 manifests in the form of a low-volume hissing sound,somewhat similar to the sound heard in quiet sections on analog tapes andvinyl. This sound will mask subtle details in the sound and make sufficientlyquiet sounds inaudible.
1.5.3 Dynamic Range
The higher the bit resolution of a digital system is, the quieter the quantizationnoise is. The level of the quantization noise is what determines the system’stotal “dynamic range;” that is, the ratio between the quietest possible soundand the loudest possible sound. The quietest possible sound is restricted by thelevel of the quantization noise, and the loudest possible sound is restricted bythe threshold for clipping.
A digital system has a dynamic range of 6dB times the bit resolution. Inother words, each bit of sampling resolution adds roughly 6dB of dynamic range.Thus, the dynamic range of a 16-bit system is about 96dB. The dynamic range
6Digital clipping may, in certain circumstances and styles, be considered aesthetically de-sirable, but in the vast majority of cases it is considered an artifact.
7See Section 1.5.5 for a discussion of sampling rates.8Figure 1.2 shows 4-bit sampling.9With particularly simple signals, particularly quiet signals, and particularly low sampling
resolutions, the quantization noise may manifest quite differently, and usually in a moredisturbing way.
14

of a 24-bit system is about 144dB, larger than the dynamic range of humanhearing.
Volume levels in the digital world are measured in “full-scale decibels,” ordBFS. The digital full-scale measurement system measures peak volume, notaverage volume. The 0dB reference point is set at the highest representableamplitude; in other words, 0dBFS is the loudness of the loudest possible sound.All other volume levels are negative; a sound with a level of -6dBFS has a peaklevel 6dB below the digital maximum, for instance.
1.5.4 Standard Sampling Resolutions
There are two commonly used sampling resolutions: 16-bit and 24-bit. 16-bitis the resolution of audio CDs and most MP3s. It is typically used for thedistribution of mixed-down music. Its dynamic range is sufficient for the vastmajority of music.
In the actual mixing process, it is preferable to use 24-bit. 24-bit has moredynamic range than 16-bit. While the difference doesn’t matter much for fin-ished mixdowns, it can make a difference when in the mixing process, becausethe extra dynamic range gives some “slop room,” allowing for the rounding er-rors introduced by digital processing to occur without significant audible effects.
Some DAWs also have a “32-bit” resolution. This usually refers to the so-called “floating point” representation of digital audio, as opposed to the usual“fixed-point” representation, which is what we have discussed so far.
32-bit floating point and 24-bit fixed point are, in a certain sense, the samething. Without going into the technical differences between the two, 32-bitfloating point audio has the same dynamic range as 24-bit fixed point audio,with the added advantage that audio above the 0dBFS threshold will not clip.Instead, the computer will effectively take bits from the bottom and add themto the top. This raises the quantization noise, but also raises the maximumrepresentable amplitude, resulting in a net effect of the same amount of dynamicrange.
It is generally not a good idea to take advantage of floating point’s abilityto exceed the 0dBFS ceiling, because even in DAWs that fully support floatingpoint, many plugins will convert their input audio to fixed point internally;when they do this, the audio will clip. So, even if you are working in floatingpoint, it is best to act as if you were not, and keep all levels below 0dBFS at alltimes.
1.5.5 Sampling Rate
The sampling rate of a digital system is the number of samples per second thatit uses to represent the audio. For instance, audio CDs uses 44,100 samples persecond. Sampling rates are measured in hertz (Hz), just like frequencies. Thus,the audio CD sampling rate might be written as 44,100Hz, or 44.1kHz.
Intuitively, you might expect that a higher sampling rate would yield higherquality audio, and this intuition is correct. Specifically, sampling rate affects
15

the “frequency response” of the digital system; that is, the range of frequenciesthat it can represent.
Digital systems have no minimum representable frequency; they can go allthe way down to 0Hz. They do, however, have a maximum representable fre-quency, and it is determined by the sampling rate. Specifically, the maximumrepresentable frequency is half of the sampling rate. Thus, with a sampling rateof 44.1kHz, the maximum representable frequency is 22.05kHz. This maximumfrequency is referred to as the “Nyquist frequency.”
The most common sampling rates are 44.1kHz, 48kHz, 96kHz, and 192kHz.The lowest of these, 44.1kHz, is typically used for distributing finished mixes.Since this sampling rate can represent all audible frequencies, you might wonderwhy anyone would ever use a higher sampling rate.
The answer is that, besides allowing higher frequencies to be represented,higher sampling rates can also make certain audio processes sound better, withfewer sonic artifacts. Such processes include equalization10 and compression11,certain aspects of synthesis, such as filtering and waveform synthesis, and certainaspects of sampling, such as repitching.
The drawback of higher sampling rates is that they imply higher CPU usage.For instance, going from 48kHz to 96kHz, you can expect most processes to usetwice as much CPU, because they are processing twice as many samples in thesame amount of time.
10See Section 4.11See Section 5.
16

Chapter 2
Preparation
In this section we will look at some things that you need to think about beforeyou set out to mix a track.
2.1 Monitors
First and foremost, you will have a devil of a time trying to mix your track ifyou can’t hear it properly. You will want a good output device.
Speakers are preferable to headphones, because they give a better picture ofthe stereo image of the music. After acquiring a good pair of speakers, you willneed to spend some time and money fine-tuning your room acoustics for idealmonitoring.
Headphones are cheaper than speakers, and require no tuning of room acous-tics to perform well. Even if you own a good pair of speakers, you will still wantto check your mix on headphones, because they can allow you to hear certainfine details in the music that would not show up otherwise.
A fantastic monitoring system is not necessary for producing fantastic mixes,but it makes things easier. The worse your monitoring system is, the harder itwill be to get good results, but it will always be possible.
2.2 Volume Setting
In order to get the best results out of your monitoring equipment, you will needto make sure that you’re monitoring at a good volume. A good volume is nottoo quiet and not too loud. In general, it’s best to err on the side of too quiet.There are many reasons to use moderation in your volume setting:
• If your volume is too loud, then your ears will quickly become fatigued,and you will lose your ability to make accurate judgments about the mix.
17
• If your volume is too quiet, then you will not be able to hear fine de-tails in the music, and this will also impair your ability to make accuratejudgments about the mix.
• Your ear’s frequency response changes with volume. Louder music willalso seem to have more bass and treble. Thus, if you monitor too loudly,then you will mix your music with too little bass and treble, and if youmonitor too quietly, then you will mix your music with too much bass andtreble.
When working on drums and percussion tracks, and anything that needsto be really kicking and punchy, I would recommend working at a somewhatlower volume than you would for normal mixdown tasks. If you do this, youwill probably end up with a punchier result. If you can make your drums soundpunchy at a low volume, then they’ll sound really punchy when you turn themup. On the other hand, getting your drums to sound punchy at a high volumeis no challenge, and the results won’t always translate to lower volumes.
2.3 Plugins
Another prerequisite to getting a really good mix is ensuring that your DAW1
is equipped with good plugins. Not all plugins are made equal, and you needto make sure that you’re using good ones. Some DAWs will come bundled withusable plugins, but other DAWs will not. You need to know which camp yourDAW falls into, and if it falls into the latter category, you need to get some goodthird-party plugins. At the very least, you need to make sure that you have areally good equalizer, compressor, and reverb plugin.
It’s also worthwhile to have some analyzer plugins: specifically, a spectrumanalyzer and a waveform viewer.2 A spectrum analyzer allows you to see thefrequency domain characteristics of your sounds, and a waveform viewer allowsyou to see the time domain characteristics of your sounds.
2.4 Ears
Your most important piece of gear, of course, is your ears. Develop a relationshipwith your ears that is based on trust and love. Try to keep them in good shape.Don’t abuse them with excessive loud sounds. That’s the love part. The trustpart is this. You will not be able to successfully mix music unless you canhave confidence in the things your ears tell you. You have to be able to takethe attitude that if it sounds good, it is good. All of the advice you read canguide you in your mixing, but every decision ultimately has to be an ear-baseddecision.
1“Digital Audio Workstation,” or DAW, is jargon for any music-making program, such asAbleton Live, Cubase, Pro Tools, or FL Studio.
2Smartelectronix’s s(M)exoscope is an excellent free waveform viewer.
18

2.5 Sound Selection
This is the one thing that will make or break your mix. You have to make surethat you have selected sounds that will naturally fit well together. Essentially,you have to pick out your sounds and compose your track such that you minimizemasking and fill out the frequency spectrum nicely, striking a balance betweenfullness and clarity. For more details on masking, see Section 4.1.1.
You will not get a good mix if you do not have good sound selection. Period.Mixing techniques can make your sounds work better together. They cannotmake your sounds work together if they do not basically work together to beginwith.
19

Chapter 3
Mixer Usage
Having spent some time working on prerequisites, we will now move into issuesdirectly related to mixing.
The most important tool for mixing is the mixer. Most DAWs today includemixers as a built-in basic feature. These mixers are traditionally modeled afteranalog hardware mixers, and share a lot of the same principles of operation.This guide assumes that you are using a software-based DAW mixer.
A mixer consists of a series of channel strips. Each of these channel stripswill correspond to one of the sounds in your mix: a virtual instrument, a drumkit, or a recorded vocal performance, for instance. Each channel strip contains avariety of tools to manipulate the sound going into it. The purpose of the mixeris to perform these manipulations, and then mix together the sounds comingfrom each channel strip, creating one audio signal that is the sum (both in theintuitive and mathematical sense) of all of the separate audio signals.
3.1 Leveling
Each channel strip will prominently feature a “level fader” which controls thevolume of the sound going into it (usually calibrated in terms of dBFS). Thelevel faders are the most basic tool for balancing mixes. The process of adjustingthe level faders to achieve a satisfactory balance is called leveling.
This seems like a fairly easy thing to do, but it is surprisingly easy to get itwrong. Leveling is easy to get wrong partially because it’s so easy to overthinkit. The more you think about the levels, the more your perception becomesdistorted, and the more likely you are to get things wrong. Leveling is reallypretty easy if you approach it the right way. In general, if you have a good soundselection, then all of your sounds will be audible in any case, and tiny differencesin level should not be of great importance. So leveling is just a matter of gettingeverything approximately right without losing perspective.
The main guiding principle of leveling is that you should make the mostimportant parts of your music the loudest. If you’re writing dance music, you
20

probably want the drums and the bassline loudest, or whichever sounds arecarrying the main groove. If you’re writing pop music, you probably want thevocal line to be the loudest. If you’re writing more left-of-field music, thenyou need to do some soul-searching and figure out which parts are the mostimportant. Perhaps all of the parts are equally important, and you should levelto achieve an even, unbiased presentation.
There are two general ways to approach leveling. The first approach is tojust level as you go. This approach generally works fine in my experience, aslong as you don’t put too much thought into it. But if at any point you’re notfeeling satisfied with your levels, and you want to completely re-do them, thereis a simple procedure for doing so.
To set your levels from scratch, start by dragging all of your faders downto zero. Then bring them up one by one, but put some thought into the orderin which you bring them up. Generally speaking you should bring them up inorder of importance, so that the most important (and loudest) parts come upfirst. This way you ensure a successful balance between the core elements ofyour track before considering the less important elements.
3.1.1 Input Gain
Many mixers offer an “input gain” control, which allows you to adjust thevolume of the input to a channel strip before any other processing occurs. Thisinput gain control is useful for getting sounds that are far too loud or far tooquiet “in the ballpark,” so to speak, so that the level faders aren’t shoved offinto the extreme ends of their ranges.
3.1.2 Headroom
One important topic that we have yet to address is that of headroom. It isimportant when you are mixing to leave a certain amount of “headroom;” inother words, to not allow the level of your mix to exceed a certain peak loudness.For instance, if your mix never goes louder than -5dBFS, you would say thatyou have 5dB of headroom. There are two reasons to leave headroom in thismanner: first, to avoid digital clipping with levels greater than 0dBFS, andsecond, to leave some space to perform mastering or finalizing processes (seeSection 7.1).
How much headroom you need to leave is an open question, but in general,when working in 24-bit audio, it is better to err on the side of too much thanon the side of too little. Anywhere between 3dB and 20dB of headroom shouldbe fine. 6dB is a pretty good amount for music with a modest dynamic range,such as pop music or electronic dance music. For music with a wide dynamicrange, you will want more headroom, to leave space for any unexpectedly largepeaks.
In order to create a given amount of headroom, you will need to set yourindividual mixer tracks so that their levels are somewhat below the desiredamount of headroom. If you want to leave 6dB of headroom, then you might set
21

your loudest mixer tracks so that their levels do not exceed -9dBFS. Of course,this is only a starting point, and depending on the nature of the interactionsbetween your mixer tracks, it may not work for your mix.
Naturally, your music will be quieter if it has a lot of headroom. Do notremove headroom because your music is too quiet; just turn up your monitoringvolume. You will want to remove most or all of the headroom before you sendyour mix out into the world, but now is not the time to do that. You shouldonly do so as one of the very last steps in the mixing process. See Section 7.1for details.
3.1.3 Level Riding
One last thing to consider when leveling is the concept of “level riding.” If youride your levels, then what that means is that, rather than having your levelfaders always stay at a fixed position, they move up and down over the course ofthe track to shape the dynamics and the balance of the music. In my experience,level riding is very useful and important for music with a wide dynamic range. Itis usually unnecessary with less dynamic music, such as electronic dance music.
3.2 Effects and Routing
You can go pretty far using a mixer just to combine your various channel stripsat different levels, but mixers can do so much more.
As previously mentioned, channel strips have a variety of controls to manip-ulate the sounds going into them. These controls vary somewhat from mixer tomixer. You can be quite certain that you’ll have a “pan” control (discussed inSection 6.1). You might also have a built-in equalizer; equalizers in general arediscussed in Section 4.
3.2.1 Inserts
One universally available feature is that of inserts. An insert allows you to usean effect plugin to process the sound going through the channel strip. Thisopens up a world of possibilities, and the bulk of the remainder of this mixingguide is concerned with the usage of various insert effects. Popular insert effectsinclude: equalizers (Section 4), compressors (Section 5), limiters (Section 5.4.1),gates (Section 5.4.5), delays (Section 6.3), stereo effects (Section 6.2), and distor-tion, chorus, flangers, phasers, filters, ring modulators, vocoders, pitch shifters,exciters, harmonizers, auto-tuners, and FSU plugins (not discussed).1
1Most of the insert effects that are not discussed are not discussed because they are usedto create dramatic changes in sound, rather than subtle sonic enhancements, and thereforefall somewhat outside the scope of a guide to mixing.
22

3.2.2 Auxiliary Sends
Inserts are not the only way to make use of effect plugins. There is anothermethod, known as auxiliary sends, or aux sends, which is useful in a slightlydifferent set of situations.
Insert effects are useful when you want to use an effect to process the soundof one channel. Aux sends are useful when you want to send several otherwiseunrelated channels through an effect, or to blend a processed version of a channelwith the normal, unprocessed version.
When you add an aux send to your project, every channel strip will have avolume control corresponding to that aux send. That volume control, if turnedup, will allow you to send varying amounts of each channel to the aux send.The audio thus sent to the aux send will be processed through the effect andadded to the mix.
Auxiliary sends are, in mixing, most often used for reverb (Section 6.4) anddelays (Section 6.3). They are also useful for performing parallel compression(Section 5.4.3).
Most DAWs provide two kinds of aux send: pre-fader and post-fader. Thesetwo types differ in their relationship to the main level fader of the channel.A pre-fader send happens “before” the fader, and a post-fader send happens“after” the fader. The practical effect of this is that changes in the level faderwill not affect the send level of a pre-fader send, but they will affect the sendlevel of a post-fader send. There are a variety of reasons to choose either, andit’s best to make this decision on a case by case basis.
3.2.3 Busses
Normally channel strips take their audio input from some source elsewhere in theDAW; a software synthesizer, a track of recorded audio, etc. But channel stripscan also take their input from other channel strips. A channel whose inputconsists of multiple other channels is sometimes called a “bus” or a “groupchannel.”
Busses are very useful. Essentially, what they allow you to do is to manip-ulate several channels as one. You can process them with the same effects, andyou can control their levels as a unit, using the level fader on the bus.
A common use of busses is on drum kits. Suppose that you have a drum kitwith a separate channel for each drum sound: kick, snare, three toms, and fourcymbals. You could then make a bus called “drums,” and route all of the drumsounds into that bus, so that they could be controlled as a unit.
You can also have hierarchies of bus groupings: channels that are groupedinto busses, which are themselves grouped into busses. A refinement of theprevious drum kit example would be to first create a “toms” bus and route ofall of the toms to it, and then a “cymbals” bus to which all of the cymbals arerouted. Then your drum kit would be described by four channels: kick, snare,the toms bus, and the cymbals bus. You could then route all four to one big“drums” bus as before.
23

3.2.4 Master Bus
There is one special bus which is present in every mix, called the “master bus.”The master bus is the bus that everything else goes through: it’s the finaldestination of all the audio. You can use the master bus to apply insert effectsto the mix as a whole.
In general, you should leave the level fader on the master bus set to 0dBFS.In the context of a normal mixdown, there is no good reason to adjust it. Thereare a number of reasons you might want to adjust it, but in all cases there arebetter ways to do the same thing:
1. You might turn it up or down to adjust your monitoring level. Instead,you should adjust the volume using a hardware or software volume controloutside your DAW.
2. You might turn it up to remove headroom at the end of the mixing process.Instead, you should use a limiter; see Section 7.1.
3. You might turn it down to add headroom. Instead, you should turn downall of the tracks going to the master bus by an equal amount, or turndown the input gain on the master bus, because if you add headroom byadjusting the master level fader, then the headroom adjustment will occurafter any insert effects on the master bus, which is not desirable.
3.2.5 Advanced Routing
Many DAWs allow even more sophisticated signal flow (“routing”) possibilitiesthan the ones described above. For instance, it is often possible to send theoutput of a channel strip to multiple other channel strips.2 Some DAWs have“anything to anywhere” routing, which means that you can send the outputof any channel strip into any other channel strip with no restrictions, creatingsignal flow paths of arbitrary complexity.
2This is useful for performing techniques such as parallel compression (Section 5.4.3.)
24

Chapter 4
Equalization
Now we arrive at the next big topic in mixing: that of equalization. Equaliza-tion, or EQ, is the process of changing the balance of the frequency componentsof sounds.
4.1 Purposes
In order to equalize successfully, you must first know what exactly you are tryingto accomplish. Do not equalize unless you have a particular reason to do so.There are two main reasons to equalize a sound: to avoid masking, or to changethe character of the sound.
4.1.1 Avoiding Masking
Masking is a phenomenon that occurs when you have multiple sounds, playingsimultaneously, that occupy similar frequency ranges. It causes one or bothof the sounds involved to be partially or entirely obscured. Masking is morepronounced in low frequencies; the lower you go, the more space your soundsneed to retain clarity.
One of the most common and oft-discussed masking-related problems is theinteraction of kick drums and basslines. In a typical pop or dance tune, thekick drum and the bassline together contain most of the low end of the music,and getting them to not interfere with each other is a constant problem forproducers. If insufficient attention is paid to the interaction of the kick and thebass, then you may end up with a messy low-end.
The same sorts of problems can occur across the frequency range. You canget away with more in the midrange and treble than you can in the bass, butultimately you always have to worry about masking.
To avoid masking, the most important thing is to simply select your soundssuch that you avoid frequency range overlaps. Don’t use two sounds that com-pete for the same frequency range. Those two sounds will never sound good
25

together, no matter what you do to them.If sound selection is your most important tool in fighting masking, then
your next most important tool is equalization. With EQ, you can remove ordeemphasize nonessential components of a sound, and emphasize the essentialcomponents of the sound. In this way you can reduce the effects of masking, bydeciding what sound will dominate in each frequency range. To cause a sound todominate in a given frequency range, cut other sounds in that frequency range,and/or boost the dominating sound in that frequency range.
Most sounds have energy across the majority of the audible spectrum, butwith most of their energy focused in one or more “critical” frequency ranges.These critical ranges are the “essence” of the sound, and are typically the partsof it that will be heard clearly in the context of a mix. If you want a sound tobe heard clearly in a mix, then you need to make sure that it dominates in itsmost important critical ranges.
Thus, the ideal approach to avoiding masking is this. Pick sounds thatdo not step on each others’ critical ranges. Arrange your sounds so that theircritical ranges fill out the frequency spectrum with a minimum of overlap. Thenequalize your sounds — only as necessary — to emphasize their critical ranges,and to deemphasize nonessential frequencies when they detract from the clarityof the mix.
4.1.2 Changing Sound Character
Besides avoiding masking, equalization can be used to change the general char-acter of a sound. It can remove or deemphasize undesirable sound components,such as mud or resonances. It can also change the balance of desirable soundcomponents (usually critical ranges). It can add sparkle to cymbals, impact todrums, and presence or fullness to instrumental lines, all by boosting or cuttingdifferent critical ranges. The boosts or cuts that one will use when changing thebalance of critical ranges often depend on the desired psychological effect of thepart; refer back to the breakdown of frequency ranges in Section 1.1.
4.2 Using a Parametric Equalizer
EQs are fairly intuitive to operate. We have all used them before; they arefound, in simple form, in the tone controls of home stereo systems. The EQsthat you use in mixing are not radically conceptually different from those tonecontrols: you have a frequency band, and you have a gain amount. But thereare some important differences.
For the purposes of mixing, you want to be using a parametric EQ. A para-metric EQ is a particular type of EQ which is well-suited to precise and nuancedadjustments of frequency balance. It consists of several “filters;” each of thesefilters creates a boost or a cut in a frequency range, and its behavior is controlledwith three adjustable parameters: frequency, gain, and Q.
26

The “frequency” parameter sets the center frequency of the filter’s action.The filter will not act on only this frequency; it will act on the center frequencyand all of the frequencies surrounding it, with the intensity of the action steadilydecreasing with distance from the center frequency.
The width of the affected frequency range is controlled by the “Q” parameter.Lower Q values result in wider ranges; higher Q values result in narrower ranges.A sufficiently high Q will result in essentially only the center frequency beingaffected.
The “gain” parameter is the simplest of the three parameters of a filter. Itsimply sets the amount of volume adjustment; specifically the amount of volumeadjustment at the center frequency. A negative value will result in a cut, and apositive value will result in a boost.
So how do you decide on values for the frequency, gain, and Q of a givenfilter? As with leveling, there is a procedure that you can follow. In thisprocedure, first you find the frequency, and then you find the gain and Q moreor less together.
4.2.1 Setting the Frequency
In finding the center frequency, you first need to decide what general frequencyrange you want to affect, and then what exact frequency you want to center on.Sometimes, particularly as you begin to develop your ear, you will know justfrom listening what frequency range you want to affect. If you don’t know, thenyou need to spend some time analyzing the frequency content of your sound.
A spectrum analyzer can tell you where the critical ranges are (they will bethe loudest portions of the frequency spectrum), and it can also tell you aboutthe presence of any nonessential frequencies that you might want to cut. To geta more nuanced perspective on the frequency content of your sound, to reallyfigure out what’s what, you can also employ a method known as the “sweeptechnique.”
To perform the sweep technique, set your filter to a medium Q and a highgain, and simply sweep it across the frequency spectrum, listening as you go.The sweep technique will tell you what the “ingredients” of your sound are,by letting you hear each frequency range individually. Once you have done asweep, you will have a better idea of what each frequency range is contributingto your sound, and you will be better equipped to decide which ranges you wantto boost and cut.
The sweep technique should be avoided whenever possible, for two reasons.First, it is very tiring to the ears. Second, after sweeping, your perception of thesound will be distorted, and you will no longer be in a good position to makejudgments about EQ. Don’t go to great lengths to avoid sweeping, but don’t doit when it’s not really necessary. You’ll find that it becomes necessary less oftenas you begin to develop an ear for what the different frequency ranges soundlike.
Presumably at this point you’ve decided on a frequency range that you wantto boost or cut. Now you have to decide on a precise frequency to set as
27
your center frequency. Sometimes it doesn’t really matter; just put the centerfrequency in more or less the center of the range you want to affect. But if youhave a tonal sound, then you can sometimes achieve a better effect by settingyour center frequency to a prominent tonal frequency.1
To do this, you will want to employ the sweep technique again, except overa narrower range, and with a very high Q rather than a low Q. The high Q willallow you to “tune” your center frequency to a strong tonal frequency in thesound. You will know that you have done this when you hear a loud ringingsound.
4.2.2 Setting the Q and Gain
Once you have found your center frequency, you should fiddle with the gainand Q values until you arrive at a satisfactory result. When boosting, I findmyself generally using low to moderate Q values (0.2-10) and less extreme gainvalues (0.2-4dB), while when cutting I find myself using higher Q values (7+)and more extreme (-2dB or lower) gain values. This is the case for a variety ofreasons, as follows.
When boosting, typically I’m boosting a critical range, and often it soundsbest to also give the frequencies around the critical range a slight boost, justto make the sound more natural. This accounts for the low Q value. The mildgain value is simply because it seldom sounds natural to give a single region ofa sound an extreme boost, and it can actually sometimes result in noticeablephase “smearing,” particularly with high Q values. This smearing can manifest,in its most blatant form, as sustained ringing near the center frequency.
You can, of course, cut critical ranges, in which case similar principles applyin terms of Q and gain settings. But, simply due to the nature of critical ranges,I don’t usually want to cut them. More often I’m dipping in between criticalranges to try and remove undesired frequencies, and I don’t want to cut thedesired frequencies, so a high Q value gives me the precise action necessary todo this. I often use a fairly extreme gain value, simply because of the natureof what I’m trying to achieve; I’m trying to remove or substantially reduceundesired frequencies, not subtly reduce undesired frequencies.
None of these things should be taken as rules. These are merely commonpatterns. Don’t be afraid to do a boost with a high Q and a high gain if thesituation calls for it. As always, your ear is the final judge.
4.2.3 Evaluating Your Results
It can sometimes be hard to judge the results of your EQing. One techniquethat is helpful is to toggle the “bypass” button on your EQ on and off, tosee what your EQing has done to the sound. Is it making the sound better,or worse? With extreme EQing the effects will be very obvious. With subtle
1It is generally profitable to pay particular attention to the precise center frequency whenEQing sounds in the bass range. The main exception to this rule is when EQing to removebass frequencies, in which case the center frequency is relatively unimportant.
28

EQing, particularly boosts and cuts less than 2dB or so in magnitude, theymay be less so. In these cases, just sit back listen to the music for a while,and it should soon become apparent whether the EQ adjustments are helpingor hurting the sound.
One final reminder. Always bear in mind that you’re not EQing the soundto sound good by itself; you’re EQing it to sound good in the context of themix. So while listening to the sound by itself can be helpful, ultimately yourjudgments have to be based on how it sounds in the mix.
4.2.4 High Shelf/Low Shelf Filters
Thus far I have made an important omission. Parametric EQs usually supplyyou with a few different types of filters. In the preceding discussion we haveexamined only one type of filter: the bandpass filter. The bandpass filter is themost common and important type of filter, but a few other common types offilters also require discussion.
The next types of filter we will look at are the high shelf and low shelffilter. High and low shelf filters have the same parameters as bandpass filters:frequency, gain, and Q. A high shelf filter boosts or cuts all of the frequenciesthat are higher than its center frequency. A low shelf filter boosts or cuts all ofthe frequencies that are lower than its center frequency.
That is a simplification. A high shelf filter does not simply adjust the volumeof all frequencies above its center frequency, and none of the frequencies belowits center frequency. As with bandpass filters, there is a curve involved, withthe Q value controlling the steepness of the curve. The center frequency is thefrequency at which the volume adjustment is half as much as is promised by thegain value. The same applies to low shelf filters.
High/low shelf filters are most useful when adjusting the balance of criticalranges when those critical ranges happen to be all frequencies above or below acertain frequency. They are also useful for reducing, but not removing, undesir-able frequencies of the same description. To entirely remove frequencies aboveor below a certain frequency, you should use a highpass or lowpass filter.
4.2.5 Highpass/Lowpass Filters
A highpass filter cuts all frequencies below a certain frequency. However, ratherthan cutting all of them by the same amount, as would a low shelf filter, thegain reduction becomes progressively more extreme with decreasing frequency,until the gain reduction is so extreme that it amounts to complete removal.A highpass filter has just one parameter: the cutoff frequency. The cutofffrequency is the center of the action of the filter; the filter has already begun toact somewhat at the cutoff frequency, but not very much.
A lowpass filter is just the opposite of a highpass filter. Rather than cuttingall frequencies below the cutoff frequency, it cuts all frequencies above the cutofffrequency. Other than that it behaves the same.
29

Some lowpass/highpass filters will also have a “resonance” parameter, whichmay also be called Q. This resonance/Q parameter is rather unlike the Q param-eter for bandpass filters. What it does is it causes the frequencies in a narrowband around the cutoff frequency to be boosted. The higher the resonancevalue, the more the frequencies are boosted.
4.3 Typical EQ Uses
EQing a sound usually involves a process of discovery. You figure out the com-ponents of the sound, and then decide how you want to balance out thosecomponents. Every sound is a little different; you can’t EQ by formula. Thatsaid, there are a number of common patterns that you will begin to notice onceyou have EQed a lot of sounds. To give you a jump start, this section will listsome of the most commonly noticed patterns.
There are a number of different sections, with each section addressing aspecific type of sound. Each section begins with a list of commonly presentfrequency ranges and what quality they lend to the sound. To add more ofa given quality to the sound, you should boost in the appropriate frequencyrange, and to give less of a given quality to a sound, you should cut in the samefrequency range.
Always be aware of the concept of yin and yang. EQing is relative, notabsolute. You may wonder why you would ever want to take away from a givenquality in a sound, but the reason is simple: by taking away from one quality,you add to all of the other qualities. On the same token, by adding to onequality of a sound, you take away from the all of the other qualities. So youwon’t get anywhere by just boosting everything; you need to use your EQ tocreate a tasteful balance.
4.3.1 General
<40Hz: Subsonics. Remove frequencies in this range if present; they will notbe audible in the mix, and will only eat up available headroom.100-300Hz: Fullness, but also muddiness. Boosting this frequency range willfatten up a sound, but this range also tends to get crowded, so you may needto cut some things in here.1-8kHz: Presence. The ear is very sensitive to this frequency range, and boost-ing critical ranges in here will make the listener really pay attention to theboosted instruments. But, boost too much, and you will end up with a verytiring and overbearing mix.10-18kHz: Air. Boosting in this range will give your mix liveliness and excite-ment; cutting will make things mellower and more relaxing. Most sounds soundbetter with a little extra air, but do not boost everything in this range, or, aswith any frequency range, you will end up with masking.
30

4.3.2 Kick Drums
40-80Hz: Gives the drum body.80-120Hz: Gives the drum punchiness.150-300Hz: Too much will make the drum sound muddy. Too little will makethe drum sound pinched and unnatural.1-8kHz: Gives the drum presence and punchiness.>8kHz: Contains the click at the attack of the drum.
4.3.3 Basslines
40-160Hz: Gives the bass smoothness and fullness.140-400Hz: Gives the bass character and personality, as well as audibility onsmall speakers.
Basslines are hard to generalize about, because there is so much variety inthem. The most important thing to think about when EQing your basslineis how it interacts with the kick drum. You will probably need to sacrificesomething from each of them to make them work well together.
4.3.4 Snare Drums
180-220Hz: Gives the drum body.200-300Hz: Gives the drum punchiness.1-8kHz: Gives the drum presence and crack.>8kHz: Contains the attack click.
4.3.5 Cymbals
<1kHz: Low-frequency components. You may want to reduce or remove these,as they may be inaudible in the mix and muddy things up. A low shelf filteris usually what you want here; a highpass filter can be nice in that it can clearthings up in a very busy mix, but you run a high risk of making the cymbalsound unnatural and disconnected from the rest of the mix.2-8kHz: Gives the cymbal a metallic quality.8-18kHz: Gives the cymbal sparkle and sizzle. Boost to add excitement. Cutto make the cymbals more soothing and less piercing.
4.3.6 Instruments
There are few specific claims that be made for tonal instruments, since they’reall different. Refer to Section 4.3.1 for the usual generalities. Read on for someadditional generalities.
With tonal instruments, particularly live instruments, you generally want tobe gentler with your EQing than with non-tonal sounds and percussion. Low Qvalues are best in most cases.
31

The usual balance that one wants to strike for a tonal instrument is betweenthree components:
The fundamental: The fundamental frequency of the tone (see Section 1.2.1),along with the first few harmonics, sort of hold the sound together and give itits “body.”
The upper harmonics: The higher harmonics contain a lot of the characterand personality of the sound, and boosting them can often bring out someinteresting characteristics.
The treble: Even low instrument sounds often contain some interestingstuff in the treble range: attack clicks, “air,” and the various scraping andshuffling sounds that are often present in live instrument recordings. Generallywhat I will do with these is either cut them or leave them be. If I want tobring them out, I will probably use some multiband compression2, rather thanboosting the treble.
4.3.7 Vocals
The same generalities apply for vocals as for instruments. The vowel part ofthe sound is in the midrange, while the consonant part is in the presence range.Vocals require even more gentleness with EQing than do instruments.
2See Section 5.4.9.
32

Chapter 5
Compression
Compression is the process of shaping the dynamics of sounds. A compressor isan automated volume control. It automatically adjusts the volume of the inputsignal in response to changes in volume in the signal itself.
Compressors are difficult to learn to use, for several reasons. They have manydifferent and unrelated purposes. They have complex mechanics of operation,and it is necessary to understand these mechanics in order to operate them.Their effect on the sound is not always readily audible. And finally, the specificthings that one has to do to get good results out of them are routinely verydifferent from what one would intuitively expect.
5.1 Purposes
Before diving into the operating mechanics of compression, we first need to lookat why you would want to compress a signal, and what can be accomplishedby doing so. As with equalization, it is important to always compress with aspecific goal in mind.
5.1.1 Reducing Dynamics
The most basic use of compression in mixing is to reduce the dynamic rangeof the input material. This is most commonly done on recorded vocal andinstrumental performances. Reducing the dynamic range of a performance canmake it sit in a mix better; smoothing out volume fluctuations allows it to bemore easily heard, particularly if it is being played quietly in the mix.
Furthermore, material with reduced dynamic range will have a higher aver-age loudness relative to its peak loudness. If you apply compression to reducethe dynamic range of most of the tracks in your mixdown, then the entire mix-down will be louder. Compression is the most important tool for achieving mixloudness.
33

5.1.2 Shaping Percussive Sounds
Compressors can also be used to modify the amplitude characteristics of percus-sive sounds, such as drums and plucked string instruments. For our purposes,a percussive sound consists of two distinct parts: an attack and a body. Theattack is the loud initial part of the sound, and the body is the quieter parttrailing off after it. There is no sharp division between the two.
A compressor can be used to change the balance between the attack and thebody of a percussive sound. It can bring up the attack, or it can bring up thebody. Bringing up the attack of a percussive sound will make it punchier, butwill also reduce its perceived loudness and presence in a mix. Bringing up thebody of a percussive sound will increase its perceived loudness and presence ina mix, but will also make it less punchy. Your goal when compressing percus-sive sounds should be to achieve the ideal balance between attack and body,punchiness and presence.
5.1.3 Creating Pumping Effects
A compressor, when applied to a group of tracks or to a whole mix, can createperiodic changes in volume synchronized to the rhythms of the music. Usu-ally this effect, known as “pumping,” is considered an artifact, but in certainsituations it can be pleasing and desirable, because it can enhance the grooveof the music. So, many producers will use compressors to intentionally createpumping effects.
5.1.4 When Not to Use Compression
Sometimes compression is not the right tool for the job. Always remember thata compressor is just an automatic volume control. If you find yourself strugglingtrying to get a compressor to do what you want, ask yourself if you can achievethe desired effect more easily with manual volume adjustments. For large-scaledynamics shaping, riding the levels is often more effective than compression.Furthermore, with modern DAW automation technology, even very fine-grainedvolume adjustments are sometimes easier to do by hand than with compression.Always be looking for the simplest and easiest way to get the job done.
5.2 How It Works
Having examined some of the situations in which one would use compression,we will now look at the theoretical principles which underlie a compressor’soperation. This section is not about how to use a compressor; this section isabout understanding exactly what a compressor does to your sound.
34

5.2.1 Threshold, Ratio, and Knee
A compressor works by reducing the volume of the loud parts of a sound; itbasically brings down the peaks. It applies negative gain to all parts of thesound that rise above a certain threshold. It does not necessarily reduce thegain enough to cause the sound to fall under the threshold; rather, it reducesthe difference between the threshold and the volume according to an adjustableratio. For example, if the ratio is 2:1, then a sound that is 6dB above thethreshold will have its volume reduced by 3dB, and a sound that is 1dB abovethe threshold will have its volume reduced by 0.5dB.
Some compressors also offer the ability to adjust the “knee” of the com-pression curve. A compressor that operates as described above will be ratherheavy-handed in its operation; it will leave sounds below the threshold com-pletely untouched, and rapidly clamp down on sounds above the threshold. Thisis “hard-knee” compression. “Soft-knee” compression basically smooths out theresponse of the compressor. Sounds a little below the threshold are slightlycompressed, and sounds that are only a bit above the threshold are compressedmore gently than louder sounds. Essentially, the threshold is “blurred” out bysoft-knee compression. Hard-knee compression is tighter and more controlled,while soft-knee compression is gentler and subtler.
5.2.2 Attack and Release
Compressors do not usually react instantaneously to sounds that cross thethreshold; they have a certain “lead-in” time, during which the gain rampsdown, and during which the sound may exceed the volume that it’s “supposed”to be at.
With modern digital technology it is possible for the compressor to reactso fast that the effect is essentially instantaneous. However, some amount ofcompression lead-in time is often a desirable characteristic, as overly fast-actingcompression can cause distortion in the waveform being compressed, and canin general sound rather crass and unsubtle. Compressors allow you to set thelength of the lead-in time, known as the “attack,” according to the nature ofyour task.
Just as it is often desirable for a compressor to begin compressing with someamount of “slop,” it is also usually desirable for a compressor to stop compress-ing with some amount of slop. When the sound falls back below the thresholdof compression, a compressor will take some time to bring the gain back up tothe normal level. The reason is the same; overly fast “de-compression” can dis-tort the waveform, and so slowing down the de-compression results in a gentlereffect.
The result of this lag is that when a sound that is being compressed rapidlydrops in volume, rather than falling back to the normal, un-compressed level, itwill fall even lower, and then gradually ramp back up to the normal level; thenegative gain is still being applied, even though the sound is no longer over thethreshold.
35

The lag time between the sound falling below threshold and the gain ad-justing appropriately is called the “release” time. As with attack time, it isadjustable.
5.2.3 Compressor Parameters
Putting it all together, a typical compressor has the following parameters:
Threshold: Determines the volume level at which the compressor will beginacting.
Ratio: Determines the amount by which material above the threshold willbe compressed.
Knee: Sets the sharpness of the knee, allowing for hard-knee or soft-kneecompression.
Attack: Determines how quickly the compressor will react to sounds abovethe threshold.
Release: Determines how quickly the compressor will return to a normalstate when sounds fall back below the threshold.
Finally, most compressors have one final parameter that we have not con-sidered:
Makeup Gain: Because compression is designed to reduce the volume ofthe peaks in the input, the output of a compressor is, unsurprisingly, usuallyquieter than the input. Since this is usually not desirable, most compressorsfeature a high-powered gain control at the end of their signal chain which willallow you to boost the signal right back up to “make up” for the compression.
5.3 Procedure for Setup
Having considered in the abstract how a compressor works, we will now moveinto some practical advice on how to use them.
The first thing you need to know when setting up a compressor is that, ifyou are also using EQ in your signal chain, the compressor typically comes afterthe EQ. This is because EQ, particularly extreme boosts or cuts, can change thedynamic structure of music. So, if you EQ after compressing, you may changethe dynamic structure of the music, partially undoing the work that you didshaping this same dynamic structure with compressor.1
Once you have your compressor placed into the signal chain, the next stepis to set its parameters to achieve the desired effect. The typical compressor,as we have seen, has six parameters: threshold, ratio, knee, attack, release,and makeup gain. Of these, only four are particularly troublesome to adjust,and they will account for most of the difficulty of configuring a compressor:
1Conversely, changing the dynamic structure of music also changes its frequency content,so compressors can often undo the work of EQs. But this generally ends up being less of aproblem, and so by putting the compressor after the EQ, you choose the lesser of two evils.
36

threshold, ratio, attack, and release. Most of the remainder of this sectionconsists of a description of a procedure for setting these four parameters.
It is not necessary to follow this procedure; if you have a good idea alreadyof what you want to do, you can generally set things up straight away withoutfollowing any special procedure. But the procedure described here is a fairly fail-safe way to get a compressor to do what you want it to do, so it is recommendedif you’re not wholly certain how to achieve your desired effect.
Begin by setting the ratio to the highest possible value, with a hard knee.If you have a rough idea of where you want your attack and release to be, setthem there. If not, set them both to the lowest possible value. All of thesesettings will change later, so don’t worry about them too much. Now set thethreshold. With the settings set as above, you should be able to easily hearwhere the compressor is acting, and so you will be in a good position to set thethreshold to a sensible value. Adjust your makeup gain if the result is too quietto properly hear it.
Now set your attack and release. This is probably the subtlest part of thewhole process, so spend a little bit of time on it. Experiment with differentsettings, and see what they do to the sound. Since you have your ratio sethigher than it will ultimately be, the effect will be exaggerated, and thereforeeasier to hear. If the sound is distorting, you probably need to make the releaseslower, or possibly the attack. Small changes in attack and release can makea significant difference when compressing rhythmic and/or percussive material,so be sensitive to these differences.
Now you have your threshold, attack, and release set. Reduce the ratio untilyou have achieved the desired amount of compression, and set the knee to thedesired value.
You should set the final makeup gain so that the compressed audio has thesame perceived volume as the uncompressed audio. Do this gain adjustmentwith your ears, without looking at the peak meters. Toggle the bypass buttonon the compressor on and off while adjusting the makeup gain until you havematched the perceived levels. It should be fairly clear when this happens; they’lljust “click.”
There are two reasons for adjusting the makeup gain in this manner. First,so that the existing balance of the mix is preseved. But, more importantly, sothat you can check your work. When you have the levels matched, then you cancheck your work by toggling the bypass button on and off. Does the compressedaudio sound better than the uncompresed audio? You can’t make this judgmentif the levels are not matched, because louder sounds naturally sound better thanquiet sounds. If the levels are not matched, then the version that you perceiveas sounding better will be whichever version is louder.
Be sure to check your work in the context of the mix, not just by itself.You’re trying to make it sound better in the mix, not by itself. In some cases,particularly with subtle compression, the effects of the compression will not benoticeable at all when playing the sound by itself, but will be quite apparentwhen playing it in the mix.
37

5.4 More Compression
In this section we will examine a variety of other topics related to compression.We will look at some specialized types of compressors and other dynamics pro-cessors, advanced techniques for using compressors, and some special applica-tions of compressors which are unusual enough to warrant special examination.
5.4.1 Limiters
A “limiter” is a special type of compressor. Unlike a normal compressor, whichmay allow the input signal to exceed the threshold, a limiter will never let thishappen. The input signal will always remain below the threshold no matterwhat. Theoretically speaking, a limiter is equivalent to a compressor with aninstantaneous attack, a ratio of ∞ : 1, and a hard knee.
Many limiters are differentiated from normal compressors by the presenceof a “look-ahead” feature.2 A normal compressor can only react to audio as itarrives, which means that if it arrives at a sudden peak, it will have to clampdown on it very quickly, possibly distorting the audio signal in the process. Withlook-ahead, the limiter sees a few milliseconds “into the future”3 so that, whena sudden peak is about to arrive, the limiter can begin clamping down ahead oftime, resulting in a smoother and more transparent effect.
Limiters have a variety of uses. In mixing, the most important of these usesis the transparent removal of peaks. With a good-quality limiter, sufficientlybrief peaks can often be reduced or removed with little or no audible effect onthe sound. This increases the available headroom of the music and allows it tobe made louder.
A limiter can also be used in any context where you are looking for extremecompression. In these cases, a limiter is simpler to configure than a compressor,and, due to look-ahead, can often produce a smoother result.
5.4.2 Serial Compression
One variation on the standard compressor usage paradigm is to use multiplecompressors on the same sound, chained one after another. This is called “serialcompression,” and there are plenty of situations in which it’s a good idea. Oftenseveral compressors working as a team can get the job done better than onecompressor.
Generally, when using serial compression, each compressor should be doinga different job. For instance, you might have one compressor with a fast attackand a high threshold, to tame the peaks, and another compressor with a slowattack and a low threshold, to reduce the dynamic range. There’s very little
2Some compressors also have a look-ahead feature, but it is more common in limiters.3Actually, it uses a delay buffer. A look-ahead limiter will introduce latency proportional
to the length of its look-ahead. Some DAWs will automatically compensate for this delay bydelaying everything else by the same amount, so that the effect on the music is transparent.This feature is often referred to as “plugin delay compensation.”
38

reason to have two compressors on a channel that have almost the same settings;just delete the second one and increase the ratio of the first one, and theoreticallyyou’ll have the same effect.4
5.4.3 Parallel Compression
Another variation on standard compressor usage is “parallel compression.” Par-allel compression involves sending a sound through a fairly heavy-handed com-pressor, and then mixing the dry signal together with the compressed signal.5
Parallel compression is a gentle effect that reduces dynamic range from the“bottom up” rather than the “top down.” Rather than bringing down peaks,it brings up low-level details.6 It is often applied to drum/percussion groupchannels7, but you can use it on any track where you want to bring out thedetails while preserving the peaks.
5.4.4 Sidechain Compression
Some compressors offer a “sidechain” input. This is a secondary audio inputthat allows you to use a signal other than the input signal to control the actionof the compressor. This second signal is called the “sidechain signal.”
A sidechained compressor behaves quite differently from a normal compres-sor. Rather than responding to peaks in the input signal, it responds to peaksin the sidechain signal. The dynamics of the sidechain signal are used to shapethe dynamics of the input signal. If the sidechain signal goes over the threshold,then the input signal will be reduced accordingly.
Effectively, sidechain compression allows you to cause to input signal to getout of the way of the sidechain signal. It is therefore useful for creating spacein a mix. For example, subtly sidechaning the background instrumentation ofa song to the vocal line, causing the background instrumentation to fall back abit when the vocals come in, can give the vocals more room to breathe whilekeeping the mix nice and full.
Sidechaining a bassline to a kick drum can also be very effective. It canget the bassline out of the way of the kick, so that it can really kick, withouttaking too much away from the power of the bassline. Furthermore, a carefullyadjusted sidechain compressor can cause the kick and the bass, when they hittogether, to fuse into one unified kick/bass sound, which can sound very nice.
Though sidechaning can be used subtly to create space in a mix, it can alsobe used as an artistic tool. With long release times and/or high ratios, sidechaincompression can cause a dramatic “ducking” effect. This effect is often used in
4Note that when you have multiple compressors in series, the effective overall compressionratio is the product of all of the ratios. So, for instance, if you have a compressor with a 2:1ratio followed by a compressor with a 3:1 ratio, the overall compression ratio is 6:1.
5You can accomplish this by putting a compressor on an auxiliary send track and sendingthe track to be compressed to it.
6If I may insert some personal opinion here, I think that parallel compression is awesome,and you should use it a lot.
7When applied to drum tracks, parallel compression is called “New York compression.”
39

modern house and techno music, where much of the instrumentation may besidechained to the kick drum, causing the music to rhythmically pulse and throbin time with the kick. A similar effect can be achieved with a single normalcompressor on the master bus, as described in Section 5.4.8.
Finally, sidechain compression can be used to reduce the level of sibilance(i.e., the consonants ‘s’ and ‘t’) in vocal recordings, a process known as “de-essing.” This is frequently desirable as these consonants can be sometimes beannoyingly loud. To de-ess your vocal, set up a sidechain compression routingwhere the sidechain signal is simply the input signal sent through an EQ. In theEQ, boost the sibilance range (around 2-8kHz). Now the sidechain compressorshould reduce the gain of the input signal whenever there is significant sibilance.
5.4.5 Gates
A gate is not a compressor. A gate is something entirely different, but it isanother device that is concerned with shaping dynamics, so it makes sense todiscuss it here.
Unlike a compressor, which is concerned with reducing the volume of theloud parts of a sound, a gate is concerned with reducing the volume of the quietparts of the sound — usually to the point that they disappear entirely.
The most important controls on a gate are threshold, attack, and release.The gate will cut all sound below the threshold. The release determines howquickly the gate will “clamp down” once the signal falls below the threshold.The attack determines how quickly the gate will relax and let the signal throughwhen the signal rises above the threshold.
The stereotypical reason to use a gate is to reduce noise in a recording.8 Byputting a gate on a noisy track, you can cause the track to be silenced whenthere is no useful signal on it, thus removing the noise in those parts.
Noise is less of an issue in computer-based electronic music production thanit is in traditional recording. That said, there are still reasons to use a gate thatare unrelated to noise reduction.
One of the most important applications of gates is cutting off the tails ofdecaying sounds. For instance, if you have an acoustic kick or snare that hasan undesirable tail end that’s muddying up the mix, then you can use a gate toremove it. Similarly, if you have an excessively reverberant sound, you can cutoff the reverb tails using a gate.9
Some gates also have sidechain inputs, and this opens up a variety of creativepossibilities. Sidechaining a gate is conceptually analogous to sidechaining acompressor. It causes the gate to clamp down on the input signal when thesidechain signal is below the threshold, and to let the input signal throughwhen the sidechain signal is above the threshold.
Effectively, a sidechained gate allows you to cause the input signal to followthe dynamics of the sidechain signal. Usually you will have a sustained sound as
8In fact, some people actually call gates “noise gates.”9This also leads to the stereotypical Phil Collins snare sound, which is based on a snare
drum routed through a thick reverb and gated to cut off the reverb tail.
40

the input signal, and a rhythmic percussive sound as the sidechain signal. Thefinal effect will be that the input signal will rhythmically pulse in time with thesidechain signal.
5.4.6 Expanders
Like a gate, an expander is not a compressor. Conceptually speaking, an ex-pander does the same thing as a compressor, except that, rather than reducingdynamic range, it increases dynamic range. When the sound rises above thethreshold, the expander amplifies it by an amount proportional to the ratio.10
Many compressors are also expanders.11 To use a compressor as an expander,simply set the ratio to a value below one.
5.4.7 Shaping Percussive Sounds
One application of compression that deserves some special attention is the shap-ing of percussive sounds, as described in Section 5.1.2. This type of compressionshould be applied to single percussive sounds: a snare drum, a cymbal, a guitar,a piano, etc. It should not be applied to mixed drum kits. If you wish to applythis technique to your drums, use a separate compressor for each drum sound.
Section 5.1.2 discusses two separate cases for shaping percussive sounds:bringing out the attack, and bringing out the body. We will consider each ofthese cases individually.
To bring out the attack, set up a compressor with a slow attack and amoderate or fast release. Set the threshold below the level of the body of thesound. Set the ratio to taste, but fairly low is usually best. This techniqueworks because the slow compressor attack leaves the attack of the sound intact,and the compressor then clamps down on the body (which is still above thethreshold). It brings out the attack by reducing the level of the body.
You can also bring out the attack by using an expander. Set up a fastattack and a moderate or fast release, and set the threshold above the body ofthe sound. Set the ratio to taste, but fairly low is usually best.
To bring out the body, set up a compressor with a very fast attack. Setthe release as fast as it will go without causing distortion. Set the thresholdjust above the highest point of the body. Set the ratio to taste. This techniqueworks by clamping down on the attack of the sound. It brings out the body byreducing the level of the attack. You can further bring out the body of the soundby using an additional compressor to compress the body, as a serial compressiontechnique.
Parallel compression is also very well-suited to the task of bringing out thebody of a percussive sound. Simply set up the compressor to completely flatten
10It is interesting to note the relationship between compressors, expanders, gates, and lim-iters. Compressors and limiters reduce dynamic range, while expanders and gates increase it.Compressors and expanders are gentle, whereas limiters and gates are merciless.
11In fact, it is actually fairly rare to come across an expander except as a special mode ofa compressor.
41

the attack out of existence, and then use the level faders to adjust the balancebetween the attack and the body, turning up the compressed channel to increasethe level of the body.
5.4.8 Creating Pumping Effects
One of the cool things about compression is its ability to manipulate grooves.By shaping the dynamics of the music, it shapes the patterns of emphasis anddeemphasis, and by shaping said patterns, it shapes the groove of the music.We have already seen one way to manipulate grooves in Section 5.4.4. Now wewill look at another method.
This method will usually be applied to a full mix, but sometimes it mightalso be applied to a group channel. The idea is that you have one or two louddrum parts (usually the kick drum and possibly the snare drum), which arerouted, along with a bunch of other elements, to the channel being compressed.You set up a compressor on the channel, and set the threshold so that it istriggered by the drums and not much else (for this technique to work the drumsmust constitute the highest peaks in the music). Set a hard knee, fast attack,slow release, and moderate ratio. Now turn up the drums. They will begin totrigger the compressor more intensely, and the slow release will cause the restof the music to pump.
The pumping, if done well, will be fairly subtle; you should hear an obviousdifference when you toggle bypass on the compressor, but you probably won’tbe able to actually hear the pumping unless you listen very closely.
If you are going to put a pumping compressor on your master bus, or reallyany compressor on your master bus, it is generally best to put it there fairly earlyon, and then mix “into it.” If you put it on after the fact, then your resultswill not be as good, because the compressor will have messed up a bunch ofmixing decisions that you made previously. If you make those decisions withthe compressor on, then you will compensate for the effects of the compressor,and get goo d results.
5.4.9 Multiband Compression
A multiband compressor is an elaboration on the basic concept of compression.A multiband compressor works by splitting the input signal into multiple fre-quency bands (usually three), sending each to a separate compressor, and thenmixing the signals together again after compression. So, in the usual case, youhave three compressors: one for bass, one for midrange, and one for treble. Youcan set the precise frequency range that each of these bands affects.
Multiband compressors were originally invented to be used as a masteringtool, but they do come in handy from time to time in mixing. They are usefulfor manipulating material that is already mixed together, such as drum loops.They can also produce interesting results when shaping percussive sounds. Moregenerally, they can be put to a variety of creative uses; reaching inside of a soundand shapings its dynamics at that level can produce quite startling results.
42

Multiband compressors are also useful for evening out instrumental perfor-mances that would otherwise be difficult to correct. For instance, if you havea guitar part that has the occasionally excessively “twangy” and sharp pluckednote, you can smooth it out by applying a compressor in the treble range andleaving the rest untouched.
Finally, multiband compressors provide a good method for de-essing. Bysetting one of the frequency bands to target the sibilance range (around 2-8kHz),you can isolate the sibilance and compress it by itself.
43

Chapter 6
Space Manipulation
The sound in a stereo audio recording can be seen as being arranged in a three-dimensional “sound stage.” A sound does not usually occupy a single point onany of these axes; rather, it is a three-dimensional “blob” in the sound space.The X (width) axis of the sound stage is stereo position. The Y (height) axis ispitch, with higher-pitched sounds appearing higher in the sound stage. Finally,the Z (depth) axis is distance, with more prominent sounds appearing closer tothe front of the sound stage. In this section, we will look at the tools that allowone to manipulate the sound stage; to move sounds forward, back, and to thesides in the mix. We will not consider how to move a sound up or down in themix
6.1 Panning
The most elementary tool for manipulating the X axis of the sound stage ispanning. Panning can send a sound to the left or the right. It is useful forproviding separation between sounds that overlap in frequency range. It isoften best to maintain a balance when panning; for each sound that is sent toone side, send a different sound, similar in frequency content, to the other side.Furthermore, the central elements of the music should usually be kept in thecenter (for pop music, this usually means the drums, bass, and vocals).
Any elements containing significant amounts of bass and subbass frequenciesshould also usually be kept in the center, for several reasons. Bass frequenciesare usually the loudest part of a mix, and if they are panned to one side, thenthat channel will be significantly louder than the other channel, reducing the netloudness of the mix. Furthermore, when playing back on speakers, it is difficultor impossible to localize bass frequencies, so the panning will probably not benoticed. (And, in fact, if the speaker system has a subwoofer, then the panningwill simply disappear.) On the other hand, when playing back on headphones,the panning will be noticed, and it will sound extremely unnatural.
Another thing that can be done with panning is auto-panning effects. When
44
you auto-pan a sound, you cause its panning position to change over the courseof the track, possibly quite rapidly. Auto-panning can be a nice ear-catchingeffect, but if used tastelessly, it can be very annoying. The human ear has beentrained by millions of years of evolution to pay particular attention to soundsthat are in motion, and auto-panning can distract the listener from the task oflistening to music with the task of following the moving sounds.
6.2 Stereo Sounds
You have heard the word “stereo,” but what does it mean? Stereo sounds aresimply sounds that have width to them, as opposed to mono sounds, which arenarrow. Mono sounds occupy a single point on the X axis of the sound space,while stereo sounds straddle a range of the same space.
A stereo signal consists of separate left and right channels, with differentsignals in them. Most DAWs allow you to treat these two channels as a unit.You can also adjust the balance between the two channels using the “balance”control, which is analogous to (and usually identical to) the “pan” control formono sounds. If sent to the left, the balance control will reduce the volume ofthe right channel while leaving the left channel alone; if sent to the right, it willreduce the volume of the left while leaving the right alone.
If a sound is in stereo, that usually means that there are two variations onthe same sound, with one variation in each channel. Some sounds are stereo tobegin with, such as natural sounds that are recorded in stereo. You can alsotake a sound that began as mono and turn it into a stereo sound. Essentially,all you have to do is to make the two channels different from each other. Thereare a number of ways to do this. Here are a few common methods:
1. You can add reverb. See Section 6.4 for details on reverb.
2. You can detune the left channel from the right channel. Since this is notpossible to do with any standard mixing tool, it must be done before themixer. This technique is seldom practical with recorded performances,but quite effective for synth patches and short one-shot samples.
3. You can EQ each channel separately. Usually you would cut the lows ofone channel, and cut the highs of the other channel, using a high shelf andlow shelf filter respectively, with the same center frequency. This would bedone after any other “normal” EQing has been done on the mono source.This technique is rather subtle; you may want to combine it with othertechniques if you are looking for a more dramatic stereo effect.
4. You can create a phase offset between the two channels. By delaying1 oneof the channels by up to 40ms, you cause the signals coming from the twospeakers to be offset, but still perceived as one signal. The sound will beperceived as coming from the side which has the earlier arrival time. Thisphenomenon is referred to as the “Haas effect.”
1See Section 6.3.
45
5. There are a variety of effects plugins which make a signal stereo as a side-effect of their operation (for instance, many chorus effects). There are evenplugins, sometimes called “stereoizers,” specially dedicated to the task ofturning mono signals into stereo signals. Most of them are, internally,based on variants and/or elaborations of the above techniques.
Stereo sounds generally sound bigger and richer than mono sounds, whereasmono sounds generally sound cleaner and punchier than stereo sounds. It isgenerally not a good idea to over-stereoize your mix. Stereo sounds take morespace in the mix than mono sounds, and a mix with overuse or tasteless use ofstereo effects can sound weedy and lacking in punch. The key to a good stereoimage is to find a good balance between mono and stereo.
6.2.1 Phase Cancellation
Stereo processing can often create problems with “phase cancellation.” Phasecancellation occurs when you have two or more instances of the same frequency.When you sum two instances of the same frequency, you might expect to geta louder version of that frequency, and indeed that is often what happens.Other times, however, you will get a quieter version of that frequency, or evensilence. To understand why, envision adding together two sine waves of thesame frequency. If their peaks and troughs are perfectly aligned (i.e., they are“in phase”2), then the sum will be a sine wave of higher amplitude. If they areoffset somewhat (i.e., they are “out of phase”), then the sum will be a sine waveof lower amplitude. If the peaks and troughs are perfectly misaligned, then thesum will be a flat line at zero (silence).
Phase cancellation has two consequences. First, it will hurt the sound some-what when in stereo, robbing it of its punchiness. Second, and possibly moreimportantly, the sound will become quieter, or even disappear, when the mixis summed to mono. You certainly don’t want your lead instrument to sud-denly disappear when someone decides to convert your mix to mono! For thisreason, if you are using stereo sounds, it is good practice to periodically listento your mix in mono to verify that there are no major problems with phasecancellation.3
Many sounds that were recorded or synthesized in stereo have problemswith phase cancellation. The phase offset technique (item 3 above) also createsphase cancellation. Problems with phase cancellation are particularly noticeablein lower frequencies, because there are fewer frequencies in that range and theyare typically louder.
Indeed, any kind of stereo effects in the bass range are rarely effective, forone reason or another. Reverb (1) muddies up the sound. Detuning (2) createsbeating, which results in the low end periodically disappearing and reappearing.Separate EQing (3) is, in this case, equivalent to bass panning, with all of the
2Sometimes also referred to as “chip shop.”3There are also stereo analyzer plugins that can point out phase cancellation in your sound.
46

same problems, since it makes the low end louder on one side. And, of course,phase offset (4) creates phase cancellation.
6.2.2 Left/Right Processing
In order to have control over the stereo characteristics of a sound, it is oftendesirable to split it into two separate mixer tracks: one track for the left channel,and one for the right. This is called “left/right,” or “L/R,” processing.
Doing L/R processing requires three or four tracks. First you have the“source” track. This track’s output is routed to two tracks: one “left” trackand one “right” track. The left track has its pan/balance control set hard left,and the right track has its pan/balance control set hard right. If desired, thesetracks are then both routed to one “destination” track, where they are mixedtogether into the final stereo sound. (This last track is not necessary unless youwant to do further processing on the combined sound.)
In the case of a mono signal, this will give you two copies of the same signal,with one in each channel, that can be manipulated separately. In the case ofa stereo signal, it will isolate the left and right channels, so that they can bemanipulated separately.
L/R processing is a good tool for doing any of the stereo processing tech-niques described above. You can also narrow the stereo width of the materialusing L/R processing; by moving the pan/balance controls of the left and rightchannels towards the center, you can make it progressively more mono.
6.2.3 Mid/Side Processing
There another way, besides L/R processing, to do stereo processing on sounds.It is called “mid/side,” or “M/S,” processing. M/S processing involves twoaudio channels, just like L/R processing, but rather than having a left and aright channel, it has a center and a side channel.
An M/S version of a signal can be produced from an L/R version of a signalusing nothing more than an audio mixer. To do so is kind of a pain; fortunately,there exist plugins to do the conversion from L/R to M/S and back again.I would recommend that you use one if possible, but also read the followingexplanation of how to do the conversion by hand, in order to gain a betterconceptual understanding of what M/S is.
The mid channel of an M/S signal is half the sum of the left and the rightchannels. The side channel is half the difference between the left and the rightchannel. Or, more concisely:
M = (L + R)/2S = (L−R)/2
You can extract the M/S channels from the L/R channels of a sound by firstsplitting it into separate L and R channels, then mixing these together into the
47

M channel, and creating the S channel by mixing together the L channel and aphase-inverted4 version of the R channel. Both channels should then be lowered3dB.
In order to make use of an M/S-encoded signal, once you are done processingit you need to convert it back to L/R format. The L channel is the sum of theM and the S channels. The R channel is the difference of the M and the Schannels. Or:
L = M + S
R = M − S
To convert an M/S signal to L/R, create the L channel by mixing togetherthe M and S channels, and the R channel by mixing together the L channel anda phase-inverted version of the S channel.
Thus, your final signal chain looks like this: convert from L/R to M/S, doprocessing, and convert from M/S back to L/R. Having set up the signal chain,you have a wealth of options for stereo processing. By lowering the volume ofthe S channel, you can reduce the stereo width, making the signal more mono,as you could do by bringing down the pan controls in L/R processing. But youcan also increase the stereo width, making the signal more stereo, by loweringthe volume of the M channel.
Beyond that, there are a wealth of different creative possibilities for makinguse of M/S processing. By applying separate processing to the mid and theside channels, including EQ, compression, and the other space manipulationtechniques that will be discussed later in this section, you can dramatically andcreatively shape the stereo character of your sound.
6.3 Delays
A delay, in its simplest form, creates two copies of the input signal, with thesecond one offset by a fixed time interval from the first. A delay has threecontrols:
Time: This parameter controls the length of the time offset. Many delaysallow you to synchronize this parameter to the tempo of the music, and set itto a musical note length. If yours does not, you can set it “by ear” to a valuethat synchronizes with the tempo.
Dry/Wet: This parameter controls the balance between the volume of thedelayed (“wet”) copy and the non-delayed (“dry”) copy. 0% silences the wetcopy. 50% creates an even balance between dry and wet. 100% silences the drycopy, leaving only the wet copy.
4Inverting the phase of a signal simply means flipping it upside down. Many DAWs havephase-inversion buttons on their mixer strips; if yours does not, you will have to use a pluginto perform the phase inversion.
48
Feedback: Turning up this parameter will result in a certain amount of thewet copy of the delay being fed back into the delay’s input. This will result inrepeated copies, or echoes, with decreasing volume. 0% feedback will make thedelay create only two copies, as previously described. 50% feedback will makethe delay create repeated echoes, with each copy being 50%, or 3dB, quieterthan the one before it. 100% feedback will make each echo as loud as the lastone, meaning that every sound that goes into the delay will echo ad infinitum.Feedback values greater than 100% will result in each echo being louder thanthe previous one, meaning that the sound coming out of the delay will increasein volume until something breaks down.
Delays can create two different general types of effects, depending on the de-lay time. With delay times below 30-40ms, the different copies of the sound willnot be heard as separate; therefore, the delay will simply modify the characterof the sound without creating the perception of multiple copies. With longerdelay times, the delay will create the perception of multiple distinct copies. Hereare some of the uses of delays:
Comb Filtering: The main effect of a short delay (under 10ms) with nofeedback will be to cause interesting phase interactions between the two copiesof the signal. The signals will cancel out in parts and combine to cause ampli-fication in other parts. This will cause a complex sonic transformation referredto as “comb filtering.” Turning up the feedback will create a more belligerenteffect. Comb filtering can be a useful creative tool. It can make some thingssound bigger and fuller. It can also be quite annoying.
Haas Effect: If the dry signal and the wet signal of a short delay are pannedto different locations in the stereo field, then the comb filtering effect will giveway to a stereoizing and localizing effect known as the “Haas effect.” This effectis described in more detail in Section 6.2.
Rhythmic Delays: Once the delay time increases beyond 30-40ms, youstart getting into the territory of rhythmic delays, where the dry and wet copiesare perceived as distinctly separate sounds, arriving one after another. Rhyth-mic delays have a variety of uses. More prominent delays, where the delayedcopies are readily audible, can add groove and complexity to rhythmic sounds.Subtler delays, where the delayed copies are not readily audible, can create ageneral effect of sonic enrichment. Use rhythmic delays on sustained soundsto “embiggen” them, or use low-volume rhythmic delays on an auxiliary sendchannel to fill out a sparse mix.
6.4 Reverb
Reverberation, or reverb, is a tool used to simulate sound of a natural acousticspace. When a sound is produced in a space, the sound that reaches your ears isheavily influenced by the space itself. In addition to reaching your ears directlyfrom the sound source, the sound repeatedly bounces off the various surfaces
49
in the space, and all of these “reflections” also reach your ears. Reverb unitssimulate this reflection behavior.
6.4.1 Purposes
Reverb is a highly multi-faceted tool that can be used for many different reasons.Some of those reasons are:
Manipulating Depth: Putting reverb on a sound tends to send it back inthe mix. So, if you want a sound to fall into the background, you can achievethat by putting more reverb on it. (Or, alternatively, if you have two soundsthat are competing for attention, and you want to bring one of them to thefront, you can put reverb on the other one to send it to the back.)
Filling Out a Mix: Reverb adds additional sounds to a mix. These soundscan fill in the holes in the mix, giving a fuller, richer presentation. In particular,reverb is usually a stereo phenomenon, and so reverb will widen the stereo imageof your track.
Tying Sounds Together: You can use reverb as a kind of “mix glue,”regularizing the sounds of a bunch of different elements so that they soundmore like they belong together.
6.4.2 How It Works
The output of a reverb effect consists of three sound components: the dry signal,the early reflections, and the tail. The dry signal is simply the unmodified inputsignal. The early reflections are the first dozen or so reflections; they are boththe loudest and the first to occur.5 The early reflections sort of merge into themain sound, sounding much like a wetter version of the same. The tail is theremaining reflections, which become a sound in their own right, that can lastwell after the sound has finished.
Reverb units are a bit more diverse than, say, compressors or equalizers,but there are still some standard parameters. We will therefore examine a fewcommon parameters and what they do.
Dry, Early, Reverb: These three parameters, or similarly named param-eters, will allow you to set the relative levels of the dry signal, early reflections,and reverb tail. More reverb and early reflections relative to the dry signal willmake the sound source seem farther away.
Decay: This parameter controls the length of the reverb tail. A reverb timearound 1 second will simulate a fairly typical-size room. A 2-3 second reverbtime will simulate a concert hall. Higher reverb times, as long as 7 seconds, willsimulate even more reverberant spaces, such as a big, empty cave or a cathedral.Reverb times far beyond that are rarely found in the real world.
Pre-Delay: This parameter controls the time delay between the dry soundand the arrival of the first early reflections. A shorter pre-delay simulates a
5More advanced reverb units often allow you to control the timing and amplitude of theindividual early reflections.
50

smaller space, and a longer pre-delay a larger space. This makes sense becausesound will take less time to hit the walls and return in a smaller space than ina larger space. A normal room will have pre-delay below 50ms. A larger spacemay have pre-delay as long as 150ms.
Room Size: This parameter controls the density of the reflections, bothin the early reflections and the tail. A smaller room size will create denser,more tightly spaced reflections, and a larger room size will create sparser, moreloosely spaced reflections. This makes sense because it takes longer for soundwaves to travel across larger rooms, and therefore reflections are created withlower frequency.
Damping, Cut: The objects and surfaces in a room, besides reflectingsound, also absorb sound. In particular, soft surfaces are known to absorb highfrequencies. Most reverb units will therefore have parameters to change thefrequency response of the room.
6.4.3 Convolution Reverb
The previous section applies to so-called “algorithmic reverbs,” which create re-verberations via mathematical simulations of rooms. In recent years an entirelydifferent technique has gained popularity for simulating reverberation, called“convolution reverb.”
Convolution reverb works by taking a recording of an “impulse” (any short,loud sound with wide-ranging frequency content) sounded in a room, and theresulting reverberations. It then processes this “impulse response” to extractthe reverberatory fingerprint of the room, allowing it to recreate the same re-verberation on any input signal.
Convolution reverb is cool because it allows you to take the acoustics of anyspace and simulate them in your computer. You can use pre-recorded impulsesof the best-sounding spaces in the world, and you can also record your ownimpulses in any nice or interesting space that you happen to be in.
There are also more creative uses of convolution reverb. You can, for in-stance, strike a pot or a pan and use the sound as an impulse response. Youcan create the effect of playing a sound in the “space” of a kitchen implement.
6.4.4 Mixing With Reverb
The most common way to use reverb is to place a reverb unit on an aux sendtrack6, and send small amounts of each mixer track to this send track, to infuseeach sound with a small amount of reverb.
Generally, each sound should have a large enough amount of reverb that thereverb is audible when the sound is playing in solo, but a small enough amountthat the reverb is inaudible when the sound is playing in the mix. Adding reverbto a sound also increases its volume, so you may want to turn the sound’s mainlevel down a bit after adding reverb.
6When using a reverb unit in this manner, be sure to turn down the dry effect level.
51

When you use reverb in the above way, you will not hear any reverb tailswhen playing back the mix (unless the mix is very sparse), but if you mute thereverb channel and then unmute it, you will hear an expansion of the stereoimage and a general enhancement of the overall sound quality.
Kick drums and basslines should usually have only the tiniest amount ofreverb on them, if any, as the reverb muddies up the bass range. Alternatively,you can put a high-pass filter before the reverb, so that the reverb only affectsthe higher frequencies of these sounds.
Not all sounds need to have reverb on them. Often, even if a sound is dry, ifthere are other sounds in the same frequency range that have reverb on them,then that will be sufficient to create the impression of reverb on the formersound. Therefore, if you want a sound to rise to the foreground, you can leaveit dry or mostly dry, and let the other sounds carry the reverb. A commonapproach is to leave the drums and lead sounds mostly dry, and drench thebackground instruments in reverb.
Don’t be afraid to use multiple reverb units, either. I often use two reverbunits. One of them is a short decay unit to which I send the drums, to fill themout and help tie them together. One of them is a moderate to long decay unitwhich I use for everything else. (I send a little bit of the drums to this unit, aswell.)
You can also use additional reverb units tailored to work well with specificimportant sounds, such as vocals or lead instruments. For instance, long pre-delay can reduce the masking effect of reverb on a sound, allowing you to put alot of reverb on a lead sound while keeping it in the front of the mix.
52

Chapter 7
Conclusion
7.1 Putting It All Together
My overall procedure for mixing usually looks like this. First, I tend to do a lotof mixing as I go. For instance, the first thing I do after I add a drum sound tothe mix is usually to EQ and compress it. Whenever I notice something thatsounds wrong, I fix it. By the time I’ve finished writing my track, I’ve alreadygot a mix that’s sounding pretty OK.
At that point, I’ll typically spend some time doing some fine-tuning on themix. I’ll do some subtler EQing to complement the broad-brush EQing I didbefore, and add in panning, reverb, and delays if I haven’t already. I mightredo the levels, and also add in some level riding if it’s needed. If the track hasboth a kick drum and a bassline, then I’ll spend some time focusing on theirrelationship and making them work better together.
Having finished my fine-tuning, my next step is to render a copy of the mixand burn it to a CD, put it on my MP3 player, etc. Then I will take it aroundand listen to it on a bunch of different sound systems, at different volume levels,and with different levels of ambient noise. For each test, I’ll take notes on whatI think is wrong with the mix in that context. “Cymbals too bright,” “Pad tooquiet,” “Bass too loud,” etc. Usually, a pretty clear pattern will emerge.
The complaints will usually sound like leveling problems, but they usuallyaren’t. More often than not, the apparent problems with levels actually indicatea problem with masking or dynamics, and are better solved with EQ, compres-sion, panning, and time-based effects than with leveling. Furthermore, oftenthe best way to solve a problem with a given track actually requires makingadjustments on a different track. For instance, if your snare drum lacks impact,it might just be that you have some other stuff in the 200Hz range that youneed to EQ out of its way. There’s always more than one way to solve a mixingproblem, but not all solutions are equally good, and many solutions will alsocreate new problems. Think before you tweak.
So now you’ve got your mix perfect. What’s next? Well, if you’re signed
53

to a record label, or you just have cash to burn, then you’ll send it off to amastering engineer to get it mastered. The mastering engineer will fix anyremaining problems with the mix, and depending on the style of the music, mayalso increase the perceived loudness so that it is competitive with other musicof that style.
You should not attempt to do your own mastering processing on the music.All of the sonic corrections that a mastering engineer would perform can bemore easily and effectively performed in the mixdown.
But what about loudness? Well, you can also do that in the mixdown. Ofcourse, it is impossible to enter into any discussion about loudness without firstmentioning the so-called “loudness war” and its effects on music. However, thistopic has been discussed to death, and I will not rehash the whole thing here.If you don’t know what I’m talking about, then go read Wikipedia’s excellentarticle on the loudness war.1
I take a moderate stance on the loudness war. On the one hand, a lot ofmusic coming out these days sounds just terrible. But, on the other hand, Ithink that you can actually get things pretty loud and still have them soundgood. I do not take the extreme stance that every transient must be perfectlypreserved; I think that you can actually take quite a bit off, and raise things upquite a bit, without substantially hurting the sound.
So how do you do this? Well, not with a brutal compressor on the masterbus. No, the way to achieve loudness with grace and style is to think aboutloudness on every level. Use compression and limiting, on the level of individualtracks, to make all of your sounds tight and controlled. Take as much transientoff of your percussion sounds as you can without hurting the sound. Avoidingmasking is also a big part of loudness, so EQ away unnecessary frequencies.2
If you do just these two things, you’ll probably find that your music is alreadypretty loud, and it doesn’t sound worse; actually, it should sound better.
You can then go ahead and put a limiter as the last step in your signal chain,but be tasteful with it. Only use it to bring down a stray peak here and there.If you did a perfect job with the mixdown then theoretically there won’t beany stray peaks, but realistically there will probably be a couple, and you canuse the limiter to rein them in and gain a few more dB of loudness with veryminimal effect on the sound.
7.2 Final Thoughts
Mixing is a perfect illustration of the 80/20 rule in art. The 80/20 rule statesthe last 20% of a piece of art will take 80% of the effort. Mixing is part of thelast 80% of the effort. All a good mixdown does is take the sound quality of apiece of music from mediocre to good. And yet, it can be a hell of a lot of work.Good mixing is a matter of making a large number of small adjustments: some
1http://en.wikipedia.org/wiki/Loudness war2Unnecessary frequencies are defined as frequencies that are not easily audible when you
put the sound in the mix.
54

EQ here, a bit of compression there; lots of small enhancements that slowlystack up to a big difference in sound. That’s why mixing takes so much timefor so little payback.3
Mixing is about balance and harmony. It’s about getting your sounds toplay nicely with each other, with nothing overwhelming anything else. Butmore than that, mixing is about getting your sounds to form something largerthan their component parts. It’s about weaving a bunch of sounds together intoa unified whole. And it’s about creating beauty. A good mix is beautiful in itsown right, even without consideration of the music that it contains.
As you mix, keep in mind the yin and yang. Adding to one thing will usuallytake away from something else. Whenever you do anything, be aware of the waysin which it hurts as well as helps the sound, and try to make the right tradeoffsand strike the right balances.
Think before you tweak. After you tweak, listen to the consequences. Listenback to the untweaked version if necessary, and compare the two. Think more.Tweak again if necessary. But don’t overthink, and don’t overtweak. Whenyou do that your perception gets distorted and you make the wrong decisions.When you feel that start to happen, take a break and come back to the mixwith a fresh perspective.
Don’t try to find mixing solutions to problems that are not mixing problems.If a vocal performance is sloppy, don’t try to use a bunch of mix processing totighten it up; record a better performance. If two synth lines are blatantly clash-ing with each other, don’t try to make them get along with EQ and sidechaincompression; change them so that they don’t clash any more, or get rid of one ofthem and write another synth line. If a tune has no low end, don’t go boostingevery track at 60Hz; write a bassline. If a tune isn’t exciting, don’t try to makeit more exciting by boosting the treble. Then it will be boring and have toomuch treble.
Be creative. The ideas in this document are suggestions, not rules. You willrun into lots of cases where you can create a very pleasing effect by doing thevery opposite of what this document told you to do. You will also run into caseswhere you can create a very pleasing effect by doing some strange thing thatno one has ever done before, or at least never written about. The importantthing is to understand the general principles at work in the mixing process (themechanics of sound, how a compressor works, etc.), and have confidence in yourability to make musical judgments based on those principles.
I have said this once before, but it deserves saying again: trust your ears. Ifit sounds bad, then it is bad. If it sounds good, then it is good.
3Despite the fact that mixing has so little payback, I still think that you should do it onyour music, and work hard at it. A big part of being a good musician is just putting in thatlast 80%, rather than stopping at 20 and moving on to the next thing. This sounds like adrag, but it’s also kind of an appealing idea that you can make yourself a better musician,overnight, just by putting more time in.
55