NFLS-x Series Flexible LED Flexible Light Strip · PDF file1 LED Flex Strip Contact here...
6
1 LED Flex Strip Contact here Solderless Clamp variety of settings and applications. Here’s how LED Light Strips can be readied for mounting in three easy steps: Primary Features • • • 12VDC operation. Applications • Back Lighting • Cove Lighting • Task Lighting • Display Case Lighting • Retail Lighting • Sign Illumination • Accent Decor Lighting • Under Cabinet Lighting • Automotive Accent Lighting NFLS-x Series Flexible LED Flexible Light Strip Simple Connection Steps SAFETY TIPS 1. Cut along the light strip tape wherever a dashed line divides two sets of positive and negative connection points. Peel away a portion of the light strip adhesive backing at one end. With the solderless clamp open, slide the strip end all the way into the solderless clamp. Close the hinged clamp. Remove the remaining adhesive backing and attach the light strip to the desired surface. Note: Polarity symbols should match on each component. LED Light Strip Handling: • Do not stare directly into LED lights when illuminated. • Always disconnect power supply before cutting/connecting LED Light Strips. • Do not expose LED Light Strips` to direct or indirect moisture. • Do not crimp light strip tape, attempt to bend light strips width-wise, or length-wise to a radius less than 15mm. Power Supply: • Do not connect LED Light Strips directly to 120V AC power. • Apply power to test LED Light Strips before mounting. • Do not connect more than one 16.5’ section of light strips to the included power supply. Overloading the included power Installation Planning Flexible LED Light Strips are highly versatile and can provide a superior lighting solution in a variety of applications. To maxi- process. Some general questions to ask in determining which installation design best suits your lighting needs are: • Where will your power supply be located? • • • How will you run your wiring to your LED strip lighting? Flexible LED Light Strips are designed to provide indirect, accent-style lighting. Be sure to install your LED lighting out of direct sight. This kit requires an UL Listed Class 2 12 VDC power supply.
Transcript of NFLS-x Series Flexible LED Flexible Light Strip · PDF file1 LED Flex Strip Contact here...

1
LEDFlex Strip
Contact here
Solderless Clamp
variety of settings and applications. Here’s how LED Light Strips can be readied for mounting in three easy steps:
Primary Features• • • 12VDC operation.
Applications• Back Lighting • Cove Lighting• Task Lighting
• Display Case Lighting• Retail Lighting• Sign Illumination
• Accent Decor Lighting• Under Cabinet Lighting• Automotive Accent Lighting
NFLS-x Series Flexible LED Flexible Light Strip
Simple Connection Steps
SAFETY TIPS
1. Cut along the light strip tape wherever a dashed line divides two sets of positive and negative connection points.
Peel away a portion of the light strip adhesive backing at one end. With the solderless clamp open, slide the strip end all the way into the solderless clamp. Close the hinged clamp.
Remove the remaining adhesive backing and attach the light strip to the desired surface.
Note: Polarity symbols should match on each component.
LED Light Strip Handling:• Do not stare directly into LED lights when illuminated.• Always disconnect power supply before cutting/connecting
LED Light Strips.• Do not expose LED Light Strips` to direct or indirect
moisture.• Do not crimp light strip tape, attempt to bend light strips
width-wise, or length-wise to a radius less than 15mm.
Power Supply:• Do not connect LED Light Strips directly to 120V AC power.
• Apply power to test LED Light Strips before mounting.• Do not connect more than one 16.5’ section of light strips to
the included power supply. Overloading the included power
Installation PlanningFlexible LED Light Strips are highly versatile and can provide a superior lighting solution in a variety of applications. To maxi-
process. Some general questions to ask in determining which installation design best suits your lighting needs are:
• Where will your power supply be located?• • • How will you run your wiring to your LED strip lighting?
Flexible LED Light Strips are designed to provide indirect, accent-style lighting. Be sure to install your LED lighting out of direct sight.
This kit requires an UL Listed Class 2 12 VDC power supply.

2
Connection, Switch and Powering OptionsThe information and illustrations below offer recommendations for choosing a general design for your application.
WallSwitch
Switched ACOutlet
12V DCPower Supply 12V DC
Power Supply120V AC
Outet
LEDDimmer
12V DCPower Supply
WirelessWall Switch
120V ACOutet Wireless
Switch Receiver
12V DCPower Supply
120V ACOutet
WirelessLED Dimmer Wireless
LED DimmerReceiver
FuseProtection
12VBattery 12V
Switch
LEDDimmer
Light strip On/Off/Brightness is controlled by an LED dimmer. 2
Light strip On/Off is controlled by a wire-less wall switch and signal receiver.
Light strip On/Off/Brightness is controlled by a wireless LED dimmer and signal receiver. 4
Light strip is powered directly by a 12Vbattery, for applications like boats, RV’s, etc.5
Light strip On/Off is controlled by a wall mounted switch. 1 3
Wiring Considerations
Important factors to consider when designing your lighting system are:• The total lighting wattage your installation will require.• The length and size of wiring needed to connect LED light
strips to the power supply. Use the chart below as a reference to minimize voltage drop.
Voltage DropVoltage drop is the normal loss of voltage that occurs as power flows along a wire connection in low voltage systems, and increases as the length of a wire connection is increased. Wire length and thickness as well as total light watt-age influence the amount of voltage drop.
Recommended Maximum Wire Lengths - Power Supply to Light Strips22 AWG Wire 18 AWG Wire
Light Strip (Length in Ft.) Wire Length (Max Length in Ft.) Light Strip (Length in Ft.) Wire Length (Max Length in Ft.)
12 10 12 2024 8 24 1636 6 36 1248 4 48 8
Layout Options
Light strips are powered from a single looped “Loop-back” connection, which also produces more consis-tent results. Often used for room perimeter and cove
3In the “Array” option, light strip “legs” are individual-ly powered. Total wattage should be determined so as not to overload power supply.
4
PowerSupply
Light strips are powered in a continuous “Straight” run. Strips that are furthest from the power supply are more likely to exhibit voltage drop.
1Light strips are powered from a spliced “Centerfeed” connection. This type of layout tends to produce more consistent brightness and color between strips.
2

3
Power Supply Options (for Straight Run and Centerfeed/Loop Back Layouts)
Power Supply Options (for Array Layouts)
Maximum Length of LED Light Strip Based on Layout Type and Power SupplyPower Supply Straight Run Center Feed / Loop Back
6 Watt Not recommended15 Watt30 Watt60 Watt
LED Light Strip power requirements are based on several factors, including the light strip layout and the length limitations of light strip-type lighting. Refer to the guide below for choosing a power supply. It is recommended to choose a power supplyoption in excess of your needs, since LED Light Strips cannot be overloaded. UL Listed Class 2 power supply required.
your connection wires. A leg can be a single LED strip or series of strips connected end-to-end.
Calculate the wattage for each leg by multiplying watts per foot by the length of LED lighting in the leg. Include only the lengths of LED tape in your calculation, not the connecting wires. Add each leg’s wattage requirement together, and referring to the chart below, determine the total watts needed to power your array and select the appropriate power supply.
Length of leg (LED tape light only)Watts used per foot
Cutting, Connecting and Wiring
LED Light Strips can be cut in 5cm lengths, each containing 3 LEDs. Lengths are marked at cutting intervals by lines lying between sets of soldering points, as indicated in the illustration below.
Positive Contacts Points
Negative Contacts Points
strips using solderless clamps.
-form than soldering contacts, in some circcumstances, soldering contacts may be necessary. For procedures such as soldering and splicing, it recommended that you are already familiar with basic wiring skills.
Contact Here
Soldered Contacts
Using Solderless Clamps/Soldering
4
Extend wire leadup to 10 ft., using
22-18 AWG
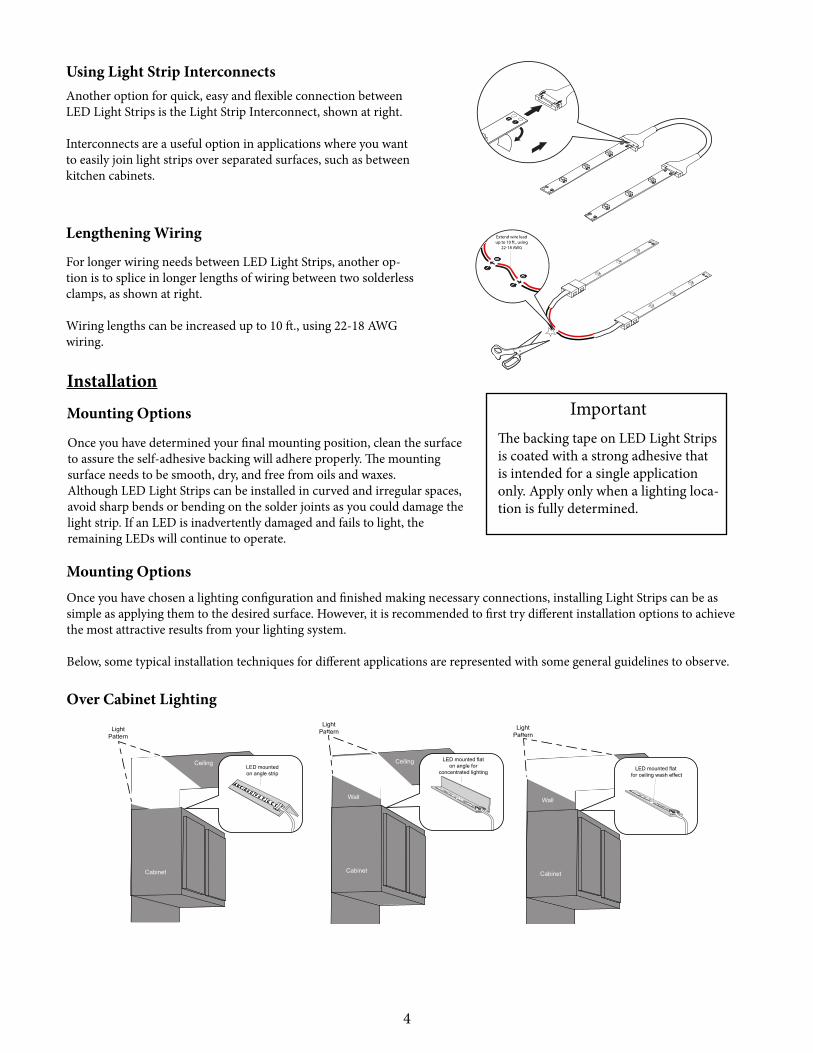
For longer wiring needs between LED Light Strips, another op-tion is to splice in longer lengths of wiring between two solderless clamps, as shown at right.
Wiring lengths can be increased up to 10 ft., using 22-18 AWG wiring.
Another option for quick, easy and flexible connection between LED Light Strips is the Light Strip Interconnect, shown at right.
Interconnects are a useful option in applications where you want to easily join light strips over separated surfaces, such as between kitchen cabinets.
Using Light Strip Interconnects
Lengthening Wiring
InstallationImportant
The backing tape on LED Light Strips is coated with a strong adhesive that is intended for a single application only. Apply only when a lighting loca-tion is fully determined.
Mounting Options
Once you have determined your final mounting position, clean the surface to assure the self-adhesive backing will adhere properly. The mountingsurface needs to be smooth, dry, and free from oils and waxes. Although LED Light Strips can be installed in curved and irregular spaces,avoid sharp bends or bending on the solder joints as you could damage thelight strip. If an LED is inadvertently damaged and fails to light, theremaining LEDs will continue to operate.
Ceiling
LED mountedon angle strip
Cabinet
Wall
Ceiling
LightPattern
Ceiling
LED mounted flaton angle for
concentrated lighting
Cabinet
Wall
Ceiling
LightPattern
Ceiling
LED mounted flat for ceiling wash effect
Cabinet
Wall
Ceiling
LightPattern
Over Cabinet Lighting
Mounting OptionsOnce you have chosen a lighting configuration and finished making necessary connections, installing Light Strips can be as simple as applying them to the desired surface. However, it is recommended to first try different installation options to achieve the most attractive results from your lighting system.
Below, some typical installation techniques for different applications are represented with some general guidelines to observe.

5
Cove /Crown Molding Lighting
CeilingLED mounted flat at least
3/4 in. from wall
Cabinet
Wall
Ceiling
LightPattern
Moulding CeilingLED mounted for ceiling wash effect
Cabinet
Wall
Ceiling
LightPattern
MouldingCeilingLED mounted at
angle for concentratedcove illumination
Cabinet
Wall
Ceiling
LightPattern
Moulding
Cove /Crown Molding Lighting
LightPattern
LED mounted flat with clearance from cabinet edge
LightPattern
LED mounted on cabinet lip for
wall wash effect
TroubleshootingTape light strip does not light• Make sure your power supply is turned on and receiving power.• Confirm you have maintained correct polarity (+ to + and – to –) when joining LED Light Strips as well as when connect-
ing to the 12V power supply.• Check all tape light connections and any switch or dimmer connections from the power supply to the LED Light Strips.
Consider testing with a multimeter to ensure light strip is receiving 12V power.
Only part of the LED tape light strip is lit• Check connections to the part of the Light Strip that is not lit.• Confirm you have maintained correct polarity (+ to + and – to –) when joining LED Light Strips as well as when con-
necting to the 12V power supply.• If only 1 LED series is out, cut out and remove the damaged 3-LED group and splice together LED Light Strips or re-
place with new 3-LED section.
LED tape lights blink on, then go off• Your power supply is not adequate for the length of LED Light Strips you are powering. Install a higher wattage power
supply or reduce watts used by shortening the lengths of your LED Light Strips.
LEDs farthest from the power supply are noticeably dimmer• This is the result of voltage drop. Decrease the length of the 12V power feed wires or use thicker power feed wires be-
tween the 12V power supply and the lighting strips.• Use shorter lengths of LED Light Strips. Refer to layout options in these guidelines. Consider a different layout.

6