NEXIO Config Installation and User Guidebssndata.app-talk.co.kr/01. Imagine...
74
NEXIO Config Installation and User Guide
Transcript of NEXIO Config Installation and User Guidebssndata.app-talk.co.kr/01. Imagine...
NEXIO ConfigInstallation and User Guide
Broadcast Communications4393 Digital Way | Mason, OH USA 45040 | Tel: 1 (513) 459 3400
www.broadcast.harris.com
©2007 Harris CorporationPart Number: 175-000308-01
Harris is a registered trademark of Harris Corporation. Trademarks and tradenames are the property of their respective companies.Lo
wLevelM
od
ule
User
Gu
ide
175-000308-01
LLM_175-000308-01_Cover:NX3600HDX_175-000303-01.qxd 11/8/2007 4:39 PM Page 1

August 2009
NEXIO Config
Installation and User Guide
Part No. 175-100142-00
Harris Corporation Broadcast Communications Division 4393 Digital Way Mason, OH USA 45040
Copyright © 2009 Harris Corporation. All rights reserved. This publication supersedes all previous releases. No part of this documentation may be reproduced in any form or by any means or used to make any derivative work without permission from Harris Corporation.
Harris Corporation reserves the right to revise this documentation and to make changes in content from time to time without obligation on the part of Harris Corporation to provide notification of such revision or change.
UNITED STATES GOVERNMENT LEGEND If you are a United States government agency, then this documentation and the software described herein are provided to you subject to the following: All technical data and computer software are commercial in nature and developed solely at private expense. Software is delivered as “Commercial Computer Software” as defined in DFARS 252.227-7014 (June 1995) or as a “commercial item” as defined in FAR 2.101(a) and as such is provided with only such rights as are provided by Harris’ standard commercial license for the Software. Technical data is provided with limited rights only as provided in DFAR 252.227-7015 (Nov 1995) or FAR 52.227-14 (June 1987), whichever is applicable. You agree not to remove or deface any portion of any legend provided on any licensed program or documentation contained in, or delivered to you in conjunction with, this User Guide.
CCS, CCS CoPilot, CCS Navigator, CCS Pilot, Command Control System, CineTone, CinePhase, CineSound, DigiBus, DigiPeek, Digital Glue, DigiWorks, DTV Glue, EventWORKS, EZ HD, Genesis, HDTV Glue, Image Q, Inca, Inca Station, InfoCaster, Inscriber, Inscriber CG—FX, Integrator, Integrated Content Environment (ICE), LeFont, Leitch, LogoMotion, MediaFile, Mix Box, NEO, the NEO design, NEOSCOPE, NewsFlash, NEXIO, NEXIO Pilot, Opus, Panacea, PanelMapper, Playlist, Portal, PROM-Slide, RAIDsoft, RouterMapper, RouterWorks, Signal Quality Manager, SpyderWeb, SuiteView, TitleMotion, UNIFRAME, Velocity, VelocityHD, VideoCarte, Videotek, and X75 are trademarks of Harris Corporation which may be registered in the United States, Canada, and/or other countries.
Windows is a registered trademark of Microsoft Corporation. AMD and Operton are trademarks of Advanced Micro Devices, Inc. Dolby Digital is a registered trademark of Dolby Laboratories.
All other trademarks are the property of their respective holders.
August 2009
iii
Contents
About This Guide........................................................................ 1
Intended Audience ........................................................................ 1Finding Specific Information in This Guide ..................................... 2
Writing Conventions ............................................................................ 2Related Documentation ....................................................................... 3Obtaining Documentation .................................................................... 4
Purchasing Documents .................................................................. 7Unpacking/Shipping Information .......................................................... 8
Unpacking a Harris Product ........................................................... 8Returning a Harris Product ............................................................. 8
Technical Support ................................................................................ 9
Chapter 1 NEXIO Config Installation ................................................... 11
Installing NEXIO Config ...................................................................... 11
Chapter 2 Using NEXIO Config ................................................................ 17
NEXIO Config Overview ..................................................................... 17Starting NEXIO Config ....................................................................... 18Working with Configuration Templates .............................................. 19NEXIO Config Windows ..................................................................... 21
Node/Domain .............................................................................. 22System Master ............................................................................ 23
Contentsiv
IP Config ....................................................................................25Video Options .............................................................................28Audio Options .............................................................................33FTP .............................................................................................36INSCRIBER ..................................................................................38LLM ............................................................................................40LLM1 ...........................................................................................42MPEG ..........................................................................................44mxfHandler .................................................................................46Other ...........................................................................................48
Appendix A Channel Configurations, Record Format Settings, and AES/EBU Color Legend ...........................................................51
Overview ............................................................................................51Channel Configurations and Features .................................................51
2 Channel Modes without Expander Client ..................................523 Channel Modes without Expander Client ..................................534 Channel Modes without Expander Client ..................................546 Channel Modes without Expander Client ..................................552 Channel Modes with Expander Client .......................................563 Channel Modes with Expander Client .......................................574 Channel Modes with Expander Client .......................................586 Channel Modes with Expander Client .......................................59
Record Format and ARC Settings ........................................................60AES/EBU Audio Color Legend .............................................................62
Index ...............................................................................................65
1
About This Guide
About This Guide provides an overview of this guide, describes guide conventions, and tells you where to look for specific information. This section also gives you important information on unpacking and shipping your Harris product.
This guide introduces and describes procedures for installing and using the NEXIO Config application.
If the information in the release notes shipped with your product differs from the information in this guide, follow the instructions in the release notes.
Intended Audience This guide is intended for users installing and operating the NEXIO Config application. NEXIO Config can be used with the following non AVI-Intra systems:
NEXIO AMP NX3601HDX
NEXIO AMP NX3601HDI
NEXIO XS NX3600HDX (with 64-bit operating system)
NEXIO XS NX3600HDI (with 64-bit operating system)
About This Guide2
Finding Specific Information in This
Guide
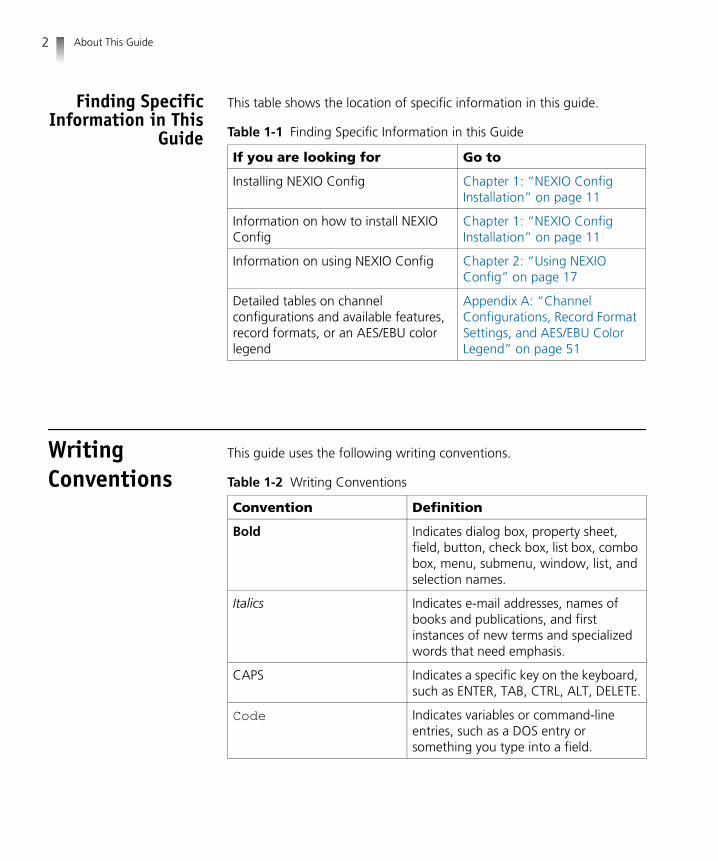
This table shows the location of specific information in this guide.
Table 1-1 Finding Specific Information in this Guide
If you are looking for Go to
Installing NEXIO Config Chapter 1: “NEXIO Config Installation” on page 11
Information on how to install NEXIO Config
Chapter 1: “NEXIO Config Installation” on page 11
Information on using NEXIO Config Chapter 2: “Using NEXIO Config” on page 17
Detailed tables on channel configurations and available features, record formats, or an AES/EBU color legend
Appendix A: “Channel Configurations, Record Format Settings, and AES/EBU Color Legend” on page 51
Writing Conventions
This guide uses the following writing conventions.
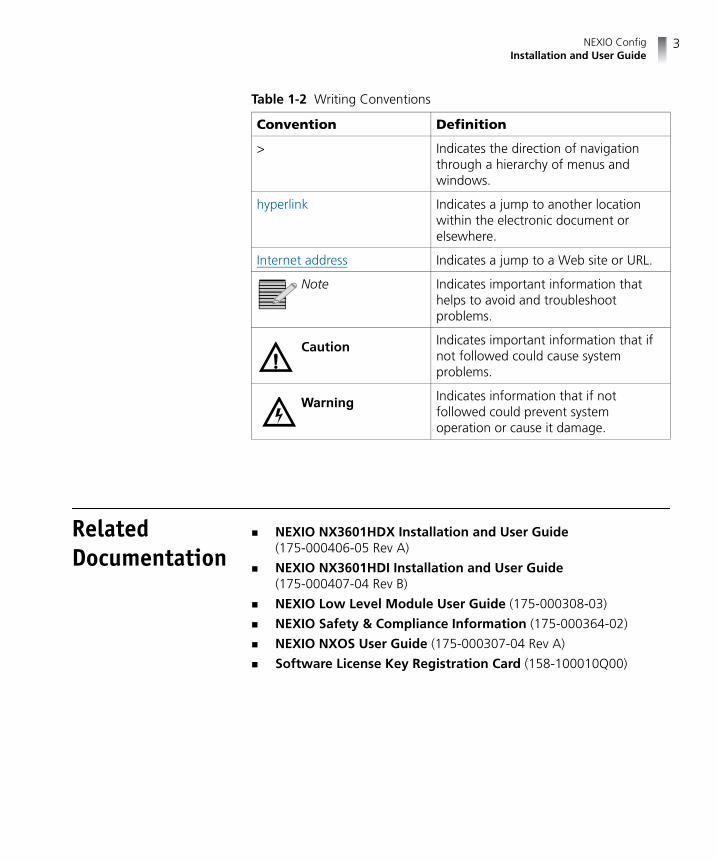
Table 1-2 Writing Conventions
Convention Definition
Bold Indicates dialog box, property sheet, field, button, check box, list box, combo box, menu, submenu, window, list, and selection names.
Italics Indicates e-mail addresses, names of books and publications, and first instances of new terms and specialized words that need emphasis.
CAPS Indicates a specific key on the keyboard, such as ENTER, TAB, CTRL, ALT, DELETE.
Code Indicates variables or command-line entries, such as a DOS entry or something you type into a field.
NEXIO ConfigInstallation and User Guide
3
Related Documentation
NEXIO NX3601HDX Installation and User Guide (175-000406-05 Rev A)
NEXIO NX3601HDI Installation and User Guide (175-000407-04 Rev B)
NEXIO Low Level Module User Guide (175-000308-03)
NEXIO Safety & Compliance Information (175-000364-02)
NEXIO NXOS User Guide (175-000307-04 Rev A)
Software License Key Registration Card (158-100010Q00)
> Indicates the direction of navigation through a hierarchy of menus and windows.
hyperlink Indicates a jump to another location within the electronic document or elsewhere.
Internet address Indicates a jump to a Web site or URL.
Note Indicates important information that helps to avoid and troubleshoot problems.
Caution Indicates important information that if not followed could cause system problems.
Warning Indicates information that if not followed could prevent system operation or cause it damage.
Table 1-2 Writing Conventions
Convention Definition
About This Guide4
Obtaining Documentation
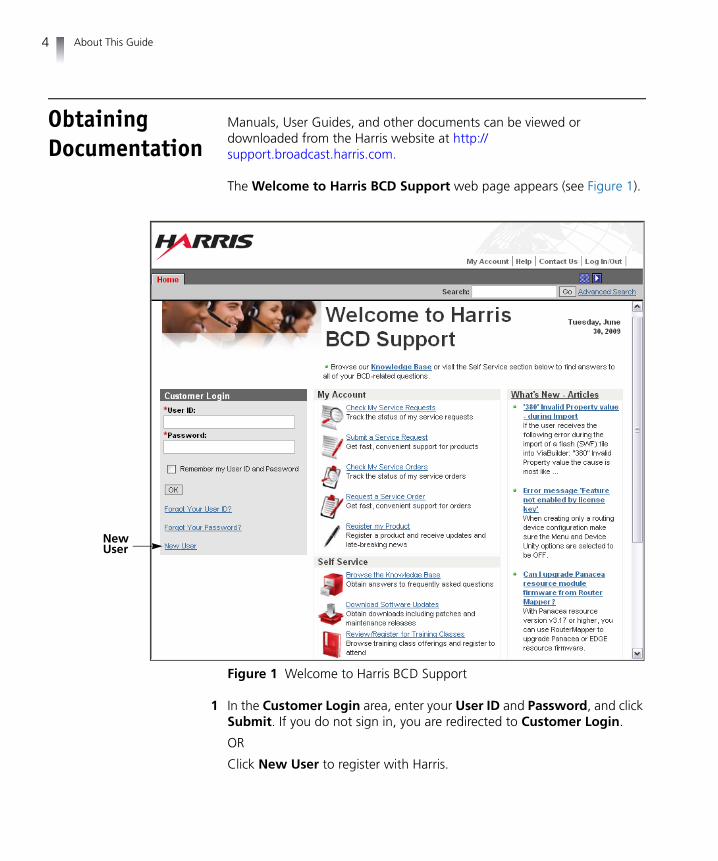
Manuals, User Guides, and other documents can be viewed or downloaded from the Harris website at http://support.broadcast.harris.com.
The Welcome to Harris BCD Support web page appears (see Figure 1).
New User
Figure 1 Welcome to Harris BCD Support
1 In the Customer Login area, enter your User ID and Password, and click Submit. If you do not sign in, you are redirected to Customer Login.
OR
Click New User to register with Harris.
NEXIO ConfigInstallation and User Guide
5
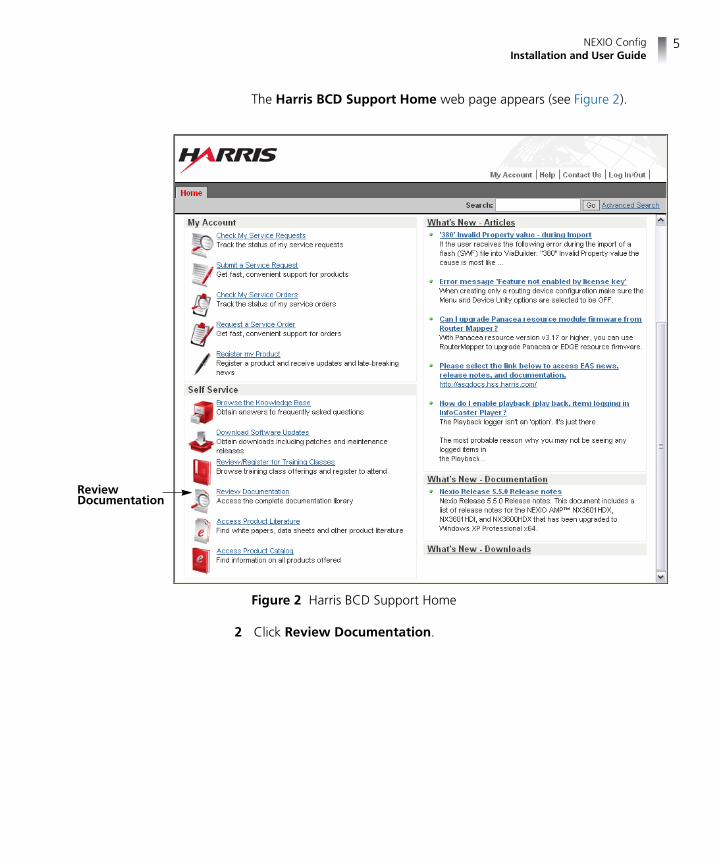
The Harris BCD Support Home web page appears (see Figure 2).
Review Documentation
Figure 2 Harris BCD Support Home
2 Click Review Documentation.
About This Guide6
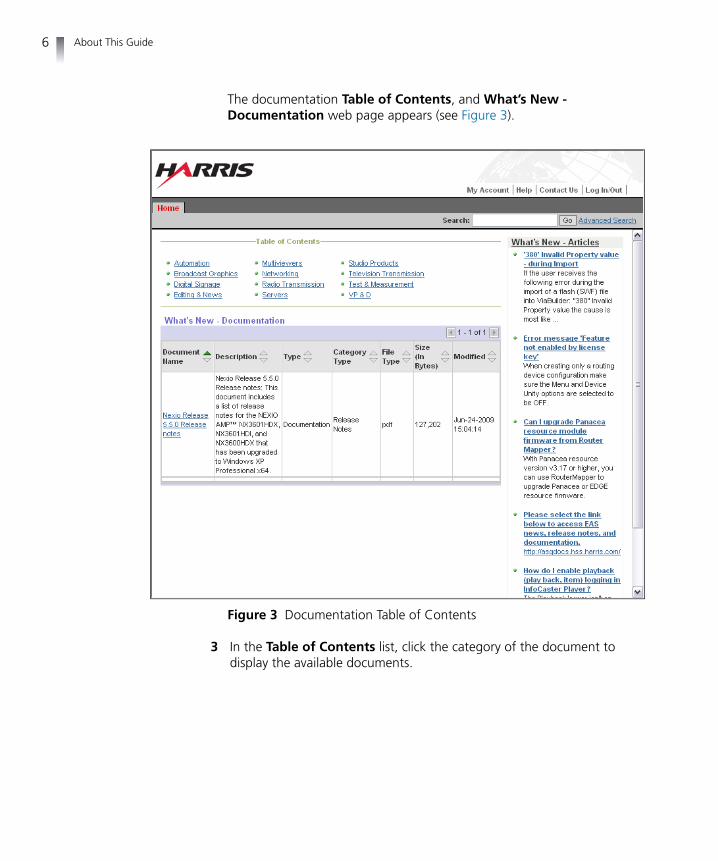
The documentation Table of Contents, and What’s New - Documentation web page appears (see Figure 3).
Figure 3 Documentation Table of Contents
3 In the Table of Contents list, click the category of the document to display the available documents.
NEXIO ConfigInstallation and User Guide
7
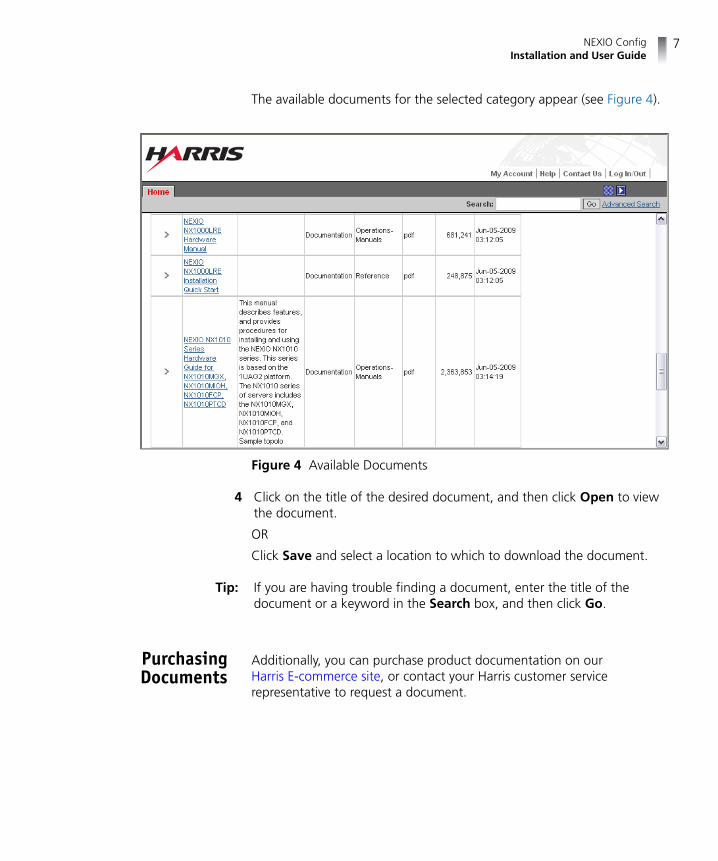
The available documents for the selected category appear (see Figure 4).
Figure 4 Available Documents
4 Click on the title of the desired document, and then click Open to view the document.
OR
Click Save and select a location to which to download the document.
Tip: If you are having trouble finding a document, enter the title of the document or a keyword in the Search box, and then click Go.
Purchasing Documents
Additionally, you can purchase product documentation on our Harris E-commerce site, or contact your Harris customer service representative to request a document.
About This Guide8
Unpacking/Shipping Information
The following sections describe:
Unpacking a Harris Product
Returning a Harris Product
Unpacking a Harris Product
All Harris NEXIO products have been carefully inspected, tested and calibrated before shipment to ensure stable and trouble-free service.
1 Check the equipment for any visible damage that may have occurred during transit.
2 Confirm that you have received all items listed on the packing list.
3 Contact your Harris NEXIO dealer if any item on the packing list is missing.
4 Contact the carrier if any item is damaged.
5 Remove all packaging material from the product and its associated components before you install the unit.
Returning a Harris Product
In the unlikely event that a Harris product fails to operate properly, contact the Harris NEXIO Customer Service Department to obtain a Return Authorization (RA) number, then send the unit back for servicing. Include the RA number on the outside of the return box.
Keep at least one set of original packaging in the event that a product needs to be returned for service. If the original package is not available, you can purchase replacement packaging from Harris Corporation. Otherwise, you can supply your own packaging as long as it meets the following criteria:
The packaging must be able to withstand the product’s weight.
The product must be held rigid within the package.
There must be at least 2 in. (5 cm) of space between the product and the container.
The corners of the product must be protected.
If the product is still within the warranty period, Harris Corporation will return it to you by prepaid ground shipping after servicing.
NEXIO ConfigInstallation and User Guide
9
Technical Support
Technical support is available 24 hours a day, 7 days a week. You can contact technical support by phone or e-mail.
Harris Broadcast Division Support
Toll Free: +1 (888) 534-8246
Email: [email protected]
Video Server Division
http://www.broadcast.harris.com/products/servers
Email: [email protected]
U.S., Canada, Central America, and Latin America (CALA)
Video Processing, Distribution, Servers, Storage, News, Inscriber and Videotek
Call: 1-888-534-8246
Fax: 1-416-445-9020
Email: [email protected]
Europe, Middle East, and Africa
24 hours a day, 7 days a week
Regular Business Hours (9am to 5pm, Monday to Friday)
24/7 Support line: +44-118-964-8100
Fax: +44-118-964-8054
Email:
Infrastructure products: [email protected]
RMA’s: [email protected]
DAM Support: [email protected]
ADC Automation: [email protected]
D Series Support: [email protected]
Transmitters: [email protected]

About This Guide10
Asia, Pacific Rim
24 hours a day, 7 days a week
Regular Business Hours (9am to 5pm HKT Monday to Friday)
Call: +852-2776-0628
After-Hour Hotline: 1-888-534-8246
Fax: +852-2776-0227
Email: [email protected]
11
1 NEXIO Config Installation
Installing NEXIO Config
NEXIO Config is installed as part of the full NEXIO AMP Release 5.5.1 installation process. If you need to install NEXIO Config separately, follow the procedure below:
To install NEXIO Config
1 Insert the NEXIO AMP Release 5.5.1 USB stick.
2 Navigate to the appropriate drive.
3 Double-click the StartHere.html file.
The NEXIO AMP 5.5.1 splash screen appears.
4 Click on Explore USB drive and install software.
5 Open the NEXIO5.5.1_AMP folder.
6 Open the NEXIOConfig folder.
7 Double-click NxConfigSetup.msi.
Chapter 1NEXIO Config Installation
12
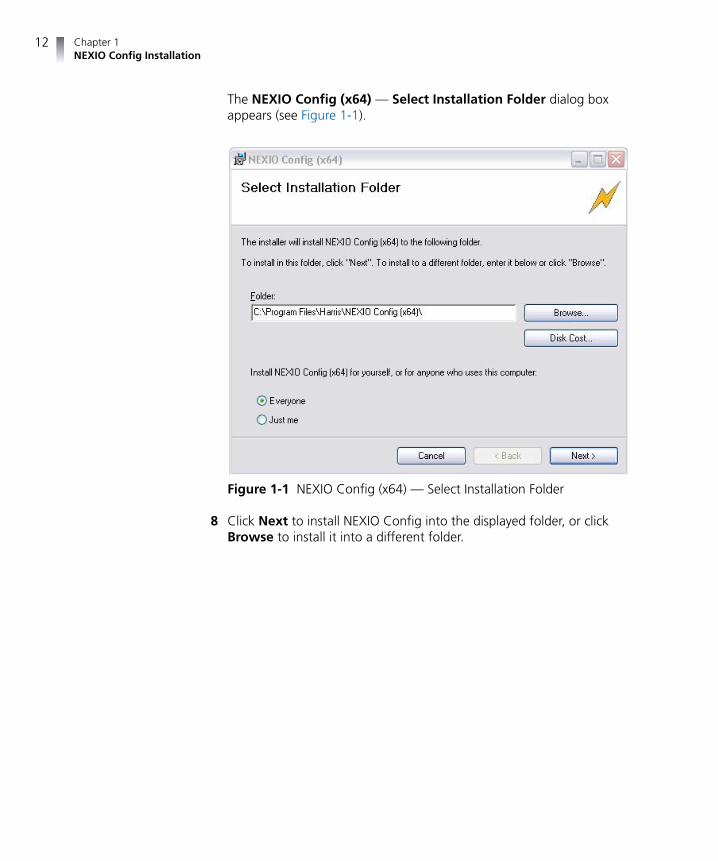
The NEXIO Config (x64) — Select Installation Folder dialog box appears (see Figure 1-1).
Figure 1-1 NEXIO Config (x64) — Select Installation Folder
8 Click Next to install NEXIO Config into the displayed folder, or click Browse to install it into a different folder.
NEXIO ConfigInstallation and User Guide
13
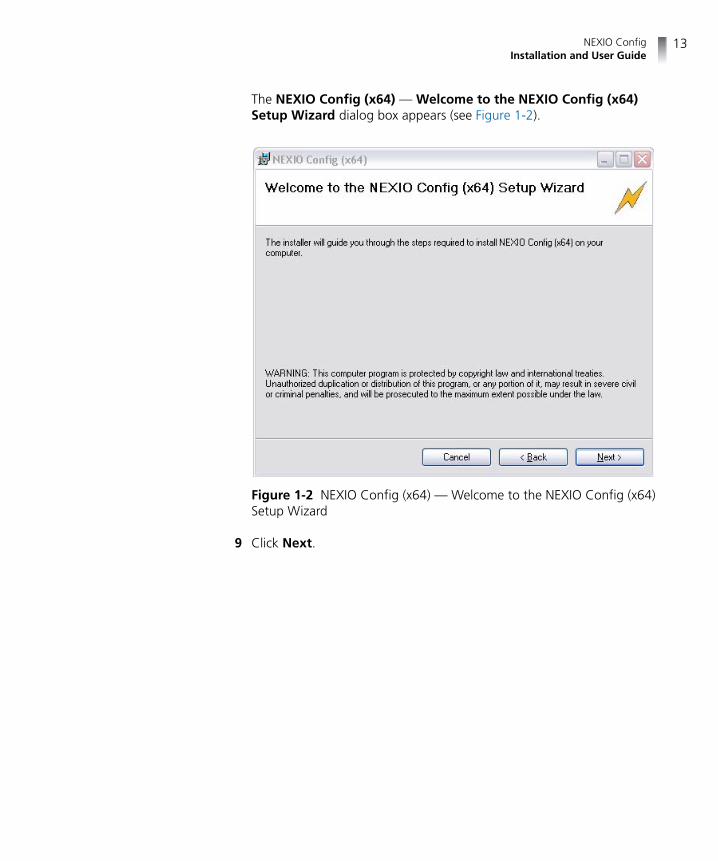
The NEXIO Config (x64) — Welcome to the NEXIO Config (x64) Setup Wizard dialog box appears (see Figure 1-2).
Figure 1-2 NEXIO Config (x64) — Welcome to the NEXIO Config (x64) Setup Wizard
9 Click Next.
Chapter 1NEXIO Config Installation
14
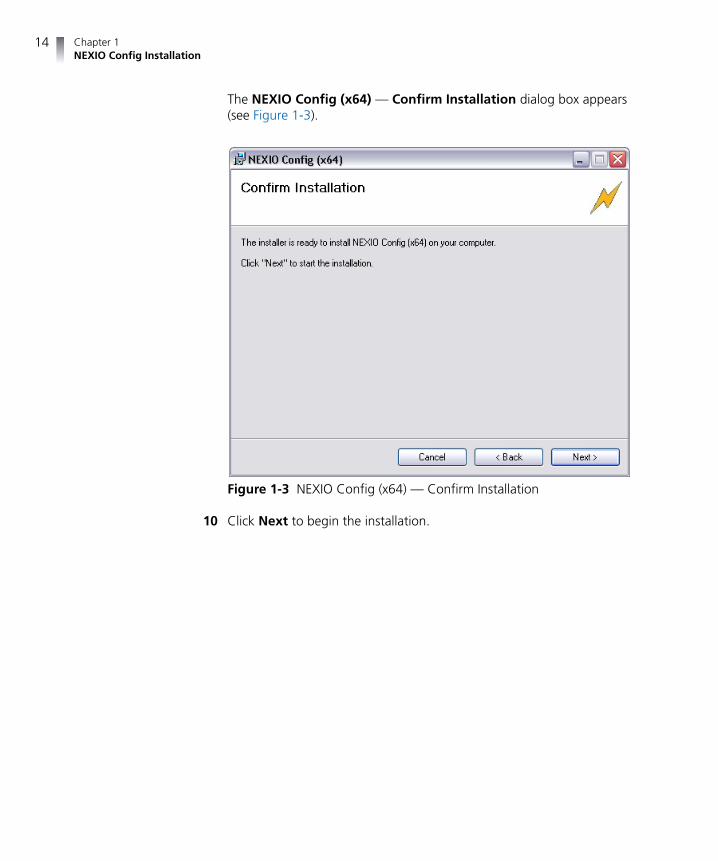
The NEXIO Config (x64) — Confirm Installation dialog box appears (see Figure 1-3).
Figure 1-3 NEXIO Config (x64) — Confirm Installation
10 Click Next to begin the installation.
NEXIO ConfigInstallation and User Guide
15
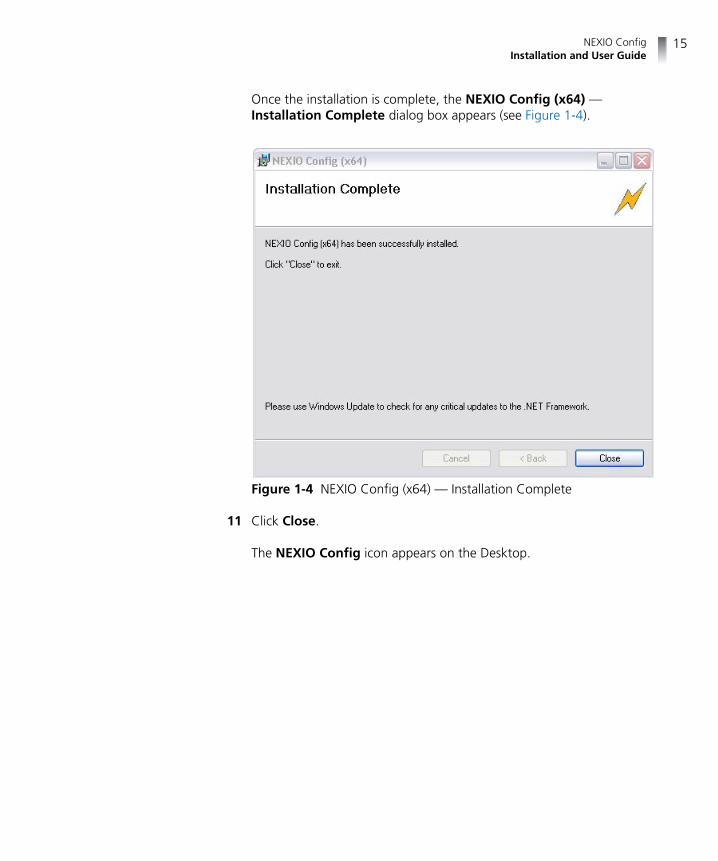
Once the installation is complete, the NEXIO Config (x64) — Installation Complete dialog box appears (see Figure 1-4).
Figure 1-4 NEXIO Config (x64) — Installation Complete
11 Click Close.
The NEXIO Config icon appears on the Desktop.

Chapter 1NEXIO Config Installation
16
17
2 Using NEXIO Config
NEXIO Config Overview
NEXIO Config enables you to easily configure all of the settings for your NEXIO AMP™ servers. You can create and save these settings in configuration templates to use at any time.
In this chapter you will learn how to work with configuration templates. You will also be provided detailed information on each NEXIO Config window.
This chapter includes the following sections:
Starting NEXIO Config
Working with Configuration Templates
NEXIO Config Windows
NEXIO Config is intended to be run while the LLM is not running. Most changes made within NEXIO Config require a restart of the LLM for the changes to take effect.
Chapter 2Using NEXIO Config
18
Starting NEXIO Config
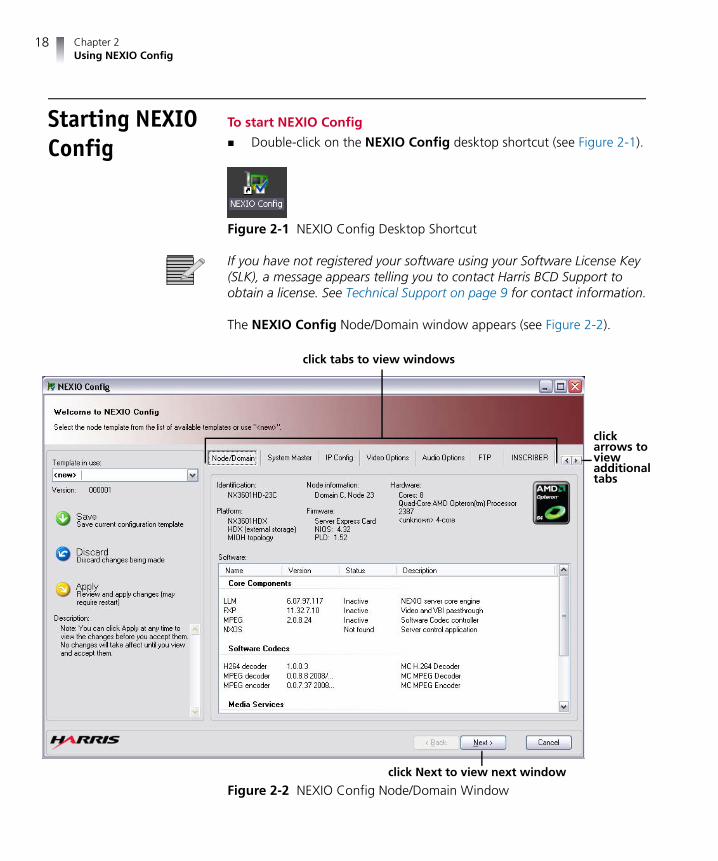
To start NEXIO Config
Double-click on the NEXIO Config desktop shortcut (see Figure 2-1).
Figure 2-1 NEXIO Config Desktop Shortcut
If you have not registered your software using your Software License Key (SLK), a message appears telling you to contact Harris BCD Support to obtain a license. See Technical Support on page 9 for contact information.
The NEXIO Config Node/Domain window appears (see Figure 2-2).
click tabs to view windows
click arrows to view additional tabs
click Next to view next window
Figure 2-2 NEXIO Config Node/Domain Window
NEXIO ConfigInstallation and User Guide
19
Working with Configuration Templates
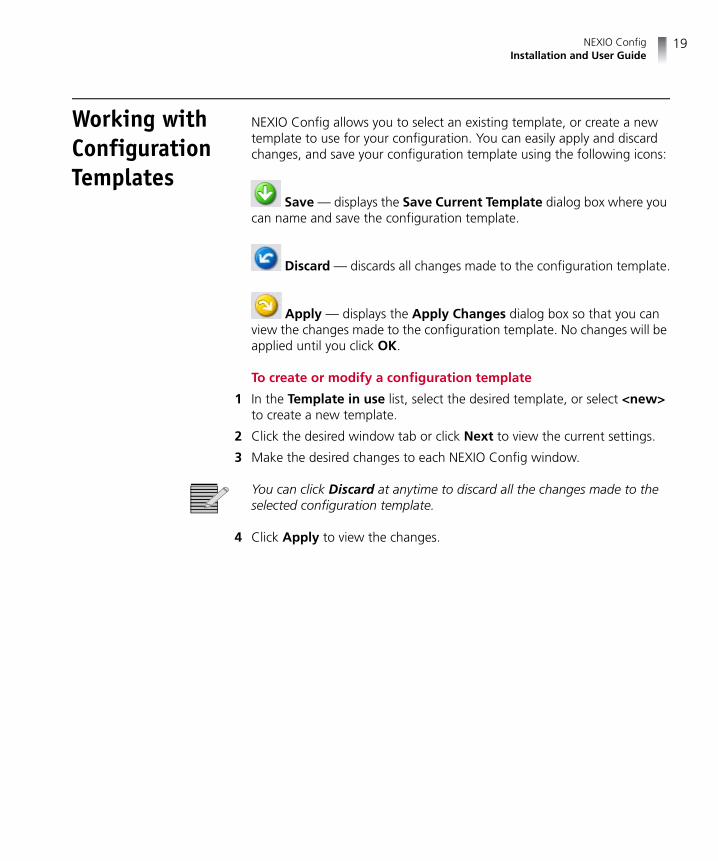
NEXIO Config allows you to select an existing template, or create a new template to use for your configuration. You can easily apply and discard changes, and save your configuration template using the following icons:
Save — displays the Save Current Template dialog box where you can name and save the configuration template.
Discard — discards all changes made to the configuration template.
Apply — displays the Apply Changes dialog box so that you can view the changes made to the configuration template. No changes will be applied until you click OK.
To create or modify a configuration template
1 In the Template in use list, select the desired template, or select <new> to create a new template.
2 Click the desired window tab or click Next to view the current settings.
3 Make the desired changes to each NEXIO Config window.
You can click Discard at anytime to discard all the changes made to the selected configuration template.
4 Click Apply to view the changes.
Chapter 2Using NEXIO Config
20
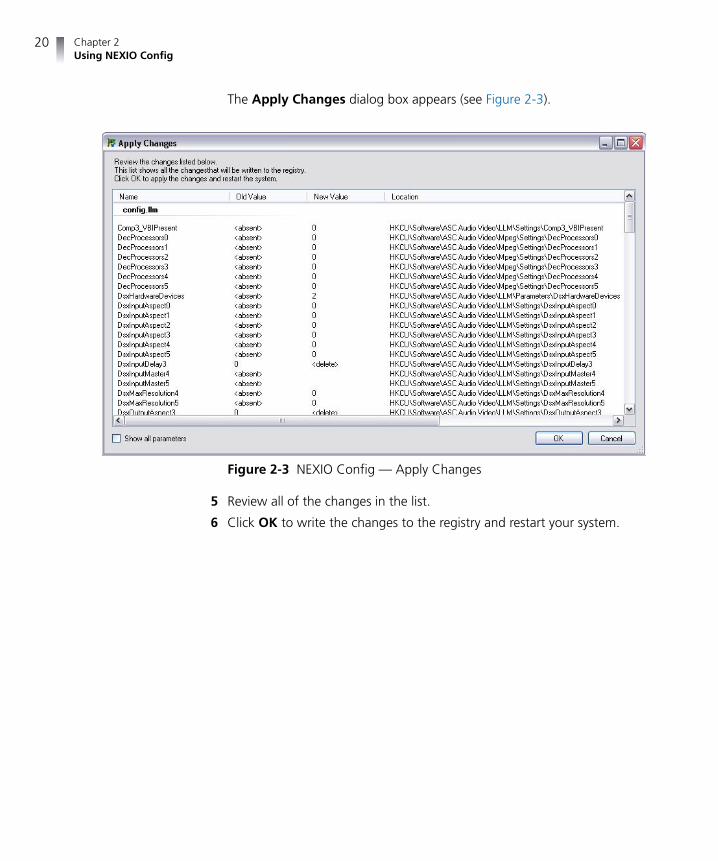
The Apply Changes dialog box appears (see Figure 2-3).
Figure 2-3 NEXIO Config — Apply Changes
5 Review all of the changes in the list.
6 Click OK to write the changes to the registry and restart your system.
NEXIO ConfigInstallation and User Guide
21
NEXIO Config Windows
The following sections describe the settings for each of the NEXIO Config windows:
Node/Domain on page 22
System Master on page 23
IP Config on page 25
Video Options on page 28
Audio Options on page 33
FTP on page 36
INSCRIBER on page 38
LLM on page 40
LLM1 on page 42
MPEG on page 44
mxfHandler on page 46
Other on page 48
Chapter 2Using NEXIO Config
22
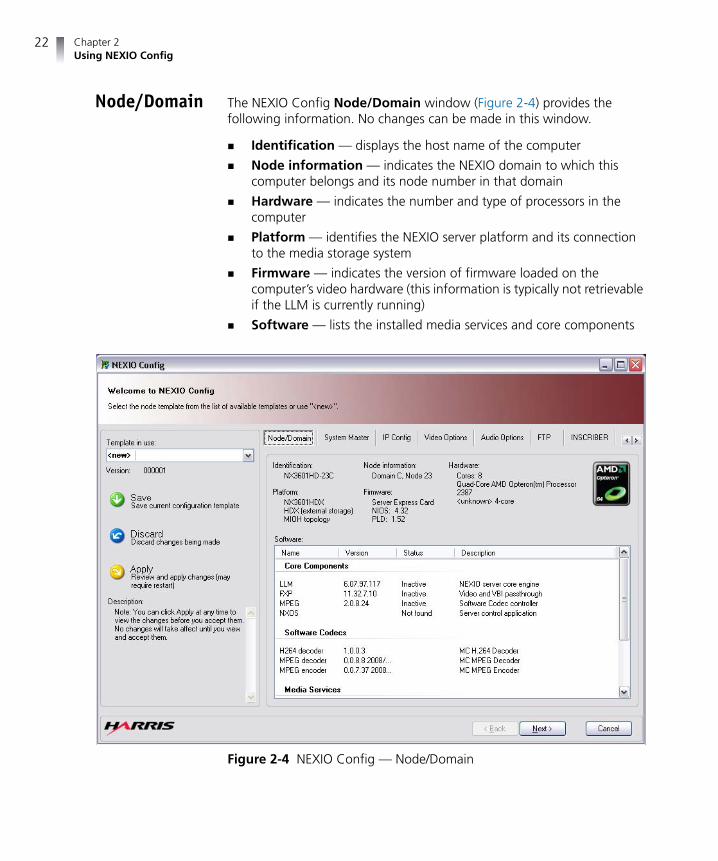
Node/Domain The NEXIO Config Node/Domain window (Figure 2-4) provides the following information. No changes can be made in this window.
Identification — displays the host name of the computer
Node information — indicates the NEXIO domain to which this computer belongs and its node number in that domain
Hardware — indicates the number and type of processors in the computer
Platform — identifies the NEXIO server platform and its connection to the media storage system
Firmware — indicates the version of firmware loaded on the computer’s video hardware (this information is typically not retrievable if the LLM is currently running)
Software — lists the installed media services and core components
Figure 2-4 NEXIO Config — Node/Domain
NEXIO ConfigInstallation and User Guide
23
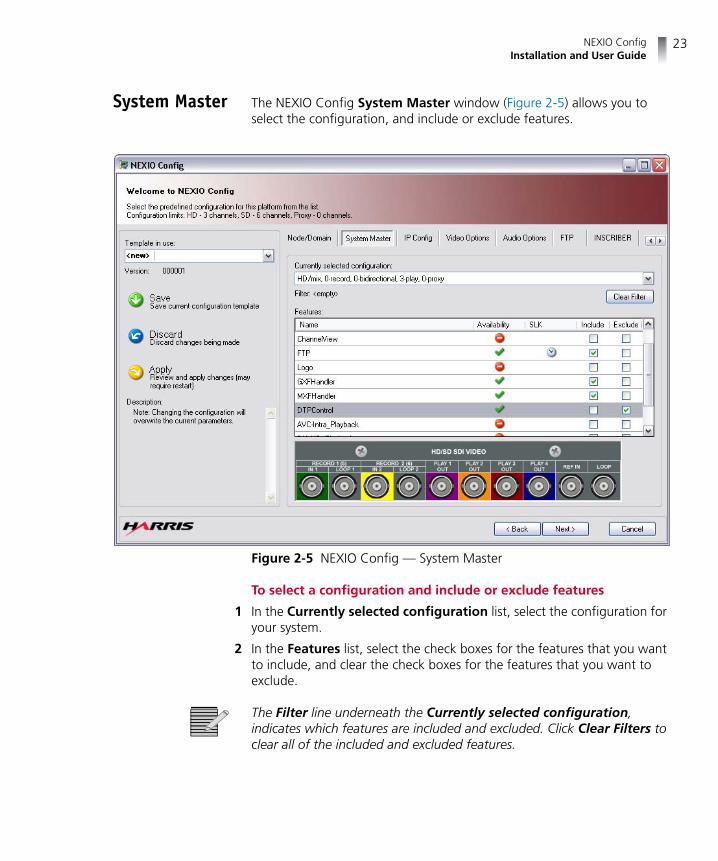
System Master The NEXIO Config System Master window (Figure 2-5) allows you to select the configuration, and include or exclude features.
Figure 2-5 NEXIO Config — System Master
To select a configuration and include or exclude features
1 In the Currently selected configuration list, select the configuration for your system.
2 In the Features list, select the check boxes for the features that you want to include, and clear the check boxes for the features that you want to exclude.
The Filter line underneath the Currently selected configuration, indicates which features are included and excluded. Click Clear Filters to clear all of the included and excluded features.
Chapter 2Using NEXIO Config
24
The Availability column indicates whether or not a feature is available for the current configuration. The availability icons are described below:
green check mark — indicates that the feature is available for the current configuration.
red minus sign — indicates that the feature is not available for the current configuration.
purple question mark — indicates that the feature has no meaning in the current configuration.
See Appendix A on page 51 for a list of the Channel Configurations and Features available in the System Master window.
The DNxHD Playback and 1080 Progressive features are not available in this release of NEXIO Config and are scheduled for future releases.
NEXIO ConfigInstallation and User Guide
25
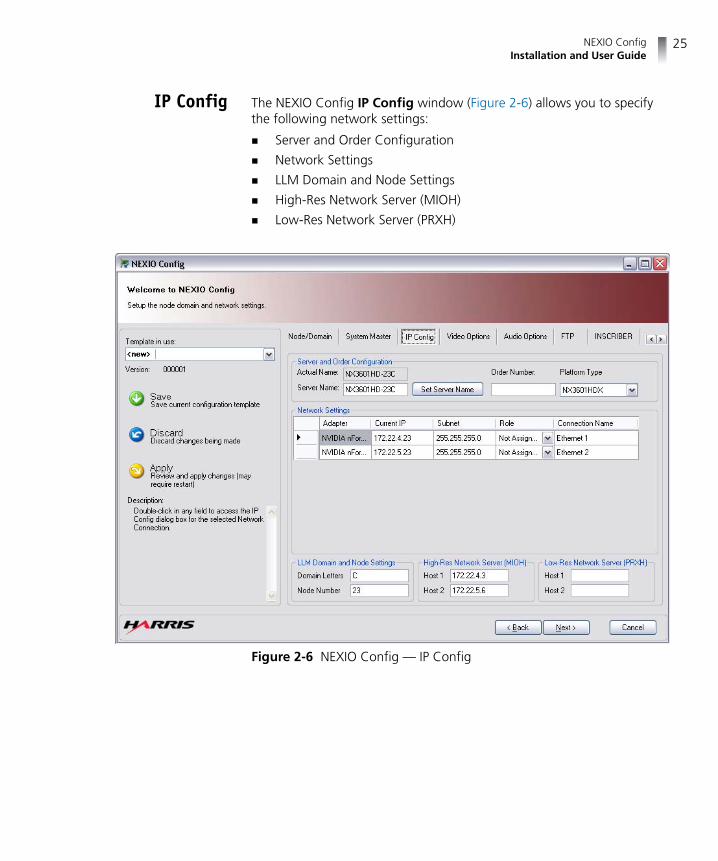
IP Config The NEXIO Config IP Config window (Figure 2-6) allows you to specify the following network settings:
Server and Order Configuration
Network Settings
LLM Domain and Node Settings
High-Res Network Server (MIOH)
Low-Res Network Server (PRXH)
Figure 2-6 NEXIO Config — IP Config
Chapter 2Using NEXIO Config
26
To specify IP configuration settings
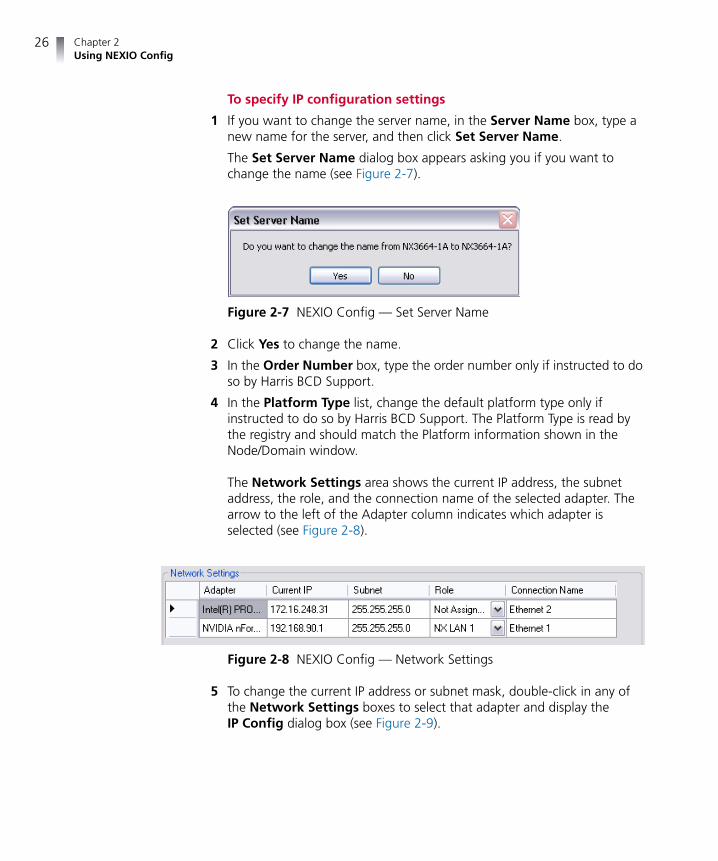
1 If you want to change the server name, in the Server Name box, type a new name for the server, and then click Set Server Name.
The Set Server Name dialog box appears asking you if you want to change the name (see Figure 2-7).
Figure 2-7 NEXIO Config — Set Server Name
2 Click Yes to change the name.
3 In the Order Number box, type the order number only if instructed to do so by Harris BCD Support.
4 In the Platform Type list, change the default platform type only if instructed to do so by Harris BCD Support. The Platform Type is read by the registry and should match the Platform information shown in the Node/Domain window.
The Network Settings area shows the current IP address, the subnet address, the role, and the connection name of the selected adapter. The arrow to the left of the Adapter column indicates which adapter is selected (see Figure 2-8).
Figure 2-8 NEXIO Config — Network Settings
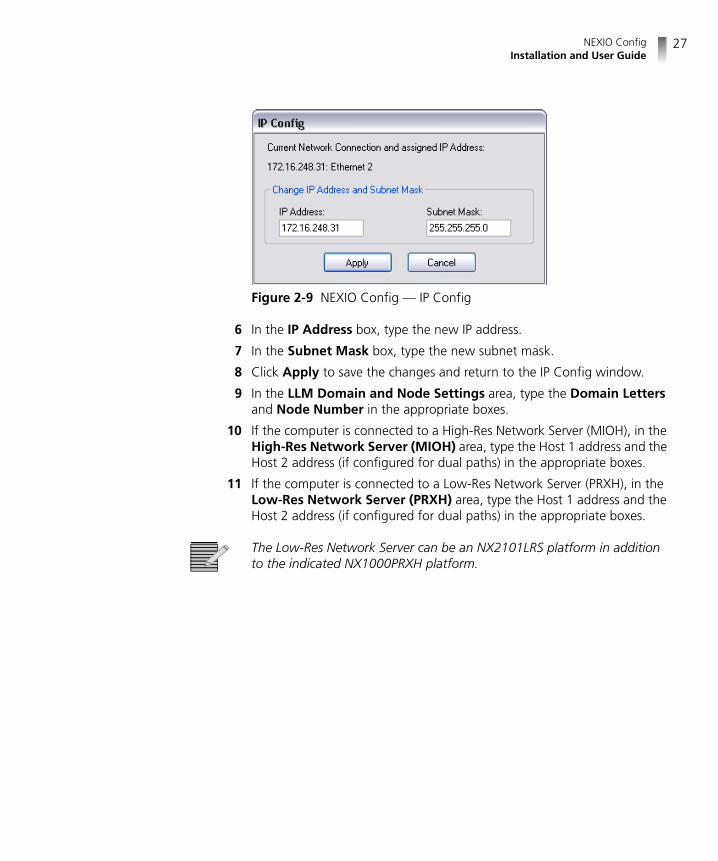
5 To change the current IP address or subnet mask, double-click in any of the Network Settings boxes to select that adapter and display the IP Config dialog box (see Figure 2-9).
NEXIO ConfigInstallation and User Guide
27
Figure 2-9 NEXIO Config — IP Config
6 In the IP Address box, type the new IP address.
7 In the Subnet Mask box, type the new subnet mask.
8 Click Apply to save the changes and return to the IP Config window.
9 In the LLM Domain and Node Settings area, type the Domain Letters and Node Number in the appropriate boxes.
10 If the computer is connected to a High-Res Network Server (MIOH), in the High-Res Network Server (MIOH) area, type the Host 1 address and the Host 2 address (if configured for dual paths) in the appropriate boxes.
11 If the computer is connected to a Low-Res Network Server (PRXH), in the Low-Res Network Server (PRXH) area, type the Host 1 address and the Host 2 address (if configured for dual paths) in the appropriate boxes.
The Low-Res Network Server can be an NX2101LRS platform in addition to the indicated NX1000PRXH platform.
Chapter 2Using NEXIO Config
28
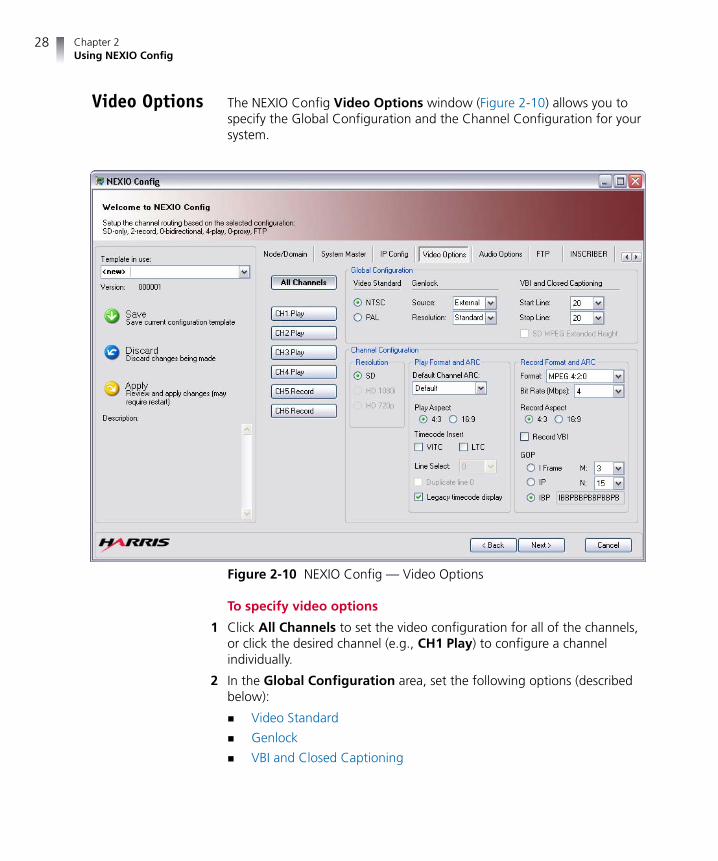
Video Options The NEXIO Config Video Options window (Figure 2-10) allows you to specify the Global Configuration and the Channel Configuration for your system.
Figure 2-10 NEXIO Config — Video Options
To specify video options
1 Click All Channels to set the video configuration for all of the channels, or click the desired channel (e.g., CH1 Play) to configure a channel individually.
2 In the Global Configuration area, set the following options (described below):
Video Standard
Genlock
VBI and Closed Captioning
NEXIO ConfigInstallation and User Guide
29
Video Standard
In the Video Standard area, select the video standard (i.e., NTSC or PAL).
Genlock
In the Genlock area, select settings to lock video outputs to external reference sources.
The available Source settings are:
Internal—This uses the internal clock of the server rather than referencing to an external reference source.
Input1—This references the output video of all channels to the timing derived from video input 1.
External—This references the video outputs to the external reference signal applied to the REF IN connector. This is the recommended setting.
The available Resolution settings are:
Standard—Use for bi-level 525 or 625 line reference.
HD1080—Use for tri-level 1080i reference.
HD720—Use for tri-level 720p reference.
VBI and Closed Captioning
a In the VBI and Closed Captioning area, set the start and stop lines (i.e., 7 through 23) for stored closed captioning and other ancillary data. This data is stored as clip essence.
b Select the SD MPEG Extended Height check box to compress the ancillary data. This only applies to SD-only, MPEG-2 configurations.
3 In the Channel Configuration area, set the following options (described below):
Resolution
Play Format and ARC
Record Format and ARC
Chapter 2Using NEXIO Config
30
Resolution
In the Resolution area, select the desired resolution for the channel configuration (i.e., SD, HD 1080i, or HD 720p).
Play Format and ARC
a Click the appropriate Play Aspect option, and then in the Default Channel ARC list select the ARC play format. For details on selecting the Play Aspect and Default Channel ARC see the appropriate section below:
SD 16:9 Aspect Ratio Output
For channels configured to play out SD media, it is important to identify the aspect ratio of the video output. If a channel is intended to display a 16:9 aspect ratio, click the 16:9 option, and then select the desired ARC setting. The selected ARC setting becomes the default ARC setting for any SD 4:3 clips (that do not have pre-defined ARC settings) loaded into that channel.
The available settings for a SD channel configured for a 16:9 aspect ratio are:
Default — Uses the Pillar Box option to display the clip.Anamorphic — Stretches the clip in the horizontal dimension to fit the 16:9 frame. Pillar Box — Adds black bars on each side of the clip to fit the 16:9 frame. Middle Cut — Enlarges the clip on four sides to fit the 16:9 frame.14:9 HD — Changes the aspect ratio of the clip to 14:9.21:9 HD — Changes the aspect ratio of the clip to 21:9.
NEXIO ConfigInstallation and User Guide
31
SD 4:3 Aspect Ratio Output
If a channel is intended to display a 4:3 aspect ratio, click the 4:3 option, and then select the desired ARC setting. The selected ARC setting becomes the default ARC setting for any SD 16:9 clips (that do not have pre-defined ARC settings) loaded into that channel.
The available settings for a SD channel configured for a 4:3 aspect ratio are:
Default — Uses the Letter Box option to display the clip.Anamorphic — Shrinks the clip in the horizontal dimension to fit the 4:3 frame.Letter Box — Adds black bars to the top and bottom of the clip to fit the 4:3 frame. Center Cut — Crops the sides of the clip to fit the 4:3 frame.14:9 SD — Changes the aspect ratio of the clip to 14:9.21:9 SD — Changes the aspect ratio of the clip to 21:9.
For SD clips loaded into SD channels, the aspect ratio conversion has been disabled. Whether the SD clips have the 16:9 or the 4:3 aspect ratio flag enabled, they will be played out of all SD configured channels without an aspect ratio conversion applied.
HD Aspect Ratio Output
For channels configured to play out HD media, the aspect ratio of the video output is always 16:9.
Select the desired ARC setting from the list. The selected ARC setting becomes the default ARC setting for any SD 4:3 clips (that do not have pre-defined ARC settings) loaded into that channel.
The available settings for a HD channel configured for 16:9 aspect ratio are:
Default — Uses the Pillar Box option to display the clip.Anamorphic — Stretches the clip in the horizontal dimension to fit the 16:9 frame. Pillar Box — Adds black bars on each side of the clip to fit the 16:9 frame.
Chapter 2Using NEXIO Config
32
Middle Cut — Enlarges the clip on four sides to fit the 16:9 frame.14:9 HD — Changes the aspect ratio of the clip to 14:9.21:9 HD — Changes the aspect ratio of the clip to 21:9.
If an AFD flag is present on input, AFD-based ARC will be applied on playout as necessary. This will override the port based ARC settings automatically for media loaded into HD channels.
b Select the desired Timecode Insert check boxes (i.e., VITC and/or LTC). Note: LTC Support is currently not available.
c In the Line Select list, select the desired line for the VITC output (i.e., 10, 11, 12, 13, 14, 15, 16, 17, 18, 19, or 20).
d Select the Duplicate line 0 check box if desired to add a duplicate line of the VITC output 2 lines later. For example, if you have VITC output on line 16, a duplicate of the output will appear on line 18.
e Select the Legacy timecode display check box to report a channel’s current output timecode based on the start time of a currently playing clip instead of the embedded timecode within the clip.
Record Format and ARC
a In the Format list, select the appropriate record format.
b In the Bit Rate (Mbps) list, select the appropriate bit rate for the format.
c Click the appropriate Record Aspect option.
d Select the Record VBI check box if you want to record the VBI information.
e Click the appropriate GOP option, and select the M and N value if applicable.
See Appendix A on page 51 for the Record Format and ARC Settings available in the Video Options window.
NEXIO ConfigInstallation and User Guide
33
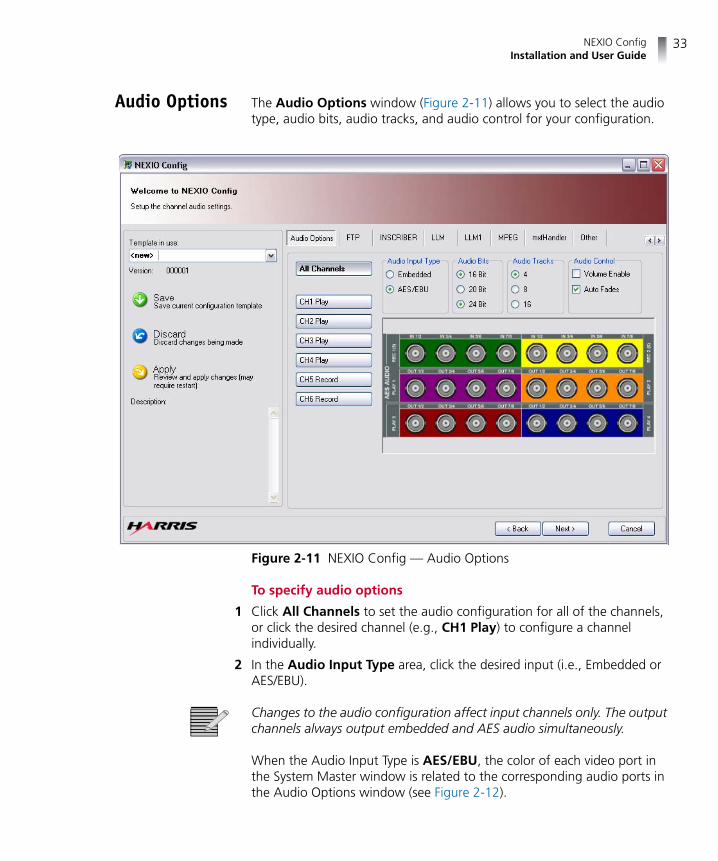
Audio Options The Audio Options window (Figure 2-11) allows you to select the audio type, audio bits, audio tracks, and audio control for your configuration.
Figure 2-11 NEXIO Config — Audio Options
To specify audio options
1 Click All Channels to set the audio configuration for all of the channels, or click the desired channel (e.g., CH1 Play) to configure a channel individually.
2 In the Audio Input Type area, click the desired input (i.e., Embedded or AES/EBU).
Changes to the audio configuration affect input channels only. The output channels always output embedded and AES audio simultaneously.
When the Audio Input Type is AES/EBU, the color of each video port in the System Master window is related to the corresponding audio ports in the Audio Options window (see Figure 2-12).

Chapter 2Using NEXIO Config
34
Figure 2-12 Video and Audio Ports when AES/EBU is Selected
The AES/EBU Audio Color Legend on page 62 in Appendix A shows the color legend for each channel mode.
NEXIO ConfigInstallation and User Guide
35
3 In the Audio Bits area, click the number of bits per sample (i.e., 16 Bit, 20 Bit, or 24 Bit).
4 In the Audio Tracks area, select the number of audio tracks (i.e., 4, 8, or 16).
5 In the Audio Control area, select the desired controls (i.e., Volume Enable to control the volume of the audio, and/or Audio Fades to create an automatic fade between clips).
If you have compressed audio (e.g., Dolby), clear the Volume Enable and Auto Fades check boxes and do not manually adjust the volume.
Chapter 2Using NEXIO Config
36
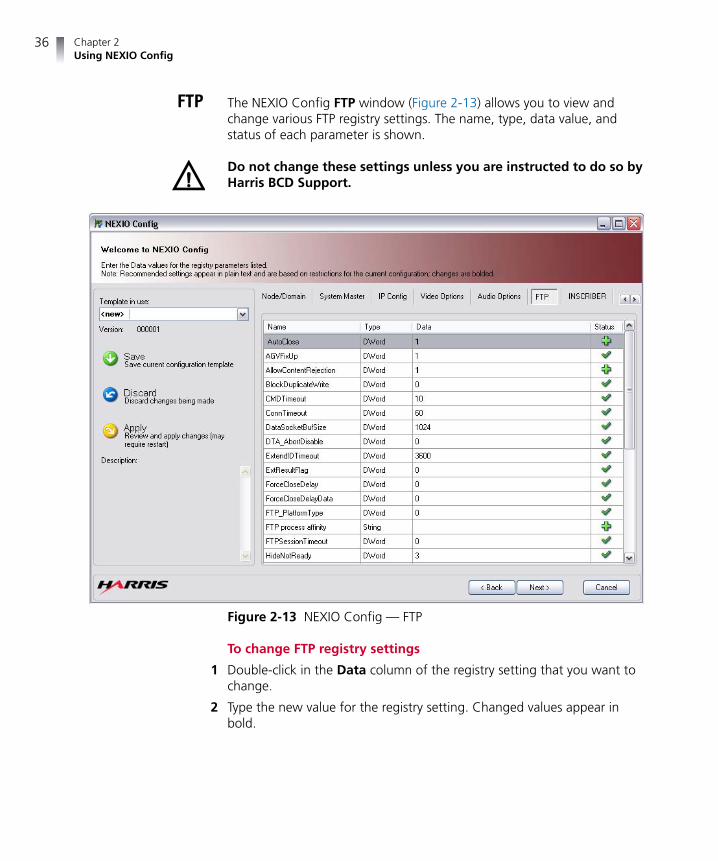
FTP The NEXIO Config FTP window (Figure 2-13) allows you to view and change various FTP registry settings. The name, type, data value, and status of each parameter is shown.
Do not change these settings unless you are instructed to do so by Harris BCD Support.
Figure 2-13 NEXIO Config — FTP
To change FTP registry settings
1 Double-click in the Data column of the registry setting that you want to change.
2 Type the new value for the registry setting. Changed values appear in bold.

NEXIO ConfigInstallation and User Guide
37
The status of each parameter appears in the Status column. The status icons are described below:
green check mark — indicates that the FTP parameter currently exists in the registry.
green plus sign — indicates that the FTP parameter is absent in the registry and will be created.
red minus sign — indicates that the FTP parameter will be deleted.
purple question mark — indicates that the FTP parameter has no meaning in the current configuration.
yellow explanation mark — indicates that the FTP parameter has been manually changed and does not meet the predefined rules.
Chapter 2Using NEXIO Config
38
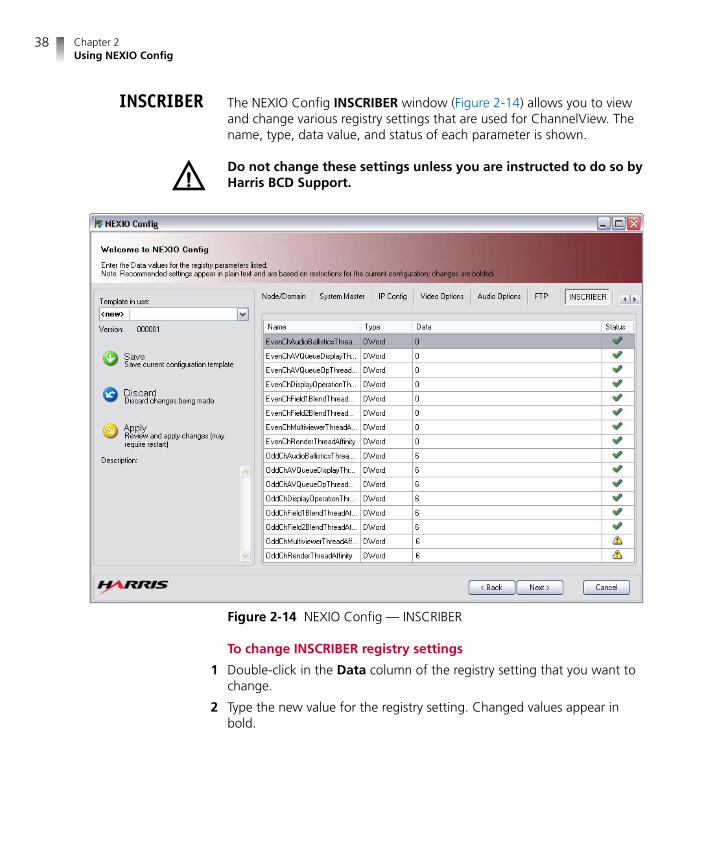
INSCRIBER The NEXIO Config INSCRIBER window (Figure 2-14) allows you to view and change various registry settings that are used for ChannelView. The name, type, data value, and status of each parameter is shown.
Do not change these settings unless you are instructed to do so by Harris BCD Support.
Figure 2-14 NEXIO Config — INSCRIBER
To change INSCRIBER registry settings
1 Double-click in the Data column of the registry setting that you want to change.
2 Type the new value for the registry setting. Changed values appear in bold.

NEXIO ConfigInstallation and User Guide
39
The status of each parameter appears in the Status column. The status icons are described below:
green check mark — indicates that the ChannelView parameter currently exists in the registry.
green plus sign — indicates that the ChannelView parameter is absent in the registry and will be created.
red minus sign — indicates that the ChannelView parameter will be deleted.
purple question mark — indicates that the ChannelView parameter has no meaning in the current configuration.
yellow explanation mark — indicates that the ChannelView parameter has been manually changed and does not meet the predefined rules.

Chapter 2Using NEXIO Config
40
LLM The NEXIO Config LLM window (Figure 2-15) allows you to view and change various LLM registry settings. The name, type, data value, and status of each parameter is shown.
Do not change these settings unless you are instructed to do so by Harris BCD Support.
Figure 2-15 NEXIO Config — LLM
To change LLM registry settings
1 Double-click in the Data column of the registry setting that you want to change.
2 Type the new value for the registry setting. Changed values appear in bold.

NEXIO ConfigInstallation and User Guide
41
The status of each parameter appears in the Status column. The status icons are described below:
green check mark — indicates that the LLM parameter currently exists in the registry.
green plus sign — indicates that the LLM parameter is absent in the registry and will be created.
red minus sign — indicates that the LLM parameter will be deleted.
purple question mark — indicates that the LLM parameter has no meaning in the current configuration.
yellow explanation mark — indicates that the LLM parameter has been manually changed and does not meet the predefined rules.
Chapter 2Using NEXIO Config
42
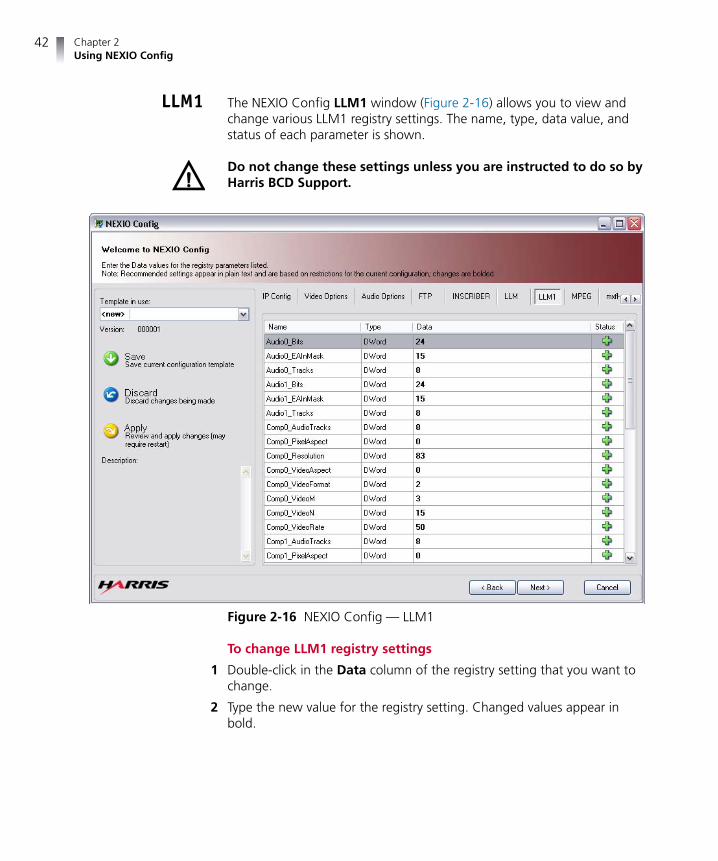
LLM1 The NEXIO Config LLM1 window (Figure 2-16) allows you to view and change various LLM1 registry settings. The name, type, data value, and status of each parameter is shown.
Do not change these settings unless you are instructed to do so by Harris BCD Support.
Figure 2-16 NEXIO Config — LLM1
To change LLM1 registry settings
1 Double-click in the Data column of the registry setting that you want to change.
2 Type the new value for the registry setting. Changed values appear in bold.
NEXIO ConfigInstallation and User Guide
43
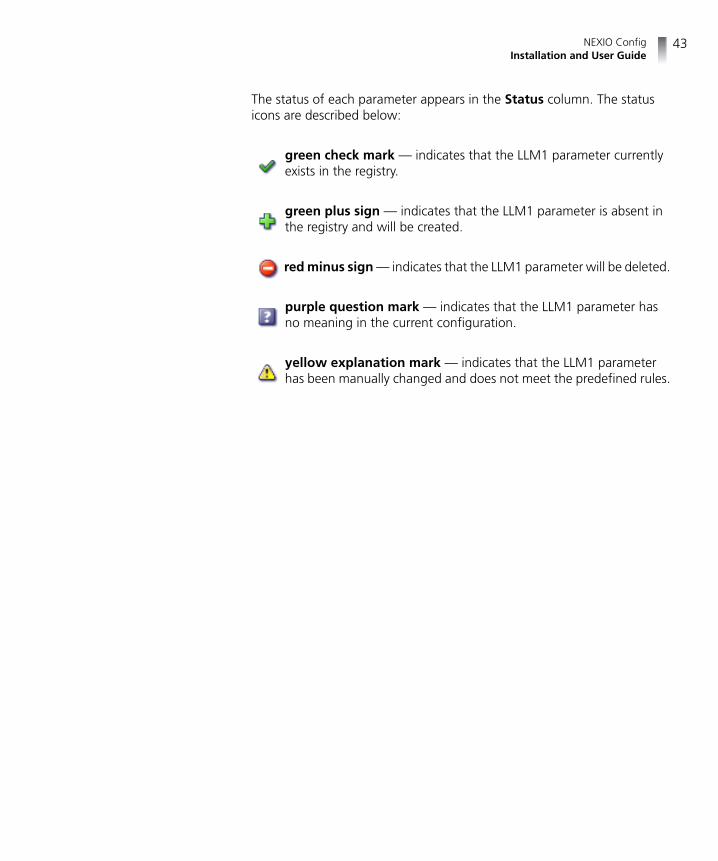
The status of each parameter appears in the Status column. The status icons are described below:
green check mark — indicates that the LLM1 parameter currently exists in the registry.
green plus sign — indicates that the LLM1 parameter is absent in the registry and will be created.
red minus sign — indicates that the LLM1 parameter will be deleted.
purple question mark — indicates that the LLM1 parameter has no meaning in the current configuration.
yellow explanation mark — indicates that the LLM1 parameter has been manually changed and does not meet the predefined rules.

Chapter 2Using NEXIO Config
44
MPEG The NEXIO Config MPEG window (Figure 2-17) allows you to view and change various MPEG registry settings. The name, type, data value, and status of each parameter is shown.
Do not change these settings unless you are instructed to do so by Harris BCD Support.
Figure 2-17 NEXIO Config — MPEG
To change MPEG registry settings
1 Double-click in the Data column of the registry setting that you want to change.
2 Type the new value for the registry setting. Changed values appear in bold.

NEXIO ConfigInstallation and User Guide
45
The status of each parameter appears in the Status column. The status icons are described below:
green check mark — indicates that the MPEG parameter currently exists in the registry.
green plus sign — indicates that the MPEG parameter is absent in the registry and will be created.
red minus sign — indicates that the MPEG parameter will be deleted.
purple question mark — indicates that the MPEG parameter has no meaning in the current configuration.
yellow explanation mark — indicates that the MPEG parameter has been manually changed and does not meet the predefined rule.

Chapter 2Using NEXIO Config
46
mxfHandler The NEXIO Config mxfHandler window (Figure 2-18) allows you to view and change various mxfHandler registry settings. The name, type, data value, and status of each parameter is shown.
Do not change these settings unless you are instructed to do so by Harris BCD Support.
Figure 2-18 NEXIO Config — mxfHandler
To change mxfHandler registry settings
1 Double-click in the Data column of the registry setting that you want to change.
2 Type the new value for the registry setting. Changed values appear in bold.
NEXIO ConfigInstallation and User Guide
47
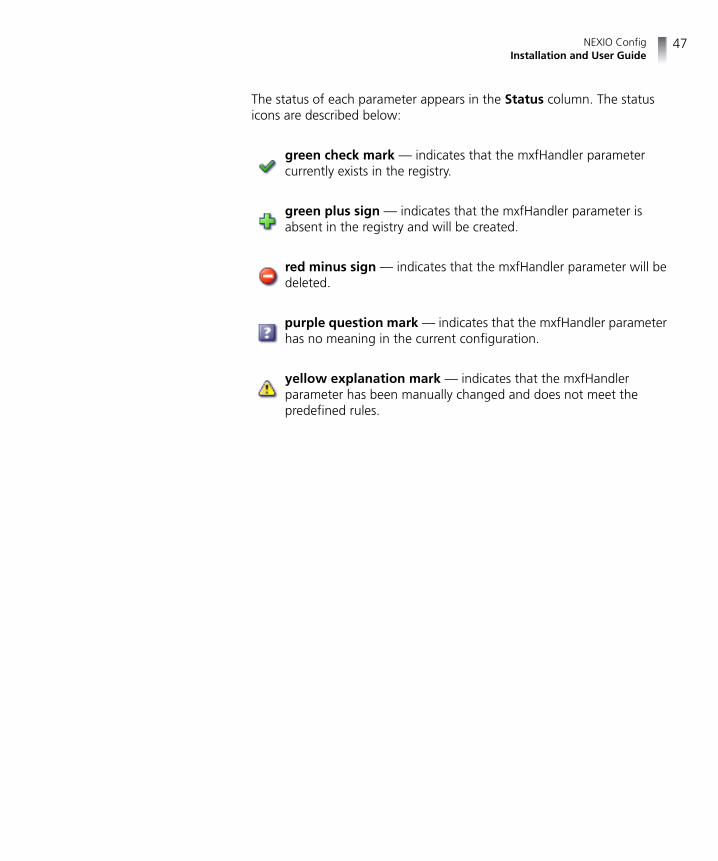
The status of each parameter appears in the Status column. The status icons are described below:
green check mark — indicates that the mxfHandler parameter currently exists in the registry.
green plus sign — indicates that the mxfHandler parameter is absent in the registry and will be created.
red minus sign — indicates that the mxfHandler parameter will be deleted.
purple question mark — indicates that the mxfHandler parameter has no meaning in the current configuration.
yellow explanation mark — indicates that the mxfHandler parameter has been manually changed and does not meet the predefined rules.

Chapter 2Using NEXIO Config
48
Other The NEXIO Config Other window (Figure 2-19) allows you to view and change various additional registry settings. The name, type, data value, and status of each parameter is shown.
Do not change these settings unless you are instructed to do so by Harris BCD Support.
Figure 2-19 NEXIO Config — Other
To change Other registry settings
1 Double-click in the Data column of the registry setting that you want to change.
2 Type the new value for the registry setting. Changed values appear in bold.
NEXIO ConfigInstallation and User Guide
49
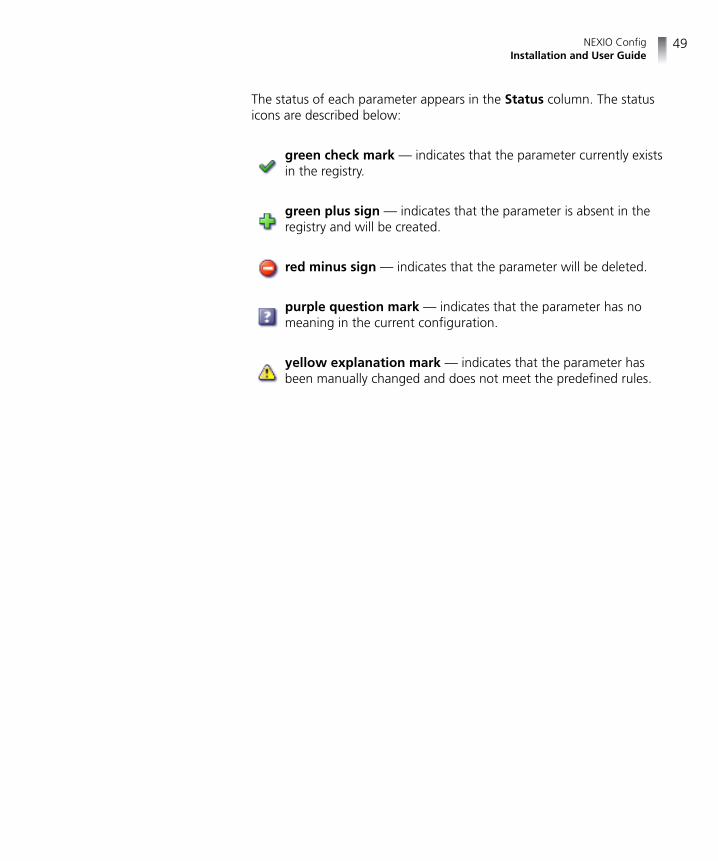
The status of each parameter appears in the Status column. The status icons are described below:
green check mark — indicates that the parameter currently exists in the registry.
green plus sign — indicates that the parameter is absent in the registry and will be created.
red minus sign — indicates that the parameter will be deleted.
purple question mark — indicates that the parameter has no meaning in the current configuration.
yellow explanation mark — indicates that the parameter has been manually changed and does not meet the predefined rules.

Chapter 2Using NEXIO Config
50
51
A Channel Configurations, Record Format Settings, and AES/EBU Color Legend
Overview Appendix A provides detailed tables for the following:
Channel Configurations and Features on page 51
Record Format and ARC Settings on page 60
AES/EBU Audio Color Legend on page 62
Channel Configurations and Features
In the System Master window, you can select the Channel Configuration and you can include or exclude Features for that configuration.
The following tables show the available channel configurations and the available features for:
2 Channel Modes without Expander Client
3 Channel Modes without Expander Client
4 Channel Modes without Expander Client
6 Channel Modes without Expander Client
2 Channel Modes with Expander Client
3 Channel Modes with Expander Client
4 Channel Modes with Expander Client
6 Channel Modes with Expander Client
Expander Client is used for systems that are connected via Ethernet (e.g., MIOH systems), as opposed to via direct connection.
Appendix AChannel Configurations, Record Format Settings, and AES/EBU Color Legend
52
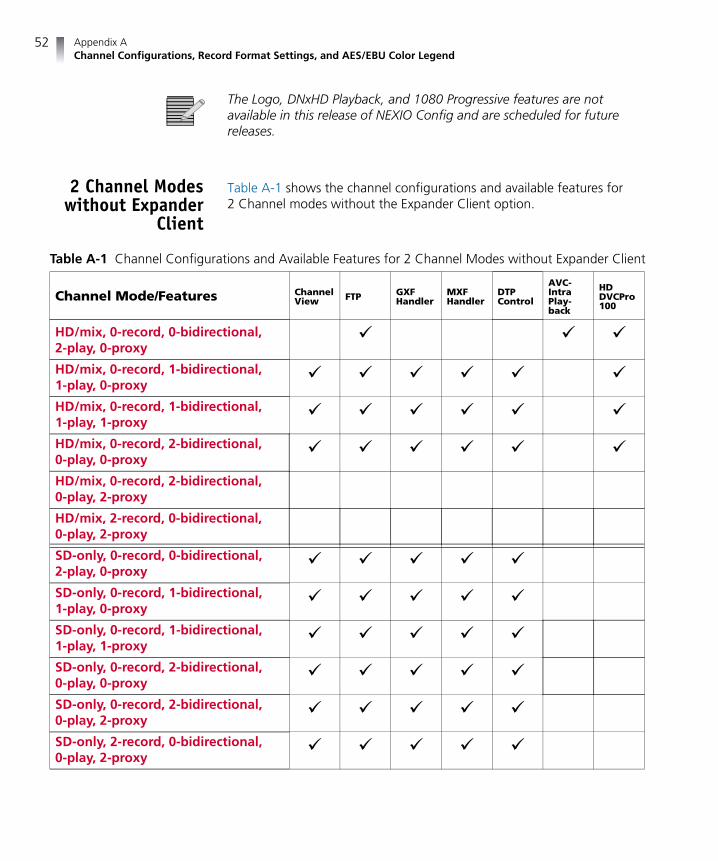
The Logo, DNxHD Playback, and 1080 Progressive features are not available in this release of NEXIO Config and are scheduled for future releases.
2 Channel Modes without Expander
Client
Table A-1 shows the channel configurations and available features for 2 Channel modes without the Expander Client option.
Table A-1 Channel Configurations and Available Features for 2 Channel Modes without Expander Client
Channel Mode/Features ChannelView FTP GXF
HandlerMXF Handler
DTP Control
AVC- Intra Play- back
HD DVCPro 100
HD/mix, 0-record, 0-bidirectional, 2-play, 0-proxy
HD/mix, 0-record, 1-bidirectional, 1-play, 0-proxy
HD/mix, 0-record, 1-bidirectional, 1-play, 1-proxy
HD/mix, 0-record, 2-bidirectional, 0-play, 0-proxy
HD/mix, 0-record, 2-bidirectional, 0-play, 2-proxy
HD/mix, 2-record, 0-bidirectional, 0-play, 2-proxy
SD-only, 0-record, 0-bidirectional, 2-play, 0-proxy
SD-only, 0-record, 1-bidirectional, 1-play, 0-proxy
SD-only, 0-record, 1-bidirectional, 1-play, 1-proxy
SD-only, 0-record, 2-bidirectional, 0-play, 0-proxy
SD-only, 0-record, 2-bidirectional, 0-play, 2-proxy
SD-only, 2-record, 0-bidirectional, 0-play, 2-proxy
NEXIO ConfigInstallation and User Guide
53
3 Channel Modes without Expander
Client
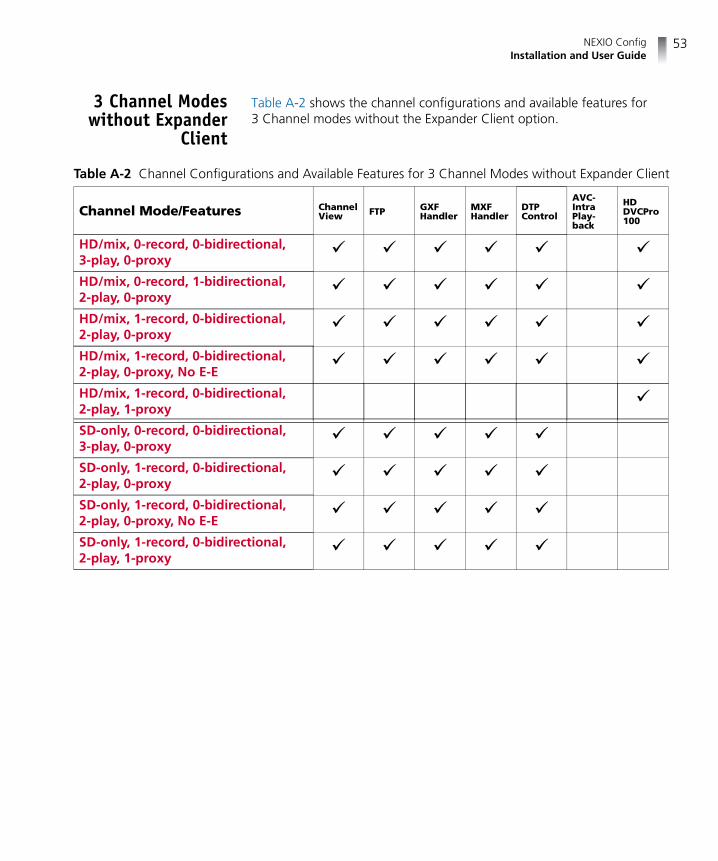
Table A-2 shows the channel configurations and available features for 3 Channel modes without the Expander Client option.
Table A-2 Channel Configurations and Available Features for 3 Channel Modes without Expander Client
Channel Mode/Features ChannelView FTP GXF
HandlerMXF Handler
DTP Control
AVC- Intra Play- back
HD DVCPro 100
HD/mix, 0-record, 0-bidirectional, 3-play, 0-proxy
HD/mix, 0-record, 1-bidirectional, 2-play, 0-proxy
HD/mix, 1-record, 0-bidirectional, 2-play, 0-proxy
HD/mix, 1-record, 0-bidirectional, 2-play, 0-proxy, No E-E
HD/mix, 1-record, 0-bidirectional, 2-play, 1-proxy
SD-only, 0-record, 0-bidirectional, 3-play, 0-proxy
SD-only, 1-record, 0-bidirectional, 2-play, 0-proxy
SD-only, 1-record, 0-bidirectional, 2-play, 0-proxy, No E-E
SD-only, 1-record, 0-bidirectional, 2-play, 1-proxy
Appendix AChannel Configurations, Record Format Settings, and AES/EBU Color Legend
54
4 Channel Modes without Expander
Client
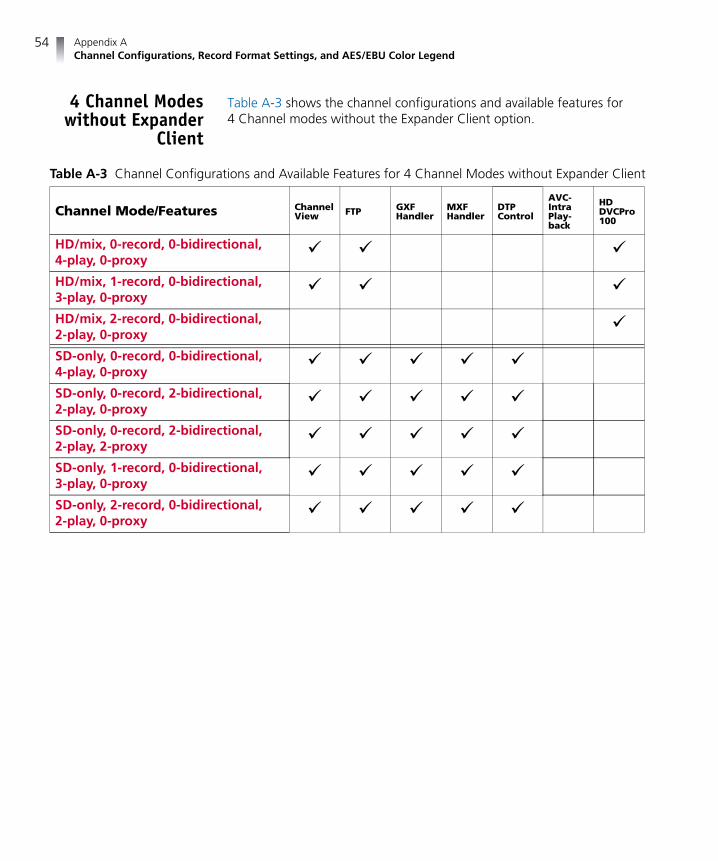
Table A-3 shows the channel configurations and available features for 4 Channel modes without the Expander Client option.
Table A-3 Channel Configurations and Available Features for 4 Channel Modes without Expander Client
Channel Mode/Features ChannelView FTP GXF
HandlerMXF Handler
DTP Control
AVC- Intra Play- back
HD DVCPro 100
HD/mix, 0-record, 0-bidirectional, 4-play, 0-proxy
HD/mix, 1-record, 0-bidirectional, 3-play, 0-proxy
HD/mix, 2-record, 0-bidirectional, 2-play, 0-proxy
SD-only, 0-record, 0-bidirectional, 4-play, 0-proxy
SD-only, 0-record, 2-bidirectional, 2-play, 0-proxy
SD-only, 0-record, 2-bidirectional, 2-play, 2-proxy
SD-only, 1-record, 0-bidirectional, 3-play, 0-proxy
SD-only, 2-record, 0-bidirectional, 2-play, 0-proxy
NEXIO ConfigInstallation and User Guide
55
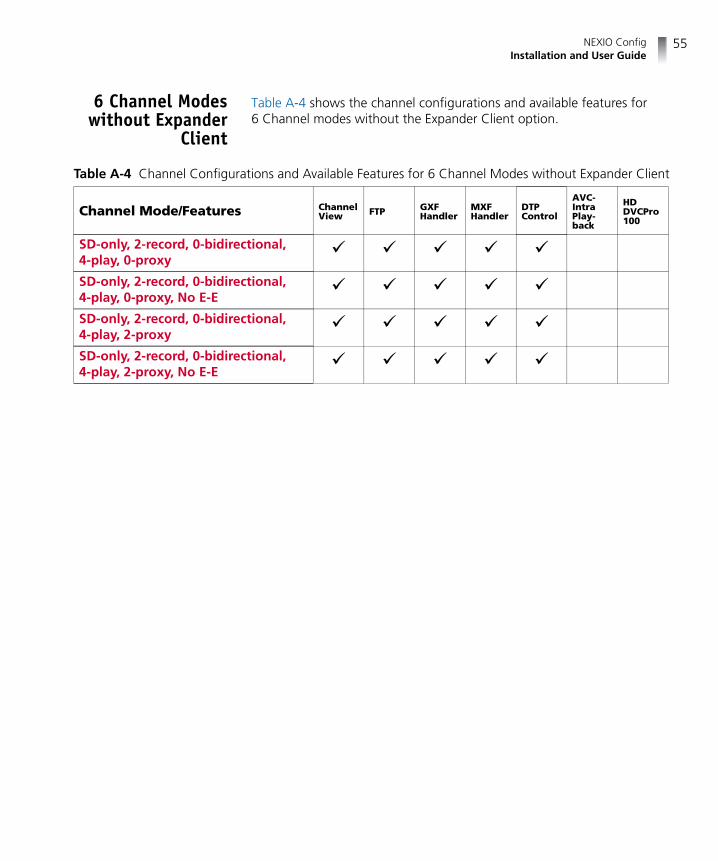
6 Channel Modes without Expander
Client
Table A-4 shows the channel configurations and available features for 6 Channel modes without the Expander Client option.
Table A-4 Channel Configurations and Available Features for 6 Channel Modes without Expander Client
Channel Mode/Features ChannelView FTP GXF
HandlerMXF Handler
DTP Control
AVC- Intra Play- back
HD DVCPro 100
SD-only, 2-record, 0-bidirectional, 4-play, 0-proxy
SD-only, 2-record, 0-bidirectional, 4-play, 0-proxy, No E-E
SD-only, 2-record, 0-bidirectional, 4-play, 2-proxy
SD-only, 2-record, 0-bidirectional, 4-play, 2-proxy, No E-E
Appendix AChannel Configurations, Record Format Settings, and AES/EBU Color Legend
56
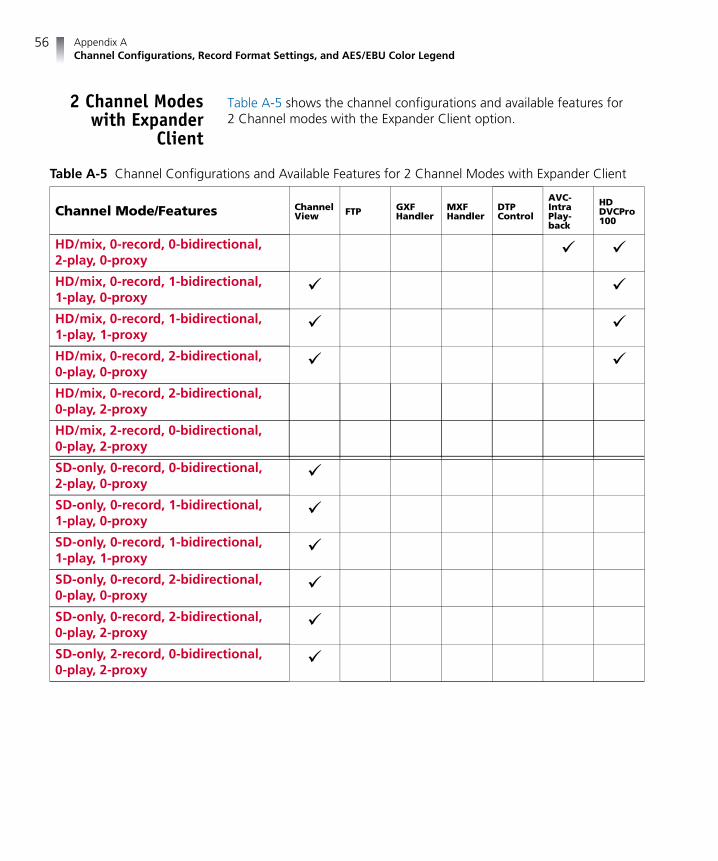
2 Channel Modes with Expander
Client
Table A-5 shows the channel configurations and available features for 2 Channel modes with the Expander Client option.
Table A-5 Channel Configurations and Available Features for 2 Channel Modes with Expander Client
Channel Mode/Features ChannelView FTP GXF
HandlerMXF Handler
DTP Control
AVC- Intra Play- back
HD DVCPro 100
HD/mix, 0-record, 0-bidirectional, 2-play, 0-proxy
HD/mix, 0-record, 1-bidirectional, 1-play, 0-proxy
HD/mix, 0-record, 1-bidirectional, 1-play, 1-proxy
HD/mix, 0-record, 2-bidirectional, 0-play, 0-proxy
HD/mix, 0-record, 2-bidirectional, 0-play, 2-proxy
HD/mix, 2-record, 0-bidirectional, 0-play, 2-proxy
SD-only, 0-record, 0-bidirectional, 2-play, 0-proxy
SD-only, 0-record, 1-bidirectional, 1-play, 0-proxy
SD-only, 0-record, 1-bidirectional, 1-play, 1-proxy
SD-only, 0-record, 2-bidirectional, 0-play, 0-proxy
SD-only, 0-record, 2-bidirectional, 0-play, 2-proxy
SD-only, 2-record, 0-bidirectional, 0-play, 2-proxy
NEXIO ConfigInstallation and User Guide
57
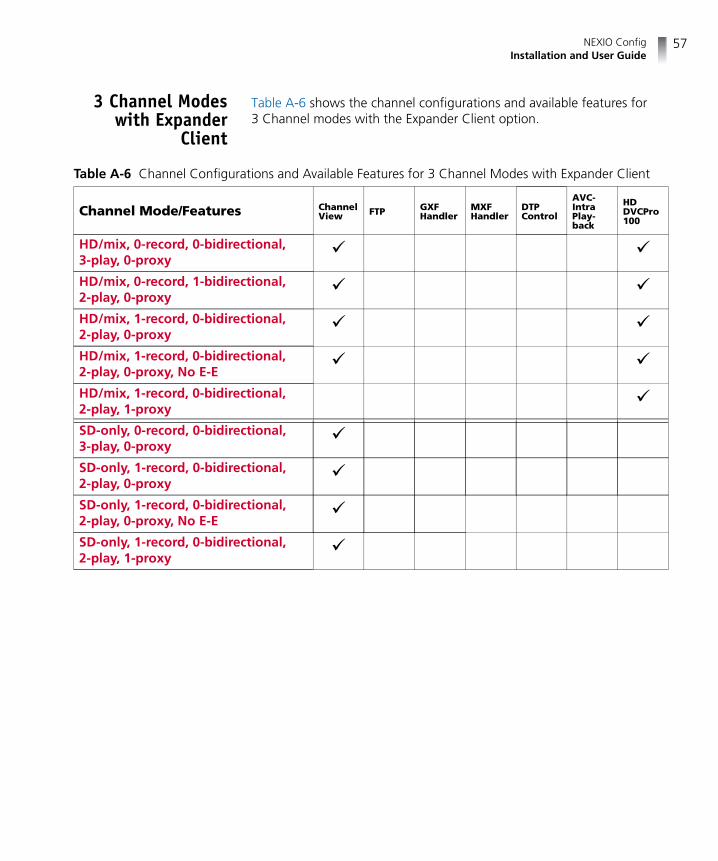
3 Channel Modes with Expander
Client
Table A-6 shows the channel configurations and available features for 3 Channel modes with the Expander Client option.
Table A-6 Channel Configurations and Available Features for 3 Channel Modes with Expander Client
Channel Mode/Features ChannelView FTP GXF
HandlerMXF Handler
DTP Control
AVC- Intra Play- back
HD DVCPro 100
HD/mix, 0-record, 0-bidirectional, 3-play, 0-proxy
HD/mix, 0-record, 1-bidirectional, 2-play, 0-proxy
HD/mix, 1-record, 0-bidirectional, 2-play, 0-proxy
HD/mix, 1-record, 0-bidirectional, 2-play, 0-proxy, No E-E
HD/mix, 1-record, 0-bidirectional, 2-play, 1-proxy
SD-only, 0-record, 0-bidirectional, 3-play, 0-proxy
SD-only, 1-record, 0-bidirectional, 2-play, 0-proxy
SD-only, 1-record, 0-bidirectional, 2-play, 0-proxy, No E-E
SD-only, 1-record, 0-bidirectional, 2-play, 1-proxy
Appendix AChannel Configurations, Record Format Settings, and AES/EBU Color Legend
58
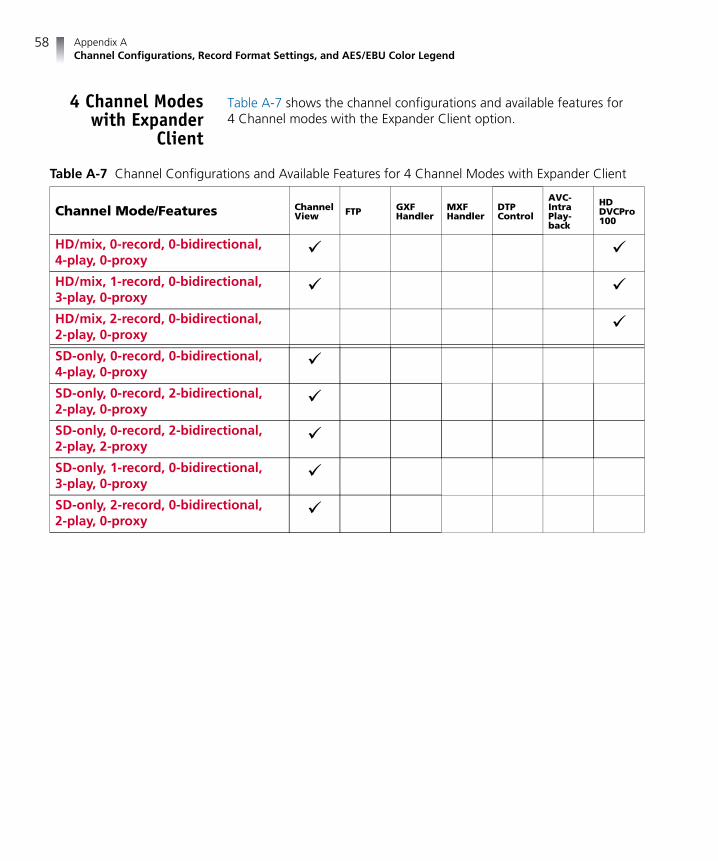
4 Channel Modes with Expander
Client
Table A-7 shows the channel configurations and available features for 4 Channel modes with the Expander Client option.
Table A-7 Channel Configurations and Available Features for 4 Channel Modes with Expander Client
Channel Mode/Features ChannelView FTP GXF
HandlerMXF Handler
DTP Control
AVC- Intra Play- back
HD DVCPro 100
HD/mix, 0-record, 0-bidirectional, 4-play, 0-proxy
HD/mix, 1-record, 0-bidirectional, 3-play, 0-proxy
HD/mix, 2-record, 0-bidirectional, 2-play, 0-proxy
SD-only, 0-record, 0-bidirectional, 4-play, 0-proxy
SD-only, 0-record, 2-bidirectional, 2-play, 0-proxy
SD-only, 0-record, 2-bidirectional, 2-play, 2-proxy
SD-only, 1-record, 0-bidirectional, 3-play, 0-proxy
SD-only, 2-record, 0-bidirectional, 2-play, 0-proxy

NEXIO ConfigInstallation and User Guide
59
6 Channel Modes with Expander
Client
Table A-8 shows the channel configurations and available features for 6 Channel modes with the Expander Client option.
Table A-8 Channel Configurations and Available Features for 6 Channel Modes with Expander Client
Channel Mode/Features ChannelView FTP GXF
HandlerMXF Handler
DTP Control
AVC- Intra Play- back
HD DVCPro 100
SD-only, 2-record, 0-bidirectional, 4-play, 0-proxy
SD-only, 2-record, 0-bidirectional, 4-play, 0-proxy, No E-E
SD-only, 2-record, 0-bidirectional, 4-play, 2-proxy
SD-only, 2-record, 0-bidirectional, 4-play, 2-proxy, No E-E
Appendix AChannel Configurations, Record Format Settings, and AES/EBU Color Legend
60
Record Format and ARC Settings
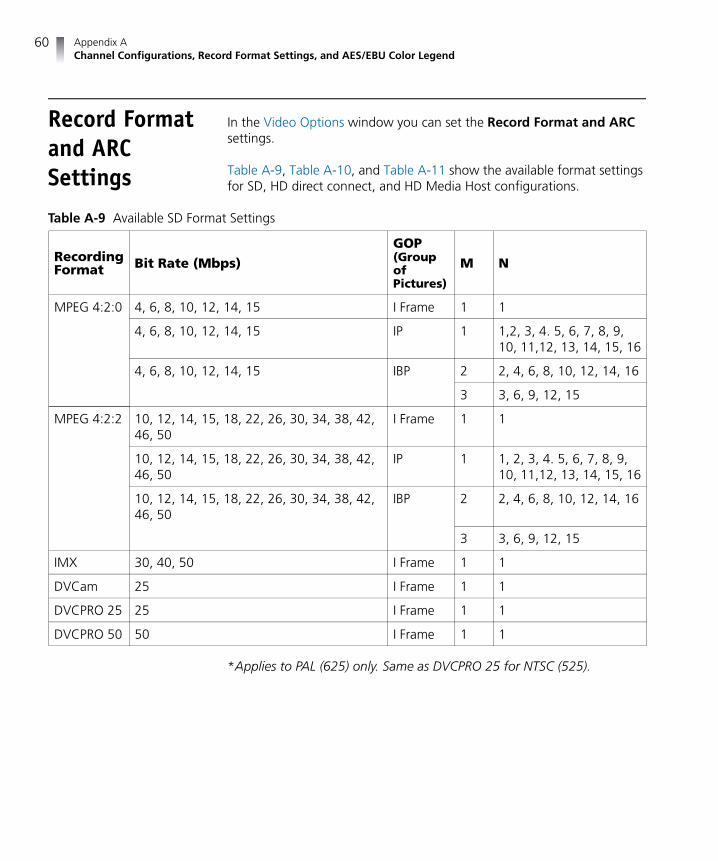
In the Video Options window you can set the Record Format and ARC settings.
Table A-9, Table A-10, and Table A-11 show the available format settings for SD, HD direct connect, and HD Media Host configurations.
Table A-9 Available SD Format Settings
Recording Format Bit Rate (Mbps)
GOP (Group of Pictures)
M N
MPEG 4:2:0 4, 6, 8, 10, 12, 14, 15 I Frame 1 1
4, 6, 8, 10, 12, 14, 15 IP 1 1,2, 3, 4. 5, 6, 7, 8, 9, 10, 11,12, 13, 14, 15, 16
4, 6, 8, 10, 12, 14, 15 IBP 2 2, 4, 6, 8, 10, 12, 14, 16
3 3, 6, 9, 12, 15
MPEG 4:2:2 10, 12, 14, 15, 18, 22, 26, 30, 34, 38, 42, 46, 50
I Frame 1 1
10, 12, 14, 15, 18, 22, 26, 30, 34, 38, 42, 46, 50
IP 1 1, 2, 3, 4. 5, 6, 7, 8, 9, 10, 11,12, 13, 14, 15, 16
10, 12, 14, 15, 18, 22, 26, 30, 34, 38, 42, 46, 50
IBP 2 2, 4, 6, 8, 10, 12, 14, 16
3 3, 6, 9, 12, 15
IMX 30, 40, 50 I Frame 1 1
DVCam 25 I Frame 1 1
DVCPRO 25 25 I Frame 1 1
DVCPRO 50 50 I Frame 1 1
*Applies to PAL (625) only. Same as DVCPRO 25 for NTSC (525).
NEXIO ConfigInstallation and User Guide
61
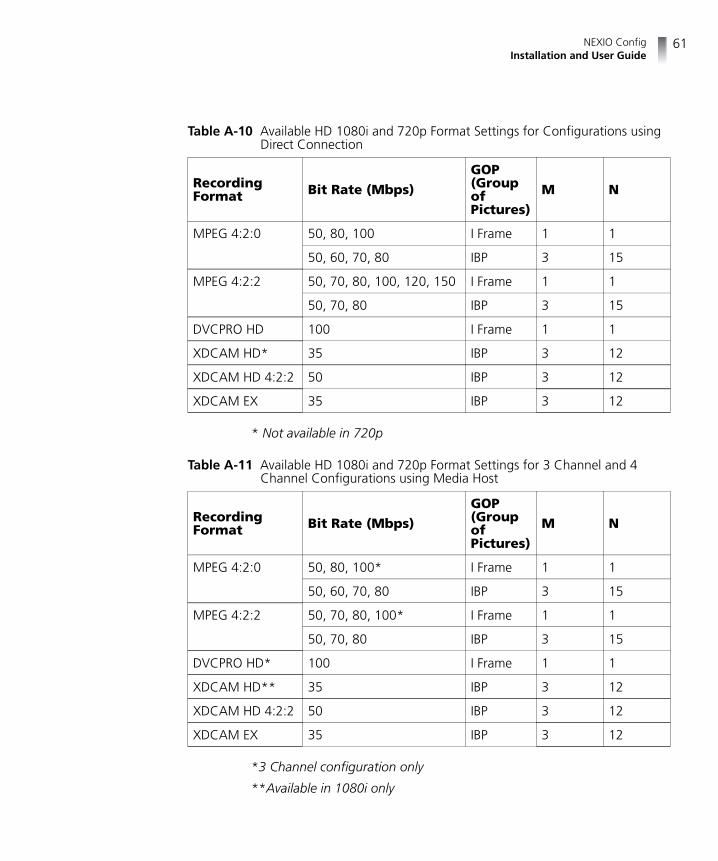
Table A-10 Available HD 1080i and 720p Format Settings for Configurations using Direct Connection
Recording Format Bit Rate (Mbps)
GOP (Group of Pictures)
M N
MPEG 4:2:0 50, 80, 100 I Frame 1 1
50, 60, 70, 80 IBP 3 15
MPEG 4:2:2 50, 70, 80, 100, 120, 150 I Frame 1 1
50, 70, 80 IBP 3 15
DVCPRO HD 100 I Frame 1 1
XDCAM HD* 35 IBP 3 12
XDCAM HD 4:2:2 50 IBP 3 12
XDCAM EX 35 IBP 3 12
* Not available in 720p
Table A-11 Available HD 1080i and 720p Format Settings for 3 Channel and 4 Channel Configurations using Media Host
Recording Format Bit Rate (Mbps)
GOP (Group of Pictures)
M N
MPEG 4:2:0 50, 80, 100* I Frame 1 1
50, 60, 70, 80 IBP 3 15
MPEG 4:2:2 50, 70, 80, 100* I Frame 1 1
50, 70, 80 IBP 3 15
DVCPRO HD* 100 I Frame 1 1
XDCAM HD** 35 IBP 3 12
XDCAM HD 4:2:2 50 IBP 3 12
XDCAM EX 35 IBP 3 12
*3 Channel configuration only
**Available in 1080i only

Appendix AChannel Configurations, Record Format Settings, and AES/EBU Color Legend
62
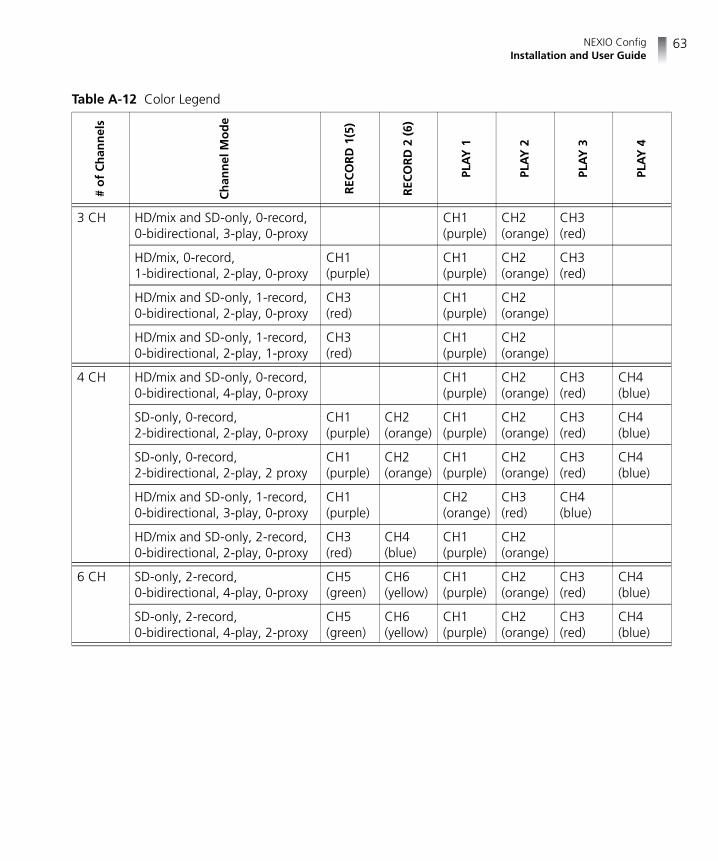
AES/EBU Audio Color Legend
In the Audio Options window you can select the Audio Input Type. When the Audio Input Type is AES/EBU, the color of each video port in the System Master window is related to the corresponding audio ports in the Audio Options window (see Figure 2-12 on page 35).
Table A-12 shows the color legend for each channel mode. Notice that if the channel is bidirectional the color is the same for record and play. There are three different channel types:
record — the channel does not support playout
bidirectional — the channel can either play or record at any time
play — the channel does not support recording
Table A-12 Color Legend
# o
f C
han
nel
s
Ch
ann
el M
od
e
REC
OR
D 1
(5)
REC
OR
D 2
(6)
PLA
Y 1
PLA
Y 2
PLA
Y 3
PLA
Y 4
2 CH HD/mix and SD-only, 0-record, 0-bidirectional, 2-play, 0-proxy
CH1 (purple)
CH2 (orange)
HD/mix and SD-only, 0-record, 1-bidirectional, 1- play, 0-proxy
CH1 (purple)
CH1 (purple)
CH2 (orange)
HD/mix and SD-only, 0-record, 1-bidirectional, 1-play, 1-proxy
CH1 (purple)
CH1 (purple)
CH2 (orange)
HD/mix and SD-only, 0-record, 2-bidirectional, 0-play, 0-proxy
CH1 (purple)
CH2 (orange)
CH1 (purple)
CH2 (orange)
HD/mix and SD-only, 0-record, 2-bidirectional, 0-play, 2 proxy
CH1 (purple)
CH2 (orange)
CH1 (purple)
CH2 (orange)
HD/mix and SD-only, 2-record, 0-bidirectional, 0-play, 2-proxy
CH1 (purple)
CH2 (orange)
NEXIO ConfigInstallation and User Guide
63
3 CH HD/mix and SD-only, 0-record, 0-bidirectional, 3-play, 0-proxy
CH1 (purple)
CH2 (orange)
CH3 (red)
HD/mix, 0-record, 1-bidirectional, 2-play, 0-proxy
CH1 (purple)
CH1 (purple)
CH2 (orange)
CH3 (red)
HD/mix and SD-only, 1-record, 0-bidirectional, 2-play, 0-proxy
CH3 (red)
CH1 (purple)
CH2 (orange)
HD/mix and SD-only, 1-record, 0-bidirectional, 2-play, 1-proxy
CH3 (red)
CH1 (purple)
CH2 (orange)
4 CH HD/mix and SD-only, 0-record, 0-bidirectional, 4-play, 0-proxy
CH1 (purple)
CH2 (orange)
CH3 (red)
CH4 (blue)
SD-only, 0-record, 2-bidirectional, 2-play, 0-proxy
CH1 (purple)
CH2 (orange)
CH1 (purple)
CH2 (orange)
CH3 (red)
CH4 (blue)
SD-only, 0-record, 2-bidirectional, 2-play, 2 proxy
CH1 (purple)
CH2 (orange)
CH1 (purple)
CH2 (orange)
CH3 (red)
CH4 (blue)
HD/mix and SD-only, 1-record, 0-bidirectional, 3-play, 0-proxy
CH1 (purple)
CH2 (orange)
CH3 (red)
CH4 (blue)
HD/mix and SD-only, 2-record, 0-bidirectional, 2-play, 0-proxy
CH3 (red)
CH4 (blue)
CH1 (purple)
CH2 (orange)
6 CH SD-only, 2-record, 0-bidirectional, 4-play, 0-proxy
CH5 (green)
CH6 (yellow)
CH1 (purple)
CH2 (orange)
CH3 (red)
CH4 (blue)
SD-only, 2-record, 0-bidirectional, 4-play, 2-proxy
CH5 (green)
CH6 (yellow)
CH1 (purple)
CH2 (orange)
CH3 (red)
CH4 (blue)
Table A-12 Color Legend#
of
Ch
ann
els
Ch
ann
el M
od
e
REC
OR
D 1
(5)
REC
OR
D 2
(6)
PLA
Y 1
PLA
Y 2
PLA
Y 3
PLA
Y 4

Appendix AChannel Configurations, Record Format Settings, and AES/EBU Color Legend
64
65
Index
AAES/EBU 33, 62anamorphic 30, 31ARC settings 60audio configuration 33audio input 33audio options 33, 62
Bbidirectional 62bit rate (Mbps) 32
Ccenter cut 31changing configuration templates 19channel configuration 29closed captioning 29configuration templates 19
changing 19discarding 19saving 19
customer support 9
Ddiscarding configuration templates 19documents
purchasing 7
Ffeature availability 24features 23finding information 2firmware information 22
GGOP 32
Hhardware information 22high-res network server (MIOH) 25
Iidentification 22inserting timecode 32installing NEXIO Config 11intended audience 1
Llegacy timecode display 32letter box 31license
SLK 18LLM domain and node settings 25low-res network server (PRXH) 25
Index66
Mmanuals
purchasing 7middle cut 30, 32MIOH 25
Nnetwork settings 26NEXIO Config windows
Audio Options 33FTP 36INSCRIBER 38IP Config 25LLM 40LLM1 42MPEG 44mxfHandler 46Node/Domain 22Other 48System Master 23Video Options 28
node information 22
Ppillar box 30, 31platform information 22play 62play format and ARC 30PRXH 25purchasing documents 7
Rrecord 62record format 60
resolution 30
Ssaving configuration templates 19server and order configuration 25server name
changing 26SLK 18software information 22software license key 18starting NEXIO Config 18support 9system features 23
Ttechnical support 9templates
changing 19discarding 19saving 19
Uuser guides
purchasing 7
VVBI 29video options 28, 60video standard 29
Wwriting conventions 2


Broadcast Communications 4393 Digital Way | Mason, OH USA 45040 | Tel: 1 (513) 459 3400
www.broadcast.harris.com
Copyright© 2009 Harris CorporationPart Number: 175-100142-00
Harris is a registered trademark of Harris Corporation. Trademarks and tradenames are the property of their respective companies.