Netra Server X3-2 Administration Guide
146
Netra Server X3-2 (formerly Sun Netra X4270 M3 Server) Administration Guide Part No.: E27129-03 August 2013
Transcript of Netra Server X3-2 Administration Guide

Netra Server X3-2(formerly Sun Netra X4270 M3 Server)
Administration Guide
Part No.: E27129-03August 2013

Copyright © 2012, 2013, Oracle and/or its affiliates. All rights reserved.This software and related documentation are provided under a license agreement containing restrictions on use and disclosure and are protected byintellectual property laws. Except as expressly permitted in your license agreement or allowed by law, you may not use, copy, reproduce, translate,broadcast, modify, license, transmit, distribute, exhibit, perform, publish, or display any part, in any form, or by any means. Reverse engineering,disassembly, or decompilation of this software, unless required by law for interoperability, is prohibited.The information contained herein is subject to change without notice and is not warranted to be error-free. If you find any errors, please report them to usin writing.If this is software or related software documentation that is delivered to the U.S. Government or anyone licensing it on behalf of the U.S. Government, thefollowing notice is applicable:U.S. GOVERNMENT RIGHTS Programs, software, databases, and related documentation and technical data delivered to U.S. Government customers are"commercial computer software" or "commercial technical data" pursuant to the applicable Federal Acquisition Regulation and agency-specificsupplemental regulations. As such, the use, duplication, disclosure, modification, and adaptation shall be subject to the restrictions and license terms setforth in the applicable Government contract, and, to the extent applicable by the terms of the Government contract, the additional rights set forth in FAR52.227-19, Commercial Computer Software License (December 2007). Oracle America, Inc., 500 Oracle Parkway, Redwood City, CA 94065.This software or hardware is developed for general use in a variety of information management applications. It is not developed or intended for use in anyinherently dangerous applications, including applications which may create a risk of personal injury. If you use this software or hardware in dangerousapplications, then you shall be responsible to take all appropriate fail-safe, backup, redundancy, and other measures to ensure its safe use. OracleCorporation and its affiliates disclaim any liability for any damages caused by use of this software or hardware in dangerous applications.Oracle and Java are registered trademarks of Oracle and/or its affiliates. Other names may be trademarks of their respective owners.Intel and Intel Xeon are trademarks or registered trademarks of Intel Corporation. All SPARC trademarks are used under license and are trademarks orregistered trademarks of SPARC International, Inc. AMD, Opteron, the AMD logo, and the AMD Opteron logo are trademarks or registered trademarks ofAdvanced Micro Devices. UNIX is a registered trademark of The Open Group.This software or hardware and documentation may provide access to or information on content, products, and services from third parties. OracleCorporation and its affiliates are not responsible for and expressly disclaim all warranties of any kind with respect to third-party content, products, andservices. Oracle Corporation and its affiliates will not be responsible for any loss, costs, or damages incurred due to your access to or use of third-partycontent, products, or services.
Copyright © 2012, 2013, Oracle et/ou ses affiliés. Tous droits réservés.Ce logiciel et la documentation qui l’accompagne sont protégés par les lois sur la propriété intellectuelle. Ils sont concédés sous licence et soumis à desrestrictions d’utilisation et de divulgation. Sauf disposition de votre contrat de licence ou de la loi, vous ne pouvez pas copier, reproduire, traduire,diffuser, modifier, breveter, transmettre, distribuer, exposer, exécuter, publier ou afficher le logiciel, même partiellement, sous quelque forme et parquelque procédé que ce soit. Par ailleurs, il est interdit de procéder à toute ingénierie inverse du logiciel, de le désassembler ou de le décompiler, excepté àdes fins d’interopérabilité avec des logiciels tiers ou tel que prescrit par la loi.Les informations fournies dans ce document sont susceptibles de modification sans préavis. Par ailleurs, Oracle Corporation ne garantit pas qu’ellessoient exemptes d’erreurs et vous invite, le cas échéant, à lui en faire part par écrit.Si ce logiciel, ou la documentation qui l’accompagne, est concédé sous licence au Gouvernement des Etats-Unis, ou à toute entité qui délivre la licence dece logiciel ou l’utilise pour le compte du Gouvernement des Etats-Unis, la notice suivante s’applique :U.S. GOVERNMENT RIGHTS. Programs, software, databases, and related documentation and technical data delivered to U.S. Government customersare "commercial computer software" or "commercial technical data" pursuant to the applicable Federal Acquisition Regulation and agency-specificsupplemental regulations. As such, the use, duplication, disclosure, modification, and adaptation shall be subject to the restrictions and license terms setforth in the applicable Government contract, and, to the extent applicable by the terms of the Government contract, the additional rights set forth in FAR52.227-19, Commercial Computer Software License (December 2007). Oracle America, Inc., 500 Oracle Parkway, Redwood City, CA 94065.Ce logiciel ou matériel a été développé pour un usage général dans le cadre d’applications de gestion des informations. Ce logiciel ou matériel n’est pasconçu ni n’est destiné à être utilisé dans des applications à risque, notamment dans des applications pouvant causer des dommages corporels. Si vousutilisez ce logiciel ou matériel dans le cadre d’applications dangereuses, il est de votre responsabilité de prendre toutes les mesures de secours, desauvegarde, de redondance et autres mesures nécessaires à son utilisation dans des conditions optimales de sécurité. Oracle Corporation et ses affiliésdéclinent toute responsabilité quant aux dommages causés par l’utilisation de ce logiciel ou matériel pour ce type d’applications.Oracle et Java sont des marques déposées d’Oracle Corporation et/ou de ses affiliés.Tout autre nom mentionné peut correspondre à des marquesappartenant à d’autres propriétaires qu’Oracle.Intel et Intel Xeon sont des marques ou des marques déposées d’Intel Corporation. Toutes les marques SPARC sont utilisées sous licence et sont desmarques ou des marques déposées de SPARC International, Inc. AMD, Opteron, le logo AMD et le logo AMD Opteron sont des marques ou des marquesdéposées d’Advanced Micro Devices. UNIX est une marque déposée d’The Open Group.Ce logiciel ou matériel et la documentation qui l’accompagne peuvent fournir des informations ou des liens donnant accès à des contenus, des produits etdes services émanant de tiers. Oracle Corporation et ses affiliés déclinent toute responsabilité ou garantie expresse quant aux contenus, produits ouservices émanant de tiers. En aucun cas, Oracle Corporation et ses affiliés ne sauraient être tenus pour responsables des pertes subies, des coûtsoccasionnés ou des dommages causés par l’accès à des contenus, produits ou services tiers, ou à leur utilisation.

Contents
Using This Documentation ix
Understanding Administration Resources 1
Common Administration Tools 1
Oracle ILOM Overview 3
BIOS Overview (Administration) 5
OSA Overview 6
HMP 7
Hardware RAID Administration Tools 8
Multiple Server Management Tools 10
Accessing Administration Tools 11
Accessing Oracle ILOM 11
▼ Log Into the Oracle ILOM Web Interface 12
▼ Access the Remote Console (Web Interface) 13
▼ Log Into the Oracle ILOM CLI (Remote) 15
▼ Log Into the Oracle ILOM CLI (Local) 16
▼ Switch Between the Oracle ILOM CLI and the Host Console 17
▼ Enable KVMS 18
▼ Log Out of Oracle ILOM 18
Accessing BIOS 19
BIOS Key Mappings 20
BIOS Setup Utility Menus 21
iii

▼ Access the BIOS Setup Utility 21
▼ Navigate BIOS Setup Utility Menus 23
▼ Exit the BIOS Setup Utility 24
Accessing OSA 25
▼ Access OSA (Oracle ILOM Web Interface) 25
▼ Access OSA (BIOS F9 Key) 26
▼ Log Out of OSA 28
▼ Access Add-On Card Configuration Utilities (BIOS) 29
Controlling the Server 31
Controlling the Power State 31
Power States 32
▼ Control the Power State 32
▼ Reset the Host 33
▼ Reset the SP 33
▼ Change Telco Alarm States Manually 34
Configuring Power-On and Boot Options 37
Configuring Power-On Policies 37
Power-On Policies 38
▼ Configure the Power-On Policy (Oracle ILOM Web Interface) 39
▼ Configure the Power-On Policy (Oracle ILOM CLI) 39
Selecting a Boot Device 40
▼ Configure the Boot Device Priority (BIOS) 41
▼ Select a Temporary Boot Device (Oracle ILOM Web Interface) 42
▼ Select a Temporary Boot Device (BIOS) 42
Configuring Oracle ILOM 45
▼ Change the Oracle ILOM Root Password (Oracle ILOM CLI) 46
▼ Recover the Oracle ILOM Root Password 46
iv Netra Server X3-2 Administration Guide • August 2013

Configuring Oracle ILOM (Oracle ILOM Web Interface) 47
▼ (Optional) Configure the Oracle ILOM Identity 48
▼ Configure the NET MGT Port 49
▼ Configure the SP SER MGT Port 51
▼ Configure the SP Date and Time 53
▼ Change the Oracle ILOM Root Password (Oracle ILOM WebInterface) 54
▼ Configure User Accounts (Oracle ILOM Web Interface) 56
Oracle ILOM User Roles 57
Configuring the SP and Oracle ILOM (BIOS) 59
▼ Configure the SP Network (BIOS) 59
▼ Configure the Date and Time (BIOS) 60
Configure the SP and Oracle ILOM (OSA) 61
▼ Configure the SP Network (OSA) 61
▼ Set the SP Clock (OSA) 63
▼ Change the Oracle ILOM Root Password (OSA) 64
▼ Configure Oracle ILOM User Accounts (OSA) 65
▼ Configure the Enhanced PCIe Cooling Mode Policy (Oracle ILOM CLI)67
Configuring BIOS 69
Resetting the BIOS to Default Settings 69
▼ Reset the BIOS to Default Settings (Oracle ILOM) 70
▼ Reset the BIOS to Default Settings (BIOS) 71
Configuring Legacy Option ROM Allocation 72
Legacy Option ROM Allocation 72
▼ Enable or Disable Option ROM Settings 73
Configuring I/O Resource Allocation 75
I/O Resource Allocation 75
▼ Enable or Disable I/O Resource Allocation 76
Contents v

Configuring Devices in BIOS 77
▼ Modify Device Configuration (UEFI Boot Mode) 77
▼ Modify Device Configuration (Legacy Boot Mode) 78
Enabling or Disabling OSA 81
▼ Disable OSA 81
▼ Enable OSA 82
Monitoring the Server 85
▼ Obtain the Server Serial Number 85
▼ Locate the Server (Oracle ILOM Web Interface) 86
Obtaining Server Information 87
▼ Display Server Information (Oracle ILOM Web Interface) 87
▼ Display Server Information (BIOS) 89
▼ Display Server Information (OSA) 89
Monitoring the Server Health (Oracle ILOM Web Interface) 91
▼ Check for Problems 92
▼ Manage Event and Audit Log Entries 93
▼ View Power Consumption 94
Understanding SNMP Traps 95
Generic Host Event Traps 95
Environmental Event Traps 96
Drive Event Traps 98
Power Event Traps 99
Fan Event Traps 100
Memory Event Traps 102
Entity Presence Event Traps 106
Physical Security Event Traps 107
Updating the Firmware and Software 109
vi Netra Server X3-2 Administration Guide • August 2013

▼ Update to a New OSA Release 110
▼ Obtain and Update Firmware (OSA) 111
▼ Restore OSA 113
Mounting the Oracle System Assistant USB Flash Drive 114
▼ Mount the Oracle System Assistant USB Flash Drive on Oracle VM3.0 114
▼ Mount the Oracle System Assistant USB Flash Drive on a LinuxOperating System 116
▼ Mount the Oracle System Assistant USB Flash Drive on an OracleSolaris 10 Operating System 117
▼ Access the Firmware and Software on the Oracle System Assistant USBFlash Drive 118
Obtaining Updated Software 119
▼ Download Software Releases (My Oracle Support) 120
Available Software Release Packages 120
Requesting Updates on Physical Media 122
▼ Request Physical Media (Online) 122
▼ Request Physical Media (By Phone) 123
Glossary 125
Index 133
Contents vii

viii Netra Server X3-2 Administration Guide • August 2013

Using This Documentation
This document explains how to administer Oracle’s Netra Server X3-2 (formerly SunNetra X4270 M3 Server) using built-in utilities such as Oracle ILOM, OSA, and BIOS.
For information on performing administrative tasks through the server’s OS, refer tothe OS documentation.
This document is written for technicians, system administrators, and authorizedservice providers.
These topics are covered:
■ “Product Notes” on page ix
■ “Related Documentation” on page x
■ “Feedback” on page x
■ “Support and Accessibility” on page x
Product NotesFor late-breaking information and known issues about this product, refer to theproduct notes at:
http://www.oracle.com/pls/topic/lookup?ctx=NetraServerX3-2
ix

x Netra Server X3-2 Administration Guide • August 2013
Related Documentation
FeedbackProvide feedback about this documentation at:
http://www.oracle.com/goto/docfeedback
Support and Accessibility
Documentation Links
All Oracle products http://www.oracle.com/documentation
Netra Server X3-2 http://www.oracle.com/pls/topic/lookup?ctx=NetraServerX3-2
Oracle Integrated LightsOut Manager (OracleILOM) 3.1 softwarelibrary
http://www.oracle.com/pls/topic/lookup?ctx=ilom31
Oracle Solaris OS andsystems software library
http://www.oracle.com/technetwork/indexes/documentation/#sys_sw
Oracle Linux http://linux.oracle.com/documentation/
Description Links
Access electronic supportthrough My Oracle Support
http://support.oracle.com
For hearing impaired:http://www.oracle.com/accessibility/support.html
Learn about Oracle’scommitment to accessibility
http://www.oracle.com/us/corporate/accessibility/index.html

Understanding AdministrationResources
Use these topics to understand the server’s administration resources:
■ “Common Administration Tools” on page 1
■ “Oracle ILOM Overview” on page 3
■ “BIOS Overview (Administration)” on page 5
■ “OSA Overview” on page 6
■ “HMP” on page 7
■ “Hardware RAID Administration Tools” on page 8
■ “Multiple Server Management Tools” on page 10
Related Information
■ “Accessing Administration Tools” on page 11
■ “Controlling the Server” on page 31
■ “Configuring Power-On and Boot Options” on page 37
■ “Configuring Oracle ILOM” on page 45
■ “Configuring BIOS” on page 69
■ “Enabling or Disabling OSA” on page 81
■ “Monitoring the Server” on page 85
■ “Updating the Firmware and Software” on page 109
Common Administration ToolsThere are many tools you can use to administer the server. Each tool has uniquecapabilities, but some of the functions overlap. You can use each tool independently,or you can use the tools together for comprehensive server administration.
1

This table lists common administrative tools that are available on the server.
Note – For administrative tasks performed through the OS, refer to thedocumentation for your OS. For a list of supported OSs and links to documentation,refer to Server OS Installation.
Related Information
■ “Oracle ILOM Overview” on page 3
■ “BIOS Overview (Administration)” on page 5
■ “OSA Overview” on page 6
■ “HMP” on page 7
Tool Description Available See:
Oracle ILOM A separate OS that is embedded inthe SP. You can use Oracle ILOM toconfigure and manage the servercomponents. Oracle ILOM enablesyou to locally or remotely connect toa dedicated port, a sideband port, ora local serial port.
As long as mainpower is applied,Oracle ILOM isalways availableeven when the hostis not powered on.
“Oracle ILOMOverview” on page 3
BIOS Firmware that controls the serverfrom power-on until an OS isbooted. BIOS provides a setuputility that enables you toadminister the server at thefirmware level.
The BIOS Setuputility is accessiblefor a short period oftime when BIOSinitializes. It is notavailable once theserver starts to bootthe OS.
“BIOS Overview(Administration)” onpage 5
OSA A setup tool that is embedded in theUSB drive inside the server. OSAenables you to locally or remotelyupdate and configure the firmware,configure hardware RAID levels 0and 1, and install supported OSs.
OSA is accessiblefor a short period oftime when BIOSinitializes. Once theOS is booted, youcan mount the OSAas a file system.
“OSA Overview” onpage 6
Oracle HMP An add-on software pack thatenables you to manage hardwarethrough the host OS either remotelyusing SNMP, or remotely using theHMP tools by connecting to the hostOS through a remote shell such asSSH, or locally using CLI tools.
Once installed,HMP is availablefrom the host OS.
“HMP” on page 7
2 Netra Server X3-2 Administration Guide • August 2013
■ “Hardware RAID Administration Tools” on page 8
■ “Multiple Server Management Tools” on page 10
Oracle ILOM OverviewOracle ILOM is system management firmware that is preinstalled on the server’s SP.Oracle ILOM enables you to manage and monitor the server, locally or remotely,independent of the power state of the server. As soon as power is applied to theserver, Oracle ILOM boots and is available even when the server is in standby.
You interact with Oracle ILOM using either a browser-based web interface or CLI.You can also configure Oracle ILOM for use in your environment through the SNMPand IPMI interfaces.
For comprehensive information about Oracle ILOM, refer to the Oracle ILOM 3.1documentation at:
http://www.oracle.com/pls/topic/lookup?ctx=ilom31
This table lists Oracle ILOM features and functionality:
Oracle ILOM Feature What You Can Do
Web interface and CLI Display server information in a simple, standardizedformat that is common across Oracle platforms.
Dedicated service processorand resources
• Manage the server without consuming systemresources.
• Manage the server using standby power even when theserver is powered off.
Simple Oracle ILOM initialconfiguration
• Oracle ILOM automatically learns the network addressof the server SP or CMM using IPv4 and IPv6 defaultsettings.
• Configure BIOS settings.
Downloadable firmwareupdates
• Download firmware updates using the browser-basedweb interface.
Understanding Administration Resources 3

Related Information
■ “Common Administration Tools” on page 1
■ “BIOS Overview (Administration)” on page 5
Remote hardware monitoring • Monitor system health and system event logs.• Monitor hardware event logs.• Monitor audit event logs.• Monitor CRUs and FRUs, including power supplies,
fans, HBAs, PCI devices, disks, CPUs, memory, andmotherboard.
• Monitor environmental temperatures (componenttemperatures).
Hardware and FRU inventoryand presence
• Identify installed CRUs and FRUs and their status.• Identify part numbers, versions, and product serial
numbers.• Identify NIC card MAC addresses.
Remote KVMS • Redirect the system serial console through serial portand LAN.
• Access KVM.• Redirect the OS graphical console to a remote client
browser.• Connect a remote CD, DVD, or floppy to the system for
remote storage.
Host power control andmonitoring
• Power the host on or off, either locally or remotely.• Force power-off for emergency shutdown or perform a
graceful shutdown to shut down the host OS beforepower-off.
• Monitor power management and power history chartsthrough the web interface.
Configuration andmanagement of user accounts
• Configure local user accounts.• Authenticate user accounts using LDAP, LDAP/SSL,
RADIUS, and Active Directory.
Error and fault management • Log events in a consistent method for service data.• Monitor hardware and server-related errors, including
ECC memory errors, reported on a dedicated userinterface page, and into SP logs, syslog, and remote loghost.
• Oracle ILOM automatically clears most fault conditionsafter you perform a service action to address the fault.
System alerts, including SNMPtraps, IPMI PETs, and alerts
• Monitor components using industry-standard SNMPcommands and the IPMItool utility.
Oracle ILOM Feature What You Can Do
4 Netra Server X3-2 Administration Guide • August 2013

■ “OSA Overview” on page 6
■ “HMP” on page 7
■ “Hardware RAID Administration Tools” on page 8
■ “Multiple Server Management Tools” on page 10
BIOS Overview (Administration)The server’s BIOS firmware controls the server from power-on until an OS is booted.
For administration, BIOS provides the BIOS Setup utility which enables you to viewserver information, and to configure, enable and disable server components.
The BIOS is based on the UEFI specification. However, the BIOS supports bootingfrom both Legacy BIOS and UEFI BIOS compatible OSs.
The server’s BIOS can be configured to operate in one of these two modes:
■ Legacy BIOS (default) – Supports all of the supported OSs, but does not offer thelatest BIOS features.
■ UEFI BIOS – Provides the latest BIOS features, but only supports these OSs:
■ Oracle Enterprise Linux
■ SUSE Linux Enterprise Server SP1
■ Red Hat Enterprise Linux
■ Microsoft Windows
Some devices do not yet support UEFI-based BIOS and can only boot from LegacyBIOS. Depending on your situation, you might need to configure the server’s BIOSfor Legacy BIOS Mode or UEFI Boot Mode.
When using OSs that support booting only from Legacy BIOS, you must use LegacyBoot Mode. When using OSs that support booting from Legacy BIOS or a UEFI BIOS,you can configure the BIOS for either mode. However, once you choose a mode, andan OS is installed, the installation can only boot using the same mode that was usedfor the installation.
Ensure that the server’s BIOS is configured for your desired mode before you installan OS. Refer to Server OS Installation for information about changing the BIOS mode.
When switching between Legacy BIOS Mode and UEFI Boot Mode (either direction),the settings for a given mode do not persist.
Understanding Administration Resources 5

You can use ueficonfig to capture and preserve the BIOS configuration if youintend to switch back to the previous BIOS mode and want to retain your previousBIOS settings. For information about ueficonfig, refer to the Oracle IntegratedLights Out Manager (ILOM) 3.1 Documentation Library athttp://www.oracle.com/pls/topic/lookup?ctx=ilom31.
The advantages to choosing a UEFI installation include the following:
■ Avoids Legacy Option ROM address constraints. For more information, see“Enable or Disable I/O Resource Allocation” on page 76.
■ Supports OS boot partitions greater than 2 TB in size.
■ PCIe device configuration utilities are integrated with BIOS Setup utility menus.
■ Bootable OS images appear in the boot list as labeled entities, for exampleWindows boot manager label versus raw device labels.
Related Information
■ “Common Administration Tools” on page 1
■ “Oracle ILOM Overview” on page 3
■ “OSA Overview” on page 6
■ “HMP” on page 7
■ “Hardware RAID Administration Tools” on page 8
■ “Multiple Server Management Tools” on page 10
OSA OverviewOSA is a single-server management tool for Oracle servers. OSA is preinstalled onthe USB drive inside the server.
OSA integrates various management products to provide a suite of tools that allowfor the quick and convenient startup and management of your server.
The components of OSA include:
■ OSA application
■ HMP (if installed. See “HMP” on page 7)
■ Oracle Linux command-line environment
■ OS software, drivers, and tools
■ Server-specific firmware
6 Netra Server X3-2 Administration Guide • August 2013

You can use OSA to obtain updates to OSA and updates to the server firmware anddrivers.
OSA provides a GUI from which you can access features and complete tasks with orwithout an OS installed on the server. Once the OS is running on the server, the OSAtools and drivers appear as files on a typical storage device, allowing you to use OSAas resource media.
OSA can help you perform these tasks:
■ Get the latest available BIOS, Oracle ILOM, firmware, and drivers from Oracle (anInternet connection is required).
■ Update BIOS, Oracle ILOM, and Oracle-certified device drivers for optionalaccessory cards and other server hardware.
■ Configure RAID 0 or RAID 1 for servers that contain a supported LSI diskcontroller.
■ Configure the SP, including modifying identification information; configurenetwork settings (IPv4 and IPv6) and DNS; add, delete, or modify users; and setthe service processor clock.
■ Install certain OSs with the latest drivers and supported tools.
■ Display server overview and hardware inventory information.
■ Set the keyboard language.
■ Access a Linux shell terminal window allowing use of the runtime environment.
■ Access HMP (using the Linux shell).
Related Information
■ “Common Administration Tools” on page 1
■ “Oracle ILOM Overview” on page 3
■ “BIOS Overview (Administration)” on page 5
■ “HMP” on page 7
■ “Hardware RAID Administration Tools” on page 8
■ “Multiple Server Management Tools” on page 10
HMPOracle HMP features two components for managing servers:
■ An SNMP monitoring agent
Understanding Administration Resources 7

■ A family of cross-OS CLI Tools
With the HMP agent SNMP Plugins, you can use SNMP to monitor Oracle serversand server modules in your data center with the advantage of not having to connectto two management points, the host and Oracle ILOM. This functionality enables youto use a single IP address (the host’s IP) to monitor multiple servers and servermodules.
HMP Agent SNMP Plugins run on the host OS of Oracle servers. The SNMP Pluginsinterface with the service processor and also with the host storage subsystem togather monitoring information. By regularly polling the service processor,information about the current state of the server is automatically fetched by theHardware Management Agent.
You use the Oracle Server CLI Tools to perform these activities:
■ Configure BIOS settings, the device boot order, and some SP settings.
■ Update Oracle ILOM and BIOS.
■ Manage SAS storage device firmware and drivers.
■ Restore, set, and view Oracle ILOM configuration settings.
■ View or create RAID volumes on storage drives that are attached to RAIDcontrollers, including storage arrays.
■ Monitor the health of the server.
For more information about obtaining and using HMP, refer to the Oracle HMPdocumentation library at: http://www.oracle.com/pls/topic/lookup?ctx=ohmp
Related Information
■ “Common Administration Tools” on page 1
■ “Oracle ILOM Overview” on page 3
■ “BIOS Overview (Administration)” on page 5
■ “OSA Overview” on page 6
■ “Hardware RAID Administration Tools” on page 8
■ “Multiple Server Management Tools” on page 10
Hardware RAID Administration ToolsDepending on the HBA installed in the server, you can configure hardware RAIDvolumes using a variety of RAID levels.
8 Netra Server X3-2 Administration Guide • August 2013

Note – If the boot drive is included in your RAID configuration, you must configureRAID before installing the OS.
Use these resources for creating and managing the RAID resources in your server:
■ OSA – You can use OSA to create RAID 0 or 1 level volumes and prepare drivesfor OS installation. Refer to Server OS Installation, configuring RAID.
■ Oracle HMP 2.2 – You can use the raidconfig commands contained in thissoftware’s Oracle Server CLI Tools component to create and manage RAIDvolumes on your server. Refer to the Oracle HMP documentation athttp://www.oracle.com/pls/topic/lookup?ctx=ohmp.
■ (SGX-SAS6-INT-Z HBA only) LSI SAS2 Integration RAID Configuration Utility– You can use the sas2ircu commands contained in the LSI SAS2 IntegratedRAID Configuration Utility to configure and manage RAID volumes on yourserver.
You can download the SAS2IRCU software from the following location:http://www.lsi.com/sep/Pages/oracle/sg_x_sas6-int-z.aspx
■ (SGX-SAS6-R-INT-Z only) LSI MegaCLI or MegaRAID Storage Manager – Youcan use the LSI MegaCLI command-line tool or the MegaRAID Storage Managergraphical interface to configure and manage RAID volumes forSGX-SAS6-R-INT-Z.
You can download the LSI MegaCLI and MegaRAID Storage Manager softwarefrom this location:http://www.lsi.com/sep/Pages/oracle/sg_x_sas6-r-int-z.aspx
Related Information
■ “Common Administration Tools” on page 1
■ “Oracle ILOM Overview” on page 3
■ “BIOS Overview (Administration)” on page 5
■ “OSA Overview” on page 6
■ “HMP” on page 7
■ “Multiple Server Management Tools” on page 10
Understanding Administration Resources 9

Multiple Server Management ToolsIf you need to perform management functions across several systems simultaneously,you might want to use Oracle Enterprise Manager Ops Center. You can order OracleEnterprise Manager Ops Center software from Oracle.
Refer to the Oracle Enterprise Manager Ops Center product information at:http://www.oracle.com/in/products/enterprise-manager/enterprise-manager-opscenter-044497-en-in.html
Related Information
■ “Common Administration Tools” on page 1
■ “Oracle ILOM Overview” on page 3
■ “BIOS Overview (Administration)” on page 5
■ “OSA Overview” on page 6
■ “HMP” on page 7
■ “Hardware RAID Administration Tools” on page 8
10 Netra Server X3-2 Administration Guide • August 2013

Accessing Administration Tools
Use these topics to access the server’s administration tools:
■ “Accessing Oracle ILOM” on page 11
■ “Accessing BIOS” on page 19
■ “Accessing OSA” on page 25
■ “Access Add-On Card Configuration Utilities (BIOS)” on page 29
Related Information
■ “Understanding Administration Resources” on page 1
■ “Controlling the Server” on page 31
■ “Configuring Power-On and Boot Options” on page 37
■ “Configuring Oracle ILOM” on page 45
■ “Configuring BIOS” on page 69
■ “Enabling or Disabling OSA” on page 81
■ “Monitoring the Server” on page 85
■ “Updating the Firmware and Software” on page 109
Accessing Oracle ILOMOracle ILOM is available when the server is in these modes:
■ Standby power mode
■ During BIOS initialization
■ While the OS is booting
■ Fully powered on and booted
For more information about power modes, see “Controlling the Power State” onpage 31.
11

Use one of these methods to access Oracle ILOM:
Related Information
■ Oracle Integrated Lights Out Manager (ILOM) 3.1 Documentation Library at:http://www.oracle.com/pls/topic/lookup?ctx=ilom31
■ “Configuring Oracle ILOM” on page 45
■ “Updating the Firmware and Software” on page 109
▼ Log Into the Oracle ILOM Web Interface1. Ensure that you have network access to the server’s SP.
See Server Installation, available connections.
2. Type the IP address of the server’s SP into a web browser’s address field.
3. Type your Oracle ILOM user name and password.
The default user name is root and the default password is changeme.
4. Click the Log In button.
The Summary page is displayed.
Description Links
Log into and out of the Oracle ILOM webinterface.
“Log Into the Oracle ILOM Web Interface” onpage 12“Log Out of Oracle ILOM” on page 18
Access the Remote Console through theOracle ILOM web interface.
“Access the Remote Console (Web Interface)”on page 13
Log into and out of the Oracle ILOM CLIthrough a network connection.
“Log Into the Oracle ILOM CLI (Remote)” onpage 15“Log Out of Oracle ILOM” on page 18
Log into and out of the Oracle ILOM CLIdirectly through a terminal deviceconnected to the SER MGT port.
“Log Into the Oracle ILOM CLI (Local)” onpage 16“Log Out of Oracle ILOM” on page 18
Switch from the Oracle ILOM CLI to thehost console and back.
“Switch Between the Oracle ILOM CLI andthe Host Console” on page 17
Use KVMS. “Enable KVMS” on page 18.
12 Netra Server X3-2 Administration Guide • August 2013

Related Information■ Oracle Integrated Lights Out Manager (ILOM) 3.1 Documentation Library at:
http://www.oracle.com/pls/topic/lookup?ctx=ilom31
■ “Access the Remote Console (Web Interface)” on page 13
■ “Log Into the Oracle ILOM CLI (Remote)” on page 15
■ “Log Into the Oracle ILOM CLI (Local)” on page 16
■ “Switch Between the Oracle ILOM CLI and the Host Console” on page 17
■ “Enable KVMS” on page 18
■ “Log Out of Oracle ILOM” on page 18
▼ Access the Remote Console (Web Interface)Use this procedure to access the Remote Console through the Oracle ILOM webinterface.
1. Log into the Oracle ILOM web interface.
See “Access the Remote Console (Web Interface)” on page 13.
Accessing Administration Tools 13

2. Navigate to the Remote Control > Redirection page.
3. Click the Launch Remote Console button.
A separate window is displayed. The information displayed in the RemoteConsole differs based on the state of the host.
■ Host is powered off – Blank screen.
■ Host is booting – BIOS initialization windows are displayed. During thisactivity, you can enter various BIOS keys to enter the BIOS Setup utility or startOSA. See “BIOS Key Mappings” on page 20.
■ Host OS is booted – A message appears prompting you to specify usercredentials for the installed OS.
Related Information■ Oracle Integrated Lights Out Manager (ILOM) 3.1 Documentation Library at:
http://www.oracle.com/pls/topic/lookup?ctx=ilom31
■ “Log Into the Oracle ILOM Web Interface” on page 12
■ “Log Into the Oracle ILOM CLI (Remote)” on page 15
■ “Log Into the Oracle ILOM CLI (Local)” on page 16
■ “Switch Between the Oracle ILOM CLI and the Host Console” on page 17
14 Netra Server X3-2 Administration Guide • August 2013

■ “Enable KVMS” on page 18
■ “Log Out of Oracle ILOM” on page 18
▼ Log Into the Oracle ILOM CLI (Remote)Use this method to log into the Oracle ILOM CLI when you are logging in over thenetwork.
1. Access a terminal device that is connected to the network for which the SP isconnected.
2. Log in to the server’s SP using an SSH session.
Use this syntax:
$ ssh username@SP_IPaddress
where username is a user account and SP_IPaddress is the IP address of the SP.
Note – In other situations, when entering an IPv6 address or Link-Local IPv6address, you must enclose the address within brackets to work correctly. However,when you specify an IPv6 address to log in to Oracle ILOM using SSH, do notenclose the IPv6 address in brackets.
The default user name is root and the default password is changeme.
The CLI prompt appears (-> is the default prompt). You are connected to the SPwhere you perform Oracle ILOM CLI commands.
For example:
% ssh [email protected]:
Oracle(R) Integrated Lights Out Manager
Version 3.1.0.18 r71592
Copyright (c) 2012, Oracle and/or its affiliates. All rightsreserved.
Warning: password is set to factory default.
->
Accessing Administration Tools 15

Related Information■ Oracle Integrated Lights Out Manager (ILOM) 3.1 Documentation Library at:
http://www.oracle.com/pls/topic/lookup?ctx=ilom31
■ “Log Into the Oracle ILOM Web Interface” on page 12
■ “Access the Remote Console (Web Interface)” on page 13
■ “Log Into the Oracle ILOM CLI (Local)” on page 16
■ “Switch Between the Oracle ILOM CLI and the Host Console” on page 17
■ “Enable KVMS” on page 18
■ “Log Out of Oracle ILOM” on page 18
▼ Log Into the Oracle ILOM CLI (Local)Use this method to log into the Oracle ILOM CLI when you are directly attached tothe SER MGT port.
1. Ensure that you have a terminal device attached to the SER MGT port.
The SER MGT port default configuration is set up for 9600 baud, 8 bit, no parity, 1stop bit.
2. Press Enter on the terminal device.
This action establishes a connection to Oracle ILOM on the SP.
3. If prompted, log into the Oracle ILOM CLI with a valid ID account andpassword.
The default Oracle ILOM account is root and the default password is changeme.
The Oracle ILOM prompt is displayed.
Related Information■ Oracle Integrated Lights Out Manager (ILOM) 3.1 Documentation Library at:
http://www.oracle.com/pls/topic/lookup?ctx=ilom31
■ “Log Into the Oracle ILOM Web Interface” on page 12
■ “Access the Remote Console (Web Interface)” on page 13
■ “Log Into the Oracle ILOM CLI (Remote)” on page 15
■ “Switch Between the Oracle ILOM CLI and the Host Console” on page 17
■ “Enable KVMS” on page 18
■ “Log Out of Oracle ILOM” on page 18
16 Netra Server X3-2 Administration Guide • August 2013

▼ Switch Between the Oracle ILOM CLI and theHost ConsoleWhen you are logged into the Oracle ILOM CLI, you can switch your connection tothe host.
Tip – If you want to connect to the Oracle ILOM CLI and access the host consolesimultaneously, start two CLI sessions. Use one of the sessions to access the hostconsole. Use the other session to access the Oracle ILOM CLI.
1. Log in to the Oracle ILOM CLI.
See “Log Into the Oracle ILOM CLI (Remote)” on page 15.
2. From Oracle ILOM, access the host.
The information displayed differs based on the state of the host:
■ Host is powering off – Serial console stopped.
■ Host is powered off – Nothing is displayed.
■ Host is booting – BIOS initialization windows are displayed. During thisactivity, you can enter various BIOS keys to enter the BIOS Setup utility or startOSA. See “BIOS Key Mappings” on page 20.
■ Host OS is booted – A message appears prompting you to specify usercredentials.
3. To switch back to Oracle ILOM, type ESC ( (the Esc key followed by ( ).
Related Information■ Oracle Integrated Lights Out Manager (ILOM) 3.1 Documentation Library at:
http://www.oracle.com/pls/topic/lookup?ctx=ilom31
■ “Log Into the Oracle ILOM Web Interface” on page 12
■ “Access the Remote Console (Web Interface)” on page 13
■ “Log Into the Oracle ILOM CLI (Remote)” on page 15
■ “Log Into the Oracle ILOM CLI (Local)” on page 16
■ “Enable KVMS” on page 18
■ “Log Out of Oracle ILOM” on page 18
-> start /HOST/consoleAre you sure you want to start /HOST/console (y/n)? y
Serial console started. To stop, type ESC (
Accessing Administration Tools 17

▼ Enable KVMSThe Oracle ILOM Remote Console, available from the web interface, provides remoteredirection for a keyboard, video, mouse, and storage.
1. Ensure that the Java Runtime Environment (1.5 or later) is installed on yourlocal server.
2. (Windows Internet Explorer) Register the 32-bit JDK file on your local serverbefore launching the Oracle ILOM Remote Console:
a. In the Windows Explorer window, click Tools > Folder Options, and thenclick the Files Types tab.
b. Select the JNLP file, browse to its location, and then click OK.
3. Set up the Oracle ILOM KVMS settings to match your desktop environment:
a. View the Remote Control > KVMS page.
b. Ensure that the video redirection stat is enabled.
c. Enable the appropriate mouse mode option (absolute or relative).
For best performance, absolute mode is typically selected for OracleSolaris-based OSs, and relative mode is selected for Linux-based OSs.
4. Click Remote Control > Redirection > Launch Remote Console.
The Oracle ILOM Remote Console starts.
Related Information■ Oracle Integrated Lights Out Manager (ILOM) 3.1 Documentation Library at:
http://www.oracle.com/pls/topic/lookup?ctx=ilom31
■ “Log Into the Oracle ILOM Web Interface” on page 12
■ “Access the Remote Console (Web Interface)” on page 13
■ “Log Into the Oracle ILOM CLI (Remote)” on page 15
■ “Log Into the Oracle ILOM CLI (Local)” on page 16
■ “Switch Between the Oracle ILOM CLI and the Host Console” on page 17
■ “Log Out of Oracle ILOM” on page 18
▼ Log Out of Oracle ILOM● Perform one of these actions:
■ Oracle ILOM CLI – Type: -> exit
18 Netra Server X3-2 Administration Guide • August 2013

■ Oracle ILOM web interface – Click the Log Out button in the upper rightcorner.
Related Information■ Oracle Integrated Lights Out Manager (ILOM) 3.1 Documentation Library at:
http://www.oracle.com/pls/topic/lookup?ctx=ilom31
■ “Log Into the Oracle ILOM Web Interface” on page 12
■ “Access the Remote Console (Web Interface)” on page 13
■ “Log Into the Oracle ILOM CLI (Remote)” on page 15
■ “Log Into the Oracle ILOM CLI (Local)” on page 16
■ “Switch Between the Oracle ILOM CLI and the Host Console” on page 17
■ “Enable KVMS” on page 18
Accessing BIOSYou can perform a variety of server administrative tasks through the configuration ofthe host BIOS.
Through BIOS, you can invoke the BIOS Setup utility that enables you to viewproduct information, configure, enable, disable, and manage server components.
The BIOS Setup utility is accessible for a short period of time when full power isapplied to the host.
Use these topics to access and navigate the BIOS Setup utility.
Related Information
■ “BIOS Overview (Administration)” on page 5
■ Server OS Installation, setting up BIOS
Description Links
Learn about the BIOS key mappings andBIOS Setup utility menus.
“BIOS Key Mappings” on page 20“BIOS Setup Utility Menus” on page 21
Access the BIOS Setup utility. “Access the BIOS Setup Utility” on page 21
Navigate the menus. “Navigate BIOS Setup Utility Menus” onpage 23
Exit from the BIOS Setup utility. “Exit the BIOS Setup Utility” on page 24
Accessing Administration Tools 19

■ “Configuring BIOS” on page 69
■ “Updating the Firmware and Software” on page 109
BIOS Key MappingsWhile the BIOS initializes, you use function keys to perform actions listed in thistable.
If you are using a terminal device that does not support function keys, instead usethe equivalent control key sequence.
Note – When using the Oracle ILOM Remote Console, F10 is trapped by the localOS. You must use the F10 option listed in the Keyboard menu that is available at thetop of the Remote Console application.
Related Information
■ “BIOS Setup Utility Menus” on page 21
■ “Access the BIOS Setup Utility” on page 21
■ “Navigate BIOS Setup Utility Menus” on page 23
■ “Exit the BIOS Setup Utility” on page 24
FunctionKey
Control KeySequence BIOS POST Function BIOS Setup Utility Function
F1 Ctrl+Q Not applicable. Activate the Setup Utility Helpmenu.
F2 Ctrl+E Enter BIOS Setup utility whilethe BIOS is performing thepower-on self-test (POST).
Not applicable.
F7 Ctrl+D Not applicable. Discard changes.
F8 Ctrl+P Activate the BIOS Boot menu. Not applicable.
F9 Ctrl+O Starts the OS. BIOS boots toOSA, bypassing the currentBoot Priority List for thisone-time boot method.
Activate Load Optimal Valuesmenu.
F10 Ctrl+S Not applicable. Activate Save and Exit menu.
F12 Ctrl+N Activate Network boot. Not applicable.
20 Netra Server X3-2 Administration Guide • August 2013

BIOS Setup Utility MenusThe following table provides descriptions for the top-level BIOS Setup utility menus.
To navigate the menus or options listed on a menu, use the arrow keys.
Related Information
■ “BIOS Key Mappings” on page 20
■ “Access the BIOS Setup Utility” on page 21
■ “Navigate BIOS Setup Utility Menus” on page 23
■ “Exit the BIOS Setup Utility” on page 24
▼ Access the BIOS Setup Utility
Note – During the reset or power on, pay close attention to the screen so that youcan interrupt the boot process at the correct time.
1. Access the server from one of these interfaces:
■ Log into the Oracle ILOM web interface and access the Remote Console. See“Log Into the Oracle ILOM Web Interface” on page 12 and “Access the RemoteConsole (Web Interface)” on page 13.
Menu Description
Main View and configure general product information, including time anddate, security settings, system serial number, and CPU and DIMMinformation.
Advanced View and configure information for the CPU, trusted computing, USB,and other information. Set the IP address for the server SP.
Boot Enable or disable internal OSA support, set the boot mode to LegacyBIOS or UEFI BIOS, and configure the boot device priority.
IO Manage configuration settings for I/O devices, such as I/Ovirtualization settings, and enable and disable Option ROMs.
UEFI DriverControl
Manage PCIe drivers for all configurable devices. Menu is only availablewhen operating in UEFI Boot Mode.
Save & Exit Save changes and exit, discard changes and exit, discard changes, orrestore the default BIOS settings.
Accessing Administration Tools 21

■ Log into the Oracle ILOM CLI and access the host console. See “Log Into theOracle ILOM CLI (Remote)” on page 15 and “Switch Between the Oracle ILOMCLI and the Host Console” on page 17.
■ Use a USB keyboard and VGA monitor connected directly to the server. (Amouse is not required to access the BIOS Setup utility.)
■ Use a terminal (or terminal emulator on a computer) through the SER MGTport on the back panel of the server.
2. Reset or power on the server.
See “Controlling the Power State” on page 31.
The BIOS begins to boot and run POST.
3. Press the F2 key (Ctrl+E from a serial connection) when prompted and while theBIOS is running POST.
The BIOS Setup utility Main window appears.
4. Navigate the BIOS Setup utility to perform administrative tasks.
See “BIOS Setup Utility Menus” on page 21 and “Navigate BIOS Setup UtilityMenus” on page 23.
Related Information■ “BIOS Key Mappings” on page 20
■ “BIOS Setup Utility Menus” on page 21
■ “Navigate BIOS Setup Utility Menus” on page 23
22 Netra Server X3-2 Administration Guide • August 2013

■ “Exit the BIOS Setup Utility” on page 24
▼ Navigate BIOS Setup Utility Menus1. Access the BIOS Setup utility.
See “Access the BIOS Setup Utility” on page 21.
2. Use the left and right arrow keys to select the different primary menu options.
As you select each menu option, the top-level window for that menu optionappears.
If you are using a serial device, see “BIOS Key Mappings” on page 20.
3. To select an option on a top-level window, use the up and down arrow keys tonavigate the options presented.
Only options that can be modified are highlighted when you press the up anddown arrow keys.
■ As you select the option, user instructions for modifying the option appear inthe right column of the window.
■ If a field is a link to a subwindow, a description of the submenu contentappears in the right column.
4. Modify the setup field by pressing the + or - keys (plus or minus keys) or bypressing Enter and selecting the desired option from the pop-up menus.
5. Press the Esc key to return from a submenu to the previous menu window.
Pressing Esc from a top-level menu is equivalent to selecting the Discard Changesand Exit option from the Save & Exit menu.
6. Modify parameters as needed.
7. Exit the BIOS Setup utility.
See “Exit the BIOS Setup Utility” on page 24.
Note – After modifying any BIOS settings and selecting Save Changes and Resetfrom the Save & Exit menu, the subsequent reboot might take longer than a typicalreboot where no settings were modified. The additional delay is required to ensurethat changes to the BIOS settings are synchronized with Oracle ILOM.
Related Information■ “BIOS Key Mappings” on page 20
■ “BIOS Setup Utility Menus” on page 21
Accessing Administration Tools 23

■ “Access the BIOS Setup Utility” on page 21
■ “Exit the BIOS Setup Utility” on page 24
▼ Exit the BIOS Setup Utility● Perform one of these actions:
■ Press F10 to save your changes and exit the BIOS Setup utility.
■ Perform these steps:
Note – When using the Oracle ILOM Remote Console, F10 is trapped by the localOS. You must use the F10 option listed in the Keyboard menu that is available at thetop of the Remote Console application.
a. Use the left and right arrow keys to navigate to the top-level Save & Exitmenu.
b. Use the up and down arrow keys to select the desired action.
c. Press the Enter key to select the option.
A confirmation dialog box appears.
d. In the confirmation dialog box, select OK to proceed and exit the BIOS Setuputility, or select Cancel stop the exit process.
24 Netra Server X3-2 Administration Guide • August 2013

Related Information■ “BIOS Key Mappings” on page 20
■ “BIOS Setup Utility Menus” on page 21
■ “Access the BIOS Setup Utility” on page 21
■ “Navigate BIOS Setup Utility Menus” on page 23
Accessing OSAYou access OSA for a short period of time when the BIOS boots and runs POST.
For an overview of OSA see “OSA Overview” on page 6.
Use one of these methods to access OSA:
■ “Access OSA (BIOS F9 Key)” on page 26
■ “Access OSA (Oracle ILOM Web Interface)” on page 25
Related Information
■ “OSA Overview” on page 6
■ “Enabling or Disabling OSA” on page 81
■ “Updating the Firmware and Software” on page 109
▼ Access OSA (Oracle ILOM Web Interface)1. Log into the Oracle ILOM web interface.
See “Log Into the Oracle ILOM Web Interface” on page 12.
2. Ensure that the host is powered off.
See “Controlling the Power State” on page 31.
Note – The host power state is displayed on the System Information Summary page.
Accessing Administration Tools 25

3. From the Oracle ILOM web interface, click Summary > Launch Oracle SystemAssistant.
Oracle ILOM starts a redirected Remote Console. BIOS initializes, and after a fewminutes, the OSA System Information window is displayed in the RemoteConsole.
4. Perform your administrative tasks using OSA.
5. Log out of OSA.
See “Log Out of OSA” on page 28.
Related Information■ “Access OSA (BIOS F9 Key)” on page 26
■ “Log Out of OSA” on page 28
▼ Access OSA (BIOS F9 Key)Use this procedure to access OSA using the F9 function key (Ctrl-O) while BIOSinitializes.
26 Netra Server X3-2 Administration Guide • August 2013

Note – During reset or power on, pay close attention to the screen so that you caninterrupt the boot process at the correct time.
1. Access the server from one of these interfaces:
■ Log into the Oracle ILOM web interface and access the Remote Console. See“Log Into the Oracle ILOM Web Interface” on page 12 and “Access the RemoteConsole (Web Interface)” on page 13.
■ Log into the Oracle ILOM CLI and access the host console. See “Log Into theOracle ILOM CLI (Remote)” on page 15 and “Switch Between the Oracle ILOMCLI and the Host Console” on page 17.
■ Use a USB keyboard and VGA monitor connected directly to the server. (Amouse is not required to access the BIOS Setup utility.)
■ Use a terminal (or terminal emulator on a computer) through the SER MGTport on the back panel of the server.
2. Reset or power on the server.
See “Controlling the Power State” on page 31.
The BIOS begins to boot and run POST.
3. When prompted, press the F9 key (or Ctrl-O).
After a few minutes, the OSA System Information window is displayed in theconsole.
Accessing Administration Tools 27

4. Perform administrative tasks using OSA.
5. Log out of OSA.
See “Log Out of OSA” on page 28.
Related Information■ “Access OSA (Oracle ILOM Web Interface)” on page 25
■ “Log Out of OSA” on page 28
▼ Log Out of OSA1. Click the Exit button.
2. Chose one of these actions:
■ Cancel – Cancel the exit process.
■ Shut Down – Exit OSA and do not boot the host.
■ Reboot – Exit OSA and do not boot the host.
28 Netra Server X3-2 Administration Guide • August 2013

Related Information■ “Access OSA (Oracle ILOM Web Interface)” on page 25
■ “Access OSA (BIOS F9 Key)” on page 26
▼ Access Add-On Card ConfigurationUtilities (BIOS)Use this procedure if you need to access add-on card configuration utilities. Thisprocedure only applies to servers configured to use UEFI BIOS mode. For moreinformation about BIOS modes, refer to Server OS Installation, setting up BIOS.
Note – In Legacy BIOS mode, I/O adapter utilities are invoked during BIOS POSTprogression using hot keys identified by the adapter’s Option ROM during POST.When the hot key is pressed, the adapter’s specific configuration utility interface ispresented. The interface has a vendor-specific design.
1. Access the BIOS Setup utility menus.
See “Access the BIOS Setup Utility” on page 21.
2. In the BIOS Setup utility, use the arrow keys to navigate to the UEFI DriverControl Menu.
A list of all controllable devices is displayed.
Note – The UEFI Driver Control menu is displayed only when UEFI Boot mode isselected.
3. Select a device.
4. Select one or more of these options:
■ View controller properties
■ Change controller properties
■ Save controller events
5. Press F10 to save the changes and exit the BIOS Setup utility.
Related Information■ “Accessing BIOS” on page 19
Accessing Administration Tools 29

■ “BIOS Overview (Administration)” on page 5
■ “Configuring BIOS” on page 69
30 Netra Server X3-2 Administration Guide • August 2013

Controlling the Server
Use these topics to control the power state and Telco alarms:
■ “Controlling the Power State” on page 31
■ “Change Telco Alarm States Manually” on page 34
Related Information
■ “Understanding Administration Resources” on page 1
■ “Accessing Administration Tools” on page 11
■ “Configuring Power-On and Boot Options” on page 37
■ “Configuring Oracle ILOM” on page 45
■ “Configuring BIOS” on page 69
■ “Enabling or Disabling OSA” on page 81
■ “Monitoring the Server” on page 85
■ “Updating the Firmware and Software” on page 109
Controlling the Power State
Note – You can configure the power state that the server enters when power isapplied. See “Configuring Power-On and Boot Options” on page 37.
Use these topics to understand and control the power state:
Description Links
Learn about the different power states. “Power States” on page 32
Change the power state. “Control the Power State” on page 32
31

Related Information
■ “Configuring Power-On and Boot Options” on page 37
Power StatesThe server can be in one of these states:
■ No power applied – No power is applied to the server. For example, when thepower cords are not connected, or the main breaker is off.
■ Standby – Power is applied to the server and the SP is running, but main power isnot applied to the host. You can access Oracle ILOM running on the SP.
■ Fully powered on – The host is powered on. During the BIOS booting stage youcan access Oracle ILOM, OSA, and the BIOS Setup utility. Once the server bootsthe OS, you can access Oracle ILOM and the OSs running on the host.
Related Information
■ “Control the Power State” on page 32
■ “Reset the Host” on page 33
■ “Reset the SP” on page 33
▼ Control the Power State● Control the power state using one of these methods:
■ From the local server – Press the Power button on the front panel of the server.
This button toggles the power state between standby and powered on.
■ From the Oracle ILOM web interface – Click Host Management > PowerControl, access the Select Action list box, and select one of the following:
■ Reset – reboots the host.
■ Immediate Power Off – Immediately turns off the power on the host,leaving the server in standby.
■ Graceful Shutdown and Power Off – Shuts down the OS gracefully thenpowers off the host, leaving the server in standby.
Reset the host. “Reset the Host” on page 33
Reset the SP. “Reset the SP” on page 33
Description Links
32 Netra Server X3-2 Administration Guide • August 2013

■ Power On – Powers on the host.
■ Power Cycle – Powers off the host, then powers on the host.
■ From the Oracle ILOM CLI:
■ start /System – After you confirm by typing y, shuts down the OSgracefully then powers off the host, leaving the server in standby.
■ stop -f /System – Immediately turns off the power to the host, leavingthe server in standby.
■ start /System – Turns on full power to the host.
■ reset /System – Resets the host, returning the server to a powered onstate.
Related Information■ “Power States” on page 32
■ “Reset the Host” on page 33
■ “Reset the SP” on page 33
▼ Reset the Host● Reset the host using one of these methods:
■ From the local server – Press the Power button on the front panel of the serverto power off the server, then press the Power button again to power on theserver.
■ From the Oracle ILOM web interface – Click Host Management > PowerControl and select Reset from the Select Action list box.
■ From the Oracle ILOM CLI – Type: reset /System
Related Information■ “Power States” on page 32
■ “Control the Power State” on page 32
■ “Reset the SP” on page 33
▼ Reset the SPIf you need to reset your SP, you can do so without affecting the host OS. However,resetting the SP disconnects your current Oracle ILOM session.
● Reset the SP using one of these methods:
Controlling the Server 33

■ From the Oracle ILOM web interface – Click ILOM Administration >Maintenance, select the Reset SP tab, and click on Reset SP.
■ From the Oracle ILOM CLI – Type: reset /SP
■ From the rear of the server – Using a stylus or similar implement, press the SPreset button. The reset button is accessible on the rear of the server through apinhole that is between the video port and the SER MGT port.
Related Information■ “Power States” on page 32
■ “Control the Power State” on page 32
■ “Reset the Host” on page 33
▼ Change Telco Alarm States ManuallyWhen an alarm is asserted, the alarm LED is turned on, and the corresponding alarmsignals are sent to the alarm port on the rear panel. When an alarm is turned off, theLED is turned off and the alarm port signal is reset. See Server Service, interpretingLEDs, for LED information.
You can manage the alarm indicators by using the Oracle ILOM CLI or web interface,or by using an IPMItool utility.
No. Description
1. Location of pinhole to access the SP reset button.
34 Netra Server X3-2 Administration Guide • August 2013

Setting an alarm indicator to On enables the corresponding alarm on the rear panelalarm port and the front panel alarm LED.
See Server Installation, alarm port, for alarm connector pinouts.
1. Log in to Oracle ILOM.
See “Log Into the Oracle ILOM CLI (Remote)” on page 15.
2. Type one of these commands.
Replace state with either on or off.
Related Information■ Oracle Integrated Lights Out Manager (ILOM) 3.1 Documentation Library at:
http://www.oracle.com/pls/topic/lookup?ctx=ilom31
■ “Accessing Oracle ILOM” on page 11
■ “Monitoring the Server” on page 85
-> set /SYS/CRITICAL_ALARM value=state-> set /SYS/ALARM/MAJOR value=state-> set /SYS/ALARm/MINOR value=state-> set /SYS/ALARM/USER value=state
Controlling the Server 35

36 Netra Server X3-2 Administration Guide • August 2013

Configuring Power-On and BootOptions
Use these topics to configure the power-on and boot options:
■ “Configuring Power-On Policies” on page 37
■ “Selecting a Boot Device” on page 40
Related Information
■ “Understanding Administration Resources” on page 1
■ “Accessing Administration Tools” on page 11
■ “Controlling the Server” on page 31
■ “Configuring Oracle ILOM” on page 45
■ “Configuring BIOS” on page 69
■ “Enabling or Disabling OSA” on page 81
■ “Monitoring the Server” on page 85
■ “Updating the Firmware and Software” on page 109
Configuring Power-On PoliciesUse these topics to configure power-on policies:
Description Links
Learn about the server’s power policysettings.
“Power-On Policies” on page 38
37

Related Information
■ “Controlling the Power State” on page 31
■ “Selecting a Boot Device” on page 40
Power-On PoliciesThe SP power-on policy determines the power state of the server when power isapplied to the server.
You can choose to enable one of these policies:
■ Auto Power-On Host On Boot – The SP automatically applies main power to thehost.
■ Set Host Power to Last Power State On Boot – When this option is enabled, theSP automatically tracks the last power state and restores the server to its lastremembered power state following a power state change of at least 10 seconds.
These policies are mutually exclusive, meaning that if one policy is enabled, the otherpolicy is disabled. If both policies are disabled, then the SP does not apply power tothe host when AC or DC power is applied to the server.
By default, these policies are disabled, which means that when power is applied, theserver does not apply power to the host, leaving the server in standby. See“Controlling the Power State” on page 31.
Related Information
■ “Configure the Power-On Policy (Oracle ILOM Web Interface)” on page 39
■ “Configure the Power-On Policy (Oracle ILOM CLI)” on page 39
Configure the power-on policy usingeither the Oracle ILOM web interface orCLI.
“Configure the Power-On Policy (OracleILOM Web Interface)” on page 39“Configure the Power-On Policy (OracleILOM CLI)” on page 39
Description Links
38 Netra Server X3-2 Administration Guide • August 2013

▼ Configure the Power-On Policy (Oracle ILOMWeb Interface)1. Log in to the Oracle ILOM web interface.
See “Log Into the Oracle ILOM Web Interface” on page 12.
2. Select System Management > Policy.
The Policy Configuration page appears.
3. Click the radio button next to the policy you want to configure.
4. Click the Action list and select Enable or Disable.
You are prompted to confirm your selection.
5. Click OK to confirm your setting.
Related Information■ “Power-On Policies” on page 38
■ “Configure the Power-On Policy (Oracle ILOM CLI)” on page 39
▼ Configure the Power-On Policy (Oracle ILOMCLI)1. Log in to the Oracle ILOM CLI.
See “Log Into the Oracle ILOM CLI (Remote)” on page 15.
Configuring Power-On and Boot Options 39

2. Display the current policies.
For example:
3. To enable or disable a policy, type a command using the following format:
-> set /SP/policy policy_name=enabled|disabled
For example:
4. Verify the policy:
Related Information■ “Power-On Policies” on page 38
■ “Configure the Power-On Policy (Oracle ILOM Web Interface)” on page 39
Selecting a Boot DeviceUse one of these tasks to select a boot device:
■ “Configure the Boot Device Priority (BIOS)” on page 41
-> show /SP/policy
/SP/policyTargets:
Properties: ENHANCED_PCIE_COOLING_MODE = disabled HOST_AUTO_POWER_ON = disabled HOST_LAST_POWER_STATE = disabled
-> set /SP/policy HOST_AUTO_POWER_ON=enabled
-> show /SP/policy
/SP/policyTargets:
Properties: ENHANCED_PCIE_COOLING_MODE = disabled HOST_AUTO_POWER_ON = enabled HOST_LAST_POWER_STATE = disabled
40 Netra Server X3-2 Administration Guide • August 2013

■ “Select a Temporary Boot Device (Oracle ILOM Web Interface)” on page 42
■ “Select a Temporary Boot Device (BIOS)” on page 42
Related Information
■ “Configuring Power-On Policies” on page 37
■ “BIOS Overview (Administration)” on page 5
▼ Configure the Boot Device Priority (BIOS)1. Access the BIOS Setup utility.
See “Accessing BIOS” on page 19.
2. Use the right arrow key to navigate to the Boot menu.
See “Navigate BIOS Setup Utility Menus” on page 23.
3. Use the up and down arrows to configure the boot device priority.
4. Save your changes and exit from the BIOS Setup utility.
See “Exit the BIOS Setup Utility” on page 24.
Related Information■ “Select a Temporary Boot Device (Oracle ILOM Web Interface)” on page 42
Configuring Power-On and Boot Options 41

■ “Select a Temporary Boot Device (BIOS)” on page 42
▼ Select a Temporary Boot Device (Oracle ILOMWeb Interface)If you use this procedure to set a temporary boot device, this boot device assignmentis only in effect for the current server boot. The permanent boot device (specifiedthrough the BIOS Setup utility) takes effect after booting from the temporary bootdevice.
1. Access Oracle ILOM through the web interface.
See “Log Into the Oracle ILOM Web Interface” on page 12.
2. Open the Host Management > Host Control window.
3. Select the boot device from the Next Boot Device menu.
4. Click Save.
5. Go to the System Information > Summary page and click Power State Turn On.
The host boots from the selected device.
Related Information■ “Configure the Boot Device Priority (BIOS)” on page 41
■ “Select a Temporary Boot Device (BIOS)” on page 42
▼ Select a Temporary Boot Device (BIOS)If you use this procedure to set a temporary boot device, this boot device assignmentis only in effect for the current server boot. The permanent boot device (specifiedthrough the BIOS Setup utility) takes effect after booting from the temporary bootdevice.
Note – During the reset or power on, pay close attention to the screen so that youcan interrupt the boot process at the correct time.
1. Reset or power on the server.
See “Controlling the Power State” on page 31.
42 Netra Server X3-2 Administration Guide • August 2013

2. Press the F8 key (or Ctrl+P from a serial connection) when prompted while theBIOS is running the POST.
The Please Select Boot Device dialog box appears.
3. In the dialog, select the boot device option according to the OS and BIOS modeyou elected to use, then press Enter.
Use the up and down arrow keys to select the boot device.
Based on whether the server is configured to use UEFI Boot Mode or Legacy BIOSMode, the dialog only displays devices that function in that mode. For example, ifyou select the UEFI Boot Mode, only UEFI boot devices are displayed in the PleaseSelect Boot Device dialog. See “BIOS Overview (Administration)” on page 5.
4. Press F10 to save and exit the BIOS Boot menu.
The host boots from the selected device.
Related Information■ “Configure the Boot Device Priority (BIOS)” on page 41
■ “Select a Temporary Boot Device (Oracle ILOM Web Interface)” on page 42
Configuring Power-On and Boot Options 43

44 Netra Server X3-2 Administration Guide • August 2013

Configuring Oracle ILOM
You can use a variety of tools to configure the SP and Oracle ILOM. Use anycombination of these topics based on the tool you want to use:
Note – These topics cover the common Oracle ILOM configuration tasks. For morecomprehensive Oracle ILOM administration tasks, refer to the Oracle ILOM 3.1documentation. See “Related Documentation” on page x.
■ “Change the Oracle ILOM Root Password (Oracle ILOM CLI)” on page 46
■ “Recover the Oracle ILOM Root Password” on page 46
■ “Configuring Oracle ILOM (Oracle ILOM Web Interface)” on page 47
■ “Configuring the SP and Oracle ILOM (BIOS)” on page 59
■ “Configure the SP and Oracle ILOM (OSA)” on page 61
■ “Configure the Enhanced PCIe Cooling Mode Policy (Oracle ILOM CLI)” onpage 67
Related Information
■ “Understanding Administration Resources” on page 1
■ “Accessing Administration Tools” on page 11
■ “Controlling the Server” on page 31
■ “Configuring Power-On and Boot Options” on page 37
■ “Configuring BIOS” on page 69
■ “Enabling or Disabling OSA” on page 81
■ “Monitoring the Server” on page 85
■ “Updating the Firmware and Software” on page 109
45

▼ Change the Oracle ILOM RootPassword (Oracle ILOM CLI)The server ships with a root account that you use to initially log in to Oracle ILOM.This account has administrative privileges (read and write) for all Oracle ILOMfeatures, functions, and commands. The default password is changeme.
To prevent unauthorized access, change the password.
1. Log in to the Oracle ILOM CLI.
See “Log Into the Oracle ILOM CLI (Remote)” on page 15.
2. Type.
Related Information■ Oracle Integrated Lights Out Manager (ILOM) 3.1 Documentation Library at:
http://www.oracle.com/pls/topic/lookup?ctx=ilom31
■ “Accessing Oracle ILOM” on page 11
■ “Recover the Oracle ILOM Root Password” on page 46
▼ Recover the Oracle ILOM RootPassword1. Establish a local serial connection to Oracle ILOM through the SER MGT port.
See “Log Into the Oracle ILOM CLI (Local)” on page 16.
2. Log into Oracle ILOM using the default user account.
For example:
-> set /SP/users/root passwordEnter new password: ********Enter new password again: ********
login: defaultPress and release the physical presence buttonPress return when this is completed...
46 Netra Server X3-2 Administration Guide • August 2013

3. Press the Locator button on the front of the server.
This action proves that you have physical access to the server.
Note – This action is required if Oracle ILOM Physical Presence Check is enabled(the default). See “(Optional) Configure the Oracle ILOM Identity” on page 48.
4. In the terminal device, press Return.
5. Type the password for the default user account:
defaultpassword
6. Recreate the root account.
Refer to the Oracle ILOM documentation.
Related Information■ Oracle Integrated Lights Out Manager (ILOM) 3.1 Documentation Library at:
http://www.oracle.com/pls/topic/lookup?ctx=ilom31
■ “Accessing Oracle ILOM” on page 11
■ “Change the Oracle ILOM Root Password (Oracle ILOM CLI)” on page 46
Configuring Oracle ILOM (Oracle ILOMWeb Interface)Use these topics to perform common SP configuration tasks using the Oracle ILOMweb interface.
Note – For more comprehensive SP configuration information, and for performingequivalent tasks using the Oracle ILOM CLI, refer to the Oracle ILOM 3.1documentation. See “Related Documentation” on page x.
■ “(Optional) Configure the Oracle ILOM Identity” on page 48
■ “Configure the NET MGT Port” on page 49
■ “Configure the SP SER MGT Port” on page 51
■ “Configure the SP Date and Time” on page 53
Configuring Oracle ILOM 47

■ “Change the Oracle ILOM Root Password (Oracle ILOM Web Interface)” onpage 54
■ “Configure User Accounts (Oracle ILOM Web Interface)” on page 56
Related Information
■ “Configuring the SP and Oracle ILOM (BIOS)” on page 59
■ “Configure the SP and Oracle ILOM (OSA)” on page 61
▼ (Optional) Configure the Oracle ILOM IdentityUse this task to assign a unique identification to this server’s SP. This task is optionalbut enables you to easily identify the SP from other SPs in your environment.
You must have Oracle ILOM Admin (a) privileges to perform this task.
1. Access the Oracle ILOM web interface.
See “Access OSA (Oracle ILOM Web Interface)” on page 25.
2. Navigate to the ILOM Administration > Identification page.
The Identification Information page is displayed.
48 Netra Server X3-2 Administration Guide • August 2013

3. Enter the identification information in the fields.
The fields have these characteristics:
■ Hostname – The host name can contain up to 60 characters. It must begin witha letter and it must contain only alphanumeric, hyphen, and underscorecharacters.
■ System Identifier – The system identifier can contain up to 60 characters usingany standard keyboard keys except quotation marks.
■ System Contact – The system contact can consist of a text string using anystandard keyboard keys except quotation marks.
■ System Location – The system location can consist of a text string using anystandard keyboard keys except quotation marks.
■ Physical Presence Check – For security reasons, this option is enabled bydefault. When this option is enabled, you must press the Locator button on theserver to recover the Oracle ILOM password or to perform othersecurity-related actions.
4. Click Save.
5. Consider your next task:
■ “Configure the NET MGT Port” on page 49
■ “Log Out of Oracle ILOM” on page 18
Related Information■ Oracle Integrated Lights Out Manager (ILOM) 3.1 Documentation Library at:
http://www.oracle.com/pls/topic/lookup?ctx=ilom31
■ “Accessing Oracle ILOM” on page 11
■ “Configure the NET MGT Port” on page 49
■ “Configure the SP SER MGT Port” on page 51
■ “Configure the SP Date and Time” on page 53
■ “Change the Oracle ILOM Root Password (Oracle ILOM Web Interface)” onpage 54
■ “Configure User Accounts (Oracle ILOM Web Interface)” on page 56
■ “Oracle ILOM User Roles” on page 57
▼ Configure the NET MGT Port1. Access the Oracle ILOM web interface.
See “Access OSA (Oracle ILOM Web Interface)” on page 25.
Configuring Oracle ILOM 49

2. Navigate to the ILOM Administration > Connectivity page.
The Identification Information page is displayed.
3. Select the Network tab.
The Network Settings page is displayed.
4. Configure the settings to suit your network environment.
5. Click Save.
6. Consider your next task:
■ “Configure the SP SER MGT Port” on page 51
■ “Log Out of Oracle ILOM” on page 18
Related Information■ Oracle Integrated Lights Out Manager (ILOM) 3.1 Documentation Library at:
http://www.oracle.com/pls/topic/lookup?ctx=ilom31
■ “Accessing Oracle ILOM” on page 11
■ “(Optional) Configure the Oracle ILOM Identity” on page 48
■ “Configure the SP SER MGT Port” on page 51
■ “Configure the SP Date and Time” on page 53
50 Netra Server X3-2 Administration Guide • August 2013

■ “Change the Oracle ILOM Root Password (Oracle ILOM Web Interface)” onpage 54
■ “Configure User Accounts (Oracle ILOM Web Interface)” on page 56
■ “Oracle ILOM User Roles” on page 57
▼ Configure the SP SER MGT PortUse this procedure to configure the SER MGT port settings.
These are the default settings:
■ Serial port is connected to the SP
■ 9600 baud
■ No flow control
Note – The default values work for most environments. If the default values aresuitable for your environment, do not perform this procedure.
1. Access the Oracle ILOM web interface.
See “Access OSA (Oracle ILOM Web Interface)” on page 25.
2. Navigate to the ILOM Administration > Connectivity page.
The Identification Information page is displayed.
3. Select the Serial Port tab.
The Serial Port Settings page is displayed.
Configuring Oracle ILOM 51

4. Configure the port settings according to your environment.
5. Click Save.
6. Consider your next task:
■ “Configure the SP Date and Time” on page 53
■ “Log Out of Oracle ILOM” on page 18
Related Information■ Oracle Integrated Lights Out Manager (ILOM) 3.1 Documentation Library at:
http://www.oracle.com/pls/topic/lookup?ctx=ilom31
■ “Accessing Oracle ILOM” on page 11
■ “(Optional) Configure the Oracle ILOM Identity” on page 48
■ “Configure the NET MGT Port” on page 49
■ “Configure the SP Date and Time” on page 53
■ “Change the Oracle ILOM Root Password (Oracle ILOM Web Interface)” onpage 54
■ “Configure User Accounts (Oracle ILOM Web Interface)” on page 56
■ “Oracle ILOM User Roles” on page 57
52 Netra Server X3-2 Administration Guide • August 2013

▼ Configure the SP Date and Time1. Access the Oracle ILOM web interface.
See “Access OSA (Oracle ILOM Web Interface)” on page 25.
2. Navigate to the ILOM Administration > Date and Time page.
The Identification Information page is displayed.
3. Set the date and time, or configure the SP to use an NTP server.
4. Click Save.
5. Select the Timezone tab.
The Timezone Settings page is displayed.
6. Select your timezone from the drop-down list.
7. Click Save.
8. Consider your next task:
■ “Change the Oracle ILOM Root Password (Oracle ILOM Web Interface)” onpage 54
■ “Log Out of Oracle ILOM” on page 18
Configuring Oracle ILOM 53

Related Information■ Oracle Integrated Lights Out Manager (ILOM) 3.1 Documentation Library at:
http://www.oracle.com/pls/topic/lookup?ctx=ilom31
■ “Accessing Oracle ILOM” on page 11
■ “(Optional) Configure the Oracle ILOM Identity” on page 48
■ “Configure the NET MGT Port” on page 49
■ “Configure the SP SER MGT Port” on page 51
■ “Change the Oracle ILOM Root Password (Oracle ILOM Web Interface)” onpage 54
■ “Configure User Accounts (Oracle ILOM Web Interface)” on page 56
■ “Oracle ILOM User Roles” on page 57
▼ Change the Oracle ILOM Root Password (OracleILOM Web Interface)The server ships with a root account that you use to initially log in to Oracle ILOM.This account has administrative privileges (read and write) for all Oracle ILOMfeatures, functions, and commands. The default password is changeme.
To prevent unauthorized access, change the password.
1. Access the Oracle ILOM web interface.
See “Access OSA (Oracle ILOM Web Interface)” on page 25.
2. Navigate to the ILOM Administration > User Management page.
The Active Sessions page is displayed.
3. Select the User Accounts tab.
The User Account Settings page is displayed.
4. In the Users panel, select the root account.
For example:
54 Netra Server X3-2 Administration Guide • August 2013

5. Click the Edit button.
A separate window is displayed.
6. Enter a new root account password and password confirmation.
7. Click Save.
8. Consider your next task:
■ “Configure User Accounts (Oracle ILOM Web Interface)” on page 56
■ “Log Out of Oracle ILOM” on page 18
Related Information■ Oracle Integrated Lights Out Manager (ILOM) 3.1 Documentation Library at:
http://www.oracle.com/pls/topic/lookup?ctx=ilom31
■ “Accessing Oracle ILOM” on page 11
■ “(Optional) Configure the Oracle ILOM Identity” on page 48
■ “Configure the NET MGT Port” on page 49
■ “Configure the SP SER MGT Port” on page 51
■ “Configure the SP Date and Time” on page 53
■ “Configure User Accounts (Oracle ILOM Web Interface)” on page 56
■ “Oracle ILOM User Roles” on page 57
Configuring Oracle ILOM 55

▼ Configure User Accounts (Oracle ILOM WebInterface)If you need to provide controlled access to Oracle ILOM, use this procedure to createup to 10 user accounts with specific roles.
1. Access the Oracle ILOM web interface.
See “Log Into the Oracle ILOM Web Interface” on page 12.
2. Navigate to the ILOM Administration > User Management page.
The Active Sessions page is displayed.
3. Select the User Accounts tab.
The User Account Settings page is displayed.
4. In the Users panel, click the Add button.
A separate window is displayed.
5. Enter the user name, password, and password confirmation.
6. Select the appropriate roles for this user.
See “Oracle ILOM User Roles” on page 57.
56 Netra Server X3-2 Administration Guide • August 2013

7. Click Save.
The window closes and the user is added to the list of users in the Users panel.
8. Continue to your next task.
Consider these tasks:
■ Perform additional SP configuration – Refer to the Oracle ILOM 3.1documentation.
■ “Log Out of Oracle ILOM” on page 18
Related Information■ Oracle Integrated Lights Out Manager (ILOM) 3.1 Documentation Library at:
http://www.oracle.com/pls/topic/lookup?ctx=ilom31
■ “Accessing Oracle ILOM” on page 11
■ “(Optional) Configure the Oracle ILOM Identity” on page 48
■ “Configure the NET MGT Port” on page 49
■ “Configure the SP SER MGT Port” on page 51
■ “Configure the SP Date and Time” on page 53
■ “Change the Oracle ILOM Root Password (Oracle ILOM Web Interface)” onpage 54
■ “Oracle ILOM User Roles” on page 57
Oracle ILOM User Roles
TABLE: Oracle ILOM User Account Roles
RoleCLINotation Privileges
Admin a User is authorized to view and change the state of Oracle ILOM configurationvariables, with the exception of tasks that require an Admin user to also have UserManagement, Reset and Host Control, and Console roles enabled.
UserManagement
u User is authorized to create and delete user accounts, change user passwords,change roles assigned to other users, and enable or disable the physical-accessrequirement for the default user account. This role also includes authorization toset up LDAP, LDAP/SSL, RADIUS, and Active Directory.
Console c User is authorized to access the Oracle ILOM Remote Console and the SP console,and to view and change the state of the Oracle ILOM console configurationvariables.
Configuring Oracle ILOM 57

This table lists Oracle ILOM predefined users that you can assign to user accountsthat you create.
Related Information
■ Oracle Integrated Lights Out Manager (ILOM) 3.1 Documentation Library at:http://www.oracle.com/pls/topic/lookup?ctx=ilom31
■ “(Optional) Configure the Oracle ILOM Identity” on page 48
Reset and HostControl
r User is authorized to operate the server, which includes power control, reset,hot-plug, enabling and disabling components, and fault management.
Read Only o User is authorized to view the state of the Oracle ILOM configuration variables butcannot make any changes. Users assigned this role can also change the passwordand the Session Time-Out setting for their own user account.
Service s User can assist Oracle service engineers in the event that on-site service is required.
TABLE: Oracle ILOM Predefined Users Roles
Predefined User Roles Privileges Granted
Administrator The Administrator user role can simultaneously grant or revoke allprivileges provided by the following preconfigured user roles:• Admin (a)• User Management (u)• Console (c)• Reset and Host Control (r)• Read-Only (o)
Operator The Operator user role can simultaneously grant or revoke allprivileges provided by the following preconfigured user roles:• Console (c)• Reset and Host Control (r)• Read-Only (o)
Advanced Roles The Advanced Roles can simultaneously grant or revoke some or allthe privileges provided by the following pre-configured roles:• Admin (a)• User Management (u)• Console (c)• Reset and Host Control (r)• Services (r)
TABLE: Oracle ILOM User Account Roles
RoleCLINotation Privileges
58 Netra Server X3-2 Administration Guide • August 2013

■ “Configure the NET MGT Port” on page 49
■ “Configure the SP SER MGT Port” on page 51
■ “Configure the SP Date and Time” on page 53
■ “Change the Oracle ILOM Root Password (Oracle ILOM Web Interface)” onpage 54
■ “Configure User Accounts (Oracle ILOM Web Interface)” on page 56
Configuring the SP and Oracle ILOM(BIOS)These topics describe how to configure the SP and Oracle ILOM through BIOS.
■ “Configure the SP Network (BIOS)” on page 59
■ “Configure the Date and Time (BIOS)” on page 60
Related Information
■ “Configuring Oracle ILOM (Oracle ILOM Web Interface)” on page 47
■ “Configure the SP and Oracle ILOM (OSA)” on page 61
▼ Configure the SP Network (BIOS)Use this procedure to configure the network settings for the SP Ethernet port (NETMGT) using the BIOS Setup utility.
1. Access the BIOS Setup utility.
See “Access the BIOS Setup Utility” on page 21.
2. Use the arrow keys to navigate to the Advanced menu.
See “Navigate BIOS Setup Utility Menus” on page 23.
3. Select BMC Network.
The BMC Network Configuration window appears.
The BMC window provides access to the SP NET MGT port configuration.
Configuring Oracle ILOM 59

4. Change the configuration settings for IPv4 Assignment or IPv6 Assignmentaccording to your network environment.
5. Select Refresh.
The configuration settings are updated with the latest values.
6. Select Commit.
7. Press F10 to save the changes and exit the BIOS Setup utility.
Related Information■ “BIOS Overview (Administration)” on page 5
■ “Accessing BIOS” on page 19
■ “Configure the Date and Time (BIOS)” on page 60
▼ Configure the Date and Time (BIOS)1. Access the BIOS Setup utility.
See “Access the BIOS Setup Utility” on page 21.
2. Use the arrow keys to highlight System Date and press Return.
60 Netra Server X3-2 Administration Guide • August 2013

3. Use the Tab key to set the date and press Return.
4. Use the arrow keys to highlight System Time.
5. Use the Tab key to set the time and press Return.
6. Press F10 to save the changes and exit the BIOS Setup utility.
Related Information■ “BIOS Overview (Administration)” on page 5
■ “Accessing BIOS” on page 19
■ “Configure the SP Network (BIOS)” on page 59
Configure the SP and Oracle ILOM(OSA)Use these topics to perform common SP configuration tasks using OSA.
■ “Configure the SP Network (OSA)” on page 61
■ “Set the SP Clock (OSA)” on page 63
■ “Change the Oracle ILOM Root Password (OSA)” on page 64
■ “Configure Oracle ILOM User Accounts (OSA)” on page 65
Related Information
■ “Configuring Oracle ILOM (Oracle ILOM Web Interface)” on page 47
■ “Configuring the SP and Oracle ILOM (BIOS)” on page 59
▼ Configure the SP Network (OSA)Use this procedure to configure the network settings for the SP NET MGT port usingOSA.
1. Access OSA.
See “Accessing OSA” on page 25.
2. Click Configure Hardware.
3. Select the Service Processor Configuration tab.
Configuring Oracle ILOM 61

4. Select Network Configuration from the drop-down list.
The SP Network Configuration window is displayed.
5. Configure the SP network settings for your environment.
6. Click Save Settings.
7. Select DNS from the drop-down list.
The SP DNS window is displayed.
62 Netra Server X3-2 Administration Guide • August 2013

8. Configure the DNS settings for your environment.
9. Click Save Settings.
10. Continue to your next task.
Consider these tasks:
■ “Set the SP Clock (OSA)” on page 63
■ “Log Out of OSA” on page 28
Related Information■ “OSA Overview” on page 6
■ “Accessing OSA” on page 25
■ “Set the SP Clock (OSA)” on page 63
■ “Change the Oracle ILOM Root Password (OSA)” on page 64
■ “Configure Oracle ILOM User Accounts (OSA)” on page 65
▼ Set the SP Clock (OSA)Use this procedure to set the SP clock manually, or to use an NTP server.
Configuring Oracle ILOM 63

1. Access OSA.
See “Accessing OSA” on page 25.
2. Click the Configure Hardware button.
3. Select Clock Settings from the drop-down list.
4. Configure the settings.
5. Click Save Settings.
6. Continue to your next task.
Consider these tasks:
■ “Change the Oracle ILOM Root Password (OSA)” on page 64
■ “Log Out of OSA” on page 28
Related Information■ “OSA Overview” on page 6
■ “Accessing OSA” on page 25
■ “Configure the SP Network (OSA)” on page 61
■ “Change the Oracle ILOM Root Password (OSA)” on page 64
■ “Configure Oracle ILOM User Accounts (OSA)” on page 65
▼ Change the Oracle ILOM Root Password (OSA)1. Access OSA.
See “Accessing OSA” on page 25.
2. Click the Configure Hardware button.
3. Select the Service Processor Configuration tab.
4. Select User Accounts from the drop-down list.
5. In the list of users, select the root user.
6. Click the Modify User button.
The Modify User window is displayed.
7. Enter the new root password and confirm the password.
8. Click the Modify User button.
9. Continue to your next task.
Consider these tasks:
64 Netra Server X3-2 Administration Guide • August 2013

■ “Configure Oracle ILOM User Accounts (OSA)” on page 65
■ “Log Out of OSA” on page 28
Related Information■ “OSA Overview” on page 6
■ “Accessing OSA” on page 25
■ “Configure the SP Network (OSA)” on page 61
■ “Set the SP Clock (OSA)” on page 63
■ “Configure Oracle ILOM User Accounts (OSA)” on page 65
▼ Configure Oracle ILOM User Accounts (OSA)1. Access OSA.
See “Accessing OSA” on page 25.
2. Click the Configure Hardware button.
3. Click the Service Processor Configuration tab.
4. Select User Accounts from the drop-down list.
The User Account window is displayed.
5. Click the Add User button.
The Add User window is displayed.
Configuring Oracle ILOM 65

6. Click the Add User button.
7. Assign the user name, roles, and password.
See “Oracle ILOM User Roles” on page 57.
8. Click the Add User button.
9. Log out from OSA.
See “Log Out of OSA” on page 28.
Related Information■ “OSA Overview” on page 6
■ “Accessing OSA” on page 25
■ “Configure the SP Network (OSA)” on page 61
■ “Set the SP Clock (OSA)” on page 63
■ “Change the Oracle ILOM Root Password (OSA)” on page 64
66 Netra Server X3-2 Administration Guide • August 2013

▼ Configure the Enhanced PCIe CoolingMode Policy (Oracle ILOM CLI)By default, the Enhanced PCIe Cooling Mode policy is disabled. When this policy isenabled, the chassis output temperature sensor thresholds are lowered. This policysetting is provided to satisfy cooler operating temperature requirements for certainPCIe cards.
Enable this policy when it is desirable to keep the chassis cooler than required intypical environments.
1. Log in to the Oracle ILOM CLI.
See “Accessing Oracle ILOM” on page 11.
2. Display the current policies.
For example:
3. To enable or disable a policy, use this format:
-> set /SP/policy policy_name=enabled|disabled
For example:
4. Verify the policy.
-> show /SP/policy
/SP/policyTargets:
Properties: ENHANCED_PCIE_COOLING_MODE = disabled HOST_AUTO_POWER_ON = disabled HOST_LAST_POWER_STATE = disabled
-> set /SP/policy ENHANCED_PCIE_COOLING_MODE=enabled
-> show /SP/policy
/SP/policyTargets:
Properties:
Configuring Oracle ILOM 67

Related Information■ Oracle Integrated Lights Out Manager (ILOM) 3.1 Documentation Library at:
http://www.oracle.com/pls/topic/lookup?ctx=ilom31
■ “Accessing Oracle ILOM” on page 11
ENHANCED_PCIE_COOLING_MODE = enabled HOST_AUTO_POWER_ON = disabled HOST_LAST_POWER_STATE = disabled
68 Netra Server X3-2 Administration Guide • August 2013

Configuring BIOS
Use these topics to configure BIOS:
■ “Resetting the BIOS to Default Settings” on page 69
■ “Configuring Legacy Option ROM Allocation” on page 72
■ “Configuring I/O Resource Allocation” on page 75
■ “Configuring Devices in BIOS” on page 77
Related Information
■ “Understanding Administration Resources” on page 1
■ “Accessing Administration Tools” on page 11
■ “Controlling the Server” on page 31
■ “Configuring Power-On and Boot Options” on page 37
■ “Configuring Oracle ILOM” on page 45
■ “Enabling or Disabling OSA” on page 81
■ “Monitoring the Server” on page 85
■ “Updating the Firmware and Software” on page 109
Resetting the BIOS to Default SettingsIf you want to set the BIOS to default settings, use one of these procedures based onthe tool you plan to use:
■ “Reset the BIOS to Default Settings (Oracle ILOM)” on page 70
■ “Reset the BIOS to Default Settings (BIOS)” on page 71
Related Information
■ “Configuring Legacy Option ROM Allocation” on page 72
69

■ “Configuring I/O Resource Allocation” on page 75
■ “Configuring Devices in BIOS” on page 77
▼ Reset the BIOS to Default Settings (Oracle ILOM)Use this procedure to set the BIOS settings to factory default settings using theOracle ILOM web interface.
Caution – Resetting the BIOS to factory default values overwrites any custom BIOSsettings.
1. Log into the Oracle ILOM web interface.
See “Log Into the Oracle ILOM Web Interface” on page 12.
2. Access the System Management > BIOS window.
For example:
3. For Reset To Defaults, select Factory.
4. Click Save.
70 Netra Server X3-2 Administration Guide • August 2013

5. Reset the host.
See “Reset the Host” on page 33.
Related Information■ “BIOS Overview (Administration)” on page 5
■ “Accessing Oracle ILOM” on page 11
■ “Reset the Host” on page 33
■ “Reset the BIOS to Default Settings (BIOS)” on page 71
▼ Reset the BIOS to Default Settings (BIOS)Use this procedure to set the BIOS settings to factory default settings using the BIOSSetup utility.
Caution – Resetting the BIOS to factory default values overwrites any custom BIOSsettings.
1. Access the BIOS Setup utility.
See “Accessing BIOS” on page 19.
2. Press the F9 key to automatically load the factory default settings.
A message appears prompting you to continue this operation by selecting OK orto cancel the operation by selecting Cancel.
3. Confirm the changes by highlighting OK, then press Enter.
The BIOS Setup utility window appears with the cursor highlighting the firstvalue on the window.
4. To save the changes and exit the BIOS Setup utility, press the F10 key.
Related Information■ “BIOS Overview (Administration)” on page 5
■ “Accessing BIOS” on page 19
■ “Reset the Host” on page 33
■ “Reset the BIOS to Default Settings (Oracle ILOM)” on page 70
Configuring BIOS 71

Configuring Legacy Option ROMAllocationUse these topics to configure BIOS to load only necessary legacy option ROMs.Doing so minimizes server boot time and reduces the likelihood of exhausting theavailable Option ROM address space.
■ “Legacy Option ROM Allocation” on page 72
■ “Enable or Disable Option ROM Settings” on page 73
Related Information
■ “Resetting the BIOS to Default Settings” on page 69
■ “Configuring I/O Resource Allocation” on page 75
■ “Configuring Devices in BIOS” on page 77
Legacy Option ROM AllocationIn Legacy BIOS mode, PC architecture constraints are placed on legacy option ROMallocation.
Note – These constraints are not placed on UEFI option ROMs, which are oftenreferred to as UEFI drivers.
The server BIOS allocates 128 Kbytes of address space for legacy option ROMs. Thisaddress space is shared between on-board devices and PCIe add-in cards. This fixedaddress space limitation is imposed by the PC architecture and not by the BIOS itself.When BIOS completes POST, the option ROM for each device is loaded into theshared address space.
If you add PCIe cards, it is possible to exhaust the available address space. When theaddress space is exhausted, Oracle ILOM displays and logs this error message:
Option ROM Space Exhausted - Device XXX Disabled
This message means that one or more devices cannot load option ROMs.
By default, all on-board legacy options ROMs are enabled in the BIOS. However, youcan disable most of these option ROMs, unless they are required to support bootingfrom the associated device or to provide some other boot-time function.
72 Netra Server X3-2 Administration Guide • August 2013

For example, it is not necessary to load the option ROM for the on-board networkports unless you want to boot from one or more network ports. Even then, you candisable the options ROMs for the remaining ports.
To minimize server boot time and reduce the likelihood of exhausting the availableoption ROM address space, disable the option ROMs for all devices that you do notintend to boot from.
Enable option ROMs only for those devices from which you intend to boot. If optionROMs are enabled for more than one boot device, you might encounter an optionROM exhaustion condition.
If you encounter the option ROM space exhausted condition even after disabling alldevices from which you do not intend to boot, then disable additional option ROMs.Under some circumstances it might be necessary to disable option ROMs for alldevices except for the primary boot device.
Related Information
■ “BIOS Overview (Administration)” on page 5
■ “Enable or Disable Option ROM Settings” on page 73
▼ Enable or Disable Option ROM Settings1. Access the BIOS Setup utility menus.
See “Access the BIOS Setup Utility” on page 21.
2. In the BIOS Setup utility, use the arrow keys to navigate to the IO Menu.
See “Navigate BIOS Setup Utility Menus” on page 23.
Configuring BIOS 73

3. In the IO Menu, select the internal device or add-in card slot for which youwant to enable or disable the option ROM setting.
The Option ROM window for that device or add-in card slot appears.
4. Do one of the following:
74 Netra Server X3-2 Administration Guide • August 2013

■ Select Enabled to enable the Option ROM setting.
■ Select Disabled to disable the Option ROM setting.
Note – Disable the option ROMs for all devices that you do not intend to boot from.
5. Press the F10 key to save the changes and exit the BIOS Setup utility.
See “Exit the BIOS Setup Utility” on page 24.
Related Information■ “BIOS Overview (Administration)” on page 5
■ “Legacy Option ROM Allocation” on page 72
Configuring I/O Resource AllocationUse these topics to configure I/O resource allocation. If the server reports PCIresource exhaustion errors, you must configure the allocation.
■ “I/O Resource Allocation” on page 75
■ “Enable or Disable I/O Resource Allocation” on page 76
Related Information
■ “Resetting the BIOS to Default Settings” on page 69
■ “Configuring Legacy Option ROM Allocation” on page 72
■ “Configuring Devices in BIOS” on page 77
I/O Resource AllocationThe server provides 64 Kbytes of I/O address space. With the increasing number ofPCIe devices supported on the server, there is a possibility that there is not enoughI/O resources for all the devices.
It is safe, but not typically required, for you to disable I/O resource allocation for anycards that are not intended to be used as bootable devices.
Configuring BIOS 75

Through the BIOS Setup utility, you can enable or disable the I/O resource allocationfor each PCIe slot. The default for this option is enabled. When enabled, I/Oresources are allocated to the device as normal. When disabled, I/O resources are notallocated to the device.
If there are one or more Sun Quad Port Gigabit Ethernet PCIe Low Profile AdapterCards installed in the server, the BIOS might detect a condition where legacy I/Oaddress space resources are exhausted. The following is a common form of error thatmight be logged:
To eliminate the PCI resource exhaustion condition, disable I/O resource allocationfor any slot in which the Quad Gigabit Ethernet card is installed unless you intend touse that card as a bootable device.
If you intend to use that card as a bootable device and you are encountering a PCIresource exhaustion event for that specific device, then you must disable I/Oallocation for some of the other cards in the server.
Related Information
■ “BIOS Overview (Administration)” on page 5
■ “Enable or Disable I/O Resource Allocation” on page 76
▼ Enable or Disable I/O Resource AllocationUse this procedure to manage configuration settings for I/O devices, such as I/Ovirtualization settings.
1. Access the BIOS Setup utility.
See “Access the BIOS Setup Utility” on page 21.
2. In the BIOS Setup utility, use the arrow keys to navigate to the IO Menu.
3. Do one of the following:
■ Select Enabled to enable I/O resource allocation for the I/O card.
6491 Tue Dec 7 14:19:57 2010 IPMI Log minorID = a5a9 : 12/07/2010 : 14:19:57 : System Firmware Error :sensor number= 0x00 : PCI resource exhaustion : Bus 147 Device 0 Func 06490 Tue Dec 7 14:19:57 2010 IPMI Log minorID = a5a8 : 12/07/2010 : 14:19:57 : System Firmware Error :sensor number= 0x00 : PCI resource exhaustion : Bus 147 Device 0 Func 1
76 Netra Server X3-2 Administration Guide • August 2013

■ Select Disabled to disable the add-in card.
4. Press F10 to save the changes and exit the BIOS Setup utility.
See “Exit the BIOS Setup Utility” on page 24.
Related Information■ “BIOS Overview (Administration)” on page 5
■ “I/O Resource Allocation” on page 75
■ “Accessing BIOS” on page 19
Configuring Devices in BIOSThe method for interacting with configuration utilities for add-on cards and I/Oadapters differs depending on whether the BIOS is configured for Legacy BIOS Modeor UEFI Boot Mode.
Use these topics, if needed, to configure devices in BIOS:
■ “Modify Device Configuration (UEFI Boot Mode)” on page 77
■ “Modify Device Configuration (Legacy Boot Mode)” on page 78
Related Information
■ “Resetting the BIOS to Default Settings” on page 69
■ “Configuring Legacy Option ROM Allocation” on page 72
■ “Configuring I/O Resource Allocation” on page 75
▼ Modify Device Configuration (UEFI Boot Mode)You access the configuration windows for the add-on cards through the BIOS Setuputility IO menu. For example, if the Oracle Sun Storage 6Gb/s PCIe RAID HBA isinstalled in the server, its configuration utility appears as a menu selection on theBIOS UEFI Driver Control menu.
1. Access the BIOS Setup utility.
See “Accessing BIOS” on page 19.
2. Use the arrow keys to navigate to the UEFI Driver Control menu.
A list of all controllable devices is displayed.
Configuring BIOS 77

3. Select a device.
4. Select one of the presented options to perform one of these actions:
■ View controller properties
■ Change controller properties
■ Save controller events
5. Press F10 to save the changes and exit the BIOS Setup utility.
Related Information■ Server OS Installation, setting up BIOS
■ “BIOS Overview (Administration)” on page 5
■ “Accessing BIOS” on page 19
■ “Modify Device Configuration (Legacy Boot Mode)” on page 78
▼ Modify Device Configuration (Legacy BootMode)You invoke the I/O adapter utilities during BIOS POST progression using hot keysthat are identified by the adapter’s option ROM during POST. When you press thehot key, the adapter’s specific configuration utility interface is displayed.
1. Access the server from one of these interfaces:
■ Log into the Oracle ILOM web interface and access the Remote Console. See“Log Into the Oracle ILOM Web Interface” on page 12 and “Access the RemoteConsole (Web Interface)” on page 13.
■ Log into the Oracle ILOM CLI and access the host console. See “Log Into theOracle ILOM CLI (Remote)” on page 15 and “Switch Between the Oracle ILOMCLI and the Host Console” on page 17.
2. Reset or power on the server.
See “Controlling the Power State” on page 31.
The BIOS begins to boot and run POST.
3. When prompted, enter the hot key for the device you want to configure.
The device’s configuration utility is displayed.
Note – The utility’s interface is a vendor-specific design.
4. Configure the device according to the utility invoked.
78 Netra Server X3-2 Administration Guide • August 2013

Related Information■ Server OS Installation, setting up BIOS
■ “BIOS Overview (Administration)” on page 5
■ “Accessing BIOS” on page 19
■ “Modify Device Configuration (UEFI Boot Mode)” on page 77
Configuring BIOS 79

80 Netra Server X3-2 Administration Guide • August 2013

Enabling or Disabling OSA
OSA is a preinstalled provisioning tool that helps you to locally or remotelyconfigure and update server hardware, and to install supported OSs.
OSA is a useful tool in helping to set up the server, however, if the securityimplications are unacceptable, or if the tool is not needed, you can disable OSA.
For more information about security implications, refer to the Netra Server X3-2(formerly Sun Netra X4270 M3 Server) Security Guide.
Use these topics to enable or disable OSA:
■ “Disable OSA” on page 81
■ “Enable OSA” on page 82
Related Information
■ “Understanding Administration Resources” on page 1
■ “Accessing Administration Tools” on page 11
■ “Controlling the Server” on page 31
■ “Configuring Power-On and Boot Options” on page 37
■ “Configuring Oracle ILOM” on page 45
■ “Configuring BIOS” on page 69
■ “Monitoring the Server” on page 85
■ “Updating the Firmware and Software” on page 109
▼ Disable OSAYou can disable OSA, which places the USB device in an offline state. This situationprotects the device from accidental erasure and overwrite.
When OSA is disabled, it is not bootable, and the OSA tools, drivers, and files areinaccessible.
81

1. Boot and access OSA.
See “Accessing OSA” on page 25.
2. Click the Preferences task button.
3. Click the Disable Oracle System Assistant tab.
4. Click the Disable Oracle System Assistant button.
5. Log out of OSA.
See “Log Out of OSA” on page 28.
Related Information■ “Accessing OSA” on page 25
■ “Enable OSA” on page 82
▼ Enable OSA1. Access the server BIOS Setup utility.
See “Accessing BIOS” on page 19.
2. Navigate to the Boot Menu.
82 Netra Server X3-2 Administration Guide • August 2013

3. Select the OSA Configuration option.
The OSA Configuration window appears.
Enabling or Disabling OSA 83

4. Press Enter and select the option.
5. Press F10 to save your changes and exit the BIOS Setup utility.
Related Information■ “Accessing BIOS” on page 19
■ “Disable OSA” on page 81
84 Netra Server X3-2 Administration Guide • August 2013

Monitoring the Server
Use these topics to monitor the server:
■ “Obtain the Server Serial Number” on page 85
■ “Locate the Server (Oracle ILOM Web Interface)” on page 86
■ “Obtaining Server Information” on page 87
■ “Monitoring the Server Health (Oracle ILOM Web Interface)” on page 91
■ “Understanding SNMP Traps” on page 95
Related Information
■ “Understanding Administration Resources” on page 1
■ “Accessing Administration Tools” on page 11
■ “Controlling the Server” on page 31
■ “Configuring Power-On and Boot Options” on page 37
■ “Configuring Oracle ILOM” on page 45
■ “Configuring BIOS” on page 69
■ “Enabling or Disabling OSA” on page 81
■ “Updating the Firmware and Software” on page 109
▼ Obtain the Server Serial Number● Use one of these methods to obtain the server identification and serial number:
■ Use administrative tools – You can obtain the server serial number usingOracle ILOM, or the BIOS Setup utility, or through OSA. See “Obtaining ServerInformation” on page 87.
■ View the serial number on the server – The server serial number is on a labelon the front of the server in the lower left corner.
85

■ Use a barcode reader – The server serial number barcode is located on a labelin the front of the server in the lower left corner.
■ Use an RFID reader – The server has an RFID tag on the front bezel that can beread by mobile or stationary RFID readers within a 9 ft. range. The serialnumber of the RFID tag is not the same as the serial number of the server, butcan be used for asset inventory.
Related Information■ “Accessing Administration Tools” on page 11
■ “Common Administration Tools” on page 1
▼ Locate the Server (Oracle ILOM WebInterface)Use this procedure to physically locate the server by illuminating the server’sLocator LED.
1. Log into the Oracle ILOM web interface.
See “Log Into the Oracle ILOM Web Interface” on page 12
2. View the System Information > Summary page.
3. Click the Locator Indicator button in the Actions panel.
No. Description
1 System serial number
2 Beginning MAC address for the host NET ports
3 RFID tag
86 Netra Server X3-2 Administration Guide • August 2013

4. When prompted, click Yes to confirm the action.
The server’s Locator LED illuminates so that you can physically identify theserver.
5. Use one of these actions to turn off the Locator LED:
■ At the server – Press the Locator LED button.
■ From the Oracle ILOM web interface – On the Summary page, click theLocator Indicator button.
Related Information■ Server Installation, front panel components
■ “Accessing Oracle ILOM” on page 11
Obtaining Server InformationA variety of tools enable you to obtain server information such as serial numbers,network addresses, date and time, installed components, and more.
Use these topics to obtain server information according to the tool you want to use:
Note – You can also obtain server information from the OS. For details, refer to thedocumentation for your OS.
■ “Display Server Information (Oracle ILOM Web Interface)” on page 87
■ “Display Server Information (BIOS)” on page 89
■ “Display Server Information (OSA)” on page 89
Related Information
■ “Monitoring the Server Health (Oracle ILOM Web Interface)” on page 91
■ “Understanding SNMP Traps” on page 95
▼ Display Server Information (Oracle ILOM WebInterface)The Oracle ILOM web interface provides easy access to server information includingthe state, inventory, and health of components.
Monitoring the Server 87
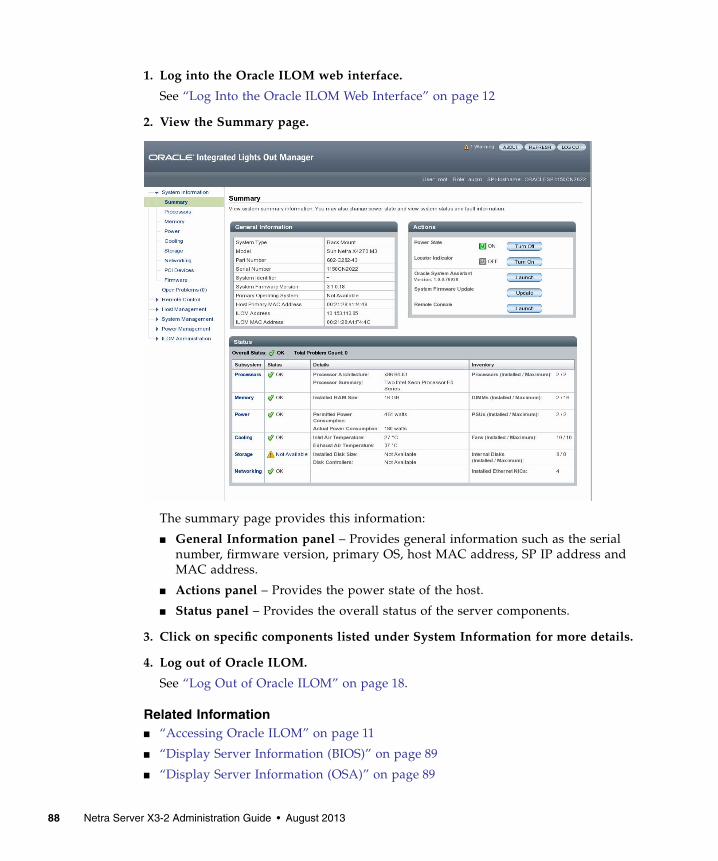
1. Log into the Oracle ILOM web interface.
See “Log Into the Oracle ILOM Web Interface” on page 12
2. View the Summary page.
The summary page provides this information:
■ General Information panel – Provides general information such as the serialnumber, firmware version, primary OS, host MAC address, SP IP address andMAC address.
■ Actions panel – Provides the power state of the host.
■ Status panel – Provides the overall status of the server components.
3. Click on specific components listed under System Information for more details.
4. Log out of Oracle ILOM.
See “Log Out of Oracle ILOM” on page 18.
Related Information■ “Accessing Oracle ILOM” on page 11
■ “Display Server Information (BIOS)” on page 89
■ “Display Server Information (OSA)” on page 89
88 Netra Server X3-2 Administration Guide • August 2013

▼ Display Server Information (BIOS)1. Access the BIOS Setup utility.
See “Accessing BIOS” on page 19.
2. In the Main window, view system information:
3. If needed, use the up and down arrows to select additional windows.
You can view additional information about these items:
■ Product
■ CPU
■ DIMMs
■ Security setting
4. Exit from the BIOS Setup utility.
See “Exit the BIOS Setup Utility” on page 24.
Related Information■ “Accessing BIOS” on page 19
■ “Display Server Information (Oracle ILOM Web Interface)” on page 87
■ “Display Server Information (OSA)” on page 89
▼ Display Server Information (OSA)OSA provides server information and system inventory.
1. Access OSA.
See “Accessing OSA” on page 25.
2. View information in the System Information > System Overview tab.
Monitoring the Server 89

3. Click the System Inventory tab then click Expand All to see the serverinventory.
90 Netra Server X3-2 Administration Guide • August 2013

4. Log out of OSA.
See “Log Out of OSA” on page 28.
Related Information■ “Accessing OSA” on page 25
■ “Display Server Information (Oracle ILOM Web Interface)” on page 87
■ “Display Server Information (BIOS)” on page 89
Monitoring the Server Health (OracleILOM Web Interface)Use these topics to monitor the server through the Oracle ILOM web interface:
Monitoring the Server 91

Note – You can also monitor the server through the Oracle ILOM CLI. For details,refer to the Oracle ILOM 3.1 documentation.
■ “Check for Problems” on page 92
■ “Manage Event and Audit Log Entries” on page 93
■ “View Power Consumption” on page 94
Related Information
■ “Obtaining Server Information” on page 87
■ “Understanding SNMP Traps” on page 95
▼ Check for ProblemsUse this procedure to check the server for potential problems. If problems are found,refer to Server Service, detecting faults for corrective actions and information onmanually clearing faults.
1. Log into the Oracle ILOM web interface.
See “Log Into the Oracle ILOM Web Interface” on page 12
2. Check the server status in the System Information > Summary page.
3. Check for any open problems by clicking on System Information > OpenProblems.
If open problems exist, details describing the problems appear in the OpenProblems table.
Note – Oracle ILOM automatically clears the messages in the Open Problems tableupon detecting the replacement or repair of a server component.
4. When applicable, click the URL link in the message to view further detailsabout the problem and for suggested corrective actions.
5. Log out of Oracle ILOM.
See “Log Out of Oracle ILOM” on page 18.
Related Information■ “Accessing Oracle ILOM” on page 11
■ “Manage Event and Audit Log Entries” on page 93
92 Netra Server X3-2 Administration Guide • August 2013

■ “View Power Consumption” on page 94
■ Server Service, detecting and managing faults
▼ Manage Event and Audit Log EntriesUse this procedure to manage these logs:
■ Event log – Tracks informational, warning, or error messages about a manageddevice such as the addition or removal of a component, or the failure of acomponent. The properties of the events recorded in the log can include theseverity of the event, the event provider (class), and the date and time the eventwas logged.
■ Audit log – Tracks all interface-related user actions such as user logins, logouts,configuration changes, and password changes. The user interfaces monitored foruser actions include the Oracle ILOM web interface, the CLI, the faultmanagement shell (captive shell), the restricted shell, and the SNMP and IPMIclient interfaces.
Note – Oracle ILOM uses UTC/GMT time zones, by default, when capturingtimestamps for log entries.
1. Log into the Oracle ILOM web interface.
See “Log Into the Oracle ILOM Web Interface” on page 12
2. View the ILOM Administration > Logs page.
The event log is displayed.
3. If needed, filter the event types shown, or control the display properties forrows and pages.
Use the controls at the top of the log table.
4. If needed, clear all log entries shown in the table.
Click Clear Log.
A confirmation dialog appears. In the confirmation dialog, click OK to clear theentries.
5. Click the Audit tab to view the audit log.
The audit log is displayed.
6. Log out of Oracle ILOM.
See “Log Out of Oracle ILOM” on page 18.
Monitoring the Server 93

Related Information■ “Accessing Oracle ILOM” on page 11
■ “Check for Problems” on page 92
■ “View Power Consumption” on page 94
■ Server Service, detecting and managing faults
▼ View Power ConsumptionUse this procedure to view the server’s current, statistical, and historical powerconsumption data. You can also view the power allocation requirements for theserver components.
1. Log into the Oracle ILOM web interface.
See “Log Into the Oracle ILOM Web Interface” on page 12
2. View the Power Management > Consumption page.
The server’s power consumption wattage value is displayed for the Actual Powerand Peak Permitted Power properties.
The consumption metric identifies the input power wattage that the server iscurrently consuming. The peak permitted power consumption metric identifiesthe maximum power wattage the server can consume.
3. View the power allocation requirements shown for the components.
4. View the Power Management > Statistics page.
The power usage statistics are displayed in 15-, 30-, and 60-second intervals.
The per-component power map provides power wattage allocations for eachserver component.
5. View the Power Management > History page.
The power history for the minimum, average, and maximum power usage isdisplayed.
6. Log out of Oracle ILOM.
See “Log Out of Oracle ILOM” on page 18.
Related Information■ “Accessing Oracle ILOM” on page 11
■ “Check for Problems” on page 92
■ “Manage Event and Audit Log Entries” on page 93
■ Server Service, detecting and managing faults
94 Netra Server X3-2 Administration Guide • August 2013

Understanding SNMP TrapsYou can configure Oracle ILOM to generate SNMP traps when hardware problemsoccur.
For information about how to configure SNMP alert rule destinations to startreceiving these traps, refer to the Oracle Integrated Lights Out Manager (ILOM) 3.1SNMP, IPMI, CIM, WS-MAN Protocol Management Reference Guide at:
http://www.oracle.com/pls/topic/lookup?ctx=ilom31
These topics list the SNMP traps that are generated for this server.
■ “Generic Host Event Traps” on page 95
■ “Environmental Event Traps” on page 96
■ “Drive Event Traps” on page 98
■ “Power Event Traps” on page 99
■ “Fan Event Traps” on page 100
■ “Memory Event Traps” on page 102
■ “Entity Presence Event Traps” on page 106
■ “Physical Security Event Traps” on page 107
Related Information
■ Oracle Integrated Lights Out Manager (ILOM) 3.1 Documentation Library at:http://www.oracle.com/pls/topic/lookup?ctx=ilom31
■ “Obtaining Server Information” on page 87
■ “Monitoring the Server Health (Oracle ILOM Web Interface)” on page 91
Generic Host Event TrapsDescription – A sensor has detected an error. This generic ’component’ trap isgenerated when the SNMP agent does not recognize the component type.
SNMP Trap MessageOracle ILOM EventMessage Severity Sensor Name
sunHwTrapComponentError Assert Major /SYS/HOST_ERR
sunHwTrapComponentError Deassert Major /SYS/HOST_ERR
Monitoring the Server 95

Related Information
■ “Environmental Event Traps” on page 96
■ “Drive Event Traps” on page 98
■ “Power Event Traps” on page 99
■ “Fan Event Traps” on page 100
■ “Memory Event Traps” on page 102
■ “Entity Presence Event Traps” on page 106
■ “Physical Security Event Traps” on page 107
Environmental Event TrapsDescription – A temperature sensor has reported that its value has gone above anupper fatal threshold setting or below a lower fatal threshold setting. ThesunHwTrapThresholdType object indicates whether the threshold was an upper orlower.
96 Netra Server X3-2 Administration Guide • August 2013

SNMP Trap Message Oracle ILOM Event Message Severity Sensor Name
sunHwTrapTempFatalThresholdExceeded
Lower fatal thresholdexceeded
Critical /SYS/PS0/T_OUT/SYS/PS1/T_OUT
/SYS/MB/T_IN_ZONE0
/SYS/MB/T_OUT_ZONE0
/SYS/MB/T_IN_ZONE1
/SYS/MB/T_OUT_ZONE1
/SYS/MB/T_IN_ZONE2
/SYS/MB/T_OUT_ZONE2
sunHwTrapTempFatalThresholdDeasserted
Lower fatal threshold nolonger exceeded
Informational /SYS/PS0/T_OUT
/SYS/PS1/T_OUT
/SYS/MB/T_IN_ZONE0
/SYS/MB/T_OUT_ZONE0
/SYS/MB/T_IN_ZONE1
/SYS/MB/T_OUT_ZONE1
/SYS/MB/T_IN_ZONE2
/SYS/MB/T_OUT_ZONE2
sunHwTrapTempFatalThresholdExceeded
Upper fatal thresholdexceeded
Critical /SYS/PS0/T_OUT
/SYS/PS1/T_OUT
/SYS/MB/T_IN_ZONE0
/SYS/MB/T_OUT_ZONE0
/SYS/MB/T_IN_ZONE1
/SYS/MB/T_OUT_ZONE1
/SYS/MB/T_IN_ZONE2
/SYS/MB/T_OUT_ZONE2
sunHwTrapTempFatalThresholdDeasserted
Upper fatal threshold nolonger exceeded
Informational /SYS/PS0/T_OUT
/SYS/PS1/T_OUT
/SYS/MB/T_IN_ZONE0
/SYS/MB/T_OUT_ZONE0
/SYS/MB/T_IN_ZONE1
/SYS/MB/T_OUT_ZONE1
/SYS/MB/T_IN_ZONE2
/SYS/MB/T_OUT_ZONE2
sunHwTrapTempFatalThresholdExceeded
Lower fatal thresholdexceeded
Critical /SYS/T_AMB
/SYS/MB/T_CORE_NET01
/SYS/MB/T_CORE_NET23
/SYS/MB/T_IN_PS0
/SYS/MB/T_IN_PS1
Monitoring the Server 97

Related Information
■ “Generic Host Event Traps” on page 95
■ “Drive Event Traps” on page 98
■ “Power Event Traps” on page 99
■ “Fan Event Traps” on page 100
■ “Memory Event Traps” on page 102
■ “Entity Presence Event Traps” on page 106
■ “Physical Security Event Traps” on page 107
Drive Event Traps
sunHwTrapTempFatalThresholdDeasserted
Lower fatal threshold nolonger exceeded
Informational /SYS/T_AMB
/SYS/MB/T_CORE_NET01
/SYS/MB/T_CORE_NET23
/SYS/MB/T_IN_PS0
/SYS/MB/T_IN_PS1
sunHwTrapTempFatalThresholdExceeded
Upper fatal thresholdexceeded
Critical /SYS/MB/T_CORE_NET01
/SYS/MB/T_CORE_NET23
/SYS/MB/T_IN_PS0
/SYS/MB/T_IN_PS1
sunHwTrapTempFatalThresholdDeasserted
Upper fatal threshold nolonger exceeded
Informational /SYS/MB/T_CORE_NET01
/SYS/MB/T_CORE_NET23
/SYS/MB/T_IN_PS0
/SYS/MB/T_IN_PS1
SNMP Trap MessageOracle ILOM EventMessage Severity and Description Sensor Name
sunHwTrapSlotOrConnectorError
Assert Major. A sensor associatedwith a slot or connector hasdetected an error.
/SYS/DBP/HDD0/STATE
/SYS/DBP/HDD1/STATE
/SYS/DBP/HDD2/STATE
/SYS/DBP/HDD3/STATE
/SYS/DBP/HDD4/STATE
/SYS/DBP/HDD5/STATE
/SYS/DBP/HDD6/STATE
/SYS/DBP/HDD7/STATE
SNMP Trap Message Oracle ILOM Event Message Severity Sensor Name
98 Netra Server X3-2 Administration Guide • August 2013

Related Information
■ “Generic Host Event Traps” on page 95
■ “Environmental Event Traps” on page 96
■ “Power Event Traps” on page 99
■ “Fan Event Traps” on page 100
■ “Memory Event Traps” on page 102
■ “Entity Presence Event Traps” on page 106
■ “Physical Security Event Traps” on page 107
Power Event TrapsDescription – A power supply sensor has detected an error.
sunHwTrapSlotOrConnectorOk
Deassert Informational. A sensorassociated with a slot orconnector has returned toits normal state.
/SYS/DBP/HDD0/STATE
/SYS/DBP/HDD1/STATE
/SYS/DBP/HDD2/STATE
/SYS/DBP/HDD3/STATE
/SYS/DBP/HDD4/STATE
/SYS/DBP/HDD5/STATE
/SYS/DBP/HDD6/STATE
/SYS/DBP/HDD7/STATE
sunHwTrapTempFatalThresholdExceeded
Upper fatalthresholdexceeded
Critical. A temperaturesensor has reported that itsvalue has gone above anupper fatal threshold settingor below a lower fatalthreshold setting.ThesunHwTrapThresholdTypeobject indicates whether thethreshold was an upper orlower.
/SYS/PS0/T_OUT
/SYS/PS1/T_OUT
/SYS/MB/T_IN_ZONE0
/SYS/MB/T_OUT_ZONE0
/SYS/MB/T_IN_ZONE1
/SYS/MB/T_OUT_ZONE1
/SYS/MB/T_IN_ZONE2
/SYS/MB/T_OUT_ZONE2
SNMP Trap MessageOracle ILOM EventMessage Severity Sensor Name
sunHwTrapPowerSupplyError Assert Major /SYS/PS0/POLL
/SYS/PS1/POLL
SNMP Trap MessageOracle ILOM EventMessage Severity and Description Sensor Name
Monitoring the Server 99

Related Information
■ “Generic Host Event Traps” on page 95
■ “Environmental Event Traps” on page 96
■ “Drive Event Traps” on page 98
■ “Fan Event Traps” on page 100
■ “Memory Event Traps” on page 102
■ “Entity Presence Event Traps” on page 106
■ “Physical Security Event Traps” on page 107
Fan Event TrapsDescription – A fan speed sensor has reported that its value has gone above an upper criticalthreshold setting or below a lower critical threshold setting. ThesunHwTrapThresholdType object indicates whether the threshold was an upper or lower.
SNMP Trap Message Oracle ILOM Event Message Severity Sensor Name
sunHwTrapFanSpeedCritThresholdExceeded
Lower Critical thresholdexceeded
Major /SYS/MB/FM0/F0/TACH
/SYS/MB/FM0/F1/TACH
/SYS/MB/FM1/F0/TACH
/SYS/MB/FM1/F1/TACH
/SYS/MB/FM2/F0/TACH
/SYS/MB/FM2/F1/TACH
/SYS/MB/FM3/F0/TACH
/SYS/MB/FM3/F1/TACH
sunHwTrapFanSpeedCritThresholdDeasserted
Lower Critical thresholdno longer exceeded
Informational /SYS/MB/FM0/F0/TACH
/SYS/MB/FM0/F1/TACH
/SYS/MB/FM1/F0/TACH
/SYS/MB/FM1/F1/TACH
/SYS/MB/FM2/F0/TACH
/SYS/MB/FM2/F1/TACH
/SYS/MB/FM3/F0/TACH
/SYS/MB/FM3/F1/TACH
100 Netra Server X3-2 Administration Guide • August 2013

Related Information
■ “Generic Host Event Traps” on page 95
■ “Environmental Event Traps” on page 96
■ “Drive Event Traps” on page 98
■ “Power Event Traps” on page 99
■ “Memory Event Traps” on page 102
■ “Entity Presence Event Traps” on page 106
■ “Physical Security Event Traps” on page 107
sunHwTrapFanSpeedFatalThresholdExceeded
Lower fatal thresholdexceeded
Critical /SYS/MB/FM0/F0/TACH
/SYS/MB/FM0/F1/TACH
/SYS/MB/FM1/F0/TACH
/SYS/MB/FM1/F1/TACH
/SYS/MB/FM2/F0/TACH
/SYS/MB/FM2/F1/TACH
/SYS/MB/FM3/F0/TACH
/SYS/MB/FM3/F1/TACH
sunHwTrapFanSpeedFatalThresholdDeasserted
Lower fatal threshold nolonger exceeded
Informational /SYS/MB/FM0/F0/TACH
/SYS/MB/FM0/F1/TACH
/SYS/MB/FM1/F0/TACH
/SYS/MB/FM1/F1/TACH
/SYS/MB/FM2/F0/TACH
/SYS/MB/FM2/F1/TACH
/SYS/MB/FM3/F0/TACH
/SYS/MB/FM3/F1/TACH
SNMP Trap Message Oracle ILOM Event Message Severity Sensor Name
Monitoring the Server 101

Memory Event Traps
SNMP Trap Message Oracle ILOM Event Message Severity and Description Sensor Name
sunHwTrapSensorNonCritThresholdExceeded
Upper noncritical thresholdexceeded
Minor. A sensor hasreported that its value hasgone above an uppernoncritical threshold settingor below a lower noncriticalthreshold setting. Thisgeneric ’sensor’ trap isgenerated when the SNMPagent does not recognize thecomponent type. ThesunHwTrapThresholdType object indicates whetherthe threshold was an upperor lower.
/SYS/VPS_CPUS
/SYS/VPS_MEMORY
sunHwTrapSensorThresholdOk
Upper noncritical thresholdno longer exceeded
Informational. A sensor hasreported that its value is inthe normal operating range.This generic ’sensor’ trap isgenerated when the SNMPagent does not recognize thecomponent type.
/SYS/VPS_CPUS
/SYS/VPS_MEMORY
sunHwTrapComponentFault
eventfault.cpu.intel.quickpath.link_slow
Major. A component issuspected of causing a fault.This generic ’component’trap is generated when theSNMP agent does notrecognize the componenttype.
/SYS/MB
sunHwTrapComponentFaultCleared
eventfault.cpu.intel.quickpath.link_slow
Informational. A componentfault has been cleared. Thisgeneric ’component’ trap isgenerated when the SNMPagent does not recognize thecomponent type.
/SYS/MB
sunHwTrapComponentFault
eventfault.cpu.intel.quickpath.unknown-errcode
Major. A component issuspected of causing a fault.This generic ’component’trap is generated when theSNMP agent does notrecognize the componenttype.
/SYS/MB
102 Netra Server X3-2 Administration Guide • August 2013

sunHwTrapComponentFaultCleared
eventfault.cpu.intel.quickpath.unknown-errcode
Informational. A componentfault has been cleared. Thisgeneric ’component’ trap isgenerated when the SNMPagent does not recognize thecomponent type.
/SYS/MB
sunHwTrapComponentFault
eventfault.memory.intel.dimm.none
Major. A component issuspected of causing a fault.This generic ‘component’trap is generated when theSNMP agent does notrecognize the componenttype.
/SYS/MB
sunHwTrapComponentFaultCleared
eventfault.memory.intel.dimm.none
Informational. A componentfault has been cleared. Thisgeneric ’component’ trap isgenerated when the SNMPagent does not recognize thecomponent type.
/SYS/MB
sunHwTrapComponentFault
eventfault.memory.intel.dimm.memtest-failed
Major. A component issuspected of causing a fault.This generic ’component’trap is generated when theSNMP agent does notrecognize the componenttype.
/SYS/MB
sunHwTrapComponentFaultCleared
eventfault.memory.intel.dimm.memtest-failed
Informational. A componentfault has been cleared. Thisgeneric ’component’ trap isgenerated when the SNMPagent does not recognize thecomponent type.
/SYS/MB
sunHwTrapComponentFault
eventfault.memory.intel.dimm.quadrank-3rd-slot
Major. A component issuspected of causing a fault.This generic ’component’trap is generated when theSNMP agent does notrecognize the componenttype.
/SYS/MB
sunHwTrapComponentFaultCleared
eventfault.memory.intel.dimm.quadrank-3rd-slot
Informational. A componentfault has been cleared. Thisgeneric ’component’ trap isgenerated when the SNMPagent does not recognize thecomponent type.
/SYS/MB
SNMP Trap Message Oracle ILOM Event Message Severity and Description Sensor Name
Monitoring the Server 103

sunHwTrapComponentFault
eventfault.memory.intel.dimm.ddr3u-unsupported
Major. A component issuspected of causing a fault.This generic ’component’trap is generated when theSNMP agent does notrecognize the componenttype.
/SYS/MB
sunHwTrapComponentFaultCleared
eventfault.memory.intel.dimm.ddr3u-unsupported
Informational. A componentfault has been cleared. Thisgeneric ’component’ trap isgenerated when the SNMPagent does not recognize thecomponent type.
/SYS/MB
sunHwTrapComponentFault
eventfault.memory.intel.mrc.unknown-errcode
Major. A component issuspected of causing a fault.This generic ‘component’trap is generated when theSNMP agent does notrecognize the componenttype.
/SYS/MB
sunHwTrapComponentFaultCleared
eventfault.memory.intel.mrc.unknown-errcode
Informational. A componentfault has been cleared. Thisgeneric ’component’ trap isgenerated when the SNMPagent does not recognize thecomponent type.
/SYS/MB
sunHwTrapMemoryFault eventfault.memory.intel.dimm.udimm-unsupported
Major. A memorycomponent is suspected ofcausing a fault.
/SYS/MB/P/D
sunHwTrapMemoryFaultCleared
eventfault.memory.intel.dimm.udimm-unsupported
Informational. A memorycomponent fault has beencleared.
/SYS/MB/P/D
sunHwTrapMemoryFault eventfault.memory.intel.dimm.sodimm-unsupported
Major. A memorycomponent is suspected ofcausing a fault.
/SYS/MB/P/D
sunHwTrapMemoryFaultCleared
eventfault.memory.intel.dimm.sodimm-unsupported
Informational. A memorycomponent fault has beencleared.
/SYS/MB/P/D
sunHwTrapMemoryFault eventfault.memory.intel.dimm.4gb-fused
Major. A memorycomponent is suspected ofcausing a fault.
/SYS/MB/P/D
sunHwTrapMemoryFaultCleared
eventfault.memory.intel.dimm.4gb-fused
Informational. A memorycomponent fault has beencleared.
/SYS/MB/P/D
SNMP Trap Message Oracle ILOM Event Message Severity and Description Sensor Name
104 Netra Server X3-2 Administration Guide • August 2013

sunHwTrapMemoryFault eventfault.memory.intel.dimm.8gb-fused
Major. A memorycomponent is suspected ofcausing a fault.
/SYS/MB/P/D
sunHwTrapMemoryFaultCleared
eventfault.memory.intel.dimm.8gb-fused
Informational. A memorycomponent fault has beencleared.
/SYS/MB/P/D
sunHwTrapMemoryFault eventfault.memory.intel.dimm.incompatible
Major. A memorycomponent is suspected ofcausing a fault.
/SYS/MB/P/D
sunHwTrapMemoryFaultCleared
eventfault.memory.intel.dimm.incompatible
Informational. A memorycomponent fault has beencleared.
/SYS/MB/P/D
sunHwTrapMemoryFault eventfault.memory.intel.dimm.incompatible-maxranks
Major. A memorycomponent is suspected ofcausing a fault.
/SYS/MB/P/D
sunHwTrapMemoryFaultCleared
eventfault.memory.intel.dimm.incompatible-maxranks
Informational. A memorycomponent fault has beencleared.
/SYS/MB/P/D
sunHwTrapMemoryFault eventfault.memory.intel.dimm.incompatible-quadrank
Major. A memorycomponent is suspected ofcausing a fault.
/SYS/MB/P/D
sunHwTrapMemoryFaultCleared
eventfault.memory.intel.dimm.incompatible-quadrank
Informational. A memorycomponent fault has beencleared.
/SYS/MB/P/D
sunHwTrapMemoryFault eventfault.memory.intel.dimm.numranks-unsupported
Major. A memorycomponent is suspected ofcausing a fault.
/SYS/MB/P/D
sunHwTrapMemoryFaultCleared
eventfault.memory.intel.dimm.numranks-unsupported
Informational. A memorycomponent fault has beencleared.
/SYS/MB/P/D
sunHwTrapMemoryFault eventfault.memory.intel.dimm.speed-slow
Major. A memorycomponent is suspected ofcausing a fault.
/SYS/MB/P/D
sunHwTrapMemoryFaultCleared
eventfault.memory.intel.dimm.speed-slow
Informational. A memorycomponent fault has beencleared.
/SYS/MB/P/D
SNMP Trap Message Oracle ILOM Event Message Severity and Description Sensor Name
Monitoring the Server 105

Related Information
■ “Generic Host Event Traps” on page 95
■ “Environmental Event Traps” on page 96
■ “Drive Event Traps” on page 98
■ “Power Event Traps” on page 99
■ “Fan Event Traps” on page 100
■ “Entity Presence Event Traps” on page 106
■ “Physical Security Event Traps” on page 107
Entity Presence Event TrapsDescription – A sensor has detected an error. This generic ’component’ trap isgenerated when the SNMP agent does not recognize the component type.
sunHwTrapMemoryFault eventfault.memory.intel.dimm.disable-quadrank
Major. A memorycomponent is suspected ofcausing a fault.
/SYS/MB/P/D
sunHwTrapMemoryFaultCleared
eventfault.memory.intel.dimm.disable-quadrank
Informational. A memorycomponent fault has beencleared.
/SYS/MB/P/D
sunHwTrapMemoryFault eventfault.memory.intel.dimm.population-invalid
Major. A memorycomponent is suspected ofcausing a fault.
/SYS/MB/P/D
sunHwTrapMemoryFaultCleared
eventfault.memory.intel.dimm.population-invalid
Informational. A memorycomponent fault has beencleared.
/SYS/MB/P/D
sunHwTrapMemoryFault eventfault.memory.intel.dimm.out-of-order
Major. A memorycomponent is suspected ofcausing a fault.
/SYS/MB/P/D
sunHwTrapMemoryFaultCleared
eventfault.memory.intel.dimm.out-of-order
Informational. A memorycomponent fault has beencleared.
/SYS/MB/P/D
sunHwTrapMemoryFault eventfault.memory.intel.dimm.category-unknown
Major. A memorycomponent is suspected ofcausing a fault.
/SYS/MB/P/D
sunHwTrapMemoryFaultCleared
eventfault.memory.intel.dimm.category-unknown
Informational. A memorycomponent fault has beencleared.
/SYS/MB/P/D
SNMP Trap Message Oracle ILOM Event Message Severity and Description Sensor Name
106 Netra Server X3-2 Administration Guide • August 2013

Related Information
■ “Generic Host Event Traps” on page 95
■ “Environmental Event Traps” on page 96
■ “Drive Event Traps” on page 98
■ “Power Event Traps” on page 99
■ “Fan Event Traps” on page 100
■ “Memory Event Traps” on page 102
■ “Physical Security Event Traps” on page 107
Physical Security Event TrapsDescription – An intrusion sensor has detected that someone might have physicallytampered with the system.
SNMP Trap Message Oracle ILOM Event Message Severity Sensor Name
sunHwTrapComponentError ENTITY_PRESENT ASSERT Major /SYS/MB/P0/PRSNT
/SYS/MB/P1/PRSNT
sunHwTrapComponentError ENTITY_PRESENT DEASSERT Major /SYS/MB/P0/PRSNT
/SYS/MB/P1/PRSNT
sunHwTrapComponentError ENTITY_ABSENT ASSERT Major /SYS/MB/P0/PRSNT
/SYS/MB/P1/PRSNT
sunHwTrapComponentError ENTITY_ABSENT DEASSERT Major /SYS/MB/P0/PRSNT
/SYS/MB/P1/PRSNT
sunHwTrapComponentError ENTITY_DISABLED ASSERT Major /SYS/MB/P0/PRSNT
/SYS/MB/P1/PRSNT
sunHwTrapComponentError ENTITY_DISABLED DEASSERT Major /SYS/MB/P0/PRSNT
/SYS/MB/P1/PRSNT
SNMP Trap MessageOracle ILOM EventMessage Severity Sensor Name
sunHwTrapSecurityIntrusion Assert Major /SYS/INTSW
/SYS/SP/SP_NEEDS_REBOOT
sunHwTrapSecurityIntrusion Deassert Major /SYS/INTSW
/SYS/SP/SP_NEEDS_REBOOT
Monitoring the Server 107

Related Information
■ “Generic Host Event Traps” on page 95
■ “Environmental Event Traps” on page 96
■ “Drive Event Traps” on page 98
■ “Power Event Traps” on page 99
■ “Fan Event Traps” on page 100
■ “Memory Event Traps” on page 102
■ “Entity Presence Event Traps” on page 106
108 Netra Server X3-2 Administration Guide • August 2013

Updating the Firmware andSoftware
Over time, Oracle updates the firmware and OSA software.
Updates are available as a software release. Software releases contain all the firmware,hardware drivers, and utilities for the server. All of these items are tested together. AREADME document is provided with each software release. The README explains whathas changed and what has not changed from the prior software release.
Use these topics to obtain and update the server’s firmware and software:
Related Information
■ “Understanding Administration Resources” on page 1
■ “Accessing Administration Tools” on page 11
Description Links
Use OSA to obtain and update the serverfirmware and software.
“Obtain and Update Firmware (OSA)” onpage 111
Restore OSA to a server with corruptedOSA.
“Restore OSA” on page 113
Mounting and accessing OSA USB flashdrive.
“Mounting the Oracle System Assistant USBFlash Drive” on page 114“Access the Firmware and Software on theOracle System Assistant USB Flash Drive” onpage 118
Obtain updates by downloading zip filesfrom My Oracle Support.
“Download Software Releases (My OracleSupport)” on page 120“Available Software Release Packages” onpage 120
Obtain updates on physical media. “Requesting Updates on Physical Media” onpage 122“Available Software Release Packages” onpage 120
109
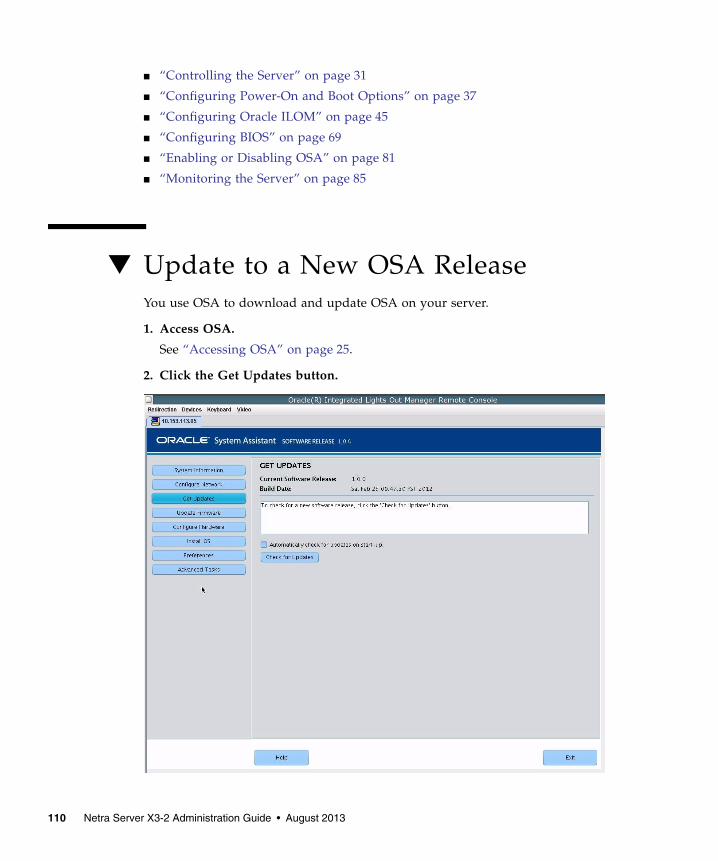
■ “Controlling the Server” on page 31
■ “Configuring Power-On and Boot Options” on page 37
■ “Configuring Oracle ILOM” on page 45
■ “Configuring BIOS” on page 69
■ “Enabling or Disabling OSA” on page 81
■ “Monitoring the Server” on page 85
▼ Update to a New OSA ReleaseYou use OSA to download and update OSA on your server.
1. Access OSA.
See “Accessing OSA” on page 25.
2. Click the Get Updates button.
110 Netra Server X3-2 Administration Guide • August 2013

3. To check for a new software release, click the Check for Updates button.
After running the Check Updates process, a new list and button appear in thepane.
4. From the Available Updates list, choose the update, then press the Downloadand Apply Updates button to start the update process.
5. Click Exit.
Related Information■ “OSA Overview” on page 6
■ “Obtain and Update Firmware (OSA)” on page 111
■ “Restore OSA” on page 113
■ “Obtaining Updated Software” on page 119
■ “Requesting Updates on Physical Media” on page 122
▼ Obtain and Update Firmware (OSA)You can use OSA to update the server firmware, hardware drivers, and utilities.
This procedure checks for and obtains updates, enables you to select which updatesyou want installed, and then installs them.
1. Access OSA.
See “Accessing OSA” on page 25.
2. Click the Update Firmware button.
3. Click the Check for Firmware Updates button to determine whether anyhardware components can be updated using OSA.
Updating the Firmware and Software 111

4. Click the Preview Changes button.
A window appears displaying the firmware updates that were found for theserver.
5. Choose which firmware updates you want to install.
6. Click the Install All Updates button to install the firmware updates.
If a reboot is required for the firmware updates to take effect, the serverautomatically reboots.
7. Click Exit.
Related Information■ “OSA Overview” on page 6
■ “Update to a New OSA Release” on page 110
■ “Restore OSA” on page 113
■ “Obtaining Updated Software” on page 119
■ “Requesting Updates on Physical Media” on page 122
112 Netra Server X3-2 Administration Guide • August 2013

▼ Restore OSAIf OSA has been erased or corrupted, you can download the image file that isavailable from the My Oracle Support web site and restore it to the USB device.
1. Download the appropriate image from the My Oracle Support web site.
Download the image that is specific to your server from this location:
http://support.oracle.com
2. Do one of the following:
■ Burn the ISO image file to a physical CD/DVD.
■ Make the ISO image file available on the server as a boot device.
3. Boot from the CD/ DVD or the ISO image file.
This action starts the recovery program. After the program verifies that theOSAUSB device is valid, a recovery continuation prompt appears.
4. Continue the recovery process by typing yes.
The recovery process begins. When the recovery is finished, the server reboots andstarts OSA.
5. Unmount the ISO image or remove the CD/DVD from the drive.
Related Information■ “OSA Overview” on page 6
Updating the Firmware and Software 113

■ “Update to a New OSA Release” on page 110
■ “Obtain and Update Firmware (OSA)” on page 111
■ “Obtaining Updated Software” on page 119
■ “Requesting Updates on Physical Media” on page 122
Mounting the Oracle System AssistantUSB Flash DriveBefore you can access the Oracle System Assistant USB flash drive on the Oracle VM3.0 or the Oracle Solaris 10 and Linux operating systems, you must first mount theUSB flash drive.
Choose one of the following procedures to mount the Oracle System Assistant USBflash drive:
■ “Mount the Oracle System Assistant USB Flash Drive on Oracle VM 3.0” onpage 114
■ “Mount the Oracle System Assistant USB Flash Drive on a Linux OperatingSystem” on page 116
■ “Mount the Oracle System Assistant USB Flash Drive on an Oracle Solaris 10Operating System” on page 117
Note – Currently you cannot directly mount the Oracle System Assistant USB flashdrive if the system is using the VMware ESXi 5.0 virtual machine software. Go to MyOracle Support to retrieve the required drivers for the VMware ESXi software.
Related Information
■ “Access the Firmware and Software on the Oracle System Assistant USB FlashDrive” on page 118
■ “Restore OSA” on page 113
▼ Mount the Oracle System Assistant USB FlashDrive on Oracle VM 3.01. Connect to your Oracle VM 3.0 server as the root user.
114 Netra Server X3-2 Administration Guide • August 2013

2. To determine the device mapping of the Oracle System Assistant USB flashdrive, type the lsscsi command.
An example of how this command displays the storage devices on the server isshown below.
The Oracle System Assistant USB flash drive is the disk labelled ORACLE SSMand in this example is mapped to /dev/sdo.
3. To determine the name of the partition on the Oracle System Assistant USBdevice, type the fdisk -l /dev/sdo command.
An example of the output produced by this command is shown below.
4. (Optional) Create a mount point to use when mounting the Oracle SystemAssistant USB flash drive.
For example:
# lsscsi[0:0:0:0] disk SEAGATE ST360057SSUN600G 0805 /dev/sda[0:0:1:0] disk SEAGATE ST32000SSSUN2.0T 0313 /dev/sdb[0:0:2:0] disk SEAGATE ST32000SSSUN2.0T 0313 /dev/sdc[0:0:3:0] disk ATA INTEL HDDSA2BZ30 0362 /dev/sdd[0:0:4:0] enclosu ORACLE BLADE14 0903 -[7:0:0:0] disk SUN StorEdge 3511 421F /dev/sde[7:0:0:1] disk SUN StorEdge 3511 421F /dev/sdf[7:0:0:2] disk SUN StorEdge 3511 421F /dev/sdg[7:0:0:3] disk SUN StorEdge 3511 421F /dev/sdh[9:0:0:0] disk SUN CSM200_R 0660 /dev/sdi[9:0:0:1] disk SUN CSM200_R 0660 /dev/sdj[9:0:0:2] disk SUN CSM200_R 0660 /dev/sdk[9:0:0:3] disk SUN CSM200_R 0660 /dev/sdl[9:0:0:4] disk SUN CSM200_R 0660 /dev/sdm[9:0:0:5] disk SUN CSM200_R 0660 /dev/sdn[11:0:0:0] disk ORACLE SSM PMAP /dev/sdo
# fdisk -l /dev/sdoDisk /dev/sdo: 3880 MB, 3880452096 bytes4 heads, 32 sectors/track, 59211 cylindersUnits = cylinders of 128 * 512 = 65536 bytesDevice Boot Start End Blocks Id System/dev/sdo1 * 17 57344 3668992 ef EFI (FAT-12/16/32)
# mkdir /mnt/OSA
Updating the Firmware and Software 115

5. To mount the Oracle System Assistant USB device, use the partition namedetermined in Step 3 and an existing mount point or the mount point that youcreated in Step 4.
Here is an example of a mount command:
The Oracle System Assistant USB flash drive is now mounted at the mountlocation specified.
▼ Mount the Oracle System Assistant USB FlashDrive on a Linux Operating SystemIf the server is running a Linux operating system, you must mount the Oracle SystemAssistant USB flash drive before you use the filesystem to display or access itscontents.
This procedure shows how to mount the Oracle System Assistant USB flash drive ona Linux operating system.
# mount -t vfat -o codepage=850 /dev/sdo1 /mnt/OSA# ls /mnt/OSAboot Firmware LiveOS OracleVM syslinux.cfgDocumentation ldlinux.sys manifest.xml readme.html Versions.txtEFI Linux Oracle Solaris Windows#
116 Netra Server X3-2 Administration Guide • August 2013

● To mount the Oracle System Assistant USB flash drive, type the commandsshown below:
The Oracle System Assistant USB flash drive is now mounted at the locationspecified.
▼ Mount the Oracle System Assistant USB FlashDrive on an Oracle Solaris 10 Operating SystemIf the server is running the Oracle Solaris 10, you must mount the Oracle SystemAssistant USB flash drive before you use the filesystem to display or access itscontents.
To mount the Oracle System Assistant USB flash drive on an Oracle Solaris 10Operating System:
1. To turn off the volfs service, type:
# svcadm disable volfs
#>mkdir /mnt/OSA#>mount LABEL=ORACLE_SSM /mnt/OSA#>cd /mnt/OSA#>ls -ltotal 916drwxr-xr-x 2 root root 4096 Nov 21 07:42 bootdrwxr-xr-x 3 root root 4096 Nov 21 07:42 Documentationdrwxr-xr-x 3 root root 4096 Oct 26 21:05 EFIdrwxr-xr-x 16 root root 4096 Nov 21 07:42 Firmware-r-xr-xr-x 1 root root 15218 Oct 26 19:10 ldlinux.sysdrwxr-xr-x 5 root root 4096 Nov 21 07:41 Linuxdrwxr-xr-x 2 root root 4096 Oct 26 21:05 LiveOS-rwxr-xr-x 1 root root 787672 Nov 21 08:17 manifest.xmldrwxr-xr-x 2 root root 4096 Nov 21 08:00 Oracle-rwxr-xr-x 1 root root 78879 Nov 21 07:42 readme.htmldrwxr-xr-x 4 root root 4096 Nov 21 07:41 Solaris-rwxr-xr-x 1 root root 263 Oct 26 21:05 syslinux.cfg-rwxr-xr-x 1 root root 3755 Nov 21 07:42 Versions.txtdrwxr-xr-x 3 root root 4096 Nov 21 07:42 VMwaredrwxr-xr-x 4 root root 4096 Nov 21 07:42 Windows#>
Updating the Firmware and Software 117

2. To identify the USB flash drive, type:
# rmformat -l
The system displays a list of devices:
3. To manually mount the USB flash drive, read-only, type:
# mount -F pcfs -o ro /dev/dsk/c1t0d0p1 /mnt
4. To retrieve the Oracle Solaris 10 content, type:
# cd /mnt/Solaris
# ls
The system displays:
5. To unmount the OSA device, type:
# cd /
# umount /mnt
6. To restart volfs, type:
# svcadm enable volfs
The Oracle System Assistant USB flash drive is now mounted.
▼ Access the Firmware and Software on the OracleSystem Assistant USB Flash DriveThe Oracle System Assistant USB flash drive contains firmware and software foryour server. The USB flash drive is accessible through the operating system or virtualmachine software filesystem. Updated firmware and software are downloaded withevery software release update using the Get Updates task within Oracle SystemAssistant.
Looking for devices...1. Logical Node: /dev/rdsk/c1t0d0p0 Physical Node:/pci@0,0/pci108e,484e@1a/hub@1/storage@2/disk@0,0 Connected Device: ORACLE SSM PMAP Device Type: Removable #
10U10 11#
118 Netra Server X3-2 Administration Guide • August 2013

This procedure describes how to access and view the firmware and software thatresides on the Oracle System Assistant USB flash drive.
1. Ensure that the server is powered on and the operating system is running.
2. Mount the Oracle System Assistant USB flash drive.
For OS specific mounting instructions, see:
■ Oracle VM: “Mount the Oracle System Assistant USB Flash Drive on Oracle VM3.0” on page 114
■ Linux operating systems: “Mount the Oracle System Assistant USB Flash Driveon a Linux Operating System” on page 116
■ Oracle Solaris 10: “Mount the Oracle System Assistant USB Flash Drive on anOracle Solaris 10 Operating System” on page 117
3. Use a filesystem browser to navigate to the internal Oracle System AssistantUSB flash drive.
The label for the USB flash drive is: ORACLE SSM on Oracle VM operatingsystem, and ORACLE_SSM on the Oracle Solaris 10 operating system and Linuxoperating systems.
Note – If the Oracle System Assistant USB flash drive is mounted but is still is notvisible, Oracle System Assistant might be disabled. To enable Oracle SystemAssistant, see “Enable OSA” on page 82.
4. To view the contents of the Oracle_SSM drive, double-click on the drive.
The Oracle System Assistant USB flash drive directory is displayed and lists thecontents of the drive.
Obtaining Updated SoftwareUse these topics to obtain the latest updated software releases from My OracleSupport:
■ “Download Software Releases (My Oracle Support)” on page 120
■ “Available Software Release Packages” on page 120
Related Information
■ “Requesting Updates on Physical Media” on page 122
Updating the Firmware and Software 119
▼ Download Software Releases (My OracleSupport)1. Go to the My Oracle Support website:
http://support.oracle.com
2. Sign in to My Oracle Support.
3. At the top of the page, click the Patches and Updates tab.
The Patches and Updates window appears.
4. In the Search window, click Product or Family (Advanced Search).
The window appears with search fields.
5. In the Product field, select the product from the drop-down list.
Alternatively, type a full or partial product name (for example, Netra Server X3-2)until a match appears.
6. In the Release field, select a software release from the drop-down list.
Expand the folders to see all available software releases.
7. Click Search.
The software release comprises a set of downloads (patches).
See “Available Software Release Packages” on page 120 for a description of theavailable downloads.
8. Click the check box next to each patch you want.
A dialog box that contains several action options appears
9. To download the update, click Download in the pop-up panel.
The download begins automatically.
10. Unzip the downloaded files and read the README files for update instructions.
Related Information■ “Available Software Release Packages” on page 120
Available Software Release PackagesDownloads on My Oracle Support are grouped by product family, then product, thenversion. The version contains one or more downloads (patches).
120 Netra Server X3-2 Administration Guide • August 2013

Each download is a zip file that contains a README file and a set of subdirectoriescontaining firmware or software files. The README file contains details on thecomponents that have changed since the prior software release and the bugs thathave been fixed.
Related Information
■ “Download Software Releases (My Oracle Support)” on page 120
When to Download This Package Package Name Description
To obtain the latest firmware. X4270 M3 SWversion –Firmware Pack
All the system firmware,including Oracle ILOM,BIOS, and option cardfirmware.
To update OS-specificdrivers, tools, or utilities.
X4270 M3 SWversion – OSPack
An OS Pack is available foreach supported OS version.Each OS Pack includes apackage of all tools, drivers,and utilities for that versionof the OS.Software includes OracleHMP and LSI MegaRAIDsoftware.Note - For the Windows OS,this OS Pack also includesIntel Network Teaming andInstall Pack.
To update a combination ofsystem firmware andOS-specific software.
X4270 M3 SWversion – AllPacks
Firmware Pack, all OS Packs,and all documents.This pack does not includeOracle VTS or the OSAimage.
To obtain the Oracle VTSdiagnostics image.
X4270 M3 SWversion –Diagnostics
Oracle VTS diagnosticsimage.
To manually recover orupdate OSA.
X4270 M3 SWversion –Oracle System Assistant
OSA recovery and ISOupdate image.
Updating the Firmware and Software 121

Requesting Updates on Physical MediaYou must have a warranty or support contract for your server in order to make aphysical media request.
Use one of these method to request physical media:
■ “Request Physical Media (Online)” on page 122
■ “Request Physical Media (By Phone)” on page 123
Related Information
■ “Obtaining Updated Software” on page 119
▼ Request Physical Media (Online)1. Gather this information:
■ Product name, software release version, and patches required.
See “Available Software Release Packages” on page 120.
■ Your shipping information.
2. Go to My Oracle Support at:
http://support.oracle.com
3. Sign in.
4. Click on the Contact Us link in the upper right corner of the window.
5. In the Request Description section, fill in this information:
a. In the Request Category drop-down menu, select the following:
Physical Media Request (Legacy Oracle Products, Primavera, BEA, SunProducts)
b. In the Request Summary field, type.
PMR for latest software release for Netra Server X3-2.
6. In the Request Details section, answer the questions in this table:
122 Netra Server X3-2 Administration Guide • August 2013

7. Fill in the Ship-To contact, phone number, email address, company name, andshipping address information.
8. Click Next.
9. Under Relevant Files, type.
Knowledge Article 1361144.1.
10. Click Submit.
Related Information■ “Request Physical Media (By Phone)” on page 123
▼ Request Physical Media (By Phone)1. Gather this information:
■ Product name, software release version, and patches required.
See “Available Software Release Packages” on page 120.
■ Your shipping information.
Question Your Answer
Is this a physical software media shipmentrequest?
Yes
Which product line does the media requestinvolve?
Sun Products
Are you requesting a required passwordfor a patch download?
No
Are you requesting a patch on CD/DVD? Yes
If requesting a patch on CD/DVD, pleaseprovide the patch number andOS/platform?
Enter the patch number for each downloadthat you want from the software release.
List the product name and versionrequested for the physical mediashipment?
Product Name: Netra Server X3-2Version: Latest software release number
What is the OS/platform for the requestedmedia?
If you are requesting OS-specific downloads,specify the OS here. If you are requestingsystem firmware only, enter Generic.
Are any languages required for thisshipment?
No
Updating the Firmware and Software 123

2. Call Oracle support, using the appropriate number from the Oracle GlobalCustomer Support Contacts Directory at:
http://www.oracle.com/us/support/contact-068555.html
3. Tell Oracle support that you want to make a physical media request for theNetra Server X3-2.
■ If you are able to access the specific software release and patch numberinformation from My Oracle Support, provide this information to the supportrepresentative.
■ If you are unable to access the software release information, request the latestsoftware release for Oracle’s Sun Netra X4270 M3 server.
Related Information■ “Request Physical Media (Online)” on page 122
124 Netra Server X3-2 Administration Guide • August 2013

Glossary
AACPI Advanced Configuration and Power Interface.
ANSI SIS American National Standards Institute Status Indicator Standard.
ASF Alert standard format (Netra products only).
ASR Automatic system recovery.
AWG American wire gauge.
BBAT basic assurance test.
BIOS Basic Input Output System.
blade Generic term for server modules and storage modules. See server module andstorage module.
blade server Server module. See server module.
BMC Baseboard management controller.
BOB Memory buffer on board.
125

Cchassis For servers, refers to the server enclosure. For server modules, refers to the
modular system enclosure.
CMA Cable management arm.
CMM Chassis monitoring module. The CMM is the service processor in themodular system. Oracle ILOM runs on the CMM, providing lights outmanagement of the components in the modular system chassis. See Modularsystem and Oracle ILOM.
CMM Oracle ILOM Oracle ILOM that runs on the CMM. See Oracle ILOM.
DDHCP Dynamic Host Configuration Protocol.
disk module ordisk blade
Interchangeable terms for storage module. See storage module.
DTE Data terminal equipment.
EECC Error-correcting code.
EIA Electronics Industries Alliance.
ESD Electrostatic discharge.
FFEM Fabric expansion module. FEMs enable server modules to use the 10GbE
connections provided by certain NEMs. See NEM.
FRU Field-replaceable unit.
126 Netra Server X3-2 Administration Guide • August 2013

GGPT GUID partition table.
GRUB GRand Unified Bootloader. A GNU implementation that supports bootingmultiple OSs on a computer.
HHBA Host bus adapter.
HMP Hardware Management Pack.
host The part of the server or server module with the CPU and other hardwarethat runs the Oracle Solaris OS and other applications. The term host is usedto distinguish the primary computer from the SP. See SP.
IICMP Internet Control Message Protocol.
IDE Integrated Development Environment.
ID PROM Chip that contains system information for the server or server module.
IP Internet Protocol.
KKVM Keyboard, video, mouse. Refers to using a switch to enable sharing of one
keyboard, one display, and one mouse with more than one computer.
Glossary 127

LLwA Sound power level.
MMAC Machine access code.
MAC address Media access controller address.
MBR Master boot record.
Modular system The rackmountable chassis that holds server modules, storage modules,NEMs, and PCI EMs. The modular system provides Oracle ILOM through itsCMM.
MSGID Message identifier.
Nname space Top-level Oracle ILOM CMM target.
NEBS Network Equipment-Building System (Netra products only).
NEM Network express module. NEMs provide 10/100/1000 Mbps Ethernet,10GbE Ethernet ports, and SAS connectivity to storage modules.
NET MGT Network management port. An Ethernet port on the server SP, the servermodule SP, and the CMM.
NIC Network interface card or controller.
NMI Nonmaskable interrupt.
128 Netra Server X3-2 Administration Guide • August 2013

OOBP OpenBoot PROM.
Oracle ILOM Oracle Integrated Lights Out Manager. Oracle ILOM firmware is preinstalledon a variety of Oracle systems. Oracle ILOM enables you to remotelymanage your Oracle servers regardless of the state of the host system.
Oracle Solaris OS Oracle Solaris operating system.
OS Operating system.
OSA Oracle System Assistant.
PPCI Peripheral component interconnect.
PCI EM PCIe ExpressModule. Modular components that are based on the PCIExpress industry-standard form factor and offer I/O features such as GigabitEthernet and Fibre Channel.
PDB power distribution board.
PMR Physical media request.
POST Power-on self-test.
PROM Programmable read-only memory.
PSH Predictive self healing.
PXE Pre-boot eXecution environment.
QQSFP Quad small form-factor pluggable.
Glossary 129

RREM RAID expansion module. Sometimes referred to as an HBA See HBA.
Supports the creation of RAID volumes on drives.
RHEL Red Hat Enterprise Linux.
SSAN Storage area network.
SAS Serial attached SCSI.
SATA Serial advanced technology attachment.
SCC System configuration chip.
SER MGT Serial management port. A serial port on the server SP, the server module SP,and the CMM.
server module Modular component that provides the main compute resources (CPU andmemory) in a modular system. Server modules might also have onboardstorage and connectors that hold REMs and FEMs.
SLES SUSE Linux Enterprise Server.
SMART Self-Monitoring, Analysis, and Reporting Technology.
SNMP Simple network management protocol.
SP Service processor. In the server or server module, the SP is a card with itsown OS. The SP processes Oracle ILOM commands providing lights outmanagement control of the host. See host.
SRU Support Repository Update. Used to updated the Oracle Solaris OS.
SSD Solid-state drive.
SSH Secure shell.
storage module Modular component that provides computing storage to the server modules.
130 Netra Server X3-2 Administration Guide • August 2013
TTIA Telecommunications Industry Association (Netra products only).
Tma Maximum ambient temperature.
TPM Trusted Platform Module (a Windows 2008 feature).
UUCP Universal connector port.
UEFI Unified Extensible Firmware Interface.
UI User interface.
UL Underwriters Laboratory Inc.
U.S. NEC United States National Electrical Code.
UTC Coordinated Universal Time.
UUID Universal unique identifier.
VVM Virtual machine.
WWDS Windows Deployment Services.
WIM Windows Imaging Format.
WWN World wide name. A unique number that identifies a SAS target.
Glossary 131

132 Netra Server X3-2 Administration Guide • August 2013

Index
Aaccessing
add-on card configuration utilities, 29BIOS, 19BIOS Setup utility, 21Oracle ILOM, 11OSA, 25, 26OSA flash drive files, 118OSA Oracle ILOM web interface, 25tools, 11
add-on card configuration utilities, 29Admin user role, Oracle ILOM, 57administration
of hardware RAID, 8resources, 1tools, 1
Administrator user role, 57Advanced menu, BIOS, 21Advanced user role, 57alarms, changing states manually, 34audit logs, managing, 93Auto Power-on Host On Boot policy, 37
BBIOS, 1
accessing, 19configuring, 69key mappings, 20Legacy mode, 5Main menu, 21overview, 5POST, 21resetting to default settings, 70, 71UEFI mode, 5version, displaying, 89
BIOS Setup utility, 21
logging out, 24menus, 21, 23Save and Exit window, 24
boot configuration, 37boot device
configuring priority through BIOS, 41selecting, 40
Boot menu, BIOS, 21
Cchanging
Oracle ILOM root password, 54Telco alarm states, 34
checking for problems, 92CLI
accessing the host console, 17Oracle ILOM, 15
common administration tools, 1configuring
add-on cards, 29BIOS, 69BIOS to default settings, 70, 71boot device priority, 41date and time, 60devices, 77Enhanced PCIe Cooling Mode policy, 67I/O resource allocation, 75Legacy option ROM allocation, 72NET MGT port, 49Oracle ILOM, 47Oracle ILOM identity, 48Oracle ILOM root password, 64Oracle ILOM user accounts, 56, 65physical presence check, 48power-on policies, 37, 39SER MGT port, 51SP clock, 63
133

SP network, 59, 61Console user role, Oracle ILOM, 57Control key sequences, BIOS, 20controller properties, 29controlling
power state, 31, 32server, 31
Ddate and time
configuring, 53, 60default root password, changing, 46device configuration
modifying, 77, 78disabling
I/O resource allocation, 76option ROM, 73OSA, 81
displayinghost power state, 87server information, 87, 89
downloading software releases, 120
Eenabling
I/O resource allocation, 76option ROM, 73OSA, 82
Enhanced PCIe Cooling Mode policy,configuring, 67
event logs, managing, 93exit command, 18
Ffirmware
obtaining updates, 111updating, 109
fully powered on, 31function keys, BIOS, 20
HHMP, 1
hardware RAID administration, 8overview, 7
hostIP address, 89
resetting, 33hostname, Oracle ILOM, 48
II/O resource allocation, 75
configuring, 75enabling or disabling, 76
IO menu, BIOS, 21IP address, SP, 89IPMI and Oracle ILOM, 3
Kkey mappings, BIOS, 20KVMS, 18
LLegacy BIOS mode, 5Legacy option ROM allocation, configuring, 72locating the server, 86Locator LED, 86logging into
Oracle ILOM CLI, 15, 16Oracle ILOM web interface, 12
logging out ofBIOS Setup utility, 24Oracle ILOM, 18OSA, 28
logs, managing, 93LSI MegaCLI storage manager, 8LSI SAS2 Utility, 8
MMain menu, BIOS, 21main window, OSA, 25managing
event and audit logs, 93menus, BIOS Setup utility, 21, 23modifying
device configuration, 77, 78monitoring
server health, 91the server, 85
mounting OSA USB flash drive, 114
134 Netra Server X3-2 Administration Guide • August 2013

NNET MGT port
configuring, 49
Oobtaining
software updates, 119the system serial number, 85updated firmware, 111
Operator user role, 57option ROM, enabling or disabling, 73Oracle Enterprise Manager Ops Center, 10Oracle ILOM, 1
accessing the host console, 17accessing the Remote Console, 13configuring, 47configuring identity, 48features, 3hostname, 48IPMI interface, 3logging into the CLI, 15, 16logging into the web interface, 12logging out, 18overview, 3physical presence check, 48predefined user roles, 57root password
changing, 46, 54, 64recovering, 46
SNMP, 3system contact, 48system identifier, 48system location, 48user accounts, configuring, 56, 65user roles, 57
OSA, 1accessing, 25, 26disabling, 81enabling, 82hardware RAID administration, 8logging out, 28main window, 25overview, 6restoring, 113Summary page, 26updating to a new release, 110
OSA flash driveaccessing files, 118
mounting, 114overview
BIOS, 5HMP, 7Oracle ILOM, 3OSA, 6
Ppackages, software release, 120physical media, requesting updates on, 122physical presence check, Oracle ILOM, 48pinhole for SP reset button, 33polices, power-on, 37power consumption
viewing, 94power state, 31
controlling, 32power-on
configuring, 37policies, 37policies, configuring, 37, 39
problems, checking for, 92
RRAID administration, 8Remote Console
accessing, 13remote redirection, 18reset /SP command, 33reset /System command, 33Reset and Host control user role, Oracle ILOM, 57reset button, SP, 33resetting
the SP, 33the host, 33
resources, administration, 1restoring OSA, 113RFID tag, 85
SSave and Exit window, BIOS Setup utility, 24selecting
boot device, 40temporary boot device
through BIOS, 42
Index 135

through the Oracle ILOM web interface, 42SER MGT port
configuring, 51default settings, 16
serial number, 85, 89serial number, obtaining, 85server
checking for problems, 92controlling, 31health, monitoring, 91information, displaying, 87, 89locating, 86monitoring, 85serial number, obtaining, 85
Service user role, Oracle ILOM, 57Set Host Power to Last Power State policy, 37SNMP and Oracle ILOM, 3SNMP traps, understanding, 95software
updating, 109software release packages, 120software releases, downloading, 120software updates
obtaining, 119requesting physical media, 122
SPclock, configuring, 63IP address, 89MAC address, 89network, configuring, 59, 61reset button, 33resetting, 33
standby power state, 31start /HOST/console command, 17Summary page, OSA, 26switching to the host console, 17system contact, Oracle ILOM, 48system identifier, Oracle ILOM, 48system location, Oracle ILOM, 48
TTelco alarms, changing states manually, 34temporary boot device, selecting, 42tools
accessing, 11for administration, 1
for hardware RAID administration, 8for managing multiple servers, 10
UUEFI BIOS mode, 5UEFI Driver Control menu, BIOS, 21understanding
administration resources, 1SNMP traps, 95
updatingfirmware and software, 109OSA, 110
User Management user role, Oracle ILOM, 57user roles, Oracle ILOM, 57
V
viewing power consumption, 94
136 Netra Server X3-2 Administration Guide • August 2013