NetApp Study Notes
32
NetApp Fundamentals • Volumes are logical entities that hold user data. They are accessible from one or more access protocols supported by Data ONTAP (NFS,CIFS,HTTP,WebDAV, DAFS, FCP and iSCSI) • Aggregates provide the underlying physical storage for traditional and flexible volumes • Traditional volume is contained by a single, dedicated aggregate.The only way to change the size of a traditonal volume is to add disks • Flexible volume is contained within a single aggregate. You can increase and decrease the size of flexible volumes almost instantaneously You assign the following attributes to every volume, whether it is a traditional or FlexVol volume: • Volume name • Volume size • Security style: determines whether a volume can contan fiels that use UNIX security or Windows NTFS file security • Option to designate the volume as one that uses CIFS oplocks (opportunistic locks) • Suppoted language • Level of space guranteed (FlexVol only) • Disk space and file limits (quotas) • Snapshot schedule (optional) • Option to designate the volume as a SnapLock volume • Option to designate the volume as a root volume. The root volume in Data ONTAP is named vol0 by default. A volume can store: • Files and directories • qtree ◦ a special subdirectory of the root directory of a volume. qtrees can be used to subdivide a volume in order to group LUN's • LUN's ◦ A LUN is logical representation of a physical unit of storage. It is a collection of, or part of, physical or virtual disks configured as a single disk. CIFS Administration
Transcript of NetApp Study Notes
NetApp Fundamentals
• Volumes are logical entities that hold user data. They are accessible from oneor more access protocols supported by Data ONTAP(NFS,CIFS,HTTP,WebDAV, DAFS, FCP and iSCSI)
• Aggregates provide the underlying physical storage for traditional and flexiblevolumes
• Traditional volume is contained by a single, dedicated aggregate.The only wayto change the size of a traditonal volumeis to add disks
• Flexible volume is contained within a single aggregate. You can increase anddecrease the size of flexible volumesalmost instantaneously
You assign the following attributes to every volume, whether it is a traditional orFlexVol volume:
• Volume name• Volume size• Security style: determines whether a volume can contan fiels that use UNIX
security or Windows NTFS file security• Option to designate the volume as one that uses CIFS oplocks (opportunistic
locks)• Suppoted language• Level of space guranteed (FlexVol only)• Disk space and file limits (quotas)• Snapshot schedule (optional)• Option to designate the volume as a SnapLock volume• Option to designate the volume as a root volume. The root volume in Data
ONTAP is named vol0 by default.
A volume can store:
• Files and directories• qtree
◦ a special subdirectory of the root directory of a volume. qtrees can beused to subdivide a volume in order to group LUN's
• LUN's◦ A LUN is logical representation of a physical unit of storage. It is a
collection of, or part of, physical or virtual disks configuredas a single disk.
CIFS Administration

# To add a new local useruseradmin user add user_name -g group_name
# To modify a local useruseradmin user modify user_name -g group_name
# To list user informationuseradmin user list user_name
# To delete a local useruseradmin user delete user_name
# To add new groupuseradmin group add group_name -r roleuseradmin group add Helpers -r admin
# To modify an existing groupuseradmin group modify group_name -g new_group_name
# To list group informationuseradmin group list group_nameuseradmin group list Helpers
# To delete a groupuseradmin group delete group_name
# To add an existing Windows domain user to a groupuseradmin domainuser add user_name -g group_name
# To list Windows domain users in a groupuseradmin domainuser list -g group_name
# To modify a share accesscifs access <share> [-g] [user_rights]cifs access datatree1 administrator Full Control
# To delete an ACL (share-level access control list) entry for a user on a share# Note: the -g option specifies that the user is the name of a UNIX group.cifs access -delete <share> [-g] [user]cifs access -delete datatree1 everyone
## Multiprotocol options:# A CIFS user can access the file without disrupting UNIX permissions# When enabled, UNIX qtree's appear as NFS volumes. (ONTAP 7.2 or later)options cifs.preserve_unix_security on
## Reconfiguring CIFS# Disconnect users and stop the CIFS servercifs terminate# Reconfigure the CIFS servicecifs setup
# These options are needed to configure basic time servicesoptions timed.max_skew 5moptions timed.proto ntpoptions timed.sched hourlyoptions timed.servers [server_ip_or_name,...]options timed.enable on
options timed.log on
## Important configuration files in a Windows domain environment# contains the storage system SID/etc/filersid.cfg# contains the Windows domain SID/etc/cifssec.cfg# contains domain administrator accounts/etc/lclgroups.cfg
# To resolve SID's runcifs lookup
# Display your domain informationcifs domaininfo
# Test the storage system connection to the Windows DC.cifs testdc [ WINSsvrIPaddress ] domainname [ storage_sys_name ]
# To display the preferred domian controller listcifs prefdc print [ domain ]
# To add a preferred domain controller listcifs prefdc add domain address [ address ... ]
# To delete a preferred domain controller listcifs prefdc delete domain
Checklist for troubleshooting CIFS issues
• Use "sysstat –x 1" to determine how many CIFS ops/s and how much CPU isbeing utilized
• Check /etc/messages for any abnormal messages, especially for oplock breaktimeouts
• Use "perfstat" to gather data and analyze (note information from "ifstat","statit", "cifs stat", and "smb_hist", messages, general cifs info)
• "pktt" may be necessary to determine what is being sent/received over thenetwork
• "sio" should / could be used to determine how fast data can be written/readfrom the filer
• Client troubleshooting may include review of event logs, ping of filer, test usinga different filer or Windows server
• If it is a network issue, check "ifstat –a", "netstat –in" for any I/O errors orcollisions
• If it is a gigabit issue check to see if the flow control is set to FULL on the filerand the switch
• On the filer if it is one volume having an issue, do "df" to see if the volume isfull
• Do "df –i" to see if the filer is running out of inodes• From "statit" output, if it is one volume that is having an issue check for disk
fragmentation• Try the "netdiag –dv" command to test filer side duplex mismatch. It is
important to find out what the benchmark is and if it’s a reasonable one• If the problem is poor performance, try a simple file copy using Explorer and
compare it with the application's performance. If they both are same, the issueprobably is not the application. Rule out client problems and make sure it istested on multiple clients. If it is an application performance issue, get all thedetails about:

◦ The version of the application◦ What specifics of the application are slow, if any◦ How the application works◦ Is this equally slow while using another Windows server over the
network?◦ The recipe for reproducing the problem in a NetApp lab
• If the slowness only happens at certain times of the day, check if the timescoincide with other heavy activity like SnapMirror, SnapShots, dump, etc. onthe filer. If normal file reads/writes are slow:
◦ Check duplex mismatch (both client side and filer side)◦ Check if oplocks are used (assuming they are turned off)◦ Check if there is an Anti-Virus application running on the client. This
can cause performance issues especially when copying multiple smallfiles
◦ Check "cifs stat" to see if the Max Multiplex value is near thecifs.max_mpx option value. Common situations where this may needto be increased are when the filer is being used by a Windows TerminalServer or any other kind of server that might have many users openingnew connections to the filer. What is CIFS Max Multiplex?
◦ Check the value of OpLkBkNoBreakAck in "cifs stat". Non-zero numbersindicate oplock break timeouts, which cause performance problem
NFS Administration
# Examples to export resources with NFS on the CLIexportfs -aexportfs -o rw=host1:host2 /vol/volX
# Exportable resourcesVolumeDirectory/QtreeFile
## Target examples from /etc/exports#
# Host - use name of IP address/vol/vol0/home -rw=venus/vol/vol0/home -root=venus,-rw=venus:mars
# Netgroup - use the NIS group name/vol/vol0/home -rw=mynisgroup
# Subnet - specify the subnet address/vol/vol0/home -rw="192.168.0.0/24"
# DNS - use DNS subdomain/vol/vol0/home -rw=".eng.netapp.com"
# Rules for exporting Resources• Specify complete pathname, must begin with /vol prefix• Cannot export /vol, which is not a pathname to a file, directory or volume
◦ Export each volume separately• When export a resource to multiple targets, separate the target names with a
colon (:)

• Resolve hostnames using DNS, NIS or /etc/hosts per order in /etc/nssswitch.conf
# Access restrictions that specify what operations a target can perform on a resource• Default is read-write (rw) and UNIX Auth_SYS (sys)• "ro" option provides read-ony access to all hosts• "ro=" option provides read-only access to specified hosts• "rw=" option provides read-write access to specified hosts• "root=" option specifies that root on the target has root permissions
# Displays all current export in memoryexportfs
# To export all file system paths specified in the /etc/exports file.exportfs -a
# Adds exports to the /etc/exports file and in memory.# default export options are "rw" (all hosts) and "sec=sys".exportfs -p [options] pathexports -p rw=hostA /vol/vol2/ora
# To export a file system path temporarly without adding a corresponding# entry to the /etc/exports file.exporfs -i -o ro=hostB /vol/vol0/lun2
# Reloads ony exports from /etc/exports filesexportfs -r
# Unexports all exportsexportfs -uav
# Unexports a specific exportexportfs -u /vol/vol0/home
# Unexports an export and removes it from /etc/exportsexportfs -z /vol/vol0/home
# To verify the actual path to which a volume is exportedexportfs -s /vol/vol9/vf19
# To display list of clients mounting from the storage systemshowmount -a filerX
# To display list of exported resources on the storage systemshowmount -e filerXnfsstat -m
# To check NFS target to access cacheexportfs -c clientaddr path [accesstype] [securitytype]exportfs -c host1 /vol/vol2 rw
# To remove entries from access cacheexportfs -f [path]
# Flush the access cache.exportfs -f

# To add an entry to the WAFL credential cachewcc -a -u unixname -i ipaddresswcc -u root
# To delete an entry from the WAFL credentail cachewcc -x uname
# To display statistics about the WAFL credential cachewcc -d -v unamewcc -d
# Displays the UNIX user mappings for the specified Windows accountwcc -s ntname# local adminwcc -s administrator# domain adminwcc -s development\administrator
# WCC rules• A Windows-to-UNIX user mapping is not stored in the WCC• The WCC contains the cached user mappings for the UNIX user identities (UID/
GID) to Windows identities (SID's)• The wcc command useful for troubleshooting user mappings issues• the cifs.trace._login option must be enabled.•
# factors that affect the NFS performance• CPU• Memory• Network• Network interface• System bus• Nonvolatile randown access memory (NVRAM)• I/O devices
◦ Disk controllers◦ Disks
# Data ONTAP commands that can be used to collect performance datasysstatnetstatifstatstatsstatitnetdiagwafl_suspnfsstatnfs.mountd.tracenfs_histpktt# Client toolsetherealnetapp-top.plperfstatsiosariostatvmstat

# Displays per-client statistics since last zeroednfsstat -h
# Displays list of clients whose statistics where collected on per-client basis# Note: nfs.per_client_stats.enable option must be set to "on"nfsstat -l
# Zeroes current cumulative and per-client statisticsnfsstat -z
# Includes reply cache statisticsnfsstat -c
# Displays stats since boot timenfsstat -t
# Displays reply cache statistics, incoming messages and allocated mbufs.# Note: most commonly used option to decode exports and mountd problems.#nfsstat -d
# Displays number and type of NFS v2,v3 requests received by all FlexCache volumesnfsstat -C
# To enable mountd tracing of denied mount requests against the storage system.option nfs.mountd.trace on
# Display Top NFS clients currently most active for the storage systemnetapp-top.pl -i 30 filerX
# Captures all needed performance information from the storage system and hosts(clients).perfstat -f filerX -h host1 -t 5 -i 12 >perfstat.out
# Recommended NFS mount options for various UNIX hosts# Note: mount options "forcedirectIO" and "noac" are only recommended ondatabases.#Linux:rw,bg,hard,nointr,rsize=32768,wsize=32768,tcp,actimeo=0,vers=3
Solaris:rw,bg,hard,nointr,rsize=32768,wsize=32768,proto=tcp,forcedirectio,noac,vers=3
AIX:cio,rw,bg,hard,intr,proto=tcp,vers=3,rsize=32768,wsize=32768
HPUX (11.31 or later):rw,bg,hard,intr,rsize=32768,wsize=32768,timeo=600,noac,forcedirectio 0 0
## Recommended test to collect NFS statistics#
nfsstat -z (zero the NFS statistics at the client)netstat -I (network stats before the tests at the client)

mount -o rsize=32768,wsize=32768 filerX:/vol/vol2/home /mnt/nfstestcd /mnt/nfstestnfsstat -m (output of the mountpoints and the mount flags)time mkfile 1g test (write test)time dd if=/mnt/nfstest/test /tmp/test (read test)time cp test test1 (read and write test)nfsstat -c (verify nfsstat output)
# Check the nfsstat output against retransmissions, timeouts and bad calls
• timeout>5%. Requests timing out before the server can answer them• badxid~timeout. Server slow. Check nfsstat -m.• badxid~0 and timeouts > 3%. Packets lost in the network; check netstat. If
this number is the same as bad calls, the network is congested.• retrans. May indicate network of routing problem if retransmit >5%.• null>0. Automounter timing out. Increase the timeout parameter on the
Automounter configuration.
# In the output of the "nfsstat -m`' command, the following parameters are critical• srtt. Smoothed round-trip time.• dev. Estimated deviation.
# NFS troubleshooting
Problem: Stale NFS File handleSample Error Messages - NFS Error 70
Resolution Tips
• Check connectivity to the storage system (server)• Check mountpoint• Check client vfstab or fstab as relevant• Check showmount –e filerx from client• Check exportfs from command line of the storage system• Check storage system /etc/exports file
Problem: NFS server not responding
NFS Server (servername) not respondingNFS client hangs, mount hangs on all clients
Resolution Tips
• Use ping to contact the hostname of the storage system (server) from client• Use ping to contact the client from the storage system• Check ifconfig from the storage system• Check that the correct NFS version is enabled• Check all nfs options on the storage system• Check /etc/rc file for nfs options• Check nfs license
Problem: Permission denied
nfs mount: mount: /nfs: Permission denied

Resolution Tips
• Check showmount –e filername from client• Try to create a new mountpoint• Check exportfs at the storage system command line to see what system is
exporting• Check auditlog for recent exportfs –a• Check the /etc/log/auditlog for messages related to exportfs• Check the storage path with exportfs –s• Check whether the client can mount the resource with the exportfs –c
command• Flush the access cache and reload the exports, then retry the mount
Problem: Network Performance Slow
Poor NFS read and/or write performance
Resolution Tips
• Check sysstat 1 for nfs ops/sec vs. kbs/sec• Check parameters on network card interface (NIC) with ifconfig –a• Check netdiag• Check network condition with ifstat –a; netstat –m• Check client side network condition• Check routing table on the storage system with netstat• Check routing table on the client• Check perfstat.sh• Check throughput with sio_ntap tool• Check rsize and wsize• Consider configuring jumbo frames (entire path must support jumbo frames)
Problem: RPC not responding
RPC: Unable to receive or RPC:Timed out
Resolution Tips
• Use ping to contact the storage system (server)• From storage system, use ping to contact client• Check mountpoint• Check showmount –e filerX from client• Verify name of directory on the storage system• Check exportfs to see what the storage system is exporting• Use the "rpcinfo -p filerx" command from the client to verify that the RPCs are
running
Problem: No Space Left On Disk
No space left on disk error
Resolution Tips
• Check df for available disk space• Check for snapshot overruns• Check quota report for exceeded quotas

Data Protection and Retention
1. What is Information Lifecycle Management (ILM)
The concept of information lifecycle management (or data lifecycle management) isbased on assigning a value todata as it ages.
Lifecycle consists of five phases.
• Phase I - Data CreationData is created during the first phase of the ILM. The data created consists ofdynamic, static, and reference information.
• Phase II - Data classification, Security, and ProtectionDuring this phase, data is classified, secured, and protected. Data regulation isimplemented at this phase.
• Phase III - Data Migration (Backup and Recovery)In this phase, data migration is implemented.
• Phase IV - Data Retention and Archiving• Phase V - Data Dispostion
Bussines Continuance Solutions
• snaprestoresnaprestore enables rapid revert (restore) of single files or volumes sooperations can resume quickly.
• snapmirrorThe are two types of snapmirror solutions:
◦ Asynchronous snapmirrorThis is an automated file system or qtree replication for disasterrecovery of data distribution.Updates of new and changed data from the source to the destinationoccur on a scheduled defined by the storage administrator.
◦ Synchronous snapmirrorReplicates writes from the source volume to the partner destinationvolume at the same time it is written to the source volume.Updates are performed in real time intervals.
• snapvaultIs a low-overhead, disk-based online backup of homogeneous storage systemsfor last and simple restores.
• Open Systems SnalVault (OSSV)Is a heterogeneous disk-based data protection feature of Data ONTAP thatenables data stored on multiple Open Systems platforms (Windows/Unix basedclients)to be backed up to and restored from a central storage system.
System Management Solutions
snaplock technology is a software feature that allows companies to implement the dataperfromance functionality of traditional WORM(write once, read many) storage in an easier-to-manage, faster access, lower costmagnetic disk-based solution.

There are two types:
• snaplock◦ snaplock Compliance
Is designed for comprehensive archival solution that meets UDSecurities and Exchange Commission regulations fordata retention. snaplock volumes of this type cannot be alteredor deleted before the expiration of retention period.
◦ snaplock EnterpriseThis solution is designed for organizations whith self-regulatedand best-practice requirements for protecting digital assets withWORM-like storage devices. Data written on a snaplockEnterprise volume can be deleted by an administrator.
• Data Fabric Manager (DFM)Data Fabric Manager provides centralized management of distributed NetApp,NetCache, storage, and NearStore appliances.
OS-Based Data Protection Solutions
snapshot technology
Creates a read-only copy of a storage appliance's file system, readily accessible viaspecial subdirectories (i.e. .snaphot), taken automatically on a schedulemanually. Creating snaphot copies is very quicly because if it an index to the filesystem.
Disk Sanitization
Disk sanitization is the process of physically removing data from a disk by overwritingpatterns on the disk in a manner that precludes therecovery of that data by any known recovery methods.
2. SnapRestore
SnapshotRestore Considerations
• Time required for data recoveryIf the amount of corrupted data is smal, it is probably asier to copy files from asnaphot.If the amount of data to be recovered is large, it takes a long time to copy filesfrom a snapshot orto restore from tape. In this case, SnapRestore is perferred for recovering fromdata corruption.
• Free space required for single file data recoveryTo use the single file SnapRestore feature, you must have enough free spaceon the volume to recover the singile file.
• Reboot required for root volume recovery• Performance hit for single file SnapRestore
A performance penality is encountered during snapshot deletion, because tehactive maps across all snapshot copiesneed to be checked. After doing a single-file SnapRestore, the system has tolook at all snapshots to see if it canfree the blocks in the file.
When a block is allocated, it cannot be reallocated until it is freed in the activefile system and not in use by any snapshot.
Reverting a Volume or File
• You can use SnapRestore to revert a volume or file to a snapshot at any time• NOTE: Reverting an Aggregate snaphot will revert ALL volumes in the
Aggregate.• Prerequisites
◦ SnapRestore licensed◦ Snapshots must exist of the appliance so that you can select a
snapshot for the reversion.◦ The volume to be reverted must be online.◦ The volume to be reverted must not be a mirror used for data
replication.◦ Enough free space must be available for recovery of a single file.
Cautions
• You cannot undo a SnapRestore reversion!• Avoid selecting a snapshot taken before any SnapMirror snapshot If you dp
this, Data ONTAP can no longer perform incrementalupdates to the mirror, it must recreate the baseline.
• You cannot use SnapRestore to undo a snapshot deletion!• After you revert a volume, you lose all snapshots that were taken after the
selected snapshot.• While SnapRestore is in progress, Data ONTAP cannot delete or create
snapshots.• Reverting a root volume requires a reboot, and will restore earlier configuration
files.
Steps to Revert a Volume
1. Notify network users2. Review list of snaphots available
snap list volname
3. Enter the name of the snapshot to be used for reverting the volume
snap restore -t vol -s snapshot_name path_and_volname
4. Enter "y" to confirm reversion of the volume.
NOTES:
• Reverting an aggregate is not recommended!• NFS users should dismount the affected volume before the reversion. If they
do not dismount the volumethey might see the "Stale File Handle" error messages after the reversion.
Steps to Revert a File
1. Notify network users2. Review list of snapshots available
snap list volname
3. Enter the name of the snapshot to be used for reverting the file
snap restore -t file -s snapshot_name -r new_path_and_filenamepath_and_filename
4. Enter "y" to confirm reversion of the file.
NOTES:• A file can only be restored to an existing directory. The SnapRestore default is
to restore the file to itsoriginal directory path. The "-r" option can be used to specify a different(existing) directory.
• NFS users who try to access a reverted file without first reopening it might geta the "Stale File Handle" error message after the reversion.
3. SnapMirror
snapmirror overview
SnapMirror provides a fast and flexible enterprise solution for replicating data overlocal area,wide area and Fibre Channel networks. SnapMirror addresses mutiple applicationsareas such asmission critical data protection, and business continuanance in case of a disaster.
• Data migration• Disaster Recovery• Remote access to data and load sharing• Remote tape archival
SnapMirror Modes
• Asynchronously. SnapMirror replicates snaphot images from a source volumeto a partner destination volume at the same time itis written to the source volume.
• Synchronously. SnapMirror replicates writes from a source volume or qtree
SnapMirror Terminology
• Source: storage appliance system whose data is to be replicated.• Destination: storage system which contains data replica.
• Volume SnapMirror (VSM): Replication process from a source volume to adestination volume.
• Qtree SnapMirror (QSM): Replication process from a source qtree to adestination qtree.
SnapMirror Components
• Source volumes and qtrees: SnapMirror source volumes and qtrees arewritable data objects.
• Destination volumes and qtrees: the SnapMirror destination volumes andqtrees are read-only objects, usually on a separate storage system.The destination volumes and qtrees are normally accessed by users ony whena distaser takes down the source systemand the administrator uses SnapMirror commands to make the replicated dataat the destination accessible and writable.
Async SnapMirror Theory of Operation
• The VSM initial baseline transfer◦ Create a restricted destination volume◦ For VSM 1st time replication, all data in all snapshots on the source are
transferred to the destination volume.◦ The baseline transfer is initiated and driven by the destination by
establishing a TCP connection with the source.◦ Read-only destination volume brought online after initial transfer
completed.• The QSM initial baseline transfer
◦ Do not create a destination qtree; it is created automatically upon first-time replication
◦ For QSM, no snapshots are sent from the source to the destination◦ Within QSM, the destination qtree is read-only, while the hosting
volume is writeable.• Incremental updates process
◦ Scheduled process updates the mirror (destination system). After thesource and destination file systems are synchronized for the first time,you can schedule incremental updates using the snapmirror.conf file.This file must created on the destination root volume (/etc).
◦ Current snapshot is compared with the previous snapshot◦ Changes are synchronized from source to destination
Volume versus Qtree SnapMirroring
• VSM can be synchronous or asynchronous, while QSM is available withasynschronous mode only.
• VSM is a block-for-block replication. QSM is a file based replication.• VSM can occur only with volumes of the same type (both must be traditional or
flexible)• With VSM, the destination volume is always a replica of a single source volume
and is read-only.• With QSM, only the destination qtree is read-only, while the containing volume
remains writeable.

• VSM replicates all Snapshot copies on the source volume to the destinatiovolume. QSM replicatesonly one snapshot of the source qtree to the destination qtree.
• VSM can ne initialized using a tape device (SnapMirror to tape); QSM does notsupport this feature.
• Cascading of mirrors is supported only for VSM
Traditional and Flexible Volumes
• For VSM: Like to Like transfers only: flex-toflex or trad-to-trad• For QSM: you can snapmirror qtrees:
◦ From a traditional volume to a flexible volume◦ From a flexible volume to a traditional volume
SnapMirror and Flexvol Space
• Space guarantee◦ volume-disable automatically on the destinal volume◦ As a result, it is possible to overcommiting the aggregate◦ When the relationship is broken, space mode is identical on source and
destination• Overcommiting the aggregate
◦ More efficient disk space utilization on the destination◦ When the relationship is broken, turn off vol optionsfs_sized_fixed and use vol size to re-size the destnation volume.
◦ To overcommit an aggregate volume, create the destination flexvolwith quarantee set to none of file
SnapMirror Control Files
• On the source system: /etc/snapmirror.allow• On the destination system: /etc/snapmirror.conf
Syntax:source:src_vol destination:dst-vol arguments schedulesource:/vol/src_vol/src_qtree destination:/vol/dst_vol/dst_qtreearguments schedulesrc_hostname:/vol/src_vol/- dst_hostname:/vol/dst_vol/dst_qtree("-" indicates all non-qtree data in the specified volume)
Arguments
kbs=kbsMaximum transfer speed, in kilobytes per second, that Data ONTAP can use to transferdata.
restart={ never | always | defaut }Restart mode that SnapMirror uses to continue an incremental transfer from acheckpoint if it is interrupted:
• Never: Transfers are always restarted from the beginning of a transfer andnever from where theywere before an interruption

• Always: Transfers are always restarted if possible from where they werebefore an interruption
• Default: Transfers are restarted if they do not conflict with a scheduledtransfer.
Schedule
For asynchronous SnapMirror, a schedule must be set per relationship and consists of:minute hour day_of_month day_of_week
Where:• minute can be a value from 0-59• hour can be 0 (midnight) to 23 (11 pm)• day_of_month can be 1-31• day_of_week can be 0 (sunday) to 6 (saturday)• all possible values can applied with an "*"• A "-" means "never" and prevents this schedule entry from executing
Options Snapmirror
• snapmirror.access (it set to legacy, the snapmirror.access file is used)• snapmirror.enable• snapmirror.log.enable• snapmirror.checkip.enable• snapmirror.delayed_acks.enable• snapmirror.window_size
Caution
With VSM, if you upgrade your systems to a later version of Data ONTAP, upgrade theSnapMirror destination before you upgradethe SnapMirror source system.
Async SnapMirror Pre-requisites
• Make sure the source volume or qtree is online• For VSM
◦ Create a non-root restricted destination volume◦ The snapmirror source volume can be the root volume◦ Destination volume capacity > or = to source◦ Disks checksum type (block or zone checksum) must be identical◦ Quota cannot be enabled on destination volume
• For QSM◦ Destination qtree must not exist and cannot be /etc◦ Destination volume must have 5% extra space◦ A destination qtree can be on the root volume
• TCP port range 10565-10569 must be open (destination system contacts thesource at TCP port 10566)
Snapmirror Snapshot copies are distinguished from the system Snapshot copies by amore elaborate naming conventionand the label snapmirror in parentheses with the "snap list" command.
The default name of a SnapMirror volume snapshot is:

Dest_system(sysid)_name.number
The default name of a SnapMirror qtree snapshot is
Dest_system(sysid)_name-src.number|dst.number
Steps to convert a Replica to a Writeable File System
• To convert a mirror to a read/write volume or qtree, you must use snapmirrorquiesce prior to using snapmirror break
◦ the snapmirror relationship is broken-off◦ the destination volume or qtree becomes writeable◦ Learn how to enable quotas on the converted file system
• What next?◦ you can resynchronize the broken-off relationship or◦ you can release the relationship if you want to make the break
permanent
NOTE: If you use SnapMirror for data migration, you can copy the /etc/quotasentries from the source to the /etc/quotas file of the destination beforeyou convert the mirror to a regular volume or qtree. However, if you use SnapMirrorfor Disaster Recovery, you must keep a copy on the destinationstorage system of all /etc/quotas entries used by the source.
Example:
Dest> snapmirror quiesce /vol/dst_vol/dst_qtreeDest> snapmirror break /vol/dst_vol/dst_qtreeDest> quota on dst_vol
Resynchronize a Broken Relationship
When the relationship is broken, subsequent updates will fail. To resume incrementalupdates, you have first to re-establishthe relationship. The snapmirror resync (on the source or destination) commandenables you to do this without executing a new initial base transfer.
Example (from the destination system):
Dest> snapmirror resync [options ] dst_hostname:dst_volDest> snapmirror resync [options ] dst_hostname:/vol/dst_vol/qtree
Releasing a Partner Relationship
You can release a mirror volume or qtree when you want to permanently remove itfrom a mirrored relationship.Releasing the mirror deletes Snapshot copies from the volume.
Example (from the source):
Src> snapmirror release src_vol dst_hostname:dst_vol

Src> snapmirror release /vol/src_vol/src_qtree dst_hostname:/vol/dst_vol/dst_qtree
NOTE: To make this removal permanent, delete the entry in /etc/snapmirror.conffile.
SnapMirror to Tape
SnapMirror to tape supports SnapMirror replication over low-bandwidth connections byaccommodatingan initial mirror between the source and destination volume using a physicallytransported tape.
1. Initial large-sized vol baseline snapshot replicated to tape from source filer.2. Tape physically transported to tape drive on destination site3. Load the tape and start replication to the destination filer.4. Incremental SnapMirror updates are made via low bandwidth connection
Example:
1. Load the tape and start replication:
Src> snapmirror store src_vol tapedevice
The command starts the initial baseline transfer from the source volume to thetape.
2. Remove the base snapshot on the source when the backup to tape iscompleted:
Src> snapmirror release src_vol tapedevice
3. Restore data from tape to the destination system:
Dest> snapmirror retrieve dst_vol tapedevice
NOTE: If you retrieve a backup tape into a file system that does not match the diskgeometry of thesource storage system used when writing the data onto tape, the retrieve can beextremely slow.
4. SnapVault
SnapVault is a disk-based storage backup feature of ONTAP that enables data storedon multiple storage systemsto be backuped up to a central, secondary NetApp storage system as read-onlySnapshot copies.
Both primary and secondary systems use SnapVault for backup and restore operations,based on thesame logical replication engine as qtree SnapMirror.
SnapVault Basic Deployment
• SnapVault Primary to Secondary to Tape◦ Enables to store an unlimited number of backups offline◦ Can be used to restore data to the SnapVault secondary◦ Reduces media costs
• SnapVault Primary to Secondary to SnapMirror◦ SnapMirror backup and standby service for SnapVault◦ SnapMirror backup and restore protection for SnapVault
The primary system's data is backup up to a secondary system. Then VolumeSnapMirror is used to mirror the data stored on secondaryto a tertiary system (SnapMirror destination) at the remote data center.
• Qtree is the basic unit of SnapVault backup• Data restored from the secondary Qtrees can be put back to their associated
Qtrees• Supports backup of non-qtree data and entire volume on primary to a Qtree on
the secondary• When you back up a source volume, the volume is backed up to a Qtree on the
secondary• Qtrees in the source volume becomes directories in the destinations qtree• SnapVault cannot restore data back to a volume (volume is restored as a qtree
on the primary)• The maximum number of secondary system Qtrees per volume is 255• The maximum total of Snapshot copies per destination volme is 251• A separate SnapVault license for the primary and the secondary system is
required
Restoration on Request
Users can perform a restore of their own data without intervention of systemadministrator.
To do a restore, issue the snapvault restore command from the primary systemwhos qtree needs to be restored.
Ater succesful restore of data, you use the snapvault start -r command to restartthe SnapVault relationshipbetween primary and secondary qtree.
Note: when you use snapvault restore command to restore a primary qtree,SnapVault places a residual SnapVaultSnapshot copy on the volume of the restored primary qtree. This Snapshot copy is notautomatically deleted.
You cannot use the snapvault restore command to restore a single file. For singlefile restores, you must use the ndmpcopy command.
The NearStore Personality
NearStore Personality allows to utilize FAS storage systems as secondary systems.
• Converts the destination storage system to a NearStore system

• Increase the number of concurrent streams on destinations system when usedfor SnapMirror and SnapVault transfers
• Requires nearstorage_option license on secondary and ONTAP 7.1 or later• The license should not be installed on these systems if hey are used to handle
primary application workloads• Supported only on FAS3000 series
TCP Port requirements
Port 10566 must be open in both directions for SnapVault backup and restoreoperations.If NDMP is used for control management, then Port 10000 must be open on primaryand secondary.
Configuring SnapVault Primary and Secondary systems
• On Primary◦ Add the license sv_ontap_pri◦ Enable SnapVault service and configure SnapVault options
• On Secondary◦ Add the license sv_ontap_sec◦ Enable SnapVault service and configure SnapVault options◦ Initialize the first baseline transfer
• On Primary and Secondary◦ Schedule SnapVault snapshots creation◦ Monitor transfers progress, status and snapshots
Example:
Pri> license add sv_primary_license_codePri> options snapvault.enable onPri> options ndmpd.enable onPri> options snapvault.access host=secondary_hostname
Sec> license add sv_secondary_license_codeSec> options snapvault.enable onSec> options ndmpd.enable onSec> ons snapvault.access host=primary_hostname1,primary_hostname2Sec> snapvault start -S pri_hostname:/vol/pri_vol/pri_qtreesec_hostname:/vol/sec_vol/sec_qtree (sec_qtree must not exist on sec_vol)
Pri/Sec> snapvault status
Schedule SnapVault Snapshot Creation
Command Syntax:
Pri/Sec> snapvault snap sched (-x) vol_name snapshot_nameretention_count@day_of_the_week@hour(s)
snapshot_name is the snapshot copy basename. It must be identical onprimary and secondary for a given scheduled data set
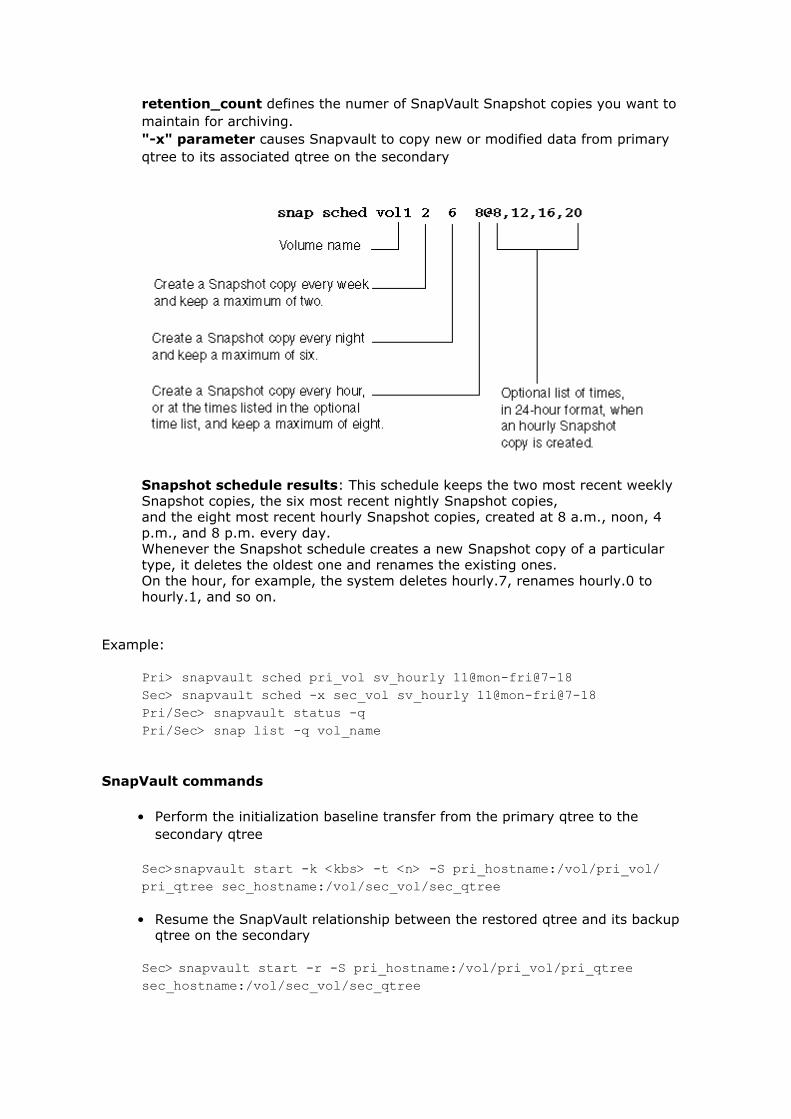
retention_count defines the numer of SnapVault Snapshot copies you want tomaintain for archiving."-x" parameter causes Snapvault to copy new or modified data from primaryqtree to its associated qtree on the secondary
Snapshot schedule results: This schedule keeps the two most recent weeklySnapshot copies, the six most recent nightly Snapshot copies,and the eight most recent hourly Snapshot copies, created at 8 a.m., noon, 4p.m., and 8 p.m. every day.Whenever the Snapshot schedule creates a new Snapshot copy of a particulartype, it deletes the oldest one and renames the existing ones.On the hour, for example, the system deletes hourly.7, renames hourly.0 tohourly.1, and so on.
Example:
Pri> snapvault sched pri_vol sv_hourly 11@mon-fri@7-18Sec> snapvault sched -x sec_vol sv_hourly 11@mon-fri@7-18Pri/Sec> snapvault status -qPri/Sec> snap list -q vol_name
SnapVault commands
• Perform the initialization baseline transfer from the primary qtree to thesecondary qtree
Sec>snapvault start -k <kbs> -t <n> -S pri_hostname:/vol/pri_vol/pri_qtree sec_hostname:/vol/sec_vol/sec_qtree
• Resume the SnapVault relationship between the restored qtree and its backupqtree on the secondary
Sec> snapvault start -r -S pri_hostname:/vol/pri_vol/pri_qtreesec_hostname:/vol/sec_vol/sec_qtree

• Removes a qtree on the secondary from the protection scheme and deletes it
Sec> snapvault stop sec_hostname:/vol/sec_vol/sec_qtree
• Forces an incremental update of the snapshot specified on the primary andtransfer it to the secondary.
Sec> snapvault update [options] -S pri_hostname:/vol/pri_vol/pri_qtree sec_hostname:/vol/sec_vol/sec_qtree
• Alter the characteristics of a SnapVault relationship, including the transferspeed, the number of re-tries and the primary and secondary paths
Sec> snapvault modify -k <kbs> -t <n> -S pri_hostname:/vol/pri_vol/pri_qtree sec_hostname:/vol/sec_vol/sec_qtree
• Display SnapVault status information on primary or secondary
Pri/Sec> snapvault status
• Halts a SnapVault transfer currently in progress, this operation will abort atransfer from the primary to the secondary
Sec> snapvault abort sec_hostname:/vol/sec_vol/sec_qtree
• Manually creates a snapshot on the primary or secondary
Pri/Sec> snapvault snap create vol_name snapshot_name
• Unconfigures a snapshot schedule on primary or secondary
snapvault snap unsched -f vol_name snaphot_name
• On primary, lists all the known destinations for SnapVault primary qtrees.
Pri> snapvault destinations
• On primary, release Snapshot copies that are no longer needed
Pri> snapvault release sec_hostname:/vol/sec_vol/sec_qtree
• Restores a qtree from the secondary to the primary
Pri> snapvault restore -s snap_name pri_hostname:/vol/pri_vol/pri_qtree sec_hostname:/vol/sec_vol/sec_qtree
Comparing SnapVault with SnapMirror
• VSM copies all snaphots from a read/write source into a read-only destination• Qtree SnapMirror is to be used in an environment requiring an immediate
failover capability• SnapVault is to be used with applications that can afford to lose some data and
not require immediate failover
• Qtree SnapMirror allows replication in both directions (source and destinationcan run on same storage system)
• Qtree SnapMirror does not allow snapshot creation or deletion on the read-onlydestination.
• SnapVault replicates in one direction (source and destination cannot run onsame storage system)
• SnapVault adds snapshot scheduling, retention, and expiration, providingversions (backups) on secondary
• SnapMirror provides up to per minute updates• SnapVault provides up to per hour updates
Throttle Network Usage of SnapMirror and SnapVault Transfers
• On per transfer basis:◦ For SnapMirror, use kbs option in the /etc/snapmirror.conf file on
the secondary/destination◦ For SnapVault, use the -k <kbs> option in the snapvault start orsnapvault modify command on the secondary
• For all transfers◦ Requires ONTAP 7.2 or later◦ Enable system wide throttling (default is off) on all systems: optionsreplication.throttle.enable on
◦ Set max bandwidth (default is unlimited) for all incoming transfers onsecondary: options replication.throttle.incoming.max_kbs
◦ Set max bandwidth (default is unlimited) for all outgoing transfers onprimary: options replication.throttle.outgoing.max_kbs
Backup with Failover
In case of a disater, when the prinmary becomes unavailable, you might want toconvert the read-only qtrees replicato a writeable file system to redirect CIFS and NFS clients access to the secondary.
SnapVault does not currently have the ability to create a writable destination on thesecondary. You can useSnapMirror/SnapVault bundle to convert the SnapVault destination qtree to aSnapMirror destination qtree,making it a typical SnapMirror destinations qtree that can be quiesced and broken.
Requirements for SnapVault/SnapMirror Bundle
• ONTAP 6.5 or later• SnapVault primary license
Note: if any changes made while in the broken state need to be copied back tothe primary, you also need a SnapMirror license on primary
• SnapVault/SnapMirror bundle license
A SnapMirror license is required on the secondary to have access to thesnapmirror convert command in priv set diag mode
Make a Secondary Qtree Writeable
• Involve NetApp Support (when entering the priv set diag mode)• Convert snapvaulted qtree to a snapmirrored qtree• Quiesce the snapmirror qtree• Break the mirror, making it writeable• Restablishing the SnapVault relationship
◦ Preserve the changes made on the secondary◦ Or discard all changes made on the secondary
Example:
1. Convert the SnapVault qtree into a SnapMirror qtree:
Sec> snapmirror offSec> options snapvault.enable offSec> priv set diagSec*> snapmirror convert /vol/sec_vol/sec_qtree
2. Quiesce the destination qtree and break the releationship (makes qtree writable)
Sec*> snapmirror onSec*> snapmirror quiesce /vol/sec_vol/sec_qtreeSec*> snapmirror break /vol/sec_vol/sec_qtree
Restablishing the SnapVault relationship
There are two scenarios.
Scenario 1 : Preserve all the changes made to the secondary during th DRperiod.
1. Resync the primary qtree
Pri> snapmirror resync /vol/pri_vol/pri_qtree
2. Quiesce the qtree
Pri> snapmirror quiesce /vol/pri_vol/pri_qtree
3. Break the mirror, making it writable
Pri> snapmirrow break /vol/pri_vol/pri_qtree
4. Resync the secondary qtree
Sec> snapmirror resync /vol/sec_vol/sec_qtree
5. Turn SnapMirror and SnapVault off
Sec> snapmirror offSec> snapvault off

6. Convert the SnapMirror qtree to SnapVault qtree
Sec> snapvault convert /vol/sec_vol/sec_qtree
7. Turn SnapMirror and SnapVault on
Sec> snapmirror onSec> snapvault on
Scenario 2: Discard all the changes made on the secondary during the DRperiod.
1. Resync the secondary qtree
Sec> snapmirror resync /vol/sec_vol/sec_qtree
2. Turn SnapMirror and SnapVault off
Sec> snapmirror offSec> snapvault off
3. Convert the SnapMirror qtree to SnapVault qtree
Sec> snapvault convert /vol/sec_vol/sec_qtree
4. Turn SnapMirror and SnapVault on
Sec> snapmirror onSec> snapvault on
5. Best Practices and Troubleshooting
Optimize Mirror Performance and Recommendation
The following methodilogy will help in troubleshooting SnapMirror, SnapVault andOSSV (Open Systems SnapVault) performance issues.
Performance issues are mainly due to:
• Overloaded SnapMirror/SnapVault implementation• non-optimal space & data layout management• High system resources utilization (CPU% util, disk I/O, CIFS/NFS connections/
transmissions, etc)• Low network bandwidth
Symptoms are:
• Initialization or transfer updates lagging, the lag is above the expectation, andthe transfer duration does not meet the SLA
• The transfer duration meets the SLA, but the throughput is low.◦ Check /etc/snapmirror.conf or snapvault snap sched, define what
is the expected lag (exptected time between two scheduled updates)
◦ Then explore the snapmirror status -l or snapvault status -loutputs to get a view of the mirror implementation:
▪ How many systems are involved?▪ How many mirror/backup services are active?▪ Which systems are a source and a destination at the same
time?▪ How many relationships are set per source and destination
systems?◦ Note the transfer lag and define the data/time the last transfer
succeeded◦ Analyze the SnapMirror logs /etc/log/snapmirror and syslog
messages /etc/messages to trace what happened before and after thelast succesful transfer has completed:when was the request sent, started and ended. Are there any errors?
6. NDMP Fundamentals
7. Snaplock
SAN Administration
NAS versus SAN
• NAS provides file-level access to data on a storage system. Access is via anetwork using ONTAP services such as CIFS and NFS
• SAN provides block-level access to data on a storage system. SAN solutionscan be a mixture of iSCSI or FCP protocols.
• SAN provides block access to LUN's (logical uniit numbers) which are treatedas local disk by both Windows and UNIX-based systems.
• Network access to LUN's is via SCSI over Fiber Channel (FCP) network(refferred to as Fabric) or SCSI over TCP/IP (Ethernet) network.
• Network access to NAS storage is via an Ethernet network.• FCP and ISCSI protocol carry encapusulated SCSI commands as the data
transport mechanism.• When SAN ans NAS storage are present on the same storage system, it is
refferred to as unified storage.• Fabrics generally refer to FC connections through a switch.
Initiator/Target Relationship
1. The host (initiator) moves requests to the storage system (target)2. An application sends a request to the file system3. The file system issues I/O calls to the operating system1. The operating system sends the I/O through its storage stack (SCSI driver) to
issue the SCSI commands2. The SCSI commands are encapsulated in FC frames or iSCSI IP packets3. Once the request is received by the storage system target, Data ONTAP OS
converts requests from the initiator4. Data ONTAP turns SCSI commands into WAFL operations

5. WAFL sends the request to the RAID subsystem where RAID manages data onthe physical disks where the LUN is located
6. Once processed, request responses move back through the FC fabric or iSCSInetwork
How are Initiators and Targets connected (FC-SAN)
• Storage systems and hosts have HBA's (Host Bus Adapters) so they can beconnected directly to each other or to FC switches
• Each FCP node is identified by a World Wide Node Name (WWNN) and a WorldWide Port Name (WWPN)
• WWPN's are used to create igroups, which controls host access to specificLUN's
How are Initiators and Targets connected (IP-SAN)
• Storage systems/controllers are connected to the network over stand Ethernetinterfaces or through target HBA's
• Nodes are identified in IP SAN enivironments using a node name. The are twoformats, iqn and eui
◦ iqn.1998-02.com.netapp:sn.12345678◦ eui.1234567812345678
• The host node names are used to create igroups, which controls host access tospecific LUN's
Fabric or Network Architectures
• NetApp supports all industry accepted fabric and network architectures• Types if architectures are:
◦ Single switch◦ Cascade◦ Mesh◦ Core-Edge◦ Director
• The maximum suported hop count for FC switches, which is the number ofinter-switch links (ISL's) crossed between a host and the storage system, islimited to three (3)
• Multivendor ISL's are not supported
Zoning for an FC SAN
• Zones separate devices into separate subsets• "Hard" zoning
◦ Restricts communication in a switched fabric◦ Prevents zoning breaches caused by bypassing the name service
• "Soft" zoning◦ Separate devices at the name service level but does not restrict
communication between zones◦ More flexible, less secure
• Similar to Ethernet VLAN's• Zones live on the switch• A FC channel zone consists of a group of FC ports or nodes that can
communicate with each other

• Two FC nodes can communicate with one another only when they arecontained in the same zone
• The name service converts a name into a physical address on the network
FC SAN Topologies
• Direct Attached (Point-to-Point)• Fiber Channel Arbitrated Loop (FCAL)
◦ A private loop works FC hubs. This Loop can address 127 devices dueto limitation of 8-bit addresses
◦ A public loop works in a fabric with switches. This loop can address 15million addresses due to its 24-bit addressing schema
• Switched Fabric• NetApp supports three basic FCP topologies between storage system targets
and host initiators:◦ Direct-Attached◦ Single Fabric◦ Dual Fabric
IP SAN topogies
• NetApp differentiates between two basic topologies:◦ Direct-Attached: The initiators (hosts) are directly attached to the
target storage controller using a cross-over cable◦ Switched environment: the hosts are attached to storage controllers
through Ethernet switches
Guidelines for creating Volumes with LUN's
• Do not create any LUN's in the systems root volume.• Ensure that no other files or directories exist in a volume that contains a LUN.
Otherwise, use a separate qtree to contain LUN's.• If multiple hosts share the same volume, create a qtree on the volume to store
all LUN's for the same host.• Ensure that the volume option create_ucode is on (this is off by default)• Use naming conventions that reflect the LUN's owner or the way that the LUN
is used.
Create and Access a LUN
There a three steps required on the storage system and two additional steps performedon the FCP or iSCSI accessed host.
• On the storage system:◦ Create a LUN◦ Create an igroup (FCP or iSCSI)
▪ mapping a LUN to an igroup os often refferred to as "LUNmasking"
▪ igroups may be created prior to creating LUN's▪ there is no requirement to populate the igroup with a WWPN
(FCP) or node name (iSCSI) before mapping a LUN to an igroup◦ Map the LUN to the igroup
• On the host:

◦ FCP: bind the HBA of the host to the storage system's WWPN (AIX andHP do not require persistent bindings)
◦ iSCSI: configure the iSCSI initiator to access the target◦ Configure (i.e. format) the LUN for use on the host
Methods for LUN creation
• lun create (storage system)◦ additional steps:
▪ igroup create (create initiator group)▪ lun map (maps the LUN to an initiator group)▪ add portset (FCP) - consists of a group of FCP target ports. You
bind a portset to an igroup to make LUN available only on asubset of FCP ports.
• lun setup (storage system)• FilerView (host) - web-based application• SnapDrive (host) - designed specifically for LUN management
Bind host HBA to WWPN (FCP igroup)
Persistant binding permanently bind a particular target ID on the host to the storagesystem WWPN. On some system you must create persistentbinding between the storage system (target) and the host (initiator) to guarantee thatthe storage system is always available at the correct SCSI target IDon the host.
Use the command fcp show adapters to display the WWPN for each HBA on thestorage system.
On the Solaris host, use one of the following methods to specify the adapter on thestorage system HBA.
• create_binding.pl• /usr/sbin/lpfc/lputil• /kernel/drv/lpfc.conf• HBAnywhere (Emulex adapter)• SANsurfer (Qlogic adapter)
To determine the WWPN of the HBA installed on the AIX or HPUX host.
• sanlun fcp show adapter -c• The "-c" option will generate the complete command necesarry for creating the
igroup• Use the WWPN when you create a FCP type initiator groups on the storage
system
To find the WWPN for the WWPN installed on the Linux host.
• modprobe driver_name - loads the driver• The system creates /proc/scsi/driver_name directory that contains a file for
each QLogic HBA port.The WWPN is contained in the file for that port.
• Look in each /proc/scsi/driver_name/HBA_port_num file and get the WWPN.The filename is the HBPA port number.

Storage system commands for Initiators and Targets
• Host initiators HBA's◦ fcp show initiators 0a
• Filer (storage) target HBA's◦ fcp show targets 0a
Access LUN's on Solaris (FCP igroup)
LUNs created on storage system that will be accessed via FCP must be configured onthe SUN Solaris host.
• Edit /kernel/drv/sd.conf file with the appropriate target and LUN IDs. The/kernel/drv/lpfc.conf file will help determinewhat should be in the sd.conf file.
• Run devfsadm on the host to allow discovery of the new LUN's or use thereboot command reboot -- -r
• Use the sanlun command to verify that the new LUN's are now visable• Use the format command to label the new LUN's as Solaris disks• Create a UNIX file system on the disk, or use it as a raw device
Access LUN's on AIX (FCP igroup)
Configure with native AIX LVM (Logical Volume Manager)
• Run cfgmgr command to discover the new LUN's. Allows the host to log intothe fabric, check for new devices and create new device entries.
• Run the sanlun lun show command to verify that the host has discovered thenew LUN's
• Run smit vg command to create a volume group.• Rim smit to access storage on a volume group.• Run smit fs to create a file system• Run lsvg newvg command to verify the information on the new volume group.
Access LUN's on HPUX (FCP igroup)
Discover the new LUN's on HPUX.
• Run ioscan to discover the LUN's.• Run ioinit -i or insf -e command to create device entries on the host.• Check to see which disk devices map to which HBA devices (tdlist or
fcdlist)• Run sanlun lun show -p all command to display information about device
nodes.• Use HPUX LVM or VERITAS Volume Manager to manage the LUN's
Access LUN's on Linux (FCP igroup)
To configure the LUN's on Linux.

• Confiure the host to find the LUN's (reboot or modprobe)• Verify that the new LUN's are visable (sanlun lun show
filer_name:path_name)• Enable the host to discover new LUN's (modprobe)• Label the new LUN's as Linux disks:
◦ File system: fdisk /de/sd[char]◦ Raw access: use raw command to bind the raw device to the block
device
Access LUN's on Solaris (iSCSI igroup)
To configure the iSCSI LUN's on Solaris.
• Configure an iSCSI target for static or dynamic discovery◦ Sendtargets (dynamic): iscsiadm add discovery-addressIpaddress:port
◦ iSNS (dynamic): iscsiadm iSNS-server Ipaddress:port◦ Static: iscsiadm add static-config eui_number,Ipaddress
• Enable an iSCSI target delivery method◦ SendTargets: iscsiadm modify discovery --sendtargets enable◦ iSNS: iscsiadm modify discovery --isns enable◦ Static: iscsiadm modify discovery --static enable
• Discover the LUN's with devfsadm -i iscsi• View LUN's with /opt/NTAP/SANToolkit/bin/sanlun lun show all• Create file systems with format command• Make iSCSI devices available on reboot. Add an entry to the /etc/vfstab file.
Administer and Manage LUNs
The commands are used to manage LUNs.
• Take LUN's offline and online◦ lun online lun_path [ lun_path ]◦ lun offline lun_path [ lun_path ]
• Unmap a LUN from an igroup◦ offline the LUN using the lun offline command◦ lun unmap lun_path igroup LUN_ID
• Rename a LUN◦ lun move lun_path new_lun_path
• Resize a LUN◦ offline the LUN using the lun offline command◦ lun resize [-f] lun_path new_size
• Modify the LUN description◦ lun comment lun_path [comment]
• Enable or disable space reservation◦ lun set reservation lun_path [enable | disable]
• Remove a LUN◦ offline the LUN using the lun offline command or use the "-f" option
with the lun destroy command.◦ lun destroy [-f] lun_path
LUN migration and Mapping
• LUN's can be migrated to another path (lun move lun_path new_lun_path) inthe same qtree or volume.
• Separate LUN maps are maintained for eahc initiator group◦ Two LUN's mapped to the same igroup must have unique LUN ID◦ You can map a LUN ony once to an igroup◦ You can add a single initiator to multiple igroups
• To migrate a LUN from one igroup to another, use the commands:◦ lun unmap /vol/vol1/lun1 igroup1 3◦ lun map /vol/vol1/lun1 igroup2 3
New and Changed SAN-related Commands for Data ONTAP 7.0
• cf takeover -n enables clustered giveback operation when different versionsof Data ONTAP are used
• fcadmin configures the FAS6000 FC cards to operate in SAN target mode orinitiator mode
• lun clone create creates a LUN clone• lun clone split (start, status, stop) splits a clone, display status of
clone splitting, stops the clone splitting process
New and Changed SAN-related Commands for Data ONTAP 7.1
• iscsi tpgroup manages the assignment of storage system network interfacesto target portal groups
• portset (help,add,create,destroy,remove,show) lists portsets, add portsto portsets, creates new portsets,destroys portsets, remove ports from a portset, show ports in a portset
• fcp config new includes the speed option, allowing you to change the speedsetting for an adapter (4,2,1, auto which is the default)
New and Changed SAN-related Commands for Data ONTAP 7.2
• igroup rename allows you to rename an igroup
LUN cloning
• A LUN clone is a point-in-time, writable copy of a LUN in a snapshot copy.• The LUN clone shares space with the LUN in the backing snapshot copy.
◦ unchanged data on the original snapshot◦ changed data written to the active file system
• Sample usage for testing◦ Use LUN cloning for long-term usage of writable copy of a LUN in a
snapshot copy◦ after LUN clone operation is complete, split the LUN clone from the
backing snapshot copy anddelete the snapshot copy.