Native Stone Catalog
20
-
Upload
mg-digital-media -
Category
Documents
-
view
221 -
download
0
description
Stone Veneer
Transcript of Native Stone Catalog


Index
Boulder Blend . . . . . . . . . . . . . . . . . 4Fieldstone . . . . . . . . . . . . . . . . . . . . 5Ledgestone . . . . . . . . . . . . . . . . . . . 6Limestone . . . . . . . . . . . . . . . . . . . . 7Old Mill . . . . . . . . . . . . . . . . . . . . . . 8Quick Fit . . . . . . . . . . . . . . . . . . . . . 9River Rock . . . . . . . . . . . . . . . . . . 10Rustic Quick Fit . . . . . . . . . . . . . . .11Splitface . . . . . . . . . . . . . . . . . . . . 12Cut Limestone . . . . . . . . . . . . . . . . 13Desert Stone . . . . . . . . . . . . . . . . . 13European Limestone . . . . . . . . . . . 14European Cobble . . . . . . . . . . . . . 14Rustic Ledgestone . . . . . . . . . . . . 15Mountain Rubble . . . . . . . . . . . . . . 15Installation Instructions . . . . . . . . . 16Accessories . . . . . . . . . . . . . . . . . 18
www.nativestone.ca
Factory direct premium stone veneer2121 Fourth Line
Ohsweken Ontario N0A 1M0Tel . 1(519)445-3040Fax 1(519)445-3045
scan with your smartphone
3
Ind
ex

An eclectic assortment of Split Face, River Rock, Flint Rock, Mountain Rubble and Fieldstone product lines offering a unique look of large asymmetrical stones with many face contours .• Stone sizes range from 2” to 16’ in length & height• 1” to 3½” in depth
Boulder Blend
Tribal Tan
4
Bo
uld
er B
len
d

Fieldstone
The settlers used these to build their homes and retaining walls. A traditional flat stone offering large irregular shapes & sizes with weathered faces.• Stone sizes range from 5½” to 14” in length & height• 1” to 3” in depthTribal Tan
Corner Profile
5
FIel
ds
ton
e

A contour filled array of rounded edge stacked stones with various depths and sizes creating slight shadows among its faces .• Stone sizes range from 6” to 17” long, 1½” to 3½” high• Depths are 1 to 2½”
ledgestone
Ojibway Heights
Corner Profile
6
led
ges
ton
e

An aged stone profile with various rectangular shapes offering an epic look into the past .• Stone sizes range from 5½” to 14” in length, 2½” to 8”
in width• Depths are 1” to 1½”
limestone
Mohawk Valley Bronze
7
lIm
esto
ne

old mill
We combined Cut Limestone, Limestone, Stack Stone, Ledgestone, European Cobble, Fieldstone and Weatherface with one another to give a truly unique linear appearance .• Stone sizes range from 4½” to 18” long with widths
of 1½” to 9½”• Depths are 1” to 3”
Hickory
Blend Ash
Winter Grey8
old
mIl
l

Quick Fit
Named for its “quick” installation, this is a sharp edged stacked stone with multiple bridges grouped together on one unit making application of this stone quick and trouble-free .• Unit lengths vary between 5” & 17” with heights of
approximately 4”• Depths are 1” to 2”
Ash
Hickory
9
Qu
Ick
FIt

river rock
You can almost hear the trickling water as you immerse yourself in this rustic look of large and small circular stones made smooth over time at the bottom of a freshwater creek .• Stone sizes range from 3” to 12” in width & length• Depths vary between 1 & 3½” inchesErie Beach
Corner Profile
10
rIv
er r
oc
k

Quick Fit’s older and smoother cousin… look for a softer finish, but they still carry the magnificent surfaces increasing attention to any vertical surface .• Lengths are 8” to 14” with heights of approximately 4”• Depths are approximately 1”
rustic Quick Fit
Hickory
Mohawk Valley Bronze
11
ru
stI
c Q
uIc
k F
It
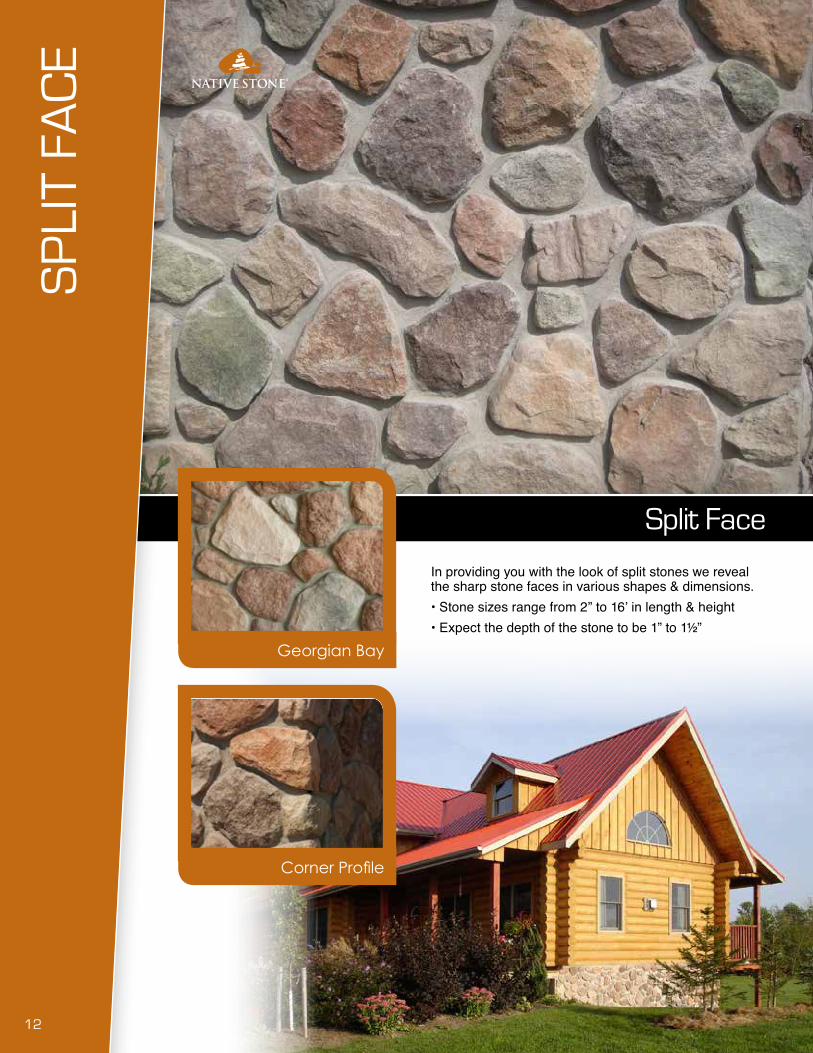
In providing you with the look of split stones we reveal the sharp stone faces in various shapes & dimensions.• Stone sizes range from 2” to 16’ in length & height• Expect the depth of the stone to be 1” to 1½”
split Face
Georgian Bay
Corner Profile
12
sp
lIt
Fac
e

desert stone
cut limestoneCreate a castle like theme with these weathered stone faces neatly cut to stack one on top of another, forming broken linear lines .• Stone sizes range from 4½” to 15½” long by
2” to 9½” high• Depths are 1” to 1½”Colonial Fort
A rugged stacked stone with magnificent textures and sharp edges . Heights vary giving this stone a unique look .• Stone sizes range from 4½” to 18” long with widths
from 1” to 9”• Depths vary between 1” & 1½”
Tribal Tan13
des
ert
sto
ne
& c
ut
lIm
esto
ne

This popular stone has a contemporary appearance with an old world feel . Stones are linear shaped and weathered .• Stone sizes range from between 5½” & 13½” long
with heights from 2” to 8½”• Depths are 1” to 1½”
A taste of old Europe with this mixture of small & large square cut stones . This style will provide you with neatly stacked and carefully planned linear stonework .• Stone sizes range from 4” to 15½” long with
heights from 1½” to 6”• Depths are 1” to 2”
european limestone
european cobble
Ash
Winter Grey14
eur
op
ean
co
BB
le &
lIm
esto
ne

With a rougher more jagged appearance than Ledgestone, look for darker shadows and more irregular edges creating multi-layered lines in your design .• Stone sizes range from 6” to 18” long with
heights from 1½” to 3”• Depths from 1½” to 3”
rustic ledgestone
mountain rubble
Hickory
Ojibway Heights
Tribal Tan
Have your guests get caught up in the tranquil mountains as they gaze upon this mixture of smooth edged round and broken stones revealing sharp & irregular features .• Stone sizes range from 3” to 13” in length & height• 1” to 1½” in depth
15
mo
un
taIn
ru
BB
le &
ru
stI
c l
edg
esto
ne

Step 1 - Preparing SurfaceNative Stone can be easily applied to any structurally sound surface without the use of wall ties, footings, sills or special foundations . Install the stone directly to clean (unsealed, unpainted or untreated) brick, block, concrete or other masonry surfaces . On wood surfaces, a 2 .5 gauge metal lath must be installed prior to install of Native Stone . Nail the lath six inches on center hitting studs whenever possible using 1 1/2” electroplated galvanized roofing nails. Sections of mesh should be horizontally lapped bottom over top a minimum of 1 inch with a similar lap at end joints . Always attach lath right side up with small cups pointing upward . This will allow good mortar encasement and eliminate the tendency for stones to slide during mortar set up period . A weather resistant barrier such as waterproof building paper or asphalt felt should be applied to wood sheathing on exterior applications prior to lath . We also recommend a 10mm airspace between the stone veneer cladding and the sheathing membrane . This can be achieved by installing a perforated aluminum J-channel over the weather resistant barrier at the starting elevation point of the stonework using 1½” electroplated galvanized roofing nails. Next, install Benjamin Obdyke Home Slicker 10 Stone and Stucco rainscreen drainage mat over the top of the weather resistant barrier and slide mat into J-channel to create a bugscreen . Lastly use 13mm staples to secure Benjamin Obdyke Home Slicker 10 Stone and Stucco rainscreen drainage mat to sheathing and begin applying metal lath .
Step 2 - Applying Scratch CoatBegin by mixing mortar to manufacturers specifications taking care not to mix to wet as this condition weakens mortar and causes difficulty in application. We recommend using any “Type S” Masonry Cement .Lathed surfaces should be covered with a thin coat of mortar raked back with a notched tile trowel to leave a grooved surface (scratch coat) and be allowed to set prior to installing Native Stone . Scratch coat should be allowed to dry up to 24 hours before applying stone . After mortar sets, prior placed scratch coat must be dampened with a mixture of water and/or bonding agent, (read bonding agent instructions prior to use as they react differently to weather conditions) to strengthen the bond between mortar and stone before moving to step 3 and 4 and applying stone .
Note: Experienced installers find that they can apply stone to the wall before initial scratch coat begins so as to allow completion in one procedure.
Step 3 - Mortar the StoneBefore install of Native Stone, lay out stones randomly near your work area making sure to include all colors and sizes. Select a stone, dampen the backside of the stone using a masonry brush and water, and apply a ½ inch thick layer of mortar evenly on back of stone.
SHEATHING AND WOOD STUD WALL
SheathingVapor Barrier10mm AirspaceMetal LathStone Veneer
Installation
16
Ins
tall
atI
on

SheathingVapor Barrier10mm AirspaceMetal LathStone Veneer
Step 4 - Applying StonePress the stone firmly into place using enough pressure to cause mortar behind the stone to extrude around its edge. Also, firmly wiggle the stone while applying pressure to ensure a good bond. Install corner stones first for easiest fitting (let them set before proceeding with flat stone) and remember to keep shapes, sizes, colors, thicknesses and textures balanced throughout application . Apply remaining stones by working from the bottom up . Joints between stones should be fitted to the customer or architectural specifications to achieve desired finish effect.Note: When necessary Native Stone units can be cut and shaped with a grinder using a 4 to 4½ inch masonry blade.
Step 5 - Remove and/or Dressing Excess MortarBe careful not to work the joints too soon or the mortar will smear . Once mortar begins to set (approx . 1/2 hour), remove excess mortar around joints of stone by tooling back joint to desired depth using a wooden or metal striking tool which allows for a stronger bond between the stone & mortar. Doing this forces the mortar into the joints to thoroughly seal the joint edges. Sponges work well at the end of this step as they prevent accidental movement or jarring of recently placed stones .
Step 6 - Brush JointsAllow mortar to set for 2 hours before using a whisk broom, to brush mortar joints until smooth and all loose mortar has been brushed away from joints and face of stones .
Step 7 - Clean Stone / CompletionClean any remaining grout off the stone using a sponge or small soft bristle brush . Do not use a wire brush for cleaning. We recommend cleaning the same day of installation as it becomes difficult and problematic to clean once mortar is left to set beyond 2 hours on the face of the stones.
Installation
17
Ins
tall
atI
on

1
2
11
10
3
7
6
5
4
8
9
12
Style Approximate Size Units 1. XL Hearthstone 17½” x 25½” x 1¼” each 2. Lg. Hearthstone 19” x 20” x 2” each 3. Md. Hearthstone 17½” x 17½” x 1¼” each 4. Sm. Hearthstone 17½” x 8½” x 1¼” each 5. Lg. Deep Keystone 11½” x 9½” x 3” each 6. Lg. Keystone 11½” x 9½” x 1½” each 7. Sm. Keystone 8½” x 7½” x 1½” each 8. Trimstone 8” x 6” x 1¾” each 9. Soldierstone 7½” x 3½” x 1½” 8 pack 10. Lg. Water Sill 21¾” x 2¾” x 4” each 11. Sm. Water Sill 17¼” x 2½” x 2¼” each 12. Corner Water Sill 22” x 2½” x 2¼” each
accessories
18
ac
ces
so
rIe
s
notes
19
no
tes

Native Stone®2121 Fourth Line, Ohsweken Ontario N0A 1M0
Tel . 1(519)445-3040 ~ Fax 1(519)445-3045www .nativestone .ca
A division of
Originally launched as “Mohawk Rock” in 1989 by founder David Smith Sr ., Native Stone® (a division of Smith Industries) has been producing natural looking, environmentally friendly stone veneer for almost a quarter century .
With its rich appearance of natural stone, “Native Stone®” will beautify any indoor or outdoor project for substantially less . Providing a light weight, water-resistant fire proof wall facing that is virtually maintenance free and meets all building codes .
It can be applied to any structurally sound surface made from any of the following: • Block • Brick •Concrete • Metal • Wood •Wallboard
Native Stone® requires no additional brick ledge or additional costly foundations for support . The return corner installation process creates an appearance of natural stone .
Native Stone® is sold direct to our customers from the manufacturing facility in Ohsweken, Ontario, where it is made by hand and ISO 9001:2008 certified. (Certificate # FM 544003)
Our vast inventory allows us to provide most customers requiring stock styles and colours with same day service . Custom orders are welcomed as we can match any colour with any style you wish in a matter of weeks. Usually within 10 business days!
Do-it-yourselfers love using Native Stone® as it is easy to apply and we provide a detailed set of instructions . We can provide you with excellent “recommended” installers that have a tremendous track record installing Native Stone® for those larger, more involved projects that you may not want to tackle on your own .
Backed with a 30 year guarantee, Native Stone® is Canada’s oldest and highest quality stone veneer manufacturer .
So if the project you are working on is as small as stone pillars for a fence, your dream home, or a vast residential / commercial project, we look forward to helping you create your masterpiece .