NASCAR Racing - Arcade - Manual - gamesdatabase · 2016-12-10 · Warranty Your new Sega Product is...
163
2ND PRINTING MARCH. 01 MANUAL NO. 4201-6588-01 Owner’s Manual Owner’s Manual Owner’s Manual Owner’s Manual Owner’s Manual SEGA ENTERPRISES, INC. USA Deluxe Version
Transcript of NASCAR Racing - Arcade - Manual - gamesdatabase · 2016-12-10 · Warranty Your new Sega Product is...

2ND PRINTING MARCH. 01
MANUAL NO. 4201-6588-01
Owner’s ManualOwner’s ManualOwner’s ManualOwner’s ManualOwner’s Manual
SEGA ENTERPRISES, INC. USA
Deluxe Version

Warranty
Your new Sega Product is covered for a period of 90 days from the date of shipment. This certifiesthat the Printed Circuit Boards, Power Supplies and Monitor are to be free of defects in workman-ship or materials under normal operating conditions. This also certifies that all Interactive ControlAssemblies are to be free from defects in workmanship and materials under normal operating condi-tions. No other product in this machine is hereby covered.
Sellers sole liability in the event a warranted part described above fails shall be, at its option, toreplace or repair the defective part during the warranty period. For Warranty claims, contact yourSega Distributor.
Should the Seller determine, by inspection that the product was caused by Accident, Misuse, Ne-glect, Alteration, Improper Repair, Installation or Testing, the warranty offered will be null and void.
Under no circumstances is the Seller responsible for any loss of profits, loss of use, or other dam-ages.
This shall be the exclusive written Warranty of the original purchaser expressed in lieu of all otherwarranties expressed or implied. Under no circumstance shall it extend beyond the period of timelisted above.

BEFORE USING THE PRODUCT, BE SURE TO READ THE FOLLOWING:To maintain the safety:
To ensure the safe usage of the product, be sure to read the following before using the product. The followinginstructions are intended for the users, operators and the personnel in charge of the operation of the product.After carefully reading and sufficiently understanding the warning displays and cautions, handle the productappropriately. Be sure to keep this manual nearby the product or elsewhere convenient for referring to itwhen necessary.
Herein, explanations which require special attention are enclosed with dual lines. Depending on the poten-tially hazardous degrees, the terms of WARNING, CAUTION, etc. are used. Be sure to understand thecontents of the displays before reading the text.
Indicates that mishandling theproduct by disregarding thiswarning will cause a potentiallyhazardous situation which canresult in death or serious injury.
Indicates that mishandling the productby disregarding this caution will causea slight hazardous situation which canresult in personal injury and or materialdamage.
For the sage usage of the product, the following pictographs are used:
Indicates “HANDLE WITH CARE.” In order to protect the human body an equipment, thisdisplay is attached to places where the Owner’s Manual and or Service Manual should be referredto.
Perform work in accordance with the instructions herein stated.Instructions for work are explained by paying attention to the aspect of accident prevention. Failing toperform work as per the instructions can cause accidents. In the case where only those who have techni-cal expertise should perform the work to avoid hazardous situation, the instructions herein state that theserviceman should perform such work.
Be sure to turn off power before working on the machine.To prevent electric shock, be sure to turn off power before starting the work in which the worker touchesthe interior of the product. If the work is to be performed in the power-on status, the Instruction Manualherein always states to that effect.
Be sure to ground the Earth Terminal (this, however, is not required in the case where a power cordwith earth is used).This product is equipped with the Earth Terminal. When installing the product, Connect the Earth Termi-nal to the “accurately grounded indoor earth terminal” by using an earth wire. Unless the product isgrounded appropriately, the user can be subject to electric shock. After performing repair, etc. for theControl equipment, ensure that the Earth Wire is firmly connected to the Control equipment.
Ensure that the Power Supply used is equipped with an Earth Leakage Breaker.This product does not incorporate the Earth Leakage Breaker. Using a power supply which is notequipped with the Earth Leakage Breaker can cause a fire when earth leakage occurs.
Be sure to use fuses which meet the specified rating. (only for the machines which use fuses).Using fuses exceeding the specified rating can cause a fire and electric shock.

Specification changes (removal of equipment, conversion and addition) not designated by SEGAare not allowed.The parts of the product include warning labels for safety, covers for personal protection, etc. It is veryhazardous to operate the product by removing parts and or modifying the circuits. Should doors, lidsand protective parts be damaged or lost, refrain from operating the product, and contact where theproduct was purchased from or the office herein stated. SEGA shall not be held responsible for anyaccidents, compensation for damage to a third party, resulting from the specifications not designated bySEGA.Ensure that the product meets the requirements of appropriate Electrical Specifications.Before installing the product, check for Electrical Specifications. SEGA products have a nameplate onwhich Electrical Specifications are described. Ensure that the product is compatible with the powersupply voltage and frequency requirements of the location. Using any Electrical Specifications differentfrom the designated Specifications can cause a fire and electric shock.Install and operate the product in places where appropriate lighting is available, allowing warninglabels to be clearly read.To ensure safety for the customers, labels and printed instructions describing potentially hazardoussituation are applied to places where accidents can be caused. Ensure that where the product is operatedhas sufficient lighting allowing the warnings to be read. If any label is peeled off, apply it again imme-diately. Please place an order with where the product was purchased from or the office herein stated.When handling the Monitor, be very careful. (Applies only to the product w/monitor.)Some of the monitor (TV) parts are subject to high tension voltage. Even after running off power, someportions are still subject to high tension voltage sometimes. Monitor repair and replacement should beperformed only be those technical personnel who have knowledge of electricity and technical expertise.Be sure to adjust the monitor (projector) properly. (Applies only to the product w/monitor.)Do not operate the product leaving on-screen flickering or blurring as it is. Using the product with themonitor not properly adjusted may cause dizziness or a headache to an operator, a player, or the custom-ers.When transporting or reselling this product, be sure to attach this manual to the product.In the case where commercially available monitors and printers are used in this product, only thecontents relating to this product are explained herein. Some commercially available equipment hasfunctions and reactions not stated in this manual. Read this manual together with the specific Instruc-tion Manual of such equipment.
Descriptions herein contained may be subject to improvement changes without notice.The contents described herein are fully prepared with due care. However, should any question arise orerrors be found, please contact SEGA.
•
•
INSPECTIONS IMMEDIATELY AFTER TRANSPORTING THE PRODUCT TO THE LOCATION.
Normally, at the time of shipment, SEGA products are in a status allowing for usage immediately aftertransporting to the location. Nevertheless, an irregular situation may occur during transportation. Beforeturning on power, check the following points to ensure that the product has been transported in a satisfac-tory status.Are there any dented portions or defects (cuts, etc.) on the external surfaces of the cabinet?Are Casters and Adjusters, damaged?Do the power supply voltage and frequency requirements meet with those of the location?Are all wiring connectors correctly and securely connected? Unless connected in the correct direction,connector connections can not be made accurately. Do not insert connectors forcibly.Do power cords have cuts and dents?Do the fuses used meet specified rating? Is the Circuit Protector in an energized status?Are all accessories available?Can all Doors and Lids be opened with the Accessory keys? Can Doors and Lids be firmly closed?

TABLE OF CONTENTS
BEFORE USING THE PRODUCT, BE SURE TO READ THE FOLLOWING:
TABLE OF CONTENTS
INTRODUCTION OF THE OWNER’S MANUAL
1. HANDLING PRECAUTIONS ..........................................................................................
2. PRECAUTIONS CONCERNING INSTALLATION LOCATION ...................................
3. OPERATION .....................................................................................................................
4. NAME OF PARTS .............................................................................................................
5. ACCESSORIES .................................................................................................................
6. ASSEMBLING AND INSTALLATION ............................................................................
7. PRECAUTIONS TO BE HEEDED WHEN MOVING THE MACHINE ........................
8. CONTENTS OF GAME ....................................................................................................
9. EXPLANATION OF TEST AND DATA DISPLAY .........................................................
9 - 1 SWITCH UNIT AND COIN METER ............................................................
9 - 2 SYSTEM TEST MODE ..................................................................................
9 - 3 GAME TEST MODE ......................................................................................
10. CONTROL PANEL ..........................................................................................................
10 - 1 ADJUSTING/REPLACING THE V.R. ..........................................................
10 - 2 GREASING ....................................................................................................
11. SPEED SHIFTER (SHIFT LEVER).................................................................................
11 - 1 REMOVING THE 4-SPEED SHIFTER .......................................................
11 - 2 REPLACING THE SWITCH ........................................................................
12. ACCELERATOR & BRAKE ............................................................................................
12 - 1 ADJUSTING AND REPLACING THE V.R. .................................................
12 -2 GREASING .....................................................................................................
13. PROJECTOR ....................................................................................................................
13 - 1 CLEANING THE SCREEN .........................................................................
13 - 2 ADJUSTMENT OF TOSHIBA PROJECTOR ..............................................
13 - 3 ADJUSTMENT OF MITSUBISHI PROJECTOR ........................................
14. COIN SELECTOR ............................................................................................................
15. REPLACING THE FLOURESCENT LAMP, AND LAMPS ..........................................
16. PERIODIC INSPECTION TABLE ..................................................................................
17. TROUBLESHOOTING ....................................................................................................
18. GAME BOARD ................................................................................................................
18 - 1 REMOVING THE GAME BOARD ..............................................................
18 - 2 COMPOSITION OF GAME BOARD ...........................................................
19. DESIGN RELATED PARTS ............................................................................................
20. COMMUNICATION PLAY .............................................................................................
20 - 1 INSTALLATION PRECAUTIONS ..............................................................
20 - 2 CONNECTING THE COMMUNICATION CABLE ...................................
20 - 3 SETTING FOR COMMUNICATION PLAY ...............................................
21. PARTS LIST .....................................................................................................................
22. WIRE COLOR CODE TABLE .........................................................................................
23. WIRING DIAGRAM ........................................................................................................
1
2 - 3
4 - 6
7
8 - 10
11 - 24
25 - 27
28 - 32
33 - 60
35 - 36
37 - 49
50 - 60
61 - 64
61 - 64
64
65 - 67
65 - 66
67
68 - 69
68 - 69
69
70 - 83
70
71 - 80
81 - 83
84 - 88
89 - 90
91 - 92
93 - 95
96 - 99
97 - 98
99
100
101 - 108
101 - 102
102 - 106
107 - 108
109 - 153
154
155 - 157

SPECIFICATIONS
INTRODUCTION OF THE OWNERS MANUAL
This Owner's Manual is intended to provide detailed descriptions together with allthe necessary information covering the general operation of electronic assemblies,electromechanicals, servicing control, spare parts, etc. as regards the product,EA SPORTS NASCAR ARCADE DX TYPE.This manual is intended for the owners, personnel and managers in charge ofoperation of the product. Operate the product after carefully reading and sufficientlyunderstanding the instructions. If the product fails to function satisfactorily, non-technical personnel should under no circumstances touch the internal system. Pleasecontact where the product was purchased from.
SEGA ENTERPRISES, INC. (U.S.A.)/CUSTOMER SERVICE45133 Industrial Drive, Fremont, California 94538, U.S.A.
Phone : (415) 701-6580Fax : (415) 701-6594
Use of this product is unlikely to cause physical injuries or damages to property. However,where special attention is required this is indicated by a thick line, the word "IMPORTANT"and its sign in this manual.
Indicates that mishandling the product by disregarding this display can cause theproduct's intrinsic performance not to be obtained, resulting in malfunctioning.STOP
IMPORTANT
Installation Space : 1,360 mm (W) X 2,610 mm (D) (53.5 in. X 102.8 in.)
Height : 2,230 mm (87.8 in.)Weight : 450 kg. (992.1 lbs.)Power, maximum current : 625 W 6.70 A (AC 120V 60 Hz AREA)
675 W 4.00 A (AC 220V 50 Hz AREA) 640 W 3.80 A (AC 220V 60 Hz AREA0 675 W 3.60 A (AC 240V 50 Hz AREA)
For TAIWANPower, current : 750 W 9.20 A (MAX.)
350 W 3.80 A (MIN.)MONITOR : 50 TYPE PROJECTION DISPLAY

DEFINITION OF LOCATION MAINTENANCE MAN AND SERVICEMAN
Non-technical personnel who do not have technical knowledge and expertise shouldrefrain from performing such work that this manual requires the location'smaintenance man or a serviceman to carry out, or work which is not explained inthis manual. Failing to comply with this instruction can cause a severe accidentsuch as electric shock.
Ensure that parts replacement, servicing & inspections, and troubleshooting are performed by thelocation's maintenance man or the serviceman. It is instructed herein that particularly hazardouswork should be performed by the serviceman who has technical expertise and knowledge.
The location's maintenance man and serviceman are herein defined as follows:
"Location's Maintenance Man" :Those who have experience in the maintenance of amusement equipment and vending machines,etc., and also participate in the servicing and control of the equipment through such routine workas equipment assembly and installation, servicing and inspections, replacement of units andconsumables, etc. within the Amusement Facilities and or locations under the management of theOwner and Owner's Operators of the product.
Activities of Location's Maintenance Man :Assembly & installation, servicing & inspections, and replacement of units & consumables asregards amusement equipment, vending machines, etc.
Serviceman :Those who participate in the designing, manufacturing, inspections and maintenance service ofthe equipment at an amusement equipment manufacturer.Those who have technical expertise equivalent to that of technical high school graduates as re-gards electricity, electronics and or mechanical engineering, and daily take part in the servicing &control and repair of amusement equipment.
Serviceman's Activities :Assembly & installation and repair & adjustments of electrical, electronic and mechanical parts ofamusement equipment and vending machines.
LISTED
UL®5K92
AMUSEMENT MACHINE

1
1. HANDLING PRECAUTIONS
When installing or inspecting the machine, be very careful of the following points and payattention to ensure that the player can enjoy the game safely.Non-compliance with the following points or inappropriate handling running counter to thecautionary matters herein stated can cause personal injury or damage to the machine.
Before performing work, be sure to turn power off. Performing the workwithout turning power off can cause an electric shock or short circuit. In thecase work should be performed in the status of power on, this manual alwaysstates to that effect.To avoid electric shock or short circuit, do not plug in or unplug quickly.To avoid electric shock, do not plug in or unplug with a wet hand.Do not expose Power Cords and Earth Wires on the surface, (floor, passage,etc.). If exposed, the Power Cords and Earth Wires are susceptible to damage.Damaged cords and wires can cause electric shock or short circuit.To avoid causing a fire or electric shock, do not put things on or damagePower Cords.When or after installing the product, do not unnecessarily pull the power cord.If damaged, the power cord can cause a fire or electric shock.In case the power cord is damaged, ask for replacement through where theproduct was purchased from or the office herein stated. Using the cord as isdamaged can cause fire, electric shock or leakage.Be sure to perform grounding appropriately. Inappropriate grounding cancause an electric shock.Be sure to use fuses meeting specified rating. Using fuses exceeding thespecified rating can cause a fire or electric shock.Completely make connector connections for IC BD and others. Insufficientinsertion can cause an electric shock.Specification changes, removal of equipment, conversion and/or addition, notdesignated by SEGA are not permitted.
• Failure to observe this may cause a fire or an electric shock. Non-compliancewith this instruction can have a bad influence upon physical conditions of theplayers or the lookers-on, or result in injury during play.
• SEGA shall not be held responsible for damage, compensation for damage toa third party, caused by specification changes not designated by SEGA.Be sure to perform periodic maintenance inspections herein stated.
For the IC board circuit inspections, only the logic tester is allowed. The useof a multiple-purpose tester is not permitted, so be careful in this regard.The Projector is employed for this machine. The Projector's screen issusceptible to damage, therefore, be very careful when cleaning the screen.For details, refer to PROJECTOR.
STOP
IMPORTANT

2
2. PRECAUTIONS CONCERNING INSTALLATION
LOCATION
This product is an indoor game machine. Do not install it outside. Even indoors,avoid installing in places mentioned below so as not to cause a fire, electric shock,injury and or malfunctioning.
Places subject to rain or water leakage, or places subject to high humidity inthe proximity of an indoor swimming pool and or shower, etc.Places subject to direct sunlight, or places subject to high temperatures in theproximity of heating units, etc.Places filled with inflammable gas or vicinity of highly inflammable/volatilechemicals or hazardous matter.Dusty places.Sloped surfaces.Places subject to any type of violent impact.Vicinity of anti-disaster facilities such as fire exits and fire extinguishers.The operating (ambient) temperature range is from 5 C° to 40 C°.Only in the case a projector is employed, the temperature range is from 5 C°to 30 C°.
LIMITATIONS OF USAGE REQUIREMENTS
Be sure to check the Electrical Specifications.Ensure that this product is compatible with the location's power supply,voltage and frequency requirements.A plate describing Electrical Specifications is attached to the product.Non-compliance with the Electrical Specifications can cause a fire andelectric shock.This product requires the Breaker and Earth Mechanisms as part of thelocation facilities. Using them in a manner not independent can cause a fireand electric shock.Ensure that the indoor wiring for the power supply is rated at 15A or higher(AC single phase 100 ~ 120V area), and 7A or higher (AC 220 ~ 240V area).Non-compliance with the Electrical Specifications can cause a fire andelectric shock.Be sure to independently use the power supply equipped with the EarthLeakage Breaker. Using a power supply without the Earth Leakage Breakercan cause an outbreak of fire when earth leakage occurs.Putting many loads on one electrical outlet can cause generation of heat and afire resulting from overload.When using an extension cord, ensure that the cord is rated at 15A or higher(AC 100 ~ 120V area) and 7A or higher (AC 220 ~ 240V area). Using a cordrated lower than the specified rating can cause a fire and electric shock.

3
STOP
IMPORTANT
For transporting the machine into the location's building, the minimum necessarydimensions of the opening (of doors, etc.) are 1.4m(W) and 1.7m(H).
For the operation of this machine, secure a minimum area of 2.0m (W) X2.8m (D). In order to prevent injury resulting from the falling down accidentduring game play, be sure to secure the minimum area for operation.Be sure to provide sufficient space so as to allow this product's ventilation fanto function efficiently. To avoid machine malfunctioning and a fire, do notplace any obstacles near the ventilation opening.SEGA shall not be held responsible for damage, compensation for damage toa third party, resulting from the failure to observe this instruction.
OPERATION AREA
Electric current consumption
MAX. 6.7 A (AC 120V 60 Hz)MAX. 4.0 A (AC 220V 50 Hz)MAX. 3.8 A (AC 220V 60 Hz)MAX. 3.6 A (AC 240V 50 Hz)
MAX. 9.2 A (For TAIWAN)
FIG. 2
10cm over.
2.8m
2.0m
70cm

4
3. OPERATION
PRECAUTIONS TO BE HEEDED BEFORE STARTING THE OPERATION
Ensure that all of theAdjusters are in contactwith the floor.
To avoid injury and trouble, be sure to constantly give careful attention to the behavior andmanner of the visitors and players.
In order to avoid accidents, check the following before starting the operation:
To ensure maximum safety for the players and the customers, ensure thatwhere the product is operated has sufficient lighting to allow any warnings tobe read. Operation under insufficient lighting can cause bodily contact witheach other, hitting accident, and or trouble between customers.Be sure to perform appropriate adjustment of the monitor (projector). Foroperation of this machine, do not leave monitor's flickering or deviation as is.Failure to observe this can have a bad influence upon the players' or thecustomers' physical conditions.It is suggested to ensure a space allowing the players who feel sick whileplaying the game to take a rest.Check if all of the adjusters are in contact with the surface. If they are not, theCabinet can move and cause an accident.
123456789012345678901234567890121234567890123456789012345678901123456789012345678901234567890121234567890123456789012345678901123456789012345678901234567890121234567890123456789012345678901123456789012345678901234567890121234567890123456789012345678901

5
Do not put any heavy item on this product. Placing any heavy item on theproduct can cause a falling down accident or parts damage.Do not climb on the product. Climbing on the product can cause falling downaccidents. To check the top portion of the product, use a step.To avoid electric shock, check to see if door & cover parts are damaged oromitted.To avoid electric shock, short circuit and or parts damage, do not put thefollowing items on or in the periphery of the product.Flower vases, flowerpots, cups, water tanks, cosmetics, and receptacles/containers/vessels containing chemicals and water.
To avoid injury, be sure to provide sufficient space by considering the potentiallycrowded situation at the installation location. Insufficient installation space cancause making bodily contact with each other, hitting accidents, and or troublebetween customers.
To avoid injury and trouble, be sure to constantly give careful attention to the behavior andmanner of the visitors and players.
PRECAUTIONS TO BE HEEDED DURING OPERATION (PAYING ATTENTION TO CUSTOMERS)
To avoid injury and accidents, those who fall under the following categoriesare not allowed to play the game.• Those who need assistance such as the use of an apparatus when walking.• Those who have high blood pressure or a heart problem.• Those who have experienced muscle convulsion or loss of consciousness when
playing video game, etc.• Those who have a trouble in the neck and or spinal cord.• Intoxicated persons.• Pregnant women or those who are in the likelihood of pregnancy.• Persons susceptible to motion sickness.• Persons whose act runs counter to the product's warning displays.A player who has never been adversely affected by light stimulus mightexperience dizziness or headache depending on his physical condition whenplaying the game. Especially, small children can be subject to thoseconditions. Caution guardians of small children to keep watch on theirchildren during play.Instruct those who feel sick during play to have a medical examination.To avoid injury resulting from falling down and electric shock due to spilleddrinks, instruct the player not to place heavy items or drinks on the product.To avoid electric shock and short circuit, do not allow customers to put handsand fingers or extraneous matter in the openings of the product or smallopenings in or around the doors.To avoid falling down and injury resulting from falling down, immediatelystop the customer's leaning against or climbing on the product, etc.To avoid electric shock and short circuit, do not allow the customers tounplug the power plug without a justifiable reason.

6
Immediately stop such violent acts as hitting and kicking the product. Suchviolent acts can cause parts damage or falling down, resulting in injury due tofragments and falling down.Instruct the Player to adjust the seat before playing the game. Playing thegame in a forcible posture can cause a contingent accident.
Caution lookers-on so as not totouch the operating unit whilein play. Failure to observe thismay cause bodily contact withthe player and trouble betweenthe customers.
Caution the player so as not tohold a child in her/his lap toplay. Failure to observe thismay cause the child to becaught between the ControlPanel and the player and falldown.
Be careful not to let anyoneinsert a part of his/her bodyinto the void at the rear of theseat. It may be caught betweenthe seat and the roll bar, andeventually he/she may beseriously injured.

7
4. NAME OF PARTS
TABLE 4
Width X Length X Height Weight
PROJECTOR(PTV) 1,140 mm X 555 mm X 1,670 mm 112 kg
PTV BASE 1,160 mm X 545 mm X 235 mm 28 kg
BILLBOARD 1,140 mm X 400 mm X 410 mm 19 kg
MAIN CABINET 1,140 mm X 2,080 mm X 1,590 mm 300 kg
When assembled 1,310 mm X 2,610 mm X 2,230 mm 450 kg
BILLBOARD
PTV
50 TYPE PROJECTOR
MAIN CABINET
AC UNIT
PTV BASE
CONTROL PANEL
COIN CHUTE DOOR
CASHBOX DOOR
BACK LIDACCELERATOR & BRAKE
4 SPEED SHIFTER
FIG. 4 a
FIG. 4 b

8
5. ACCESSORIES
When transporting the machine, make sure that the following parts are supplied.
TABLE 5 ACCESSORIES
KEY MASTER220-5576 (2)
For opening/closingthe doors
KEY(2)
For the CASHBOX DOOR
DESCRIPTION OWNERS MANUAL
Part No. (Qty.) 420-6588-01 (1)
Note
FiguresIf Part No. has no description, the Number has not beenregistered or can not be registered. Such a part may notbe obtainable even if the customer desires to purchase it.Therefore, ensure that the part is in safekeeping with you.
CORD CLAMP280-5009-01 (1)
Used for securing thepower cord.see 4 of Section 6.
AC Cable (Power Cord)600-7228 (1) TAIWAN600-6695 (1) USA600-6618 (1) OTHERS600-6619 (1) HONG KONG
Used for installation,
see 4 of Section 6.
The Keys are inside the CoinChute Door at the time ofshipment from the factory.
VOL CONT B-5K OHM220-5373
(1)220-5484
Spare, see Section 10, 12.
WIRE HARN EARTH W/LUG M6600-6664-02 (1)
For TAIWAN.
Used for installation,see 4 of Section 6.
TAMPERPROOF†WRENCHM8 540-0009-01 (1)
TOOL
SW MICRO TYPE509-5636 (1)
Spare, refer to Section 11.

9
FLEX TUBE310-5050-220200 (1)
For communication play,refer to Section 20.
ASSY FIBER CABLE600-6275-0500 (1)
For communication play,refer to Section 20.
CARTON BOX601-10642 (1)
Used for transporting theGame Board.Refer to Next Page.
CHECK SIDE
CONN 22310-5051-22 (2)
For communication play,refer to Section 20.
NUMBER STICKER(for rear)421-11304 (1)
For communication play,refer to Section 20.
NUMBER STICKER(for side)421-11305 (1)
For communication play,refer to Section 20.
POWER
R / B
R / G / B
TEST
1 8 9 10
PICTURE
R-MUTE G-MUTE B-MUTE
+
MITSUBISHI
ENTER
--
TEST MODE WRITING
POSITION
ADJUST
SELECT
RESET
R BG
PIC-ADJ
SET
P
TOSHIBARemote Controller used foradjustment of the projector.See Section 14.
200-5536(1)
One of the above 3 types ofRemote Controllers is used for theProjector.
MITSUBISHIRemote Controller used foradjustment of the projector.See Section 14.
200-5532(1)
The Remote Controller is attached to the Projector at thetime of shipment.

10
Wrap the Shield Case with the packing material and put it in the Carton Box as shown. Puttingit upside down or packing otherwise in the manner not shown can damage the Game Board andparts.
When asking for the replacement or repair of the product's Game Board (SEGAHIKARU), be sure to put the Game Board together with the Shield Case in aCarton Box. Otherwise, the request is not acceptable.Put the Shield Case in the Carton Box by paying attention to the correctdirection as per the following instructions and as shown by the instructionsprinted on the Carton Box. Handling in an erroneous manner can damage theGame Board.Remove the Shield Case Brackets from the Shield Case and put the Shield Casein the Carton Box.
CHECK SIDE
"CHECK SIDE" Display
FILTER BOARD
SHIELD CASE BRACKETS
The shape depends on the type of product.
HOW TO USE THE CARTON BOX
STOP
IMPORTANT

11
Perform assembly work by following the procedure herein stated. Failing tocomply with the instructions can cause electric shock hazard.Perform assembling as per this manual. Since this is a complex machine,erroneous assembling can cause an electric shock, machine damage and or notfunctioning as per specified performance.When assembling, be sure to use plural persons. Depending on the assemblywork, there are some cases in which working by one person alone can causepersonal injury or parts damage.Ensure that connectors are accurately connected. Incomplete connections cancause electric shock hazard.Be careful so as not to damage wirings. Damaged wiring can cause electricshock and short circuit hazards.Do not carelessly push the PTV. Pushing the PTV carelessly can cause thePTV to fall down.This work should be performed by the Location's Maintenance Man orServiceman. Performing work by non-technical personnel can cause a severeaccident such as electric shock. Failing to comply with this instruction cancause a severe accident such as electric shock to the player during operation.Provide sufficient space so that assembling can be performed. Performingwork in places with narrow space or low ceiling may cause an accident andassembly work to be difficult.To perform work safely and avoid serious accident such as the cabinet'sfalling down, do not perform work in places where step-like gradedifferences, a ditch, or slope exist.Carefully handle the PTV on the PTV base because it is very unstable. Ifhandled carelessly, it may fall down and eventually cause a serious personalinjury.
6. ASSEMBLING AND INSTALLATION
To perform work safely and securely, be sure to prepare a step which is in asecure and stable condition. Performing work without using the step can causeviolent falling down accidents.

12
When carrying out the assembling and installation, follow the following 6-item sequence.
24mm
ASSEMBLING THE PTV
COUPLING THE MAIN CABINET TO THE PTV
SECURING IN PLACE (ADJUSTER ADJUSTMENT)
POWER SUPPLY CONNECTION
TURNING POWER ON
ASSEMBLING CHECK
123456
The master key (accessories) in addition to the tools such as a Phillips type screwdriver, wrench,socket wrench and Ratchet Handle are required for the assembly work.
SOCKET WRENCH,(M8 hexagon bolt)RATCHET HANDLE
WRENCH (for M16 hexagon bolt)
Phillips type screwdriver
KEY MASTER

13
ASSEMBLING THE PTV1Fix the two mask holders onto the PTV top panel each with the 2 countersunk-head screws.
Insert and raise the TV mask as illustrated below, and fix it with the 6 screws.
Fix the panel-mounting brackets L and R onto the PTV front each with the 2 screws.
Mount the front panel onto the PTV front. Fix it with the 4 trusshead screws.
FRONT PANEL
PTV
PANEL MOUNT BRACKET L
FIG. 6. 1 a
Place the PTV on the PTV base. Minimum 3workers must engage in lifting the PTV whileseveral other works must hold the PTV base.
FIG. 6. 1 b
When lifting the PTV the minimum 3workers must cooperate.
FLAT HEAD SCREW (2 each)
M4 X 12
TRUSS SCREW(2) black
M5 X 25, flat washer used.
MASK HOLDER
TV MASK
SCREW (2 each)
M5 X 16, w/flat & spring washers
PANEL MOUNT BRACKET R
TRUSS SCREW(4) black
M5 X 25, flat washer used.
SCREW (4)
M5 X 20, w/flat &spring washers
1
2
3
4
5

14
Connect the billboard wire's two connectors to the PTV top panel's connectors. For the safetythe 2 workers must hold the billboard while another worker must use a stool when connecting.
Place the billboard on thePTV top panel. Engagingthe billboard on the 2mask holders, slide it tothe PTV front. Be carefulnot to damage the wiresin this instance.
Fix the billboard with the2 screws.
SCREW (2)
M5 X 16,w/flat & spring washers
BILLBOARD
Connect the Connector.
PTV
PTV BASE
FIG. 6. 1 c
FIG. 6. 1 d
When performing work,be sure to use a step.
6
7
8

15
COUPLING THE MAIN CABINET TO THE PTV2Move the main cabinet and the PTV closer to each other. Carefully move the PTV on the PTVbase because it is unstable.
Take out the 2 wires from the main cabinet; one for the video signals and another for the power.
Connect the wires between the maincabinet and the PTV. The connectorpanel of the PTV front provides twoconnectors. Into them, insert the 2wire connectors from the main cabi-net; one for the video signals andanother for the power. Each has aninsertion direction. Make sure aboutthe insertion direction before insertingthe connectors, and do not applyexcessive force when inserting;otherwise they may be damaged. Theconnector for the video signals hastwo fixing screws at its both ends.Tightly fasten them after inserting theconnector.
Fasten the screws.
TOSHIBA PROJECTOR
MECA SIDE LIDE
Fasten the screws.
MITSUBISHI PROJECTOR
TRUSS SCREW (3) black
M4 X 8
PHOTO 6. 2 a
FIG. 6. 2 a
1
2
3

16
FIG. 6. 2 b
Remove the 3 trusshead screws to detachthe mechanism-side lid from the maincabinet. A square hole appears.
Couple the PTV and the main cabinetwith each other. Before attaching themclosely without a gap, insert a hand intothe square hole and pull the 2 wires intothe main cabinet. This will prevent thewires from being caught between them.
PHOTO6. 2 b
Mount the 2 joint bracket centers onto the PTV and the main cabinet. Fix them each with 4hexagonal-head bolts.
Mount the 2 joint bracket onto the PTV base and the main cabinet. Fix them each with 3hexagonal-head bolts.
Replace the mechanism-side lid to the main cabinet and fix it with the 3 trusshead screws.
HEXAGON BOLT (4 each) black
M8 X 30, large flat washer used.
JOINT BREACKET CENTER
JOINT BRACKET PTV BASE
HEXAGON BOLT (3 each) black
M8 X 30, large flat washer used.
4
5
6
7
8

17
Peel off the double-sided adhesive tape on the POP reverse and stick the POP Holder.
By using the 3 Truss screws, secure the POP Holder to the Billboard ceiling.
POP HOLDER
TRUSS SCREW (3) black
M4 X 8
FIG. 6. 2 c
POP
Height:320mm
Double-sided adhesive tape
INSTALLING THE POP
1
2

18
3 SECURING IN PLACE (ADJUSTER ADJUSTMENT)
Transport the product to theinstallation position. Be sure toprovide adequate space allowingthe player to get on and off.
Have all of the Adjusters makecontact with the floor. Adjust theAdjuster's height by using awrench so that the machineposition is kept level.
After making adjustment, fastenthe Adjuster Nut upward andsecure the height of Adjuster(FIG. 6. 3 b).
FIG. 6. 3 a BOTTOM VIEW
FIG. 6. 3 b ADJUSTER
10cm over
2.8m
2.0m
70cm
Make sure that all of the adjusters are in contact with the floor. If they are not, thecabinet can move and cause an accident.
This product has 10 casters (4 for PTV base, 6 for Main Cabinet) and 10 Adjusters(4 for PTV base, 6 for Main Cabinet). (FIG. 6. 3a) When the installation position is determined,cause the adjusters to come into contact with the floor directly, make adjustments in a mannerso that the casters will be raised approximately 5mm. from the floor and make sure that themachine position is level.
ADJUSTER
Approx.5mm
ADJUSTER
CASTER
FASTEN UPWARD.
ADJUSTER
CASTER
FIG. 6. 3 cRefer to this Fig. (Scale:1/100)for the layout of the place ofinstallation.
FIG. 6. 3 dBe sure to provide space as shown betweenthe Air Vent and the wall surface.
1
2
3

19
4 POWER SUPPLY, AND EARTH CONNECTION
Main SW off
The AC Unit is mounted on the right side of the machine. The AC Unit has Main SW, CircuitProtector, Earth Terminal and the Inlet which connects the Power Cord.
Ensure that the Main SW is OFF.
FIG. 6. 4 a AC unit
INLET
MAIN SW
Be sure to independently use the power supply socket outlet equipped with anEarth Leakage Breaker. Using a power supply without an Earth LeakageBreaker can cause a fire when electric leakage occurs.Ensure that the "accurately grounded indoor earth terminal" and the earth wirecable are available (except in the case where a power cord plug with earth isused). This product is equipped with the earth terminal. Connect the earthterminal and the indoor earth terminal with the prepared cable. If thegrounding work is not performed appropriately, customers can be subjected toan electric shock, and the product's functioning may not be stable.Ensure that the power cord and earth wire are not exposed on the surface(passage, etc.). If exposed, they can be caught and are susceptible to damage.If damaged, the cord and wire can cause electric shock and short circuitaccidents. Ensure that the wiring position is not in the customer's passageway or the wiring has protective covering.After wiring power cord on the floor, be sure to protect the power cord.Exposed power cord is susceptible to damage and causes an electric shockaccident.
AC Cable (Power Cord)
1

20
Connect one end of the earth wire to the AC Unitearth terminal, and the other end to the indoor earthterminal. The AC Unit earth terminal has a Bolt andNut combination. Take off the Nut, pass the end ofearth wire through the Bolt, and fasten the Nut.Note that the Earth Wire is incorporated in the PowerCord for the Areas of AC 120V (USA) and AC 220 ~240V, and therefore, this procedure is not necessary.
Connect the Earth Wireto the Earth Terminal.
FIG. 6. 4 b Earth Wire Connection
Firmly insert the power plug into thesocket outlet.Insert the opposite side of Power Cordplug to the AC Unit's connector("INLET").
Perform wiring for the Power Cordand Earth Wire. Install protectivecovering for the Power Cord andEarth Wire.
FIG. 6. 4 c Connecting Power Cord and Earth Wire
Wiring Cover
In case the Power Plug is apt to come out of place, secure thePower Cord to the periphery of the AC Unit with the CordClamp (an accessory).
HOW TO USE THE CORD CLAMP
2
3
4

21
5 TURNING POWER ON
Connect the power by turning on the AC unit's main switch. Then the billboard's fluorescentlight comes on.The monitor (PTV screen) displays a system power-on message, and then an advertising screen(a plying-for-hire screen) appears. At the same time the right and left speakers on the controlpanel output an advertise sound. The sound is inaudible, however, when you have disabled itsfunction.Before an advertising screen appears the system automatically conducts an initialization. Do nottouch the product until the system completes an initialization and the advertising screen appears.During an initialization the handle (steering wheel) turns counterclockwise and clockwise andstops at the original center position (for a straight-ahead direction). This corrects the volumevalue inside the control panel. Do not touch the handle or play the game before an initializationis completed (that is, the handle automatically stops at the center position). Failure to observethis may affect the handle's operability and the handle's force feedback (force feedback againstcrashing) during playing the game. If the handle's operability or force feedback is abnormal,disconnect and reconnect the power for initializing the system again.When you disconnect the power, the system saves the data for the credit number, ranking, andlatest game's score. Assume that the credits effective for playing a game remain when youdisconnect the power. In this case, when you will reconnect the power a game startup screenwill appear with the start button flashing.If several machines are interconnected or networked for a communication play, the systemchecks the network. A network-checking screen as illustrated below appears before anadvertising screen appears. Usually, checking the network takes 1 to 3 minutes. If the systemdetects a problem related with the network, it keeps displaying the network-checking screen oran error message.
FIG. 6. 5 a
FIG. 6. 5 b NETWORK check screen
Handle turns counterclockwiseand clockwise.
Sound is emitted.
On-screen images are outputted.
Fluorescent lamps are always lit.

22
6In the TEST MODE, ascertain that the assembly has been made correctly and IC BD. issatisfactory (refer to Section 9).In the test mode, perform the following test:
Selecting the RAM TEST on the system testmode menu screen causes the on-board memoryto be tested automatically. The game board issatisfactory if the display beside each IC No.shows GOOD.
(1) MEMORY TEST
(2) C.R.T. TEST
In the system test mode menu, selecting C.R.T.TEST allows the screen (on which the monitoris tested) to be displayed. Although the monitoradjustments have been made at the time ofshipment from the factory, color deviation, etc.,may occur due to the effect caused bygeomagnetism, the location building's steelframes and other game machines in theperiphery. By watching the test mode screen,make judgment as to whether an adjustment isneeded. If it is necessary, adjust the monitor byreferring to Section 13.
ASSEMBLING CHECK
C.R.T. TEST PAGE#1
0 31
RED
GREEN
BLUE
WHITE
PRESS SERVICE BUTTON TO ANOTHER PAGE PRESS TEST BUTTON TO EXIT
123456789012345678901234567891234567890123456789012345678912345678901234567890123456789123456789012345678901234567891234567890123456789012345678912345678901234567890123456789123456789012345678901234567891234567890123456789012345678912345678901234567890123456789123456789012345678901234567891234567890123456789012345678912345678901234567890123456789123456789012345678901234567891234567890123456789012345678912345678901234567890123456789123456789012345678901234567891234567890123456789012345678912345678901234567890123456789123456789012345678901234567891234567890123456789012345678912345678901234567890123456789
C.R.T. TEST PAGE#2
PRESS SERVICE BUTTON TO ANOTHER PAGE PRESS TEST BUTTON TO EXIT
RAM TEST
IC15 IC16 IC17S IC18S GOOD
IC22 IC23 IC24S IC25S GOOD
IC28 IC29S GOOD
IC41 GOOD
IC42 GOOD
IC44 IC45S IC46 IC47S GOOD
IC91S IC92S GOOD
IC98 GOOD
OPTIONAL SOUND BOARD:
IC2 GOOD
OPTIONAL COMMUNICATION BOARD:
IC7 IC8 IC9 IC10 GOOD
PRESS TEST BUTTON TO EXIT

23
(4) INPUT TEST
Selecting the INPUT TEST on the game testmode menu screen causes the screen (onwhich each switch is tested) to be displayed.Press each switch. For the coin switch test,insert a coin from the coin inlet with the coinchute door open. If the display beside eachswitch indicates "ON," the switch andwiring connections are satisfactory.
(3) SOUND TEST
In the system test mode, selecting SOUNDTEST causes the screen (on which soundrelated BD and wiring connections aretested) to be displayed.Check if the sound is satisfactorily emittedfrom each speaker and the sound volume isappropriate.
SOUND TEST
MAIN SPEAKER LEFT MAIN SPEAKER RIGHT OPTION SPEAKER LEFT OPTION SPEAKER RIGHT > EXIT
SELECT WITH SERVICE BUTTON AND PRESS TEST BUTTON
JVS TEST > DISPLAY CONFIG EXIT
NODE 1/1 SWITCH SYSTEM ________ PLAYER1 _____________ PLAYER2 _____________ COIN SLOT1 0000 SLOT2 8000 ANALOG CH1 0000 CH2 0000 CH3 0000 CH4 0000 CH5 0000 CH6 0000 CH7 0000 CH8 0000
SELECT WITH SERVICE BUTTON AND PRESS TEST BUTTON
INPUT TEST
STEERING WHEEL XXXGAS PEDAL XXXBRAKE PEDAL XXXGEAR POSITION ONSTART BUTTON OFFVIEW CHANGE BUTTON OFF
SERVICE SWITCH OFFTEST SWITCH OFF
PRESS TEST AND SERVICE BUTTON TO EXIT

24
(5) OUTPUT TEST
Select OUTPUT TEST from the Menuscreen in the Game Test Mode to cause thescreen (on which output unit such as lampsand wiring connections are tested) to appear.Ensure that the output unit functionssatisfactorily.
Perform the above inspections also at the time of monthly inspection.
OUTPUT TEST
> START BUTTON VIEW CHANGE BUTTON BASS SHAKER(FRONT) BASS SHAKER(FRONT+REAR)
PRESS TEST BUTTON TO EXIT

25
7. PRECAUTIONS TO BE HEEDED WHEN MOVING THE MACHINE
When moving the machine, be sure to unplug the power plug. Moving themachine with the plug as is inserted can damage the power cord and cause fireand electric shock hazards.When moving the machine on the floor, retract the Adjusters and ensure thatCasters make contact with the floor. During transportation, pay carefulattention so that Casters do not tread power cords and earth wires. Damagingthe power cords can cause electric shock and short circuit hazards.When lifting the cabinet, be sure to hold the grip portions or bottom part.Lifting the cabinet by holding other portions can damage parts and installationportions due to the empty weight of the cabinet, and cause personal injury.When transporting the product in places with step-like differences in grade,disassemble into each unit before transporting. Lifting up the product in anattempt to cross the step-like differences in an as is assembled condition maydamage the unit's joining portions and cause a personal injury resulting fromdamage.When moving the PTV, do not push it from the rear side. Push it fromsideways. Pushing the PTV from the rear side can have the PTV fall down,causing personal injury etc. In case the floor has slanted surfaces or step-likedifferences, be sure to move the machine by 2 or more persons.Do not insert the fork to places other than designated when using a Forklift totransport the machine.Failure to observe this could cause falling down and injury resulting fromfalling down.Carefully handle the PTV on the PTV base because it is very unstable. Ifhandled carelessly, it may fall down and eventually cause a serious personalinjury.
When transporting the product in places with steps, disassemble into each unitbefore transporting. Inclining the product in an as is assembled condition orplacing the cabinet in places with steps can damage the unit's joining portions.To protect surface, do not directly apply a rope to the surfaces of product.Use protective materials to the places the rope is applied to.
Do not push the plastic made parts. Failure to observe this may damage partsand cause injury due to fragments resulting from damage.Do not use the handle or lever to move the product. Failure to observe thismay cause the parts to be deformed or damaged.
STOP
IMPORTANT

26
FIG. 7 a
FIG. 7 b
123456789012345678901234567890121234567890123456789012345678901212345678901234567890123456789012123456789012345123456789012345678901234567890121234567890123456789012345678901212345678901234567890123456789012123456789012345123456789012345678901234567890121234567890123456789012345678901212345678901234567890123456789012123456789012345123456789012345678901234567890121234567890123456789012345678901212345678901234567890123456789012123456789012345123456789012345678901234567890121234567890123456789012345678901212345678901234567890123456789012123456789012345123456789012345678901234567890121234567890123456789012345678901212345678901234567890123456789012123456789012345123456789012345678901234567890121234567890123456789012345678901212345678901234567890123456789012123456789012345123456789012345678901234567890121234567890123456789012345678901212345678901234567890123456789012123456789012345123456789012345678901234567890121234567890123456789012345678901212345678901234567890123456789012123456789012345123456789012345678901234567890121234567890123456789012345678901212345678901234567890123456789012123456789012345
123456789012345678901234567890121234567890123456789012345678901212345678901234567890123456789012123456789012341234567890123456789012345678901212345678901234567890123456789012123456789012345678901234567890121234567890123412345678901234567890123456789012123456789012345678901234567890121234567890123456789012345678901212345678901234123456789012345678901234567890121234567890123456789012345678901212345678901234567890123456789012123456789012341234567890123456789012345678901212345678901234567890123456789012123456789012345678901234567890121234567890123412345678901234567890123456789012123456789012345678901234567890121234567890123456789012345678901212345678901234123456789012345678901234567890121234567890123456789012345678901212345678901234567890123456789012123456789012341234567890123456789012345678901212345678901234567890123456789012123456789012345678901234567890121234567890123412345678901234567890123456789012123456789012345678901234567890121234567890123456789012345678901212345678901234
Do not push PTV from the back. Pushing the PTVfrom the back can cause the PTV to fall down. Pushit from the side.
On level surfaces,move the machine by causingthe Casters to make contact with the surfaces.
GRIP
When transporting the product in places with stepsor step-like differences in grade, disassemble intoeach unit before transporting.

27
FIG. 7 c
SCREEN,TV MASK
HANDLE
PLASTIC Part
FIG. 7 d
When moving the product, use its recessions and bottomparts. Do not hold or push the illustrated parts to move theproduct.
The PTV on the PTV base is very unstable.
GRIP

28
The billboard's fluorescent light is always on when the power is connected.The monitor displays the demonstration images and ranking data. The ranking data is updatedevery week.The lights (integrated with the two buttons on the control panel) are off.The right and left speakers on the control panel output an advertise sound. The right and leftspeakers on the seat backrest and the bass shaker do not output an advertise sound.You can activate or deactivate an advertise sound output function on the test mode screen.
FIG. 8 a
8. CONTENTS OF GAME
The following explanations apply to the case the product is functioning satisfactorily. Shouldthere be any moves different from the following contents, some sort of faults may haveoccurred. Immediately look into the cause of the fault and eliminate the cause thereof to ensuresatisfactory operation.
Advertising (Plying-for-Hire) Performance
Fluorescent lamps are lit.
Emits sounds.
Image output on the monitor.
Coin Inlet
29
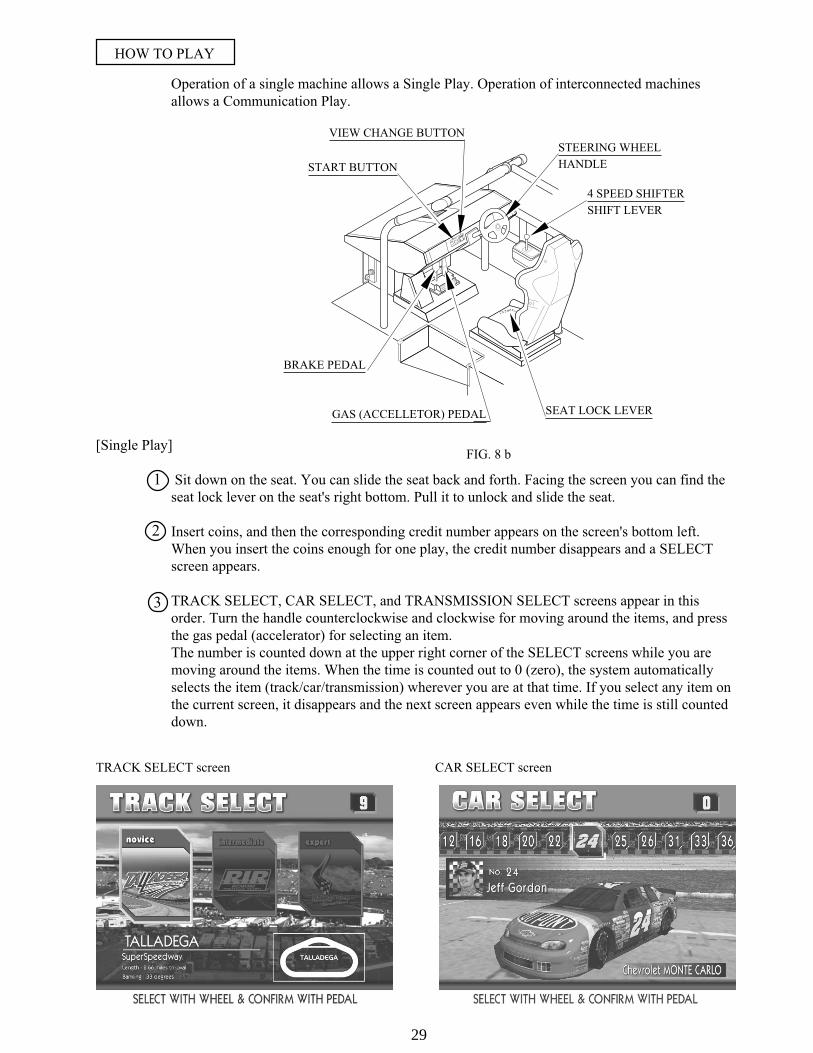
Operation of a single machine allows a Single Play. Operation of interconnected machinesallows a Communication Play.
VIEW CHANGE BUTTON
START BUTTON
STEERING WHEEL
HANDLE
4 SPEED SHIFTER
SHIFT LEVER
SEAT LOCK LEVERGAS (ACCELLETOR) PEDAL
BRAKE PEDAL
FIG. 8 b[Single Play]
Sit down on the seat. You can slide the seat back and forth. Facing the screen you can find theseat lock lever on the seat's right bottom. Pull it to unlock and slide the seat.
Insert coins, and then the corresponding credit number appears on the screen's bottom left.When you insert the coins enough for one play, the credit number disappears and a SELECTscreen appears.
TRACK SELECT, CAR SELECT, and TRANSMISSION SELECT screens appear in thisorder. Turn the handle counterclockwise and clockwise for moving around the items, and pressthe gas pedal (accelerator) for selecting an item.The number is counted down at the upper right corner of the SELECT screens while you aremoving around the items. When the time is counted out to 0 (zero), the system automaticallyselects the item (track/car/transmission) wherever you are at that time. If you select any item onthe current screen, it disappears and the next screen appears even while the time is still counteddown.
TRACK SELECT screen CAR SELECT screen
HOW TO PLAY
1
2
3

30
After you select a transmission, therace starts. If you press the viewchange button on theTRANSMISSION SELECTscreen, you can activate a timeattack mode.
TRANSMISSION SELECT screen
Rules with Time Attack ModeYou drive a car alone to compete in the lap time. You must cycle the course within a limitedtime. If you succeed to cycle the course within a limited time, the remaining time is added to thelimited time of a next cycling. If you clear the specified number of cycling times, the game isfinished. If you fail to cycle the course within a limited time, the game is over.
You start last. You must cycle thecourse within a limited time. If yousucceed to cycle the course withina limited time, the remaining timeis added to the limited time of anext cycling.
If you succeed to overtake thepreceding cars and thereby reach atarget position, the bonus time isadded to the limited time. Thetarget position is eventually carriedup.
If you clear the specified number ofcycling times, the game is finished.If you fail to cycle the course within a limited time, the game is over.
The handle gives a force feedback when your car touches the course walls or other cars, or is offthe course.
If you press the view change button, you can change the viewpoint. After pressing the button, itsintegrated light flashes for several seconds.
When the game is finished or over, the system automatically opens the TRACK SELECT screenonly if playable credits remain at that time.
4
5
6
7
8
9
10

31
[Communication Play]
Starting/playing procedures of a communication play are different from those of a single play.
When a player inserts the coins enough for one play, an entry screen appears. At the same timethe start button flashes.
A player who wants a communication play must insert the coins (enough for onecommunication play) into the separate coin chute slot. A player who wants a single play mustpress the start button immediately when an entry screen appears.
When an entry screen appears, thesystem starts counting down thetime. If there are no competitorsand the time is counted out to 0(zero), only a single play isavailable.
If there are some competitors andthe time is counted out to 0 (zero),the TRACK SELECT screenappears. Turn the handlecounterclockwise and clockwisefor moving around the items andpress the gas pedal (accelerator) forselecting an item. The track isdecided by majority of the players.
Next to the TRACK SELECT screen, the CAR SELECT and TRANSMISSION SELECTscreens appear in this order. Again, turn the handle counterclockwise and clockwise for movingaround the items and press the gas pedal (accelerator) for selecting an item.
On the NAME ENTRY screen, too,turn the handle counterclockwiseand clockwise for moving aroundthe items and press the gas pedal(accelerator) for selecting acharacter.The number is counted down at theupper right corner of the SELECTscreens and the NAME ENTRYscreen while you are movingaround the items. When the time iscounted out to 0 (zero), the systemautomatically selects the item (car/transmission) wherever a player isat that time.If a player selects any item on thecurrent screen, it disappears and thenext screen appears even while thetime is still counted down.
When the number is counted out to 0 (zero) on the NAME ENTRY screen, the race starts.
NAME ENTRY screen
1
2
3
4
5
6
7

32
Players compete with each other in the position. The top player can add the time remained aftera cycling to the limited time of a next cycling.
When the top player clears the specified number of cycling times, the game is finished. If aplayer fails to cycle the course within a limited time, the game is over.
8
9

33
The contents of settings changed in the TEST mode are stored when the testmode is finished from EXIT in the menu mode. If the power is turned offbefore the TEST mode is finished, the contents of setting change becomeineffective.Executing "BACKUP DATA CLEAR" in the SYSTEM TEST MODE doesnot clear the BOOKKEEPING data in the GAME TEST mode.Entering the TEST mode clears fractional number of coins less than one creditand BONUS ADDER data.When the 2 or more machines are linked for communication play, be carefulto enter the test mode. If one of the machines linked enters the test mode, allothers display the NETWORK CHECK screen.
By operating the switch unit, periodically perform the tests and data check. When installing themachine initially or collecting cash, or when the machine does not function correctly, performchecking in accordance with the explanations given in this section.The following shows tests and modes that should be utilized as applicable.SEGA HIKARU GAME BOARD is used for the product. The system of this game boardallows another game to be played by replacing the ROM Board Case mounted on the SEGAHIKARU CASE. As such, the Test Mode of this system consists of the System Test Mode forthe system to execute SELF-TEST, COIN ASSIGNMENTS, etc. used in common for themachines employing the SEGA HIKARU BOARD, and the Game Test Mode for the specificproduct to execute Input/Output test for the operation equipment, difficulty setting, etc.
9. EXPLANATION OF TEST AND DATA DISPLAY
STOP
IMPORTANT

34
9-2 F,G, 9-3 F
9-2 C, 9-3 B
9-3 C
9-2 B,J
9-2 B,J
9-2 B,J9-2 F,G, 9-3 F9-2 C, 9-3 B9-3 C
9-2 C, 9-3 B
9-3 D,E,10,11,12
9-2 E13
9-2 B,J9-2 D
9-2 H, 9-3 G
TABLE 9 EXPLANATION OF TEST MODE
INSTALLATIONOF MACHINE
MEMORY
PERIODICSERVICING
CONTROLSYSTEM
MONITOR
IC BOARD
DATA CHECK
When the machine is installed, perform the following: 1. Check to see that each setting is as per standard setting made at
the time of shipment. 2. In the INPUT TEST mode, check such input devices as each
SW, V.R., etc. 3. In the OUTPUT TEST mode, check such output devices as
lamps, motors, etc. 4. In the SELF-TEST mode, check ICs on the IC Board.
Choose MEMORY TEST in the MENU mode to allow theMEMORY test to be performed. In this test, PROGRAM RAMs,ROMs, and ICs on the IC Board are checked.
Periodically perform the following: 1. MEMORY TEST 2. Ascertain each setting. 3. In the INPUT TEST mode, test the CONTROL device 4. In the OUTPUT TEST mode, check such output devices as
lamps, motors, etc.
1. In the INPUT TEST mode, check such input devices as eachSW, V.R., etc.
2. Adjust or replace each SW and VR. 3. If the problem can not be solved yet, check the CONTROL's
moves.
In the MONITOR ADJUSTMENT mode,check to see if the PROJECTOR adjustment is appropriatelymade.
1. MEMORY TEST 2. In the SOUND TEST mode, check the sound related ROMs.
Check such data as game play time and histogram to adjust thedifficulty level, etc.
ITEMS DESCRIPTION REFERENCE SECTIONS

35
Open the coin chute door, and the switch unit shown will appear.The functioning of each SW is as follows:The sound volumes of the front and rear speakers are adjusted as indicated by the illustration onthe switch unit, at the factory before shipping. This adjustment aims to attain the best outputbalance between the front and rear speakers. Remember that carelessly changing this adjustmentmay cause the best balance to be lost.
BASE SHAKER Output Adjustment Volume
FIG. 9. 1 a SWITCH UNIT
9 - 1 SWITCH UNIT AND COIN METER
Adjust to the optimum sound volume by considering the environmentalrequirements of the installation location.If the COIN METER and the game board are electrically disconnected, gameplay is not possible.A cover is provided on the bass shaker output adjustment volume in order toprevent the BASE SHAKER against being carelessly adjusted.
Never touch places other than those specified. Touching places not specified cancause electric shock and short circuit hazards.
STOP
IMPORTANT
SWITCH UNIT
SOUND VOLUME
TEST BUTTON SERVICE BUTTON

36
TEST
SERVICE
FRONT SPEAKER
REAR SPEAKER
BASS SHEAKER
FIG. 9. 1 b COIN METER
TEST BUTTON : For the handling of the test button, refer to the following pages.
SERVICE BUTTON : Gives credits without registering on the coin meter.
SOUND VOLUME : Adjusts the sound volume of the left and right speakers on the control panel.
SOUND VOLUME : Adjusts the sound volume of the left and right speakers on the seat backrest.
BASE SHAKER Output Adjustment Volume : Adjusts the vibration output of the base shakers each onthe seat backrest and the control panel.
Open the Cashbox Door by using the key tohave the Coin Meter appear underneath theCashbox.
COIN METER
COIN METER

37
SYSTEM MENU XXXXXXXXX VERSION
RAM TEST JVS TEST SOUND TEST C.R.T. TEST SYSTEM ASSIGNMENTS COIN ASSIGNMENTS BOOKKEEPING BACKUP DATA CLEAR ROMBD TEST CLOCK SETTING GAME TEST MODE > EXIT
SELECT WITH SERVICE BUTTON AND PRESS TEST BUTTON
RAM TEST
IC15 IC16 IC17S IC18S GOOD IC22 IC23 IC24S IC25S GOOD IC28 IC29S GOOD IC41 GOOD IC42 GOOD IC44 IC45S IC46 IC47S GOOD IC91S IC92S GOOD IC98 GOOD
OPTIONAL SOUND BOARD: IC2 GOOD
OPTIONAL COMMUNICATION BOARD: IC7 IC8 IC9 IC10 GOOD
PRESS TEST BUTTON TO EXIT
9 - 2 SYSTEM TEST MODE
A. SYSTEM TEST MODE MENU
Press TEST Button to enter the TEST MODE, and the following Menu screen will be displayed.
Press SERVICE Button to move thearrow (>) to the desired item andselect with TEST Button.
Bring the arrow to EXIT and pressTEST Button to return to the GAMEMode.
B. RAM TEST
This allows for checking the functioning of the RAM on the Game BD.In this test, IC's are checked in every row. During the test, "CHECKING" is displayed at theright-hand side of the screen. "BAD" is indicated for irregular RAMs, if any.Upon finishing the test, "PRESS TEST BUTTON TO EXIT" is displayed on the lower center ofthe monitor. Press TEST Button to return to the MENU screen.

38
JVS TEST INPUT TEST > EXIT
NODE 1/1 NAME SEGA ENTERPRISES,LTD.;837-13741 I/O CONTROL BD2;Ver0.15;99/06 CMD VER 1.1 JVS VER 2.0 COM VER 1.0 SWITCH 2PLAYERS 12BITS COIN 2SLOTS ANALOG 8CH DRIVER OUT 22CH
SELECT WITH SERVICE BUTTON AND PRESS TEST BUTTON
Execute EXIT to return to the MENU screen.
When INPUT TEST is selected and executed, the following screen appears.
Execute EXIT to return to the MENU screen.
JVS TEST > DISPLAY CONFIG EXIT
NODE 1/1 SWITCH SYSTEM ________ PLAYER1 _____________ PLAYER2 _____________ COIN SLOT1 0000 SLOT2 8000 ANALOG CH1 0000 CH2 0000 CH3 0000 CH4 0000 CH5 0000 CH6 0000 CH7 0000 CH8 0000
SELECT WITH SERVICE BUTTON AND PRESS TEST BUTTON
With a switch input from thecontrol panel etc., this changesinto 1.
With a coin switch input, thisaccumulates. And, the coinmeter counts.
Analogue values are displayedbetween 0000 and FF00.
In this test, Functioning of the I/O Board connected to Game Board is displayed and INPUTTEST can be performed.
C. JVS TEST

39
D. SOUND TEST
This is a sound output test. Each speaker outputs the game's playing message in English.
SOUND TEST
MAIN SPEAKER LEFT MAIN SPEAKER RIGHT OPTION SPEAKER LEFT OPTION SPEAKER RIGHT > EXIT
SELECT WITH SERVICE BUTTON AND PRESS TEST BUTTON
MAIN SPEAKER LEFT : Output from the front left speaker
MAIN SPEAKER RIGHT : Output from the front right speaker
OPTION SPEAKER LEFT : Output from the rear left speaker
OPTION SPEAKER RIGHT : Output from the rear right speaker
Front speakers are located on the control panel. Rear speakers are located on the seat's backrest.Press the service button to move the > mark to a desired item (speaker), and press the testbutton. Make sure that the selected speaker outputs the playing message. The playing messageheard indicates that the speaker and related wires are normal.Execute EXIT to return to the MENU screen.

40
C.R.T. TEST PAGE#1
0 31
RED
GREEN
BLUE
WHITE
PRESS SERVICE BUTTON TO ANOTHER PAGE PRESS TEST BUTTON TO EXIT
12345678901234567890123456789123456789012345678901234567891234567890123456789012345678912345678901234567890123456789123456789012345678901234567891234567890123456789012345678912345678901234567890123456789123456789012345678901234567891234567890123456789012345678912345678901234567890123456789123456789012345678901234567891234567890123456789012345678912345678901234567890123456789123456789012345678901234567891234567890123456789012345678912345678901234567890123456789123456789012345678901234567891234567890123456789012345678912345678901234567890123456789123456789012345678901234567891234567890123456789012345678912345678901234567890123456789
C.R.T. TEST PAGE#2
PRESS SERVICE BUTTON TO ANOTHER PAGE PRESS TEST BUTTON TO EXIT
E. C.R.T. TEST
In this test, monitor adjustment can be performed. Periodically check to see if the monitoradjustment is appropriate in this test. This test consists of 2 screens. Use SERVICE Button tochange the screen displayed. Press TEST Button to return to the MENU screen.
The first screen displays color bars. Thecolor adjustment can be checked. Eachof red, green, blue is the darkest at theleftmost end, and becomes brightertowards the right-hand end.
The second screen displays crosshatches.In this page, monitor size and deviationcan be checked.

41
Performs setting for the whole system. Set each item in accordance with the cabinet. Use theitems except ADVETISE SOUND and COMMUNICATION MODE as they are at the time ofshipment. To change setting, bring the arrow (>) to the desired item with the SERVICE buttonand press the TEST button.
SYSTEM ASSIGNMENTS
CABINET TYPE 1PLAYER ADVERTISE SOUND ON MONITOR TYPE HORIZONTAL DISPLAY MODE AUTOSCAN SERVICE TYPE COMMON COMMUNICATION MODE MASTER> EXIT
SELECT WITH SERVICE BUTTON AND PRESS TEST BUTTON
Set the CABINET TYPE and MONITOR TYPE to a correct value according tothe cabinet you use. If you fail to observe this, an error message appears whenconnecting the power and when exiting from a test mode; and eventually youcannot play the game.
CABINET TYPE (1PLAYER ~ 8PLAYERS) : Always set to 1PLAYER.
ADVERTISE SOUND (ON, OFF) : Set to ON or OFF (that enables to outputor not an advertise sound from the speak-ers).
MONITOR TYPE (HORIZONTAL, VERTICAL) : Always set to HORIZONTAL.
DISPLAY MODE (AUTOSCAN, 31KHz, 24KHz) : Always set to AUTOSCAN.
SERVICE TYPE (COMMON, INDIVIDUAL) : Always set to COMMON.
COMMUNICATION MODE (MASTER, SLAVE, RELAY, NO LINK):
Select from among MASTER, SLAVE, NO LINK, and RELAY.When performing setting for communication play, be careful of the following points.
MASTER : Set only one of the linked machine to MASTER for communication play.
SLAVE : Set the other linked machines to SLAVE for communication play.
RELAY : Set to RELAY when you want to use the machine as a monitor showing thecommunication play.
NO LINK : Set to NO LINK when you operate the machine alone.
F. SYSTEM ASSIGNMENTS
STOP
IMPORTANT

42
COIN ASSIGNMENTS COIN CHUTE TYPE COMMON COIN/CREDIT SETTING #1 COIN CHUTE #1 1COIN 1CREDIT
COIN CHUTE #2 1COIN 1CREDIT
MANUAL SETTING SEQUENCE SETTING > EXIT
SELECT WITH SERVICE BUTTON AND PRESS TEST BUTTON
G. COIN ASSIGNMENTS
In this mode, the setting of incremental credit increase as against coin insertion can be changed.This test consists of 3 screens, and the following is the first screen.The setting done in the first screen will be stored when exited.
COIN CHUTE TYPE sets whether Coin Chute is used in common by all players orseparately allocated to each player in case 2 or more Coin Chutes are incorporated.COMMON: This setting is for common use by plural players.INDIVIDUAL: As each player uses an independent coin chute, setting to INDIVIDUALcauses COIN CHUTE #2 to be disappeared.
COIN/CREDT SETTING is set when using one of the existing 26 settings or FREE PLAY.The selected coin rates in the COIN/CREDIT SETTING are displayed below COIN CHUTE#1 and COIN CHUTE #2. If you wish to set a coin rate rather than to select from theexisting setting, select MANUAL SETTING. The display next to COIN/CREDIT SETTINGindicates "MANUAL", not "#n" in this case.

43
COIN ASSIGNMENTS MANUAL SETTING
COIN TO CREDIT 1 BONUS ADDER 0 COIN CHUTE #1 MULTIPLIER 1 COINCOUNT AS 1COIN COIN 1 2 3 4 5 6 7 8 9 CREDIT 1 2 3 4 5 6 7 8 9
COIN CHUTE #2 MULTIPLIER 1 COINCOUNT AS 1COIN COIN 1 2 3 4 5 6 7 8 9 CREDIT 1 2 3 4 5 6 7 8 9
SEQUENCE SETTING > EXIT
SELECT WITH SERVICE BUTTON AND PRESS TEST BUTTON
MANUAL SETTING
When MANUAL SETTING is selected in the first screen, the following second screen appears.
COIN TO CREDIT determines how many coins are needed for one credit. (1 ~ 9)
BONUS ADDER determines how many coins should be inserted to obtain one SERVICECOIN.
COIN CHUTE #1 MULTIPLIER, COIN CHUTE #2 MULTIPLIER sets how many tokensone Coin represents inserted in each COIN CHUTE.
SETTING EXAMPLE 1)Setting of 2 COINS 1 CREDIT, set to:COIN TO CREDIT :2BONUS ADDER :0COIN CHUTE #1 MULTIPLIER :1
SETTING EXAMPLE 2)Setting of 5 COINS 6 CREDITS (5 COINS 1 BONUS), set toCOIN TO CREDIT :1BONUS ADDER :5COIN CHUTE #1 MULTIPLIER :1
When exiting from MANUAL SETTING, if the identical coin rate is in the existing COIN/CREDIT SETTING, such existing mode other than what is set in the MANUAL SETTING isconfirmed.

44
NAME OF SETTING FUNCTIONING OF COIN CHUTE #1 FUNCTIONING OF COIN CHUTE #2
SETTING #1 1 COIN 1 CREDIT 1 COIN 1 CREDIT
SETTING #2 1 COIN 2 CREDITS 1 COIN 1 CREDIT
SETTING #3 1 COIN 3 CREDITS 1 COIN 1 CREDIT
SETTING #4 1 COIN 4 CREDITS 1 COIN 1 CREDIT
SETTING #5 1 COIN 5 CREDITS 1 COIN 1 CREDIT
SETTING #6 1 COIN 2 CREDITS 1 COIN 2 CREDITS
SETTING #7 1 COIN 5 CREDITS 1 COIN 2 CREDITS
SETTING #8 1 COIN 3 CREDITS 1 COIN 3 CREDITS
SETTING #9 1 COIN 4 CREDITS 1 COIN 4 CREDITS
SETTING #10 1 COIN 5 CREDITS 1 COIN 5 CREDITS
SETTING #11 1 COIN 6 CREDITS 1 COIN 6 CREDITS
SETTING #12 2 COINS 1 CREDIT 2 COINS 1 CREDIT
SETTING #13 1 COIN 1 CREDIT 2 COINS 1 CREDIT
SETTING #14 1 COIN 2 CREDITS 2 COINS 1 CREDIT
SETTING #15 1 COIN 1 CREDIT 1 COIN 1 CREDIT
2 COINS 3 CREDITS 2 COINS 3 CREDITS
SETTING #16 1 COIN 3 CREDITS 1 COIN 1 CREDIT
2 COINS 3 CREDITS
SETTING #17 3 COINS 1 CREDIT 3 COINS 1 CREDIT
SETTING #18 4 COINS 1 CREDIT 4 COINS 1 CREDIT
SETTING #19 1 COIN 1 CREDIT 1 COIN 1 CREDIT
2 COINS 2 CREDITS 2 COINS 2 CREDITS
3 COINS 3 CREDITS 3 COINS 3 CREDITS
4 COINS 5 CREDITS 4 COINS 5 CREDITS
SETTING #20 1 COIN 5 CREDITS 1 COIN 1 CREDIT
2 COINS 2 CREDITS
3 COINS 3 CREDITS
4 COINS 5 CREDITS
SETTING #21 5 COINS 1 CREDIT 5 COINS 1 CREDIT
SETTING #22 1 COIN 2 CREDITS 3 COINS 1 CREDIT
5 COINS 2 CREDITS
SETTING #23 2 COINS 1 CREDIT 2 COINS 1 CREDIT
4 COINS 2 CREDITS 4 COINS 2 CREDITS
5 COINS 3 CREDITS 5 COINS 3 CREDITS
SETTING #24 1 COIN 3 CREDITS 2 COINS 1 CREDIT
4 COINS 2 CREDITS
5 COINS 3 CREDITS
SETTING #25 1 COIN 1 CREDIT 1 COIN 1 CREDIT
2 COINS 2 CREDITS 2 COINS 2 CREDITS
3 COINS 3 CREDITS 3 COINS 3 CREDITS
4 COINS 4 CREDITS 4 COINS 4 CREDITS
5 COINS 6 CREDITS 5 COINS 6 CREDITS
SETTING #26 1 COIN 6 CREDITS 1 COIN 1 CREDIT
2 COINS 2 CREDITS
3 COINS 3 CREDITS
4 COINS 4 CREDITS
5 COINS 6 CREDITS
SETTING #27 FREE PLAY FREE PLAY
TABLE 1 COIN/CREDIT SETTING

45
Table 3: MANUAL SETTING
NAME OF SETTING EACH SEAT'S COIN CHUTE
SETTING #1 1 COIN 1 CREDIT
SETTING #2 1 COIN 2 CREDITS
SETTING #3 1 COIN 3 CREDITS
SETTING #4 1 COIN 4 CREDITS
SETTING #5 1 COIN 5 CREDITS
SETTING #11 1 COIN 6 CREDITS
SETTING #12 2 COINS 1 CREDIT
SETTING #15 1 COIN 1 CREDIT
2 COINS 3 CREDITS
SETTING #17 3 COINS 1 CREDIT
SETTING #18 4 COINS 1 CREDIT
SETTING #19 1 COIN 1 CREDIT
2 COINS 2 CREDITS
3 COINS 3 CREDITS
4 COINS 5 CREDITS
NAME OF SETTING EACH SEAT'S COIN CHUTE
SETTING #21 5 COINS 1 CREDIT
SETTING #23 2 COINS 1 CREDIT
4 COINS 2 CREDITS
5 COINS 3 CREDITS
SETTING #25 1 COIN 1 CREDIT
2 COINS 2 CREDITS
3 COINS 3 CREDITS
4 COINS 4 CREDITS
5 COINS 6 CREDITS
SETTING #27 FREE PLAY
Table 2: COIN/CREDIT SETTING (COIN CHUTE INDIVIDUAL TYPE)
COIN TO CREDIT 1 COIN 1 CREDIT2 COINS 1 CREDIT3 COINS 1 CREDIT4 COINS 1 CREDIT5 COINS 1 CREDIT6 COINS 1 CREDIT7 COINS 1 CREDIT8 COINS 1 CREDIT9 COINS 1 CREDIT
BONUS ADDER NO BONUS ADDER2 COINS GIVE 1 EXTRA COIN3 COINS GIVE 1 EXTRA COIN4 COINS GIVE 1 EXTRA COIN5 COINS GIVE 1 EXTRA COIN6 COINS GIVE 1 EXTRA COIN7 COINS GIVE 1 EXTRA COIN8 COINS GIVE 1 EXTRA COIN9 COINS GIVE 1 EXTRA COIN
COIN CHUTE (# 1 / # 2) 1 COIN COUNTS AS 1 COIN MULTIPLIER 1 COIN COUNTS AS 2 COINS
1 COIN COUNTS AS 3 COINS1 COIN COUNTS AS 4 COINS1 COIN COUNTS AS 5 COINS1 COIN COUNTS AS 6 COINS1 COIN COUNTS AS 7 COINS1 COIN COUNTS AS 8 COINS1 COIN COUNTS AS 9 COINS

46
SEQUENCE1 : Credit number enough to start the game
Each sequence can be set between 1 ~ 5.SEQUENCE 2 to 8 are not used. On the screen, however, the credit number is changeable.
Select EXIT to return to the first screen.
COIN ASSIGNMENTS SEQUENCE SETTING
SEQUENCE1 *CREDIT SEQUENCE2 *CREDIT SEQUENCE3 *CREDIT SEQUENCE4 *CREDIT SEQUENCE5 *CREDIT SEQUENCE6 *CREDIT SEQUENCE7 *CREDIT SEQUENCE8 *CREDIT > EXIT
[ XXXXXXXXXXXXXXXXXXXXX ] [ SEGA ENTERPRISES,LTD. ] DESCRIPTION OF SEQUENCE SEQ1 CREDIT TO 1 PLAYER START SEQ2 NOT USED SEQ3 NOT USED SEQ4 NOT USED SEQ5 NOT USED SEQ6 NOT USED SEQ7 NOT USED SEQ8 NOT USED
SELECT WITH SERVICE BUTTON AND PRESS TEST BUTTON
SEQUENCE SETTING
When SEQUENCE SETTING is selected in either first or second screen, the SEQUENCESETTING Mode (the third screen) appears.In this mode, number of credits required for starting game can be set.

47
BOOKKEEPING PAGE#1
TOTAL TIME 55H27M13S COIN1 16 SERVICE1 5 COIN2 4 SERVICE2 0 CREDIT 10
TOTAL COIN 20 COIN CREDIT 10 SERVICE CREDIT 5 TOTAL CREDIT 15
PRESS SERVICE BUTTON TO ANOTHER PAGE PRESS TEST BUTTON TO EXIT
BOOKKEEPING PAGE#2
PLAYER1 SEQ1 1 SEQ2 0 SEQ3 1 SEQ4 0 SEQ5 0 SEQ6 0 SEQ7 0 SEQ8 0
PRESS SERVICE BUTTON TO ANOTHER PAGE PRESS TEST BUTTON TO EXIT
H. BOOKKEEPING
This allows such data as operating time/No. of coins inserted/ No. of credits to be checked, etc.This test consists of 2 screens. Pressing SERVICE Button causes screen to be changed. PressTEST Button to return to the MENU screen.On the first screen, such data as total time, coin, and credit are displayed.
Total Time is displayed as "X X H X X M X X S" and no date will be displayed after exceeding24 hours.
On the second screen, each sequence displays the frequency of functioning.

48
Press the service button to move the > mark to YES (CLEAR) item, and press the test button.When the system completes clearing, a 'COMPLETED' message appears on the screen. Pressthe test button again to return to the SYSTEM MENU screen.Press the service button to move the > mark to NO (CANCEL) item, and press the test button.The system does not execute clearing, but returns to the SYSTEM MENU screen.
I. BACKUP RAM CLEAR
This enables you to clear the BOOKKEEPING data (coin- and credit-related data and TOTALTIME data) in the SYSTEM MENU screen.NOTE: The same screen appears also in the GAME TEST MENU screen to clear the operatingdata.
BACKUP DATA CLEAR
YES (CLEAR) > NO (CANCEL)
SELECT WITH SERVICE BUTTON AND PRESS TEST BUTTON
J. ROMBD TEST
This screen enables to check the ROM on the ROM board. When the system completeschecking successfully or unsuccessfully, respectively 'GOOD' or 'BAD' message appears on thescreen. For the program ROM (IC 35 and IC36), 'GOOD' or 'BAD' message does not appear.
ROMBD TEST [ XXXXXXXXXXXXXXXXXXXXXX ] [SEGA ENTERPRISES,LTD.]
NO. TYPE RESULT BYTE WORDIC35 32M ------ XXXX XXXXIC36 32M ------ XXXX XXXXIC19 128M GOOD XXXX XXXXIC20 128M GOOD XXXX XXXX ÅE ÅE ÅE ÅE ÅE ÅE ÅE
PRESS TEST BUTTON TO EXIT
Press TEST Button to return to MENU mode.

49
CLOCK SETTING
2000 7/ 7 7: 7 7 FRI
YEAR MONTH DAY HOUR MINUTE SECOND
> EXIT CANCEL 2000 7/ 7 7: 7 ** FRI
SELECT WITH SERVICE BUTTON AND PRESS TEST BUTTON
K. CLOCK SETTING
The ranking data appears during advertising. It is automatically updated weekly; thereforecorrectly set the clock in the CLOCK SETING screen.YEAR, MONTH, DAY, HOUR, and MINUTE are set for SEGA HIKARU BD.Select the desired item with SERVICE Button and press TEST Button to increase the value.Bring the arrow to EXIT and press TEST Button to return to MENU Mode.
L. GAME TEST MODE
Enters the TEST Mode of the game connected to SEGA HIKARU BD. The TEST Modeincludes INPUT Test, GAME ASSIGNMENTS such as game difficulty, etc. Refer to 9-3 fordetails.

50
SYSTEM MENU XXXXXXX VERSION
RAM TEST JVS TEST SOUND TEST C.R.T. TEST SYSTEM ASSIGNMENTS COIN ASSIGNMENTS BOOKKEEPING BACKUP DATA CLEAR ROMBD TEST CLOCK SETTING > GAME TEST MODE EXIT
SELECT WITH SERVICE BUTTON AND PRESS TEST BUTTON
GAME TEST MENU
INPUT TEST OUTPUT TEST FORCE FEEDBACK INPUT ASSIGNMENTS GAME ASSIGNMENTS BOOKKEEPING BACKUP DATA CLEAR
> EXIT
SELECT WITH SERVICE BUTTON AND PRESS TEST BUTTON
Press the service button to move the > mark to any desired item, and press the test button. Thenthe selected item's screen appears. In the screen use the service button and the test buttonsimilarly to in the SYSTEM MENU screens.After testing, select the EXIT and press the test button. The SYSTEM MENU screen reappears.Again select the EXIT and press the test button. The SYSTEM MENU screen disappears, and aplaying mode screen appears.
9 - 3 GAME TEST MODE
A. GAME MENU
Press the service button to move the > mark to GAME TEST MODE item, and press the testbutton. Then the following GAME TEST MODE screen appears.

51
Press the service button to select the INPUT TEST item in the GAME TEST MENU screen, andpress the test button. The following INPUT TEST screen appears.Periodically test the input devices by using the screen.
B. INPUT TEST
INPUT TEST
STEERING WHEEL XXXGAS PEDAL XXXBRAKE PEDAL XXXGEAR POSITION ONSTART BUTTON OFFVIEW CHANGE BUTTON OFF
SERVICE SWITCH OFFTEST SWITCH OFF
PRESS TEST AND SERVICE BUTTON TO EXIT
• Each of STEERING WHEEL, GAS PEDAL, and BRAKE PEDAL indicates an analogvalue. Make sure that the value can smoothly change as you operate the input device. If notsmoothly, readjust the volume or replace it with a new one. (See Chapter 10 and 12.)
• GEAR POSITION indicates N, 1, 2, 3, or 4. Make sure that the value can change as youoperate the 4-speed shifter. If not, replace the switch with a new one. (See Chapter 11.)
• Make sure that each of the rest of the input devices can change its indication from OFF toON as you operate the device.
• After testing, press the test button and the service button simultaneously. The GAME TESTMENU screen reappears.
VIEW CHANGE BUTTON
START BUTTON
BRAKE PEDAL
GAS PEDAL
GEAR POSITION
STEERING WHEEL
FIG. 9. 3 b

52
C. OUTPUT TEST
Press the service button to select the OUTPUT TEST item in the GAME TEST MENU screen,and press the test button. The following OUTPUT TEST screen appears to test the outputdevices.Periodically test the output devices (the lights integrated with the START and VIEW CHANGEbuttons and base shaker) by using the screen.
Item is automatically changed or selected in turn. Make sure that the corresponding outputdevice can normally operate (that is, the light comes on or the base shaker vibrates).After testing, press the test button. The GAME TEST MENU screen reappears.
OUTPUT TEST
> START BUTTON VIEW CHANGE BUTTON BASS SHAKER(FRONT) BASS SHAKER(FRONT+REAR)
PRESS TEST BUTTON TO EXIT

53
D. FORCE FEEDBACK
Press the service button to select the FORCE FEEDBACK item in the GAME TEST MENUscreen, and press the test button. The following FORCE FEEDBACK screen appears to set theintensity of the force feedback against the steering wheel (handle) during playing.
FORCE FEEDBACK
(MIN 0 : MAX 10 : DEFAULT 9)
FORCE = 9
UP DOWN
FORCE TEST (FORCE = 4)
CENTER OFF RIGHT OFF LEFT OFF
> EXIT
SELECT WITH SERVICE BUTTON AND PRESS TEST BUTTON
FORCE : Indicates the intensity of the force feedback. The larger number the moreintense force feedback.
FORCE TEST : Tests the performance of the motor of the steering motor unit. Intensity isfixed at 4. Press the service button to select the CENTER, RIGHT, andLEFT items in turn, and press the test button. Make sure that each itemcan change its indication from OFF to ON as you press the test button;and eventually the motor can operate to make the handle turn to right orleft or fixed at a center position (for a straight-ahead direction) as selectedby you.
EXIT : Returns to the GAME TEST MENU screen.

54
E. INPUT ASSIGNMENTS
Press the service button to select the INPUT ASSIGNMENTS item in the GAME TEST MENUscreen, and press the test button. The following INPUT ASSIGNMENTS screen appears toselect the input device.
Press the service button to move the > mark to a targeted input device to select, and press thetest button. Then the assignments screen of the selected input device appears.Selecting the DEFAULT SETTING recovers to the standard factory settings.After testing, select the EXIT and press the test button. The GAME TEST MENU screenreappears.
INPUT ASSIGNMENTS
STEERING 0 (DEFAULT = 0) GAS PEDAL 0 (DEFAULT = 0) BRAKE PEDAL 0 (DEFAULT = 0)
DEFAULT SETTING
> EXIT
SELECT WITH SERVICE BUTTON AND PRESS TEST BUTTON
Ea. STEER ASSIGNMENTS
This screen enables to set the volume value of the steering wheel (handle). In other words, thisscreen sets the volume value of the steering wheel's center position (for a straight-aheaddirection).Reset the volume value on this screen when the operability of the steering wheel is undesirable.Also newly set the volume value on this screen whenever you have adjusted or replaced thevolume.
First fix the steering wheel to a centerposition (for a straight-ahead direction).Check the '0' for a position on the screen. Ifit is not on the ( mark above the CENTER,press the service button to move the > markto the RIGHT or LEFT, and press the testbutton so that the '0' is positioned just on the( mark.After testing, select the EXIT and press thetest button. The INPUT ASSIGNMENTSscreen reappears.
STEER ASSIGNMENTS
(MIN -40 : MAX 40 : DEFAULT 0) STEERING = -10
0 ^ CENTER
RIGHT LEFT
> EXIT
SELECT WITH SERVICE BUTTON AND PRESS TEST BUTTON

55
Eb. GAS ASSIGNMENTS
This screen enables to set the volume value of the gas pedal (accelerator). The MIN indicatesthe volume value when the pedal is not stepped on and the MAX when stepped on.
Reset the volume value on this screen when the operability of the gas pedal is undesirable. Alsonewly set the volume value on this screen whenever you have adjusted or replaced the volume.
Check the '0' for a position on the screen. Ifit is not on the Å» marks above the MIN andMAX, press the service button to move the >mark to the UP or DOWN, and press the testbutton so that the '0' is positioned just on theÅ» marks.After testing, select the EXIT and press thetest button. The INPUT ASSIGNMENTSscreen reappears.
GAS ASSIGNMENTS
(MIN -40 : MAX 40 : DEFAULT 0) GAS = 0
0 ^ ^ MIN MAX
UP DOWN
> EXIT
SELECT WITH SERVICE BUTTON AND PRESS TEST BUTTON
Ec. BRAKE ASSIGNMENTS
This screen enables to set the volume value of the brake pedal. The MIN indicates the volumevalue when the pedal is not stepped on and the MAX when stepped on.
Reset the volume value on this screen when the operability of the brake pedal is undesirable.Also newly set the volume value on this screen whenever you have adjusted or replaced thevolume.
Check the '0' for a position on the screen. Ifit is not on the marks above the MIN andMAX, press the service button to move the >mark to the UP or DOWN, and press the testbutton so that the '0' is positioned just on the marks.After testing, select the EXIT and press thetest button. The INPUT ASSIGNMENTSscreen reappears.
BRAKE ASSIGNMENTS
(MIN -40 : MAX 40 : DEFAULT 0) BRAKE = 0
0 ^ ^ MIN MAX
UP DOWN
> EXIT
SELECT WITH SERVICE BUTTON AND PRESS TEST BUTTON
<
<
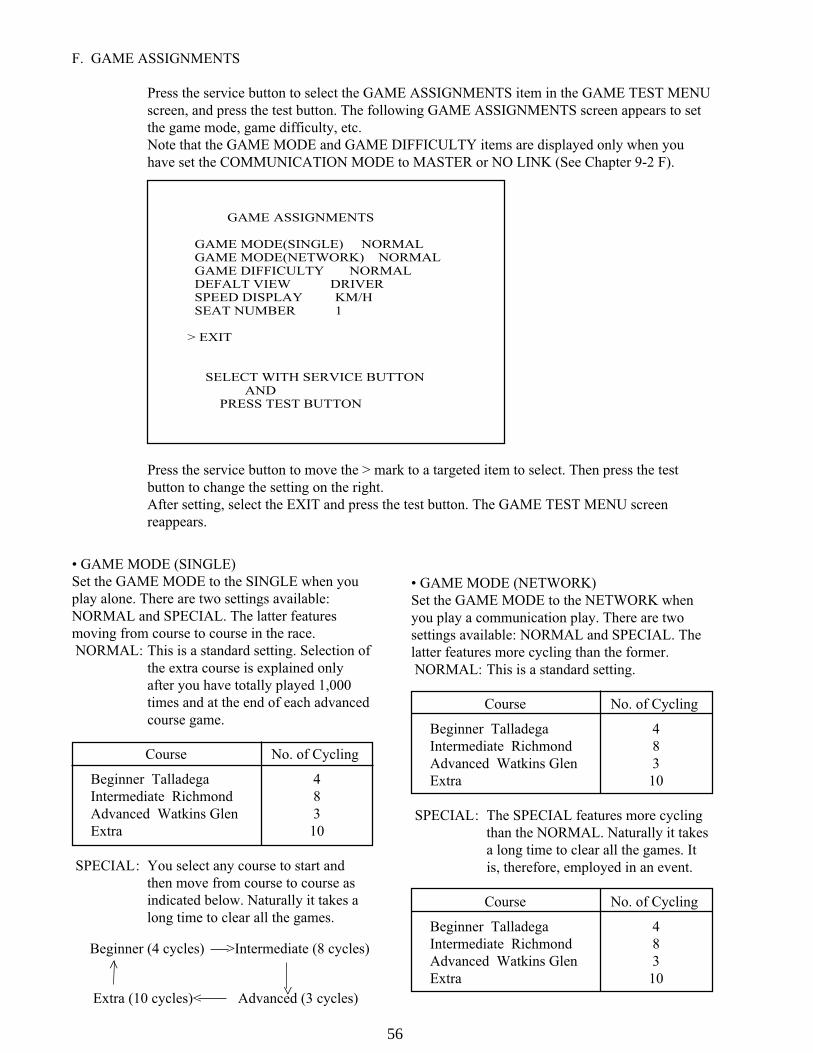
56
F. GAME ASSIGNMENTS
Press the service button to select the GAME ASSIGNMENTS item in the GAME TEST MENUscreen, and press the test button. The following GAME ASSIGNMENTS screen appears to setthe game mode, game difficulty, etc.Note that the GAME MODE and GAME DIFFICULTY items are displayed only when youhave set the COMMUNICATION MODE to MASTER or NO LINK (See Chapter 9-2 F).
GAME ASSIGNMENTS
GAME MODE(SINGLE) NORMAL GAME MODE(NETWORK) NORMAL GAME DIFFICULTY NORMAL DEFALT VIEW DRIVER SPEED DISPLAY KM/H SEAT NUMBER 1
> EXIT
SELECT WITH SERVICE BUTTON AND PRESS TEST BUTTON
Press the service button to move the > mark to a targeted item to select. Then press the testbutton to change the setting on the right.After setting, select the EXIT and press the test button. The GAME TEST MENU screenreappears.
• GAME MODE (SINGLE)Set the GAME MODE to the SINGLE when youplay alone. There are two settings available:NORMAL and SPECIAL. The latter featuresmoving from course to course in the race. NORMAL: This is a standard setting. Selection of
the extra course is explained onlyafter you have totally played 1,000times and at the end of each advancedcourse game.
Course No. of Cycling
Beginner Talladega 4Intermediate Richmond 8Advanced Watkins Glen 3Extra 10
SPECIAL: You select any course to start andthen move from course to course asindicated below. Naturally it takes along time to clear all the games.
• GAME MODE (NETWORK)Set the GAME MODE to the NETWORK whenyou play a communication play. There are twosettings available: NORMAL and SPECIAL. Thelatter features more cycling than the former. NORMAL: This is a standard setting.
Course No. of Cycling
Beginner Talladega 4Intermediate Richmond 8Advanced Watkins Glen 3Extra 10
SPECIAL: The SPECIAL features more cyclingthan the NORMAL. Naturally it takesa long time to clear all the games. Itis, therefore, employed in an event.
Course No. of Cycling
Beginner Talladega 4Intermediate Richmond 8Advanced Watkins Glen 3Extra 10
Beginner (4 cycles) >Intermediate (8 cycles)
Extra (10 cycles)< Advanced (3 cycles)
>
>

57
GAME DIFFICULTY : Sets the game's difficulty level. You can set it to VERY EASY,EASY, NORMAL, HARD, or VERY HARD.
DEFAULT VIEW : Sets the viewpoint when a game is started. You can set it to DRIVERor REAR.
SPEED DISPLAY : Sets the unit used to display the speed. You can set it to KM/H ORMPH.
SEAT NUMBER : Sets the number of the cabinets interconnected for a communicationplay. Arrange them; and facing the screen set their SEAT NUMBERto 1, 2, 3, ...from left to right. If you have set the COMMUNICATIONMODE to the RELAY (a live relay monitor), set the SEAT NUMBERto the NO DEFINED.

58
G. BOOKKEEPING
Press the service button to select the BOOKKEEPING item in the GAME TEST MENU screen,and press the test button. The following BOOKKEEPING screens (1/2 & 2/2) appear to displaythe operation data. Press the service button to migrate between the 1/2 and 2/2 screens.After setting, select the EXIT and press the test button. The GAME TEST MENU screenreappears.
BOOKKEEPING 1/2
CABINET TYPE XXXXNUMBER OF GAMES 0PLAY TIME 0D 0H 0M 0SAVERAGE PLAY TIME 0M 0SLONGEST PLAY TIME 0M 0SSHORTEST PLAY TIME 0M 0S
PLAY TIME HISTOGRAM
0M 0S~1M59S ---- 02M 0S~2M29S ---- 02M30S~2M59S ---- 03M 0S~3M29S ---- 03M30S~3M59S ---- 04M 0S~4M29S ---- 04M30S~4M59S ---- 05M 0S~5M29S ---- 05M30S~5M59S ---- 06M 0S~6M29S ---- 0OVER 6M30S ---- 0
PRESS SERVICE BUTTON TO ANOTHER PAGE PRESS TEST BUTTON TO EXIT
CABINET TYPE : Displays the type of the cabinet used. It is automaticallydetected by the system.
NUMBER OF GAME : Displays the total number of the games played.
PLAY TIME : Displays the total operating hours.
PLAY TIME HISTOGRAM : Displays the number of the games per playing period.

59
DRIVER SELECT : Displays the number of selection times for the most frequentlyselected 7 players.
COURSE SELECT : Displays the number of selection times by course.
TRANSMISSION SELECT : Displays the number of selection times by transmissiontype.
BOOKKEEPING 2/2
DRIVER SELECT
Steve Park 0 Rusty Wallace 0 Dale Earnhardt 0 Bobby Hamilton 0 Terry Labonte 0 Mark Martin 0 Michael Waltrip 0
COURSE SELECT
Talladega 0 Richmond 0 Watkins Glen 0
TRANSMISSION SELECT
AUTOMATIC 0 MANUAL 0
PRESS SERVICE BUTTON TO ANOTHER PAGE PRESS TEST BUTTON TO EXIT

60
H. BACKUP DATA CLEAR
Press the service button to select the BACKUP DATA CLEAR item in the GAME TESTMENU screen, and press the test button. This screen enables to clear the BOOKKEEPING dataand the ranking data.
Press the service button to move the > mark to YES (CLEAR) item, and press the test button.When the system completes clearing, a 'COMPLETED' message appears on the screen. Pressthe test button again to return to the GAME TEST MENU screen.
Press the service button to move the > mark to NO (CANCEL) item, and press the test button.The system does not execute clearing, but returns to the GAME TEST MENU screen.
BACKUP DATA CLEAR
> YES (CLEAR) NO (CANCEL)
SELECT WITH SERVICE BUTTON AND PRESS TEST BUTTON

61
10. CONTROL PANEL (STEERING MOTOR UNIT)
Prepare a Phillips screwdriver and awrench for M8 hexagonal nut.
Turn off power.
Referring to Chapter 6, uncouple thePTV and the main cabinet from eachother. However, leave the wiresconnected.
Remove the 6 Trusshead screws anddetach the Mech Front Lid from themain cabinet.
MECH FRONT LID
TRUSS SCREW (6)
M4 X 8
PHOTO 10. 1 a
Before starting to work, ensure that the Power SW is OFF. Failure to observethis can cause electric shock or short circuit.Use care so as not to damage wirings. Damaged wiring can cause electricshock or short circuit.Do not touch undesignated places. Touching places not designated can causeelectric shock or short circuit.This work should be performed by the Location's Maintenance Man orServiceman. Performing work by non-technical personnel can cause electricshock hazard.
Do not insert hand into the mechanism so as not to cause hand and fingerspinched in. Failure to observe this can cause a serious injury such as afracture.
When performing work such as parts replacement other than those specified inthis manual, be sure to contact where you purchased the product from andconfirm the work procedures and obtain precautions prior to performing work.Inappropriate parts replacement and/or installing with erroneous adjustmentcan cause an overload or the parts to come into contact, resulting in an electricshock, a short circuit, and a fire.Carefully handle the PTV on the PTV base because it is very unstable. Ifhandled carelessly, it may fall down and eventually cause a serious personalinjury.
10 - 1 ADJUSTING OR REPLACING THE V.R.
In cases the Steering operability is poor and the adjustment of VOLUME SETTING in theTEST mode is ineffective, the causes may be the Volume Gear's mesh failure and or Volumemalfunctioning. By using the following procedure, adjust Volume gear mesh, or replace theVolume. In this product, when the Steering Wheel is moved fully left/right, if the Volume shaftis rotating within the movable range, the Volume is not feared to be damaged. Secure theVolume in the manner the Volume shaft is oriented as shown and the gears are appropriatelyengaged when the steering wheel is in the centering position allowing the car to go straightforward.
ADJUSTING THE VOLUME
1
2
3

62
The V.R. is on the VR BASE (a white, plastic made part). Loosen the 2 screws which securethe VR BASE and adjust the angle and appropriateness of gear mesh by moving the VR BASE.
Adjust to an appropriate mesh by securing the Steering Wheel in the direction allowing the carto advance straight forward and ensuring the "D" CUT FACE of the Volume shaft is oriented asshown.
Tighten the 2 screws to secure the VR BASE.
Turn on power.
Set the Center Value of the Volume in the TEST mode.
In the TEST mode, check to see if the Volume Value varies smoothly in accordance with thesteering wheel operation.
VR BASE
SCREW (2)
M4 X 12, w/flat & spring washers
FIG. 10. 1 a
"D" CUT FACE
4
5
6
7
8
9

63
Disconnect the connector from theVolume.
Take out 2 screws to remove theVolume together with VR BASEfrom the HANDLE MECHA.
Take out 2 screws from the VRBASE reverse side to remove theVolume together with VR Bracketfrom the VR BASE.
Remove the Volume from VRBracket and replace.
PHOTO 10. 1 b
VR BASE
SCREW (2)
M4 X 12, w/flat & spring washers
PHOTO 10. 1 c
TRUSS SCREW (2)
M4 X 12
REPLACING THE VOLUME
1
2
3
4

64
10 - 2 GREASING
Be sure to use the designated grease. Using undesignated grease can causeparts damage.Do not apply greasing to undesignated places. Failure to observe this can causemalfunctioning or quality deterioration of parts.
VR BASE
SCREW (2)
M4 X 12, w/flat & spring washers
FIG. 10. 1 b
Turn on power.
Set the Center Value of the Volume in the TEST mode.
In the TEST mode, check to see if the Volume Value varies smoothly in accordance with thesteering wheel operation.
After replacing the Volume, engage the gears at the angular position shown and fix the VRBracket.
V.R.
220-5484220-5373
Apply greasing to gear meshportions once every 3 months.Use GREASE MATE (SEGAPART NO. 090-0066).
VOLUME GEAR MESH PORTION
PHOTO 10. 2
STOP
IMPORTANT
5
6
7
8

65
11. 4-SPEED SHIFTER (SHIFT LEVER)
11 - 1 REMOVING THE 4-SPEED SHIFTER
Turn off power.
Remove the 6 Trusshead screws and remove the shift cover.
Remove the 6 Hexagon Bolts.
TRUSS SCREW (6) black
M4 X 12
SHIFT COVER
HEXAGON BOLT (4)
M8 X 20, w/spring washer
4 SPEED SHIFTER
PHOTO 11. 1 a PHOTO 11. 1 b
Before starting to work, ensure that the Power SW is OFF. Failure to observethis can cause electric shock or short circuit.Use care so as not to damage wirings. Damaged wiring can cause electricshock or short circuit.Do not touch undesignated places. Touching places not designated can causeelectric shock or short circuit.This work should be performed by the Location's Maintenance Man orServiceman. Performing work by non-technical personnel can cause electricshock hazard.When performing work such as parts replacement other than those specifiedin this manual, be sure to contact where you purchased the product from.Confirm the work procedures and obtain precautions from where youpurchased the product from prior to performing work. Inappropriate partsreplacement and/or installation with erroneous adjustment can cause anoverload or the parts to come into contact, resulting in an electric shock, ashort circuit, and a fire.
1
2
3

66
Pull up the 4-speed shifter upright. Be careful not to letthe wires caught on some sections or not to let the partshit against each other.
Disconnect the connectors from each other. Uncouple the4-speed shifter.When replacing it to an original position, be careful aboutthe installation direction. The side with the wires mustface the PTV.
PHOTO 11. 1 c
When replacing it to an original position,be careful about the installation direction.
Disconnect the connector.
4
5
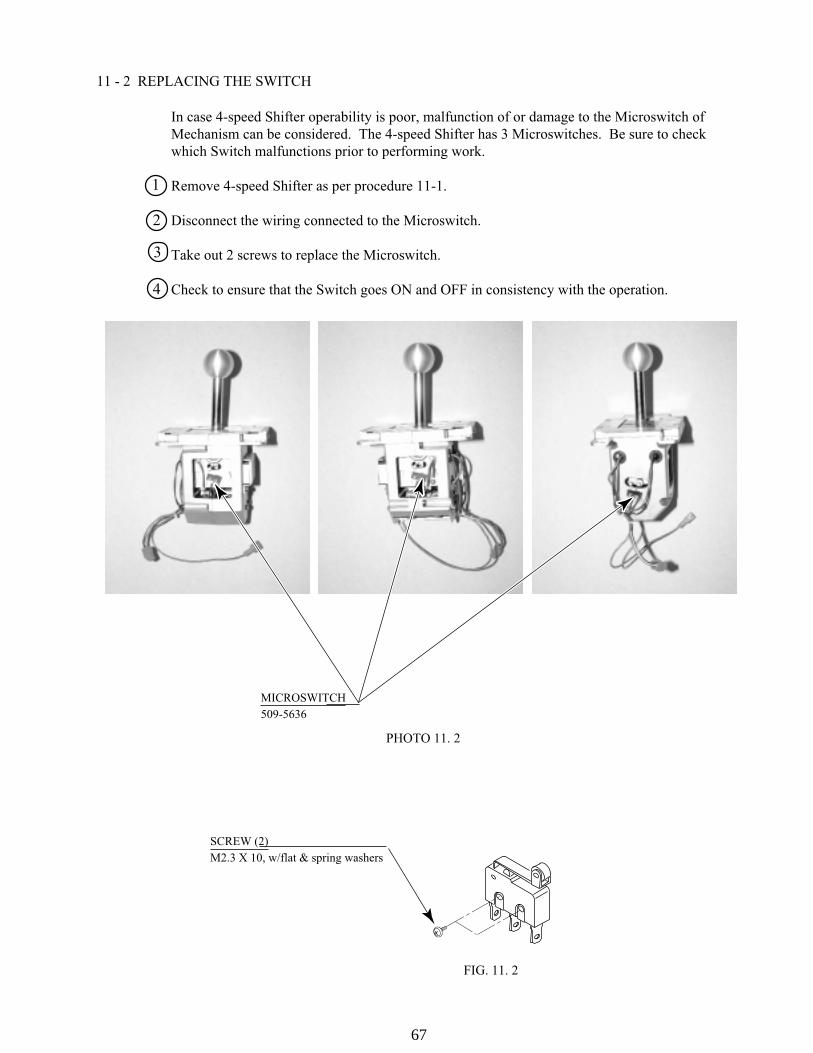
67
11 - 2 REPLACING THE SWITCH
In case 4-speed Shifter operability is poor, malfunction of or damage to the Microswitch ofMechanism can be considered. The 4-speed Shifter has 3 Microswitches. Be sure to checkwhich Switch malfunctions prior to performing work.
Remove 4-speed Shifter as per procedure 11-1.
Disconnect the wiring connected to the Microswitch.
Take out 2 screws to replace the Microswitch.
Check to ensure that the Switch goes ON and OFF in consistency with the operation.
SCREW (2)
M2.3 X 10, w/flat & spring washers
FIG. 11. 2
PHOTO 11. 2
MICROSWITCH
509-5636
1
2
3
4

68
12. ACCELERATOR & BRAKE
Before starting to work, ensure that the Power SW is OFF. Failure to observethis can cause electric shock or short circuit.Use care so as not to damage wirings. Damaged wiring can cause electricshock or short circuit.Do not touch undesignated places. Touching places not designated can causeelectric shock or short circuit.This work should be performed by the Location's Maintenance Man orServiceman. Performing work by non-technical personnel can cause electricshock hazard.When performing work such as parts replacement other than those specifiedin this manual, be sure to contact where you purchased the product from.Confirm the work procedures and obtain precautions from where youpurchased the product from prior to performing work. Inappropriate partsreplacement and/or installation with erroneous adjustment can cause anoverload or the parts to come into contact, resulting in an electric shock, ashort circuit, and a fire.
If Accel. and Brake operation is not satisfactory, adjustment of Volume installation position orVolume replacement is needed. Also, be sure to apply greasing to the gear mesh portion onceevery 3 months.
12 - 1 ADJUSTING AND REPLACING THE V.R.
The appropriate value for both ACCEL. Volume and Brake Volume is under 30H when releasedand over C0H when stepped on. Check Volume values in the TEST mode. Since work isperformed inside the energized cabinet, be very careful so as not to touch undesignated places.Touching places not specified can cause electric shock or short circuit.
Take out the 2 truss screws andremove the Front Cover from theAccel. & Brake Unit(FIG. 12. 1 a).
Loosen the screw which secure thePotentiobase, and adjust theVolume value by moving the Base.(FIG. 12. 1 b)
Secure the Potentiobase.
Perform Volume setting in theVolume setting mode.
TRUSS SCREW (2)
M4 X 8, chrome
FRONT COVER
FIG. 12. 1 a
SCREW
M512,w/flat & spring washers
POTENTIOBASE
V.R.
220-5484220-5373
FIG. 12. 1 b
1
2
3
4

69
Turn the power off.
Take out the 2 screws and remove thePotentiocover (FIG. 12. 1 c).
Disconnect the connector of theVolume to be replaced.
Remove the screw which secures thePotentiobase (FIG. 12. 1 b).
Remove the Potentiobase togetherwith the Volume as is attached.(FIG. 12. 1 c)
Remove the Base and Gear to replacethe Volume.
Adjust the Volume as per the previouspage after replacing.
Once every 3 months, apply greasingto the Spring and Gear mesh portion.For spray greasing, use GREASEMATE (PART No. 090-0066).
GREASING
FIG. 12. 2
TRUSS SCREW (2)
M4 X 8
POTENTIOCOVER
POTENTIOBASEÅ@FIG. 12. 1 c
Be sure to use the designated grease. Using undesignated grease can cause partsdamage.
12 - 2 GREASING
REPLACING THE VOLUME
STOP
IMPORTANT
1
2
3
4
5
6
7

70
13. PROJECTOR
FIG. 13. 1
Since the Projector has been adjusted at the time of shipment, avoid makingfurther adjustments without good reason.
The Projector is subject to color deviation due to Convergence deviation causedby the geomagnetism at the installation location and peripheral magnetic field.After the installation of machine, and before commencing operation, check forConvergence deviation and if deviated, make adjustments.
When the screen surfacebecomes dirty with dust,etc., clean it by using asoft cloth such as gauze.When water, and volatilechemicals such asbenzine, thinner, etc., spillon the screen surface, itmay be subject to damage,therefore, do not usethem. Also, since thesurfaces are susceptible todamage, refrain fromrubbing them with a hardmaterial or using a duster.
13 - 1 CLEANING THE SCREEN
Since the Projector screen is susceptible to damage, pay careful attention to itshandling. When cleaning, refrain from using water or volatile chemicals.
Projector adjustments are stored. Due to distortion or color deviation in the TEST mode, if anadjustment is necessary, use the Remote Control to make adjustments. There are two ProjectorMakers (Toshiba and Mitsubishi) and the adjustment method varies depending on the specificmaker.
STOP
IMPORTANT

71
TEST MODE WRITING
POSITION
ADJUST
SELECT
RESET
R BG
PIC-ADJ
SET
P
REMOTE CONTROL LIGHT EMITTING PORTION
MODE (mode selection)
TEST (adjust/normal shift)
R. G. B. (color selection)
POSITION (to select the position)
ADJUST (adjustment)
WRITING (storing the data)
P (automatic color matching)
SET (to decide the selection)
PIC - ADJ (item selection)
RESET
SELECT (pattern selection)
REMOTE CONTROL BUTTONS
When adjusting the Projector, direct the Remote Control's light emitting portion towards theProjector Screen.
13 - 2 ADJUSTMENT OF TOSHIBA PROJECTOR
SETTING THE INTERFACE
In this product, set to INPUT LEVEL: 0.7V and IMPEDANCE: 75Ω. Failure toobserve this can cause CRT membrane to burn or Shutdown device to functionresulting in power off.
The Projector's Connector Panel contains the Interface setting SW.
WINNER LAMP AC100-120V~
AC100-120V~
AC IN
RGB IN
COM
IMPEDANCE INPUT LEVEL
HIGH 75 ¶ @ @0.7V 1~3V
STOP
IMPORTANT

72
AUTOMATIC COLOR MATCHING
The Projector may be subject to color deviations affected by earth magnetism, the building steelframes, etc. When the Projector is initially installed or the Projector's installation position ischanged, have the color matching performed automatically.
Keep pressing the P button (red) for approximately 3 seconds to havethe ensuing movements performed automatically.
TEST MODE WRITING
POSITION
ADJUST
SELECT
RESET
R BG
PIC-ADJ
SET
P
When the green cross pattern movements are finished, similar detectionis performed sequentially in order of red and then blue cross move-ments. After detecting by green, red and blue cross movements, thegame mode returns with the color deviation status being corrected.
Although very rarely, the TRY AGAIN error display in red may appear. At this time, press theP button (red) for approximately 3 seconds.Even after the above operation is repeated, if the error condition still exists, then the displayshifts to PLEASE ADJ. In this case, the auto color matching function can not be used. Contactthe place of contact herein stated or where the product was purchased from.
If the automatic color matching indicates an error, color matching can manually be performed.Refer to CONVERGENCE ADJUSTMENT (manual color matching).
The Projector will shift to the color deviationcorrection mode from the game mode, withthe green cross pattern appearing on thescreen.
The cross pattern moves up/down and right/left to start the movement of searching the cor-rect screen position and inclination.
1

73
TEST MODE WRITING
POSITION
ADJUST
SELECT
RESET
R BG
PIC-ADJ
SET
P
CONTRASTBRIGHTNESSH.POSIV.POSIH.SIZEV.SIZEEXIT
CONTRASTBRIGHTNESSH.POSIV.POSIH.SIZEV.SIZEEXIT
CONTRAST 230 . . . . . . . . . . . . . . . . . . . .
CONTRAST 156 . . . . . . . . . . . . . . . . . . . .
WRITING
WRITING
ADJUST
SET
PIC-ADJ
PIC-ADJ
Press either or PIC - ADJ button.
The on-screen menu willhave one item in purple and6 items in white.
Press the SET button (to decide selection).
When the selection of theCONTRAST adjustmentmode is decided, theadjustment data scale barappears on the screen.
Make adjustment by using either or ADJUST button.
As the Cursor is moved, theadjustment data valuechanges. Make adjustmentso as to obtain the desiredon-screen contrast status.
Press the WRITING button (for storing and finish).
Choose CONTRAST by using either or PIC - ADJ button.
The WRITING displayappears and the adjustmentdata is stored.
When discontinuing the adjustment, choose EXIT from the menu at the stage of procedure andpress the SET button.To continue adjusting other menu items, repeat procedure ~ .Unless the adjustment data is stored, the data in the adjusted status will be erased at the time the poweris turned off and the pre-adjustment status will remain when the power is turned on next time.
Have CONTRAST dis-played in purple. SinceCONTRAST is selectedinitially, no particularoperation is required in thiscase.
ADJUSTING THE ON-SCREEN CONTRAST
Although the on-screen picture quality has been adjusted at the time of shipment from thefactory, the on-screen contrast can be readjusted if desired. When the Game Board is replaced,readjustment may be necessary. Changing the CONTRAST causes the light and shade of theon-screen images to be changed.
Herein,procedureis skipped.
1
2
3
4
5
2
2
4
2

74
TEST MODE WRITING
POSITION
ADJUST
SELECT
RESET
R BG
PIC-ADJ
SET
PCONTRASTBRIGHTNESSH.POSIV.POSIH.SIZEV.SIZEEXIT
CONTRASTBRIGHTNESSH.POSIV.POSIH.SIZEV.SIZEEXIT
BRIGHTNESS 128 . . . . . . . . . . . . . . . . . . . .
BRIGHTNESS 156 . . . . . . . . . . . . . . . . . . . .
WRITING
WRITING
ADJUST
SET
PIC-ADJ
PIC-ADJ
Press either or PIC - ADJ button.
The on-screen menu will have oneitem in purple and 6 items inwhite.
Choose BRIGHTNESS by using either or PIC- ADJ button.
Have the BRIGHTNESS displayedin purple.
When the selection of theBRIGHTNESS adjustment modeis decided, the adjustment datascale bar appears on the screen.
Press the SET button (to decide selection).
Press the WRITING button (for storing and finish).
Make adjustment by using either or ADJUSTbutton.
When discontinuing the adjustment, choose EXIT from the menu at the stage of procedure and pressthe SET button.To continue adjusting other menu items, repeat procedure ~ .Unless the adjustment data is stored, the data in the adjusted status will be erased at the time the poweris turned off and the pre-adjustment status will remain when the power is turned on next time.
The WRITING display appearsand the adjustment data is stored.
As the Cursor is moved, theadjustment data value changes.Make adjustment so as to obtainthe desired on-screen brightnessstatus.
ADJUSTING THE SCREEN BRIGHTNESS
Although the on-screen picture quality has been adjusted at the time of shipment from thefactory, readjustment can be made if desired. When the Game Board is replaced, readjustmentmay be necessary. Changing the BRIGHTNESS causes the brightness of the on-screen imagesof black portions to be changed.
1
2
3
4
5
2
2 4

75
TEST MODE WRITING
POSITION
ADJUST
SELECT
RESET
R BG
PIC-ADJ
SET
PCONTRASTBRIGHTNESSH.POSIV.POSIH.SIZEV.SIZEEXIT
CONTRASTBRIGHTNESSH.POSIV.POSIH.SIZEV.SIZEEXIT
H.POSI 128 . . . . . . . . . . . . . . . . . . . .
H.POSI 156 . . . . . . . . . . . . . . . . . . . .
WRITING
WRITING
ADJUST
SET
PIC-ADJ
PIC-ADJ
Press either or PIC - ADJ button.
The on-screen menu will haveone item in purple and 6 items inwhite.
Choose H. POSI or V. POSI by using either or PIC ADJ button.
When the selection of the H.POSI or V. POSI is decided, theadjustment data scale bar appearson the screen.
Press the SET button (to decide selection).
Press the WRITING button (for storing and finish).
Make adjustment by using either or ADJUSTbutton.
When discontinuing the adjustment, choose EXIT from the menu at the stage of procedure and pressthe SET button.To continue adjusting other menu items, repeat procedure ~ .Unless the adjustment data is stored, the data in the adjusted status will be erased at the time the poweris turned off and the pre-adjustment status will remain when the power is turned on next time.
Have the H. POSI or V. POSIdisplayed in purple. The Figureshows the status in which H.POSI is selected.
When making adjustmentsin vertical directions, alsouse either or ADJUST button.
The WRITING display appearsand the adjustment data is stored.
As the Cursor is moved, theadjustment data value changes.Make adjustment so as to obtainthe desired on-screen positionstatus.
ADJUSTING THE ON-SCREEN DISPLAY POSITION
Although the on-screen display position (H. POSI, V. POSI) has been adjusted at the time ofshipment from the factory, readjustment can be made if desired. When the Game Board isreplaced, readjustments may be necessary.
1
2
3
4
5
2
2 4

76
TEST MODE WRITING
POSITION
ADJUST
SELECT
RESET
R BG
PIC-ADJ
SET
PCONTRASTBRIGHTNESSH.POSIV.POSIH.SIZEV.SIZEEXIT
CONTRASTBRIGHTNESSH.POSIV.POSIH.SIZEV.SIZEEXIT
H.SIZE 128 . . . . . . . . . . . . . . . . . . . .
H.SIZE 156 . . . . . . . . . . . . . . . . . . . .
WRITING
WRITING
ADJUST
SET
PIC-ADJ
PIC-ADJ
Press either or PIC - ADJ button.
Choose H. SIZE or V. SIZE by using either or PIC - ADJ button.
When the selection of the H. SIZEor V. SIZE adjustment mode isdecided, the adjustment data scalebar appears on the screen.
Press the SET button (to decide selection).
Press the WRITING button (for storing and finish).
As the Cursor is moved, theadjustment data value changes.Make adjustment so as to obtainthe desired on-screen positionstatus.
Make adjustment by using either or ADJUSTbutton.
When discontinuing the adjustment, choose EXIT from the menu at the stage of procedure and pressthe SET button.To continue adjusting other menu items, repeat procedure ~ .Unless the adjustment data is stored, the data in the adjusted status will be erased at the time the poweris turned off and the pre-adjustment status will remain when the power is turned on next time.
When making adjustmentsin vertical directions, alsouse either or button.
The on-screen menu will have oneitem in purple and 6 items inwhite.
Have the H. SIZE or V. SIZEdisplayed in purple. The Figureshows the status in which H. SIZEis selected.
The WRITING display appearsand the adjustment data is stored.
ADJUSTING THE SCREEN SIZE
Although the on-screen size (H. SIZE, V. SIZE) has been adjusted at the time of shipment fromthe factory, readjustment can be made if desired. When the Game Board is replaced,readjustments may be necessary.
1
2
3
4
5
2
2 4

77
CONVERGENCE ADJUSTMENT (manual color matching)
To avoid circuitry malfunctioning due to electrical load increase, never utilizeCONVERGENCE ADJUSTMENT (Line Convergence Adjustment in particular)for adjusting screen size changes.
There is no means to restore the Convergence Adjustment data once stored, to itsoriginal state. To avoid changing the screen size by erroneously usingconvergence adjustment, do not perform the green Line Convergence Adjustment.
As such, be sure to perform the adjustment work from this page onward by theTechnical staff and the location's Maintenance Personnel who are well versed insuch adjustment work. In the Static Convergence Adjustments, if satisfactoryadjustments can not be performed, do not make another convergence adjustmentsinadvertently. Contact the office herein stated or where the product waspurchased from.
To avoid making the adjustment work ineffective, do not press the RESETbutton during adjustment.
To discontinue adjustment work, keep pressing the TEST button forapproximately 3 seconds at the stage before storing the adjustment data bypressing the WRITING button.
Should the screen be abnormally disturbed by noise due to static electricity,etc., turn the power off without storing the adjustment data.
Pressing the or PIC - ADJbutton in the Convergence Adjustmentmode status will display theAdjustment Menu shown right. Do notutilize this Adjustment Menu as this isthe one applied at the factory.
Adjusting this menu causes theCustomer's adjustment range to bedeviated.
Should the menu shown right bedisplayed by mistake, first chooseEXIT by using either or PIC- ADJ button and then press the SETbutton.
ADJUST MODE
SUB VSIZE SUB HSIZE SUB BRIGHT EXIT
Adjustment menu used in the factory.
STOP
IMPORTANT

78
TEST MODE WRITING
POSITION
ADJUST
SELECT
RESET
R BG
PIC-ADJ
SET
P
ADJUST MODE
ADJUST MODE
ADJUST MODE
ADJUST MODE
ADJUST MODE
WRITING
Keep pressing the TEST button forapproximately 3 seconds.
Press the R button to have the red adjustmentmode.
Make adjustment by using the ADJUST buttons.
Press the B button to have the blue adjustmentmode.
Press the WRITING button (for storing and finish).
The screen will change toADJUST mode from the Gamemode to cause the green testpattern to be displayed on thescreen.
The red test pattern is added tothe display. The frame colorturns red and this signifies thered adjustment mode.
Make adjustment so as to havered superimposed on green.When red is superimposed ongreen, the color becomesyellow.
Similarly as in the case of red,adjust the blue color. Whengreen, red, and blue are super-imposed, the color becomeswhite.
The WRITING display appearsand the adjustment data isstored. After the data is stored,the Game mode returns.
When either of COLORSELECT buttons (R, B) is pressed, if thecolor desired to be adjusted disappears,press that particular button again. Forexample, if the red color needs to beadjusted again at the stage of , the Rbutton need to be pressed twice.
STATIC CONVERGENCE ADJUSTMENT
In the static convergence adjustment, each of red and blue images is comprehensively moved toand superimposed on the green color. If automatic color matching function is not sufficientlysatisfactory, perform this adjustment. Be sure to perform automatic color matching beforestarting the above adjustment.
DO NOT PUSH THIS.
1
2
3
4
5
2 4
4

79
POINT CONVERGENCE ADJUSTMENT
In the POINT CONVERGENCE adjustment, each of red, green and blue images is partiallymoved for color matching. The adjustment may be necessary when the Game Board is replaced orchanged, or screen size is changed. Be sure to perform automatic color matching before startingthe adjustment.
Press the WRITING button (for storing and finish).
TEST MODE WRITING
POSITION
ADJUST
SELECT
RESET
R BG
PIC-ADJ
SET
P
ADJUST MODE
ADJUST MODE
ADJUST MODE
ADJUST MODE
ADJUST MODE
ADJUST MODE
WRITING
Keep pressing the TEST button forapproximately 3 seconds.
The screen changes to ADJUSTmode from the Game mode anddisplays the green test pattern.
Using either R or B button, select the desiredcolor to be adjusted. Note 2 By using the Gbutton, the green color can also be selected.
The selected color is displayed bysuperimposing on green. TheMARKER will be in the colorselected.
The MARKER moves in thedirection of the button's arrow.However, the movable point ispredetermined.
Although the direct vicinity of theMARKER's center moves mostconspicuously, make adjustmentby paying attention to the periph-ery area also. Shown left is themagnified MARKER periphery.
WRITING is displayed and theadjustment data is stored. After thedata is stored, the Game Boardscreen returns.
If the test pattern is not displayed inthe periphery of the screen, adjust-ments can be made by pressing theSELECT button to superimpose thetest pattern and the Game Board'sCRT test screen.
Press the SELECT button as necessary tosuperimpose Game Board images. Note 3
Make adjustment by using the ADJUST buttons.
The crosshatch test pattern appearsand the MARKER indicating theadjustment point is displayed.
By using the ADJUST buttons,move the MARKER to the position to be adjusted.
Press the MODE button twice to have the POINTADJUSTMENT mode. Note 1
Å@MARKER
DO NOT PRESS.
Note 1 When the MODE button is repeatedlypressed, the adjustment modes willcirculate as follows:
STATIC ADJUSTMENT MODE
LINE ADJUSTMENT MODE
POINT ADJUSTMENT MODE
Note 2 When either of the COLOR SELECTbuttons (R, B) is pressed, if the desiredcolor to be adjusted disappears, pressthat particular button again.
Note 3 By repeatedly pressing the SELECTbutton, only the Projector's TESTpattern screen and the screensuperimposing the Game Board Testpattern can be alternately displayed.
1
2
3
4
5
6
7

80
LINE CONVERGENCE ADJUSTMENT
In the LINE CONVERGENCE ADJUSTMENT, the adjustment point of the column line (verti-cal) or row line (horizontal) is comprehensively moved for color matching. It is convenient toutilize this adjustment when the color of the column line or row line is uniformly deviated.
TEST MODE WRITING
POSITION
ADJUST
SELECT
RESET
R BG
PIC-ADJ
SET
PADJUST MODE
ADJUST MODE
ADJUST MODE
ADJUST MODE
ADJUST MODE
ADJUST MODE
ADJUST MODE
WRITING
The screen changes to ADJUSTmode from the Game Board modeand displays the green test pattern.
Keep pressing the TEST button for approximately3 seconds.
Press the MODE button once to have the POINTADJUSTMENT mode. Note 1
The crosshatch test pattern appearsand the vertically long MARKERis shown.
The selected color is displayed bysuperimposing on green. TheMARKER will be in the colorselected.
By using the POSITION buttons,move the MARKER to the position to be adjusted.
Use the buttons to selectthe column line, and the MARKERmoves in the right/left direction.However, the movable range ispredetermined.
Use the buttons to selectthe row line and the MARKERmoves in the up/down direction.However, the movable range ispredetermined.
Make adjustment by using the ADJUST buttons.
The selected column line or rowline (shown left is the column line)can be moved in the desired up/down or right/left directions asapplicable.
Press the WRITING button (for storing and finish).
WRITING is displayed and theadjustment data is stored. Afterthe data is stored, the Game Boardscreen returns.
Using either R or B button, select the desired color tobe adjusted. Note 2 Although the green color can alsobe selected by using the G button, to avoid the screensize change adjustment, do not choose green.
DO NOT PUSH.
MARKER
Note 1 When the MODE button is repeatedlypressed, the adjustment modes willcirculate as follows:
STATIC ADJUSTMENT MODE
LINE ADJUSTMENT MODE
POINT ADJUSTMENT MODE
Note 2 When either of the COLOR SELECTbuttons (R, B) is pressed, if the desiredcolor to be adjusted disappears, pressthat particular button again.
1
2
3
4
5
6

81
13 - 3 ADJUSTMENT OF MITSUBISHI PROJECTOR
For the operation of Remote Control, use only the Keys of R/B, (UP shift), (LEFT shift), (DOWN shift), (RIGHT shift),TEST, -, +, and PICTURE. Do not press keys other than those explained inthis manual.When operating the Remote Control, have it point the screen.
The Projector has DYNAMIC CONVERGENCE adjustment functions. This manual does notrefer to the functions as the adjustment of DYNAMIC CONVERGENCE is very troublesomeand in addition, visual effects are negligible.
PICTURE KEY
POWER
R / B
R / G / B
TEST
1 8 9 10
PICTURE
R-MUTE G-MUTE B-MUTE
+
MITSUBISHI
ENTER
--
R/B KEY
(UP shift)KEY
(LEFT shift) KEY
(DOWN shift) KEY
TEST KEY
(RIGHT shift) KEY
- KEY
+ KEY
STOP
IMPORTANT

82
• POWER KEY......................... This does not have power ON/OFF function.Does not function even if it is pressed.
• R/B KEY ................................ Used to select "R" for red adjustment or "B" for blue adjustment in theSTATIC CONVERGENCE ADJUSTMENT mode.
• (UP shift) KEY................. Used to move the test cross upward in the STATIC CONVERGENCEADJUSTMENT mode.
• (LEFT shift) KEY ............ Used to move the test cross to the left in the STATIC CONVERGENCEADJUSTMENT mode.
• (DOWN shift) ................... Used to move the test cross downward in the STATIC CONVERGENCEADJUSTMENT mode.
• (RIGHT shift) KEY.......... Used to move the test cross to the right in the STATIC CONVERGENCEADJUSTMENT mode.
• TEST KEY ............................. This is the ON/OFF key in the STATIC CONVERGENCE ADJUSTMENTmode. In the ON status of this key, the test cross pattern appears in theapproximately on-screen center.
• ENTER KEY.......................... Used for DYNAMIC CONVERGENCE.
• - KEY .................................... Used to decrease the adjustment data in the adjustment mode of CON-TRAST, BRIGHTNESS, HORIZONTAL/VERTICAL POSITIONS andWIDTH.
• + KEY .................................... Used to increase the adjustment data in the adjustment mode of CON-TRAST, BRIGHTNESS, HORIZONTAL/VERTICAL POSITIONS andWIDTH.
• PICTURE KEY ...................... Used for the ADJUSTMENT mode of CONTRAST, BRIGHTNESS, HORI-ZONTAL/VERTICAL POSITIONS and WIDTH.Every time this key is pressed, the ADJUSTMENT mode proceeds asfollows:
CONTRASTADJUSTMENT
MODE
BRIGHTNESSADJUSTMENT
MODE
H-POSIADJUSTMENT
MODE
H-WIDTHADJUSTMENT
MODE
V-POSIADJUSTMENT
MODE
V-HEIGHTADJUSTMENT
MODE
NORMALOPERATION
EXPLANATIONS OF ADJUSTMENT MODES
• CONTRAST................ Used to vary image contrast. Use + and - keys to adjust.
• BRIGHTNESS ............ Used to change image brightness. Use + and - keys to adjust.
• H-POSI ........................ Used to move the image position in the horizontal direction. Use + and - keys toadjust.
• H-WIDTH ................... Used to change the horizontal width of image. Use + and - keys to adjust.
• V-POSI ........................ Used to move the image position in the vertical direction. Use + and - keys toadjust.
• V-HEIGHT.................. Used to change the vertical width of image. Use + and - keys to adjust.

83
+
RED 31K
H:+75 V:-11
R
B
STATIC CONVERGENCE ADJUSTMENT
Press the TEST KEY to change the screen to Red LineAdjustment mode.
Superimpose the red line on the green line.When the red line is superimposed on the green line, thegreen line turns to yellow or white.
To MOVE RED LINE:Use key to move it left.Use key to move it right.Use key to move it upward.Use key to move it downward.
Press the R/B KEY.Changes to the Blue Line Adjustment screen.Every time the key is pressed, "from red to blue" and"from blue to red" are alternated.
SUPERIMPOSING BLUE LINE ON GREEN LINE:Superimposing blue line on green line causes the greenline to turn to white.
TO MOVE BLUE LINE:Use key to move it left.Use key to move it right.Use key to move it upward.Use key to move it downward.
Press the TEST KEY.Adjustment is finished.
AUTOMATIC CANCELLATION OF ADJUSTMENT MODE
In each adjustment mode, only in the case where an effective key input (variation of values andimages) is not performed within the time limit indicated below, the adjustment mode isautomatically cancelled and finished, shifting to on-screen normal images.
Approximately 6 seconds CONTRASTBRIGHTNESSH-POSIH-WIDTHV-POSIV-HEIGHT
Approximately 5 min. STATIC CONVERGENCE

84
FIG. 14 b
CRADLE
14. COIN SELECTOR
The coin selector should be cleaned once every3 months. When cleaning, follow the procedurebelow:Turn the power for the machine OFF. Open thecoin chute door.Open the gate and dust off by using a soft brush(made of wool, etc.).Remove and clean smears by using a soft clothdipped in water or diluted chemical detergentand then squeezed dry.Remove the CRADLE.When removing the retaining ring(E ring), be very careful so as not to bend therotary shaft.Remove stain from the rotary shaft and shaftreceiving portions by wiping off with a softcloth, etc.After wiping off as per above, further applya dry cloth, etc. to cause the coin selector to drycompletely.
CLEANING THE COIN SELECTOR
COIN INSERTION TEST
Once every month, when performing theCoin SW Test, simultaneously check thefollowing:
Does the Coin Meter count satisfactorily?Does the coin drop into the Cashboxcorrectly?Is the coin rejected when inserted whilekeeping the Reject Button pressed down?
Remove and clean smears by using asoft cloth dipped in water or dilutedchemical detergent and thensqueezed dry.Never apply machine oil, etc. to theCoin Selector.After cleaning the Coin Selector,insert a regular coin in the normalworking status and ensure that theSelector correctly functions.
FIG. 14 a
FIG. 14 c
GATE
Insert a coinwhile keeping theReject Buttonpressed down andcheck if it isrejected.Å@Å@
COIN METER
If the coin is not rejected when the REJECT button is pressed, open the coin chute door andopen the selector gate. After removing the jammed coin, put a normal coin in and check to seethat the selector correctly functions.
HANDLING THE COIN JAM
STOP
IMPORTANT
5
1
2
3
4
5
6

85
DK
5
L
C
GH
M
E
A
24
18
29
J
F
B
5
1
28
17
25
14
27
2119
22
12
20
16
23
13
11
3
24C REJECT CUP SIDE PLATE891-1105-01
29
28
27
26
25
24M
24L
24K
24J
24H
24G
24F
24E
24D 891-1106-00
891-1107-00
891-1110-00
891-1116-16
891-1125-00
892-1002-07
892-1002-08
892-1002-09
892-1002-11
891-0604-16
891-0614-16
892-1002-01
892-1002-021
892-1002-10 BRACKET, HOLD DOWN
BRACKET, COVERSIDE
BRACKET, LAMPSIDE
MINI DOOR W/DBV C/O
MINI DOOR 2 ENTRIES
SCREW, PAN HEAD
SLEEVE, SNAP-ON
ELASTIC SNAP NUT
CLIP, SNAP-ON
COVER, PLASTIC
MICROSWITCH, BLACK - MED.
ADJUSTER, COIN
BRACKET, MICROSWITCH
REJECT CUP BASE PLATE
LAMP WEDGE BASE 6 VOLT
14
24
24B
24A
23
22
21
20
19
18
17
16
15
13 891-0100-4016
891-1008-107
891-1113-03
891-1113-011
891-1117-00
891-1118-00
891-1121-00
891-1311-16
891-1312-16
891-1109-16
020X1877-005
890-1007-00
891-2216-16
890-1206-02
BASE PLATE ASSEMBLY
KEP NUT
SCREW,FLAT HEAD M/S
MICROSWITCH ASSEMBLY
NUT KEPS #8-32 X 5/16 HEX
REJECT FLAP
REJECT BEZEL, NYLON
BUTTON BEZEL, NYLON
SPRING, E/R BUTTON
LAMPHOLDER
E/R BUTTON US $1 COIN RIGHT
E/R BUTTON US 4x25c/$1 LEFT
COVER PLATE
11
12
10
9
8
7
6
5
4
3
2
1
# W.G. PART #
812-4150-011
812-4050-011
890-1002-00
890-1003-00
890-1017-00
890-1019-00
890-1300-00
891-0514-00
025X3711-001
025X3712-001
891-0509-162
891-0547-00
DOUBLE FRAME
METAL CASHBOX
ENCLOSURE W/CHUTE
CLAMP UK 5/8" CABINET
KEYHOOK
WASHER INTERNAL TOOTH 3/4"
SCREW TRILOBULAR
CLAMP SCREW
HINGE SCREW
S-10 US $1 COIN MECH RIGHT
S-7 US 25c COIN MECH LEFT
DESCRIPTION
6
2
9
48
10
5
7
26
8 4
15
LOCK SINGLE BIT
WELLS-GARDNER
2701 N. KILDARE CHICAGO, IL 60639 2 ENTRIES WITH BILLOVER/UNDER MINI DOOR
VALIDATOR BOTTOM DOOR
WGD15-2110-01
& SPECIAL ENCLOSURE
1-800-336-6630
ELECTRONICS CORPORATION
WWW.WGEC.COM

86
Tom
Hap
pP
h: 8
47-5
93-6
161
ext.
107
tom
.hap
p@ha
ppco
ntro
ls.c
omF
x: 8
47-9
56-2
091
Hap
p C
ontr
ols,
106
Gar
lisc
h D
rive
, Elk
Gro
ve, I
L 6
0007
Vis
it o
ur w
ebsi
te h
ttp:
//w
ww
.hap
pcon
trol
s.co
m
Gua
rdia
n H
asp
30-2
400-
200

87
OPTIONAL DOLLAR BILL ACCEPTOR
THE COIN DOOR ASSEMBLY USED ON NASCAR DX TYPE COMES
EQUIPPED TO ACCEPT A DOLLAR BILL ACCEPTOR. ALL NEEDED
WIRING CONNECTIONS ARE CONVIENENTLY LOCATED INSIDE THE
GAME FOR THIS APPLICATION.
THE COIN DOOR CAN ACCCOMMODATE THE FOLLOWING
VALIDATOR(S):
FORWARD-MOST Mars 2000 series
HOLE POSITION
**42-1155-00 MARS VALIDATOR $1, 2, 5 300 CAP
The frame and cashbox enclosure on this coindoor has been modified to accomodatea Mars 2000 series upstacker. A 2000 series stacker can be added by simply remov-ing the cut-out plate. This one entry door can be ordered through Happ Controls orone of Happ Controls authorized distributors. The part number is 40-6000-10EX.The Mars stacker can be obtained through an autherized Mars distibutor.
**Happ part number
Note: Your game may have either Happ Controls Coin Door Assembly or the WellsGardner Coin Door Assembly (not shown).
Security Locking Bar/Bracket Set Part No.# 999-0966
Modified Cash Box (For use when DBA installed)Part No. # 999-1106
Plastic Cash Box - Full Size Part No. # 999-1177

88
**Coin door shown with optional dollar bill validator inserted**

89
15. REPLACING THE FLUORESCENT LAMP, AND LAMPS
FIG. 15 a
FIG. 15 b
Remove the billboard holder, slide up the billboard plate, and replace the fluorescent tube.
When performing work, be sure to turn power off. Working with power oncan cause electric shock and short circuit hazards.The Fluorescent Lamp, when it gets hot, can cause burn. Be very carefulwhen replacing the Fluorescent Lamp.Be sure to use lamps of the designated rating. Using lamps of undesignatedrating can cause a fire or malfunctioning.
To perform work safely and securely, be sure to prepare a step which is in asecure and stable condition. Performing work without using the step cancause violent falling down accidents.Be careful when handling the plastic made parts. Failure to observe this maycause injury due to damage or fragments resulting from damage.
INSIDE THE BILLBOARD
When performing work,prepare a step.
TRUSS SCREW (3) black
M4 X 8
BILLBOARD HOLDER
BILLBOARD PLATE
FLUORESCENT LAMP 32W:390-5251-32-01
GLOW LAMP:390-5638-5P
To slide.

90
Turn power off.
Remove the 4 Trusshead screws.
Remove the switch plate from thecontrol panel carefully withoutdamaging the wires.
SWITCH PLATE
TRUSS SCREW (4)
M4 X 8, chrome
PHOTO 15 a
The lamp is inside the wiringconnecting portion. Push and thenturn the Lamp counterclockwise toremove.
On the rear side of the switch plate there is a metallic projectionon the foot of each button. Turn the projection to unlock, andremove the wire connection part from the button body.
Unlock.
PHOTO 15 b
PHOTO 15 c
START BUTTON,VIEW CHANGE BUTTON
LAMP 6.3V 1W
390-5445-01
1
2
3
4
5

91
16. PERIODIC INSPECTION TABLE
The items listed below require periodic check and maintenance to retain the performance of thismachine and to ensure safe business operation.When handling the controller, the player will be in direct contact with it . In order to alwaysallow the player to enjoy the game, be sure to clean it regularly. Also, it is advisable to providewet tissue, etc. available for player use.
Be sure to check once a year to see if Power Cords are damaged, the plug issecurely inserted, dust is accumulated between the Socket Outlet and thePower Plug, etc. Using the product with dust as is accumulated can cause fireand electric shock hazards.Periodically once a year, request the place of contact herein stated or theDistributor, etc. where the product was purchased from, as regards the internalcleaning. Using the product with dust as is accumulated in the interiorwithout cleaning can cause a fire or accident. Note that cleaning the interiorparts can be performed on a pay-basis.
CLEANING THE CABINET SURFACES
When the cabinet surfaces are badly soiled, remove stains with a soft cloth dipped in water ordiluted (with water) chemical detergent and squeezed dry. To avoid damaging surface finish, donot use such solvents as thinner, benzine, etc. other than ethyl alcohol, or abrasives, bleachingagent and chemical dustcloth.
Item Interval Reference
CABINET Check Adjusters'contact with surface. Daily 3
CONTOROL PANEL Cleaning As necessary
Inspection of SW, VR. Monthly 9
Greasing to the gear mesh portion. Trimonthly 10-2
4-SPEED SHIFTER Inspection of SW. Monthly 9
ACCEL. & BRAKE Check VOLUME VALUE. Monthly 9
Gear and Spring portion greasing Trimonthly 12-2
COIN CHUTE DOOR Check COIN SW. Monthly 9
Coin insertion test. Monthly 14
Cleaning of COIN SELECTOR. Trimonthly 14
PROJECTOR SCREEN cleaning. Weekly 13-1
Check adjustments. Monthly or when moving. 6, 9, 12
SEAT Greasing to the seat rail Trimonthly FIG.16
GAME BD MEMORY TEST. Monthly 9
Check settings. Monthly 9
INTERIOR Cleaning Annually See above.
POWER SUPPLY PLUG Inspection and cleaning
Cabinet surfaces Cleaning As necessary. See below.
TABLE 16

92
Move the Seat to the rearmost portion and applyspray greasing to the portion shown at the rightonce every 3 months by using NOK KLUBER L60or GREASE MATE SEGA PART No. 090-0066.After greasing, move the Seat a few times forwardand backward so as to allow the grease to beapplied all over uniformly. Be sure to wipe greasewhich attaches to the surfaces of the PROTECTRUBBER on the Seat Rail, or any excess grease. FIG. 16
SEAT (Greasing to Seat Rail Portion)

93
17. TROUBLESHOOTING
In case a problem occurs, first check wiring connector connections.
In order to prevent electric shock and short circuit, be sure to turn power offbefore performing work.Be careful so as not to damage wirings. Damaged wiring can cause electricshock or short circuit.After removing the cause of the functioning of the Circuit Protector, reinstatethe Circuit Protector. Depending on the cause of the functioning, using theCircuit Protector as is without removing the cause can cause generation ofheat and fire hazard.
PROBLEMS CAUSE COUNTERMEASURES
With Main SW ON,no activation.
The color on PTVscreen is incorrect.
Color deviation onPTV screen.
No sound is emitted.
Power is not supplied.
Power supply/voltage is not correct.
The Circuit Protector functioneddue to the momentary overload.
Image adjustment is inappropriate.
Affected by peripheral machines orthe building's steel frames.
Sound volume adjustment is notappropriate.
Board and Amplifiermalfunctioning.
Securely insert the power plug into theplug socket.
Make sure that power supply/voltage iscorrect.
After eliminating the cause of overload,reinstate the AC Unit's Circuit Protector(see 4 , Sec. 6, Refer to the following).Reset the circuit protector on the ASSYELEC. (see PHOTO 17 a, b)
Adjust appropriately (see Sec.13).
Perform convergence adjustment(see Sec. 13).
Change installation direction or position.
Move the machine which causes theproblem.
Adjust sound volume (see Sec. 9).
Perform the sound test and confirm(see Sec. 9).
TABLE 17 a
FIG. 17
CIRCUIT PROTECTOR
Functions due to the activation ofbimetal. To restore the function,wait for approximately one minuteor longer until the bimetal coolsoff. (Press the Button.)
CIRCUIT PROTECTOR
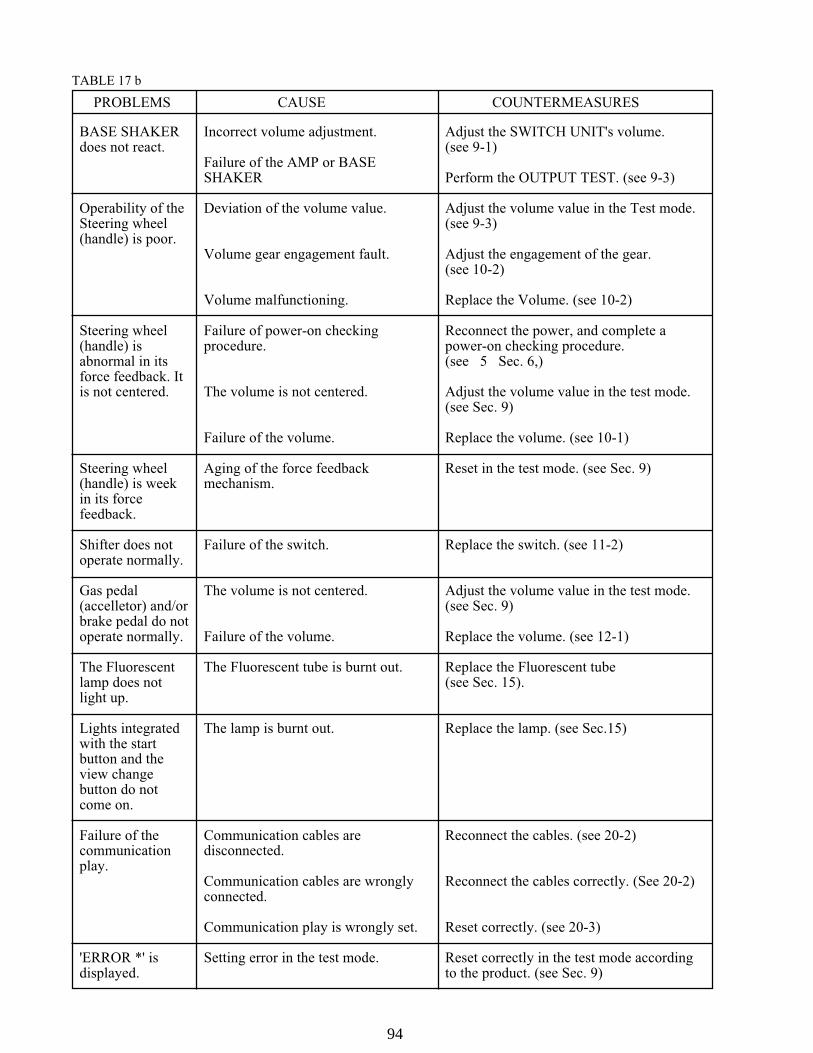
94
BASE SHAKERdoes not react.
Operability of theSteering wheel(handle) is poor.
Steering wheel(handle) isabnormal in itsforce feedback. Itis not centered.
Steering wheel(handle) is weekin its forcefeedback.
Shifter does notoperate normally.
Gas pedal(accelletor) and/orbrake pedal do notoperate normally.
The Fluorescentlamp does notlight up.
Lights integratedwith the startbutton and theview changebutton do notcome on.
Failure of thecommunicationplay.
'ERROR *' isdisplayed.
Incorrect volume adjustment.
Failure of the AMP or BASESHAKER
Deviation of the volume value.
Volume gear engagement fault.
Volume malfunctioning.
Failure of power-on checkingprocedure.
The volume is not centered.
Failure of the volume.
Aging of the force feedbackmechanism.
Failure of the switch.
The volume is not centered.
Failure of the volume.
The Fluorescent tube is burnt out.
The lamp is burnt out.
Communication cables aredisconnected.
Communication cables are wronglyconnected.
Communication play is wrongly set.
Setting error in the test mode.
Adjust the SWITCH UNIT's volume.(see 9-1)
Perform the OUTPUT TEST. (see 9-3)
Adjust the volume value in the Test mode.(see 9-3)
Adjust the engagement of the gear.(see 10-2)
Replace the Volume. (see 10-2)
Reconnect the power, and complete apower-on checking procedure.(see 5 Sec. 6,)
Adjust the volume value in the test mode.(see Sec. 9)
Replace the volume. (see 10-1)
Reset in the test mode. (see Sec. 9)
Replace the switch. (see 11-2)
Adjust the volume value in the test mode.(see Sec. 9)
Replace the volume. (see 12-1)
Replace the Fluorescent tube(see Sec. 15).
Replace the lamp. (see Sec.15)
Reconnect the cables. (see 20-2)
Reconnect the cables correctly. (See 20-2)
Reset correctly. (see 20-3)
Reset correctly in the test mode accordingto the product. (see Sec. 9)
TABLE 17 b
PROBLEMS CAUSE COUNTERMEASURES

95
Carefully handle the PTV on the PTV base because it is very unstable. If handledcarelessly, it may fall down and eventually cause a serious personal injury.
A circuit protector is located both in the AC unit and on the main cabinet's ASSY ELEC. If theconnection of the power fails even though you have turned the main switch on, either circuitprotector may have tripped. If the main switch does not function normally, check the circuitprotector on the ASSY ELEC.
Referring to Chapter 6, uncouplethe main cabinet from the PTV.However, leave the wiresconnected.
Remove the 2 trusshead screws todetach the front lid from the maincabinet
Now, you can access to the circuitprotector on the ASSY ELEC.
FRONT LID
CIRCUIT PROTECTOR
PHOTO 17 a
PHOTO 17 b
TRUSS SCREW (2) black
M4 X 30
ASSY ELEC
CIRCUIT PROTECTOR on the ASSY ELEC
1
2
3

96
18. GAME BOARD
Put the Game Board in the Carton Box (an accessory) together with the ShieldCase when requesting for the replacement or repair. Transporting the GameBoard in an undesignated status for replacement/repair is unacceptable.In this manual, how to remove the Game Board is explained for convenience.However, this work should be performed by SEGA SERVICEMAN.
In order to prevent electric shock and short circuit hazards, be sure to turnpower off before performing work.Be careful so as not to damage wirings. Damaged wiring can cause fire,electric shock and short circuit hazards.Do not expose the Game BD, etc. without a good reason. Failure to observethis can cause electric shock hazard or malfunctioning.
The electronic parts on the IC Board could be damaged due to human body's staticelectricity. Before performing IC Board related work, be sure to dischargephysically accumulated statics by touching grounded metallic surfaces, etc.
STOP
IMPORTANT

97
18 - 1 REMOVING THE GAME BOARD
Turn power off.
Remove the 2 trusshead screws of the back lid, unlock it, and detach it from the main cabinet.
Disconnect the connectors of all the wires between the ASSY MAIN BD DX and the maincabinet.
Disconnect the connectors of all the wires between the shield case's filter board on the ASSYMAIN BD DX and the main cabinet.
Remove the 2 wing bolts that fix the base (a wooden plate) of the ASSY MAIN BD DX.
BACK LID
TRUSS SCREW (2) black
M4 X 30
Disconnect the connector.
ASSY MAIN BD DX
Unlock.
FIG. 18. 1 a
Disconnect all the connectorsto the filter board.
WING BOLT (2)
M4 X 25, flat washer used.
1
2
3
4
5

98
Draw out the ASSY MAIN BD DX from themain cabinet. More than two workers mustengage in this action. Note that the ASSYMAIN BD DX is heavy, and, if a singleworker draws out it alone, he/she maydamage the wires by snagging or catchingthe wires on other parts.NOTE: If you remove the 3 screws anddetach the shield case lid, you can access tothe game board. This action is allowed,however, only for the Sega's serviceengineer.
Remove the 4 screws that fix the shield caseonto the base (a wooden plate), and detachthe former from the latter.
Remove the 2 screws each, and detach theshield case from the shield case brackets.Wrap the shield case with protectiveshipping materials, and contain it in a cartonbox. Send it for repairing.
FIG. 18. 1 b
To perform work safely,use 2 or more workers.
SHIELD CASE LID
SCREW (3)
M4 X 8,w/flat & spring washers
SCREW (4)
M4 X 16, w/flat & spring washers
SHIELD CASE BRACKETÅ@
FIG. 18. 1 c
SCREW (2 each)
M4 X 8, w/flat & spring washers
6
7
8

99
GAME BD NCR (833-14033)
SAMURAI COMMUNICATION BD
837-13404
ROM BD NCR
834-14125
BD TRAY FOR SEGA HIKARU
105-5380
MAIN BD SEGA HIKARU
834-13821-01
SAMURAI EXTEND SOUND BOARD
837-13629
MAIN BDJUMPER SETTING
JP4 1-2JP5 1-2JP6 1-2JP7 1-2JP8 2-3JP9 2-3JP10 1-2JP11 2-3
FIG. 18. 2
ROM BDJUMPER SETTING
JP3 2-3JP4 2-3JP5 2-3JP6 2-3
SCREW (2)
M3 X 70, w/flat & spring washers
SCREW (3)
M3 X 50, w/flat & spring washers
18 - 2 COMPOSITION OF GAME BOARD
FLANGE NUT (8)
M3, plastic washer used.

100
NCR-0204
POP SH NCR
423-0338
BILLBOARD PLATE NCR DX 422-0822-01
PLAY INSTR SH NCR DX ENG
NCR-2302-B
STICKER SHIFT COVER
NCR-2002-B
STICKER FRONT TOP
NCR-0511
STICKER PTV SIDE L
OPPOSITE SIDE
NCR-0512
STICKER PTV SIDE R
NCR-2002-C
STICKER FRONT SIDE L
OPPOSITE SIDE
NCR-2002-D
STICKER FRONT SIDE R NCR-2002-B
STICKER FRONT TOP
NCR-1002-B
STICKER BASE SIDE L
421-11305
STICKER BASE SIDE 1-8 NCR
NCR-1002-D
STICKER BASE CENTER SIDE
NCR-1005-B
STICKER BACK LID
NCR-1002-E
STICKER BASE TOP
NCR-2401-B
STICKER SEAT BACK NCR
RIGHT SIDE
NCR-1002-C
STICKER BASE SIDE R
NCR-1004-B
STICKER SIDE LID
421-11304
STICKER REAR 1-8 NCR
NCR-0205
NUMBER PLATE
19. DESIGN RELATED PARTS
For the Warning Display stickers, refer to Section 1.

101
20. COMMUNICATION PLAY
For this game, up to 8 machines can be connected to allow up to 8 players to playsimultaneously. In this instance, connecting the communication cable and setting for thecommunication play are required.
20 - 1 INSTALLATION PRECAUTIONS
To perform work safely, be sure to secure the space corresponding to number ofmachines to be linked. Failure to observe this can cause accident.
The optic fiber cable is used for the communication linkage.Excessive bending may damage the communication cable. Be very careful in thisregard.
Since 2 or more machines are to be linked, sufficient power corresponding to the number ofmachines used need to be supplied. Note that as a standard, the per machine capacity should be15A for the 100 ~ 120V area, and 7A for the 220 ~ 240V area.
STOP
IMPORTANT
Before starting to work, ensure that the Power SW is OFF. Failure to observethis can cause electric shock or short circuit.Use care so as not to damage wirings. Damaged wiring can cause electricshock or short circuit.Do not touch undesignated places. Touching places not designated can causeelectric shock or short circuit.This work should be performed by the Location's Maintenance Man orServiceman. Performing work by non-technical personnel can cause electricshock hazard.When linking a number of machines, be sure to supply sufficient power forthe corresponding number of machines. Be sure to secure per machinecurrent as stated in this manual. Failure to observe this can cause a fire and anelectric shock accident.Due to the length of the communication cable, the distance in between themachines is limited. However, to avoid accidents, be sure to secure space inexcess of 70 cm between the machines.In order to avoid personal injury, when separating the machine into eachCABI, pay attention so as not to cause the PTV to fall down.To perform work safely and avoid serious accident such as the cabinet'sfalling down, do not perform work in places where step-like gradedifferences, a ditch, or slope exist.

102
70cm 70cm
FIG. 20. 1
20 - 2 CONNECTING THE COMMUNICATION CABLE
To enable the game machines to serve in a communication play, you must interconnect theirgame boards with the communication cables (optical fiber cables).As for a wiring of the communication cables within the main cabinet (between the game boardand the connector plate), Sega has completed it before shipping. Each connector plate has twoconnectors. Use them to wire the communication cables between one game machine to the next;thereby you can interconnect all the game boards. For this wiring, prepare in advance somestandard accessories: flexible tube, 2 of connector 22, communication cable, and 2 sets ofnumber sticker.
Turn off power and disconnect the plug. From the viewpoint of protecting, disconnect thepower cord.
Referring to Chapter 6, uncouple themain cabinet from the PTV base/PTV/billboard. Be careful not to damage thewires between them.Also be careful not to carelessly push thePTV base/PTV/billboard because it iseasy to fall to the ground.
Remove the 4 trusshead screws to detachthe connector box from the main cabinet.
TRUSS SCREW (4) black
M4 X 16
CONNECTOR BOXPHOTO 20. 2
Be sure to secure space in excess of 70cm between machines.
DISTANCE BETWEEN MACHINES
1
2
3

103
Remove the 2 screws to detach the hole lid from the connector box. Depending on the numberand arrangement of the interconnected game machines, you may remove either or both of the 2hole lids. (Fig. 20. 2a)
CONNECTOR BOXTRUSS SCREW (4) black
M4 X 16
HOLE LID
SCREW (2) black
M3 X 8, w/flat & spring washers
FIG. 20. 2 a
Connect theCommunication cable.
4

104
Attach CONNECTOR 22 to the both ends of FLEX TUBE. First, disassemble CONNECTOR22 (Fig. 20. 2 b).
First pass the plastic nut through the flex tube. Otherwise, the following work can not beperformed and therefore, be very careful of this point.
Install the holder and then the "insert" to the end of the flex tube by turning them as in bolts andnuts (Fig. 20. 2 c).
Tighten the plastic nut to the connector. At this time, pass the communication cable through theflex tube ahead of time so as to allow the following work to be performed easily (Fig. 20. 2 d).
Install the flex tube into the CONNECTOR BOX HOLE. Insert the connector into theCONNECTOR BOX HOLE, put the seal washer through and fasten the metal nut (Fig. 20. 2 e).
INSERT
CONNECTOR
FLEX TUBEFLEX TUBE
FIG. 20. 2 b FIG. 20. 2 c FIG. 20. 2 d
PLASTIC NUT
HOLDER
PLASTIC NUT
HOLDER
CONNECTOR
INSERT
SEAL WASHER
METAL NUT
SEAL WASHER
METAL NUT
CONNECTOR BOX COMMUNICATION CABLE
FIG. 20. 2 e
5
6
7
8
9

105
Wire the communication cables. A wiring method (connecting which connector to whichconnector) varies depending on the number of the game machines to interconnect. Wire exactlyaccording to the illustration below. For the number other than in the illustration, always connectthe TX of one game machine to the RX of the other, and thereby make a loop of thecommunication cable finally. (Fig. 20. 2f)
FIG. 20. 2 f
8
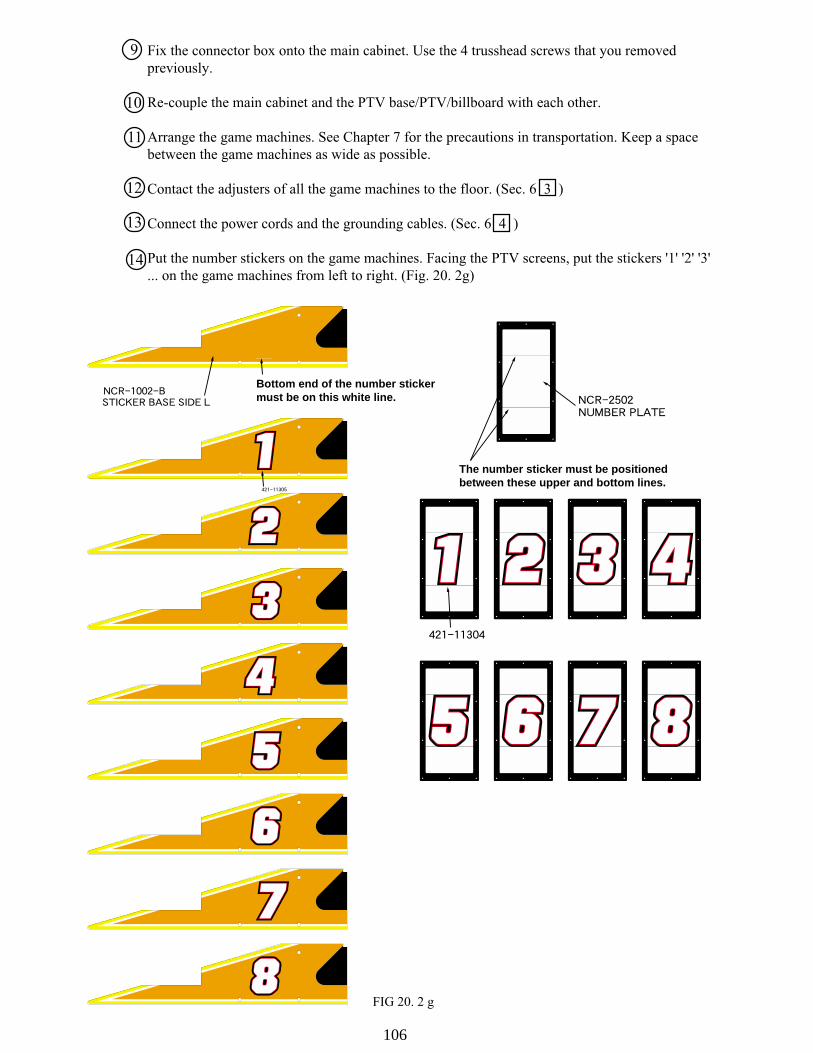
106
Fix the connector box onto the main cabinet. Use the 4 trusshead screws that you removedpreviously.
Re-couple the main cabinet and the PTV base/PTV/billboard with each other.
Arrange the game machines. See Chapter 7 for the precautions in transportation. Keep a spacebetween the game machines as wide as possible.
Contact the adjusters of all the game machines to the floor. (Sec. 6 3 )
Connect the power cords and the grounding cables. (Sec. 6 4 )
Put the number stickers on the game machines. Facing the PTV screens, put the stickers '1' '2' '3'... on the game machines from left to right. (Fig. 20. 2g)
Bottom end of the number stickermust be on this white line.
The number sticker must be positionedbetween these upper and bottom lines.
FIG 20. 2 g
9
10
11
12
13
14

107
20 - 3 SETTING FOR COMMUNICATION PLAY
Change the game setting for each seat in a manner so as to meet communication play. If thesetting is not correct, communication play cannot be played.
FIG. 20. 3 a
SYSTEM ASSIGNMENTS
CABINET TYPE 1PLAYER ADVERTISE SOUND ON MONITOR TYPE HORIZONTAL DISPLAY MODE AUTOSCAN SERVICE TYPE COMMON> COMMUNICATION MODE MASTER EXIT
SELECT WITH SERVICE BUTTON AND PRESS TEST BUTTON
Activate the game test mode. (9-3)
Select and open the GAME ASSIGNMENTS screen. Note that the screen looks differentbetween the MASTER and SLAVE game machines.
Perform the SEAT NUMBER setting in the GAME ASSIGNMENTS screen. Set the machinessequentially to No.1, No.2, No.3, and so on as applicable starting from the extreme left facingthe monitor's front side. Set every seat number correctly without duplication.
During communication play, if the test mode is not finished within 3 minutes onall the linked machines, the NETWORK CHECK cannot be performed, causingNETWORK ERROR.
STOP
IMPORTANT
Turn the linked machines' power on.
Cause all of the machines to enter the test mode.
Select the SYSTEM ASSIGNMENTS.
Perform the COMMUNICATION MODE setting in the SYSTEM ASSIGNMENTS screen. Setone of the machines to MASTER and all others to SLAVE. Set to RELAY for exclusive use ofLIVE Monitor.
SETTING FOR COMMUNICATION PLAY
1
2
3
4
5
6
7

108
Cause all of the machines to exit from the test mode. After the test mode, the screens proceed toand display the NETWORK CHECK.
When a network-checking is finished, the system displays am advertisement screen. This meansa successful completion of setting. If any seat number is duplicated, an error message appearson the screen. Normally the NETWORK CHECK takes less than one minute. If the screendoes not proceed from the NETWORK CHECK screen, some sorts of errors such as incorrectsetting, or incorrect connection or malfunctioning of the communication cable can beconsidered.
GAME ASSIGNMENTS
GAME MODE(SINGLE) NORMAL GAME MODE(NETWORK) NORMAL GAME DIFFICULTY NORMAL DEFALT VIEW DRIVER SPEED DISPLAY KM/H > SEAT NUMBER X
EXIT
SELECT WITH SERVICE BUTTON AND PRESS TEST BUTTON
FIG. 20. 3 b
20 - 4 CAUTIONS TO BE HEEDED DURING COMMUNICATION PLAY
With a communication play, the ADVERTISE SOUND and GAMEDIFFICULTY items can be set only on the MASTER game machine. Newsettings by the MASTER game machine become effective to all theinterconnected game machines.If any setting is inadequate or if the communication cables are improperlyconnected, the system keeps displaying the network-checking screen or anerror message. If this is the case, you cannot play the game.During communication play, if communication is interrupted due to somecause, the game is discontinued and the NETWORK CHECK screen isdisplayed.If one of the linked machines enters the test mode, all others display theNETWORK CHECK screen.
Machine's operation when linked for communication play alters comparing to that of whenindependently operated. Be careful of this point.As described above, some setting items must be set only on the MASTER game machine. Theycannot be set on any SLAVE game machines or, if set, will not become effective.When any game machine is in a test mode, a network-checking screen appears on the othergame machines interconnected for a communication play. While a guest is using any one of theinterconnected game machines, therefore, do not activate a test mode even on the unused gamemachine.
STOP
IMPORTANT

109
1 TOP ASSY NCR DX (D-1/2)
21. PARTS LIST

110
ITEM NO. PART NO. DESCRIPTION NOTE
1 NCR-0500 ASSY PTV2 NCR-1000 ASSY MAIN CABINET3 POD-0550 ASSY PTV BASE4 NCR-0002 JONT BRKT CENTER5 NCR-0003 JOINT BRKT PTV BASE6 DYN-0011 DENOMI PLATE W/O ORIGINAL7 440-WS0220-EG STICKER W HEAD ARM ENG8 421-7308- ~ DENOMINATION SHEET 1GAME ~
15 440-CS0186-EG STICKER C EPILEPSY 40 ENG16 440-WS0002XEG STICKER W POWER OFF ENG17 421-7020 STICKER CAUTION FORK18 421-8479-01 STICKER INSTR SUNLIGHT ENG19 440-WS0130-EG STICKER W GEAR BOX ENG20 422-0822-01 PLAY INSTR SH NCR DX ENG21 440-CS0221-EG STICKER C KEEP OUT 93 X 63 ENG22 SGM-4365 POLY COVER 1700 X 2200 X 1700
201 030-000830-SB HEX BLT W/S BLK M8 X 30202 068-852216-0B FLT WSHR BLK 8.5-22 X 1.6203 000-T00408-0B M SCR TH BLK M4 X 8204 008-T00412-0B TMP PRF SCR TH BLK M4 X 12
401 601-6604-70 CARTON BOX 70402 SGM-2675 POLYETHYLENE BAG, 240 X 370404 600-7228 AC CABLE CONNECT TYPE 15A TAIWAN
600-6618 AC CABLE CONNECT TYPE FOR EXP OTHERS600-6619 AC CABLE CONNECT TYPE FOR UK HONG KONG600-6695 AC CABLE CONNECT TYPE USA 15A USA
405 SGM-4111 KEY BAG (SGB-1035X)406 220-5576 KEY MASTER FOR 220-5575407 280-5009-01 CORD CLAMP 21408 509-5636 SW MICRO TYPE SS-5GL2T409 220-5373 VOL CONT B-5K
220-5484 VOL CONT B-5K OHM410 600-6664-02 WIRE HARN EARTH W/LUG M6 TAIWAN
NOT USED OTHERS411 600-6275-0500 ASSY FIBER CABLE 5 0500CM412 540-0009-01 WRENCH FOR TAMP SCR M8413 420-6588-01 OWNERS MANUAL NCR DX ENG414 310-5051-22 CONN 22415 310-5050-220200 FLEX TUBE 22-0200CM416 421-11304 STICKER REAR 1-8 NCR417 421-11305 STICKER BASE SIDE 1-8 NCR
/ 421-6690-03 STICKER 220V AC 220V AREA/ 421-6690-05 STICKER 240V AC 240V AREA/ 421-6690-06 STICKER 110V AC 110V AREA/ 421-6690-01 STICKER 120V AC 120V AREA/ 421-6119-91 STICKER FCC
USA/ 421-6120-92 STICKER SEGA USA
1 TOP ASSY NCR DX (D-2/2)

111
2 ASSY PTV (NCR-0500) (D-1/2)

112
2 ASSY PTV (NCR-0500) (D-2/2)
ITEM NO. PART NO. DESCRIPTION
1 NCR-0510 PTV W/STICKER NCR2 MGL-1150 ASSY MASK3 NCR-0550 ASSY BILLBOARD4 NCR-0600 ASSY FRONT PANEL5 DYN-0501 PANEL MOUNT BRKT L6 DYN-0502 PANEL MOUNT BRKT R7 RAL-0501 MASK HOLDER
201 000-F00412 M SCR FH M4 X 12202 000-P00516-W M SCR PH W/FS M5 X 16203 000-P00520-W M SCR PH W/FS M5 X 20205 000-T00525-0B M SCR TH BLK M5 X 25206 068-552016-0B FLT WSHR BLK 5.5-20 X 1.6207 000-T00520-0B M SCR TH BLK M5 X 20208 000-P00516-WB M SCR PH W/FS BLK M5 X 16

113
3 ASSY BILLBOARD (NCR-0550) (D-1/2)

114
3 ASSY BILLBOARD (NCR-0550) (D-2/2)
ITEM NO. PART NO. DESCRIPTION NOTE
1 NCR-0551 BILLBOARD BOX2 423-0338 BILLBOARD PLATE NCR DX3 NCR-0552 BILLBOARD SASH4 253-5457 FL HOLDER OTHERS
Locally supplied. USA5 421-7501-18 STICKER FL32W OTHERS
Locally supplied. USA6 440-WS0002XEG STICKER W POWER OFF ENG7 440-WS0012XEG STICKER W HIGH TEMP ENG
101 390-6659-32EX ASSY FL32W EX W/CONN HIGH S CE OTHERSLocally supplied. USA
102 280-5275-SR10 CORD CLAMP SR10
201 000-T00408-0C M SCR TH CRM M4 X 8202 000-P00430-S M SCR PH W/S M4 X 30 OTHERS
Locally supplied. USA203 068-441616 FLT WSHR 4.4-16 X 1.6 OTHERS
Locally supplied. USA

115
4 ASSY FRONT PANEL (NCR-0600) (D-1/2)

116
4 ASSY FRONT PANEL (NCR-0600) (D-2/2)
ITEM NO. PART NO. DESCRIPTION
1 NCR-0601 FRONT PANEL2 EZT-0603 SIDE BRKT3 EZT-0604 BRKT UPPER4 EZT-0605 BRKT LOWER
201 068-552016 FLT WSHR 5.5-20 X 1.6202 050-F00500 FLG NUT M5

117
5 ASSY MASK (MGL-1150)
ITEM NO. PART NO. DESCRIPTION
1 MGL-1102 TV MASK2 MGL-1151 SLIT PLATE3 MGL-1152 MASK SIDE HOLDER
201 012-F00408-0B TAP SCR #2 FH BLK 4 X 8202 000-F00410 M SCR FH M4 X 10

118
6 PTV W/STICKER NCR (NCR-0510)
ITEM NO. PART NO. DESCRIPTION
1 NCR-0511 STICKER PTV SIDE L2 NCR-0512 STICKER PTV SIDE R
101 200-5788-31 PROJECTION DSPL T 50TYPE 31K

119
7 ASSY PTV BASE (POD-0550)
ITEM NO. PART NO. DESCRIPTION
1 POD-0551 PTV BASE2 SCR-1008 NUT PLATE FOR CASTER3 ARC-1006 LEG BRACKET4 117-5233 PLATE LEG BRACKET BLACK6 POD-1008 NUT BRKT
101 999-0169 CASTER 160-2 1/2”102 999-0167 LEG ADJUSTER BOLT 1/2-13 X 3”
201 011-T03512 TAP SCR TH 3.5 X 12202 Loc. Purchase HEX BLT W/S BLK M6 X 25203 Loc. Purchase HEX BLT W/FS M6 X 25204 Loc. Purchase HEX NUT BLK M16205 000-P00520-W M SCR PH W/FS M5 X 20

120
8 ASSY MAIN CABINET (NCR-1000) (D-1/3)

121
8 ASSY MAIN CABINET (NCR-1000) (D-2/3)
ITEM NO. PART NO. DESCRIPTION
1 NCR-1001 ASSY SUB-CABI2 NCR-1070 FAN UNIT3 999-1051 TOWER ASSY4 NCR-2000 ASSY CTRL PNL5 NCR-2100 STEERING MOTOR UNIT6 NCR-2200 PEDAL UNIT7 NCR-2300 ASSY ROLL BAR SIDE8 NCR-2400 ASSY SEAT9 NCR-2500 ASSY ROLL BAR R
11 NCR-4000 ASSY MAIN BD DX12 NCR-4100 ASSY AMP BD13 NCR-4200 ASSY ELEC14 NCR-1008 PLATE HOLD BRKT15 NCR-1009 HOLD BRKT FRONT16 NCR-1010 FLOOR FRONT L17 NCR-1011 FLOOR FRONT S18 NCR-1014 FLOOR REAR L A19 NCR-1015 FLOOR REAR R A20 NCR-1016 FLOOR REAR B21 NCR-1017 REAR SASH22 NCR-1018 FLOOR REAR L C23 NCR-1019 FLOOR REAR R C24 NCR-1020 FRONT MECHA BOX25 NCR-1021 MECHA SIDE LID26 NCR-1022 MECHA FRONT LID27 NCR-1026 FLOOR GUARD PLATE28 NCR-1027 NON SLIP MAT29 NCR-1028 FRONT SIDE SASH30 NCR-1029 SIDE SASH M31 NCR-1030 CORNER SASH32 NCR-1102 TOWER BASE33 NCR-2202 PEDAL BASE BRKT34 NCR-2001 ROLL BAR F35 NCR-2051 ROLL BAR H36 NCR-2052 PIPE HOLDER37 NCR-2053 PIPE HOLDER L38 NCR-2054 PIPE HOLDER R39 NCR-2055 PIPE HOLDER C40 999-1052 PAD SIDE41 SRT-3206 KEY 5 X 5 X 1742 FRI-2006 KEY 6 X 6 X 1643 NCR-2008 BONNET LID44 NCR-1082 CONNECTOR BOX45 DYN-0009 HOLE LID46 FRI-2508 BOX CORNER PAD47 999-1053 PAD FL48 999-1054 PAD FR49 999-1055 PAD RL50 999-1056 PAD RR51 NCR-1032 CONCEAL PLATE52 NCR-1002-E STICKER BASE TOP53 421-9107-300 STICKER UNIT WEIGHT 300KG54 NCR-1034 DRIVE BD BASE55 838-12912-01 SERVO MOTOR DRIVE BD NEW

122
ITEM NO. PART NO. DESCRIPTION
101 111-1131 COUPLING MJT-40K-BL 16-20102 253-5460-01 AIR VENT BLACK103 601-10969 INSULOCK TIE T60R-W
201 079-000008 SCR NAIL THH STNLS 1.5 X 16204 050-F00400 FLG NUT M4205 030-000825-S HEX BLT W/S M8 X 25206 060-F00800 FLT WSHR M8207 030-000830-SB HEX BLT W/S BLK M8 X 30208 030-000816-SB HEX BLT W/S BLK M8 X 16209 060-F00800-0B FLT WSHR BLK M8210 032-000425 WING BLT M4 X 25211 068-441616 FLT WSHR 4.4-16 X 1.6212 032-000530 WING BLT M5 X 30213 068-552016 FLT WSHR 5.5-20 X 1.6214 031-000620-0B CRG BLT BLK M6 X 20215 060-F00600 FLT WSHR M6216 050-F00600 FLG NUT M6217 000-T00416-0B M SCR TH BLK M4 X 16218 000-T00408-0B M SCR TH BLK M4 X 8219 068-852216-0B FLT WSHR BLK 8.5-22 X 1.6220 030-0008A0-0B HEX BLT BLK M8 X 100221 030-000816-S HEX BLT W/S M8 X 16222 030-000830-S HEX BLT W/S M8 X 30224 031-0S0865 CRG BLT STN M8 X 65225 050-C00800-0C CAP NUT CRM M8226 060-S00800-0B SPR WSHR BLK M8228 060-F00800-0C FLT WSHR CRM M8229 000-T00412-0B M SCR TH BLK M4 X 12230 000-P00308-WB M SCR PH W/FS BLK M3 X 8231 060-S00800-0C SPR WSHR CRM M8232 068-441616-0B FLT WSHR BLK 4.4-16 X 1.6233 050-H00400 HEX NUT M4234 060-F00400 FLT WSHR M4235 060-S00400 SPR WSHR M4236 030-000840-SB HEX BLT W/S BLK M8 X 40237 000-P00412-W M SCR PH W/FS M4 X 12238 000-P00320-W M SCR PH W/FS M3 X 20
8 ASSY MAIN CABINET (NCR-1000) (D-3/3)

123
9 ASSY SUB-CABI (NCR-1001) (D-1/2)

124
9 ASSY SUB-CABI (NCR-1001) (D-2/2)
ITEM NO. PART NO. DESCRIPTION
1 NCR-1090 AC UNIT2 STR-1070 FAN UNIT3 NCR-1080 ASSY CONNECTOR PLATE4 NCR-1002 WOODEN CABINET5 NCR-1003 FRONT LID6 NCR-1004 SIDE LID7 NCR-1005 BACK LID8 NCR-1006 SUPPORT PLATE LOWER A9 NCR-1007 HOLD PLATE A
10 NCR-1012 SUPPORT PLATE LOWER B11 NCR-1013 HOLD PLATE B12 NCR-1024 STEP GUARD PLATE13 NCR-1025 SIDE STEP PLATE14 ARC-1006 LEG BRACKET15 999-1042 PLATE LEG BRACKET BLACK16 253-5460-01 AIR VENT BLACK17 DP-1148X LKG TNG18 117-0062 PLATE LOCK RETAINER19 117-5098 TNG RETAINER PLATE20 NCR-1004-B STICKER SIDE LID21 APC-1090 CORNER GUARD22 NCR-1005-B STICKER BACK LID
101 999-0169 CASTER 160-2 1/2”102 999-0167 LEG ADJUSTER103 220-5575 CAM LOCK MASTER W/O KEY104 117-5402-06-91 EARTH TERMINAL PLATE 6P
201 000-T00420-0B M SCR TH BLK M4 X 20203 FAS-110010 TAP SCR FH #1 BLK 3 X 10204 030-000630-SB HEX BLT BLK W/S M6 X 30205 030-000625-WB HEX BLT W/FS BLK M6 X 25206 050-H01600 HEX NUT M16207 079-000008 SCR NAIL THH STNLS 1.5 X 16208 011-F03516 TAP SCR FH 3.5 X 16209 011-T00312 TAP SCR TH 3 X 12210 000-T00430-0B M SCR TH BLK M4 X 30211 030-000830-S HEX BLT W/S M8 X 30212 060-F00800 FLT WSHR M8213 000-T00416-0C M SCR TH CRM M4 X 16
301 600-6275-0300 ASSY FIBER CABLE 5 0300CM302 600-7009-3000 ASSY RGB CA D-SUB 15P 3000MM303 600-7141-250 CABLE JVS TYPE A-B 250CM

125
10 AC UNIT
ITEM NO. PART NO. DESCRIPTION
1 999-1043 AC BRKTNOT SHOWN DYN-0402 NOISE FILTER BASENOT SHOWN 421-8202 STICKER EARTH MARK
101 999-1044 AC INLET PANEL TYPE104 999-0676 SW ROCKER J8 V-B

126
11 FAN UNIT (STR-1070)
ITEM NO. PART NO. DESCRIPTION
1 105-5340-01 FAN BRKT LONG
101 260-0011-02 AXIAL FLOW FAN AC100V 50-60HZ102 601-8543 FAN GUARD
201 000-P00312-W M SCR PH W/FS M3 X 12
CONNECTOR

127
12 ASSY CONNECTOR PLATE (NCR-1080)
ITEM NO. PART NO. DESCRIPTION
1 NCR-1081 CONNECTOR PLATE2 421-7515 STICKER FIBER CABLE TX/RX
101 211-5479-01 CONN OPT JOINT
201 000-P00312-W M SCR PH W/FS M3 X 12

128
13 FAN UNIT (NCR-1070)
ITEM NO. PART NO. DESCRIPTION
1 NCR-1071 FAN BRKT
101 260-0011-02 AXIAL FLOW FAN AC100V 50-60HZ102 601-8543 FAN GUARD
201 000-P00312-W M SCR PH W/FS M3 X 12202 050-H00300 HEX NUT M3203 060-S00300 SPR WSHR M3204 060-F00300 FLT WSHR M3
CONNECTOR
129
14 ASSY COINCHUTE TOWER (NCR-1100) (D-1/2)

130
14 ASSY COINCHUTE TOWER (NCR-1100) (D-2/2)
ITEM NO. PART NO. DESCRIPTION NOTE
1 NCR-1150 SW UNIT2 NCR-1101 COINCHUTE TOWER3 BSS-1471 METER BRKT4 BSS-1472 METER HOLE LID OTHERS
Locally supplied. USA5 DP-1167 TNG LKG OTHERS
Locally supplied. USA6 105-5171 CHUTE PLATE SINGLE OTHERS
105-5172 CHUTE PLATE DOUBLE USA7 253-5366 CASH BOX8 421-6591-01 STICKER COIN METER9 421-7501-02 STICKER 6.3V 0.15A OTHERS
Locally supplied. USA
101 220-5237-92- ~ ASSY C.C 2DR ~220-5482-91- ~ ASSY C.C 2DR ~
Locally supplied. USA102 220-5643-01 MAG CNTR DC5V 6P WH MZ-674-D04103 220-5575 CAM LOCK MASTER W/O KEY OTHERS
Locally supplied. USA104 220-5574 CAM LOCK W/KEYS OTHERS
Locally supplied. USA105 280-5009-01 CORD CLAMP 21106 280-5275-SR10 CORD CLAMP SR10107 310-5029-F20 SUMITUBE F F 20MM OTHERS
Locally supplied. USA108 601-0460 PLASTIC TIE BELT 100 MM
201 000-P00408-W M SCR PH W/FS M4 X 8
301 600-6455-02 WIRE HARN C.C DOOR SINGLE OTHERSLocally supplied. USA
302 600-6972-0150 WIRE HARN EARTH ID5 0150MM303 NCR-60040 WIRE HARN EXT SOUND VR B304 NCR-60041 WIRE HARN EXT TOWER B
/ 220-5643-02 MAG CNTR DC5V 6P YE MZ-674-D05 USA

131
15 SW UNIT (NCR-1150)
ITEM NO. PART NO. DESCRIPTION
1 999-1045 SW BRKT2 421-11297 STICKER SW UNIT NCR3 999-1046 VR COVER4 999-1050 COIN METER
101 509-5028 SW PB 1M102 220-5179 VOL CONT B-5K OHM103 601-0042 KNOB 22 MM104 601-0460 PLASTIC TIE BELT 100 MM105 310-5029-F20 SUMITUBE F F 20MM
4

132
16 ASSY CTRL PNL (NCR-2000) (D-1/2)
M8
TO
RQ
UE
20N
•m

133
16 ASSY CTRL PNL (NCR-2000) (D-2/2)
ITEM NO. PART NO. DESCRIPTION
1 SRT-2150 ASSY SW PLATE2 NCR-2002 CTRL PNL BOX3 NCR-2004 HANDLE BASE4 NCR-2005 STEERING SHAFT5 NCR-2006 STEERING COLLAR6 NCR-2003 BEARING HOLDER7 NCR-2007 CTRL PNL PLATE8 NCR-2009 CENTER GUARD9 SPG-2001 STEERING WHEEL
10 SPG-2002 STEERING EMBLEM11 SPG-2039 SPACER RING12 DUT-2105 STOPPER BOLT M1013 DUT-2106 STOPPER RUBBER14 NCR-2010 STICKER CTRL PNL
101 130-5206 SPKR 16CM 4OHM 25W102 280-5009-01 CORD CLAMP 21103 100-5377 BEARING 30104 100-5240 BEARING FAI30105 130-5172 BASS SHAKER
201 020-000850-0Z HEX SKT H CAP SCR BLK OZ M8 X 50202 060-S00800 SPR WSHR M8203 000-T00408-0C M SCR TH CRM M4 X 8204 008-B00830-0B TMP PRF SCR BH BLK M8 X 30205 060-S00800-0B SPR WSHR BLK M8206 068-852216-0B FLT WSHR BLK 8.5-22 X 1.6207 000-T00416-0B M SCR TH BLK M4 X 16208 060-F01200 FLT WSHR M12209 000-P00420-WB M SCR PH W/FS BLK M4 X 20210 030-001435 HEX BLT M14 X 35211 060-S01400 SPR WSHR M14212 060-F01400 FLT WSHR M14213 050-U00400 U NUT M4214 060-F00400 FLT WSHR M4215 FAS-200013 HEX SKT H CAP SCR CRM M4 X 16216 030-000820-S HEX BLT W/S M8 X 20217 060-F00800 FLT WSHR M8218 030-000830-SB HEX BLT W/S BLK M8 X 30219 000-T00410-0B M SCR TH M4 X 10 BLK220 011-F00312 TAP SCR #1 FH 3 X 12
301 NCR-60044 WIRE HARN EXT SPEAKER FRONT302 NCR-60045 WIRE HARN EXT START & VIEW303 NCR-60053 WIRE HARN SPEAKER L304 NCR-60054 WIRE HARN SPEAKER R

134
17 ASSY SW PLATE (SRT-2150)
ITEM NO. PART NO. DESCRIPTION
1 SRT-2151 SW PLATE
101 509-5838-Y SW PB LW1L-15Y-TK1670102 509-5495-05 PUSH BUTTON BLUE
301 600-7008-079 WIRE HARN BUTTON

135
18 STEERING MOTOR UNIT (NCR-2100) (D-1/2)
SC
RE
W F
AS
TE
NIN
G T
OR
QU
E T
O B
E
M3
X 0
.76
N•m
M4
X 1
.8 N
•m
M6
X 5
.8 N
•m
M8
X 1
8 N
•m
GRE
ASIN
G

136
18 STEERING MOTOR UNIT (NCR-2100) (D-2/2)
ITEM NO. PART NO. DESCRIPTION
1 FRI-2101 MECHA BASE2 FRI-2102 BASE LID3 NCR-2101 MOTOR SHAFT4 FRI-2104 SHAFT LOCK PLATE5 SPG-2504 PULLEY 20 S5M6 SPG-2505 PULLEY 60 S5M7 SPG-2506 MOTOR BRKT8 FRI-2105 VR BRKT9 SPG-2453 KEY 4 X 4 X 40
10 ASK-3502 MOTOR SPACER11 ASK-3503 MOTOR COLLAR12 DYN-1270 STOPPER KEY13 SLC-1130 ADJUST RING14 SPG-2454 MOTOR SHAFT COLLAR15 FRI-2106 VR BASE
101 350-5448-01 SERVO MOTOR 500W NEW102 100-5112 BEARING 17103 601-8966 GEAR HOLDER104 601-6172 GEAR 48105 601-6959 GEAR 64106 601-9173 TIMING BELT107 220-5373 VOL CONT B-5K
220-5484 VOL CONT B-5K OHM108 310-5029-F20 SUMITUBE F F 20MM109 280-0419 HARNESS LUG110 280-5009-01 CORD CLAMP 21
201 028-A00408-P SET SCR HEX SKT CUP P M4 X 8202 028-A00308-P SET SCR HEX SKT CUP P M3 X 8203 065-S012S0-Z STP RING BLK OZ S12204 065-S020S0-Z STP RING BLK OZ S20205 000-P00408-W M SCR PH W/FS M4 X 8206 000-P00412-W M SCR PH W/FS M4 X 12207 030-000612-S HEX BLT W/S M6 X 12208 060-F00600 FLT WSHR M6209 030-000820-S HEX BLT W/S M8 X 20210 030-000840-S HEX BLT W/S M8 X 40211 068-852216 FLT WSHR 8.5-22 X 1.6212 060-F00800 FLT WSHR M8
301 NCR-60055 WIRE HARN HANDLE VR

137
19 PEDAL UNIT (NCR-2200)
ITEM NO. PART NO. DESCRIPTION
1 SPG-2200 ASSY ACCEL & BRAKE2 FRI-2201 FOOT REST FRI3 NCR-2201 PEDAL BASE
201 030-000825-SB HEX BLT W/S BLK M8 X 25202 060-F00800-0B FLT WSHR BLK M8203 050-H00800 HEX NUT M8204 060-S00800 SPR WSHR M8205 060-F00800 FLT WSHR M8
SCREW FASTENING TORQUE TO BE
M8 X 18 N•m

138
20 ASSY ACCEL&BRAKE (SPG-2200) (D-1/2)

139
20 ASSY ACCEL&BRAKE (SPG-2200) (D-2/2)
ITEM NO. PART NO. DESCRIPTION
1 SPG-2201 BASE2 SPG-2202 ACCEL PEDAL3 SPG-2203 BRAKE PEDAL4 SPG-2204 ACCEL SPRING5 SPG-2205 BRAKE SPRING6 SPG-2206 SHAFT7 SPG-2207 ACCEL GEAR8 SPG-2208 BRAKE GEAR9 SPG-2209 NEUTRAL STOPPER
10 SPG-2210 VR PLATE ACCEL11 SPG-2211 VR PLATE BRAKE12 SPG-2212 AMPL GEAR13 SPG-2213 GEAR SHAFT14 SPG-2214 STOPPER15 SPG-2215 RUBBER CUSHION16 SPG-2216 COVER17 SPG-2217 VR COVER19 SPG-2219 GEAR STAY20 SPG-2220 WSHR21 SPG-2221 NEUTRAL STOPPER D
101 100-5263 BEARING 12102 220-5484 VOL CONT B-5K OHM
220-5373 VOL CONT B-5K104 601-7944 GEAR 15105 310-5029-F15 SUMITUBE F F 15MM106 280-0419 HARNESS LUG
201 028-A00304-P SET SCR HEX SKT CUP P M3 X 4202 020-000520-0Z HEX SKT H CAP SCR BLK M5 X 20203 000-P00420 M SCR PH M4 X 2204 000-P00508-W M SCR PH W/FS M5 X 8205 000-T00408-0C M SCR TH CRM M4 X 8206 FAS-450005 SPR PIN BLK OZ 6 X 10207 000-P00405 M SCR PH M4 X 5208 FAS-000001 M SCR TH CRM M3 X 6209 050-H00500 HEX NUT M5210 060-F00400 FLT WSHR M4
301 600-6840 WIRE HARN ACCEL&BRAKE

140
21 ASSY ROLL BAR SIDE (NCR-2300)
ITEM NO. PART NO. DESCRIPTION
1 NCR-2150 ASSY 4SPEED SHIFTER2 NCR-2301 ROLL BAR SIDE3 NCR-2302 SHIFT COVER4 NCR-2303 SHIFT BOX
NOT SHOWN 999-1047 SHIFT BOX SUPPORT
101 280-5009-01 CORD CLAMP 21
201 030-000820-S HEX BLT W/S M8 X 20202 060-F00800 FLT WSHR M8203 000-T00412-0B M SCR TH BLK M4 X 12

141
22 ASSY 4SPEED SHIFTER (NCR-2150) (D-1/2)

142
22 ASSY 4SPEED SHIFTER (NCR-2150) (D-2/2)
ITEM NO. PART NO. DESCRIPTION
1 NCR-2151 SHIFT KNOB2 SPG-2152 STOPPER RUBBER3 SPG-2153 FRONT BASE4 SPG-2154 SLIDE COVER5 SPG-2155 SLIDE PLATE6 SPG-2156 REAR BASE7 SPG-2157 RUBBER BLOCK 458 SPG-2158 RUBBER BLOCK 659 SPG-2159 INSULATOR SHEET
10 SPG-2160X SHAFT CASE11 SPG-2161 SHAFT BOLT12 SPG-2162 CENTERING BLOCK13 SPG-2163 RUBBER CASE14 SPG-2164 ROLLER BOLT15 SPG-2165 ROLLER SUPPORT
101 100-5252 BEARING ROLLER 25102 100-5193 GROMMET 11103 100-5242 BEARING FAI 8104 509-5636 SW MICRO TYPE SS-5GL2T105 601-0460 PLASTIC TIE BELT 100 MM106 280-5306 SPACER FAI 6 X 30107 280-5307 SPACER FAI 8 X 55
201 000-F00406 M SCR FH M4 X 6202 000-P00410-W M SCR PH W/FS M4 X 10203 000-P00420-W M SCR PH W/FS M4 X 20204 000-P00510-W M SCR PH W/FS M5 X 10205 050-H00600 HEX NUT M6206 060-S00600 SPR WSHR M6207 065-S010S0-Z STP RING BLK OZ S10208 FAS-000033 M SCR PH W/FS M2.3 X 12209 FAS-650008 WAVE WSHR 12.7-18.1 X 2.5210 FAS-450006 SPR PIN WAVE STN 5 X 45
301 600-6445-45 WIRE HARN SHIFT MECHA302 600-6872 WIRE HARN EARTH SHIFT MECHA

143
23 ASSY SEAT (NCR-2400) (D-1/2)
SC
RE
W F
AS
TE
NIN
G T
OR
QU
E T
O B
E
M8
Bol
t fo
r fa
sten
ing
plas
tic:
8.3
N•m
M8
Oth
ers:
19.
9N•m
M4
Son
ic L
ock
Por
tion
: 0.
9N•m

144
23 ASSY SEAT (NCR-2400) (D-2/2)
ITEM NO. PART NO. DESCRIPTION
1 NCR-2401 SEAT BACK COVER2 NCR-2402 UPPER SEAT3 NCR-2403 LOWER SEAT4 NCR-2404 SEAT BASE5 SRT-2402 SEAT FRAME6 999-1048 TURTLE COVER9 FRI-3309 CABLE BEAR BRKT
12 STC-1608 SPEAKER NET L13 STC-1609 SPEAKER NET R15 DUT-2205 SHAKER BASE REAR16 STC-1607 SP MOUNT BRKT17 INY-1302-B MASK CUSHION SIDE
103 280-5297 SCRIVET 8 1K31104 130-5162 GULL BOX SPEAKER 8OHM 8W105 130-5172 BASS SHAKER106 280-5009-01 CORD CLAMP 21107 280-5275-SR10 CORD CLAMP SR10108 601-6981-009 CABLE BEAR L=009109 601-6563-225 BUSH 2.4T
201 030-000816-S HEX BLT W/S M8 X 16202 030-000850-S HEX BLT W/S M8 X 50203 050-H00800 HEX NUT M8204 060-S00800 SPR WSHR M8205 068-852216 FLT WSHR 8.5-22 X 1.6206 000-T00408-0B M SCR TH BLK M4 X 8207 000-P00410-W M SCR PH W/FS M4 X 10208 000-T00516-0B M SCR TH BLK M5 X 16209 000-T00616-0B M SCR TH BLK M6 X 16210 000-P00408-S M SCR PH W/S M4 X 8211 060-F00400 FLT WSHR M4212 050-U00400 U NUT M4213 030-000855-S HEX BLT W/S M8 X 55214 012-P00412 TAP SCR #2 PH 4 X 12

145
24 ASSY ROLL BAR R (NCR-2500)
ITEM NO. PART NO. DESCRIPTION
1 NCR-2501 ROLL BAR R2 NCR-2502 NUMBER PLATE
201 000-T00408-0C M SCR TH CRM M4 X 8

146
25 ASSY MAIN BD DX (D-1/2)
NO
TE
:M
AK
E S
UR
E T
HA
T T
HE
RE
IS
NO
WIR
ING
, ET
C.
IN T
HE
SL
AS
H M
AR
K P
OR
TIO
NS
.

147
25 ASSY MAIN (D-2/2)
ITEM NO. PART NO. DESCRIPTION
1 NCR-4001 WOODEN MAIN BD BASE2 NCR-4050 ASSY SHIELD CASE NCR3 105-5382 SHIELD CASE BRKT
101 400-5397-01 SW REGU FOR JVS VA104 601-0460 PLASTIC TIE BELT 100 MM
201 000-P00412-W M SCR PH W/FS M4 X 12202 000-P00408-W M SCR PH W/FS M4 X 8204 011-F00312 TAP SCR #1 FH 3 X 12
301 600-7159-025 WIRE HARN JVS PWR 025CM

148
26 ASSY SHIELD CASE NCR (NCR-4050) (D-1/2)

149
26 ASSY SHIELD CASE NCR (NCR-4050) (D-2/2)
ITEM NO. PART NO. DESCRIPTION
1 833-14033 GAME BD NCR2 839-1079-02 FLT BD SEGA HIKARU NCR3 105-5378 SHIELD CASE FOR SEGA HIKARU4 105-5379 SHIELD CASE LID FOR SEGAHIKARU5 105-5381 FLT BD BRKT FOR SEGA HIKARU6 421-9174 STICKER CAUTION ANTISTATIC7 421-10023-AAB STICKER BD SERIAL NUMBER AAB8 421-10023-BBR STICKER BD SERIAL NUMBER BBR9 441-314033 STICKER 833-14033
10 601-10642 CARTON BOX SEGA HIKARU
101 260-0064 FAN MOTOR DC12V102 280-5275-SR10 CORD CLAMP SR10
201 010-P00310-F S-TITE SCR PH W/F M3 X 10202 000-P00408-W M SCR PH W/FS M4 X 8203 000-P00325-W M SCR PH W/FS M3 X 25

150
27 ASSY AMP BD (NCR-4100) (D-1/2)
NO
TE
:1.
MA
KE
SU
RE
TH
AT
TH
ER
E I
S N
O W
IRIN
G, E
TC
.
IN T
HE
SL
AS
H M
AR
K P
OR
TIO
NS
.
2.S
et t
he 8
38-1
3578
(áB
) ju
mpe
r as
ill
ustr
ated
.
JUM
PER S
ETTIN
G

151
27 ASSY AMP BD (NCR-4100) (D-2/2)
ITEM NO. PART NO. DESCRIPTION
1 NCR-4101 WOODEN AMP BD BASE2 BY-4102 FAN MOTOR BRACKET3 838-13578 PWR AMP 2CH & MIXER4 838-13142 BASS AMP 50W X 2
101 601-10369 STEREO PWR AMP 47STEREO PWR AMP 47 CE
102 998-0136 RELAY JW2ASN-DC5V103 998-0137 RELAY SOCKET JW2-SFD104 999-1049 AXIAL FLOW FAN AC100V 50-60HZ105 211-5305 C JMPR SCKT106 280-5275-SR10 CORD CLAMP SR10107 280-5009-01 CORD CLAMP 21108 280-0419 HARNESS LUG109 601-0460 PLASTIC TIE BELT 100 MM
201 000-P00445-W M SCR PH W/FS M4 X 45202 011-T03512 TAP SCR TH 3.5 X 12203 011-T00325 TAP SCR TH 3 X 25204 011-P00330 TAP SCR PH 3 X 30205 011-F00312 TAP SCR #1 FH 3 X 12
301 NCR-60016 WIRE HARN AMP AC IN302 NCR-60017 WIRE HARN AMP AC100V303 NCR-60018 WIRE HARN AMP AUDIO304 NCR-60019 WIRE HARN AMP TO AMP305 NCR-60020 WIRE HARN AMP VR306 NCR-60021 WIRE HARN AMP SPEAKER

152
28 ASSY ELEC (NCR-4200) (D-1/2)
NO
TE
:1.
MA
KE
SU
RE
TH
AT
TH
ER
E I
S N
O W
IRIN
G, E
TC
.
IN T
HE
SL
AS
H M
AR
K P
OR
TIO
NS
.
2.S
et a
ll t
he D
IP s
wit
ches
(83
7-13
844
(áB
) an
d 83
8-13
366
(áC
)) t
o O
FF
.
102

153
28 ASSY ELEC (NCR-4200) (D-2/2)
ITEM NO. PART NO. DESCRIPTION NOTE
1 NCR-4201 WOODEN ELEC BASE2 NCR-4202 C.P.BRKT3 837-13844 I/O CONTROL BD 2 FOR JVS FRI4 838-13366 DRIVE BD SRT5 838-12912-01 SERVO MOTOR DRIVE BD NEW7 421-7468-01 STICKER C.P W/PIC
102 998-0135 POWER TRANSFORMER ER-501103 117-5225 FUSES 1-6.25 A SLOW BLOW
2-3A SLOW BLOW 1-15A SLOW BLOW
104 512-5046-15000 C.P 15000MA CE UL105 310-5029-K20 SUMITUBE F K 20MM106 280-5009-01 CORD CLAMP 21108 601-0460 PLASTIC TIE BELT 100 MM
201 011-T00316 TAP SCR TH 3 X 16202 011-T00325 TAP SCR TH 3 X 25203 000-P00516-W M SCR PH W/FS M5 X 16204 000-P00416-W M SCR PH W/FS M4 X 16205 011-T03512 TAP SCR TH 3.5 X 12206 011-F00312 TAP SCR #1 FH 3 X 12

154
22. WIRE COLOR CODE TABLETHE WIRE COLOR CODE is as follow:
A PINK
B SKY BLUE
C BROWN
D PURPLE
E LIGHT GREEN
Wires other than those of any of the above 5 single colors will be displayed by 2
alphanumeric characters.
1 RED
2 BLUE
3 YELLOW
4 GREEN
5 WHITE
7 ORANGE
8 BLACK
9 GRAY
If the right-hand side numeral of the code is 0, then the wire will be of a single color shown
by the left-hand side numeral (see the above).
Note 1: If the right-hand side alphanumeric is not 0, that particular wire has a spiral color
code. The left-hand side character shows the base color and the right-hand side
one, the spiral color.
<Example> 51 .................. WHITE / RED
Note 2: The character following the wire color code indicates the size of the wire.
U: AWG16
K: AWG18
L: AWG20
None: AWG22
RED WHITE

VISIT OUR WEBSITE!