napoleontrules Layout 1 - 1ShoppingCart.com losses suffered during the Russian Campaign of ... the...
24
Introduction ............................................................................2 Campaigns ..............................................................................2 End of a Campaign..................................................................3 Components ............................................................................3 Force Counters ........................................................................4 Force Types ............................................................................5 Set-Up ....................................................................................6 Sequence of Play ....................................................................7 French Turn ............................................................................7 Battle ......................................................................................8 Pre-Battle ................................................................................8 Battle Overview ....................................................................11 Battle Turns ..........................................................................14 Post-Battle ............................................................................18 Enemy Turn ..........................................................................19 Next Turn ..............................................................................20 Solitaire Decisions ................................................................20 Linked Campaigns ................................................................21 Bonus Material ......................................................................21 Credits ..................................................................................21 Extended Example ................................................................22
Transcript of napoleontrules Layout 1 - 1ShoppingCart.com losses suffered during the Russian Campaign of ... the...

Introduction ............................................................................2Campaigns ..............................................................................2End of a Campaign..................................................................3Components ............................................................................3Force Counters ........................................................................4Force Types ............................................................................5Set-Up ....................................................................................6Sequence of Play ....................................................................7French Turn ............................................................................7Battle ......................................................................................8Pre-Battle ................................................................................8
Battle Overview ....................................................................11Battle Turns ..........................................................................14Post-Battle ............................................................................18Enemy Turn ..........................................................................19Next Turn ..............................................................................20Solitaire Decisions ................................................................20Linked Campaigns ................................................................21Bonus Material ......................................................................21Credits ..................................................................................21Extended Example ................................................................22

IntroductionWelcome to Field Commander: Napoleon, the latest in ourseries of Field Commander games. My goal in designing thisgame system is to make the careers of some of history’s greatcommanders accessible in an easy to learn, fast playing gameformat. I decided on solitaire, because it had the proper feel.Commanders have a staff and advisors, but in the end, theyalone make the hard decisions that affect lives, change thecourse of Campaigns, and decide the fate of nations.
In this game, you make all the decisions needed to commandthe French forces. The game rules, charts, and die rolls dictatethe actions of the opposing forces.
NapoleonNapoleon Bonaparte was born onthe island of Corsica in 1769. Hejoined the French army in 1785and trained as an artillery officer.Napoleon’s actions at the Siege ofToulon in 1793 earned him theCommand of France’s Army ofItaly. He immediately beganstrategic planning for operationsin the region.
Napoleon used his success in the1796 Italian Campaign to return
to France a hero, and gain a firm foothold in French politics.
He established himself as the most powerful person in Francein 1799 when his political maneuvers led to his election asFirst Consul. He later crowned himself Emperor in 1804.
The French Empire enjoyed many military successes until thedevastating losses suffered during the Russian Campaign of1812. The on-going drain of French forces during thePeninsular War in Spain also sapped France’s supply oftrained soldiers.
By 1813, the Allied countries of Europe had grown weary ofNapoleon, and their massed armies swung the balance ofpower in their favor.
The War of 1814 resulted in a French defeat and Napoleon’sabdication of the throne and his forced removal to the islandof Elba.
Napoleon appeared once more in 1815. He escaped Elba andreturned to France to begin the 100 Days. During that time,he briefly ruled France until the combined might of the Alliedforces overwhelmed him once again.
Napoleon spent the remainder of his days exiled on the islandof Saint Helena. He died in 1821.
During his lifetime, he revolutionized the tactics and strategyused in modern warfare.
CampaignsYou take on the role of Napoleon and command the FrenchForces and their allies in each Campaign. All the othernationalities are Enemy Forces. Game mechanics control theEnemy Forces.
Each Campaign map details your goals for the Campaign inthe Set-Up or Special Rules sections. Goals normally involvemoving your Forces to hold key historical locations on themap.
Holding an AreaThere are multiple Areas oneach Campaign map. EachArea has a unique namederived from a large city orimportant battle.
You Hold an Area if you have French Forces in the Area andthere are no Enemy Forces in the Area.
The Enemy Holds an Area if he (the game system you areplaying against) has Forces in the Area and there are noFrench Forces in the Area.
If an Area does not have any Forces present, it is not Held byeither side and is uncontrolled.
Forces may only move into named Areas. Forces cannot moveinto water.
Objective AreasDuring the Set-Upphase, the Campaignmap will direct you to
place Objective counters on specific Areas of the map. TheseAreas represent important locations specific to the Campaign.
Many of the Campaign Victory Conditionsinvolve Holding Objective Areas.
2

End of a CampaignThe Campaign ends when you meet the Victory or DefeatCondition, or when you move the Campaign Turn counterpast the last box on the map’s Turn Track.
VictoryUnless a Campaign states otherwise, you win the Campaignwhen your French Forces Hold all the Objective Areas listedin the Set-Up section.
Some Campaigns havea Victory Conditionspecified in their Set-Up or Special Rules
that does not involve Holding Areas. To successfully completethe Campaign, you must achieve this Condition.
If you meet the Victory Condition at the end of any step of aCampaign Turn, you win. You do not need to complete allsteps in the Campaign Turn.
Example: In the 1796 Campaign, if you Hold Nice, Turin, Milan,Mantua, and Klagenfurt at the end of your Battle step, you win. Donot complete the Campaign Turn.
DefeatSome Campaigns have a DefeatCondition. If the DefeatCondition is met at the end of
any step during a Campaign Turn, you immediately lose theCampaign and score 0 Victory Points.
If Napoleon is ever on the Battlefield Sheet without FrenchForces, you lose the Campaign.
If Napoleon is ever in a map Area without French Forces, youlose the Campaign.
Unless the Campaign instructs otherwise, you lose theCampaign when you move the Campaign Turn counter pastthe last box on the map’s Turn Track.
Victory PointsIn some Campaignsyou will findCampaign Turn Trackboxes with a VictoryPoint number in the
top-right corner. When you meet the Campaign’s VictoryCondition, you score the Victory Points shown in the box forthe current Campaign Turn. You do not score Victory Points ifthe Defeat Condition ended the Campaign.
Campaigns also have a historical description comparing youroutcome to Napoleon’s.
Superior - This means you did better than Napoleon.
Historical - You did as well as Napoleon
Inferior - You did not do as well as Napoleon.
If the first of the Victory descriptions is “Superior”, and youcomplete the Campaign before that box, you score 30 VictoryPoints and a Superior Victory.
If the first of the Victory descriptions is “Inferior”, and theCampaign ends before that box, treat it as incurring a DefeatCondition.
ComponentsMaps (7)
Campaign maps show Areas of movement, Set-Upinformation, and other information you need to play eachCampaign.
Battlefield Sheet (1)Use the Battlefield Sheet toresolve Battles.
Move all the Forces from theCampaign map Area where aBattle is taking place to this Sheetto resolve the Battle.
Help Sheet (1)The Help Sheet displays helpfulgame information.
This Sheet also contains the BattleTurn Track and Battle PlanQuantity sections. You will use theHelp Sheet when resolving Battleson the Battlefield Sheet.
3

Player Log (1)Photocopy your Player Log anduse it to record your Campaigninformation.
You can also download and printthe Player Log from thewww.dvg.com web site.
Die (1)Roll a single ten-sided die whenever a die roll is required.The die generates results from 1 to 10.
Counters (6 Sheets)The game uses counters to represent military forces on themap and various record keeping game functions.
NapoleonEach Campaign uses a unique Napoleon counter.Use the Napoleon counter with the same year asthe Starting year of the Campaign. This counterrepresents Napoleon’s location on the Campaignmap and his presence on the Battlefield. Never
treat a Napoleon counter as a Force counter.
ForceForce counters represent largeformations of men, horses, cannons,and structures in the game.
Supply pointsFind all the Supply counters and place them in apile. The numbers on the Supply countersindicate their worth in Supply points. Use thesecounters to record French and Enemy Supplypoints. The counter mix does not limit game play.
ScoutsUse Scout counters to track the number of Scoutsyou have purchased.
Campaign TurnThis counter shows the Campaign game Turn youare resolving. There is a blue side (French) andorange side (Enemy) to help you keep track ofwhich half of the Turn you are resolving.
Battle TurnThis counter shows the Battle Turn you areresolving. There is a blue side (French) andorange side (Enemy) to help you keep track ofwhich half of the Battle Turn you are resolving.
Battle PlansBattle Plans are specific Orders issuedto Forces in battle.
Battle Plan QuantityUse these counters to record the number of BattlePlan counters your French Forces can use eachTurn of a Battle, and the number of Battle Plancounters the Enemy draws each Turn of a Battle.
InsightsThese are special Battlefield optionsonly Napoleon can use.
Battle LocationUse this counter to mark the map location wherethe Battle is taking place. There is a blue side(French) and orange side (Enemy) to help youkeep track of which half of the Campaign Turnyou are resolving.
ObjectiveUse these counters to mark the location ofCampaign Objective Areas on the Campaign map.
Force Counters
Skill LevelThe letter in the medallion in the top left corner of each Forcecounter shows the Skill Level of the Force. From weakest tostrongest the Skill Levels are:
Conscript Poor Line Line Veteran Elite
NationalityThe stripe along the left edge identifies the nationality of theForce.
4

Each of your French and allied Force counters have thefollowing stripe along their left edge:
French
Each of the Enemy Force counters have one of the followingstripes along their left edge:
Austrian British Mameluke
Ottoman Russian Piedmont
Spanish Swedish Prussian
Polish
Campaign YearThe year on a Force counter identifies the Campaign thecounter is used in.
Force Type GraphicThe graphic on a Force indicates the Force’s Type: Infantry,Cavalry, Cannon, Garrison, or Fortification.
Commander’s NameThe Commander’s name on the counter shows theCommander who historically commanded the Force. Thename does not affect game play.
Activation NumberForces use this number when attempting to Activate a BattlePlan.
Combat Value and Buy CostForces use their Combat value when performing attacks.Some Forces have a Superior Combat value, noted with asuperscript on their Combat value.
You must pay the Buy Cost when purchasing a Force.
Command RatingOnly Napoleon counters have thisnumber. Use this number to ActivateInsight counters and to adjust BattlePlan Quantities.
Front and Back of CounterForce counters have a full strength sideand a reduced strength side.
The reduced side has a red slashthrough the counter.
Place Forces on the map with their full strength side face up.
When a Force suffers a Hit, flip it to its reduced side.
If a reduced Force suffers a Hit, Destroy it and remove it fromplay.
If a Force does not have Activation andCombat values on its reduced side,Destroy it when it suffers its first Hit.
Force TypesThere are two types of Forces: Mobile and Static.
Mobile ForcesThere are three types of Mobile Forces in the game: Infantry,Cavalry, and Cannon. You can move these Forces on theCampaign map and on the Battlefield Sheet.
InfantryInfantry counters have a soldiergraphic.
CavalryCavalry counters have a soldiermounted on a horse graphic. Cavalry donot have a reduced side. Destroy themwhen they suffer one Hit.
CannonCannon counters have a wheeledcannon graphic. Cannons do not have areduced side. Destroy them when theysuffer one Hit.
Recruits A Recruit is a sub-type of Infantry,Cavalry, and Cannons. Treat Recruits asan Infantry, Cavalry, or Cannon basedon the graphic appearing on theircounter. Recruits do not have a reduced
side. Destroy them when they suffer one Hit.
5

Static ForcesThere are two types of static Forces: Garrisons andFortifications. Static Forces do not move on the Campaignmap or Battlefield Sheet.
GarrisonsGarrisons have a graphic of a soldierstanding behind a wall.
FortificationsFortifications have a graphic of acannon placed behind a wall.
Set-UpTo begin, select the Campaign map you want to play andplace it in front of you. We recommend you start with the1796 Italian Campaign.
Some maps have more than one Campaign. If there is morethan one Campaign on the map, choose which Campaign youwant to play. We recommend starting with the 1796 ItalianCampaign. Each Campaign on a map has its own Set-Upsection and Turn Track.
Example: The Italian Campaign map has a 1796 and 1800Campaign.
All Campaigns use the same Set-Up procedures. The Set-Upsection of each Campaign maplists the year of the Campaign and
provides you with all the information you need to get started.
Special RulesSome Campaigns have Special Rules printed on their maps.Special Rules take precedence over standard rules.
Campaign TurnPlace the Campaign Turn counteron the “Start” box of theCampaign Turn Track with itsblue side face up.
ScaleEach Campaignnotes the scale ofthe Forces. Thisdoes not affectgame play. Thesize of units
varied, but in general, a Corps contained roughly 25,000 men,a Division contained roughly 10,000 men, and a Brigadecontained roughly 5,000 men.
Supply PointsThe Set-Up Area of the Campaign map specifiesthe number of Supply points the French andEnemy begin the game with. Place the FrenchSupply counters in the French Resupply box.Place the Enemy Supply counters in the Enemy
Resupply box.
Use the Supply counters to track the Supply points availableto the French and Enemy throughout the Campaign.
Battle PlansPlace the Enemy Battle Plan counters in anopaque cup for later drawing.
Place the French Battle Plans next tothe Battlefield Sheet to choose fromlater.
CitiesIf only French Forces begin the Campaignin an Area with a City symbol, also place 1French Garrison and 1 French Fortificationcounter in the Area.
Example: In the 1796 Campaign, Nice beginsthe Campaign Held by the French. Place 1 French Garrison and 1French Fortification in the Nice Area.
During Set-Up, if only Enemy Forces are assigned to an Areawith a City symbol, place 1 Enemy Garrison and 1 EnemyFortification counter in the Area.
Example: In the 1796 Campaign, Genoa begins the CampaignHeld by the Enemy. Place 1 Enemy Garrison and 1 EnemyFortification in the Genoa Area.
During Set-Up, if both French and Enemy Forces begin theCampaign in an Area with a City symbol, place 1 EnemyGarrison and 1 Enemy Fortification counter in the Area.
During Set-Up, if no Forces begin the Campaign in an Areawith a City symbol, place 1 Enemy Garrison and 1 EnemyFortification counter in the Area.
Example: In the 1796 Campaign, Turin, Milan, Mantua, andKlagenfurt begin the Campaign uncontrolled. Place 1 EnemyGarrison and 1 Enemy Fortification in each of those Areas.
ForcesUse only Forces with the same Year as the Campaign you areplaying. If a Force has a parenthetical notation in the Set-Upsection, it means there is more than one counter with theCommander’s name. Place all the counters with theCommander’s name in the designated Area.
6

7
Example: In the 1796 Campaign, “Dichat (2)” appears in thePiedmont list of starting Forces. Place both Dichat counters inSavona.
Some Force counters begin the Campaign on the map andothers arrive mid-way through the Campaign.
Starting ForcesFind the StartingForces listed in theSet-Up section of themap. Place thecorresponding Forcecounters on theindicated Areas of themap.
Example: In the 1796 Campaign, placethe Napoleon counter and the followingFrench Forces in Nice at the start ofthe Campaign: Augereau, Serurier,Macquard, Garnier, Stengel, Kilmaine,La Harpe, and Maynier. Also placeFrench Garrison and Fortificationcounters because Nice starts theCampaign as a French-Held City.
Late ArrivalsSome Campaignslist the Turns, orConditions, inwhich to placespecific Forces.Place those
Forces off to the side and add them to the game when youadvance the Turn counter into the specified Campaign TurnTrack box, or when the appropriate Campaign Conditionshave occurred based on the Set-Up instructions.
Example: In the 1796 Campaign, place the following AustrianForces in Klagenfurt when French Forces first enter Lonato orMantua: Quasdanovich (2), Melas (2), d’Irles, Davidovich (2),Meszaros (2).
French Recruits and Static ForcesPlace all French Recruits and extra Static Forces to the sidefor later purchase.
Enemy RecruitsPlace all Enemy Recruits in a Reinforcement cup for lateruse.
Enemy Static ForcesPlace all extra Enemy Static Forces to the side for later use.
Objective CountersPlace Objective counters in the map Areasdesignated by the Set-Up instructions.
Example: In the 1796 Campaign, place Objectivecounters in the following Areas: Nice, Turin, Milan,Mantua, and Klagenfurt.
Sequence of PlayDuring each Campaign Turn, playthe game using the followingsteps. You may not go back to astep once it has been completed.Perform all steps in the order theyare shown.
Each Campaign game Turn hastwo major sections, your half ofthe Campaign Turn, and theEnemy half of the Campaign Turn.During your half of the gameTurn, you will move your Forces,initiate Battles, and Resupply yourForces. During the Enemy half ofthe Turn, he will perform EnemyOrders, initiate Battles, andResupply his Forces.
French TurnThis is the time during the Campaign Turn when you carrythe battle to the enemy.
Advance Turn CounterMove the Campaign Turn counter one space to the right alongthe Campaign Track.
If you move the counter off the end of the Campaign Track,the Campaign ends in failure.
Example: The 1796 Italian Campaign ends in failure when youmove the Turn counter to the right of the May 1797 box.
Exception: Some Campaigns do not end in failure when youmove the Turn counter off the Track. Such Campaigns haveSpecial Rules printed on their maps.
Example: When playing the 1798 Egyptian Adventure Campaign,you must play through all Turns on the Campaign Track.
MovesYou may now move each of your Mobile Forces to an Areaadjacent to its current Area. There is no cost to do this.
Example: In the 1796Campaign, these 2Forces in Lodi can moveto: Milan, Lonato,Mantua, Genoa, orMarengo.
If you have French Forces in the same Campaign map Area asEnemy Forces, you cannot move them.

8
Example: In the Peninsula Campaign of 1807, the French ForceDupont and the Spanish Force Castanos begin the Campaign inthe Toledo Area. During your Move step, you cannot move Dupontbecause he is in the same Area as an Enemy Force.
You can move the Napoleon counter to an Area adjacent tohis current Area. There is no cost to do this. If you moveNapoleon to an Area that does not contain French Forcecounters, you lose the Campaign. You may move theNapoleon counter even if he is in the same Campaign mapArea as Enemy Forces.
Resolve BattlesYou must resolve a Battle when French and Enemy (ieopposing) Forces are present in the same Area.
Example: You must resolvethe Battle for Marengobecause French and EnemyForces are present in theArea.
Choose a Battle you would like to resolve. You can resolvethe Battles in any order.
Place the Battle Location counter on the map to mark thelocation of the Battle. Place the counter with the blue sideface up as a reminder that the Battle is taking place duringyour half of the Turn.
BattleBattle Turn SequenceUse the Battle Turn Sequence listed on the Help Sheet toresolve each Battle.
Pre-BattleRoll for Fog of WarEnvelopment CheckDetermine Battle Plan QuantitiesBuy additional French Battle PlansSelect InsightsPlace French ForcesPlace Enemy Forces
Battle TurnsInsight ActivationSelect and Place French Battle PlansDraw and Assign Enemy Battle PlansResolve Enemy Battle PlansResolve French Battle PlansRout CheckAdvance Battle Turn counter
Pre-BattlePerform the following steps to prepare for each Battle.
Roll for Fog of WarRoll a die andconsult the Fog ofWar chart on theHelp Sheet.
If the Enemy has 4to 6 Supply points,spend 2 of them andadd 2 to the roll. Ifthe Enemy has 7 ormore Supply points,spend 4 of them andadd 4 to the roll.
Scout CountersIf you have any available Scout counters, you candiscard 1 Scout counter to re-roll the Fog of Wardie roll. When you re-roll due to a Scout, do notapply the modifier the Enemy received fromspending Supply points. You can accept a roll or
continue to re-roll and discard Scout counters until you havediscarded all your Scout counters. You can repurchasediscarded Scout counters during your Resupply steps.
Die RollThe Roll column on the Fog of War chart shows the modifieddie roll results.
Battle TurnsThe Battle Turns column on the Fog of War chart specifiesthe number of Battle Turns the Battle will last. Place theBattle Turn counter on the appropriate box of the Battle TurnsTrack on the Help Sheet.
Example: At the start of a Battle, you roll a Fog of War die and getan 8. The Enemy has 11 Supply points. You spend 4 of theirSupply points to modify the roll to a 12. You do not like the result,so you expend one of your Scout counters to re-roll the die. Thenew roll is a 7. Even though the Enemy still has Supply points, donot modify the roll. The Battle lasts 5 Turns and you get 2 of theEnemy’s Supply points.
Fog of War EventEach Fog of War result benefits either the French or EnemyForces.
1 - If Napoleon is not present, select 1 Insight If Napoleon is not in the Battle Area, you can choose 1Insight counter to use during the Battle. This Insight does notreduce your Battle Plan Quantity. If the Insight requires anActivation roll, use the Command rating on Napoleon’sCampaign counter.
2 - You gain 2 Supply pointsImmediately add 2 Supply points to your French Supply box.

9
3 - You gain 1 ScoutImmediately add 1 Scout counter to the Scout box on theHelp Sheet.
4 - Pay 2 Supply points to add any 1 French Recruit to any1 French occupied AreaIf you pay 2 Supply points, add 1 of your currentlyunpurchased Recruits to any Area containing French Forces.If you cannot add a Force, or do not pay the 2 Supply points,disregard this Event.
5 - You may move Napoleon to this Battle from anotherAreaIf Napoleon is not in the Battle Area, and he is present inanother Area on the Campaign map, you can move him to thisBattle Area. If he is not present on the Campaign map,disregard this event.
6 - You may move 1 Mobile French Force to this BattleYou may move 1 of your Mobile Forces on the Campaignmap to the Battle Area. You may not move the Napoleoncounter.
7 - Transfer 2 of the Enemy’s Supply points to YouImmediately transfer up to 2 of the Enemy’s Supply points toyour French Supply pile. If the Enemy has only 1 Supplypoint, transfer it to you. If the Enemy has no Supply points,disregard this event.
8 - Transfer 2 of your Supply points to the EnemyImmediately transfer up to 2 of your Supply points to theEnemy Supply pile. If you have only 1 Supply point, transferit to the Enemy. If you have no Supply points, disregard thisevent.
9 - Inflict 1 Hit on your Forces in 1 random Frenchoccupied CityRandomly select a City Area containing French Forces. Inflict1 Hit on any one of your Forces in that Area. If you do nothave any Forces in Cities, disregard this Event.
10 - Add 1 Enemy Reinforcement to the BattleImmediately draw 1 Enemy Reinforcement from theReinforcement cup and add it to the Battle. If the cup isempty, give the Enemy 2 Supply points instead.
11-12 - Add 1 Enemy Garrison to the BattleAdd 1 Enemy Garrison to the Enemy Approach Area of theBattlefield Sheet. If the Garrison survives the Battle, place iton the Campaign map in the Area the Battle took place. Ifyou cannot add a Garrison, give the Enemy 2 Supply pointsinstead.
13-14 - Enemy gains +1 Battle PlanIncrease the Enemy Battle Plan Quantity counter’s value by 1.
Envelopment CheckTotal the Combat values for the Enemy Forces participating inthe Battle and compare that number to the total Combatvalues for the French Forces participating in the Battle. If oneside’s Combat value is 3 times, or more than, the opponent’s
Combat value, the weaker Forces are Enveloped. Do not fightthe Battle. Destroy all the weaker Forces. If Napoleon ispresent in the Area and your Forces are Destroyed, yourCampaign ends in Defeat.
Example: In the battle shown on theleft, the Enemy Forces have a totalCombat value of 9. The FrenchForces have a total Combat value of28. Your Forces have at least 3 timesthe Combat value of the Enemy, sothe Enemy Forces are Enveloped,and Destroyed.
If there is no Envelopment, move all the Forces from theCampaign map’s Battle Area to the Battlefield Sheet. Markthe Battle Area with the Battle Location counter with its blueside face up.
Determine Battle Plan QuantitiesThe Set-Up sectionon the Campaign
map shows the number of Battle Plans the Enemy receives.
Determine the number of Battle Plans the Enemydraws, and place a Battle Plan Quantity counterwith that number on the Help Sheet in the EnemyBattle Plan Quantity box. Adjust the counter ifdirected to do so by the Fog of War event.
Example: In the 1796 Campaign, the Enemy receives 2 BattlePlans each Turn of Battle. A Fog of War roll of 13 increases theirBattle Plan Quantity to 3 each Turn.
If Napoleon is in the same Area as the Battle, you gain thenumber of Battle Plans equal to his Command rating.
If Napoleon is not in the same Area as the Battle, you receivethe number of “No Napoleon” Battle Plans shown in the Set-Up section of the Campaign map.
Example: In the 1796Campaign, ifNapoleon is not
present in the Battle Area, you receive 1 Battle Plan each BattleTurn. The Enemy still receives 2 Battle Plans each Battle Turn.
Determine the number of Battle Plans your French Forcesreceive, and place a Battle Plan Quantity counter showing thatnumber on the Help Sheet in the French Battle Plan Quantitybox.
Buy Additional French Battle PlansYou may spend Supply points to increase your Battle Plans. Ifyou spend 2 Supply points, increase your Battle Plan Quantitycounter by 1. If you spend 5 Supply points, increase yourBattle Plan Quantity counter by 2.

10
Select Insight CountersIf Napoleon is present at the Battle, youmay choose Insight counters.
Every Insight counter you selectreduces the number of your Battle
Plans by one. Adjust your Battle Plan Quantity counter asneeded.
Example: In the 1796 Campaign, Napoleon has a Commandrating of 2. This gives you 2 Battle Plans. You also paid 2 Supplypoints to get 1 extra Battle Plan, for a total of 3. To indicate this,you place a Battle Plan Quantity counter “3” on the Help Sheet.You now decide you want 1 Insight counter. Reduce the Quantitycounter from a 3 to a 2. You will get to select 1 Insight counter forthe Battle, plus 2 Battle Plans each Turn of the Battle.
Place the chosen Insight counters next to the Battlefield Sheetuntil you are ready to use them.
You may Activate more than 1 Insight each Battle Turn.
Each Insight counter has its own rules.
Duration - This Insight automaticallyActivates during the Insight Activationstep of the first Battle Turn. Increase ordecrease the duration of the Battle by 1Turn.
Engineers - During the InsightActivation step of any Battle Turn, youmay attempt to roll Napoleon’sCommand rating or less to use thisInsight. If successful, inflict 1 Hit on
each Enemy Garrison and Fortification participating in thisBattle. If unsuccessful, retain the Insight and continue toattempt 1 roll each Turn until successful, or until the Battleends.
Front - This Insight automaticallyActivates during the Place FrenchForces step. Place up to 3 of yourForces in the French Front Area.
Morale - This Insight automaticallyActivates during the Insight Activationstep of the first Battle Turn. Treat allyour Forces as having +3 Combat valueduring the Battle when conducting
Shock checks.
Example: Your Force has a Combat value of 5 and must make aShock check. Instead of needing to roll a 5 or less to succeed, itmust roll an 8 or less to succeed.
Raid - This Insight automaticallyActivates during the Insight Activationstep of the first Battle Turn. Roll a dieand compare it to the counter. Transferthe specified number of Supply points
from the Enemy to you. If the Enemy has less than thespecified Supply points, transfer the ones they have.
Sweep - During the Insight Activationstep of any Battle Turn, you mayattempt to roll Napoleon’s Commandrating +1 or less to use this Insight.Once this Insight is successfully
Activated, immediately move 1, 2, or 3 French CavalryForces from the French Reserve Region to the Campaignmap’s Battle Area. Roll 3 Attacks for each Force you havereturned to the map. The attacks inflict Hits on the EnemyForces from the Enemy’s rearmost Region forward. Apply theHits in the standard order of lowest Skill Level to highest.Inflict the Hits from lowest to highest Skill Level in eachRegion. If unsuccessfully Activated, retain the Insight andcontinue to attempt 1 roll each Turn until successful, or untilthe Battle ends.
Example: You have 3 Cavalry Forces in your French ReserveRegion. You successfully Activate this Insight at the start of aBattle Turn. You decide to use 2 of the Cavalry to perform theSweep. Roll 3 unmodified Attacks for each Cavalry and apply theirHits to the Enemy Forces, starting in their Enemy Reserve Regionand moving forward until all the Hits have been absorbed. Movethe 2 Cavalry counters back to the Campaign map’s Battle Area.
Terrain - This Insight automaticallyActivates during the Place EnemyForces step. Place all the EnemyForces, including Cannons, Garrisons,and Fortifications in either the Enemy
Approach Region or the Enemy Reserve Region. Ignore theApproach Region’s 4 Force placement limitation.
Place French ForcesMove the Forces from the Battle Area on the Campaign mapto the Battlefield Sheet at the start of each Battle.
The Battlefield Sheet
The Battlefield Sheet has 6Regions: Enemy Reserve,Enemy Approach, Enemy Front,French Front, French Approach,and French Reserve.
Enemy Reserve - EnemyInfantry and Cavalry cannotattack when they are in theirown Reserve Region. There is nolimit to the number of Forces inthis Region.
Enemy Approach - Up to 4 Mobile Enemy Forces start in theEnemy Approach Region. During the Battle, up to 4 MobileEnemy Forces and 4 Mobile French Forces can occupy theRegion at any given time.
Enemy Front - During the Battle, up to 6 Mobile Enemy and6 Mobile French Forces can occupy the Enemy Front Regionat any given time.
French Front - During the Battle, up to 6 Mobile French and6 Mobile Enemy Forces can occupy the French Front Region

11
at any given time.
French Approach - You can select up to 4 of your MobileForces to start in your Approach Region. During the Battle,up to 4 Mobile French Forces and 4 Mobile Enemy Forcescan occupy this Region at any given time.
French Reserve - Your Infantry and Cavalry Forces cannotattack when they are in your Reserve Area. There is no limitto the number of Forces in this Region.
Place French Static ForcesMove the French Garrisons from theBattle Area on the Campaign map to theFrench Approach Region on theBattlefield Sheet. Move FrenchFortifications from the Battle Area to theFrench Reserve Region on the BattlefieldSheet.
French Static Forces do not count againsta Region’s Force maximum.
Place Mobile French ForcesMove the Mobile French Forces from the Campaign map’sBattle Area to the Battlefield Sheet in the French ApproachRegion and the French Reserve Region. You can place up to 4Mobile French Forces in your Approach Region.
Place NapoleonIf Napoleon is in the Campaign map’s BattleArea, move the Napoleon counter to theNapoleon box on the Battlefield Sheet. Napoleondoes not move or fight, but his presence givesyou Battle Plans equal to his Command rating
and allows you the option of selecting Insight counters.
Place Enemy ForcesPlace Enemy Static ForcesMove the Enemy Garrisons from the Campaign map’s BattleArea to the Enemy Approach Region. Move EnemyFortifications in the map’s Battle Area to the Enemy ReserveRegion.
Enemy Static Forces do not count against a Region’s Forcemaximum.
Place Mobile Enemy ForcesRandomly place the first 4 Enemy Infantry and CavalryForces in their Approach Region and place all other EnemyMobile Forces in their Reserve Region.
FormationsThe game uses two Formations: Columnand Line. Position a Force counterhorizontally to show it is in LineFormation. Position the counter verticallyto show it is in Column Formation.
Place all Cannons, Garrisons, and Fortifications in LineFormation.
You can set up each of your Mobile French Forces in eitherLine or Column Formation.
Place Enemy Infantry and Cavalry Forces in ColumnFormation.
Battle OverviewEvery Force receives a Battle Plan every Turn of theBattle. The French have two types of Battle Plans,counters and Default. The Enemy has two types ofBattle Plans, counters and Default.
Battle Plan counters are more powerful than DefaultPlans and allow the Force you place them on to domore actions. Default Battle Plans are printed on the
Battlefield Sheet. Any Force that does not receive a Battle Plancounter uses a Default Battle Plan.
Battle Plans use key words to designate the actions the Force isto perform.
No Roll - The Force does not need to roll to Activate this BattlePlan. It automatically performs the Orders on the Battle Plan.
Only Inf (Only Cav) - Only Infantry (or Cavalry) can Activatethe Battle Plan.
Advance - Advance the Force 1 Region. A Force cannot Advanceif it is in Melee combat.
Retreat - Retreat the Force 1 Region.
Routed - Can only be selected and Activated if the Forces areRouted.
Attack - Perform an Attack against the closest opposing Forces.
2+, 0-1, 0+ - Designates the number of Regions you must befrom the closest opposing Force to Activate the Battle Plan.
Line - Change the Force’s Formation to Line.
Column - Change the Force’s Formation to Column.
Battle Plan AssignmentUnless a Battle Plan states otherwise in its description, you canonly assign Battle Plans to Infantry and Cavalry Forces.
Garrisons, Fortifications, and Cannons have special limitationson the Battle Plans they are able to use.
Garrisons - A Garrison always performs a Fire or Combat BattlePlan if there are opposing Forces in its same or adjacent Region.A Garrison does not act there are no opposing Forces in its sameor adjacent Regions.
Fortifications - A Fortification always performs a Fire orCombat Battle Plan is there are non-Melee combat opposingForces at range 1 or from the Fortification. If all the opposingForces are in Melee combat, or there are opposing Forces in theFortification’s Region, the Fortification does not act.

12
French Cannons - A French Cannon can perform a Fire BattlePlan is there are non-Melee combat Enemy Forces at range 1 ormore. French Cannons can perform March Battle Plans, but onlyto Retreat. French Cannons perform the Retreat Battle Plans ifthe French Forces Rout.
Enemy Cannons - An Enemy Cannon always performs aCombat Battle Plan is there are non-Melee combat French Forcesat range 1 or more. If all the French Forces are in Melee combat,or there are French Forces at range 0, the Cannon does not act.French Enemy Cannons perform the Retreat Battle Plan if theEnemy Forces Rout.
Battle Plan ActivationFor a Force to perform a Battle Plan, you must roll the Force’sActivation number or less. If you are successful, that Forceperforms the Orders listed on the Battle Plan.
If the Activation roll is unsuccessful, the Force does not performan action this Turn.
When performing a Battle Plan, the Force follows the BattlePlan’s list of instructions, in order from top to bottom,performing all the Orders it is able to perform.
Example: Augereau has an Activationvalue of 7 and a Combat value of 8. ToActivate a Battle Plan, he must roll a 7 orless.
If there is an Order the Force cannot perform, skip it, and moveon to the next Order. Do not return to the skipped Orders.
Example: Augereau is using the Engage Battle Plan.He is in Line Formation, so you must roll hisActivation value of 7 or less to Activate the BattlePlan. If he were in Column Formation, you would notneed to roll to Activate the Battle Plan. You roll a 4,and are successful. Augereau Advances into aRegion with no Enemy Forces and the Battle Planchanges Augereau to Line Formation. He is alreadyin Line Formation, so you ignore the Order. He isadjacent to a Region with Enemy Forces and
performs an Attack with a +1/+1 modifier.
If a Force that is not in Melee combat has a Battle Plancounter on it at the time it is to act, you must perform theBattle Plan. A Force must perform all the Orders on a BattlePlan that it is able to perform.
Advance and RetreatAdvance means to move a Force one Region closer to theopposing side’s edge of the Battlefield Sheet (behind itsReserve Region).
Example: An Enemy Force in the French Front Region receives anAdvance Order. Move the Force to the French Approach Region.
Example: A French Force in the Enemy Approach Region receivesan Advance Order. Move the Force to the Enemy Reserve Region.
Ignore Battle Plan Advance or Retreat Orders that wouldmove a Force into a Region that already contains themaximum number of Forces allowed for the Region.
Ignore Advance Orders for Forces that are in the opposing
side’s Reserve Region.
Example: A French Force is in the Enemy Reserve Region and itsBattle Plan specifies an Advance and Attack. Ignore the Advanceand perform the Attack.
Retreat means to move a Force one Region closer to its ownedge of the Battlefield Sheet (behind its Reserve Region).
Example: A French Force in the French Approach Region receivesa Retreat Order, Move the Force to the French Reserve Region.
ShockWhen a Force enters a Region containing opposing Forces,select one opposing Force with the lowest Skill Level to makea Shock check. If there are several Forces of the same Level,choose the Force to make the check.
Example: A Force moves into a Region containing the followingopposing Forces: 2 Conscript Forces, 1 Veteran Force, and 1 EliteForce. You select one of the Conscript Forces to perform theShock check.
To perform a Shock check, roll the Force’s printed Combatvalue or less to succeed.
If a Force passes its Shock check, it suffers no ill effects.
If the Force fails its Shock check, the Force suffers one Hitand Retreats one Region on the Battlefield Sheet. StaticForces do not retreat. If the Retreating Force exceeds thenumber of Forces allowed in the Region, Destroy the Force.
Example: A French Force moves into aRegion containing Enemy Forces. Roll aShock check for one of the lowest SkillLevel Enemy Forces in the Region. TheForce has a Combat value of 5. You roll a
6, so the Force fails its Shock check. Inflict 1 Hit on the EnemyForce and Retreat the Enemy Force 1 Region. If the new Regionalready contains its maximum number of Forces, Destroy theShocked Force.
If the “Close Ranks” Battle Plancancels the Shock Hit, the Force stillmust Retreat one Region.
Infantry and Cavalry in Column Formation automatically failShock checks.
Example: You Advance 1 of your Forces into a Region containing2 Enemy Veteran Forces. One Force is in Line Formation and theother is in Column Formation. You choose to have the Force inColumn Formation make the Shock check. It automatically fails.The Force suffers 1 Hit and Retreats 1 Region.
Infantry and Cavalry in their own Approach Region orReserve Region automatically fail Shock checks.
If a Mobile Force is in its Reserve Area and must Retreat dueto a failed Shock check, Destroy the Force.
Melee CombatOpposing Forces that are in the same Region on the

13
Battlefield Sheet are in Melee combat.
Example: There are Enemy Forces and French Forces in theEnemy Approach Region. All those Forces are in Melee combat.
Always perform the Default “Combat” BattlePlan when an Enemy Force in Melee acts.
If an Enemy Force in Melee combat has a BattlePlan counter on it at the time it acts, disregardand discard the Battle Plan counter and performthe Combat Default Battle Plan.
A French Force in Melee combat can perform any of thefollowing Battle Plans: Fire, Pivot, Square, Prepare, Retreat(if Routed), Formation, or March (Retreat move only).
If a French Force has any other Battle Plan counter on it atthe time it acts, disregard and discard the Battle Plan andperform a Default Battle Plan.
A Force in Melee combat can never perform an AdvanceOrder from a Battle Plan. This means that a Force will nevermove behind an opposing Force on the Battlefield Sheet.
Example: A French Cavalry Force performs a ChargeBattle Plan and Advances into a Region containing 3Enemy Forces. Perform a Shock check for one of theEnemy Forces at -3. Do not perform the secondAdvance Order on the Battle Plan because theCavalry is in Melee combat.
If a Force enters Melee combat due to its Battle Plan Orders,continue to perform the Orders listed on the Battle Plan.
A Force in Melee combat can Retreat.
Treat a Force in Melee combat as having a Combat value of+3/+3 when Attacking. Apply the second Hit on an opposingForce in an adjacent Region if there are no more opposingForces in the Melee combat Region.
Example: A Russian Infantry Force inMelee combat has a Combat value of 6.While in Melee combat, treat it as havinga Combat value of 9/3.
Example: An Enemy Cavalry Force inMelee combat has a Combat value of 2/1.While in Melee combat, treat it as havinga Combat value of 5/4.
Cannons and Fortifications cannot Attack when in Meleecombat.
Example: An Enemy Force moves into a Region containing 2French Fortifications. The Fortifications cannot Attack until theyare no longer in Melee combat.
Performing an AttackForces can attack opposing Forces in the same Region or anadjacent Region.
If a Force is supposed to conduct an attack, and there are noopposing Forces in the same Region or adjacent Regions, do notperform an attack.
Infantry and Cavalry cannot attack when in their own ReserveRegion. Cannons and Fortifications can Attack from any Region.
When a Force is attacking, roll its Combat value or lower. If theroll is successful, inflict one Hit on an opposing Force.
If the attacking Force has a superscripted number, and the roll isequal to or lower than its superscripted value, the attack scores 2Hits.
Example: A Force has a Combat value of6/3. It inflicts 1 Hit on a die roll of 4 through6, or 2 Hits on a die roll of 1 through 3.
Cannons and FortificationsCannons and Fortifications cannot attack opposing Forcesengaged in Melee combat. Cannons and Fortifications attackopposing Forces in the closest non-Melee combat Region of theBattlefield.
Example: A French Cannon is located in the French Reserve Region.The French Approach Region contains only French Forces. TheFrench Front Region contains French and Enemy Forces. The EnemyFront Region contains no Forces. The Enemy Approach Regioncontains Enemy Forces. The Enemy Reserve Region contains EnemyForces. The French Cannon would attack the Enemy ApproachRegion.
Inflict Cannon and Fortification Hits starting with the lowestSkill Level Force in the Region. If all the opposing Forces in theRegion are Destroyed, apply remaining Hits against the nextfarthest Region containing opposing Forces in Skill Level orderfrom lowest to highest.
Attack BonusesWhen a roll is modified by a Battle Plan, Insight, or special rule,treat the Force’s Combat value and superscript Combat value asbeing higher by the amounts indicated. If the Force has nosuperscript value, assume the superscript value is a zero.
Example: An Enemy Infantry Force has a Combat valueof 6 with no superscript value. When the Force uses theAimed Battle Plan, treat the Force’s Combat value asbeing 10/0.
Allocating HitsWhen you inflict a Hit on the Enemy, apply the Hit on the lowestSkill Level Force in the Region you are attacking.
If an Attack inflicts 2 Hits, the Hits can be allocated to the sameor different opposing Forces.
If the attacking Force is in Melee combat, an opposing Force inMelee combat must absorb the Hit. If there are no opposingforces remaining in Melee combat, allocate the Hit to an

14
opposing Force in an adjacent Region.
Suffering HitsA Force must absorb each Hit scored. One Hit flips a fullstrength Force to its reduced side, or Destroys a reduced strengthForce and removes it from play.
Destroyed ForcesMove your Destroyed French Forces to your Reinforcement pile.Your Destroyed Forces can be re-purchased during yourResupply steps. Move Destroyed Mobile Enemy Forces to theReinforcement cup. Move Destroyed Garrisons andFortifications back to the table for later purchase.
Battle TurnsPerform the following steps each Turn of a Battle.
Insight ActivationRoll Napoleon’s Command rating or less to activate anInsight counter. You may attempt to Activate one or moreInsights. Roll a die for each. Insights with a dash “-” do notrequire a Command roll. They automatically Activate.
If you have any available Scout counters, you candiscard 1 Scout counter to re-roll an Activationdie roll. You can accept a roll or continue to re-roll and discard Scout counters until you havediscarded all your Scout counters. You can
repurchase discarded Scout counters during your Resupplysteps.
Select and Place French Battle PlansYou get to choose your Battle Plans during each Turn ofBattle. You get to choose a number of Battle Plan counters upto your Battle Plan Quantity number. Do not place more thanone Battle Plan on each French Force.
You may only place Battle Plans on Infantry and CavalryForces unless a Battle Plan states otherwise.
If you are able to select more Battle Plans than you haveForces that can receive Battle Plans, do not assign theadditional Battle Plans.
Advance Orders are highlighted in green to help them stand-out on the counters. Attack Orders are highlighted in red.
Select and place your Battle Plan counters at this time.
French Battle Plan CountersDesignated by the French banner in the top-left corner.
Charge – Roll to Activate this Battle Plan. Onlya Cavalry Force can Activate this Battle Plan.Advance the Force. If the Force enters a Regioncontaining an Enemy Force, the Enemy Forcemust make a Shock check at -3. Advance theForce, if the Force is not in Melee combat. If theForce enters a Region containing an EnemyForce, the Enemy Force must make a Shock
check at -3. Perform an Attack for the Force if there areEnemy Forces at range 0 or 1.
Engage - If the Force is in Column Formation, donot roll for Activation, this Battle Planautomatically Activates. Advance the Force. If theForce enters a Region containing an EnemyForce, the Enemy Force must make a Shockcheck at -2. Change the French Force to LineFormation. Perform an Attack for the Force witha +1/+1 modifier if there are Enemy Forces at
range 0 or 1.
Example: A French Force using the Engage Battle Plan Advancesinto a Region with 3 Enemy Infantry Forces. Roll a Shock checkfor the Enemy Force with the lowest Skill Level at -2. He fails theroll, so you inflict a Hit on the Enemy counter, and Retreat thecounter one Region. Change the French Force to Line Formation.Perform an Attack for your Force with a +1/+1 modifier due to theEngage Battle Plan and add a +3/+3 modifier for being in Meleecombat, for a total of +4/+4.
Flank - This Battle Plan can only be Activated ifthe Force is exactly 2 Regions away from thenearest Enemy Force. If the Force is in ColumnFormation, do not roll for Activation, this BattlePlan automatically Activates. Advance the Force.Advance the Force. When the Force enters aRegion containing an Enemy Force, the EnemyForce must make a Shock check at -3. Perform an
Attack if there are Enemy Forces at range 0 or 1.
Formation - Do not roll to Activate this BattlePlan. Do not assign this Battle Plan to a Force.Place it off to the side of the Battlefield. Once, atany time, during the Enemy or French ResolveBattle Actions steps you can change theFormation of up to 3 of your Forces, includingForces in Melee combat.
Grapeshot - This Battle Plan is an exception:You can place this Battle Plan on Cannons andFortifications. You cannot place this Battle Planon Infantry, Cavalry, or Garrisons.
Do not roll for Activation, this Battle Planautomatically Activates. Perform an Attack forthe Force with a +2/+1 modifier.
Prepare - Do not roll for Activation, this BattlePlan automatically Activates. This Battle Plan isan exception, you can place it on any of yourForces.
Add this Battle Plan to a Force that already hasbeen assigned a Battle Plan counter or willreceive a Default Battle Plan. This is the only
Battle Plan that can be attached to a Force that has been, orwill be, assigned another Battle Plan. Resolve the Battle Plancounter or Default Battle Plan before you resolve the EnemyBattle Plans. If your Force acts when in Melee combat,discard its other Battle Plan counter as normal, but do not

15
discard the Prepare Battle Plan.
Example: Your Force begins the Battle Turn in Melee combat withan Enemy Cavalry. You assign your Force a Volley Battle Plan anda Prepare Battle Plan. You hope that by the time the Force acts,another one of your Forces will use its Square to Destroy theEnemy Cavalry. As it turns out, it fails to Destroy the Cavalry. It isnow time for your Force to act using its Prepare. You must discardthe Volley. The Prepare counter stays, and you use it to perform aDefault Battle Plan before the Enemy acts.
Push - If the Force is in Column Formation, donot roll for Activation, this Battle Planautomatically Activates. Change the Force toColumn Formation. Advance the Force. If theForce enters a Region containing an EnemyForce, the Enemy Force must make a Shockcheck at -4.
Example: Your Force enters a Region containing an Enemy Forcewith a Combat value of 6. The Enemy Force would need to roll a 2or less for its Shock check.
Square - Only an Infantry Force can Activate thisBattle Plan. This Battle Plan automaticallyActivates. Before the Enemy resolves its BattlePlans for the Turn, perform an Attack for theForce with a +4/+0 modifier against an EnemyCavalry Force at range 0 or 1. The Attack cannotaffect any Force other than Cavalry. This BattlePlan can be placed on and Activated by a Force in
Melee combat.
Volley - If the Force is in Line Formation, do notroll for Activation, this Battle Plan automaticallyActivates. If the Force is an Infantry, perform anAttack for the Force with a +4/+0 modifier ifthere are Enemy Forces at range 1. If the Force isa Cavalry, perform an Attack for the Force with a+2/+2 modifier if there are Enemy Forces atrange 1.
French Default Battle PlansDesignated by the orange banner in the top-left corner.
Any French Force that does not receive a Battle Plan countermay use a Default Plan. Select the Default Plan for a Forcewhen it is about to act.
There are several Default Battle Plans printed on theBattlefield Sheet.
You may also choose for a Force to do nothing during theTurn.
March - If the Force is in Column Formation, donot roll for Activation, this Battle Planautomatically Activates. If the Force is a Cavalry,you may (but are not required to) Advance theForce. If the Force enters a Region containing anEnemy Force, the Enemy Force must make aShock check. Advance the Force (if the Force isnot in Melee combat) or Retreat the Force. If the
Force enters a Region containing an Enemy Force, the EnemyForce must make a Shock check. This Battle Plan is anexception: Cannons may use this Battle Plan to Retreat.
Fire - This Battle Plan is an exception: All yourForces may use this Battle Plan. If the Force is inLine Formation, do not roll for Activation, thisBattle Plan automatically Activates. Perform anAttack for the Force if there are Enemy Forces atrange 0 or 1.
Pivot - This Battle Plan automatically Activates.Change the Force from Line to Column or fromColumn to Line.
Retreat - Once your French Forces Rout, allMobile French Forces must select this BattlePlan. This Battle Plan automatically Activates.Change the Force to Column Formation. Retreatthe Force.
Draw and Assign Enemy Battle PlansDraw from the cup, and place a number of Enemy BattlePlans equal to their Enemy Battle Plan Quantity.
Assign Battle Plan counters to Cavalry and Infantry Forcesonly. Do not assign them to Garrisons, Cannons, orFortifications.
Do not place more than one Battle Plan on an Enemy Force.
Place each Enemy Battle Plan on the highest Skill LevelForce that does not already have a Battle Plan. If there ismore than one Force with the same Skill Level, you canchoose.
Choose the Enemy Force to receive each Battle Plan beforedrawing the next Battle Plan.
If the Enemy is able to draw more Plans than he has Forcesthat can receive Plans, do not draw the additional Plans.
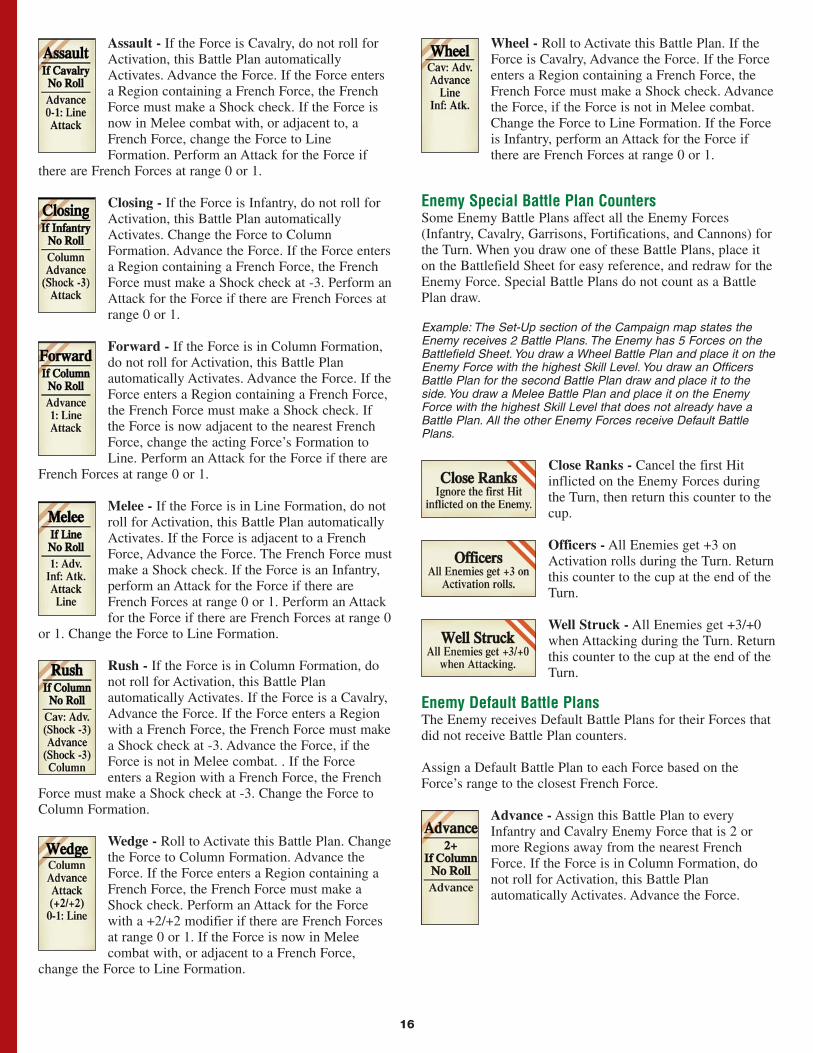
Enemy Battle Plan CountersAimed - If the Force is in Line Formation, do notroll for Activation, this Battle Plan automaticallyActivates. If the Force is an Infantry, perform anAttack for the Force with a +4/+0 modifier ifthere are French Forces at range 1. If the Force isa Cavalry, perform an Attack for the Force with a+2/+2 modifier if there are French Forces atrange 1.
16
Assault - If the Force is Cavalry, do not roll forActivation, this Battle Plan automaticallyActivates. Advance the Force. If the Force entersa Region containing a French Force, the FrenchForce must make a Shock check. If the Force isnow in Melee combat with, or adjacent to, aFrench Force, change the Force to LineFormation. Perform an Attack for the Force if
there are French Forces at range 0 or 1.
Closing - If the Force is Infantry, do not roll forActivation, this Battle Plan automaticallyActivates. Change the Force to ColumnFormation. Advance the Force. If the Force entersa Region containing a French Force, the FrenchForce must make a Shock check at -3. Perform anAttack for the Force if there are French Forces atrange 0 or 1.
Forward - If the Force is in Column Formation,do not roll for Activation, this Battle Planautomatically Activates. Advance the Force. If theForce enters a Region containing a French Force,the French Force must make a Shock check. Ifthe Force is now adjacent to the nearest FrenchForce, change the acting Force’s Formation toLine. Perform an Attack for the Force if there are
French Forces at range 0 or 1.
Melee - If the Force is in Line Formation, do notroll for Activation, this Battle Plan automaticallyActivates. If the Force is adjacent to a FrenchForce, Advance the Force. The French Force mustmake a Shock check. If the Force is an Infantry,perform an Attack for the Force if there areFrench Forces at range 0 or 1. Perform an Attackfor the Force if there are French Forces at range 0
or 1. Change the Force to Line Formation.
Rush - If the Force is in Column Formation, donot roll for Activation, this Battle Planautomatically Activates. If the Force is a Cavalry,Advance the Force. If the Force enters a Regionwith a French Force, the French Force must makea Shock check at -3. Advance the Force, if theForce is not in Melee combat. . If the Forceenters a Region with a French Force, the French
Force must make a Shock check at -3. Change the Force toColumn Formation.
Wedge - Roll to Activate this Battle Plan. Changethe Force to Column Formation. Advance theForce. If the Force enters a Region containing aFrench Force, the French Force must make aShock check. Perform an Attack for the Forcewith a +2/+2 modifier if there are French Forcesat range 0 or 1. If the Force is now in Meleecombat with, or adjacent to a French Force,
change the Force to Line Formation.
Wheel - Roll to Activate this Battle Plan. If theForce is Cavalry, Advance the Force. If the Forceenters a Region containing a French Force, theFrench Force must make a Shock check. Advancethe Force, if the Force is not in Melee combat.Change the Force to Line Formation. If the Forceis Infantry, perform an Attack for the Force ifthere are French Forces at range 0 or 1.
Enemy Special Battle Plan CountersSome Enemy Battle Plans affect all the Enemy Forces(Infantry, Cavalry, Garrisons, Fortifications, and Cannons) forthe Turn. When you draw one of these Battle Plans, place iton the Battlefield Sheet for easy reference, and redraw for theEnemy Force. Special Battle Plans do not count as a BattlePlan draw.
Example: The Set-Up section of the Campaign map states theEnemy receives 2 Battle Plans. The Enemy has 5 Forces on theBattlefield Sheet. You draw a Wheel Battle Plan and place it on theEnemy Force with the highest Skill Level. You draw an OfficersBattle Plan for the second Battle Plan draw and place it to theside. You draw a Melee Battle Plan and place it on the EnemyForce with the highest Skill Level that does not already have aBattle Plan. All the other Enemy Forces receive Default BattlePlans.
Close Ranks - Cancel the first Hitinflicted on the Enemy Forces duringthe Turn, then return this counter to thecup.
Officers - All Enemies get +3 onActivation rolls during the Turn. Returnthis counter to the cup at the end of theTurn.
Well Struck - All Enemies get +3/+0when Attacking during the Turn. Returnthis counter to the cup at the end of theTurn.
Enemy Default Battle PlansThe Enemy receives Default Battle Plans for their Forces thatdid not receive Battle Plan counters.
Assign a Default Battle Plan to each Force based on theForce’s range to the closest French Force.
Advance - Assign this Battle Plan to everyInfantry and Cavalry Enemy Force that is 2 ormore Regions away from the nearest FrenchForce. If the Force is in Column Formation, donot roll for Activation, this Battle Planautomatically Activates. Advance the Force.

17
Combat - Assign this Battle Plan to every EnemyForce that is 1 Region or less away from thenearest French Force. This Battle Planautomatically Activates. Change the Force to LineFormation. Perform an Attack for the Force ifthere are French Forces at range 0 or 1.
Retreat - Once the Enemy Forces Rout, allMobile Enemy Forces must select this BattlePlan. This Battle Plan automatically Activates.Change the Force to Column Formation. Retreatthe Force 1 Region.
Resolve Enemy Battle PlansResolve Enemy Battle Plans in order from the frontmost torearmost Battlefield Regions (from French Reserve to EnemyReserve). In each Region, resolve the actions for EnemyForces that have a Battle Plan counter before resolvingactions for those using Default Battle Plans.
Roll to Activate and resolve the Battle Plan for each EnemyForce, one at a time.
As you resolve each Battle Plan counter, return it to theirBattle Plan cup.
If the Force is in Melee combat at the time it acts, discard itsBattle Plan. It must use the “Combat” Default Battle Plan.
Resolve French Battle PlansRoll to Activate and resolve the Battle Plans for your FrenchForces in any order.
If the French Force has a Battle Plan counter, resolve itsBattle Plan. If the Force does not have a Battle Plan counter,select a French Default Battle Plan for it to use when it acts.
As you resolve each Battle Plan counter, return it to the table.
If a Force is in Melee combat at the time it acts, discard itsBattle Plan. Select a Default Battle Plan for the Force.
Rout CheckRecheck the Combat values of each side to determine if oneside has Routed the other.
Total the Combat values for the Enemy Forces on theBattlefield Sheet and compare that number to the totalCombat values for the French Forces on the Battlefield Sheet.If one side’s Combat value is 3 times, or more than, theopponent’s Combat value, the weaker Forces have beenRouted.
Example: Your French Forces have a total Combat value of 15.The Enemy Forces have a total Combat value of 52. Your ForcesRout.
When a side’s Force’s Rout, immediately Destroy all of itsBattlefield Garrisons and Fortifications. All its Mobile Forcesmust choose the Retreat Battle Plan until they all exit theBattlefield, by moving behind their Reserve Region.
If a Retreating Force exceeds the number of Forces allowed inthe Region, Destroy the Force.
If a Force moves behind its Reserve Region it exits the Battle.As each Force exits the Battle, return the Mobile EnemyForces to one randomly selected friendly controlled oruncontrolled Area adjacent to the Battle Area. If no adjacentAreas are friendly controlled or uncontrolled, Destroy theForce.
If you voluntarily Retreat a Force behind your FrenchReserve Region, follow the above procedure.
If your French Forces are Routed, move the Napoleon counterto the same Campaign map Area your first Force moves towhen it exits the Battlefield.
Once one side has Routed, ignore the Battle Turn Track.Continue resolving Battle Turns until all of the Routed Forcesare Destroyed, or have exited the Battlefield.
Advance Battle Turn Counter
Advance the Battle Turn counter on the Help Sheet and begina new Turn of Battle starting with the Insight Activation step.
End of the BattleThe Battle ends when the first of three conditions is met:
The Battle ends if the Battlefield contains only French orEnemy Forces.
The Battle ends when one side is Routed and the last RoutedMobile Force exits the Battlefield Sheet.
If the Battle ends with only one side’s Forces present on theBattlefield, return that side’s remaining Forces, and Napoleonif present, to the Campaign map’s Battle Area.
The Battle ends when you move the counter into theWithdrawal box of the Turn Track. Roll and consult theWithdrawal chart to determine what to do next.
18
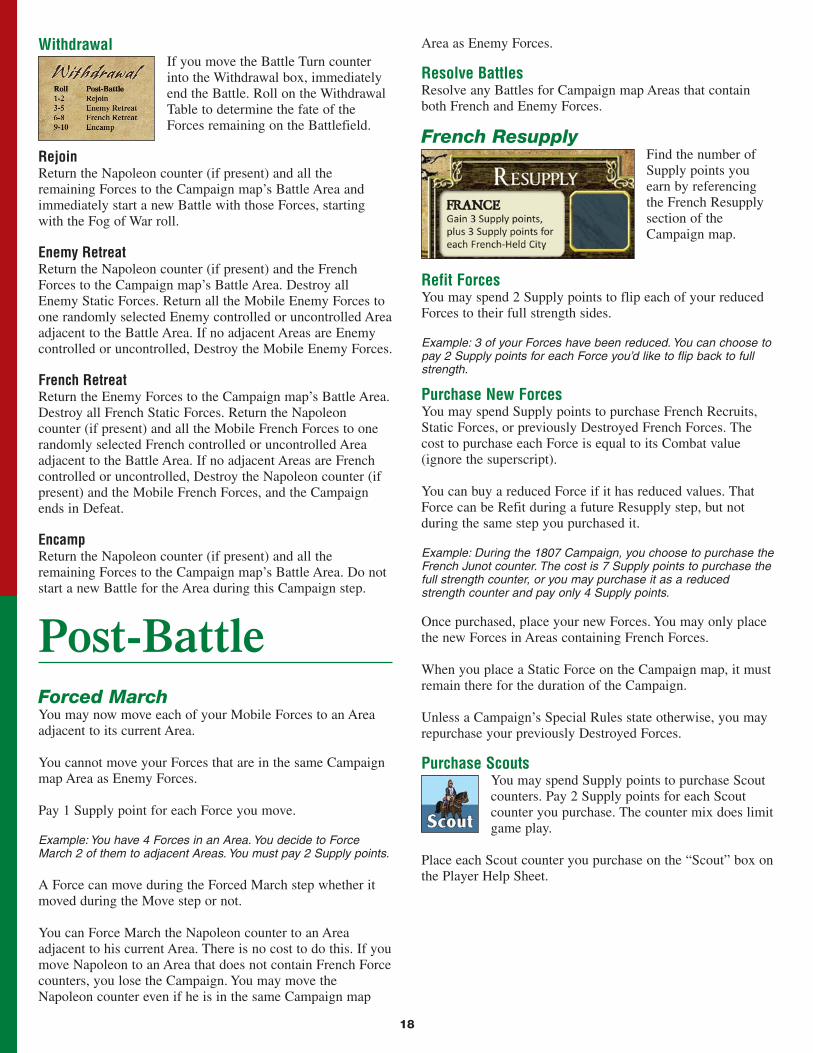
WithdrawalIf you move the Battle Turn counterinto the Withdrawal box, immediatelyend the Battle. Roll on the WithdrawalTable to determine the fate of theForces remaining on the Battlefield.
RejoinReturn the Napoleon counter (if present) and all theremaining Forces to the Campaign map’s Battle Area andimmediately start a new Battle with those Forces, startingwith the Fog of War roll.
Enemy RetreatReturn the Napoleon counter (if present) and the FrenchForces to the Campaign map’s Battle Area. Destroy allEnemy Static Forces. Return all the Mobile Enemy Forces toone randomly selected Enemy controlled or uncontrolled Areaadjacent to the Battle Area. If no adjacent Areas are Enemycontrolled or uncontrolled, Destroy the Mobile Enemy Forces.
French RetreatReturn the Enemy Forces to the Campaign map’s Battle Area.Destroy all French Static Forces. Return the Napoleoncounter (if present) and all the Mobile French Forces to onerandomly selected French controlled or uncontrolled Areaadjacent to the Battle Area. If no adjacent Areas are Frenchcontrolled or uncontrolled, Destroy the Napoleon counter (ifpresent) and the Mobile French Forces, and the Campaignends in Defeat.
EncampReturn the Napoleon counter (if present) and all theremaining Forces to the Campaign map’s Battle Area. Do notstart a new Battle for the Area during this Campaign step.
Post-BattleForced MarchYou may now move each of your Mobile Forces to an Areaadjacent to its current Area.
You cannot move your Forces that are in the same Campaignmap Area as Enemy Forces.
Pay 1 Supply point for each Force you move.
Example: You have 4 Forces in an Area. You decide to ForceMarch 2 of them to adjacent Areas. You must pay 2 Supply points.
A Force can move during the Forced March step whether itmoved during the Move step or not.
You can Force March the Napoleon counter to an Areaadjacent to his current Area. There is no cost to do this. If youmove Napoleon to an Area that does not contain French Forcecounters, you lose the Campaign. You may move theNapoleon counter even if he is in the same Campaign map
Area as Enemy Forces.
Resolve BattlesResolve any Battles for Campaign map Areas that containboth French and Enemy Forces.
French ResupplyFind the number ofSupply points youearn by referencingthe French Resupplysection of theCampaign map.
Refit ForcesYou may spend 2 Supply points to flip each of your reducedForces to their full strength sides.
Example: 3 of your Forces have been reduced. You can choose topay 2 Supply points for each Force you’d like to flip back to fullstrength.
Purchase New ForcesYou may spend Supply points to purchase French Recruits,Static Forces, or previously Destroyed French Forces. Thecost to purchase each Force is equal to its Combat value(ignore the superscript).
You can buy a reduced Force if it has reduced values. ThatForce can be Refit during a future Resupply step, but notduring the same step you purchased it.
Example: During the 1807 Campaign, you choose to purchase theFrench Junot counter. The cost is 7 Supply points to purchase thefull strength counter, or you may purchase it as a reducedstrength counter and pay only 4 Supply points.
Once purchased, place your new Forces. You may only placethe new Forces in Areas containing French Forces.
When you place a Static Force on the Campaign map, it mustremain there for the duration of the Campaign.
Unless a Campaign’s Special Rules state otherwise, you mayrepurchase your previously Destroyed Forces.
Purchase ScoutsYou may spend Supply points to purchase Scoutcounters. Pay 2 Supply points for each Scoutcounter you purchase. The counter mix does limitgame play.
Place each Scout counter you purchase on the “Scout” box onthe Player Help Sheet.

19
Enemy TurnThe Enemy now gets a chance to go on the offensive.
Enemy OrdersEach Campaign maphas an Enemy Orderschart.
This chart dictates themovement actions ofthe Enemy Forces onthe map.
Enemy Orders MovementIf Enemy Forces are in the same Campaign map Area asFrench Forces, do not move them.
Enemy Force GroupsIn each Campaign map Area containing Mobile EnemyForces, separate the Enemy Forces into different pilesaccording to Nationality. Treat Recruits as being a separateNation.
Example: An Area contains 6 Austrian Forces, 5 Russian Forces,2 Prussian Forces, and 3 Recruit Forces. Separate them into anAustrian stack, a Russian stack, a Prussian stack, and a Recruitstack.
After separating the Forces by Nationality, randomly breakapart the Forces into the size of groups specified on theEnemy Orders chart. Then, roll once on the chart for eachgroup’s action.
Example: If the Enemy Orders chart reads: “Roll for groups of 4Forces in each Area”, randomly separate the Enemy Forces ineach Area into groups of 4 Forces by Nationality.
Example: Randomly separate the 6 Austrian Forces into a groupof 4 and a group of 2. Randomly separate the 5 Russian Forcesinto a group of 4 and a group of 1. The 2 Prussian Forces remaina group of 2. The 3 Recruit Forces remain a group of 3.
Roll for each group of Enemy Forces and consult the EnemyOrders chart to determine its action. You get to choose theorder in which you roll for the Enemy groups. Move eachgroup before rolling for the next.
Treat all rolls as if they are conducted simultaneously.
Example: In the 1796 Campaign, an Enemy group in Savonareceives the “French-Held Objective” order, so you move the groupinto Nice, an Objective Area that is Held by French Forces. Youthen roll for a second Enemy group in Savona. It also receives a“French-Held Objective” order. Advance this group into Nice also.Even though the Area is not French-Held at the time of the dieroll, the Area was French-Held when you started rolling for EnemyOrders and all orders are considered simultaneous.
Many of the Enemy Orders charts have modifiers listed at thebottom. Use these modifiers to modify the die rolls for the
Enemy groups.
Example: In the 1796 Campaign, you are rolling for 3 groups: 1Piedmont and 2 Austrian. The Enemy has 5 Supply points. Spend2 of his Supply points and add 2 to all his die rolls. You roll a 4 forthe Piedmont Force, which becomes a 6. Perform a Randommovement for the Force. You roll a 1, which becomes a 3, for thefirst Austrian Force. The Austrian Force Holds. You roll a 10, whichbecomes a 12, for the second Austrian Force. The ForceAdvances twice toward the closest French-Held Objective.
If you have any available Scout counters, you candiscard 1 Scout counter to re-roll an EnemyOrders die roll. When you re-roll due to a Scout,do not apply any modifiers. You can accept a rollor continue to re-roll and discard Scout counters
until you have discarded all your Scout counters. You canrepurchase discarded Scout counters during your Resupplysteps.
The Enemy Orders chart contains the following instructions.
Enemy-Held ObjectiveMove the group one Area toward the closest Objective that isHeld by the Enemy. If the Enemy does not Hold anyObjectives, move the group to a random adjacent Area that isuncontrolled or Enemy Held. If there are no uncontrolled orEnemy-Held adjacent Areas, the group Holds.
Enemy-Held CityUse the same rules as for an Enemy-Held Objective, except inregard to Cities instead of Objectives.
HoldDo not move the group.
RandomMove the group to a randomly chosen adjacent Area.
Example: A group of Enemy Forcesin Lodi receives the Random order.They can move to Milan, Lonato,Mantua, Genoa, or Marengo. Roll adie and give each possible adjacentArea an equal chance of beingchosen. On a 1 or 2 move them toMilan, a 3 or 4 Lonato, 5 or 6Mantua, a 7 or 8 Genoa, and a 9 or10 Marengo.
French-Held ObjectiveMove the group one Area toward the closest Objective that isHeld by the French. If you do not Hold any Objectives, treatas an Advance. Move the group toward the French occupiedObjective Area that has the lowest total Combat value.
French-Held CityUse the same rules as for an French-Held Objective, except inregard to Cities instead of Objectives.
AdvanceMove the group one Area toward the closest French Force.Move the group toward the French occupied Area that has thelowest total Combat value.

20
Advance x2 or x3Move the group 2 (or 3) Areas toward the French occupiedArea with the lowest total Combat value that the group canmove into. If the group cannot reach any French Forces, moveit toward the French occupied Area with the lowest totalCombat value.
Example: There is an Enemy group in Mantua with an “Advancex2” Order. It would move to Savona to attack the French Forceswith a total Combat value of 7. While the group can reach Lodi,the French Forces in Lodi have a higher Combat value. The groupcannot reach Turin, so it wouldn’t move toward that Area. If thegroup had an “Advance x3”, they would move into Turin.
French-Held Objective x2 or x3Move the group 2 (or 3) Areas toward the closest Objectivethat is Held by the French with the lowest Combat values. Ifyou do not Hold any Objectives, treat as an Advance x2 (orx3).
French-Held City x2Use the same rules as for an French-Held Objective, except inregard to Cities instead of Objectives.
Move Toward…Move the group one Campaign map Area closer to the namedCampaign map Area, or the Campaign map Area containingNapoleon, whichever is specified by the Enemy Ordersinstructions.
Resolve BattlesAfter you complete all Enemy movement, resolve a Battle foreach Area containing opposing Forces (French and EnemyForces in the same Area).
As you move the Forces to the Battlefield Sheet, mark theLocation of each Battle Area on the Campaign map byplacing the Battle Location counter with the orange side faceup.
Continue to the Enemy Resupply step after you have resolvedall Battles.
Enemy ResupplyThe Enemy Resupply section ofeach map has a chart andinstructions used to determinehow many new Forces andSupply points they receive.
Example: In the Italian
Campaigns, roll once on the Resupply chart for each Enemy-HeldCity. If the Enemy Holds Mantua and Milan, you would roll oncefor Mantua and once for Milan.
Fortification - Place the noted number of EnemyFortification counters in the Area you are rolling for. If theEnemy does not have a Fortification Force available, for everyForce they are supposed to receive, but did not, give them 2Supply points instead.
Garrison - Place the noted number of Enemy Garrisoncounters in the Area you are rolling for. If the Enemy doesnot have a Garrison Force available, for every Force they aresupposed to receive, but did not, give them 2 Supply pointsinstead.
Reinforcement - Draw the noted number of Reinforcementcounters from the Enemy Reinforcement cup and place themin the Area you are rolling for. If the Enemy does not haveany Forces in their Reinforcement cup, for every Force theycannot draw, give them 2 Supply points instead.
Supply - Add the noted number of Supply points to theEnemy Resupply box on the Enemy Resupply section of themap.
Perform all the Resupply rolls for the Enemy. After the rolls,the Enemy will Refit any reduced Forces on the map. If anyEnemy Forces are flipped to their reduced side, spend 2Enemy Supply points to flip each of them back to their fullstrength side in order from highest to lowest Skill Level.
Example: The Enemy has 3 Supply points, 1 reduced Line Force,and 1 reduced Poor Line Force. Spend 2 of the Supply points toRefit the Line Force.
Next Turn
This concludes one Campaign Turn. Return tothe start of the Sequence of Play and resolvethe next Turn. Continue to do so until theend of the Campaign.
Solitaire DecisionsThere will be times during the game when you need to makegame decisions for the Enemy Forces. The rules provide youwith procedures to guide your decision making. If the rulesleave you with more than one equally valid option, you arefree to choose from the available options.
Example: A group of Enemy Forces on the Campaign mapreceives an Advance Order. There are French Forces in twoequally close Areas. Both Areas contain 12 Combat points ofFrench Forces. You get to choose which Area the Enemy Forcesmove closer to.

21
Example: There are 3 Enemy Forces on the Battlefield Sheet withLine Skill Level, but they only have 2 Battle Plans to allocate tothem. You get to choose which 2 Forces receive the Battle Plans.
Example: When rolling for Enemy Orders, you get to choose theorder in which to roll for the Areas containing Enemy Forces.
Linked CampaignsInstead of playing each Campaign as a stand-alone game, youcan link them into a series of linked Campaigns stretchingfrom Napoleon’s first battle to his last.
Begin with the 1796 Campaign, and play each Campaign inchronological order.
If you ever suffer a Campaign Defeat, do not continue, yourquest for immortality has ended.
At the end of each Campaign, note on the Player Log thenumber of Victory Points you scored.
Historical note: If a commander survived a battle, but lostmost of his men, he would be given new green recruits. In thegame, a Commander’s Combat value and Activation valuechanges between Campaigns because the skills of his menchange.
At the end of each Campaign, also note on the Player Log theForce Commanders that were on the map at the end of theCampaign. The next Campaign may use some of the sameForce Commanders. You may re-use the surviving counters inthe next Campaign if their name appears on one of your Forcecounters in the next Campaign. This is useful when theprevious Campaign’s commander is superior to the newCampaign’s commander.
Example: Augereau in the 1805 Campaign has Activation 7 andCombat 4. In the 1806 Campaign he has Activation 6 and Combat4. If Augereau was on the map at the end of the 1805 Campaign,you could bring his 1805 counter into the 1806 Campaign insteadof using the 1806 Augereau counter.
You may also choose to use the counter which normally goeswith the next Campaign. Choose to use a Commander’s newcounter or the Commander’s counter from the previousCampaign individually.
For each counter you replace with a past Campaign’ssurviving Commander counter, roll on the enemy upgradetable and place the resulting Enemy Force in a randomEnemy-Held Area.
Roll Upgrade1-2 Fortification3-4 Garrison5-8 Reinforcement9-10 5 Supply points
If the result includes Supply points, place them in the EnemySupply box. If the Enemy runs out of Fortification, Garrison,or Reinforcement counters replace each with 5 additional
Supply points.
Once you have completed all eleven Campaigns, compareyour total Victory Points to the chart below to determine howlong history will remember your exploits.
Victory Points Years0 to 39 5040 to 89 10090 to 129 500130 to 169 1000170 to 199 1500200 to 229 2000230 to 259 2500260 to 279 3000280 to 299 4000300 or more 5000
Bonus MaterialWe believe new material is the best way to keep games freshand new. We will be providing free additional material for thisgame on our website: www.dvg.com
If you have any ideas for optional rules, scenarios, or add-ons,please email us. Our plan is to make available our newmaterials as well as that sent in by players.
CreditsGame Design Dan VerssenGame Development Holly VerssenArtwork Wan Chiu, Miguel Santos,
Aaron Anderson, Dan VerssenResearch Mike Bowen, Lance McMillian,
Jose Manuel Moreno Ramos,Nick Russo
Proofing: Hans Korting, Rodolphe Duhil,Enrico Acerbi, John Gill, Hans - Karl Weiss, Digby Smith, Al Amos, Jonathan Gingerich,Oscar Lopez, Erik Strahler,Ron McGuigan
Playtesters:Michelle Fairbanks, Kevin Verssen, Kira Verssen
Research Sources:The Campaigns of Napoleon by David G. Chandlerhttp://napoleon-series.orghttp://www.napoleonguide.comhttp://napoleonistyka.atspace.comhttp://www.dean.usma.edu/
Copyright 2011 • Dan Verssen Games (DVG)

22
Extended ExampleThis is an extended example of play for the Italian 1796Campaign. Some of the actions in this example are to illustrategame mechanics, rather than as part of a winning strategy.
Set-UpHere is how the Campaign map looks after the counters havebeen placed following Set-Up. Note the additional Garrison andFortification counters placed in Mantua due to the Special Rules.
1st Campaign Turn - French HalfI begin the Turn by advancing the Campaign Turn counter. I thenget to move my French Force counters. According to the SpecialRules, I must Hold at least 2 Objectives at the end of my Turn, ormy Campaign ends in Defeat.
I move 4 Forces into Turin to claim a second Objective, and theremainder of my Mobile Forces and Napoleon into Savona todestroy the Piedmont Forces.
Battle of TurinI choose to resolve the Turinbattle first. I start by rolling forFog of War. The Enemy has 8Supply points, so I spend 4 ofthem and add 4 to the roll. Iroll a 1, which becomes a 5. Ican move the Napoleon counterto this battle. I choose not to. Ithen check for Envelopment. Ihave 28 Combat points, theEnemy has 9 Combat points. Ihave a total Combat value of 3
to 1 or higher, so they are Enveloped. I Destroy their Forces andthe battle ends.
Battle of SavonaI proceed to the battle for Savona. The Fog of War roll is an 8,plus 2 because they spend 2 Supply points, and it becomes a 10. Irandomly draw an Enemy Force from their Reinforcement cup. Itis a Cannon. I add it to their Reserve Region in Line Formation.The battle will last 5 turns. I place the Battle Turn counter on the“5” box of the Battle Turns Track on the Help Sheet. I check forEnvelopment: I have 23, they have 26, so no Envelopment takesplace. I then determine Battle Plan Quantities. They receive 2 asper the map, and I receive 2 due to my Napoleon counter. Ichoose not to purchase any additional Battle Plans. I move theForces to the Battlefield Sheet. I choose to place 3 of my Forcesin my Approach Region and 1 in the Reserve Region. I choose toplace 3 in Column Formation and 1 in Line Formation. Irandomly place 4 of their Forces in their Approach Region. Alltheir Infantry and Cavalry Forces start in Column Formation.
I choose to use 1 of my 2 Battle Plans tobuy a Sweep Insight. I will now only getto select 1 Battle Plan each turn of thebattle.
I start the first turn of the battle by rollingto Activate my Sweep Insight. I need toroll a 3 or less because I need to rollNapoleon’s Command rating, plus 1, orless. I roll a 5, so it doesn’t Activate thisturn.
For my 1 Battle Plan, I choose an Engage and place it next toGarnier’s counter. I resolve the Enemy Battle Plans from theirfrontmost to rearmost Regions. I randomly grab 2 Enemy BattlePlans from their cup. Before looking at the Battle Plans, I decideto place the first on Dichat’s Cavalry. It is a Wheel. I choose toplace the next Battle Plan on Brempt. It is a Closing. Dichat mustroll his Activation value of 7 or less to Activate the Battle Plan,and rolls a 3. Because the Force is a Cavalry, it Advances. It thenAdvances again. It then changes to Line Formation. It is not anInfantry, so it does not Attack. Since Brempt’s Force is anInfantry, it does not need to roll to Activate. Brempt Advances.There are no French Forces in the same or adjacent Regions, so itdoes not Attack. The 2 remaining Enemy Infantry performDefault Advance Battle Plans because they are 2 or more Regionsfrom the closest French Force. They are in Column Formation, sothey do not need to roll to Activate the Battle Plans. I then resolveBattle Plans for their Reserve Region, and perform an Advancefor deVital. Cannons always perform Combat Battle Plans, so Iroll for its Attack. It needs to roll 4 or less, and it rolls a 2. Isuffer 1 Hit, and I must apply it to Garnier because he is in theclosest non-Melee Combat Region, and he is the lowest SkillLevel Force in the Region. I flip Garnier to his reduced side.
I now get to resolve my Battle Plans inany order. I choose to resolve Garnier’sEngage first. He does not need toActivate because he is in ColumnFormation. He Advances and the lowestSkill Level Enemy Force must make aShock roll because he has entered theirRegion. Dichat is the only Force, and theShock roll is at -2 because of the Engage.Normally, he would need to roll a 6 orless, but now he must roll a 4 or less. Herolls a 3, succeeds, and suffers no effect.I change Garnier to Line. He Attacks
with +4/+4 and rolls a 10, missing. I then perform a Fire forSerurier. He needs to roll a 7 or less, and he rolls a 2, scoring 1Hit. Dichat is Destroyed. I then use March to Advance Macquard.I do nothing with Stengel.
I check for Rout. I have 22, and theyhave 20. No Rout. I Advance the BattleTurn counter to the “4”.
I start the second turn of the battle androll for my Sweep Insight. I need a 3 orless, and roll a 9, failing.
I select the Formation Battle Plan. It isnot assigned to a particular Force, so Iplace it next to the Battlefield Sheet.
I draw 2 Battle Plans for the Enemy.They must be placed on Dichat and Provera because they havethe highest Skill Levels. They are Melee and Aimed. I use myFormation to change Macquard to Line and Serurier to Column. Istart with Dichat. He must roll 6 or less to Activate, and he rolls a2. Because he is at range 1, he Advances. Garnier must roll a 2 or

23
less for his Shock, and he rolls a 3. He suffers 1 Hit and isDestroyed. Because Dichat is an Infantry, he Attacks. He wouldnormally need to roll a 5 or less to score 1 Hit, but because he isin Melee combat, he will score 2 Hits on a roll of 1 to 3, and 1Hit on a roll of 4 to 8. He rolls a 9 and misses. He then Attacksagain, and rolls a 7 for 1 Hit. I flip Macquard to his reduced side.I then roll for Provera to Activate his Aimed. He needs a 6 or lessand rolls a 9. He does nothing. Brempt is at range of 0 or 1, so heperforms a Combat. He changes to Line and Attacks. He rolls a 9,missing. deVital then Advances. The Cannon then Attacks androlls a 3, Hitting. Serurier takes the Hit because he is the closestForce not in Melee Combat. I flip Serurier.
I then perform my Battle Plans. SerurierAdvances. This forces Dichat to make aShock check, but Dichat is in ColumnFormation and automatically fails. Dichatsuffers 1 Hit and Retreats. Macquard thenAttacks, needs to roll a 3, and rolls a 1,inflicting 1 Hit. I can choose betweendeVital and Brempt, and I choosedeVital. I have Stengel do nothing.
I check for Rout. I have 15, and theyhave 17. No Rout. I move the Turncounter to the “3”.
I start the third turn by rolling for mySweep. I need a 3 or less, and I roll a 2.Success!
I can choose up to 3 Cavalry Forces inmy Reserve Region to Sweep. I haveonly 1, Stengel, so he will Sweep. I roll 3Attacks for him, and roll a 2, 5, and 7. Atotal of 4 Hits. I apply them from theEnemy’s rearmost Region forward. 1 HitDestroys his Cannon. The next 3 Hits getapplied to his Front Region to deVitaland Brempt. 3 Hits are enough to
Destroy both of them. I return Stengel to Savona on theCampaign map. I choose the Push Battle Plan for Serurier.
I draw a Well Struck for Dichat, so I draw again and get anAssault. I draw a Wedge for Provera. Because of the Well Struck,all Enemy Forces get +3/+0 to Attack this turn. Dichat rolls a 7 toActivate, fails, and does nothing. Provera rolls a 10 to Activate,fails, and does nothing.
Serurier uses the Push to Advance. Ichoose for Dichat to make the Shock rollat -4. He is in Column and failsautomatically. He is Destroyed. I orderMacquard to March. He rolls for andsucceeds in his Activation roll to March,and enters Provera’s Region. Provera failshis Shock check, suffers 1 Hit, andRetreats.
I check for Rout. I have 7, and they have3. No Rout. I move the Turn counter tothe “2”.
I select Formation for my Plan. I draw Aimed for Provera. Hefails his Activation roll. I use Formation to change Macquard toColumn. Macquard Advances, forcing Provera to make a Shockcheck. Provera fails automatically because he is in ColumnFormation. He also fails because he is in his own ApproachRegion. This ends the battle. I place all the Destroyed EnemyForces in their Reinforcement cup. I place all my DestroyedForces off to the side for later repurchase.
I return my 2 reducedForces to Savona tojoin Stengel.
Here is what the maplooks like after mybattles.
Post BattleI can now choose toForce March any of myForces by paying 1
Supply point each. I choose to Force March Augereau, Kilmaine,and La Harpe from Turin to Savona for a cost of 3 Supply points.
I now resolve my Resupply step. I gain 9 Supply points due tothe Resupply instructions. I spend 2 to flip Macquard back to fullstrength, and 4 to purchase a French Fortification for Savona. Isave 3 for later. This ends my half of the Campaign Turn.
1st Campaign Turn - Enemy HalfI begin by rolling for their Orders. They have 2 Supply points, sothey spend 1 to get +1 on their Order die rolls. The only MobileForces they have on the map are in Genoa. I divide those Forcesinto groups of 3 in accordance with the Enemy Ordersinstructions, then roll for each group’s action. The first group isLiptay, diCuto, and Schubirz. I roll a 4, which becomes a 5, andthey move randomly. There are 4 possible adjoining Areas forthem to move to, I assign an equal chance to each Area and roll.They move to Lodi. The next group is Rosselmini, Nicoletti, andKerpen. I roll a 1, which becomes a 2, and they move 1 Areatoward the nearest Enemy-Held Objective, Mantua. The nextgroup of 3 is Salisch (Infantry), Salisch (Cavalry), and Pittoni. Iroll a 9, which becomes a 10, and they move into Savona.Rukavina is the final group, and I roll a 2, which becomes a 3,and he stays in Genoa.
I then resolvethe battle inSavona. I rollfor Fog of Warand get a 7. Itransfer theEnemy’s 1Supply point tome. I performan Envelopmentcheck. I have
44, and they have 14. I Envelop them, and Destroy all theirForces.
There are no otherbattles, so I go on to theEnemy Resupply step. Iroll once on the EnemyResupply chart for eachEnemy-Held City, whichis: Genoa, Mantua,Milan, and Klagenfurt.For Genoa, I roll a 1, andit gets a Fortification. A 2for Mantua, and they get
a Garrison. A 4 for Milan, so I draw 1 counter from theirReinforcement cup and Salisch’s Cavalry re-enters the Campaign.An 8 for Klagenfurt, so I add 3 Supply points to the EnemyResupply box.
This ends the first Campaign Turn. I’ll repeat the process until Irun out of Campaign Turns on the track, suffer the DefeatCondition, or meet my Victory Condition.

To see more, please visit us at: www.dvg.com
Some of our fine DVG games...
DO
W
N IN FLAMES
D
RA G O N
S!D
RA G O N
S!
DO
W
N IN FLAMES
LE A D E R
CO R S A I R
B
O M B E R
S
DOWN IN FLAMES - WW
I
FO R C E S
SP E C I A L
M
A R I N E AIR
HO
R
NET LEADER II
EARTH
GONE MAD!
L
EA D E R I I
HO R N E T
W
ORLD WAR I
DO
W
N IN FLAMES
CA R R I E R A I R G R OU
P
HO
R
NET LEADER II
TERRA
STARFORCE