Na2009 enus rep_02
54
Chapter 2: Interactive Features 2-1 CHAPTER 2: INTERACTIVE FEATURES Objectives The objectives are: • Learn when to use headers and footers and how to add or delete a header or footer section. • To understand the difference between Print Preview and Print Layout. • Describe the visibility options for the RoleTailored client and how to use them. • Understand interactive sorting and know how to implement it. • Understand the way document maps work and how to add them to a report Introduction In the previous chapter the new architecture of Microsoft Dynamics ® NAV 2009 was introduced and the anatomy of a report was explained in detail. You learned how to create a basic report for the RoleTailored client, but now it is time to dive a little deeper into the possibilities that the world of Reporting Services has to offer. In environments that support interactivity reports can include a variety of features that provide interactivity to users. Users can influence the appearance of a report and the data it contains by typing or selecting a value for a filter before running the report. A user can show or hide items in a report and click links that go to other reports, Web pages and RoleTailored client pages. Reporting Services also provides a document map, which acts like a table of contents. A user can click items in the document map to jump to areas within a report. Formatting the items in your report makes the report look more attractive and enhances its readability. You can format the text boxes and individual items within text boxes, the images, the expressions, and the data while in design mode. You can design a report so that different styles are applied to report items or properties based on the data in the report. You can build conditional expressions using any feature supported by expressions, including built-in report and aggregate functions, built-in collections, and custom code. In this chapter we will explain some of the interactive features Reporting Services has to offer for the reports that will be running on the RoleTailored client. Microsoft Official Training Materials for Microsoft Dynamics ® Your use of this content is subject to your current services agreement
-
Upload
peter-muscat -
Category
Technology
-
view
1.057 -
download
0
Transcript of Na2009 enus rep_02

Chapter 2: Interactive Features
2-1
CHAPTER 2: INTERACTIVE FEATURES Objectives
The objectives are:
• Learn when to use headers and footers and how to add or delete a header or footer section.
• To understand the difference between Print Preview and Print Layout.
• Describe the visibility options for the RoleTailored client and how to use them.
• Understand interactive sorting and know how to implement it. • Understand the way document maps work and how to add them to a
report
Introduction In the previous chapter the new architecture of Microsoft Dynamics® NAV 2009 was introduced and the anatomy of a report was explained in detail.
You learned how to create a basic report for the RoleTailored client, but now it is time to dive a little deeper into the possibilities that the world of Reporting Services has to offer.
In environments that support interactivity reports can include a variety of features that provide interactivity to users. Users can influence the appearance of a report and the data it contains by typing or selecting a value for a filter before running the report. A user can show or hide items in a report and click links that go to other reports, Web pages and RoleTailored client pages. Reporting Services also provides a document map, which acts like a table of contents. A user can click items in the document map to jump to areas within a report.
Formatting the items in your report makes the report look more attractive and enhances its readability. You can format the text boxes and individual items within text boxes, the images, the expressions, and the data while in design mode.
You can design a report so that different styles are applied to report items or properties based on the data in the report. You can build conditional expressions using any feature supported by expressions, including built-in report and aggregate functions, built-in collections, and custom code.
In this chapter we will explain some of the interactive features Reporting Services has to offer for the reports that will be running on the RoleTailored client.
Microsoft Official Training Materials for Microsoft Dynamics ® Your use of this content is subject to your current services agreement

Report Design in Microsoft Dynamics® NAV 2009
2-2
Objectives
In the previous chapter you were introduced in the new reporting solution. You created a basic report and basically used the dataset to implement currency and date formatting. In this chapter you will discover the interactive features from the new solution. You will learn to work with different types of headers and footers, how to define interactive sorting, how to apply visibility options, how to use pictures and how to add extra navigation features such as document map.
Working with Headers and Footers Both in the Classic client and in the RoleTailored client you can use headers and footers in reports. But there is a big difference here between the two clients. The Classic client has more types of headers and footers than the RoleTailored client. The purpose and functionality of headers and footers in the Dynamics NAV Report Designer and in the Visual Studio Report Designer are also completely different.
Page headers and footers can contain static content, but they are more commonly used to display varying content like page numbers or information about the contents of a page.
It is important to have a good understanding of the purpose, capabilities and limitations of headers and footers, in both environments.
For the Classic Client
In the Classic Client, you can add multiple sections to a report. To add a section in the Section Designer, you select Edit, and then click New. In the Insert New Section window, you select a data item, a section type and a section position.
There are different kinds of sections available in the Classic client:
Section Purpose
Body Prints for each iteration of the data item loop. When there is an indented data item, the complete loop for this data item begins after the body section of the higher level data item has been printed.
Header Prints before a data item loop begins. If the PrintOnEveryPage property of the section is set to Yes, the header is also printed on each new page.
Footer Prints after the loop has finished. If the PrintOnEveryPage property of the section is set to Yes, the footer is also printed on each new page. If the PlaceInBottom property of the section is set to Yes, the footer section is printed at the bottom of the page, even if the data item loop ends in the middle of a page.
Microsoft Official Training Materials for Microsoft Dynamics ® Your use of this content is subject to your current services agreement

Chapter 2: Interactive Features
2-3
Section Purpose
GroupHeader When a new group starts this section is printed.
GroupFooter When a new group ends this section is printed.
TransHeader If a page break occurs during a data item loop, the TransHeader is printed at the top of the new page. This section is printed after any header section of the data item.
TransFooter If a page break occurs during a data item loop, the TransFooter is printed before the page break This section is printed before any footer section of the data item.
In a report that is going to be printed, each data item has one or more sections. A section can be thought of as a block of information that should be printed. The complete report is composed of a number of sections. Some sections are printed only once, for example, headers. Other sections are printed for each record retrieved from the database. The information printed in the sections is displayed using controls.
The available controls are:
• Text boxes – for printing the result of the evaluation of any valid C/AL expression, such as the contents of a table field (also used for complex calculations).
• Labels – for printing static text such as a caption for a column of data.
• Shapes, images and picture boxes – for printing graphical elements (lines, circles) and bitmap pictures.
After you have defined one or more data items, you can design the visual layout of the report in Section Designer. You can use the Field Menu to select fields and place them in the sections as controls. You can think of each section as one or more lines on the paper that the report will eventually be printed on. A header section is printed only once, while a body section is typically printed several times as each loop of the report is iterated. You can control whether the header should be printed every time a page break occurs while the body sections of the same data item are being printed.
You can edit properties and triggers for each section by opening the Properties window or the C/AL Editor, respectively, while the section is selected. The controls you place in the sections have a subset of the properties that controls have on forms, not all the properties are relevant for a report. You can see a list of the properties in the Properties window.
Microsoft Official Training Materials for Microsoft Dynamics ® Your use of this content is subject to your current services agreement

Report Design in Microsoft Dynamics® NAV 2009
2-4
Example:
FIGURE 2.1 THE REPORT HEADER IN REPORT 206
As you can see a report can contain multiple headers and footers for one data item.
For the RoleTailored Client
If the classic client supports 7 section types, in the RoleTailored Client there are only three section types: a Header, a Body and a Footer section. No additional sections can be added. When you open Visual Studio Report Designer, all three sections will normally be displayed.
Visual Studio Report Designer supports less section types than Section Designer. Example: TransHeader and TransFooter sections are not supported in the RoleTailored client.
When printing a report, Microsoft Dynamics NAV 2009 will first print the header section, then the body section and finally the footer section. You can have only one header, one body and one footer in a report.
The next paragraphs explain which classic sections are supported in the RoleTailored client and how to add, design or delete these sections.
Microsoft Official Training Materials for Microsoft Dynamics ® Your use of this content is subject to your current services agreement

Chapter 2: Interactive Features
2-5
Page Header / Footer
The page header is the first section that will be printed when a report is run. Typically a header contains some general information, such as:
• the report title • the user who printed the report • date and time information • page number and or number of pages • company logo
The page header will normally be printed at the beginning of the report. However you can have it printed on every page by setting the page header's properties.
The Page Header and Page Footer sections correspond to the Header and Footer section of the Classic client, the only difference being that in the RoleTailored client they are only defined once.
Note: if you add paging information to a header, it might not always be correct when you run the report in preview mode, especially if the report has a long body section. If you print the report to a printer, the information will be correct. For more information about this, see the section Print Preview and Print Layout.
Design a Header/Footer Section
If no header or footer has been defined yet for the report in Visual Studio, only the body section will appear. Headers and footers can be designed in the same way as body sections. To add a control to a header section, grab the control in the Visual Studio Toolbox and drag it to the header section. Alternatively, select the control in the Toolbox, then click the Header section to insert the control.
You cannot add data region controls (table, matrix, chart, list and subreport) to a header or footer.
You can use the Header or Footer properties to add borders, background images, or colors, or to adjust the width of the header. To access the Header or Footer properties, right-click the corresponding section and select Properties.
Delete a Page Header or Page Footer
Headers and footers can be removed easily using the same toggle items that you use for adding a header or footer. By removing a header or footer section, you delete it from the report. Any controls that you previously added to the section will be destroyed. If you subsequently add the header or footer section again, the controls will not reappear.
To delete an existing Page Header or Page Footer section, select Report, then choose respectively Page Header or Page Footer in the menu
Microsoft Official Training Materials for Microsoft Dynamics ® Your use of this content is subject to your current services agreement
Report Design in Microsoft Dynamics® NAV 2009
2-6
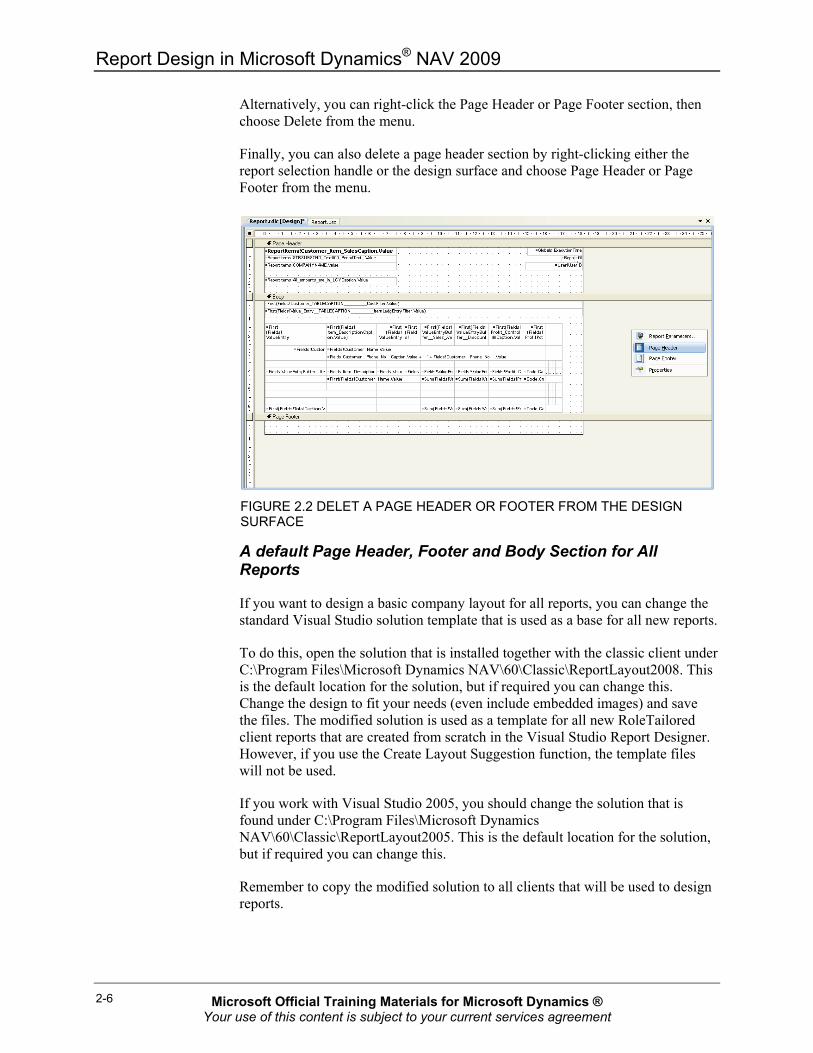
Alternatively, you can right-click the Page Header or Page Footer section, then choose Delete from the menu.
Finally, you can also delete a page header section by right-clicking either the report selection handle or the design surface and choose Page Header or Page Footer from the menu.
FIGURE 2.2 DELET A PAGE HEADER OR FOOTER FROM THE DESIGN SURFACE
A default Page Header, Footer and Body Section for All Reports
If you want to design a basic company layout for all reports, you can change the standard Visual Studio solution template that is used as a base for all new reports.
To do this, open the solution that is installed together with the classic client under C:\Program Files\Microsoft Dynamics NAV\60\Classic\ReportLayout2008. This is the default location for the solution, but if required you can change this. Change the design to fit your needs (even include embedded images) and save the files. The modified solution is used as a template for all new RoleTailored client reports that are created from scratch in the Visual Studio Report Designer. However, if you use the Create Layout Suggestion function, the template files will not be used.
If you work with Visual Studio 2005, you should change the solution that is found under C:\Program Files\Microsoft Dynamics NAV\60\Classic\ReportLayout2005. This is the default location for the solution, but if required you can change this.
Remember to copy the modified solution to all clients that will be used to design reports.
Microsoft Official Training Materials for Microsoft Dynamics ® Your use of this content is subject to your current services agreement

Chapter 2: Interactive Features
2-7
Data Fields in Page Header and Page Footer
From chapter 1, you know that Visual Studio Report Designer has a serious limitation: data fields cannot be added to a Page Header or Footer. Although in design mode you will be able to add a textbox to a Page Header, drag a field from the dataset to it, and even import the RDLC data in the report, you will not be able to save the report in Report Designer. Instead an error message will be displayed:
This looks like a very serious limitation. However, there is a scenario to get around this. The scenario can be found in various standard reports:
1. Add the data elements to the body section, and make them invisible by using the visible property of their textbox. (The control should refer to the value of a field in the Fields collection.)
2. Add a new textbox control to the Page Header. 3. Right-click the textbox in the Page Header and select Expression.
The Expression window will appear. 4. After the = sign, enter the following text: ReportItems!
The system will automatically display a list of all available textboxes in the ReportItems collection.
5. From the ReportItems collection, select the (invisible) textbox from the body section containing the data element to display in the header.
6. Enter a "." Now a list with properties is displayed. Elements in the ReportItems collection have only one property: Value.
7. Click the Value property to add it to the expression. The entire expression should look like this. =ReportItems!<TableFilter>.Value (where TableFilter represents the name of the textbox control in the body section.)
8. Click OK to close the Expression window.
This scenario can be used to have filter expressions displayed in a page header. Using the GETFILTERS instruction, you can put the filter criteria in a text variable. The text variable must then be added to the visual design in Section Designer, to make it appear in the dataset. Next, you can add it to the body section of the RDLC layout, as a separate textbox or as a table column. Finally, you can use the ReportItems collection to retrieve the contents of the invisible textbox in the Header section.
If you change invisible controls to a section, it is recommended to change the color of the controls, in order to distinguish them from the visible report controls.
When using this scenario, it is recommended to add the variable as an invisible column to a table in the body section. As tables might span several pages, the variable (and its contents) will travel along and will always be available.
Microsoft Official Training Materials for Microsoft Dynamics ® Your use of this content is subject to your current services agreement

Report Design in Microsoft Dynamics® NAV 2009
2-8
If you place the filter string in a separate textbox (instead of a table column), the reference to the textbox and its value might be lost as soon as the report spans more than one page. (The textbox will normally be printed only once.) However, you can have the text box travel along with the table and have it repeated on every page:
1. Right-click the textbox control and select Properties. 2. Check the Repeat report item with data region on every page. 3. In the Data Region field, select the data region that the textbox
control is connected with. The text box will now be repeated on all pages spanned by the table.
The ReportItems collection contains the text boxes within the report. Items within the ReportItems collection have only one property: Value. The value for a ReportItems item can be used to display or calculate data from another field in the report.
Demonstration: Add a Page Header or Footer
Mort has to add a report header to his reports. In order to do that, he adds a Page Header section to the report.
1. Open the report in Visual Studio. 2. To add a Page Header section, select Report, Page Header in the
menu 3. To add a Page Footer section, select Report, Page Footer in the
menu.
As an alternative solution, you can use the following procedure to add the Page Header or Page Footer section:
1. Right-click either the report selection handle or the report design surface
2. Select Page Header and/or Page Footer in the menu.
Microsoft Official Training Materials for Microsoft Dynamics ® Your use of this content is subject to your current services agreement

Chapter 2: Interactive Features
2-9
A header and/or footer will now be added to the report. In both menus, Page Header and Page Footer are toggle items; they can be used both for adding and deleting the section.
FIGURE 2.3 AN ROLETAILORED CLIENT REPORT WITH A PAGE HEADER AND PAGE FOOTER
Group Header / Footer
In the Classic client, the GroupHeader and GroupFooter sections are used for printing grouping information and subtotals. Both sections were respectively printed at the start and at the end of each group of records. While the GroupHeader section was used to display the grouping criteria, the GroupFooter was used for printing subtotals. Using these sections (in combination with the DataItemTableView, TotalFields and GroupTotalFields properties) is a requirement for having correct totals and groups in the classic client.
In the RoleTailored client, group headers and group footers are not displayed using separate sections. Instead they can be added as additional rows or columns to data region controls (rows for a table, and columns in a matrix control).
Microsoft Official Training Materials for Microsoft Dynamics ® Your use of this content is subject to your current services agreement

Report Design in Microsoft Dynamics® NAV 2009
2-10
After adding a group header and footer, two new rows have been added to the table (one immediately above the detail row, and on immediately below). These are the Group Header and the Group Footer row. On the row handle, you see the group row icon containing the group level. This is very convenient if you want to group data on multiple levels. For example, if you want to print a list of customers, grouped by salesperson and then by country/region. On the detail row, you will have the details of your customer (no., name, phone no.). The first group you add will be a grouping on salesperson code. The second group you insert will be a grouping on country/region code.
Grouping on Multiple Levels
It is possible to group data on several levels. Take the example of the customer list, grouped by country/region by salesperson. This can be done by inserting multiple groups. Please note that if you add multiple group headers, the new header will be created on the lowest possible level.
First, you select the detail row and insert a group to group on Country/Region Code. Secondly, you select the detail row again and insert a second group to group on Salesperson Code. Note that the second group will be created inside the first group. In order to have the correct grouping, make sure to start with the highest grouping level. If you need to insert a new grouping between two other grouping levels (e.g. customers by country by continent by salesperson), then be sure to select the highest grouping level (the salesperson group) before inserting the new continent group.
Design a Group Header or Group Footer
To add data to a group header or footer, select an element in the dataset and drag it to a cell in the group header or footer. (You can obtain the same result by setting a value for the Value property of the header or footer cell.) You can also take values from cells in other rows (for example the detail row).
Note that if you add a decimal value to the group header or footer, Visual Studio Report Designer will automatically add the Sum operator to the field value. As a consequence, the subtotal for the corresponding group will be displayed. This way, you can group data on any field and have subtotals calculated, without having to define any keys (with SumIndexFields) nor to set sorting, grouping and totaling properties in Microsoft Dynamics NAV. This is in fact a huge benefit compared to the Classic Report Designer.
Delete a Group Header or Group Footer
Follow the instructions below, to delete a group header and the corresponding footer:
1. Right-click the row handle of the group header or footer to delete 2. Choose Delete Group.
In this case, both the group header and its footer will be removed.
Microsoft Official Training Materials for Microsoft Dynamics ® Your use of this content is subject to your current services agreement

Chapter 2: Interactive Features
2-11
If you want to delete a group footer without the corresponding group header, proceed as follows:
1. Right-click the row handle of the correct group level. 2. Select Edit Group. 3. In the Grouping and Sorting Properties window, uncheck the
Include group header or Include group footer options to remove the header and/or the footer.
4. Click OK to apply the changes.
As an alternative solution, you can manage the groups (add, edit and delete) in the Table Properties window.
1. Select any cell in the table, then press Esc. (If you want, you can obtain the same result by selecting the table control in the Properties window.)
2. Right-click the grey dotted table border and select Properties. 3. Click the Groups tab. Here you see a list of all groupings that have
been defined for the table. 4. Use the buttons in the window to add new groups, delete and edit
existing groups or to change the order of the groups. 5. Click OK to apply the changes and close the Table Properties
window.
Demonstration: Add a Group Header or Footer
To group the data and display totals in the report, Mort will use group headers and group footers.
The following example shows how to add a group header to a table control in the RoleTailored client.
1. Select a detail row in a table. 2. Right-click the row handle and select Insert group. The Grouping
and Sorting Properties window will be displayed. 3. On the General tab, in the Group on list box, select the fields or
values on which you want to group the data in the table. 4. Use the checkboxes in the bottom of the window to control the
behavior of the group header. When you add a group header, a group footer will be inserted at the same time. If you uncheck the Include group footer field, the group footer will not be created.
5. Click OK to close the Grouping and Sorting Properties window.
Microsoft Official Training Materials for Microsoft Dynamics ® Your use of this content is subject to your current services agreement

Report Design in Microsoft Dynamics® NAV 2009
2-12
Table Header / Footer
In Classic client, the body section of a data item is printed for every record in a data item. In RoleTailored client, there is only one body section, which is printed once. In order for a report to show multiple records from a table, a repeating data control such as a table is needed.
A table is a repeating data region control. Unlike a line or a rectangle, a table control (and more in particular the detail row) is used to loop through the records of a table and display data. In addition; the detail row is designed (normally) only once and then repeated for every record in the recordset. You can add multiple tables to the body section.
A table can have three types of rows:
Row Type Description Table Header
The table header is printed once for each table. This is a typical place to put captions. If you drag an item containing text from your data set into a header, the environment automatically adds “First” to it. “First” means that it will show the first value in the data set, as opposed to looping through each record in the data set. Tables can have multiple table headers.
Table Details
The detail row is used to display data from the dataset. It can be compared to the body section of the classic Section Designer. Tables can have multiple detail rows.
Table Footer
The table footer is printed once for each table. It is a typical place to insert subtotals or grand totals. If you drag an item containing a numerical value from your dataset into a footer, the environment automatically adds “Sum” to it, and the report will print the total from the report. Tables can have multiple footers.
By combining table headers and footers with group header and footers, you can print any total you want, even if you don't have any corresponding table keys in Microsoft Dynamics NAV.
When you add a table header and footer, two new rows are added to the table (one immediately above the detail row, and on immediately below). These are the table header and the table footer row. In case group headers and or footers have been defined for the table, the table header will be inserted above all group headers and the table footer will appear after all group footers.
On the row handle, you see the table header or table footer row icon.
Microsoft Official Training Materials for Microsoft Dynamics ® Your use of this content is subject to your current services agreement

Chapter 2: Interactive Features
2-13
Design a Table Header or Table Footer
To add data to a group header or footer, select an element in the dataset and drag it to a cell in the table header or footer. (You can obtain the same result by setting a value for the Value property of the header or footer cell.) You can also take values from cells in other rows.
Note that if you add a decimal value to the header or footer, Visual Studio Report Designer will automatically add the Sum operator to the field value. As a consequence, the grand total for the table will be displayed. This way, you can have totals calculated, without having to define any keys (with SumIndexFields) nor to set sorting, grouping and totaling properties in Microsoft Dynamics NAV. This is in fact a huge benefit compared to the classic report design.
Delete a Table Header or Table Footer
Follow the instructions below, to delete a table header and the corresponding footer:
1. Right-click the row handle of any row in the table. 2. Click the toggle items Table Header and/or Table Footer
In this case, all table headers and footers will be removed.
If you want to delete an individual header or footer row, proceed as follows:
1. Right-click the row handle of the correct table header or footer. 2. Select Delete Rows.
Only the selected row will be deleted.
Demonstration: Add a Table Header or Footer
Mort will add a table header and a table footer row to display the field captions.
The following example shows how to add a table header to a table control.
1. Select a detail row in a table. 2. Right-click the row handle and select Table Header or Table Footer.
Repeat Headers and Footers on New Pages
In Classic client, you can have headers and footers repeated on every page by setting the PrintOnEveryPage property on the corresponding sections. In RoleTailored client, you can do this by setting the RepeatOnNewPage property on each of the individual header and footer rows.
Microsoft Official Training Materials for Microsoft Dynamics ® Your use of this content is subject to your current services agreement

Report Design in Microsoft Dynamics® NAV 2009
2-14
As an alternative solution, you can define this for all headers or footers at the same time in the Table Properties window.
1. Select any cell in the table, then press Esc. (If you want, you can obtain the same result by selecting the table control in the Properties window.)
2. Right-click the grey dotted table border and select Properties. 3. Set the RepeatHeaderOnNewPage and RepeatFooterOnNewPage
properties. 4. Click OK to apply the changes and close the Table Properties
window.
Changing the Table Properties window will cause the properties of the underlying table and the individual table rows to change. Setting the RepeatOnNewPage property on an individual table header row will cause the table property RepeatHeaderOnNewPage to get the same value.
Note: the Repeat Group Header option is a function that will only work in the report viewer. It will not apply when exporting the report to Excel and or PDF.
Freezing the Header Rows in Preview Mode
If you want the header rows to remain visible when scrolling in a report, you can also define this in the Table Properties window. Note that when you export the report to Excel, the worksheet window in Excel will be split in multiple resizable panes. The Page Header section will be put in one pane (and remain visible) while the body section will be put in another.
Colors in Headers and Footers
Unlike reports for the classic client, reports for the RoleTailored client can be printed in color. Although you can define colors for controls in the Section Designer, colors will not be printed when the report is run. The only way to print colors in the Classic Client is to use Image or PictureBox controls.
Using Colors in Headers and Footers
In order to fine-tune the layout and to get a beter view on the contents of the report, you can work with colors. Colors allow to emphasize specific pieces of data and also to reflect the structure of the content. For example, you can have the Unit Price printed in blue and the Unit Cost in red. Or you can print a specific group header row (and the corresponding group footer) with a green background color, so you can easily distinguish the logical structure of the report (everything between the two green rows is a logical group.)
You can define the colors for each individual control by setting the BackgroundColor and Color properties. The Color property defines the text color; the BackgroundColor property determines the background color of the control. By default the BackgroundColor property is set to Transparent and the Color is set to Black.
Microsoft Official Training Materials for Microsoft Dynamics ® Your use of this content is subject to your current services agreement

Chapter 2: Interactive Features
2-15
In Visual Studio Report Designer it is also possible to set the BackgroundColor and Color properties for multiple controls at the same time. If you select multiple individual controls or an entire table row or column, you can change the background and text color for all these controls by setting both properties. This is not possible in Classic Report Designer;
Beside the BackgroundColor and Color properties, there are a number of other properties (TextAlign, CanGrow, CanShrink) and property collections (Font, Padding, BorderColor, BorderStyle, BorderWidth...) that can be defined for multiple controls at the same time (provided that the properties are common to all selected controls).
Adding Texts to Headers and Footers
As you work with headers and footers and subtotals on different levels, it might be interesting to print extra "labels" explaining the data printed in the report. For example, next to each subtotal you can print a text like "Total for Customer 10000", "Total for Country AT". Or you can add the name of the customer to a separate cell in the "Customer No." group header. The additional texts can be a fixed text, an element from the dataset, or a combination of both.
To print a text in a specific cell, you simply select the cell and change its Value property. It is recommended to use the Expression window, as it allows you both to enter text and to select variables, functions... from a list.
You should bear in mind that the width of the cell containing the text depends on the size of the column in the table detail row. If you want to include longer texts in a header or footer row, you might have to merge the cells from the row before inserting the text. To merge cells, select the necessary cells, right-click any of the selected cells and choose Merge Cells. If you want to split the cells, right-click the merged cell and select Split Cell.
To enter a custom text in the merged cell, proceed as follows:
1. Select the merged cell. 2. Select its Value property in the Properties window. 3. From the dropdown list, select <Expression...>. The Expression
window will appear. 4. In the listbox the current cell value - if any - is displayed. If the cell
is empty, only the "=" sign will be displayed. Make sure not to delete the "=" sign. It indicates that the cell value is an expression and not a fixed text. If you remove the "=" sign, all text that you enter in the expression window will be displayed as plain text.
Microsoft Official Training Materials for Microsoft Dynamics ® Your use of this content is subject to your current services agreement

Report Design in Microsoft Dynamics® NAV 2009
2-16
5. In the listbox, you can now compose an expression consisting of fixed texts and/or variables, functions, dataset elements, etc. Fixed text should be placed between double quotes. To use a dataset element, function, variable..., select the element in the corresponding category and double-click it. If the text consists of multiple parts, you can use the ampersand (&) to concatenate the parts.
6. Click OK to close the Expression window. The expression will be copied to the Value property.
Finally, you can change the alignment of the texts by setting the individual cell properties.
In the same way, you might want to have the customer name printed next to the customer number. To do this, merge the necessary cells (if necessary) then drag the Customer Name from the dataset to the right cell in the group header.
Using Pictures in a Report
Pictures can be displayed using the Image control. In the RoleTailored client, you can work with three sources of pictures:
• embedded pictures • external pictures • database pictures from a table in Microsoft Dynamics NAV
Embedded Pictures
Embedded pictures are pictures that are stored in the report itself.
To import a picture in the report, select Report, Embedded Images. Click the New Image button, select an image file, and click OK.
External Pictures
External pictures are not stored in the report or in a database. Instead they come from a public external location, like for example the Internet.
External pictures are supported in Microsoft Dynamics NAV 2009 SP1. To use external pictures, the EnableExternalImages property must be set to True. Using external pictures is not recommended for security reasons.
Database Pictures from Microsoft Dynamics NAV
In the report you can also work with pictures that come from the NAV database, for example to print an item catalog including the item pictures, or even to print the company logo that is stored in the Company Information table.
Database pictures can be added to Header, Body and Footer sections. However, adding database pictures to headers and footers requires using code and expressions.
Microsoft Official Training Materials for Microsoft Dynamics ® Your use of this content is subject to your current services agreement

Chapter 2: Interactive Features
2-17
Image Properties
When working with pictures, there are three important properties:
Source: This property indicates the source of the picture. Supported options in Microsoft Dynamics NAV 2009 are Embedded and Database. It is also possible to use an expression to define the picture source.
MIME Type: This property contains the MIME Type of the picture; MIME is an Internet standard for describing the contents of a file. The property is used in HTML to render the picture in the correct way. Examples are image/bmp, image/gif, image/jpeg, application/pdf, application/msword... If you want to use pictures from a database table, you will need to set this property to image/bmp (as pictures are stored as bitmaps in Dynamics NAV).
Value: This property contains the name of the picture that is displayed in the image control. The property can contain a picture name (for embedded pictures) or a field from the dataset (for database pictures).
MIMEType applies only if the Source property is set to Database. If the Source property is set to External or Embedded, the value of MIMEType is ignored.
Adding Pictures
To add a picture to a report, you first have to add a control to the report that can contain a picture. In the Section Designer, there were two controls that can be used to display images. In the Visual Studio Report Designer, there is only one control: the image control.
Adding an Embedded Picture
To add an embedded picture, select Report, and then select Embedded Images from the menu bar. In the Embedded Images window, you see a list of all pictures that have been stored in the report. Here you can delete existing pictures and/or add new ones. To delete an existing image from the report, select the image and click the Delete button.
Embedding pictures can be done at any time, even without having any image controls in the report.
As a next step, you will add an image control and link the control to an embedded image. After you have added the Image control, you can use the properties of the Image control to link the control to an image. Afterwards, the selected image will be shown in the Image control. By default, the Image control will be resized to the image's proper size. If you resize the Image control, you will see that the Sizing property is changed from AutoSize to Fit.
Note that the MIME Type property is set automatically. It contains the value of the MIME Type property as it has been defined in the Embedded Images window. You can change the MIME Type in the Properties window; however the changes will be overwritten.
Microsoft Official Training Materials for Microsoft Dynamics ® Your use of this content is subject to your current services agreement

Report Design in Microsoft Dynamics® NAV 2009
2-18
Embedded pictures can be used in header, body and footer sections.
Adding an External Picture
The procedure for adding an external picture to the report is almost identical to the procedure for adding embedded images. You use the Image control to display the picture then set the properties for the image control. You must set the Source property to External and the Value property to the exact external location of the picture.
However, to enable the use of external pictures, you must set the report property EnableExternalImages to TRUE. (The default value for the property is FALSE.) If you don't set this property and use an external picture in the report, an error message will be displayed.
External pictures can be used in header, body and footer sections.
Remember that external pictures are supported in Microsoft Dynamics NAV 2009 SP1. Furthermore, the use of external images is not recommended for security reasons.
Adding a Picture From a Table in Microsoft Dynamics NAV
Like with an embedded or external image, you can use the Image control to display pictures that are stored in a table in Microsoft Dynamics NAV. Typical examples are the Company Information and the Item table.
The procedure for using database pictures depends on the section it will be added to.
Adding a Database Picture to the Body
The procedure is the same as for an embedded image: you insert an Image control and link it to a picture using the control properties. Instead of linking to an embedded image, you will link to an element in the dataset.
Prerequisite of course is that the Picture element is part of the dataset, which implies that the picture is also part of the classic design.
If you want to print a "loose" picture (such as a company logo), you can work with a single Image control. If you want to print a picture as part of a record, you will have to work with a repeating container (such as a table control), and insert an image control in a table cell.
Microsoft Official Training Materials for Microsoft Dynamics ® Your use of this content is subject to your current services agreement

Chapter 2: Interactive Features
2-19
Adding a Database Picture to the Header or the Footer
Suppose you want to add the company logo to a report. From chapter 1, you know that the Visual Studio Report Designer has a serious limitation: data fields cannot be added to a Page Header or Footer.
As an alternative, you can convert the database picture into an embedded picture. You could try to include it in the Body section, but the body section will not function as a real header. However, there is a way to use database pictures in a Header section, but it requires using custom code and expressions. This will be demonstrated in Chapter 3.
Other Image properties
After you inserted the Image control, you can use the other properties to further fine-tune the layout and the position of the image control.
Background Images
You can use an image as a background image in the body of the report or in a rectangle, text box, list, matrix, or table. A background image has the same properties as an image. You can also specify how the image is repeated to fill the background of the item.
If you define a background image for the report body, but not the page header or footer, HTML reports will automatically use the same background image in all three regions of the report. If you do not want to use the background image in the header or footer, you must explicitly define a different image for those regions. If you do not want any image to appear in those regions, you can create and assign a small transparent image to the header or footer to create the effect of having no image at all.
To add a background image, do the following:
1. Open the client report definition (.rdlc) file in graphical design mode. 2. Select the report item to which you want to add a background image.
Note: Background images apply only to rectangle, text box, table, matrix, list, or report body items.
Microsoft Official Training Materials for Microsoft Dynamics ® Your use of this content is subject to your current services agreement

Report Design in Microsoft Dynamics® NAV 2009
2-20
3. In the Properties window, expand BackgroundImage, and then do the following: For Source, select Embedded, External or Database. For Value, type or select an expression that evaluates to the source of the image. If the Source property is set to Embedded, the expression must evaluate to the name of an image that is embedded in the report. If the Source property is set to Database, the expression must evaluate to a field that contains binary image data. If the Source property is set to External, remember to set the EnableExternalImages property to True. For MIMEType, select the appropriate MIME type for the image.
4. For BackgroundRepeat, select Repeat, NoRepeat, RepeatX, or RepeatY.
Demonstration: Adding an Image Control
To add an image control to the report, follow the list of steps below:
1. Open the report in Visual Studio. 2. In the Toolbox window, select the Image control. 3. Click the Header, Body or Footer section to insert the image control.
Demonstration: Adding an Embedded Picture to a Report
To add an embedded picture to the report, proceed as follows:
1. Click New Image. 2. In the Import Image dialog box, select the image to embed in the
report. You can select the following image file types: *.bmp, *.gif, *.png, *.jpg and *.jpe.
3. Click Open to import the file. Now the newly embedded image will be added to the Embedded Images window. The name and MIME type of the image are imported automatically into the Name and MIME Type columns. They can be changed if you want.
4. Click OK to close the window and save the newly embedded image. Click Cancel to cancel the embedding.
Microsoft Official Training Materials for Microsoft Dynamics ® Your use of this content is subject to your current services agreement

Chapter 2: Interactive Features
2-21
Demonstration: Display an Embedded Picture in a Report
1. Select the image control. 2. In the Properties window, set the Source property to Embedded. As
a consequence, all embedded images will be available in the Value property.
3. In the Properties window, click the Value property. Select the image from the list.
Demonstration: Display a Database Picture in the Body Section
1. Select the image control. 2. In the Properties window, set the Source property to Database. As a
consequence, all fields from the dataset will be available in the Value property.
3. In the Properties window, select the corresponding field from the dataset.
Print Preview and Print Layout Preview mode is a new feature in Microsoft Dynamics NAV 2009. This section explains the difference between the two modes: Print Preview and Print Layout.
How Does It Work?
When you run a report in the RoleTailored Client, a request page appears. In this page you can have three options:
• Cancel the report • Print the report • Preview the report.
Cancel will close the popup and you return to the RoleTailored Client. Print will send the report to the printer, but Preview will open the Report Viewer.
Besides these options in the request page you also have the possibility to apply filters to the report or fill in options in the options tab, if there were any options defined for the report.
The Report Viewer allows you to preview the report before sending it to the printer, or saving it as a PDF or Excel file.
Microsoft Official Training Materials for Microsoft Dynamics ® Your use of this content is subject to your current services agreement

Report Design in Microsoft Dynamics® NAV 2009
2-22
At the top of the Report Viewer window there is a toolbar. In this toolbar you have a number of buttons:
FIGURE 2.4 THE REPORT VIEWER TOOLBAR
One of these buttons is the Print button, which will allow you to send the report to the printer.
At the right side of the Print button, there is a button called Print Layout. If you click this button, the report will be regenerated in Print Layout mode. In this mode you can see exactly how the report will be printed on paper (in contradiction to the Print Preview mode, where you cannot see the width of the page and the page breaks.) By clicking the Print Layout button again, you can switch back to Print Preview mode.
Working with Visibility Options The new reporting solution in Microsoft Dynamics NAV 2009 takes advantage of the more advanced reporting functionalities of Microsoft SQL Server Reporting Services. This lesson describes the interactive features (such as visibility options, interactive sorting and document maps) that can be added to reports for the RoleTailored client.
More information regarding browser support can be found on http://msdn.microsoft.com/en-us/library/ms251673.aspx
Microsoft Official Training Materials for Microsoft Dynamics ® Your use of this content is subject to your current services agreement

Chapter 2: Interactive Features
2-23
For the Classic Client
In the Classic client, it is possible to influence the content of a report by using a request form. A typical scenario would be:
• You use the request form to offer a number of printing options to the user.
• You design a number of sections to cover the necessary printing layouts.
• In the OnPreSection trigger you use the CurrReport.SHOWOUTPUT() statement together with the variables from the request form to print or hide a section based on the user's preference.
Although this functionality involves a lot of design work to create the different sections (to cover all combinations of user options), it can often cover the user's needs. However, it has one disadvantage: sometimes the user has to spend a lot of time browsing and scrolling through the report, especially in large reports with grouping on different levels. But here you are faced with a dilemma: the report contains information that you don't want to see, but that can not be omitted for some reason (like totaling). Basically you have the option whether or not to include some data. If you don't include it, you don't have the information you need. If you include it, you might get overwhelmed by a huge amount of data. Moreover, the report can become difficult to analyze when the information of a specific data item is spread over several pages.
For the RoleTailored Client
The RoleTailored client offers a very nice visibility feature that gives the user the possibility of dynamically expanding and collapsing groups of data. This allows the user to gradually step into the content of a report, making the report complete and easier to analyze.
Let's look at report 123456700, Sales by Salesperson - L1.1. The report contains an overview of the total sales and profit amount, broken down by salesperson, country/region code, customer number and document type. Suppose you want to have a look at the sales amount realized by John Roberts, and particularly in Germany. You would like to see the details of Germany, and at the same time, you want to see the correct totals for all countries/regions.
If you print the report in Classic design, you see the details of all customers and countries. You cannot filter the data item, because you would lose the details for the other countries, resulting in wrong totals. Once the information is printed, there is no way to collapse specific sections.
The same comment applies to the RoleTailored client layout of the report. You see all details, even the details that you don't want to see at this time.
In the next paragraphs you will see how to work with visibility options.
Microsoft Official Training Materials for Microsoft Dynamics ® Your use of this content is subject to your current services agreement

Report Design in Microsoft Dynamics® NAV 2009
2-24
The Visibility Feature
The Visibility feature is a toggle feature you can use to dynamically show or hide data regions using the Expand/Collapse technique.
When you add the visibility feature to a specific data region, the data region will get a small + icon. If you click it, the region will be expanded, and at the same time, the icon will change from a + to a -. If you click it again, the region will be collapsed and the icon will change back into a +.
Visibility options defined for a group header will also apply to the corresponding group footer (and vice versa).
Implement the Toggle Visibility functionality
The visibility feature is typically used in data region controls, to influence the visibility of grouped data (table rows, matrix columns). Although it can be defined for each cell, you normally define it by table row. Often you will define visibility options for all levels except the highest data level. Visibility options are often defined in a cascading scenario.
Visibility and Totaling
So far you have added visibility options for the different groupings. Still you need to expand the different groups and look at the group footers in order to know the subtotals for each group. To avoid this, you can have the totals displayed in the group header row, so you see the subtotals without having to expand the individual groups. (In this case, the group footers become obsolete in a way.)
To add the totals to the group header, select the fields in the dataset and drag them to the correct cell in the group header. (You can also copy or move the fields from the footer row.) When you add a numerical field to a header or footer, the Sum() function will be added automatically. As a result, the header will contain the same information as the footer. You can now disable the individual footers, as described in the section Delete a Group Header or Group Footer section.
Demonstration: Adding Toggle Visibility Options
In report 123456700, you would define visibility options for the Country/Region Code, Customer No. and Document Type group headers and the table details row (showing the individual customer ledger entries).
The following list of steps shows how to define visibility options for a table row:
1. Right-click the row handle for the table row you want to add visibility options to. In this case, select the Country/Region Code group header.
2. Select Edit Group.
Microsoft Official Training Materials for Microsoft Dynamics ® Your use of this content is subject to your current services agreement

Chapter 2: Interactive Features
2-25
3. On the Visibility tab, select an initial visibility state for the data level. Default state is Visible (which means that the data region will be expanded). If you select Hidden, the data region will appear collapsed. In this case, select Hidden.
4. Check the Visibility can be toggled by another report item option. 5. In the Report Item field, select the control that can influence the
visibility of the selected table row. In this case, select Customer__Salesperson_Code_.value.
6. Click OK to close the Grouping and Sorting Properties window.
Now you have defined the visibility for one level. You can repeat the procedure above to define it for the remaining levels. If you run the report afterwards, the result will look similar to this:
FIGURE 2.5 ROLETAILORED CLIENT REPORT WITH VISIBILITY OPTIONS
You notice that the report shows only the two salespersons. The details for the Country/Region Code grouping (and all underlying groupings) are hidden. If you click the Expand/Collapse icon, the details of the next level are shown; if you click the button again, the details are hidden again.
You can have the initial visibility state determined by an expression. This is often used to influence the visibility of individual controls. Using expressions will be described in Chapter 3.
Microsoft Official Training Materials for Microsoft Dynamics ® Your use of this content is subject to your current services agreement

Report Design in Microsoft Dynamics® NAV 2009
2-26
Interactive Sorting Sorting data in the Microsoft Dynamics NAV Classic client is strictly related to keys. The different sorting orders for data must be defined as keys. After you have defined a key, you can use it in tables, forms, reports... to sort data in the desired order.
In reports, you can either let the user define the sorting order, or you can predefine the sorting order (using the DataItemTableView property on data item level). In any way, the sorting order is defined before the report is printed. If a different sorting order is required, you must run the report again.
The RoleTailored client supports interactive sorting. This means that you can add sort buttons to the data columns which allow you to change the sorting of the data after the report is run.
When you view the report, columns that support interactive sorting have arrow icons that change to indicate the sort order. The first time you click an interactive sort button, items are sorted in ascending order. Subsequent clicks toggle the sort order between ascending and descending order.
Working with interactive sorting allows you to support multiple user requirements while minimizing development time.
What is Interactive Sorting
Interactive sort can be defined on multiple columns. In reports without grouping, the data will be sorted according to the selected column and the selected sort order (ascending or descending). In this case interactive sorting will affect the whole data region, from top to bottom and from left to right. To some extent, you can say that interactive sorting here equals interactive grouping: data will be sorted and also grouped differently (as each record will be a group on its own).
In reports with grouping, interactive sorting will depend on grouping. The interactive sort functionality is limited to a specific group of data. By changing the sorting of a specific group, you will affect the sorting of the data in the current group (and underlying groups), but it should not affect the sorting and will not affect the grouping that have been defined on a higher level. In case of reports with grouping, it is important to define the correct sorting scope.
For each column the user can select the sort order. For example; you can have the first column sorted in ascending order, the second in descending order, the third in ascending order again...
Visibility options might have a side-effect on interactive sorting: when you change the sorting on a column, the data for the current group will be refreshed, taking into account the Initial visibility settings. When combining interactive sorting and visibility options, you have to remember to first select the right sorting order for the different columns before expanding the data groups.
Microsoft Official Training Materials for Microsoft Dynamics ® Your use of this content is subject to your current services agreement

Chapter 2: Interactive Features
2-27
Demonstration: Adding Interactive Sorting - No Grouping
Mort needs to add interactive sorting to report 101, Customer - List, so that customers can be sorted interactively on Salesperson Code.
The following list of steps shows how to activate interactive sorting for a column in a report without grouping.
1. Open report 101 in Visual Studio Report Designer. 2. Select the header cell for the column you want to add interactive sort
to. 3. Right-click the cell and select Properties to open the Textbox
Properties window. 4. On the Interactive Sort tab, check Add an interactive sort action
to this textbox. 5. In the Sort expression field, select the name of the field to sort on.
FIGURE 2.6 INTERACTIVE SORTING ON SALESPERSON CODE
6. Click OK to close the Textbox Properties window.
Exit Visual Studio, save and import the RDLC changes, save and compile the report in the Report Designer and run the report.
Demonstration: Adding Interactive Sorting - Grouping (Group Header Field)
After he introduced interactive sorting in some reports, Mort receives similar requests for all kind of reports. Michael asks him to change the sorting in report 113, Customer/Item Sales, so that he can sort cusomer No. In addition, Michael would like to sort the data by Item No. and by Item Description.
Microsoft Official Training Materials for Microsoft Dynamics ® Your use of this content is subject to your current services agreement

Report Design in Microsoft Dynamics® NAV 2009
2-28
Mort will first define the interactive sorting on the Customer No. field, which is a group header field.
The following list of steps shows how to activate interactive sorting for a group header field in a report with grouping:
1. Open report 113 in Visual Studio Report Designer. 2. Select the header cell for the column you want to add interactive sort
to. In this case, interactive sort must be added to the Customer No. column. Note that the Customer No. column does not contain a caption. You can either include one or leave it blank.
3. Right-click the cell and select Properties to open the Textbox Properties window.
4. On the Interactive Sort tab, check Add an interactive sort action to this textbox.
5. In the Sort expression field, select the name of the field to sort on. In this case, select =Fields!Customer__No__.Value.
6. In the Evaluate sort expression in this scope field, select the Choose data region or grouping option.
7. In the Choose data region or grouping field, select table1_group. This means that changing the sort order will only affect the selected group (and the underlying groups). It is important that you select the correct scope for each group).
FIGURE 2.7 INTERACTIVE SORT FOR A GROUP HEADER FIELD
8. Click OK to close the Textbox Properties window.
Exit Visual Studio, save and import the RDLC changes, save and compile the report in Report Designer and run the report.
Microsoft Official Training Materials for Microsoft Dynamics ® Your use of this content is subject to your current services agreement

Chapter 2: Interactive Features
2-29
Demonstration: Adding Interactive Sorting - Grouping (Detail Field)
Now that interactive sort is added to the Customer No. field, Mort needs to add interactive sorting for the Item No. and Item Description fields. Both fields appear on the detail level of the
The following list of steps shows how to activate interactive sorting for a detail column in a report with grouping:
1. Open the report in Visual Studio Report Designer. 2. Select the header cell for the column you want to add interactive sort
to. In this case, you will add interactive sort to the Item No. field. . 3. Right-click the cell and select Properties to open the Textbox
Properties window. 4. On the Interactive Sort tab, check Add an interactive sort action
to this textbox. 5. In the Sort expression field, select the name of the field to sort on.
In this case, select =Fields!ValueEntryBuffer__Item_No__.Value. 6. In the Evaluate sort expression in this scope field, select the Detail
Scope option. This means that changing the sort order will only affect the detail scope of the table.
FIGURE 2.8 INTERACTIVE SORT FOR A DETAIL ROW FIELD
7. Click OK to close the Textbox Properties window. 8. Select the header cell for the column you want to add interactive sort
to. Next, you will add interactive sort to the Item Description field. .
9. Right-click the cell and select Properties to open the Textbox Properties window.
Microsoft Official Training Materials for Microsoft Dynamics ® Your use of this content is subject to your current services agreement

Report Design in Microsoft Dynamics® NAV 2009
2-30
10. On the Interactive Sort tab, check Add an interactive sort action to this textbox.
11. In the Sort expression field, select the name of the field to sort on. In this case, select =Fields!Item_Description.Value.
12. In the Evaluate sort expression in this scope field, again select the Detail Scope option.
13. Click OK to close the Textbox Properties window.
Exit Visual Studio, save and import the RDLC changes, save and compile the report in the Report Designer and run the report.
Working with Document Maps In this lesson, you will learn how to improve the navigation of a report by working with a document map. You will learn how to define a name and map levels for the document map. In addition you will see what happens to the document map when exporting in different formats.
What is a Document Map
A document map is a built-in feature of Microsoft SQL Server Reporting Services that allows the user to quickly navigate the contents of a report. The document map has a tree view structure. It appears as a separate side pane next to the report content, and functions as a table of contents: when you click an item in the document map, the report content at the right side will be refreshed.
If you change the sorting of the report, the document map will be rebuilt to follow the sorting of the document.
The document map is will be rendered differently depending on how you will export the report:
• PDF renders a document map as the Bookmarks pane. All items in the document map are listed one after the other down the pane. There is no hierarchy to the list of links.
• Excel renders a document map as a named worksheet that includes a hierarchy of links. Report sections are rendered in separate worksheets that are included with the document map in the same workbook.
You can use a document map in a report to provide users with a way to navigate to certain areas of the report. When you view an Excel or PDF report, a document map appears along the side of the report. Clicking items in the document map refreshes the report and displays the area of the report that corresponds to the item in the document map.
You can add multiple document maps to a report. If the report contains multiple data region controls, you can add a document map for each data region control.
Microsoft Official Training Materials for Microsoft Dynamics ® Your use of this content is subject to your current services agreement

Chapter 2: Interactive Features
2-31
In this case, it is recommended to specify a document map label for each data region control.
Document maps provide a hierarchical overview of the information in the report. Often they contain entries for the different groups that have been defined.
Demonstration: Adding a Document Map
The following list of steps shows how to create a document map.
1. Open report 123456700 in Visual Studio Report Designer. 2. Right-click the top left corner of the table that you want to create a
document map for and select Properties to open the Table Properties window.
3. On the Groups tab, select the group that you want to include in the document map and click Edit.
4. In the Document map label field, select the field that you want to show in the document map. In this example, select Fields!Customer__Salesperson_Code_.Value. (You can select other fields than the one in the Group on field. For example, you can group the data on Customer No. and include the Customer Name in the document map. You can even combine multiple fields by entering an expression.)
5. Click OK to close the Grouping and Sorting Properties window. 6. Repeat steps 3 to 5 for each group level that you want to include in
the document map. 7. On the Navigation tab, enter a name for the data region in the
Document map label field. The name will allow you to identify the data region control in the document map. This is very convenient if the report contains multiple data region controls.
8. Click OK to close the Table Properties window. 9. Exit Visual Studio, save and import RDLC changes, save and
compile the report in the Report Designer.
Microsoft Official Training Materials for Microsoft Dynamics ® Your use of this content is subject to your current services agreement

Report Design in Microsoft Dynamics® NAV 2009
2-32
When you run the report in the RoleTailored Client, the result will look similar to this:
FIGURE 2.9 A REPORT WITH A DOCUMENT MAP
Notice the Expand button in the top left corner. Unfortunately this does not display anything in Microsoft Dynamics NAV 2009 RTM. This will be fixed in Service Pack 1.
The Document Map Settings
The document map settings are defined in the Grouping and Sorting Properties window, which can also be accessed by right-clicking the row handle for each group header row then selecting Edit Group. If you define the document map settings in this way, you need to open the Table Properties window afterwards to specify a document map label for the table.
Specifying a document map label for the table is not mandatory. However it is recommended to do this when the report contains multiple data region controls. If you don't specify any names for the different tables, all document map entries will be included sequentially. The document map will loose at least some of its added value.
When you run the report in preview mode, you can click a button in the ReportViewer toolbar to enable or disable the document map.
Microsoft Official Training Materials for Microsoft Dynamics ® Your use of this content is subject to your current services agreement

Chapter 2: Interactive Features
2-33
What about reports without grouping? Even when no groups have been defined in the report, you can include a document map:
1. Right-click the row handle for the detail row and select Edit Group. 2. On the General tab, select the field that you want to add to the map
in the Document map label field. 3. In the Group on field, select the field that you want to group the data
on. This is typically the default sorting field. 4. Click OK to close the Details Grouping window.
Microsoft Official Training Materials for Microsoft Dynamics ® Your use of this content is subject to your current services agreement
Report Design in Microsoft Dynamics® NAV 2009
2-34
Lab 2.1 - Adding Visibility Options In this lab you will learn how to add interactive features to a report.
Scenario
In Lab 1.1 Mort finished the rough design of the Sales by Salesperson report. He added the necessary groups and also included subtotals and grand totals. However, Kevin has a few extra wishes. First of all, he would like to have the totals displayed on group level (with drilldown possibilities). In addition, he would like to see the Customer Name printed next to the Customer No. Finally, he asks Mort of it is possible to use different colors in the headers and footers, to ease report navigation.
Mort adds the necessary visibility options and extra information to the report.
Challenge Yourself!
Change the report so that:
• By default, only the salesperson codes are displayed. • By clicking the Salesperson Code, the Country/Region Code group
will be expanded. • By clicking the Country/Region Code, the Customer No. group will
be expanded. • By clicking the Customer No., the Document Type group will be
expanded. • By clicking the Document Type, the Customer Ledger Entry details
will be expanded. • Subtotals are displayed in Header rows. • Extra information labels such as "Total for XX" are displayed next to
the totals. • The Headers and Footers have different background colors. • The Customer Name is displayed in the Customer Group Header.
Need a Little Help?
Execute the following list of steps:
1. Add Visibility options for the Country/Region Code, Customer No., Document Type levels
2. Add Visibility Options for the Detail Row. 3. Have the Salesperson Group Totals Displayed in the Header 4. Have the Country/Region Code group totals displayed in the header 5. Have the Document Type Group Totals Displayed in the Header
Microsoft Official Training Materials for Microsoft Dynamics ® Your use of this content is subject to your current services agreement

Chapter 2: Interactive Features
2-35
6. Add an Information Label to the Customer No. Footer Row 7. Add an Information Label to the Table Footer Row 8. Change Background Colors of Headers and Footers 9. Add the Customer Name to the Customer Group Header
Step by Step Add Visibility Options for the Country/Region Code, Customer No., Document Type Levels
1. Open the RDLC layout of report 123456700 in the Visual Studio
Report Designer. 2. Right-click the top left corner of the table for and select Properties to
open the Table Properties window. 3. On the Groups tab, select the table1_group2 and click Edit. 4. On the Visibility tab, in the Initial Visibility field, select Hidden. 5. Check the Visibility can be toggled by another report item field. 6. In the dropdown list, select Customer__Salesperson_Code_. 7. Click OK to close the Grouping and Sorting Properties window. 8. On the Groups tab, select the table1_group3 group and click Edit. 9. On the Visibility tab, in the Initial Visibility field, select Hidden. 10. Check the Visibility can be toggled by another report item field. 11. In the dropdown list, select Customer__Country_Region_Code_. 12. Click OK to close the Grouping and Sorting Properties window. 13. On the Groups tab, select the table1_group4 group and click Edit. 14. On the Visibility tab, in the Initial Visibility field, select Hidden. 15. Check the Visibility can be toggled by another report item field. 16. In the dropdown list, select Cust__Ledger_Entry__Customer_No__. 17. Click OK to close the Grouping and Sorting Properties window. 18. On the Groups tab, select the table1_group4 group and click Edit.
Add Visibility Options for the Detail Row
1. Right-click the row handle for the table details row. 2. Seleect Edit Group. 3. On the Visibility tab, in the Initial visibility field, select Hidden. 4. Check the Visibility can be toggled by another report item field. 5. In the dropdown list, select
Cust__Ledger_Entry__Document_Type_. 6. Click OK to close the Details Grouping window.
Microsoft Official Training Materials for Microsoft Dynamics ® Your use of this content is subject to your current services agreement

Report Design in Microsoft Dynamics® NAV 2009
2-36
Have the Salesperson Group Totals Displayed in the Header
1. Select the subtotal for the Sales LCY field in the Salesperson Code footer row. (This is the first grouping level.)
2. Drag it to the corresponding group header (same column). 3. Select the subtotal for the Profit LCY field in the Salesperson Code
footer row. (This is the first grouping level.) 4. Drag it to the corresponding group header (same column). 5. Right-click the row handle for the Salesperson Code group footer. 6. Select Delete Rows. (The footer will be deleted.)
Have the Country/Region Code Group Totals Displayed in the Header
1. Select the subtotal for the Sales LCY field in the Country/Region
Code footer row. (This is the second grouping level.) 2. Drag it to the corresponding group header (same column). 3. Select the subtotal for the Profit LCY field in the Country/Region
Code footer row. (This is the second grouping level.) 4. Drag it to the corresponding group header (same column). 5. Right-click the row handle for the Country/Region Code group
footer. 6. Select Delete Rows. (The footer will be deleted.)
Have the Document Type Group Totals Displayed in the Header
1. Select the subtotal for the Sales LCY field in the Document Type
footer row. (This is the fourth grouping level.) 2. Drag it to the corresponding group header (same column). 3. Select the subtotal for the Profit LCY field in the Document Type
footer row. (This is the fourth grouping level.) 4. Drag it to the corresponding group header (same column). 5. Right-click the row handle for the Document Type group footer. 6. Select Delete Rows. (The footer will be deleted.)
Add an Information Label to the Customer No. Footer Row
1. In the only group footer row, select the third, fourth and fifth cell. 2. Right-click any of the selected cells and select Merge Cells. 3. Right-click the new merged cell and select Expression.
Microsoft Official Training Materials for Microsoft Dynamics ® Your use of this content is subject to your current services agreement

Chapter 2: Interactive Features
2-37
4. In the Build an expression using Visual Basic language syntax, after the "=" sign, enter "Total for Customer ", followed by the "&" sign. (be sure to include the double quotes and add a space before and after the ampersand.)
5. In the Category list, select Fields (DataSet_Result). 6. In the Field list, double-click
Cust__Ledger_Entry_Customer_No_.Value 7. Click OK to close the Expression window. 8. In the Properties window for the merged cell, set the TextAlign
property to Right. 9. In the Properties window for the merged cell, set the FontWeight
property (in the Font property collection) to Medium.
Add an Information Label to the Table Footer Row
1. In the table footer row, select the third, fourth and fifth cell. 2. Right-click any of the selected cells and select Merge Cells. 3. Right-click the new merged cell and select Expression. 4. In the Build an expression using Visual Basic language syntax,
after the "=" sign, enter "Total for all Salespersons" (be sure to include the double quotes).
5. Click OK to close the Expression window. 6. In the Properties window for the merged cell, set the TextAlign
property to Right. 7. In the Properties window for the merged cell, set the FontWeight
property (in the Font property collection) to Bold.
Change Background Colors of Headers and Footers
1. Click the row-handle for the first group header row. 2. In the Properties window, set the BackgroundColor to LightCoral. 3. Click the row-handle for the second group header row. 4. In the Properties window, set the BackgroundColor to LightGreen. 5. Click the row-handle for the third group header row. 6. Press the Ctrl key, and keep it pressed down, while you click the row
handle for the corresponding group footer row. (Now two rows have been selected.).
7. In the Properties window, set the BackgroundColor to LightSkyBlue.
8. Click the row-handle for the fourth group header row. 9. In the Properties window, set the BackgroundColor to Yellow.
Microsoft Official Training Materials for Microsoft Dynamics ® Your use of this content is subject to your current services agreement

Report Design in Microsoft Dynamics® NAV 2009
2-38
Add the Customer Name to the Customer Group Header
1. In the (blue) Customer No. group header, select the fourth andf fifth cell.
2. Right-click the cells and select Merge Cells. 3. Select the Customer_Name field in the dataset. 4. Drag it to the newly merged cell.
Microsoft Official Training Materials for Microsoft Dynamics ® Your use of this content is subject to your current services agreement

Chapter 2: Interactive Features
2-39
Lab 2.2 - Adding Interactive Sorting In this lab you will add Interactive Sorting for a number of fields.
Scenario
After implementing the Visibility options, Mort presents the new report to Kevin, who is really excited. He asks Mort to duplicate the report, but with different sortings. Mort decides to implement interactive sorting for a number of fields, so that Kevin can change the sorting of the data without having to run the report again.
Challenge Yourself!
Add interactive sorting for the following fields:
• Salesperson Code • Country Region Code • Customer No. • Posting Date • Profit (LCY)
Need a Little Help?
1. Add Interactive Sorting for the Salesperson Code Field. 2. Add Interactive Sorting for the Country/Region Code Field. 3. Add Interactive Sorting for the Customer No. Field. 4. Add Interactive Sorting for the Posting Date Field. 5. Add Interactive Sorting for the Profit (LCY) Field.
Step by Step Add Interactive Sorting for the Salesperson Code Field
1. Open report 123456700 in Visual Studio Report Designer. 2. Select the first cell in the table header row, the cell containing the
caption for the Salesperson Code field. 3. Right-click the cell and select Properties. 4. On the Interactive sort tab, check the Add an interactive sort
action to this textbox. 5. In the Sort expression field, select
=Fields!Customer__Salesperson_Code_.Value 6. In the Evaluate Sort Expression in this scope field, select Choose
data region or grouping.
Microsoft Official Training Materials for Microsoft Dynamics ® Your use of this content is subject to your current services agreement

Report Design in Microsoft Dynamics® NAV 2009
2-40
7. In the Choose data region or grouping field, select table1_Group1. 8. Click OK to close the Textbox Properties window.
Add Interactive Sorting for the Country/Region Code Field
1. Open the report in Visual Studio Report Designer. 2. Select the second cell in the table header row, the cell containing the
caption for the Country/Region Code field. 3. Right-click the cell and select Properties. 4. On the Interactive sort tab, check the Add an interactive sort
action to this textbox. 5. In the Sort expression field, select
=Fields!Customer__Country_Region_Code_.Value 6. In the Evaluate Sort Expression in this scope field, select Choose
data region or grouping. 7. In the Choose data region or grouping field, select table1_Group2. 8. Click OK to close the Textbox Properties window.
Add Interactive Sorting for the Customer No. Field
1. Open the report in Visual Studio Report Designer. 2. Select the third cell in the table header row, the cell containing the
caption for the Customer No. field. 3. Right-click the cell and select Properties. 4. On the Interactive sort tab, check the Add an interactive sort
action to this textbox. 5. In the Sort expression field, select
=Fields!Cust__Ledger_Entry_Customer_No_.Value 6. In the Evaluate Sort Expression in this scope field, select Choose
data region or grouping. 7. In the Choose data region or grouping field, select table1_Group3. 8. Click OK to close the Textbox Properties window.
Add Interactive Sorting for the Posting Date Field
1. Open the report in Visual Studio Report Designer. 2. Select the fifth cell in the table header row, the cell containing the
caption for the Posting Date field. 3. Right-click the cell and select Properties. 4. On the Interactive sort tab, check the Add an interactive sort
action to this textbox. 5. In the Sort expression field, select
=Fields!Cust__Ledger_Entry__Posting_Date_.Value
Microsoft Official Training Materials for Microsoft Dynamics ® Your use of this content is subject to your current services agreement

Chapter 2: Interactive Features
2-41
6. In the Evaluate Sort Expression in this scope field, select Detail Scope.
7. Click OK to close the Textbox Properties window.
Add Interactive Sorting for the Profit (LCY) Field
1. Open the report in Visual Studio Report Designer. 2. Select the last cell in the table header row, the cell containing the
caption for the Profit LCY field. 3. Right-click the cell and select Properties. 4. On the Interactive sort tab, check the Add an interactive sort
action to this textbox. 5. In the Sort expression field, select
=Fields!Cust__Ledger_Entry__Profit__LCY__.Value. 6. In the Evaluate Sort Expression in this scope field, select Detail
Scope. 7. Click OK to close the Textbox Properties window.
Microsoft Official Training Materials for Microsoft Dynamics ® Your use of this content is subject to your current services agreement

Report Design in Microsoft Dynamics® NAV 2009
2-42
Lab 2.3 - Adding a Document Map In this lab you will add a document map to the report. You will learn how to add a named document map
Scenario
During his conversations with Kevin, Mort notices that Kevin pays a lot of attention to the report navigation.
In the meantime, Mort has found out about document maps, a built-in feature of Microsoft SQL Server Reporting Services that allows the user to quickly navigate the contents of a report. He decides to implement a document map in the Sales by Salesperson report.
Challenge Yourself!
Add a document map to the report with the following specifications:
• The document map should be labeled "Sales by Salesperson" • The document map should contain the following data levels:
Salesperson Code, Country Code, Customer Name
Need a Little Help?
1. Define a Name for the Data Region Control in the Document Map 2. Add Fields to the Document Map
Step by Step Define a Name for the Data Region Control in the Document Map
1. Open the RDLC layout of report 123456700 in Visual Studio Report
Designer. 2. Right-click the top left corner of the table for and select Properties to
open the Table Properties window. 3. On the Navigation tab, enter "Sales by Salesperson" in the
Document map label field. This will appear as a label for the current table (data region control) in the report. This is very convenient if the report contains several tables with a document map.
Microsoft Official Training Materials for Microsoft Dynamics ® Your use of this content is subject to your current services agreement

Chapter 2: Interactive Features
2-43
Add Fields to the Document Map
1. On the Groups tab, select the table1_group1 group and click Edit. The Grouping and Sorting Properties window will appear.
2. On the General tab, select =Fields!Customer__Salesperson_Code_.Value in the Document map label field.
3. Click OK to close the Grouping and Sorting Properties window and return to the Table Properties window.
4. On the Groups tab, select the table1_group2 group and click Edit. The Grouping and Sorting Properties window will appear.
5. On the General tab, select =Fields!Customer__Country_Region_Code_.Value in the Document map label field.
6. Click OK to close the Grouping and Sorting Properties window and return to the Table Properties window.
7. On the Groups tab, select the table1_group3 group and click Edit. The Grouping and Sorting Properties window will appear.
8. On the General tab, select =Fields!Customer_Name.Value in the Document map label field.
9. Click OK to close the Grouping and Sorting Properties window and return to the Table Properties window.
Microsoft Official Training Materials for Microsoft Dynamics ® Your use of this content is subject to your current services agreement

Report Design in Microsoft Dynamics® NAV 2009
2-44
Lab 2.4 - Adding Pictures to a Report In this lab you will work with pictures. You will use embedded images and database pictures. In addition, you will add a report header and use the ReportItems collection to add data fields to the header.
Scenario
Michael, the account manager, needs to go a new customer. In order to give the customer a running start, Michael wants to provide the customer with an Item Catalog.
Michael arranges a meeting with Mort to explain the specifications of the Item Catalog. The report should have a header (printed on every page). Apart from the report title, the header should contain the Cronus company logo as an embedded picture. Furthermore, the basic company info such as company name, address, post code, city, country and VAT Registration No. should be included.
The list should also include the pictures of the items. However, as not all items have pictures, you will include the picture as a hidden field, that can be made visible when the user clicks the Item No.
Mort knows that an unfinished version of a similar report already exists for the classic client. He uses the report as a starting point to develop the RDLC report layout.
Challenge Yourself!
Create an Item Catalog report with the following specifications
• The body contains the following item information: No., Description, Base Unit of Measure, Unit Price, Inventory and Picture.
• The Picture can be made visible by clicking the Item No. • The header contains the report title, basic company information
(company name, address, post code, city, country and VAT Registration No.) and the Cronus logo (as an embedded picture). The header must appear on every page.
Need a Little Help?
1. Import the object. 2. Export the Company Logo from the Demo Database 3. Create the Table in the RoleTailored Client Layout 4. Set the Format for the Unit Price Field 5. Set the Format for the Inventory Field 6. Change the Layout of the Table Header Cells 7. Add the Picture Field to the Table
Microsoft Official Training Materials for Microsoft Dynamics ® Your use of this content is subject to your current services agreement

Chapter 2: Interactive Features
2-45
8. Set the Visibility for the Picture Field 9. Embed the Company Logo Picture in the Report. 10. Add a Page Header Section to the Report. 11. Add an Image Control for the Company Logo to the Report 12. Add the Report Title to the Page Header 13. Add (Hidden) Company Information to the Table 14. Resize the Hidden Columns 15. Add Textboxes for the Company Information to the Page Header 16. Run the Report
Step by Step Import the object
1. Open the Microsoft Dynamics NAV 2009 demo database. 2. Open the CRONUS International Ltd. demo company. 3. Select Tools, Object Designer to open the Object Designer.. 4. Select File, Import. 5. Browse to the report R123456704.fob. 6. Click OK to start the import. 7. In the dialog box, choose to open the Import Worksheet window. 8. In the Action column, verify that the action is set to Create. 9. Click OK to import the object in the database.
Export the Company Logo from the Demo Database
1. Open the Cronus International Ltd. company in Microsoft Dynamics NAV.
2. In the Object Designer, run form 1, Company Information. 3. Click Picture, Export. 4. Save the company logo as bitmap (cronus.bmp) on the Windows
Desktop. 5. Close the Company Information window.
Create the Table in the RoleTailored Client Layout
1. Open report 123456704 in Visual Studio Report Designer. 2. Add a table to the Body section. 3. Add two columns to the table. 4. In the Website Data Sources window, select Item__No__ and drag
it to the first cell in the table detail row. 5. In the Website Data Sources window, select Item_Description and
drag it to the second cell in the table detail row.
Microsoft Official Training Materials for Microsoft Dynamics ® Your use of this content is subject to your current services agreement

Report Design in Microsoft Dynamics® NAV 2009
2-46
6. In the Website Data Sources window, select Item__Base_Unit_Of_Measure_ and drag it to the third cell in the table detail row.
7. In the Website Data Sources window, select Item__Unit_Price_ and drag it to the fourth cell in the table detail row.
8. In the Website Data Sources window, select Item_Inventory and drag it to the fifth cell in the table detail row.
Set the Format for the Unit Price Field
1. On the table detail row, select the cell containing the Unit Price. 2. Right-click the cell and select Properties. 3. On the Format tab, in the Format Code field, select the proper
format code using the Expression windwo: =Fields!Item__Unit_Price_Format.Value.
4. Click OK to close the Textbox Properties window.
Set the Format for the Inventory Field
1. On the table detail row, select the cell containing the Inventory. 2. Right-click the cell and select Properties. 3. On the Format tab, in the Format Code field, select the proper
format code using the Expression window: =Fields!Item_InventoryFormat.Value.
4. Click OK to close the Textbox Properties window.
Change the Layout of the Table Header Cells
1. Click the row handle for the table header row 2. Set the FontWeight property in the (Font collection) to Bold. 3. Set the VerticalAlign property to Bottom.
Add the Picture Field to the Table
1. Add a column to the right side of the table. 2. From the Toolbox window drag an Image control to the new
column. 3. In the Properties window, set the Source property to Database. 4. In the Properties window, set the Value property to
Fields!Item_Item_Picture.Value. 5. In the Properties window, set the MIME Type property to
image/bmp.
Microsoft Official Training Materials for Microsoft Dynamics ® Your use of this content is subject to your current services agreement

Chapter 2: Interactive Features
2-47
Set the Visibility for the Picture Field
1. In the Properties window, in the Visibility property collection, set the Hidden property to True.
2. In the Properties window, in the Visibility property collection, set the ToggleItem property to Item__No__.
Embed the Company Logo Picture in the Report
1. In the Report menu, select Embedded Images. 2. In the Embedded Images window, select New. 3. Browse to the Windows Desktop and select cronus.bmp. 4. Click OK to import the picture in the report.
Add a Page Header Section to the Report
1. In the Report menu, select Page Header.
Add an Image Control for the Company Logo to the Report
1. In the Toolbox window, select the Image control and insert it in the page header section.
2. Select the Image control. 3. In the Properties window, set the Location property to 10,5cm;
0,25cm. 4. In the Properties window, set the Source property to Embedded. 5. In the Properties window, set the Value property to cronus. (The
MIME Type property will be filled automatically.) 6. In the Properties window, check that the Sizing property is set to
Autosize.
Add the Report Title to the Page Header
1. In the Toolbox window, select the Textbox control and insert it in the top left corner of the page header section.
2. Select the Textbox control. 3. Set the value property to "Item Catalog" 4. Set the FontSize property to 18pt. 5. Set the Color property to RoyalBlue.
Microsoft Official Training Materials for Microsoft Dynamics ® Your use of this content is subject to your current services agreement

Report Design in Microsoft Dynamics® NAV 2009
2-48
Add (Hidden) Company Information to the Table
1. Add a new column to the right side of the table. 2. Select the column by clicking the column handle. 3. In the Properties window, set the Hidden property to True. 4. In the Properties window, set the Color property to Red. 5. Add five new columns to the right of the column created in step 1. 6. In the dataset, select CompInfo_Name and drag it to the first of the
six hidden columns. 7. In the dataset, select CompInfo_Address and drag it to the next
hidden column. 8. In the dataset, select CompInfo__Post_Code_ and drag it to the next
hidden column. 9. In the dataset, select CompInfo_City and drag it to the next hidden
column. 10. In the dataset, select CompInfo__Country_Region_Code_ and drag it
to the next hidden column. 11. In the dataset, select CompInfo__VAT_Registration_No__ and drag
it to the last hidden column.
Resize the Hidden Columns
1. Select the six hidden columns. 2. Resize the columns with the mouse or by setting the Width property
(in the Properties window) to 0,25cm
Add Textboxes for the Company Information to the Page Header
1. Add 6 new textboxes to the Page Header. Arrange them in the same
way as in the header section of the Classic report. 2. Right-click the first textbox and select Expression. 3. In the Build an expression using Visual Basic language syntax
field, enter =ReportItems!CompInfo_Name.Value. 4. Click OK to close the Expression window. 5. Right-click the next textbox and select Expression. 6. In the Build an expression using Visual Basic language syntax
field, enter =ReportItems!CompInfo_Address.Value. 7. Click OK to close the Expression window. 8. Right-click the next textbox and select Expression. 9. In the Build an expression using Visual Basic language syntax
field, enter =ReportItems!CompInfo__Post_Code_.Value. 10. Click OK to close the Expression window.
Microsoft Official Training Materials for Microsoft Dynamics ® Your use of this content is subject to your current services agreement
Chapter 2: Interactive Features
2-49
11. Right-click the next textbox and select Expression. 12. In the Build an expression using Visual Basic language syntax
field, enter =ReportItems!CompInfo_City.Value. 13. Click OK to close the Expression window. 14. Right-click the next textbox and select Expression. 15. In the Build an expression using Visual Basic language syntax
field, enter =ReportItems!CompInfo__Country_Region_Code_.Value.
16. Click OK to close the Expression window. 17. Right-click the next textbox and select Expression. 18. In the Build an expression using Visual Basic language syntax
field, enter =ReportItems!CompInfo__VAT_Registration_No__.Value.
19. Click OK to close the Expression window.
Run the Report
1. Exit Visual Studio. 2. Save and import the RDLC changes. 3. Save and compile the report in the Report Designer. 4. Run the report from the Start, Run menu.
Summary In this chapter you learned to work with the enriched functionalities of the new reporting solution. You saw the different types of headers and footers and how to activate them. Furthermore you learned how to use interactive sorting, visibility options, document maps and different types of pictures. Finally, you discovered the ReportItems collection.
Microsoft Official Training Materials for Microsoft Dynamics ® Your use of this content is subject to your current services agreement
Report Design in Microsoft Dynamics® NAV 2009
2-50
Test Your Knowledge Test your knowledge with the following questions.
1. Which header sections are not supported by Visual Studio Report Designer?
( ) Page Header ( ) Group Header ( ) Transport Header ( ) Table Header
2. Which properties are not supported by Visual Studio Report Designer?
( ) PrintOnEveryPage ( ) RepeatOnNewPage ( ) RepeatHeaderOnNewPage ( ) PlaceInBottom
3. In which windows can you delete a Group Header? (Select all that apply)
( ) Properties window ( ) Table Properties window ( ) Grouping and Sorting Properties window ( ) Header Properties window
4. What is not a valid option for the Source property of an Image control?
( ) Internal ( ) External ( ) Embedded ( ) Database
5. Which controls cannot be added to a Page Header section?
( ) Chart ( ) Label ( ) Textbox ( ) List
6. Which sections can contain database pictures?
( ) Body Sections ( ) Page Header and Page Footer sections ( ) Page Header, Body and Page Footer sections ( ) None of the answers is correct.
Microsoft Official Training Materials for Microsoft Dynamics ® Your use of this content is subject to your current services agreement

Chapter 2: Interactive Features
2-51
7. Which properties can be used to set the background and the foreground color of a control?
( ) BackgroundColor and ForegroundColor ( ) BackgroundColor and TextColor ( ) BackgroundColor and Color ( ) BackgroundColor and CellColor
8. What is the ReportItems collection?
( ) A collection of all textboxes in a report. ( ) A collection of all controls in a report. ( ) A collection of all sections in a report. ( ) A collection of all reports
Microsoft Official Training Materials for Microsoft Dynamics ® Your use of this content is subject to your current services agreement

Report Design in Microsoft Dynamics® NAV 2009
2-52
Quick Interaction: Lessons Learned Take a moment and write down three Key Points you have learned from this chapter
1.
2.
3.
Microsoft Official Training Materials for Microsoft Dynamics ® Your use of this content is subject to your current services agreement

Chapter 2: Interactive Features
2-53
Solutions Test Your Knowledge
1. Which header sections are not supported by Visual Studio Report Designer?
( ) Page Header ( ) Group Header ( ) Transport Header (•) Table Header
2. Which properties are not supported by Visual Studio Report Designer?
(√) PrintOnEveryPage ( ) RepeatOnNewPage ( ) RepeatHeaderOnNewPage (√) PlaceInBottom
3. In which windows can you delete a Group Header? (Select all that apply)
( ) Properties window (√) Table Properties window (√) Grouping and Sorting Properties window ( ) Header Properties window
4. What is not a valid option for the Source property of an Image control?
(•) Internal ( ) External ( ) Embedded ( ) Database
5. Which controls cannot be added to a Page Header section?
(√) Chart ( ) Label ( ) Textbox (√) List
6. Which sections can contain database pictures?
( ) Body Sections ( ) Page Header and Page Footer sections (•) Page Header, Body and Page Footer sections ( ) None of the answers is correct.
Microsoft Official Training Materials for Microsoft Dynamics ® Your use of this content is subject to your current services agreement

Report Design in Microsoft Dynamics® NAV 2009
2-54
7. Which properties can be used to set the background and the foreground color of a control?
( ) BackgroundColor and ForegroundColor ( ) BackgroundColor and TextColor (•) BackgroundColor and Color ( ) BackgroundColor and CellColor
8. What is the ReportItems collection?
(•) A collection of all textboxes in a report. ( ) A collection of all controls in a report. ( ) A collection of all sections in a report. ( ) A collection of all reports
Microsoft Official Training Materials for Microsoft Dynamics ® Your use of this content is subject to your current services agreement