NA-07-STS009 PLC programming
93
Gæðaskjal (GSK) GSK-1066 Date of issue: 27.3.2014 Revision no.:2.0 Responsible: Einar Friðgeir Björnsson Editor: Bjarni Ingi Björnsson 07-Instrumentation PLC - PROGRAMMING Doc. no.: NA-07-STS009 This standard technical description is subject to change without prior notice. The most current issue will at all times be located on the Nordural web site, www.nordural.is.
Transcript of NA-07-STS009 PLC programming

Gæðaskjal (GSK) GSK-1066 Date of issue: 27.3.2014 Revision no.:2.0 Responsible: Einar Friðgeir Björnsson
Editor: Bjarni Ingi Björnsson
07-Instrumentation
PLC - PROGRAMMING
Doc. no.: NA-07-STS009
This standard technical description is subject to change without prior notice. The most current issue will at all times be located on the Nordural web site, www.nordural.is.

PLC - PROGRAMMING Doc.no. NA-07-STS009 Revision no.: 2.0
- 2/93 -
Contents
RESPONSIBILITY .................................... ........................................................... 8 1
INTRODUCTION ................................................................................................. 8 2
Abbreviations ..................................... ................................................................ 11 2.1
Comments and Descriptions ......................... .................................................... 12 2.2
Spare requirements ................................ ............................................................ 12 2.3
UPS Requirements .................................. ........................................................... 12 2.4
SOFTWARE TYPES ......................................................................................... 12 3
File type standards ............................... .............................................................. 13 3.1
Version Control ................................... ............................................................... 13 3.2
PLC Vendor Mandates ............................... ........................................................ 13 3.3
CONTROLLOGIX MODULE ASSIGNMENT STANDARDS .......... ................... 15 4
Chassis Sizes and Modules Slot Assignment ......... ......................................... 15 4.1
Local Rack Modules Position ....................... ..................................................... 15 4.2
Remote I/O Rack Modules Position .................. ................................................. 16 4.3
ControlLogix Remote Rack module position .......... ......................................... 16 4.44.4.1 Flex IO Remote Rack module position........................................................ 16
4.4.2 Point IO Remote Rack module position ...................................................... 16
NAMING STANDARDS .................................. .................................................. 17 5
Processor Naming .................................. ............................................................ 18 5.1
Rack Naming ....................................... ................................................................ 19 5.2
Network Communication Module Naming ............... ......................................... 19 5.35.3.1 Ethernet Communication Module in a Local Rack ...................................... 19
5.3.2 Ethernet Communication Module in a Remote Rack................................... 20
5.3.3 Directly connected Devices on Ethernet ..................................................... 20
5.3.4 ControlNet Communication Module in a Local Rack ................................... 21
5.3.5 ControlNet Communication Module in a Remote Rack ............................... 21
5.3.6 Directly Connected Devices on ControlNet ................................................. 22
5.3.7 DeviceNet Communication Modules ........................................................... 23
I/O Module Naming ................................. ............................................................ 24 5.45.4.1 IO Module in a Local Rack .......................................................................... 24
5.4.2 IO Module in a Remote Rack ...................................................................... 24
5.4.3 Module Configuration ................................................................................. 24
Task, Program and Routine Naming .................. ............................................... 25 5.55.5.1 Task Name ................................................................................................. 25
5.5.2 Program Name ........................................................................................... 26
5.5.3 Routine Name ............................................................................................ 26
Tag Naming and usage .............................. ........................................................ 27 5.65.6.1 Internal PLC Tag Naming ........................................................................... 28
5.6.2 Intermediate Variables ................................................................................ 29
5.6.3 External Variables ...................................................................................... 29
5.6.4 Variable Extensions Codes ......................................................................... 29
RSNetworx File Naming Standards ................... ................................................ 30 5.75.7.1 RSNetworx for Ethernet .............................................................................. 30
5.7.2 RSNetworx for ControlNet .......................................................................... 31
5.7.3 RSNetworx for DeviceNet ........................................................................... 31

PLC - PROGRAMMING Doc.no. NA-07-STS009 Revision no.: 2.0
- 3/93 -
PROCESSOR AND MODULE CONFIGURATION STANDARD ....... ............... 33 6
Processor Configuration ........................... ......................................................... 33 6.16.1.1 Date and Time Setup .................................................................................. 33
6.1.2 System Overhead Time Slice ..................................................................... 34
Communication Modules Setup ....................... ................................................. 34 6.26.2.1 Electronic Keying ........................................................................................ 36
6.2.2 RPI Settings ............................................................................................... 36
Ethernet Modules Configurations ................... .................................................. 37 6.36.3.1 RSNetworks for Ethernet ............................................................................ 38
6.3.2 Level 1 and Level 2 Ethernet configuration ................................................. 39
6.3.3 Monitoring of Ethernet IP network ............................................................... 39
6.3.4 Stratix 8000 Switches ................................................................................. 40
6.3.5 Device Level Ring (DLR) ............................................................................ 41
ControlNet Modules Configurations ................. ................................................ 44 6.46.4.1 ControlNet Keeper ...................................................................................... 44
6.4.2 ControlNet Specifications ........................................................................... 45
6.4.3 RSNetworx for ControlNet .......................................................................... 45
DeviceNet Modules Configurations................... ................................................ 47 6.56.5.1 RSNetworx for DeviceNet ........................................................................... 49
6.5.2 DeviceNet mapping .................................................................................... 49
6.5.3 Automatic Device Recovery (ADR) ............................................................. 52
6.5.4 DeviceNet Tag Generator ........................................................................... 53
Analog module configuration ....................... ..................................................... 56 6.6
PROGRAM STRUCTURE ................................................................................. 57 7
Task Priorities ................................... .................................................................. 58 7.1
Programming languages ............................. ....................................................... 58 7.27.2.1 Ladder Logic............................................................................................... 59
7.2.2 Sequential Function Charts ........................................................................ 60
7.2.3 Function Block Diagram ............................................................................. 62
7.2.4 Startup of PLC application code. ................................................................ 63
7.2.5 Arrays and User Defined data types (UDT) ................................................ 63
Add-On Instruction (AOI) .......................... ......................................................... 65 7.37.3.1 General tab ................................................................................................ 67
7.3.2 Parameters and tags in an AOI................................................................... 67
7.3.3 Scan modes ............................................................................................... 69
7.3.4 Help ............................................................................................................ 70
Routine Structure ................................. .............................................................. 70 7.4
The Norðurál programming library .................. ................................................. 71 7.5
Monitoring of Modules and Nodes ................... ................................................. 71 7.67.6.1 IO Validation ............................................................................................... 72
7.6.2 Input Handling ............................................................................................ 72
7.6.3 Outputs ....................................................................................................... 73
7.6.4 System Status / Utilities .............................................................................. 73
SCADA / HMI interfacing ........................... ......................................................... 74 7.77.7.1 Group control .............................................................................................. 74
PLC PROGRAMMING STANDARDS ......................... ...................................... 75 8
Coding Standards .................................. ............................................................. 75 8.18.1.1 Attribute ...................................................................................................... 75
8.1.2 Instance ...................................................................................................... 75
8.1.3 Class .......................................................................................................... 75

PLC - PROGRAMMING Doc.no. NA-07-STS009 Revision no.: 2.0
- 4/93 -
Programming Standards ............................. ....................................................... 77 8.28.2.1 Device Control Module - Routine Template ................................................ 77
8.2.2 Power Up Handler Program ........................................................................ 77
8.2.3 Language and Comments .......................................................................... 77
Modes of Operation ................................ ............................................................ 78 8.38.3.1 Control Modes ............................................................................................ 78
8.3.2 Control Program Architecture ..................................................................... 78
SFC Sequence ...................................... .............................................................. 79 8.48.4.1 SFC Management in the _LAD routine ....................................................... 79
8.4.2 Actions ....................................................................................................... 81
8.4.3 SFC editor and SFC Step data types .......................................................... 82
8.4.4 Transition Triggers...................................................................................... 84
Testing and Simulation of CLX Programming ......... ......................................... 85 8.58.5.1 Instructions for debugging application code ................................................ 85
Quality and Verification of Programming ........... .............................................. 86 8.68.6.1 Program Evaluation 25% ............................................................................ 86
8.6.2 Program Evaluation 50% ............................................................................ 87
8.6.3 Program Evaluation 75% ............................................................................ 87
8.6.4 Program Evaluation 100% .......................................................................... 87
COMMUNICATION AND INTERFACES ...................... ..................................... 88 9
Communication Link ................................ .......................................................... 88 9.1
Produced and Consumed Tags ........................ ................................................. 88 9.29.2.1 Communication .......................................................................................... 88
9.2.2 Produced and Consumed Tags Naming and Contents ............................... 89
9.2.3 Message Tags Naming and Contents ......................................................... 91
Alarm Handling .................................... ............................................................... 91 9.3
Alarm List ........................................ .................................................................... 92 9.4
Interlocks ........................................ .................................................................... 92 9.5
Permissive ........................................ .................................................................. 93 9.6
Appendix A – recommended PLC Hardware ............. .................................... 93 10

PLC - PROGRAMMING Doc.no. NA-07-STS009 Revision no.: 2.0
- 5/93 -
Table of figures Figure 1 – Tag Comments ....................................................................................................... 12
Figure 2 – Rung comments ...................................................................................................... 12
Figure 3 – Ethernet module configuration................................................................................. 20
Figure 4 – directly connected device on Ethernet ..................................................................... 21
Figure 5 – ControlNet Communication Module in a Remote Rack ............................................ 22
Figure 6 – VFD Configuration on ControlNet ............................................................................ 23
Figure 7 – DeviceNet Module Configurations ........................................................................... 23
Figure 8 – Module Configuration .............................................................................................. 25
Figure 9 – Task Naming Structure............................................................................................ 25
Figure 10 – Program Naming Structure .................................................................................... 26
Figure 11 – Routine name and description ............................................................................... 27
Figure 12 – Routine naming structure ...................................................................................... 27
Figure 13 – AKS Mask ............................................................................................................. 28
Figure 14 – ControlNet File Path .............................................................................................. 31
Figure 15 – System Overhead Time Slice ................................................................................ 33
Figure 16 – SFC Execution Controller Configuration ................................................................ 33
Figure 17 – Periodic and continuous tasks ............................................................................... 34
Figure 18 – Communication Format settings ............................................................................ 35
Figure 19 – RPI Settings .......................................................................................................... 37
Figure 20 – Local Rack L0 Ethernet Modules Configuration ..................................................... 38
Figure 21 – Remote Rack L0 Ethernet Modules Configuration ................................................. 38
Figure 22 – RSNetworks for Ethernet Configuration ................................................................. 39
Figure 23 – Ethernet configurations ......................................................................................... 39
Figure 24 – Network structure .................................................................................................. 39
Figure 25 – Message instructions to retrieve IP addresses from Modules ................................ 40
Figure 26 – Stratix 8000 switch ................................................................................................ 41
Figure 27 – Stratix 8000 AOI .................................................................................................... 41
Figure 28 – DLR normal operation ........................................................................................... 42
Figure 29 – DLR with a failed link ............................................................................................. 42
Figure 30 – Enable DLR in Network tab for DLR configurations ............................................... 43
Figure 31 – Both ports active for DLR operation....................................................................... 43
Figure 32 – DLR has been selected and a fault issued. ........................................................... 44
Figure 33 – ControlNet Modules Configuration......................................................................... 44
Figure 34 – ControlNet Network Parameter settings ................................................................ 46
Figure 35 – ControlNet Configurations ..................................................................................... 47
Figure 36 – ControlNet Panel Names ....................................................................................... 47
Figure 37 – DeviceNet Modules Configuration ......................................................................... 48
Figure 38 – Edit I/O Parameters ............................................................................................... 49
Figure 39 – Typical DeviceNet Setup ....................................................................................... 49
Figure 40 – DeviceNet Scanlist ................................................................................................ 50
Figure 41 – DeviceNet Input Assembly .................................................................................... 50
Figure 42 – DeviceNet Output Assembly.................................................................................. 51
Figure 43 – DeviceNet Advanced Mapping .............................................................................. 51
Figure 44 – DeviceNet ADR Setting ......................................................................................... 53
Figure 45 – DeviceNet Tag Generated Routines ...................................................................... 53
Figure 46 – UDT after import with the DeviceNet Tag Generator ............................................. 53
Figure 47 – UDT upgraded ...................................................................................................... 54
Figure 48 – UDT Tag structure ................................................................................................. 55
Figure 49 – CPS instruction used for UDT aliasing .................................................................. 55
Figure 50 – Loop Control ......................................................................................................... 57
Figure 51 – Task Monitor AOI .................................................................................................. 58
Figure 52 – Ladder Logic ......................................................................................................... 60
Figure 53 – Routines to Control a Sequence ............................................................................ 60
Figure 54 – SFC elements Initial Step ...................................................................................... 61
Figure 55 – Initial Step ............................................................................................................. 61
Figure 56 – Selective branch .................................................................................................... 61

PLC - PROGRAMMING Doc.no. NA-07-STS009 Revision no.: 2.0
- 6/93 -
Figure 57 – Simultaneous branch ............................................................................................ 62
Figure 58 – Function Block Diagram ........................................................................................ 63
Figure 59 – Boolean array ........................................................................................................ 64
Figure 60 – Boolean tags ......................................................................................................... 64
Figure 61 – Data type memory allocation ................................................................................. 64
Figure 62 – Recommended UDT Setup ................................................................................... 64
Figure 63 – Not Recommended UDT Setup ............................................................................. 65
Figure 64 – Non Reversible Motor UDT ................................................................................... 65
Figure 65 – Non Reversible Motor Tag Structure ..................................................................... 65
Figure 66 – Single Speed motor AOI ........................................................................................ 66
Figure 67 – AOI definition ........................................................................................................ 67
Figure 68 – AOI Parameters .................................................................................................... 68
Figure 69 – AOI Local Tags ..................................................................................................... 68
Figure 70 – AOI Scan Modes ................................................................................................... 70
Figure 71 – Plant PAx Motor AOI ............................................................................................. 70
Figure 72 – AOI Help Tab ........................................................................................................ 70
Figure 73 – IO Validation and Input Image ............................................................................... 72
Figure 74 – CPS Instruction ..................................................................................................... 73
Figure 75 – GSV from the Controller ........................................................................................ 73
Figure 76 – ASN Group AOI ..................................................................................................... 74
Figure 77 – Motor non reversable UDT .................................................................................... 76
Figure 78 – SFC Input / Output Chart ....................................................................................... 80
Figure 79 – SFC management in SEQ001_Cooling_LAD ........................................................ 81
Figure 80 – Action Qualifier ...................................................................................................... 81
Figure 81 – Actions and reaction indication in an SFC ............................................................. 82
Figure 82 – Corresponding action in _LAD Routine ................................................................. 82
Figure 83 – Action Properties ................................................................................................... 82
Figure 84 – Automatic SFC element naming shall be turned off ............................................... 83
Figure 85 – The SFC UDT structure and naming convention. .................................................. 83
Figure 86 – SFC step data and configuration ........................................................................... 83
Figure 87 – Result Bits in SFC UDT ......................................................................................... 84
Figure 88 – Result bit used in an SFC chart ............................................................................. 84
Figure 89 – Result Bit used in the _LAD routine ....................................................................... 84
Figure 90 – Selective branch in an SFC chart .......................................................................... 85
Figure 91 – Selective Branch LAD routine ................................................................................ 85
Figure 92 – Unused Branch not allowed................................................................................... 86
Figure 93 – Produced / Consumed data type ........................................................................... 89
Figure 94 – Produced / Consumed tags ................................................................................... 90
Figure 95 – Interlock AOI ......................................................................................................... 93
Figure 96 – Permissive AOI ..................................................................................................... 93

PLC - PROGRAMMING Doc.no. NA-07-STS009 Revision no.: 2.0
- 7/93 -
Table of tables Table 1 – Plant PAx library ......................................................................................................... 9
Table 2 – Norðurál AKS Library ................................................................................................. 9
Table 3 – Abbreviations ........................................................................................................... 12
Table 4 – File type standards ................................................................................................... 13
Table 5 – Software versions ..................................................................................................... 13
Table 6 – PLC Vendor Mandates ............................................................................................. 14
Table 7 – Local Rack Configuration ......................................................................................... 15
Table 8 – ControlLogix Remote Rack Configuration ................................................................. 16
Table 9 – Flex Remote Rack Configuration .............................................................................. 16
Table 10 – Point IO Remote Rack Configuration ...................................................................... 16
Table 11 – Area Codes ............................................................................................................ 17
Table 12 – Device Type Codes ................................................................................................ 18
Table 13 – Network Identification Description .......................................................................... 19
Table 14 – Tag naming structure ............................................................................................. 28
Table 15 – Variable extension codes ....................................................................................... 30
Table 16 – ControlNet module Specifications ........................................................................... 45
Table 17 – DeviceNet I/O size .................................................................................................. 48
Table 18 – DeviceNet Mapping ................................................................................................ 52
Table 19 – Plant PAx prefixes .................................................................................................. 66
Table 20 – Parameter Tags...................................................................................................... 69
Table 21 – Non Reversible Motor Class ................................................................................... 76
Table 22 – Control Modes ........................................................................................................ 78
Table 23 – Communication links .............................................................................................. 88
Table 24 – Alarm Severity’s ..................................................................................................... 92
Table 25 – Alarm list ................................................................................................................ 92

PLC - PROGRAMMING Doc.no. NA-07-STS009 Revision no.: 2.0
- 8/93 -
RESPONSIBILITY 1This Standard Technical Specification (STS) is of responsibility of the owner. The revision and date of issue are on the front page.
All deviations from the specifications must be approved in writing by the Owner.
INTRODUCTION 2This document describes control systems configuration standards that must be used and implemented at Norðurál locations. The document specifically handles the configuration of devices, networks and PLC modules. It also provides directives for Level-0 and Level-1 control systems programming and provides the basis of the various entity tag naming.
This document is the master document to be supported by a series of other documents as:

PLC - PROGRAMMING Doc.no. NA-07-STS009 Revision no.: 2.0
- 9/93 -
Standard Number Description SYSLIB-RM001 Basic Analog Input (P_AIn) SYSLIB-RM002 Standard Alarm Sub-Block (P_Alarm) SYSLIB-RM003 Discrete Input (P_DIn) SYSLIB-RM004 Interlocks with First-Out and Bypass (P_Intlk) SYSLIB-RM005 Standard Modes (P_Mode) SYSLIB-RM006 Single-Speed Motor (P_Motor) SYSLIB-RM007 Permissives with Bypass (P_Perm) SYSLIB-RM008 Shared Reset (P_Reset) SYSLIB-RM009 Restart Inhibit for Large Motor (P_ResInh) SYSLIB-RM010 RunTime and Starts (P_RunTime) SYSLIB-RM011 Analog Output (P_AOut) SYSLIB-RM012 Two-Speed Motor (P_Motor2Spd) SYSLIB-RM013 Reversing Motor (P_MotorRev) SYSLIB-RM014 Motor Operated Valve (P_ValveMO) SYSLIB-RM015 Solenoid Valve (P_ValveSO) SYSLIB-RM016 Variable Speed Drive (P_VSD) SYSLIB-RM018 Advanced Analog Input (P_AInAdv) SYSLIB-RM019 Dual Analog Input (P_AlnDual) SYSLIB-RM020 Flow meter Dosing (P_DoseFM) SYSLIB-RM021 Weigh Scale Dosing (P_DoseWS) SYSLIB-RM022 Hand-Operated Motor Monitor (P_MotorHO) SYSLIB-RM025 Hand-Operated 2-Position Valve (P_ValveHO) SYSLIB-RM026 Multible Analog Outputs (P_AinMulti) SYSLIB-RM027 Boolean Logic with Snapshot (P_Logic) SYSLIB-RM028 Discrete 2-,3-,or 4-state Device (P_D4SD) SYSLIB-RM029 Discrete Output (P_DOut) SYSLIB-RM030 Analog Fanout (P_Fanout) SYSLIB-RM031 n-Position Device (P_nPos) SYSLIB-RM032 Pressure/Temp. Compensated Flow (P_PTComp) SYSLIB-RM033 Tank Strapping Table (P_StrapTbl) SYSLIB-RM034 Analog Control Valve (P_ValveC) SYSLIB-RM035 Mix Proof Valve (P_ValveMP) SYSLIB-RM036 2-State Valve Statistics (P_ValveStats) PowerFlex 755 module (P_PF755) MMS_047415 GuardLogix Project Files MMS_047416 ME Faceplates for GuardLogix Safety Systems MMS_055487 Device Level Ring MMS_057881 Stratix 8000 Logix Diagnostics RM003 PlantPAx library of Logix Diagnostics Objects (RA-BAS) L_TaskMon-Faceplate
L faceplates for Logix controllers task monitor
(RA-BAS) L_CPU-Faceplate
L faceplates for Logix controllers CPU details
Table 1 – Plant PAx library
Standard Name Description AKS Handbook [ISL] Description of the AKS coding system [Icelandic]
AKS Handbook [ENG] Description of the AKS coding system [English] AKS Key Total Plant Function Key Main Group AKS Key 1 System AKS Key 1 system AKS Key 2 Aggregates AKS Key 2 Aggregates AKS Key 3 Components AKS Key 3 Components
Table 2 – Norðurál AKS Library
The standards have been designed with the objective of obtaining control systems that will operate with optimum efficiency, reliability and low cost of ownership. To obtain a plant wide

PLC - PROGRAMMING Doc.no. NA-07-STS009 Revision no.: 2.0
- 10/93 -
uniformity of design and configuration of the control systems, all requirements of these standards are to be strictly followed, regardless of which group or entity is involved or in charge of the design. Any change or deviation from the standards herein shall be considered on a case by case basis and submitted for evaluation to the owner.
This document namely contains the following standards:
• ControlLogix configuration standards
• Ethernet configuration standards
• ControlNet configuration standards
• DeviceNet configuration standards
• ControlLogix programming standards
• PLC Programming Handbook
The preferred communication protocol for L0 and L1 networks on the Norðurál Site will be Ethernet IP using DLR technology, the use of all other communication protocols require the approval of the owner.
Password protecting any part of a PLC code or network application is strictly prohibited.

PLC - PROGRAMMING Doc.no. NA-07-STS009 Revision no.: 2.0
- 11/93 -
Abbreviations 2.1
Abbreviations Definitions
1756 ControlLogix Control System 1794 Flex I/O distributed 1768 CompactLogix Control System CAN ControlNet Adapter Module ACNR Adapter ControlNet Redundant ACS ABB ACS (VFD) AND DeviceNet Adapter Module ADR Automatic Device Replacement AC Area Code AK AKS Code AI Analogue Input Module AO Analogue Output Module AOI Add-On Instruction API Actual Packet Interval CIP Control and Information Protocol, Common Industrial Protocol CLX ControlLogix controller CNB(R) ControlNet Bridge Module (Redundant) COS Change Of State CPL CompactLogix CPU DI Digital Input Module DNB DeviceNet Scanner Bridge Module DO Digital Output Module DTC Device Type Code ENBT Ethernet Bridge Module EN2T Ethernet Bridge Module EQT Equipment Tag FLEX Flex I/O Module of distributed I/O point, networked FT Factory Talk FTD Factory Talk Directory GLX GuardLogix Safety Controller GPS Global Position System HI Hart Input Module HMI Human Machine Interface, PanelView Plus, solid state HO Hart Output Module HSC High Speed Counter module I/O Input Output Device or point ICE Inview CE ID Net ID IDI Isolated Digital Input Module IDO Isolated Digital Output Module MAC Media Access Control address MES Manufacturing Execution Systems – Management MVI Serial Communication Module NUT Network Update Time OSI Open Systems International P&ID Process and Instrumentation Diagram PID Proportional Integral Derivative control PM Power Monitor PVP PanelView Plus (HMI) RIUP Removal and Insertion Under Power RPI Requested Packet Interval RAN Rack Name CNR ControlNet Remote Rack

PLC - PROGRAMMING Doc.no. NA-07-STS009 Revision no.: 2.0
- 12/93 -
Abbreviations Definitions
ENR EtherNet Remote Rack LOR Local Rack SCADA PC-based Supervisory Control And Data Acquisition System SMAX Scheduled Maximum (node No) UDT User-Defined Data Type UMAX Unscheduled Maximum (node no) VFD Variable Frequency Drive IIS Internet Information Service
Table 3 – Abbreviations
Comments and Descriptions 2.2The use of descriptions for all items related to a PLC and a network application is mandatory. The owner reserves the right to reject any application or network configuration file that does not fulfill the owner’s requirements on comments and descriptions. See below and example of descriptions that is useful to maintenance personnel.
Figure 1 – Tag Comments
Figure 2 – Rung comments
Spare requirements 2.3The vendors shall guaranty that there is a minimum of 20% spare for further expansions. Including 20% spare IO, 20% spare space in the control panels, 20% spare in the Local rack etc.
Minimum of 20% empty slot for spare modules in all racks shall be available.
UPS Requirements 2.4All PLC applications shall be connected through a UPS and shall receive a signal from the UPS indicating the state of the UPS in order to safely put the PLC controlled system in a safe state after power loss. This must be done so that PLC system will take appropriate action when power is restored. The restart state of equipment or machines can wary depending on the application.
SOFTWARE TYPES 3In this document, the generic use of the term software can designate one of the following specific elements:
• Firmware - This software is specific to the device or machine and controls the hardware directly, e.g. Control Flash CLX version 19, Intel BIOS
• Infrastructure software - This software shall be for platform level hardware and run directly on the firmware, BIOS or basic operating system of platform, e.g. Windows 7, Windows Server, ADS, DNS, DHCP and WINs

PLC - PROGRAMMING Doc.no. NA-07-STS009 Revision no.: 2.0
- 13/93 -
• Application Infrastructure software - This software shall run on a base layer of infrastructure and provides application support for a specific application, e.g. RSLinx Enterprise, I.I.S (Internet Information Service), Factory Talk directory
• Development software – Concerns the software used for the development of application code and configuration duties for Level-0 and Level-1 automation systems, e.g. RSLogix 5000, FTView Studio, and RSNetworx.
• Application Software - Consists in the software developed by the control systems designers and vendors using any development software package.
File type standards 3.1The following file types shall be used for:
Name Type ControlLogix, RSLogix 5000 *.ACD RSNetworx Ethernet/IP *.enet RSNetworx ControlNet *.xc RSNetworx DeviceNet *.dnt FactoryTalk ME .APA
Table 4 – File type standards
Version Control 3.2This project shall fix its initial development on the following versions of software and hardware as standard.
Software Version RSLogix 5000 20.01 RSLinx-classic 2.59 RSLogix Emulator 5000 20 RSNetWorks for ControlNet 11.00.00 RSNetworks for DeviceNet 11.00.00 RSNetworks for Ethernet 11.00.00 Factory Talk View Machine Edition
6.0/6.1
Factory Talk View Site Edition 6.0/6.1
Table 5 – Software versions
See Appendix A for information on hardware versions.
Hardware and software requirement can change year by year therefore it is vital that vendors make sure that they develop their applications with the appropriate versions.
PLC Vendor Mandates 3.3The PLC vendors must provide the following documentation with a unique document number according to vendor coding system.

PLC - PROGRAMMING Doc.no. NA-07-STS009 Revision no.: 2.0
- 14/93 -
Title Type Functional Description Document Simulation procedure Document Factory Acceptance Test (FAT) Document Site Acceptance Test (SAT) Document Fault and Alarm List Excel PLC Tag List CSV Custom UDT Definition Document Interlock list Document Custom AOI Definition Document All other documents included in the contract
Table 6 – PLC Vendor Mandates
The Vendor must also provide the following services:
• Programming to support the MES command, set point, and requirement (if required)
• Support for the MES configuration
• Support for the HMI / SCADA configuration and testing.
• All other activities included in the contract

PLC - PROGRAMMING Doc.no. NA-07-STS009 Revision no.: 2.0
- 15/93 -
CONTROLLOGIX MODULE ASSIGNMENT STANDARDS 4The following ControlLogix module assignment standards shall apply for the Norðurál Site.
Chassis Sizes and Modules Slot Assignment 4.1
The processor shall be placed in the left hand slot (slot 0) of the chassis (the local rack). Where multiple processors are placed within a single chassis, they are to be placed in priority order starting from the left hand side. Empty slots should be closed off with blank cover module (1756-N2).
The physical location of the module within a chassis must follow certain rules in order make the control systems at Norðurál homogenous and to optimize the maintenance of the control system. The assignment of module within the rack slightly varies depending on the function of the rack and whether it is:
• Local Rack (series 1756)
• Remote Rack (series 1756)
• Compact Logix (series 1768)
• Remote Rack with Flex I/O (series 1794)
• Remote Rack with Point I/O (series 1734)
• Remote Safety Point IO (series 1734)
Local Rack Modules Position 4.2
Modules are listed below by position importance in the rack from left to right.
If multiple modules of any type are required they should be lined up in sequence and the following modules should be moved respectively.
If a certain module type is not used, the next module should start in the next available slot, e.g. if a rack only contains Digital Inputs the first input should start in the first empty slot after the controller or the communication adapter.
Module Control Level
Starting Slot Comment
Processors 1 0 Ethernet Modules 2 1 Ethernet Modules 1 2 Depending on use ControlNet Modules 1 3 Depending on use DeviceNet Modules 0 3 Depending on use Processor support Modules (e.g.: 1756-MVI 0-1 3 Depending on use Special Modules like High Speed Counter, Thermocouple, RTD
0 3 Depending on use
Analogue Inputs/Output 0 3 Depending on use Discrete Inputs/Outputs module 0 3 Depending on use
Table 7 – Local Rack Configuration
Note: In safety setup applications the safety partner is always in slot number 1. All subsequent slot numbers are increased by one.

PLC - PROGRAMMING Doc.no. NA-07-STS009 Revision no.: 2.0
- 16/93 -
Remote I/O Rack Modules Position 4.3
The modules are listed below by position importance in the rack from left to right.
If multiple modules of any type are required they should be lined up in sequence and the following modules should be moved respectively.
If a certain module type is not used, the modules should start in the next available slot, e.g. if a rack only contains Digital Inputs the first input should start in the first empty slot after the communication adapter.
ControlLogix Remote Rack module position 4.4
Module Type Control Level
Starting Slot Comment
Communication Adapter Ethernet ControlNet
1 0
DeviceNet 0 1 Depending on use Thermocouple & RTD 0 2 Depending on use Analogue Input / Output modules
0 3 Depending on use
Discrete Input / Outputs modules
0 4 Depending on use
Table 8 – ControlLogix Remote Rack Configuration
4.4.1 Flex IO Remote Rack module position
Module Type Control Level
Starting Slot Comment
Communication Adapter Ethernet, ControlNet
1 NA
Thermocouple & RTD 0 0 Depending on use Analogue Input / Output modules
0 1 Depending on use
Discrete Input / Outputs modules
0 2 Depending on use
Table 9 – Flex Remote Rack Configuration
4.4.2 Point IO Remote Rack module position
Module Type Control Level
Starting Slot Comment
Communication Adapter Ethernet, ControlNet
1 NA
Thermocouple & RTD 0 0 Depending on use Analogue Input / Output modules
0 1 Depending on use
Discrete Input / Outputs modules
0 2 Depending on use
Table 10 – Point IO Remote Rack Configuration

PLC - PROGRAMMING Doc.no. NA-07-STS009 Revision no.: 2.0
- 17/93 -
NAMING STANDARDS 5At Norðurál, a software tag based on the following naming standard must be given to each device (processor, communication modules, I/O module …) in the RSLogix 5000 software.
Area Code Description 00 General 10 Utilities 20 Administration 30 Material Handling 40 Power 50 Reduction 60 Anode Production 70 Casting 80 Environmental 90 Automation
Standard
Table 11 – Area Codes
The tag structure explained in this section uses a DEVICE type code. The table below provides a list of these DEVICE type codes with their description.

PLC - PROGRAMMING Doc.no. NA-07-STS009 Revision no.: 2.0
- 18/93 -
Device Type Code
Device Type Description
CLX ControlLogix CPU GLX GuardLogix CPU CPL CompactLogix CPU ICE Inview CE PVP PanelView Plus (HMI) PM Power Monitor VFD Variable Frequency Drive ACS ABB ACS (VFD) RR Remote Rack LR Local Rack DI Digital Input Module IDI Isolated Digital Input Module DO Digital Output Module IDO Isolated Digital Output Module AI Analogue Input Module AO Analogue Output Module HO Hart Output Module HI Hart Input Module HSC High Speed Counter module MVI Serial Communication Module DNB DeviceNet Scanner Bridge Module ADN DeviceNet Adapter Module CNB(R) ControlNet Bridge Module
(Redundant) CN2(R) ControlNet Bridge Module
(Redundant) ACN ControlNet Adapter Module ENBT Ethernet Bridge Module EN2T Ethernet Bridge Module ETAP Ethernet Tap module TMQ Telemecanique AENT Flex Ethernet Adapter
Table 12 – Device Type Codes
Processor Naming 5.1
Processors shall be named according to the following format convention:
GRT – Grundartangi
HEL – Helguvík
VLI – Vlissigen
“GRTAC_AKxxx_DTCxxx_Description”
GRT: Norðurál Grundartangi (GRT is always present)
AC: Refers to the area code where the application is located refer to the Table 11.
AKxxx: Refers to the system code refer to the Norðurál AKS coding system. xxx refers to the system number see Table 2.
DTCxxx: Refers to the device type code e.g. (CLX, GLX CPL). xxx is a sequential number to ensure that no duplicate name is created inside an area see Table 12.
Description: short description of the application use, max 21 characters.

PLC - PROGRAMMING Doc.no. NA-07-STS009 Revision no.: 2.0
- 19/93 -
The Processor module naming for the gas treatment center for pot line 1 could therefore be:
“GRT80_FD100_CLX001_GasTreatmentCenter”
Rack Naming 5.2
A Local Rack always contains the processor and a Remote Rack is controlled over a Ethernet or a ControlNet communication module (adapter or a bridge) depending of the I/O series used. A rack (that doesn’t include processor) is considered as a Remote Rack even if the rack is in the same control panel as the local rack
Racks shall be named according to the following format convention:
• LOR001, where LOR is the Device Type Code used for Local Rack and the 3 digit numbers will be always 001 as the local rack will always have the ControlNet node number 001 or the IP address x.x.x.001.
o The exception on this rule is in redundancy applications the local rack cannot have the ControlNet node address number 1 as it will cause problems with the keeper during change over.
o Generally Redundancy controllers are not required on the Norðurál Site. Their use will be handled case by case.
• ENR002 to ENRxxx where ENR stands for Ethernet Rack 3 following numbers represent the last three numbers of the device IP address assigned to the rack (starting at 002 and going up).
• CNR002 to CNRxxx, where CNR the stands for Remote Rack and the 3 following digit numbers represent the ControlNet node address assigned to the rack (starting at 002 and going up).
Network Communication Module Naming 5.3
This section defines the naming convention to be used for network communication modules (ENBT, CNBR, AENT, ACNR15, ADN or DNB).
The table below provides the Network Identifiers (NetID) code established on the project. Often the NetID is part of a module name.
NetID Network Identification Description ENxxx Ethernet used for an isolated standalone device 01-254 CNxxx ControlNet used for Control and Remote I/O level (xx is
the network number 01-99) DNxxx DeviceNet used for Distributed devices (xx is the network
number 01-99)
Table 13 – Network Identification Description
5.3.1 Ethernet Communication Module in a Local Rack The module naming shall be as per the following format:
“IDxxx_RANxxx_SxxDTC”
IDxxx: Net ID, EN001 identified as the I/O Ethernet Network and is number 001.
RANxxx: Refers to the rack name according to Table 13. The sequential number xxx is always 001 for a local rack since it will always be number one. LOR001.
Sxx: S is always present. Example: S01, Communication module located in slot 01 of the Local rack.
DTC: The Device Type Code acronym used for an Ethernet Bridge module ENB.

PLC - PROGRAMMING Doc.no. NA-07-STS009 Revision no.: 2.0
- 20/93 -
Following example shows a naming convention for Ethernet module:
“EN001_LOR001_S01ENB”
5.3.2 Ethernet Communication Module in a Remote Rac k If the Ethernet module on Ethernet number 1 in local rack number 1 connects to a remote rack with a Flex communication adapter the name would be as shown.
“IDxxx_RANxxx_DTC_Description”
IDxxx: Net ID, EN001 identified the I/O Ethernet Network and is number 01.
RANxxx: Rack Name, ENR010, Remote Ethernet Rack IP address 010.
DTC: The Device Type Code acronym used for an Ethernet adapter module AENT.
Description: Short description of the remote location
Following example shows a naming convention for Ethernet module:
“EN001_ENR010_AEN_FilterTop”
The configuration screen for an Ethernet Adapter installed in a remote rack is shown in Figure 3.
Figure 3 – Ethernet module configuration
5.3.3 Directly connected Devices on Ethernet In addition to Ethernet modules devices can be connected directly on the Ethernet network such as VFD’s, MCC’s etc.
The naming convention for directly connected equipment on Ethernet shall be as per the following format:
“IDxxx_DTCxxx_EQT
For example, if we have a VFD (PowerFlex drive) connected on the Ethernet network EN01 and configured with the Ethernet address last number 012, its name will be:
IDxxx : EN001, Identified the I/O Ethernet network number 001 on which the VFD is connected.
DTCxxx: PFL, which is the Device Type Code used for a PowerFlex drive, 012, is the last number in the drives IP address “192.168.1.12”.
EQT: Is the Equipment tag used to identify the motor.
“EN001_PFL012_FD220_AE11_M10”

PLC - PROGRAMMING Doc.no. NA-07-STS009 Revision no.: 2.0
- 21/93 -
The configuration for VFD on Ethernet is shown below:
Figure 4 – directly connected device on Ethernet
5.3.4 ControlNet Communication Module in a Local Ra ck The module naming shall be as per the following format:
“IDxxx_RANxxx_SxxDTC”
IDxxx : Net ID CN001, Identified as the I/O ControlNet Network and is number 001.
RANxxx: Rack Number, LOR001, Local Rack 001.
Sxx: Slot number S is always present. S01, module located in slot 01 of the Local rack.
DTC: CNB, which is the Device Type Code acronym used for a ControlNet Bridge module.
Following example shows a naming convention for ControlNet module:
“CN001_LOR001_S01CNB”
5.3.5 ControlNet Communication Module in a Remote R ack The module naming shall be as per the following format:
“IDxxx_RANxxx_SxxDTC_Description”
IDxxx : Net ID, CN001, Identified as the I/O ControlNet Network and is number 001.
RANxxx: Rack Number, CNR001, Remote Rack 001.
Sxx: Slot Number, S is always present. Example: S01, module located in slot 01 of the Remote rack. If the ControlNet nodule does not have a slot name the slot number shall be skipped.
DTC: Device Type): CNB, which is the Device Type acronym used for a ControlNet Bridge module.
Description: Descriptive text.
Following example shows a naming convention for ControlNet module for a CLX rack:
“CN001_CNR001_S01CNB_Description”
Following example shows a naming convention for ControlNet module for a Flex rack:
“CN001_CNR001_ACN_Description”

PLC - PROGRAMMING Doc.no. NA-07-STS009 Revision no.: 2.0
- 22/93 -
The configuration screen for a ControlNet Adapter installed in a remote rack is shown below:
Figure 5 – ControlNet Communication Module in a Remote Rack
5.3.6 Directly Connected Devices on ControlNet In addition of a ControlNet Bridge or a ControlNet Adapter Rack (1756-CNBR or 1794- ACNR15 modules), other devices can be attached directly on the ControlNet network, like VFD’s PVP’s etc.
For example the naming convention for a VFD drive shall be as per the following format:
“IDxxx_DTCxxx_EQT”
For example, if we have a VFD connected on the ControlNet network CN001 and configured with the ControlNet node address 008, its name will be:
IDxxx : CN001, Identified the I/O ControlNet Network number 01 on which the VFD is connected.
DTCxxx: PFL, which is the Device Type Code used for a PowerFlex drive, 008, is the ControlNet node address associated to the drive.
EQT: Is the Equipment tag used to identify the motor, according to AKS coding specifications.
“CN001_PFL008_FD220_AE10_M10”
The screen configuration of the naming for VFD on ControlNet is shown below:

PLC - PROGRAMMING Doc.no. NA-07-STS009 Revision no.: 2.0
- 23/93 -
Figure 6 – VFD Configuration on ControlNet
5.3.7 DeviceNet Communication Modules The module naming shall be as per the following format:
“IDxxx_RANxxx_SxxDTC
IDxxx : (NetID): DN001, Identified as DeviceNet and slot number of the installed module.
RANxxx : LOR001, identified the Local Rack.
Sxx : S04, is the slot number where the DeviceNet module is located.
DTC: DNB is the Device Type Code acronym used to identify a DeviceNet communication module (1756-DNB).
Below, an example is given for the configuration of a DeviceNet scanner:
“DN001_LOR001_S04DNB”
Figure 7 – DeviceNet Module Configurations

PLC - PROGRAMMING Doc.no. NA-07-STS009 Revision no.: 2.0
- 24/93 -
I/O Module Naming 5.4
I/O modules placed within the racks (Local or Remote) shall be labeled upon location and device type as standard, where the location refers to the chassis slot identification.
5.4.1 IO Module in a Local Rack The module naming shall be as the following format the RANxxx (Net ID) is not required for a Local rack since it is not controlled by a network.
“RANxxx_SxxDTC”
RANxxx: (Rack Number): same as in the rack naming standards.
Sxx: (Slot Number): S is always present. Example: S05, Communication module located in slot 05 of the local rack.
DTC: Device Type Code for the I/O module (see Device Type Codes Table).
The following name would be used for a digital input module located in slot 05 of the local rack:
“LOR001_S05DI”
5.4.2 IO Module in a Remote Rack The module naming shall be as the following format:
“IDxxx_RANxxx_SxxDTC”
AAxxx : Net ID, CN001, Identified as the I/O ControlNet Network and is number 01, or EN001 identified the I/O Ethernet Network and is number 01.
RANxxx: Rack Name is the same as in the rack naming standards.
Sxx: Slot Number, S is always present. Example: S05, Communication module located in slot 05 of the remote rack.
DTC: Device Type Code for the I/O module (see Device Type Codes Table).
The following name would be used for a digital input module located in slot 05 of the remote rack (IP address 21) on the EN001 Network:
“EN001_ENR021_S05DI”
5.4.3 Module Configuration Figure 8 shows the naming conventions for a typical I/O configuration tree in RSLogix 5000.

PLC - PROGRAMMING Doc.no. NA-07-STS009 Revision no.: 2.0
- 25/93 -
Figure 8 – Module Configuration
Task, Program and Routine Naming 5.5
The PLC program shall only have English US text and no special character. Tag name separators shall be done using underscore (_).
5.5.1 Task Name For each task use a short descriptive name of the task function that will improve the application navigation.
• The Main Task shall always be named MainTask.
When using periodic tasks the priority of the task and the scan rate of the task should be included in the task name as shown in Figure 9. Sometimes the scan rate of the task can be changed automatically from the PLC or manually from the SCADA system then the range of execution of the task should be given in the tag name.
Figure 9 – Task Naming Structure
The MainTask shall always be at the top in the task tree followed by the periodic tasks, the naming conventions for the periodic tasks shall be as follows.
“Priority_Time_Description”
Priority: The task priority level from 1-15
Time: Period time or time interval and the time unit e.g. 10s or 10ms

PLC - PROGRAMMING Doc.no. NA-07-STS009 Revision no.: 2.0
- 26/93 -
Description: A short description of the function of the task
“P1_100ms_to_250ms_Bagpulsing_Control”
When the task time can change the vendor must guaranty that the change does not have undesired effects on the scan time or cause any task from overlapping. Each priority can only be used once.
5.5.2 Program Name The Program names must be descriptive of their function where system grouping could be useful. The number of programs should always be kept to a minimum, without losing the control system overview and integrity. Note that a large number of programs will affect PLC performance. Some programs must always present such as.
• IO_Validation (IO Validation for all modules)
• Input_Handling (input mapping / copying)
• DeviceNetInputs (When applicable)
• Communication
• System_Status / Utilities
• DeviceNet Outputs (When applicable)
Figure 10 – Program Naming Structure
5.5.3 Routine Name Each program shall be split up into as many routines as required for the process. Mandatory is to segregate all equipment into separate routines where the routine name represents the equipment tag name. This is done for easy troubleshooting and fault finding of the PLC application.
A short descriptive text is permitted as part of the routine name for equipment. A more detailed description shall be available in the routine description field.

PLC - PROGRAMMING Doc.no. NA-07-STS009 Revision no.: 2.0
- 27/93 -
Figure 11 – Routine name and description
The example given below with:
• Filling pump GH100_AP10_M10
• Flow Pump PG010_AP11_M10_PUMP_A
• Filling valve GH100_AA10
• Discharge valve GH100_AA20
• Filling pressure GH100_CP10
• Discharge pressure GH100_CP20
• Level in tank GH100_CL10_XP10_SILO_310
Figure 12 – Routine naming structure
Each individual routine contains all the equipment code including interlocks, alarms and permissive. Sequences and process control shall not be done within the equipment routines. But separate routines shall be created for the sequences as shown in chapter 8.4.
Tag Naming and usage 5.6
The Tags created within the processor shall be Controller scoped, for all structures used for interfacing and program task interaction as standard. The vendor shall always follow the following steps when creating a PLC application. Assistive tags, unlikely to be shared between programs or used by SCADA/HMI can be program scope.
• Unused tags should always be deleted
PLC - PROGRAMMING Doc.no. NA-07-STS009 Revision no.: 2.0
- 28/93 -
• Comments are obligatory for all tasks, programs, routines and tags.
• Comment associated to a Boolean shall reflect the “TRUE” state (Logical “1”).
• Temporary tags should always be deleted
• Temporary tags and commissioning tags shall be marked with a comment, the developers name and contact information.
Tag naming shall be according to the Norðurál AKS coding standard and shall equipment tags have the same name as given on the P&ID or electrical drawing.
The system tag is split into three components separated with an underscore (_). Figure 13 shows the tag structure for the AKS tag names. Table 14 shows an example of the tag name structure.
Figure 13 – AKS Mask
Refer to Table 2 for information on Norðurál AKS coding system
Equipment Tagname Pump GH100_AP10_M10 Fan FD230_AN10_M10 Valve FD120_AA10_KA10 Pressure Transmitter
FD120_CP10_XP10
Level Transmitter FD340_CL10_XL10
Table 14 – Tag naming structure
5.6.1 Internal PLC Tag Naming When internal PLC tags are created they shall follow the Norðurál AKS coding system.
For example if a PID controller is created it shall take the name of the primary controlled equipment with the PID extension.
• FD230_AP10_M10 shall be FD230_AP10_M10_PID
A timer for equipment shall get the equipment name and the Timer extension.
• FD230_AP10_M10 shall be FD230_AP10_M10_TIMER
If multiple timers need to be created for equipment then an array of timers shall be created and the tag name should for example be:
• FD230_AP10_M10 shall be FD230_AP10_M10_TIMER[xx]

PLC - PROGRAMMING Doc.no. NA-07-STS009 Revision no.: 2.0
- 29/93 -
5.6.2 Intermediate Variables Sometimes, intermediate variables need to be created for calculation, alarm or any other use. The AKS system prefix is always preferred as this makes tag filtering in RSLogix5000 easy.
Linked
Where atomic or structured type tags are used in the controller as internal tags related to an existent input/output or an existing dynamic object, it is beneficial to end the tag name with an extension, which conveys easily the specific function of the tag.
The intermediate variable shall have the same format with an adjustment of the variable extension code function part using extension that shall always be preceded with an underscore (_) if used with atomic base tags.
Extension can also be used to identify a device or instrument related to equipment like a main disconnect switch for a conveyor’s motor
• FD230_AN10_M10_DISC.
Extensions will be related to the attributes of the instance or elements of the object structure. For structured tags the dot (.) is used instead of an underscore (_).
• FD230_AN10_M10_TIMER[1].ACC
Unlinked
The variable shall be entered following instrument’s format except that the loop number part shall take a sequential number. In these circumstances, the tag description shall be very descriptive. This kind of tag should only be used when no link exist with an existing instrument. This can be used for internal usage.
• _FD230_SEQ001_TIMER[xx]
5.6.3 External Variables A tag used for an external variable, received or sent, shall be entered with an underscore (_) at the beginning. These tags are for example produced, consumed and messages. All other part of the tag name shall follow the tag name of the primary controlled equipment.
Motor disconnected signal from another PLC used in the logic for interlock purpose.
• _FD230_AN10_M10_DISC
5.6.4 Variable Extensions Codes Variable extension codes for PLC tag naming where required as additional information or for tag separation.

PLC - PROGRAMMING Doc.no. NA-07-STS009 Revision no.: 2.0
- 30/93 -
Extension Funtion Alarm Alarm Alm Alarm Acq Acquire Ack Acknowledge Byp Bypass Cmd Command Com Communication Chk Check Disable Disable Disc Disconnected Enable Enable Fault Fault Fbk Feedback Hand Hand control Intlk Interlock Inhibit Inhibit IOFault Communication module status JogF Jog Forward JogR Jog Revers Lock Lock NB Non bypassable Ok Ok Ovrd Override Ovrl Overload Perm Permissive Pause Pause PTC PTC fault Rel Release Run (Running) Run / Running status Reset Reset Start Start Stop Stop Starting Starting Stopping Stopping Sim Simulation Trip Trip Timer Timer Unlock Unlock
Table 15 – Variable extension codes
RSNetworx File Naming Standards 5.7
5.7.1 RSNetworx for Ethernet The file name shall be in relation with the PLC and the network area as:
“GRTAC_AKxxx_DTCxxx_IDxxx.ent”
GRT: Norðurál Grundartangi (GRT is always present)
AC: Refers to the area code where the application is located refer to the Table 11).
AKxxx: Refers to the system code refer to the Norðurál AKS coding system. xxx refers to the system number see Table 2
DTCxxx: Refers to the device type e.g. (CLX, GLX CPL). xxx is a sequential number to ensure that no duplicate name is created inside an area see Table 12.
IDxxx: Net ID EN001 identified the I/O Ethernet Network and is number 01

PLC - PROGRAMMING Doc.no. NA-07-STS009 Revision no.: 2.0
- 31/93 -
“GRT80_FD200_CLX001_EN001.ent”
5.7.2 RSNetworx for ControlNet The RSNetworx for ControlNet name shall be in relation with the PLC and the network area as:
“GRTAC_AKxxx_DTCxxx_IDxxx.xc”
GRT: Norðurál Grundartangi (GRT is always present)
AC: Refers to the area code where the application is located refer to the Table 11.
AKxxx: Refers to the system code refer to the Norðurál AKS coding system. xxx refers to the system number see Table 2
DTCxxx: Refers to the device type e.g. (CLX, GLX CPL). xxx is a sequential number to ensure that no duplicate name is created inside an area see Table 12.
IDxxx: Net ID CN001, Identified as the I/O ControlNet Network and is number 001.
“GRT80_FD200_CLX001_CN001.xc”
When the ControlNet configuration has been completed the path to the ControlNet file must be deleted from the RSNetworx tab in the ControlNet module configuration, and the file issued to Norðurál. This is done so that when someone downloads to the processor the ControlNet configuration does not get overwritten.
Figure 14 – ControlNet File Path
5.7.3 RSNetworx for DeviceNet The RSNetworx DeviceNet configuration file shall be linked in RSLogix 5000 as standard in all cases. The file name shall be in relation with the PLC and the network area as:
“GRTAC_AKxxx_DTCxxx_IDxxx.dnt”
GRT: Norðurál Grundartangi (GRT is always present)
AC: Refers to the area code where the application is located refer to the Table 11.
AKxxx: Refers to the system code refer to the Norðurál AKS coding system. xxx refers to the system number see Table 2
DTCxxx: Refers to the device type e.g. (CLX, GLX CPL). xxx is a sequential number to ensure that no duplicate name is created inside an area see Table 12.
IDxxx: Net ID DN001, Identified as DeviceNet and slot number of the installed module.
“GRT80_FD200_CLX001_DN001.dnt”

PLC - PROGRAMMING Doc.no. NA-07-STS009 Revision no.: 2.0
- 32/93 -

PLC - PROGRAMMING Doc.no. NA-07-STS009 Revision no.: 2.0
- 33/93 -
PROCESSOR AND MODULE CONFIGURATION STANDARD 6The following processor and module configuration settings shall be used as standard.
Processor Configuration 6.1
The controller shall be configured with Power up and Fault routines as standard. A system overhead time slice of 30% (default is 20%) shall be configured. This is done to gain communication time resource.
Figure 15 – System Overhead Time Slice
The controller SFC shall also be configured to execute current active steps and restart at the most recently executed step. The configuration of the controller shall not scan the active step at last. The Default configuration shall be used se Figure 16.
Figure 16 – SFC Execution Controller Configuration
6.1.1 Date and Time Setup A GPS clock will be used to synchronize all servers and PLC’s at the Norðurál Site.

PLC - PROGRAMMING Doc.no. NA-07-STS009 Revision no.: 2.0
- 34/93 -
6.1.2 System Overhead Time Slice The system overhead time slice specifies the percentage of continuous task execution time that is devoted to communication and background redundancy functions. System overhead functions include the following:
• Communicating with programming and HMI devices (such as RSLogix 5000 software and FTView)
• Responding and sending messages
• Serial port message and instruction processing
• Alarm instruction processing
The controller performs system overhead functions for up to 1 ms at a time. If the controller completes the overhead functions in less than 1 ms, it resumes the continuous task. The advantage in having only periodic tasks are that the CPU will finish scanning all tasks and then the CPU goes idle and handles all other operations such as messaging and communication. When using a continuous task the task will be interrupted regularly depending on the system overhead time slice setting.
The Figure 17 compares a continuous and periodic task:
Figure 17 – Periodic and continuous tasks
The Logix5000 CPU time slices between the continuous task and system overhead. Each task switch between user task and system overhead takes additional CPU time to load and restore task information.
Communication Modules Setup 6.2
There are multiple ways to set up a communication module and they impact the control system in different ways as described below. The recommended setup for the Norðurál Site is Rack optimized for all Remote IO since it will limit the amount of connections used by the network.

PLC - PROGRAMMING Doc.no. NA-07-STS009 Revision no.: 2.0
- 35/93 -
Figure 18 – Communication Format settings

PLC - PROGRAMMING Doc.no. NA-07-STS009 Revision no.: 2.0
- 36/93 -
Rack Optimized Communication Format
• A rack optimized connection economizes connection usage between the owner and digital I/O modules in the remote chassis. Only one connection is made from the controller to the network adapter for the rack image.
• Choosing a rack connection is only available to digital I/O modules, although direct connections to digital I/O modules are also allowed.
• Analog I/O modules cannot participate in the rack connection, so all connections to Analog modules are direct connections.
“None” Communication Format
• Choosing “None” as the communication format will increase the number of connections required for a remote rack.
• Free calibration of the RPI is possible with “None” as the communication format
• The diagnostic function of digital modules will be available when using diagnostic modules.
Listen Only / Rack Optimized Communication Format
• An I/O connection where another controller owns/provides the configuration data for the module. A controller using a listen only connection does not write configuration. It can only establish a connection to the module when the owner controller is actively controlling.
6.2.1 Electronic Keying The standard setup for electronic keying for the Norðurál Site for all modules shall be set to compatible keying.
The following criteria must be met, or else the inserted module will reject the connection:
• The Module Types, Catalog Number, and Major Revision must match
• The Minor Revision of the physical module must be equal to or greater than the one specified in the software
6.2.2 RPI Settings The RPI setting determines how fast the network scans the IO network or individual modules. The setting for the RPI must correspond to the PLC scan time. If the RPI setting is too slow compared to the scan time then the PLC can miss updates in the IO for one or more scans. Setting the RPI faster (specifying a smaller number) than what your application needs wastes network resources, such as ControlNet schedule bandwidth, network processing time, and CPU processing time. Choosing an extremely fast RPI setting will result in too much time being used for I/O communication rather than being able to use the time for L2 communication
A general rule of thumbs is that the RPI should be half the scan time of the routine. For example, if the scan time of the PLC is 80 ms, set the RPI at 40 ms. The data is asynchronous to the controller scan, so you sample data twice as often (but no faster) than you need it to make sure you have the most current data.

PLC - PROGRAMMING Doc.no. NA-07-STS009 Revision no.: 2.0
- 37/93 -
Figure 19 – RPI Settings
The type of controller determines the data transmission rate.
• ControlLogix controllers transmit data at the RPI you configure for the module.
• CompactLogix controllers transmit data at powers of 2 ms (such as 2, 4, 8, 16, 64, or 128). For example, if you specify an RPI of 100 ms, the data actually transfers at 64 ms.
Ethernet Modules Configurations 6.3
Ethernet modules shall be configured in the following manner as standard.
For all L0 communication on Ethernet the default IP range shall be used which is 192.168.1.xxx where the L0 Ethernet module in the local rack will always have the IP address 192.168.1.1.
• PLC and IO 192.168.1.1-49
• Directly connected devices 192.168.1.50-149
• HMI devices: 192.168.1.150-199
• EWS 192.168.1.200-249
For the L0 devices the Subnet Mask shall be 255.255.255.0

PLC - PROGRAMMING Doc.no. NA-07-STS009 Revision no.: 2.0
- 38/93 -
Figure 20 – Local Rack L0 Ethernet Modules Configuration
Figure 21 – Remote Rack L0 Ethernet Modules Configuration
For allowed communication modules for the Norðurál Site refer to Norðurál recommended hardware document.
6.3.1 RSNetworks for Ethernet The tag names for equipment shall match in the RSLogix 5000 software and the RSNetworks. Racks shall get the name of the control panel the modules are located in see Figure 22 and Figure 23.

PLC - PROGRAMMING Doc.no. NA-07-STS009 Revision no.: 2.0
- 39/93 -
Figure 22 – RSNetworks for Ethernet Configuration
Figure 23 – Ethernet configurations
6.3.2 Level 1 and Level 2 Ethernet configuration For Level 1 and Level 2 Ethernet communication the IP addresses shall be issued to vendors by Norðurál.
Figure 24 – Network structure
6.3.3 Monitoring of Ethernet IP network Monitoring of the Control system Ethernet Network shall be done in the PLC and information relayed to the SCADA system, the IP addressed shall be read from the PLC available in the SCADA system on a network overview screen.

PLC - PROGRAMMING Doc.no. NA-07-STS009 Revision no.: 2.0
- 40/93 -
A message instruction must be used to retrieve the IP address from Ethernet devices in order to display them on a SCADA system for easy troubleshooting of the Network.
The tag name should be the same as the tag name for the module followed by _IP
Example:
“EN001_LOR001_S01ENB_IP”
“EN001_ENR004_AEN_IP”
Note: the descriptive text in the remote rack tag name shall be skipped in this case.
Figure 25 – Message instructions to retrieve IP addresses from Modules
Further details on how to monitor IP addresses can be found in the Rockwell Automation documentation.
6.3.4 Stratix 8000 Switches The Stratix 8000 switches will be used as standard for the Norðurál Site for level 1 communi-cation. The approved switches and expansion modules are listed in Norðuráls recommended hardware documentation.
The Stratix 8000 Ethernet Managed Switches provide a rugged, easy-to-use, secure switching infrastructure for harsh environments. These switches can connect to network devices such as servers, routers, and other switches. In industrial environments any Ethernet-enabled industrial communication devices can be connected including programmable logic controllers (PLCs), human-machine interfaces (HMIs), drives, sensors, and I/O.
You can mount the switches on a DIN rail in an industrial enclosure, on a wall, or panel.

PLC - PROGRAMMING Doc.no. NA-07-STS009 Revision no.: 2.0
- 41/93 -
Figure 26 – Stratix 8000 switch
The selected switch shall be chosen with the requirements of the port usage. A 20% of spare ports shall be available. If more ports are needed, it is possible to add a copper or a fiber expansion module with 8 ports.
A power supply 24Vdc class 2 shall be used to feed the switch. For more information about installation and configuration of Stratix 8000 see Rockwell Automation documentation.
In the case where the Stratix 8000 is used in a critical redundant system, or where it is required for higher availability and reliability, the second power input could be used. For most of the application it is not mandatory to use the second power input.
The Startix 8000 has an AOI and a SCADA faceplate that shall be used for monitoring and maintaining the switch.
Figure 27 – Stratix 8000 AOI
6.3.5 Device Level Ring (DLR) A DLR is an Ethernet ring network and shall be used in Ethernet applications at the Norðurál Site. The DLR protocol supports a simple, single-ring topology, it has no concept of multiple or overlapping rings. A network installation may however use more than one DLR-based ring provided each of the rings is isolated. DLR protocol messages from one ring must not be present on another ring.
A DLR network includes at least one node configured to be a ring supervisor, and any number of normal ring nodes. It is assumed that all the ring nodes have at least two Ethernet ports and incorporate embedded switch technology. Non-DLR multi-port devices “switches or end-devices” may be placed in the ring subject to certain implementation constraints. Non-DLR devices will also affect the worst-case ring recovery time.

PLC - PROGRAMMING Doc.no. NA-07-STS009 Revision no.: 2.0
- 42/93 -
Figure 28 – DLR normal operation
Figure 28 illustrates the normal operation of a DLR network. As it is shown there, each node has two Ethernet ports, and is assumed to have implemented an embedded switch. When a ring node receives a packet on one of its Ethernet ports, it determines whether the packet needs to be received by the ring node itself (e.g., the packet has the node's MAC address) or whether the packet should be sent out on the node's other Ethernet port.
The active ring supervisor blocks traffic on one of its ports with the exception of few special frames and does not forward traffic from one port to other. Because of this configuration a network loop is avoided and only one path exists between any two ring nodes during normal operation. The active ring supervisor transmits a Beacon frame through both of its Ethernet ports once per beacon interval (400µs by default). The active ring supervisor also sends Announce frames once per second.
Figure 29 – DLR with a failed link
The DLR protocol is suitable for EtherNet/IP networks. A DLR network is tolerant to all single-point failures providing high network availability in a single-ring topology. The worst case fault recovery time in a 50-node DLR network is less than 3ms.
6.3.5.1 Device Level Ring (DLR) Configuration In a DLR configuration, an EN2TR communication card in the CPU CLX Rack is the preferred choice for the acting DLR supervisor. Configuring the Module properties of the communication card is done in the Network tab of the EN2TR configuration pane.

PLC - PROGRAMMING Doc.no. NA-07-STS009 Revision no.: 2.0
- 43/93 -
Figure 30 – Enable DLR in Network tab for DLR configurations
Once one supervisor mode has been selected, the network will establish the DLR ring and issue faults according the current status. Both ports of the EN2T must be connected and active for the DLR to work.
Figure 31 – Both ports active for DLR operation
Once the supervisor node has been configured the remaining nodes can be configured and all faults cleared.

PLC - PROGRAMMING Doc.no. NA-07-STS009 Revision no.: 2.0
- 44/93 -
Figure 32 – DLR has been selected and a fault issued.
6.3.5.2 ETAP Ethernet configuration The IP addresses and naming for ETAP’s follows the same standard as the other Ethernet modules. For configuration of the ETAP’s refer to Rockwell Automation literature.
ControlNet Modules Configurations 6.4
ControlNet modules communication format shall use Rack Optimization as a standard. The communication format selected will be used for the entire rack. Electronic keying shall be set to Compatible Keying.
Figure 33 – ControlNet Modules Configuration
Connections shall be based on appropriate application usage of the derived data, and the RPI shall not be set above the task operation rates associated to devices or I/O module under this ControlNet module.
6.4.1 ControlNet Keeper The ControlNet Configuration Keeper node is responsible for maintaining and distributing the network and scheduling information. The Keeper node must hold the network attributes and scheduling information in non-volatile storage, allowing re-distribution after a power-fail event. Every ControlNet link must have a Keeper-capable node to:

PLC - PROGRAMMING Doc.no. NA-07-STS009 Revision no.: 2.0
- 45/93 -
• Support scheduled traffic
• Save and distribute the network parameters and scheduling information
6.4.2 ControlNet Specifications The ControlNet modules used at the Norðurál Site shall be of the following category as standard or higher.
1756-CN2(R)/B
1756-CNB(R)/E
Attribute 1756-
CN2(R)/B 1756-CNB(R)/E
ControlNet communication rate 5 Mbps 5 Mbps Logix communication connections
128 40…48
Connections supported, max 128 64 Number of nodes, max 99 99
Table 16 – ControlNet module Specifications
6.4.3 RSNetworx for ControlNet CLX’s and I/O adapters shall be numbered sequentially starting with address 1. Node number skipping shall not be done if not necessary. Other devices such as programming terminals or HMI interfaces that may be attached to ControlNet networks shall have an address that is sequential to those of the CLX`s and I/O adapters. In all cases, the last node address of the Smax node number will be left open for network configuration. This must be taken into account for the configuration of the UMAX in RSNetworx.
ControlNet is a deterministic and scheduled network. In each application the appropriate NUT time shall be chosen based on the system requirements directly. The amount of unscheduled space versus the scheduled utilization shall be checked to ensure that there is sufficient capacity for current and future planned requirements allowing for the 20% spare capacity criteria.
As general rules:
• SMAX and UMAX shall be kept as small as possible
• Consideration shall be given to scheduling ControlNet without affecting other systems
• 400,000 Bytes of unscheduled bandwidth shall be left for spare
Other considerations:
• RPIs shall be determined only by real process requirements
• Analogue modules shall not use RPIs faster than the RTS rates supported
• COS will not be used on I/O modules where RPI rate has been set to process requirements

PLC - PROGRAMMING Doc.no. NA-07-STS009 Revision no.: 2.0
- 46/93 -
Figure 34 – ControlNet Network Parameter settings
Every NUT ControlNet allows a 480 byte data CIP packet on the network for each scheduled node, this shall be taken into account when configuring and programming data exchanges. The buffer length of 480 bytes shall be used as the principle forming factor for the size of arrays and structures exchanges in the communications as this is the size of interoperable data packet that can be used directly with ControlNet.
RSNetWorx for ControlNet and RSLogix 5000 shall be used to configure ControlNet network. I/O relationships shall be configured with RSNetWorx for ControlNet to set network planning details such as SMAX, UMAX, NUT, Media redundancy, media length and repeaters.
In all cases the NUT shall be chosen based upon the minimum update time required by the application.
To set the SMAX and UMAX these following rules shall be respected:
• The total number of nodes addresses in the network;
• Add to the 20% spare capacity criteria for future planned requirements;
• And Round up to the next value.
• SMAX and UMAX shall be equal.
Example:
• The network has 13 nodes.
• Add 20% gives 15.6 round up and get 16
• SMAX and UMAX shall be 16.
Information on media distance and media types refer to the Rockwell Automation user manuals.
The equipment names in the RSNetworks file shall match with the equipment names in the RSLogix 5000 software, along with the descriptions.

PLC - PROGRAMMING Doc.no. NA-07-STS009 Revision no.: 2.0
- 47/93 -
Figure 35 – ControlNet Configurations
The physical control panel names shall be given in the RSNetworks Graph sheet.
Figure 36 – ControlNet Panel Names
DeviceNet Modules Configurations 6.5
Design of DeviceNet communication should aim to keep the DeviceNet modules located in the Local rack. But if required due the Network distance, a DNB module can be located in a remote rack. But attention should be given to the fact than DeviceNet consumes a lot of communication bandwidth.
The preferred DeviceNet scanner is the 1756-DNB and the DeviceNet Bridge module shall always be node zero.
The Input and output Assembly size of the DeviceNet Scanner shall be set to the required size. By default, the maximum mapped devices size is 124 DINT’s Input and 123 DINT’s output. The input and output size shall be reduced and optimized, especially if the DNB module is in a remote rack, keeping 20% spare. The minimum status size shall be left at 32 DINTs. This is done to minimize network bandwidth.
Example:
A DeviceNet contains equipment’s all with different I/O sizes. It is not allowed to use the same DINT for multiple equipment, the size shall be rounded up to a whole DINT value. Table 17 shows the calculation of the DeviceNet network where the total input size is 11 DINT and the output size is 10 DINT. The output and Input size shall match for the DeviceNet scanner. In this example the input size is larger and shall govern in the calculations. 20% extra IO size shall be available.
• The network has 11 DINT Input and 10 Dint Output.
• Add 20% gives 13,2 DINT round up to the next whole DINT and get 20
• Input and Output size shall be set to 20.

PLC - PROGRAMMING Doc.no. NA-07-STS009 Revision no.: 2.0
- 48/93 -
Device EQ1 EQ2 EQ3 EQ4 Input size Byte 18 7 12 4 Input size DINT 4,5 1,75 3 1 Input size DINT Round up 5 2 3 1 Output size Byte 8 5 15 6 Output size DINT 2 1,25 3,75 1,5 Output size DINT Round up 2 2 4 2
Table 17 – DeviceNet I/O size
Figure 37 – DeviceNet Modules Configuration
Compatible Keying mode shall be used as standard Electronic Keying.
Devices shall be configured for Polled operation Every Scan as default standard.
The Cyclic operation can be used for some devices that are to be sampled independent of change of status, but considerations should be taken into account.
The Change of State operation (COS) can be used when only discrete data is sampled such as limit switch or photocell or where the inputs are known not to change at a rate above that of the RPI required and set for the module adapter base.
For COS/Cyclic configuration special considerations should be taken into account like Expected Packet Rate and network scan time. In that case, it should only be done knowing the impact of each parameter setting. If device type is configured as Cyclic, the Heartbeat Rate shall match the device application time cycle and each device shall have different Heartbeat Rate to reduce network congestion.
The Strobed operation shall not be used.
Generally, it is best to go with a network of all the same types of messaging as this reduces the variance in transmit times for the packets. Typical setting for Polled communication is shown in Figure 38.

PLC - PROGRAMMING Doc.no. NA-07-STS009 Revision no.: 2.0
- 49/93 -
Figure 38 – Edit I/O Parameters
It is strictly forbidden to use Device Logic at any time by devices that have that possibility. All logic must be done within the CLX processor.
6.5.1 RSNetworx for DeviceNet The DeviceNet file shall be thoroughly documented and commented as shown in Figure 39 Where the Scanner name and description shall represent the name in the RSLogix5000 and the equipment shall have tag names visible and commented.
Figure 39 – Typical DeviceNet Setup
For information on DeviceNet physical media and network architecture refer to the Rockwell Automation DeviceNet publications.
6.5.2 DeviceNet mapping Standard device configurations shall be used for all devices on DeviceNet, these device configurations shall be made initially via the EDS files. These assemblies for input and output shall then be mapped into the scanner in node addresses order. If the EDS file needs to be edited then the edited file must be issued to Norðurál for reference and maintenance.

PLC - PROGRAMMING Doc.no. NA-07-STS009 Revision no.: 2.0
- 50/93 -
Figure 40 – DeviceNet Scanlist
Device shall be mapped in such way to the DNB scanner that the same DINT does not share data from different node addresses on DeviceNet. This shall be achieved by using the Advanced mapping tool in RSNetworx. It is not allowed to leave empty spaces in the mapping since it will result in higher scan time with the transfer of useless information.
Examples of Mapping and Advanced Mapping are shown below for standard devices.
Figure 41 – DeviceNet Input Assembly

PLC - PROGRAMMING Doc.no. NA-07-STS009 Revision no.: 2.0
- 51/93 -
Figure 42 – DeviceNet Output Assembly
Figure 43 – DeviceNet Advanced Mapping
As shown in Figure 43 the device with node address 3 has been mapped into DWord 6. The input and output assembly’s must match meaning that if a device has a large input assembly but a short output assembly the larger assembly size shall govern and the next device shall be mapped after the larger assembly.

PLC - PROGRAMMING Doc.no. NA-07-STS009 Revision no.: 2.0
- 52/93 -
Data [DINT] Input Output Data[0] FD230_AN10_M10 FD230_AN10_M10 Data[1] FD230_AN10_M10 FD230_AN10_M10 Data[2] FD230_AN10_M10 FD230_AN10_M10 Data[3] FD230_AN10_M10 FD230_AN10_M10 Data[4] FD230_AN10_M10 FD230_AN10_M10 Data[5] Not used FD230_AA12 Data[6] FD230_AN11_M10 FD230_AN11_M10 Data[7] FD230_AN11_M10 FD230_AN11_M10 Data[8] FD230_AN11_M10 FD230_AN11_M10 Data[9] FD230_AN11_M10 FD230_AN11_M10 Data[10] FD230_AN11_M10 FD230_AN11_M10 Data[11] Not used FD230_AA11 Data[12] Not used Not used Data[13] Not used Not used Data[14] Not used Not used Data[15] Not used Not used Data[16] Not used Not used Data[17] Not used Not used Data[18] Not used Not used Data[19] Not used Not used Data[20] Not used Not used
Table 18 – DeviceNet Mapping
6.5.3 Automatic Device Recovery (ADR) Automatic Device Recovery (ADR) shall be used as standard on the master control DNB scanner especially where dip switches or rotary selectors are not available on a device for address selection. ADR is not supported for all DeviceNet components but shall be used wherever supported.
Important: make sure that when configuring ADR in RSNetworx software, that the latest slave device configuration is uploaded to the RSNetworx project and saved. This is because when the recovery configuration is loaded into the ADR configuration tool, it is NOT uploaded from the network, but is gotten from the project file. If the latest device configuration is not already in the project file, then factory defaults will be used for the ADR data. An upload from network will cause the latest configuration to be read into RSNetworx and be used in the configuration recovery function to a slave device.
PLC - PROGRAMMING Doc.no. NA-07-STS009 Revision no.: 2.0
- 53/93 -
Figure 44 – DeviceNet ADR Setting
6.5.4 DeviceNet Tag Generator The DeviceNet Tag Generator shall be used as standard for all DeviceNet networks on the Norðurál Site.
DeviceNet Tag Generator will automatically create two routines for each DeviceNet module selected. Each of these routines will contain all related ladder code associated to input/output device image data copied, using synchronous copy file (CPS) instruction to be used by the program. One routine will be automatically created for device input into the DeviceNetInputs program and one for device output into the DeviceNetOutputs program.
These routines name will be as per the module name followed by “InputsRoutine” and “OutputsRoutine” see Figure 45.
Figure 45 – DeviceNet Tag Generated Routines
The DeviceNet Tag Generator will automatically create UDT for the imported devices these UDT must be adapted to the PLC application. The name of the UDT shall be renamed to a name descriptive of the application use.
As an example a network containing a Norgren Valve Island has been imported with the use of the DeviceNet Tag Generator. The imported UDT is called _002A_NA_O_AAB94180 which is not descriptive of the function of the Valve Island at all. The name should be changed to a name more descriptive of its function such as Norgren_Valve_Island_Output_Data se Figure 47
Figure 46 – UDT after import with the DeviceNet Tag Generator

PLC - PROGRAMMING Doc.no. NA-07-STS009 Revision no.: 2.0
- 54/93 -
Figure 47 – UDT upgraded
The original UDT is created as an array of SINT(4) to make maintenance and troubleshooting easier the instances of the UDT shall be modified to a structure similar to the instance parameter setup in the equipment user manual. For this example the equipment controls 20 valves which fill up one DINT starting at DINT.0 and ending at DINT.19 the rest is unused. The UDT should be modified as shown above and should be of the same size.

PLC - PROGRAMMING Doc.no. NA-07-STS009 Revision no.: 2.0
- 55/93 -
Figure 48 – UDT Tag structure
The tags or any functions created in the DeviceNet tag generator should not be changed except for the renaming of the UDT since the tag generator will rewrite the routine if it is run again. Once the UDT has been modified then the CPS function shall be used to create an equipment oriented tag.
Example:
The valve island only has outputs therefore only the outputs need to be mapped into the DeviceNet tag see Figure 49.
Note: here the last section of the tag name has been skipped since there are multiple valves associated to this tag name.
Figure 49 – CPS instruction used for UDT aliasing
This will make the navigation in the Program tag view easier as a filter can be applied for the data type and a function of each bit is visible from the view and the user does not have to look at the equipment manual to figure out which function a specific bit has.

PLC - PROGRAMMING Doc.no. NA-07-STS009 Revision no.: 2.0
- 56/93 -
Analog module configuration 6.6
The analog modules shall be scaled via the PlantPAx scaling function in the SCADA system since that will result in easy troubleshooting and analyzing of the scaling for modules. Some modules offer/require internal scaling and shall be set as generic as practical and perform scaling in the P_Ain blocks.

PLC - PROGRAMMING Doc.no. NA-07-STS009 Revision no.: 2.0
- 57/93 -
PROGRAM STRUCTURE 7A PLC application code is split up into tasks, programs and routines. When designing a PLC application attention needs to be given to the number of tasks and programs within an application code. Since the way these items are used can affect the scan time of the PLC.
A PLC always reads code from left to right and from top to bottom therefore the structure of a PLC application is important in order for the code to execute in the right order. Avoid checking the same conditions many times. Each instruction adds scan time to the controller.
A task provides scheduling and priority information for a set of one or more programs. Tasks can be configured as either continuous, periodic, or event. A task contains programs, each with its own routines and program-scoped tags. Once a task is triggered (activated), all the programs assigned to the task execute in the order in which they are listed in the Controller Organizer.
Programs are useful to segregate areas or application zones and organize groups of routines that need to share a common data area
Routines contain the executable code. Each program has a main routine that is the first routine to execute within a program. Use logic, such as the Jump to Subroutine (JSR) instruction, to call other routines. Optional program fault routine can also be specified. An unlimited amount of routines can be used within a program.
• Tasks are used to configure controller execution
• Programs to group data and logic
• Routines to encapsulate executable code written in a single programming language
Periodic tasks shall be used for application specific tasks such as PID loop. These tasks shall state in their name according to the associated function, as shown in the picture below:
Figure 50 – Loop Control
Periodic tasks shall have a task monitor AOI to monitor the operation of the task and display it in the SCADA system.

PLC - PROGRAMMING Doc.no. NA-07-STS009 Revision no.: 2.0
- 58/93 -
Figure 51 – Task Monitor AOI
Task Priorities 7.1
Each task in the controller has a priority level. A higher priority task (such as 1) interrupts any lower priority task (such as 15). The continuous task has the lowest priority and is always interrupted by a periodic or event task.
If a periodic or event task is executing when another is triggered and both tasks are at the same priority level, the tasks will share execution time and the first task will run for 1ms and then the other will run for the same time. This interruption between the two tasks will continue until one of the tasks completes execution.
At the end of a task, the controller performs output processing for the output modules in your system. This processing depends on the number of output connections configured in the I/O tree.
If there are too many tasks, then;
• Tasks may experience overlaps. If a task is interrupted too frequently or too long, it may not complete its execution before it is triggered again.
• If a periodic task is set to run every 10 ms but the task takes 11ms to scan it will interrupt itself after 10 ms and will not scan the remainder of the Code
• Controller communication might be slower.
• If the application is designed for data collection, multiple tasks should be avoided. Switching between multiple tasks limits communication bandwidth.
Programming languages 7.2
In a Logix controller there are four types of programming languages and their optimal use differs from one to the other.
• Ladder logic (LD)
o Continuous or parallel execution of multiple operations (not sequenced)
o Boolean or bit-based operations
o Complex logical operations
o Message and communication processing

PLC - PROGRAMMING Doc.no. NA-07-STS009 Revision no.: 2.0
- 59/93 -
o Machine interlocking
• Operations that service or maintenance personnel may have to interpret to troubleshoot the machine or process.
o Servo motion control
• Function block diagram (FBD)
o Loop control
• Sequential function chart (SFC)
o High-level management of multiple operations
o Repetitive sequences of operations
o Batch process
• Motion control sequencing (via sequential function chart with embedded structure text)
o State machine operations
• Structured text (ST)
o Complex mathematical operations
o ASCII string handling or protocol processing
For the Norðurál Site three language types may be used Ladder Logic, Function Block Diagrams and Sequential function charts, but they can only be used for their recommended application usage as shown in the list above. In special cases Structured Text can be used but only with the approval of owner.
7.2.1 Ladder Logic Ladder logic shall be the primary language used on the Norðurál Site since it is the simplest form of programming and easily read by maintenance personnel.
Description for all parameters and tags as well as rung section description is mandatory. Comments will be included for each section and routine header, as general function and operation as standard. Each tag used shall also be commented as standard.
Device based programming is mandatory i.e. all equipment shall be in separate routines such as motors, valves, analog instruments etc. refer to Figure 52 for an example of the Ladder routine setup.
Important: The use of the Latch and Unlatch instructions should be kept to a minimum since they will retain their state after power failure and are generally harder to debug.

PLC - PROGRAMMING Doc.no. NA-07-STS009 Revision no.: 2.0
- 60/93 -
Figure 52 – Ladder Logic
7.2.2 Sequential Function Charts SFC’S are the preferred method of programming for all kind of sequential functions and state machine management. The SFC’s shall however always be used in combination with Ladder logic. All logical evaluations shall be externally handled by a Ladder program.
7.2.2.1 SFC Naming Figure 53 shows an SFC routine and the associated ladder routine. The SFC shall have a descriptive name following a running sequence number. The Name shall be appended with a "_SFC". The associated ladder routine shall bear the same name, with an "_LAD" instead of the "_SFC"
Figure 53 – Routines to Control a Sequence
7.2.2.2 SFC Basics SFC programming offers a graphical method of organizing the program. The four main components of an SFC are steps, actions, transitions and the transition result. Steps are merely chunks of logic, i.e., a unit of programming logic that accomplishes a particular control task. Actions represent commands to external equipment associated with particular actuator or logic action. Transitions are the mechanisms used to move from one step to another. Control logic for each Step, Action and Transition is programmed in Ladder Diagram.
As a graphical language, SFC programming offers you several choices for executing a program, each depicted in a visually distinct way. In a sequential configuration, the processor simply

PLC - PROGRAMMING Doc.no. NA-07-STS009 Revision no.: 2.0
- 61/93 -
executes the actions in step 1 repeatedly (command to open valve), until the transition logic becomes true (valve is open). The processor then proceeds to step 2.
Figure 54 – SFC elements Initial Step
All SFC begin in their initial steps after restart. The tag in the initial step shall always be _SFC.Step[0].
Care must be taken when doing online modifications to SFC routines. When changes are activated, the SFC is reset to the Initial step.
Figure 55 – Initial Step
7.2.2.3 Selective Branch In a selective branch, only one branch is executed depending on which transition is active. In Figure 56, a selection branch is shown. In every scan transitions T4, T5 and T6 are checked. The path belonging to the first transition to be active is chosen. If T5 is active first, then S5 is the next active step. If more than one transition is active within the same scan, the default priority shall be used, where the priority decreases from left to right and the leftmost sequence is executed.
Figure 56 – Selective branch
S2
T4 T5 T6
S3 S5
T7 T9
S4 S6
T8 T10
S7
Transition
Step Action
Reaction

PLC - PROGRAMMING Doc.no. NA-07-STS009 Revision no.: 2.0
- 62/93 -
7.2.2.4 Simultaneous Branch In a simultaneous branch, all branches are executed until the transition becomes active. From Figure 57, Steps S3, S5 and S7 are executed after S2/T6 is done. T9 is not tested until all paths are done; S4, S6 and S7 have to be active.
Figure 57 – Simultaneous branch
7.2.3 Function Block Diagram Like SFC, FBD is a graphical language that allows programming in other languages (ladder, instruction list, or structured text) to be nested within the FBD. In FBD, program elements appear as blocks which are "wired" together in a manner resembling a circuit diagram. FBD is mostly useful in those applications involving a high degree of information/data flow between control components, such as process control.
On the Norðurál Site FBD shall only be used for loop control and the standard rules apply to tag names and descriptions.
S2
T6
S3 S5 S7
T7 T8
S4 S6
T9
Simultaneous Branch

PLC - PROGRAMMING Doc.no. NA-07-STS009 Revision no.: 2.0
- 63/93 -
Figure 58 – Function Block Diagram
7.2.4 Startup of PLC application code. On transition to Run mode, the controller prescans logic to initialize instructions. The controller resets all state-based instructions, such as outputs (OTE) and timers (TON). Some instructions also perform operations during prescan. For example, the ONSR instruction turns off the storage bit. Note that latched bits (OTL) retains the state after power failure / Pre scan/First Scan.
First scan differs from Prescan in that the controller does not execute logic during prescan. The controller executes logic during first scan, the controller sets the S:FS bit for one scan:
• During the first scan that follows prescan.
• During the first scan of a program when it has been uninhibited.
• Each time a step is first scanned (when S:FS is set). You can view the S:FS bit being set only from the logic contained in actions that execute during the first scan of their parent step.
The S:FS bit should be used to ensure that when the PLC is put into run mode the equipment starts from a safe state.
7.2.5 Arrays and User Defined data types (UDT) User Defined data types shall be used as much as possible if a UDT is not applicable then arrays should be used this will reduce controller scan time and memory.
When a tag is created, the controller always sets aside at least 4 bytes (32 bits) of memory. The controller does this even if the tag needs only 1 bit.
When you create an array or a user-defined data type, the controller packs smaller data types into 4-byte (32-bit) words. This means the controller has less data to manipulate.
This array of 32 BOOLs takes only 4-bytes:

PLC - PROGRAMMING Doc.no. NA-07-STS009 Revision no.: 2.0
- 64/93 -
Figure 59 – Boolean array
These 3 BOOL tags take 12 bytes total (3 tags x 4 bytes/tag 12 bytes).
Figure 60 – Boolean tags
In addition to memory allocation for data, a tag uses additional memory in the controller. To manipulate SINT or INT data, the controller converts the values to DINT values, performs the programmed manipulation, and then returns the result to a SINT or INT value. This requires additional memory and execution time when compared to using DINT values for the same operation.
Figure 61 – Data type memory allocation
UDT should be kept as compact as possible and like data types should be put together to save memory. Align all the BOOLs together.
• Align all the SINTs together.
• Put all the INTs together.
• Put all the REALs together.
Figure 62 shows how categorizing of data types saves memory. In this example the data type takes up 12 bytes, since the BOOL’s are put together;
Figure 62 – Recommended UDT Setup
PLC - PROGRAMMING Doc.no. NA-07-STS009 Revision no.: 2.0
- 65/93 -
Figure 63 shows the same data as before, but here the BOOL’s are distributed. In this example the data type takes up 20 bytes;
Figure 63 – Not Recommended UDT Setup
UDT’s can be reused as often as required. UDT can also contain AOI defined data types to group multiple AOI types together into a single tag. The data type shown in Figure 64 is for a non-reversible motor that has multiple “Plant PAx” AOI associated to it like the motor control, interlock, permissive etc.
Figure 64 – Non Reversible Motor UDT
This is done to enable a single tag name for all functions of the motor. The motor tag name could be as shown in Figure 65.
Figure 65 – Non Reversible Motor Tag Structure
Add-On Instruction (AOI) 7.3
The Plant PAx library used for the Norðurál Site is built on AOI’s and shall be used always when applicable. The use of user developed AOI is encouraged where the Plant PAx library does not apply to certain scenarios. The User developed AOI should be built in the same way as the Plant PAx AOI Using the standard UDT and AOI for alarms and other functions. This will ensure that the application code will be uniform.

PLC - PROGRAMMING Doc.no. NA-07-STS009 Revision no.: 2.0
- 66/93 -
When an AOI is created it must follow the style and layout of the Plant PAx library. All developed AOI have to be verified by owner, prior to use.
Plant PAx prefixes should be used to categorize parameters and tags.
PlantPAx Prefix
Description
Ack_ Alarm acknowledge (used with P_Alarm) Alm_ Alarm (used with P_Alarm) Cfg_ Configuration parameters Err_ Error in configuration Inp_ Input MCmd Maintenance Command OCmd_ Operator command (set while in operator mode, or
man) Out_ Output PCmd_ PLC command (set while in PLC mode, or auto) PSet_ Program owner request Rdy_ Ready Sts_ Status Val_ Values Wrk_ Intermediate / Internal variable
Table 19 – Plant PAx prefixes
Only Ladder logic can be used inside an AOI.
PlantPAx provides various AOI for different application. Some of these AOI can work together for single equipment while others should be used individually. For example does a digital input only need to be defined as P_Din AOI while a single speed motor could have interlock (P_Intl), permissive (P_Perm) runtime (P_RunTime) and restart inhibited (P_ResInh) associated.
The Norðurár library PLC example program provides many common UDT groups for easy grouping of functions.
The code within the AOI takes care of interaction between the Program, the SCADA/HMI and the equipment.
Figure 66 – Single Speed motor AOI
The Add-on Instruction is a self-standing code module, located in the Add-On Instruction folder of the RSLogix 5000 configuration tree. It is like a sub-routine, which is called via a line of code in a routine using the appropriate AOI instruction.

PLC - PROGRAMMING Doc.no. NA-07-STS009 Revision no.: 2.0
- 67/93 -
If AOI instruction included in the PLC Program Library does not match the application needed, custom AOI and routine can be developed following the standard. Custom AOI must be well documented and issued to the owner.
7.3.1 General tab
Figure 67 – AOI definition
All parameters must be filled out properly.
Name: Descriptive name of the control element.
All user defined AOI created for the Norðurál Site shall start with the letters GRT_ followed by a short description.
Description: Description of the function and use of the AOI.
Type: The type must be Ladder Logic.
Revision: Revision numbers are essential to keep track of changes to the AOI
Revision note: Description of the changes made in in the current revision
Vendor: The Vendor name.
7.3.2 Parameters and tags in an AOI An AOI can contain both Parameters and local tags. Parameters are used as outputs and inputs from SCADA and IO while local tags are used locally within the AOI.

PLC - PROGRAMMING Doc.no. NA-07-STS009 Revision no.: 2.0
- 68/93 -
Figure 68 – AOI Parameters
Figure 69 – AOI Local Tags
The tag names shall be in the same format as the Plant PAx tag naming structure starting with a short acronym followed by the tags function:
Description for all parameters and tags as well as rung description is mandatory.
Example:

PLC - PROGRAMMING Doc.no. NA-07-STS009 Revision no.: 2.0
- 69/93 -
Tagname Usage Data Type Visibility Description Function
Inp_RunFdbk Input BOOL Yes Input Signal: RUN feedback from motor
Input from IO
Cfg_HasRunFdbk
Input BOOL No 1=Motor provides a run feedback signal
Configuration of the equipment function
PCmd_Start Input BOOL No Program Command to Start Motor
Commands for the equipment from a sequence or condition
OCmd_Start Input BOOL No Operator Command to Start Motor
Commands from SCADA / HMI
Out_Run Output BOOL Yes 1=Run Motor, 0=Stop Motor
Output to IO
Val_Notify Output SINT NO Current Alarm Level and Acknowledgement (enumeration)
Numeric representation of the current alarm severity required for the ASN buttons
Sts_Stopped Output BOOL Yes 1=Motor requested to stop and is confirmed stopped
Status of the equipment
Alm_FailToStart Output BOOL No 1=Motor Fail to Start Alarm
Alarm representation to SCADA / HMI
Ack_FailToStart Output BOOL No 1=Fail to Start Alarm has been acknowledged
Handshake to PLC that alarm has been acknowledged in SCADA / HMI
Rdy_Start Output BOOL No 1=Ready to receive OCmd_Start (enables HMI button)
Equipment readiness
Table 20 – Parameter Tags
Local tags are created in the AOI for internal control of the AOI. These tags cannot be used in the PLC application code in the same way as the parameter tags. These local tags can tough be accessed from the SCADA system and must be accessed for retrieving the tag name and description. Then the tag name can be selected from the tag browser but the extension must be manually entered for example
• tagname.Cfg_Desc
• tagname.Cfg_Tag.
Important: Tags of same data type should always be grouped together to save memory.
7.3.3 Scan modes A Prescan in AOI should be used to reset command and status bits, intermediate variables and etc. An Enable in False routine should also be created to handle cases when the code is not being executed. An example of these functions is shown in the Plant PAx library.

PLC - PROGRAMMING Doc.no. NA-07-STS009 Revision no.: 2.0
- 70/93 -
Figure 70 – AOI Scan Modes
The EnableInFalse routine will turn all outputs off and show the SCADA faceplate as disabled.
Figure 71 – Plant PAx Motor AOI
7.3.4 Help The AOI help shall be filled out in a way that instructs a user or maintenance person on its use and function. The Help function will automatically create a help file for all tags and parameters in the AOI based on the description given. But an extended functional description of the AOI shall be provided by the vendor.
Figure 72 – AOI Help Tab
Routine Structure 7.4
All routines shall be split up into multiple sections separated by a section description. The sections can for example be split up into input mapping, alarm, mode management, commands,

PLC - PROGRAMMING Doc.no. NA-07-STS009 Revision no.: 2.0
- 71/93 -
output mapping etc. Section 1 should always contain status information in a rung with a NOP output for easy trouble shooting of the equipment. Input mapping shall always be done before the AOI for the equipment are called. The following sections shall contain the running conditions such as interlocks (P_Intlk), permissive (P_Perm) etc. with the applicable AOI. The equipment control AOI such as P_motor, P_valve etc. shall always be at the bottom of the routine followed by the output energizing.
Within a project the aim should be taken to set up all routines for the same equipment type in the same way with as many sections as required. This will increase readability of the PLC application and ease maintenance.
See the pilot project for more details and examples of section segregation.
The Norðurál programming library 7.5
The available pilot project contains ready to use routines for various purposes. The use of these routines and the associated UDT’s is highly encouraged.
The use of these routines ensures similarity of programs throughout new projects and thus simplifies programming and debugging.
The following table lists the available examples at this point. As more projects are completed, additional items will be added.
UDT Routine Description A_Out PG011_AA30_M10_Spennir Analog output usage routine with
intlk. Faults General purpose UDT for Faults Group GRT60_StemGrind_Sys Group control setup Module_Valid IO_Validation Module validation routines Motor_NonReversable JF010_AE01_6M1_Grinder Single direction motor control Motor_R JF010_AE03_6M3_Lift Bi-directional motor control Motor_VSD PG010_AP11_DAELA_A VFD Drive control Msg_data Communication UDT for MSG communication Prod_Cons Communication UDT for produced/consumed SFC_32 SEQ001_PINBLASTER_SEQ
SEQ001_PINBLASTER_LAD UDT for SFC programming, 32 steps
SFC_64 UDT for SFC programming, 64 steps
Valve_MO Motor operated valve Valve_SO JF010_AE01_6M1_Grinder Solenoid operated valve PG010_PT016_PID
PG010_PT016_PIDE PIDE example
P_AIn PG010_CP30 Analog input example
Monitoring of Modules and Nodes 7.6
Monitoring of all modules in the application is vital for easy troubleshooting of the system in case of a fault in a module. This applies to all modules on all of the three network types. A monitoring routine shall be created for all modules to give an alarm in the SCADA system of a faulty IO. All module alarms shall be of severity 4 so they will take priority of other alarms in the alarm summary since a module fault will cause multiple alarms relative to the module. The module alarms should be segregated to avoid unwanted alarms
When a IO module fails only an alarm for that module should appear and if a communication module fails the alarms for all modules connected to that module should be disabled but the safe state of the IO should always be guaranteed.

PLC - PROGRAMMING Doc.no. NA-07-STS009 Revision no.: 2.0
- 72/93 -
7.6.1 IO Validation Because the majority of the inputs/outputs control signals travel over networks like DeviceNet, ControlNet, Ethernet and modules located inside the Local chassis, each I/O signal shall be validated in the PLC program when used. Here, "validated" means that the state of the I/O is confirmed. The methods used to validate transmitted information vary based on their origin. All modules and networks shall be supervised and an alarm sent to the SCADA system in case of failure in the hardware
Any malfunction in the control system shall generate actions to safely protecting the system without affecting plant safety and integrity.
These principles shall be applied in accordance with the process and the groupings made during network design.
Figure 73 demonstrates the setup of the IO validation routine. Examples of the IO validation routines are in the pilot project.
Figure 73 – IO Validation and Input Image
7.6.2 Input Handling As all inputs are read asynchronously by the controller it becomes important to map (copy) all physical inputs to internal tags, which are then used with a stable value inside the ladder code scan execution. This is done in the Input handling routine and the Synchronous Copy File (CPS) instruction used, see Figure 74.
Input handling is mostly relevant for digital inputs as most analog inputs are mapped in a specific Analog input routine. See the pilot project for an example.

PLC - PROGRAMMING Doc.no. NA-07-STS009 Revision no.: 2.0
- 73/93 -
Figure 74 – CPS Instruction
7.6.3 Outputs The output modules are validated in the IO validation routine in the same way as the input modules. But the outputs do not have an output handling routine since all outputs are directly referenced in the equipment routines.
7.6.4 System Status / Utilities A system status program is required for information on the controller and general system status. Alarms for all items that can result in a failure in the control system shall be created and displayed in the alarm summary in the SCADA system.
• Controller Status
• Battery status
• Clock
• IP addresses
• System status / Scada watchdog
Figure 75 – GSV from the Controller
In this routine the CLX AOI should be created to give information on the CLX status such as faults, scan time, modes etc.
• L_CPU
Information on fault codes can be found in the RSLogix5000 manuals and help files.

PLC - PROGRAMMING Doc.no. NA-07-STS009 Revision no.: 2.0
- 74/93 -
SCADA / HMI interfacing 7.7
Each AOI has an SCADA faceplate associated to it this means that any communication from PLC to SCADA for a certain equipment is done through an AOI defined data type that makes connecting a faceplate in the SCADA system very user friendly.
7.7.1 Group control A group routine shall always be created to group together items in a process line or a group. This group control is used for the ASN function of the SCADA system where all alarms and states are shown for a process. For this handling of information an AOI and a Group function ladder routine has been created. The AOI P_Group handles group functionality, see Figure 76. The group control function shall enable a group of equipment to start, stop, hold, restart or go to home position depending on the application requirements.
Figure 76 – ASN Group AOI
The function of the group control can be split into multiple functions.
• Control of a process line or sequence is done through the group control function of the SCADA or ME system. From the group control popup the process section can be operated, started, stopped, held, paused or restarted.
• Statuses of the process group are programmed in the group control to indicate in which state the process group is in.
• Displaying alarms in the ASN section of the SCADA display. For this function all alarms belonging to a process section are grouped together in the PLC as they would appear on a SCADA process screen containing the equipment. By doing this a field bellow the selection button for a process page will change color in accordance with the alarm severity.
• Interlocks and Permissive for the process group running criteria are shown.
Equipment that does not belong to any process group should be included into a group that has relevance to the equipment as seen from the SCADA display screen. Ensuring that when an alarm for that equipment is active it will appear on the ASN button bar for the page the equipment is located on. It shall however not have any interlock or control connection to the group.
Important: Any equipment that is shown on a SCADA display shall belong to a group for the display it is located on so the alarm functionality is guaranteed.

PLC - PROGRAMMING Doc.no. NA-07-STS009 Revision no.: 2.0
- 75/93 -
The name of the group control program shall always start with a short description followed by Sys and number. The number can be used to differentiate between similar named systems in a controller or multiple systems groups.
• Material_Handling_Sys1_0
• Airlift_Sys1_0
• PG011_Sys1_0
• PG011_Sys1_1
PLC PROGRAMMING STANDARDS 8For the Norðurál Site the following standards for PLC programming shall apply. The use of AOI and UDT shall be used as much as possible by doing so a high standard of grouping is achieved. Comments will be included for each section and routine header, as general function and operation as standard. Each tag used shall also be commented as standard.
Coding Standards 8.1
Coding shall be according to this document and the AKS coding system. All equipment tag names shall be as they are defined in the P&ID or drawings.
8.1.1 Attribute An attribute is the lowest form of a data structure element within an object structure device, to represent the parameters of this device, such as VFD parameter, Sensor state or data, motor protector parameters.
Each attribute shall be defined by using standard extension code key word from the table as shown under Variable Extensions Codes section of this document 5.6.4. Also, see rules establish in the same section regarding tag naming convention.
Example:
• FD122_AN20_M10.Inp_PermOK (Where Inp_PermOK is the attribute for the permissive state of the motor).
• FD122_AN20_M10.PCmd_Start (Where PCmd_Start is the attribute for the program controlled start).
8.1.2 Instance An instance is a sub-structure UDT or AOI defined embedded in an object structure. A good practice is to create different instances (as needed) in which we regroup logically the attributes (parameters).
For example I/O relative to a device (an object) like a Motor will have multiple AOI used to control the motor like interlock, permissive, motor control etc.
Example:
• P_Perm (will be the instance UDT for the AOI that controls the permissive state of the motor)
• P_Intlk (will be the instance UDT for the AOI that controls the interlock state of the motor)
8.1.3 Class A class is a family (a category) of instances. Concept of Class is used to identify and facilitate the explanation/comprehension of these programming standards.
A device such as a motor has a class where multiple AOI have been grouped together to for a single tag.

PLC - PROGRAMMING Doc.no. NA-07-STS009 Revision no.: 2.0
- 76/93 -
Example:
Figure 77 – Motor non reversable UDT
Examples of the Class Instance and Attribute structure can be seen bellow Each Class can have multiple Instances and each instance can have multiple Attributes.
Class Instance Attribute Description MotorNR P_Motor PCmd_Start Start command issued
from the program OCmd_Start Start command issued
from an operator P_Intlk Sts_IntlkOK Status if any interlock is
active then motor stops PCmd_Reset Reset command issued
from the program P_Perm Sts_Perm INT value for individual
permissive status Sts_BypActive Permissive criteria is
bypassed P_ResInh Sts_Ready Permissive for unit to
start Inp_Stopped Equipment is confirmed
Stopped P_RunTime Inp_Running Motor is Running
feedback from motor PCmd_ClearTotHrs Program Command to
Clear Total Running Time
Table 21 – Non Reversible Motor Class
The tag name for an on reversible motor would for example be.
• FD122_AN10_M10.P_RunTime.Val_CurRunHrs
o FD122_AN10_M10 is the class
o P_RunTime is the Instance

PLC - PROGRAMMING Doc.no. NA-07-STS009 Revision no.: 2.0
- 77/93 -
o Val_CurRunHrs is the attribute
Programming Standards 8.2
The following section describes and shows how RSLogix 5000 and ControlLogix shall be used with the previously described structure of object-oriented coding.
RSLogix 5000 shall be used to control the processor programming and control architecture in the following manner. For the Norðurál Site, a sample of device level structures UDT, Add-On instructions (AOI) and specific device control Routines was created in coordination to support typical Device type as VFD, Motor Starter and Transmitter. These items are included in the PLC Program pilot project and shall be used as guidelines for the Vendors to develop their PLC program.
8.2.1 Device Control Module - Routine Template Device Control Routines shall be used in the Norðurál Site and shall always be developed in ladder for typical devices, such as a VFD or Motor Soft Starter, Valve and Transmitter. Each Device Control Routine shall include all the ladder code to take care of at least the following functions:
• Device Input mapping to UDT attributes
• HMI Message, Fault & Alarm warning associated with the device
• Interlocking of the device
• Status and Mode of operation control
• Starting and stopping of the device
• Activating real Device Output from UDT attributes
8.2.2 Power Up Handler Program The power-up handler is an optional program that executes when the controller powers up in run or remote run mode. Use the power-up handler when you want to accomplish the following after restart of the PLC.
• When power is restored, take specific actions and then resume normal operation:
• Clear the major fault and enter the logic for the actions
8.2.3 Language and Comments In the task, program and routine, everything shall be fully documented in such a way that any reader can understand it throughout the lifetime of the installation.
Every sequence should carry reference number of particular SEQ module or sub-module.
• Each line group forming a function shall be documented with rung comments
• Each instruction shall have a comment title
• Each sequence step, action and transition shall be documented
• Sequence step numbering shall be from top to bottom and left to right.
• Each sequence step shall have a Boolean Action and an indicator tag to better clarify the step conditions.
All descriptions and tag names in the PLC application shall be in English.

PLC - PROGRAMMING Doc.no. NA-07-STS009 Revision no.: 2.0
- 78/93 -
Modes of Operation 8.3
An AOI has been created to control a Line or a group of equipment’s called Group Control. This function will be used to control a process line or an equipment section starting, stopping, restarting, holding etc.
The modes of operation shall allow a system to:
• Reach the right operating conditions before production
• If possible, stay in production during abnormal conditions
• Be stopped then re-started
• Be stopped in clean and secure manner in all situations
• Automatically reset itself after an abnormal condition or failure and also during PLC start-up.
8.3.1 Control Modes The equipment Add-On instructions use the following standard Modes implemented using an embedded P_Mode Add-On instruction.
Control Mode
Description
Operator The operator starts and stops the motor using the HMI / SCADA Faceplate.
Program Logic outside the AOI starts and stops the equipment using Program Commands (PCmd_Start, PCmd_Stop).
Override Instruction or strategy is driven to an override state based on exceptional process conditions or other logic above and beyond normal operation.
Maintenance Instruction or strategy is removed from normal production and is reserved for commanding by Maintenance personnel.
Hand Instruction or strategy is controlled by hardwired logic and cannot be manipulated by or through the controller.
Table 22 – Control Modes
The modes have the following priority:
• Hand (highest)
• Maintenance
• Override
• Operator and Program (lowest)
8.3.2 Control Program Architecture Line, unit and equipment is a group of machines, equipment’s or control device within a common area that produce a common product or process outcome. These line, unit and equipment are also named group.
An example of this structure is shown below where line 1 can contain multiple Units and each unit can contain many equipment units.
• Line 1
o Unit 1

PLC - PROGRAMMING Doc.no. NA-07-STS009 Revision no.: 2.0
- 79/93 -
� Equipment 1.1
� Equipment 1.n+1
o Unit 2
� Equipment 2.1
� Equipment 2.n+1
• Line 2
It shall always be done in a way that any equipment can be started before a line or a unit and the equipment shall resume operation when the line is started.
SFC Sequence 8.4
Normally an SFC sequence controls the sequence of events within a machine or operation. The SFC is the routine that controls and issues command to the equipment of a Group according to the mode of operations. Depending on the process involved, it can be unique or separated into many SFCs as shown below:
• Start-up and preparation (Initialization) SFC sequence
o Start a group of equipment in a proper order, for example series of conveyors.
� Example: SEQ001_Cooling_Startup_SFC
• Normal operation SFC sequence (can be multiple SFC’s)
� Example: SEQ001_Cooling_SFC
• Shutdown and closure (Stop) SFC sequence due to breakdown or aborting SFC sequence
o Stop a group of equipment in a proper order, for example series of conveyors.
� Example: SEQ001_Cooling_Stopping_SFC
• Homing Sequence
o Ensures an automatic safe return of a machine to its initial position.
� Example: SEQ001_Cooling_Homing_SFC
8.4.1 SFC Management in the _LAD routine Logically, an SFC is controlled by the Group System Control. The group controls the state (e.g. running, reset and pause) of the SFC routine. Commands from HMI’s, other program parts, actuator status and sensors act as inputs to the sequence controlled by the SFC. SFC issue commands for actuators, other program parts and give statuses to HMI according to the state, see the I/O chart on Figure 78.
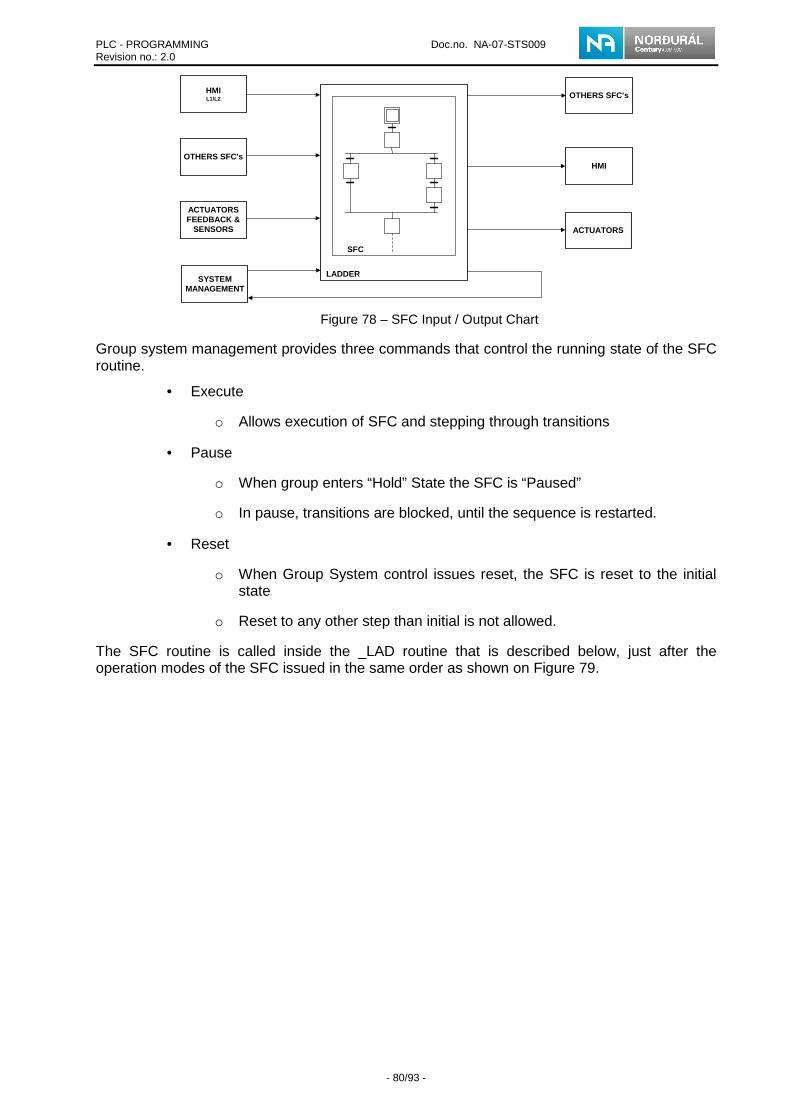
PLC - PROGRAMMING Doc.no. NA-07-STS009 Revision no.: 2.0
- 80/93 -
Figure 78 – SFC Input / Output Chart
Group system management provides three commands that control the running state of the SFC routine.
• Execute
o Allows execution of SFC and stepping through transitions
• Pause
o When group enters “Hold” State the SFC is “Paused”
o In pause, transitions are blocked, until the sequence is restarted.
• Reset
o When Group System control issues reset, the SFC is reset to the initial state
o Reset to any other step than initial is not allowed.
The SFC routine is called inside the _LAD routine that is described below, just after the operation modes of the SFC issued in the same order as shown on Figure 79.
SFC
LADDER
HMIL1/L2
SYSTEMMANAGEMENT
HMI
ACTUATORS
OTHERS SFC's
OTHERS SFC's
ACTUATORSFEEDBACK &
SENSORS

PLC - PROGRAMMING Doc.no. NA-07-STS009 Revision no.: 2.0
- 81/93 -
Figure 79 – SFC management in SEQ001_Cooling_LAD
The first rung shows the Group control issuing an execute command when entering “Running” state. The second rung shows the group control issuing a Pause command when entering “Hold” State. The third rung resets the SFC when the system has stopped for any reason, for example a non-recoverable fault or operator stop command.
8.4.2 Actions The operation of individual actions within a step can be varied with the use of action qualifiers. On the Norðurál Site all actions shall be of type N – Non-Stored and other logic if needed shall be performed in the associated ladder and not in the SFC.
Figure 80 – Action Qualifier
For each step the actions that make the associated transition true shall be visible as non-stored Boolean. If a step starts a motor the motor running indication shall be visible next to the step. This will enhance readability of the SFC code, see Figure 81.

PLC - PROGRAMMING Doc.no. NA-07-STS009 Revision no.: 2.0
- 82/93 -
Figure 81 – Actions and reaction indication in an SFC
The Actions shall always have a corresponding rung in the _LAD routine as shown in Figure 81 and Figure 82.
Figure 82 – Corresponding action in _LAD Routine
The settings for each action are configured as shown on Figure 83, where the indicator tag has been added. Furthermore, the Non-stored Qualifier has been selected. Ticking the “Pause Timer When Routine is Paused” is highly recommended.
Figure 83 – Action Properties
8.4.3 SFC editor and SFC Step data types The standard uses an SFC “UDT” for all tags used within an SFC routine and therefore “Auto-Naming” must be turned off, else it will create new tags every time a new step is added.

PLC - PROGRAMMING Doc.no. NA-07-STS009 Revision no.: 2.0
- 83/93 -
Figure 84 – Automatic SFC element naming shall be turned off
For step data, a special SFC data structure called SFC_32 for sequences with fewer than 32 steps and SFC_64 for sequences fewer than 64 steps shall be used. The data structure is based on a simple UDT that can be copied and modified if more than 64 steps are needed. The tag instance shall take the same name as the SFC to be programmed, as shown in Figure 85.
Figure 85 – The SFC UDT structure and naming convention.
A typical step configuration is shown in Figure 86. The use of the embedded timers is encouraged and if used, checking the “Pause timer when Routine is pause” is required.
Figure 86 – SFC step data and configuration

PLC - PROGRAMMING Doc.no. NA-07-STS009 Revision no.: 2.0
- 84/93 -
Important: Ticking the “Pause Timer When Routine is Paused” is recommended to avoid timer related problems during “Hold”.
Description for all parameters and tags as well as rung description is mandatory. All actions, transitions and results shall include an appropriate description in the SFC UDT.
8.4.4 Transition Triggers Transitions trigger shall be placed in the _LAD routine after the Action section. All logic condition to set the trigger bit of each transition in a sequence is programmed in the ladder.
Using only the Result bit from the SFC UDT makes the code more flexible as restarts of SFC are avoided during online changes. Furthermore Ladder is the preferred choice for logical evaluations. Status is monitored by cross-referencing the .Res bit and viewing the ladder code. An example is shown in Figure 88 to Figure 89.
Figure 87 – Result Bits in SFC UDT
Figure 88 – Result bit used in an SFC chart
Figure 89 – Result Bit used in the _LAD routine
When the sequence is programmed using a Selective branch, all evaluations must be grouped together within the same rung. If the rung evaluation is very large, then rungs must be in consecutive rungs next to each other in the _LAD routine. This makes the evaluations more readable. An example is shown on Figure 90 to Figure 91.

PLC - PROGRAMMING Doc.no. NA-07-STS009 Revision no.: 2.0
- 85/93 -
Figure 90 – Selective branch in an SFC chart
Figure 91 – Selective Branch LAD routine
Testing and Simulation of CLX Programming 8.5
All software, inclusive of modules interfacing statuses, I/O routine’s, control modules, equipment modules, procedural programs and routine’s shall be tested in a modular method.
The principal method of testing developed code, shall be utilizing RSLogix 5000 Emulator, for testing developed programs within the PC.
Following this, simulation of the code shall be done both within the PC using RSLogix Emulator 5000, or in a simulated lab environment utilizing Allen Bradley CLX hardware, I/O modules and appropriate networks and devices.
Simulation shall be carried out to ensure that all code development work is in line with operational parameters and executes as expected.
Full simulation shall be carried out that replaces the inputs with simulated values, these values shall be injected into the input assemblies as standard in simulation mode.
During FAT of the vendor application the fully simulated PLC code shall be used where the function of the code is tested in a safe environment.
Automated code for simulation purposes only, may be contained within a separate task that is specifically for simulation mode. When not in simulation mode this task shall not be in the task schedule to run.
Final versions of working code placed in the field shall not contain this simulation task; it shall be retained though as a specific version of the RSLogix software program on file issued to Norðurál.
8.5.1 Instructions for debugging application code The use of instructions such as AFI is prohibited since it is impossible to maintain. If a vendor or a programmer needs to make changes to an application code or to block certain parts of a code temporarily the programmer shall create a DINT and use the XIO and XIC instructions. In the description field for the used elements of the DINT the programmer shall put his name and email address as well as the date and description of the modification. IO forces are also prohibited for use in any application in the Norðurál Site. Unused branches are not allowed in the Norðurál Site.

PLC - PROGRAMMING Doc.no. NA-07-STS009 Revision no.: 2.0
- 86/93 -
Figure 92 – Unused Branch not allowed
Quality and Verification of Programming 8.6
At certain point during programming, verification of PLC, HMI and/or SCADA Vendor’s programs shall be made to insure delivery of these programs to fulfill completely its quality level.
At 25% completion verification is mandatory. If program (at 25% completion) evaluation is not satisfactory, the vendor will be asked to modify its program according to comments and resubmit for approval. If resubmitted program evaluation is satisfactory, the vendor will be asked to submit its program at 50% completion for a second evaluation. If second evaluation is satisfactory, then the vendor will continue until 75% completion to be verified again as normal procedure.
When the programming has reached 100% a FAT shall take place. For the FAT the vendors shall deliver all required test documents. In the FAT the PLC application will be tested in a workshop environment to reduce commissioning time and hazards.
8.6.1 Program Evaluation 25%
• Software version verification
• General configuration
o Controller naming
o IO configuration shall be finished
o Module naming
o System overhead time slice
o Node addresses for all DNB and CNB modules
o Ethernet addresses for all ENB modules
• Program evaluation
o Tasks structure shall be ready and period time for periodic tasks
o Network setup shall be ready
• Comments and Descriptions

PLC - PROGRAMMING Doc.no. NA-07-STS009 Revision no.: 2.0
- 87/93 -
o Descriptions shall be as per specifications
• Tags
o Tag naming standards shall be followed
o UDT and AOI structure as per project standards
• Mapping and Validation
o Input mapping as per project standards shall be completed
o I/O validation and alarm function as per project standards shall be completed
• Equipment Program
o One Equipment Routine shall be ready for each type of equipment.
o Main routine defined with logic “JSR instruction”
o Fault routine (if used)
o Modes routine containing logic (for SCADA indication)
8.6.2 Program Evaluation 50%
• Program evaluation
o All routines and programs shall be ready
o All Equipment routines shall been programmed.
• Comments and Descriptions
o Descriptions shall be as per specifications
• Tags
o All Tags shall have been created
• Equipment Program
o Equipment program shall be finished with all equipment connected
o At least one sequence routine shall be completed.
8.6.3 Program Evaluation 75%
• General configuration
o Available memory as per project standards, a minimum of 25% free space.
• Program evaluation
o All sequences and Transition routines shall be completed.
8.6.4 Program Evaluation 100%
• FAT
o All functions of the PLC system shall be simulated.

PLC - PROGRAMMING Doc.no. NA-07-STS009 Revision no.: 2.0
- 88/93 -
COMMUNICATION AND INTERFACES 9Network communication means transferring and validating information between devices like controller, HMI and SCADA. These mechanisms are listed below for data exchange, fault, alarm and interlock.
Communication Link 9.1
Data exchange means data sent or received between two PLC’s, or a PLC with external devices. There are two communication mechanisms used in the Norðurál Site, which are Produced / Consumed and Message:
Produced / Consumed Message Deterministic Non-Deterministic Scheduled portion of the bandwidth Unscheduled portion of the
bandwidth Repetitive time interval (RPI) No repetitive time interval Highest priority Low priority Does not change medium Can use different network types Does not support online edit Can be modified online
Table 23 – Communication links
Note: Time critical interlocks, control bits and other time sensitive data that have a direct impact on the behavior of the control system must be communicated through the method of Produced / Consumed tags with Ethernet or ControlNet communication.
Messages are less sensitive to settings in switches and routers and therefore often more convenient to use messages for general purpose data.
Produced and Consumed Tags 9.2
9.2.1 Communication Where communication to other PLC’s and devices are required a special program shall be created for controller to controller communication for easy maintenance access.
Routine for communication with other PLCs shall be created under this program. One routine named “Com_Produced” will be used to map the data (interlock or control signals) produced for other PLC(s). Also a routine named “Com_Consumed” will be used to validate the data (interlock or control signals) from other PLC(s).
One routine named “Message_Read” will be used to validate and map the data read into other PLC or explicit message reading. Also a routine named “Message_Write” will be used to map the data to be written into other PLC or explicit message writing.
To share produced and/or consumed tags between controllers, controllers shall be attached to the same control network segment. The produced/consumed communication method is the first choice of communication to be used. Produced and consumed tags cannot be used over two distinct networks using a bridge. In that case, Message Instruction will be required.
Controllers can produce and consume tags over these networks:
• ControlLogix chassis backplane (local rack)
• ControlNet network
• Ethernet/IP network
Produced tag: A tag configured as Produced in a controller can become available for other controller(s) (consumer). Multiple controllers can simultaneously consume this tag. When the tag is created and configured, the produced tag is already sent (by the source controller) to the specified number of consumer.

PLC - PROGRAMMING Doc.no. NA-07-STS009 Revision no.: 2.0
- 89/93 -
Consumed tag: It is a tag configured in each controller who wants to receive (consume) the data of a produced tag. When a consumed tag is created, it must be the same data type and array dimension that the produced tag. Also, at the configuration of a consumed tag, you specify at which frequency the tag will be requested at the source controller. This parameter is the RPI (Requested Packet Interval). The RPI shall be at set minimum to network update time (NUT) or shall be a binary multiple of the NUT.
Principally because, produced and consumed tags cannot be configured online and also to minimize the quantity of ControlNet connections used, they shall be transferred via UDT structured tag. These tags will be configured on all PLC’s that need to receive the data, one as Produced tag in the source PLC and one as Consumed tag in the destination PLC’s. This setup will permit exchange of signal(s) from the first PLC to the other PLC’s.
The Produced / Consumed data type shall be as shown in Figure 93.
Figure 93 – Produced / Consumed data type
Also there should be a timer running all the time from which the accumulator value is copied on the element (Watchdog) of the produced UDT structured tag. The accumulator mapping shall be done at last, after each data has been copied into the structure. In the PLC who consumed UDT structured tag, the timer value shall be recopied in a produced UDT structured tag to the PLC who has the timer to be compared.
These mechanisms will be used to detect if the connections associated to the UDT structured tags are actives or that the PLC is in run mode. These timers shall have duration of 10 seconds for the purposes of communication watchdog.
Each PLC, who consumed UDT structured tag, shall monitor the element (WATCHDOG) of the produced UDT structured tag value (timer accumulator) and detect if the value is changing to ensure communication link is being updated.
Finally, alias tag will be used to access elements of the Consumed UDT structured tag. The name of the alias tag shall match the tag of the element mapped in the Produced UDT structured tag. The communication watchdog bit shall always be used to validate data coming from the Consumed UDT structured tag when used in the logic.
When a Watchdog fails it should be interpreted as a interlock fault. If the watchdog times out there shall be an alarm in the SCADA system.
9.2.2 Produced and Consumed Tags Naming and Content s Naming rules for Produced and Consumed tag shall be as per the following format:
In the PLC producing a tag, the UDT structured tag name starts with “Produced_” followed by the PLC name.
• Produced_GRT80_FD100_CLX001

PLC - PROGRAMMING Doc.no. NA-07-STS009 Revision no.: 2.0
- 90/93 -
In the PLC consuming a tag, the UDT structured tag name starts with “Consumed_” followed by the PLC name producing the tag, to understand from which PLC the data is produced.
• Consumed_GRT80_FD100_CLX001
When a tag is consumed by another controller the tag names must match for both the producing controller and the consuming controller. The tag description of the alias tag in the consumer PLC shall be the same as the producer PLC tag description
The produced tag should be mapped to the appropriate UDT see example below.
GRT80_FD122_AN20_M10.Sts_Stopped: is mapped to the produced tag
• Produced_GRT80_FD100_CLX001.DATA[1].0
Consumed_GRT80_FD100_CLX001.DATA[1].0 is in turn mapped to a tag name that matches the tag name in the producing PLC
• _GRT80_FD122_AN20_M10_Sts_Stopped
Figure 94 – Produced / Consumed tags
Message Instruction (MSG)
Message communication is any communication that you do not configure through the I/O configuration folder of the project, such as the MSG instructions.
Message communication occurs only when a periodic or event task is not running. If you use multiple tasks, make sure that their scan times and execution intervals leave enough time for message communication. Adjust the update rates of the tasks as needed to get the best trade-off between executing your logic and servicing message communication. The disadvantage is that extra care needs to be given to the scan time to avoid the tasks from overlapping and leaving time for other communication.

PLC - PROGRAMMING Doc.no. NA-07-STS009 Revision no.: 2.0
- 91/93 -
Writing messages is considered more efficient that reading messages and therefore messages are to be sent using “CIP Data Table Write”.
The MSG instruction asynchronously reads or writes a PLC block of data (tag array or custom UDT that include different type of array like the produced-consumed UDT) to or from another PLC block of data. The message communication method has a low priority and therefore should be watchdog monitored.
These tag arrays or custom UDT are configured in each controller who wants to read or write a tag. As with the produced/consumed tags, it must be the same data type and array dimension in both PLC’s. Also, at the configuration of a read or write message instruction, you specify if a Cache Connection is needed when the frequency is important (under 1 sec.) If more than four continuous messages are to be used, cascade method shall be used instead of Cache Connection. Cascade message will be sent one at the time. This will use less amount of the unscheduled bandwidth.
Logic to ensure that the write message is conditional and also time based cyclic is done in the communication routine. It is encourage to program each message to trigger a write on different time intervals, even with prime numbers, to avoid collisions.
A watchdog and an alarm for communication failure are mandatory for message instructions like the produced and consumed connections.
9.2.3 Message Tags Naming and Contents Naming rules for tag array sent or received shall be as per the following format:
A transmitting message tag shall begin with the letters “To_” followed by the destination PLC name followed by “_MSG1[xx]” for the first tag array. The [xx] represent the array dimension.
• To_GRT80_FD100_CLX001_MSG1[xx]
A receiving message tag shall begin with the letters “FROM_” followed by the source PLC name followed by “_MSG1[xx]” for the first tag array.
• From_GRT80_FD200_CLX002_MSG1[xx]
The same mapping shall be done for message tags as is used for the produced consumed tags see chapter 9.2.2.
The pilot project provides an UDT similar to produced/consumed for use with messages (Msg_data).
As for the produced/consumed tag, the description of the alias tag in the destination PLC shall be the same as the PLC source tag description. The tag description of the element of the tag array shall also follow the same format as a produced/consumed tag. The tag array shall have enough extra array elements declared for future use.
Alarm Handling 9.3
Alarms shall be created as standard in the PLC for all device objects and control objects, this shall be done in the device control module (routines) and equipment control module (for group).
Process-based alarms shall be created in the PLC at the procedural and equipment level as standard. Network, communication and module status events and alarms shall be created directly by the fault routines.
The PlantPAx library includes an alarm AOI (P_Alarm) and its use is highly encouraged.
Alarms shall be classified with the following table.

PLC - PROGRAMMING Doc.no. NA-07-STS009 Revision no.: 2.0
- 92/93 -
State Severity Range Use Low 1 0-250 Message
Medium 2 251-500 Warning high 3 501-750 Alarm
Urgent 4 751-1000 Control system faults Network and PLC
Table 24 – Alarm Severity’s
All alarms shall have an acknowledge bit associated as standard, for use with SCADA and HMI systems.
When an alarm occurs, depending on the priority, the equipment or group stops. To rearm, after that equipment or group fault or alarm warning has been removed, a re-start shall be done for the equipment or group.
Alarm List 9.4
When the vendor supplies only the PLC program, the vendor must then provide the Alarm List to Norðurál at specific milestones.
This list must include the following information:
Item Description Tag Name The tag name of the alarm, specified in detail Message Severity
As it is possible to change this in the Runtime SCADA system this should be stated as a default value for the severity, proposed by the vendor.
Message The message for the user that will be displayed in the SCADA system
Alarm Class The alarm class for the alarm, this is depending on the process the equipment is a part of. This is used for alarm filtering with in the SCADA system.
Disable Tag Disable the Alarm Suppress Tag Suppress the Alarm Acknowledge Tag
Acknowledge a single alarm
Global Acknowledge
Acknowledge all alarms
Table 25 – Alarm list
Interlocks 9.5
In the Plant PAx standard which the Norðurál standard is based on the Interlock is categorized as an occurrence in the process that results in the equipment stopping e.g. an overload fault or stall fault or connecting equipment fails while running.
The Interlock AOI can handle up to sixteen (16) interlocks. The Interlock AOI will handle the Interlocks and the result of the interlock validation will be an input to the equipment block.

PLC - PROGRAMMING Doc.no. NA-07-STS009 Revision no.: 2.0
- 93/93 -
Figure 95 – Interlock AOI
Process interlocks are for equipment operation and some can be modified for a particular process. Interlocks do not require acknowledgement unless they are connected to an alarm. Interlock alarms are visible from the popup for the equipment and from the alarm summary page. Acknowledgement for specific equipment interlock alarms can only be done from the alarm summary.
All interlocks immediately stops equipment in all modes of operation.
Permissive 9.6
Permissive is categorized as permission criteria for the equipment to operate. All permissive conditions must be fulfilled in order for the equipment to start. A permissive state does not require acknowledgment.
Figure 96 – Permissive AOI
The permissive conditions are configurable in the same way as the interlock conditions. Permissive only take effect when the equipment is in off mode or stopped state.
Appendix A – recommended PLC Hardware 10Refer to the Norðurál Site recommended PLC hardware document.