MySQL Migration Toolkit · base systems to MySQL. MySQL Migration Toolkit is designed to work with...
56
MySQL Migration Toolkit
Transcript of MySQL Migration Toolkit · base systems to MySQL. MySQL Migration Toolkit is designed to work with...

MySQL Migration Toolkit

MySQL Migration ToolkitAbstract
This is the MySQL Migration Toolkit Manual.
MySQL Migration Toolkit has reached EOL. See the EOL notice. Please upgrade to MySQL Workbench.
Document generated on: 2010-01-28 (revision: 18877)
Copyright 2005-2008 MySQL AB, 2008-2010 Sun Microsystems, Inc.
This documentation is NOT distributed under a GPL license. Use of this documentation is subject to the following terms: You may create a printed copyof this documentation solely for your own personal use. Conversion to other formats is allowed as long as the actual content is not altered or edited inany way. You shall not publish or distribute this documentation in any form or on any media, except if you distribute the documentation in a manner sim-ilar to how Sun disseminates it (that is, electronically for download on a Web site with the software) or on a CD-ROM or similar medium, providedhowever that the documentation is disseminated together with the software on the same medium. Any other use, such as any dissemination of printedcopies or use of this documentation, in whole or in part, in another publication, requires the prior written consent from an authorized representative ofSun Microsystems, Inc. Sun Microsystems, Inc. and MySQL AB reserve any and all rights to this documentation not expressly granted above.
For more information on the terms of this license, for details on how the MySQL documentation is built and produced, or if you are interested in doing atranslation, please contact the http://www.mysql.com/company/contact/.
If you want help with using MySQL, please visit either the MySQL Forums or MySQL Mailing Lists where you can discuss your issues with otherMySQL users.
For additional documentation on MySQL products, including translations of the documentation into other languages, and downloadable versions in vari-ety of formats, including HTML, CHM, and PDF formats, see MySQL Documentation Library.


Table of Contents1. MySQL Enterprise .. . . . . . . . . . . . . . . . . . . . . . . . . . . . . . . . . . . . . . . . . . . . . . . . . . . . . . . . . . . . . . . . . . . . . . . . . . . . . . . . . . . . . . . . . . . . . . . . . . . . . . . . . . . . . . . . . . . . . . . . . . . . . 12. Introduction to the MySQL Migration Toolkit . . . . . . . . . . . . . . . . . . . . . . . . . . . . . . . . . . . . . . . . . . . . . . . . . . . . . . . . . . . . . . . . . . . . . . . . . . . . . . . . . . . . . . . . . . . . . 23. Installation .. . . . . . . . . . . . . . . . . . . . . . . . . . . . . . . . . . . . . . . . . . . . . . . . . . . . . . . . . . . . . . . . . . . . . . . . . . . . . . . . . . . . . . . . . . . . . . . . . . . . . . . . . . . . . . . . . . . . . . . . . . . . . . . . . . . . . . 3
3.1. Introduction .. . . . . . . . . . . . . . . . . . . . . . . . . . . . . . . . . . . . . . . . . . . . . . . . . . . . . . . . . . . . . . . . . . . . . . . . . . . . . . . . . . . . . . . . . . . . . . . . . . . . . . . . . . . . . . . . . . . . . . . . . . . 33.2. Installing Under Windows ... . . . . . . . . . . . . . . . . . . . . . . . . . . . . . . . . . . . . . . . . . . . . . . . . . . . . . . . . . . . . . . . . . . . . . . . . . . . . . . . . . . . . . . . . . . . . . . . . . . . . . . . . 3
3.2.1. Using the Windows Installer . . . . . . . . . . . . . . . . . . . . . . . . . . . . . . . . . . . . . . . . . . . . . . . . . . . . . . . . . . . . . . . . . . . . . . . . . . . . . . . . . . . . . . . . . . . . . . 33.2.2. Installing From the ZIP File .. . . . . . . . . . . . . . . . . . . . . . . . . . . . . . . . . . . . . . . . . . . . . . . . . . . . . . . . . . . . . . . . . . . . . . . . . . . . . . . . . . . . . . . . . . . . . . 3
3.3. Installing Under Linux ... . . . . . . . . . . . . . . . . . . . . . . . . . . . . . . . . . . . . . . . . . . . . . . . . . . . . . . . . . . . . . . . . . . . . . . . . . . . . . . . . . . . . . . . . . . . . . . . . . . . . . . . . . . . . 33.3.1. Installing the Generic Tarball . . . . . . . . . . . . . . . . . . . . . . . . . . . . . . . . . . . . . . . . . . . . . . . . . . . . . . . . . . . . . . . . . . . . . . . . . . . . . . . . . . . . . . . . . . . . . 43.3.2. RPM Installation .. . . . . . . . . . . . . . . . . . . . . . . . . . . . . . . . . . . . . . . . . . . . . . . . . . . . . . . . . . . . . . . . . . . . . . . . . . . . . . . . . . . . . . . . . . . . . . . . . . . . . . . . . . . 4
3.4. Installing Under Mac OS X ... . . . . . . . . . . . . . . . . . . . . . . . . . . . . . . . . . . . . . . . . . . . . . . . . . . . . . . . . . . . . . . . . . . . . . . . . . . . . . . . . . . . . . . . . . . . . . . . . . . . . . . 54. Removing MySQL GUI Tools .. . . . . . . . . . . . . . . . . . . . . . . . . . . . . . . . . . . . . . . . . . . . . . . . . . . . . . . . . . . . . . . . . . . . . . . . . . . . . . . . . . . . . . . . . . . . . . . . . . . . . . . . . . . . . . . 6
4.1. Uninstall – Windows ... . . . . . . . . . . . . . . . . . . . . . . . . . . . . . . . . . . . . . . . . . . . . . . . . . . . . . . . . . . . . . . . . . . . . . . . . . . . . . . . . . . . . . . . . . . . . . . . . . . . . . . . . . . . . . . 64.2. Uninstall – Linux ... . . . . . . . . . . . . . . . . . . . . . . . . . . . . . . . . . . . . . . . . . . . . . . . . . . . . . . . . . . . . . . . . . . . . . . . . . . . . . . . . . . . . . . . . . . . . . . . . . . . . . . . . . . . . . . . . . . 64.3. Uninstall – Mac OS X ... . . . . . . . . . . . . . . . . . . . . . . . . . . . . . . . . . . . . . . . . . . . . . . . . . . . . . . . . . . . . . . . . . . . . . . . . . . . . . . . . . . . . . . . . . . . . . . . . . . . . . . . . . . . . . 6
5. Upgrading MySQL GUI Tools .. . . . . . . . . . . . . . . . . . . . . . . . . . . . . . . . . . . . . . . . . . . . . . . . . . . . . . . . . . . . . . . . . . . . . . . . . . . . . . . . . . . . . . . . . . . . . . . . . . . . . . . . . . . . . . . 75.1. Upgrading – Windows ... . . . . . . . . . . . . . . . . . . . . . . . . . . . . . . . . . . . . . . . . . . . . . . . . . . . . . . . . . . . . . . . . . . . . . . . . . . . . . . . . . . . . . . . . . . . . . . . . . . . . . . . . . . . . 75.2. Upgrading – Linux ... . . . . . . . . . . . . . . . . . . . . . . . . . . . . . . . . . . . . . . . . . . . . . . . . . . . . . . . . . . . . . . . . . . . . . . . . . . . . . . . . . . . . . . . . . . . . . . . . . . . . . . . . . . . . . . . . . 7
5.2.1. Tarball Upgrade .. . . . . . . . . . . . . . . . . . . . . . . . . . . . . . . . . . . . . . . . . . . . . . . . . . . . . . . . . . . . . . . . . . . . . . . . . . . . . . . . . . . . . . . . . . . . . . . . . . . . . . . . . . . . 75.2.2. RPM Upgrade .. . . . . . . . . . . . . . . . . . . . . . . . . . . . . . . . . . . . . . . . . . . . . . . . . . . . . . . . . . . . . . . . . . . . . . . . . . . . . . . . . . . . . . . . . . . . . . . . . . . . . . . . . . . . . . 7
5.3. Upgrading – Mac OS X ... . . . . . . . . . . . . . . . . . . . . . . . . . . . . . . . . . . . . . . . . . . . . . . . . . . . . . . . . . . . . . . . . . . . . . . . . . . . . . . . . . . . . . . . . . . . . . . . . . . . . . . . . . . . 86. Running MySQL GUI Tools .. . . . . . . . . . . . . . . . . . . . . . . . . . . . . . . . . . . . . . . . . . . . . . . . . . . . . . . . . . . . . . . . . . . . . . . . . . . . . . . . . . . . . . . . . . . . . . . . . . . . . . . . . . . . . . . . . 9
6.1. Running Under Windows ... . . . . . . . . . . . . . . . . . . . . . . . . . . . . . . . . . . . . . . . . . . . . . . . . . . . . . . . . . . . . . . . . . . . . . . . . . . . . . . . . . . . . . . . . . . . . . . . . . . . . . . . . . 96.2. Running Under Linux ... . . . . . . . . . . . . . . . . . . . . . . . . . . . . . . . . . . . . . . . . . . . . . . . . . . . . . . . . . . . . . . . . . . . . . . . . . . . . . . . . . . . . . . . . . . . . . . . . . . . . . . . . . . . . . 96.3. Running On Mac OS X ... . . . . . . . . . . . . . . . . . . . . . . . . . . . . . . . . . . . . . . . . . . . . . . . . . . . . . . . . . . . . . . . . . . . . . . . . . . . . . . . . . . . . . . . . . . . . . . . . . . . . . . . . . . . 9
7. Features of the MySQL Migration Toolkit . . . . . . . . . . . . . . . . . . . . . . . . . . . . . . . . . . . . . . . . . . . . . . . . . . . . . . . . . . . . . . . . . . . . . . . . . . . . . . . . . . . . . . . . . . . . . . . . .118. An Overview of the Migration Process .. . . . . . . . . . . . . . . . . . . . . . . . . . . . . . . . . . . . . . . . . . . . . . . . . . . . . . . . . . . . . . . . . . . . . . . . . . . . . . . . . . . . . . . . . . . . . . . . . . . .129. The Migration Process In-Depth .. . . . . . . . . . . . . . . . . . . . . . . . . . . . . . . . . . . . . . . . . . . . . . . . . . . . . . . . . . . . . . . . . . . . . . . . . . . . . . . . . . . . . . . . . . . . . . . . . . . . . . . . . . . .15
9.1. Introduction .. . . . . . . . . . . . . . . . . . . . . . . . . . . . . . . . . . . . . . . . . . . . . . . . . . . . . . . . . . . . . . . . . . . . . . . . . . . . . . . . . . . . . . . . . . . . . . . . . . . . . . . . . . . . . . . . . . . . . . . . . .159.2. The Welcome Screen .. . . . . . . . . . . . . . . . . . . . . . . . . . . . . . . . . . . . . . . . . . . . . . . . . . . . . . . . . . . . . . . . . . . . . . . . . . . . . . . . . . . . . . . . . . . . . . . . . . . . . . . . . . . . . . .159.3. The Configuration Type Screen .. . . . . . . . . . . . . . . . . . . . . . . . . . . . . . . . . . . . . . . . . . . . . . . . . . . . . . . . . . . . . . . . . . . . . . . . . . . . . . . . . . . . . . . . . . . . . . . . . .169.4. The Source Database Screen .. . . . . . . . . . . . . . . . . . . . . . . . . . . . . . . . . . . . . . . . . . . . . . . . . . . . . . . . . . . . . . . . . . . . . . . . . . . . . . . . . . . . . . . . . . . . . . . . . . . . . .16
9.4.1. Microsoft Access .. . . . . . . . . . . . . . . . . . . . . . . . . . . . . . . . . . . . . . . . . . . . . . . . . . . . . . . . . . . . . . . . . . . . . . . . . . . . . . . . . . . . . . . . . . . . . . . . . . . . . . . . .179.4.2. Microsoft SQL Server .. . . . . . . . . . . . . . . . . . . . . . . . . . . . . . . . . . . . . . . . . . . . . . . . . . . . . . . . . . . . . . . . . . . . . . . . . . . . . . . . . . . . . . . . . . . . . . . . . . .179.4.3. Oracle .. . . . . . . . . . . . . . . . . . . . . . . . . . . . . . . . . . . . . . . . . . . . . . . . . . . . . . . . . . . . . . . . . . . . . . . . . . . . . . . . . . . . . . . . . . . . . . . . . . . . . . . . . . . . . . . . . . . . . .189.4.4. MySQL ... . . . . . . . . . . . . . . . . . . . . . . . . . . . . . . . . . . . . . . . . . . . . . . . . . . . . . . . . . . . . . . . . . . . . . . . . . . . . . . . . . . . . . . . . . . . . . . . . . . . . . . . . . . . . . . . . . .209.4.5. Saving Connection Information .. . . . . . . . . . . . . . . . . . . . . . . . . . . . . . . . . . . . . . . . . . . . . . . . . . . . . . . . . . . . . . . . . . . . . . . . . . . . . . . . . . . . . . . .21
9.5. The Target Database Screen .. . . . . . . . . . . . . . . . . . . . . . . . . . . . . . . . . . . . . . . . . . . . . . . . . . . . . . . . . . . . . . . . . . . . . . . . . . . . . . . . . . . . . . . . . . . . . . . . . . . . . . .219.6. The Connect to Server Screen .. . . . . . . . . . . . . . . . . . . . . . . . . . . . . . . . . . . . . . . . . . . . . . . . . . . . . . . . . . . . . . . . . . . . . . . . . . . . . . . . . . . . . . . . . . . . . . . . . . . . .229.7. The Source Schema Selection Screen .. . . . . . . . . . . . . . . . . . . . . . . . . . . . . . . . . . . . . . . . . . . . . . . . . . . . . . . . . . . . . . . . . . . . . . . . . . . . . . . . . . . . . . . . . . . .239.8. The Reverse Engineering Screen .. . . . . . . . . . . . . . . . . . . . . . . . . . . . . . . . . . . . . . . . . . . . . . . . . . . . . . . . . . . . . . . . . . . . . . . . . . . . . . . . . . . . . . . . . . . . . . . . .249.9. The Object Type Selection Screen .. . . . . . . . . . . . . . . . . . . . . . . . . . . . . . . . . . . . . . . . . . . . . . . . . . . . . . . . . . . . . . . . . . . . . . . . . . . . . . . . . . . . . . . . . . . . . . .25
9.9.1. Migrating a Sub-Set of Object Types .. . . . . . . . . . . . . . . . . . . . . . . . . . . . . . . . . . . . . . . . . . . . . . . . . . . . . . . . . . . . . . . . . . . . . . . . . . . . . . . . . .269.10. The Object Mapping Screen .. . . . . . . . . . . . . . . . . . . . . . . . . . . . . . . . . . . . . . . . . . . . . . . . . . . . . . . . . . . . . . . . . . . . . . . . . . . . . . . . . . . . . . . . . . . . . . . . . . . . .27
9.10.1. GRT Object . . . . . . . . . . . . . . . . . . . . . . . . . . . . . . . . . . . . . . . . . . . . . . . . . . . . . . . . . . . . . . . . . . . . . . . . . . . . . . . . . . . . . . . . . . . . . . . . . . . . . . . . . . . . . . .289.10.2. Table Objects .. . . . . . . . . . . . . . . . . . . . . . . . . . . . . . . . . . . . . . . . . . . . . . . . . . . . . . . . . . . . . . . . . . . . . . . . . . . . . . . . . . . . . . . . . . . . . . . . . . . . . . . . . . . .28
9.11. The Meta Migration Screen .. . . . . . . . . . . . . . . . . . . . . . . . . . . . . . . . . . . . . . . . . . . . . . . . . . . . . . . . . . . . . . . . . . . . . . . . . . . . . . . . . . . . . . . . . . . . . . . . . . . . . .299.12. The Manual Editing Screen .. . . . . . . . . . . . . . . . . . . . . . . . . . . . . . . . . . . . . . . . . . . . . . . . . . . . . . . . . . . . . . . . . . . . . . . . . . . . . . . . . . . . . . . . . . . . . . . . . . . . . .309.13. The Object Creation Options Screen .. . . . . . . . . . . . . . . . . . . . . . . . . . . . . . . . . . . . . . . . . . . . . . . . . . . . . . . . . . . . . . . . . . . . . . . . . . . . . . . . . . . . . . . . . . .319.14. The Creating Objects Screen .. . . . . . . . . . . . . . . . . . . . . . . . . . . . . . . . . . . . . . . . . . . . . . . . . . . . . . . . . . . . . . . . . . . . . . . . . . . . . . . . . . . . . . . . . . . . . . . . . . . .329.15. The Data Mapping Options Screen .. . . . . . . . . . . . . . . . . . . . . . . . . . . . . . . . . . . . . . . . . . . . . . . . . . . . . . . . . . . . . . . . . . . . . . . . . . . . . . . . . . . . . . . . . . . . .339.16. The Bulk Data Transfer Screen .. . . . . . . . . . . . . . . . . . . . . . . . . . . . . . . . . . . . . . . . . . . . . . . . . . . . . . . . . . . . . . . . . . . . . . . . . . . . . . . . . . . . . . . . . . . . . . . . . .349.17. The Summary Screen .. . . . . . . . . . . . . . . . . . . . . . . . . . . . . . . . . . . . . . . . . . . . . . . . . . . . . . . . . . . . . . . . . . . . . . . . . . . . . . . . . . . . . . . . . . . . . . . . . . . . . . . . . . . . .359.18. Saving the Current Application State .. . . . . . . . . . . . . . . . . . . . . . . . . . . . . . . . . . . . . . . . . . . . . . . . . . . . . . . . . . . . . . . . . . . . . . . . . . . . . . . . . . . . . . . . . . .36
10. The Generic Runtime Environment (GRT) Shell . . . . . . . . . . . . . . . . . . . . . . . . . . . . . . . . . . . . . . . . . . . . . . . . . . . . . . . . . . . . . . . . . . . . . . . . . . . . . . . . . . . . . . . .3810.1. Introduction .. . . . . . . . . . . . . . . . . . . . . . . . . . . . . . . . . . . . . . . . . . . . . . . . . . . . . . . . . . . . . . . . . . . . . . . . . . . . . . . . . . . . . . . . . . . . . . . . . . . . . . . . . . . . . . . . . . . . . . . .3810.2. Exploring the GRT Shell . . . . . . . . . . . . . . . . . . . . . . . . . . . . . . . . . . . . . . . . . . . . . . . . . . . . . . . . . . . . . . . . . . . . . . . . . . . . . . . . . . . . . . . . . . . . . . . . . . . . . . . . . .38
10.2.1. Menu Items ... . . . . . . . . . . . . . . . . . . . . . . . . . . . . . . . . . . . . . . . . . . . . . . . . . . . . . . . . . . . . . . . . . . . . . . . . . . . . . . . . . . . . . . . . . . . . . . . . . . . . . . . . . . . .3910.2.2. The Shell . . . . . . . . . . . . . . . . . . . . . . . . . . . . . . . . . . . . . . . . . . . . . . . . . . . . . . . . . . . . . . . . . . . . . . . . . . . . . . . . . . . . . . . . . . . . . . . . . . . . . . . . . . . . . . . . . .40
iv

10.2.3. The Globals Tree Panel .. . . . . . . . . . . . . . . . . . . . . . . . . . . . . . . . . . . . . . . . . . . . . . . . . . . . . . . . . . . . . . . . . . . . . . . . . . . . . . . . . . . . . . . . . . . . . . . .4010.3. Using the GRT Shell . . . . . . . . . . . . . . . . . . . . . . . . . . . . . . . . . . . . . . . . . . . . . . . . . . . . . . . . . . . . . . . . . . . . . . . . . . . . . . . . . . . . . . . . . . . . . . . . . . . . . . . . . . . . . . .4110.4. Invoking the GRT Shell From the Command Line .. . . . . . . . . . . . . . . . . . . . . . . . . . . . . . . . . . . . . . . . . . . . . . . . . . . . . . . . . . . . . . . . . . . . . . . . . . .42
11. Scripted Migration .. . . . . . . . . . . . . . . . . . . . . . . . . . . . . . . . . . . . . . . . . . . . . . . . . . . . . . . . . . . . . . . . . . . . . . . . . . . . . . . . . . . . . . . . . . . . . . . . . . . . . . . . . . . . . . . . . . . . . . . . . . .4411.1. The Steps for Scripted Migration .. . . . . . . . . . . . . . . . . . . . . . . . . . . . . . . . . . . . . . . . . . . . . . . . . . . . . . . . . . . . . . . . . . . . . . . . . . . . . . . . . . . . . . . . . . . . . . .4411.2. Setting the Source and Target Connection .. . . . . . . . . . . . . . . . . . . . . . . . . . . . . . . . . . . . . . . . . . . . . . . . . . . . . . . . . . . . . . . . . . . . . . . . . . . . . . . . . . . . .4411.3. Reverse Engineering .. . . . . . . . . . . . . . . . . . . . . . . . . . . . . . . . . . . . . . . . . . . . . . . . . . . . . . . . . . . . . . . . . . . . . . . . . . . . . . . . . . . . . . . . . . . . . . . . . . . . . . . . . . . . . .4511.4. Migration Methods .. . . . . . . . . . . . . . . . . . . . . . . . . . . . . . . . . . . . . . . . . . . . . . . . . . . . . . . . . . . . . . . . . . . . . . . . . . . . . . . . . . . . . . . . . . . . . . . . . . . . . . . . . . . . . . . .4511.5. Map Objects and Migrate .. . . . . . . . . . . . . . . . . . . . . . . . . . . . . . . . . . . . . . . . . . . . . . . . . . . . . . . . . . . . . . . . . . . . . . . . . . . . . . . . . . . . . . . . . . . . . . . . . . . . . . . .4511.6. The SQL Create Statements .. . . . . . . . . . . . . . . . . . . . . . . . . . . . . . . . . . . . . . . . . . . . . . . . . . . . . . . . . . . . . . . . . . . . . . . . . . . . . . . . . . . . . . . . . . . . . . . . . . . . .4611.7. Bulk Data Transfer .. . . . . . . . . . . . . . . . . . . . . . . . . . . . . . . . . . . . . . . . . . . . . . . . . . . . . . . . . . . . . . . . . . . . . . . . . . . . . . . . . . . . . . . . . . . . . . . . . . . . . . . . . . . . . . . .46
12. Extending The MySQL Migration Toolkit . . . . . . . . . . . . . . . . . . . . . . . . . . . . . . . . . . . . . . . . . . . . . . . . . . . . . . . . . . . . . . . . . . . . . . . . . . . . . . . . . . . . . . . . . . . . . . . .4712.1. Introduction .. . . . . . . . . . . . . . . . . . . . . . . . . . . . . . . . . . . . . . . . . . . . . . . . . . . . . . . . . . . . . . . . . . . . . . . . . . . . . . . . . . . . . . . . . . . . . . . . . . . . . . . . . . . . . . . . . . . . . . . .4712.2. Architecture of the MySQL Migration Toolkit . . . . . . . . . . . . . . . . . . . . . . . . . . . . . . . . . . . . . . . . . . . . . . . . . . . . . . . . . . . . . . . . . . . . . . . . . . . . . . . .4712.3. The Modular Migration Process .. . . . . . . . . . . . . . . . . . . . . . . . . . . . . . . . . . . . . . . . . . . . . . . . . . . . . . . . . . . . . . . . . . . . . . . . . . . . . . . . . . . . . . . . . . . . . . . . .4712.4. Tools Required to Extend the MySQL Migration Toolkit . . . . . . . . . . . . . . . . . . . . . . . . . . . . . . . . . . . . . . . . . . . . . . . . . . . . . . . . . . . . . . . . . . . .48
13. Preparing a Microsoft Access Database for Migration .. . . . . . . . . . . . . . . . . . . . . . . . . . . . . . . . . . . . . . . . . . . . . . . . . . . . . . . . . . . . . . . . . . . . . . . . . . . . . . . . .49
MySQL Migration Toolkit
v

List of Figures8.1. The MySQL Migration Toolkit Migration Plan .. . . . . . . . . . . . . . . . . . . . . . . . . . . . . . . . . . . . . . . . . . . . . . . . . . . . . . . . . . . . . . . . . . . . . . . . . . . . . . . . . . . . . . . .129.1. The MySQL Migration Toolkit Welcome Screen .. . . . . . . . . . . . . . . . . . . . . . . . . . . . . . . . . . . . . . . . . . . . . . . . . . . . . . . . . . . . . . . . . . . . . . . . . . . . . . . . . . . . . .159.2. The Configuration Type Screen .. . . . . . . . . . . . . . . . . . . . . . . . . . . . . . . . . . . . . . . . . . . . . . . . . . . . . . . . . . . . . . . . . . . . . . . . . . . . . . . . . . . . . . . . . . . . . . . . . . . . . . . . . .169.3. Source Database – Microsoft Access .. . . . . . . . . . . . . . . . . . . . . . . . . . . . . . . . . . . . . . . . . . . . . . . . . . . . . . . . . . . . . . . . . . . . . . . . . . . . . . . . . . . . . . . . . . . . . . . . . . . .179.4. Source Database – Microsoft SQL Server .. . . . . . . . . . . . . . . . . . . . . . . . . . . . . . . . . . . . . . . . . . . . . . . . . . . . . . . . . . . . . . . . . . . . . . . . . . . . . . . . . . . . . . . . . . . . . . .179.5. Source Database – Oracle .. . . . . . . . . . . . . . . . . . . . . . . . . . . . . . . . . . . . . . . . . . . . . . . . . . . . . . . . . . . . . . . . . . . . . . . . . . . . . . . . . . . . . . . . . . . . . . . . . . . . . . . . . . . . . . . . .189.6. Oracle JDBC Driver Not Attached ... . . . . . . . . . . . . . . . . . . . . . . . . . . . . . . . . . . . . . . . . . . . . . . . . . . . . . . . . . . . . . . . . . . . . . . . . . . . . . . . . . . . . . . . . . . . . . . . . . . . . .199.7. Source Database – MySQL ... . . . . . . . . . . . . . . . . . . . . . . . . . . . . . . . . . . . . . . . . . . . . . . . . . . . . . . . . . . . . . . . . . . . . . . . . . . . . . . . . . . . . . . . . . . . . . . . . . . . . . . . . . . . . . .209.8. Target Database – MySQL ... . . . . . . . . . . . . . . . . . . . . . . . . . . . . . . . . . . . . . . . . . . . . . . . . . . . . . . . . . . . . . . . . . . . . . . . . . . . . . . . . . . . . . . . . . . . . . . . . . . . . . . . . . . . . . .219.9. The Connect to Servers Screen .. . . . . . . . . . . . . . . . . . . . . . . . . . . . . . . . . . . . . . . . . . . . . . . . . . . . . . . . . . . . . . . . . . . . . . . . . . . . . . . . . . . . . . . . . . . . . . . . . . . . . . . . . . .229.10. The Source Schema Selection Screen .. . . . . . . . . . . . . . . . . . . . . . . . . . . . . . . . . . . . . . . . . . . . . . . . . . . . . . . . . . . . . . . . . . . . . . . . . . . . . . . . . . . . . . . . . . . . . . . . . .239.11. The Reverse Engineering Screen .. . . . . . . . . . . . . . . . . . . . . . . . . . . . . . . . . . . . . . . . . . . . . . . . . . . . . . . . . . . . . . . . . . . . . . . . . . . . . . . . . . . . . . . . . . . . . . . . . . . . . . . .249.12. The Object Type Selection Screen .. . . . . . . . . . . . . . . . . . . . . . . . . . . . . . . . . . . . . . . . . . . . . . . . . . . . . . . . . . . . . . . . . . . . . . . . . . . . . . . . . . . . . . . . . . . . . . . . . . . . . .259.13. The Detail View of the Object Type Selection Screen .. . . . . . . . . . . . . . . . . . . . . . . . . . . . . . . . . . . . . . . . . . . . . . . . . . . . . . . . . . . . . . . . . . . . . . . . . . . . . . .269.14. The Add Ignore Pattern Dialog .. . . . . . . . . . . . . . . . . . . . . . . . . . . . . . . . . . . . . . . . . . . . . . . . . . . . . . . . . . . . . . . . . . . . . . . . . . . . . . . . . . . . . . . . . . . . . . . . . . . . . . . . . .279.15. The Object Mapping Screen .. . . . . . . . . . . . . . . . . . . . . . . . . . . . . . . . . . . . . . . . . . . . . . . . . . . . . . . . . . . . . . . . . . . . . . . . . . . . . . . . . . . . . . . . . . . . . . . . . . . . . . . . . . . . .289.16. The Meta Migration Screen .. . . . . . . . . . . . . . . . . . . . . . . . . . . . . . . . . . . . . . . . . . . . . . . . . . . . . . . . . . . . . . . . . . . . . . . . . . . . . . . . . . . . . . . . . . . . . . . . . . . . . . . . . . . . . .299.17. The Manual Editing Screen .. . . . . . . . . . . . . . . . . . . . . . . . . . . . . . . . . . . . . . . . . . . . . . . . . . . . . . . . . . . . . . . . . . . . . . . . . . . . . . . . . . . . . . . . . . . . . . . . . . . . . . . . . . . . . .309.18. The Manual Editing Screen – Detailed View ... . . . . . . . . . . . . . . . . . . . . . . . . . . . . . . . . . . . . . . . . . . . . . . . . . . . . . . . . . . . . . . . . . . . . . . . . . . . . . . . . . . . . . . . .309.19. The Object Creation Options Screen .. . . . . . . . . . . . . . . . . . . . . . . . . . . . . . . . . . . . . . . . . . . . . . . . . . . . . . . . . . . . . . . . . . . . . . . . . . . . . . . . . . . . . . . . . . . . . . . . . . .319.20. The Creating Objects Screen .. . . . . . . . . . . . . . . . . . . . . . . . . . . . . . . . . . . . . . . . . . . . . . . . . . . . . . . . . . . . . . . . . . . . . . . . . . . . . . . . . . . . . . . . . . . . . . . . . . . . . . . . . . . .329.21. The Data Mapping Options Screen .. . . . . . . . . . . . . . . . . . . . . . . . . . . . . . . . . . . . . . . . . . . . . . . . . . . . . . . . . . . . . . . . . . . . . . . . . . . . . . . . . . . . . . . . . . . . . . . . . . . . .339.22. The Bulk Data Transfer Screen .. . . . . . . . . . . . . . . . . . . . . . . . . . . . . . . . . . . . . . . . . . . . . . . . . . . . . . . . . . . . . . . . . . . . . . . . . . . . . . . . . . . . . . . . . . . . . . . . . . . . . . . . . .349.23. The Summary Screen .. . . . . . . . . . . . . . . . . . . . . . . . . . . . . . . . . . . . . . . . . . . . . . . . . . . . . . . . . . . . . . . . . . . . . . . . . . . . . . . . . . . . . . . . . . . . . . . . . . . . . . . . . . . . . . . . . . . . .3510.1. The GRT Shell (Windows) .. . . . . . . . . . . . . . . . . . . . . . . . . . . . . . . . . . . . . . . . . . . . . . . . . . . . . . . . . . . . . . . . . . . . . . . . . . . . . . . . . . . . . . . . . . . . . . . . . . . . . . . . . . . . . .3813.1. The Show Section .. . . . . . . . . . . . . . . . . . . . . . . . . . . . . . . . . . . . . . . . . . . . . . . . . . . . . . . . . . . . . . . . . . . . . . . . . . . . . . . . . . . . . . . . . . . . . . . . . . . . . . . . . . . . . . . . . . . . . . . . .4913.2. The System Objects .. . . . . . . . . . . . . . . . . . . . . . . . . . . . . . . . . . . . . . . . . . . . . . . . . . . . . . . . . . . . . . . . . . . . . . . . . . . . . . . . . . . . . . . . . . . . . . . . . . . . . . . . . . . . . . . . . . . . . . .4913.3. Granting Access to the System Objects .. . . . . . . . . . . . . . . . . . . . . . . . . . . . . . . . . . . . . . . . . . . . . . . . . . . . . . . . . . . . . . . . . . . . . . . . . . . . . . . . . . . . . . . . . . . . . . . .49
vi

Chapter 1. MySQL EnterpriseA MySQL Enterprise subscription is the most comprehensive offering of MySQL database software, services and support; it ensuresthat your business achieves the highest levels of reliability, security, and uptime.
An Enterprise Subscription includes:
1. The MySQL Enterprise Server – the most reliable, secure, and up-to-date version of the world’s most popular open source database
2. The MySQL Enterprise Monitor – An automated virtual DBA assistant that monitors all your MySQL Servers around-the-clock,identifies exceptions to MySQL best practices, and provides expert advice on fixing any problems discovered
3. MySQL Production Support – Technical and consultative support when you need it, along with regularly scheduled service packs,hot-fixes, and more
For more information, visit http://www.mysql.com/enterprise.
1
Chapter 2. Introduction to the MySQL Migration ToolkitThe MySQL Migration Toolkit is a graphical tool provided by MySQL AB for migrating schema and data from various relational data-base systems to MySQL.
MySQL Migration Toolkit is designed to work with MySQL versions 5.0 and higher.
If you find that MySQL Migration Toolkit lacks some feature important to you, or if you discover a bug, please use our MySQL BugSystem to request features or report problems.
At the moment, MySQL Migration Toolkit is only available for Windows.
2

Chapter 3. Installation
3.1. IntroductionMySQL GUI Tools run on Windows, Linux, and Mac OS X. You can find MySQL GUI Tools for the operating system of your choiceon the MySQL GUI Tools Downloads page.
The MySQL Migration Toolkit requires the Java Runtime Environment (JRE). The minimum version supported is 5.0 update 8.
3.2. Installing Under WindowsMySQL GUI Tools run on recent 32-bit Windows NT based operating systems, including Windows 2000, XP, Vista, and 2003. Theydon't run on Windows NT 4 and below.
3.2.1. Using the Windows InstallerMySQL GUI Tools can be installed on all Windows operating systems using the Windows Installer (.msi) installation package. TheMSI package is contained within a ZIP archive named mysql-gui-tools-version-win32.msi, where version indicates theMySQL GUI Tools version.
The Microsoft Windows Installer Engine was updated with the release of Windows XP; those using a previous version of Windows canreference this Microsoft Knowledge Base article for information on upgrading to the latest version of the Windows Installer Engine.
In addition, Microsoft has recently introduced the WiX (Windows Installer XML) toolkit. This is the first highly acknowledged OpenSource project from Microsoft. We have switched to WiX because it is an Open Source project and it allows us to handle the completeWindows installation process in a flexible manner using scripts.
Improving the MySQL Installation Wizard depends on the support and feedback of users like you. If you find that the MySQL Installa-tion Wizard is lacking some feature important to you, or if you discover a bug, please report it in our bugs database using the instruc-tions given in How to Report Bugs or Problems.
To install MySQL GUI Tools, right click on the MSI file and select INSTALL.
Note
Installing MySQL GUI Tools on Windows Vista requires administrative privileges.
At the Setup Type window you may choose a complete or custom installation. If you do not wish to install all of the MySQLGUI Tools choose the custom option. Custom installation also gives you the option of installing support for languages other than Eng-lish. MySQL GUI Tools supports, German, Greek, Japanese, Polish, and Brazilian Portuguese.
Unless you choose otherwise, MySQL GUI Tools are installed in C:\%PROGRAMFILES%\MySQL\MySQL Tools forversion\, where %PROGRAMFILES% is the default directory for programs on your machine and version is the version number ofMySQL GUI Tools. The %PROGRAMFILES%directory might be C:\Program Files or C:\programme.
Note
Installing MySQL GUI Tools using the Windows installer automatically creates entries in the Start menu.
MySQL Workbench is not included in the bundled MySQL GUI Tools download so must be installed separately. To dothis, find the link to MySQL Workbench on http://dev.mysql.com/downloads/. After downloading install this file as de-scribed in Section 3.2, “Installing Under Windows”.
3.2.2. Installing From the ZIP FileIf you are having problems running the installer, as an alternative, you can download a ZIP file without an installer. That file is calledmysql-gui-tools-noinstall-version-win32.zip. Using a ZIP program, unpack it to the directory of your choice. Youmay also want to create shortcuts to MySQLAdministrator.exe, MySQLMigrationTool.exe, and MySQLQuery-Browser.exe for your desktop or the quick launch bar.
3.3. Installing Under Linux
3

MySQL GUI Tools runs on Linux machines that have a graphical desktop installed. It is designed to run under the Gnome desktop withGTK2 and has been tested on Linux kernel versions 2.4 and 2.6. It should also run on other versions, and even on a number of Unix-likeoperating systems.
Note
Currently, the MySQL Migration Toolkit is not available for Linux.
3.3.1. Installing the Generic TarballThe generic tar archive allows you to install MySQL GUI Tools on most Linux distributions. The tarball file is called mysql-gui-tools-version.tar.gz, where version indicates the MySQL GUI Tools version (for example, 5.0r3).
To see all files in the tarball, run this command:
shell> tar -tzf mysql-gui-tools-version.tar.gz
To install MySQL GUI Tools, run this command:
shell> tar --directory=/opt -xzvf mysql-gui-tools-version.tar.gz
This installs the various application binaries in the directory, /opt/mysql-gui-tools-version.
If you install MySQL GUI Tools to the opt directory, icons for use with desktop shortcuts or for creating menu items are found underthe opt/mysql-gui-tools-version/share/mysql-gui directory.
If you install MySQL GUI Tools to a directory other than the /opt directory, you will need to update the installation directory. Thisdone by using the --update-paths option the first time that you run any one of the MySQL GUI Tools. For example, when runningQuery Browser for the first time, navigate to the installation directory and enter the following command:
shell> ./mysql-query-browser --update-paths
You need only run one MySQL GUI Tools application with the --update-path option. This updates the path for all MySQL GUITools.
If you do not use the default installation directory and create a Desktop shortcut using the .desktop files found under the mysql-gui-tools-5.0 directory you must edit the properties of any shortcut you create. Enter the correct path for the application on yoursystem.
3.3.2. RPM InstallationIn addition to a generic tarball, some distribution-specific RPMs are available. Currently these include Red Hat Enterprise Linux(RHEL) 3 and 4, Fedora Core 5 (FC5), and SuSE Linux 10.x. For FC5 and SuSE the gtkmm24 toolkit is a requirement for installingthe RPM version of MySQL GUI Tools. You may also need to install the widget for displaying HTML pages. On FC5 you may installthese RPMs from the command line in the following way:
shell> yum install gtkmm24 gtkhtml2
For installation on SuSE Linux:
shell> yast2 -i gtkmm24 gtkhtml2
Note
You may need root privileges to run the yast2 command.
The Red Hat RPMs are self contained so no additional packages need to be installed.
The RPM downloads are made up of the individual GUI Tools components combined into a single TAR archive. Extract the individualRPMs in the following way:
shell> tar -zxf mysql-gui-tools-version.tar.gz
Installation
4

This will decompress the RPM files to the current directory.
Install all the RPM files by typing:
shell> rpm -ivh mysql-*.rpm
If you are upgrading to a newer version of MySQL GUI Tools see Section 5.2.2, “RPM Upgrade”.
If you install the RPM files individually, you must install the mysql-gui-tools-version.rpm file first in order to satisfy de-pendencies.
If you wish, you may install only one of the MySQL GUI Tools. For example, to install MySQL Administrator only, do the following:
shell> rpm -ivh mysql-gui-toolsversion.rpm mysql-administratorversion.rpm
If possible, the RPM installation process creates shortcuts in the start menu of your window manager. For example, SuSE Linux withthe KDE window manager adds shortcuts to the MySQL GUI Tools under the DEVELOPMENT, OTHER TOOLS menu item. Likewise,with FC5, shortcuts are created under the DEVELOPMENT menu item.
Icons for use with desktop shortcuts or for creating menu items are found under the /usr/share/mysql-gui directory.
See the MySQL GUI Tools Downloads page for the most up-to-date listing of the various RPM packages available.
3.4. Installing Under Mac OS XTo install MySQL GUI Tools under Mac OS X, double-click the downloaded .dmg file and wait for it to be opened and attached. Oncea window containing the MySQL GUI Tools icon pops up, drag it to your Applications folder — or any other location you prefer.
Once the copy is complete, you may eject the disk image.
The minimum supported version is Mac OS X 10.4.
Note
Currently, the MySQL Migration Toolkit is not available for Mac OS X.
Installation
5

Chapter 4. Removing MySQL GUI ToolsUnder Linux and Mac OS X it is easy to remove all the MySQL GUI Tools or individual applications. Under Windows, removing indi-vidual applications is a bit more problematic.
4.1. Uninstall – WindowsTo uninstall MySQL GUI Tools, open the Control Panel and Choose Add or Remove Programs. Find the MySQL Toolsentry and choose the REMOVE button. Choosing this option will remove all of the GUI Tools.
Note
Currently, there is no command-line option for removing MySQL GUI Tools.
After you have removed MySQL GUI Tools you may remove the MySQL Tools for version directory. Unless you chose other-wise on installation, you should find this directory below the C:\%PROGRAMFILES%\MySQL\ directory.
You may remove individual applications manually. Go to the C:\%PROGRAMFILES%\MySQL\ directory and delete the exe and chmfiles associated with the application you wish to remove. Also remove the appropriate icon from the Start menu.
Note
Removing an application manually will not remove all the files belonging to that application.
4.2. Uninstall – LinuxUnless you chose otherwise, you should find MySQL GUI Tools in the /opt/mysql-gui-tools-version directory.
If you installed MySQL GUI Tools using the RPM files you can remove all the tools by typing at the command line:
shell> rpm -e mysql-*.rpm
You may remove individual tools by using the e option with the name of the specific tool you wish to remove. For instance, to removeonly the Administrator tool type:
shell> rpm -e mysql-administrator-version.rpm
Note
Remember, if you plan to keep any one of the MySQL GUI Tools you must also keep the mysql-gui-tools-ver-sion.rpm file.
After removal of all the MySQL GUI Tools, remove the /opt/mysql-gui-tools-version directory. if you have removed onlyselected tools, remove only the associated directories.
If you installed MySQL GUI Tools using the generic tarball, you can remove the tools by deleting the/opt/mysql-gui-tools-version directory. If you wish to remove an individual tool, find the directory associated with thattool and delete it.
4.3. Uninstall – Mac OS XFind the directory where you installed MySQL GUI Tools, and remove applications by moving their icons to the Trash.
6
Chapter 5. Upgrading MySQL GUI Tools
5.1. Upgrading – WindowsIf you are upgrading using the installer file follow the instructions given in Section 3.2, “Installing Under Windows”. There are is noneed to remove your current installation.
If you are not using the installer file remove the current MySQL GUI Tools directory, and extract and install the new version as de-scribed in Section 3.2, “Installing Under Windows”.
MySQL Workbench is not included in the bundled MySQL GUI Tools download so must be installed separately. To do this, find thelink to MySQL Workbench at http://dev.mysql.com/downloads/. After downloading, install this file as described in Section 3.2,“Installing Under Windows”.
5.2. Upgrading – Linux
5.2.1. Tarball UpgradeIf you are upgrading using the generic tarball file, remove the current MySQL GUI Tools directory, and extract and install the new tar-ball as described in Section 3.3.1, “Installing the Generic Tarball”.
5.2.2. RPM UpgradeIf you installed the MySQL GUI Tools using RPM files you can upgrade by navigating to the directory that contains the RPM files andtyping at the command line:
shell> rpm -Uvh mysql-*.rpm
You may upgrade individual tools by using the U with the name of the specific tool you wish to upgrade. You will also need to upgradethe mysql-gui-tools-version.rpm file. For instance, to upgrade only the Administrator tool type:
shell> rpm -Uvh mysql-administrator-version.rpm mysql-gui-tools-version.rpm
Note
The mysql-gui-tools-version.rpm file is used by all MySQL GUI Tools. You must always upgrade this file.
When upgrading, packages cannot be installed separately because version conflicts will arise.
If your previous installation of MySQL GUI Tools included Workbench, (this tool has been removed from the GUI Tools package) youmay encounter the following error when upgrading:
error: Failed dependencies:mysql-gui-tools = old-version is needed by (installed)mysql-workbench-version
To continue with the upgrade you must remove the Workbench RPM file. To determine the name of the Workbench RPM file issue thefollowing command:
shell> rpm -qa | grep workbench
Remove Workbench by issuing the command:
shell> rpm -e mysql-workbench-version
You should now be able to upgrade MySQL GUI Tools as described above.
If you do not wish to remove Workbench, perform an RPM installation rather than an upgrade. For instructions on doing this see Sec-tion 3.3.2, “RPM Installation”.
7

5.3. Upgrading – Mac OS XFind the directory where you installed MySQL GUI Tools, and remove the applications by moving their icons to the Trash.
Install the upgrade as described in Section 3.4, “Installing Under Mac OS X”.
Upgrading MySQL GUI Tools
8

Chapter 6. Running MySQL GUI ToolsHow you start any one of the MySQL GUI Tools depends on the operating system you are using.
6.1. Running Under WindowsUnder Windows, the names of the executable files in the MySQL GUI Tools suite are:
• MySQLAdministrator.exe
• MySQLQueryBrowser.exe
• MySQLMigrationTool.exe
Start any one of the MySQL GUI Tools by double clicking its desktop icon, or by selecting it from the Start menu. Alternatively, youcan open a DOS window and start it from the command line. For example, you could run the MySQL Administrator in the followingway:
C:\> "C:\%PROGRAMFILES%\MySQL\MySQL Tools for version\MySQLAdministrator.exe"
%PROGRAMFILES% is the default directory for programs on your machine, for example C:\Program Files or C:\programme.If your path contains spaces, you must enclose the command within quotation marks as shown above.
6.2. Running Under LinuxUnder Linux, the names of the executable files in the MySQL GUI Tools suite are:
• mysql-administrator
• mysql-query-browser
Note
There is no Linux version of MySQL Migration Toolkit.
If you installed MySQL GUI Tools to the /opt directory using the tar archive file, change into the/opt/mysql-gui-tools-version directory to run any one of the MySQL GUI Tools.
To run MySQL Administrator you would type:
shell> ./mysql-administrator
However, adding /opt/mysql-gui-tools-version to the PATH variable makes it much simpler to run MySQL GUI Tools —you need not worry about your present working directory.
When installed from RPM files, the MySQL GUI Tools are found in the /usr/bin directory. This directory is usually included in thePATH variable, so running any one of the MySQL GUI Tools simply requires typing the executable file name, regardless of your cur-rent directory. For example:
shell> mysql-administrator
For those distributions that create menu items, you may also, of course, start any one of the tools by choosing the menu item.
6.3. Running On Mac OS XOn Mac OS X, navigate to the MySQL GUI Tools installation directory and double-click on the application you wish to start.
9

Note
There is no Mac OS X version of MySQL Migration Toolkit.
Running MySQL GUI Tools
10
Chapter 7. Features of the MySQL Migration ToolkitThe following are some of the key features of the MySQL Migration Toolkit:
• The MySQL Migration Toolkit supports a variety of source database systems, including the following:
• Oracle
• Microsoft SQL Server
• Microsoft Access
• Sybase
• MySQL
• The MySQL Migration Toolkit is fully customizable through its Java runtime interface. Advanced users can use Java to performcustom data and schema transformations.
• The MySQL Migration Toolkit supports agent-based data migrations, with the MySQL Migration Toolkit residing on a separate ma-chine than the source and target database servers, through the use of a special migration agent. The agent-based data migration im-proves migration performance by allowing data to be transferred directly from the source machine to the target machine without be-ing routed through the MySQL Migration Toolkit.
11

Chapter 8. An Overview of the Migration ProcessMigrating data from an external RDBMS to MySQL is an eight step process :
Figure 8.1. The MySQL Migration Toolkit Migration Plan
12

An Overview of the Migration Process
13

• Source/Target Selection: In the first step you specify the connection parameters for the source and target database servers.
• Object Selection: In the second step you select the objects (tables, views, stored procedures) that will be migrated.
• Object Mapping: In the third step you choose the method used for mapping and transforming the objects.
• Manual Editing: In the fourth step you can manually edit the new objects to ensure a proper transformation.
• Schema Creation: In the fifth step the MySQL Migration Toolkit creates the transformed object on the target MySQL server.
• Data Mapping: In the sixth step you specify any changes that need to be made to the data as it is migrated.
• Bulk Transfer: In the seventh step the MySQL Migration Toolkit transfers the data from the source server to the target server.
• Summary: In the eighth and final step the MySQL Migration Toolkit creates a summary report of the migration process for you toreview.
Each of these sections will be covered in more detail in the coming chapters.
An Overview of the Migration Process
14

Chapter 9. The Migration Process In-Depth
9.1. IntroductionIn this chapter we will cover the different steps of the MySQL Migration Toolkit in depth. The different steps will be covered in the or-der that they appear in the MySQL Migration Toolkit.
9.2. The Welcome ScreenThe first screen of the MySQL Migration Toolkit is the Welcome Screen:
Figure 9.1. The MySQL Migration Toolkit Welcome Screen
The welcome screen indicates the progress of loading the various components of the MySQL Migration Toolkit. If you encounter anyerrors on the welcome screen you should close the MySQL Migration Toolkit and confirm that you have properly installed the JavaRuntime Environment. See Chapter 2, Introduction to the MySQL Migration Toolkit for information on downloading and installing theJava Runtime Environment.
15

9.3. The Configuration Type ScreenThe Configuration Type screen allows you to choose between a Direct Migration and a Agent-Based Migration:
Figure 9.2. The Configuration Type Screen
Use the Direct Migration if the MySQL Migration Toolkit is installed on either the source or target machine. The Direct Migra-tion should not be used when the MySQL Migration Toolkit is not located on either the source or target machine, as it will create a largeamount of network traffic and will result in decreased performance.
Use the Agent-Based Migration when migrating between two server machines that do not support the use of the MySQL Migra-tion Toolkit. The MySQL Migration agent should be installed on the source machine before using the Agent-Based Migration.
9.4. The Source Database ScreenUse the Source Database screen to select the source RDBMS used in the migration and to specify the connection parameters.
The Source Database screen's appearance will vary depending on the type of source database selected.
All Data Source screens will feature a DETAILS button that can be used to expose the ADVANCED SETTINGS panel. The Advanced Set-tings panel can be used to manually specify a JDBC driver and JDBC connection string for your migration session.
The Migration Process In-Depth
16

9.4.1. Microsoft AccessThe Source Database screen appears as follows when you select Microsoft Access as the source database:
Figure 9.3. Source Database – Microsoft Access
Specify the path to the .mdb database file in the Database File field and specify the database user name and password informationif applicable.
You must make special modifications to your Access database file before it can be used with MySQL Migration Toolkit. Please seeChapter 13, Preparing a Microsoft Access Database for Migration for further information.
9.4.2. Microsoft SQL ServerThe Source Database screen appears as follows when you select MS SQL Server as the source database:
Figure 9.4. Source Database – Microsoft SQL Server
The Migration Process In-Depth
17

Specify the host name, user name, and password to connect to the source Microsoft SQL Server to connect and click NEXT.
9.4.3. OracleThe Source Database screen appears as follows when you select Oracle as the source database:
Figure 9.5. Source Database – Oracle
The Migration Process In-Depth
18

If you encounter the following database selection screen, it means that you do not have the appropriate JDBC driver for Oracle installed:
Figure 9.6. Oracle JDBC Driver Not Attached
The Migration Process In-Depth
19

If the Oracle JDBC driver is present on your system, click the LOCATE JDBC DRIVER ON HARDDISK button to attach the driver.
If the Oracle JDBC driver is not present on your system, click the DOWNLOAD JDBC DRIVER FROM THE WEB button to download it.Download the ojdbc14.jar file and then attach it by clicking on the LOCATE JDBC DRIVER ON HARDDISK button.
After attaching the Oracle JDBC driver you need to restart the MySQL Migration Toolkit.
9.4.4. MySQLThe Source Database screen appears as follows when you select MySQL as the source database:
Figure 9.7. Source Database – MySQL
The Migration Process In-Depth
20

9.4.5. Saving Connection InformationAfter entering the connection information for the source database, click the + button to save the connection information.
When prompted, enter a name for the connection information and click the OK button to save the connection information for later re-use.
You can discard saved connection information by selecting the saved connection from the CONNECTION drop-down list and clicking the– button.
9.5. The Target Database ScreenUse the Target Database screen to select the target RDBMS used in the migration and to specify the connection parameters.
The target Database screen uses an interface that is identical to that of the Source Database screen:
Figure 9.8. Target Database – MySQL
The Migration Process In-Depth
21

Target database support for the MySQL Migration Toolkit is currently limited to MySQL 4.1 and MySQL 5.0.
9.6. The Connect to Server ScreenAfter you specify your source and target database servers, the MySQL Migration Toolkit will connect to each server and retrieve theschema information from the source server:
Figure 9.9. The Connect to Servers Screen
The Migration Process In-Depth
22

Click the DETAILS button to see a more detailed log of the connection process.
9.7. The Source Schema Selection ScreenUse the Source Schema Selection screen to choose which databases from the source server you would like to migrate.
If there are a large number of databases to choose from, you can search for a specific database by entering the database name in theschemata textbox as shown in the following image.
Figure 9.10. The Source Schema Selection Screen
The Migration Process In-Depth
23

9.8. The Reverse Engineering ScreenOnce you select the databases you wish to migrate, the MySQL Migration Toolkit begins the process of reverse engineering the sourcedatabase:
Figure 9.11. The Reverse Engineering Screen
The Migration Process In-Depth
24

The MySQL Migration Toolkit collects column and index information for each table in the source database, along with information onstored procedures and views.
Click the DETAILS button to see a detailed log of the reverse engineering process.
9.9. The Object Type Selection ScreenUse the Object Type Selection screen to choose which objects you wish to migrate:
Figure 9.12. The Object Type Selection Screen
The Migration Process In-Depth
25

Check the box next to the objects types (Tables, Views, Stored Procedures) that you wish to migrate.
9.9.1. Migrating a Sub-Set of Object TypesIf you only wish to migrate a sub-set of the available object types, click the DETAILED SELECTION button next to the object type:
Figure 9.13. The Detail View of the Object Type Selection Screen
The Migration Process In-Depth
26
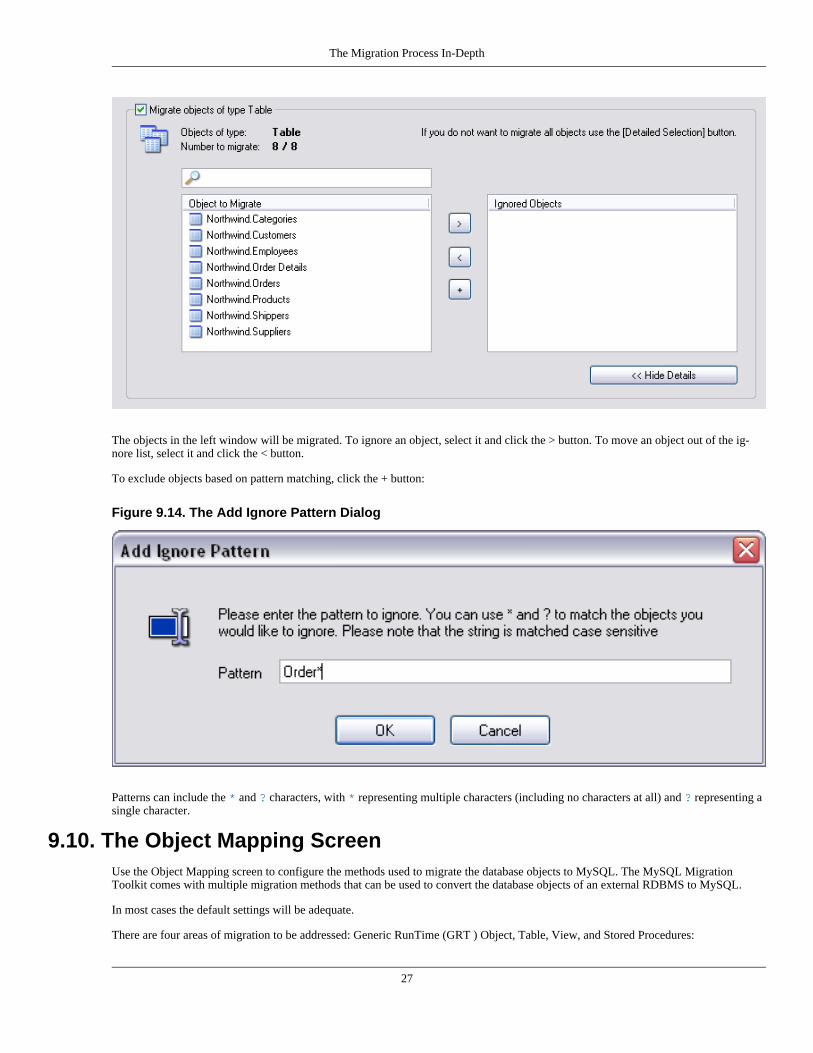
The objects in the left window will be migrated. To ignore an object, select it and click the > button. To move an object out of the ig-nore list, select it and click the < button.
To exclude objects based on pattern matching, click the + button:
Figure 9.14. The Add Ignore Pattern Dialog
Patterns can include the * and ? characters, with * representing multiple characters (including no characters at all) and ? representing asingle character.
9.10. The Object Mapping ScreenUse the Object Mapping screen to configure the methods used to migrate the database objects to MySQL. The MySQL MigrationToolkit comes with multiple migration methods that can be used to convert the database objects of an external RDBMS to MySQL.
In most cases the default settings will be adequate.
There are four areas of migration to be addressed: Generic RunTime (GRT ) Object, Table, View, and Stored Procedures:
The Migration Process In-Depth
27

Figure 9.15. The Object Mapping Screen
9.10.1. GRT ObjectThe GRT Object section of the Object Mapping screen dictates the properties of the database itself. By default a generic profile is used,with a Latin1 character set.
To modify the character set used on the database level, click the SET PARAMETER button. Choose from Latin1, Multilanguage, orUser defined.
9.10.2. Table Objects
The Migration Process In-Depth
28

The Table section of the Object Mapping screen dictates the properties of the individual tables. By default a generic profile is used, withan InnoDB storage engine.
To modify the storage engine used with the migrated tables, click the SET PARAMETER button. Choose the Data consistency op-tion to use the InnoDB storage engine for transactional and foreign key support. Choose the Statistical data option to use theMyISAM storage engine with increased performance but no transaction safety. Choose the Data consistency / multilan-guage option to use the InnoDB storage engine with UTF8 as the default charset. If none of the provided options meet your needs,choose the User defined option and provide your own settings.
9.11. The Meta Migration ScreenAfter you configure data object mapping, the MySQL Migration Toolkit performs the conversion of the database objects and generatesSQL CREATE statements.
Figure 9.16. The Meta Migration Screen
The Migration Process In-Depth
29
The SQL CREATE statements are not executed on the target server at this stage of the migration, but will be executed later.
Click the DETAILS button to view a detailed log of this stage of the migration process.
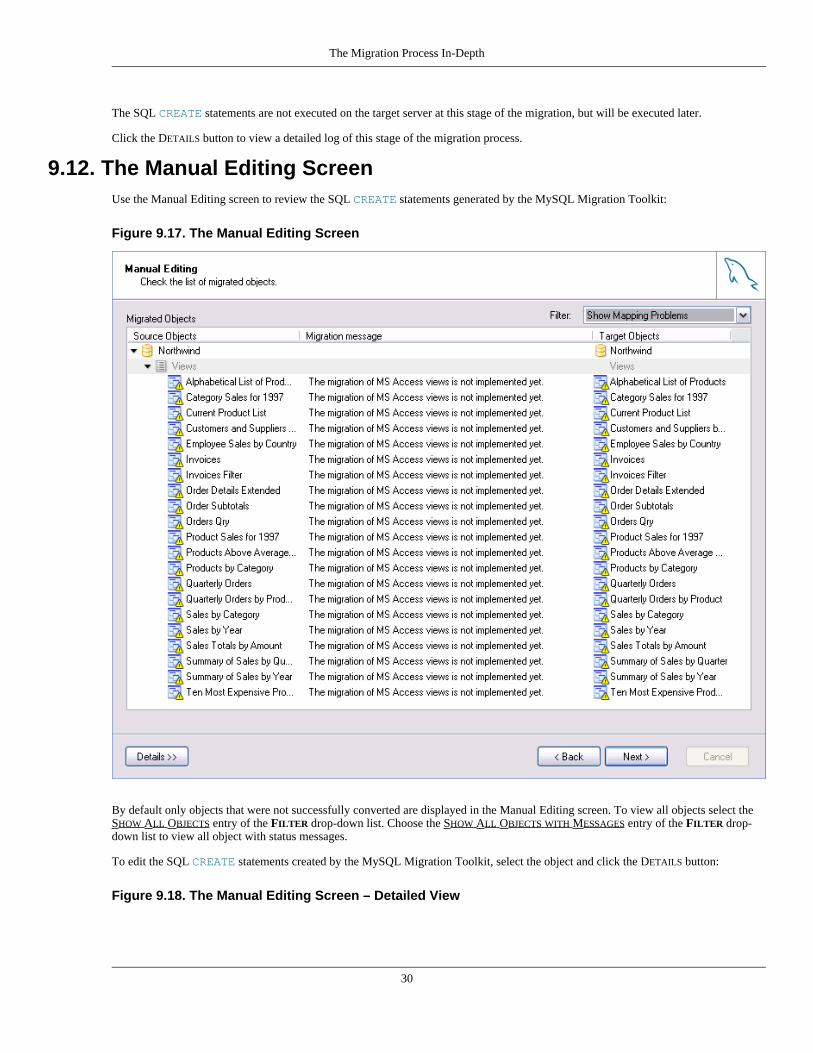
9.12. The Manual Editing ScreenUse the Manual Editing screen to review the SQL CREATE statements generated by the MySQL Migration Toolkit:
Figure 9.17. The Manual Editing Screen
By default only objects that were not successfully converted are displayed in the Manual Editing screen. To view all objects select theSHOW ALL OBJECTS entry of the FILTER drop-down list. Choose the SHOW ALL OBJECTS WITH MESSAGES entry of the FILTER drop-down list to view all object with status messages.
To edit the SQL CREATE statements created by the MySQL Migration Toolkit, select the object and click the DETAILS button:
Figure 9.18. The Manual Editing Screen – Detailed View
The Migration Process In-Depth
30

Make changes to the CREATE statement and click the APPLY CHANGES button. If you make a mistake while editing, click the DISCARDCHANGES button to undo the CREATE statement.
9.13. The Object Creation Options ScreenAfter performing manual object editing the MySQL Migration Toolkit is ready to create the database objects on the target server. Youhave the option of either creating the database objects directly on the target server or to create a script file of the CREATE statements forlater execution:
Figure 9.19. The Object Creation Options Screen
The Migration Process In-Depth
31

Select both options to create the target database objects and preserve a backup copy of the CREATE statements for later use.
9.14. The Creating Objects ScreenOnce you choose object creation objects, the MySQL Migration Toolkit connects to the target server and creates the database objects(assuming you chose to have the MySQL Migration Toolkit connect to the target server to create the database objects).
Figure 9.20. The Creating Objects Screen
The Migration Process In-Depth
32

Click the DETAILS button to view a detailed log of this stage of the migration process.
Choose the Create Script File for Create Statements check box to save a copy of the CREATE statements to disk.
9.15. The Data Mapping Options ScreenAfter the database objects are created on the target database server the MySQL Migration Toolkit is ready to move the server data to thetarget server. You have the option of either inserting the data directly on the target server or to create a script file of the INSERT state-ments for later execution:
Figure 9.21. The Data Mapping Options Screen
The Migration Process In-Depth
33

Select both options to move the data and preserve a backup copy of the INSERT statements for later use.
You can access additional options by clicking the DETAILS button. If you do not wish to move BLOB data to the target server, check thebox next to the EXCLUDE BLOB VALUES option. The BLOB data will not be moved to the target server and will not be written to thescript file. If you do not wish to move BLOB data to the target server, but wish to have the BLOB data written to the script file, alsocheck the box next to the WRITE BLOBS TO INSERT SCRIPT option.
If you wish to limit the number of rows transferred to the target server, check the box next to the MAXIMUM NUMBERS OF ROWS TOTRANSFER FOR A TABLE option and enter the desired number of rows. This option can be useful when generating test data.
9.16. The Bulk Data Transfer ScreenOnce the data mapping options are set, the MySQL Migration Toolkit will begin the bulk data transfer process. Data will be convertedto a MySQL compatible format and inserted into the target database server using bulk INSERT statements. Data is typically inserted inbatches of 15,000 rows at a time to maximize insertion speed.
Figure 9.22. The Bulk Data Transfer Screen
The Migration Process In-Depth
34

Click the DETAILS button to view a detailed log of this stage of the migration process.
9.17. The Summary ScreenOnce the bulk data transfer is complete, a summary report of the migration will be displayed:
Figure 9.23. The Summary Screen
The Migration Process In-Depth
35

Click the GENERATE MIGRATION SCRIPT to create a Lua script file of the migration process. With this file you can script the migrationof a database or customize it. For more information about this topic, see Chapter 11, Scripted Migration.
Click the FINISH button to exit the MySQL Migration Toolkit.
9.18. Saving the Current Application StateIf you need to close the MySQL Migration Toolkit part way through the migration process, you can save the state of the MySQL Migra-tion Toolkit to disk and continue later.
To save the current state of the MySQL Migration Toolkit, choose the STORE CURRENT APPLICATION STATE option of the FILE menu.
To later retrieve the application state and resume configuring the migration, choose the RELOAD STORED APPLICATION STATE option ofthe FILE menu.
The Migration Process In-Depth
36

Saving the application state will prove useful when examining scripted migration in Chapter 11, Scripted Migration.
The Migration Process In-Depth
37

Chapter 10. The Generic Runtime Environment (GRT) Shell
10.1. IntroductionThe GRT is a thin C layer, inspired by Objective C, which allows for dynamic typing and dynamic data objects. The GRT is used by theMySQL Migration Toolkit and provides a means for expanding these tools. Through the use of the GRT, these tools can support newbehavior and data sources using code written in languages such as C, C++, Java, Python, and Lua with support for Mono forthcoming.
The GRT is not only useful for expanding MySQL GUI Tools. By using a script file from within the GRT shell you can perform repetit-ive tasks programmatically from the command line. Suppose, for example, that you have multiple schemata that you wish to migrate toMySQL. You can do this once using the graphical interface, in the process saving the procedure as a script file. You can then adapt thisscript file and run it unattended from the GRT shell.
The preferred development language is Lua, a lightweight scripting language expressly designed for extending applications. For moreinformation about this language see lua.org.
Note
The GRT supports Lua version 5.0. Version 5.1 is not supported.
10.2. Exploring the GRT ShellTo open the GRT shell from within the MySQL Migration Toolkit choose the GRT ENVIRONMENT SHELL option under the TOOLSmenu. I
Figure 10.1. The GRT Shell (Windows)
38

The GRT shell itself is the default tab on the left of the screen. Beside it is the Snippets tab, used for saving code snippets.
On the right, is the GRT Globals Tree—showing the various objects, variables, structures, and code modules used by the applica-tion. These objects are all directly accessible from the shell.
10.2.1. Menu ItemsThe menu runs across the top of the screen and varies significantly depending upon which OS you are using. Since the MySQL Migra-tion Toolkit is currently only implemented on Windows, all references to invoking the GRT shell from this application apply only to theWindows OS.
10.2.1.1. The File or Shell Menu
10.2.1.1.1. Windows File Menu
Currently only two of the submenus under the FILE menu are implemented; EXIT, which simply exits the GRT shell, and OPEN SCRIPT.The OPEN SCRIPT option is for opening existing Lua scripts and is only implemented under Windows.
Sample scripts are found in the Scripts directory which is immediately below the installation directory. Opening a script from thismenu option will create an additional tab labeled with the name of the script. Click on this tab to see the file contents. You may paste
The Generic Runtime Environment (GRT) Shell
39

text between the GRT Shell tab and any script tab.
10.2.1.1.2. Linux Shell Menu
Under Linux the SHELL menu shows menu items for closing the shell, refreshing the objects listed in the Global tree or saving the objecttree.
The SAVE TREE ... menu option saves an XML file of all the data types and classes shown in the three tabs of the Objects Tree.
Under Linux there is no menu option to open a script.
10.2.1.2. The View Menu
10.2.1.2.1. The View Menu: Windows
The REFRESH option of the VIEW menu refreshes the view of the objects shown in the object tree tabs on the right.
The DISPLAY TYPE INFO and DISPLAY OBJECT VALUES menu items toggle the view of the objects in the Values tab on the right.When checked, DISPLAY TYPE INFO shows the data type of objects and DISPLAY OBJECT VALUES shows their value.
The DISPLAY OBJECT REFCOUNT shows the current number of references to specific objects.
10.2.1.2.2. The View Menu: Linux
The VIEW menu has only one element, STRUCTURE ONLY and it is not yet activated.
10.2.1.3. Mac OS X Menu
Under Mac OS X there are only two menu options, RELOAD and RELOAD SELECTED. RELOAD reloads all the objects in the Object Treepanel and is equivalent to the Windows VIEW, REFRESH option. The RELOAD SELECTED option only reloads the selected object.
10.2.2. The ShellThe GRT shell is principally used for running Lua scripts or typing Lua commands directly. However, you can also access the GRTScripting Library functions and global functions and objects. To see the available commands type “?”.
Some OS-specific commands are also available. For instance, under Windows you can clear the screen by typing cls. Unlike mostshells, you can cut and paste text to and from the shell window.
Working from the command line is described in detail in Section 10.3, “Using the GRT Shell”.
The Snippets tab functions as a scratch pad for saving code snippets. This makes it easy to reuse code and does away with the needto retype it at the command line.
If you have opened script files as described in Section 10.2.1.1.1, “Windows File Menu” [39], there may be any number of tabs to theright of the Snippets tab. These tabs will be labeled with the names of the script files. As with the Snippets tab you can cut andpaste to or from any of the tabs. This gives you the opportunity to test code from the command line.
10.2.3. The Globals Tree PanelThe Globals Tree is found on the right side of the screen and is made up of three tabs, Values, Structs, and Modules.
10.2.3.1. The Values Tab
If you are running MySQL Migration Toolkit, find a migration object beneath the root object. Both applications show the rd-bmsMgmt object.
When the Values tab is selected right clicking an object in the Globals Tree panel opens a pop-up menu with the options:
• Refresh
• Remove Object
The Generic Runtime Environment (GRT) Shell
40

• Display Type Info
• Display Object Values
• Display Object RefCount
With the exception of REMOVE OBJECT, these options are the same as those shown in Section 10.2.1.2, “The View Menu”. You may re-move any object except the root object.
Note
Note this pop-up menu only shows under Windows.
10.2.3.2. The Struct Tab
A struct is a user-defined data type formed by combining primitive data types. This tab shows the definitions of the structs used bythe objects in the Values tab and the modules in the Modules tab.
When the Structs tab is selected right clicking a structure in the list opens a pop-up menu with the options:
• Order by Name
• Order by Hierarchy
• Order by Package
Note
Note this pop-up menu only shows under Windows.
The default view for this tab is by package, a grouping of elements by functionality. Double-click a package to show related structures.Under db.mgmt, for example, you should see elements you are already familiar with from the user interface, Connection, Driver,and so forth. If an element can be further decomposed, an arrow will show on it's left. Double-click the item to reveal its constituent ele-ments.
If you switch to the hierarchical view you'll find the db.mgmt.driver object under the GRT Object since this is the parent objectfrom which it is derived.
Ordering by name simply shows all the different objects arranged alphabetically.
10.2.3.3. The Modules Tab
A module can be either a Python or Lua script or a Java class file. Information about modules appears in the window below the moduletree. For example, go to the Modules tab and click on the ReverseEngineeringGeneric module. Double click a module andyou will see its methods.
Double clicking a method name will copy it into the GRT shell window. You will see how useful this can be in Section 10.3, “Using theGRT Shell”.
10.3. Using the GRT ShellThere are three built-in Lua modules that assist working from the GRT shell:
• grtV – for accessing any object/variable in the Values tab
• grtS – for viewing the structs defined in the Structures tab
• grtM – for accessing any object in the Modules tab
All items in all the tabs are accessible from the GRT shell.
The Generic Runtime Environment (GRT) Shell
41

The script example below uses the getGlobal method of the grtV object to return a list of databases and then iterates through thislist.
dbs = grtV.getGlobal("/rdbmsMgmt/rdbms")for i = 1, grtV.getn(dbs) do
print(dbs[i].name)end
The getGlobal method returns the object found at the path parameter passed to it. In this case, the object is a list that is traversed us-ing a for loop controlled by the getn method which returns the number of elements in the database list.
Running this for loop outputs the names of the database formats supported by the MySQL Migration Toolkit:
"Oracle""Mysql""MaxDB""GenericJdbc""Mssql""Access"
To discover all the methods available for a specific object, type the object name preceded by a “?”. For example typing ?grtV shows:
GRT Value Management Library - grtV-----------------------------------A library that contains functions to work with GRT values.
clearList child diffMakediffApply duplicate fromXmlgetContentType getKey getListItemByObjNamegetListRefValueByObjName getn getGlobalinsert load lookupAddlookupId newDict newListnewObj remove savesetContentType setGlobal toLuatoXml typeOf
Type 'help grtV.<command>' to get help on a specific command.
10.4. Invoking the GRT Shell From the Command LineNote
This capability is currently only available under Windows.
In addition to using the GRT shell from within the MySQL Migration Toolkit, you can invoke it directly from the command line. If thelocation of the MySQL GUI Tools is not included in the PATH variable, navigate to the installation directory and find the grtsh.exefile.
Execute this file by typing:
C:\> grtsh -?
Do this and you should see the following listing:
Usage: C:\Program Files\MySQL\MySQL Tools for 5.0\grtsh.exe [-classpath path] »[-modulepath path] [-jvm library] [-d path] [-listen port] [-verbose] [-x] [luafile]C:\Program Files\MySQL\MySQL Tools for 5.0\grtsh.exe -j structsfile outputdirC:\Program Files\MySQL\MySQL Tools for 5.0\grtsh.exe -p structsfile outputdir
-lua ......... Use the Lua shell (default).-py .......... Use the Python shell.-classpath ... Sets the java classpath to the given value.-modulepath .. Sets the location of the GRT module directory.-jvm ......... The java virtual machine library to use (with absolute path).-basedir ..... Path to the data files location.-d path ...... Modules directory-x ........... Exits the shell after running the specified fileluafile ...... File that is run at startup.
-listen port . Runs in 'remote agent' mode on the given port number.-verbose ..... Prints detailed startup information.-j ........... Generates Java classes from the given structs file.-p ........... Generates PHP classes from the given structs file.-D var=value . Sets a global shell variable to the given value.
The Generic Runtime Environment (GRT) Shell
42

Environment variables:GRT_MODULE_PATH Equivalent to -modulepath, must point to the directory
where the grtsh binary resides
The default shell is the Lua shell and is indicated by the / > prompt. Using the -py option opens a Python shell, indicated by the />>> prompt.
If you wish to set the classpath for Java classes use the classpath option. You may also change the Java Virtual Machine (JVM) byusing the jvm option with the absolute path to the JVM you wish to use.
The modulepath option sets the location of the dll files used with the GRT shell. These files are located in the same directory as thegrtsh.exe file. You can also set this directory by defining the environment variable, GRT_MODULE_PATH.
The location of any data files you wish to use may be set using the basedir option.
To see the various modules that are loaded at startup use the verbose option. The java modules are stored in thejava\com\mysql\grt\modules directory immediately below the installation directory and the Lua modules in the lua direct-ory. Currently, importing Python modules is not supported.
To include modules other than the default modules, use the d option with a path.
It is also possible to use the GRT shell to convert XML files to Java or PHP class files, by opening the shell using the j or the p optionand specifying the XML source file and the destination directory.
Use the listen option with a port number to run the GRT shell as a service that can be accessed from a remote location.
Perhaps most importantly, you can pass a Lua script to the shell on startup. This allows you to perform tasks using a script file withouteven opening the MySQL Migration Toolkit. This is an especially useful feature if you need to migrate the same database a number oftimes or you want to customize a migration. You can easily create a Lua script by clicking the GENERATE MIGRATION SCRIPT when mi-grating using the graphical interface. For information on creating a Lua script, see Section 9.17, “The Summary Screen”. A Lua migra-tion script is examined in detail in Chapter 11, Scripted Migration.
Passing a Lua file to the shell is usually invoked using the x option so that the shell closes after the script has executed.
The appearance of the GRT shell run from the command line is identical to its appearance when run from within the MySQL MigrationToolkit. All the commands and options described in Section 10.3, “Using the GRT Shell” are available when the GRT shell is invokedfrom the command line.
The Generic Runtime Environment (GRT) Shell
43

Chapter 11. Scripted MigrationThis section reviews a simple migration script and assumes some familiarity with the GRT shell. If you haven't yet done so, readChapter 10, The Generic Runtime Environment (GRT) Shell.
As noted earlier in Section 9.17, “The Summary Screen”, if you choose, you can generate a migration script when migrating a database.Doing this creates a Lua script of the entire migration process. You can find out more about Lua by going to lua.org. However, if youhave some familiarity with programming you should be able to make sense of this script without too much effort.
Note
The MySQL Migration Toolkit supports Lua version 5.0. Version 5.1 is not supported.
For a better understanding of the migration script, it is useful to have the GRT shell open within the MySQL Migration Toolkit. In thisway you can examine the various objects created during migration by clicking on them in the Globals Tree panel. To save the applica-tion state and have access to these objects, migrate a database as described in Chapter 9, The Migration Process In-Depth, and whenyou reach the Summary step, choose the menu options FILE, STORE CURRENT APPLICATION STATE .... This will save an XML file of theentire migration process. You can now reload the migration state whenever you wish.
11.1. The Steps for Scripted MigrationThe migration script is conveniently divided up into six sections or checkpoints:
1. Set Source and Target Connection
2. Do the Reverse Engineering
3. Migration Methods and Ignore List
4. Set Object Mappings and Do Migration
5. Generate and Execute SQL Create Statements
6. Bulk Data Transfer
Each checkpoint will be examined in turn. To reload the application state and have access to the objects created during migration,choose the menu options FILE, RELOAD STORED APPLICATION STATE .... Find the XML file that you previously saved. Open this file andyou will see how the various objects in the GRT Globals Tree are referenced from the shell. Press F4 to open the GRT shell.
11.2. Setting the Source and Target ConnectionWith the GRT shell open and the VALUES tab selected, double click the migration object and find the sourceConnection ob-ject. Click this item and its parameters and the values of those parameters will be exposed in the frame beneath the Globals tree. Theparameters are as follows:
• _id
• driver
• modules
• name
• parameter values
Note
If you cannot find a sourceConnection object then the application state has not been reloaded.
Open the Lua script that you generated during migration and find the -- Set source connection line. Immediately below this
44

line is the code that defines the source connection of the schema that is being migrated.
The names of the parameters of the source connection in the Lua script should match the parameters shown in the frame below theGlobals tree (though they do not appear in the same order). The value shown for the _id parameter is the value created by thenewGuid method of the grt object. The Universally Unique Identifier (UUID) of the driver show in this frame should match the valueshown in your script.
The name is the name of the variable being created by the Lua script.
In the Values tab both the modules and parameterValues items show as objects of the dict type.
Click on modules to see the modules used during migration. The MigrationModule has a name specific to the migration sourceschema. If you are migrating from Access, for example, it is called MigrationAccess. Click on parameterValues and see theparameters you supplied for connecting to the source schema.
Below the -- set struct and types line find the definition of the data types used so far. A sourceConnection is a structderived from the db.mgmt.Connection structure. modules and parameterValues are both strings.
The parameters and the modules used for a targetConnection are shown beneath the --Set target connection line. Afterexamining a sourceConnection you should quickly be able to understand a targetConnection. The same applies to thestructs and data types used by the targetConnection.
11.3. Reverse EngineeringThe conversion of the source schema to a MySQL schema occurs in the lines immediately following the comment -- Do the re-verse engineering. This calls the GRT reverse engineering module to convert from the current schema type to the target type.
Note
To convert GRT objects to Lua values requires using the toLua method. Future versions of the GRT may overload the as-signment operator.
The reverse engineering modules used by the MySQL Migration Toolkit are also used by the MySQL Workbench.
11.4. Migration MethodsThe code following the comment -- Migration methods and ignore list invokes the migration module appropriate to thesource database.
If you are migrating from Access, for instance, the MigrationAccess module will be invoked. Find this module in the modules tabto examine its three methods:
• migrationMethods
• migrate
• dataBulkTransfer
Any schema objects that you chose not to migrate, show up in the ignoreList object. This object is found beneath the migrationobject in the Globals tree panel.
11.5. Map Objects and MigrateInstead of finding an object in the Values tab of the Objects tree, you may query an object from the command line in the GRT shell.For example, in the code following the comment -- Set object mappings and do migration a mappingDefaultsobject is created by the grtV.setGlobal method.
To see that this method has executed successfully enter the following command in the GRT shell:
/ > print(grtV.getGlobal("/migration/mappingDefaults"))
This should output a listing of the mapping defaults as shown in your script file. The results will vary depending upon the objects you
Scripted Migration
45

have chosen to migrate. However, in all cases you should see a schema mapping.
Beneath the -- update _ids comment the migration methods are copied to a local variable and then executed.
11.6. The SQL Create StatementsThe code to create the target schema follows the -- Generate and execute sql create statements comment. If youchose the Create Script File for Create Statements option on the OBJECT CREATION OPTIONS screen then a text fileof the data definition statements required to create the migrated schema is written to a file. For information on setting this option see.Section 9.13, “The Object Creation Options Screen”.
The actual creation of the schema on the database server is done by the transformationModule module.
11.7. Bulk Data TransferThe code to populated the target schema follows the -- Bulk data transfer comment. If you chose the Create ScriptFile for Insert Statements option on the DATA MAPPING OPTIONS screen then a text file of the insert statements requiredto populate the migrated schema is written to a file. For more information on setting this option, see Section 9.15, “The Data MappingOptions Screen”.
The actual creation of the data in the new schema is done by the migrationModule module.
Scripted Migration
46

Chapter 12. Extending The MySQL Migration Toolkit
12.1. IntroductionOne of the key features of the MySQL Migration Toolkit is that it can be easily extended and customized to support new data sources.This is done through the use of its Generic RunTime (GRT) Environment.
Extending the MySQL Migration Toolkit to support a new RDBMS requires the creation of two new modules: one module that reverseengineers (ie., retrieves schema information) the source database objects and converts them into GRT objects, and one module that mi-grates the source GRT objects into MySQL GRT objects. The MySQL Migration Toolkit then converts the GRT MySQL objects intoSQL statements that create the target MySQL server objects.
Existing modules can be easily expanded and customized to achieve the perfect migration for individual requirements. New migration“methods” that define how the migration is performed can be added easily. The new methods are listed and can be selected from theWizard interface or used in migration scripts.
12.2. Architecture of the MySQL Migration ToolkitThe MySQL Migration Toolkit is built on three primary modules: reverse engineer modules, migration modules, and transformationmodules.
Reverse engineering modules retrieve the schema information from the source database and return GRT objects that describe theschema. Reverse engineering modules will have a name similar to ReverseEngineeringAccess.
Migration modules convert the source database GRT objects to MySQL GRT objects and then handle the bulk data transfer between thesource and MySQL databases. Migration modules will have a name similar to MigrationAccess.
Transformation modules convert the MySQL GRT objects into the actual SQL statements used to create objects such as tables andviews on the target MySQL server. Transformation modules will have a name similar to TransformationMySQL. Transformationmodules are supplied by the MySQL GUI team and need not be created to add support for a new source database.
All modules are derived from base classes whose methods can be rewritten to match the new source database.
12.3. The Modular Migration ProcessFrom the point of view of modular development, the migration process is as follows:
1. The MySQL Migration Toolkit prompts the user for a source database and connection parameters. The user selection determineswhich modules will be used for the source database.
2. The MySQL Migration Toolkit calls the testConnection method of the reverse engineering module. The testConnectionmethod returns success or failure to the MySQL Migration Toolkit.
3. The MySQL Migration Toolkit calls the getSchemata method of the reverse engineering module. The getSchemata methodreturns a list of the schemata available on the source RDBMS.
4. Once the user has selected one or more schemata to migrate, the MySQL Migration Toolkit calls the reverseEngineer meth-od of the reverse engineering module. The reverseEngineer method converts all objects in the source RDBMS (tables, views,procedures) into a collection of GRT objects.
5. After the source database has been reverse engineered, the MySQL Migration Toolkit calls the migrationMethods method ofthe migration module. The migrationMethods method generates a list of available methods than can be selected by the user inthe Object Mapping Screen.
6. Once the user has selected the migration methods, the MySQL Migration Toolkit calls the migrate method of the migrationmodule. The migrate method converts the source RDBMS GRT objects into MySQL GRT objects by calling the selected migra-tion method for each source schema object. If no explicit method is assigned, the default migration method for the object type willbe used.
7. After the MySQL GRT objects have been created, the MySQL Migration Toolkit calls the transformation module to convert theMySQL GRT objects into SQL statements that will create the objects on the target MySQL server. The MySQL Migration Toolkit
47

then either executes the SQL statements on the target MySQL server or writes them to a script file.
8. In the final step, the MySQL Migration Toolkit calls the dataBulkTransfer method of the migration module. The dataB-ulkTransfer method loops through the selected tables in the selected schema and migrates the rows of the tables to the targetMySQL database or loads them into a script file, depending on the user preference.
12.4. Tools Required to Extend the MySQL Migration ToolkitThe MySQL AB GUI Team uses Eclipse for development of the MySQL Migration Toolkit modules and recommends Eclipse for usewhen developing modules for the MySQL Migration Toolkit. See http://www.eclipse.org/ for more information.
Extending The MySQL Migration Toolkit
48

Chapter 13. Preparing a Microsoft Access Database for MigrationThe MySQL Migration Toolkit requires access to the system tables of a Microsoft Access database for the purpose of reverse-en-gineering. By default, read access to the system tables of an Access database is restricted for external applications.
To enable access to the system tables by the MySQL Migration Toolkit, open the database in Microsoft Access and choose the OPTIONSentry of the TOOLS menu. Within the Options dialog, select the VIEW tab and look for the Show section:
Figure 13.1. The Show Section
Check the box next to the SYSTEM OBJECTS option and close the options dialog. System tables for the database should now be present:
Figure 13.2. The System Objects
Note the presence of the various MSys tables.
After you expose the system objects to the MySQL Migration Toolkit, you must also grant permission to access the objects. Choose theUSER AND GROUP PERMISSIONS entry from the SECURITY section of the TOOLS menu:
49

Figure 13.3. Granting Access to the System Objects
Enable the Administer permission for both the MSysObjects, MSysQueries, and MSysRelationships tables. You willneed to click the APPLY button after enabling each table and before moving to the next table.
After completing these steps, you can reverse engineer the schema in your Access database using the MySQL Migration Toolkit.
Preparing a Microsoft Access Database for Migration
50