MX OPC Server Quick Start5 - int76.ruThe MX OPC Server 5.0 is a Mitsubishi I/O driver OPC Data...
35
Mitsubishi Electric 1-1 MX OPC Server Quick Start
Transcript of MX OPC Server Quick Start5 - int76.ruThe MX OPC Server 5.0 is a Mitsubishi I/O driver OPC Data...
Mitsubishi Electric 1-1
MX OPC Server Quick Start

MX OPC Server Quick Start MX OPC Server
1-2 Mitsubishi Electric
1.1 Introduction to MX OPC Server The MX OPC Server 5.0 is a Mitsubishi I/O driver OPC Data Access (DA) and Alarm/Events (AE) server that provides the interface and communications protocol between a wide range of Mitsubishi hardware and your process control software. Mitsubishi drivers incorporate the following attributes to provide flexibility and ease-of-use: OLE for Process Control (OPC) compliance. The MX OPC Server consists of the following components: MX OPC Configurator MX Runtime The MX OPC Server complies with version 3.00 of the OLE for Process Control (OPC) Data Access standard, version 1.01 of the OPC XML Data Access standard, and version 1.01 of the OPC Alarm and Events standard. Any OPC client application can access process hardware data through the I/O Server.

MX OPC Server MX OPC Server Quick Start
Mitsubishi Electric 1-3
1.1.1 Compatibility with Former Versions The MX OPC Server 5.00 is fully backward compatible with previous versions (4.20, etc.). The configuration databases from all previous versions can be used. The MX OPC Server 5.00 Configurator provides an automated conversion from the older configuration database into the current structure. All the database content will be preserved and converted into the new structure if needed.
The MX OPC Server 5.00 configuration database cannot be used in the previous versions.
The MX OPC Server does not support importing of CSV configurations generated by a different version. Although this process is partially successful in some versions, the 5.00 version will not import a CSV file created before version 5.00 due to major changes in the database structure.
To preserve the configuration, the user can import the CSV file to a MDB database using the original configurator, upgrade the MDB database using the MX OPC Server 5.00 configurator and then export to CSV.

MX OPC Server Quick Start MX OPC Server
1-4 Mitsubishi Electric
1.1.2 What Is OLE for Process Control OLE™ for Process Control (OPC) is a standards-based approach for connecting data sources (e.g., PLCs, controllers, I/O devices, databases, etc.) with HMI client applications (graphics, trending, alarming, etc.). It enhances the interface between client and server applications by providing a universally supported and well-documented mechanism to communicate data from a data source to any client application. Included are not only a detailed guide on how to pass the data, but also specific information on other attributes to supplement those data, such as range information, data type, quality flags, and date and time information. The figure below shows the OPC Architecture, which was introduced by the OPC Foundation. By following the OPC Architecture, a device needs only one standard driver, which is an OPC-compliant server. All OPC-compliant client applications can then be connected to that device, either locally or over a network. Furthermore, connections can be made to more than one OPC server at the same time.
OPC-Based Client-Server Architecture Any OPC client application can connect to any OPC server. In other words, OPC offers true Plug-and-Play capability in the fields of HMI and industrial automation. OPC server types include OPC Data Access (DA), OPC Alarm and Events (AE), and OPC Historical Data Access (HDA).

MX OPC Server MX OPC Server Quick Start
Mitsubishi Electric 1-5
1.1.3 MX OPC Runtime The MX OPC Runtime maintains the driver's communication channels, devices, data blocks, and data tags, performs all required functions for communicating with the process hardware, and exposes the methods and properties to other applications. This server provides a software layer between all client applications and the Mitsubishi ActiveX Communication support Tool (MXComponent). The MXComponent tool handles all the low-level communication details by providing a set of interfaces that the I/O Server uses.
In addition to performance improvements, the MX OPC Runtime provides the following functionality:
• Supports OLE for Process Control (OPC)
• Automatically creates data blocks
• Provides local configuration and control
• Supports telephone modem communication
• Provides phasing
• Enables or disables Individual devices, data blocks and tags
• Provides QuickFail Logic
• Provides latched data
• Provides a time/date stamp for data and alarms
• Supports block writes
• Supports array element and individual bit reads
• Provides advanced diagnostics
• MX Component

MX OPC Server Quick Start MX OPC Server
1-6 Mitsubishi Electric
1.1.4 MX OPC Configurator The I/O Driver Configurator is a client application to the I/O Server with a graphical user interface. The MX OPC Configurator accesses the I/O Server and lets you view and modify properties of communication channels, devices, data blocks and data tags.
The MX OPC Configurator provides the following:
• The server connection - only local I/O Server.
• The tree control for an overall view of your system configuration.
• A Statistics View for displaying the statistics of your I/O driver while it is running. Statistics are provided for devices and data blocks.
• A Configuration View for displaying and modifying device, data block and tag properties.
• A Monitor View for displaying real-time data tag values during runtime mode.
• An interface to the MXComponent Communication Setting Wizard for importing or creating new configurations.
• The feature to cut, copy and paste data blocks for fast configuration.
• Support for telephone modem communication.
• Templates for configuring default alarm settings.
• Simulation for tags and alarms using a built-in function pattern.

MX OPC Server MX OPC Server Quick Start
Mitsubishi Electric 1-7
1.2 Installing MX OPC Server This section describes the steps for installing the MX OPC Server. Be sure to close any other applications before installing MX OPC Server.
There are two separate parts to the software:
• The MX OPC runtime module, which reads data from the device
• The MX OPC configurator, which defines the data to be read
The MX OPC Server runtime module can optionally be installed as an NT service. NT services run automatically in the background whenever the computer is started; they do not rely on a user logging in to the computer to start the program manually.
MX OPC Server Quick Start MX OPC Server
1-8 Mitsubishi Electric
1.2.1 System Requirements To use MX OPC Server 5.0, you must have the following minimum system requirements:
• 233 MHz processor
• 64 MB RAM
• 100 MB disk space
• 8X speed CD-ROM drive
• VGA video card (256 or more colors for best results)
• Microsoft® Windows® 2000 with Service Pack 3, Windows XP with Service Pack 2, Windows NT® 4.0 with Service Pack 6a, or Windows Embedded NT and XP.
Performance will improve with higher specification hardware (faster data updates). Note: Only versions of Microsoft Windows that accommodate Unicode character sets are supported.

MX OPC Server MX OPC Server Quick Start
Mitsubishi Electric 1-9
1.2.2 Installation Procedure The following steps detail the MX OPC Server installation:
Note: If your operating system (e.g., Windows NT) requires a login name, you must log in with administrator capability before installing MX OPC Server.
1. Before installing the software, be sure that all other applications are closed and/or disabled.
2. Insert the product CD into your CD-ROM drive. If the option to start CDs automatically is enabled in your operating system, the CD introduction starts automatically. Otherwise, browse to your CD-ROM drive and run the program "Setup.exe”.
3. The Setup screen briefly appears, followed by the Welcome screen, as shown in the figure below. Click the Next button to continue.
Welcome Screen
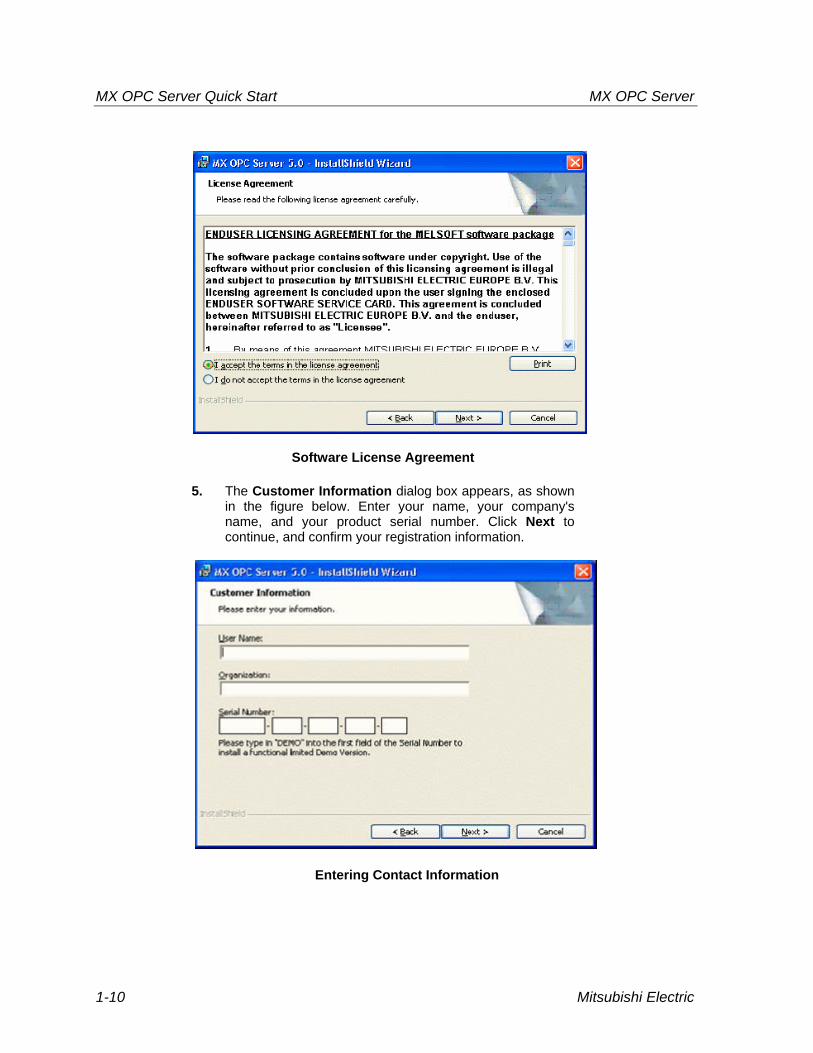
4. The Software License Agreement dialog box appears, as shown in the figure below. Read the License Agreement. Click Next if you accept the terms of the agreement.
MX OPC Server Quick Start MX OPC Server
1-10 Mitsubishi Electric
Software License Agreement
5. The Customer Information dialog box appears, as shown in the figure below. Enter your name, your company's name, and your product serial number. Click Next to continue, and confirm your registration information.
Entering Contact Information
MX OPC Server MX OPC Server Quick Start
Mitsubishi Electric 1-11
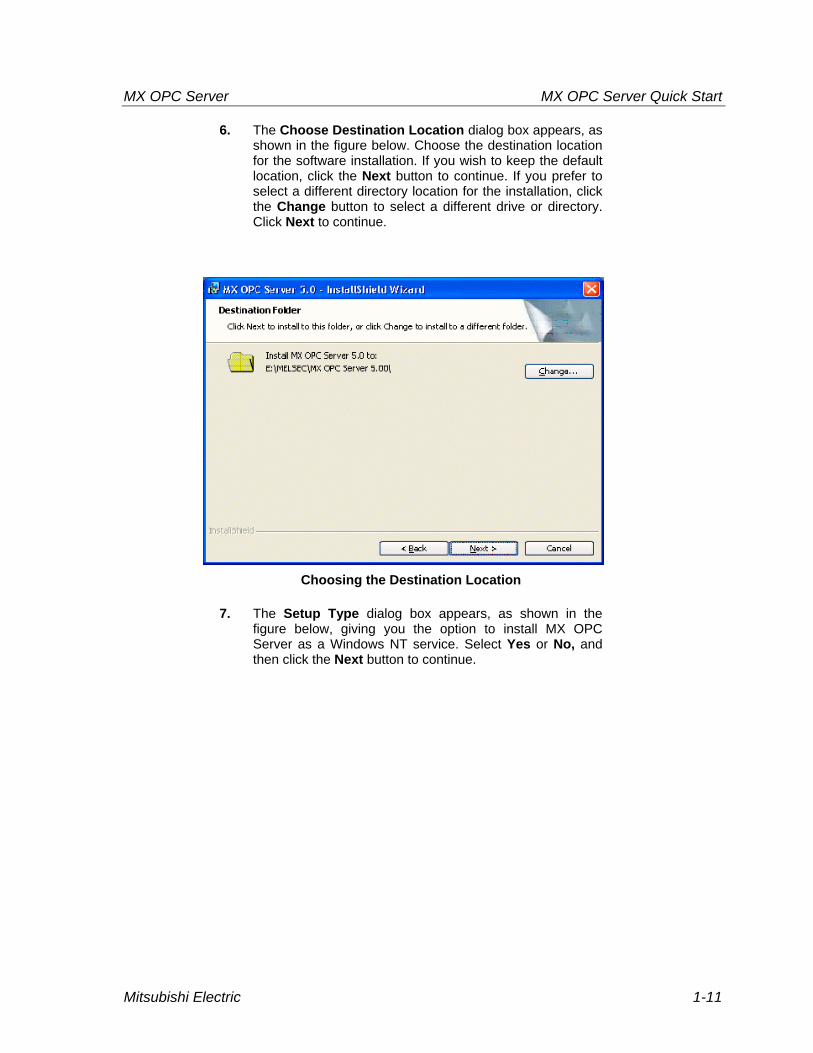
6. The Choose Destination Location dialog box appears, as shown in the figure below. Choose the destination location for the software installation. If you wish to keep the default location, click the Next button to continue. If you prefer to select a different directory location for the installation, click the Change button to select a different drive or directory. Click Next to continue.
Choosing the Destination Location
7. The Setup Type dialog box appears, as shown in the figure below, giving you the option to install MX OPC Server as a Windows NT service. Select Yes or No, and then click the Next button to continue.

MX OPC Server Quick Start MX OPC Server
1-12 Mitsubishi Electric
Option to Run MX OPC Server as an NT Service
8. Click Install, as shown in the figure below, to begin installing the files. MX Component and EasySocket will also be installed.
Note: You can click Cancel to stop the installation procedure at any time.
Starting File Installation

MX OPC Server MX OPC Server Quick Start
Mitsubishi Electric 1-13
9. After all files and components have been installed, click the Finish button to complete the installation, as shown in the figure below. You may be prompted to restart your computer before using the product. Choose whether to configure the NT Service now or later, and then click the Finish button.
Installation Complete

MX OPC Server Quick Start MX OPC Server
1-14 Mitsubishi Electric
1.3 MX OPC Server Quick Start The objectives of this Quick Start section are to:
1. Start the MX OPC Configurator.
2. Set up the driver.
3. Set up a communication channel.
4. Create and configure a new device.
5. Create and configure a new data tag.
6. Start the I/O Server driver.
7. Connect to the server using the Sample OPC Client.

MX OPC Server MX OPC Server Quick Start
Mitsubishi Electric 1-15
1.3.1 Starting the MX OPC Configurator Once you have installed MX OPC Server, start the MX OPC Configurator:
1. From the Windows Start menu, select Programs > Melsoft Application > MX OPC Server 5.0 > MX OPC Configurator. Note: The name of the program folder may vary depending on your local settings (e.g. language settings).
2. This opens the Configurator for the MX OPC Server, as shown in the figure below. The screen consists of a split window with a tree control view in the left-hand pane and a configuration view in the right-hand pane. The Configurator provides a default standard configuration database called MXConfigurator.mdb, which contains a sample configuration project.
Configurator Screen
The MX OPC Configurator is a client of the MX OPC Runtime that accesses the I/O Server and lets you view and modify properties for devices, data blocks, and data tags. The Address Space tree control in the Configurator sets the properties and connection parameters for the following hierarchy of server objects:
• Devices: A device is a hardware device or station that uses the I/O driver to communicate with a client PC. The device item contains the properties and methods that govern the behavior of a device. A device is visible to the OPC client.
• Data blocks: A data block is an addressable portion of a device. The data block contains the properties and methods that manage the behavior of a data block. Data blocks in the server’s local memory correspond to data areas in the MX Runtime. When you add new data blocks to the server’s local memory, you also add new data areas to the MX Runtime. Data blocks are not visible to the OPC client.

MX OPC Server Quick Start MX OPC Server
1-16 Mitsubishi Electric
Note: Data block configuration is optional (for advanced users).
• Data tags: A data tag is an object that makes device data accessible to OPC clients. Data tags can be logically organized into groups (folders).

MX OPC Server MX OPC Server Quick Start
Mitsubishi Electric 1-17
1.3.2 Setting Up the Driver
The table below provides a general overview of the steps necessary for setting up your I/O driver.
1 Know your process hardware: What device does the driver
communicate with? What type of cable are you using? What is the station number for each
device? What addresses do you want to
access and what data do you want to retrieve?
2 Know the hardware parameters: Example for serial communication
COM Port Baud Rate Stop Bits Data Bits Parity 3 Choose the method of
configuration: Use the MX OPC Configurator 4 Configure the I/O Driver: Configuring Communication Channels Configuring devices Configuring data blocks Setting default values for driver,
channels, devices, data blocks and tags Configuring tags
5 Check the I/O Driver Status: Using monitoring mode

MX OPC Server Quick Start MX OPC Server
1-18 Mitsubishi Electric
1.3.3 Creating Communication Channels In the following examples, we will create and configure new channels for both the Serial and Ethernet communication paths.
Serial Communication Channel To create a new Serial communication path:
1. Right-click the Address Space tree control of the Configurator screen and select New MX Device from the pop-up menu, as shown in the figure below.
Adding a New Device
2. This opens the Communication Setting Wizard, as shown in the figure below. Specify the communication type to use on the PC side, as shown in the figure below. In the PC Side I/F field, select the Serial connection type from the drop-down list. Click Next to continue.

MX OPC Server MX OPC Server Quick Start
Mitsubishi Electric 1-19
Setting up the Connection for the PC Side
3. Now you must specify the communication type to use on the PLC (device) side, as shown in the figure below. In the PLC Side I/F field, select a communication type from the drop-down list as the connection type to use for the selected channel. Click Next to continue.
Setting up the Connection for the PLC Side
MX OPC Server Quick Start MX OPC Server
1-20 Mitsubishi Electric
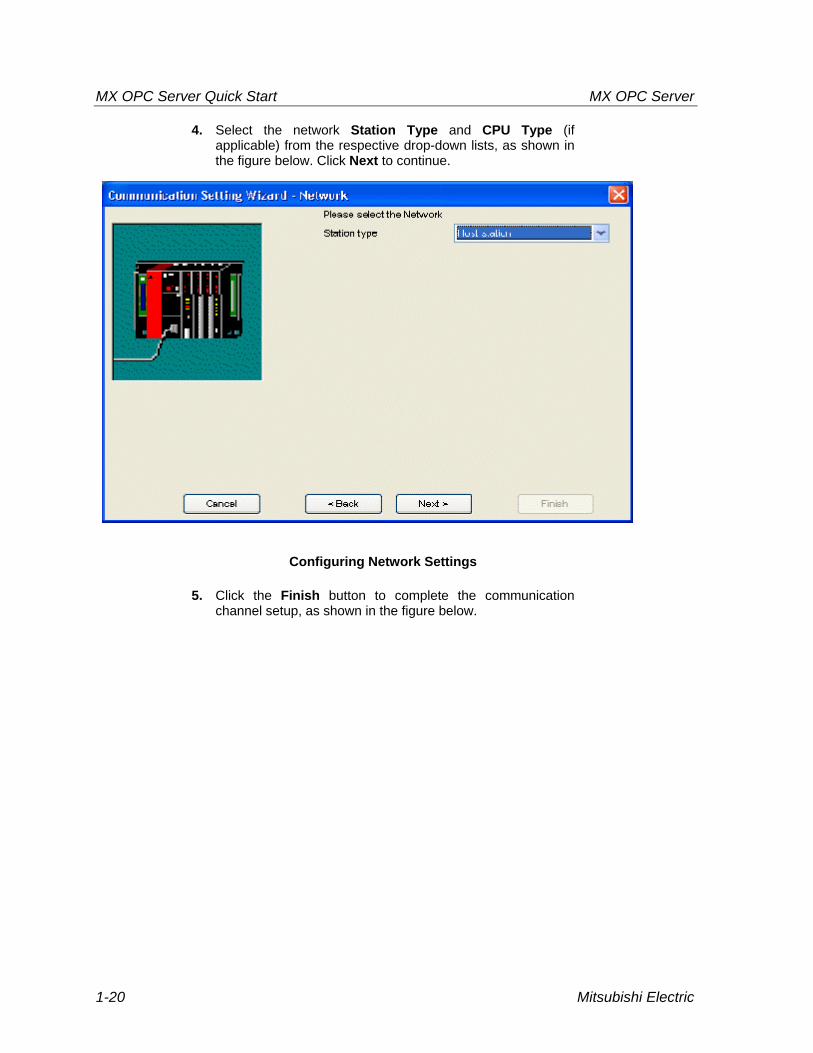
4. Select the network Station Type and CPU Type (if applicable) from the respective drop-down lists, as shown in the figure below. Click Next to continue.
Configuring Network Settings
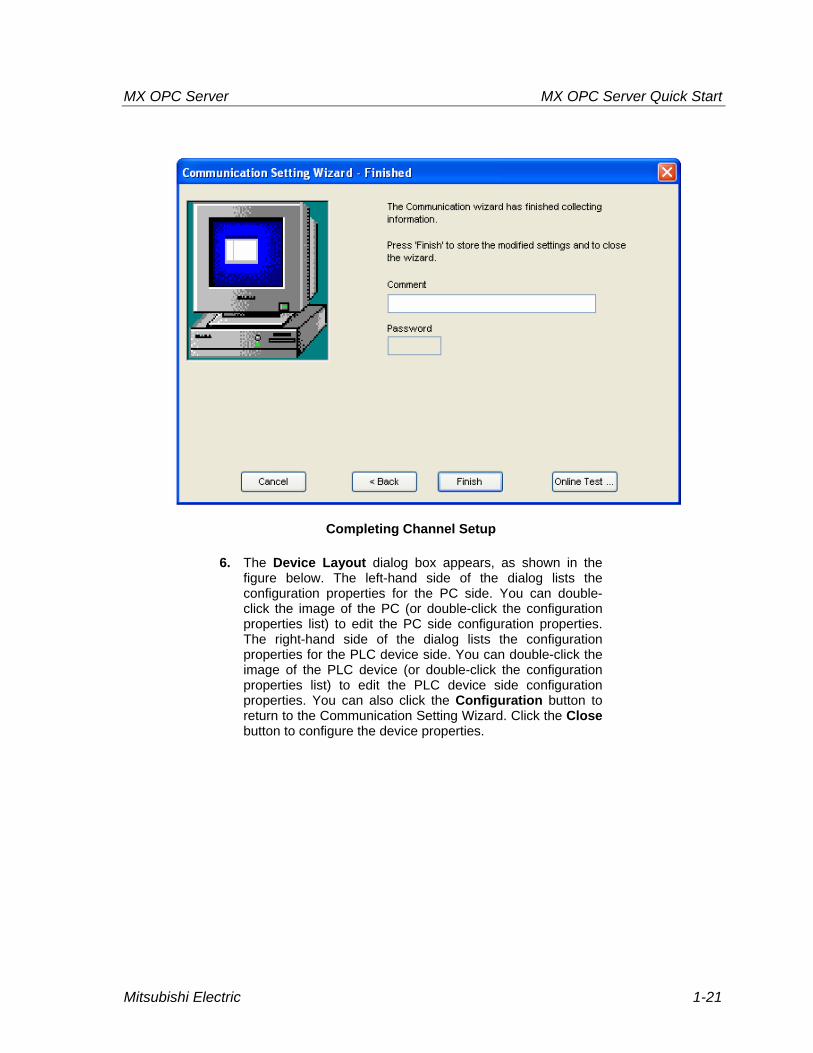
5. Click the Finish button to complete the communication channel setup, as shown in the figure below.
MX OPC Server MX OPC Server Quick Start
Mitsubishi Electric 1-21
Completing Channel Setup
6. The Device Layout dialog box appears, as shown in the figure below. The left-hand side of the dialog lists the configuration properties for the PC side. You can double-click the image of the PC (or double-click the configuration properties list) to edit the PC side configuration properties. The right-hand side of the dialog lists the configuration properties for the PLC device side. You can double-click the image of the PLC device (or double-click the configuration properties list) to edit the PLC device side configuration properties. You can also click the Configuration button to return to the Communication Setting Wizard. Click the Close button to configure the device properties.

MX OPC Server Quick Start MX OPC Server
1-22 Mitsubishi Electric
Device Layout
Note: For complete information about channel configuration properties and the Communication Setting Wizard, see Chapter 3.
Ethernet Communication Channel To create a new Ethernet communication path:
1. Right-click the Address Space tree control of the Configurator screen and select New MX Device from the pop-up menu, as shown in the figure below.

MX OPC Server MX OPC Server Quick Start
Mitsubishi Electric 1-23
Adding a New Device
2. This opens the Communication Setting Wizard, as shown in the figure below. Specify the communication type to use on the PC side, as shown in the figure below. In the PC Side I/F field, select the Ethernet board connection type from the drop-down list. Select a module number from the Connect module drop-down list. Click Next to continue. Note: For a list of supported devices, please see Chapter 3.
Setting up the Connection for the PC Side
3. Now you must specify the communication type to use on the PLC (device) side, as shown in the figure below. In the PLC Side I/F field, select Ethernet module from the drop-down list as the connection type to use for the selected channel. Specify a Host name and a Port number. Click Next to continue.

MX OPC Server Quick Start MX OPC Server
1-24 Mitsubishi Electric
Setting up the Connection for the PLC Side
4. Select the network Station Type and CPU Type (if applicable) from the respective drop-down lists, as shown in the figure below. Click Next to continue.
Configuring Network Settings

MX OPC Server MX OPC Server Quick Start
Mitsubishi Electric 1-25
5. Click the Finish button to complete the communication channel setup, as shown in the figure below.
Completing Channel Setup
6. The Device Layout dialog box appears, as shown in the figure below. The left-hand side of the dialog lists the configuration properties for the PC side. You can double-click the image of the PC (or double-click the configuration properties list) to edit the PC side configuration properties. The right-hand side of the dialog lists the configuration properties for the PLC device side. You can double-click the image of the PLC device (or double-click the configuration properties list) to edit the PLC device side configuration properties. You can also click the Configuration button to return to the Communication Setting Wizard. Click the Close button to configure the device properties.

MX OPC Server Quick Start MX OPC Server
1-26 Mitsubishi Electric
Device Layout
Note: For complete information about channel configuration properties and the Communication Setting Wizard, see Chapter 3.

MX OPC Server MX OPC Server Quick Start
Mitsubishi Electric 1-27
1.3.4 Configuring a New Device In the previous section, we used the Communication Setting Wizard to set up Serial and Ethernet communication channels between the PC and PLC. Once you have completed the wizard:
1. The Basic tab of the Device Properties dialog box appears, as shown in the figure below. The communication type (e.g. Serial, Ethernet, etc.) is shown in the PC Side I/F field, as shown in the figure below.
Configuring Device Properties
2. In the Name field, type a name for the new device, and type a description for the device (optional). To specify which connection type and which physical connection (COM) port to use for the selected device, click the Configuration button to launch the Communication Setting Wizard for the Primary device.
MX OPC Server Quick Start MX OPC Server
1-28 Mitsubishi Electric
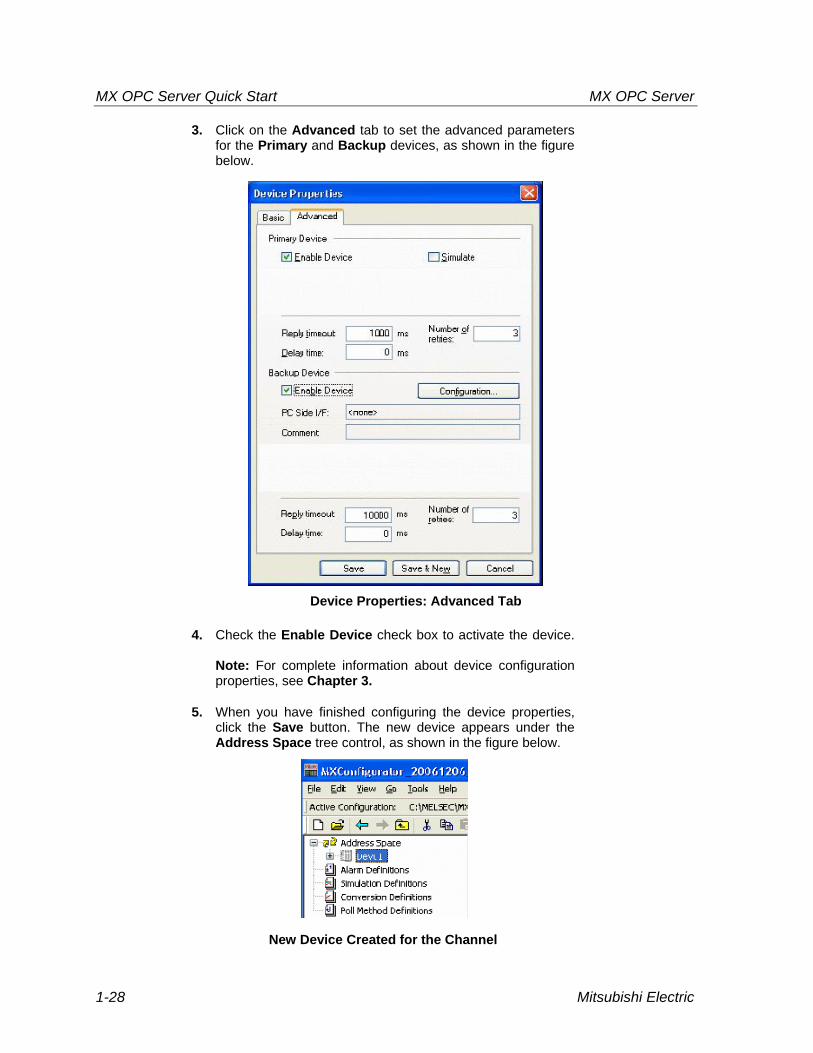
3. Click on the Advanced tab to set the advanced parameters for the Primary and Backup devices, as shown in the figure below.
Device Properties: Advanced Tab
4. Check the Enable Device check box to activate the device. Note: For complete information about device configuration properties, see Chapter 3.
5. When you have finished configuring the device properties, click the Save button. The new device appears under the Address Space tree control, as shown in the figure below.
New Device Created for the Channel

MX OPC Server MX OPC Server Quick Start
Mitsubishi Electric 1-29
Note: For complete device configuration properties info, see Chapter 3.
1.3.5 Creating Data Tags Now you can create a new data tag that the OPC clients can request from the server.
Note: Data tags can be logically organized into groups (folders). You can configure as many folders as required. You can even create subfolders for each group to create a hierarchical organization of tags. See Chapter 3 for details.
To create a new tag:
1. Right-click on the Dev01 device on the tree control of the Configurator screen and select New Data Tag from the pop-up menu, as shown in the figure below.
Adding a New Data Tag
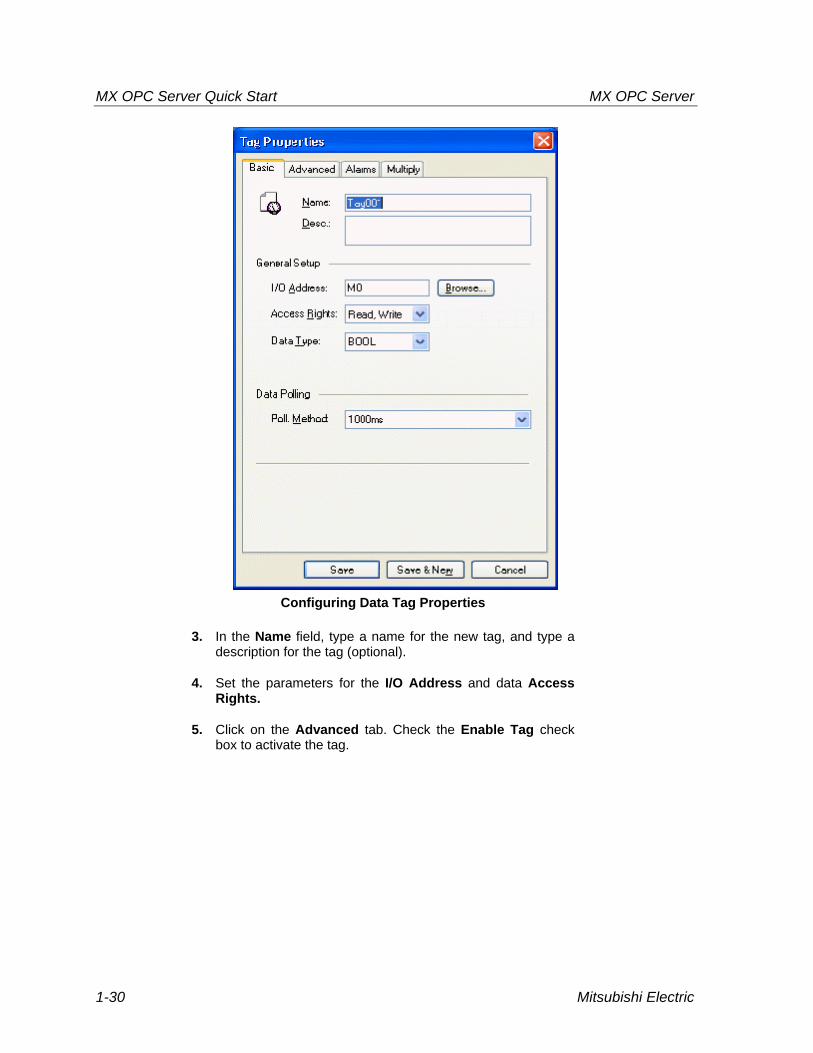
2. The Basic tab of the Data Tag Properties dialog box appears, as shown in the figure below.
MX OPC Server Quick Start MX OPC Server
1-30 Mitsubishi Electric
Configuring Data Tag Properties
3. In the Name field, type a name for the new tag, and type a description for the tag (optional).
4. Set the parameters for the I/O Address and data Access Rights.
5. Click on the Advanced tab. Check the Enable Tag check box to activate the tag.
MX OPC Server MX OPC Server Quick Start
Mitsubishi Electric 1-31
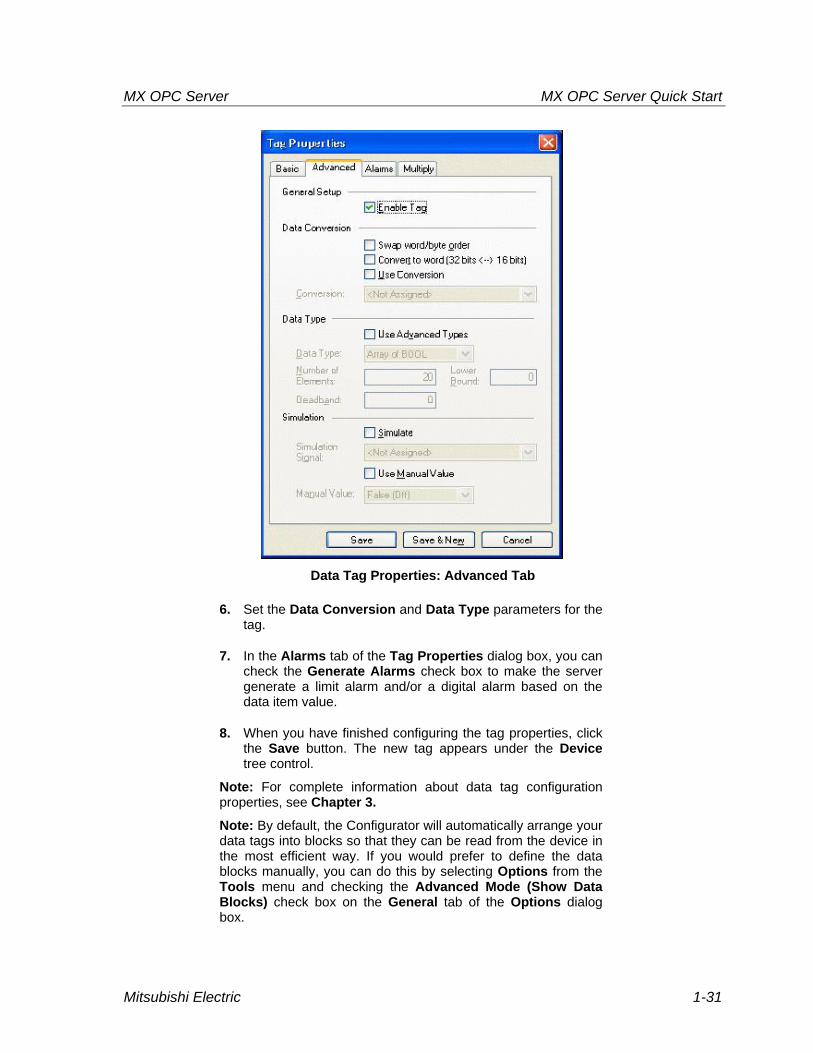
Data Tag Properties: Advanced Tab
6. Set the Data Conversion and Data Type parameters for the tag.
7. In the Alarms tab of the Tag Properties dialog box, you can check the Generate Alarms check box to make the server generate a limit alarm and/or a digital alarm based on the data item value.
8. When you have finished configuring the tag properties, click the Save button. The new tag appears under the Device tree control.
Note: For complete information about data tag configuration properties, see Chapter 3.
Note: By default, the Configurator will automatically arrange your data tags into blocks so that they can be read from the device in the most efficient way. If you would prefer to define the data blocks manually, you can do this by selecting Options from the Tools menu and checking the Advanced Mode (Show Data Blocks) check box on the General tab of the Options dialog box.

MX OPC Server Quick Start MX OPC Server
1-32 Mitsubishi Electric
1.3.6 Starting the MX OPC Runtime Driver Once you are finished with your device and data tag configuration, you can start the MX OPC Runtime driver by clicking the Start button (green triangle icon) on the Standard toolbar of the MX OPC Configurator. This enables client/server communication. To stop the driver, click the Stop button (red square icon) on the Standard toolbar, as shown in the figure below.
Starting and Stopping the Driver

MX OPC Server MX OPC Server Quick Start
Mitsubishi Electric 1-33
1.3.7 Connecting to the Server Using OPC DataSpy
Introduction to OPC DataSpy
With the introduction of the OPC Foundation Plug and Play communications standard called OPC Data Access, and recently the OPC Alarm and Events Specifications, a universal diagnostics and analysis utility was needed by industry. This need is filled with OPC DataSpy. Features of OPC DataSpy OPC DataSpy includes the following key standard features: • Internet OPC over TCP/IP tag browsing. • GenBroker Monitor. • Simple-to-use OPC test client inspection and diagnostics utility. • Determination of whether server is OPC compliant. • Available as a stand-alone OPC test client. • OPC Data Access (DA) test client. • OPC Alarm and Events (AE) test client. • OPC Data Access troubleshooting tool. • OPC Alarm and Events troubleshooting tool. • OPC-compliance testing of third-party servers. • Determination of OPC standards for OPC servers. • OPC loading and OPC traffic analysis.
The main concept behind the OPC DataSpy is to provide an easy-to-use OPC Test Client to test, diagnose, and troubleshoot industrial applications using the OPC Foundations, OPC Data Access, and Alarm and Events specifications. The OPC DataSpy tree control capability consists of three main parts: 1. OPC Item Browsing 2. OPC Data and Alarm Monitors 3. GenBroker Monitor The OPC item browser mode allows you to browse for OPC-compliant Data Access and OPC Alarm and Event servers, as well as OPC Historical Data Access servers, and to provide basic information allowing users to view, test, and troubleshoot any OPC third-party servers. The OPC monitors provide real-time monitoring of OPC server data. The OPC DataSpy user interface consists of the following elements:
• OPC Item browser • OPC Data and Alarm Monitors • Diagnostics and statistics and logging module (output window)
MX OPC Server Quick Start MX OPC Server
1-34 Mitsubishi Electric
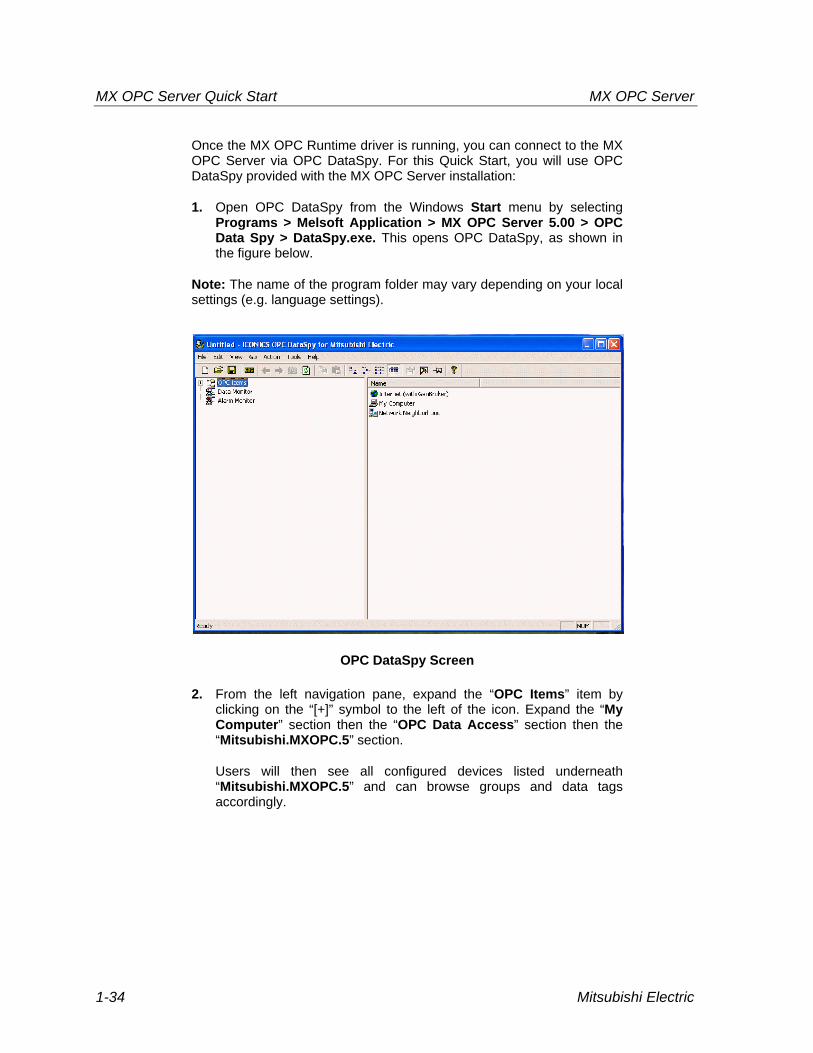
Once the MX OPC Runtime driver is running, you can connect to the MX OPC Server via OPC DataSpy. For this Quick Start, you will use OPC DataSpy provided with the MX OPC Server installation:
1. Open OPC DataSpy from the Windows Start menu by selecting Programs > Melsoft Application > MX OPC Server 5.00 > OPC Data Spy > DataSpy.exe. This opens OPC DataSpy, as shown in the figure below.
Note: The name of the program folder may vary depending on your local settings (e.g. language settings).
OPC DataSpy Screen
2. From the left navigation pane, expand the “OPC Items” item by clicking on the “[+]” symbol to the left of the icon. Expand the “My Computer” section then the “OPC Data Access” section then the “Mitsubishi.MXOPC.5” section.
Users will then see all configured devices listed underneath “Mitsubishi.MXOPC.5” and can browse groups and data tags accordingly.

MX OPC Server MX OPC Server Quick Start
Mitsubishi Electric 1-35
3. Right click on any selected tag listed beneath “Mitsubishi.MXOPC.5” and click on “Monitor”. Next, click on “Data Monitor” that is listed underneath OPC Items when that section is fully collapsed. In the right navigation pane, users will be able to see the values associated with selected tags.
4. If your client application does not support reading single array elements or reading a single bit within a word, you may still be able to use these features by changing the name of the item that you add.
A client can address a bit within a word tag using the item syntax "tagname.bitNr" (e.g. tagname.0 for bit 0).
A client can address a single element of an array tag using the item syntax ‘arraytag[elemNr]’ (e.g. arraytag[2] for element 2).
5. To Write to Tags, right-click on the tag name in the right navigation pane. The “Enter a Value” dialog pops up. Users can then enter values in the text entry box.
Note: If you are writing a floating point value, the period (.) character is always used as the radix character (e.g. ‘123.4’ not ‘123,4’). If you are writing values to an array item, the values should be separated by commas (,).