MUSIC VIDEO 101 - Timothy Dwelle"MUSIC VIDEO 101 is the best how-to manual that anyone making videos...
33
Free Trial - For Adobe Acrobat 5.0 and later MUSIC VIDEO 101 Home Camcorder Production Free Trial Version Copyright © 1993, 2000, 2003, 2005 Timothy Dwelle All Rights Reserved. No Part Of This Publication May Be Reproduced Or Distributed In Any Form Or By Any Means Without The Prior Written Consent Of The Publisher. Published In The U.S.A. By DASH Entertainment Productions, Inc. This free trial version was first published in December 2000. It includes Chapter 1, and excerpts from 2, 3, and 4. The full version of this e-Book includes all text, graphics, and photos from the 1993 booklet. It also includes access to the Update 2005 Web page, with new information. In the full version, the Print function is enabled, so you can print a copy of the e-Book for your own personal use. The full version of this e-Book is available for $5 (US). See How To Order at the end of this document. TIMTV.com http://www.timtv.com (the link is active when you're connected to the Internet)
Transcript of MUSIC VIDEO 101 - Timothy Dwelle"MUSIC VIDEO 101 is the best how-to manual that anyone making videos...
Free Trial - For Adobe Acrobat 5.0 and later
MUSIC VIDEO 101 Home Camcorder Production
Free Trial Version
Copyright © 1993, 2000, 2003, 2005 Timothy Dwelle
All Rights Reserved. No Part Of This Publication May BeReproduced Or Distributed In Any Form Or By Any Means
Without The Prior Written Consent Of The Publisher.
Published In The U.S.A. ByDASH Entertainment Productions, Inc.
This free trial version was first published in December 2000.It includes Chapter 1, and excerpts from 2, 3, and 4.
The full version of this e-Book includes all text, graphics,and photos from the 1993 booklet. It also includes access
to the Update 2005 Web page, with new information.
In the full version, the Print function is enabled, so youcan print a copy of the e-Book for your own personal use.
The full version of this e-Book is available for $5 (US).See How To Order at the end of this document.
TIMTV.comhttp://www.timtv.com
(the link is active when you're connected to the Internet)
E-mail:[email protected]
Correspondence: TIMTV P.O. Box 2251 Douglasville GA 30133
Special thanks to the following companies for providing photographs:JVC Panasonic Sony Newtek-Video Toaster
In 1986, the original Music Video 101 was written about in Billboard magazine (September 13), and USA Today (Today’s Tip-Off, Life section, October 2). Condensed excerpts appeared in the May/June 1988 issue of Videomaker magazine.
Here's what they've had to say about MUSIC VIDEO 101:
"MUSIC VIDEO 101 is the best how-to manual that anyone making videos can use."
Anne Leighton, Managing EditorHit Parader magazine, June 1994 issueVideo View Column, Page 114
"A how-to manual for beginners and anyone looking to produce a demo-quality video, Music Video 101 is basic but thorough, and as user-friendly as any aspiring videomaker could want."
Lorena Alexander, Executive EditorGuitar magazine, February 1995 issueStreet Noise Column, Page 12
"Aspiring video makers seeking a production primer may want to explore 'Music Video 101- Home Camcorder Production'..."
Deborah Russell, Music Video EditorBillboard magazine, April 30, 1994 issueThe Eye Column, Page 50
* * *
The 1986 and 1993 versions of MUSIC VIDEO 101 were created with Atari ST computers
About The Author...
Since 1981, I’ve done a little bit of everything in broadcast video production: Camera Operator, Director, Producer, Scriptwriter, Editor, Lighting Director, VCR Field Operator, Audio Mixer, Grip, Tele-prompter Operator, Video Assist Operator, Dolly Operator, Grip Truck/Van Driver, and Voice-Over Talent.
My career began in April 1981, when I graduated with honors, from the Music Business Institute in Atlanta. I returned to MBI as a part time Class Projects music video instructor from March 1984 to February 1985. I taught students how to produce, direct, shoot, and edit broadcast-quality music videos on 3/4” broadcast videotape. (MBI was purchased by the Art Institutes Of Atlanta. MBI was founded in 1979 by Mert Paul... thanks Mert.)
Career Highlights
MTV music videos -(1) “Storm Inside My Head” by Fortnox - Epic Records. Camera Operator and Associate Producer, for Group 7 Productions, 1983. Fortnox later changed their name to Bombay.
(2) “Rumble Tonight” by Bombay, MTV Basement Tapes winner, April 14, 1985. Producer, Director, Scriptwriter, Co-editor. (There’s more about the show below.)
* 8 television commercials for Warner Brothers-Elektra-Atlantic Records - WEA Atlanta, 1984-86.
* Camera Operator for NBC Sports, Behind The Scenes, 1996 Summer Olympics. July 18 - August 5, Atlanta GA.
* Hand-held Camera Operator for the NFL’s Super Bowl Channel, on the SportSouth cable network, January 27-30, 1994. Georgia World Congress Center, Atlanta.
* SuperStation WTBS, 1990-93. Freelance Camera Operator for WCW - World Championship Wrestling.
* WATL-TV, Fox 36 Atlanta, 1993. Freelance studio Camera Operator for La Toya Jackson Step Up Workout home video.
* For Video Tape Associates, Atlanta. Freelance Camera Operator for A Current Affair (interview), and Sound Mixer for an Aerosmith-Geffen Records TV commercial shoot, April 1988.
* Freelance Camera Operator for Henderson/Crowe Productions Atlanta - TV station sales promos, taped in Hollywood CA (April 1984) with the late actor Vincent Price, for
a nationally-syndicated show called Halloween Thriller. “HT” featured Mr. Price as host, a magician, and music videos.
Visit http://www.timtv.com to see the Greatest Hits & Photo Gallery from my television career.
For fun, I enjoy the beach (any beach!), and playing basketball, golf, and several musical instruments.
From (2) above:In the mid-1980’s, MTV’s Basement Tapes appeared once a month, and featured
6 bands, and their music videos. After the clips were shown, each band was given its own 1-900 telephone number, and viewers “voted” by calling the number (at 5O cents per call) of their favorite group. The winner was determined by the band with the most calls at the end of the show. On April 14,1985, Rumble won with 43% of the vote, and the band won a $5,000 Fostex 8-track recording system! On this particular night, the show was hosted by MTV VJ Martha Quinn, and comedian/actor Billy Crystal.
After 6 shows, the winning videos competed in the Basement Tapes Finals, and the winner would receive a 4-song EP recording contract from a major record label. (In this case, Elektra Records.) Bombay appeared in the August 1985 Finals competition, which was won by The Sharks from New Jersey.
Foreword
The original MUSIC VIDEO 101 was published in July 1986, and sold for $25. It showed how to create a music video for the least amount of money, using broadcast TV equipment and personnel.
This time around, I’ve created something for everyone... from junior high school students to professional musicians. And hopefully, some readers will be inspired to pursue TV production as a career.
Always take the work very seriously, but not yourself. Even if it’s just for fun, everyone involved should take a professional approach to the project. And you may encounter some musicians - and even video crew members - with tremendous egos, who are sometimes difficult to work with.
Always keep your eyes, ears, and mind open to new innovations and education. Never be satisfied with what you’ve already learned, there’s always something new. There are many types of instruction books and courses on audio cassette and videotape, including film and video production books.
Business courses, music lessons, and foreign languages can be learned in the privacy of your home. Music lesson cassettes and videotapes are advertised in magazines like Guitar World, Keyboard, and Guitar Player. Take lessons from a star! And if you develop a passion for a career or project, develop a plan of action, and GO FOR IT! Especially, if someone tells you not to.
* * *

Table Of ContentsCHAPTER 1 - THE LEAST EXPENSIVE METHOD
The Difference Between Film And VideoMajor Music Video CostsHome Camcorder ConnectionList: Seven Requirements For The Least Expensive MethodRequirement 1 - A Camcorder And Blank VideotapeCamcorder Audio InputRental OptionsEarphone JackCamcorder DefinedRecord Times For Different Tape FormatsPickup TubesPower (AC Or Battery)Fade OptionsCreditsAuto/Manual Focus ControlZoomIris ControlCare Of Tape StockRequirement 2 - A Camcorder OperatorHand-Held And Tripod Camcorder OperationStatic ShotCamera Moves - Pan And Tilt (Diagram)Practice TipsShaky CamRequirement 3 - LightingOutdoors With SunlightCloud CoverIndoor LightingAuto/Manual White Balance SwitchRequirement 4 - Shoot Location OptionsRequirement 5 - Performer(s)Instrument/Lip Sync Practice Tips For PerformersClothingRequirement 6 - Master AudioAudio Recording OptionsLive Performance and Multi-TrackAudio Playback During The ShootRequirement 7 - Special Audio Cables"Y" Audio AdaptersRecording-Line Level Attenuator PlugAudio Cable Connection (Diagram)Two Options For Shooting The Least Expensive Music Video Without Editing
(Diagrams)Shooting Inside A Room (Diagram)Building An Outdoor "Room"Plastic SheetingPlastic Garbage BagsBalloonsStyrofoam And CardboardProducer And Director Defined
CHAPTER 2: PRE-PRODUCTION PLANNING FOR SHOOTING AND EDITING
Only excerpts appear in this free e-Book. Topics in the full version include:
How To Find An Editing FacilityThe Easiest ApproachEditing Visuals In Sync With Vocals And Music"Source Footage" And "Take" DefinedReference AudioAudio For Scenes Before And/Or After The SongStereo Master AudioCountdownReference Audio PlaybackAudio Playback OperatorProduction AssistantsExtrasMore Shoot LocationsExtra LightingCamera MountsSnap ZoomLens FiltersPhrases A Director Uses During A ShootContinuityRenting An Industrial CamcorderCable TV Public Access OptionEquipment PhotosDiagram For Taping A Choir Performance
CHAPTER 3: SCRIPTWRITING AND STORYBOARDS
Only excerpts appear in this free e-Book. Topics in the full version include:
Beat Sheet StoryboardBlank Beat Sheet FormShot DescriptionsScene DescriptionsCamera AnglesCutFadeHeadroom

TakeCutaway ShotsOverhead Maps For ShootingPlanning ShotsBeat Sheet ExampleTake SheetSlateAfter The ShootChecklist For The ShootBlank Take Sheet Form
CHAPTER 4: BASIC EDITING
Only excerpts appear in this free e-Book. Topics in the full version include:
Video-Only Insert EditsCuts-Only EditingFrames Per Second (FPS)Control TrackCrystal BlackSlateCreditsElements Appearing On The Master VideotapeAudio-Only Insert EditSafety MasterVideo-Only Insert EditIn PointPrerollEditing With The Cuts-Only SystemEquipment PhotosPausing A VCRFreeze-FrameEditing Random Shots Without Syncing Visuals To Vocals And MusicEditing In Sync With Vocals And MusicDigital Displays On The Edit ControllerProgramming The In Points and Out PointsPreviewVCR SlippingEditing Off The DownbeatMaking The First Edit In Sync With Vocals And MusicFading From BlackTime EstimatesEditing ChecklistComputer Special EffectsThe Least Expensive Broadcast Editing Options"Ballpark" Cost EstimatesTape StockDissolveA/B RollMixTime Code

Recommended Reading (now part of the Update Web page)
Chapter 1THE LEAST EXPENSIVE METHOD
The Difference Between Film and VideoMajor Music Video CostsHome Camcorder ConnectionList: Seven Requirements For The Least Expensive MethodRequirement 1 - A Camcorder and Blank VideotapeCamcorder Audio InputRental OptionsEarphone JackCamcorder DefinedRecord Times For Different Tape FormatsPickup TubesPower (AC Or Battery)Fade OptionsCreditsAuto/Manual Focus ControlZoomIris ControlCare Of Tape StockRequirement 2 - A Camcorder OperatorHand-Held and Tripod Camcorder OperationStatic ShotCamera Moves - Pan and Tilt (Diagram)Practice TipsShaky CamRequirement 3 - LightingOutdoors With SunlightCloud CoverIndoor LightingAuto/Manual White Balance SwitchRequirement 4 - Shoot Location OptionsRequirement 5 - Performer(s)Instrument/Lip Sync Practice Tips For PerformersClothingRequirement 6 - Master AudioAudio Recording OptionsLive Performance and Multi-TrackAudio Playback During The ShootRequirement 7 - Special Audio Cables"Y" Audio AdaptersRecording-Line Level Attenuator Plug
Audio Cable Connection (Diagram)Two Options For Shooting The Least Expensive Music Video Without Editing (Diagrams)Shooting Inside A Room (Diagram)Building An Outdoor "Room"Plastic SheetingPlastic Garbage BagsBalloonsStyrofoam and CardboardProducer and Director Defined
* * *
When shooting with a home video camcorder, it’s not proper to say, “We’re going to film a music video”. Always use the words videotape or tape. There’s a big difference between shooting a music video with videotape and video cameras, and motion picture film and film cameras:
(A) Videotape has magnetic properties. Recording (with a video camera and VCR), playback, and editing takes place electronically.
(B) Motion picture film has to be: Exposed during the shoot, using a motion picture film camera; Chemically developed, which creates the negative; Transferred to videotape for editing.
Virtually all major record label music videos are shot with 16mm or 35mm motion picture film. The common practice is to shoot with film, have it developed, then transferred to videotape for the convenience of videotape editing.
Major record companies have a large financial investment in every band they sign. They usually want the absolute best picture quality, and use top film crews and equipment, and pay top dollar. Most major label music videos cost between $25,000 and $100,000 each. The cost can be much higher for Superstars.
Many music videos and concerts have been shot with video cameras, and edited on videotape, then broadcast or cablecast nationally. To insure top quality, it is essential to use broadcast-quality cameras, and broadcast-quality editing equipment.
On the other hand, in 1988, Bad Medicine by Bon Jovi was shot with home camcorders. The video gear was distributed at a concert, and the fans shot it! Then, the video footage was transferred to broadcast videotape, and edited with broadcast editing equipment. The clip has appeared many times on MTV.
Footage shot with home camcorders can be transferred (“bumped up”) to broadcast tape, and edited with broadcast equipment. Many newscasts and reality-based TV shows often include home camcorder video footage.
Always save the videotapes of the performers that you shoot! In the event that they become successful, there’s always the possibility that some of your footage could be

used in a future TV broadcast.
In a nutshell, here are the requirements for The Least Expensive Method:
1) A Camcorder and a Blank Videotape2) A Camcorder Operator3) Lighting4) Shoot location5) Performer(s)6) Audio7) Special Audio Cables and Adapters
Now, let’s go through them...
1) A CAMCORDER AND A BLANK VIDEOTAPE - The camcorder must have an external microphone input jack to record Master audio. If you don’t own a camcorder, options include rental, libraries (some treat camcorders like books), school, and borrowing one from a friend or relative. As for rental, check your local telephone company’s Yellow Pages, and look under Video Tapes & Discs - Renting & Leasing or Video Recorders & Players - Renting & Leasing or Audio-Visual Services. If a company says they don’t rent home camcorders, ask if they can refer you to a company that does.
Obtain a copy of the camcorder’s instruction manual, and read it at least twice. When shooting with a rental camera or an unfamiliar borrowed model, ask if an instruction manual is available. If not, ask the owner for advice.
It’s best to use a camcorder that has an earphone jack, so that audio can be monitored during the shoot. (Some models don’t have one!) A small, plastic earphone that fits in one’s ear, or personal stereo Walkman-type headphones with a 1/8” plug can be used. However, the sound will be in Mono (monaural), and will be heard through only one side of the headphones. For sound in both sides, a stereo-to-mono plug adapter is available through electronic stores like Radio Shack.
A camcorder is a video camera and video cassette recorder (VCR) combination, and designed as one unit. There are many makes and models of home camcorders. A modern home video camcorder contains an image sensor called a Chip, which converts optical images into electrical energy, which can be recorded onto magnetic videotape. Early model home cameras came with a separate VCR, and used a vacuum Pickup Tube as the image sensor. Newer home camcorders have one chip; early model video cameras have one tube. Avoid using a 1-tube home camera, as chip camcorders make better pictures.
Full-sized VHS home camcorders are designed to rest on a person’s shoulder during hand-held operation. They use regular size VHS cassettes, and can record up to 2 hours on one tape.
Smaller home camcorders are compact, and referred to as palmcorders. The unit is strapped to a person’s hand during hand-held operation. Here are the tape formats for palmcorders, and the maximum record time per tape:
8mm (2 hours) VHS-C (30 minutes)
Hi-8mm (2 hours) Super-VHS-C (30 minutes)
* VHS-C and Super VHS-C palmcorders use smaller video cassettes than the regular full-sized VHS and S-VHS video cassettes. By using an adapter cassette, a small video cassette can be played back in a regular VHS VCR or Super-VHS VCR. The small cassettes and adapters can also be used during editing. Longer record time is possible with the VHS-C formats, but the quality won’t be as good.
* In 1993, Sony and Sharp introduced a new type of camcorder. Instead of a viewfinder, the Sony Handycam Snap, and the Sharp Viewcam had a 3” color view screen on the back.
* If you happen to use a camera with a Pickup Tube: Tubes are extremely sensitive to bright light. Permanent tube damage can occur, if the camera is accidentally moved, and the lens is pointed at the sun, active flashbulbs or TV lights. Mirrors, water, chrome, jewelry, and other reflective surfaces also pose potential tube danger. When a pickup tube becomes permanently damaged by excessive light, it’s called burn-in, and the tube must be replaced. (It would be a better idea to buy a new or used chip camcorder than to replace the tube in an old home video camera.) Rock music fans: Be on the lookout for an early live version of “Sunday, Bloody Sunday” by U2. Some of the broadcast video cameras show many red streaks... that’s burn-in.
Home video camcorders need either an AC power adapter or a rechargeable battery to operate. The convenience and portability of battery power is the preferred way to go, especially for all hand-held camera work.
Always use common sense when shooting with lights, AC power and/or extension power cords. Bring an extra videotape as a spare, in case of tape failure. It’s unlikely, but you’ll be prepared.
FADE - Some camcorders have special effects, like freeze-frame or strobe. Many camcorders can Fade-up from black, and Fade-down to black by pushing a button. Fades are the ideal way to begin and end the video.
If your camcorder doesn’t have the Fade option, here’s another idea. Just before shooting the music video, place the lens cap on the lens, press the Record button, and tape for 5-10 seconds. About one second before the song begins, remove the lens cap, start the music, and proceed to shoot. When the song is over, quickly place the lens cap back on, and let the videotape continue to record for another 5-10 seconds, then pause the tape.
CREDITS - Some camcorders have a built-in Character Generator, which creates electronic lettering on the videotape. If your camcorder has flying erase heads, there will be a Cut ( a clean and instant transition) between shots every time the camcorder is paused.
Credits can be shot after the music video. Before the shoot, print the lettering with a large Magic Marker on a sheet of paper, or with a typewriter or computer desktop publishing system. Tape each sheet to a wall. Use a camcorder tripod for steady shots. Shoot about 5 seconds of each page. For multiple pages, pause the camcorder as you

change each sheet, or shoot continuously as a hand removes each page. Credits could be printed with chalk on a chalkboard, then erased (show the hand and eraser) at the end of each shot.
FOCUS - Camcorders have an AUTO/MANUAL Focus control. AUTO mode will automatically focus the lens during taping. MANUAL allows focusing by hand. On some models, Manual focus is motorized, and controlled by pushing a button. While shooting, maintain a steady distance from the performers, and use the MANUAL setting. Zoom In all the way to one performer. Using your left hand (or button), turn the focus ring back or forth until a clear, sharp picture is seen through the viewfinder. Zoom Out all the way. Proceed to shoot.
ZOOM - Most home video camcorders have a Zoom lens with a power Zoom control, which makes it possible to shoot several different shots from one camera position. During a Take, the camera operator can Zoom In or Zoom Out to show more or less of an area, object or performer. (Take means shoot attempt.) A Zoom can be slow or fast, and combined with Pans and Tilts in order to maintain proper framing of a moving person or object.
It’s possible to turn off the power Zoom control on a camcorder, and manually turn the Zoom ring on the lens with your left hand. This allows Zooms to be much faster than with the auto Zoom control. A common music video technique involves manually Zooming In and Out, while leaning left and right, back and forth.
Limit power Zooms while shooting. The Zoom control on a home camcorder is not as responsive as an Industrial or broadcast camera. Zoom all the way Out, and move in as close as possible to the performers for proper framing in the viewfinder.
IRIS CONTROL - Auto and Manual. The Iris gradually opens or closes to let in more or less light. While looking in the viewfinder, switch to Auto, and Zoom Out wide for a shot of a performer. After 5 seconds, switch to Manual. No further adjustment should be necessary.
Always take proper care of videotape stock. Tapes should remain in their individual cases until ready for use. Read and follow the instructions on the package. Keep them away from sunlight, extreme cold, heat or humidity, moisture, and dust. It’s a good idea to transport the tapes in a plastic bag until ready for use. Always affix a label to each cassette with the name of the performers, date, etc.
2) A CAMCORDER OPERATOR - I assume it’s you! Like anything else, the more you practice, the better your camcorder work will be. Hand-held camcorder operation - The human body is capable of going places, obtaining angles, and making camera moves that wouldn’t be possible with a tripod. It takes a lot of practice to make smooth camera moves when shooting by hand. Another option is to shoot from a stationary tripod, which has 3 adjustable legs, and allows the operating height of the camera to be raised or lowered. A mounting head is used to attach a camcorder to the top of a tripod.
STATIC SHOT - No camera moves (Pans, Tilts, or Zooms).
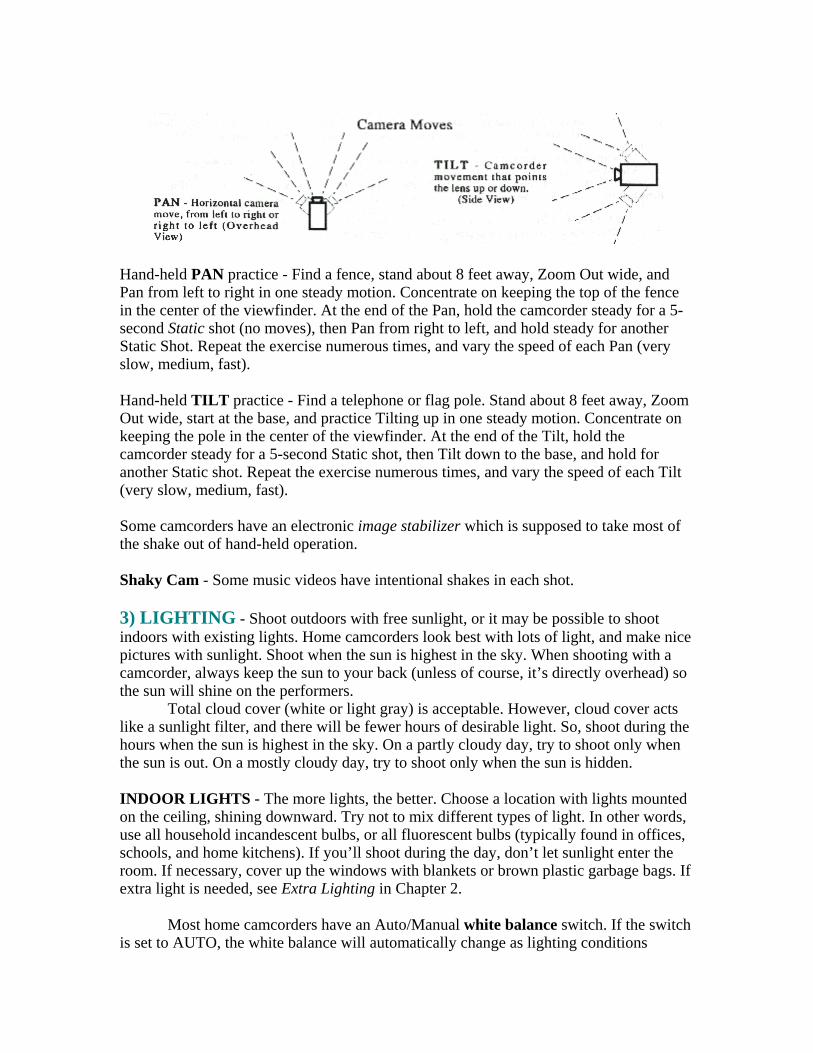
Hand-held PAN practice - Find a fence, stand about 8 feet away, Zoom Out wide, and Pan from left to right in one steady motion. Concentrate on keeping the top of the fence in the center of the viewfinder. At the end of the Pan, hold the camcorder steady for a 5-second Static shot (no moves), then Pan from right to left, and hold steady for another Static Shot. Repeat the exercise numerous times, and vary the speed of each Pan (very slow, medium, fast).
Hand-held TILT practice - Find a telephone or flag pole. Stand about 8 feet away, Zoom Out wide, start at the base, and practice Tilting up in one steady motion. Concentrate on keeping the pole in the center of the viewfinder. At the end of the Tilt, hold the camcorder steady for a 5-second Static shot, then Tilt down to the base, and hold for another Static shot. Repeat the exercise numerous times, and vary the speed of each Tilt (very slow, medium, fast).
Some camcorders have an electronic image stabilizer which is supposed to take most of the shake out of hand-held operation.
Shaky Cam - Some music videos have intentional shakes in each shot.
3) LIGHTING - Shoot outdoors with free sunlight, or it may be possible to shoot indoors with existing lights. Home camcorders look best with lots of light, and make nice pictures with sunlight. Shoot when the sun is highest in the sky. When shooting with a camcorder, always keep the sun to your back (unless of course, it’s directly overhead) so the sun will shine on the performers.
Total cloud cover (white or light gray) is acceptable. However, cloud cover acts like a sunlight filter, and there will be fewer hours of desirable light. So, shoot during the hours when the sun is highest in the sky. On a partly cloudy day, try to shoot only when the sun is out. On a mostly cloudy day, try to shoot only when the sun is hidden.
INDOOR LIGHTS - The more lights, the better. Choose a location with lights mounted on the ceiling, shining downward. Try not to mix different types of light. In other words, use all household incandescent bulbs, or all fluorescent bulbs (typically found in offices, schools, and home kitchens). If you’ll shoot during the day, don’t let sunlight enter the room. If necessary, cover up the windows with blankets or brown plastic garbage bags. If extra light is needed, see Extra Lighting in Chapter 2.
Most home camcorders have an Auto/Manual white balance switch. If the switch is set to AUTO, the white balance will automatically change as lighting conditions

change. The MANUAL setting allows you to choose between different lighting conditions. (Some models don’t have Manual.)
Always consult the camcorder’s instruction manual about the proper white balance setting for the lighting conditions you’ll be shooting in. When shooting with a rental camera or an unfamiliar borrowed model, ask if an instruction manual is available. If not, ask the owner for advice.
If a color TV will be available at the shoot location, shoot some sample footage in both Auto and Manual white balance settings, then play back the tape using the camcorder’s VCR. One setting might look better than the other, or there may be little or no difference.
If a color TV will be unavailable at the shoot, try to shoot advance sample footage in both Auto and Manual white balance, then play back the tape through a TV at home.
When playing back a videotape, be sure that the color TV is adjusted properly. Many TVs have an AUTO button that will automatically adjust the color, brightness, and other settings. Some camcorder models have a color viewfinder. However, a white balance check through a color TV will be far superior.
If it’s absolutely necessary to shoot with a mixture of different types of light - either indoors or outside at night - try to check the white balance in advance with a TV.
On the other hand, improper Manual white balance settings may offer a special effect by distorting the colors. So experiment!
4) SHOOT LOCATION - As long as there is enough light, you can shoot inside any building - house, office, school, basement, band practice room, gymnasium, etc.
Some outdoor locations include a public park, sidewalk, woods, beach, football field, mountain top, junkyard, and open fields. The exteriors and rooftops of homes and office buildings can also be used. (Use extreme caution on a rooftop!) Some locations are free. Some require simply asking for permission from the owner. And wherever you shoot, make sure that everyone is legally parked.
5) PERFORMER(S) - The Master audio of the music video will be recorded by the camcorder during the shoot. An audio cable and adapters will be used to connect the audio source to the audio input on the camcorder. The performers will have to:
(A) Instrument/Lip Sync to a recording of a song (the easiest option); or(B) Record the song live, with a PA system and audio mixer.
INSTRUMENT/LIP SYNC (To Be Or Not To Be) - Many performers don’t know how to Lip Sync properly. The secret is to breathe normally. They can’t be lazy, and just mouth along like a puppet. Each vocalist should practice singing their parts out loud, along with a tape recording of the song. (A rehearsal recording is fine for practice purposes.) By singing out loud, they’re forced to breathe like they would in a live performance. They should concentrate on not missing a single syllable, and the smallest of breaths won’t get lost. When Lip Syncing with a microphone, the performer’s approach to the mic should be the same as if it were a live performance.
After they’ve gotten used to proper Lip Syncing, the band should practice Instrument Syncing along with the tape. If they have a drummer, the volume should be
loud enough so that he or she can still “rock out” if necessary, without drowning out the song. (This would make the others lose their place.) It’s not necessary to amplify the other instruments.
After the band has gotten used to proper Instrument Syncing, they should practice Instrument/Lip Syncing at the same time. Ask them to pretend they’re on a stage in front of 20,000 people.
I’ve seen some confident first-time video performers suddenly freeze as soon as the videotape rolls. This is a natural response for someone who’s never performed in front of a video camera before, but you can waste a lot of time waiting for them to thaw. Please remind the group in advance that the camcorder is nothing to be afraid of, and theyshouldn’t worry about making a mistake. Everybody makes mistakes, but those who are prepared make fewer.
For vocalists who’ve never performed in front of a video camera, here’s a way for them to rehearse before the shoot. Take a black sheet of construction paper, and cut out a circle that is approximately 3 inches in diameter. Presto! A practice camcorder lens. Each vocalist should have a practice "lens", and practice by themselves, at home. Have them tape the “lens” to the center of a mirror, stand 3-5 feet away, and practice Lip Syncing with a recording of the song. (Musical instruments are optional.) Encourage them to jive around while Syncing, while maintaining constant eye contact with the “lens”. They’ll still be able to see themselves with their peripheral vision.
After they’ve gotten used to staring at the practice lens, they should practice Lip Syncing while maintaining constant eye contact with themselves, and not look directly at the “lens”. Next, they should practice while looking around at different points on the mirror (like scanning an audience), while avoiding direct eye contact with the “lens”. This is the time to make intentional “Bloopers”, so they should relax, loosen-up, and enjoy themselves! By practicing this exercise several times, they’ll be more comfortable performing in front of a camcorder.
If a color TV will be used while the shoot is in progress, point the screen away from the performers. During taping, they should play towards the camera, and not watch the TV.
CLOTHING - The phrase “Dress For Success” applies to music video, as a band’s visual image is extremely important. Some rely on it much more than others. Ripped-up blue jeans, T-shirts, and sports shoes are fine for some; others will want nice clothes, or flashy, custom-made costumes.
If needed, secondhand clothing stores, yard sales, and flea markets are ideal places to find an inexpensive and/or unusual wardrobe. If the budget allows, a costume shop can make a performer look like anyone from King Arthur to King Kong.
6) MASTER AUDIO - The Master audio of the music video will be recorded by the camcorder during the shoot. Most home camcorders have only one audio channel, so the sound will be in Mono, not stereo. If the music video is played back on a stereo TV, sound will be heard in both speakers, but it won’t be stereo sound. The 8mm and Hi-Fi VHS-C camcorders offer Hi-Fi (High Fidelity) audio quality.
The performers will have to Instrument/Lip Sync to a recording of a song, or
perform live with a PA system, and multi-channel audio mixer. For live audio, an audio cable and adapters will be used to connect the audio output of the audio mixer to the audio input on the camcorder.
INSTRUMENT/LIP SYNC (Easiest Option) - You’ll need a song on an audio tape. During the shoot, the audio tape will be played back through an audio tape player, and the camcorder will record the song from this tape. An audio cable and adapters will be used to connect the audio output of the audio tape player to the audio input on the camcorder.
If you’ll be having fun with friends - who are playing air guitar and other air instruments (meaning no instruments) - it could be a song by your favorite band. If a compact disc and CD player are available, they can be used instead of an audio tape and player. If your music video will be for a recording that’s not commercially available, the options are:
A) The band can perform live, and record the song using a PA system with a multi-channel audio mixer, and an audio record machine. The audio record machine could be one of the following:
Home Stereo Audio Cassette Recorder Stereo VCR Hi-Fi stereo VCR
Or professional gear, like a 2-track stereo reel-to-reel tape recorder, or a DAT digital audio tape recorder
Note: The sound quality of a Hi-Fi stereo VCR is close to that of a compact disc. Some Hi-Fi VCRs need a video source (camera, cable TV or antennae) in order to record Hi-Fi audio. The sound quality of a regular stereo VCR is about the same as a standard audio cassette recorder. As for stereo VCRs, always record audio with the fastest tape speed (SP). Always use a brand new videotape for audio recording.
B) The band can record the song in a recording studio, using a multi-track audio tape recorder. When recording a song, it allows each instrument and vocal to be recorded on individual tracks, that are independent of each other. Small recording studios use 8 or 16-track machines. Many musicians have “basement” studios at home, with gear ranging from 4, 8, or 16-track machines. Some stars have 24 tracks or more!
If desired, each part can be recorded one track at a time. If a mistake is made on any track - say, during the lead guitar solo, it can be re-recorded as many times as needed, without affecting the other tracks. It’s possible to have more than one sound on a track, such as recording 3 background singers with a microphone, on one track.
Once all of the tracks are recorded, the multi-track tape is played back, and the song is mixed through the audio mixer. (Mixing means that the sound of each track is adjusted, including volume and effects.) When the mix is just right, the song is played back, and recorded by a 2-track stereo audio tape recorder, which creates the Master tape. It’s common for the Master audio machine to be a 2-track reel-to-reel tape recorder or a DAT digital audio tape recorder.
C) The band could record the song live, using a PA system with a multi-channel audio mixer, and a multi-track recorder. After mixing the multi-track recording, the song would
be recorded by a 2-track stereo audio tape recorder, creating the Master tape.
AUDIO PLAYBACK DURING THE SHOOT - For best sound quality, use the same machine that was used to record the 2-track stereo Master audio tape. The next best thing would be to use a comparable machine.
If that’s not possible or practical, use a stereo audio cassette recorder, and a blank audio tape to record a copy of the song from the Master tape. Try to use the same recorder/player for song playback during the shoot.
For shooting and syncing where AC power isn’t available, use a stereo audio cassette recorder to record the song from the Master tape. Use a battery-powered audio cassette player for song playback, and use brand new alkaline batteries.
Some readers may wish to have a Production Assistant in charge of audio playback. A “PA” lends a helping hand during the shoot. If needed, ask a friend if they could assist with simple tasks.
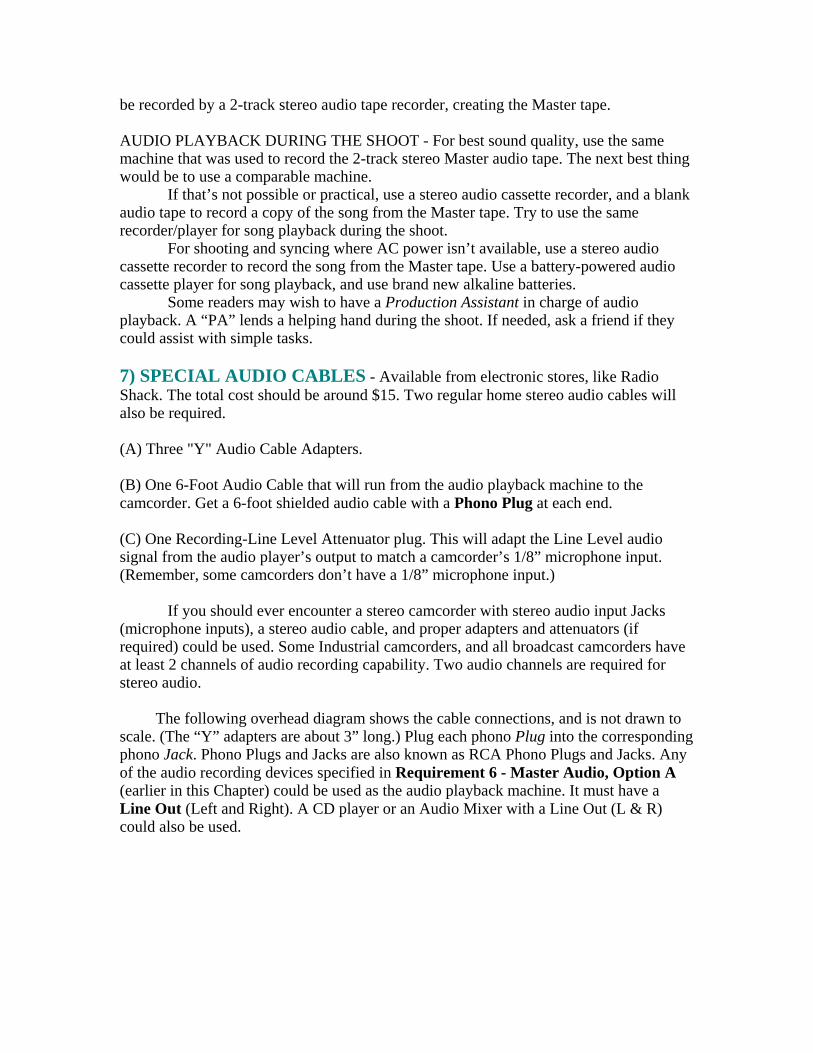
7) SPECIAL AUDIO CABLES - Available from electronic stores, like Radio Shack. The total cost should be around $15. Two regular home stereo audio cables will also be required.
(A) Three "Y" Audio Cable Adapters.
(B) One 6-Foot Audio Cable that will run from the audio playback machine to the camcorder. Get a 6-foot shielded audio cable with a Phono Plug at each end.
(C) One Recording-Line Level Attenuator plug. This will adapt the Line Level audio signal from the audio player’s output to match a camcorder’s 1/8” microphone input. (Remember, some camcorders don’t have a 1/8” microphone input.)
If you should ever encounter a stereo camcorder with stereo audio input Jacks (microphone inputs), a stereo audio cable, and proper adapters and attenuators (if required) could be used. Some Industrial camcorders, and all broadcast camcorders have at least 2 channels of audio recording capability. Two audio channels are required for stereo audio.
The following overhead diagram shows the cable connections, and is not drawn to scale. (The “Y” adapters are about 3” long.) Plug each phono Plug into the corresponding phono Jack. Phono Plugs and Jacks are also known as RCA Phono Plugs and Jacks. Any of the audio recording devices specified in Requirement 6 - Master Audio, Option A (earlier in this Chapter) could be used as the audio playback machine. It must have a Line Out (Left and Right). A CD player or an Audio Mixer with a Line Out (L & R) could also be used.
Here Are 2 Options For Shooting TheLeast Expensive Music Video, Without Editing
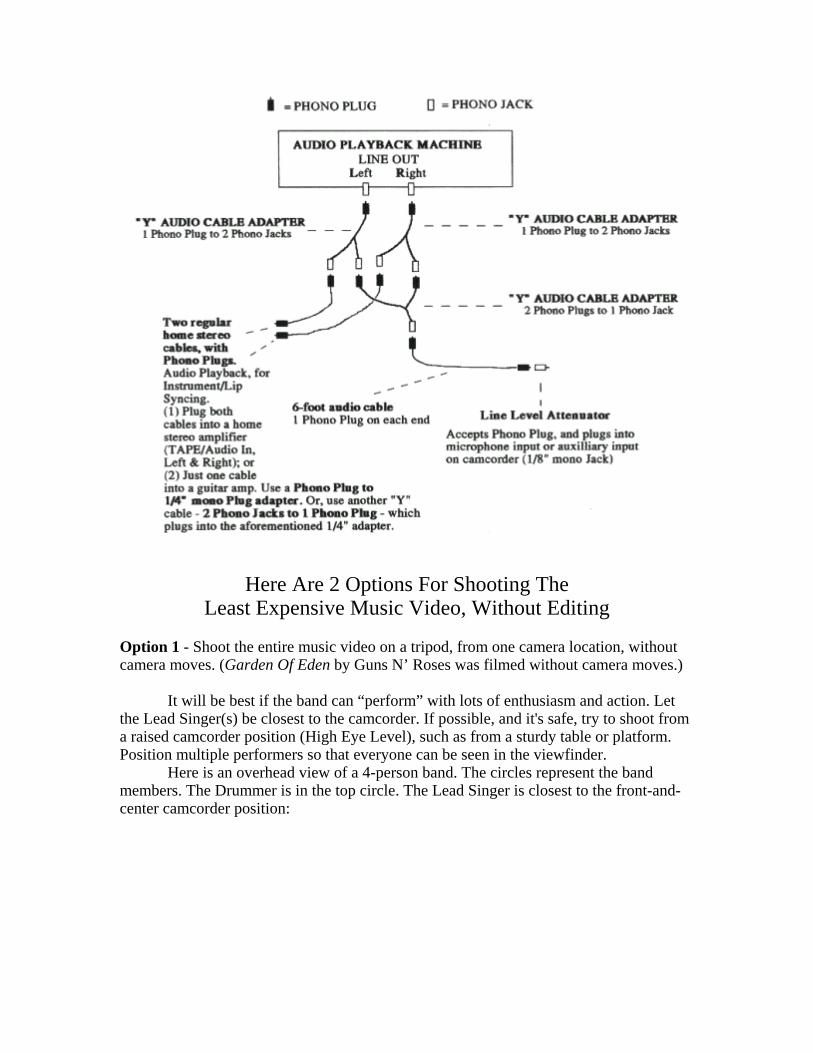
Option 1 - Shoot the entire music video on a tripod, from one camera location, without camera moves. (Garden Of Eden by Guns N’ Roses was filmed without camera moves.)
It will be best if the band can “perform” with lots of enthusiasm and action. Let the Lead Singer(s) be closest to the camcorder. If possible, and it's safe, try to shoot from a raised camcorder position (High Eye Level), such as from a sturdy table or platform. Position multiple performers so that everyone can be seen in the viewfinder.
Here is an overhead view of a 4-person band. The circles represent the band members. The Drummer is in the top circle. The Lead Singer is closest to the front-and-center camcorder position:
Overhead View - The Lead Singer should be closest to the camcorder. Before taping, Zoom Out wide, and move the camcorder position forward or
backward to establish proper framing in the viewfinder.
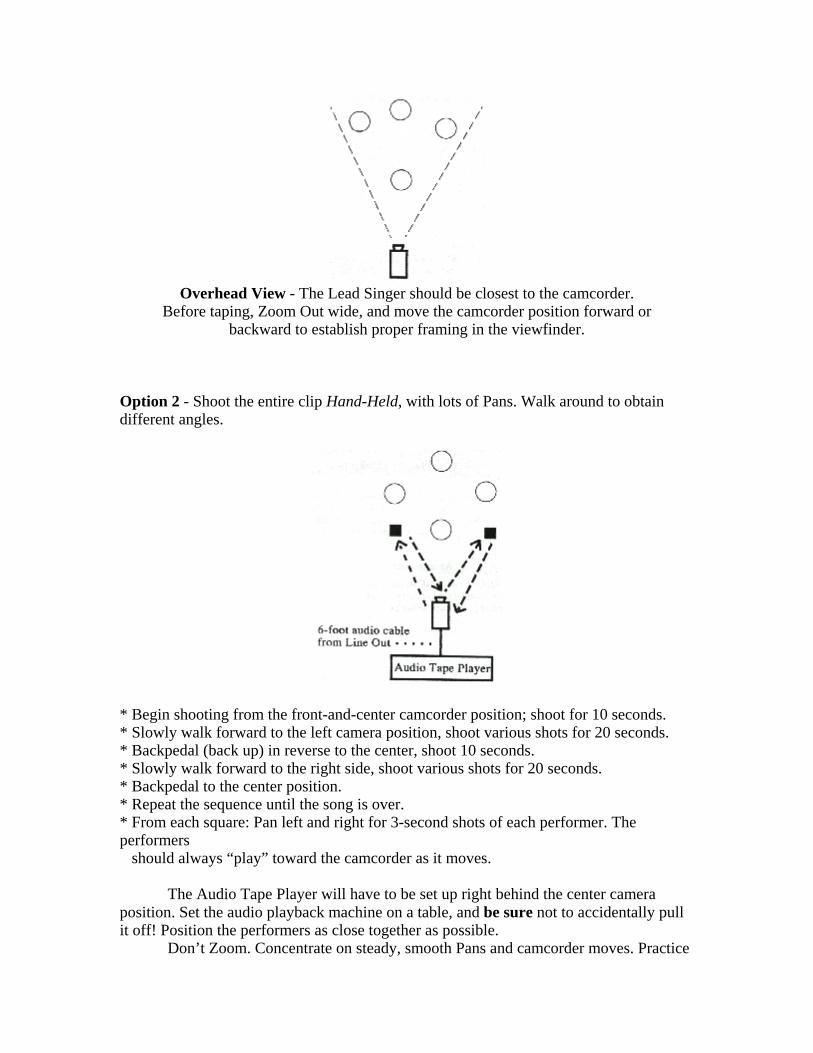
Option 2 - Shoot the entire clip Hand-Held, with lots of Pans. Walk around to obtain different angles.
* Begin shooting from the front-and-center camcorder position; shoot for 10 seconds.* Slowly walk forward to the left camera position, shoot various shots for 20 seconds.* Backpedal (back up) in reverse to the center, shoot 10 seconds.* Slowly walk forward to the right side, shoot various shots for 20 seconds.* Backpedal to the center position.* Repeat the sequence until the song is over.* From each square: Pan left and right for 3-second shots of each performer. The performers should always “play” toward the camcorder as it moves.
The Audio Tape Player will have to be set up right behind the center camera position. Set the audio playback machine on a table, and be sure not to accidentally pull it off! Position the performers as close together as possible.
Don’t Zoom. Concentrate on steady, smooth Pans and camcorder moves. Practice
the footwork with a camcorder in advance, and walk softly.
* * *
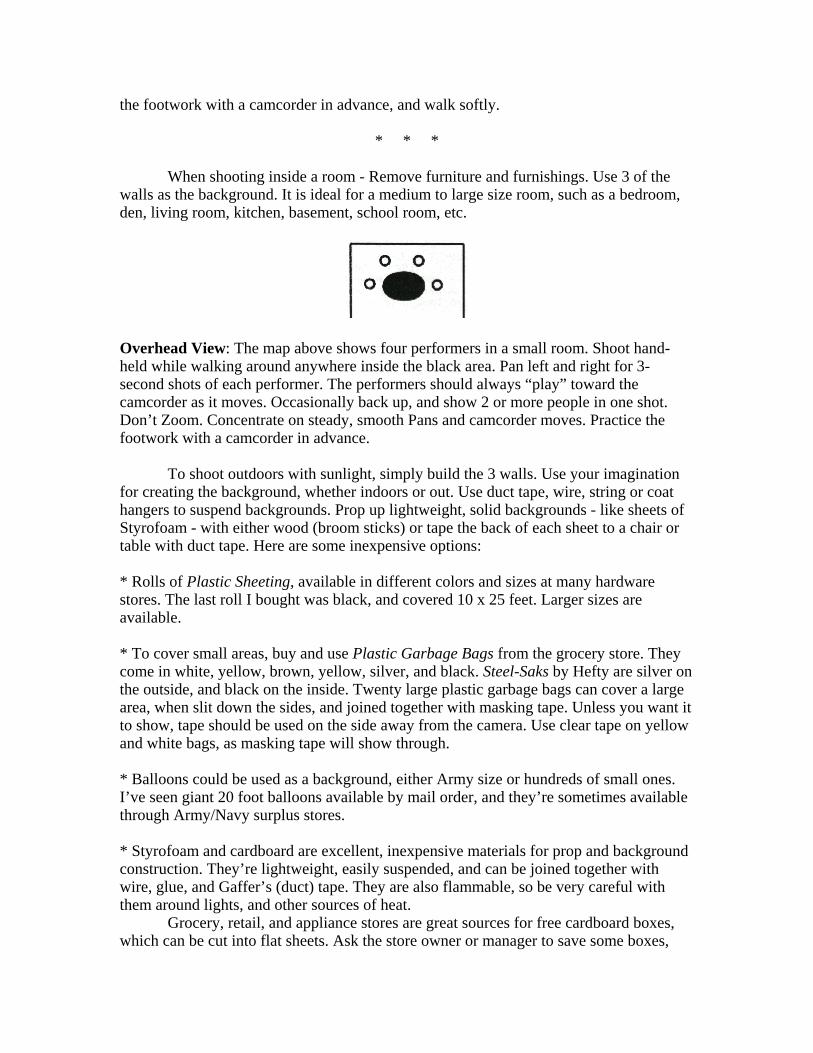
When shooting inside a room - Remove furniture and furnishings. Use 3 of the walls as the background. It is ideal for a medium to large size room, such as a bedroom, den, living room, kitchen, basement, school room, etc.
Overhead View: The map above shows four performers in a small room. Shoot hand-held while walking around anywhere inside the black area. Pan left and right for 3-second shots of each performer. The performers should always “play” toward the camcorder as it moves. Occasionally back up, and show 2 or more people in one shot. Don’t Zoom. Concentrate on steady, smooth Pans and camcorder moves. Practice the footwork with a camcorder in advance.
To shoot outdoors with sunlight, simply build the 3 walls. Use your imagination for creating the background, whether indoors or out. Use duct tape, wire, string or coat hangers to suspend backgrounds. Prop up lightweight, solid backgrounds - like sheets of Styrofoam - with either wood (broom sticks) or tape the back of each sheet to a chair or table with duct tape. Here are some inexpensive options:
* Rolls of Plastic Sheeting, available in different colors and sizes at many hardware stores. The last roll I bought was black, and covered 10 x 25 feet. Larger sizes are available.
* To cover small areas, buy and use Plastic Garbage Bags from the grocery store. They come in white, yellow, brown, yellow, silver, and black. Steel-Saks by Hefty are silver on the outside, and black on the inside. Twenty large plastic garbage bags can cover a large area, when slit down the sides, and joined together with masking tape. Unless you want it to show, tape should be used on the side away from the camera. Use clear tape on yellow and white bags, as masking tape will show through.
* Balloons could be used as a background, either Army size or hundreds of small ones. I’ve seen giant 20 foot balloons available by mail order, and they’re sometimes available through Army/Navy surplus stores.
* Styrofoam and cardboard are excellent, inexpensive materials for prop and background construction. They’re lightweight, easily suspended, and can be joined together with wire, glue, and Gaffer’s (duct) tape. They are also flammable, so be very careful with them around lights, and other sources of heat.
Grocery, retail, and appliance stores are great sources for free cardboard boxes, which can be cut into flat sheets. Ask the store owner or manager to save some boxes,
before they get crushed, and thrown into the trash.Large sheets of Styrofoam are available at most hardware stores and lumber
yards. Styrofoam can be painted, but it probably will take two coats. When applied directly, enamel paint will destroy Styrofoam. If an enamel gloss finish is desired on a Styrofoam prop, use latex paint for the first coat. When it is dry, enamel paint can be used.
Using some creativity, patience, and a razor knife, you can build just about any kind of prop or background imaginable. ALWAYS USE COMMON SENSE when working with sharp instruments or power extension cords.
Once, I had to shoot and edit a music video of a classical pianist performing a sonata for use in a local TV telethon. Using one broadcast camera, I shot the 5-minute performance 3 times, from 3 different angles. The grand piano was on a basketball court inside of a gymnasium (of all places). Luckily, I found a huge sheet of Styrofoam, which became the background for each camera angle. By moving the Styrofoam around, it gave the impression that the performance took place in a small room with white walls. I wasn’t about to ask a classical pianist to Sync to a recording! Fortunately, musical discipline allowed her to play at virtually the same speed each time. The audio that was recorded during the first angle was used as the Master audio during editing.
If you should ever send a music video to a show like America’s Funniest Home Videos, include a copy of the song on an audio cassette. The video and stereo audio will be transferred to broadcast videotape.
In addition to Camcorder Operator, you’ll also serve as Producer and Director, unless you wish to share these responsibilities with someone else. A Producer has total responsibility for the production, and should know every detail concerning the shoot. Try to anticipate potential problems, and be ready with alternate plans, if needed.
A Director accepts ideas from others, but makes the final decisions. Work closely with the performers, and discuss ideas and options. During the shoot, a Director is responsible for the composition of each shot as seen through the viewfinder. Similar to a sports coach or an orchestra conductor, the Director does whatever is necessary to get the maximum performance out of the performers. During editing, the Director decides where each edit will take place. Sometimes, a Director has to shout... or whisper.
Chapter 2 PRE-PRODUCTION PLANNING FOR SHOOTING AND EDITING
Only excerpts appear in this free trial. Topics in the full version include:
How To Find An Editing FacilityThe Easiest ApproachEditing Visuals In Sync With Vocals And MusicSource Footage And Take Defined
Reference AudioAudio For Scenes Before And/Or After The SongStereo Master AudioCountdownReference Audio PlaybackAudio Playback OperatorProduction AssistantsExtrasMore Shoot LocationsExtra LightingCamera MountsSnap ZoomLens FiltersPhrases A Director Uses During A ShootContinuityRenting An Industrial CamcorderCable TV Public Access OptionEquipment PhotosDiagram For Taping A Choir Performance
The next 3 chapters are for those who want to create an edited music video. Unless you have free access to equipment (like at school), you’ll have to go to a video editing studio, and pay an hourly rate for the equipment, and the person who pushes the buttons... the Editor. You’ll simply Direct the Editor to make the edits with the scenes that you’ve shot, and selected in advance.
To Edit The Visuals In Sync With Vocals And Music: The band will have to Instrument and Lip Sync several times to an audio recording of the song. This will allow the Camcorder Operator to shoot from different positions and/or locations. Unfortunately, the talent can’t play live, because the speed of the song would vary each time. During editing, it is of the utmost importance to have access to several different camera angles of the song being “performed” at exactly the same speed each time. The majority of the music videos that we see on TV are shot this way. When shooting instrument/lip sync scenes, the camcorder records visuals and Reference Audio, which is referred to during editing. Reference Audio will not appear on the Master videotape. During editing, and before each edit, the Reference Audio on the Source videotapes will be used to synchronize the Source video footage with the audio on the Master videotape.
* * *
This should eliminate any confusion about which Take to use when making a copy for the sync/shoot, or transferring the Master audio to the Master videotape before editing. If a second audio record machine is used for a same-day shoot/sync, also write down the counter numbers from that machine. If the Master deck and second deck aren't the exact

same type, make, and model, the counter numbers will be different. Once the best version of the song has been chosen, this will make it easy to find the starting point on the second audio machine. EXTRA EXTRA - In addition to band members, music videos often feature actors and actresses to help tell a story. You shouldn’t have any problem finding family members, relatives, and friends who will volunteer to be part of the action. However, be careful when selecting Extras! Don’t choose someone who is prone to being late!
Too Many Cooks Can Spoil The View - As soon as each Take is completed, play back the footage for review - either in the camcorder’s viewfinder or on a color TV. If using a TV, it’s a natural desire for the band to want to see it too, especially if they’ve never seen themselves on “TV” before. Unfortunately, this is when EVERYBODY becomes a Director, making comments and suggestions.
MORE LOCATIONS
When shooting with an audience, don’t make open invitations to “Come Be A Part Of Our Music Video Extravaganza”, or every troublemaker and rival band in town will show up. Try to hand-pick the audience, if possible. The audience won’t be needed for the entire shoot because they won’t be seen in every shot.
Temperature is another factor. When shooting outside in cold weather for an extended period, a nearby building or shelter will be welcome for periodic breaks. If it’s warm outside, the performers are likely to perspire. The hot and sweaty look is OK for some performers, but others will require extra time to cool down, and dry off. If AC power will be nearby, bring an electric fan, and a hair dryer. A nearby air conditioned building or vehicle also could come in handy.
During the shoot, make sure that no one trespasses onto private property. And don’t go barging into an airport, grocery store, shopping mall, or any public facility, unless you receive permission in advance. Some people and places disapprove of any type of camera, for security or competitive reasons.
Professional bands sometimes own or have access to Par, Spot, or Fresnel lights that can be used indoors or outside at night. Stage lights with Colored Gels can be used. The intensity of each light is usually controlled by a dimmer.
Plain flood lights are excellent, and available at local hardware stores. They’re also available in different colors (red, green, blue, etc.) for color lighting effects. A dimmer for each flood light could be used to create a basic light “show”. Photography bulbs (not flash bulbs) in the proper lamp could be used for regular lighting.
When shooting indoors, and automatic water sprinklers are present, MAKE SURE that the lights don’t get near the heat sensors. And be very careful when using sharp instruments to cut with. Power Requirements - Home video camcorders need either an AC power adapter or a rechargeable battery to operate. The convenience and portability of battery power is the

preferred way to go, especially for all hand-held camera work, and when shooting in more than one location.
Never assume (dangerous word) that the mere presence of an outlet guarantees that sufficient voltage is flowing to it. Older buildings and outdoor facilities are notorious for having patchwork repairs to at least one electrical outlet, and it’s usually the one that’s needed the most. An inexpensive circuit tester is available at most hardware stores, and outlets can be checked in advance.
* * *
Continuity - When shooting a scene with one camera from different angles, continuity means that the conditions existing in Take 1 should be recreated during the remaining Takes. As a result, it will simulate a multi-camera shoot.
As for the performance parts of a music video, there are 2 schools of thought about continuity: (1) Follow the normal rule of continuity; (2) Throw continuity out the window.
* * *
Shooting With An 8mm or Super-8mm Home Film Camera
Before home video cameras and camcorders were invented, “home movies” were shot with 8mm or Super-8mm motion picture film cameras. (Super means that audio can be recorded onto a magnetic strip on the film.) If you have some old, developed film footage - such as an adult performer filmed as a child - it can be transferred to videotape, and edited onvideotape.
I know that someone will have an old home movie film camera tucked away in the attic, and will want to experiment. There’s a certain risk with shooting film, as unlike videotape, film footage can’t be played back and reviewed, during the shoot. Improper adjustments or an eyelash in the camera gate could render the footage undesirable or worthless.
Standard motion picture film rolls at 24 frames per second, or FPS. A frame is a single picture. Ten seconds of normal film playback in a projector equals 240 pictures. Videotape records and plays back at 30 FPS. During editing, it’s possible to view one frame at a time on a video monitor. Ten seconds of videotape playback equals 300 individual pictures. Our brains are fooled into perceiving continuous movement through Persistence Of Vision. (Look under “Eye” in an encyclopedia.) Some professional l6mm/Super-l6mm and 35mm cameras are able to roll at 30 FPS, which is preferred when transferring film to videotape.
Home movie film footage (24 FPS) can be transferred to videotape (30 FPS). However, the 6-frame difference (1/5 of a second) makes it tough to sync visuals to vocals and music during editing. Therefore, the best approach is to shoot many random shots of the band members, have the film transferred to videotape, and edit without
regard to syncing the visuals to the vocals and music.
Chapter 3SCRIPTWRITING & STORYBOARDS
Only excerpts appear in this free trial. Topics in the full version include:
Beat Sheet StoryboardBlank Beat Sheet FormShot DescriptionsScene DescriptionsCamera AnglesCutFadeHeadroomTakeCutaway ShotsOverhead Maps For ShootingPlanning ShotsBeat Sheet ExampleTake SheetSlateAfter The ShootChecklist For The Shoot Take
A music video can be performance only, concept or some of both. A performance video is relatively simple to plan. A concept video can be either a literal or abstract interpretation of the lyrics. As a Director and Scriptwriter, it’s important to work closely with the band, and obtain their ideas.
Beat Sheet Storyboard
My Beat Sheet method makes it easy to work on the script, and find any place in the song. It will give everyone an idea of how the the clip will look before shooting begins. It will also save time during the edit session.
Since the audio of your video clip will be music, it will be nice to have something similar to a music Lead Sheet, for quick and easy reference. Musical notes aren’t needed, just the number of measures, and number of beats per measure.
Find someone who can read music, and let them read this page. If you can’t get a favor, it might cost a few dollars. Ask for a referral from a musical instrument store, choir director, or piano store.
Print this Chapter, and show them the Beat Sheet example below. Give them an audio cassette of the song, a copy of the lyrics, and photocopies of the Beat Sheet form.
A blank Beat Sheet is included in the full version of Music Video 101.

The Print function is also enabled, so you can print a copyof the e-Book for your own personal use.
When you receive the completed sheets, SAVE THEM! Make copies to write on. When working on the Beat Sheet, listen to parts of the song over and over again, if necessary. Use a pencil and eraser so that changes can be easily made.
CUT - When watching videotape playback, a Cut is an instant transition from one shot to the next. Editing involves the use of a Cuts-Only editing system, which can play back only one Source tape at a time. Editing with this type of system is simply a matter of copying shots - one at a time - from the Source tapes onto the Master videotape. A Cut is the point where one shot ends, and the next one begins.
Note: During a Take, a Director may see or hear a problem and yell, "Cut!" to stop the action.
During the shoot, each Take should be given a number. Every time you move to a new Camera Position, start with Take 1. Due to mistakes or miscues, each Camcorder Position may require multiple Takes.
The previous examples represent plenty of Source footage. The actual number of Camera Positions and Takes will depend on the number of performers, and the band’s layout on stage. If the video will be performance and concept, you won’t need as much performance footage.
* * *
TAKE SHEET
A Take Sheet is like a scorecard that’s filled out as the shoot is in progress. It’s important

for someone to keep accurate Take Sheets during the shoot, as you’ll save time when searching for shots during editing. Make sure that the person in charge of keeping the Take Sheet is not distracted. If necessary, one Production Assistant could serve as Audio Playback Machine Operator, and take care of the Slate and Take Sheet, during the shoot.
A blank Take Sheet is included in the full version of Music Video 101.The Print function is also enabled, so you can print a copy
of the e-Book for your own personal use.
After the shoot, make a copy of the Source footage onto another videocassette. Use the copy for review at home. Save the Master Source tape for editing.
During editing, you’ll tell the Editor that you’re looking for a shot - let’s say Camera Position 4, Take 2 - and it should be easy to find. You’ll be able to search the Source tape forwards and backwards, and see the footage played back on a video monitor. Refer to the Slates at the beginning of each Take to find the correct Camera Position and Take number.
Chapter 4BASIC EDITING
Only excerpts appear in this free trial. Topics in the full version include:
Video-Only Insert EditsCuts-Only EditingFrames Per Second (FPS)Control TrackCrystal BlackSlateCreditsElements Appearing On The Master VideotapeAudio-Only Insert EditSafety MasterVideo-Only Insert EditIn PointPrerollEditing With The Cuts-Only SystemEquipment PhotosPausing A VCRFreeze-FrameEditing Random Shots Without Syncing Visuals To Vocals and MusicEditing In Sync With Vocals and MusicDigital Displays On The Edit ControllerProgramming The In Points and Out PointsPreview
VCR SlippingEditing Off The DownbeatMaking The First Edit In Sync With Vocals and MusicFading From BlackTime EstimatesEditing ChecklistComputer Special EffectsThe Least Expensive Broadcast Editing Options"Ballpark" Cost EstimatesTape StockDissolveA/B RollMixTime CodeRecommended Reading
This chapter is for those who want to go to a video editing studio, and pay an hourly rate for the equipment, and the person who pushes the buttons... the Editor. You should simply direct the Editor to make the edits with the shots that you’ve already selected on the Beat Sheet. To save time at the session, let the Editor read this Chapter in advance.
FRAMES PER SECOND (FPS) - A frame is a single picture. Videotape records and plays back at 30 FPS. During editing, it’s possible to view one frame at a time on a video monitor. Ten seconds of videotape playback equals 300 individual pictures. Our brains are fooled into perceiving continuous movement through Persistence Of Vision. (Look under “Eye” in an encyclopedia.)
BLACK - Before editing begins, Crystal Black must be recorded onto the Master videotape. When watching the playback of a Blacked tape, all you’ll see is a black screen on the video monitor. Different shots will be electronically joined together in sequence by making Insert edits - one at a time - onto the Master videotape. In order for the Edit/Record VCR to make an Insert edit, it needs Control Track for reference. Recording Crystal Black onto the Master videotape provides the necessary Control Track.
Save The Source Tapes! Who knows? In the future, you may decide to use a better editing facility, or transfer the footage to broadcast tape and edit. Store them in a safe place, and don’t play them at home. Make a copy for review or amusement at home.
Proper storage of the Master tape is essential. For added protection, buy a plastic cassette case that completely encloses the cassette. And you may wish to do the same with the Source tapes.
It’s common to make a Safety Master copy when editing is complete. This is simply a copy of the Master tape, which should be stored in a safe place, and never played. (Except for the once-a-year playback.) It will become the new Master, if the original Master videotape ever gets damaged or lost.
Both the Playback and Edit/Record VCRs can play back audio and video. As a
tape is being played back at normal speed, the Edit Controller allows the Editor to Pause either VCR, at any time. Pausing a VCR will produce a freeze-frame on its monitor. Once a VCR has been paused, the tape can be searched either forwards or backwards in order find a particular shot. The speed of the search is variable, from as slow as one frame at a time (Jog), to very fast (Shuttle).
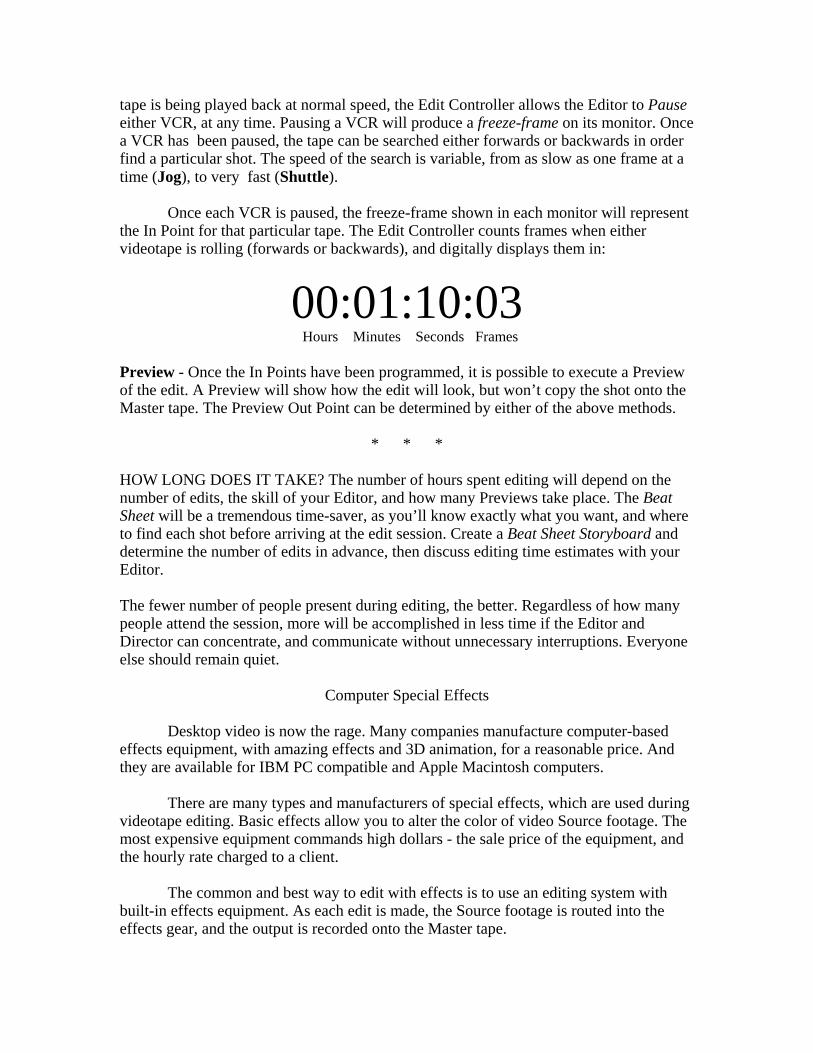
Once each VCR is paused, the freeze-frame shown in each monitor will represent the In Point for that particular tape. The Edit Controller counts frames when either videotape is rolling (forwards or backwards), and digitally displays them in:
00:01:10:03 Hours Minutes Seconds Frames
Preview - Once the In Points have been programmed, it is possible to execute a Preview of the edit. A Preview will show how the edit will look, but won’t copy the shot onto the Master tape. The Preview Out Point can be determined by either of the above methods.
* * *
HOW LONG DOES IT TAKE? The number of hours spent editing will depend on the number of edits, the skill of your Editor, and how many Previews take place. The Beat Sheet will be a tremendous time-saver, as you’ll know exactly what you want, and where to find each shot before arriving at the edit session. Create a Beat Sheet Storyboard and determine the number of edits in advance, then discuss editing time estimates with your Editor.
The fewer number of people present during editing, the better. Regardless of how many people attend the session, more will be accomplished in less time if the Editor and Director can concentrate, and communicate without unnecessary interruptions. Everyone else should remain quiet.
Computer Special Effects
Desktop video is now the rage. Many companies manufacture computer-based effects equipment, with amazing effects and 3D animation, for a reasonable price. And they are available for IBM PC compatible and Apple Macintosh computers.
There are many types and manufacturers of special effects, which are used during videotape editing. Basic effects allow you to alter the color of video Source footage. The most expensive equipment commands high dollars - the sale price of the equipment, and the hourly rate charged to a client.
The common and best way to edit with effects is to use an editing system with built-in effects equipment. As each edit is made, the Source footage is routed into the effects gear, and the output is recorded onto the Master tape.
BROADCAST EDITING
I know that some readers (like professional musicians) will want to shoot with a home camcorder, and edit with broadcast equipment.
The least expensive broadcast tape formats for editing include Super-VHS and 3/4” (three-quarter inch). Specify broadcast videotape and VCRs, as Super-VHS and 3/4” are also available in Industrial formats. For better quality at a higher price, use Betacam, 3/4” SP, or better yet, Betacam SP tapes and VCRs.
* * *
Recommended Reading
This section is now online, and includes new information and updates. It's available in the full version.
* * *
Beat Sheet Storyboard from MUSIC VIDEO 101 - TIMTV.com
A blank Beat Sheet is included in the full version of Music Video 101
The Print function is also enabled, so you can printa copy of the e-Book for your own personal use.
* * *
Take Sheet from MUSIC VIDEO 101 - TIMTV.com
Artist_______________________ Date__________ Sheet ___ Of ___
Song_______________________________ Tape______
A blank Take Sheet is included in the Full version of Music Video 101

* * *
How To Order:MUSIC VIDEO 101 e-Book
System Requirements: Windows 95/98/Me/NT/2000/XP
Mac Users! Coming Soon... Adobe PDF version! Adobe Acrobat 5.0 and later required
Get It Now Download Version (Windows) - $5 (US) - - CD-R Disk - $8 postpaid (US)
Satisfaction Guaranteed Or Your Money Back!
In the full version, the Print function is enabled, so you can print a copy of the e-Book for your own personal use. It also includes access to the Update Web page, with new information.
CD-R Disk Version - $8 (US)Order the Music Video 101 e-Book on a CD-R disk! The price is $8 postpaid, by PayPal, check or money order. (At this time, the CD-R offer is only available for delivery within the USA.) It is available by mail order from:
TIMTVPO Box 2251
Douglasville GA 30133
Library, school and church Purchase Orders welcome!
The price includes First Class shipping and handling. No C.O.D. orders accepted. If you would like to order the CD-R disk by credit card with PayPal, write to [email protected] and we'll send you an invoice.
Download Version - $5 (US) - Windows only!There are 2 ways to order:
(1) Online by credit card with Amazon.com or PayPal and download it instantly!
TIMTV.com/order
http://www.timtv.com/order
(2) Mail - Check or money order, and receive your e-Book by E-mail attachment. Send $5.00 (US Funds) along with your E-mail Address, payable to:
TIMTVPO Box 2251
Douglasville GA 30133USA
Your e-Book will be sent by E-mail within 5-7 business days after receipt of your order. Foreign orders: Please use an International Money Order, payable in US FUNDS!
* * *Customer Service - write to: [email protected]
TIMTV.com Privacy Statement: Your information will not be shared with anyone!
Copyright © 2001-2005 Timothy Dwelle. All Rights Reserved.
TIMTV.comhttp://www.timtv.com
MUSIC VIDEO 101 Home Camcorder Production
Free Trial Version
Copyright © 1993, 2000, 2003, 2005 Timothy Dwelle