Murphy’s Vinyl Fence Laws - Amazon S3 · 2018-01-23 · Murphy’s Vinyl Fence Laws Welcome to...
39
REALLY Murphy’s Vinyl Fence Laws Important stuff to know about installing your WamBam fence. 1-877-778-5733 www.wambamfence.com V-01.18 “How to Fight with Murphy ...and WIN!” CLEVER JOE - Your Installation Buddy
Transcript of Murphy’s Vinyl Fence Laws - Amazon S3 · 2018-01-23 · Murphy’s Vinyl Fence Laws Welcome to...

REALLY
Murphy’s Vinyl Fence Laws
Important stuffto know aboutinstalling your
WamBam fence.
1-877-778-5733www.wambamfence.com
V-01.18
“How to Fight with Murphy...and WIN!”
CLEVER JOE - Your Installation Buddy

Murphy’s Vinyl Fence Laws
Welcome to the World of WamBam...........................................................................11 - How do I determine whether or not my fence line has a slope?...............................22 - How do I deal with sloping ground?.....................................................................2 • Stepped Fence Considerations.............................................................................3 • Sloped Fence Considerations..............................................................................43 - How do I determine if obstructions exist underground?..........................................64 - How do I deal with rocks and other underground obstructions?..............................7 • Option One - Core Drilling.................................................................................7 • Option Two - Surface Mount...............................................................................8How about ground that has been backfilled...............................................................7 5 - How do I deal with extremely hard or dry ground?...............................................11 • Option One - Use Water to Loosen Soil..................................................................11 • Option Two - Use Concentrated Water to Loosen Soil...........................................11 • Option Three - Use High Pressure Water to Loosen Soil..........................................12 • Option Four - Pre-Drill a Pilot Hole in the Ground................................................126 - How do I deal with loose or disturbed soil?..........................................................13 • Option One - Install Metal Post Stabilizers.............................................................13 • Option Two - Install a traditional concrete footing around your anchor..................14 • Option Three - Use Styrofoam filler around your anchor......................................15 • Option Four - Compact the soil around the anchor..............................................167 - How do I compensate for anchors that have been pounded in severely crooked?....18 • Option One, Two, Three........................................................................................18 • Option Four - How to remove a crooked anchor..................................................19 • Option Five - How to straighten a crooked anchor..............................................208 - How do I mount my posts to a concrete or wood surface?.....................................21 • Option One - Install Surface Mounts......................................................................21 • Option Two - Core Drill Directly Through the Conrete............................................22 • Option Three - Chain Drilling to Create a 2” Hole in Concrete...............................239 - How do I equalize my fence sections to fit my overall fence run?...........................2410 - How do I trim down or extend my fence panel for a custom fit if necessary?........2511 - How do I deal with low hanging roof lines?......................................................2712 - How do I deal with angles in my fence line?......................................................2913 - How do I close a gap between my first post and my wall?..................................3014 - Installing a Gate Without a Gate Jig.................................................................3115 - Installing a Surface Mount on a Wooden Deck..................................................3216 - Warnings on Using Manual Post Pounder..........................................................33Tips & Tricks on Using the Post Pounder....................................................................35More Tips & Tricks.................................................................................................37
Page
TABLE OF CONTENTS

Murphy’s Law is an old adage that basically means “anything that can go wrong, generally does”. Unfortunately, because we live on planet earth (and not in heaven) it applies to both you and I. Another old saying goes like this, “fail to plan, plan to fail”. Please take the time to plan your fence project. Walk your fence line. Re-walk your fence line. Planning around potential problems before you get to them allows for options and no unpleasant surprises. If you don’t see any obvious problems, you are not home free. Odds are that you could run into some obstructions under the ground, such as rocks, utilities or otherwise. If you are able to complete your fence project without running into one snag oranother, be grateful!
Welcome to the World of
WamBam
For installation videos and more information, visit www.wambamfence.com
Howdy again! I’m assuming that you’ve read over your specific fence and gate instructions before getting this far. If not, please do so.
My intent with the following information is to try and help you foresee some of the possible problems you may encounter with your fence project. After almost twelve years of installing fence the WamBam way, I’ve seen almost every scenario under the sun. Emphasis on “almost”. Solutions to the most common problems I’ve encountered are outlined in the following pages. If you have a unique problem that we do not cover, please feel free to call us. We’d love to hear from you!
1
Joe’sTipA Word From Clever Joe
What’s Murphy’s Law?
One Last WordI have built this information around installing a typical privacy fence. You may be installing a different fence style. The principles (with a few more or less nuances) are the same for every fence.All right…let’s go!
To read more about my story, visit our website.

For installation videos and more information, visit www.wambamfence.com 2
Run a level string line from the start to the �nish of your fence line. This will help you understand how much of a fall yourfence line has. You will need to compensate for this di�erence in height either equally throughout your fence panels, or whatever is most visually pleasing to you.
Murphy’s Vinyl Fence Laws
How do I determine whether or not my fence line has a slope?
-1-
If slope is greater than 10 degrees, please order large anchors regardless of your fence style. To determine rise height: height/length = rise per inch / rise x 12 = rise per foot
Height
Length
Measure to determine your slope before purchasing your posts (or anchors).
Often the ground slope of your fence line will be much greater than
you think it is.
STEPPED
There are two ways to tackle a fence line with ground that slopes either up or down. You can step or slope your fence as illustrated below, or on the next page. Because no other man-made vertical element in your backyard is generally installed with a noticeable slope, neither should your fence. However, this is just my personal preference. Yours may be di�erent. The exception is the Even Stephen and Simple Simon fence styles. They should be only installed using the slope method �owing up or down with the changes in your elevation. For all other vinyl fence styles, keeping the top of your fence level generally takes a little more installation time and is a little more costly (you need to order the next longer post size up), but the overall e�ect is more pleasing to the eye.
How do I deal with sloping ground?-2-
Please order longer posts to accommodate this style of fence installation,and large anchors regardless of your fence style chosen.
A
Your fence rails will remain horizontal for all fence sections, and you will need to purchase extended posts.

For installation videos and more information, visit www.wambamfence.com 3
Murphy’s Vinyl Fence Laws
SLOPEDB
Stepped Fence Considerations
X
Your transition in a stepped fencedesign from one panel of fence tothe next should look similar to this.
X
Your fence rails will remain horizontal for all fence
sections, and you will need to purchase extended posts.
BA C
You will need to trim down your posts length (because you’ve ordered extra long posts) either as you install your fence (see illustrations below), or leave them all randomly high and trim at completion. See tips on how to cut vinyl at the back of this guide.
Trim downas necessary

For installation videos and more information, visit www.wambamfence.com 4
At the higher ground, keep the bottom rail either as close to the ground as possible, or even bury it down a few inches. This will help keep the gap on the bottom rail at the lower ground as minimal as possible. Once your fence is complete, you can “feather in” back�ll dirt to minimize the gap between the bottom rail and the ground.
Murphy’s Vinyl Fence Laws
For small angles, no trimming needs to be done to the panel.
D
If you choose to go with the slope method, you need to be aware of the following potential con�icts. If your slope is severe (greater than 10 degrees) you will need to angle cut your rails and the top and bottom of your fence boards (on certain styles only) to �t and function properly.
A
You may fill in remainingspace with dirt per
your discretion.
Sloped Fence Considerations

For installation videos and more information, visit www.wambamfence.com 5
Murphy’s Vinyl Fence Laws
Rail holes will have to be enlarged for extreme slopes.
If you use the slope method to install the Jiminy Picket, Nervous Nelly, or the Peeping Tom Fence, you may need to enlarge the holes on the bottom of the top fence rail. This will allow your pickets to remain vertical while your rails are sloped. These holes already come enlarged for moderately sloped fence lines. You can use a rat tail �le to accomplish this rather quickly.
For severe angles, mark angle on top and bottomand cut accordingly.
Trim panels accordingly to fit between top and bottom rails.
B
D
C
Trim open picket style from both ends of horizontal rails to fit spacing between posts.This will ensure equalized spacing between first picket and post, and the last picket and the post.
For installation videos and more information, visit www.wambamfence.com 6
Murphy’s Vinyl Fence Laws
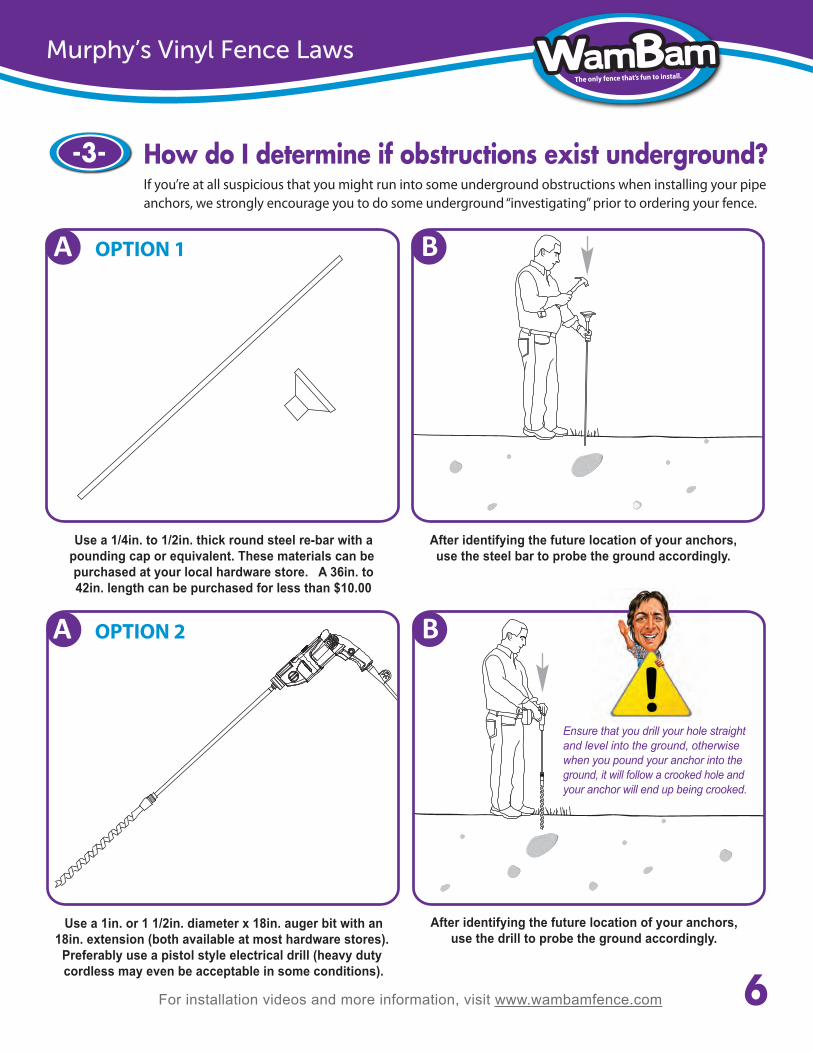
How do I determine if obstructions exist underground?-3-If you’re at all suspicious that you might run into some underground obstructions when installing your pipeanchors, we strongly encourage you to do some underground “investigating” prior to ordering your fence.
A B
Use a 1/4in. to 1/2in. thick round steel re-bar with apounding cap or equivalent. These materials can be purchased at your local hardware store. A 36in. to42in. length can be purchased for less than $10.00
After identifying the future location of your anchors,use the steel bar to probe the ground accordingly.
A B
Use a 1in. or 1 1/2in. diameter x 18in. auger bit with an18in. extension (both available at most hardware stores).
Preferably use a pistol style electrical drill (heavy duty cordless may even be acceptable in some conditions).
After identifying the future location of your anchors,use the drill to probe the ground accordingly.
Ensure that you drill your hole straight and level into the ground, otherwise when you pound your anchor into the ground, it will follow a crooked hole andyour anchor will end up being crooked.
OPTION 2
OPTION 1
For installation videos and more information, visit www.wambamfence.com 7
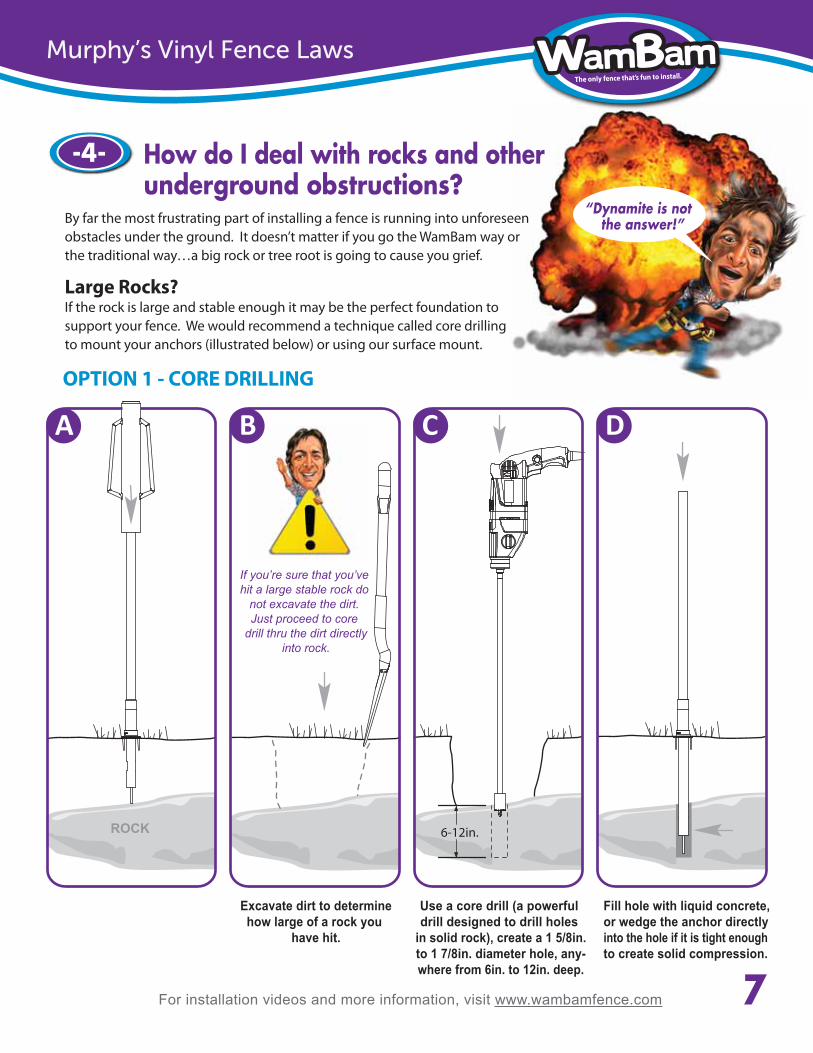
By far the most frustrating part of installing a fence is running into unforeseen obstacles under the ground. It doesn’t matter if you go the WamBam way or the traditional way…a big rock or tree root is going to cause you grief.
Large Rocks?If the rock is large and stable enough it may be the perfect foundation to support your fence. We would recommend a technique called core drilling to mount your anchors (illustrated below) or using our surface mount.
Murphy’s Vinyl Fence Laws
How do I deal with rocks and other underground obstructions?
-4-
A
“Dynamite is not the answer!”
B C D
Excavate dirt to determinehow large of a rock you
have hit.
Use a core drill (a powerful drill designed to drill holes
in solid rock), create a 1 5/8in.to 1 7/8in. diameter hole, any-where from 6in. to 12in. deep.
Fill hole with liquid concrete, or wedge the anchor directlyinto the hole if it is tight enoughto create solid compression.
ROCK 6-12in.
OPTION 1 - CORE DRILLING
If you’re sure that you’ve hit a large stable rock do
not excavate the dirt. Just proceed to core
drill thru the dirt directlyinto rock.

For installation videos and more information, visit www.wambamfence.com 8
Murphy’s Vinyl Fence Laws
Using a hammer drill, create the holes necessary for the anchors. You may want to enlarge the holes on the base plate and use expanding bolts to create a stronger
connection than the regular fasteners included.
A
OPTION 2 - SURFACE MOUNT
Use the leveling donuts to compensate for anycrookedness that still exists in the anchor shaft.
Level surface mount with galvanized washers.
B C
D E

Use your pounder upside down to
tamp your backfill.
For installation videos and more information, visit www.wambamfence.com 9
Small Rocks?Your anchor will penetrate smaller intermittent stones (less than 1 inch) with relative ease. For larger rocks, dig them out of the way much in the same way if you were installing a traditional fence footing. Depending how far they are under the surface will determine if you can back�ll with granular material (gravel that will compact) and re-drive your anchor into the ground.
Murphy’s Vinyl Fence Laws
A B C
You may need to excavate and dig out thesmall rocks to gain penetration.
Backfill with material (dirt or gravel) that will compress
tightly around the anchor and provide adequate stabilization.
Tree Roots?The blade on the bottom of the anchor is designed to slice through tree roots up to about 2in. in diameter. For larger tree roots either relocate the anchor (if possible) or excavate and cut out the section of o�ending root.
Try to remove and relocateyour anchor 1 or 2 inches closer (not further!), to the previous anchor to avoid
small obstructions.
TREE ROOTS

For installation videos and more information, visit www.wambamfence.com 10
Murphy’s Vinyl Fence Laws
TopsoilFieldstone or SimilarIncongruous Material
Our system is ideally designed for virgin soil like clay. Underground pockets of air created by incongruous materials will not provide enough structural integrity for our pipe anchors.
If you ground has been back�lled with clean �ll, but has not been mechanically compacted or given enough time to settle, this could pose problems as well. In these cases we would recommend you dig traditional concrete footings.
What about ground that has been backfilled?If your ground has been back�lled with chunks of concrete, �eld stone or any other materials that can create air pockets under the ground, the WamBam system is not the way to go.

11
Murphy’s Vinyl Fence Laws
How do I deal with extremely hard or dry ground?-5-OPTION 1 - Use Water to Loosen Soil
Pound anchor into groundas far as possible.
Fill anchor to the top with water and let sit until water
is completely drained.
A B C
Continue to pound anchor into ground and repeat steps at
separate intervals as needed.
Let a garden hose run for a minimum of 5 to 10 minutes over the spot you intend to pound your anchor into.
Doing this the day beforewill allow time for the water to thoroughly saturate your ground.
Outlined below are some additional things you can do if you still �nd pounding your anchor is going too slow.
OPTION 2 - Use Concentrated Water to Loosen Soil
12
Murphy’s Vinyl Fence Laws
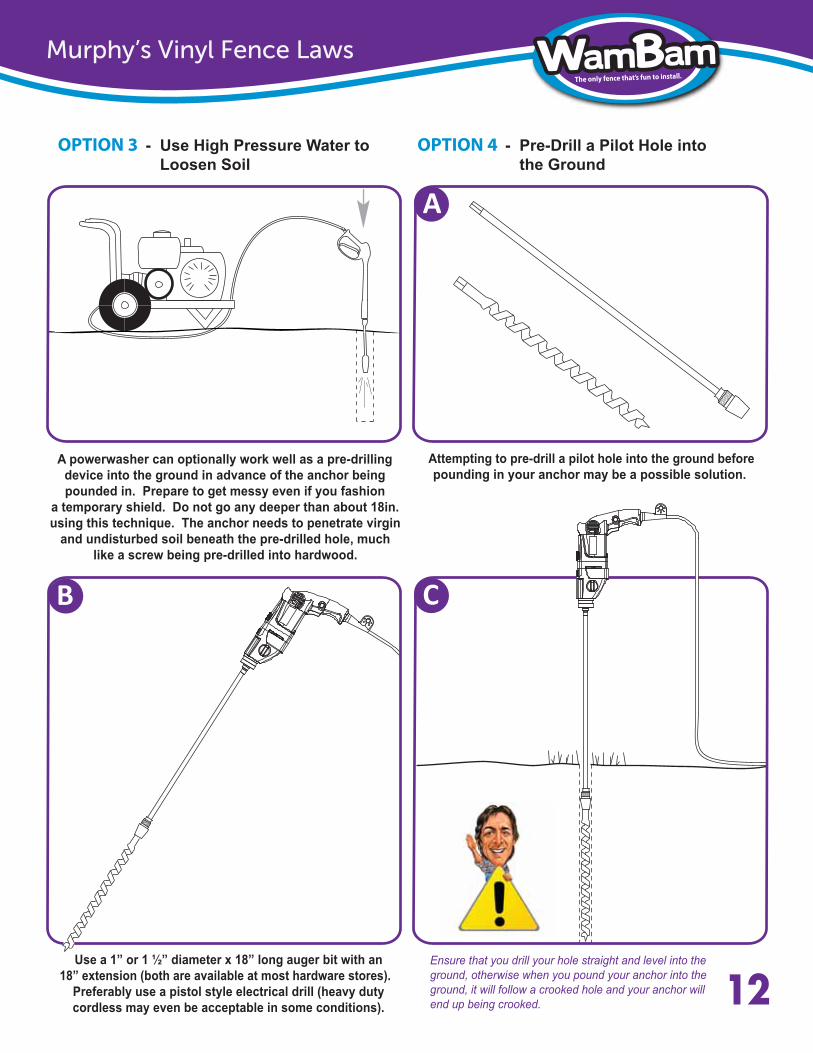
Attempting to pre-drill a pilot hole into the ground before pounding in your anchor may be a possible solution.
A
OPTION 4 - Pre-Drill a Pilot Hole into the Ground
A powerwasher can optionally work well as a pre-drilling device into the ground in advance of the anchor being pounded in. Prepare to get messy even if you fashion
a temporary shield. Do not go any deeper than about 18in. using this technique. The anchor needs to penetrate virgin
and undisturbed soil beneath the pre-drilled hole, much like a screw being pre-drilled into hardwood.
OPTION 3 - Use High Pressure Water to Loosen Soil
CB
Use a 1” or 1 ½” diameter x 18” long auger bit with an18” extension (both are available at most hardware stores).
Preferably use a pistol style electrical drill (heavy dutycordless may even be acceptable in some conditions).
Ensure that you drill your hole straight and level into the ground, otherwise when you pound your anchor into the ground, it will follow a crooked hole and your anchor will end up being crooked.

For installation videos and more information, visit www.wambamfence.com 13
Your pipe anchors, even when driven to the recommended depths of 36 inches AND 42 inches, will have a wind load resistance problem if the ground around them is unstable. If your entire fence line is located in loose or extremely loamy conditions, you can install our fence system much like you would if you were installing a traditional fence with concrete footings. Unfortunately you did not purchase our fence to do that. You wanted to avoid drilling, digging, cementing etc. However, maybe in the course of installing your fence, you’ve run across a few occasional spots in your fence line that have shifty soil conditions. The following illustrations outline three options to overcome those isolated spots.
Murphy’s Vinyl Fence Laws
How do I deal with loose or disturbed soil?
-6-
OPTION 1
Insert the three legs on the AnchorPositioner into the three holes on
the Metal Post Stabilizer.
Identify location and insert flushinto the ground using hand force.
A B
Install Metal Post Stabilizers (purchase separately).
6”
6”
6”

14
Murphy’s Vinyl Fence Laws
OPTION 2
Dig hole 8 inches in diameter by 30 inches deep.
Pour 3 to 5 bags of pre-mixed concrete into the hole and
install your anchor.
BA C
Install a traditional concrete footing around your anchor.
8in.
30in.
DC E
Once position is identified insert your anchor and begin to pound into place.
Remove 1” to 4” of soil underneath the unit
Ensure the entire unit is stompedtightly into the ground. Use hammeron exposed metal edges if required.

For installation videos and more information, visit www.wambamfence.com 15
Murphy’s Vinyl Fence Laws
OPTION 3
WamBam your anchor into the suggested depth, either 36in. or 42in deep.
BA C
Use Styrofoam filler around your anchor.
Cut 1 or 2in. Styrofoam into 12in. x 12in. square blocks and cut 1 5/8in. hole in the center.
Fill in the last 3in. or 4in. with backfilled dirt.
ED F
18in.
12in.
12in. 12in.
Remove anchor positioner and dig around the anchor a minimum of 18in. deep x 12in. square hole.
(Purchase large Styrofoam sheets from BigBox store)
Load Styrofoam blocks over the anchor down into the bottom of the hole.
Cut opening for hole tight to theanchor to create compression. A sloppy hole will create problems.
Use your pounder upside down to
tamp your backfill.

For installation videos and more information, visit www.wambamfence.com 16
Murphy’s Vinyl Fence Laws
OPTION 4Compact the Soil Around the Anchor
Ensure the ground around the anchor is moist to accelerate compaction
Add additional soil in a 10” to 12” diameter circle as necessary around the anchor.
Flip the post driver upside down to use as a compaction tool. A spud bar flipped upside down also works as a great compaction tool.
A B
C D
E F
For installation videos and more information, visit www.wambamfence.com 17
Murphy’s Vinyl Fence Laws
G H
I J
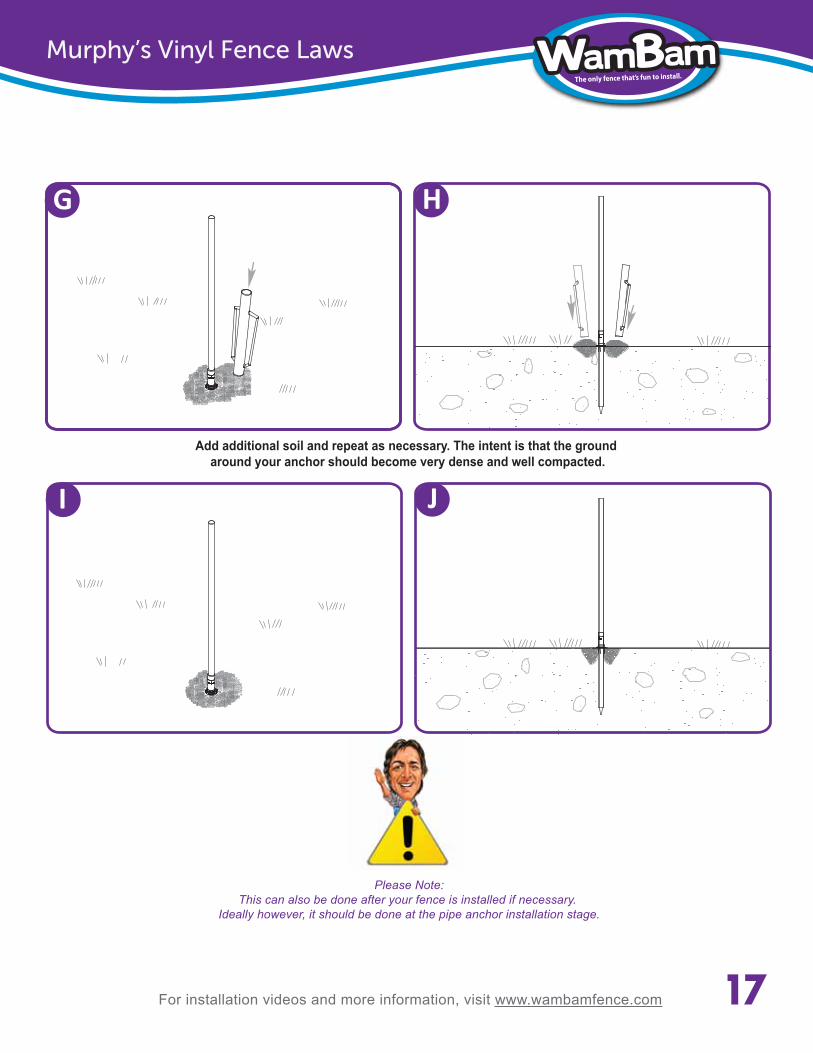
Add additional soil and repeat as necessary. The intent is that the ground around your anchor should become very dense and well compacted.
Please Note:This can also be done after your fence is installed if necessary.
Ideally however, it should be done at the pipe anchor installation stage.

18
If your leveling donut will not allow for compensation of a severely crooked anchor, then you have at least three options:
Murphy’s Vinyl Fence Laws
How do I compensate for anchors that havebeen pounded in severely crooked?
-7-
OPTION TWO
BA C
A B
Continue to pound the anchor deeper into the ground than what we typically recommend. This corrective ability of your leveling donut is amplified the closer it gets to the Anchor Positioner.
OPTION ONE
16in. minimum
Use your pounder upside down, like a sledgehammer,
as necessary.
A
If the ground that your anchor has been driven into is tight, you may be able to bend the anchor as illustrated to compensate. Slip your pounder down over the anchor about 3 to 4 inches. Use theleverage in the pounder to bend your anchor into straight position. The integrity of your anchor will be slightly compromised, but willstill perform acceptably.
BOPTION THREE
Remove WamBam donut. Screw post into top of anchor.
This technique should be usedin isolated events. In other words,
do not correct back to backanchors using this technique or you may compromise the integrityof your fence panel’s resistance
to heavy winds, etc.

6”
14”
For installation videos and more information, visit www.wambamfence.com 19
Murphy’s Vinyl Fence Laws
OPTION 4How to Remove a Crooked Anchor
Using one or two pipe anchors (two people)force the pipe up and out of the ground.
A
C
D
E
Drill a 1/4” to 1/2” diameter hole directly thru the pipe about 7” up from the ground.
Insert a steel bolt or peg about 6” to 14” long.
1/4” to 1/2”DIA
B

For installation videos and more information, visit www.wambamfence.com 20
Murphy’s Vinyl Fence Laws
OPTION 5How to Straighten a Crooked Anchor
A B
C D
E
Moisten the soil around your anchor. Add soil on the offending side of the anchor.
Compact soil using post pounder flipped upside down. A spud bar flipped upside down can also work really well.
Repeat as necessary until you have forcedthe bottom of the anchor into level.

www.wambamfence.com 21
Murphy’s Vinyl Fence Laws
How do I mount my posts to a concrete or wood surface?-8-
Any WamBam vinyl fence can be mounted to a wood, or concrete
surface using our surface mounts.
A B
C
Use concrete screws included, and hammer drill(if concrete surface) to drill and mount.
Leveling donuts can be adjusted to compensate for uneven mounting surfaces(see fence or gate instructions).
D

Murphy’s Vinyl Fence Laws
22
OPTION 2 - Core Drill Directly Through Concrete
Use a core drill to create a 2in. diameter hole directlythrough the concrete.
A B
Trim Anchor Positioner along bottom edge.
C D
Pound anchors through holes in concrete to a depthof approx 36in. or 42in.
If necessary, see fence instructions for more information on how to install anchors, adjust leveling donuts and install vinyl posts.
See next page for another option for drilling thru concrete.
Murphy’s Vinyl Fence Laws
23
A
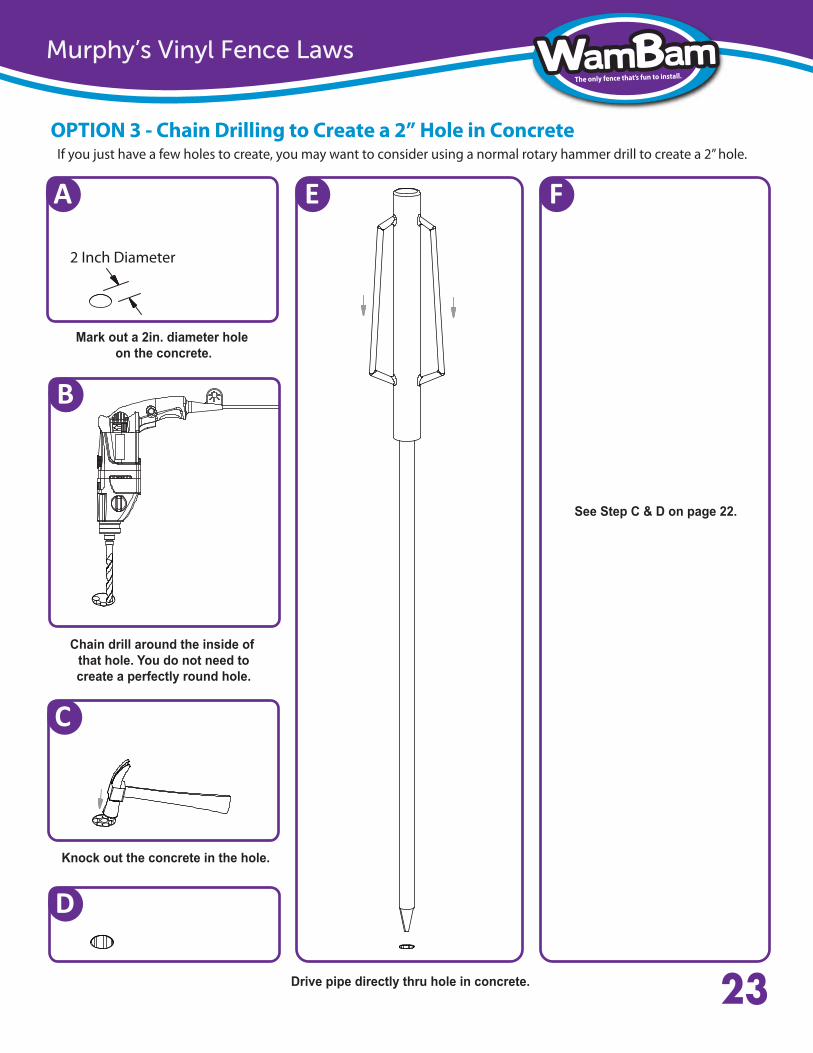
OPTION 3 - Chain Drilling to Create a 2” Hole in Concrete If you just have a few holes to create, you may want to consider using a normal rotary hammer drill to create a 2” hole.
2 Inch Diameter
Mark out a 2in. diameter hole on the concrete.
Chain drill around the inside of that hole. You do not need tocreate a perfectly round hole.
Knock out the concrete in the hole.
Drive pipe directly thru hole in concrete.
See Step C & D on page 22.
B
C
D
E F

For installation videos and more information, visit www.wambamfence.com 24
Very rarely will your fence sections all �t perfectly into your fence line. You have three options. You must consider these three options before installing your �rst anchor.
Murphy’s Vinyl Fence Laws
How do I equalize my fence sections to fit my overall fence run?
-9-
A
This is the most pleasing to the eye way to equalize your fence sections. It also is the most work as you will need to trim every panel down in length. If you take pride in what you do,and have the time, this is the way most professional companies would tackle your project.
BEST
B
Trimming down both end panels is an acceptable way to equalize your fence panels. This will minimize having one panel stand out like a sore thumb.
ACCEPTABLE
C
This is not the ideal situation, but this method provides for the least amount of work and the least amount of waste. Professionals typically would not install your fence this way.
ACCEPTABLE

Murphy’s Vinyl Fence Laws
How do I trim down or extend my fence panelfor a custom fit if necessary?
-10-
Measure distance between postsand cut to the measured length.
Measure both top and bottom rail to ensureboth are the same length before cutting.
A B
Trim last panel as needed to fit within the posts and rails.
C
X
X
For installation videos and more information, visit www.wambamfence.com 25
D

For installation videos and more information, visit www.wambamfence.com 26
Murphy’s Vinyl Fence Laws
E
Sleeve over your wood blocking by using the same size extruded vinyl. If you do not haveany left over waste, please call us as we may be able to help you with finding a solution.
If your anchors inadvertently were spaced too far apart, you can extend yourhorizontal rails using wood blocking cut to fill the void in the extruded cavity
HF
G
27
Murphy’s Vinyl Fence Laws
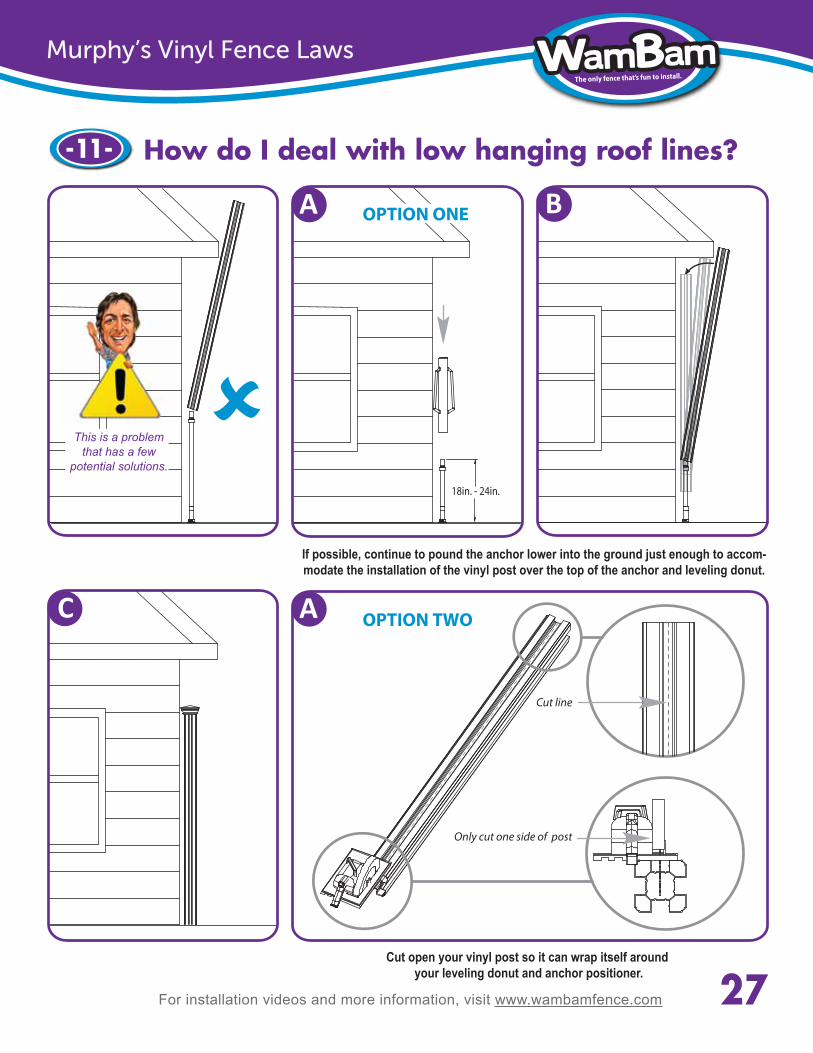
How do I deal with low hanging roof lines?-11-
If possible, continue to pound the anchor lower into the ground just enough to accom-modate the installation of the vinyl post over the top of the anchor and leveling donut.
A B
18in. - 24in.
Cut line
Only cut one side of post
Cut open your vinyl post so it can wrap itself around your leveling donut and anchor positioner.
AC OPTION TWO
For installation videos and more information, visit www.wambamfence.com
OPTION ONE
This is a problem that has a few
potential solutions.

28
Murphy’s Vinyl Fence Laws
Cut open your vinyl post so it can wrap itself around your leveling donut and anchor positioner.
For installation videos and more information, visit www.wambamfence.com
Cut down a piece of wood tofit inside of your post.
Cut a second piece of wood to fit between post and wall. Leave
enough space for post cap to fit.
OPTION THREE
B C
A B C
Screw outer piece of wood to wall first.
Secure in place as necessary.

29
Murphy’s Vinyl Fence Laws
For installation videos and more information, visit www.wambamfence.com
Secure in place as necessary.
How do I deal with angles in my fence line?-12-
Mark angle and post channel cornerto cut on top and bottom rail
according to your fence angle.
Insert wood into the end of the rail. This will create a strong connection between the rail and the post because your screw will have more to bite into other than one vertical wall surface on your rail.
Cut on marked lines previously madeon both top and bottom rails.
BA C
E
Wood inserts
D
OPTION 1
OPTION 2Separately Purchase a Universal Angle Kit Helper. See our website for more details.
30
Murphy’s Vinyl Fence Laws
For installation videos and more information, visit www.wambamfence.com
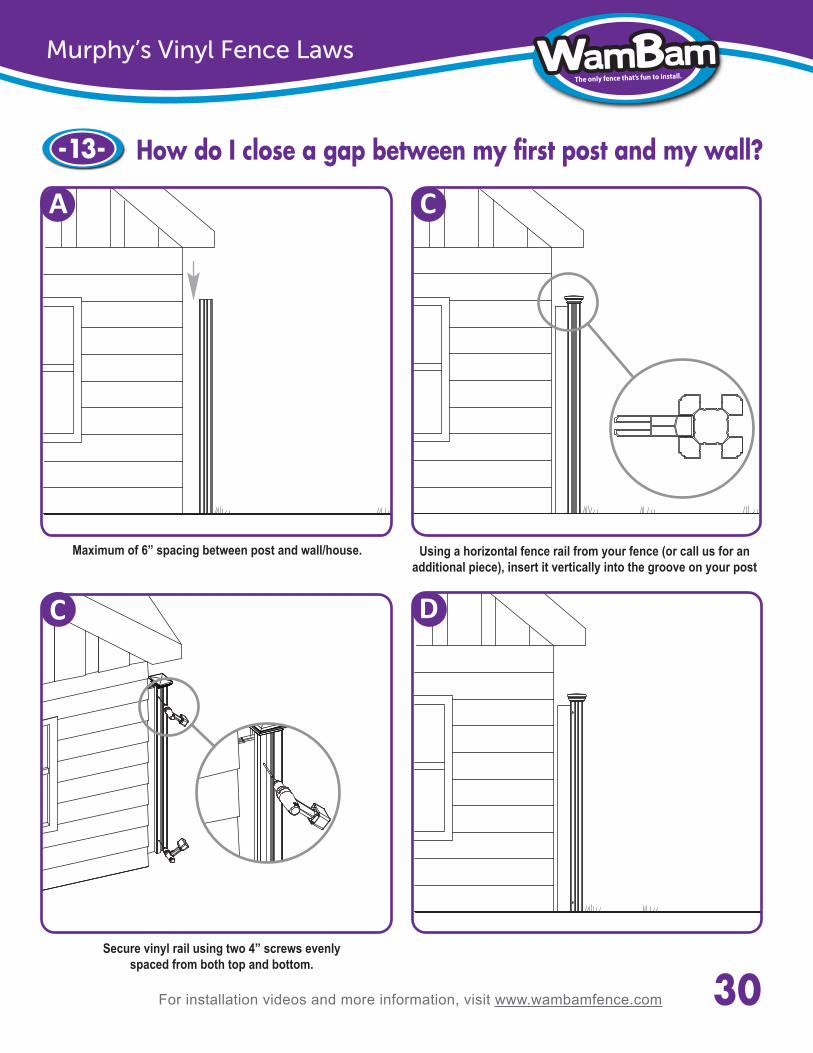
How do I close a gap between my first post and my wall?-13-
Maximum of 6” spacing between post and wall/house.
Secure vinyl rail using two 4” screws evenlyspaced from both top and bottom.
A
Using a horizontal fence rail from your fence (or call us for anadditional piece), insert it vertically into the groove on your post
C
C D

31
Murphy’s Vinyl Fence Laws
Installing a Gate Without a Gate Jig-14-
For installation videos and more information, visit www.wambamfence.com
If your sidewalk gets in the way of using the provided gate jig, you can either cut down the provided vinyl gate jigor re-create a small gate jig out of 4x4 wood (see gate instructions) to span the distance between the anchor and
the concrete as necessary. The jig can simply be be pressure fitted against the concrete to hold its position.
GROUND
PRE-EXISTING CONCRETE SIDEWALK
Cut down the vinyl gate jig included with your gate(or re-create a wood gate jig using your own materials)
to span the distance between your anchor and pre-existing concrete sidewalk.
32
Murphy’s Vinyl Fence Laws
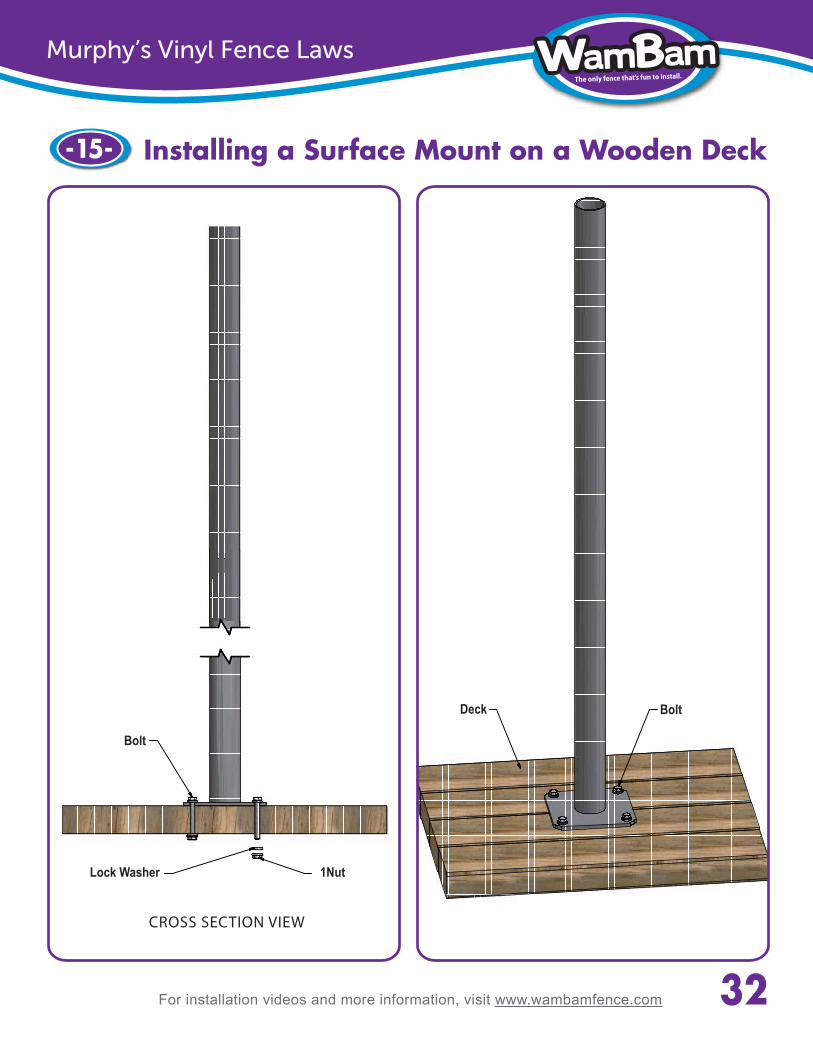
Installing a Surface Mount on a Wooden Deck-15-
For installation videos and more information, visit www.wambamfence.com
Deck Bolt
Bolt
Lock Washer 1Nut
CROSS SECTION VIEW

33
Murphy’s Vinyl Fence Laws
For installation videos and more information, visit www.wambamfence.com
Warnings on Using Manual Post Pounder-16-
Getting something that's about 20 or even 30lbs to move up and down repeatedly takes a lot of work. You can see this by watching the "Manual Post Drivers in Action Video" on our website. Even on a cool day you are going to sweat. Remember you will be sweating about half as much (or less) compared to using a gas powered auger, mixing concrete and getting rid all of your excavated soil. If you want to sweat a little less, you can use a pneumatic pounder. See our website for more details.
1 - You’re gonna sweat!
Relax your grip on the down-stroke to minimize vibration fatigue. If it’s possible hang on to the shaft of the pounder versus hanging onto to the handles. The handles will tend to giveoff more vibration and shock. You’ll be a little less sore in the morning as well. Clever Joe suggests that “throwing” the pounder down can avoid this completely. In other words,release your hands completely before anchor and pounder impact each other.
2 - Relax your grip on the pounder!
Breaking down the most demanding physical part of your project into smallerchunks will make it easier. Slow down and enjoy yourself. You’re still going to finishfaster than if you had to auger, mix concrete and clean up.
3 - Take a break!
After your anchor is about 18in. into the ground, begin to check for level at about 6in. intervals during penetration into the ground. This will slow you down significantly but ultimately will save you time by avoiding a severely crooked anchor.
4 - Your anchor can get out of level very quickly.
Murphy’s Vinyl Fence Laws
For installation videos and more information, visit www.wambamfence.com
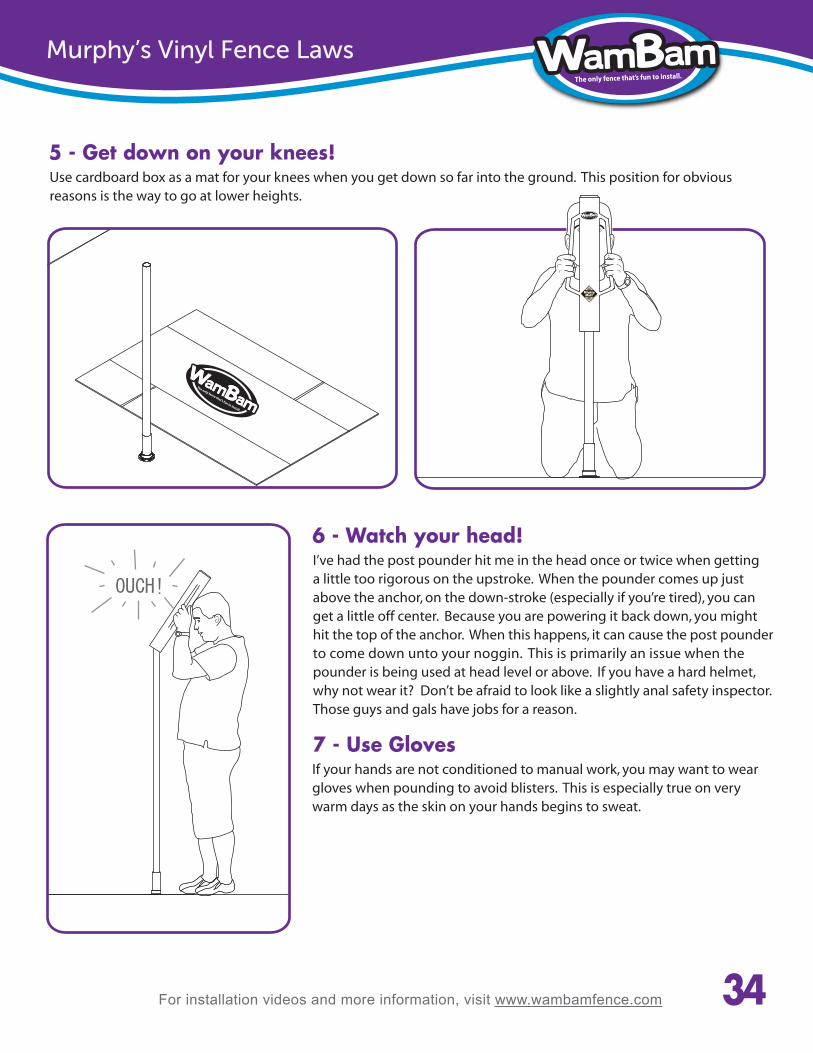
Use cardboard box as a mat for your knees when you get down so far into the ground. This position for obvious reasons is the way to go at lower heights.
5 - Get down on your knees!
I’ve had the post pounder hit me in the head once or twice when getting a little too rigorous on the upstroke. When the pounder comes up just above the anchor, on the down-stroke (especially if you’re tired), you can get a little off center. Because you are powering it back down, you might hit the top of the anchor. When this happens, it can cause the post pounder to come down unto your noggin. This is primarily an issue when the pounder is being used at head level or above. If you have a hard helmet, why not wear it? Don’t be afraid to look like a slightly anal safety inspector. Those guys and gals have jobs for a reason.
6 - Watch your head!
If your hands are not conditioned to manual work, you may want to wear gloves when pounding to avoid blisters. This is especially true on very warm days as the skin on your hands begins to sweat.
7 - Use Gloves
The only fence that’s fun to install.
The only fence that’s fun to install.
OUCH!
34

35
Murphy’s Vinyl Fence Laws
1 - You can either leave the leveling donut off or on during pounding.In the vast majority of installations, the top of your anchor will not mushroom enough to cause con�ict when putting the donut back over the anchor. The only potential problem is really hard or dry ground where repeated blows with the pounder are required.
TIPS TRICKS
2 - Begin to use your level only after your anchor has been pounded about 18 inches into the ground.
Initially you can use other level reference points (house, another fence etc.) to eyeball level from. Step back 3 or 4 feet from your anchor in both directions to do this.
& On Using the Post Pounder
For installation videos and more information, visit www.wambamfence.com
“If you decide to leave the donut off during pounding,watch the top of your anchor does not become
so mushroomed you cannot slide the donut back over.
36
Murphy’s Vinyl Fence Laws
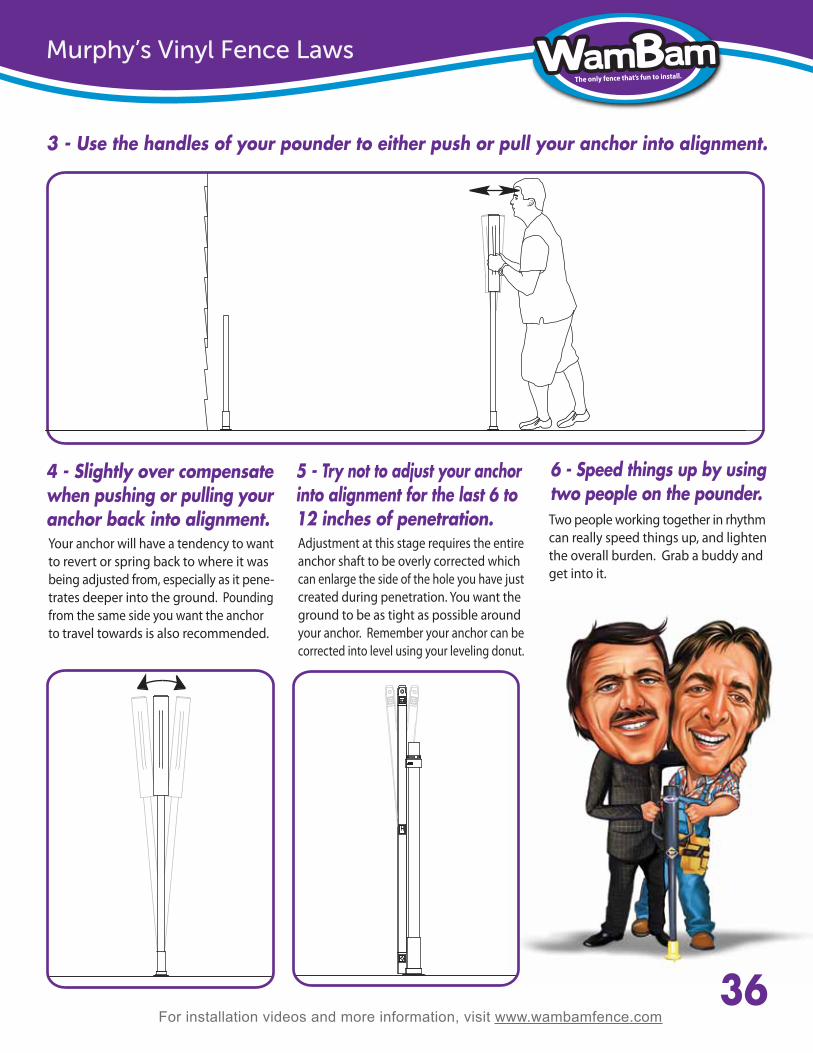
3 - Use the handles of your pounder to either push or pull your anchor into alignment.
4 - Slightly over compensate when pushing or pulling your anchor back into alignment. Your anchor will have a tendency to want to revert or spring back to where it was being adjusted from, especially as it pene- trates deeper into the ground. Pounding from the same side you want the anchor to travel towards is also recommended.
For installation videos and more information, visit www.wambamfence.com
5 - Try not to adjust your anchor into alignment for the last 6 to 12 inches of penetration.Adjustment at this stage requires the entire anchor shaft to be overly corrected which can enlarge the side of the hole you have just created during penetration. You want the ground to be as tight as possible aroundyour anchor. Remember your anchor can be corrected into level using your leveling donut.
6 - Speed things up by using two people on the pounder. Two people working together in rhythm can really speed things up, and lighten the overall burden. Grab a buddy andget into it.
37
Murphy’s Vinyl Fence Laws
More TIPS TRICKS2 - What saw blade should I use when cutting vinyl?
Vinyl fencing can be cut just like wood. Preferably use a circular saw with a PVC blade or a sharp and straight �ne-tooth carbide blade. If your saw blade is designed for rough cutting lumber and dull, it could shatter the vinyl. This is especially true if the vinyl is cold.
“If you come across a problem or situation that you’ve found a novel solution to and would like to share it
with others, please contact us. This is an expanding document, so we would love to include it for others to enjoy.”
CLEVER JOE
&
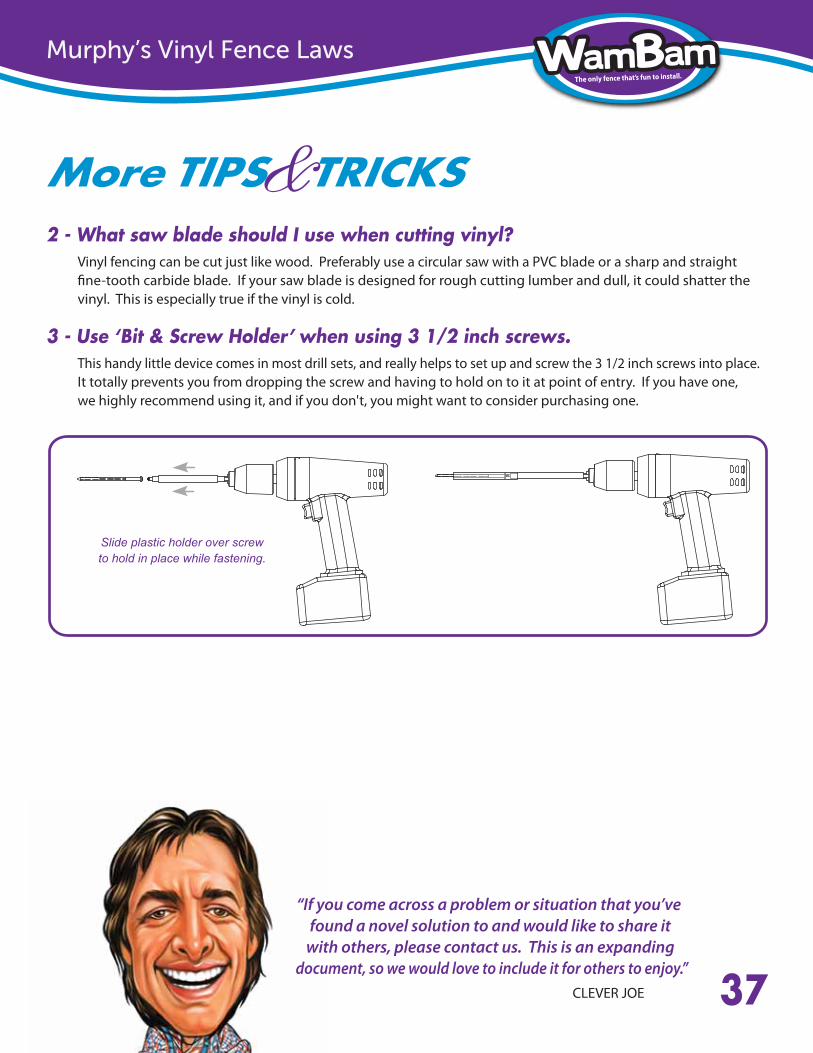
3 - Use ‘Bit & Screw Holder’ when using 3 1/2 inch screws.This handy little device comes in most drill sets, and really helps to set up and screw the 3 1/2 inch screws into place. It totally prevents you from dropping the screw and having to hold on to it at point of entry. If you have one,we highly recommend using it, and if you don't, you might want to consider purchasing one.
Slide plastic holder over screwto hold in place while fastening.