Multipor interior insulation systems · Inadequate thermal insulation on the outside ......
58
101 Multipor interior insulation systems LE RED IGHLY ITS OLID G - ADE Multipor interior insulation systems 4 4
Transcript of Multipor interior insulation systems · Inadequate thermal insulation on the outside ......

101Multipor interior insulation systems
4
Multipor interior insulation systems 4.0
COST-EFFECTIVE HEALTHY CAPILLARY-ACTIVE VAPOR-PERMEABLE REFURBISHMENT MODERNISATION LISTED FACADE HALF-TIMBERED BUILDING BASEMENT ECO-FRIENDLY NATURAL SUSTAINABLE HIGHLY INSULATING ENERGY-EFFICIENT EXECUTION RELIABILITY INHIBITS MOULD COMFORTABLE INDOOR CLIMATE NON-COMBUSTIBLE SOLID SOLID CREATIVE SURFACE FINISH SOUND INSULATION PLANNING CERTAINTY EXECUTION RELIABILITY CAPILLARY-ACTIVE VAPOR-PERMEABLE COST-EFFECTIVE REFURBISHMENT BASEMENT FACADE
Multipor interior insulation systems4
4

102 Multipor interior insulation systems
Multipor interior insulation systems4.0 Multipor interior insulation systems/ Multipor compact plus
4.0 Interior
insulation
systems
Older buildings often have poor
insulation, if any at all. Inadequate
thermal insulation on the outside
walls favors mold growth on the in-
side and leads to increased energy
consumption in winter and high
indoor temperatures in summer.
This creates an uncomfortable in-
door climate and may even cause
significant structural damage.
When renovating old buildings, it is
no longer enough to simply replace
the heating system and fit new win-
dows. It‘s also a matter of preserv-
ing architecturally diverse exteriors
and at the same time increasing
their energy efficiency in a mean-
ingful yet sensitive way. Creating a
comfortable living space is also an
important factor.
Multipor interior insulation systems
are the perfect solution for mold re-
mediation, thermal bridge optimiza-
tion and interior insulation projects
requiring the highest level of energy
efficiency. Multipor satisfies all the
requirements for modern interior
insulation with the slender, space-
saving 30 or 40 mm thick Multipor
compact plus system or the interior
insulation system from 60 to 300
mm.
Good structural reasons for insu-
lating a building with a Multipor
interior insulation system:
■■ Increases surface temperature
and so prevents condensation
forming at the surface
■■ This in turn prevents moisture-
related mold growth on the sur-
face of the walls
■■ Improves thermal comfort
■■ Extends the life of the building by
going beyond minimum thermal
insulation requirements
■■ In existing buildings, a comfort-
able indoor climate can be
achieved even with a low insula-
tion thickness
■■ Satisfies the highest energy effi-
ciency standards, including pas-
sive house standards where
achievable.
The use of Multipor mineral insula-
tion boards for interior insulation
is far more than a mere cosmetic
solution. To improve the energy ef-
ficiency and overall comfort of a
building and operate the property
economically in the long term, it is
often the only solution.
■■ Cost-effective interior insulation systems for old and new buildings
■■ Special thermal and moisture transmission properties for a comfortable
indoor climate
■■ Ideal for preventing mold
■■ Preserving the facades of listed buildings
■■ Perfect for half-timbered buildings and basements
■■ Useful if an adjacent property excludes the use of an ETICS
■■ May be eligible for DGNB certification and KfW grants
■■ Healthy, environmentally friendly systems certified by natureplus,
IBU declaration and highest A+ rating from the eco- INSTITUT

103Multipor interior insulation systems
4
Multipor interior insulation systems 4.0
Multipor interior insulation
The Multipor interior insulation sys-
tem is a cost-effective and energy-
efficient means of insulating old and
new buildings. Available in insula-
tion thicknesses ranging from 60 to
300 mm, it is suitable even for com-
plex refurbishment projects, includ-
ing listed buildings. Multipor mine-
ral insulation boards enable rooms
to heat up quickly and ensure opti-
mal heat retention. Their excellent
permeability and capillary structure
reliably insulates even half-timbered
buildings without the need for vapor
barriers.
■■ Perfect solution for high quality
energy-efficient refurbishments
■■ Cost-effective interior insulation
system for new buildings too
■■ Vapor-permeable and capillary-
active – no need for a vapor
barrier
■■ Preserves the facades of listed
and historic buildings
■■ Perfect for half-timbered build-
ings and basements
■■ Useful if an adjacent property
excludes the use of an ETICS
■■ Can generally be fitted quickly,
easily and securely without ad-
ditional anchor fixings
■■ Healthy, environmentally friendly
system certified by natureplus,
IBU declaration and highest A+
rating from the eco -INSTITUT.
Multipor compact plus
Multipor compact plus is an excel-
lent choice if the main aim is to pre-
vent mold and reduce thermal brid-
ging. At just 30 or 40 mm thick, with
these slender, compact insulation
boards you don‘t have to forfeit
much living space. They effectively
increase the surface temperature of
the walls to prevent mold formation
and create a more comfortable in-
door climate. They reduce heating
costs too.
■■ Improves the energy perfor-
mance of existing walls to prev-
ent mold formation
■■ More comfortable indoor climate
■■ Vapor-permeable and capillary-
active – no need for a vapor
barrier
■■ Provides effective thermal insu-
lation with λ = 0.045 W/(mK),
despite space-saving format
■■ Quick, clean and easy installation
■■ Packed in cardboard boxes for
effortless transportation to site
and easy handling
■■ Healthy, environmentally friendly
system certified by natureplus,
IBU declaration and highest A+
rating from the eco- INSTITUT.
Multipor mineral insulation board
Multipor compact plus mineral insulation board
Thomasblock, Oldenburg
Old weaving mill in Fulda
4.1Multipor compact plus

104 Multipor interior insulation systems
Multipor interior insulation systems4.0
General introduction and planning
Experience proves us right
Millions of square meters of interior
walls insulated with Multipor or Multi-
por compact plus interior insulation
are the result of our extensive expe-
rience in the field of interior insula-
tion, which now spans over 20 years.
Experience which enables you to fit
up-to-date, energy-efficient insulation
to existing buildings..
Advantages at a glance
■■ Vapor-permeable and capillary-
active – the system needs no
vapor barrier
■■ Best fire protection –
non-combustible insulating
material (Class A1 fire rating)
■■ Thermal insulation and thermal
storage combined
Healthy, natural and environmen-
tally friendly
Thanks to its natural constituents,
Multipor mineral insulation board is
an ecologically valuable, non-toxic
insulating material.
The environmental product decla-
ration (EPD) issued by the German
Institute for Construction and Envi-
ronment (IBU) documents its eco-
logical properties. You can find it in
the download area of our website at
www.multipor.com. The insulation
board has also been awarded the
natureplus eco-label in recognition
of its environmental compatibility.
Finally, the eco- INSTITUT in Colo-
gne confirmed that the board meets
the strictest requirements on pol-
lutants and emissions by awarding
Table 1: Characteristic values of Multipor interior insulation systems
Multipor mineral insulation board Multipor compact plus Multipor lightweight mortar
Regulations
National technical approval Z- 23.11 -1501 European technical assessmentETA -05/0093
National technical approval Z- 23.11- 1501 European technical assessmentETA- 05/0093
Lightweight mortar LW as per EN 998-1
Dry bulk density 85 – 95 kg/m³ 100 –115 kg/m3 approx. 770 kg/m³
Compressive strength ≥ 200 kPa ≥ 300 kPa CS II; 1.50 – 5.0 N/mm²
Thermal conductivity (rated value)
λ = 0.042 W/(mK) λ = 0.045 W/(mK) λ10, dry = 0.18 W/(mK)
Water vapor diffusion resistance factor
µ = 2 µ = 3 µ ≤ 10
Building material class A1; non-combustible A1; non-combustible A2-s1, d0; non-combustible
Dimensions /delivery quantity
600 x 390 mmd = 60 – 300 mm (in increments of 20)Special format d = 50 mm with λ = 0.045 W/(mK)
500 x 390 x 30/40mm (L x W x D)
20 kg/bag
4.2
■■ Sounds solid – like monolithic
masonry
■■ High compressive strength com-
bined with mesh-reinforced
plaster
■■ Safe and easy-to-use
■■ Can frequently be applied to
existing surfaces
■■ Versatile surface finishes from in-
terior silicate paints and mineral
plasters to wallheaters mounted
to Multipor mineral insulation
boards offer scope for creative
freedom.
■■ Pioneering specialists in the field
of capillary-active interior insula-
tion
■■ Tried and tested.
General introduction and planning4.2

105Multipor interior insulation systems
4
Multipor interior insulation systems 4.0
General introduction and planning 4.2
it the highest Category A+ rating:
Rooms insulated with Multipor mi-
neral insulation boards do not emit
harmful VOC emissions via their
insulation systems.
Non-combustibility for peace
of mind
When redeveloping existing housing
stock, very careful consideration
should be given to fire protection.
The existing walls may have been
built at a time when little or no
thought was given to the matter.
Multipor mineral insulation board
has been designated a Class A1
construction and insulating mater-
ial (non-combustible) in accordance
with DIN EN 13501 -1. Together with
the accompanying Multipor light-
weight mortar, the systems are en-
tirely safe because in the event of
fire, even at extremely elevated
temperatures, they do not produce
smoke, toxic fumes or burning
droplets – advantages that can save
lives.
Sound insulation with Multipor
Insulating materials often change
a building‘s acoustic performance –
and interior insulation in particular
can have a significant impact on the
wall‘s sound insulation. So at the
Xella Technology and Research
Centre, we have been investigating
the factors affecting both the insu-
lated component and the subse-
quently installed partition walls.
On the test bed we measured sound
transmission through adjacent walls
insulated with Multipor and studied
the impact on the weighted sound
reduction index of the partition wall
in different installation conditions
(Fig. 1).
During the course of these measure-
ments, we did not find any significant
impact on the sound reduction index
of the partition wall.
Subsequently installed dry-lined
internal walls thus continue to offer
complete flexibility when it comes to
configuring the living space, since
the interior insulation – in terms of
sound insulation – does not have to
be breached to connect the partition
walls (Fig. 1).
A test report from the Xella Research
and Development Center is available
on request.
Variant 1: Multipor separated; dry-lined wall connected directly to the external wall
Fig.1: Sound transmission via solid wall adjacent to dry-lined wall
Test stand frameCW profile
2 beads of acoustic sealant between profiles and solid masonry components
2 beads of acoustic sealant between profiles and Multipor
Variant 2: Multipor continuous; dry-lined wall connected to the Multipor insulation

106 Multipor interior insulation systems
Multipor interior insulation systems4.0
Creative surface finishes
The versatility of Multipor and Multi-
por compact plus interior insulation
systems offers tremendous scope
for creativity in terms of the surface
finish. Here are a few examples:
■■ Thin-film felted, textured or
smooth finishing plaster on the
reinforcing layer
■■ Vapor-permeable wallcoverings
and paints
■■ Dry lining solutions on subframe
■■ Tiles on the reinforcing layer.
Please see Chapter 4.4 for more
information on surface finishes, or
download the surface finish guide
from the download section of our
website at www.multipor.com.
Thorough building survey provides
sound basis for planning
As the level of insulation in buildings
increases, so too does the planning
complexity. And it is important to
bear in mind that the maximum
thickness of energy-saving insula-
tion is not always the most sensible
solution for existing buildings. In ad-
dition to energy efficiency, consider-
ation should also be given to a heal-
thy indoor climate with reference to
DIN 4108 -3 (Thermal protection and
energy economy in buildings; Part 3:
Protection against moisture subject
to climate conditions). Although lev-
els of thermal insulation that comply
with today‘s standards may not be
possible in many existing buildings,
a reduced insulation thickness can
nevertheless significantly increase
housing quality and noticeably
reduce energy consumption.
General introduction and planning4.2
For this reason, it is important to
carry out a survey of the existing
building as shown in Figure 2 before
planning the interior insulation. The
purpose of this survey is to obtain
information about the aim of the
insulation measure as defined by
the client/building contractor (e.g.
achievement of minimum thermal
insulation standard) alongside any
usage or listed building requirements
that may apply. This step ensures the
lasting success of the construction
and refurbishment work.
A site visit – involving visual inspec-
tions at the very least – is essential
to gain a reliable and comprehensive
understanding of the existing struc-
ture. The visit should focus less on
thermal performance and more on
assessing the overall structural situ-
ation, including moisture, sound and
(where appropriate) fire protection.
The following criteria should be
agreed in writing by the building
contractor/client and planner:
■■ Assessment of the building‘s
location (protected or exposed
position etc.)
■■ General condition of the masonry/
existing fabric of the building
■■ Situation regarding moisture
levels in the building, with refer-
ence to salt deposits where rele-
vant
■■ Protection against driving rain
(cladding, paint, plaster) and
driving rain load on the external
facade, exposure level of individ-
ual facades (as per Table 2)
■■ Other sources of moisture within
the structure (rising damp, defec-
tive guttering etc.)
■■ Indoor climate
■■ Assessment of the condition of
the building, including any dam-
age, mapping where necessary
and collating data on the property.
■■ Subsequent use of the building
and of rooms designated for en-
ergy efficiency upgrades.
A pleasant indoor climate is
all-important
Multipor interior insulation achieves
the minimum thermal insulation
standard and is therefore guaran-
teed to improve the energy-efficiency
of buildings. At the same time, by in-
creasing the surface temperature it
also enhances well-being and coun-
teracts mold growth. However, con-
sideration should always be given to
connected structures and adjacent
ceilings and walls when carrying out
refurbishment work. Further im-
provements to the thermal insula-
tion can be achieved with relatively
little effort here by reducing existing
thermal bridges to harmless levels.
With Multipor interior insulation,
spaces used only occasionally –
such as churches or other public
buildings – heat up quickly to ensure
greater comfort. The heat energy
remains in the room instead of
seeping straight out through the
cold internal walls.

107Multipor interior insulation systems
4
Multipor interior insulation systems 4.0
General introduction and planning 4.2
A comfortable indoor climate
requires a well-coordinated
overall plan
Old, draughty windows result in high
air exchange rates within the build-
ing, thereby reducing the risk of
mold formation. On the downside,
they also lead to high heating costs.
Consequently, a well-coordinated
overall energy-efficiency plan is
needed when installing new high-
performance windows, because with-
out corresponding interior insula-
tion, there is an increased risk of
mold. So we always recommend in-
sulating external walls, including the
window reveals, at the same time as
replacing windows since moisture
Building analysisRequirements of building
contractor/owner
Specifyaim of insulation work
Specifyadditional measures
Determinethickness of Multipor
insulation
Clarify connections,including any possible
thermal bridging
Implementation(site instructions
if necessary)
Verify hygrothermal perfor-mance (heat and moisture transmission) of planned
construction using WUFI® or DELPHIN
Multipor service
Fig. 2: Flowchart for planning and implementing interior insulation
Load class Description
Load class I■■ Applies to annual rainfall < 600 mm
■■ Applies to higher rainfall levels in areas particularly sheltered from the wind
Load class II
■■ Applies to annual rainfall of 600 mm to 800 mm
■■ Applies to higher rainfall levels in areas particularly sheltered from the wind
■■ Applies to multi-story buildings and houses in exposed locations which would otherwise be in Class I
Load class III
■■ Applies to annual rainfall > 800 mm
■■ Applies to lower rainfall levels in windy areas
■■ Applies to multi-story buildings and houses in exposed locations which would otherwise be in Class II
Table 2: Overview of driving rain load classes as per DIN 4108-3

108 Multipor interior insulation systems
Multipor interior insulation systems4.0
does not condense on warm sur-
faces – a key requirement for avoid-
ing mold formation. And the percep-
tion of comfort noticeably increases.
Creating a comfortable indoor cli-
mate is an important objective when
selecting construction materials and
insulation. DIN EN ISO 7730 defines
thermal comfort above all as a sense
of satisfaction with the ambient cli-
mate. Although everyone perceives
this feeling differently, it is perfectly
possible to define generally applic-
able comfort zones (Fig. 3). The fol-
lowing key factors contribute to a
comfortable indoor climate:
■■ Average temperature of the en-
closing walls, including floors and
ceilings
■■ Average indoor air temperature
■■ Average indoor relative humidity.
Chapter 7 on building physics con-
tains in-depth information on the
subject of indoor climate with de-
tailed examples.
Practical tip:
Multipor interior insulation
allows rooms that are used only
occasionally to heat up rapidly
and maintain high levels of
comfort.
Requirements for interior
insulation
Retrofitted interior insulation influ-
ences the building-physical behavior
of the existing building. Special con-
sideration must be given to water
vapor diffusion from inside to outside,
combined with the potential for con-
densation to form on the original,
now cold inner surface of the struc-
ture. The external wall will also dry
much more slowly after exposure to
driving rain due to a decrease in the
average temperature of the wall.
Careful planning, a high-quality sys-
tem such as Multipor interior insula-
tion and meticulous workmanship
will nevertheless guarantee success-
ful insulation work.
The Multipor and Multipor compact
plus interior insulation systems are
regarded as forerunners in the field
of vapor-permeable internal insula-
tion. Their products and material
characteristics have raised aware-
ness of the importance of building
physics in ensuring a simple, reliable
construction process.This is borne
out by a study which showed that a
housing development insulated with
Multipor almost 20 years ago was
still free from damage. Our experts
at Multipor will gladly work with you
to ensure the success of your up-
coming refurbishment project.
General introduction and planning4.2
Indoor air temperature [°C]
Aver
age
surf
ace
tem
pera
ture
of th
e su
rfac
es e
nclo
sing
the
room
[°C
]
10
12
14
16
18
20
22
24
26
10 14 16 18 20 22 24 26 28
28
30
uncomfortably cold
comfortable
stillcomfortable
As per W. Frank: “Raumklima und thermische Behaglichkeit” (Indoor climate and thermal comfort), Berichte aus der Bauforschung, Heft 104, Berlin (1975)
Fig. 3: Thermal comfort during sedentary activity, moderate activity and with suitable clothing as a function of the average surface temperature of the surfaces enclosing the room and the indoor air temperature; See Chapter 7.1 for further details

109Multipor interior insulation systems
4
Multipor interior insulation systems 4.0
General introduction and planning 4.2
Current EnEV requirements for
existing buildings
The current German Energy Saving
Ordinance (EnEV) discusses the
requirement levels for the refurbish-
ment of existing buildings. The mini-
mum thermal insulation standard is
the minimum requirement for insu-
lation on the inside of external walls,
although the current EnEV no longer
governs interior wall insulation for
refurbishment purposes. A recom-
mended U-value of 0.35 W/(m²K) for
interior insulation can easily be
achieved with Multipor, both techni-
cally and in terms of building phy-
sics.
Multipor interior insulation systems
provide optimal solutions which
comply with the latest general re-
quirements for the exterior walls of
existing buildings. The ordinance
also stipulates that the impact of
construction-related thermal
bridging on heat energy consump-
tion in old buildings should be kept
to a minimum.
The general thermal bridge correc-
tion factor for interior insulation
could spoil what initially seemed to
be a well-conceived, energy efficient
solution, resulting in an uneconomi-
cal thickness of insulation. This area
offers further potential for energy-
savings of up to 30% based on a
building‘s annual heating demand.
See Chapter 7.1.6 for more informa-
tion on the EnEV.
As a service to you, we provide
specimen structural calculations for
selected thermal bridges in a wide
range of constructions. Find the
checklist in the download section of
our website at www.multipor.com.
Types of interior insulation system
There are basically two options for
interior insulation:
1. Vapor-retardant and vapor-
impermeable interior insulation
systems (Fig. 4):
These systems, such as stud wall
constructions with mineral wool
and vapor-retardant membranes or
virtually vapor-impermeable syn-
thetic foams, prevent the diffusion
of water vapor into the walls from
outside to inside, which also pre-
vents existing walls drying inwards,
as they would tend to do in sum-
mer. These vapor-retardant and
vapor-impermeable systems must
be handled with particular care
during installation and subsequent
use and require a high standard of
workmanship – especially around
details and connections. It is es-
sential to ensure that the system
is airtight, including connections to
adjacent components, since even
an incorrectly retrofitted socket can
lead to moisture damage. Expe-
rience shows that such systems –
especially around connections –
can easily be damaged during
construction or subsequent use.
2. Vapor-permeable, capillary-
active interior insulation systems
(Fig. 5):
These modern, safe and well-tested
systems allow water vapor to dif-
fuse into the wall; they absorb any
moisture arising, buffer it and
transport it back to the inner sur-
face by capillary action. This means
that not only are moisture levels
within the walls continuously re-
duced to a non-critical level, but the
walls also remain vapor-perme-
able, which enables them to absorb

110 Multipor interior insulation systems
Multipor interior insulation systems4.0
General introduction and planning4.2
Exterior
Fig. 5: Operating principle of vapor-permeable interior insulation
Temperature and vapor pressure trend
Condensation
Interior
Highervapor flow
Capillary flow
Fig. 4: Operating principle of vapor-retardant interior insulation
Verlauf von Temperatur und Dampfdruck
Kaum
Dampfstrom
Kein Kondensat
AußenInnen
Temperature and vapor pressure trend
No condensation
InteriorExterior
Virtually no vapor flow
moisture peaks from the indoor air
and to dry increased moisture loads
in the existing structure inwards.
Multipor interior insulation systems
are ideal for this purpose. The nu-
merous areas of application are ex-
plained in more detail further in this
guide.
Chapter 7 on building physics ex-
plains how the different systems
work.

111Multipor interior insulation systems
4
Multipor interior insulation systems 4.0
General introduction and planning 4.2
Dr.-Ing. Hartwig M. Künzel from
the Fraunhofer Institute for
Building Physics in Holzkirchen
on the subject of certifying the
hygrothermal performance of
interior insulation systems:
Mention the subject of ‘moisture
transport in building materials’,
and most practitioners will think
of vapor diffusion, dew point and
the Glaser method described in
DIN 4108. Once a building ele-
ment has been classified as ‘safe
according to Glaser’, all is over
and done with as far as the plan-
ner is concerned. The search for
alternative assessment methods
will only take place if moisture
damage unexpectedly occurs or
if the designed building element
does not pass the standard Glaser
assessment. Since condensation
in winter due to vapor diffusion
(which is what Glaser investi-
gates) is only one of a large
number of possible moisture
loads, a positive assessment
according to DIN 4108 may imply
moisture safety which does not
actually exist.
Indoor air convection, precipitati-
on or rising damp are not usually
considered. The same goes for
construction moisture, which is
becoming increasingly problem-
atic in view of today‘s deadline
pressures. In order to allow for
these affects too, we need to
switch from Glaser’s simple
steady-state assessment method
to a realistic simulation of hygric
processes in building elements.
To this end, new non-steady-state
calculation methods have gained
acceptance among practitioners
in recent years due to their relia-
bility. This fact is also recognized
in the redrafted DIN 4108- 3, which
now admits these methods.
The now widely used dynamic
simulation model WUFI® (see
Chapter 7) analyzes the relevant
climatic and material data and
the accuracy of the calculations,
offering numerous advantages to
practitioners. Some areas of ap-
plication and novel possibilities
for assessing the hygrothermal
behavior of building components
exposed to natural climatic con-
ditions – which go significantly
beyond Glaser – are listed below:
■■ realistic simulation of conden-
sation during the heating pe-
riod, allowing for water vapor
sorption and capillary conduc-
tion
■■ drying of construction
moisture
■■ summer condensation due to
reverse diffusion
■■ solar radiation, driving rain
load and surface condensation
on roofs and facades
■■ effect of moisture on energy
consumption.
The results for moisture and
temperature fields in the compo-
nent are available in any desired
spatial or temporal resolution
and may be used for:
■■ extrapolating experimental
results
■■ transferring proven construc-
tion methods to different
climatic conditions
■■ planning new buildings or
renovation measures for old
buildings
■■ developing and optimizing
building products
■■ determining maximum per-
missible indoor moisture loads
■■ determining the hygrothermal
requirements for and the limits
of proper application of build-
ing materials and components.
In recent years, these advantages
of hygrothermal simulations have
created strong demand for com-
putational investigations, espe-
cially in the context of renovating
old buildings, since standard so-
lutions are often not applicable
here. Multipor mineral insulation
board is already widely used for
successful interior insulation.
Since this product is stored in the
WUFI® database, dynamic simu-
lations of different structural
components can be performed at
any time.
In 1997 the WTA (International
Association for Science and Tech-
nology of Building Maintenance
and Monuments Preservation)
established a WTA working group
whose task is to draw up practical
guidelines and regulate the use of
hygrothermal simulation methods
in the construction industry.
112 Multipor interior insulation systems
Multipor interior insulation systems4.0
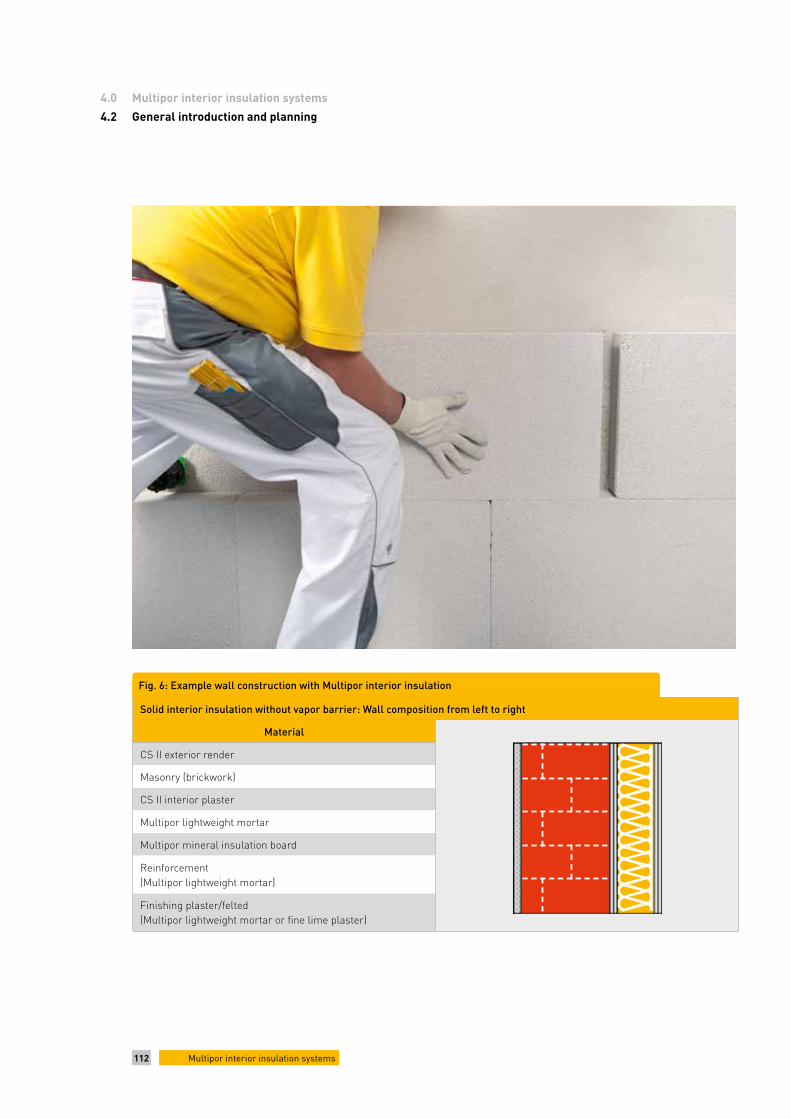
Fig. 6: Example wall construction with Multipor interior insulation
4.2 General introduction and planning
Solid interior insulation without vapor barrier: Wall composition from left to right
Material
CS II exterior render
Masonry (brickwork)
CS II interior plaster
Multipor lightweight mortar
Multipor mineral insulation board
Reinforcement(Multipor lightweight mortar)
Finishing plaster/felted(Multipor lightweight mortar or fine lime plaster)

113Multipor interior insulation systems
4
Multipor interior insulation systems 4.0
General introduction and planning 4.2
Wall construction with Multipor
interior insulation systems
Multipor mineral insulation boards
in thicknesses of 60 to 140 mm are
ideal where the main aim is to
provide an effective level of thermal
insulation. Even thicker boards are
suitable for energy-efficient refurb-
ishment to the highest standards.
At this level, it is easily possible to
cut heating oil consumption and CO2
emissions by 80%, depending on the
component.
Practical tip:
The following rule of thumb applies:
U -value x 10 = heating oil consump-
tion in liters per m2 of heated area
and heating period, U -value x 10 x 3
= CO2 emissions in kg per m2 of
heated area and heating period.
Figure 6 shows an example confi-
guration of a Multipor interior insu-
lation system. The U-value calcula-
tions for different wall types shown
in Tables 3 and 4 are based on this
system configuration.
It’s a different matter if the primary
purpose of the refurbishment is to
improve the indoor climate and/or
prevent mold. In this case, due to
the reduced thickness of insulation,
it is only possible to achieve a ‘still
comfortable’ indoor climate (Fig. 3).
Tables 3 and 4 illustrate the poten-
tial of interior insulation for diffe-
rent wall types, depending on the
aim of refurbishment. Whilst the
main aim of insulating with Multi-
por compact plus is to increase the
temperature of the external wall on
the inside, the use of thicker insu-
lation illustrates the potential of
energy-efficient refurbishment to
significantly improve the U-value.
Wall structures with Multipor
interior insulation systems
Using numerical climate modeling,
we have verified all the layer confi-
gurations with Multipor mineral in-
sulation board shown below. We did
this by applying the temperature,
relative humidity, direct and indirect
Assumptions: Solid brick: λ = 1.2 W/(mK), t = 11.5 cm, no air gap, masonry as per table, interior plaster: λ = 0.51 W/(mK), t = 15 mm, After refurbishment: Lightweight mortar: λ10,dry = 0.18 W/(mK), t = 10 mm, thermal resistance: Rsi = 0.13 m2K/W, Rse = 0.04 m2K/W
Table 3: The use of Multipor interior insulation to improve the U-value of double-leaf walls
Wall construction
before
Thick-ness
t
[mm]
U-values
[W/(m2K)]
Wall construction with Multipor compact plus
λ = 0.045 W/(mK)
Wall construction with Multipor λ = 0.042 W/(mK)
30 [mm]
40 [mm]
60 [mm]
80 [mm]
100 [mm]
120 [mm]
140 [mm]
Calcium- silicate block λ = 0.99 W/(mK)
115U- value before 2.43 2.43 2.43 2.43 2.43 2.43 2.43
U-value after 0.92 0.76 0.54 0.43 0.36 0.30 0.27
240U- value before 1.86 1.86 1.86 1.86 1.86 1.86 1.86
U-value after 0.82 0.69 0.50 0.41 0.34 0.29 0.26
300U- value before 1.67 1.67 1.67 1.67 1.67 1.67 1.67
U-value after 0.78 0.66 0.49 0.40 0.33 0.29 0.25
solar radiation and driving rain
typical of the mid-German climate
to the outside of the building while
maintaining a constant air tempe-
rature of 20° C and 50% relative hu-
midity on the inside – in accordance
with DIN 4108.
The result: The rising moisture
level in the cold half of the year –
mainly in gaseous form as relative
humidity in the pore air – is non-
critical because, without exception,
it dries out completely during the
evaporation phase. Nevertheless,
it is important to comply with the
latest directions for use when in-
stalling Multipor interior insulation
to ensure its long-term structural
performance within the system
configuration.

114 Multipor interior insulation systems
Multipor interior insulation systems4.0
General introduction and planning4.2
Assumptions: Masonry as per table, interior plaster: λ = 0.51 W/(mK), t = 20 mm; exterior render: λ = 1.0 W/(mK), t = 20 mm; Thermal resistance: Rsi = 0.13 m2K/W, Rse = 0.04 m2K/W
Table 4: Improving the U-values of monolithic existing walls with Multipor interior insulation
Wall construction
before
Thick-ness
t
[mm]
U-values
[W/(m2K)]
Wall construction with Multipor compact plus
λ = 0.045 W/(mK)
Wall construction with Multipor λ = 0.042 W/(mK)
30 [mm]
40 [mm]
60 [mm]
80 [mm]
100 [mm]
120 [mm]
140 [mm]
Bricks λ = 0.86 W/(mK)
115U-value before 2.76 2.76 2.76 2.76 2.76 2.76 2.76
U-value after 0.97 0.80 0.56 0.44 0.36 0.31 0.27
175U-value before 2.31 2,31 2.31 2.31 2.31 2,31 2.31
U-value after 0.91 0.76 0.54 0.43 0.36 0.30 0.27
240U-value before 1.97 1.97 1.97 1.97 1.97 1.97 1.97
U-value after 0.85 0.72 0.52 0.41 0.35 0.30 0.26
300U-value before 1.73 1.73 1.73 1.73 1.73 1.73 1.73
U-value after 0.80 0.68 0.50 0.40 0.34 0.29 0.26
365U-value before 1.53 1.53 1.53 1.53 1.53 1.53 1.53
U-value after 0.76 0.65 0.48 0.39 0.33 0.28 0.25
Calcium- silicate block λ = 0.99 W/(mK)
115U-value before 2.90 2.90 2.90 2.90 2.90 2.90 2.90
U-value after 0.99 0.81 0.56 0.44 0.37 0.31 0.27
175U-value before 2.46 2.46 2.46 2.46 2.46 2.46 2.46
U-value after 0.93 0.77 0.55 0.43 0.36 0.31 0.27
240U-value before 2.12 2.12 2.12 2.12 2.12 2.12 2.12
U-value after 0.88 0.74 0.53 0.42 0.35 0.30 0.26
300U-value before 1.88 1.88 1.88 1.88 1.88 1.88 1.88
U-value after 0.83 0.70 0.51 0.41 0.34 0.30 0.26
Autoclaved aerated concrete (AAC) λ = 0.21 W/(mK)
115U-value before 1.29 1.29 1.29 1.29 1.29 1.29 1.29
U-value after 0.69 0.60 0.45 0.37 0.32 0.28 0.24
240U-value before 0.73 0.73 0.73 0.73 0.73 0.73 0.73
U-value after 0.49 0.44 0.36 0.31 0.27 0.24 0.21
300U-value before 0.60 0.60 0.60 0.60 0.60 0.60 0.60
U-value after 0.43 0.39 0.32 0.28 0.25 0.22 0.20
AAC mounting component λ = 0.14 W/(mK)
150U-value before 0.77 0.77 0.77 0.77 0.77 0.77 0.77
U-value after 0.51 0.46 0.37 0.31 0.27 0.24 0.22
200U-value before 0.60 0.60 0.60 0.60 0.60 0.60 0.60
U-value after 0.43 0.39 0.32 0.28 0.25 0.22 0.2
250U-value before 0.32 0.32 0.32 0.32 0.32 0.32 0.32
U-value after 0.37 0.34 0.29 0.26 0.23 0.21 0.19
Concrete λ = 2.1 W/(mK)
200U-value before 3.08 3.08 3.08 3.08 3.08 3.08 3.08
U-value after 1.01 0.82 0.57 0.45 0.37 0.31 0.27
250U-value before 2.87 2.87 2.87 2.87 2.87 2.87 2.87
U-value after 0.99 0.81 0.56 0.44 0.37 0.31 0.27
300U-value before 2.69 2.69 2.69 2.69 2.69 2.69 2.69
U-value nachher 0.96 0.79 0.56 0.44 0.36 0.31 0.27

115Multipor interior insulation systems
4
Multipor interior insulation systems 4.0
General introduction and planning 4.2
interior insulation and its certifica-
tion, while guidelines for Division 8
(Half-timbered constructions) con-
tains a wealth of useful information
about the energy-efficient refur-
bishment of half-timbered build-
ings.
As a supporting member of the
WTA, Xella Deutschland GmbH
helps to ensure that the Associa-
tion‘s latest findings and insights –
and more besides – are published
promptly.
By using the simulation methods
referred to above and following the
advice in the relevant WTA Guide-
lines, it is possible to successfully
certify and safely install vapor-per-
meable, capillary-active Multipor
interior insulation systems.
Here is an extract from the latest,
greatly extended ”Technical guide-
lines for insulating the inside of ex-
ternal walls using interior insulati-
on systems” (Technischen Richtlinie
zur Innendämmung von Außenwän-
den mit Innendämm-Systemen)
published by Germany‘s ETICS
trade association (Fachverband
Wärmedämm Verbundsysteme e. V.)
in 2016:
“Successful certification means
that the moisture content of the in-
dividual layers of material is limited
by the system, damage does not oc-
cur and accumulated moisture can
dry out again, i.e. the overall mois-
ture content of the structure does
not rise continuously over a period
of several years.” Multipor interior
insulation systems have been proven
to satisfy this requirement with
unerring reliability.
This simulation process also allows
component connections – such as
connected ceiling joists – to be in-
cluded in the hygrothermal analy-
sis. This ensures a safe wall struc-
ture and greater planning certainty
when it comes to sensitive con-
struction details.
Countless computational verifica-
tions confirm that the solid, entirely
mineral-based systems function
perfectly in practice. Numerous po-
sitive user experiences with Multi-
por interior insulation systems fur-
ther highlight their effective and
enduring contribution to energy-
efficient thermal and moisture
control.
Quality seal for the system
Our Multipor technical advisers will
gladly discuss specific customer
requirements and different building
and component types in more detail.
As a special service to our cus-
tomers, at Multipor we can certify
the hygrothermal performance of a
wide range of building components
and structures using dynamic simu-
lation programs (see Chapter 7.2.5).
Our expertise in this area is the re-
sult of several thousand hygrother-
mal analyses translated into suc-
cessful building practice. To help
you plan with confidence, download
the checklist from the download
section of our website at
www.multipor.com.
Follow the WTA recommendations
for internal insulation
The International Association for
Science and Technology of Building
Maintenance and Monuments
Preservation (WTA) publishes sev-
eral sets of guidelines on the sub-
ject of interior insulation. WTA
Guidelines for Division 6 (Physical
and chemical fundamentals) cover

116 Multipor interior insulation systems
Multipor interior insulation systems4.0
General introduction and planning4.2
Thomasblock (former Donnerschwee Barracks),Oldenburg
Reference building
■■ Redevelopment and sensitive conversion of barracks to residential development
■■ Preservation of listed facade
■■ Comfortable indoor climate and long-term environmental compatibility
■■ High level of thermal insulation and optimum fire protection
■■ Rapid installation without vapor barrier
Project data
Building type Residential development
Location Oldenburg
Application Interior insulation
Products used■■ Multipor mineral insulation board, t = 100 mm
■■ Multipor lightweight mortar

117Multipor interior insulation systems
4
Multipor interior insulation systems 4.04.0
4.2General introduction and planning
Primary school, Duisberg
Reference building
■■ Energy-efficient refurbishment of a listed school building
■■ Attainment of EnEV standard applicable at the time
■■ Energy costs savings of 70 %
■■ High standards of environmental health
■■ Quick and economical installation of around 1400 m² Multipor mineral insulation boards
Project data
Building type School
Location Duisburg
Application Interior insulation
Products used
■■ 900 m² Multipor mineral insulation board t = 100 mm
■■ 500 m² Multipor mineral insulation board t = 60 mm
■■ Multipor lightweight mortar

118 Multipor interior insulation systems
Multipor interior insulation systems4.0
Download these and other detail drawings at www.multipor.com/detaildrawings.php
Detail drawings for interior insulation systemsDetail drawings for interior insulation systems
Horizontal window section Vertical window section
Cross-section of foundations/interior insulation
to external wall
Timber ceiling with exposed joists/interior insulation
to external wall
Interior insulation 16-001
Interior insulation 16-003
Interior insulation 16-002
Interior insulation 16-004
006 Thermal insulation039 Impact sound insulation040 Floating screed067 Horizontal damp-proofing/barrier membrane 111 Separation or protective layer117 Flexible sealing tape
149 Pre-compressed sealing tape 168 Existing masonry169 Existing interior plaster (or levelling plaster)172 Timber joists173 Multipor lightweight mortar174 Multipor reinforcement mesh
175 Corner protectors177 Multipor reveal board178 Multipor hemp-felt insulation strips250 Multipor interior insulation 286 System-compatible interior plaster330 Screed-edge insulation strips
4.3
Detail drawings for interior insulation systems4.3
* Plaster-finishing profile * Plaster-finishing profile

119Multipor interior insulation systems
4
Multipor interior insulation systems 4.0
Detail drawings for interior insulation systems 4.3
Detail drawings for interior insulation systems
Timber ceiling without exposed joists/
interior insulation to external wall
Reinforced concrete ceiling with insulating wedge/
interior insulation to external wall
Roof connection to timber joist ceiling Roof connection to slab ceiling
Interior insulation 16-009
Interior insulation 16-005 Interior insulation 16-006
Interior insulation 16-010
007 Reinforced concrete ceiling040 Floating screed135 Plasterboard168 Existing masonry169 Existing interior plaster (or levelling plaster)170 Existing ceiling plaster
172 Timber joists173 Multipor lightweight mortar174 Multipor reinforcement mesh178 Multipor hemp-felt insulation strips180 Trowel joint250 Multipor internal insulation
254 Multipor insulating wedge286 System-compatible interior plaster328 Floorboards329 Dry screed330 Screed-edge insulation strips333 Reed board
Download these and other detail drawings at www.multipor.com/detaildrawings.php
*
* Platte nicht „knirsch“ gestoßen* Leave 2-3 mm wide joint between wall and ceiling insulation
* Platte nicht „knirsch“ gestoßen
* Leave 2-3 mm wide joint between wall and ceiling insulation

120 Multipor interior insulation systems
Multipor interior insulation systems4.0
Detail drawings for interior insulation systems4.3
Detail drawings for interior insulation systems
Cross-section with wall heating Wall heating – three-dimensional view
Timber framework/
Interior insulation with Multipor lightweight mortar
Timber framework/
Interior insulation with Multipor clay mortar
Interior insulation 16-007
Interior insulation 16-011
Interior insulation 16-008
Interior insulation 16-012
005 Exterior render026 Membrane under roof, vapor-permeable 133 Lightweight mortar168 Existing masonry169 Existing interior plaster (or levelling plaster)172 Timber joists173 Multipor lightweight mortar
174 Multipor reinforcement mesh182 Multipor reinforcement mesh 7 x 7 mm250 Multipor interior insulation 286 System-compatible interior plaster287 Multipor clay mortar 326 Multipor screw-in anchor (though mesh, approx. 4 anchors per m²)
Download these and other detail drawings at www.multipor.com/detaildrawings.php
* Wall heating
* Wall heating
* Putzträger (z.B. Schilfrohr) bei Ausgleichsputz*Plaster baseboard (e.g. reed board) for levelling plaster * Putzträger (z.B. Schilfrohr) bei Ausgleichsputz*Plaster baseboard (e.g. reed board) for levelling plaster
121Multipor interior insulation systems
4
Multipor interior insulation systems 4.0
Detail drawings for interior insulation systems 4.3
Detail drawings for interior insulation systems
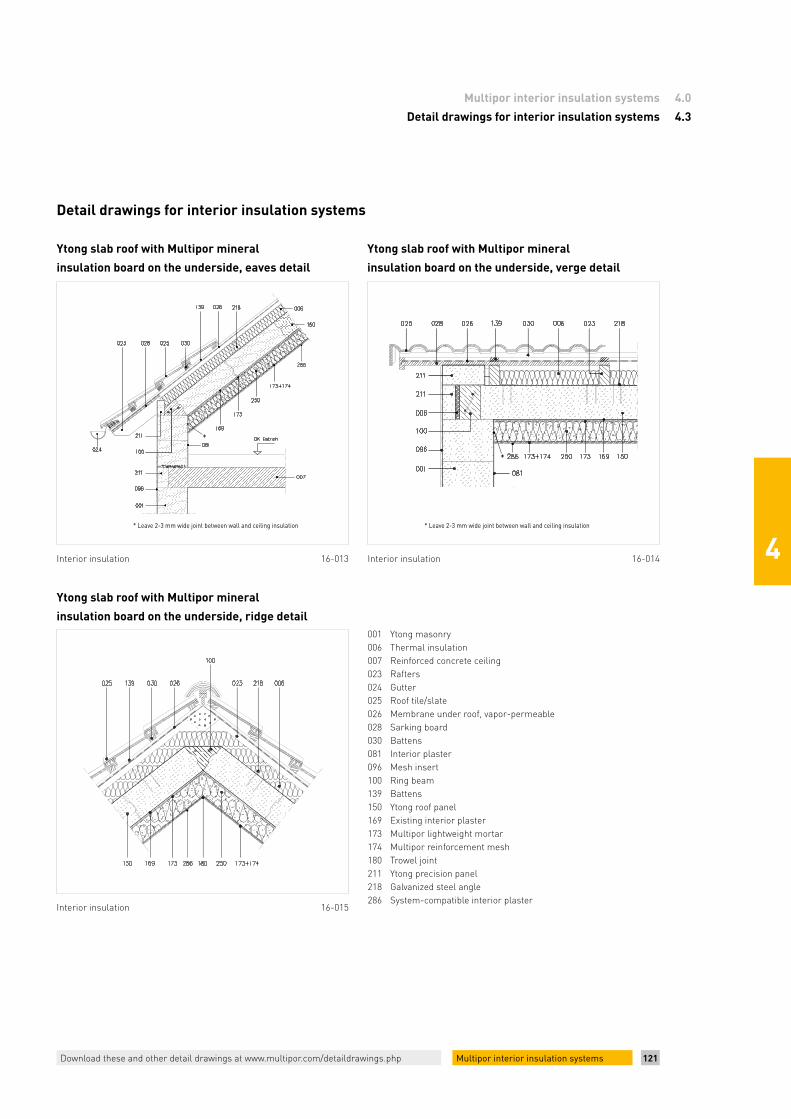
Ytong slab roof with Multipor mineral
insulation board on the underside, eaves detail
Ytong slab roof with Multipor mineral
insulation board on the underside, verge detail
Ytong slab roof with Multipor mineral
insulation board on the underside, ridge detail
Interior insulation 16-013
Interior insulation 16-015
Interior insulation 16-014
001 Ytong masonry006 Thermal insulation007 Reinforced concrete ceiling023 Rafters024 Gutter025 Roof tile/slate026 Membrane under roof, vapor-permeable 028 Sarking board030 Battens081 Interior plaster096 Mesh insert100 Ring beam139 Battens150 Ytong roof panel169 Existing interior plaster173 Multipor lightweight mortar174 Multipor reinforcement mesh180 Trowel joint 211 Ytong precision panel218 Galvanized steel angle286 System-compatible interior plaster
* Platte nicht „knirsch“ gestoßen * Platte nicht „knirsch“ gestoßen
Download these and other detail drawings at www.multipor.com/detaildrawings.php
* Leave 2-3 mm wide joint between wall and ceiling insulation * Leave 2-3 mm wide joint between wall and ceiling insulation
122 Multipor interior insulation systems
Multipor interior insulation systems4.0
4.3 Detail drawings for interior insulation systems
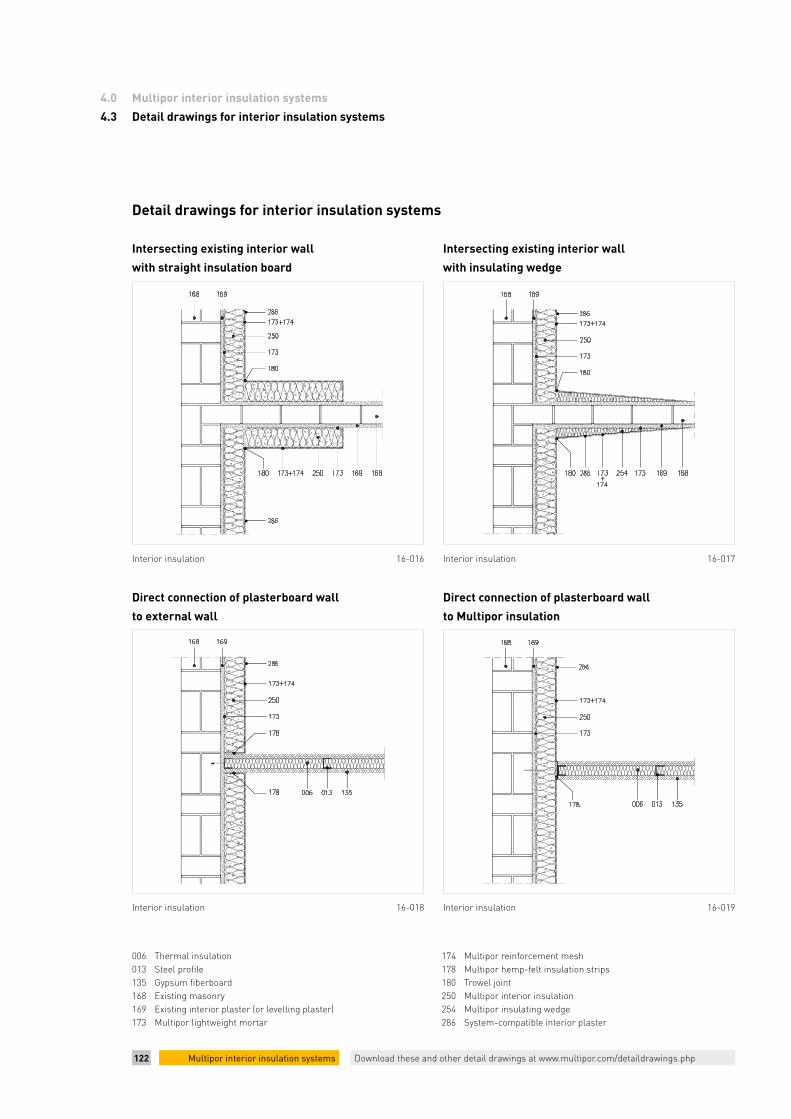
Detail drawings for interior insulation systems
Intersecting existing interior wall
with straight insulation board
Intersecting existing interior wall
with insulating wedge
Direct connection of plasterboard wall
to external wall
Direct connection of plasterboard wall
to Multipor insulation
Interior insulation 16-016
Interior insulation 16-018
Interior insulation 16-017
Interior insulation 16-019
006 Thermal insulation013 Steel profile135 Gypsum fiberboard168 Existing masonry169 Existing interior plaster (or levelling plaster)173 Multipor lightweight mortar
174 Multipor reinforcement mesh178 Multipor hemp-felt insulation strips 180 Trowel joint 250 Multipor interior insulation 254 Multipor insulating wedge 286 System-compatible interior plaster
Download these and other detail drawings at www.multipor.com/detaildrawings.php

4

124 Multipor interior insulation systems
Multipor interior insulation systems4.0
Products and system components4.4
Products and system components4.4
Solid, dimensionally stable Multipor
and Multipor compact plus mineral
insulation boards come in light-
weight, handy formats which can
quickly and easily be cut to size and
sanded smooth to give a neat finish.
Installation is also quick and
straightforward; the boards are
simply bonded with Multipor light-
weight mortar, so in most cases
there is no need for additional me-
chanical fastening. The products
undergo continuous internal and
external production quality control
before they arrive at the point of
use or place of interim storage.
A high degree of system reliability
during subsequent use is further
confirmation of product quality.
Delivery and handling
Multipor interior insulation systems
together with all system compo-
nents should ideally be delivered
straight to the point of use wher-
ever possible to avoid unnecessary
costly and time-consuming interim
transport. However, if interim sto-
rage is required, a stable, level and
dry storage site should be provided.
Our experienced haulage compa-
nies have vehicles equipped with a
hydraulic crane or fork lift which
carefully places insulating boards in
individual packs or pallets on a flat
substrate beside the vehicle.
It is also possible to set down the
materials close to the installation
site by arrangement, subject to fea-
sibility. We can provide more com-
pact vehicles to deliver goods to
smaller construction sites by spec-
ial arrangement. These vehicles are
also suitable for supplying small
additional quantities.
Only suitable, approved lifting gear
is to be used for unloading and
handling. Pallet trucks can also be
used to transport Multipor mineral
insulation boards on hard surfaces.
The clamp on the lifting gear must
pass round the pack and under-
neath the pallet to grip the load se-
curely during unloading. Under no
circumstances should the clamp
grip or press the Multipor mineral
insulation boards directly (see Fig.
1), nor should pallets be stacked.
Care must also be taken to prevent
any cables, chains or slings used
during unloading from damaging
the material.
Small, manageable packs of Multi-
por mineral insulation boards are
bundled on a pallet which is shrink-
wrapped to protect it from the
weather. The shrink-wrap also
serves to keep the packaging unit
stable and should not be removed
until just before use.
Multipor compact plus comes in
handy boxes which are palletized
for delivery to the construction site
or wholesaler.
Multipor pallet
Small pack of Multipor mineral insulation board
Box of Multipor compact plus
Fig.1: Loading instructions

125Multipor interior insulation systems
4
Multipor interior insulation systems 4.0
Products and system components 4.4
Multipor insulating wedges designed to reduce thermal bridging are
also packed securely in handy boxes. The packaging can be disposed
of responsibly (e.g. in Germany in compliance with Interseroh Contract
No. 31560) – another way in which we help to protect the climate and
environment.
Tools and resources
Construction progress is fast and proficient when you use tools designed
for Multipor interior insulation systems.
Fine-toothed Multipor handsaw
Multipor mineral insulation boards can be trimmed to size accurately and
effortlessly using a fine-toothed Multipor handsaw [1] [7 – 10].
Multipor notched trowel
Multipor notched trowels are designed to apply a full bed of Multipor
lightweight mortar to the mineral insulation boards. Notch size per board
thickness:
12-mm notched trowel for insulation thickness up to 140 mm
15-mm notch trowel for insulation thickness of 160 mm or above.
Clean notched trowels thoroughly immediately after use for perfect
troweling every time [2].
Multipor paddle mixer
Multipor lightweight mortar should ideally be mixed to a workable con-
sistency in a Multipor graduated bucket using a low-speed mixer with a
long, sturdy paddle. Clean paddle mixers thoroughly after use for optimal
mixing results [3].
Multipor sanding board
Multipor and Multipor compact plus mineral insulation boards can be
sanded with ease. After sanding, remove the sanding dust with a hand
Multipor insulating wedge
Multipor handsaw
Multipor notched trowel
Multipor paddle mixer
1
2
3
Multipor toolsFor safe and easy application

126 Multipor interior insulation systems
Multipor interior insulation systems4.0
Products and system components4.4
brush or industrial vacuum cleaner to ensure optimum adhesion of the
Multipor lightweight mortar [4] [11].
Multipor bucket
Multiple buckets are ideal for mixing Multipor lightweight mortar. The bucket
is graduated so you can easily measure the required amount of water accu-
rately – 4 l for 10 kg and 8 l for a 20 kg-bag [5].
System components
Multipor lightweight mortar
Mix the Multipor lightweight mortar with the quantity of water indicated on
the mortar bag according to the directions and the safety precautions. Note
for example, that Multipor lightweight mortar should not be used if the air or
surface temperature is below 5° C. The level indicator on the Multipor bucket
simplifies the task of mixing the lightweight mortar (20 kg/bag) for subse-
quently bonding the Multipor mineral insulation boards, applying the rein-
forcement layer and smoothing if necessary. To obtain a workable consistency
it is advisable to use a low-speed mixer with a long, sturdy paddle. Leave the
mortar to stand for around 5 minutes and then stir again before use 6].
Practical tip: The graduated Multipor bucket makes it easy to add the
correct quantity of water to the Multipor lightweight mortar.
■■ Add 8 l of water per 20 kg bag of Multipor lightweight mortar and mix
with the paddle mixer.
■■ Processing time: approx. 1.5 hours, depending on the weather. Do not
use if the surface or ambient air temperature is below 5° C.
■■ Multipor lightweight mortar has a high coverage rate; one bag yields 30 l
of fresh mortar, which is enough to cover up to 6 m² with a 5-mm layer
thickness, depending on the condition of the substrate.
Multipor sanding board Mixing Multipor lightweight mortar
Easy to trim
Preparing chases in the boards to accommo-date pipework
4
Multipor bucket
5 6
7
8
Creating chases
9

127Multipor interior insulation systems
4
Multipor interior insulation systems 4.0
Products and system components 4.4
■■ Multipor lightweight mortar can
also be applied with conventional
plastering machines. The set-
tings required vary, depending on
the machine.
Always follow the technical data
sheet and directions for use on the
mortar bag. Multipor lightweight
mortar can be stored on a pallet in a
dry place for up to 12 months from
the date of production.
Use only Multipor lightweight mor-
tar, otherwise we cannot guarantee
the performance of the Multipor in-
sulation system.
Multipor hemp-felt insulation
strips
Special care must be taken to ensure
that the first course of internal in-
sulation is plumb and level, allowing
for any height differences in the
adjacent floor construction.
It is also important to isolate any
structures likely to exhibit different
expansion or settling behavior from
the insulation board with decoupling
strips. Multipor hemp-felt insulation
strips are particularly suitable for
ensuring optimal sound insulation
and for decoupling Multipor and
Multipor plus mineral insulation
boards when fitting interior insula-
tion up to intersecting flexible com-
ponents (ceilings, floors or interior
walls) [12].
Chases for existing wiring Shaping to contours
10 11
Multipor hemp-felt insulation strips
12
Lightweight mortar LW as per EN 998 -1
Compressive strength class CS II; 1.5–5.0 N/mm2
Diffusion resistance factor ≤ 10
Water absorption due to capillary action W2, c ≤ 0.2 kg/(m2min0.5)
Thermal conductivity λ10,dry = 0.18 W/(mK)
Building material class A2-s1, d0; non-combustible
Weight per bag 20 kg
Pallet content 40 bags
Table 1: Technical data for Multipor lightweight mortar
100% hemp fibers
Approval Construction Products List C
Bulk density 155–210 kg/m³
Thermal conductivity λ 10,dry = 0.047 W/(mK)
Water vapor diffusion resistance factor = 1 to 2
Building material class E
Spec. heat capacity c = 2300 J/(kgK)
Roll size L x W x H25 m x 50 mm x 5 mm25 m x 100 mm x 5 mm
Table 2: Technical data for Multipor hemp-felt insulation strips

128 Multipor interior insulation systems
Multipor interior insulation systems4.0
Products and system components4.4
Multipor reveal boards
Multipor reveal boards are ideal for re-
ducing thermal bridging round window
reveals. Boards are available in thick-
nesses of 20, 30 and 40 mm, depen-
ding on space and requirements, and
are processed in the same way as
Multipor and Multipor compact plus
mineral insulation boards [13] [14].
Installing Multipor reveal boards
Multipor insulating wedge Intersecting wall with Multipor insulating wedge
Multipor reveal board
14
15 16
13
Dry bulk density approx. 150 kg/m³
Compressive strength ≥ 350 kPa
Tensile strength ≥ 80 kPa
Thermal conductivity λ = 0.050 W/(mK)
Water vapor diffusion resistance factor µ = 3
Building material class A1; nicht brennbar
Dimensions, delivery format Size L x W x H [mm] Unit/box m2/box
600 x 250 x 20 600 x 250 x 30600 x 250 x 40
1286
1.801.200.90
Dry bulk density approx. 95 kg/m³
Compressive strength ≥ 200 kPa
Thermal conductivity λ = 0.042 W/(mK)
Water vapor diffusion resistance factor µ = 2
Building material class A1; non-combustible
Dimensions, delivery format Size L x W x H [mm] Unit/box m2/box
390 x 500 x 60/20 10 1.95
Table 3: Technical data for Multipor reveal board
Table 4: Technical data for Multipor insulating wedge
Multipor insulating wedge
Fit 500-mm wide Multipor insula-
ting wedges to interior walls and
ceilings where they intersect the
external wall to reduce thermal
bridging. Apply in the same way as
Multipor mineral insulation boards
[15] [16].

129Multipor interior insulation systems
4
Multipor interior insulation systems 4.0
Products and system components 4.4
Multipor 4 x 4 mm reinforcement mesh
Embed the Multipor reinforcement mesh gently into the top third of the freshly
applied lightweight mortar, taking care to overlap joints by at least 10 cm [17]
[18]. Coverage: 1.10 m²/m². The mesh is available in 1 m wide rolls and 25 or
50 m lengths [19].
Health and safety on the construction site
Safety must always be a number one priority.
The processing of Multipor insulation systems is governed by safety require-
ments relating to working platforms and scaffolding as well as general
construction site safety. Other technical rules and regulations also apply to
ensure that construction site operations run smoothly.
These include general personal safety and hygiene measures such as the
wearing of safety goggles and dust masks during sanding operations, espe-
cially when working overhead.
... and troweling over
Embedding the reinforcement mesh ...
17
18
19
Alkali-resistant glass fiber mesh for internal and external use, white
Grammage 160 +/– 5 g/m²
Mesh width 4 x 4 mm
Strength– on delivery– after aging (ETAG 004)
≥ 1750 N/5 cm≥ 50 % und ≥ 1000 N/5 cm
Roll size– width– length
1 m25 or 50 m
Coverage approx. 1.1 m²/m²
Table 5: Technical data for Multipor 4 x 4 mm reinforcement mesh
Multipor reinforcement mesh (25 or 50 m)

130 Multipor interior insulation systems
Multipor interior insulation systems4.0
Using Multipor interior insulation systems with lightweight mortar4.5
4.5
External wall requirements
The wall to which the Multipor inte-
rior insulation system is applied
must be protected from rising damp
and moisture ingress. An effective
vertical or horizontal barrier mem-
brane is an essential requirement.
These can be retrofitted by suitable
means if necessary. Water under
pressure (e.g. groundwater) poses a
particular problem – and calls for an
inspection of the building.
Protection against driving rain
DIN 4108 -3 provides guidance for as-
sessing whether the external facade
offers sufficient protection against
driving rain, which is part of the initial
planning process. If resistance to dri-
ving rain cannot be determined un-
equivocally by this means, it is pos-
sible to conduct an initial water ab-
sorption test on external facades
using a gauge known as a Karsten or
Rilem tube. Further information can
be found under the following link:
https://ktauniversity.com/wind-driven-
rain-resistance-testing/.
More detailed wall tests may then be
required, depending on the results.
Any damage or shortcomings found –
e.g. defective joint mortar – must
be rectified using carefully selected
methods. Moisture-adaptive impreg-
nation is one means of effectively pro-
tecting against driving rain, and must
be renewed at specified intervals – in
consultation with the manufacturer of
the protective wall coating.
Benefits:
■■ Practical solutions for interior insulation without vapor barriers
■■ Vapor-permeable and capillary-active
■■ Compatible system components ensure overall system reliability
■■ Moisture-regulating with high reserves
■■ Safety of use – confirmed by over 20 years of practical experience
■■ Individual apartments/rooms can be refurbished step-by-step
■■ Non-combustible, entirely mineral-based
■■ Easy to process and install using standard construction tools
■■ Can be simply bonded to solid substrates – anchor fixings not normally required
Insulation thicknesses of 220 mm and above available on request
Table 1: Multipor mineral insulation boards – dimensions and thermal resistance R [m²K/W]
Thermal conductivity (rated value)
Board thickness [mm] Multipor compact plus
Board thickness [mm] Multipor interior insulation system
30 40 50 60 80 100 120 140 160 180 200 220 240 260 280 300
λ = 0.042 W/(mK) – – – 1.429 1.905 2.381 2.857 3.333 3.810 4.286 4.762 5.238 5.714 6.190 6.667 7.143
λ = 0.045 W/(mK) 0.667 0.889 1.111 – – – – – – – – – – – – –
Insulation applied to the inside of external walls is often the only option for upgrading the thermal insulation of
elaborate or listed historic facades. Multipor or Multipor compact plus interior insulation systems can also be used
in new buildings with exposed concrete facades, for example. Water-vapor-permeable, capillary-active Multipor
interior insulation systems are ideal for insulating the inside of different solid wall materials, without the hassle of
installing a vapor barrier.
Using Multipor interior insulation systems with lightweight mortar

131Multipor interior insulation systems
4
Multipor interior insulation systems 4.0
Using Multipor interior insulation systems with lightweight mortar 4.5
Table 2: Assessment of substrates for interior insulation
Further information and recommen-
dations for assessment can be found
in WTA Guidelines 6–4 “Interior insu-
lation as per WTA I: Planning guide”
(Innendämmung nach WTA I: Pla-
nungsleitfaden), 6–5 “Interior insula-
tion as per WTA II: The use of numeri-
cal calculation methods to verify inte-
rior insulation systems” (Innendäm-
mung nach WTA II: Nachweis von In-
nendämmsystemen mittels nume-
rischer Berechnungsverfahren), 8–4
“Restoration of half-timbered con-
structions as per WTA IV: External
cladding” (Fachwerkinstandsetzung
nach WTA IV: Außenbekleidungen)
and 8–5 “Restoration of half-timbered
constructions as per WTA V: Interior
Old existing wall
1
Checking the evenness of the substrate
2
insulation” (Fachwerkinstandsetzung
nach WTA V: Innendämmung).
Substrate
Multipor interior insulation systems
need a sufficiently even substrate
to achieve a full-surface bond. The
substrate must also be dry, load-
bearing and free from residues that
may hinder adhesion [1] [2].
Non-load-bearing old plaster, barri-
er membranes, coats of paint wall-
papers etc. must be removed befor-
ehand and defective areas repaired.
Silicate paints, on the other hand,
often provide a suitable substrate for
bonding due to their silicifying prop-
erties. If the interior plaster is com-
pletely removed, a levelling layer may
be needed in some circumstances –
for example to fill large joint cavities.
A ‘dubbing out’ coat of plaster can
be applied to the existing substrate
to level out larger areas of uneven-
ness. Defects are best repaired and
plastered with a CS II plaster mortar
as per DIN EN 998 -1 with a com-
pressive strength of at least 1.5 to
5 N/mm², such as Multipor light-
weight mortar for example. The
plaster substrate must be carefully
tested by the specialist contractor
to verify its suitability for adhesion.
Please contact your Multipor techni-
cal advisor for more information
about surface testing.
Freshly plastered substrates need a
defined drying period before Multi-
por mineral insulation boards can be
applied. Please refer to the plaster
manufacturer’s directions.
Existing substrate Measure Recommendations
Smooth, fully mortared masonry None Remove dust, dirt and paint if necessary
Uneven substrate Apply levelling plaster CS II lime-cement plaster
Uneven or flaking old plaster Level out or remove If necessary, level with CS II lime-cement plaster
Lime or lime-cement plaster NoneRemove dust, dirt and flaking parts and patch if necessary
Gypsum plaster Remove Completely remove gypsum plaster
Old paint Remove Completely remove old paint (e.g. by sanding)
Wallpaper Remove Wash and scrape off, remove residual paste
Waterlogged masonry Seal, leave to dryReplace horizontal or vertical membrane, leave to dry out
Half-timbered wall with clay plaster on the inside
Level with clay plaster if necessary
Use clay plaster system (see Chapter 4.5)
Lightweight construction Unsuitable substrate Not suitable for Multipor insulation
Existing insulation (e.g. lightweight wood-wool boards or similar)
RemoveRemove old insulating materials, level with CS II lime-cement plaster if necessary

132 Multipor interior insulation systems
Multipor interior insulation systems4.0
Using Multipor interior insulation systems with lightweight mortar4.5
Construction site conditions
During the processing and setting of Multipor lightweight mortar the room
temperature and surface temperature of the structure must not fall below
> 5 °C. Relative humidity should not exceed 80%.
Components in contact with the ground
The floor and wall area of structural components adjacent to the ground must
be permanently protected against rising damp and moisture penetration.
This is normally done by applying a waterproof membrane to the outside of the
building at the time of construction. The same applies to the base plate (sole
plate). Bitumen or plastic sheeting is suitable for retrofit waterproofing.
Mixing Multipor lightweight mortar
Mix Multipor lightweight mortar (20 kg/bag) with the quantity of water indicated
on the mortar bag. The Multipor bucket is graduated to make it easy to add the
right quantity. To obtain a workable consistency we advise using a low-speed
mixer with a long, sturdy paddle [3]. Leave the mixed mortar to stand for about
5 minutes before re-stirring. 20 kg of lightweight mortar combined with the
required amount of water yields approximately 30 liters of fresh mortar.
Clean tools and mixers thoroughly after use or before long breaks to ensu-
re optimal mixing and processing results [4].
Bonding Multipor mineral insulation boards
Using a 12-mm notched trowel, apply a full bed of Multipor lightweight
mortar to the back of the Multipor mineral insulation board and comb to
create an optimum adhesive bond [5–7]. Depending on the thickness of
insulation, we recommend using different trowel sizes to obtain the right
ridge thickness required for full-surface bond:
■■ 12-mm notched trowel for insulation thickness up to 140 mm
■■ 15-mm notch trowel for insulation thickness of 160 mm or above
Mixing Multipor lightweight mortar Cleaning the tools
3 4
Decoupling strips, e.g. made from hemp
8
Applying the lightweight mortar …
… combing it
A fully mortared mineral insulation board
5
6
7

133Multipor interior insulation systems
4
Multipor interior insulation systems 4.0
Using Multipor interior insulation systems with lightweight mortar 4.5
Slide into place Butt head and bed joints up tightly
Ridges of Multipor lightweight mortar
Ridges start to blur ...
... full coverage
Position
10 11
12
13
14
9
Slight unevenness in the substrate can also be levelled out in this way.
If necessary, Multipor mineral insulation boards can be laid wet-on-wet
(buttering and floating method) to level out further uneven areas.
The following points must be strictly observed when using vapor-permeable,
capillary active systems such as Multipor or Multipor compact plus interior
insulation:
■■ Bond with a full bed of Multipor lightweight mortar
■■ Slide and press the Multipor mineral insulation board into position
correctly
■■ Mortar-free head and bed joints [12–14].
Larger tolerances in the substrate must be evened out with a suitable level-
ling plaster before starting the insulation work. Table 2 “Assessment of
substrates for interior insulation“ provides useful guidance on this subject.
Special care must be taken to ensure that the first course is plumb and level,
allowing for any height differences in the adjacent floor construction. Struc-
tures like to exhibit different expansion or settling behavior (e.g. timber joist
ceilings and floors) must be decoupled from the insulation board using
Multipor hemp-felt insulation strips [8]. Bond the Multipor mineral insulation
boards with a minimum joint offset of 15 cm using a full bed of Multipor light-
weight mortar [9–11]. After applying the bonding mortar, position the Multi-
por mineral insulation boards on the wall surface and press down to ensure
the entire surface is fully bonded. Only a full-surface bond will prevent warm,
damp indoor air flowing behind the insulation and in addition to regulating
humidity, it also guarantees the long-term performance of the interior insu-
lation in terms of building physics. Figures [12–14] illustrate how the ridges
of Multipor lightweight mortar should respond to ensure correct positioning
of Multipor mineral insulation boards. It is not necessary to interlock the in-
sulation boards with intersecting internal walls; they simply need to butt up
tightly against one another. During subsequent reinforcement, do not run the
mesh around internal corners.

134 Multipor interior insulation systems
Multipor interior insulation systems4.0
Using Multipor interior insulation systems with lightweight mortar4.5
Cutting and shaping
It is easy to cut Multipor mineral
insulation board to fit the features
of the room. Closers can also
be quickly cut to size using a fine-
toothed Multipor handsaw [15].
Small areas of unevenness can be
sanded smooth with the Multipor
sanding board before applying sub-
sequent coatings [16] [17]. Remove
any sanding dust from the surface
of the insulation boards before ap-
plying the reinforcement plaster,
and re-prime the sanded area if
necessary.
Solid intermediate floors
Vapor barriers between two storeys
are unnecessary.
Floorboards on top of a timber-
joist ceiling
Tongue-and-groove floorboards or
engineered wooden boards may be
laid on top of a timber-joist ceiling.
When renovating old buildings,
the structural condition of the tim-
ber joists and flooring should be
checked and if necessary repaired
before installing the insulation
boards. There should be no give or
spring in the floor (screw down
loose floorboards).
Where possible, Multipor mineral
insulation boards should be installed
on the unfinished floor and the sub-
sequently laid screed should be
decoupled by inserting screed-edge
insulation strips between the screed
and the insulation boards. If it is not
possible to lay the insulation boards
on the unfinished floor, the first
course must be laid straight on to
the top edge of the finished floor,
against the wall (the resulting ther-
mal bridge created by the ceiling
must be assessed at the planning
stage – see Chapter 7.1.3). The in-
sulation must also be decoupled
from flexible components (such as
wooden flooring) using Multipor
hemp-felt insulation strips [18].
Intersecting timber-joist ceilings
must also be decoupled from Multi-
por mineral insulation boards at the
point of intersection using the same
decoupling strips. The strips absorb
any vibrations from these compo-
nents to prevent them transferring
to the insulation.
Reinforcing the insulated wall
To reinforce the insulated surface,
apply reinforcement plaster (Multi-
por lightweight mortar) with an av-
erage thickness of 5 mm to the
entire surface using a 10-mm or
12-mm notched trowel. Then press
in the alkali-resistant Multipor rein-
forcement mesh and work carefully
into the upper third of the reinforce-
ment layer [19] [20].
Cut to size
Sand off uneven surfaces
Shape to contours
15
16
17
Elastic decoupling at floor level
18

135Multipor interior insulation systems
4
Multipor interior insulation systems 4.0
Using Multipor interior insulation systems with lightweight mortar 4.5
Apply the finishing plaster
Multipor fine lime plaster
Smooth with a float
Texture with a trowel
Apply the reinforcing layer
19
Embed the mesh
20 21
22
23
24
■■ Reinforcement: Multipor lightweight mortar approx. 3 to 4 kg/m2
for a 5-mm layer thickness
■■ Mesh: Multipor reinforcement mesh 4 x 4 mm approx. 1.1 m2/m2
(overlap approx. 10 cm)
For additional reinforcement, use alkali-resistant armored mesh to increase
the compressive strength of impact-prone areas of interior walls (e.g. stair-
wells, public buildings such as schools). Embed the additional mesh in the
Multipor lightweight mortar before the normal reinforcement layer, with the
edges butting up rather than overlapping. Allow the armored reinforcement
to dry before applying the normal reinforcement layer to the entire surface.
This armored mesh can also be inserted before fitting edge protectors and
expansion joint profiles.
Coatings
The surface of Multipor and Multipor compact plus interior insulation sys-
tems can be finished in various ways – for example plastering, painting or
tiling. Clay plasters or plasterboard (drywall boards) are another option and
offer great scope for creating decorative finishes.
Applying finishing plaster to the reinforcement layer
Apply a finishing coat of Multipor lightweight mortar or Multipor fine lime
plaster [21] in a 2 to 3-mm layer thickness and smooth with a felted float
before it sets [22] [23]. Multipor lime finishing plaster is applied in a 2-mm
layer thickness and is suitable for a creating superior quality finish.
Once this is done, you can apply wallpaper or paint the walls with Multipor
interior silicate paint. Alternatively, apply Class CS I/CS II CR finishing plaster
to EN 998 -1 or silicate textured plaster, e.g. Multipor silicate plaster, with a
trowel ‘to grain thickness’ and texture when still wet [24]. Apply gypsum
finishing plasters in a maximum layer thickness of 3 mm and lime or fine
lime plasters in a 3 to 5-mm layer thickness. The total thickness of plaster

136 Multipor interior insulation systems
Multipor interior insulation systems4.0
Using Multipor interior insulation systems with lightweight mortar4.5
(reinforcement layer and finishing
plaster) should not exceed 8 mm.
The plaster surfaces can then be fi-
nished with Multipor interior silicate
paint. Allow the plaster to dry fully
before painting.
Coverage:
■■ Finishing plaster with Multipor
lightweight mortar:
approx. 2 kg/m2 for a 2 to 3-mm
layer thickness
■■ Finishing plaster with Multipor
smooth lime plaster:
approx. 2 kg/m2 for a 2-mm layer
thickness (see Table 3)
■■ Please refer to the respective
manufacturer‘s technical data
sheets for coverage of other
suitable plasters.
Other mineral-based lightweight
plasters can also be used as a
finishing plaster, provided that they
do not exceed compressive strength
class CS II. As a basic rule, the finish-
ing plaster should have a maximum
thickness of 3 mm, the base plaster
and reinforcing layer ≤ 8 mm and
never thicker than the reinforcing
layer underneath. It is also important
to ensure that the finishing plaster
bonds effectively with the Multipor
lightweight mortar – it’s a good idea
to conduct plaster tests beforehand
to check this.
Wallpaper
Wallpapers can also be applied to
Multipor insulation system for a
decorative finish. We recommend
the following types and materials:
■■ woodchip wallpapers
■■ embossed wallpapers
■■ printed wallpapers.
Under typical conditions in a home
(20° C and average relative humid-
ity 50% to maximum 60%), there are
no restrictions in terms of building
physics.
Woodchip, embossed and glass-
fiber wallpapers should ideally be
applied to a plaster substrate of
Multipor lightweight mortar.
…or brush
27
Apply Multipor interior silicate paint with a roller ...
26
Multipor interior silicate paint
25
Technical data Multipor fine lime plasterMultipor smooth lime plaster
Compressive strength CS II 1.5 – 5.0 N/mm2 > 1.0 N/mm²
Water vapor perme- ability coefficient
µ ≤ 13 µ ≤ 25
Bulk density: 1800 kg/m³ 984 kg/m³
Building material class A1; non-combustible A1; non-combustible
Air and ambient temperature
≥ 5 °C ≥ 5°C
Processing time approx. 70 – 110 min. approx. 120 Min.
Delivery form25 kg bag48 bags per pallet
20 kg bag48 bags per pallet
Storagedry on pallet, approx. 12 months
dry,approx. 6 months
Water requirement per bag
approx. 5.5 – 6.0 l approx. 8 – 9 l
Yield per bagapprox. 14 l fresh mortar;sufficient for approx. 5.0 m2
in a 3-mm layer thickness
approx. 10 m² for a 2-mm layer thickness
Coverage per m²approx. 5.0 kg/m2 for a max. 3-mm layer thickness
approx. 2.0 kg/m2 for a max. 2-mm layer thickness
Table 3: Multipor fine lime plaster/smooth lime plaster
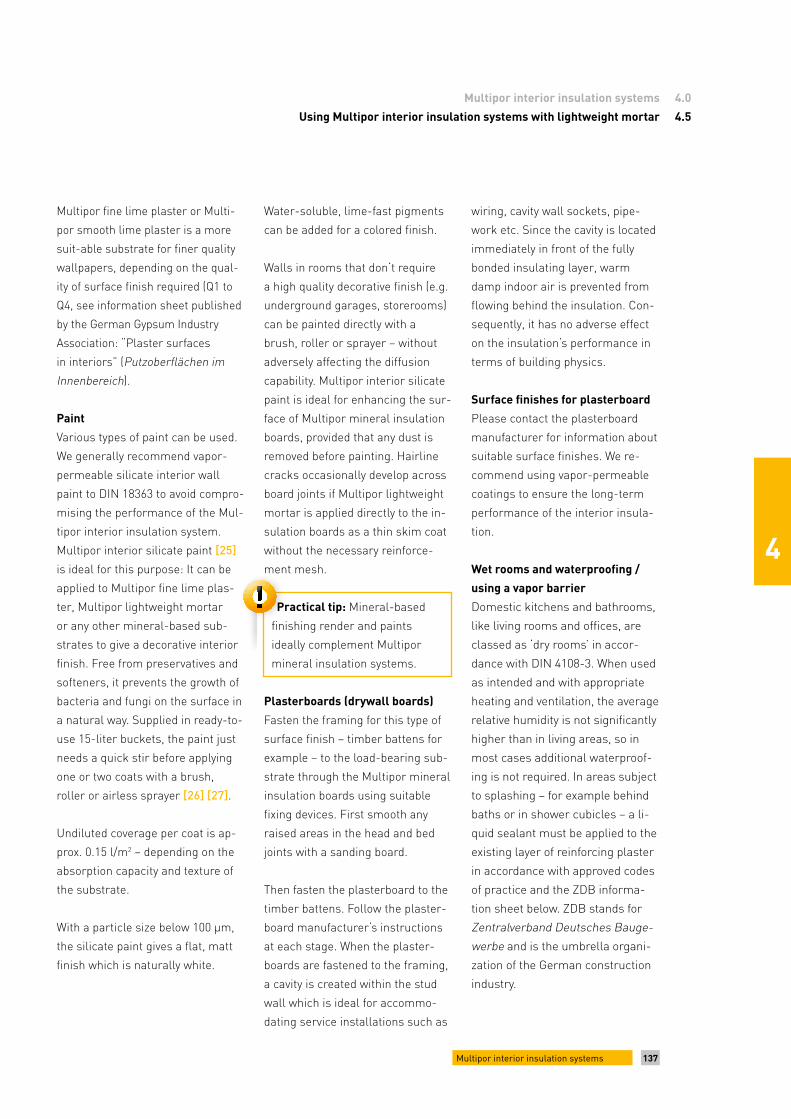
137Multipor interior insulation systems
4
Multipor interior insulation systems 4.0
Using Multipor interior insulation systems with lightweight mortar 4.5
Multipor fine lime plaster or Multi-
por smooth lime plaster is a more
suit-able substrate for finer quality
wallpapers, depending on the qual-
ity of surface finish required (Q1 to
Q4, see information sheet published
by the German Gypsum Industry
Association: “Plaster surfaces
in interiors” (Putzoberflächen im
Innenbereich).
Paint
Various types of paint can be used.
We generally recommend vapor-
permeable silicate interior wall
paint to DIN 18363 to avoid compro-
mising the performance of the Mul-
tipor interior insulation system.
Multipor interior silicate paint [25]
is ideal for this purpose: It can be
applied to Multipor fine lime plas-
ter, Multipor lightweight mortar
or any other mineral-based sub-
strates to give a decorative interior
finish. Free from preservatives and
softeners, it prevents the growth of
bacteria and fungi on the surface in
a natural way. Supplied in ready-to-
use 15-liter buckets, the paint just
needs a quick stir before applying
one or two coats with a brush,
roller or airless sprayer [26] [27].
Undiluted coverage per coat is ap-
prox. 0.15 l/m2 – depending on the
absorption capacity and texture of
the substrate.
With a particle size below 100 μm,
the silicate paint gives a flat, matt
finish which is naturally white.
wiring, cavity wall sockets, pipe-
work etc. Since the cavity is located
immediately in front of the fully
bonded insulating layer, warm
damp indoor air is prevented from
flowing behind the insulation. Con-
sequently, it has no adverse effect
on the insulation‘s performance in
terms of building physics.
Surface finishes for plasterboard
Please contact the plasterboard
manufacturer for information about
suitable surface finishes. We re-
commend using vapor-permeable
coatings to ensure the long-term
performance of the interior insula-
tion.
Wet rooms and waterproofing /
using a vapor barrier
Domestic kitchens and bathrooms,
like living rooms and offices, are
classed as ‘dry rooms’ in accor-
dance with DIN 4108-3. When used
as intended and with appropriate
heating and ventilation, the average
relative humidity is not significantly
higher than in living areas, so in
most cases additional waterproof-
ing is not required. In areas subject
to splashing – for example behind
baths or in shower cubicles – a li-
quid sealant must be applied to the
existing layer of reinforcing plaster
in accordance with approved codes
of practice and the ZDB informa-
tion sheet below. ZDB stands for
Zentralverband Deutsches Bauge-
werbe and is the umbrella organi-
zation of the German construction
industry.
Water-soluble, lime-fast pigments
can be added for a colored finish.
Walls in rooms that don‘t require
a high quality decorative finish (e.g.
underground garages, storerooms)
can be painted directly with a
brush, roller or sprayer – without
adversely affecting the diffusion
capability. Multipor interior silicate
paint is ideal for enhancing the sur-
face of Multipor mineral insulation
boards, provided that any dust is
removed before painting. Hairline
cracks occasionally develop across
board joints if Multipor lightweight
mortar is applied directly to the in-
sulation boards as a thin skim coat
without the necessary reinforce-
ment mesh.
Practical tip: Mineral-based
finishing render and paints
ideally complement Multipor
mineral insulation systems.
Plasterboards (drywall boards)
Fasten the framing for this type of
surface finish – timber battens for
example – to the load-bearing sub-
strate through the Multipor mineral
insulation boards using suitable
fixing devices. First smooth any
raised areas in the head and bed
joints with a sanding board.
Then fasten the plasterboard to the
timber battens. Follow the plaster-
board manufacturer‘s instructions
at each stage. When the plaster-
boards are fastened to the framing,
a cavity is created within the stud
wall which is ideal for accommo-
dating service installations such as
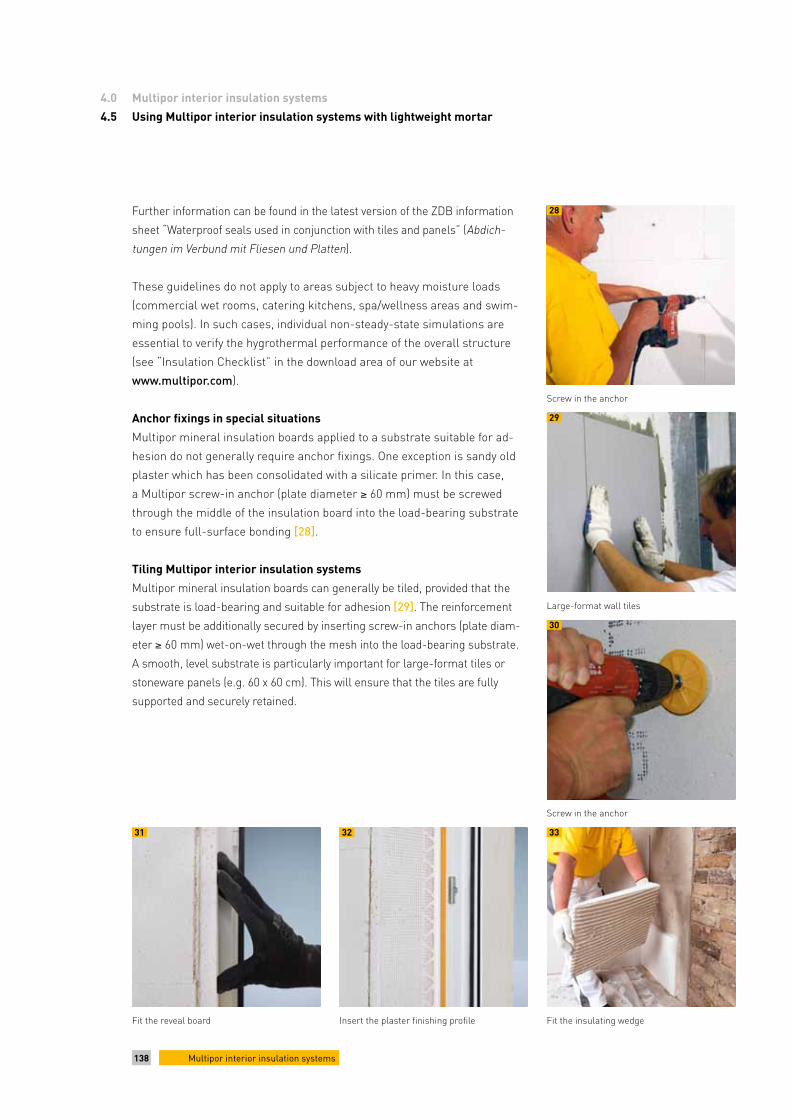
138 Multipor interior insulation systems
Multipor interior insulation systems4.0
Using Multipor interior insulation systems with lightweight mortar4.5
Further information can be found in the latest version of the ZDB information
sheet “Waterproof seals used in conjunction with tiles and panels” (Abdich-
tungen im Verbund mit Fliesen und Platten).
These guidelines do not apply to areas subject to heavy moisture loads
(commercial wet rooms, catering kitchens, spa/wellness areas and swim-
ming pools). In such cases, individual non-steady-state simulations are
essential to verify the hygrothermal performance of the overall structure
(see “Insulation Checklist” in the download area of our website at
www.multipor.com).
Anchor fixings in special situations
Multipor mineral insulation boards applied to a substrate suitable for ad-
hesion do not generally require anchor fixings. One exception is sandy old
plaster which has been consolidated with a silicate primer. In this case,
a Multipor screw-in anchor (plate diameter ≥ 60 mm) must be screwed
through the middle of the insulation board into the load-bearing substrate
to ensure full-surface bonding [28].
Tiling Multipor interior insulation systems
Multipor mineral insulation boards can generally be tiled, provided that the
substrate is load-bearing and suitable for adhesion [29]. The reinforcement
layer must be additionally secured by inserting screw-in anchors (plate diam-
eter ≥ 60 mm) wet-on-wet through the mesh into the load-bearing substrate.
A smooth, level substrate is particularly important for large-format tiles or
stoneware panels (e.g. 60 x 60 cm). This will ensure that the tiles are fully
supported and securely retained.
Screw in the anchor
Screw in the anchor
29
Fit the reveal board
31
28
Large-format wall tiles
30
Fit the insulating wedge
33
Insert the plaster finishing profile
32
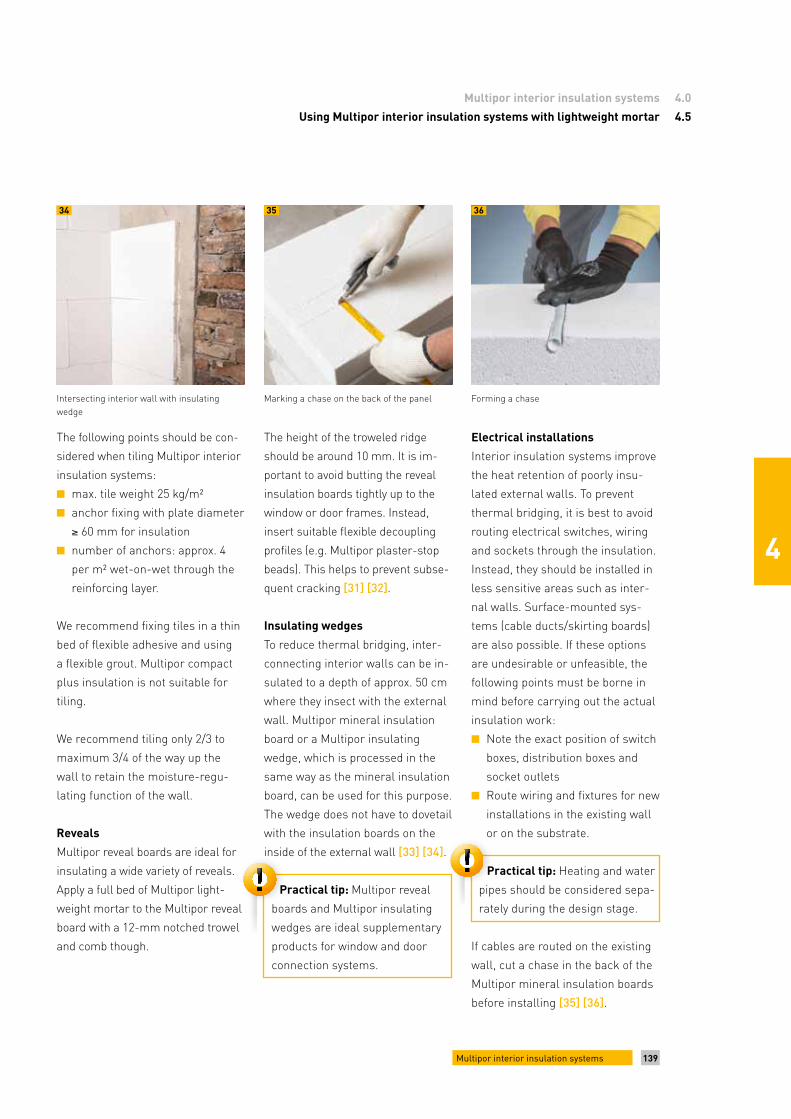
139Multipor interior insulation systems
4
Multipor interior insulation systems 4.0
Using Multipor interior insulation systems with lightweight mortar 4.5
The following points should be con-
sidered when tiling Multipor interior
insulation systems:
■■ max. tile weight 25 kg/m²
■■ anchor fixing with plate diameter
≥ 60 mm for insulation
■■ number of anchors: approx. 4
per m² wet-on-wet through the
reinforcing layer.
We recommend fixing tiles in a thin
bed of flexible adhesive and using
a flexible grout. Multipor compact
plus insulation is not suitable for
tiling.
We recommend tiling only 2/3 to
maximum 3/4 of the way up the
wall to retain the moisture-regu-
lating function of the wall.
Reveals
Multipor reveal boards are ideal for
insulating a wide variety of reveals.
Apply a full bed of Multipor light-
weight mortar to the Multipor reveal
board with a 12-mm notched trowel
and comb though.
Intersecting interior wall with insulating wedge
34
The height of the troweled ridge
should be around 10 mm. It is im-
portant to avoid butting the reveal
insulation boards tightly up to the
window or door frames. Instead,
insert suitable flexible decoupling
profiles (e.g. Multipor plaster-stop
beads). This helps to prevent subse-
quent cracking [31] [32].
Insulating wedges
To reduce thermal bridging, inter-
connecting interior walls can be in-
sulated to a depth of approx. 50 cm
where they insect with the external
wall. Multipor mineral insulation
board or a Multipor insulating
wedge, which is processed in the
same way as the mineral insulation
board, can be used for this purpose.
The wedge does not have to dovetail
with the insulation boards on the
inside of the external wall [33] [34].
Practical tip: Multipor reveal
boards and Multipor insulating
wedges are ideal supplementary
products for window and door
connection systems.
Electrical installations
Interior insulation systems improve
the heat retention of poorly insu-
lated external walls. To prevent
thermal bridging, it is best to avoid
routing electrical switches, wiring
and sockets through the insulation.
Instead, they should be installed in
less sensitive areas such as inter-
nal walls. Surface-mounted sys-
tems (cable ducts/skirting boards)
are also possible. If these options
are undesirable or unfeasible, the
following points must be borne in
mind before carrying out the actual
insulation work:
■■ Note the exact position of switch
boxes, distribution boxes and
socket outlets
■■ Route wiring and fixtures for new
installations in the existing wall
or on the substrate.
Practical tip: Heating and water
pipes should be considered sepa-
rately during the design stage.
If cables are routed on the existing
wall, cut a chase in the back of the
Multipor mineral insulation boards
before installing [35] [36].
Marking a chase on the back of the panel
35
Forming a chase
36
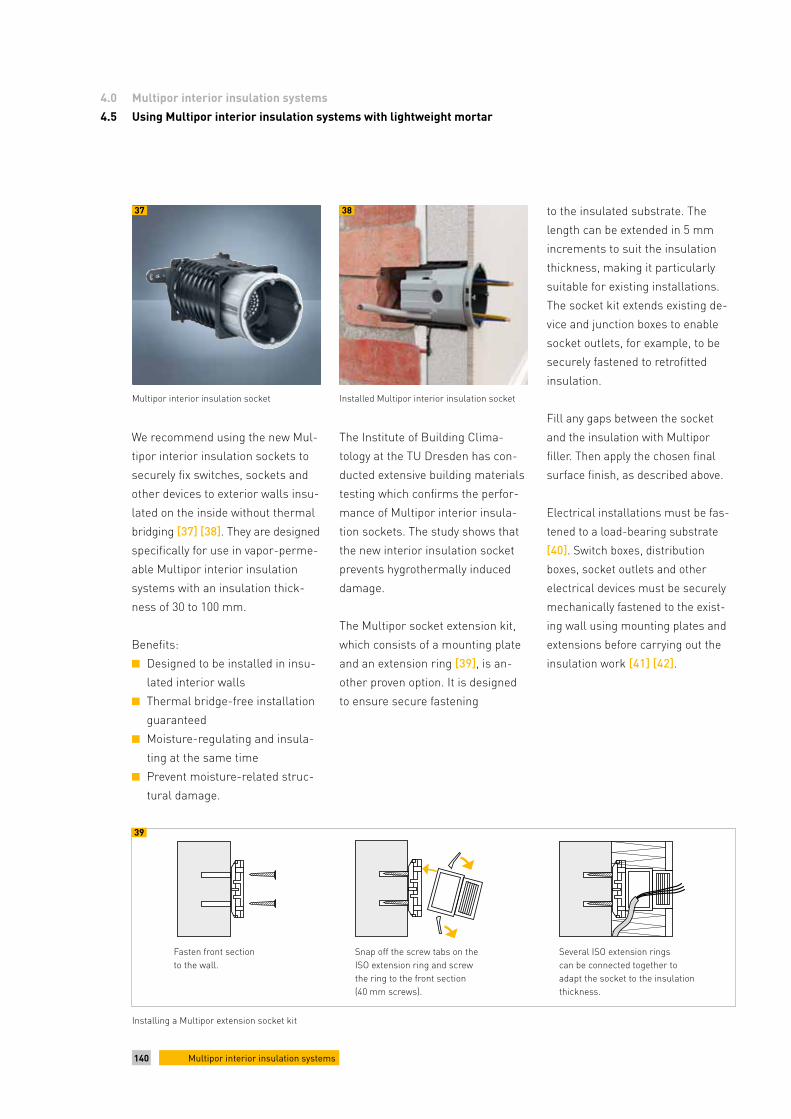
140 Multipor interior insulation systems
Multipor interior insulation systems4.0
Using Multipor interior insulation systems with lightweight mortar4.5
We recommend using the new Mul-
tipor interior insulation sockets to
securely fix switches, sockets and
other devices to exterior walls insu-
lated on the inside without thermal
bridging [37] [38]. They are designed
specifically for use in vapor-perme-
able Multipor interior insulation
systems with an insulation thick-
ness of 30 to 100 mm.
Benefits:
■■ Designed to be installed in insu-
lated interior walls
■■ Thermal bridge-free installation
guaranteed
■■ Moisture-regulating and insula-
ting at the same time
■■ Prevent moisture-related struc-
tural damage.
Multipor interior insulation socket
37
Installed Multipor interior insulation socket
38
The Institute of Building Clima-
tology at the TU Dresden has con-
ducted extensive building materials
testing which confirms the perfor-
mance of Multipor interior insula-
tion sockets. The study shows that
the new interior insulation socket
prevents hygrothermally induced
damage.
The Multipor socket extension kit,
which consists of a mounting plate
and an extension ring [39], is an-
other proven option. It is designed
to ensure secure fastening
to the insulated substrate. The
length can be extended in 5 mm
increments to suit the insulation
thickness, making it particularly
suitable for existing installations.
The socket kit extends existing de-
vice and junction boxes to enable
socket outlets, for example, to be
securely fastened to retrofitted
insulation.
Fill any gaps between the socket
and the insulation with Multipor
filler. Then apply the chosen final
surface finish, as described above.
Electrical installations must be fas-
tened to a load-bearing substrate
[40]. Switch boxes, distribution
boxes, socket outlets and other
electrical devices must be securely
mechanically fastened to the exist-
ing wall using mounting plates and
extensions before carrying out the
insulation work [41] [42].
Installing a Multipor extension socket kit
39
Fasten front sectionto the wall.
Snap off the screw tabs on the ISO extension ring and screw the ring to the front section (40 mm screws).
Several ISO extension rings can be connected together to adapt the socket to the insulation thickness.

141Multipor interior insulation systems
4
Multipor interior insulation systems 4.0
Using Multipor interior insulation systems with lightweight mortar 4.5
Socket extension kit mounted to the wall
40
Insulation boards fitted round the socket
41
Completed installation of Multipor insulation boards
42
In the insulated state
44
Multipor telescopic device mount on uninsulated wall
43Multipor telescopic device mounts
and Multipor telescopic device boxes
can also be steplessly adjusted to
suit the insulation thickness. Electri-
cal devices can then be mounted
securely with ease [43] [44].
We do not advise mounting electrical
sockets and cables directly to Multi-
por mineral insulation boards since
this is not generally considered a
proper and secure method of instal-
lation. In the case of plasterboard,
fasten electrical installations to the
stud wall and route cables in the
cavity in front of the insulation board.
Other fittings: Insulating roller
shutter boxes
After windows, roller shutter boxes are
the main cause of significant heat loss
in old buildings, often associated with
drafts due to outdated construction
methods. Since roller shutter boxes
are generally poorly insulated and
insufficiently airtight, if at all, they
create thermal bridges which signifi-
cantly increased heating costs. In
construction terms, roller shutter
boxes should be considered part of the
wall, because they separate the indoor
and outdoor climate.
Although they account for a relatively
small percentage of the overall wall
surface, in terms of energy perfor-
mance they are the weakest compo-
nent.
With attention increasingly turning to
roller shutter boxes within the context
of energy efficient refurbishments,
well-known manufacturers now offer
suitable interior remediation systems
for virtually any roller shutter situa-
tion. Your Multipor technical adviser
will gladly advise you in this matter.
Mounting radiators
Radiator recesses originally had an
aesthetic function. Since old-fash-
ioned radiators were very deep, the
recesses prevented them projecting
too far into the living space. However,
these recesses reduced the thickness
of the external wall, creating a
‘design-related’ thermal bridge which
allowed heat to flow outside more
quickly than via the remaining build-
ing envelope. Up to 6% of heat energy
can be lost via this weak spot alone.
To improve energy performance in
these areas, the recesses can be
initially filled in with Ytong precision
blocks during renovation work.
The newly installed radiators can then
be fastened directly to the solid Ytong
precision block using suitable wall
anchors. Failing this, it is a good idea
to insulate the radiator recesses with
Multipor interior insulation systems
of a suitable thickness and connect
them to the remaining wall surface. If

142 Multipor interior insulation systems
Multipor interior insulation systems4.0
Using Multipor interior insulation systems with lightweight mortar4.5
Material Coverage
Basic components
Multipor mineral insulation board 4.3 boards/m2
Multipor compact plus mineral insu-lation board
5.2 boards/m2
Multipor lightweight mortar (adhesive)
approx. 3.5 kg/m2 for a max. 5 mm layer thickness
Multipor lightweight mortar (reinforcement)
approx. 3.5 kg/m2 for a max. 5 mm layer thickness
Multipor reinforcement mesh approx. 1.1 m/m2
Alternative components
Multipor lightweight mortar (finishing plaster)
approx. 2.5 kg/m2 for a max. 5 mm layer thickness
Multipor screw-in anchor 4.3 units/m2
Multipor reveal boards 1.66 units/lm
Multipor insulating wedge 2.56 units/lm
Multipor smooth lime plasterapprox. 2.0 kg/m² for a max. 2 mm layer thickness
Multipor fine lime plasterapprox. 5.0 kg/m² for a max. 3 mm layer thickness
Multipor interior silicate paint approx. 0.3 l/m²
Table 4: Consumption of basic components
If the recesses are sealed with Multi-
por interior insulation systems, make
sure that the anchor fixings for the
radiators pass through the insulation
into the load-bearing substrate.
There are several ways of doing this:
■■ Extend the existing brackets by
the thickness of the insulation.
■■ Fit brackets to the interior insu-
lation by screwing them through
the insulation to the load-bear-
ing substrate using suitably
sized fasteners.
■■ Fasten new telescopic brackets
to the existing wall and fit insu-
lation round them.
■■ Mount the radiators on the floor.
In areas subject to increased load-
ing, for example in schools or dis-
cotheques, we recommend using
angle brackets or floor-mounting
the radiators.
VDI Standard 6036 “Fasteners of ra-
diators - requirements for planning
and design” provides more detailed
information on this subject. It is
advisable to choose a suitable fas-
tening option on the basis of this
standard. Reputable radiator
manufacturers are also a useful
source of help.
Guide values for processing times
Allow 10 to 15 minutes to bond
1.0 m² Multipor mineral insulation
board, depending on the level of
experience. This does not include
preparing the plaster and other
preparatory work such as removing
separating layers. Insulating reveals,
surface adjustment and similar are
not included. Provision must also be
made for other tasks (e.g. plaster
profiles) where necessary. Profit and
risk must be included in the calcula-
tion. The time allowance thus shows
wide variation: from 0% to approx.
12%. Direct transport to the site and
setup times must also be included.
Multipor interior insulation systems
Multipor interior insulation systems
consist of carefully matched, spe-
cially developed system components
with good material compatibility.
They offer solutions for any insula-
tion project or energy-efficient refur-
bishment scheme. Please contact
your Multipor technical advisor for
the complete product range.
You can find your dedicated technical
adviser on the contact page of our
website at www.multipor.com.

143Multipor interior insulation systems
4
Multipor interior insulation systems 4.0
the same time protecting historic,
listed wall structures. Clay mortar
has traditionally been used to pro-
tect the timber components of half-
timbered buildings thanks to its
ability to rapidly remove moisture.
Further processing instructions and
data sheets are available in the
download section of our website at
www.multipor.com
Multipor clay mortar can also be
used as interior plaster on numer-
ous surfaces (both in new build-
ings and refurbishment projects).
Apply a 3 to 5-mm layer of clay
mortar to the dried substrate and
smooth with a trowel or sponge
float to the desired texture. With
good ventilation, the mortar sets
well enough within 3 to 5 days for
the surface finish to be applied.
Natural clay
Ecological Multipor clay paint is the
perfect partner for Multipor clay
mortar.
Multipor clay mortar
4.6Using Multipor interior insulation systems with clay mortar
Using Multipor interior insulation systems with clay mortar
Eco-friendly, healthy and climate-
regulating: Environmentally com-
patible solutions are particularly
important for refurbishment pro-
jects – and Multipor clay mortar
and a suitable Multipor clay paint
are ideal for this purpose.
The Multipor interior insulation sys-
tem with clay mortar can be used
as interior wall insulation for en-
ergy-efficient refurbishments and
as interior plaster systems on
masonry such as Ytong autoclaved
aerated concrete and Silka calcium-
silicate blocks when a health-con-
scious approach to modernization
is required.
Consisting of a blend of powdered
clay and natural sand, Multipor clay
mortar conforms to current regula-
tions for building with clay and to
DIN 18947 “Earth plasters” (see
Table 1).
The fact that it dries purely by me-
chanical means, can be reused and
contains no chemical additives
qualifies it as a healthy building
material. Furthermore, with high
capillary conductivity, it absorbs
and distributes moisture to speed
up the drying process.
Multipor clay mortar can be used
in a wide variety of ways:
■■ Single or multi-layer levelling
plaster up to 40 mm layer thick-
ness for uneven substrates
■■ Adhesive mortar for Multipor
mineral insulation boards, in
accordance with the relevant
directions for use
■■ Reinforcement plaster with mesh
insert on Multipor mineral insu-
lation boards
■■ Interior plaster on Multipor min-
eral insulation boards, Ytong AAC
masonry and Silka calcium-
silicate masonry
■■ Wall heating plaster in accor-
dance with manufacturer‘s
instructions.
It is very easy to use and, as a 100%
natural material, can be remixed
time and again: If the material sets
to soon, just add more water and
mix again to reproduce a workable
consistency.
Any remaining mortar can be stored
indefinitely, and is also fully com-
postable.
Refurbishing half-timbered
buildings
Another important area of applica-
tion for Multipor clay mortar is the
refurbishment of half-timbered
buildings. Combined with Multipor
mineral insulation boards, the two
materials complement other per-
fectly, having the ideal building
physical properties for creating an
optimum indoor climate while at
4.6

144 Multipor interior insulation systems
Multipor interior insulation systems4.0
Using Multipor interior insulation systems with clay mortar4.6
Two to three coats of this natural,
solvent-free, clay-based wall paint,
applied with a brush or roller, is suf-
ficient to create a white, vapor-per-
meable and therefore breathable
decorative finish for interior walls
and ceilings. Mineral-based stains
and pigments can be added to
create different color and textural
effects.
Special benefits for healthy living
In brief, the Multipor interior insula-
tion system with clay mortar is an
ecological and environmentally
friendly solution for surface finishes
and energy efficient refurbishments.
Healthy products – also suitable for
allergy sufferers – can be applied
to a wide variety of substrates to
significantly enhance comfort and
quality of life.
Multipor 7x7 mm reinforcement
mesh
7 x 7 mm reinforcement mesh (see
Table 2) has been designed specifi-
cally for use with Multipor interior
insulation systems with clay mortar.
Embed it gently into the upper third
of the freshly applied Multipor clay
mortar, taking care to overlap the
joints by at least 10 cm. Coverage:
1.10 m²/m². The mesh is available
in 1 m wide rolls and 25 or 50 m
lengths.
Bonding Multipor mineral insula-
tion boards with clay mortar
Mix the Multipor clay mortar with
approx. 6 l of water per bag (25 kg)
to a smooth, uniform consistency
using a suitable mixer [1]. Bond
Multipor mineral insulation boards
Thermal conductivity λ = 1.0 W/(mK)
Water vapor permeability coefficient ≤ 11
Heat capacity 1.0 KJ/kgK
Bulk density 2,042 kg/m3
Shrinkage 1.9 %
Flexural strength 0.70 N/mm2
Compressive strength 1.5 N/mm2
Equilibrium moisture content, wt% 2.0 – 4.5 %
Building material class A1; non-combustible
Processing temperature ≥ 5 °C
Storage Indefinite if properly stored on dry pallet
Delivery form 25 kg bag48 bags per pallet
Table 1: Technical data for Multipor clay mortar manufactured to DIN 18947/LPM-0/0.8 m - S II - 2.0
Alkali-resistant glass fiber mesh for interior use
Grammage 105 +/– 5 g/m²
Mesh width 7 x 7 mm
Strength- on delivery- after ageing
≥ 1750 N/5 cm≥ 50 % und ≥ 1000 N/5 cm
Roll size- width- length
1 m25 or 50 m
Coverage approx. 1.1 m²/m²
Table 2: Technical data for Multipor reinforcement 7 x 7 mm mesh
Mix the Multipor clay mortar Comb the Multipor clay mortar
1 2
to the substrate in a staggered
pattern using a full bed of Multipor
clay mortar. Apply a full bed of clay
mortar to the back of the Multipor
insulation board with a notched
trowel (12-mm notch) and comb [2].

145Multipor interior insulation systems
4
Multipor interior insulation systems 4.0
Using Multipor interior insulation systems with clay mortar 4.6
After combing, the troweled ridges
should be at least 10 mm high.
The existing wall surface can also
be prefilled with clay mortar to a
maximum depth of 10 mm using
a smoothing trowel prior to fitting
the insulation board wet-on-wet.
After applying the clay mortar,
position the Multipor mineral insu-
lation board on the wall and press
down firmly [3].
This ensures a thin adhesive bond
and complete mortar coverage.
Butt the head and bed joints of the
Multipor mineral insulation boards
up tightly rather than mortaring
them [4].
Special care must be taken to en-
sure that the first course is plumb
and level, allowing for any height
differences in the adjacent floor
construction. If structures are likely
to exhibit different expansion or
settling behavior, they should be
decoupled from adjacent compo-
nents with Multipor hemp-felt insu-
lation strips.
Closers for Multipor mineral insu-
lation boards can be cut to any size
using a fine-toothed Multipor hand-
saw.
Practical tip: You can add more
water repeatedly to dried out
Multipor clay mortar to achieve
the required consistency.
Reinforcement plaster/base
plaster
To use Multipor clay mortar as a
reinforcing layer, mix to a workable
consistency by adding approx. 4.5 l
of water per bag. Note that rein-
forcement plaster requires less
water than adhesive plaster. Then
comb the Multipor clay mortar onto
the surface of the insulation board
with a 12-mm notched trowel [5].
The troweled ridges should be
around 10 mm high. Then embed
reinforcement mesh with a mesh
width of 7 x 7 mm into the upper
third of the reinforcement plaster.
Once troweled smooth, this gives an
average layer thickness of 5 mm [6].
Installing anchor fixings
Multipor mineral insulation boards
generally require mechanical faste-
ning when Multipor clay mortar is
used as the adhesive in energy-effi-
cient refurbishments. This is done
using thermally decoupled screw
fasteners with plate head (minimum
60 mm diameter).
Slide the Multipor board into position ... Apply the reinforcement layer
Embed the mesh
Screw in the anchor
… and press down firmly
3 5
6
7
4

146 Multipor interior insulation systems
Multipor interior insulation systems4.0
Using Multipor interior insulation systems with clay mortar4.6
In the case of half-timbered build-
ings, screw-in anchors should be in-
serted in the timber frame to avoid
damaging the space in between.
Use at least four Multipor screw-in
anchors per m2. We recommend
using one anchor per board on all
free edges (e.g. window recesses).
Interlock the insulation boards
where they intersect at corners.
Screwing in the anchors
■■ Screw-in anchors are normally
inserted in the middle of the
board.
■■ If the plaster is >10 mm thick
(reinforcement and base coat),
insert the screw-in anchors
through the reinforcement
layer wet-on-wet [7].
Slit a cross in the reinforcement
mesh with a knife before insert-
ing the screw.
■■ If wall heating is to be installed
on walls insulated with Multipor
mineral insulation boards, insert
the anchors screws through the
reinforcement layer wet-on-wet
after plastering in the wall heat-
ing pipes. For more detailed
guidance, please refer to our
technical information on wall
heating which you can find on
the download section of our
website at www.multipor.com.
Multipor clay mortar as finishing
plaster
Multipor clay mortar can be ap-
plied to prepared, dry substrates
as a decorative finish. Apply a 3
to 5-mm layer of Multipor clay
mortar to the existing reinforcing
layer with a notched trowel [8]
and then smooth with a trowel or
sponge float to the desired texture
[9].
Surface finish/paint
The surface can be painted as soon
as the finishing plaster is dry [10] –
we recommend using our Multipor
clay paint which we supply as white
powder paint in 2 or 8 kg sacks.
To obtain the right consistency for
the substrate, add water in a ratio
of no more than 1:10 and stir well
with a mechanical mixer – then it‘s
ready for immediate use. The paint
is easy to apply with a brush or
roller. Apply two to three coats to
ensure complete coverage, allowing
three hours’ drying time between
coats under normal ambient condi-
tions.
Practical tip: Shrinkage and
drying cracks may occur on clay
plastered surfaces, depending
on the material. These empha-
size the natural character of
Multipor clay mortar. They do
not constitute a defect and can
easily be rectified by lightly
dampening the affected area
(e.g. using a spray bottle) and
closing them back up again with
a float.
Commercially available mineral
tints and pigments can be added to
our Multipor clay paint to achieve
the desired color.
Apply the finishing plaster Paint with a brush or rollerTexture with a trowel
8 109

147Multipor interior insulation systems
4
Multipor interior insulation systems 4.0
Using Multipor interior insulation systems with clay mortar 4.6
Supplementary notes
When improving the energy perfor-
mance of buildings, consideration
must be given to the avoidance
thermal bridging where compo-
nents connect (e.g. walls and ceil-
ings). Connections should be in-
cluded in the assessment from an
early stage as part of the planning
process. The product range for
Multipor clay-based interior insu-
lation systems includes suitable
companion products such as
Multipor clay mortar to DIN 18947
Delivery form 25 kg/bag
Yield per bag approx. 15 l of fresh mortar is sufficient for approx. 1.5 m² with a 10-mm layer thickness
Water requirement per bag approx. 6.0 l bonding, approx. 4.5 – 5 l reinforcement
Bonding approx. 7 – 8 kg/m²
Reinforcement approx. 7 – 8 kg/m²
Finishing plaster approx. 5 kg/m² (for 3 mm) to approx. 8 kg/m² (for 5 mm)
Multipor clay paint (powder paint)
Delivery form 2 – 8 kg containers
Quantity of water required 1.5 l/kg dry powder
Materials requirement per coat approx. 90 g/m² and coat
Drying time approx. 2 hours at normal room temperature (20 °C, 50 % RH)
Table 3: Recommended coverage
Multipor reveal boards and insulat-
ing wedges.
Building physics in half-timbered
structures
Upgrading the energy performance
of half-timbered buildings often re-
presents a major problem for plan-
ners and building contractors since
it requires a great deal of specialist
knowledge and expertise, particu-
larly with regard to assessing the
hygrothermal performance.
Multipor provides a “Checklist for
insulating the inside of half-timbe-
red buildings” in the download
section of our website at
www.multipor.com.
Once completed, the checklist
can be used to carry out a realistic
analysis of hydrothermal inter-
actions within the building. We
perform this service on request.

148 Multipor interior insulation systems
Multipor interior insulation systems4.0
Using Multipor interior insulation systems with clay mortar4.6
Half-timbered building, Soest
Reference building
■■ Total energy-efficient refurbishment of a stripped out half-timbered building
■■ Multipor interior insulation system with clay mortar used throughout
■■ Multipor clay mortar used as levelling plaster, adhesive and reinforcement layer
and finishing plaster
■■ Multipor clay paint as high quality surface finish
■■ Satisfies stringent requirements for environmentally friendly and healthy
construction methods and material
Project data
Building type Half-timbered house
Location Soest
Application Interior insulation with clay
Products used
■■ Multipor mineral insulation board, t = 80 mm
■■ Multipor clay mortar
■■ Multipor clay paint

149Multipor interior insulation systems
4
Multipor interior insulation systems 4.0
Using Multipor interior insulation systems with clay mortar 4.6
Half-timbered building, Warendorf
Reference building
■■ Preservation of listed facade
■■ Multipor interior insulation system with clay mortar used throughout
■■ Multipor clay mortar used as levelling plaster, adhesive and reinforcement layer
and finishing plaster
■■ Satisfies KfW Efficiency House Standard for listed buildings
■■ Satisfies stringent requirements for environmentally friendly and healthy
construction methods and materials
Project data
Building type Half-timbered house
Location Warendorf
Application Interior insulation with clay
Products used Multipor mineral insulation board
■■ Multipor clay mortar

150 Multipor interior insulation systems
Multipor interior insulation systems4.0
Insulating air ducts with Multipor interior insulation systems4.7
Insulating air ducts with Multipor interior insulation systems
Modern buildings are increasingly
fitted with intelligent ventilation
and air conditioning technology.
The fresh air supply for these
systems is usually drawn in via
suitably sized air ducts, and then
distributed around the building
after treatment. Residual heat is
recovered from the used air before
it is fed back outside via other air
ducts.
In large buildings (office complexes,
hospitals, function rooms), these air
ducts can be substantial. To mitigate
heat loss in adjacent rooms, air
ducts can be insulated or reduced
to a non-critical size.
Due to its ecological properties, the
Multipor interior insulation system
(see Table 1) is ideal for this pur-
pose. As well as being resistant
to pests, the high alkalinity of the
product effectively inhibits mold
growth. Furthermore, Multipor
is non-toxic and solvent-free.
The latest certificate from the
eco-INSTITUT in Cologne confirms
the ecological properties of Multipor
mineral insulation boards and
Multipor lightweight mortar:
The indoor air contains no harmful
VOC concentrations (VOC stands for
volatile organic compounds)
■■ Quick, cost-effective adhesive installation
■■ Non-combustible, A1-rated material in compliance with DIN EN 13501 -1
■■ Does not generate smoke, burning droplets or toxic gases in the event of fire
■■ Purely mineral-based, free from fibers and harmful substances
■■ Pressure-resistant and deformation-free
■■ Dimensionally stable, no bowing or shrinkage
■■ Safe, ecologically certified building material
Table 1: Technical data for Multipor mineral insulation board and Multipor lightweight mortar
Multipor mineral insulation board Multipor lightweight mortar
Regulations
National technical approval Z-23.11-1501European technical assessment ETA-05/0093
Lightweight mortar LW as per EN 998-1
Dry bulk density 85–95 kg/m³ approx. 770 kg/m³
Compressive strength ≥ 200 kPa CS II; 1.50–5.0 N/mm²
Thermal conductivityλ = 0.042 W/(mK) (design value)
λ10, dry = 0.18 W/(mK)
Water vapor diffusion resistance factor µ = 2 µ ≤ 10
Building material class A1; non-combustible A2-s1, d0; non-combustible
Dimensions /delivery quantity
600 x 390 mmd = 60 – 300 mm (in increments of 20) special format d = 50 mm with λ = 0,045 W/(mK)
20 kg/bag
4.7

151Multipor interior insulation systems
4
Multipor interior insulation systems 4.0
Insulating air ducts with Multipor interior insulation systems 4.7
Please refer to VDI Standard 6022
for more information about hygiene
requirements for ventilation and air
conditioning systems. Part 3 of this
standard defines the structural,
technical and organizational mea-
sures required for the design, man-
ufacture, installation, operation and
maintenance of heating, ventilation
and air conditioning systems (HVAC
systems).
The maximum air velocity in the air
duct has a major bearing on the
design of the surface finish. In some
cases, it may be up to 30 m/s (108
km/h) and certain measures must
be put in place to allow for this.
Table 3 lists a range of air velocities
with corresponding construction
guidance.
Using Multipor interior insulation
system for air ducts
The instructions for using the Multi-
por interior insulation system and
Multipor ceiling insulation system
must be complied with.
The individual components of the
Multipor interior insulation system
for insulating air ducts are carefully
matched to ensure the greatest
possible degree of system safety,
combined with easy processing and
installation.
With this logical system, it is pos-
sible to eliminate thermal bridging
at adjacent components/rooms or
reduce them to a non-critical level.
Make sure that the substrate of the
supply and exhaust air ducts is load-
bearing and suitable for adhesion.
Remove any mold oil residues or
other components that may inhibit
adhesion.
Smooth down any rough areas on
the surface to be insulated to ensure
full-surface adhesion. Level out
uneven areas with a depth of up to
3 mm using the combed bed method.
Always apply the adhesive to the
Multipor mineral insulation boards.
Substrate unevenness to a maximum
of 5 mm can be rectified using the
buttering-and-floating method – in
this case the adhesive is applied
both to the Multipor mineral insula-
tion boards and the substrate to be
insulated.
Apply a full bed of Multipor light-
weight mortar to the back of the
board with a 12-mm notched trowel
(use a 15-mm notched trowel for
boards with a thickness of 160 mm
and above). Set the mortared board
onto the surface to be insulated.
Uneven areas in the insulated sur-
face can easily be smoothed out with
the Multipor sanding board.
Alkali-resistant glass fiber mesh for internal and external use, white
Grammage 160 +/– 5 g/m²
Mesh width 4 x 4 mm
Strength- on delivery- after aging (ETAG 004)
≥ 1750 N/5 cm≥ 50 % and ≥ 1000 N/5 cm
Roll size- width- length
1 m25 or 50 m
Coverage approx. 1.1 m²/m²
Table 2: Technical data for Multipor reinforcement 4 x 4 mm mesh

152 Multipor interior insulation systems
Multipor interior insulation systems4.0
Insulating air ducts with Multipor interior insulation systems4.7
Additional guidance notes on air
duct insulation
If airflow speeds inside the ventila-
tion shafts do not exceed 10 m/s,
the surface of the Multipor mineral
insulation boards can simply be
painted with Multipor interior sili-
cate paint. Use a roller or sprayer
to apply the paint to the insulation
boards (two coats).
For airflow speeds of up to 20 m/s,
we advise skimming the boards with
Multipor lightweight mortar in a
thickness of approx. 3 mm. In this
case, mesh reinforcement is not
strictly necessary, but will increase
the resistance.
For airflow speeds up to max.
30m/s, mechanical fasteners are
additionally required. These must
be screwed through the reinforce-
ment layer (wet-on-wet) into the
load-bearing substrate and the an-
chor plate must also be skimmed.
Build up the layers as follows:
■■ Bond Multipor mineral insulation
board to the load-bearing sub-
strate with Multipor lightweight
mortar
■■ Reinforce the surface of the insu-
lation board with Multipor light-
weight mortar and reinforcement
mesh, including wet-on-wet me-
chanical fastening with Multipor
screw-in anchors. Slit a hole in
the mesh first with a sharp knife.
■■ Apply the final coating
as required (either Multipor
lightweight mortar, Multipor fine
lime plaster or Multipor smooth
lime plaster for a smooth finish)
■■ Apply Multipor interior silicate
paint if required.
Quality of surface finish for air
duct insulation
Multipor lightweight mortar and
Multipor fine lime plaster applied to
the reinforcement layer of Multipor
lightweight mortar satisfy the require-
ments for a Q2 grade surface finish.
Multipor smooth lime plaster (see
Table 4) applied to the Multipor
lightweight mortar reinforcement
layer can satisfy the requirements
for a Q3 surface finish.
Airflow speed Construction/surface Remarks
up to 10 m/s ■■ Apply fully mortared Multipor mineral insulation board
■■ Paint surfaces with Multipor interior silicate paint
■■ Apply paint with roller or airless sprayer■■ Two coats of paint are normally required
up to 20 m/s ■■ Apply fully mortared Multipor mineral insulation board
■■ Apply an additional skim coat of Multipor lightweight mortar
■■ Finish with Multipor interior silicate paint if required
■■ Skim coat thickness approx. 3 mm (hairline cracking may occur where the insulation boards join)
■■ Additional mesh reinforcement increases surface strength and minimizes the risk of hairline cracking
up to max. 30 m/s ■■ Apply fully mortared Multipor mineral insulation board
■■ Mechanically fasten the Multipor mineral insulation boards by inserting anchors screws through the reinforcement layer wet-on-wet
■■ Always use Multipor lightweight mortar for reinforcement
■■ Use Multipor lightweight mortar, Multipor fine lime plaster or Multipor smooth lime plaster for the finishing coat
■■ Finish with Multipor interior silicate paint if required
■■ Use Multipor screw-in anchors with a plate diameter of at least 60 mm
■■ Insert mesh in the reinforcing layer■■ Fit one anchor per Multipor mineral
insulation board■■ Select the anchor based on the fire
protection requirements for the building concerned
Table 3: Insulation of air ducts with Multipor mineral insulation board

153Multipor interior insulation systems
4
Multipor interior insulation systems 4.0
Insulating air ducts with Multipor interior insulation systems 4.7
The maximum plaster thickness
(reinforcement and finishing plaster)
is 8 mm.
If construction requirements call for
thicker plaster, it is essential to provide
additional mechanical fastening by
inserting Multipor screw-in anchors
through the reinforcement layer when
still wet. The maximum surface load
should be determined in consultation
with your Multipor technical adviser.
If the surface of the insulation boards
has to be sanded down, remove any
dust and loose fragments before ap-
plying any further coatings (e.g. with a
fine brush). However, it is not neces-
sary to prime the surface before ap-
plying Multipor lightweight mortar.
Multipor interior silicate paint can
also be applied without further sub-
strate preparation.
Practical tip: The hygiene
requirements of ventilation and
air conditioning systems are
described in VDI Standard 6022.
Weathering
Areas subject to indirect weathering
(transition to outside air) must be
protected by a metal plate or simi-
lar. Areas directly exposed to weath-
ering must be treated in the same
way as Multipor ETICS mineral
insulation board, i.e. the Multipor
mineral insulation boards must be
fully bonded and additionally fas-
tened with one screw-in anchor per
insulation board, inserted beneath
the mesh into the load-bearing sub-
strate. For airflow speeds of 20 to
30m m/s, fasten anchor fixings
through the mesh. The surface coat-
ing always consists of mesh-rein-
forced base plaster, followed by
finishing plaster and then paint.
Accessible walkways (floors of
inspection areas)
If air ducts have to be accessed on
foot, the insulation boards must be
protected with additional boarding
and the adjacent insulation must be
finished accordingly.
Cement-bonded lightweight boards
with a laminated structure are suit-
able for this purpose, laid horizon-
tally over the full surface. Bond
the boards in a full bed of Multipor
lightweight mortar and butt up
tightly together. Fill any gaps be-
tween individual panels with Multi-
por lightweight mortar.
Cut boards to size with a standard
circular saw with dust extraction.
Multipor mineral insulation boards
installed with additional boarding
in areas that can be walked on
must have a minimum thickness of
120 mm.
Smoke extraction ducts
It is generally possible to install
Multipor mineral insulation boards
around smoke extraction ducts.
Due to variations in air temperature
and speed, each project must be
assessed individually. Our Multipor
technical advisers will gladly explain
the services we provide in this area.
Scope of services
■■ Project-based consultation
■■ Support with tendering
■■ On-site training for contractors
■■ Preparation of structural calcu-
lations to verify the performance
of the structure if necessary.
Compressive strength > 1.0 N/mm²
Water vapor permeability coefficient µ ≤ 25
Bulk density: 984 kg/t
Building material class A1; non-combustible
Air and ambient temperature ≥ 5 °C
Processing time approx. 120 Min.
Delivery form 20 kg/bag, 48 bags per pallet
Storage dry, approx. 6 months
Water requirement per bag approx. 8 – 9 l/bag
Yield per bagapprox. 10 m² for a 2-mm layer thickness
Coverage per m²approx. 2.0 kg/ m² for a 2-mm layer thickness
Table 4: Technical data for Multipor smooth lime plaster

154 Multipor interior insulation systems
Multipor interior insulation systems4.0
Attaching loads to Multipor interior insulation systems4.8
Attaching loads to Multipor interior insulation systems4.8
Different loads may be fastened
directly to the Multipor / Multipor
compact plus mineral insulation
board or through the insulation
into the load-bearing substrate,
depending on the type of load.
Wall plugs, anchors and screws are
standard items in a builder’s toolkit.
In the construction industry, spe-
cialist knowledge of the anchor
substrate, fastening systems and
connection method is essential for
ensuring safety and reliability.
Experience suggests that the great-
est challenge lies in correctly gaug-
ing the requirements and choosing
the right fastener. It is also wise to
seek agreement between the vari-
ous trades. The following aspects
should be taken into account when
selecting a suitable fastener:
■■ What is the condition of the sub-
strate (building material, strength
class)?
■■ What are the dimensions of the
components? Do you have to
comply with specific hole depths,
edge distances and spacings?
■■ What is the structural condition
of the assembly to be mounted?
What forces will be transferred?
■■ What stress conditions are pre-
sent in the substrate (tensile or
compression zone)?
■■ Are there any special require-
ments concerning corrosion
protection, fire protection or
temperature resistance?
■■ Does the fastener require ap-
proval as a structural fastening?
■■ Can you ensure compliance with
the manufacturer‘s installation
requirements?
Anchor types and their operating
principles
Three types of anchor fixing are suit-
able for fastening components to
Multipor mineral insulation boards
or into the load-bearing substrate:
■■ Steel or plastic expansion anchor
■■ Bonded anchor in cement or
synthetic resin
■■ Undercut anchor with mechani-
cal interlock.
The operating principles vary as
follows:
■■ Friction locking: Generated by
friction between the anchor and
the substrate, whereby the an-
chorage is achieved by expansion
of the segments. The expansion
segments may be made from
plastic or steel. A distinction is
made between torque-controlled
anchors (maximum load after
applying a prescribed tightening

155Multipor interior insulation systems
4
Multipor interior insulation systems 4.0
Attaching loads to Multipor interior insulation systems 4.8
A choice of suitable fasteners
can be found under ‘technical
information’ on our website at
www.multipor.com.
Anchoring boards to walls
Fasten the mineral insulation boards
to the wall using system-compatible
anchors if substrates are unsuitable
for secure adhesive bonding of
Multipor mineral insulation boards
or if insulated interior walls are to
be subsequently tiled.
torque) and deformation-con-
trolled anchors (expansion is
achieved by driving a cone a
defined length of travel into the
substrate).
■■ Structural bonding: Bonded an-
chors are anchored in the sub-
strate by bonding to the sides of
the drilled hole with an adhesive,
without expansion.
■■ Mechanical interlocking: This
method requires an undercut
hole or suitable cavity. The an-
chor is fastened so that it can
support itself without generating
expansion forces.
Anchor installation
Multipor offers a range of system-
compatible fasteners. Please refer
to the product specifications for
guidance on anchor installation and
be aware that each type of anchor
requires a specific insertion depth
and tightening torque. The product
specifications and technical data
sheets also provide information
about requirements such as embed-
ment depth, edge distances and
spacings.
For example, it is easy to make a
drill hole perpendicular to the sur-
face with a hammer drill. Here too,
information about hole depths and
diameters can be found in the re-
spective anchor manufacturers‘ data
sheets. The substrate determines
the type of drill to use, and the set-
tings.
For example:
■■ Ytong AAC: Three-piece drive tool
(6 mm, 8 mm, 10 mm)
■■ Silka calcium-silicate block:
Drill with a hammering and ro-
tary action
■■ Vertically perforated bricks and
lightweight materials: Drill with
a rotary action
■■ Other anchor substrates: Drill
with a hammering and rotary
action.
Clean the drilled hole with a brush
or blower, because the drill dust can
adversely affect the frictional behav-
ior of friction-locking anchors and
the surface penetration behavior of
bonded anchors.
Fixtures
The method of load attachment de-
pends on the anticipated load and
the stress. The choice of fastening
mechanism and its location depends
on these factors too.
Fastening mechanism:
■■ Plate-fastening for non-load-
bearing substrates
■■ Mechanical fastening of light
loads to Multipor mineral insula-
tion board
■■ Mechanical fastening of heavy or
dynamic loads through the Multi-
por mineral insulation board into
the substrate.
Multipor screw-in anchor
1
Inserting Multipor screw-in anchor
2
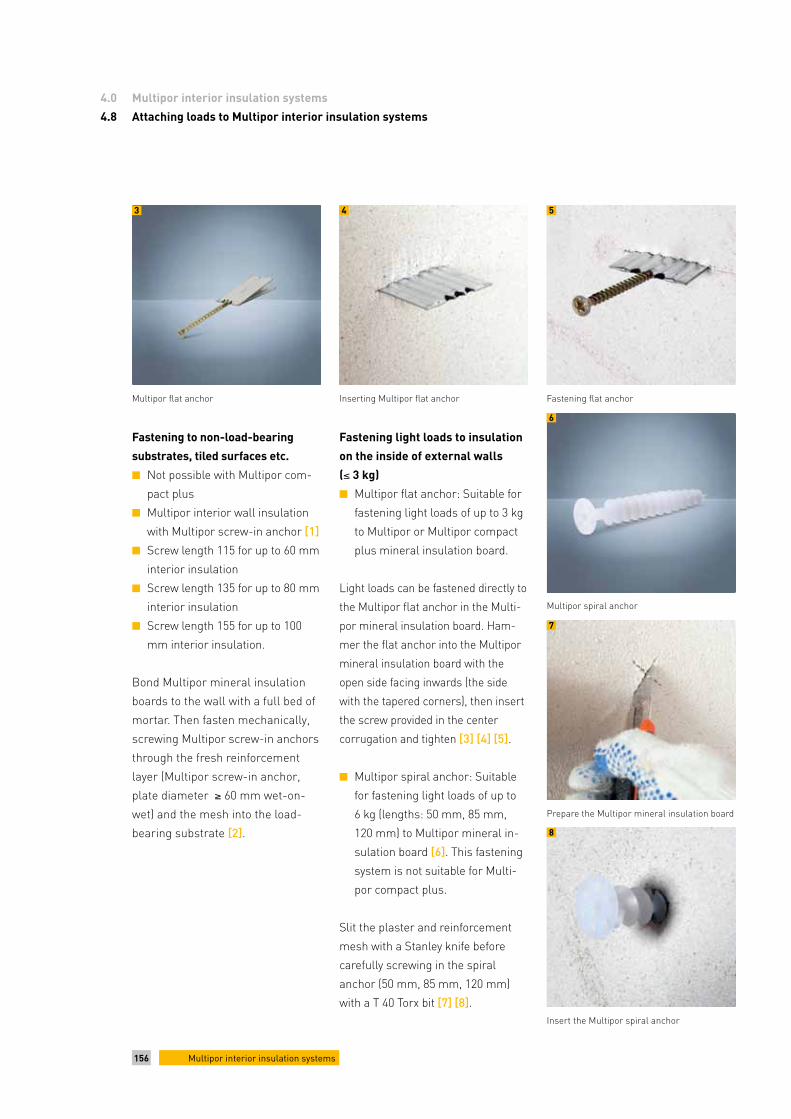
156 Multipor interior insulation systems
Multipor interior insulation systems4.0
Attaching loads to Multipor interior insulation systems4.8
Fastening to non-load-bearing
substrates, tiled surfaces etc.
■■ Not possible with Multipor com-
pact plus
■■ Multipor interior wall insulation
with Multipor screw-in anchor [1]
■■ Screw length 115 for up to 60 mm
interior insulation
■■ Screw length 135 for up to 80 mm
interior insulation
■■ Screw length 155 for up to 100
mm interior insulation.
Bond Multipor mineral insulation
boards to the wall with a full bed of
mortar. Then fasten mechanically,
screwing Multipor screw-in anchors
through the fresh reinforcement
layer (Multipor screw-in anchor,
plate diameter ≥ 60 mm wet-on-
wet) and the mesh into the load-
bearing substrate [2].
Fastening light loads to insulation
on the inside of external walls
(≤ 3 kg)
■■ Multipor flat anchor: Suitable for
fastening light loads of up to 3 kg
to Multipor or Multipor compact
plus mineral insulation board.
Light loads can be fastened directly to
the Multipor flat anchor in the Multi-
por mineral insulation board. Ham-
mer the flat anchor into the Multipor
mineral insulation board with the
open side facing inwards (the side
with the tapered corners), then insert
the screw provided in the center
corrugation and tighten [3] [4] [5].
■■ Multipor spiral anchor: Suitable
for fastening light loads of up to
6 kg (lengths: 50 mm, 85 mm,
120 mm) to Multipor mineral in-
sulation board [6]. This fastening
system is not suitable for Multi-
por compact plus.
Slit the plaster and reinforcement
mesh with a Stanley knife before
carefully screwing in the spiral
anchor (50 mm, 85 mm, 120 mm)
with a T 40 Torx bit [7] [8].
Prepare the Multipor mineral insulation board
7
Multipor flat anchor
3
Inserting Multipor flat anchor
4
Fastening flat anchor
5
Multipor spiral anchor
6
Insert the Multipor spiral anchor
8

157Multipor interior insulation systems
4
Multipor interior insulation systems 4.0
Attaching loads to Multipor interior insulation systems 4.8
Fastening heavy loads
(≥ 6 kg)
Do not fasten loads over 6 kg and
dynamic loads directly to Multipor
or Multipor compact plus mineral
insulation board, fasten them to the
substrate instead.
■■ Fastening single loads: Fasten
light fittings and cabling through
the Multipor or Multipor compact
plus mineral insulation boards
into the load-bearing substrate.
Point loads are distributed with
the aid of a 30-mm washer [9].
■■ Fastening single loads: Fasten
light fittings and cabling through
the Multipor or Multipor compact
plus mineral insulation boards
into the load-bearing substrate.
Point loads are distributed with
the aid of a 30-mm washer
[10 – 13].
Fastening through Multipor mineral insulation board
Fitting a Multipor device mount Installed Multipor device mount
10 11
Multipor device mount with light fitting Multipor device mount with light
12 13
9
155 Drop-in anchor/compact anchor156 Threaded rod157 Nut with washer ∅ 30 mm158 Pipe clamp251 Multipor ceiling insulation

158 Multipor ceiling insulation systems
FAST COST-EFFECTIVE NON-COMBUSTIBLE VERSATILE BASEMENT SURFACE FINISH UNDERGROUND GARAGES ECO-FRIENDLY SOLID DIMENSIONALLY STABLE WOODPECKER-PROOF BASEMENT ENERGY-EFFICIENT SUSTAINABLE 100% RECYCLABLE EASY TO INSTALL EXECUTION RELIABILITY GARAGES MOISTURE CONTROL FIRE PROTECTION NATURAL PURELY MINERAL-BASED BASEMENT WOODPECKER-PROOF SUSTAINABLE NON-COMBUSTIBLE EXECUTION RELIABILITY SURFACE FINISH ECO-FRIENDLY VERSATILE DIMENSIONALLY STABLE FAST GARAGES UNDERGROUND GARAGES