MUL-1.2M-KU DTH KU-Band Satellite Dish Manual
15
MUL-1.2M-KU Satellite Dish Manual www.multicominc.com All Rights Reserved © 2017 Multicom, Inc. (800) 423-2594 (407) 331-7779 1 MUL-1.2M-KU DTH KU-Band Satellite Dish Manual Multicom, Inc. 1076 Florida Central Parkway, Longwood, FL 32750 www.multicominc.com November 2017 (Version 1a10) This manual is intended solely for use by purchasers of Multicom, Inc. satellite dishes and their qualified service technicians. This document is the property of Multicom, Inc. and incorporates proprietary subject material and information. The use of all design, manufacture, reproduction, and all other rights regarding these contents in whole or part without Multicom, Inc. written consent is expressly prohibited. Multicom® and the Multicom logo are registered trademarks of Multicom, Inc.
Transcript of MUL-1.2M-KU DTH KU-Band Satellite Dish Manual

MUL-1.2M-KU Satellite Dish Manual
www.multicominc.com All Rights Reserved © 2017 Multicom, Inc. (800) 423-2594
(407) 331-7779
1
MUL-1.2M-KU
DTH KU-Band Satellite Dish
Manual
Multicom, Inc. 1076 Florida Central Parkway, Longwood, FL 32750
www.multicominc.com November 2017 (Version 1a10)
This manual is intended solely for use by purchasers of Multicom, Inc. satellite dishes and their qualified service
technicians. This document is the property of Multicom, Inc. and incorporates proprietary subject material and information.
The use of all design, manufacture, reproduction, and all other rights regarding these contents in whole or part without
Multicom, Inc. written consent is expressly prohibited. Multicom® and the Multicom logo are registered trademarks of
Multicom, Inc.

MUL-1.2M-KU Satellite Dish Manual
www.multicominc.com All Rights Reserved © 2017 Multicom, Inc. (800) 423-2594
(407) 331-7779
2
Table of Contents Warnings and Safety Precautions .................................................................................................................... 3
1. Brief Introduction ......................................................................................................................................... 3
1.1 Product Description ................................................................................................................................. 3
2. Installation ..................................................................................................................................................... 4
2.1 Warnings ................................................................................................................................................. 4
2.2 Selecting an Installation Site .................................................................................................................. 4
2.3 Installation Site Prep .............................................................................................................................. 4
2.4 Assembly Details ..................................................................................................................................... 5
2.5 Dish Antenna Assembly ......................................................................................................................... 8
2.5.1 Assemble Universal Mount ............................................................................................................. 9
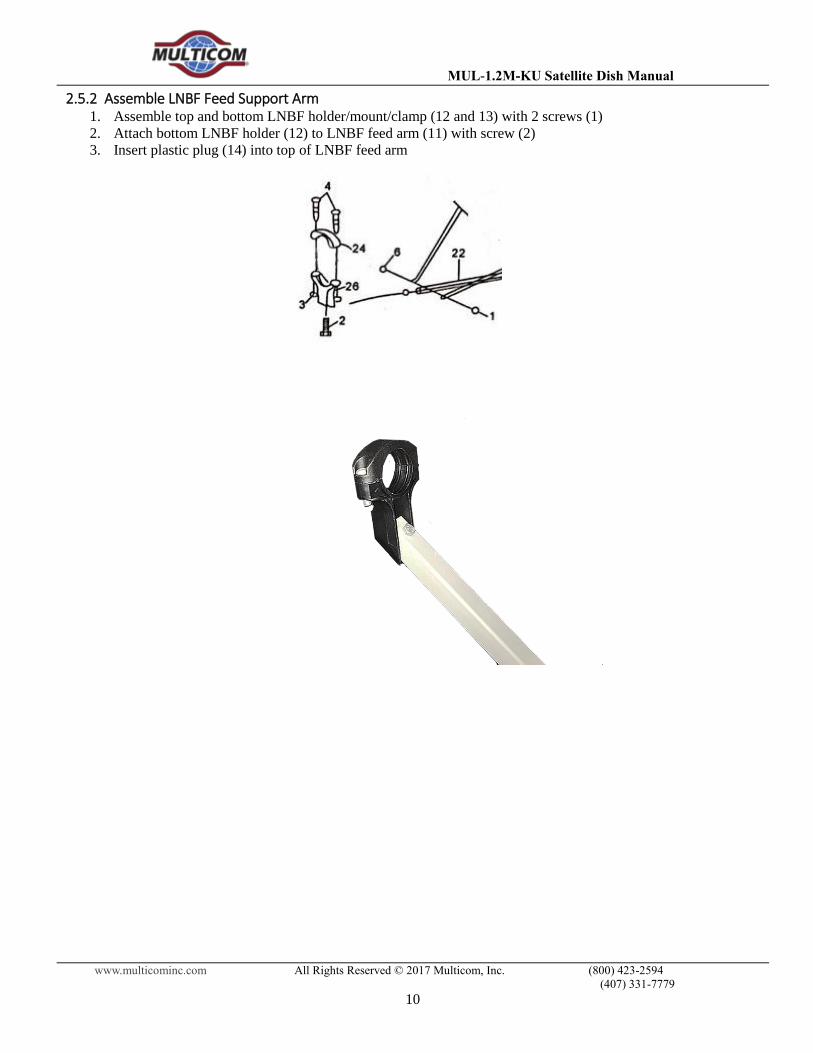
2.5.2 Assemble LNBF Feed Support Arm ............................................................................................ 10
2.5.3 Assemble Satellite Dish and Mount ............................................................................................. 12
2.5.4 Assemble Mast/Pipe Mount and Clamp ...................................................................................... 12
2.5.5 Install LNBF ................................................................................................................................... 13
2.6 Satellite Dish Alignment Instructions ................................................................................................. 13
2.7 Additional Installation Items ............................................................................................................... 14
3. Maintenance ................................................................................................................................................. 14
3.1 Inspection .............................................................................................................................................. 14
4. After-Sales Service ...................................................................................................................................... 14
5. Disclaimer .................................................................................................................................................... 14
6. Multicom Satellite-Related Dishes, LNBFs, Cable .................................................................................. 15

MUL-1.2M-KU Satellite Dish Manual
www.multicominc.com All Rights Reserved © 2017 Multicom, Inc. (800) 423-2594
(407) 331-7779
3
Warnings and Safety Precautions
The Multicom MUL-1.2M-KU Satellite Dish and Universal Mount includes a universal mount design
that is designed for roof/wall/flat surface mounting. Do NOT use the mount with a larger satellite dish
antenna. Miss-use can cause damage and/or personal injury. Please carefully read and observe the
following rules for your own safety.
Warnings:
DANGER: Do not install near powerlines or other wires.
DANGER: Do not install on windy/rainy/snowy/icy days.
DANGER: Do make sure that that area the mount is being installed on is structurally sound
and can handle the ballast-mount-antenna weight, wind load, snow/ice load, etc.
Do make sure the mount, mast, and satellite antenna are properly electrically grounded.
Do make sure that the mounting area is properly sealed from leaks.
Installation must meet local codes, regulations, standards, and ordinances for safety,
appearance, etc and must be done by a licensed professional installer.
DANGER: Improper and/or inadequate installations can be very dangerous and very susceptible to
wind-related or weight-related damage to property and personnel – potentially resulting in SERIOUS
INJURY OR DEATH. Installation must be done by a licensed professional installer.
1. Brief Introduction
This manual introduces the equipment in detail. Reading through this entire document before installing the
equipment can help you understand this product and familiarize you with the product features, technical
parameters and the operating environment while potentially avoiding safety issues, hazards, and other
problems and issues.
1.1 Product Description
The Multicom MUL-1.2M-KU DTH satellite dish has been specifically designed for DTH use. Mechanically
and electrically tested and field proven, this satellite dish provides the performance necessary for
demanding residential and commercial reception applications.

MUL-1.2M-KU Satellite Dish Manual
www.multicominc.com All Rights Reserved © 2017 Multicom, Inc. (800) 423-2594
(407) 331-7779
4
2. Installation
2.1 Warnings
WARNING - Weather: Installing dish antennas and mounts on windy days is extremely dangerous and
must never be attempted. Due to the size and surface area of the dish, even slight wind/gusts create
strong forces creating unsafe conditions. ATTEMPTING TO INSTALL OR MOUNT A DISH ON WINDY
DAYS COULD RESULT IN DEATH OR SERIOUS INJURY. Multicom is not responsible or liable for
damage or injury resulting from dish antenna, mount, and/or related equipment installations.
WARNING - Structural: Dish antennas and mounts improperly assembled or installed on inadequate
structures are susceptible to wind damage. This damage can be very serious or life threatening. The
owner/installer assumes full responsibility that the installation is structurally sound to support all loads
(ballast, weight, wind, and ice) and properly sealed against leaks and protected from other damage.
2.2 Selecting an Installation Site
Optimum installation requires an unobstructed view at the correct look angle to receive the highest powered satellite signal transmissions available. The any roof mount installation must be flat, without damage or other issues, and with a large enough clear area to accommodate the mount and dish antenna. The roof must also be able to handle the load of roof mount, dish antenna, concrete ballast, installers, and wind, snow, ice, etc. Insure that there are connections nearby for proper grounding. Insure that the installation and overhead area is free of electrical cabling/wires, overhead lines, etc. In high wind-prone areas, the assembly should be tethered to other structural members on the roof to prevent sliding/flying off.
2.3 Installation Site Prep
Determine the area for installation and clear it of any debris, loose materials, etc. Insure that the area is clean and dry.

MUL-1.2M-KU Satellite Dish Manual
www.multicominc.com All Rights Reserved © 2017 Multicom, Inc. (800) 423-2594
(407) 331-7779
5
2.4 Assembly Details

MUL-1.2M-KU Satellite Dish Manual
www.multicominc.com All Rights Reserved © 2017 Multicom, Inc. (800) 423-2594
(407) 331-7779
6
Assemble the mount per the photos, drawing, part list, and instructions below.
ABOVE: Front view of 1.2m satellite dish with LNBF mount
ABOVE: Side view of the satellite dish, mount, and supports

MUL-1.2M-KU Satellite Dish Manual
www.multicominc.com All Rights Reserved © 2017 Multicom, Inc. (800) 423-2594
(407) 331-7779
7
ABOVE: Rear view close up of dish with mount
ABOVE: Overview of the entire assembly

MUL-1.2M-KU Satellite Dish Manual
www.multicominc.com All Rights Reserved © 2017 Multicom, Inc. (800) 423-2594
(407) 331-7779
8
2.5 Dish Antenna Assembly
Item Part Description Quantity Comments
1 Bolt M8 x 35 1 LNBF Arm Braces to LNBF Arm
2 Bolt M6 x 35 2 LNBF Clamp to LNBF Arm
3 Hex Nut M6 2 LNBF Clamp
4 Round Head Philllips Bolt M6 x 25 2 LNBF Clamp
5 Bolt M8 x 15 4 LNBF Braces to Reflector, LNBF Arm Bracket
6 Flange Nut M8 22
7 Carriage Bolt M8 x 16 8 Reflector, Angle Bracket
8 U-Bolt M8 2
9 Bolt M8 x 75 2 Mast Supports, Base
10 Concrete Anchor Bolt M8 x 60 4 Expansion bolts
11 Elevation Adjust Bolt M8 1
12 Bolt M6 x 12 2 Bracket pivot
13 Flange Nut M6 4
14 Dish Reflector 1.2M 1
15 Reflector Mount Bracket 1
16 Mast Reflector Bracket 1
17 LNBF Arm Bracket 1 On bottom of reflector to attach LNBF Arm
18 Mast/J-pipe 1
19 Mast Support (Left) 1
20 Mast Support (Right) 1
21 Mast Base Bracket 1
22 LNBF Arm 1 LNBF Clamp on one end , Reflector on other
23 LNBF Arm Brace 2
24 LNBF Clamp (Top) 1
25 Flat Washer M8 8
26 LNBF Clamp (Bottom) 1
ABOVE: 1.2M Dish – Mount Parts List

MUL-1.2M-KU Satellite Dish Manual
www.multicominc.com All Rights Reserved © 2017 Multicom, Inc. (800) 423-2594
(407) 331-7779
9
2.5.1 Assemble Universal Mount 1. Pre drill holes in mounting surface using base (21) as a template
2. Attach base to mounting surface with 2 anchor bolts (8)
3. Install mount arm/pipe (18) into base (21)
4. Insert and loosely tighten both mast/pipe support legs (20), using nut (7), screw (19)
MUL-1.2M-KU Satellite Dish Manual
www.multicominc.com All Rights Reserved © 2017 Multicom, Inc. (800) 423-2594
(407) 331-7779
10
2.5.2 Assemble LNBF Feed Support Arm 1. Assemble top and bottom LNBF holder/mount/clamp (12 and 13) with 2 screws (1)
2. Attach bottom LNBF holder (12) to LNBF feed arm (11) with screw (2)
3. Insert plastic plug (14) into top of LNBF feed arm

MUL-1.2M-KU Satellite Dish Manual
www.multicominc.com All Rights Reserved © 2017 Multicom, Inc. (800) 423-2594
(407) 331-7779
11
4. Attach LNBF feed arm (11) to reflector bracket/mount (10) with 2 nuts (5) and 2 screws (3).

MUL-1.2M-KU Satellite Dish Manual
www.multicominc.com All Rights Reserved © 2017 Multicom, Inc. (800) 423-2594
(407) 331-7779
12
2.5.3 Assemble Satellite Dish and Mount 1. Attach satellite dish reflector (14) to satellite reflector bracket/mount (15) with 4 nuts (6) and screws (7)
2. Tighten all pieces
2.5.4 Assemble Mast/Pipe Mount and Clamp 1. Loosely assemble 2 u-bolts (8) through the
pipe mount (16) using 4 nuts (6)
2. Mount the pipe mount assembly (16) into
the satellite reflector bracket (15) using 4
bolts (4) with their heads on the inside and
4 nuts (5) on the outside.
3. Mount the dish assembly on the mast/pipe,
orient and then tighten all screws/nuts.

MUL-1.2M-KU Satellite Dish Manual
www.multicominc.com All Rights Reserved © 2017 Multicom, Inc. (800) 423-2594
(407) 331-7779
13
2.5.5 Install LNBF 1. Take care to align LNBF so that it is
positioned correctly (not rotated and so that
it is facing dish).
2. Mount with F‐connectors facing
downwards.
3. Do not overtighten LNB clamp.
4. Use high quality compression connector on
coaxial cable.
5. Attach and tighten coaxial cable to LNBF –
take care not to overstress F‐connector.
6. Route coaxial cable along the LNB feed
arm and use the cable clip or cable ties to
attach to the arm.
Note that Multicom also offers optional adapters that allow Dish Network or DirecTV LNBFs to be mounted
on Multicom satellite dishes.
2.6 Satellite Dish Alignment Instructions 1. Write down desired the azimuth and
elevation to point the dish
2. Using a magnetic/electronic compass to
determine the azimuth direction
3. Adjust the azimuth – making sure the U-
bolts are loosened first, then tighten when
in place at the correct azimuth.
4. Using a protractor determine the elevation
5. Adjust the elevation with the long elevation
adjustment bolt and its nut at the top of the
mast clamp – making sure the elevation
bolts/nuts are loosened first

MUL-1.2M-KU Satellite Dish Manual
www.multicominc.com All Rights Reserved © 2017 Multicom, Inc. (800) 423-2594
(407) 331-7779
14
2.7 Additional Installation Items Electrically ground the antenna-mast-mount assembly per the US National Electric Code (NEC) standards. This material is not provided. In high wind prone areas, the assembly should be tethered to other structurally sound members on the structure to prevent sliding/flying in any direction. These materials are not provided.
3. Maintenance
3.1 Inspection
It is recommended that the installation be inspected every 6 months or more and after every severe weather storm. Check for:
Loose bolts
Loose mounts/clamps
Corrosion
Damage to dish, mount, brackets
Loose/damaged tethers
Movement of the dish and/or LNBF and/or mount
Roof damage, leaks
Loose ground connections Resolve all issues immediately to insure the highest performance and safety.
4. After-Sales Service
1. If the equipment malfunctions, immediately contact your local in-country dealer or distributor or directly
call our Multicom USA Technical Support Hotline 407-331-7779.
2. The onsite installation, maintenance, and operation of equipment must be performed by trained personnel
5. Disclaimer
Multicom reserves the right to change any products described herein at any time, and without prior notice.
Multicom assumes no responsibility or liability arising from the use of the products described herein,
except as expressly agreed to in writing by Multicom, Inc. The use and purchase of this product does not
convey a license under any patent rights, copyrights, trademark rights, or any intellectual property rights.
Nothing hereunder constitutes a representation or warranty that using any products in the manner described
herein will not infringe any patents of third parties.

MUL-1.2M-KU Satellite Dish Manual
www.multicominc.com All Rights Reserved © 2017 Multicom, Inc. (800) 423-2594
(407) 331-7779
15
6. Multicom Satellite-Related Dishes, LNBFs, Cable
KU Band
KU Band, Offset Satellite dish – 60CM MUL-60CM-KU KU Band, Offset Satellite dish – 75CM MUL-75CM-KU KU Band, Offset Satellite dish – 90CM MUL-90CM-KU
KU Band, Offset Satellite dish – 1M MUL-1M-KU KU Band, Offset Satellite dish – 1.2M MUL-1.2M-KU
C Band
C Band, Prime Focus Satellite dish – 1.8M MUL-1.8M-W C Band, Prime Focus Satellite dish – 2.4M MUL-2.4M-W
Roof Mounts
Non Penetrating Roof Mount – 1.0/1.2M MUL-NPRM
Adapters
KU adapter for Dish Pro LNBF MUL-KU-LNBF-ADAPTER
KU Band LNBF
KU Band LNBF – 1 Port MUL-SINGLE-LNBF KU Band LNBF – 2 Port MUL-TWIN-LNBF KU Band LNBF – 4 Port MUL-QUAD-LNBF
KU Band LNBF – 8 Port MUL-OCTO-LNBF
Coaxial Cable
RG-6 90% single shield drop cable M690-BV
RG-6 60% single shield drop cable M660-BV
RG-6 60% trishield drop cable M660T-BV
Check the Multicom website (www.multicominc.com ) and product catalog
(www.multicominc.com/catalog/ ) for these and other installation tools, test instruments, and products such
as bulk cable, jumpers, connectors, splitters, taps, and much more.
The contents of this manual are subject to change and/or update without notice.