MTN 020 Participant Tracking Database 020 Participant Tracking Database User’s Manual Version 1.0...
14
MTN 020 Participant Tracking Database User’s Manual Version 1.0 June 2012
Transcript of MTN 020 Participant Tracking Database 020 Participant Tracking Database User’s Manual Version 1.0...

MTN 020 Participant Tracking Database
User’s Manual
Version 1.0 June 2012
2
Disclaimer
The MTN 020 participant tracking database is an optional tool provided to study sites by SCHARP for use in study visit management/visit tracking purposes. This database does not collect or store any data used for study analyses, and this database will not be transferred, shared, or provided to any persons outside of the study site. This database is not used to record/collect source data or generate source documents. All information entered into the database is based on source documents contained in participants‟ study records. Information contained within the database, or printed from the database, is not source data or documentation. As with all study data, every effort should be made to maintain participant privacy and confidentiality.
This manual and the MTN 020 participant tracking database
were developed by SCHARP and FHI 360 with input from the MTN 020 study team. Please direct questions about this manual
to the following individuals:
Jennifer Berthiaume – [email protected]

3
Table of Contents
1. Introduction .................................................................................................................................. 4 1.1 What the database can do ........................................................................................................... 4 1.2 What the database cannot do ...................................................................................................... 4
2. Equipment .................................................................................................................................... 5 3. Password-Protection Access to the Database ............................................................................... 5 4. MS Access Basics: Tips for Navigating the Database ................................................................ 6 5. Non-Valid (Dummy) PTIDs for Initial Testing of Database ....................................................... 6 6. Entering Participant Recruitment Sources and Health Workers .................................................. 7
5.1 Recruitment Sources .............................................................................................................. 7 5.2 Health Workers ...................................................................................................................... 7
7. Adding and Updating Participant Information ............................................................................. 8 6.1 Initial Entry of a Participant .................................................................................................. 8 6.2 Updating Participant Information ........................................................................................ 10
8. Generating Participant Follow-up Schedules ............................................................................. 10 9. Managing Participant Follow-Up Visits .................................................................................... 11
8.1 Checking Target and Allowable Dates for Follow-Up Visits ............................................. 11 8.2 Scheduling Follow-Up Visits .............................................................................................. 11
8.3 Entering Completion of Follow-Up Visits .......................................................................... 12 10. Generating Reports .................................................................................................................. 13
9.1 Screening and Enrollment Reports ...................................................................................... 13
9.2 Scheduled Visit Reports ...................................................................................................... 14 9.3 Late and Missed Visit Reports ............................................................................................. 14

4
1. Introduction The MTN 020 participant tracking database is a Microsoft Access application used by MTN 020 site staff to assist in a number of study administrative and management functions, including:
visit scheduling and tracking identifying study participants who are due for visits, in order to conduct visit reminders identifying study participants who are late for or have missed scheduled visits, in order
to conduct timely participant outreach and retention efforts Output from the database consists of Microsoft Access reports. Use of the database is completely optional, and is in no way associated with collection, management, or storage of data that will be used for analytic purposes vis-à-vis the MTN 020 study objectives. Note: The database is to be used for participant tracking purposes only. It should not be used to record source data or generate source documents. All information entered into the database is based on other source documents contained in participants‟ study records. Information contained within the database, or output/reports printed from the database, are not source data/documentation.
1.1 What the database can do
Let you know when Enrollment Visits are coming up
List per calendar month # screens, # of enrollments
Generate a follow-up visit schedule with dates (Excel Tool)
Tell you which PTIDs have visits coming up on which day and what type of visit
Tell you which visits a PTID has missed
Tell you which visits for which a PTID is late
Tell you which PTIDs have terminated early
Inform which recruitment sources are most effective at yielding enrollments
1.2 What the database cannot do
Indicate what procedures are required at a visit
Tell you if a participant is enrolled in MTN-015 or is currently pregnant
Be used for co-enrollment identification
Allow for separate dates for split visits to be entered
Cannot trigger reminders for second half of split visits
Allow you to generate retention rates
Be used as source for any information
All information should be documented in other places
Tell you which participants attended the clinic on days prior to today
Synch data with Outlook calendars
Flag if a visit is scheduled outside of its‟ windows

5
2. Equipment
Equipment consists of one security-encrypted Hewlett-Packard (HP) 1104 Mini-laptop computer and an external mouse per site. Information on the security-encryption phrase, required to be typed-in each time the laptop is turned on, will be provided to each site separately at the time the laptop is supplied.
The participant tracking database has been installed on the C drive of the laptop computer. SCHARP is providing the laptop with the database installed in order to avoid software computability issues and/or computer hardware issues that could affect the performance of the database. The above-listed equipment may be used for purposes of running the participant tracking database only. The equipment should not be used for any other office, business, or leisure activities. No additional software should be installed on the computer and the computers should not be used for word processing, browsing the Internet, or any other application. No technical changes should be made to any of the equipment unless directed by SCHARP.
In particular, please ensure that the original version of Microsoft Access 2010 remains on this laptop and later versions of Microsoft Office Suite and Windows are not installed at any time during the study. Since a laptop with the database will be provided in working order, SCHARP is not responsible for any data loss and/or future technical or software support needs incurred by the site. To best protect participant confidentiality, the database should not be backed-up or stored on another device/location. If all or part of the database is lost or damaged, it should be possible to re-enter/re-create the database if the site chooses, as the database is not the source for any of the information it contains (all data can be entered based on source documents maintained by the study site).
If the site makes any modifications to the database and/or other software, or makes any changes to laptop hardware, network connections, etc., the site is responsible for any effects these modifications have on the participant tracking database.
3. Password-Protection Access to the Database
To maintain participant privacy and confidentiality, the database must be maintained in a secure environment. Password protection should be established for each authorized database user by following these steps:
Open Microsoft Access. A Password text box will prompt you to enter a password before you can access the database.
Type the password given to you during the site-specific training. Click OK.
Be sure to record all passwords in a secure location away from the machine on which
the database is installed.

6
4. MS Access Basics: Tips for Navigating the Database
To open the database:
Double-click the MTN-020 Participant Tracking Database shortcut or icon present on the desktop.
The database is a menu-driven MS Access application. As such, navigation within the database is based on user selections from options on a series of hierarchical menus. The top level menu, which greets users upon entry, is called the Main Menu. From the Main Menu, users can select from multiple submenus. Some of these submenus have their own submenus, while others have options for data entry forms or reports.
Like in other MS Access applications, navigation among records in the database is accomplished by use of the Navigation Bar at the bottom of each form. The Navigation Bar indicates the number of existing records and offers 5 navigation buttons:
l< takes users to the first record
< to the previous record
> to the next record
>l to the last record
>* to a new record
When closing a form within the database, use the „Close‟ button rather than the “x” at the top right of the form. It is fairly easy to confuse the “x” on the intended form with the “x” on the Access window, leading to the unintentional closing the entire database.
5. Non-Valid (Dummy) PTIDs for Initial Testing of Database
Nine non-valid PTIDs are available to be entered so that the database may be tested prior to study start. The following dummy PTIDs can be entered along with dummy screening and enrollment dates to experiment with different components of the database.
999-99999-1 999-99999-2 999-99999-3 999-99999-4 999-99999-5 999-99999-6
999-99999-7 999-99999-8 999-99999-9
If sites choose to enter these PTIDs for testing and training purposes, please ensure that these PTIDs and any associated information are deleted prior to study start.
7
6. Entering Participant Recruitment Sources and Health Workers
Before any participant-specific information can be entered in the database, some other information must be pre-populated in the database. This pre-populated information – Recruitment Sources and Health Workers – is used by the system to create drop-down lists on the Participant Information Form (see Section 6 below). While Recruitment Sources and Health Workers must be entered before any participant-specific information can be entered, this information can also be added to or updated at any time during the course of the study.
5.1 Recruitment Sources
If sites wish to use the database to track sources of participant recruitment, the site must assign code numbers to their participant recruitment sources (the method by which the participant was recruited). The recruitment source code number is then entered for each participant on the Participant Information Form. To initially enter or update Recruitment Source code numbers, from the Data Entry Menu:
Click the Update Recruitment Sources button.
Enter the source‟s code number and name in the boxes on the Recruitment Sources Form.
You can also search for a Recruitment Source record by clicking on the arrows at the bottom of the form, and edit that information as needed. Close the Recruitment Sources Form by clicking the Close button. Note: Once a recruitment source code number has been assigned to a particular recruitment source, the code number should not be deleted from the database or re-assigned to another recruitment source. There is virtually no limit to the number of recruitment sources that can be entered into the database.
5.2 Health Workers
If Health Workers are assigned to specific participants at your site, and you wish to keep track or be able to know which workers are assigned to which participants, you may enter the names (or initials) of the Health Worker assigned to each participant in the database. As a first step, you must enter the Health Workers names in the database to create a drop-down list in the Participant Information Form. To enter or update Health Worker information, from the Data Entry Menu,
Click the Update Health Worker button.

8
Enter the worker‟s name (full or partial) or initials in the box on the Health Worker Form. You can also search for a Health Worker record by clicking on the arrows at the bottom of the form, and edit that information as needed.
Close the Health Worker Form by clicking the Close button. Note: Once a Health Worker has been entered in the database, that person‟s name should not ever be deleted from the database, even if that worker stops working on MTN 020.
7. Adding and Updating Participant Information Participant Information should be entered into the database upon initial screening. You will need the participant‟s study ID number (PTID) to begin entering data. Each participant with a PTID will have a single record in the database. If a participant screen fails or fails to enroll during the allowable window, yet is deemed suitable for further consideration and re-screening, update the appropriate fields (for example, Screening Visit date, Enrollment Visit date for 2nd screening attempt) in the participant‟s existing records and proceed accordingly.
6.1 Initial Entry of a Participant To add a new participant, from the Data Entry Menu:
Click the Add New Participant menu button. This opens the Participant Information Form in a new record, where you can begin entering a participant‟s information.
Figure 1: Participant Information Form The first section of this form records information about the participant. Fields on the form are:

9
PTID – Enter the participant‟s assigned MTN-020 PTID (###-#####-#). Once a PTID is entered into this field, a message box will appear asking to verify that this PTID is correct. If an invalid PTID is entered into this field, an error message will appear.
Recruitment Source – Select from the drop-down list. If the relevant Recruitment Source is not on the drop-down list, enter the Recruitment Source in the database by following the procedure in section 5.1.
Screening Consent Date – Entering the “Screening Consent Date” is very important because this date is used by the database to determine the last possible enrollment date allowed for this screening attempt. Always double-check the accuracy of this entry.
Enroll by – This field is automatically generated by the database based on the “Screening Consent Date.”
Enrollment/Randomization Date – Entering the “Enrollment/Randomization Date” is very important because this date is used by the database to determine the target date and allowable visit window for each of the protocol-defined follow-up visits. Always double-check the accuracy of this entry.
Health Worker 1 – If Health Workers are assigned at your site, select from the drop-down list. Otherwise leave this field blank. If the relevant Health Worker is not on the drop-down list, enter the Health Worker‟s name in the database by following the procedure in section 5.2.
Health Worker 2 – If two Health Workers are assigned at your site, select from the drop-down list. Otherwise leave this field blank. If the relevant Health Worker is not on the drop-down list, enter the Health Worker‟s name in the database by following the procedure described in section 5.2.
Participant Status – Select participant‟s current status from drop-down list. The default value is “Screening.” Be sure to update if a participant withdraws consent, is lost to follow-up, or becomes ineligible during the screening process. Mark “Invalid PTID Entry” if a PTID was entered incorrectly or if two entries were created in the database for the same participant. If this occurs, please mark in the comments box that the entry was created in error. If a participant terminates early at any point during the study, update her status to “Early Termination”.
The next section of this form contains (optional) fields to enter a participant‟s home and/or mobile phone number and checkboxes to indicate whether the participant has given permission for the clinic staff to contact her. The last section of this form is a Comment field. This field can be used to record relevant administrative or study management information for the participant such as preferred/primary language and Date of Birth. No medical information should be entered in this field. To add another participant:
Click the Add New Participant button at the top of the form or the >* button at the bottom right of the Record Navigation bar of the Participant Information Form.
After entering all participant information, close the Participant Information Form to return to the Data Entry Menu. All data entered will be automatically saved.

10
6.2 Updating Participant Information
To update participant information:
From the Data Entry Menu, click the Update Participant Information button. This will open the Participant Information Form.
To search for the participant whose record you would like to update:
Click the Find Participant button at the top of the form. This opens a Search Dialog Box. By using the “Find What” box, you can search for any entry in any field (e.g., all or part of the PTID, participant name or nick name, street address, etc.). To search all fields at once, select “Participant Check-in Form” from the “Look In” drop down box, select “Any Part of Field” from the “Match” drop down box and selecting “All” from the “Search” drop down box,. If searching by full participant ID, be sure to include the dashes.
Click the “Find Next” button to execute search.
Once you have located the correct participant‟s record, edit the Schedule Visit Data,
Actual Visit Date or Missed Visit fields as needed.
Close the Participant Information Form to return to the Data Entry Menu. All edits will automatically be saved.
8. Generating Participant Follow-up Schedules
The database will generate enrolled participant-specific follow-up visit schedules based on the enrollment (randomization) date entered on the Participant Information Form. The generated follow-up schedule includes the participant‟s PTID, her enrollment date, and all of the following for each required follow-up visit:
target visit date visit window start (open) date visit window end (close) date scheduled visit date actual visit date
It is recommended to generate the schedule for each participant upon enrollment, for use as a tracking tool in each participant‟s study notebook. Subsequent generations of the schedule, generated after follow-up visits have taken place, will contain data on scheduled and actual visits based on information entered on the Follow-up Visit Master Log form (as described in section 8).
Access the participant‟s Participant Information Form as described in section 6.
Click on the Schedule Follow-up Visits button on the Participant Information Form. The Participant Follow-up Visit Schedule opens.
11
Note that the participant information (including Screening Date and Enrollment Date) cannot be edited in this form. This can only be edited in the Update Participant Information form as described above in section 6.2.
9. Managing Participant Follow-Up Visits
Follow-up visits can be scheduled and managed for only those participants with a completed Participant Information Form. In particular, the form‟s Enrollment/Randomization Date field must be complete.
8.1 Checking Target and Allowable Dates for Follow-Up Visits
To check the target date and allowable visit window for a specific follow-up visit, consult the Participant Follow-up Visit Schedule previously generated for the participant (see section 7.0). Alternately:
Click the Schedule Follow-up Visits button on either the Data Entry Menu or the Participant Information Form. The Follow-up Visit Master Log will open.
Click the Check Visit Target and Window button on the participant‟s Follow-up Visit
Master Log.
Enter the relevant visit month () and hit „Enter‟ to display the target and allowable dates for that visit.
8.2 Scheduling Follow-Up Visits
To record scheduled dates for follow-up visits:
Click the Schedule Follow-up Visits button on either the Data Entry Menu or Participant Information Form. The Follow-up Visit Master Log will open.
Locate the desired participant record by clicking on the Find Participant button. This
will open a Search Dialog Box.
You can search by PTID or by participant name. Remember, to search all fields at once, select “Participant Check-in Form” from the “Look In” drop down box, select “Any Part of Field” from the “Match” drop down box and selecting “All” from the “Search” drop down box,. If searching by full participant ID, be sure to include the dashes.
Once you have located the correct participant, close the Search Dialog Box.
The top part of the Follow-up Visit Master Log contains data populated by the Participant Information Form. You cannot change any participant information on the Log all changes must be made on the Participant Information Form (as described in section 6.2).

12
Figure 2: Follow-up Visit Master Log The lower portion of the Follow-up Visit Master Log contains the Follow-up Visits Subform. This subform contains the fields listed below. This subform is tabulated based upon the participant‟s enrollment date. The information on this subform is duplicated on the follow-up schedule, which can be printed for each participant‟s binder. The Scheduled Visit Date, Actual Visit Date and Missed Visit fields can updated during the study at any time.
Follow-up Visit Month – The follow-up visits will appear in the “Follow-up Visit Month” box.
Visit Month – The visit month will appear in the “Visit month” box. Target Visit Date - The target date will appear in the “Target Visit Date” box. This
is pre-filled based on the Enrollment date and cannot be changed.
Scheduled Visit Date – The scheduled visit date will be entered in the “Scheduled Visit Date” box. This date is based upon your clinic schedule and the participant, provided the scheduled visit date falls within the allowable visit window. Enter the scheduled visit date as agreed upon with the participant.
Actual Visit Date – After a visit takes place, enter the actual date of the visit on the Participant Check-in Form or on the Follow-up Visit Master log
Missed Visit – Mark this box if the visit window for a scheduled visit has passed and the participant has been unable to attend her scheduled visit for that month.
Close the Follow-up Visit Master Log. All data will be saved automatically.
8.3 Entering Completion of Follow-Up Visits
After a follow-up visit takes place:
Click the Participant Check-in Form button on the Main Menu. The Participant Check-in Form will open.
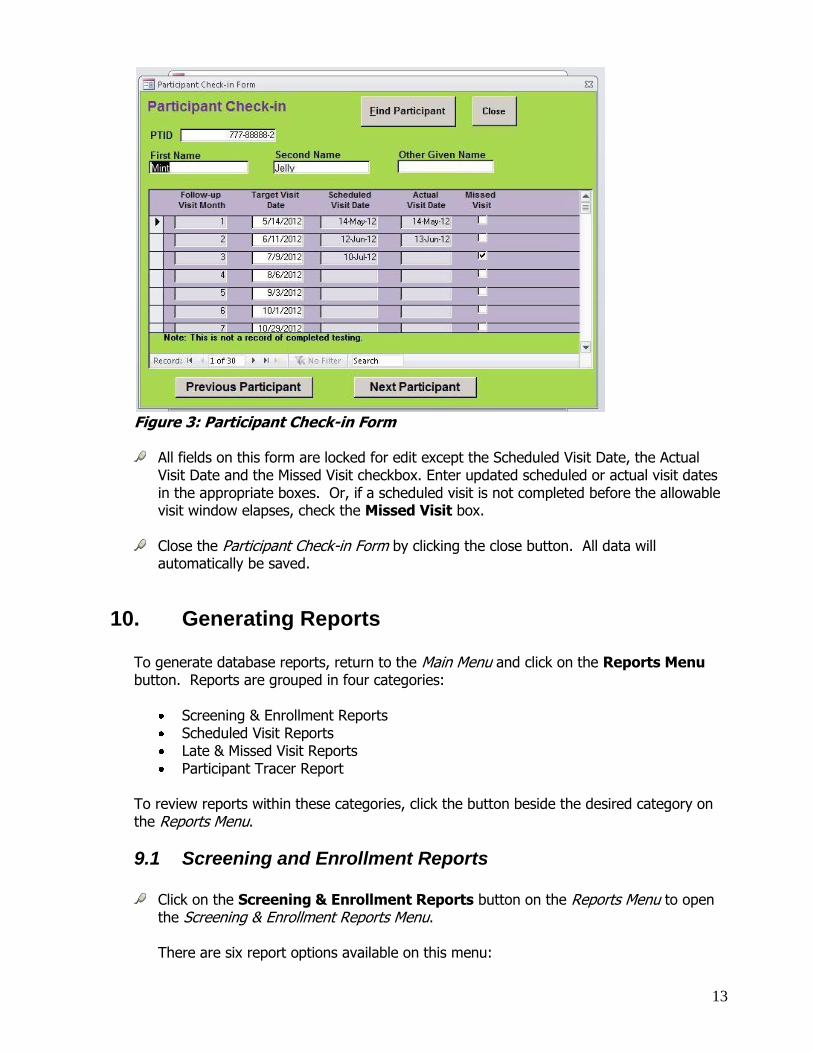
13
Figure 3: Participant Check-in Form
All fields on this form are locked for edit except the Scheduled Visit Date, the Actual
Visit Date and the Missed Visit checkbox. Enter updated scheduled or actual visit dates in the appropriate boxes. Or, if a scheduled visit is not completed before the allowable visit window elapses, check the Missed Visit box.
Close the Participant Check-in Form by clicking the close button. All data will
automatically be saved.
10. Generating Reports
To generate database reports, return to the Main Menu and click on the Reports Menu button. Reports are grouped in four categories:
Screening & Enrollment Reports Scheduled Visit Reports Late & Missed Visit Reports Participant Tracer Report
To review reports within these categories, click the button beside the desired category on the Reports Menu.
9.1 Screening and Enrollment Reports
Click on the Screening & Enrollment Reports button on the Reports Menu to open
the Screening & Enrollment Reports Menu.
There are six report options available on this menu:
14
Participants with Two Weeks Left to Enroll Participants with One Week Left to Enroll Screening & Enrollment Report (This report shows the number of screened and
enrolled participants for the preceding 7 days and cumulatively by month.)
Screened & Enrolled Participants (This report is a cumulative list of participants that have been screened and enrolled per month.)
Participant Early Termination Report (This report is a cumulative list of participants whose status=”early termination” on the Participant Information Form.)
Enrollment Yield by Recruitment Source (This report lists the number of screening and enrollment visits completed due to each recruitment source and enrollment yield)
9.2 Scheduled Visit Reports
Click on the Scheduled Visit Reports button on the Reports Menu to open the
Scheduled Visit Reports Menu. There are six report options available on this menu: Scheduled Follow-up Visits for Selected Day (This report allows you select a date in
order to see follow-up visits that are scheduled for that particular day.) Scheduled Follow-up Visits Next 2 Weeks Scheduled Follow-up Visits 2 Weeks Out Scheduled vs. Actual Visits (Monthly) (This report tabulates the number of visits
scheduled, the number of visits completed, and a raw participant follow-up rate on a monthly basis.)
Scheduled vs. Actual Visits (by Health Worker) Participant Visits (Requires PTID)
9.3 Late and Missed Visit Reports
Click on the Late & Missed Visit Reports button on the Reports Menu to open the
Late & Missed Visit Reports Menu.
There are two report options available on this menu:
Participants Late for Follow-up Visits (visit window has not yet expired)
Missed Visits


![January 10, 2012 [Participant Name] [Participant Street ......January 10, 2012 [Participant Name] [Participant Street Address] [Participant City, State Zip code] Dear [Participant](https://static.fdocuments.us/doc/165x107/5f8ad691c7ddf87a4309ec05/january-10-2012-participant-name-participant-street-january-10-2012.jpg)

![[Date] [Participant Name Participant Address1 …Date] [Participant Name Participant Address1 Participant City ST Zip] Dear Participant: RE: Request for Hardship Distribution under](https://static.fdocuments.us/doc/165x107/5b002b357f8b9af1148c48bc/date-participant-name-participant-address1-date-participant-name-participant.jpg)