MSS Installation Guide - Voice Communications Inc. 6510 UMS Mss... · 2011-05-11 · 6510 UM MSS...
104
MSS INSTALLATION GUIDE Draft
Transcript of MSS Installation Guide - Voice Communications Inc. 6510 UMS Mss... · 2011-05-11 · 6510 UM MSS...

MSS INSTALLATION GUIDEDraft

NOTICE
The information contained in this document is believed to be accurate in all respects but is not warranted by Mitel Networks Corporation (MITEL®). The information is subject to change without notice and should not be construed in any way as a commitment by Mitel or any of its affiliates or subsidiaries. Mitel and its affiliates and subsidiaries assume no responsibility for any errors or omissions in this document. Revisions of this document or new editions of it may be issued to incorporate such changes.
No part of this document can be reproduced or transmitted in any form or by any means - electronic or mechanical - for any purpose without written permission from Mitel Networks Corporation.
COPYRIGHT
6510 Unified Messaging MSS Installation GuideRelease 1.1November 2002
®,™ Trademark of MITEL Networks Corporation©Copyright 2002, MITEL Networks CorporationAll rights reserved
TRADEMARKS
MITEL and Mitel Networks are trademarks of Mitel Networks Corporation.
MS-DOS is a registered trademark of Microsoft Corporation.
Other brands and their products are trademarks or registered trademarks of their respective holders and should be noted as such.

6510 UM MSS Installation Guide 3
Table of Contents
About This Guide 7Document Overview 8
Intended Audience 8
Before You Begin 8
Conventions 8
Contacting Mitel Networks™ 9
CHAPTER 1 MSS Installation 11MSMQ Overview 12
Installing MSMQ 12
NT 4.0 Network Requirements for MSMQ 13
MSMQ 1.0 Server Requirements 13
Connectivity Requirements 13
Ensuring Optimal Performance 14
Overview of the Installation Procedure for MSMQ Server 1.0 15
Installing SQL 7.0 for MSMQ 1.0 server 15
Installing the MSMQ Server 1.0 Overview 19
Installing MSMQ Server (PEC) 1.0 20
Installing MSMQ 1.0 Client on Windows NT 4.0 23
Installing MSMQ 2.0 Client on Windows 2000 Professional for MSMQ server 1.0 25
Using the MSMQ Explorer 26
Installing MSMQ 2.0 in a Windows 2000 Network 27
Installing MSMQ 2.0 Server 28
Verifying the Installation of MSMQ on Windows 2000 30
Installing MSMQ 2.0 Client 31
Verifying MSMQ Client on Windows 2000 33
Testing for MSMQ Connectivity 33
Installing Microsoft IIS5 35

4 6510 UM MSS Installation Guide
Table of Contents
CHAPTER 2 MSS Installation and Configuration 37Understanding MSS 38
Using a Centralized Queue Server 38
Installing the MSS Server 40
Installing the MSS Connector for Exchange 5.5 41
Installing MSS Connector for Exchange 2000 44
Installing MSS Connector for Lotus Notes 47
Installing the RIM MSS Connector 49
Specifying the MSS Service Rights 52
Specifying the MSS Connector Rights (Exchange 5.5) 55
Specifying the MSS Connector Rights (Exchange 2000) 56
Enabling the MSS Voice Mail Connector 58
Managing the Synchronization Schema 59
Selecting the MSS Server 61
Changing the Log Level 61
Specifying the Log Files 62
Stopping the MSS Service 62
Changing Memory and Disk Space 62
Specifying the Refresh Rate 63
Maintaining the Client’s Property Page 64
Registering a New MSS Client 64
Disconnecting an Existing MSS Client 66
Unregistering a MSS Client 67
Managing the Client User’s Operations 67
Pushing MSS Client Message Queue 70
Refreshing the Page 70
Maintaining the Databases Property Page 71
Creating new MSS administration System Database 71
Viewing Database Statistics and Status 72
Compacting the MSS System Database 73
Creating a Daily Compacting Schedule 74
Creating a Weekly Schedule 75
Creating a Monthly Schedule 76

5 6510 UM MSS Installation Guide
Table of Contents
Refreshing the Page 76
Specifying the Import Users Property Page 76
Editing Users Through Exchange Administration 78
Installing MSS Connector Client-Side Extension 80
Configuring the MSS Connector for Lotus Client Extension 81
Lotus Domino Settings Configuration 82
Understanding the RIMMSS Connector 95
Configuring the RIMMSS Connector 95
Configuring the RIMMSS Software 97
Binding a Wireless User with the 6510 UM and Messaging Server 99
Unbinding a User 99
Installing MSS Connector on the Blackberry Device 100
Uninstalling the MSS Server and Connector 100
Uninstalling the MSS Server 101
Uninstalling MSS Exchange 5.5 Connector 101
Uninstalling MSS Exchange 2000 Connector 102
Uninstalling the Lotus Notes Connector 103
Uninstalling RIMMSS Connector for Blackberry Wireless Devices 104
6 6510 UM MSS Installation Guide
Table of Contents

6510 UM MSS Installation Guide 7
About This Guide
In This Chapter...
Document Overview on page 8
Intended Audience on page 8
Before You Begin on page 8
Conventions on page 8
Contacting Mitel Networks on page 9
8 6510 UM MSS Installation Guide
About This Guide
Document Overview
This guide provides detailed instructions on installing the 6510 Unified Messaging (UM) MSS software.
Note: Some screen captures in this document may not reflect the Mitel Networks™ 6510 UM software exactly. All screens will be updated in the next release of the 6510 UM documentation.
Intended Audience
This guide is intended for anyone responsible for installing and maintaining the 6510 Unified Messaging MSS software, including IT Administrators.
Before You Begin
Before you begin, ensure that you have fulfilled both the hardware and software requirements.
Conventions
This guide contains three types of help:
Note: Contains additional information about the task you are performing
Hint: Contains an alternative method of performing the task or offers a solution if you run into a problem.
Caution: Information that alerts you to potential loss of data or potential damage to an application, system, or device.
Warning:Information that alerts you to potential personal injury.

6510 UM MSS Installation Guide 9
About This Guide
Contacting Mitel Networks
Contact us by mail at:
Mitel Networks Corporation
350 Legget Drive
Ottawa, ON K2K 2W7
Contact us by phone:
Tel: 613-592-2122
Fax: 613-592-4784
Contact us on the Web:
www.mitel.com

10 6510 UM MSS Installation Guide
About This Guide

6510 UM MSS Installation Guide 11
CHAPTER 1 MSS Installation
In This Chapter...
MSMQ Overview on page 12
Installing MSMQ on page 12
Installing SQL 7.0 for MSMQ 1.0 server on page 15
Installing MSMQ Server (PEC) 1.0 on page 20
Installing MSMQ 1.0 Client on Windows NT 4.0 on page 23
Installing MSMQ 2.0 Client on Windows 2000 Professional for MSMQ server 1.0 on page 25
Using the MSMQ Explorer on page 26
Installing MSMQ 2.0 in a Windows 2000 Network on page 27
Installing MSMQ 2.0 Server on page 28
Installing MSMQ 2.0 Client on page 31
Installing Microsoft IIS5 on page 35
12 6510 UM MSS Installation Guide
MSS Installation and Configuration
MSMQ Overview
MSMQ software uses a centralized queue server (Primary Enterprise Controller or PEC) and a set of MSMQ clients. There are two types of clients— dependent and independent—but only independent clients might be used with MSS.
MSS software runs under both Windows NT 4.0 and Windows 2000 platforms. Due to using MSMQ, you must install and configure TCP/IP services on each machine that runs MSS software. All machines should be configured to use DNS name resolution.
Many distributed applications need the ability to handle delays between a request and a response. This is because all the steps of a distributed application process may not need to or cannot be completed at one time. Microsoft Message Queuing (MMQ) allows applications to use components that communicate with one another using queued messages. Like e-mail messages that sit in an inbox, messages can exist on dissimilar systems that may not even be directly communicating with each another.
Installing MSMQ
The following steps are required to install MSMQ:
1. For an NT 4.0 network, install MSMQ 1.x on a network domain controller (Windows NT4).
2. For a Windows 2000 network, install MSMQ 2.0 server on a network domain controller (Windows 2000).
3. Install MSMQ as an independent client on your Exchange server.
4. Connect the VM Server to the domain, then install MSMQ on the 6510 UM system.
5. Typically, the MSS server and MSMQ primary enterprise controller executed (PEC), should be on the same computer, that belongs to some Windows NT domain or acts as a PDC or BDC for domain.
6. Messaging servers and MSS connectors can be executed on computers that belong to same domain as computer that runs MSS server. Each machine that has MSS connector installed should run MSMQ independent client connected to MSMQ primary enterprise controller (see explanation below).

6510 UM MSS Installation Guide 13
MSS Installation and Configuration
7. Make sure that computers that are supposed to run MSS server or MSS connectors have Windows NT Server 4.0 / Windows 2000 Server or NT 4.0 workstation/ 2000 professional is installed and configured. Each computer should belong the same Windows domain.
Warning: You will need Administrator rights for the domain in order to install MSMQ and the MSS software
The IP of the Server must be static.
NT 4.0 Network Requirements for MSMQ
There are four components required to run MSMQ on an NT 4.0 Network:
1. SQL 7.0
2. MSMQ Server
3. MSMQ 1.0 Client on Windows NT 4.0
4. MSMQ 2.0 Client on Windows 2000
MSMQ 1.0 Server Requirements
The following servers are used by MSMQ:
1. PEC
2. PSCs
3. BSCs
4. MSMQ routing servers
Connectivity Requirements
The following requirements must be met for correct connectivity:
1. Each MSMQ controller server must meet the connectivity requirements of the enterprise.
2. PSCs (and the PEC) must share a CN with every other PSC.
3. BSCs must share a CN with the PSCs or the PEC they back up.

14 6510 UM MSS Installation Guide
MSS Installation and Configuration
4. Every MSMQ independent client and MSMQ routing server must share a CN with at least one PSC/PEC or BSC within its own site.
Ensuring Optimal Performance
To ensure optimal performance, do not install MSMQ servers on a primary domain controller (PDC) or a backup domain controller (BDC) . PDCs and BDCs maintain and replicate the network accounts database and perform network login authentications, which are resource-intensive tasks.
If you have a very small network in which account information rarely changes, and in which users do not log on and off frequently, you can use the same server as both a domain controller and an MSMQ server.
Note: MSMQ controller servers PEC, PSCs, and BSCs) use a SQL Server version 7.0 database to store the MQIS.
Specifying MSMQ Controller Server Computer Names
To ensure that SQL installs correctly, the MSMQ controller server’s computer name must be a valid SQL identifier, with the first character of the computer name being a letter or an underscore. Characters following the first character can include letters, numbers, or the symbols -, #, $, or _. However, no embedded spaces are allowed.
If your computer name contains a hyphen, the SQL Server Setup will display a warning message stating that the computer name is not valid. If characters that SQL does not recognize are used in the computer name, you must rename the computer before installing MSMQ or SQL Server. For directions on renaming computers, refer to the Windows NT online Help.
If the renamed computer is a member of a Windows NT Server domain, contact your network administrator to have the new computer name added to the domain.

6510 UM MSS Installation Guide 15
MSS Installation and Configuration
Overview of the Installation Procedure for MSMQ Server 1.0
Perform the following steps to install MSMQ Server 1.0:
1. Install NT 4.0 server use standard install.
2. Apply service pack 3.0.
3. Install service pack 4.0 or higher.
4. Install Microsoft IE4.01 or higher.
5. Install SQL 7.0. Make sure the following registry key exists before proceeding:
HKEY_LOCAL_MACHINE\SOFTWARE\Microsoft\MSSQLServer\Setup-"SQLPath"="C:\MSSQL"
6. From the NT4.0 option pack disk, install MSMQ as a PEC.
7. Use Explore to ping MSMQ to verify it is working.
8. Apply NT 4.0 service pack 4.0 or higher.
Installing SQL 7.0 for MSMQ 1.0 server
You must have both Service Pack 5 and IE 4 to install SQL 7.0. You will install SQL on the same machine that you plan to install the MSMQ1.0 server software on. MSMQ users the SQL database to store event queues in the network.

16 6510 UM MSS Installation Guide
MSS Installation and Configuration
To install SQL 7.0
1. Insert the Windows NT 4.0 Option Pack CD into the CD-ROM drive. The Welcome screen appears.
2. Double-click Select SQL Server 7.0 Components. The Install SQL Server 7.0 Components dialog appears.

6510 UM MSS Installation Guide 17
MSS Installation and Configuration
3. Double-click Database Server - Desktop Edition. The Select Install Method dialog appears.
4. Select Local install – Install to the Local Machine, then click Next. The Welcome dialog appears.
5. Click Next. The Software License Agreement dialog appears.
6. Click Yes. The User Information dialog appears.
7. In the Name field, enter the user’s name
8. In the Company field, enter the company name and click Next. The Setup Type screen appears.

18 6510 UM MSS Installation Guide
MSS Installation and Configuration
9. Click on Typical Installation, leaving the destination folders as their default settings and click Next. The Services Accounts dialog appears.
10.Select Use the same account for each service. Auto start SQL Server Service.
11.In the Service Settings, select Use the Local System account as the service setting and click Next. The Start Copying Files dialog appears.
12.Click Next. The Setup process begins. After the Setup process completes, the Setup Complete dialog appears. Click Finish, then restart the computer.
Once the SQL server installation is complete you can now proceed to install MSMQ server 1.0

6510 UM MSS Installation Guide 19
MSS Installation and Configuration
Installing the MSMQ Server 1.0 Overview
The Microsoft Message Queue (MSMQ) server is installed as part of the Windows NT 4.0 Option Pack installation. When the MSMQ is selected, it inserts configuration dialog boxes both before and after the Option Pack file copying process. If you elected to install the Microsoft Message Queue server, the MSMQ Setup dialog box appears and prompts you to choose the MSMQ server or client component to install. By default, the Primary Enterprise Controller (PEC) option is selected, with the PEC containing the master copy of the MSMQ Information Store.
Note: For an enterprise network, a Primary Enterprise Controller is required in order for other MSMQ servers or clients to be installed.
In addition to the Primary Enterprise Controller option, the Message Queue server dialog box enables you to select six other options, specifically:
Option Function
Primary Site Controller (PSC) A primary site controller is required at each site.
Backup Site Controller (BSC) Backup site controllers are not required, but are recommended for failure recovery.
Routing Server A routing server provides routing, store and forward services, and remote message store
Independent Client Independent clients contain their own message stores, and can send or receive messages
Dependent Client Dependent clients require an active network connection and do not contain their own message stores.
RAS Connectivity Service The RAS connectivity service enables remote clients to use MSMQ message services.

20 6510 UM MSS Installation Guide
MSS Installation and Configuration
Note: If this is the first MSMQ installation on the network, you must select the Primary Enterprise Controller option. Otherwise, choose the type of MSMQ installation you want to perform.
Installing MSMQ Server (PEC) 1.0
The Primary Enterprise Controller (PEC) is another term for the MSMQ server. A complete MSMQ install is called an Enterprise, and the assigned server is the main controller or PEC.
Note: Before you start, make sure that Windows NT Server 4.0 is installed and configured.
To install MSMQ Server
1. Insert the Windows NT 4.0 Option Pack CD into the CD-ROM drive. In a few seconds, the Welcome dialog appears.
2. Click Next. The End User License Agreement dialog appears.
3. Click Accept, then Next. The following dialog appears.
4. Click Custom. The Select Components dialog appears.

6510 UM MSS Installation Guide 21
MSS Installation and Configuration
5. Click Next. The Server Type dialog appears.
6. Select Primary Enterprise Controller (PEC) and click Continue. The Information Server Database on SQL Server dialog appears.
7. Use the default options for MSMQ database and click Continue. The New Enterprise dialog appears.
8. In the Enterprise Name field, enter the Enterprise name for MSMQ Enterprise and click Continue. The New Connected Network dialog appears.
9. In the Connected Network Name field, enter the name of the Domain. Select IP as the Protocol and click OK. The Connected Networks dialog appears.

22 6510 UM MSS Installation Guide
MSS Installation and Configuration
10.Click Add. The New Site dialog appears.
11.In the Site Name field, enter the name of the site, then click Continue. The MSMQ Server setup is now complete.
12.Install MSMQ clients on all computers those supposed to run MSS software and configure MSMQ software as described below.
13.Use MSMQ Explorer to make sure that new MSMQ Enterprise was created.

6510 UM MSS Installation Guide 23
MSS Installation and Configuration
Installing MSMQ 1.0 Client on Windows NT 4.0
Before you start, identify the operating system that the client is running. MSMQ1.0 client can be installed on Windows NT 4.0
To install MSMQ 1.0 Client on Windows NT 4.0
1. Insert the Windows NT 4.0 Option Pack CD into the CD-ROM drive. In a few seconds, the Welcome dialog appears.
2. Click Next. The End User License Agreement dialog appears.
3. Click Accept, then Next. The following Option Pack dialog appears.
4. Click Custom. The Select Components dialog appears.
5. Check Microsoft Message Queue, then click Next. The Information Server Setup dialog appears.

24 6510 UM MSS Installation Guide
MSS Installation and Configuration
6. In the MTS Install Folder field, enter the installation folder for Microsoft Transaction Server, then click Next. The following dialog appears.
7. Select Local as the administration mode for Microsoft Transaction Server, then click Next. The following dialog appears.
6510 UM MSS Installation Guide 25
MSS Installation and Configuration
8. Select Independent Client as the type of MSMQ software that you want to install, then click Next.
9. Click Next. The Microsoft Message Queue Setup dialog appears.
10.Specify the name of the computer running MSMQ Server. If MSMQ 1.0 server is used, specify the name of primary site controller.
11.Click Next. The Microsoft Message Queue Setup dialog appears.
12.Specify installation folder for MSMQ software, then click Next.
13.Click Finish. The a confirmation message appears.
14.Click Yes. After the system has restarted, use MSMQ Explorer to make sure that the new MSMQ client was created.
Installing MSMQ 2.0 Client on Windows 2000 Professional for MSMQ server 1.0
Before you install MSMQ 2.0 Client on Windows 2000 professional integrated with a MSMQ1.0 server, make sure that you have:
1. Installed and configured Windows 2000
2. Installed MSMQ 1.0 Server software on the primary site controller.
3. Made sure that the computer is part of the Windows NT 4.0 Domain where the MSMQ 1.0 Server is installed.
To install MSMQ 2.0 Client
1. Click Start > Settings > Control Panel. The Control Panel window appears.
2. Double-click Add/Remove Programs. The Add/Remove Programs window appears.

26 6510 UM MSS Installation Guide
MSS Installation and Configuration
3. Click Add/Remove Windows Components. The Windows Components dialog appears.
4. Select Message Queuing Services, then click Next. The Message Queuing Type dialog appears.
5. Select Independent Client, then click Next. The Configuring Components dialog appears and begins installing MSMQ.
Note: The software will search for the PEC connected to the network.
6. Click Finish, do not proceed with the terminal server installation when installation is complete. Restart the computer. After the system has restarted, use MSMQ Explorer to make sure that the new MSMQ client was created.
Using the MSMQ Explorer
The MSMQ Explorer is a Windows-based management tool for administering MSMQ operations on your network. This test is a mandatory requirement before starting MSS installation.

6510 UM MSS Installation Guide 27
MSS Installation and Configuration
To use MSMQ Explorer
1. To run MSMQ Explorer, click Start > Programs > Windows NT 4.0 Option > Pack Microsoft Message > Queue Explorer. The Tools menu provides the following options:
You must be able to find other machines that have MSMQ installed. If you cannot find a MSMQ client to the MSMQ server (or vice versa), do not install the MSS middleware service for Unified messaging.
Installing MSMQ 2.0 in a Windows 2000 Network
If you are installing the Server in a Windows 2000 network utilizing an active directory, you must add the MSMQ 2.0 server to your network.
Software required for a Windows 2000 network:
1. MSMQ server 2.0 installed on a Windows 2000 server with windows 2000 server OS SP2
2. MSMQ Client 2.0 installed on the existing e-mail server
Options Function
Find Find a Computer or Queue
Purge Queue Purge the contents of a queue
Send Test Message Test a message queue
Remove User Certificates Remove the certificate from a selected user account.

28 6510 UM MSS Installation Guide
MSS Installation and Configuration
3. MSMQ client 2.0 installed on the Server
Installing MSMQ 2.0 Server
Before you install MSMQ 2.0, make sure that:
1. You have installed and configured the active directory services.
2. You have reinstalled the latest Windows service pack following the MSMQ and IIS installation and setup
PDC
Computer roles:NT: DC for domain TEST1
Software installed:Windows 2000 Server sp2
UC
Computer roles:NT: Work Station
MSS: MSS ConnectorSoftware installed:
Windows 2000 Pro SP2,3Com UCMessage Queue 2.0 ClientMSS Connector for UC
Email DC
Computer roles:NT: DC in domain TEST1MSMQ 2.0 PECMSS: MSS Connector
Software installed:Windows 2000 Server sp2 Exchange Server 2000 sp2Message Queue Server 2.0,MSS Connector for Exchange
Computer roles:NT: DC in domain TEST1MSMQ 1.0 ClientMSS: MSS Administration
Software installed:Windows NT 4.0 Server SP6
Message Queue Client 1.0 MSS Server

6510 UM MSS Installation Guide 29
MSS Installation and Configuration
To install the MSMQ 2.0 Server
1. Click Start > Settings > Control Panel on the machine that you plan to install the MSMQ server on. The Control Panel window appears.
2. Double-click Add/Remove Programs. The Add/Remove Programs window appears.
3. Click Add/Remove Windows Components, select Message Queuing Services and click Next. The Terminal Services Setup dialog appears.
4. Select Remote Admin for remote administration or Application Admin for application administration. The Windows Components dialog appears.
5. Click Next. The Message Queuing Type dialog appears.
6. Select Message Queuing server, then click Next.
7. The Windows 2000 Messaging Queuing Clients dialog appears.
8. Click Next. The Setup program begins to configure the components. After the installation is complete verify MSMQ is installed properly through active directory.

30 6510 UM MSS Installation Guide
MSS Installation and Configuration
Verifying the Installation of MSMQ on Windows 2000
Follow this procedure to view the MSMQ server in the network.
To verify the server software
1. Open Active directory sites and services snap-in.
2. Make sure that the server where you have installed MSMQ server is the global catalog for active directory by viewing the properties for NTDS services for this server.

6510 UM MSS Installation Guide 31
MSS Installation and Configuration
3. Open Active directory Users and Computers snap-in.
4. Select View>Advanced features.
5. Select View>Users and computers as containers.
6. Make sure that MSMQ object appears under computer where you have installed MSMQ services.
7. Restart your PC.
Installing MSMQ 2.0 Client
Before you start, make sure that you have:
1. Installed and configured Windows 2000.
2. Made sure that the computer is part of either the Windows NT 4.0 Domain (where the MSMQ 1.0 Server is installed), or the Windows 2000 Domain running ADS (Active Directory Service).

32 6510 UM MSS Installation Guide
MSS Installation and Configuration
3. Installed MSMQ server software on a Windows 2000 domain controller.
4. MSMQ 2.0 server software installed on the designated server machine.
5. Installed and configured Windows 2000, and that the active directory services are installed and configured.
6. Installed the latest Windows service packs and updates following installation.
To install MSMQ 2.0 Client
1. Click Start > Settings > Control Panel. The Control Panel window appears.
2. Double-click Add/Remove Programs. The Add/Remove Programs window appears.
3. Click Add/Remove Windows Components. The Windows Components dialog appears.
4. Select Message Queuing Services, then click Next. The Message Queuing Type dialog appears.

6510 UM MSS Installation Guide 33
MSS Installation and Configuration
5. Select Independent Client, then click Next. The Configuring Components dialog appears and begins installing MSMQ.
Note: The software will search for the PEC connected to the network. If the PEC is installed with NT4 OS, you have to manually identify the MSMQ Server
6. Click Finish when the installation process is finished.
Verifying MSMQ Client on Windows 2000
After you install MSMQ, you must make sure that you can view the MSMQ server on Windows 2000.
To verify MSMQ Client on Windows 2000
1. If MSMQ server software installed on Windows 2000, then Open Active directory sites and services snap-in.
2. Make sure that the server where MSMQ server installed is the global catalog for active directory by viewing properties for NTDS services for this server. Open Active directory users and computers snap-in.
3. Select View > Advanced.
4. Select View > Users and Computers as containers.
5. Make sure that MSMQ object appears under computer where you have installed MSMQ services.
Testing for MSMQ Connectivity
Before you install MSS, check that your network environment can accommodate the software requirements.
Install MSMQ client on the mail server. From MSMQ Explorer (NT 4.0) or active directory (Windows 2000), you must able to view client MSMQ computers. If you can ping the e-mail server from the Domain controller with MSMQ server, then the site is ready for a UM deployment.

34 6510 UM MSS Installation Guide
MSS Installation and Configuration
To test for MSS Compliance in a Windows 2000 Environment
1. Ensure the view is set accurately in active directory.
2. Make sure that MSMQ is added to the computer object for e-mail & voice server as above.
3. Right click on MSMQ object under each computer and select properties.
4. Click on the MQPing button to ensure you can receive a reply from the MSMQ server. Repeat the process for each computer with MSMQ.

6510 UM MSS Installation Guide 35
MSS Installation and Configuration
Installing Microsoft IIS5
The following procedure installs Microsoft IIS5 on the 6510 UM Server.
To install Microsoft IIS5
1. Insert the Windows 2000 installation CD into the CD-ROM drive. The Install Add-On Components dialog appears.
2. Select Install Add-On Components. The Windows Components Wizard dialog appears.
3. Select Internet Information Services (IIS), then click Details to make sure that all components have been selected. The Internet Information Services (IIS) dialog appears.
Note: You do not have to select the RAD option.
4. Click OK. The Configuring Components dialog appears.
5. Click Next to begin the installation. The system begins installing IIS.
6. Click Finish when installation is complete.

36 6510 UM MSS Installation Guide
MSS Installation and Configuration
7. After you have installed all of the software, run the Windows Update program for the latest Service Pack installation. Make sure that you re-install Service Pack 2 for Windows 2000.
8. Check to see if you can browse the queues. Create a test queue, then use MSQ’s Ping utility to test the installation.
9. Make sure that MSMQ is added to the computer object for e-mail & voice server as above.
10.Right-click on MSMQ object under each computer and select properties.
11.Click on the MQPing button to ensure you can receive a reply from the MSMQ server. Repeat the process for each computer with MSMQ.

6510 UM MSS Installation Guide 37
CHAPTER 2 MSS Installation and Configuration
In This Chapter...
Understanding MSS on page 38
Installing the MSS Server on page 40
Installing the MSS Connector for Exchange 5.5 on page 41
Installing MSS Connector for Exchange 2000 on page 44
Installing MSS Connector for Lotus Notes on page 47
Installing the RIM MSS Connector on page 49
Enabling the MSS Voice Mail Connector on page 58
Managing the Synchronization Schema on page 59
Installing MSS Connector Client-Side Extension on page 80
Configuring the MSS Connector for Lotus Client Extension on page 81
Lotus Domino Settings Configuration on page 82
Configuring the RIMMSS Connector on page 95
Installing MSS Connector on the Blackberry Device on page 100
Uninstalling the MSS Server and Connector on page 100
38 6510 UM MSS Installation Guide
MSS Installation and Configuration
Understanding MSS
The Message Synchronization Service (MSS) allows you to synchronize all of your messaging servers with the 6510 UM server, including Lotus Notes, Exchange 5.5 and Exchange 2000.
Using MSS, you can maintain several messaging servers in a synchronized state. The software uses centralized MSS server (MSS Agent) and a set of MSS connectors to connect particular messaging servers to MSS server. In addition, MSS uses MSMQ queues as a transport for information interchange between MSS server and MSS connectors.
MSS can be used with MSMQ version 1.0 (NT 4.0) and MSMQ 2.0 (Windows 2000 only).
Using a Centralized Queue Server
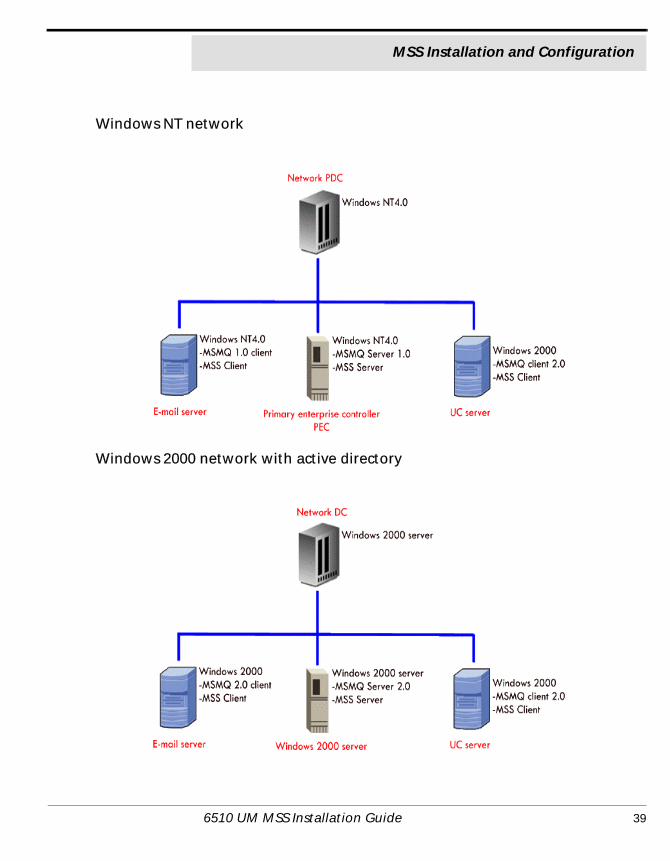
MSMQ software itself also uses centralized queue server (primary enterprise controller) and set of MSMQ clients (actually there are two types of clients — dependent and independent — but only independent clients can be used with MSS). From the other hand there are several MSMQ servers types (for example, primary site controller or routing server), but these server types are used rarely in cases of complex enterprise infrastructure, so using these server types with MSS is also out of the scope.
MSS software runs under Windows NT 4.0 and Windows 2000 platform. Due to using MSMQ, it is necessary to install and configure TCP/IP services on each machine that runs MSS software. All machines should be configured to use DNS name resolution.
Typically MSS server and MSMQ primary enterprise controller are executed on the same computer that belongs to some Windows NT domain or acts as a PDC or BDC for the domain. Messaging servers and MSS connectors can be executed on those computers that belong to same domain as the computer that runs MSS server or to any other domain. Each machine that has MSS connector installed should run MSMQ independent client connected to MSMQ primary enterprise controller (see explanation below).
6510 UM MSS Installation Guide 39
MSS Installation and Configuration
Windows NT network
Windows 2000 network with active directory
40 6510 UM MSS Installation Guide
MSS Installation and Configuration
Installing the MSS Server
Since the MSS Server is used as the central messaging area for all MSS devices, it must be installed before any of the other connectors.
To install the MSS Server
1. The MSS Setup dialog appears.
2. Click Next. The License Agreement dialog appears.
3. Select I accept the License Agreement, then click Next. The User Information dialog appears.
4. In the Full Name field, enter the name of the licensee of the product.
5. In the Organization field, enter the name of the organization that the Licensee works for.
6. Select Anyone who uses this computer, then click Next. The Select Feature dialog appears.
7. Select MSS Server, then click Next. The Database Engine dialog appears.
8. Select Codebase, then click Next. The Licensing Component Location dialog appears.
9. Select Local machine if your licensing component is installed on a local machine, or Remote machine if it is installed on a remote machine. Click Next. The Start Installation dialog appears.
10.Click Install. The Installation Wizard begins to install MSS Server software.
11.Click Finish when the installation is complete.
6510 UM MSS Installation Guide 41
MSS Installation and Configuration
Note: After completing the MSS Server installation, you need to install the appropriate MSS Connectors to enable full integration.
• To install the MSS Connector for Exchange 5.5, proceed to Installing the MSS Connector for Exchange 5.5 on page 41.
• To install the MSS Connector for Exchange 2000, proceed to Installing MSS Connector for Exchange 2000 on page 44.
• To install the MSS Connector for Lotus Notes, proceed to Installing MSS Con-nector for Lotus Notes on page 47.
• To install the RIM MSS Connector, proceed to Installing the RIM MSS Connector on page 49.
Installing the MSS Connector for Exchange 5.5
The MSS E-mail connector serves as the local server interface to the MSS server.
To install the Exchange 5.5 connector
1. The MSS Connector for Microsoft Exchange Server 5.5 Setup screen appears.Click Next. The License Agreement dialog appears.
2. Select I accept the License Agreement, then click Next. The User Information dialog appears.

42 6510 UM MSS Installation Guide
MSS Installation and Configuration
• In the Full Name field, enter the name of the Licensee.
• In the Organization field, enter the name of the organization that the Lic-ensee works for.
• Select Anyone who uses this computer, then click Next. The Destination Folder dialog appears.
3. In the Destination Folder dialog, select the destination where you want to install the MSS Connector 5.5 or click Next to accept the default folder. (Recommended). The MSS Connector settings dialog appears.

6510 UM MSS Installation Guide 43
MSS Installation and Configuration
4. In the Service account field, select the same user that is used to start the Microsoft Exchange 5.5 services on this computer. This is typically the domain administrator’s account
5. In the Service password field, enter the password for the service account selected above
6. In the MSS server field, enter the name of the MSS server computer, then click Next. The Start Installation dialog appears.
7. Click Next. The Installation Wizard begins to install MSS. When the installation has finished, the Installation Completed dialog appears.
8. Click Finish.
Note: You may select to install another Connector, or proceed to Specifying the MSS Service Rights on page 52.

44 6510 UM MSS Installation Guide
MSS Installation and Configuration
Installing MSS Connector for Exchange 2000
The Exchange 2000 connector serves as the local server interface to the MSS server.
To install the Exchange 2000 Connector
1. The MSS Connector for Microsoft Exchange Server 2000 setup dialog appears.
2. Click Next. The License dialog appears.
3. Select I accept the License Agreement, then click Next. The User Information dialog appears.

6510 UM MSS Installation Guide 45
MSS Installation and Configuration
• In the Full Name field, enter the name of the Licensee.
• In the Organization field, enter the name of the organization that the Lic-ensee works for.
• Select Anyone who uses this computer, then click Next. The Destination Folder dialog appears.
4. Click Next. The MSS connector settings dialog appears.
5. In the MSS server field, enter the machine name of the MSS server, then click Next. The Service Account dialog appears.

46 6510 UM MSS Installation Guide
MSS Installation and Configuration
6. The Service Account Name is pre-determined and cannot be changed.
7. In the Service Account Password field, you can designate a service account password, or use the default password that is generated.
Note: The Service Account password assigned in this field will be used for both the User account and the Services account.
8. Click Next. The Installation will start copying files.
9. Click Finish when the installation is complete.
Note: You may select to install another Connector, or proceed to Specifying the MSS Service Rights on page 52.

6510 UM MSS Installation Guide 47
MSS Installation and Configuration
Installing MSS Connector for Lotus Notes
The Lotus Domino R.5 connector serves as the local server interface to the MSS server.
To install the Lotus Notes Connector
1. The MSS Connector for Domino R.5 Setup dialog appears.
2. Click Next. The License dialog appears.
3. Select I accept the License Agreement, then click Next. The User Information dialog appears.
• In the Full Name field, enter the name of the current user.
• In the Organization field, enter the name of the organization that the cur-rent user works for.
4. Select Anyone who uses this computer, then click Next. The Destination Folder dialog appears.
5. Click Next. The Destination Folder dialog appears.

48 6510 UM MSS Installation Guide
MSS Installation and Configuration
6. Click Browse to select an installation folder, or click Next to accept the default destination. The MSS connector settings dialog appears.
• In the MSS Server field, enter machine name of the MSS server.
• In the Domino Administrator’s password field, enter the administrator’s password for the connector to access the Notes accounts, then click Next. The Start Installation dialog appears.
7. Click Start. The Installation Wizard begins installing the MSS connector software. When the installation is finished, the Installation Complete dialog appears.
8. Click Finish. The Installation Wizard may prompt you to reboot the system (due to rare cases where the setup cannot replace modules because they are locked by other applications). Click Yes to reboot your computer or no to continue with the installation.
Note: If you plan to run administration from the same machine that you have installed the MSS Connector, please ensure that you have already installed the Lotus Dominos administration client

6510 UM MSS Installation Guide 49
MSS Installation and Configuration
on the same machine. If the MSS connector detects a Lotus client installation it will also give you the option to install MSS administrative tools for the Lotus client.
You may select to install another Connector, or proceed to Specifying the MSS Service Rights on page 52.
Installing the RIM MSS Connector
The RIMMSS Connector allows the user to connect their RIM PDA to the synchronization schema.
Note: Before you start, make sure that the PC has MSMQ installed, and that you can ping the MSMQ server on your network.
To install the RIMMSS Connector
1. The MSS Connector for RIM devices Setup screen appears.
2. Click Next. The License Agreement dialog appears.
3. Read the License Agreement, then click Next. The User Information dialog appears.
• In the Full Name field, enter the user’s name.
• In the Organization field, enter the user’s organization
50 6510 UM MSS Installation Guide
MSS Installation and Configuration
• In the Product ID fields, enter the Sentinel license number, under the product ID information and select next and install under the default mss folder.
• Select all components to be installed on your computer, then click Next.
• Define what PC in your Domain that the MSS Server is installed as well identify the Network PC name for:
• POP3 server (usually the network mail server)
• SMTP Server (usually the network mail server)
Make sure you have already created an e-mail account in your mail server for the RIM connector so you can define the configured profile in the RIM devices setup screen such as:
• RIM e-mail
• RIM POP3 Account name
• RIM POP3 Password
• RIM SMTP Account name
• RIM SMTP Password

6510 UM MSS Installation Guide 51
MSS Installation and Configuration
4. Click Next. The MSS connector settings dialog appears.
The installation commences and configures your server.
Hint: Make sure you have a copy of your Windows 2000 CD available.
5. Click Finish when the configuration is complete. The message appears, prompting you to restart your computer.
6. Click Yes to restart your system or No to continue without rebooting.
Note: It is recommended that the system is rebooted following the installation.
52 6510 UM MSS Installation Guide
MSS Installation and Configuration
Specifying the MSS Service Rights
The MSS server handles all interactions with MSMQ. It therefore requires the appropriate service rights to create queues for the synchronization process. The default setting logon is local system.
Hint: If there are problems creating queues, you can specify that the service runs in conjunction with the rights of a domain administrator.
To change the MSS Service Rights
1. Navigate to the Services icon from Start>Programs>Administrative tools>Services.
Hint: If you are using Windows 2000 Professional, the Administrative Tools feature is hidden by default. To show the Administrative Tools, you must right-click the Desktop task bar, click Properties and then the Advanced tab. In the Start Menu Settings box, select the Display Administrative Tools checkbox, click Apply and then OK. You can now follow step 1 above and the Administrative Tools option will be available to you.

6510 UM MSS Installation Guide 53
MSS Installation and Configuration
2. Double-click MSS server service. The General dialog appears.
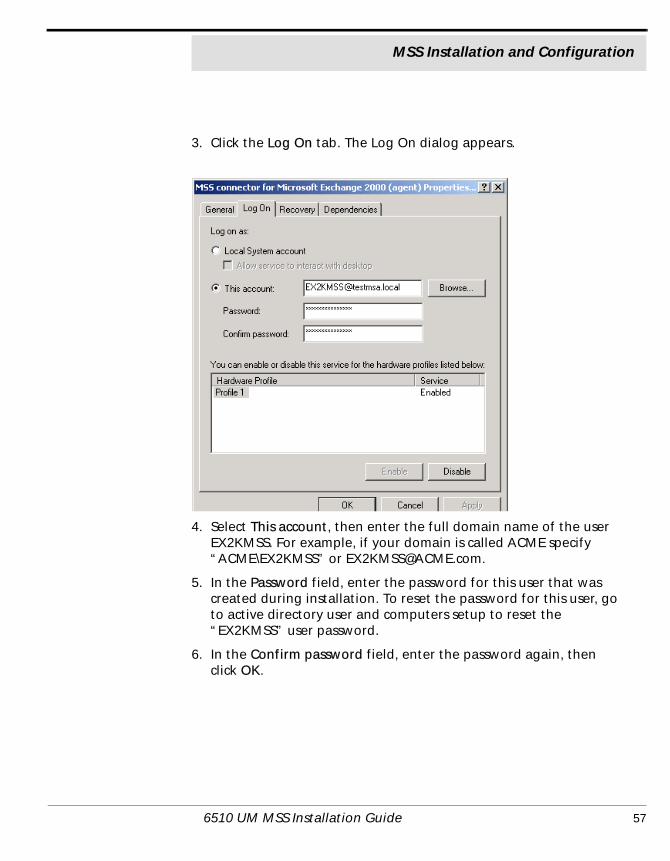
3. Click the Log On tab. The Log On dialog appears.

54 6510 UM MSS Installation Guide
MSS Installation and Configuration
4. Select This account, then enter the location of the server.
Hint: Click Browse to search for the directory.
5. In the Password field, enter the administrator password for the server.
Note: The password must be identical to the user’s password in the Active directory.
6. In the Confirm password field, enter the password again, then click OK.

6510 UM MSS Installation Guide 55
MSS Installation and Configuration
Specifying the MSS Connector Rights (Exchange 5.5)
The MSS Connector handles all interactions with MSMQ. You must specify the appropriate service rights so that the MSS Connector can create and write queues for the synchronization process.
To specify the MSS Connector Rights
1. In the control panel, navigate to the Services icon.
2. Double-click the MSS Connector for Exchange 5.5 (Agent). The General dialog for the Exchange 5.5 Connector appears.

56 6510 UM MSS Installation Guide
MSS Installation and Configuration
3. Click the Log On tab. The Log On dialog appears.
4. Select This account, then enter the domain administrators account.
Hint: Click Browse to search for the directory.
5. In the Password field, enter the password for the domain administrator.
6. In the Confirm Password field, enter the password again, then click OK.
Specifying the MSS Connector Rights (Exchange 2000)
The MSS Connectors handle all interactions with MSMQ. If you are running into issues with the synchronization of Exchange 2000 with the Server, follow the trouble shooting exercise below. You may requires the appropriate service rights to create and write queues for the synchronization process.
Note: The default setting logon is: EX2kmss. This user account and its password is automatically created by the MSS exchange 2000 connector during installation. It is used to monitor all the activity on the exchange server and provide events to the MSS server and its synchronization schema.
Trouble shooting MSS Service Rights
1. Navigate to the Services icon in the Control Panel.
2. Double-click the MSS Connector for Exchange 2000 (agent). The General dialog for the Exchange 2000 Connector appears.
6510 UM MSS Installation Guide 57
MSS Installation and Configuration
3. Click the Log On tab. The Log On dialog appears.
4. Select This account, then enter the full domain name of the user EX2KMSS. For example, if your domain is called ACME specify “ACME\EX2KMSS” or [email protected].
5. In the Password field, enter the password for this user that was created during installation. To reset the password for this user, go to active directory user and computers setup to reset the “EX2KMSS” user password.
6. In the Confirm password field, enter the password again, then click OK.
58 6510 UM MSS Installation Guide
MSS Installation and Configuration
Enabling the MSS Voice Mail Connector
You must enable the MSS voice mail connector in order to include the 6510 UM server in the synchronization schema for MSS.
To enable the connector
1. Log into the 6510 UM Administration console.
2. Click Parameters.
3. Click Edit INI. The .ini file opens in Notepad.
4. Scroll down to the end of the file.
Note: If configuring the .ini file for the first time, you must enter the MSA Settings variables.
5. Enter the following:
MSS Server=your server name(example, Mitel_6510UMserver)MSS Client Name=your client name (example, 6510VM)MSS Log Filename=path/filename for the log text file
(example, c:\mssclient.txt)
Use MSA=Yes
6. Save the .ini file and close Notepad.
7. In the 6510 UM toolbar, click Files>Exit.
8. The Shutting Down Services dialog appears.
9. Click Wait For Activity to End. The system will wait for all ongoing activity to end and then stop the service.
10.In the Windows taskbar, click Start>Programs>6510UM>6510UM.
11.The 6510 UM Welcome dialog appears.
12.Click Start 6510 Unified Messaging.
13.6510 UM has now started and the MSS Voice Mail Connector is now enabled.

6510 UM MSS Installation Guide 59
MSS Installation and Configuration
Managing the Synchronization Schema
You can modify and adjust the following MSS Agent and MSS Administrator properties:
1. MSS Agent service
2. specify another MSS server
3. specify logging level
4. view or clear log file
5. start and stop MSS Agent service
6. view and change MSS Agent service minimum resources requirements
7. refresh page in case of need
8. adjust automatic refresh interval
60 6510 UM MSS Installation Guide
MSS Installation and Configuration
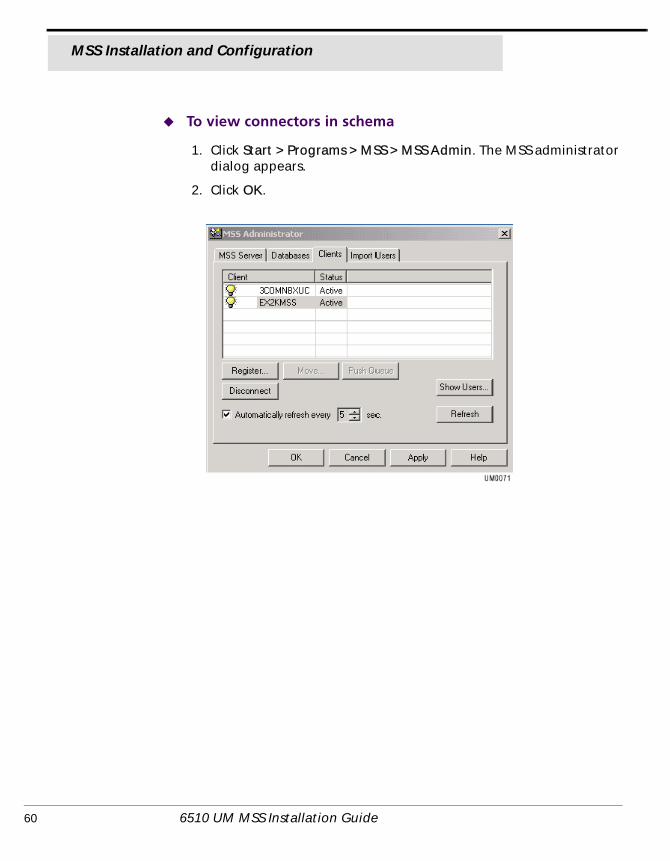
To view connectors in schema
1. Click Start > Programs > MSS > MSS Admin. The MSS administrator dialog appears.
2. Click OK.

6510 UM MSS Installation Guide 61
MSS Installation and Configuration
Selecting the MSS Server
In order to perform administration functions, you must first select an MSS server.
To select an MSS Server
1. Double-click the MSS icon on the MSS server machine. The MSS Administrator dialog appears.
2. Select the MSS Server tab, then click Browse or press Ctrl+B. The
Browse for Computer dialog appears.
3. Select the computer where MSS Server is installed from the corresponding list. If no MSS Server is installed on the server selected, a message appears.
Changing the Log Level
The Log Level determines how detailed the activity log will be.
Note: 3 is the most comprehensive, and 0 is the least detailed.

62 6510 UM MSS Installation Guide
MSS Installation and Configuration
Specifying the Log Level
1. From the Log Level spin box, select a log level
2. Click OK.
Specifying the Log Files
The Log Files contain information on the activity between the MSS server and its connectors.
To specify the Log Files
1. In the Log File field, enter the path to the log file.
2. Click View or press Ctrl + W to view the log file.
3. Click Clear or press Ctrl + C to clear the log file.
4. Click OK.
Stopping the MSS Service
You can stop MSS service on a specified server if you need to upgrade the software or perform system maintenance.
To start and stop the MSS Service
1. Click Start or press Ctrl+S to start MSS Service
2. Click Stop or press Ctrl+T to stop MSS Service.
3. Click OK.
Changing Memory and Disk Space
The 6510 UM server allows you to optimize system performance by changing memory and disk space requirements.

6510 UM MSS Installation Guide 63
MSS Installation and Configuration
To change the minimum requirements
1. Click Change... or press Ctrl +H. The Minimum Requirements dialog appears.
2. From the Min Free Memory spin box, change the free memory limits.
3. From the Min Free Disk Space spin box, change the minimum free disk space, then click OK.
Specifying the Refresh Rate
The Refresh rate controls the rate at which the Administrator utility refreshes its display
To specify the refresh rate
1. Click Refresh or press Ctrl + R.
2. Click Automatically refresh every 5 sec if you want the page to refresh automatically.
3. From the Automatically refresh every 5 sec spin box, change the number of seconds that the screen will be refreshed.
Note: The service must be stopped and restarted in order for these to take affect.
4. Click OK.

64 6510 UM MSS Installation Guide
MSS Installation and Configuration
Maintaining the Client’s Property Page
Clients refer to other mail servers logged into the MSS Service. For example, both Exchange and the Server are clients to the MSS server when they install the client connectors onto their respective servers. Auser can perform the following tasks:
1. Manage registered MSS clients
2. Register new MSS client
3. Unregister existing MSS client
4. Disconnect MSS client
5. Display information about users of the client selected
6. Bind and unbind users on the corresponding MSS client
7. Push client message queue in case of need
Registering a New MSS Client
All connectors (for example, Exchange, Lotus, RIMM, and voice mail) are self registering. The following steps are for only advanced users.

6510 UM MSS Installation Guide 65
MSS Installation and Configuration
To register a new MSS Client
1. Click the Clients tab. The Clients dialog appears.
2. Click Register.... The Register Client dialog appears.
3. In the Client Name field, enter the user name for the client application in the MSS Schema.
4. In the Computer Name field, enter the computer name, then click OK.
Hint: Click Browse to search for the computer name.
66 6510 UM MSS Installation Guide
MSS Installation and Configuration
Disconnecting an Existing MSS Client
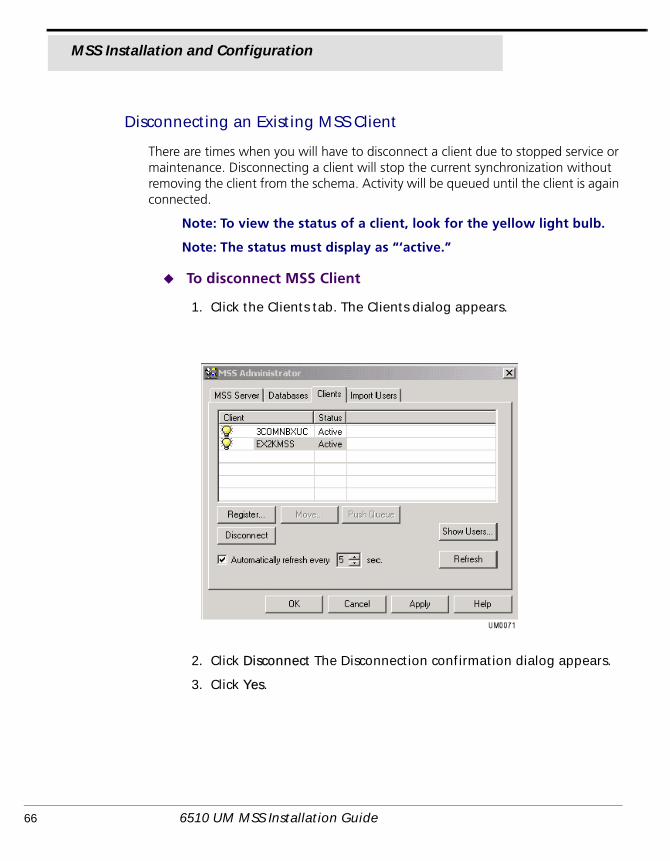
There are times when you will have to disconnect a client due to stopped service or maintenance. Disconnecting a client will stop the current synchronization without removing the client from the schema. Activity will be queued until the client is again connected.
Note: To view the status of a client, look for the yellow light bulb.
Note: The status must display as “‘active.”
To disconnect MSS Client
1. Click the Clients tab. The Clients dialog appears.
2. Click Disconnect The Disconnection confirmation dialog appears.
3. Click Yes.

6510 UM MSS Installation Guide 67
MSS Installation and Configuration
Unregistering a MSS Client
Unregistering a client will permanently remove it from the synchronization schema.
To unregister a MSS Client
1. Select a client you want to unregister under the clients tab
2. Click Unregister. The warning dialog will appear.
3. Click Yes to unregister MSS client selected.
Note: The MSS client needs to be disconnected before unregistering the software.
Managing the Client User’s Operations
The Clients dialog allows you to view and monitor the status of the MSS connectors.

68 6510 UM MSS Installation Guide
MSS Installation and Configuration
To manage the client user’s operations
1. Click the Clients tab. The Clients dialog appears.
2. Click Show Users. The User’s statistics screen appears.
3. You have five options that you can perform.

6510 UM MSS Installation Guide 69
MSS Installation and Configuration
Action Operations Required
View users statistics
Select Options, Show Statistics command.
View registered users
Select Options, Show Registered Users command.
View unregistered users
Select Options, Show Unregistered Users command.
Bind selected unregistered user
1. Select Tools > Bind User. The Bind User dialog appears.
2. Select MSS client from Client Name list, then click Show Users.3. Select user from the users list, then click OK.
Unbind selected registered user
1. Select Tools > Unbind User. The warning dialog will appear.
2. Click Yes button to unbind selected user.

70 6510 UM MSS Installation Guide
MSS Installation and Configuration
Pushing MSS Client Message Queue
The 6510 UM server allows you to push a message through a queue manually when an event halts.
To force an event through MSMQ.
1. Select the MSS client that will push through message queues.
2. Click Push Queue. It is likely that the event will be lost, and the action or message that it was pertaining to will then be out of synch.
Refreshing the Page
The Refresh rate controls the rate at which the administration interface queries the MSMQ for messages or activity. The quicker the refresh, the higher the load on networking activity. A default of 5 sec is recommended

6510 UM MSS Installation Guide 71
MSS Installation and Configuration
To specify the refresh rate
1. Click Refresh or press Ctrl + R.
2. Click Automatically refresh every 5 sec if you want the page to refresh automatically.
3. From the Automatically refresh every 5 sec spin box, change the number of seconds that the screen will be refreshed.
Note: If the service restart is necessary, the corresponding message will appear.
4. Click OK.
Maintaining the Databases Property Page
You can manage the MSS system databases by viewing the status and size of the MSS system databases, recreating MSS system databases, compacting system databases, and creating a system databases compacting schedule.
Creating new MSS administration System Database
The MSS system database is used to store all transactions in the MSS Schema.

72 6510 UM MSS Installation Guide
MSS Installation and Configuration
To create a new MSS system database
1. Click the Databases tab. The Databases dialog appears.
2. Click Create or press Ctrl+E. A dialog appears.
3. Click Yes to recreate the MSS system databases.
Viewing Database Statistics and Status
The Database dialog allows you to display usage statistics on each database used by the system.

6510 UM MSS Installation Guide 73
MSS Installation and Configuration
To view system statistics and status
1. Click Statistics or press Ctrl+S. The statistic information appears. The Statistics button changes its caption to Status.
2. Click Status or press Ctrl+S. The statistic information appears. The Status button changes its caption to Statistics.
Compacting the MSS System Database
The 6510 UM server allows you to manually compact data in order to improve performance. This is useful if the database size is large and occupies a lot of storage space.
To compact the database, click Compact or press Ctrl+P.
You can create a schedule that will compact the database automatically. There are three schedule types available: daily, weekly and monthly.

74 6510 UM MSS Installation Guide
MSS Installation and Configuration
Creating a Daily Compacting Schedule
You can create a schedule that will compact the database daily.
To create a daily compacting schedule
1. Click Schedule or press Ctrl+H. The DB Compact Schedule dialog appears.
2. From the Schedule drop down list, select Daily.
3. From the Start Time spin box, select the time that you want the system to start compacting the database.
4. Click Advanced... to specify the job start date and end date. The Schedule Daily spin box appears.
5. From the Every spin box, select when you want the system to compact the database, then click OK.
6510 UM MSS Installation Guide 75
MSS Installation and Configuration
Creating a Weekly Schedule
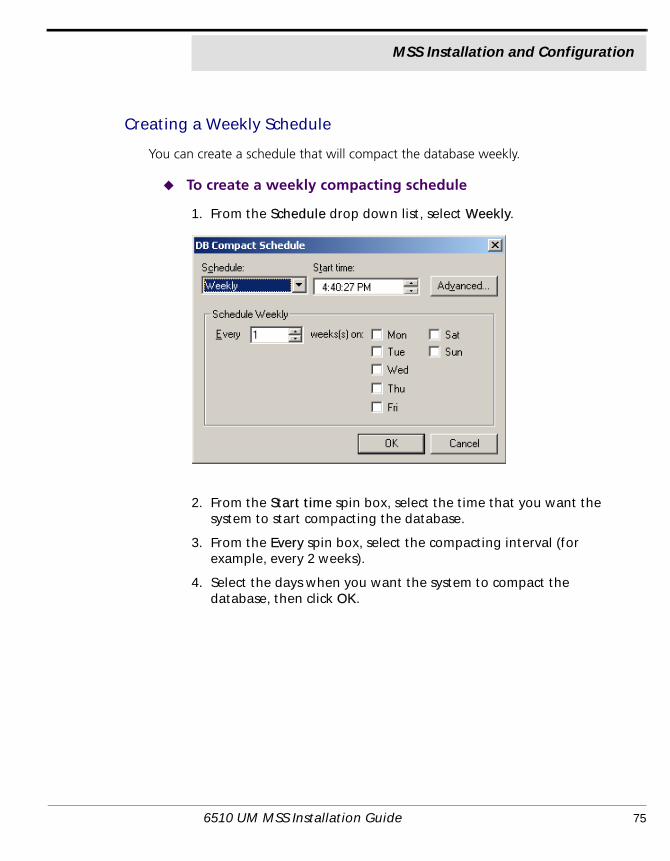
You can create a schedule that will compact the database weekly.
To create a weekly compacting schedule
1. From the Schedule drop down list, select Weekly.
2. From the Start time spin box, select the time that you want the system to start compacting the database.
3. From the Every spin box, select the compacting interval (for example, every 2 weeks).
4. Select the days when you want the system to compact the database, then click OK.

76 6510 UM MSS Installation Guide
MSS Installation and Configuration
Creating a Monthly Schedule
You can create a monthly schedule that will compact the database monthly.
To create a monthly compacting schedule
1. From the Schedule drop down list, select Monthly.
2. From the Start time spin box, select the time that you want the system to start compacting the database.
3. Select the variant to specify compacting interval using weeks and days of the week.
4. Click Select Months... to specify compacting months. The Select Months dialog appears.
5. Select the months to compact the database, then click OK.
Refreshing the Page
1. To refresh the page click Refresh or press Ctrl+F.
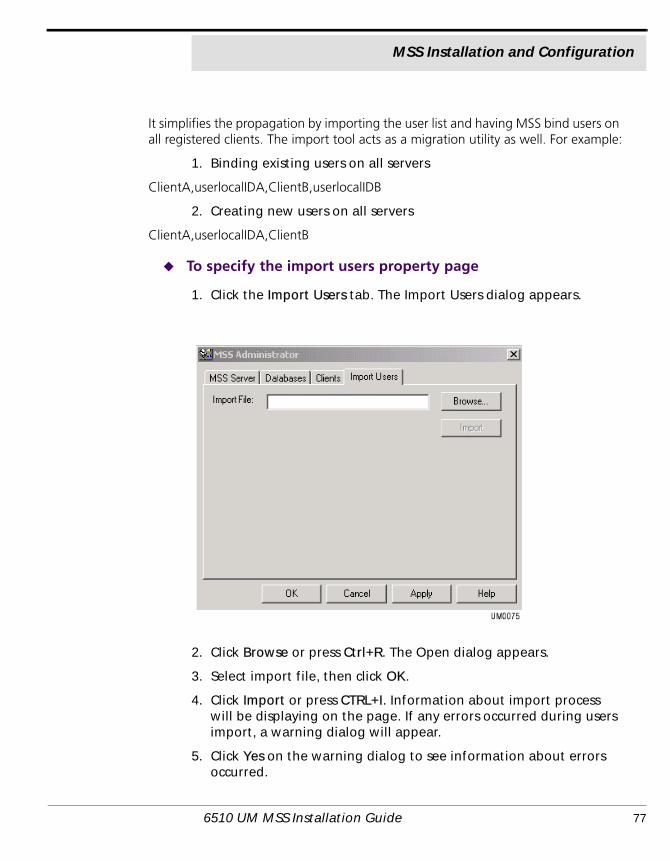
Specifying the Import Users Property Page
The Users Property dialog allows you to import users to the MSS using specially formatted imported files. You would use this utility if you wanted to propagate all databases centrally through MSS. The import utility supports comma delimited format. This utility would be used in an installation that has a large number of users.
6510 UM MSS Installation Guide 77
MSS Installation and Configuration
It simplifies the propagation by importing the user list and having MSS bind users on all registered clients. The import tool acts as a migration utility as well. For example:
1. Binding existing users on all servers
ClientA,userlocalIDA,ClientB,userlocalIDB
2. Creating new users on all servers
ClientA,userlocalIDA,ClientB
To specify the import users property page
1. Click the Import Users tab. The Import Users dialog appears.
2. Click Browse or press Ctrl+R. The Open dialog appears.
3. Select import file, then click OK.
4. Click Import or press CTRL+I. Information about import process will be displaying on the page. If any errors occurred during users import, a warning dialog will appear.
5. Click Yes on the warning dialog to see information about errors occurred.

78 6510 UM MSS Installation Guide
MSS Installation and Configuration
Editing Users Through Exchange Administration
To create, edit, or modify a user on the exchange server go to the exchange server and open Exchange Manager in the Exchange group in the programs folder from start button for Exchange 5.5. For Microsoft Exchange 2000 users, edit the users MSS properties right from Active directory. Highlight recipients on the left, and the exchange mailboxes will appear in the right field.

6510 UM MSS Installation Guide 79
MSS Installation and Configuration
1. Select New, Edit, or Delete.
2. Fill in the valid fields, then click Save. These values will be used to set up a new mailbox in the 6510 UM.
Attribute Description
Registered Sets user for MSS
Request Pending Current status of queued information
VM Company Assigned company in 6510 UM (multi-tenant systems)
VM Alias This value will be assigned as the mailbox number
VM Extension This value will be assigned as the internal phone address.
VM Password Initial password assigned to the mailbox

80 6510 UM MSS Installation Guide
MSS Installation and Configuration
Installing MSS Connector Client-Side Extension
Due to the limitations imposed by the Domino Server R5, the Installation of the MSS Connector Client-Side Extension on all systems that run Lotus Notes allows the extension to communicate with the MSS Connector. This communication enables the indicating of read and unread messages, allowing the MSS server to mark read messages.
To install the client-side extension
1. Insert CD 1 of the 6510 UM installation CD into the CD-ROM drive
2. In the Windows Taskbar, click Start>Run. The Run dialog appears.
3. In the Open: field, enter the drive that your CD-ROM is located in and click OK. (For example, enter D:). The CD-ROM drive directory appears.
4. Double-click the MSS folder. The MSS dialog appears.
5. Double-click the Clients folder. The Clients dialog appears.
6. Double-click the LN50MSS folder. the LN50MSS dialog appears.
7. Copy the file LN50MSSExt.exe to a folder on the computer’s hard drive.
Note: It is recommended that you copy the file to the folder \Lotus\Notes.
Warning: You must repeat steps 1-7 on ALL computers that are running Lotus Notes.

6510 UM MSS Installation Guide 81
MSS Installation and Configuration
Configuring the MSS Connector for Lotus Client ExtensionMSS Connector for Lotus Client Extension settings can be configured to suit each user’s needs. All computers that will be running Lotus Notes must have the client extension application installed. After the client extension application has been installed, it needs to be configured on each computer.
To configure the MSS Connector for Lotus Client Extension
1. From the folder where LN50MSSExt.exe is copied to, double-click LN50MSSExt.exe. The MSS Connector for Lotus client extension dialog appears.
Note: The recommended folder to copy LN50MSSExt.exe into is \Lotus\Notes.
Hint: If the MSS Connector for Lotus client extension dialog does not appear, double-click the Domino R5 client extension icon
in the Windows system tray.
2. In the Password on Domino Server field, enter the password for your Domino server.
3. Click the Check button. The Client Extension verifies the password entered. A dialog will appear if the password is incorrect or if the Domino server is unavailable. Check to see if you are using the correct password and verify that your Domino server is available and retry step 2.
4. If the password is correct, a dialog appears, verifying the password check as successful. Click OK.

82 6510 UM MSS Installation Guide
MSS Installation and Configuration
5. Select the Automatically refresh read/unread mark states every checkbox if you want the MSS connector to update read/unread marks.
6. In the Minutes drop-down list, select the interval (in minutes) that the system should wait between automatic updates.
7. In the Seconds drop-down list, select the interval (in seconds) that the system should wait between automatic updates.
8. Click the Refresh button if you want to manually update read/unread marks. This button is only enabled if the Automatically refresh read mark states every checkbox is not selected.
9. Select the Automatically start on Windows startup checkbox if you want the MSS Connector for Lotus client extension application to start automatically each time Windows starts up.
10.When all configurations are complete, click the minimize button to hide the MSS Connector for Lotus client extension dialog. This dialog can be opened at any time by double-clicking i in the
system tray.
Warning: Do not close the MSS Connector for Lotus client extension dialog. Closing it will disable the application and read/unread marks update will not be performed.
Lotus Domino Settings Configuration
After configuring the main settings in the 6510 UM Administrator, you must open the Lotus Domino R5 Administrator to configure, manage and maintain the MSS connector for Domino R.5. Features include Server Control, Log monitoring, Connector Parameters configuration and Lotus Domino Users settings.

6510 UM MSS Installation Guide 83
MSS Installation and Configuration
To start the MSS connector for Domino R5 Administrator
1. In the Windows toolbar, click Start>Programs>MSS>MSS Connector for Lotus Domino R5 Administrator. The MSS Connector Admin for Lotus Notes/Domino dialog appears.
Hint: You can also access the Administrator when in the Lotus Notes or Lotus Administrator applications by selecting Actions>MSS Connector Admin in the toolbar.

84 6510 UM MSS Installation Guide
MSS Installation and Configuration
To configure Server Control settings
1. In the Lotus Domino R5 Administrator, click the Server Control tab. The Server Control tab appears.
2. In the Domino server field, enter the Domino server name or click Browse to select the server name. This identifies where the MSS connector is installed, so that the MSS connector Admin can connect to it. (For system configurations where the MSS connector is located on a different machine than the MSS connector Admin).
3. In the Connector Service box, click Start to start the Domino Server.
4. In the Minimum Requirements box, click Change. The Minimum Requirements dialog appears.

6510 UM MSS Installation Guide 85
MSS Installation and Configuration
•In the Min Free Memory spinbox, select the minimum free memory that is required for the Domino Server to run.
•In the Min Free Disk Space spinbox, select the minimum free disk space needed for the Domino Server to run.
5. Click OK. You are returned to the Server Control tab.
6. Click the Automatically refresh every checkbox to enable automatic refresh, and select the time the system should wait before refreshing in the sec spinbox (in seconds).
Note: To manually refresh the service status, you can click the Refresh button.
7. Click Apply and OK when all configurations are completed.

86 6510 UM MSS Installation Guide
MSS Installation and Configuration
To configure /monitor log files
1. In the Lotus Domino R5 Administrator, click the Logs tab. The Logs tab appears:
•The Current Activity box lists all events written to the the event log.
2. Select the Track Changes checkbox if you want the system to update activity online.
3. Select the Last Lines Only checkbox if you want optimum performance while tracking the latest activity. (This function will only list the last 30 events committed).
4. Click Find Errors to list system errors that are logged in the Current Activity box.

6510 UM MSS Installation Guide 87
MSS Installation and Configuration
5. The Log File field displays the current log file being used. To select a different log file to be used by the system, click Browse and either select an exisitng log file or specify a new log file name. After this log file is specified, the connector must be restarted in order for it to be used.
6. Use the Min Level/Max Level slider to indicate the log level to be used.
7. Click Clear Log to clear the log file displayed in the Current Activity box.
8. Click View to open the current log file in an external text editor such as Notepad.
9. Click Apply and then OK when all changes have been applied.
None Only startup/shutdown and critical error messages are committed.
Minimum Actions from None, as well as the basic information about performed operations are committed.
Medium Actions from Minimum, as well as extended information about operations and warnings messages are committed.
Maximum Full trace log of all activities.

88 6510 UM MSS Installation Guide
MSS Installation and Configuration
To configure MSS connector for Domino R5 settings
1. In the Lotus Domino R5 Administrator, click the Connector Parameters tab. The Connector Parameters tab appears.
2. In the Server field, enter the name of the server that you want the MSS connector to synchronize with or click ... to browse and select a server.
3. The Connector field indicates the MSS Connector you are using.
4. The Domino Server field indicates the Domino Server name.
5. The Administrator field indicates the Domino Server administrator name.
6. In the Password field, you can enter a new password for the adminstrator.

6510 UM MSS Installation Guide 89
MSS Installation and Configuration
7. In the Polling Interval spinbox, you can select the polling interval to use (in seconds). Polling interval is the value that indicates when the system should re-scan the Domino user databases in order to track change activity.
Note: The lower the value, the faster the interval, resulting in possible slow-down of the Domino R5 Server’s performance.
8. The Local Storage field indicates the directory folder in which the local storage is located. Click Move to select a new destination folder or Clear to remove the displayed folder.
9. Click Apply and OK when all changes have been made.
To manage Domino R5 user settings
1. In the Lotus Domino R5 Administrator, click the Lotus Domino Users tab. The Lotus Domino Users tab appears.
The Lotus Domino Users tab displays the names and e-mail addresses of users within the MSS synchronization space. It also allows you to create, modify, delete,
register and bind users. Unregistered users are displayed with a "spy" icon.

90 6510 UM MSS Installation Guide
MSS Installation and Configuration

6510 UM MSS Installation Guide 91
MSS Installation and Configuration
To create new users
1. In the Lotus Domino Users tab, click Create to create a new unregistered user. The User Properties dialog appears.
2. In the First Name field, enter the user’s first name.
3. In the Initials field, enter the user’s initials.
4. In the Last Name field, enter the user’s last name.
5. In the E-mail field, enter the user’s e-mail address.
6. Click Add to add an attribute to the created user. The Add Attribute dialog appears.

92 6510 UM MSS Installation Guide
MSS Installation and Configuration
7. In the Attribute Name drop-down list, select the attribute you want to assign to the user and click OK.
8. Double-click the added attribute to assign a value to it. The Edit Attribute dialog appears.
9. In the Edit Attribute field, enter the attribute and click OK. The Attribute List will be updated with the new value.
10.You can click Modify at any time to modify the user attributes and values.
11.Click OK to save the changes.

6510 UM MSS Installation Guide 93
MSS Installation and Configuration
To register users
1. In the Lotus Domino Users tab, select a user to register and click Register. The "spy" icon beside the user becomes a "user" icon, indicating that the user is now registered.
During the next polling cycle, the MSS connector for Lotus Domino R5 will log the new user registration event and forward this notification to all other MSS connectors.

94 6510 UM MSS Installation Guide
MSS Installation and Configuration
To bind users
1. In the Lotus Domino Users tab, select the unregistered user and click Bind. The Bind User dialog appears.
2. In the Client Name drop-down list, select the MSS connnector that holds the registered user you want to bind the selected user to.
3. Click Show Users. The Bind User list displays all users registered to the selected MSS connector.
4. Select the user you want to bind the unregistered user to and click OK. The users are now bound.
Note: To Unbind users, select the user in the Lotus Domino Users tab and click Unbind.
To delete users
1. In the Lotus Domino Users tab, select a user and click Delete. The User is deleted.
Note: Unregistered users will be deleted only from the Domino R5 server. Registered users will be deleted from all servers that

6510 UM MSS Installation Guide 95
MSS Installation and Configuration
they are a part of in the message synchronization environment.
Understanding the RIMMSS Connector
The RIMMSS connector for Blackberry devices is not a real MSS connector. It converts SMTP sync messages from the RIM handheld device to the real MSS synchronization messages and vice versa.
Note: The current version of the RIMMSS connector does not support custom folders, folders moving, copying, or deleting.
There are three different scenarios for setting up the RIMMSS connector:
1. MSS Server – An MSS Server with logged in clients (for example, e-mail, voice mail and RIMSS)
2. RIM Server – A particular computer with RIMMSS connector installed, Usually Voice Server.
3. Server B – A messaging server with MSS connector installed (for example, Microsoft Exchange or Lotus Notes server)
Configuring the RIMMSS Connector
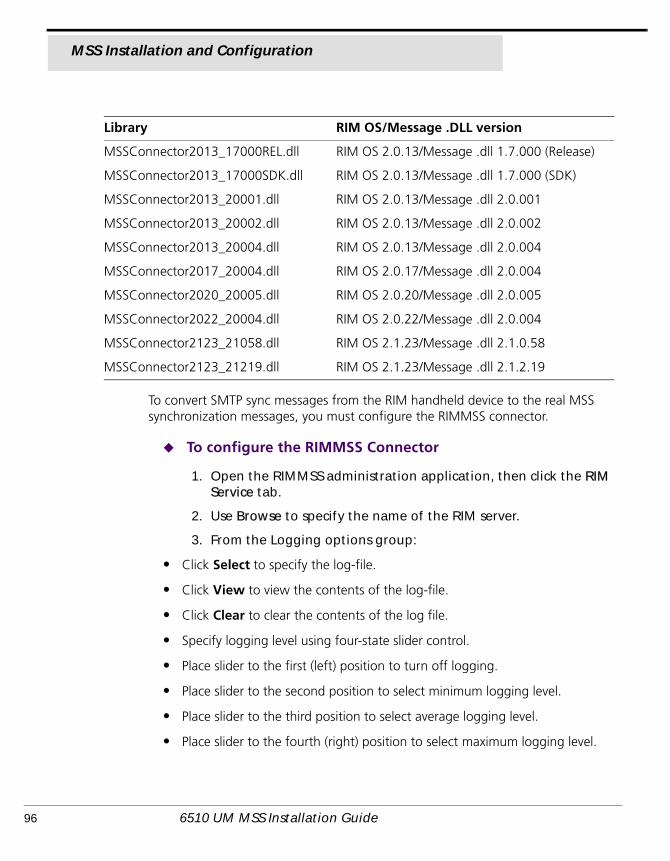
The MSS Connector performs actions to determine the addresses of the unread messages counter. Depending on the version of the RIM operating system you are using, these addresses are assigned different values. 12 libraries have been created to address each of the known sets of RIM operating systems and their corresponding message .dlls.
To ensure that the RIMMSS Connector determines the correct addresses of the unread message counter, you must use the MSSConnector*.dll that matches with the RIM OS and message .dll versions installed on your Blackberry Wireless Device. The table below indicates the correct MSSConnector*.dll to use with each known set of RIM OS and Message .DLL.
Library RIM OS/Message .DLL version
MSSConnector14570_15000.dll RIM OS 1.4.57.0/Message .dll 1.5.000
MSSConnector14890_16030.dll RIM OS 1.4.89.0/Message .dll 1.6.030
96 6510 UM MSS Installation Guide
MSS Installation and Configuration
To convert SMTP sync messages from the RIM handheld device to the real MSS synchronization messages, you must configure the RIMMSS connector.
To configure the RIMMSS Connector
1. Open the RIMMSS administration application, then click the RIM Service tab.
2. Use Browse to specify the name of the RIM server.
3. From the Logging options group:
• Click Select to specify the log-file.
• Click View to view the contents of the log-file.
• Click Clear to clear the contents of the log file.
• Specify logging level using four-state slider control.
• Place slider to the first (left) position to turn off logging.
• Place slider to the second position to select minimum logging level.
• Place slider to the third position to select average logging level.
• Place slider to the fourth (right) position to select maximum logging level.
MSSConnector2013_17000REL.dll RIM OS 2.0.13/Message .dll 1.7.000 (Release)
MSSConnector2013_17000SDK.dll RIM OS 2.0.13/Message .dll 1.7.000 (SDK)
MSSConnector2013_20001.dll RIM OS 2.0.13/Message .dll 2.0.001
MSSConnector2013_20002.dll RIM OS 2.0.13/Message .dll 2.0.002
MSSConnector2013_20004.dll RIM OS 2.0.13/Message .dll 2.0.004
MSSConnector2017_20004.dll RIM OS 2.0.17/Message .dll 2.0.004
MSSConnector2020_20005.dll RIM OS 2.0.20/Message .dll 2.0.005
MSSConnector2022_20004.dll RIM OS 2.0.22/Message .dll 2.0.004
MSSConnector2123_21058.dll RIM OS 2.1.23/Message .dll 2.1.0.58
MSSConnector2123_21219.dll RIM OS 2.1.23/Message .dll 2.1.2.19
Library RIM OS/Message .DLL version

6510 UM MSS Installation Guide 97
MSS Installation and Configuration
• Click the RIM Service tab, then select the Synchronize items in Sent folder check box to include Sent folder into synchronization scheme if you want to include sent events in the schema from the wireless device.
• Click the RIM Service Parameters tab to:
• Specify the name of the MSS Server machine using corresponding ellipses but-ton.
• Specify the RIM connector mailbox on the e-mail server in the Admin mail-box field.
• Specify the name of the POP3 server, POP3 account, and POP3 password for the RIM connector in the corresponding fields.
• Specify the name of the SMTP server, SMTP account and SMTP password for the RIM connector in the corresponding fields.
• From the Database polling group, select the RIM connector database’s polling interval using Polling Interval edit.
• From the SMTP Port Number group, select Automatic to use default SMTP port number.
• From the SMTP Port Number group, select Manual only if you need to specify SMTP port number using the corresponding field.
• From the Local storage group, click Move to move local storage to another location.
• Click the RIM Service tab.
• In the Connector service group, click Start. The RIMMSS connector begins wireless synchronization with configured accounts.
4. In Exchange, open up the specific user accounts that have the Blackberry devices, then click on the MSS tab.
5. Select RIM, then enter the RIM e-mail address for that specific user.
Configuring the RIMMSS Software
Once you have configured the RIMMSS Connector, you can configure the RIMMSS software. The following user’s properties are included in the MSS synchronization scheme:

98 6510 UM MSS Installation Guide
MSS Installation and Configuration
1. First name
2. Last name
3. Initials
4. Alias
5. RIM e-mail
All MSS specific properties are also included into the synchronization scheme.
To configure RIMMSS
1. Run the RIM Administration utility, then click the RIM Users tab.
2. Click Create. The User Properties window appears.
3. Specify the new user attributes, then click OK. The new unregistered user will be created in the RIMMSS local storage. A new record with unregistered user icon is created in the user's list.
4. Select new user, then click Register to register user on MSS server.
The following operations occur in the background:
• The RIMMSS connector receives notification about user registration, sets the Registered attribute to 1, and forwards it to its outbound queue.
• MSS Server receives notification about user creation and adds information about user to ‘USERS’ table of MSS system database. Count of records MSS Server adds to ‘USERS’ table is equal to number of registered MSS connectors.
• One of those records (corresponding to user created on RIMMSS) contains actual information about user’s local ID. Information about local IDs of user in other records filled later.
• MSS Server forwards notification about user creation to all other MSS connec-tors.
• Other MSS connectors receive notification about user creation and creates new user with specified attributes.
• MSS connectors for other messaging servers determine local ID of newly cre-ated user and forward it to MSS Server.
• If the specific MSS connector could not create the new user with specified attributes, then the zero local ID forwards to the MSS Server.

6510 UM MSS Installation Guide 99
MSS Installation and Configuration
• MSS Server receives notification about local ID of user created on server B and stores information about its local ID in ‘USERS’ table of MSS system database.
• All MSS connector’s queues are empty.
• ‘USERS’ table contains actual local IDs for user on all messaging servers.
• IF the local ID for specific user in the ‘USERS’ table is equal to zero, then the specific MSS connector was not able to create the new user with specified attributes.
• Values for all attributes (that supposed to be synchronized) of newly created user are equal on every messaging server.
Binding a Wireless User with the 6510 UM and Messag-ing Server
In order to synchronize information between the Exchange and the messaging servers, you must identify the user to both servers.
To bind a wireless user
1. Run the RIM Admin utility, then click the RIM Users tab.
2. Select the user, then click Bind. The User binding window appears.
3. Select the connector where the registered user to be bounded with resides (Messaging Server), then click Show Users. A list of users available for binding appears in the Bind user dialog.
4. Select the user on other MSS connector (Messaging server) for binding.
5. Click OK in the User binding dialog to finish binding users. MSS Server receives notification about the user’s binding.
Unbinding a User
If you do not want to synchronize information between the Exchange and the messaging servers, you must unregister the user on the MSS server.

100 6510 UM MSS Installation Guide
MSS Installation and Configuration
To unbind a user
1. Run the RIM Admin utility, then click the RIM Users tab.
2. Select the user, then click Unbind. The RIMMSS connector performs the following operations:
• Sets the Registered attribute to zero.
• Changes the user's icon to unbound.
• Sends notification about the user’s unbinding to the MSS Server.
• MSS Server receives notification about the unbinding of the user. In the ‘USERS’ table of the MSS system database, the local ID of the unbound RIMMSS user is set to zero.
• Empties all of the MSS connector queues
• Excludes the unbounded user from sync.
Installing MSS Connector on the Blackberry Device
Installing the handheld-based component of the RIMMSS system does not differ from the installation of the regular RIM application. There are two files included into installation package:
1. MSSCONNECTOR.DLL – MSSConnector binaries
2. MSSCONNECTOR.ALI – installation info
These files are installed in the RIMMSS folder on the server that the RIMMSS server was installed on (for example, C:\MSS\BIN\) . For more information, refer to the Client Installation Guide.
Warning: You must use RIM desktop software to install MSSConnec-tor.ALI file. You should specify e-mail of the RIMMSS server only.
Uninstalling the MSS Server and Connector
You can uninstall the MSS Server and/or the various Connectors by using the Add/Remove feature in the Windows Explorer.

6510 UM MSS Installation Guide 101
MSS Installation and Configuration
Uninstalling the MSS Server
To uninstall the MSS Server
1. In Windows, click Start>Settings>Control Panel. The Control Panel window appears.
2. Click Add/Remove Programs. The Add/Remove Programs window appears.
3. Select Message Synchronization System and click Remove. The system prompts you to confirm the deletion.
4. Click Yes. The MSS Server is now removed.
Warning: As a precaution, the uninstallation process will not remove all the data from the MSS directory. (Default C:\MSS). To fully uninstall the MSS Server, you must use the Windows Explorer to manually remove the C:\MSS directory.
For system configurations where the MSS Server resides on the same computer as the MSS Connector, be aware that by default, the Connector files are located in C:\MSS\Ex**Store, and manually removing the C:\MSS folder will also remove the Connector data.
Note: It is recommended that the system is rebooted after you uninstall the MSS Server.
Uninstalling MSS Exchange 5.5 Connector
To uninstall the MSS Connector
1. In Windows, click Start>Settings>Control Panel. The Control Panel window appears.
2. Click Add/Remove Programs. The Add/Remove Programs window appears.
3. Select MSS Connector for Exchange 5.5 Server and click Remove. The system prompts you to confirm the deletion.
4. Click Yes. The MSS Exchange 5.5. Connector is now removed.

102 6510 UM MSS Installation Guide
MSS Installation and Configuration
Warning: As a precaution, the uninstallation process will not remove all the data from the MSS Connector directory. (Default C:\MSS\Ex55Store). To fully uninstall the MSS Connector, you must use the Windows Explorer to manually delete the entire C:\MSS\ directory.
For system configurations where the MSS Server resides on the same computer as the MSS Connector, do not delete the entire C:\MSS\ directory. You should only delete the C:\MSS\Ex55Store directory.
Note: It is recommended that the system is rebooted after you uninstall the MSS Exchange 5.5 Connector.
Uninstalling MSS Exchange 2000 Connector
To uninstall the MSS Connector
1. In Windows, click Start>Settings>Control Panel. The Control Panel window appears.
2. Click Add/Remove Programs. The Add/Remove Programs window appears.
3. Select MSS Connector for Exchange 2000 Server and click Remove. The system prompts you to confirm the deletion.
4. Click Yes. The MSS Exchange 2000 Connector is now removed and you are now required to remove the EX2KMSS gateway.
5. In the Windows Task Bar, click Start>Administrative Tools>Active Directory Sites and Services. The AD Sites and Services dialog appears.
6. In the Tree tab, click Services. EX2KMSS appears in the right window.

6510 UM MSS Installation Guide 103
MSS Installation and Configuration
7. Right-click EX2KMSS and select Delete. A dialog appears, prompting you to confirm the deletion.
8. Click Yes. EX2KMSS is now deleted.
Warning: As a precaution, the uninstallation process will not remove all the data from the MSS Connector directory. (Default C:\MSS\Ex2kStore). To fully uninstall the MSS Connector, you must use the Windows Explorer to manually delete the entire C:\MSS\ directory.
For system configurations where the MSS Server resides on the same computer as the MSS Connector, do not delete the C:\MSS\ directory. You should only delete the C:\MSS\Ex2kStore directory.
Note: It is recommended that you reboot the system after uninstallingl the MSS Exchange 2000 Connector.
Uninstalling the Lotus Notes Connector
To uninstall the Lotus Notes Connector
1. In Windows, click Start>Settings>Control Panel. The Control Panel window appears.
2. Click Add/Remove Programs. The Add/Remove Programs window appears.
3. Select MSS connector for Domino R.5 and click Remove. The system prompts you to confirm the deletion.

104 6510 UM MSS Installation Guide
MSS Installation and Configuration
4. Click Yes. The Lotus Notes Connector is now removed.
Warning: As a precaution, the uninstallation process will not remove all the data from the Lotus Notes Connector directory. (Default C:\MSS\LNStore). To fully uninstall the Lotus Notes Connector, you must use the Windows Explorer to manually delete the C:\MSS\LNStore directory.
Note: It is recommended that the system is rebooted after you uninstall the Lotus Notes Connector.
Uninstalling RIMMSS Connector for Blackberry Wireless Devices
To uninstall the MSS Connector
1. In Windows, click Start>Settings>Control Panel. The Control Panel window appears.
2. Click Add/Remove Programs. The Add/Remove Programs window appears.
3. Select RIMMSS for RIM Devices and click Remove. The system prompts you to confirm the deletion.
4. Click Yes. The RIMMSS Connector is now removed.
Warning: As a precaution, the uninstallation process will not remove all the data from the RIMMS Connector directory. (Default C:\MSS\RIMStore). To fully uninstall the Lotus Notes Con-nector, you must use the Windows Explorer to manually delete the C:\MSS\RIMStore directory.
Note: It is recommended that the system is rebooted after you uninstall the RIMMSS Connector.


![Gem fall 2017[6510]](https://static.fdocuments.us/doc/165x107/5a66f76f7f8b9a68588b48bd/gem-fall-20176510.jpg)