MSI US54G (MS-6861) Wireless 11g USB 2.0 Stickfaenl.msi.com/ftp/CE Documents/68xx/US54G/MS-6861...
41
MSI US54G (MS-6861) Wireless 11g USB 2.0 Stick User’s Guide
Transcript of MSI US54G (MS-6861) Wireless 11g USB 2.0 Stickfaenl.msi.com/ftp/CE Documents/68xx/US54G/MS-6861...
i
MSI US54G (MS-6861) Wireless 11g USB 2.0 Stick
User’s Guide

i i
FCC Caution 1. The device complies with Part 15 of the FCC rules. Operation is subject to
the following two conditions:(1) This device may not cause harmful interference, and(2) This device must accept any interference received, including interference that may cause undesired operation.
2. FCC RF Radiation Exposure Statement: The equipment complies with FCCRF radiation exposure limits set forth for an uncontrolled environment.
3. This Transmitter must not be co-located or operating in conjunction withany other antenna or transmitter.
4. Changes or modifications to this unit not expressly approved by theparty responsible for compliance could void the user authority to operatethe equipment.
Copyright NoticeThe material in this document is the intellectual property of MICRO-STAR INTERNA-TIONAL. We take every care in the preparation of this document, but no guarantee isgiven as to the correctness of its contents. Our products are under continual improve-ment and we reserve the right to make changes without notice.
TrademarksMicrosoft Windows and Internet Explorer are registered trademarks or trademarks ofMicrosoft Corporation.All brand names, icons, and trademarks used in this manual are the sole property of theirrespective owners.
Revision HistoryRevision History DateV 1.0 First Release August 2004

i i i
Important Safety PrecautionsAlways read and follow these basic safety precautions carefully when handling anypiece of electronic component.
1. Keep this User’s Guide for future reference.2. Keep this equipment away from humidity.3. Lay this equipment on a reliable flat surface before setting it up.4. The openings on the enclosure are for air convection hence protects the
equipment from overheating.5. All cautions and warnings on the equipment should be noted.6. Never pour any liquid into the opening that could damage or cause electrical
shock.7. If any of the following situations arises, get the equipment checked by a
service personnel:Liquid has penetrated into the equipmentThe equipment has been exposed to moistureThe equipment has not work well or you can not get it work
according to User’s ManualThe equipment has dropped and damagedIf the equipment has obvious sign of breakage
8. DO NOT LEAVE THIS EQUIPMENT IN AN ENVIRONMENTUNCONDITIONED, STORAGE TEMPERATURE ABOVE 60O C ORBELOW -20OC, IT MAY DAMAGE THE EQUIPMENT.

i v
How to Use This GuideThis User’s Guide provides instructions and illustrations on how to install and use yourMSI US54G - the Wireless 11g USB 2.0 Stick.
Chapter 1, Introduction, provides a general information on the product youbought, including its application, specification, and requirements.
Chapter 2, Hardware Installation, tells you how to install the product intoyour system.
Chapter 3, Software Installation, guides you through the installation of theproduct’s driver and utility.
Chapter 4, Wireless Network Utility, describes the MSI Wireless NetworkUtility that lets you configure your product to connect the network quicklyand easily.
Chapter 5, Networking Basic, helps you to build your network and shareresources over the network.
Please note that the setting diagrams or values in this guide are FOR YOUR REFER-ENCE ONLY. The actual settings and values depend on your system and network. Ifyou are not sure about these information, please ask your network administrator or MISstaff for help.
Technical Support Visit the MSI website for FAQ, technical guide, driver and software updates,
and other information: http://www.msi.com.tw/. Contact our technical staff at: [email protected].
v
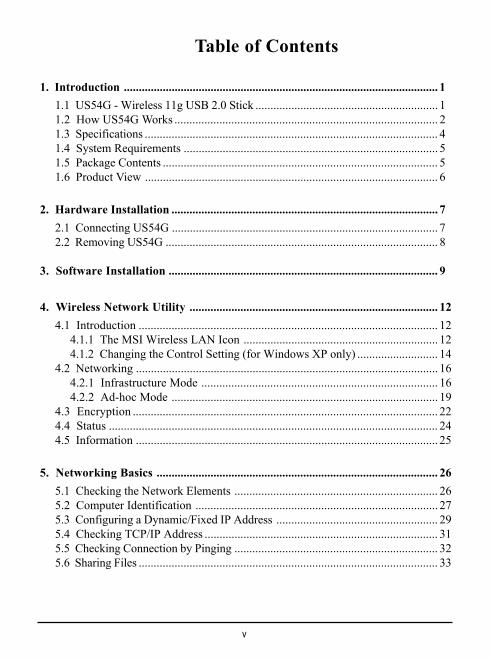
Table of Contents
1. Introduction ......................................................................................................... 11.1 US54G - Wireless 11g USB 2.0 Stick ............................................................. 11.2 How US54G Works ........................................................................................ 21.3 Specifications .................................................................................................. 41.4 System Requirements ..................................................................................... 51.5 Package Contents ............................................................................................ 51.6 Product View .................................................................................................. 6
2. Hardware Installation ......................................................................................... 72.1 Connecting US54G ......................................................................................... 72.2 Removing US54G ........................................................................................... 8
3. Software Installation .......................................................................................... 9
4. Wireless Network Utility ................................................................................... 124.1 Introduction .................................................................................................... 12
4.1.1 The MSI Wireless LAN Icon ................................................................. 124.1.2 Changing the Control Setting (for Windows XP only) ........................... 14
4.2 Networking ..................................................................................................... 164.2.1 Infrastructure Mode ............................................................................... 164.2.2 Ad-hoc Mode ......................................................................................... 19
4.3 Encryption ...................................................................................................... 224.4 Status .............................................................................................................. 244.5 Information ..................................................................................................... 25
5. Networking Basics .............................................................................................. 265.1 Checking the Network Elements .................................................................... 265.2 Computer Identification ................................................................................. 275.3 Configuring a Dynamic/Fixed IP Address ...................................................... 295.4 Checking TCP/IP Address .............................................................................. 315.5 Checking Connection by Pinging .................................................................... 325.6 Sharing Files .................................................................................................... 33

1
Introduction
The MSI Wireless 11g USB 2.0 Stick - US54G (hereaftercalled US54G), compliant with IEEE802.11g, is a high-efficiencywireless adapter for wireless networking at home, in office or inpublic places. The data rate can be up to 54 Mbps and auto-negotiated to 48, 36, 24, 18, 12, 9, 6Mbps (IEEE 802.11g), or 11,5.5, 2, 1Mbps (IEEE802.11b).
With US54G, you can roam between conference room and officewithout being disconnected the LAN cables; in addition, sharingfiles and printers can be easy tasks.
The US54G is available to Microsoft Windows operating sys-tems (Windows® XP/2000) and can be integrated into network-ing with either Ad-hoc mode (computer-to-computer, withoutan Access Point) or Infrastructure mode (computer-to-accesspoint, an Access Point is required).
>>> 1.1 US54G - Wireless 11g USB 2.0 Stick
2
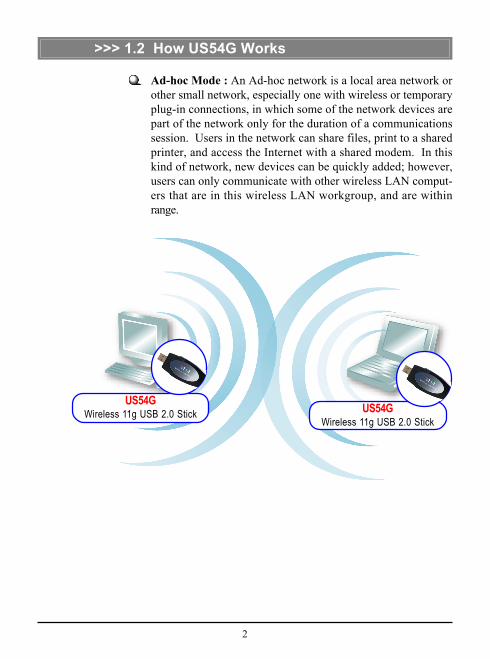
Ad-hoc Mode : An Ad-hoc network is a local area network orother small network, especially one with wireless or temporaryplug-in connections, in which some of the network devices arepart of the network only for the duration of a communicationssession. Users in the network can share files, print to a sharedprinter, and access the Internet with a shared modem. In thiskind of network, new devices can be quickly added; however,users can only communicate with other wireless LAN comput-ers that are in this wireless LAN workgroup, and are withinrange.
>>> 1.2 How US54G Works
US54GWireless 11g USB 2.0 Stick US54G
Wireless 11g USB 2.0 Stick
3
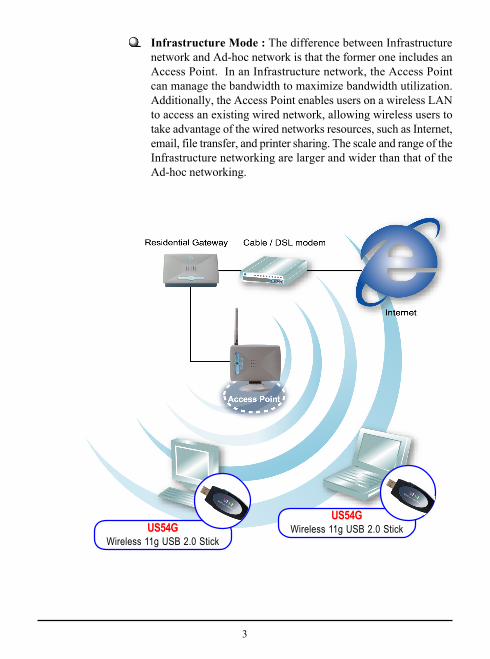
Infrastructure Mode : The difference between Infrastructurenetwork and Ad-hoc network is that the former one includes anAccess Point. In an Infrastructure network, the Access Pointcan manage the bandwidth to maximize bandwidth utilization.Additionally, the Access Point enables users on a wireless LANto access an existing wired network, allowing wireless users totake advantage of the wired networks resources, such as Internet,email, file transfer, and printer sharing. The scale and range of theInfrastructure networking are larger and wider than that of theAd-hoc networking.
US54GWireless 11g USB 2.0 Stick
US54GWireless 11g USB 2.0 Stick

4
>>> 1.3 Specifications
Form Factor / USB 2.0; 5 ± 0.5V (from USB port)Operation Voltage
Network Standard IEEE 802.11g/b
Frequency Range 2.412 ~ 2.484GHz
Data Rate and - IEEE 802.11b (Auto-Fallback):Modulation Types CCK @ 5.5 and 11Mbps; DQPSK
@ 2Mbps; DBPSK @ 1Mbps- IEEE 802.11g (Auto-Fallback): OFDM @ 54, 48, 36, 24, 18, 12, 9, 6Mbps
Operating - USA/Canada: 11 channels (1~11);Channels - Europe: 13 channels (1~13);
- Japan: 14 channels (1~14);- Spain: 2 channels (10~11);- France: 4 channels (10~13)
Media Access Direct Sequence Spread SpectrumProtocol (DSSS) with ACK
Security / Hardware 64/128 bit WEP/TKIP/Encryption AES-OCB/802.1x, support for WPA
Range Up to 400m (outdoor)
Antenna Chip Antenna
Operating system Microsoft® Windows® 98SE/ME/2000/XP
Environmental - Operating Temperature: 0 ~ 50OC- Storage Temperature: -40 ~ 75OC- Operating Humidity: 10 ~ 90%, non-condensing
5
>>> 1.4 System Requirements
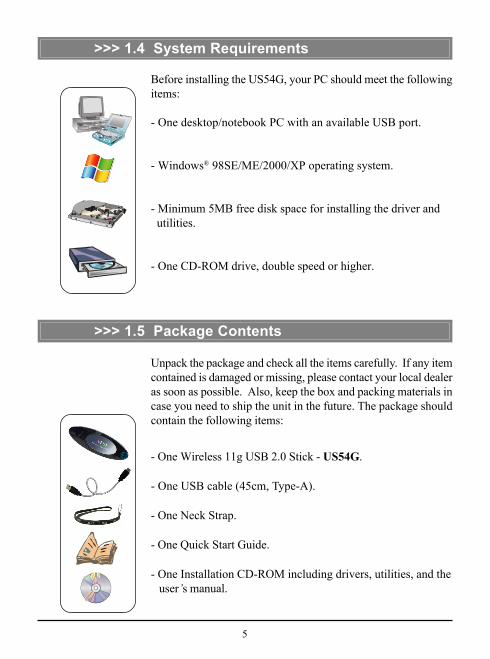
Before installing the US54G, your PC should meet the followingitems:
- One desktop/notebook PC with an available USB port.
- Windows® 98SE/ME/2000/XP operating system.
- Minimum 5MB free disk space for installing the driver and utilities.
- One CD-ROM drive, double speed or higher.
>>> 1.5 Package Contents
Unpack the package and check all the items carefully. If any itemcontained is damaged or missing, please contact your local dealeras soon as possible. Also, keep the box and packing materials incase you need to ship the unit in the future. The package shouldcontain the following items:
- One Wireless 11g USB 2.0 Stick - US54G.
- One USB cable (45cm, Type-A).
- One Neck Strap.
- One Quick Start Guide.
- One Installation CD-ROM including drivers, utilities, and the user’s manual.

6
>>> 1.6 Product View
USB Connector
LED (GREEN)ON - US54G is connected to thecomputer.Flashing - US54G is transmittingdata over the network.
Cover

7
The following diagrams provide you with a basic installation foryour US54G, including how to install and remove the USB stick.
Hardware Installation
>>> 2.1 Connecting US54G
The hardware installation for US54G is simply plugging it intoan available USB port on your desktop/notebook computer.
Connection 1.
USB Port
Connecting US54G

8
The MSI US54G supports hot-plug function, so that you canremove it under Windows operating system without shuttingdown the system. Note: DO NOT remove US54G while trans-ferring data (the LED is flashing). Please close the communica-tion programs or stop the task before removing it.
>>> 2.2 Removing US54G
Connection 2. If necessary, you can connect the provided USB cable to yourcomputer, and connect US54G to the cable.
Removting US54G
USB Cable

9
Software InstallationThis chapter describes the procedures of installing the driverand utility. Follow the instruction step by step to finish theinstallation.
Please NOTE that your US54G should be installed into thecomputer before installing the driver and utility. Then, theoperating system will detect a new device and start to configurethe new device. Click Cancel here to start installation from theInstallShield Wizard.
Click
Your Wireless LAN adapter type

10
Insert the software CD into your CD-ROM drive, and theSetup program should launch automatically.
If the Autorun program doesn’t launch automatically, click Startat the taskbar and select Run.... Type E:\setup.exe (where E isyour CD-drive) in the Open box and click OK to launch theSetup program manually.
The main screen of Setup program will appear as below. Clickthe Install Software button.
Step 1.
Click
The welcome screen of InstallShield Wizard appears. ClickNext.
Read and accept the License Agreement; then, click Next.
In the following window, enter the user’s information (UserName, Organization) in the respective fields; then, click Next.
Step 2.

11
Click Install and the program will copy the necessary files tothe system. The progress indicator shows the installing status.
MSI Wireless LAN icon
Click Finish when the installation is completed. The MSI Wire-less LAN icon* will appear in the status area.
Step 3.
Step 4.

12
Wireless Network Utility
Right-clicking the icon will bring up a sub-menu containingmore settings:
After installing the driver, MSI US54G provides a convenientand powerful utility that allows you to set up, configure, andknow your networking status easily and clearly.
>>> 4.1 Introduction
The MSI Wireless LAN icon
- Not connected to the network.- Connected to the network.- Receiving/transmitting data from/to the network.
When you move the mouse over the icon, it shows the currentconnection information.
4.1.1
13
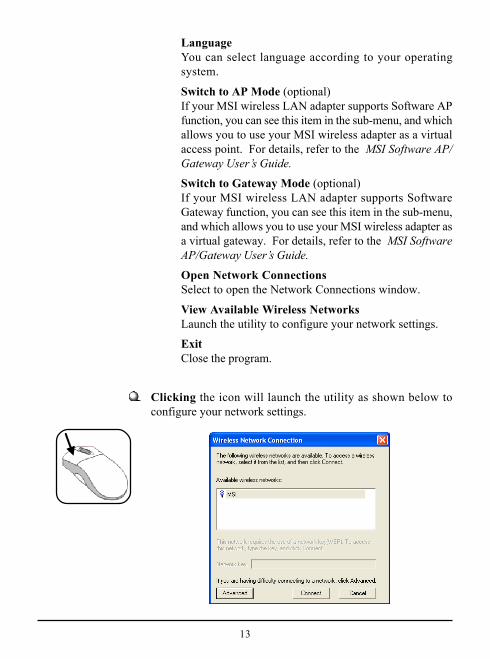
LanguageYou can select language according to your operatingsystem.
Switch to AP Mode (optional)If your MSI wireless LAN adapter supports Software APfunction, you can see this item in the sub-menu, and whichallows you to use your MSI wireless adapter as a virtualaccess point. For details, refer to the MSI Software AP/Gateway User’s Guide.
Switch to Gateway Mode (optional)If your MSI wireless LAN adapter supports SoftwareGateway function, you can see this item in the sub-menu,and which allows you to use your MSI wireless adapter asa virtual gateway. For details, refer to the MSI SoftwareAP/Gateway User’s Guide.
Open Network ConnectionsSelect to open the Network Connections window.
View Available Wireless NetworksLaunch the utility to configure your network settings.
ExitClose the program.
Clicking the icon will launch the utility as shown below toconfigure your network settings.
14
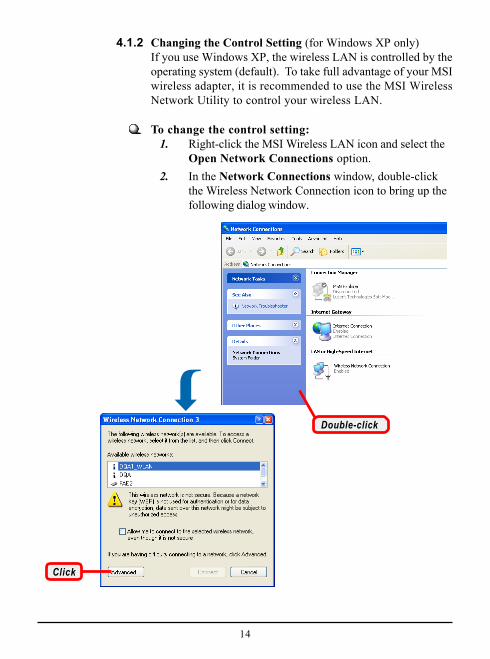
4.1.2 Changing the Control Setting (for Windows XP only)If you use Windows XP, the wireless LAN is controlled by theoperating system (default). To take full advantage of your MSIwireless adapter, it is recommended to use the MSI WirelessNetwork Utility to control your wireless LAN.
Click
Double-click
To change the control setting: 1. Right-click the MSI Wireless LAN icon and select the
Open Network Connections option. 2. In the Network Connections window, double-click
the Wireless Network Connection icon to bring up thefollowing dialog window.

15
3. Click Advanced, and the Properties window willappear as below.
Uncheck this option
Click
4. Uncheck the Use Windows to configure mywireless network settings option. Then, click OK.
5. Now, you can use MSI Wireless Network Utility toconfigure your network.
16
Since the US54G is installed in your computer, you have toconfigure the settings for communication to start working inyour network environment.
Select
>>> 4.2 Networking
4.2.1
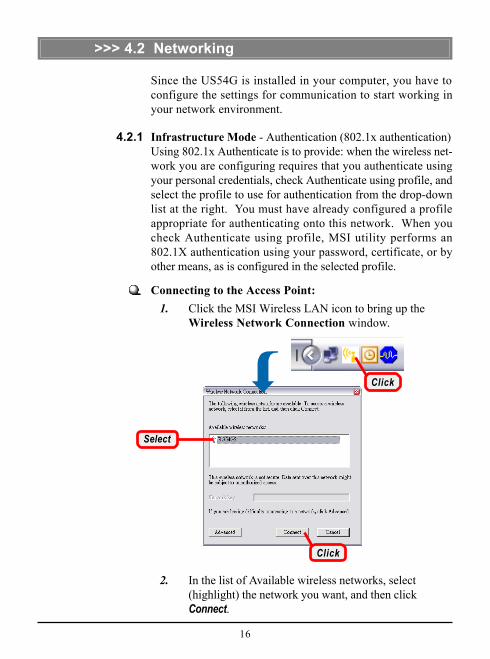
Connecting to the Access Point: 1. Click the MSI Wireless LAN icon to bring up the
Wireless Network Connection window.
Infrastructure Mode - Authentication (802.1x authentication)Using 802.1x Authenticate is to provide: when the wireless net-work you are configuring requires that you authenticate usingyour personal credentials, check Authenticate using profile, andselect the profile to use for authentication from the drop-downlist at the right. You must have already configured a profileappropriate for authenticating onto this network. When youcheck Authenticate using profile, MSI utility performs an802.1X authentication using your password, certificate, or byother means, as is configured in the selected profile.
2. In the list of Available wireless networks, select(highlight) the network you want, and then clickConnect.
Click
Click
17
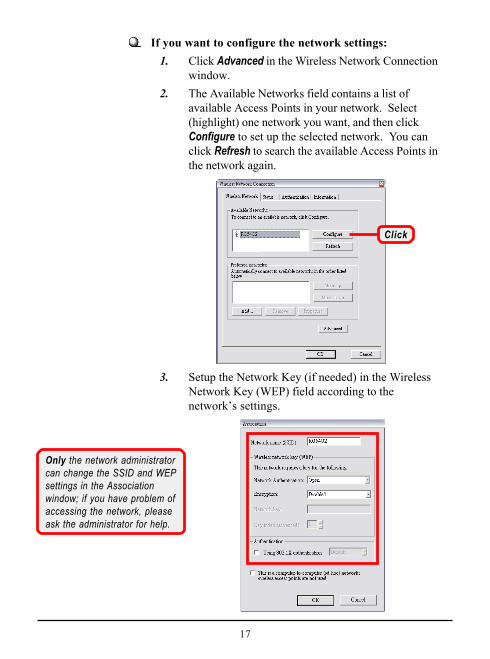
If you want to configure the network settings: 1. Click Advanced in the Wireless Network Connection
window. 2. The Available Networks field contains a list of
available Access Points in your network. Select(highlight) one network you want, and then clickConfigure to set up the selected network. You canclick Refresh to search the available Access Points inthe network again.
Click
Only the network administratorcan change the SSID and WEPsettings in the Associationwindow; if you have problem ofaccessing the network, pleaseask the administrator for help.
3. Setup the Network Key (if needed) in the WirelessNetwork Key (WEP) field according to thenetwork’s settings.

18
connected
4. Click OK. The selected network will appear in thePreferred Networks field. If it contains two or morenetworks in the list, you can use Move up/Move downto set the priority.
5. Click OK to complete the configuration, and an iconindicating connected to the network will appear inthe status area.
Click

19
4.2.2 Ad-hoc ModeAd-hoc mode allows your computer to communicate directlywith any computer installed with compatible wireless adapter.If you want to use the network in Ad-hoc mode: - All the computers connected should be set to Ad-
hoc mode. - The computers have the same SSID (network name)
setting.
To configure the settings: 1. Click the MSI Wireless LAN icon to bring up the
Wireless Network Connection window. Then,click Advanced.
Click
Click
20
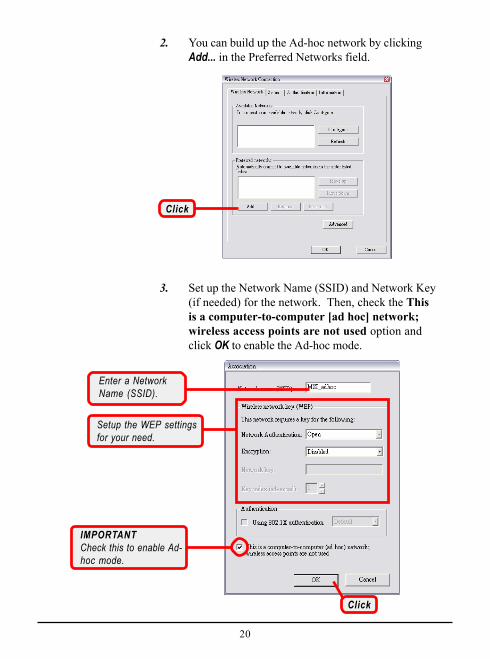
3. Set up the Network Name (SSID) and Network Key(if needed) for the network. Then, check the Thisis a computer-to-computer [ad hoc] network;wireless access points are not used option andclick OK to enable the Ad-hoc mode.
2. You can build up the Ad-hoc network by clickingAdd... in the Preferred Networks field.
Click
Enter a NetworkName (SSID).
IMPORTANTCheck this to enable Ad-hoc mode.
Setup the WEP settingsfor your need.
Click

21
4. The computer set up with this Ad-hoc network instep 3 is the designated administrator of the network.Any computer can access the network by selectingConnect in the Wireless Network Connectionwindow.
connected
5. Click OK to complete the configuration, and an iconindicating connected to the network appears in thestatus area.
Click
Select
22
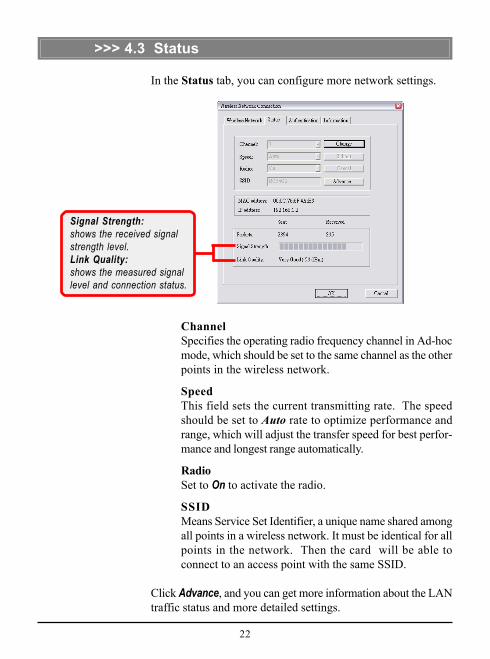
In the Status tab, you can configure more network settings.
ChannelSpecifies the operating radio frequency channel in Ad-hocmode, which should be set to the same channel as the otherpoints in the wireless network.
SpeedThis field sets the current transmitting rate. The speedshould be set to Auto rate to optimize performance andrange, which will adjust the transfer speed for best perfor-mance and longest range automatically.
RadioSet to On to activate the radio.
SSIDMeans Service Set Identifier, a unique name shared amongall points in a wireless network. It must be identical for allpoints in the network. Then the card will be able toconnect to an access point with the same SSID.
Click Advance, and you can get more information about the LANtraffic status and more detailed settings.
Signal Strength:shows the received signalstrength level.Link Quality:shows the measured signallevel and connection status.
>>> 4.3 Status
23
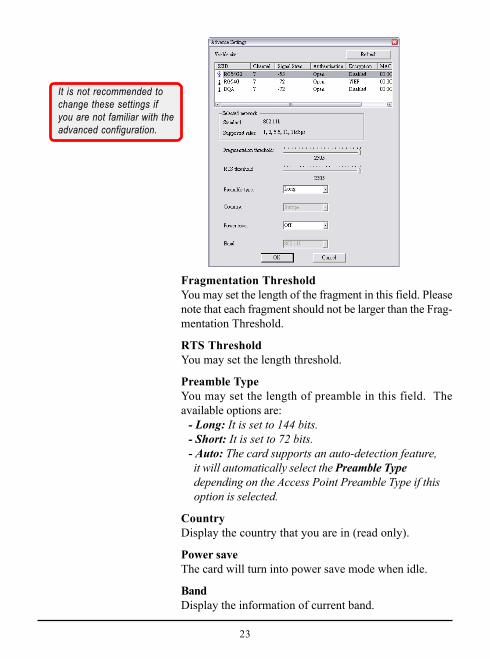
Fragmentation ThresholdYou may set the length of the fragment in this field. Pleasenote that each fragment should not be larger than the Frag-mentation Threshold.
RTS ThresholdYou may set the length threshold.
Preamble TypeYou may set the length of preamble in this field. Theavailable options are:
- Long: It is set to 144 bits.- Short: It is set to 72 bits.- Auto: The card supports an auto-detection feature, it will automatically select the Preamble Type depending on the Access Point Preamble Type if this option is selected.
CountryDisplay the country that you are in (read only).
Power saveThe card will turn into power save mode when idle.
BandDisplay the information of current band.
It is not recommended tochange these settings ifyou are not familiar with theadvanced configuration.
24
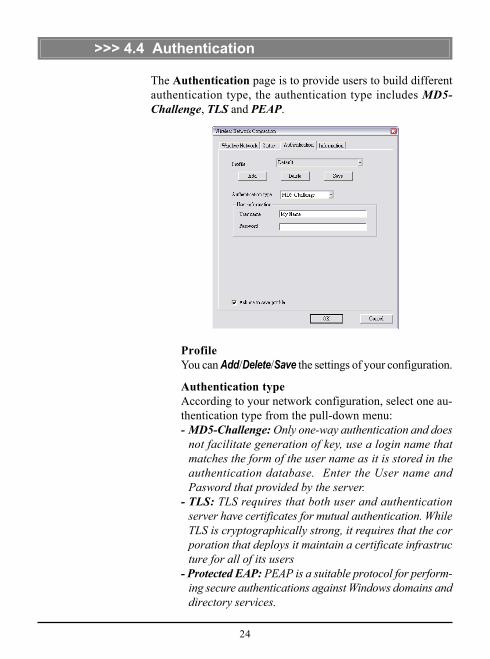
ProfileYou can Add/Delete/Save the settings of your configuration.
Authentication typeAccording to your network configuration, select one au-thentication type from the pull-down menu:- MD5-Challenge: Only one-way authentication and does
not facilitate generation of key, use a login name thatmatches the form of the user name as it is stored in theauthentication database. Enter the User name andPasword that provided by the server.
- TLS: TLS requires that both user and authenticationserver have certificates for mutual authentication. WhileTLS is cryptographically strong, it requires that the corporation that deploys it maintain a certificate infrastructure for all of its users
- Protected EAP: PEAP is a suitable protocol for perform-ing secure authentications against Windows domains anddirectory services.
The Authentication page is to provide users to build differentauthentication type, the authentication type includes MD5-Challenge, TLS and PEAP.
>>> 4.4 Authentication

25
In the Information tab, you can get some information about themanufacturer, hardware and software.
>>> 4.5 Information
Your Wireless LAN adapter model
26
This chapter describes how to prepare for connection to net-work and some basic outline of networking basics, includingsharing files, printing from a computer on the network, or ac-cessing the Internet on multiple computers with one connection.
Networking Basics
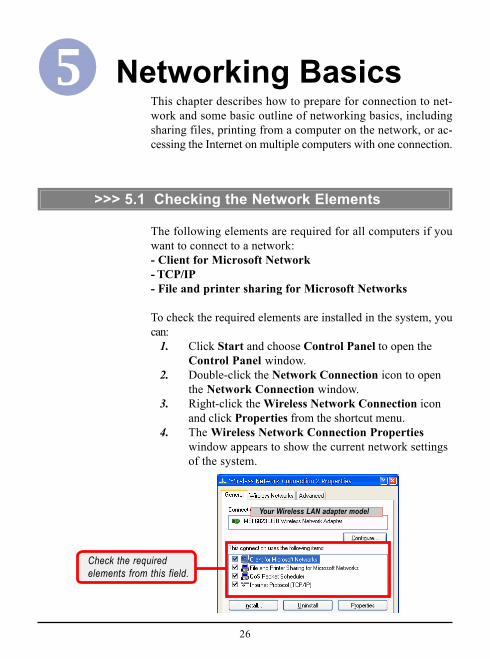
The following elements are required for all computers if youwant to connect to a network:- Client for Microsoft Network- TCP/IP- File and printer sharing for Microsoft Networks
To check the required elements are installed in the system, youcan: 1. Click Start and choose Control Panel to open the
Control Panel window. 2. Double-click the Network Connection icon to open
the Network Connection window. 3. Right-click the Wireless Network Connection icon
and click Properties from the shortcut menu. 4. The Wireless Network Connection Properties
window appears to show the current network settingsof the system.
>>> 5.1 Checking the Network Elements
Check the requiredelements from this field.
Your Wireless LAN adapter model

27
2. The System Properties window appears; chooseComputer Name tab.
Right-click
Select
Your computer’s name.
Your computer will belong tothis workgroup.
Enter some information forreference.
>>> 5.2 Computer Identification
Please verify that each computer has a unique name and commonworkgroup name, if you had previously given your Windows2000/XP computer’s name.
1. Right-click My Computer icon on your Windowsdesktop, and click Properties from the shortcut menu.

28
3. To rename the computer and join a workgroup/domain,click Change.
4. The Computer Name Changes window appears asbelow. Enter a Computer Name, select Workgroupand enter the name of your workgroup. Please NOTEthat each computer’s name must be unique on aparticular network to avoid confusion.
5. Click OK to save changes.
Enter a name for yourcomputer (less than 15characters without space.
Enter the name of theworkgroup.

29
Select this
Click
Your Wireless LAN adapter model
When the drivers are installed, the default setting here is set toobtain IP dynamically through a DHCP server. If you want tochange the settings, please follow the steps below:
1. Click Start and choose Control Panel to open theControl Panel window.
2. Double-click the Network Connection icon to openthe Network Connection window.
3. Right-click the USB Wireless Network Adapter iconand click Properties from the shortcut menu.
4. When the Wireless Network Connection Proper-ties window appears, choose General tab and selectInternet Protocol [TCP/IP], and click Properties tobring up the Internet Protocol [TCP/IP] Proper-ties window.
>>> 5.3 Configuring a Dynamic/Fixed IP Address
30
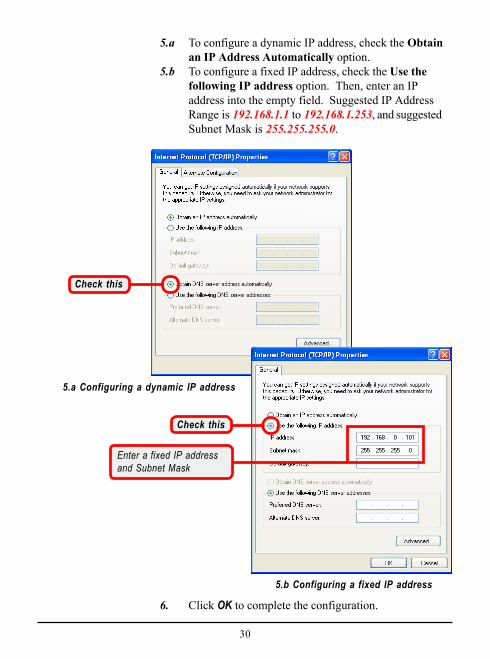
5.a To configure a dynamic IP address, check the Obtainan IP Address Automatically option.
5.b To configure a fixed IP address, check the Use thefollowing IP address option. Then, enter an IPaddress into the empty field. Suggested IP AddressRange is 192.168.1.1 to 192.168.1.253, and suggestedSubnet Mask is 255.255.255.0.
Check this
Enter a fixed IP addressand Subnet Mask
Check this
6. Click OK to complete the configuration.
5.a Configuring a dynamic IP address
5.b Configuring a fixed IP address

31
Check the configuration ofIP Address, Subnet Mask,and Default Gateway arecorrect.
1. Go to Start -> Run.... 2. Type cmd in the Open box and click OK.
3. A DOS prompt window appears. Type ipconfig/alland press [Enter] to display IP information.
Type cmd here.
Your Wireless LAN adapter model
>>> 5.4 Checking TCP/IP Address

32
1. Go to Start -> Run.... 2. Type cmd in the Open box and click OK. 3. A DOS prompt window appears. Type ping 210.59.
147.160 (or any URL address), which is the IP addressof the Gateway in this case, and press [Enter].
You will get reply if thepinging is successful.
>>> 5.5 Checking Connection by Pinging
33
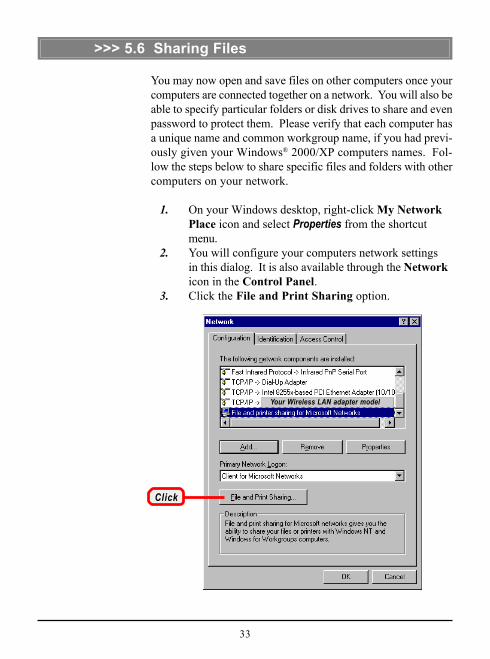
You may now open and save files on other computers once yourcomputers are connected together on a network. You will also beable to specify particular folders or disk drives to share and evenpassword to protect them. Please verify that each computer hasa unique name and common workgroup name, if you had previ-ously given your Windows® 2000/XP computers names. Fol-low the steps below to share specific files and folders with othercomputers on your network.
1. On your Windows desktop, right-click My NetworkPlace icon and select Properties from the shortcutmenu.
2. You will configure your computers network settingsin this dialog. It is also available through the Networkicon in the Control Panel.
3. Click the File and Print Sharing option.
>>> 5.6 Sharing Files
Click
Your Wireless LAN adapter model
34
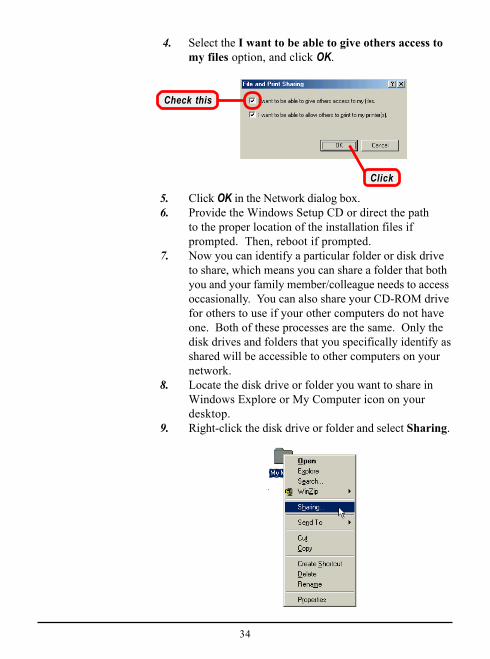
4. Select the I want to be able to give others access tomy files option, and click OK.
Check this
5. Click OK in the Network dialog box. 6. Provide the Windows Setup CD or direct the path
to the proper location of the installation files ifprompted. Then, reboot if prompted.
7. Now you can identify a particular folder or disk driveto share, which means you can share a folder that bothyou and your family member/colleague needs to accessoccasionally. You can also share your CD-ROM drivefor others to use if your other computers do not haveone. Both of these processes are the same. Only thedisk drives and folders that you specifically identify asshared will be accessible to other computers on yournetwork.
8. Locate the disk drive or folder you want to share inWindows Explore or My Computer icon on yourdesktop.
9. Right-click the disk drive or folder and select Sharing.
Click
35
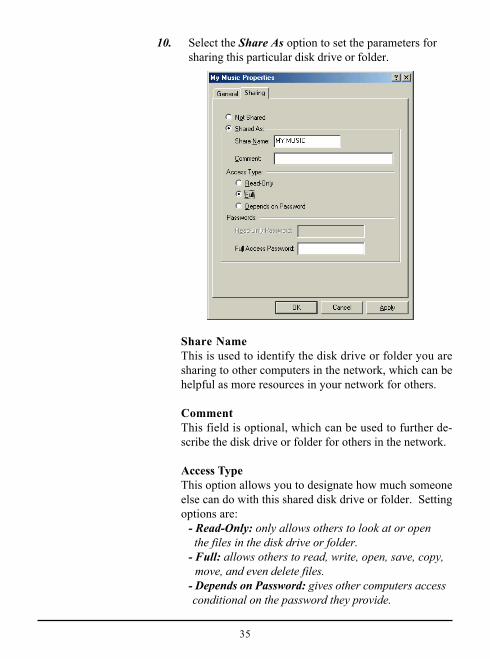
10. Select the Share As option to set the parameters forsharing this particular disk drive or folder.
Share NameThis is used to identify the disk drive or folder you aresharing to other computers in the network, which can behelpful as more resources in your network for others.
CommentThis field is optional, which can be used to further de-scribe the disk drive or folder for others in the network.
Access TypeThis option allows you to designate how much someoneelse can do with this shared disk drive or folder. Settingoptions are:
- Read-Only: only allows others to look at or open the files in the disk drive or folder.- Full: allows others to read, write, open, save, copy,
move, and even delete files.- Depends on Password: gives other computers access
conditional on the password they provide.
36
PasswordThis option allows you to apply a level of security toyour shared disk drive and folder. Any other computer(user) will be asked to enter the password you set herebefore accessing the disk drive or folder. Two passwordsare used to give two levels of security (or access) to othersin the network using the Depends on Password setting.Leaving the Password boxes empty will give everyone inthe network access to the disk drive or folder.
11. Click OK to continue. You will be prompted to typethe password(s) you provided for verification. Typethe password(s) just as you typed them again.
12. Now you may access this disk drive or folder fromanother computer in your network. You may do so bydouble-clicking the My Network Place icon on yourWindows desktop or inside Windows Explorer.
13. Navigate to the computer with the shared disk drive orfolder (recognized by the Computer Name youprovided), and double-click it. If you specified apassword when sharing this disk drive or folder, youwill be asked for the password.
14. You can access a disk drive of folder shared over thenetwork from most Windows 2000/XPapplications.you can map these disk drives and folders to a driveletter on another computer to make this process easier.For example, on a computer where you are accessing ashared folder from another computer, inside WindowsExplorer right-click and select the Map Network Driveoption. Now you are able to assign an available driveletter. Checking the Reconnect at logon optionallows Windows to map this network drive each timewhen you start your computer.