MPLAB X Project and MIPS Assembly Helpslynnd/cst204/ftp/MPLAB X Project and MIPS... · MPLAB X...
6
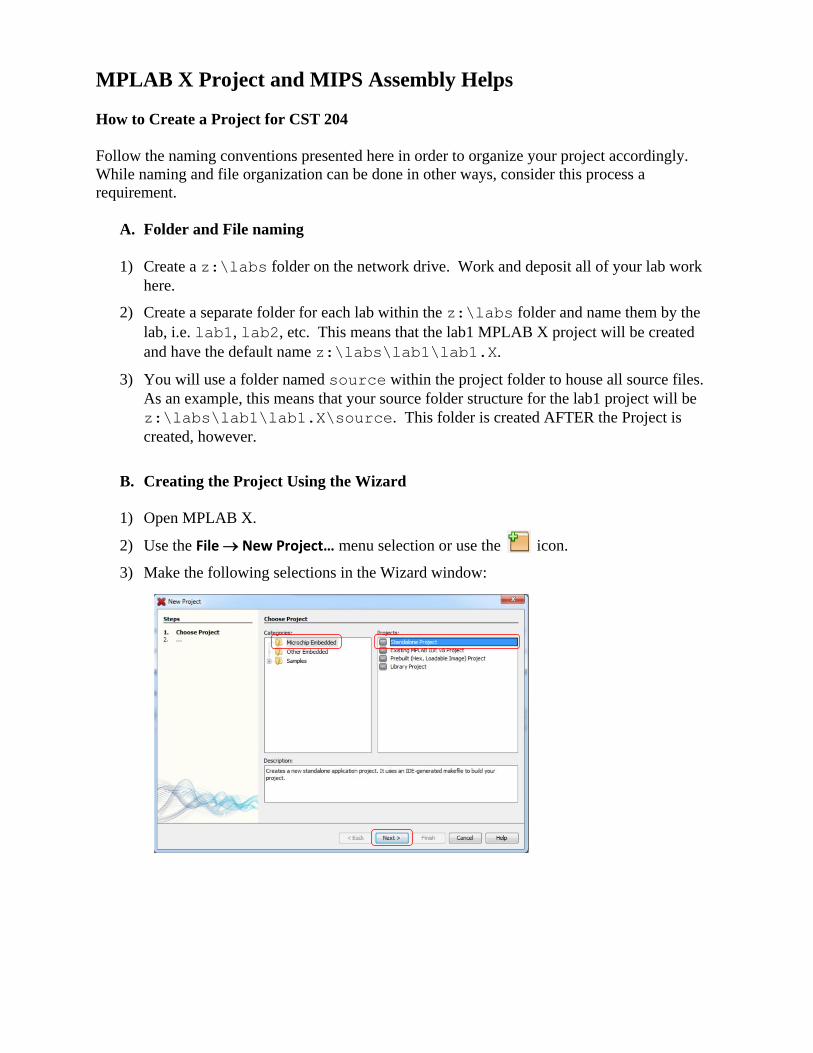
MPLAB X Project and MIPS Assembly Helps How to Create a Project for CST 204 Follow the naming conventions presented here in order to organize your project accordingly. While naming and file organization can be done in other ways, consider this process a requirement. A. Folder and File naming 1) Create a z:\labs folder on the network drive. Work and deposit all of your lab work here. 2) Create a separate folder for each lab within the z:\labs folder and name them by the lab, i.e. lab1, lab2, etc. This means that the lab1 MPLAB X project will be created and have the default name z:\labs\lab1\lab1.X. 3) You will use a folder named source within the project folder to house all source files. As an example, this means that your source folder structure for the lab1 project will be z:\labs\lab1\lab1.X\source. This folder is created AFTER the Project is created, however. B. Creating the Project Using the Wizard 1) Open MPLAB X. 2) Use the File New Project… menu selection or use the icon. 3) Make the following selections in the Wizard window:
-
Upload
duongtuyen -
Category
Documents
-
view
236 -
download
0
Transcript of MPLAB X Project and MIPS Assembly Helpslynnd/cst204/ftp/MPLAB X Project and MIPS... · MPLAB X...
MPLAB X Project and MIPS Assembly Helps
How to Create a Project for CST 204
Follow the naming conventions presented here in order to organize your project accordingly.
While naming and file organization can be done in other ways, consider this process a
requirement.
A. Folder and File naming
1) Create a z:\labs folder on the network drive. Work and deposit all of your lab work
here.
2) Create a separate folder for each lab within the z:\labs folder and name them by the
lab, i.e. lab1, lab2, etc. This means that the lab1 MPLAB X project will be created
and have the default name z:\labs\lab1\lab1.X.
3) You will use a folder named source within the project folder to house all source files.
As an example, this means that your source folder structure for the lab1 project will be
z:\labs\lab1\lab1.X\source. This folder is created AFTER the Project is
created, however.
B. Creating the Project Using the Wizard
1) Open MPLAB X.
2) Use the File New Project… menu selection or use the icon.
3) Make the following selections in the Wizard window:

4) Make the following selections in the Wizard window:
5) Make the following selections in the Wizard window:
6) Select the latest version of the XC32 compiler in the Wizard window:

7) Enter the name of the lab, e.g. lab1, and Browse over to the z:\cst204\labs\lab1
folder. Let the Project Folder then default to the “.X” name:
8) If is suggested that you arrange the IDE windows as follows. The view includes the
Project, Files, and Dashboard windows to the left, and the Output window to the lower-
right. The Source file will eventually be displayed in the upper-right area where the Start Page is displayed by default. :

C. Creating the “source” folder
Once you have created the Project, you can use the Windows File Explorer to to create
the source folder. Or, you can follow the process below.
1) Switch over to the Files window in the Project area. Right-click on the Project folder
name, e.g. lab1, and make the following selection:
2) Make the following selections in the Wizard window:

3) Make the Folder Name source and let the Created Folder name default under the
Project folder (.X) as shown:
As mentioned above under “A. Folder and File naming”, this is where you will plave all
of your source files.

Memory Functions
Warning: You must be aware of alignment when allocating and accessing memory. All LOADS
and STORES must reference an address that is aligned to the reference type. That is,
A WORD access must reference an address that is a multiple of 4
A HALFWORD access must reference an address that is a multiple of 2
A BYTE access is allowed at any address
A typical error occurs when a WORD or HALFWORD access uses a label that is aligned to an
ODD address.
The following allocation statements are assumed to be in a .data section.
1) Create an uninitialized variable var_lab_4: .space 4 // allocate 1 word this address
var_lab_2: .space 2 // allocate 1 halfword at this address
var_lab_1: .space 1 // allocate 1 byte at this address
2) Create an initialized variable var_lab_4: .word 0x12345678 // initialize 0x12345678 at this address
var_lab_2: .half 0x1234 // initialize 0x1234 at this address
var_lab_1: .byte 0x12 // initialize 0x12 at this address
The following fragments LOAD a register with an IMMEDIATE, constant value.
li t0, 0x1234abcd // Load t0 with constant 0x1234abcd
The following fragments perform LOADS (memory-to-register transfers) and STORES (register-
to-memory transfers) in a .text section.
1) Load register t0 with a memory value using t9 (though any registers can be used)
la t9, var_label // load t9 with label address
lw t0, 0(t9) // load a WORD value into t0 from
// address in t9. The “0” is a displacement
// and can be nonzero
2) Store a register value to memory using register t9 (though any register can be used)
la t9, var_label // load t9 with label address
sw t0, 0(t9) // store a WORD value in t0 into memory at
// address in t9. The “0” is a displacement
// and can be nonzero
In the fragments above, in addition to words, halfwords and bytes can also be transferred:
lh t0, 0(t9) // Or, lhu for an UNSIGNED, non-sign extended transfer
lb t0, 0(t9) // Or, lbu for an UNSIGNED, non-sign extended transfer
sh t0, 0(t9)
sb t0, 0(t9)