MOXON VISE - highlandwoodworking.com...developed our Moxon vise using the same principles which...
12
1 · History · Joseph Moxon’s double-screw vise described in his 17th c. book “The Art of Joinery” was the genesis of all modern “Moxon” vises. Modern woodworkers have discovered the usefulness of a vise that brings work up to a more convenient height, particularly when working the ends of boards, as in dovetailing. Early modern versions feature a tapped rear jaw and screws of threaded wood. Modern threading tools for wood screws leave much to be desired, so we developed our Moxon vise using the same principles which guide the development of our other vises: smooth, effortless action. Joseph Moxon wasn’t the only one to describe this type of vise. Roubo and Felebien also document a double-screw vise that is held to the top of a bench with clamps or holdfasts in order to facilitate certain work. The difference between these historical examples and our version is primarily the thickness of the jaws. Since most woodworkers discovered this vise they’ve used the general configuration from the Popular Woodworking article in lieu of using the thicker jaws in the historical examples.Thicker jaws will deflect less, and rack less. But because this vise is used primarily for working the ends of boards, where the entire board spans the vertical plane of the Contents: (2) Cast iron handwheel (2) acme screw (4) acme nut (2) thick washer (1) Crubber jaw liner Assembly & Installation Instructions For: MOXON VISE
Transcript of MOXON VISE - highlandwoodworking.com...developed our Moxon vise using the same principles which...
1
· History ·
Joseph Moxon’s double-screw vise described in his 17th c. book “The Art of Joinery” wasthe genesis of all modern “Moxon” vises. Modern woodworkers have discovered the usefulnessof a vise that brings work up to a more convenient height, particularly when working the endsof boards, as in dovetailing. Early modern versions feature a tapped rear jaw and screws ofthreaded wood. Modern threading tools for wood screws leave much to be desired, so wedeveloped our Moxon vise using the same principles which guide the development of ourother vises: smooth, effortless action.
Joseph Moxon wasn’t the only one to describe this type of vise. Roubo and Felebien alsodocument a double-screw vise that is held to the top of a bench with clamps or holdfasts in orderto facilitate certain work. The difference between these historical examples and our version isprimarily the thickness of the jaws. Since most woodworkers discovered this vise they’ve used thegeneral configuration from the Popular Woodworking article in lieu of using the thicker jaws inthe historical examples. Thicker jaws will deflect less, and rack less. But because this vise is usedprimarily for working the ends of boards, where the entire board spans the vertical plane of the
Contents:
(2) Cast iron handwheel(2) acme screw(4) acme nut(2) thick washer(1) Crubber jaw liner
AAsssseemmbbllyy && IInnssttaallllaattiioonn IInnssttrruuccttiioonnss FFoorr::
MOXON VISE
2
jaws (and thus eliminates vertical racking) and most woodworkers are accustomed to this form,we spec the jaws at 1 3/4” thick using widely available 8/4 stock. We feel the comparativelythinner jaws function quite well, while keeping the vise light enough that you’ll actually get itout and use it.
Although our vise isn’t an exact copy of Moxon’s or Roubo’s, the term “Moxonvise” has been widely adopted to describe this type of vise.
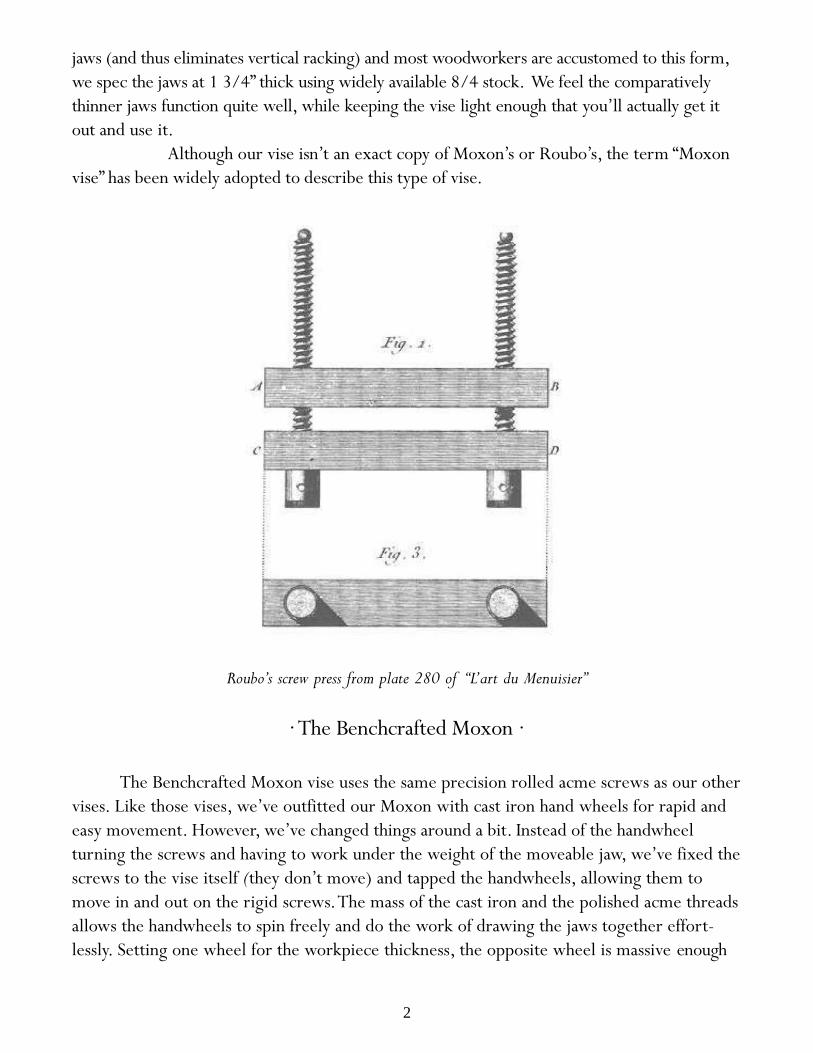
Roubo’s screw press from plate 280 of “L’art du Menuisier”
The Benchcrafted Moxon vise uses the same precision rolled acme screws as our othervises. Like those vises, we’ve outfitted our Moxon with cast iron hand wheels for rapid andeasy movement. However, we’ve changed things around a bit. Instead of the handwheelturning the screws and having to work under the weight of the moveable jaw, we’ve fixed thescrews to the vise itself (they don’t move) and tapped the handwheels, allowing them tomove in and out on the rigid screws. The mass of the cast iron and the polished acme threadsallows the handwheels to spin freely and do the work of drawing the jaws together effort-lessly. Setting one wheel for the workpiece thickness, the opposite wheel is massive enough
· The Benchcrafted Moxon ·
3
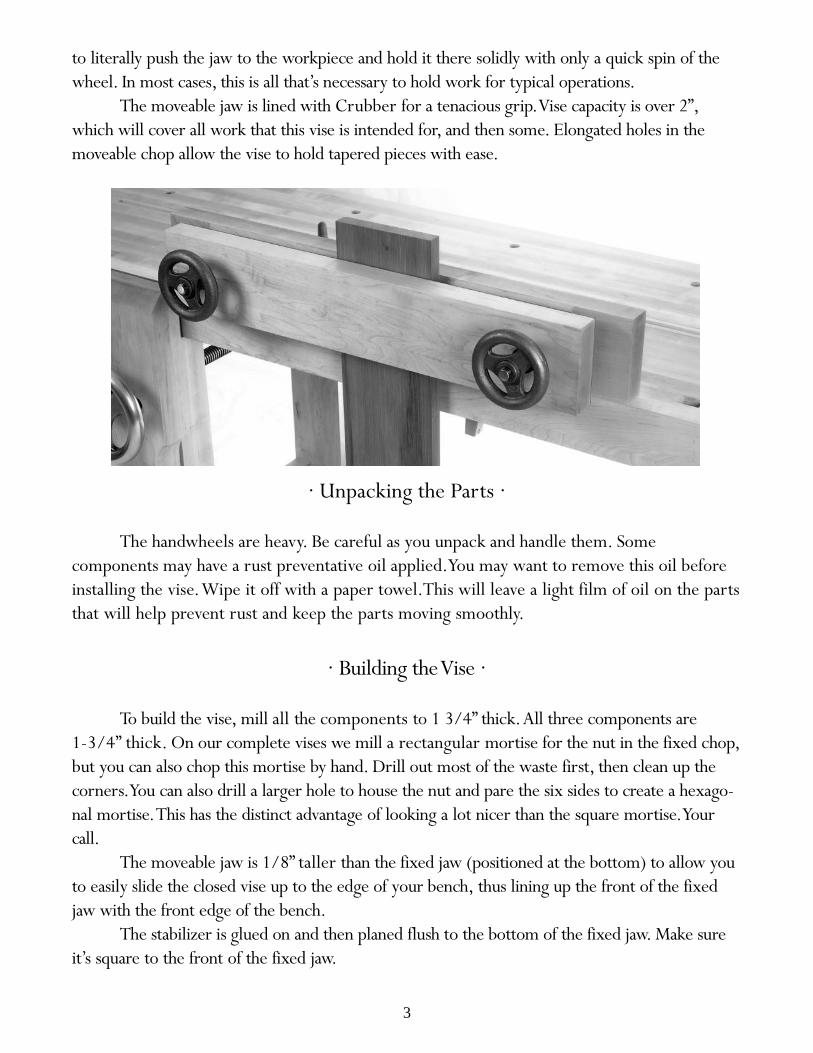
to literally push the jaw to the workpiece and hold it there solidly with only a quick spin of thewheel. In most cases, this is all that’s necessary to hold work for typical operations.
The moveable jaw is lined with Crubber for a tenacious grip. Vise capacity is over 2”,which will cover all work that this vise is intended for, and then some. Elongated holes in themoveable chop allow the vise to hold tapered pieces with ease.
· Unpacking the Parts ·
The handwheels are heavy. Be careful as you unpack and handle them. Somecomponents may have a rust preventative oil applied.You may want to remove this oil beforeinstalling the vise. Wipe it off with a paper towel.This will leave a light film of oil on the partsthat will help prevent rust and keep the parts moving smoothly.
· Building the Vise ·
To build the vise, mill all the components to 1 3/4” thick. All three components are1-3/4” thick. On our complete vises we mill a rectangular mortise for the nut in the fixed chop,but you can also chop this mortise by hand. Drill out most of the waste first, then clean up thecorners. You can also drill a larger hole to house the nut and pare the six sides to create a hexago-nal mortise. This has the distinct advantage of looking a lot nicer than the square mortise. Yourcall.
The moveable jaw is 1/8” taller than the fixed jaw (positioned at the bottom) to allow youto easily slide the closed vise up to the edge of your bench, thus lining up the front of the fixedjaw with the front edge of the bench.
The stabilizer is glued on and then planed flush to the bottom of the fixed jaw. Make sureit’s square to the front of the fixed jaw.
4
Drill the elongated holes in the moveable jaw with a 3/4” Forstner bit, then shift the jawover to elongate the hole, finishing up with a couple passes between the two to remove the web.Forstner bits can easily cut partial arcs, just make sure the jaw is clamped securely in your drillpress. If you don’t have a drill press you can elongate the hole with a round rasp or gouge. Makesure the mortise is no greater than 3/4” tall. You want the jaw to pivot horizontally, but have littlevertical play.
To assemble the vise, thread a nut onto each screw so 1 3/4” of screw remains. Insert thisend into the nut mortise on the fixed jaw. Place a nut behind the fixed jaw and cinch it down.Install the moveable jaw onto the screws, slip on the two washers then spin the handwheels on. Alittle lubrication used sparingly will keep the wheels running smoothly. A drying bicycle chain-type lubricant is a good choice. Plane the top edge of the jaws flush with the vise closed.Finally, glue the Crubber to the inside of the moveable jaw with contact cement or wood glue,then trim it flush to the edges and holes. If you purchased a complete Moxon vise, completethis step before assembling the vise components to the jaws.
The vise doesn’t need to be finished, but it will stay clean longer and be nicer to usewith a coat of oil or shellac. Don’t apply finish to the inside of the fixed jaw, or to the bottomof the vise. You want these areas to stay grippy.
· Using the Vise ·
To use the vise for its most useful task--working the ends of boards narrow and wide asin dovetailing--place the closed vise on your benchtop and clamp the fixed jaw firmly to thebenchtop at each end. If you have holdfasts, you can use these instead. If your bench is outfit-ted with a Benchcrafted Tail Vise or other wagon vise, and dogs positioned close to the frontedge, you can trap the stabilizer between dogs and clamp firmly. Tap the dogs down with ahammer to bring the vise into firm contact with your benchtop.
To clamp a workpiece, first spin the wheels to open the jaws, insert your workpieceand slide it up to one of the screws (usually opposite your dominant hand). Spin the wheeluntil the jaw just touches the workpiece. You won’t adjust this wheel again unless you changeyour workpiece thickness. Now center your workpiece between the screws and spin the
other wheel. This will push the jaw up to the workpiece and clamp it securely. You won’tneed to tighten the vise further in most cases. Practice a few times to get a feel for how faryou need to open the jaw to move the workpiece. When you open the vise, pull back on theworkpiece to spread the jaws so when you reinsert another workpiece its quick and easy.
When you have a whole chest of drawers to dovetail and you’re moving numerousworkpieces in and out of the vise, this sequence will translate into quick and effortlessworkholding. The vise is also excellent for cutting tenons.
5
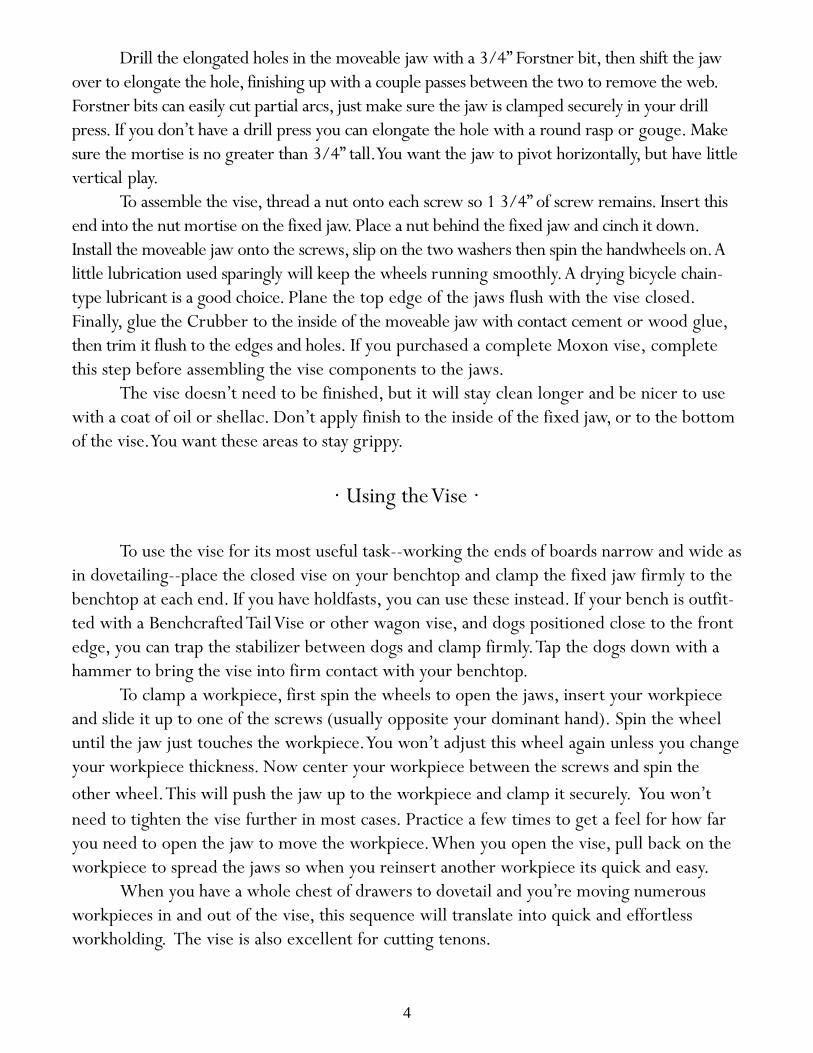
A previous version of our Moxon handwheel on a benchtop bench.
· Benchtop Bench ·
You may wish to use your Moxon vise hardware to build a benchtop bench. Thisminiature bench is clamped to your regular height bench and used in the same way as thestandard Moxon vise. The work surface behind the fixed jaw allows you to clamp work di-rectly to the top, transfer dovetail locations to your pin board, or keep small tools at theready. A variety of different versions can be built with the hardware depending on yourapplication. If you’d like to include benchdogs in the moveable jaw we recommend beefingup the jaw to 3” thick or so. This will help eliminate vertical racking when using the dogs.
· Moxon the Short ·
Similar to the benchtop bench pictured above, you can build a shorter version of theMoxon vise with less distance between screws. In this example, just over 16”. This size is veryhandy for most drawer and small to medium size case work. It’s not often you need a full 24”capacity. Having several different vises at the ready is a nice convenience. But we’re morefrugal. Swapping out the hardware between jaw sets is a quick operation. But if you want tobuild several complete vises, we won’t complain.
· Maintenance ·
The handwheels are made from cast iron, which will rust under the right circum-stances. If your shop is not climate controlled, or you live in a particularly humid area, likealong a seacoast, you will need to take the same measures as with any steel or iron implement
6
in your shop. There are many recipes for preserving cast iron. One uses equal parts boiledlinseed oil and beeswax. Brush on a coat and wipe most of it off, leaving a thin layer. Let thisdry overnight. You can also brush on a coat of shellac, or spray lacquer. Use your own judge-ment depending on your local conditions. We keep our test shop heated and air-conditionedyear-round and we don’t have a problem with rust. The other parts of the vise being morehighly polished are less susceptible to rust, but you should also take precautions with those aswell.
To keep the handwheels spinning freely its most important to keep the screws clean. Agood brushing or blast of compressed air at the end of the session should do it. You may findthat a new handwheel will vibrate a bit if you spin it aggressively. First, go easy. A steady butpositive spin is all you need. Secondly, when we tap the handwheels’ hub, the thread’s profileis sharp and crisp. After a bit of use the cast iron threads will ease and the handwheel’s actionwill get even sweeter.
Text and measured drawings Copyright Benchcrafted 2017
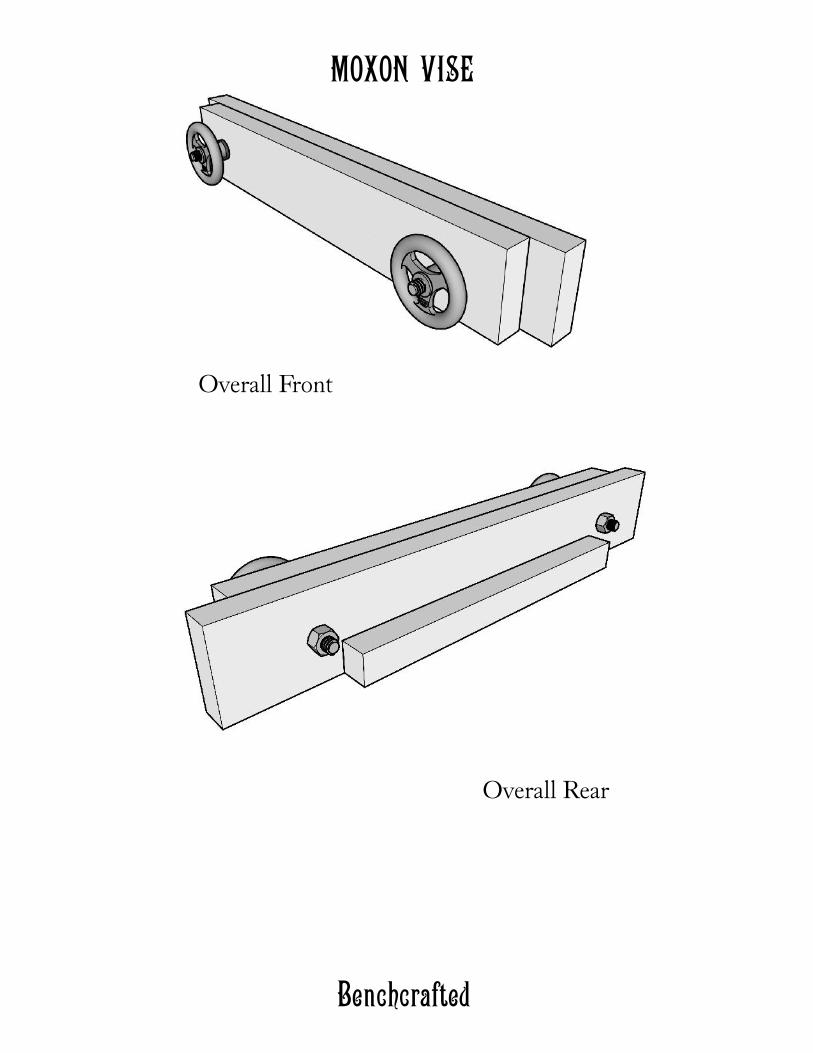
Overall Front
MOXON VISE
Benchcrafted
Overall Rear

Plan
Elevation, Front
Elevation, Rear
MOXON VISE
Benchcrafted
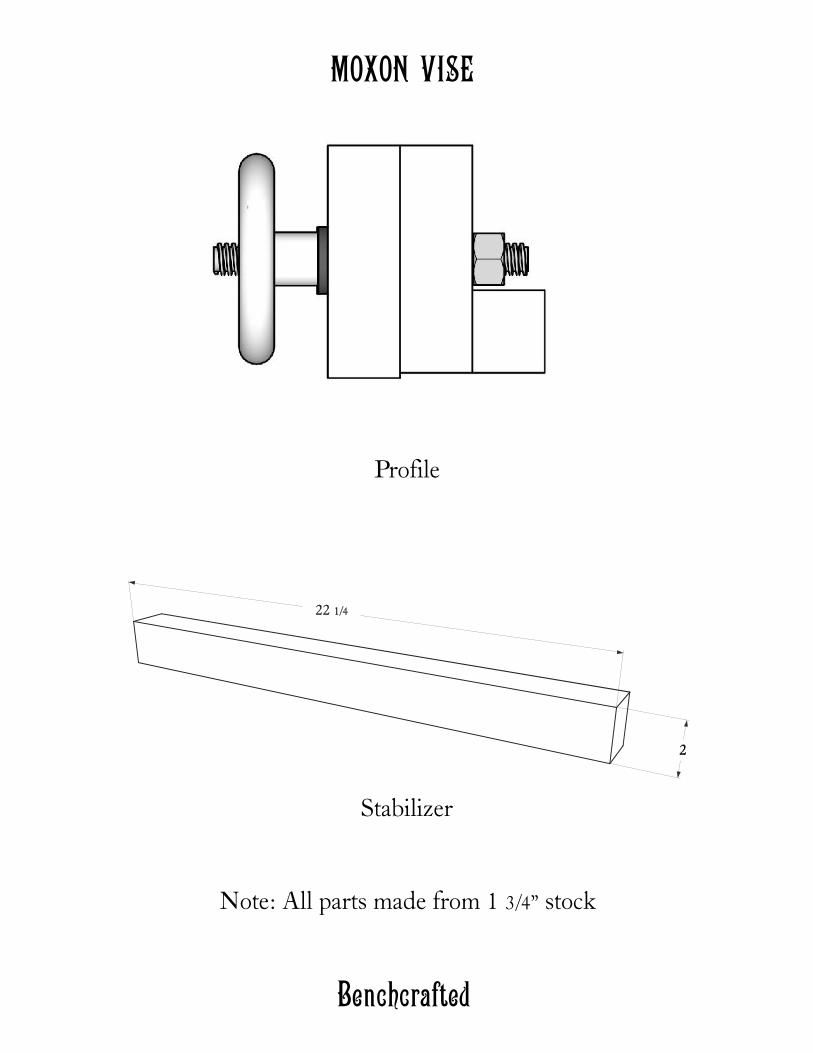
Profile
Stabilizer
Note: All parts made from 1 stock3/4”
MOXON VISE
Benchcrafted
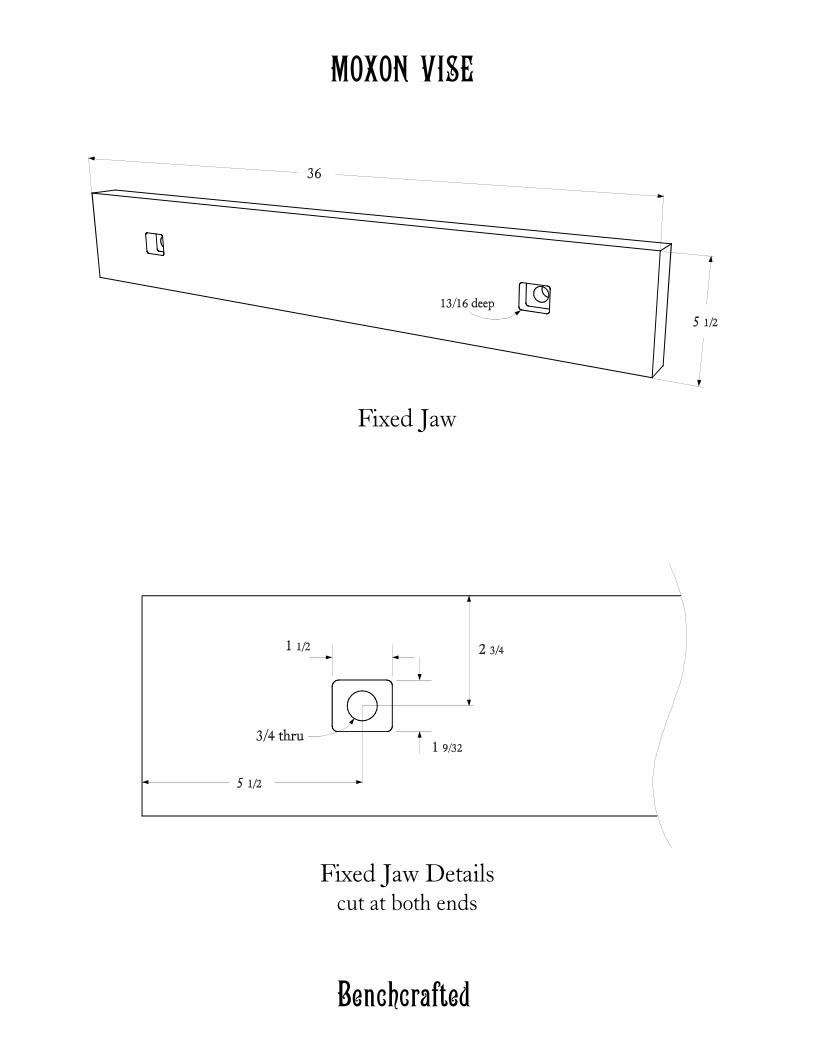
Fixed Jaw
Fixed Jaw Detailscut at both ends
MOXON VISE
Benchcrafted

Movable Jaw
Movable Jaw Detailscut at both ends
MOXON VISE
Benchcrafted
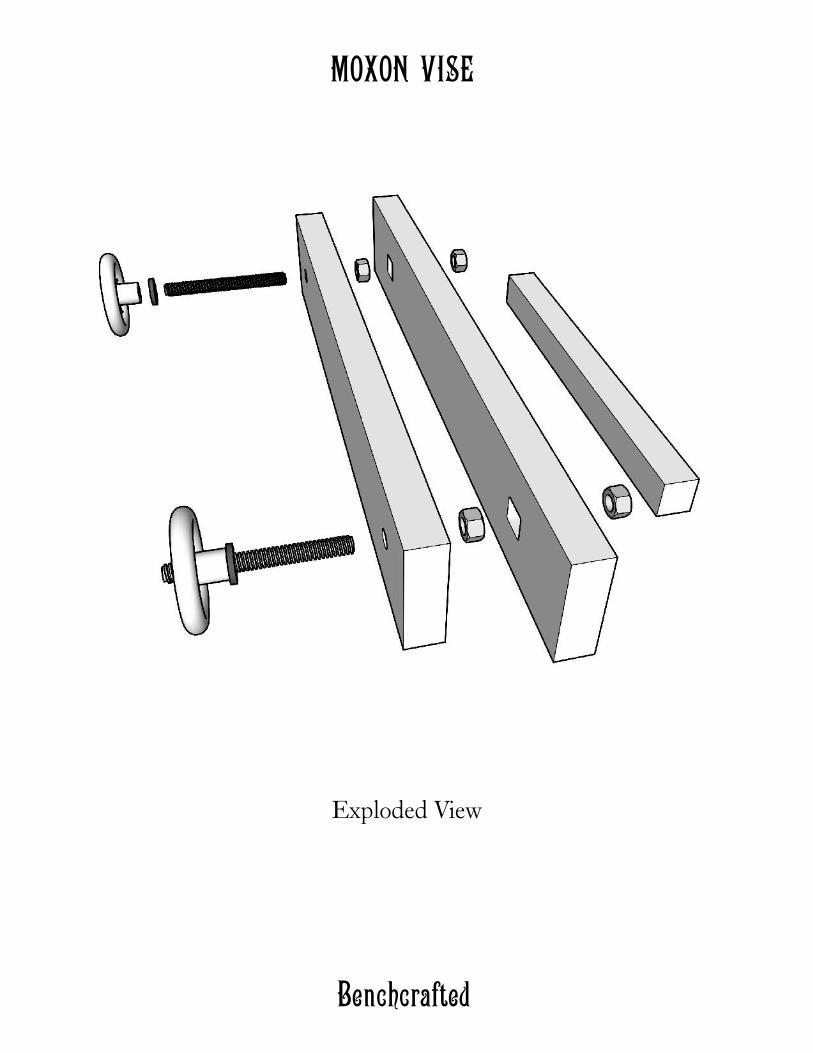
Exploded View
MOXON VISE
Benchcrafted