Movavi VideoSuite pb2img.movavi.com/suite/VideoSuitePDF.pdf · DVD for iPod, Zune, PDA, PSP, and...
31
Movavi VideoSuite User Guide ` Brief overviews and detailed tutorials to get you up and running quickly
Transcript of Movavi VideoSuite pb2img.movavi.com/suite/VideoSuitePDF.pdf · DVD for iPod, Zune, PDA, PSP, and...
MovaviVideoSuite
User Guide`
Brief overviews and detailed tutorials toget you up and running quickly

2
Table of Contents
Table of Contents
3. Introduction to Movavi VideoSuite
4. The Modules.
5. Convert Video DVD: Key Features
6. Convert video/DVD: Convert for iPod
7. Convert video/DVD: Convert for Zune
8. Convert video/DVD: Convert for PSP
9. Convert video/DVD: Convert for PDA.
10. Convert video/DVD: Convert for Cellphone.
11. Convert Video/DVD: Extract a Song from your Favorite Movie on DVD
12. Convert Video/DVD: Merge the Best Parts of your Videos
13. Convert Video/DVD: Create Galleries of Pictures
14. Capture Video: Key Features
15. Capture Video from your DV Camera
16. Video Message: Key Features
17. Video Message: Create Video Postcards from any Footage
18. Video Message: Capture Video from a Webcam and Create a Video Postcard
19. Video Message: Capture Video From a Webcam and Create a Video Postcard
20. Edit Video: Key Features
21. Edit Video: Automatic Filters to Correct Common Problems
22. Edit Video: Professional Filters to Enhance Video Quality
23. Edit Video: How Professional Filters Can Correct Specific Problems
24. Edit Video: Applying Special Effects to your Video
25. Edit Video: Some Ideas to Enhance your Video
26. Split Video: Key Features
27. Create CD/DVD: Key Features
28. Create CD/DVD: Create Data Disc
29. Create CD/DVD: Create Audio Disc
30. Create CD/DVD: Create Video Disc
31. Create CD/DVD: Copy Disc

3
Introduction
Welcome to Movavi VideoSuite - multifunctional video creation,conversion and editing in a single package!
Movavi VideoSuite is perfect for home video processing. It is designed to meet the needsof both experienced and beginning video makers, incorporating a wide range of functionswhile still being easy to use.
Movavi VideoSuite contains six main modules as shown in the screen shot above. It’s easyto switch between modules to complete different tasks.

4
The Modules
Convert Video/DVDConverts video from one format to another; rips DVDs; converts video andDVD for iPod, Zune, PDA, PSP, and mobile phones; saves stills from yourmovies as picture files; extracts soundtracks from your favorite blockbusters.
Capture VideoLets you capture videos from your DV camera and save them on the computeras DV AVI files. You can transfer video from your DV cassette or shoot andcapture video simultaneously.
Edit VideoGives you a wide selection of tools to improve the quality of your videoclips, to repair damaged video or to add artistic effects. You can apply anyeffect to any part of a video.
Split VideoSeparate out a video clip or split files into multiple segments. The uniquevideo trimming technology splits MPEG and AVI files withoutrecompression.
Video MessageCreate video postcards for your friends and family. You can createpersonalized video greeting cards for special occasions and events and sharethem via email or blog.
Create CD/DVDCreate and burn video and audio CDs and DVDs, including widescreenDVDs. Clone, copy and back up DVDs, create data CDs and DVDs, burnDVDs to NTSC or PAL systems, and save video as VIDEO_TS.vob files.

5
Convert Video/DVD
Key Features
Input formats: AVI (DivX, XviD, etc.), VOB, IFO, DVD, MPEG, MPEG4 (iPod, PSP,MP4), 3GPP, 3GPP2, MOV, WMV, ASF.Output formats: FLV, AVI, MPEG (DVD, VCD, SVCD), MPEG4 (iPod, PSP, MP4),3GPP, 3GPP2, MOV, WMV, RM, WAV, MP3, WMA.
o Convert videos between all popular formats.o Rip your DVD and watch your favorite movies on computer, iPod, Zune, PSP or
PDA.o Select and convert segments of a longer movie or DVD.o Batch-convert dozens of video files with just one click.o Merge multiple files in different formats to create one larger video file. Even if
one file is corrupted and can’t be included, the program will automatically skip it.o Extract audio tracks from any video or DVD and save it in MP3, WAV or WMA
format. User the seek slider to mark the audio segment you want, then save it toyour iPod, Zune or cell phone.
o Manually capture any video or DVD frame and save it as a still image.o Use the Gallery feature to automatically capture thousands of pictures. Set the
total number of snapshots (up to 300), capture a picture every determined period oftime (1-30 seconds) or save every frame of your video.

6
Convert Video/DVD
Convert for iPod
Movavi VideoSuite converts your videos and DVDs to iPod-compatible formats quicklyand easily.
To convert for iPod:
1. Select the videos and DVDs you want to convert.To convert just a part of a video file - move the right and left markers of the seekslider to set the segment. You can define segments for each selected video andDVD.
2. In the Devices mode from the drop-down menu select Apple iPod.Two presets are provided for iPod output:
a. 'iPod video, 320*240 (.mp4)'b. 'iPod 5G, 640*480 (.mp4)'.
3. Select the folder where you want to save the converted videos and DVDs.4. Hit the Convert button.
7
Convert Video/DVD
Convert for Zune
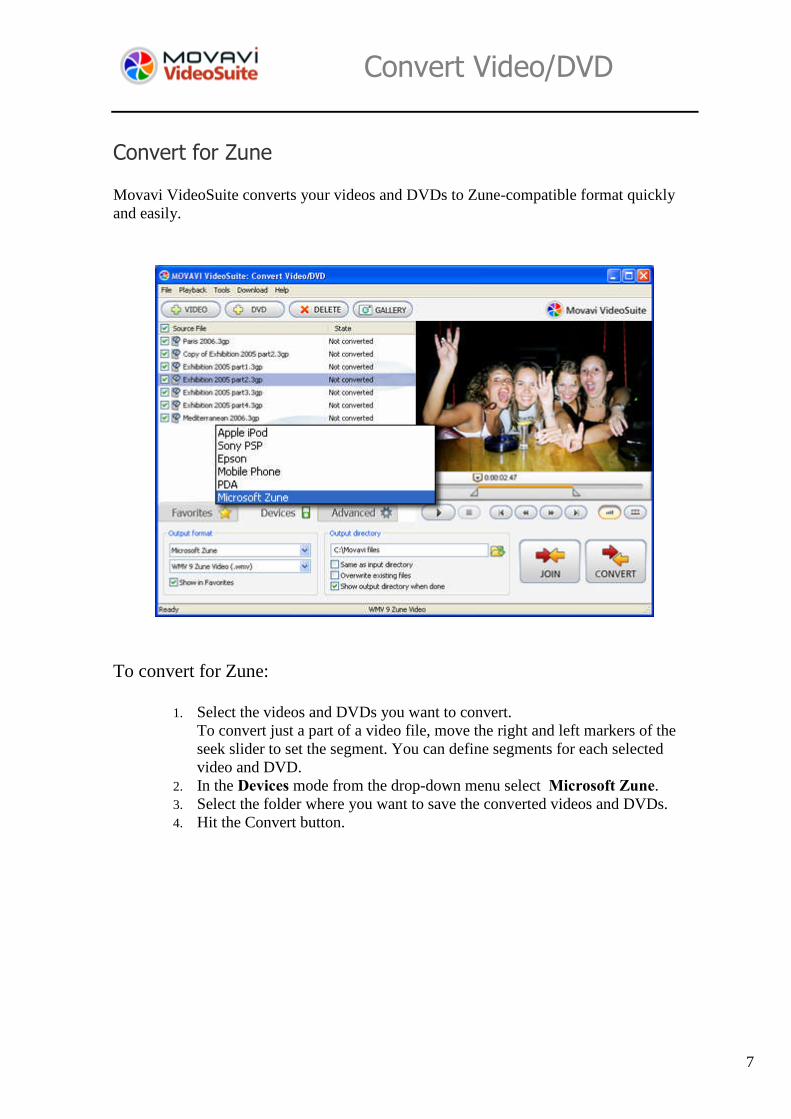
Movavi VideoSuite converts your videos and DVDs to Zune-compatible format quicklyand easily.
To convert for Zune:
1. Select the videos and DVDs you want to convert.To convert just a part of a video file, move the right and left markers of theseek slider to set the segment. You can define segments for each selectedvideo and DVD.
2. In the Devices mode from the drop-down menu select Microsoft Zune.3. Select the folder where you want to save the converted videos and DVDs.4. Hit the Convert button.

8
Convert Video/DVD
Convert for PSP
Movavi VideoSuite converts your videos and DVDs to PSP-compatible format quickly andeasily.
To convert for PSP:
1. Select the videos and DVD you want to convert.To convert just a segment of a video file, move the right and left markers ofthe seek slider to set the segment. You can define segments for each selectedvideo and DVD.
2. In the Devices mode from the drop-down menu select Sony PSP.3. Select the folder where you want to save the converted videos and DVDs.4. Hit the Convert button.

9
Convert Video/DVD
Convert for PDA
Movavi VideoSuite converts your video files to PDA-compatible format quickly andeasily.
To convert for PDA:
1. Select the video or DVD you want to convert.You can convert just a part of the file by moving the right and left markers ofthe seek slider to set the segment.
2. In the Devices mode from the drop-down menu select PDA.3. Select the folder where you want to save converted videos and DVDs.4. Hit the Convert button.

10
Convert Video/DVD
Convert for Cellphone
Movavi VideoSuite quickly and easily converts your video files so you can watch them onyour cellphone.
To convert for cellphones:
1. Select the video files you want to convert.To convert just a segment of a video file, move the right and left markers of theseek slider to set the segment. You can define segments for each movie selected.
2. In the Devices mode from the drop-down menu select Mobile Phone, then selectquality of the output video.
3. Select the folder where you want to save converted videos.4. Hit the Convert button.

11
Convert Video/DVD
Extract a Song from your Favorite Movie or DVD
Movavi VideoSuite lets you extract soundtracks and save them for your iPod, Zune, PSP,PDA, or cellphone.
To extract a song from your DVD:
1) Add the DVD from which you want to extract a song.2) Move the seek slider to quickly preview the movie and find the segment with the song
you want. Move the left and the right marker to set the beginning and the end of thesong.
3) In the Advanced mode for the output format choose:a) 'WAV (Audio only) orb) 'MP3 (Audio only)' orc) 'WMA (Audio only)'.
4) In the lower drop-down menu, select the desired quality for the extracted song; thehigher the quality, the larger the audio file will be.
5) Select a folder where you want to save the extracted song.6) Hit Convert.

12
Convert Video/DVD
Merge the Best Parts of your Videos
With Movavi VideoSuite, you can link together video segments in different formats andsave the longer movie in the desired format.
To merge video segments:
1. Open the files you want to join.You can open as many video files as you need. The videos can be from differentsources and in different formats.
2. Arrange the videos on the list in the desired order.3. For every opened video, select the segment to join by moving the left and right
markers on the seek slider.4. Select an output format.5. Select an output directory.6. Hit the Join button.

13
Convert Video/DVD
Automatically Create Galleries of Pictures
With Movavi VideoSuite you can automatically capture thousands of stills from any videoand save them in BMP, GIF, JPEG, or PNG formats.
To automatically capture still frames from any video:
1. Add the video or DVD from which you want to capture still images.2. Move the left and the right markers of the seek slider to define the video segment
containing the images you want. You can select different fragments from eachadded movie.
3. On the Toolbar, click Gallery to open the Gallery dialog window.4. Define a folder where you want to save the captured images.5. Choose the desired format for the still images.6. Choose the desired capture method
a. Set the total number of pictures to be captured from the selected videosegment; the number can vary from 1 to 300 frames.
b. Capture a picture every defined time interval; the interval can vary from 1to 30 seconds.
c. Capture every frame.7. In the Gallery dialog window, click Start.

14
Capture Video
Capture Video: Key Features
With Movavi VideoSuite, you can transfer video from your DV camera to the computerand capture video from your webcam.
o Save video from your Mini DV cassette as DV-AVI files to the computer.o Rewind and preview footage right inside the program.o Capture any frame as a still image.o Capture video from your webcam.

15
Capture Video
Capture Video from your DV Camera
With Movavi VideoSuite, you can transfer video from your Mini DV cassette to yourcomputer as DV-AVI files.
To capture video from a DV camera:
1. Connect your DV camera to your computer using a FireWire cable.2. Select the folder where you want to save the captured video.3. Preview the video stored on your DV camera and select the starting point of the
segment you want to save to your computer4. Click Start Capture.5. At the end of the segment to be captured, click Stop Capture.
Note: if you capture several video segments while previewing your DV cassette, the resultwill be several discrete DV-AVI files. If you want to link some video segments into onefile, you can do this in the Convert Video/DVD module using the Join feature. Learn howto do this in Merge the Best Parts of your Videos of this tutorial.

16
Video Message
Video Message: Key Features
With Movavi VideoSuite, you can create personalized video postcards and save or sharethem via email, blogs, and more.
o Includes 11 professional and 15 holiday-themed video frameso Supports all popular video formatso Captures video from your webcam and automatically opens it for video postcard
creationo Converts video messages to formats suitable for sharing via email and blogso Automatically sends your video message via emailo Add personal text messages to customize the frameo Apply frames to videos on the flyo 640x480 and 320x240 output options

17
Video Message
Video Message: Create Video Postcards from any Footage
To create a video postcard:
1. Open the video you’d like to use.2. Choose a frame from the Frame box. Your selected video will appear in the
Preview area.3. Choose '320*240' resolution (for smaller size) or '640*480' resolution for better
image quality (but remember that this will create a larger file).4. Type your message in the Text Message area.5. Choose a still shot for your postcard by moving the lower Seek slider.6. Click Start to create your video postcard.
After you've successfully created your video postcard, you can: play the message at your computer; save the message to your computer for future sharing; send the message to your friends right away!

18
Video Message
Capture Video from a Webcam and Create a Video Postcard
Step 1: Capture video from your webcam.
1. Connect your web camera to your computer using a USB cable.2. Select the folder where you want to save your captured video.3. Click Start Capture to start shooting your video greeting. When you’re finished
shooting, click Stop Capture.4. Preview the captured video to decide whether you are happy with it. To do this,
press the Play button.Note: if you are not satisfied with the captured video, just click Start Capture to shootanother video.5. Having shot the video you want to use for your video postcard, click Done. Youvideo will automatically open in the main window of the Video Message module.
19
Video Message
Capture Video from a Webcam and Create a Video Postcard
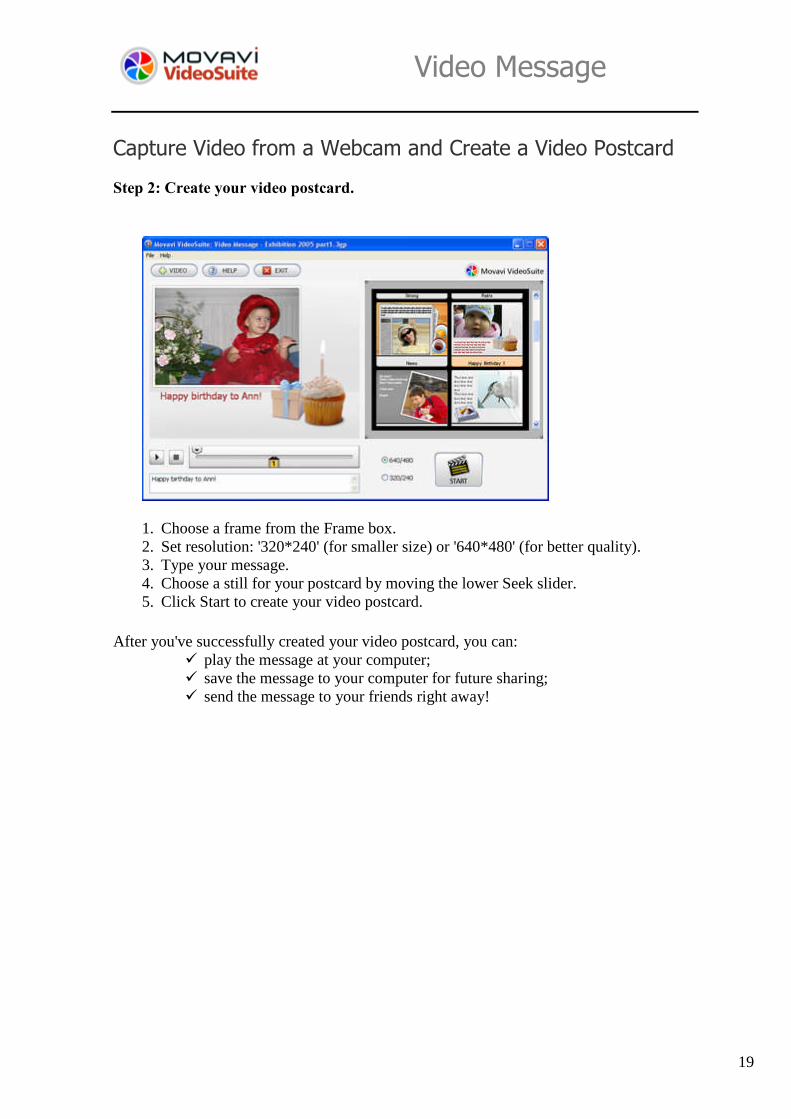
Step 2: Create your video postcard.
1. Choose a frame from the Frame box.2. Set resolution: '320*240' (for smaller size) or '640*480' (for better quality).3. Type your message.4. Choose a still for your postcard by moving the lower Seek slider.5. Click Start to create your video postcard.
After you've successfully created your video postcard, you can: play the message at your computer; save the message to your computer for future sharing; send the message to your friends right away!

20
Edit Video
Edit Video: Key FeaturesWith Movavi VideoSuite, you can apply automatic filters to your videos, makecorrections, and add special effects for a change of mood.
Automatic filters: Magic Enhance automatically balances colors, adjusts brightness and contrast. Auto Contrast calculates the best contrast for frame-enhancing highlights and
shadows Auto Saturation adjusts the color saturation of the entire image. Auto White Balance calculates the best white balance values relative to the
lighting conditions.
Correction filters:Using these filters, you can dramatically improve the quality of your video withoutneeding a degree in movie production.
Deinterlace Brightness Contrast Blur Sharpen Color Temperature Hue/Saturation Gamma Chroma Balance Denoiser Deblocking
Special effectsApplying special effects can turn your video into a completely different production. Try these:
Mosaic Add Noise Posterize Diffuse Greyscale Invert

21
Edit Video
Edit Video: Automatic Filters to Correct Common Problems
These four automatic filters will correct most common problems by analyzing andcalculating the optimum characteristics for your video.
To use automatic filters:
1. In Easy Fix mode, select the filter you want to apply.2. Double click or drag-and-drop its icon to the Preview area.3. The selected filter will be applied and appear in the Applied filters list.4. Hit Save to keep the filter or Delete to remove it and try another one

22
Edit Video
Edit Video: Professional Filters to Enhance Video Quality
Experiment with this range of professional filtering controls to dramatically improvethe quality of your video:
Deinterlace Brightness/Contrast Blur Sharpen Color Temperature Hue/Saturation Gamma Chroma Balance Denoiser Deblocking
To use professional filters:
1. In the Filters mode, select the filter you want to apply.2. Move the Seek Slider markers to select the segment to which to apply the filter.3. Double-click or drag-and-drop its icon into the Preview area.4. By moving the filter's slider, choose the value that provides the best results.5. Preview the result in Split mode.6. Click Save.
23
Edit Video
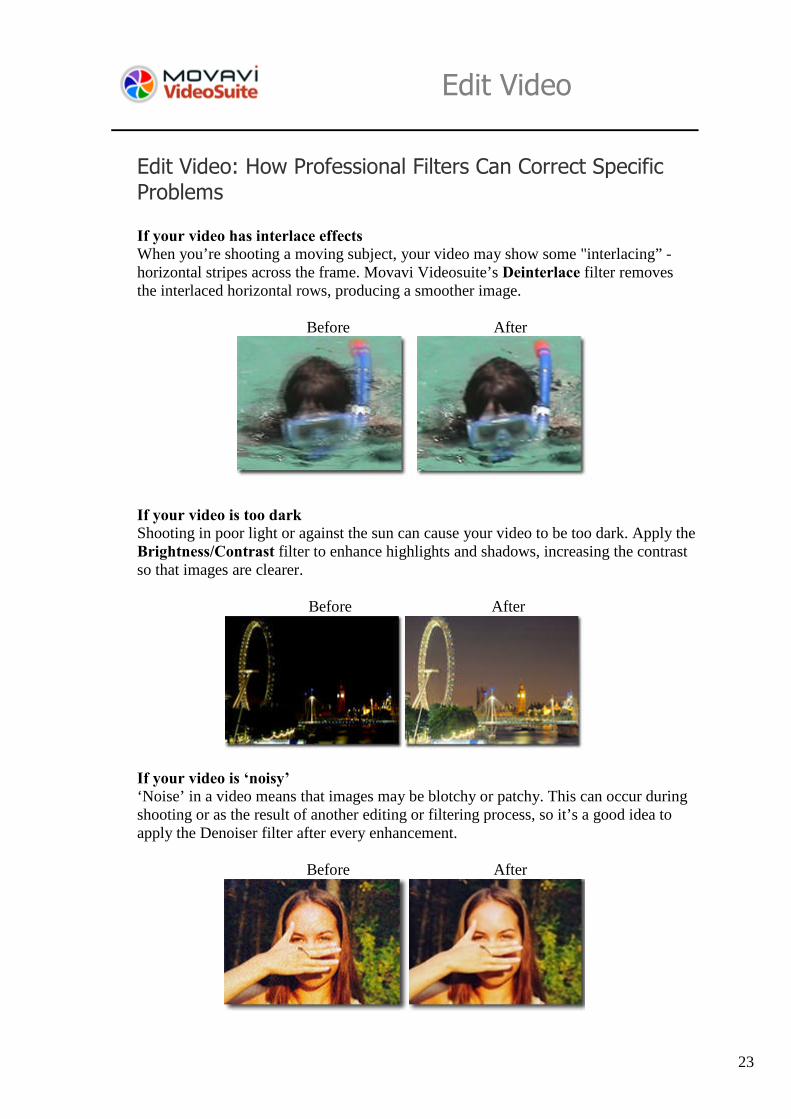
Edit Video: How Professional Filters Can Correct SpecificProblems
If your video has interlace effectsWhen you’re shooting a moving subject, your video may show some "interlacing” -horizontal stripes across the frame. Movavi Videosuite’s Deinterlace filter removesthe interlaced horizontal rows, producing a smoother image.
Before After
If your video is too darkShooting in poor light or against the sun can cause your video to be too dark. Apply theBrightness/Contrast filter to enhance highlights and shadows, increasing the contrastso that images are clearer.
Before After
If your video is ‘noisy’‘Noise’ in a video means that images may be blotchy or patchy. This can occur duringshooting or as the result of another editing or filtering process, so it’s a good idea toapply the Denoiser filter after every enhancement.
Before After

24
Edit Video
Edit Video: Applying Special Effects to your Video
Experiment with different moods and special effects, and completely change the look and feel ofyour video. You can apply one or several effects to achieve the results you want.
To apply special effects:
1. In the Effects mode, select the effect you want to apply.2. Move the Seek Slider markers to select the segment to which to apply the effect.3. Double-click or drag-and-drop its icon to the Preview area.4. Move the filter's slider to select the result you’re looking for.5. Preview the result in Split mode.6. Click Save.

25
Edit Video
Edit Video: Some Ideas to Enhance your Video
Turn your video into a 30’s-style film noirFirst, filter out the color by applying the Greyscale effect, which converts any video intoblack and white. Then, make your video look older with the Add Noise effect. This addsrandom pixels to the video, creating the impression of lower-quality film, as you mightexpect in an old movie.
Mask out details with the Mosaic effect.The Mosaic effect makes your video look as if it's made up of square blocks; the blocksrepresent the colors of pixels in the video. This is the effect often used on television whenfilming criminals and others who don’t want their identities know.
Add sci-fi effectsYou can turn your home movies into futuristic fantasies by applying the Invert effect tocreate a negative effect. Another way to add a hint of mystery to your video is to use thePosterize effect, which lets you adjust the level of brightness to create large flat areas thatcould easily imply a UFO landing.
26
Split Video
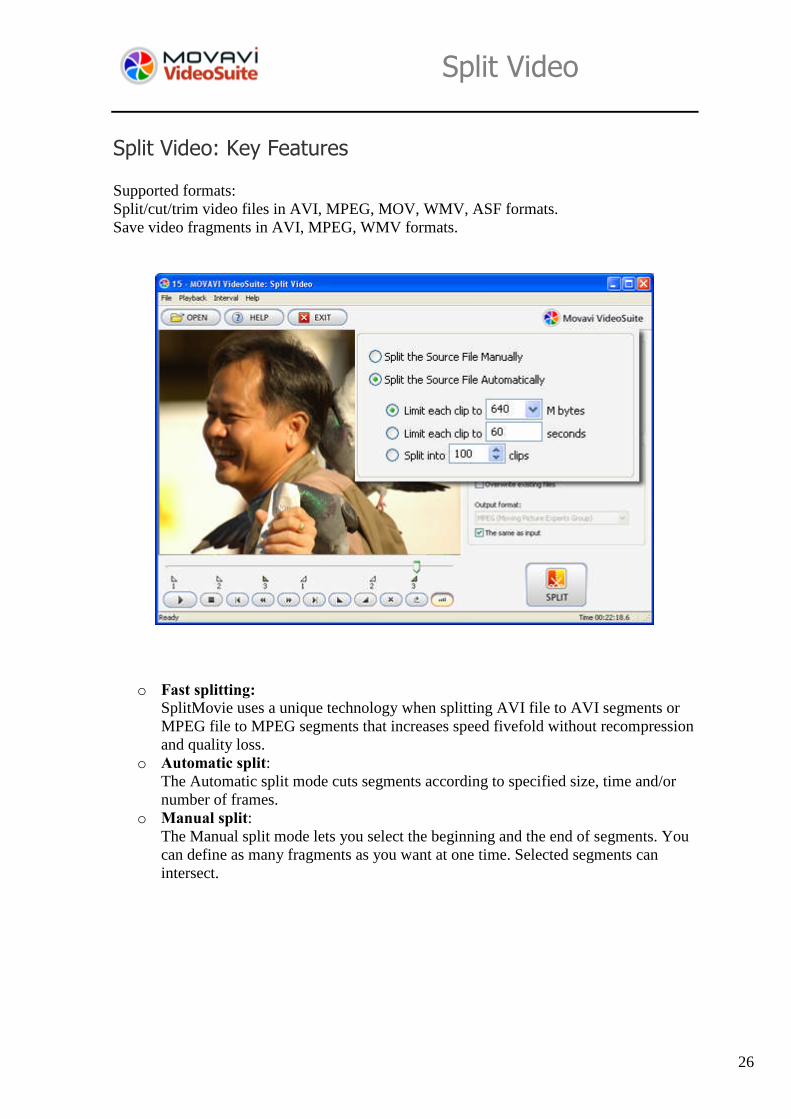
Split Video: Key Features
Supported formats:Split/cut/trim video files in AVI, MPEG, MOV, WMV, ASF formats.Save video fragments in AVI, MPEG, WMV formats.
o Fast splitting:SplitMovie uses a unique technology when splitting AVI file to AVI segments orMPEG file to MPEG segments that increases speed fivefold without recompressionand quality loss.
o Automatic split:The Automatic split mode cuts segments according to specified size, time and/ornumber of frames.
o Manual split:The Manual split mode lets you select the beginning and the end of segments. Youcan define as many fragments as you want at one time. Selected segments canintersect.

27
Create CD/DVD
Create CD/DVD: Key Features
With Movavi VideoSuite you can burn CDs and DVDs, share, back up and copy any ofyour data, audio, or video files.
o Make CDs and DVDs with any kind of content - audio, video, data.o Burn music CDs containing MP3, WMA, and WAV audio files.o Create video CDs (VCD), Super Video CDs (SVCD) and DVDs of popular video
formats: AVI, MPEG, MOV, WMV, ASF.o Preview and edit videos before burningo Add chapters and titles to your DVDs.o Save DVD files to hard disk.o Add files directly from Windows Explorer

28
Create CD/DVD
Create CD/DVD: Create Data Disc
With Movavi VideoSuite, you can create a data disc (CD or DVD) containing any types offile.
To create a data disc:
1. Insert a blank or rewritable CD or DVD.2. Click the Data tab at the top of the window.3. Click the folder button to create a new folder if necessary.4. Drag and drop the required files or folders from your hard drive to the Content
Area. Make sure that the total size of your data does not exceed the capacity of thedisc.
5. Hit the Start button to initiate the Burning/Saving Wizard.6. Choose a drive, select a disc name and a burn speed, and start the burning process.
A progress bar and information status report are displayed as your disc is recorded.

29
Create CD/DVD
Create CD/DVD: Create Audio Disc
With Movavi VideoSuite, you can create an audio CD using any available audio files.
To create an audio disc:
1. Insert a blank or rewritable CD.2. Click the Audio tab at the top of the window.3. Drag and drop the desired audio files or folders from your hard disk into the
Content Area. Make sure that the total size of your data does not exceed thecapacity of your disc.
4. Click the Play/Stop buttons to double-check files before you burn them.5. Click the Start button to initiate the Burning/Saving Wizard.6. Choose a drive, select a disc name and burn speed, and start the burning process. A
progress bar and information status report are displayed as your disc is recorded.

30
Create CD/DVD
Create CD/DVD: Create Video Disc
With Movavi VideoSuite, you can create a video CD or DVD from existing video files.
To create a video disc:
1. Insert a blank or rewritable CD/DVD into the drive.2. Click the Video tab at the top of the window.3. Drag and drop the desired files or folders from your hard disk into the Content
Area.4. Choose the appropriate mode for your video disc: Video CD, Super Video CD or
DVD-Video. Make sure that the total size of your data does not exceed the capacityof your disc.
5. To preview and edit added video before burning, click the Edit button. The EditVideo Dialog appears.
6. If desired, divide the saved video into chapters and automatically enhance itsquality.
7. Click the Start button to initiate the Burning/Saving Wizard.8. Choose a drive, select a disc name and burn speed, and start the burning process. A
progress bar and information status report are displayed as your disc is recorded.

31
Create CD/DVD
Create CD/DVD: Copy Disc
With Movavi VideoSuite, you can copy DVD, creating a new disk that will be an exactcopy of the original DVD without the need for two DVD drives. Do not use this processwith copyrighted materials or other commercial DVDs without the original owner’spermission - it is illegal.
To copy your DVD:
1. Insert the DVD to be copied into the DVD drive.2. Make sure your DVD is recognized by Movavi VideoSuite and its name is
displayed in the Source name box.3. If you want to create a DVD copy, select the Destination drive. If you want to
create a copy on your hard disc, select the folder where the DVD content will besaved.
4. Movavi VideoSuite will automatically create a disc label based on the name ofyour original disk.
5. Press Start.6. Movavi VideoSuite will make a copy of your DVD and ask you to insert a blank
disc into the drive. The original DVD content will be automatically written to thenew blank DVD.