Mordheim In our second installment of Mordheim ...The setting is Mordheim, a city of the Empire...
6
The idea of fighting Warhammer battles with small bands of warriors running about and hiding in the streets of a ruined medieval city opens up vast possibilities for fantastic scenery. As a fantasy landscape, this is something completely new. Players of Warhammer 40,000 and Necromunda have long been used to playing games set in ruined cities, but who would have thought you could do the same thing in an age of swords and sorcery? The setting is Mordheim, a city of the Empire ruined by the impact of a huge meteorite. The city has not been entirely destroyed, but there is a massive crater where part of it used to be. As you go outward from the crater, the buildings become gradually less ruined, varying from totally demolished to areas where only part of a building has been destroyed. leaving the rest of it precariously intact, and on into parts of the city which are only slightly damaged, but deserted and eerie. Here, there are just holes in the roofs and walls made by flying debris and fragments of meteorite. Stone buildings survive better than timber ones and often the stone built lower stories of buildings still stand, while the rest has been destroyed. This then is the setting we should aim to recreate for our games of Mordheim. The entire battlefield (an area 4x4', suitable for a skirmish game) needs to be covered in ruined buildings, separated by streets. To make the battlefield interesting, the streets need to be narrow and winding, opening up now and again into a square or market place. There must be open areas between the cover for the models to run and shoot across, but the battlefield should create the cramped and menacing atmosphere of a fantasy medieval city. The key to creating a Mordheim battlefield is the style of the buildings. Ideally we want a lot of different buildings, such as houses, shops, taverns, workshops, temples, stables, archways, ruins, towers, graveyards, docks and anything else we could think of that might be found in Mordheim. They should look as if they were built of stone or timber or a mixture of both, and all be ruined to varying extents so that it is possible to move models into them. The doors and windows should be open to permit models to enter and shoot. There should be several In our second installment of Mordheim Architecture, Nigel Stillman explains just how easy it can be to make your own ruined buildings for your battles in the City of the Damned. 123 Mordheim Architecture By Nigel Stillman
Transcript of Mordheim In our second installment of Mordheim ...The setting is Mordheim, a city of the Empire...
The idea of fighting Warhammer battles withsmall bands of warriors running about andhiding in the streets of a ruined medieval cityopens up vast possibilities for fantastic scenery.As a fantasy landscape, this is somethingcompletely new. Players of Warhammer 40,000and Necromunda have long been used toplaying games set in ruined cities, but whowould have thought you could do the samething in an age of swords and sorcery?
The setting is Mordheim, a city of the Empireruined by the impact of a huge meteorite. Thecity has not been entirely destroyed, but thereis a massive crater where part of it used to be.As you go outward from the crater, thebuildings become gradually less ruined,varying from totally demolished to areas whereonly part of a building has been destroyed.leaving the rest of it precariously intact, and oninto parts of the city which are only slightlydamaged, but deserted and eerie. Here, thereare just holes in the roofs and walls made byflying debris and fragments of meteorite. Stonebuildings survive better than timber ones andoften the stone built lower stories of buildingsstill stand, while the rest has been destroyed.This then is the setting we should aim torecreate for our games of Mordheim.
The entire battlefield (an area 4x4', suitable fora skirmish game) needs to be covered in ruinedbuildings, separated by streets. To make thebattlefield interesting, the streets need to benarrow and winding, opening up now andagain into a square or market place. Theremust be open areas between the cover for themodels to run and shoot across, but thebattlefield should create the cramped and menacing atmosphere of a fantasy medieval city.
The key to creating a Mordheim battlefield isthe style of the buildings. Ideally we want a lotof different buildings, such as houses, shops,taverns, workshops, temples, stables,archways, ruins, towers, graveyards, docks andanything else we could think of that might befound in Mordheim. They should look as ifthey were built of stone or timber or a mixtureof both, and all be ruinedto varying extents sothat it is possible tomove models intothem. The doors andwindows should beopen to permit modelsto enter and shoot.There should be several
In our second installment ofMordheim Architecture, NigelStillman explains just how easy itcan be to make your own ruinedbuildings for your battles in theCity of the Damned.
123
MordheimArchitecture
By Nigel Stillman
floors partly remaining so that troops can be placedon different levels.
The buildings should also feature overhanging upperstoreys, tall chimneys, high pitched roofs, balconies,archways and anything else you can think of, and beembellished with such things as grotesque gargoyles,tavern signs or lamps. The buildings should reallylook like they belong in the townscape of a JohnBlanche painting!
MaterialsTo construct the buildings we used for playtestingMordheim I used foamboard. This is available from artand craft shops. It consists of two sheets of thin whitecardboard with a thin layer of polystyrene foam inbetween. It is easy to cut with a modelling knife, andis quite strong even though it is very light.
Other materials which could be used instead of thisare cardboard packaging of the sort which has twolayers of thin brown card with corrugated card inbetween (like GW Mail Order boxes! – Fat Bloke),polystyrene ceiling tiles (which must be painted withtextured paint before spraying so as not to melt thefoam), balsa wood or thin card like that fromcornflake packets would all be viable alternatives.Each of these materials has strengths and weaknessesfor modelling, so it’s worth experimenting.
The buildings which Imade were constructedentirely from foamboard,but you could use a stronger,heavier material such as MDF board, hardboard orcork tile for the bases. By having a heavy base abuilding can overhang without falling over.
ConstructionTo make the buildings I cut out the shapes I wantedfrom the sheets of foamboard using a modellingknife. I drew the shapes on the foamboardbeforehand. It’s good practice to have a rough idea ofwhat the building will look like and work out whatshapes will be needed to make each storey. Theseshapes were basically squares and rectangles of astandard size. I cut strips about 2" high and 12" longthat were then scored and bent at right angles tocreate walls of buildings. Then I cut rectangles orsquares varying from 4" square to 6" square to beused as bases, floors and roofs. I also cut out extrashapes 2" high and varying lengths to be the insidewalls of the buildings. This 2" height is the minimumheight for each storey – any less and the buildingsmay begin to look a little too small, and moreimportantly, your models won’t fit inside. You couldmake them higher than 2" or even vary the height ofthe storeys within a single building.
When I had a pile of varying shapes I beganconstructing buildings. I made them up as I wentalong. To fix each of the pieces together I put PVAglue on the edges I wanted to join together and thenpinned them with ordinary pins. The foamboard iseasy to pin in this way and the assembled pieces areheld together firmly while the glue dries, enablingyou to work quite rapidly.
I assembled thebuildings storey bystorey. First I took a2x12" strip andscored it in twoplaces, then bent italong the scorelines. This createdthree 2x4" walls.Then I cut a door inone wall, andwindows in theothers. I bent thescored sectionaround to createthree sides of asquare with the finalside left open. I thencut the edges of theopen side to give aruined effect.
123
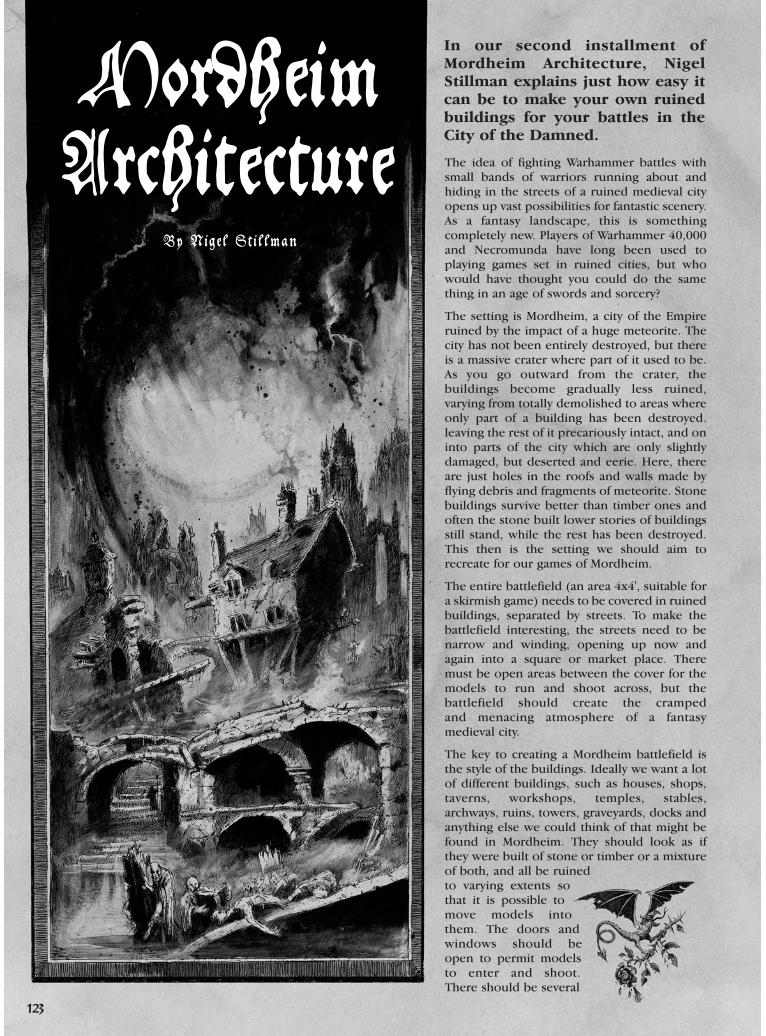
This is one of the finished basic buildings. It was easy andfun to build and took very little time to do. The morecomplex buildings use exactly the same techniques but justa little more patience.
Constructing Basic Buildings
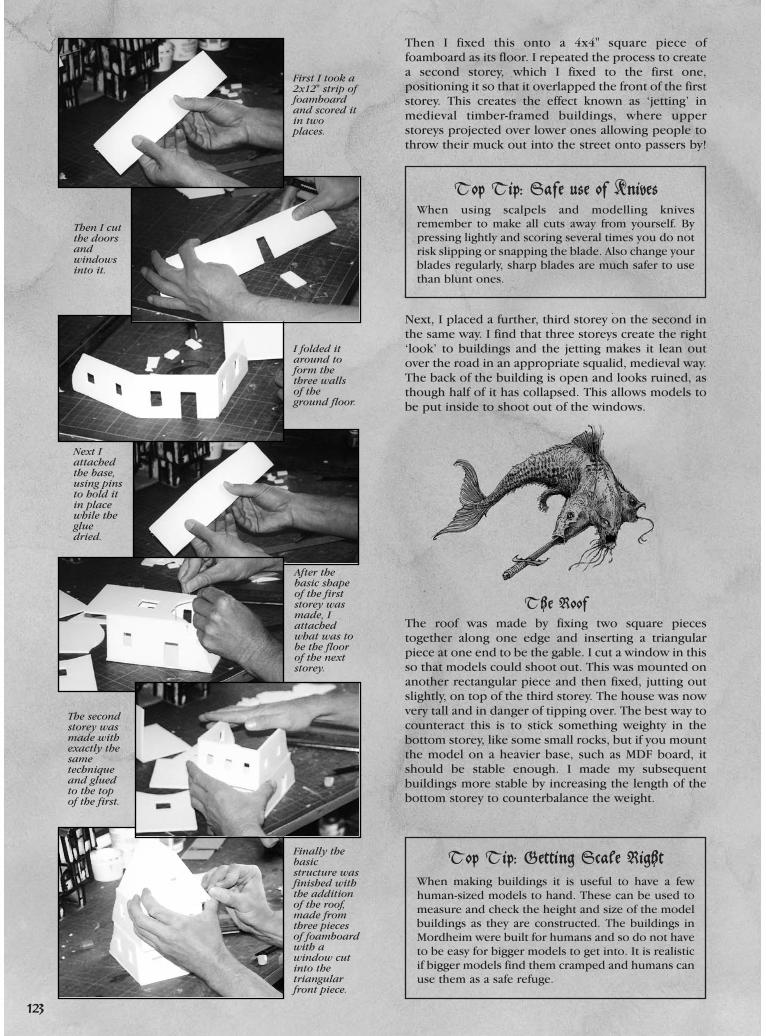
Then I fixed this onto a 4x4" square piece offoamboard as its floor. I repeated the process to createa second storey, which I fixed to the first one,positioning it so that it overlapped the front of the firststorey. This creates the effect known as ‘jetting’ inmedieval timber-framed buildings, where upperstoreys projected over lower ones allowing people tothrow their muck out into the street onto passers by!
Next, I placed a further, third storey on the second inthe same way. I find that three storeys create the right‘look’ to buildings and the jetting makes it lean outover the road in an appropriate squalid, medieval way.The back of the building is open and looks ruined, asthough half of it has collapsed. This allows models tobe put inside to shoot out of the windows.
The RoofThe roof was made by fixing two square piecestogether along one edge and inserting a triangularpiece at one end to be the gable. I cut a window in thisso that models could shoot out. This was mounted onanother rectangular piece and then fixed, jutting outslightly, on top of the third storey. The house was nowvery tall and in danger of tipping over. The best way tocounteract this is to stick something weighty in thebottom storey, like some small rocks, but if you mountthe model on a heavier base, such as MDF board, itshould be stable enough. I made my subsequentbuildings more stable by increasing the length of thebottom storey to counterbalance the weight.
Top Tip: Getting Scale Right
When making buildings it is useful to have a fewhuman-sized models to hand. These can be used tomeasure and check the height and size of the modelbuildings as they are constructed. The buildings inMordheim were built for humans and so do not haveto be easy for bigger models to get into. It is realisticif bigger models find them cramped and humans canuse them as a safe refuge.
Top Tip: Safe use of KnivesWhen using scalpels and modelling knivesremember to make all cuts away from yourself. Bypressing lightly and scoring several times you do notrisk slipping or snapping the blade. Also change yourblades regularly, sharp blades are much safer to usethan blunt ones.
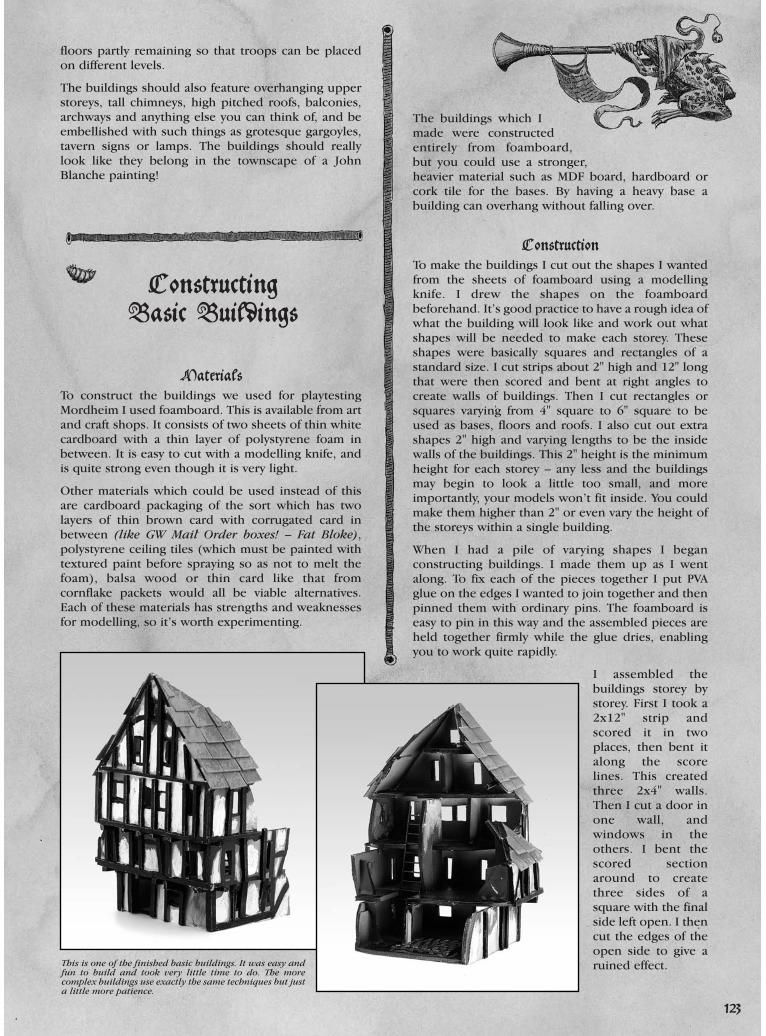
Then I cutthe doorsandwindowsinto it.
Next Iattachedthe base,using pinsto hold itin placewhile thegluedried.
After thebasic shapeof the firststorey wasmade, Iattachedwhat was tobe the floorof the nextstorey.
The secondstorey wasmade withexactly thesametechniqueand gluedto the topof the first.
Finally thebasicstructure wasfinished withthe additionof the roof,made fromthree piecesof foamboardwith awindow cutinto thetriangularfront piece.
First I took a2x12" strip offoamboardand scored itin twoplaces.
I folded itaround toform thethree wallsof theground floor.
123
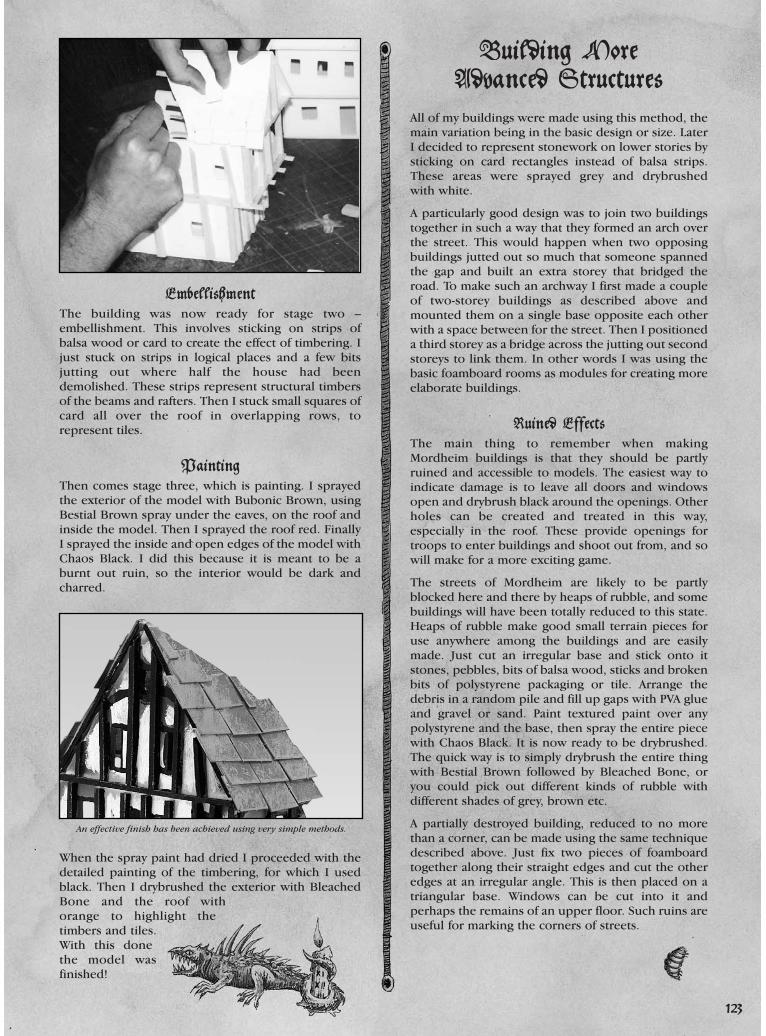
EmbellishmentThe building was now ready for stage two –embellishment. This involves sticking on strips ofbalsa wood or card to create the effect of timbering. Ijust stuck on strips in logical places and a few bitsjutting out where half the house had beendemolished. These strips represent structural timbersof the beams and rafters. Then I stuck small squares ofcard all over the roof in overlapping rows, torepresent tiles.
PaintingThen comes stage three, which is painting. I sprayedthe exterior of the model with Bubonic Brown, usingBestial Brown spray under the eaves, on the roof andinside the model. Then I sprayed the roof red. FinallyI sprayed the inside and open edges of the model withChaos Black. I did this because it is meant to be aburnt out ruin, so the interior would be dark andcharred.
When the spray paint had dried I proceeded with thedetailed painting of the timbering, for which I usedblack. Then I drybrushed the exterior with BleachedBone and the roof withorange to highlight thetimbers and tiles.With this donethe model wasfinished!
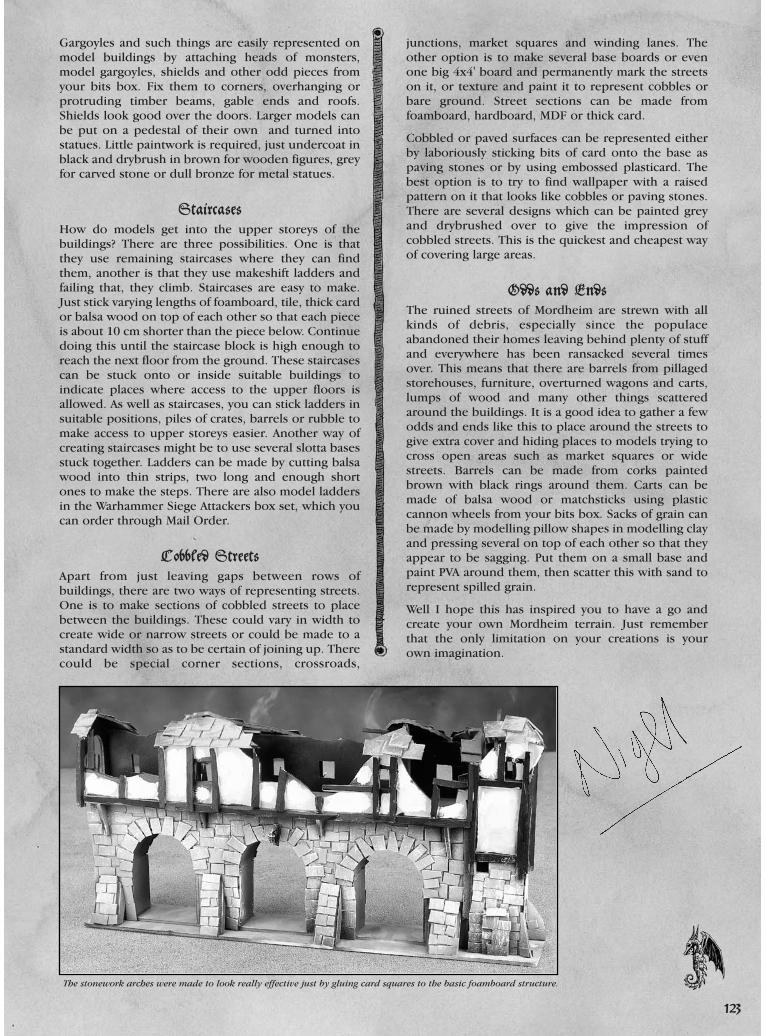
All of my buildings were made using this method, themain variation being in the basic design or size. LaterI decided to represent stonework on lower stories bysticking on card rectangles instead of balsa strips.These areas were sprayed grey and drybrushed with white.
A particularly good design was to join two buildingstogether in such a way that they formed an arch overthe street. This would happen when two opposingbuildings jutted out so much that someone spannedthe gap and built an extra storey that bridged theroad. To make such an archway I first made a coupleof two-storey buildings as described above andmounted them on a single base opposite each otherwith a space between for the street. Then I positioneda third storey as a bridge across the jutting out secondstoreys to link them. In other words I was using thebasic foamboard rooms as modules for creating moreelaborate buildings.
Ruined EffectsThe main thing to remember when makingMordheim buildings is that they should be partlyruined and accessible to models. The easiest way toindicate damage is to leave all doors and windowsopen and drybrush black around the openings. Otherholes can be created and treated in this way,especially in the roof. These provide openings fortroops to enter buildings and shoot out from, and sowill make for a more exciting game.
The streets of Mordheim are likely to be partlyblocked here and there by heaps of rubble, and somebuildings will have been totally reduced to this state.Heaps of rubble make good small terrain pieces foruse anywhere among the buildings and are easilymade. Just cut an irregular base and stick onto itstones, pebbles, bits of balsa wood, sticks and brokenbits of polystyrene packaging or tile. Arrange thedebris in a random pile and fill up gaps with PVA glueand gravel or sand. Paint textured paint over anypolystyrene and the base, then spray the entire piecewith Chaos Black. It is now ready to be drybrushed.The quick way is to simply drybrush the entire thingwith Bestial Brown followed by Bleached Bone, oryou could pick out different kinds of rubble withdifferent shades of grey, brown etc.
A partially destroyed building, reduced to no morethan a corner, can be made using the same techniquedescribed above. Just fix two pieces of foamboardtogether along their straight edges and cut the otheredges at an irregular angle. This is then placed on atriangular base. Windows can be cut into it andperhaps the remains of an upper floor. Such ruins areuseful for marking the corners of streets.
123
Building More Advanced Structures
An effective finish has been achieved using very simple methods.
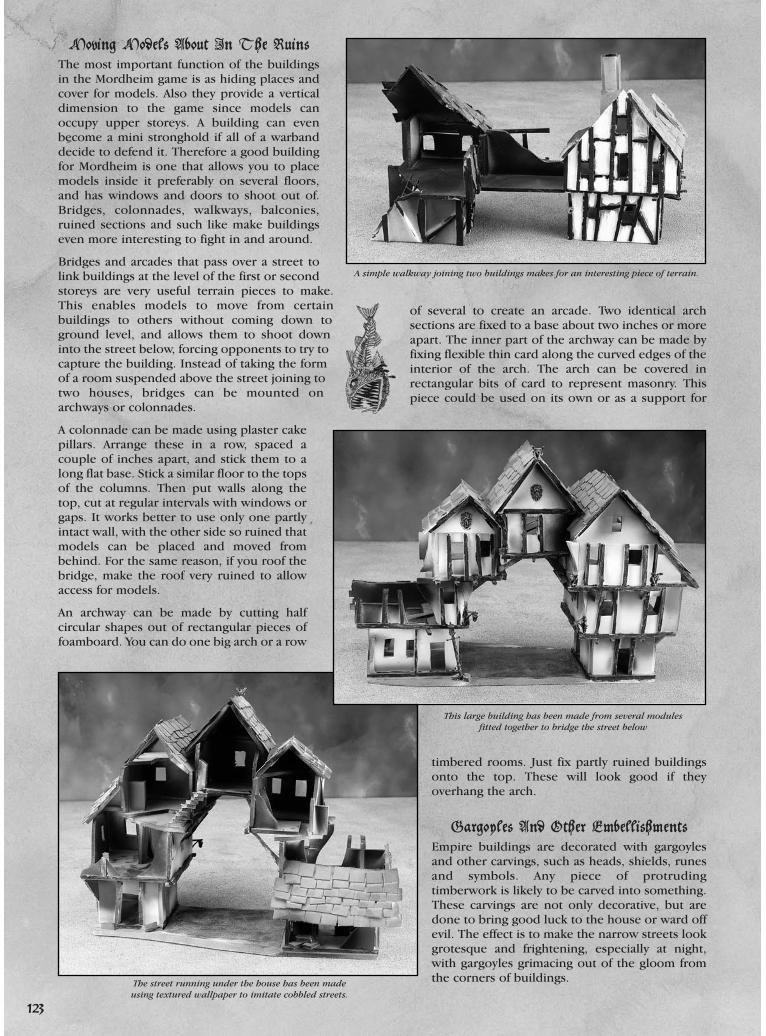
Moving Models About In The RuinsThe most important function of the buildingsin the Mordheim game is as hiding places andcover for models. Also they provide a verticaldimension to the game since models canoccupy upper storeys. A building can evenbecome a mini stronghold if all of a warbanddecide to defend it. Therefore a good buildingfor Mordheim is one that allows you to placemodels inside it preferably on several floors,and has windows and doors to shoot out of.Bridges, colonnades, walkways, balconies,ruined sections and such like make buildingseven more interesting to fight in and around.
Bridges and arcades that pass over a street tolink buildings at the level of the first or secondstoreys are very useful terrain pieces to make.This enables models to move from certainbuildings to others without coming down toground level, and allows them to shoot downinto the street below, forcing opponents to try tocapture the building. Instead of taking the formof a room suspended above the street joining totwo houses, bridges can be mounted onarchways or colonnades.
A colonnade can be made using plaster cakepillars. Arrange these in a row, spaced acouple of inches apart, and stick them to along flat base. Stick a similar floor to the topsof the columns. Then put walls along thetop, cut at regular intervals with windows orgaps. It works better to use only one partlyintact wall, with the other side so ruined thatmodels can be placed and moved frombehind. For the same reason, if you roof thebridge, make the roof very ruined to allowaccess for models.
An archway can be made by cutting halfcircular shapes out of rectangular pieces offoamboard. You can do one big arch or a row
of several to create an arcade. Two identical archsections are fixed to a base about two inches or moreapart. The inner part of the archway can be made byfixing flexible thin card along the curved edges of theinterior of the arch. The arch can be covered inrectangular bits of card to represent masonry. Thispiece could be used on its own or as a support for
timbered rooms. Just fix partly ruined buildingsonto the top. These will look good if theyoverhang the arch.
Gargoyles And Other EmbellishmentsEmpire buildings are decorated with gargoylesand other carvings, such as heads, shields, runesand symbols. Any piece of protrudingtimberwork is likely to be carved into something.These carvings are not only decorative, but aredone to bring good luck to the house or ward offevil. The effect is to make the narrow streets lookgrotesque and frightening, especially at night,with gargoyles grimacing out of the gloom fromthe corners of buildings.
This large building has been made from several modulesfitted together to bridge the street below
The street running under the house has been madeusing textured wallpaper to imitate cobbled streets.
123
A simple walkway joining two buildings makes for an interesting piece of terrain.
Gargoyles and such things are easily represented onmodel buildings by attaching heads of monsters,model gargoyles, shields and other odd pieces fromyour bits box. Fix them to corners, overhanging orprotruding timber beams, gable ends and roofs.Shields look good over the doors. Larger models canbe put on a pedestal of their own and turned intostatues. Little paintwork is required, just undercoat inblack and drybrush in brown for wooden figures, greyfor carved stone or dull bronze for metal statues.
StaircasesHow do models get into the upper storeys of thebuildings? There are three possibilities. One is thatthey use remaining staircases where they can findthem, another is that they use makeshift ladders andfailing that, they climb. Staircases are easy to make.Just stick varying lengths of foamboard, tile, thick cardor balsa wood on top of each other so that each pieceis about 10 cm shorter than the piece below. Continuedoing this until the staircase block is high enough toreach the next floor from the ground. These staircasescan be stuck onto or inside suitable buildings toindicate places where access to the upper floors isallowed. As well as staircases, you can stick ladders insuitable positions, piles of crates, barrels or rubble tomake access to upper storeys easier. Another way ofcreating staircases might be to use several slotta basesstuck together. Ladders can be made by cutting balsawood into thin strips, two long and enough shortones to make the steps. There are also model laddersin the Warhammer Siege Attackers box set, which youcan order through Mail Order.
Cobbled StreetsApart from just leaving gaps between rows ofbuildings, there are two ways of representing streets.One is to make sections of cobbled streets to placebetween the buildings. These could vary in width tocreate wide or narrow streets or could be made to astandard width so as to be certain of joining up. Therecould be special corner sections, crossroads,
junctions, market squares and winding lanes. Theother option is to make several base boards or evenone big 4x4' board and permanently mark the streetson it, or texture and paint it to represent cobbles orbare ground. Street sections can be made fromfoamboard, hardboard, MDF or thick card.
Cobbled or paved surfaces can be represented eitherby laboriously sticking bits of card onto the base aspaving stones or by using embossed plasticard. Thebest option is to try to find wallpaper with a raisedpattern on it that looks like cobbles or paving stones.There are several designs which can be painted greyand drybrushed over to give the impression ofcobbled streets. This is the quickest and cheapest wayof covering large areas.
Odds and EndsThe ruined streets of Mordheim are strewn with allkinds of debris, especially since the populaceabandoned their homes leaving behind plenty of stuffand everywhere has been ransacked several timesover. This means that there are barrels from pillagedstorehouses, furniture, overturned wagons and carts,lumps of wood and many other things scatteredaround the buildings. It is a good idea to gather a fewodds and ends like this to place around the streets togive extra cover and hiding places to models trying tocross open areas such as market squares or widestreets. Barrels can be made from corks paintedbrown with black rings around them. Carts can bemade of balsa wood or matchsticks using plasticcannon wheels from your bits box. Sacks of grain canbe made by modelling pillow shapes in modelling clayand pressing several on top of each other so that theyappear to be sagging. Put them on a small base andpaint PVA around them, then scatter this with sand torepresent spilled grain.
Well I hope this has inspired you to have a go andcreate your own Mordheim terrain. Just rememberthat the only limitation on your creations is your own imagination.
The stonework arches were made to look really effective just by gluing card squares to the basic foamboard structure.
123