Monet s water lilies€¦ · · 2018-02-12MONET’S WATER LILIES. ... read the book and point out...
12
value painting & paper craft Monet’s water lilies DEEP SPACE TWO @ 40-MINUTE ART SESSIONS
Transcript of Monet s water lilies€¦ · · 2018-02-12MONET’S WATER LILIES. ... read the book and point out...
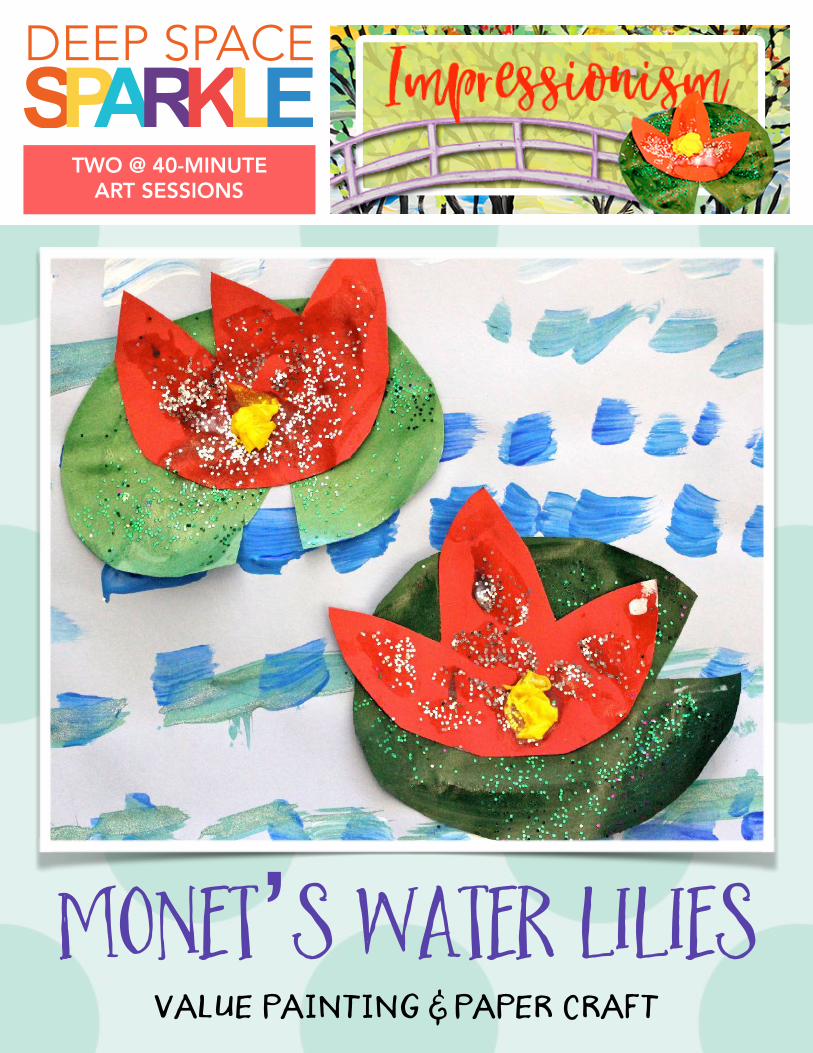
value painting & paper craft
Monet’s water lilies
DEEP SPACE
TWO @ 40-MINUTE ART SESSIONS

D E E P S P A C E S P A R K L E & T H E M E M B E R S C L U B !2
Here's what You'll Need:
12” x 9” light blue or lilac
paper
Black oil pastel or crayon
Liquid tempera paints: blue,
white, green, purple
Assorted pieces of 5” x 5”
paper scraps (green and pink)
Tissue paper
White school glue
Mod-Podge
Scissors
Monet’s water lilies are ethereal and serene. How
did Monet create this feeling? With lots of colors
and short brush strokes to mimic the colors in his
Japanese water garden.
This lesson combines painting techniques with a
little crafting.
MONET’S WATER LILIES

D E E P S P A C E S P A R K L E & T H E M E M B E R S C L U B !3
The Magical Garden of Claude
Monet is a perfect book in which to
accompany this lesson.
Beautifully illustrated with just the
right amount of text, children are
transported to Monet’s garden and
Lily Pond. They are on the lookout for
Monet’s magical lily pad; the star of
this lesson.
The children sit on the floor while I
read the book and point out Monet’s
art posters. Like with all the books I
read during art, I talk about the
illustrations and use of technique
throughout the book.
Once we finished reading, I quickly
demonstrate the process for making
the lily pad and the shimmering
water….
Monet was a master of painting light.
He studied art extensively especially
the technique en plein air which
means studying the light outdoors. His garden was his favorite spot to paint. he owned many
botanical books and created several gardens.
About claude monet
D E E P S P A C E S P A R K L E & T H E M E M B E R S C L U B !4
• To make the lily and lily pads, use the
templates provided or draw a lily pad from the
handout. For my students, I used templates as I
had little time to complete the entire lesson (just
45 minutes). If you have longer, you can chose
which method you prefer.
• Simply trace templates onto colored paper
and then cut out. With a brush, dip into a
container of glue and water mixture (4 parts glue
to 1 part water). You can also use Mod-Podge.
• Sprinkle glitter over glue and shake away. I
offer the children the choice of adding glitter to the lily and/or the pad.
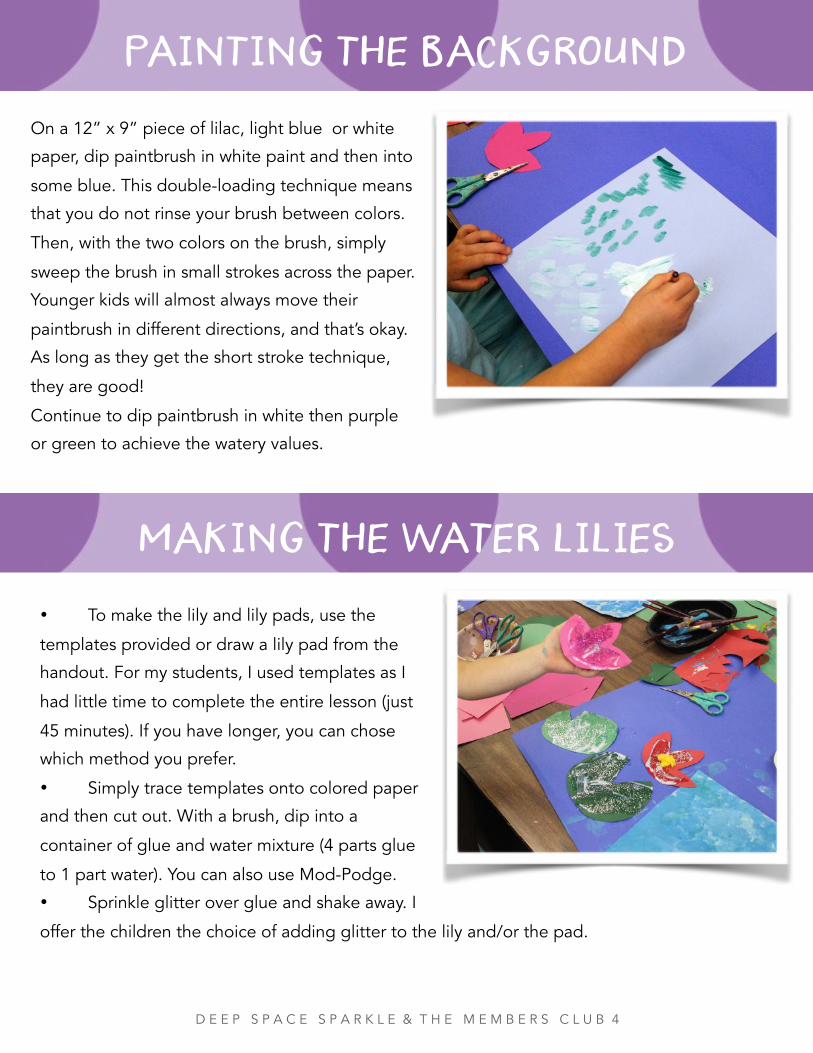
On a 12” x 9” piece of lilac, light blue or white
paper, dip paintbrush in white paint and then into
some blue. This double-loading technique means
that you do not rinse your brush between colors.
Then, with the two colors on the brush, simply
sweep the brush in small strokes across the paper.
Younger kids will almost always move their
paintbrush in different directions, and that’s okay.
As long as they get the short stroke technique,
they are good!
Continue to dip paintbrush in white then purple
or green to achieve the watery values.
painting the background
making the water lilies
D E E P S P A C E S P A R K L E & T H E M E M B E R S C L U B !5
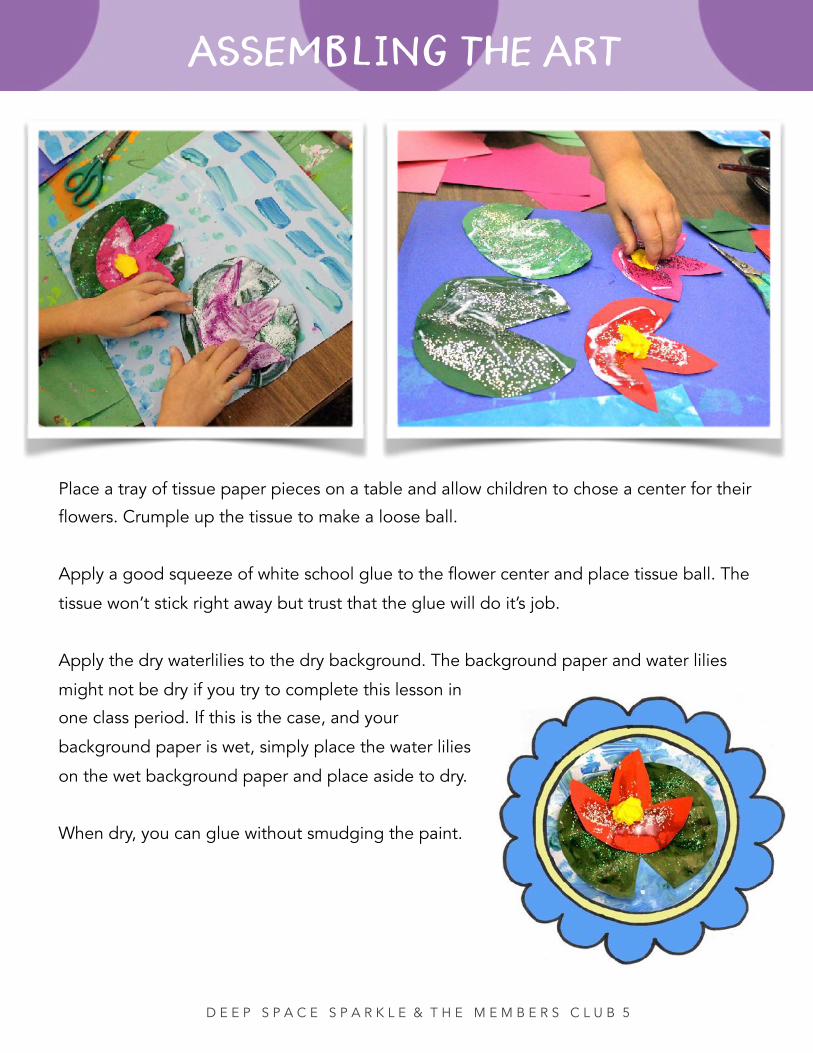
assembling the art
Place a tray of tissue paper pieces on a table and allow children to chose a center for their
flowers. Crumple up the tissue to make a loose ball.
Apply a good squeeze of white school glue to the flower center and place tissue ball. The
tissue won’t stick right away but trust that the glue will do it’s job.
Apply the dry waterlilies to the dry background. The background paper and water lilies
might not be dry if you try to complete this lesson in
one class period. If this is the case, and your
background paper is wet, simply place the water lilies
on the wet background paper and place aside to dry.
When dry, you can glue without smudging the paint.

D E E P S P A C E S P A R K L E & T H E M E M B E R S C L U B !6
water lily template

D E E P S P A C E S P A R K L E & T H E M E M B E R S C L U B !7
kindergarten & first grade water lilies

D E E P S P A C E S P A R K L E & T H E M E M B E R S C L U B !8
circle the supplies used in this art project
I LIKE MY ART BECAUSE…
I USED THESE SUPPLIES:
MY NAME IS:

D E E P S P A C E S P A R K L E & T H E M E M B E R S C L U B !9
CREATING Generate and conceptualize artistic ideas and work — Imaginative play with materials—
art-making in response to an artistic problem.
Organize and develop artistic ideas and work — Experiment to build skills in art-making—
identify safe and non-toxic materials-create art of different environments
Refine and complete artistic work—Explain process while creating art
Presenting/producing Analyze, interpret and select artistic work for presentation— explain why artwork is
chosen for portfolio or personal display
Develop and refine artistic work for presentation — explain the purpose of a portfolio or
collection
Convey meaning through the presentation of artistic work — explain what an art museum
is and why it is different from other buildings
Responding Perceive and analyze artistic work- identify uses of art within one’s personal environment-
describe what an image represents Interpret intent and meaning in artistic work — interpret art by identifying subject matter
and describing relevant details
Apply criteria to evaluate artistic work— explain reasons for selecting a preferred artwork
Connecting Synthesize and relate knowledge and personal experiences to make art- create art that
tells a story about a life experience Relate artistic ideas and works with societal, cultural and historical context to deepen understanding —create art that tells a story about a life experience
NATIONAL CORE ARTS STANDARDS-kindergarten
X
X
X
X
X
X
X
X
D E E P S P A C E S P A R K L E & T H E M E M B E R S C L U B !10
CREATING Generate and conceptualize artistic ideas and work — Collaboratively use imaginative play
with materials—use observations to prepare for artwork
Organize and develop artistic ideas and work — Explore materials to create artwork—
demonstrate safe & proper procedures—identify and classify through drawing
Refine and complete artistic work—use art vocabulary to describe choices in art-making
Presenting/producing Analyze, interpret and select artistic work for presentation— explain why some objects,
artifacts and artwork are valued over others
Develop and refine artistic work for presentation — ask and answer questions of where,
when, why and how artwork should be prepared for presentation/preservation.
Convey meaning through the presentation of artistic work — identify the roles and
responsibilities of people who work in museums and art settings
Responding Perceive and analyze artistic work- select art that illustrates daily life experiences to others
—compare images that represent the same object. Interpret intent and meaning in artistic work — interpret art by categorizing subject matter
and identifying the characteristics of form
Apply criteria to evaluate artistic work— classify artwork based on different reasons for
preferences
Connecting Synthesize and relate knowledge and personal experiences to make art- identify times,
places and reasons by which students make art outside school Relate artistic ideas and works with societal, cultural and historical context to deepen understanding —identify times, places and reasons by which students make art outside
school
NATIONAL CORE ARTS STANDARDS-FIRST GRADE
X
X
X
X
X
X
X
X
X

D E E P S P A C E S P A R K L E & T H E M E M B E R S C L U B !11
• Today I will learn about VALUE, so that I CAN paint using colors in a similar way to Monet by combining white with blue and/or green to achieve water-like values (light and dark).
• Today I will learn about ORGANIC SHAPES, so that I CAN draw or trace water lilies and pads.
• Today I will learn about MIXED MEDIA, so that I CAN create a Monet Water Lily collage using paint, scrap paper, tissue paper, glue, and glitter.
Common Core STANDARDS for monet water lilies
CCSS.ELA-Literacy.RL.K.7 With prompting and support, describe the relationship between illustrations and the story in
which they appear (e.g., what moment in a story an illustration depicts).
As you read through the story, you can have students talk about the illustrations and why
they were picked to go with that part of the text.
CCSS.ELA-Literacy.SL.K.2 Confirm understanding of a text read aloud or information presented orally or through other
media by asking and answering questions about key details and requesting clarification if
something is not understood.
After reading The Magical Garden of Claude Money, ask students questions about
important details from the story to formally assess their understanding of the work of Monet.
This is a great way to introduce young students to his life and work while checking their
comprehension!
I can statements for Monet water lilies

D E E P S P A C E S P A R K L E & T H E M E M B E R S C L U B
ASSESSMENT CHECKLIST
Student Name:
Did the student create value with tempera paint?
Did the student paint in the style of Monet (repeated short strokes)?
Did the student securely glue their water lilies to the background?
Main Ideas from:
MONET’S WATER LILIES