Moldova Electoral Support - undp.md Website... · ELECTORAL SUPPORT TO MOLDOVA ... might not have...
52
ELECTORAL SUPPORT TO MOLDOVA TECHNICAL SPECIFICATIONS ON CEC WEBSITE INTEGRATION INTO SAISE
Transcript of Moldova Electoral Support - undp.md Website... · ELECTORAL SUPPORT TO MOLDOVA ... might not have...

ELECTORAL SUPPORT TO MOLDOVA
TECHNICAL SPECIFICATIONS ON CEC WEBSITE INTEGRATION INTO SAISE

Technical Specifications on CEC Website Integration into SAISE
2010/10/08 CEC Website Integration into SAISE Technical Spec NEW
Revision 3 P a g e | 2 # 52
LIST OF ABBREVIATIONS
Abbr. Description
UNDP United Nations Development Program
IOM International Organization for Migration
CEC Central Election Commission
DEC District Election Commission
PS Polling Station
MID Ministry of Information and Development
MICT Ministry of Information and Communications Technology (previously MID)
CTS Centre of Special Telecommunications
SAISE State Automated Information System – Elections
ROV Register of Voters
ROP Register of Population
GUI Graphical User Interface
RTS Result Tabulation System
VS Microsoft Visual Studio
EVR Electronic Voters Register
OCV Out-of-Country Voting
Doc Nr The passport or ID Card’s number. For example, every passport issued to the same person, willhave a different number. A Voter can potentially have a ID card with Doc Nr, Russian Passportwith Doc Nr and Moldova Passport with Doc Nr, or even previous Documents with Doc Nr, all ofthem different numbers, but the same person.
IDNP Identity Number for Natural Person. Unique number for each person. Every Moldovan citizenmight not have an IDNP yet. Citizens are allowed to refuse such a number for religious reasons.

Technical Specifications on CEC Website Integration into SAISE
2010/10/08 CEC Website Integration into SAISE Technical Spec NEW
Revision 3 P a g e | 3 # 52
INTRODUCTION
PURPOSE
The State Automated Information System – Elections (SAISE) is a comprehensive Election System whichintegrates all the IT tools and functions needed by an Election Management Body (EMB) to conduct Elections.
This document is the Technical Specifications Manual describing how the CEC Website should be developed tointegrate with the SAISE in a seamless manner.
The CEC is required to adapt their IT Systems to fit into the State Automated Information System – Elections(SAISE). One of which is the Official CEC Website www.cec.md
SAISE requires that the CEC will have one automated IT System to support the CEC in carrying out their line offduty. This includes displaying Polling Stations, Election Results, Voter Lists, Legal Documents etc. Part of SAISEwould be the CEC Website.
Few Terms of Reference were identified for the CEC Website. Content, Layout and Branding, Technicalrequirements.
Technical Specifications on CEC Website Integration into SAISE
2010/10/08 CEC Website Integration into SAISE Technical Spec NEW
Revision 3 P a g e | 4 # 52
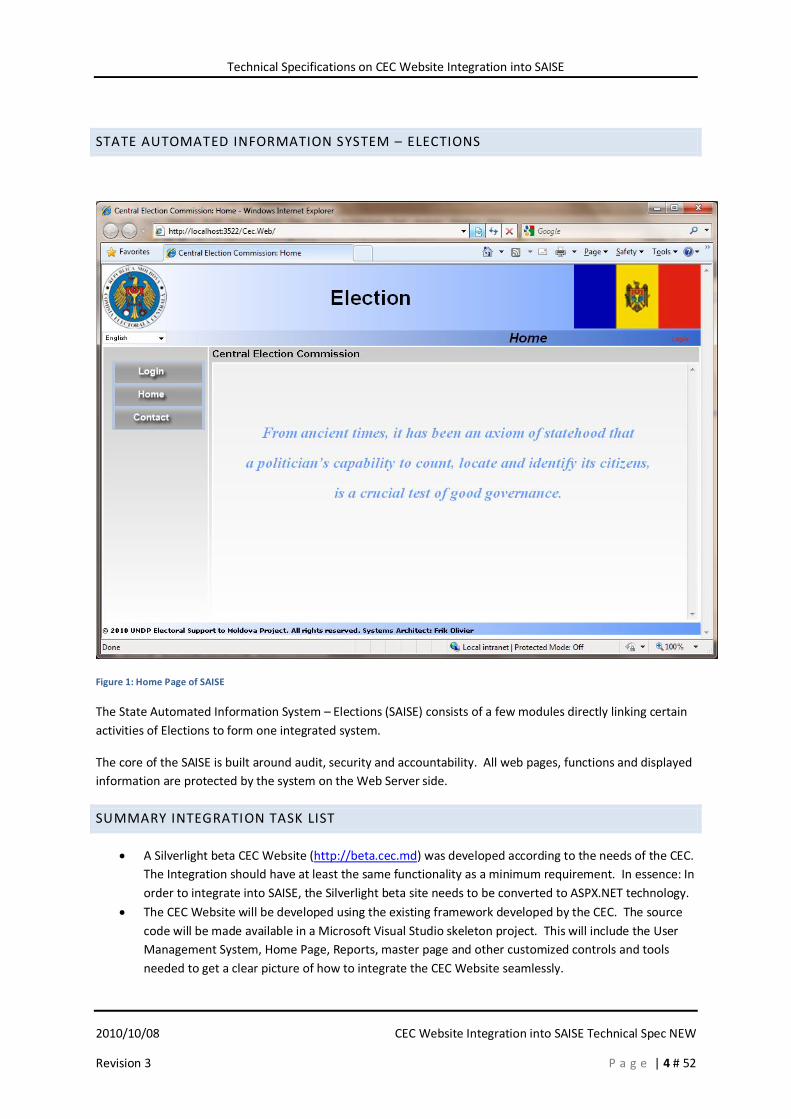
STATE AUTOMATED INFORMATION SYSTEM – ELECTIONS
Figure 1: Home Page of SAISE
The State Automated Information System – Elections (SAISE) consists of a few modules directly linking certainactivities of Elections to form one integrated system.
The core of the SAISE is built around audit, security and accountability. All web pages, functions and displayedinformation are protected by the system on the Web Server side.
SUMMARY INTEGRATION TASK LIST
· A Silverlight beta CEC Website (http://beta.cec.md) was developed according to the needs of the CEC.The Integration should have at least the same functionality as a minimum requirement. In essence: Inorder to integrate into SAISE, the Silverlight beta site needs to be converted to ASPX.NET technology.
· The CEC Website will be developed using the existing framework developed by the CEC. The sourcecode will be made available in a Microsoft Visual Studio skeleton project. This will include the UserManagement System, Home Page, Reports, master page and other customized controls and toolsneeded to get a clear picture of how to integrate the CEC Website seamlessly.

Technical Specifications on CEC Website Integration into SAISE
2010/10/08 CEC Website Integration into SAISE Technical Spec NEW
Revision 3 P a g e | 5 # 52
· The current SAISE Menu System needs to be adjusted to fit into the Website methodology wherebythe User can add, edit or remove menu items.
· The current Master Page and the CSS should be adapted to look more like the Silverlight beta CECWebsite.
· Deviation on beta Silverlight site: System User, Roles and Permissions should be adapted to use theSAISE User Management.
· Deviation on beta Silverlight site: The number of list items on a page (the page length) should beconfigurable.
· Deviation on beta Silverlight site: The viewed item should be like an accordion pane. The list itemsshould be pushed down and the viewed item details should be viewed below the selected item. Thedetails should be hidden when the selected item is toggled or when another item is selected.
· Deviation on beta Silverlight site: Menu Levels should be more than two.· Deviation on beta Silverlight site: The Archive Menu Item will contain all the previous Elections with
the sub menu items as configured at the time of the said Election. In other words, the last or latestElection will appear in the main menu automatically and the User can add, edit or remove sub menuitems. All the previous Elections and their sub menu items as the User defined them will be movedautomatically to the Archive Menu Item.
· Deviation on beta Silverlight site: Menu detail items may contain a mixture of item detail templates.
· Deviation on beta Silverlight site: Pictures should be able to have a title and description.· Working with the UNDP/CEC Webmaster on content management. The Webmaster is responsible of
transferring all content to the new CEC Website. One such task would be to advise the Webmaster onhow to transfer MS Word documents for the new CEC Website to be able to search the documentstoo. One such task could be to copy and paste all previous documents into the new Website andstore the information as text in the MS SQL database for easy search.
SYSTEM ARCHITECTURE
Application Software Developed in C# .NET Framework 4.0 as a Web Based Application usingVisual Studio 2010
Database SQL Server 2008Central Operating System Windows 7 Server with IIS 7 or higherClient Side Any OS capable of running Internet Explorer 6 and higher
The Application will connect to the Database Server using a connection string defined inside the web.config filefound in the root folder of the website.
The connection string should be named “CecConnectionString”. There should also be only ONE connectionstring named “CecConnectionString”. The application uses only ONE connection string named“CecConnectionString”. The other connection strings with suffixes are examples of how the string can be usedin different environments.
The section in the web.config file looks like this:
<connectionStrings> <add name="CecConnectionString" connectionString="Data Source=localhost;InitialCatalog=SAISE;Integrated Security=True;Connect Timeout=30;"providerName="System.Data.SqlClient" />

Technical Specifications on CEC Website Integration into SAISE
2010/10/08 CEC Website Integration into SAISE Technical Spec NEW
Revision 3 P a g e | 6 # 52
</connectionStrings>
Where “localhost” should point to the Database Server and “SAISE” is the Database Instance.
Normally this section of the file would be encrypted and can only be seen from the IIS Server tool with thecorrect access permissions such as Administrator.

Technical Specifications on CEC Website Integration into SAISE
2010/10/08 CEC Website Integration into SAISE Technical Spec NEW
Revision 3 P a g e | 7 # 52
GENERAL NAVIGATION
A. Language Selection – The User can click on the drop down box to select from a variety of Languagesin which the User feels most comfortable with.
B. Status Line – The SAISE will give timely feedback on the User’s action. The color of the line will alsoindicate the severity of the error:
a. Black – General information such as a confirmation of the User’s action.b. Blue – Some issues were picked up and the User needs to pay closer attention, such as a
warning that the Voter found is not from the User’s Polling Station.c. Red – And error occurred and the SAISE could not process the request, such as Duplicate
Polling Station Name was entered. In these cases, the User should rectify the problem andresubmit the request.
C. Page Title – The current selected Menu (F) item will be displayed as the Page Title. This is anindication of the tasks or an action the Users is currently busy with, such as Election, Voter orDelimitation.
D. Login User – The current Login User Name is displayed. All actions and changes will be logged againstthis User’s name.
E. Logout – The User should logout whenever the User leaves the SAISE system unattended. This willprevent unauthorized users to use the SAISE.
F. Menu Options – Only the authorized actions for the login User (D) will be displayed in the Menu.G. Main Area – Most of the actions will happen in the main display area.H. Contact – All necessary contact information can be found here should any problem arise with the
SAISE.

Technical Specifications on CEC Website Integration into SAISE
2010/10/08 CEC Website Integration into SAISE Technical Spec NEW
Revision 3 P a g e | 8 # 52
SOURCE CODE NAMING CONVENTION
The general Naming Convention of this project is based on the Microsoft Naming Convention for .NET. Morecan be read at the following Website: http://msdn.microsoft.com/en-us/library/ms229042.aspx
The following general guidelines should apply throughout the project:
· The property names should match the table column names
· The property names should match the Graphical User Interface (GUI) input fields or buttons
DATABASE
Each table will:
· All Tables and Columns names will follow the same naming convention as described below
· Be named after the entity it holds and it should be singular (e.g. Voter)
· Have an auto increment Primary Key with the same name as the table with Id as a Suffix (e.g. VoterId)· Each table will have accountability columns (e.g. EditUserId, EditDate)
· Each table will have version control and concurrency column (e.g. Version)
· The field names should match the properties of the business objects exactly.· Foreign Keys should match the Primary Key of the foreign table, except when two Foreign Key links
exists for the same foreign table. In such a case the Foreign Keys name should reflect the purpose.(e.g. Two Foreign Keys linking to Village could be named VillageId to indicate the normal delimitationlink and RopVillageId to reflect the Register of Population Village reference link.
Technical Specifications on CEC Website Integration into SAISE
2010/10/08 CEC Website Integration into SAISE Technical Spec NEW
Revision 3 P a g e | 9 # 52
SYSTEM SECURITY
OVERVIEW
This is an existing module and placed in this specification for completeness and clarity. This should be used inthe integrated CEC Website exactly as it is used in SAISE.
The core of the SAISE is built around audit, security and accountability. All web pages, functions and displayedinformation are protected by the SAISE on the Web Server side. This manual will show and describe allfunctionalities available, but it should be noted that the functionality will not be visible to the Logon User if theUser does not have the permission to use the said functionality certain functionality. The Permission System issimilar to the Windows environment where permissions are assigned to roles and roles assigned to persons.This makes the Permission System very flexible and configurable for any situation or function.
This section will describe the following:
Logon Page – All Users need to logon before the SAISE can be accessed and used.
Registration of New Users – A User needs to be registered before they can logon. This is the page whereUsers register by entering their details into the SAISE for approval by an Administrator.
User Management – Administrators use this screen to approve or unlock Users.
Role Management – Administrators use this page to assign or remove Roles to or from Users.
Permission Management – SAISE Administrators use this page to create Roles and assign specific Permissionsto the Roles.
All Roles will be assigned a certain level. A User will be at the same level as the highest role level. Userscannot see Roles or Users at a higher level. The function of this is to be able to delegate administrative roles tolower level EMB’s without the opportunity to assign themselves higher privileges of accessing higher level Useraccounts.
LAW 101
“23. The security and protection of information are ensured through a complex system of regulatory,organizational and technical measures, aimed at ensuring the necessary level of integrity, confidentiality andaccessibility of information resources.
24. SAIS “Elections” is organized and managed in accordance with the standards in the area of informationsecurity, approved by the Republic of Moldova. “– Page 5, LAW No. 101 from 15.05.2008
Although Law 101 most certainly describes wider security concepts including firewall, hardware security,premises security, operating system security and database security, is the aim of the System User Securitymodule to give an additional protection layer to the data from an Application point.
Technical Specifications on CEC Website Integration into SAISE
2010/10/08 CEC Website Integration into SAISE Technical Spec NEW
Revision 3 P a g e | 10 # 52
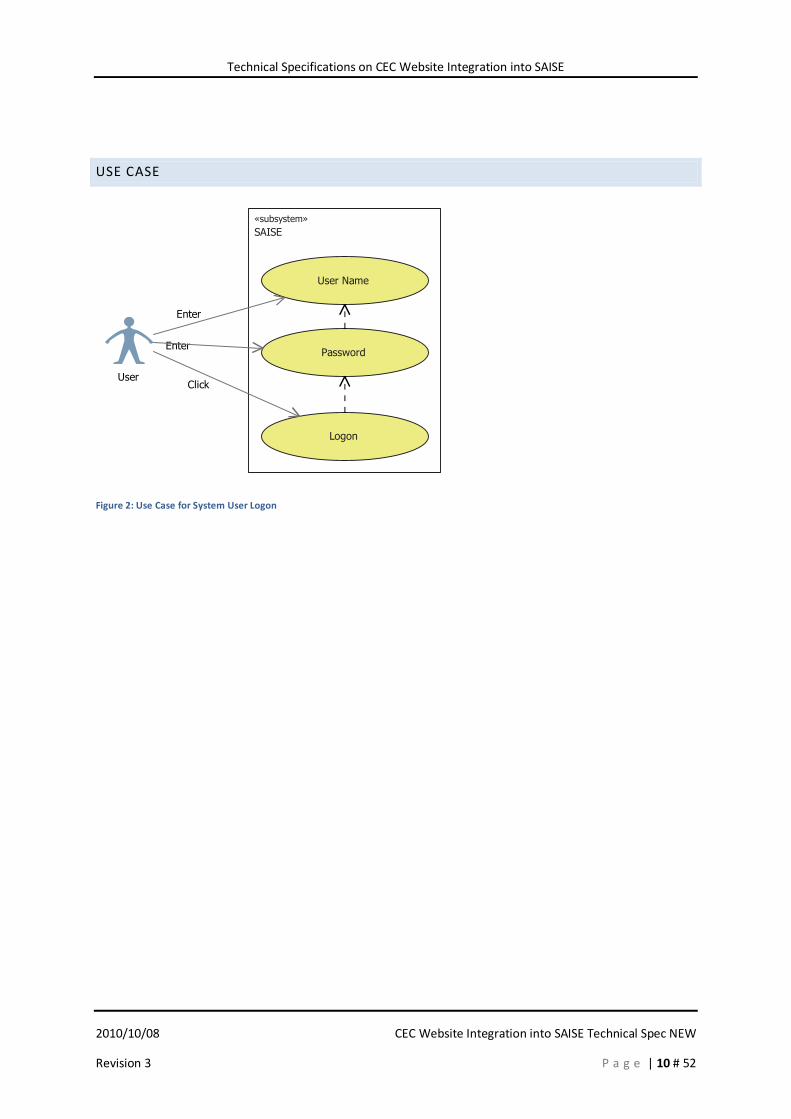
USE CASE
User
SAISE«subsystem»
User Name
Password
Logon
Enter
Enter
Click
Figure 2: Use Case for System User Logon
Technical Specifications on CEC Website Integration into SAISE
2010/10/08 CEC Website Integration into SAISE Technical Spec NEW
Revision 3 P a g e | 11 # 52
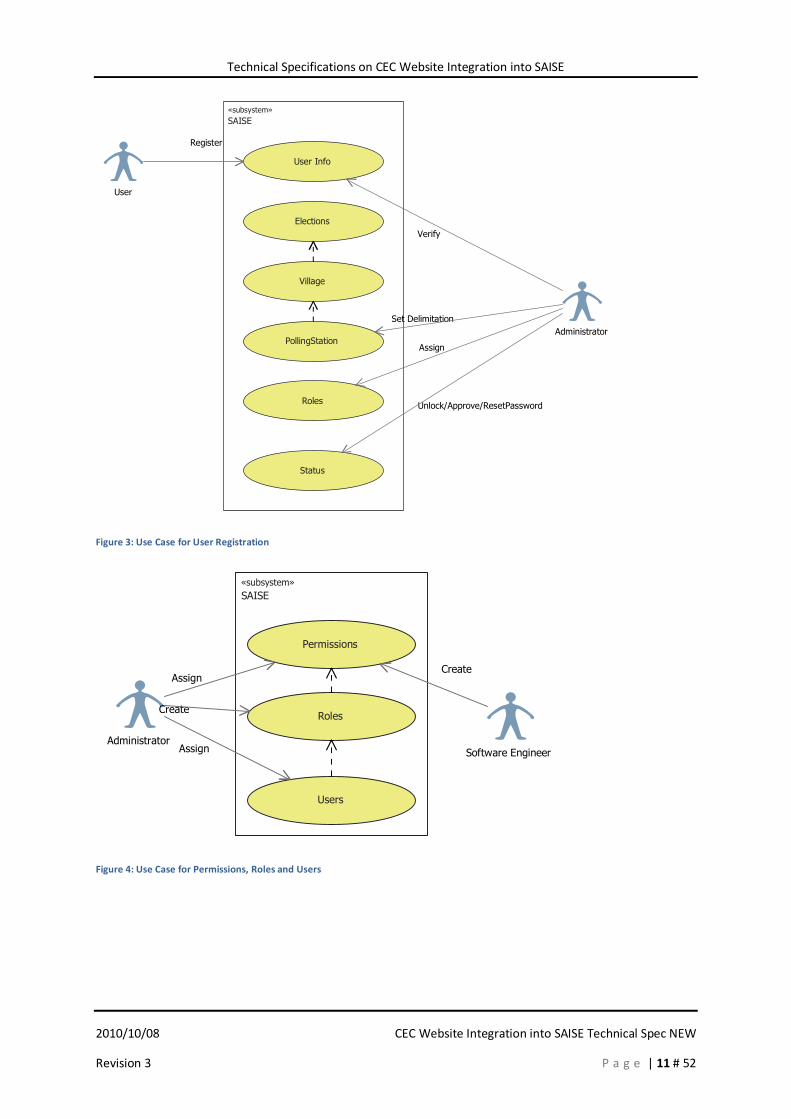
User
Administrator
SAISE«subsystem»
Status
User Info
PollingStation
Village
Elections
Roles
Register
Verify
Set Delimitation
Unlock/Approve/ResetPassword
Assign
Figure 3: Use Case for User Registration
AdministratorSoftware Engineer
SAISE«subsystem»
Permissions
Roles
Users
Assign
Create
Assign
Create
Figure 4: Use Case for Permissions, Roles and Users

Technical Specifications on CEC Website Integration into SAISE
2010/10/08 CEC Website Integration into SAISE Technical Spec NEW
Revision 3 P a g e | 12 # 52
ACTIVITY DIAGRAMS
LoadSystemUser
[Logon]
[NoDatabaseConnection]
[HasDatabaseConnection]
[IsNotLocked]
[IsNotApproved]
IncrementLockCount[PasswordNotMatch] [LockCountBelowLimit]
LockUser
[LockCountReachedLimit]
Load Roles
Load Permissions
Cache User
Figure 5: Logon Activity Diagram

Technical Specifications on CEC Website Integration into SAISE
2010/10/08 CEC Website Integration into SAISE Technical Spec NEW
Revision 3 P a g e | 13 # 52
Validate Information
[Register]
[DuplicateUser]
Save User Info
[NoDuplicate]
Report Duplicate
LoadRoles
[NoPermission]
[HasPermission]
[RolesPageLoad]
LoadUsers
AddRole
RefreshLists
[AssignRole]
[NoSelectedUser]
[RoleIsAssigned]
[ValidSelectedUser]
[NewAssignedRole]
AddUser
RefreshLists
[AssignUser]
[NoSelectedRole]
[NewAssignedRole]
[ValidSelectedRole]
[UserIsAssigned]
RemoveRole
RefreshLists
[RemoveRole]
[NoSelectedUser]
[AssignedRoleExists]
[ValidSelectedUser]
[RoleNotAssigned]
RemoveUser
RefreshLists
[RemoveUser]
[NoSelectedRole]
[AssignedRoleExists]
[ValidSelectedRole]
[RoleNotAssigned]
Figure 6: Assign Role Activities on Page Load, Assign Role, Assign User, Remove Role and Remove User
Technical Specifications on CEC Website Integration into SAISE
2010/10/08 CEC Website Integration into SAISE Technical Spec NEW
Revision 3 P a g e | 14 # 52
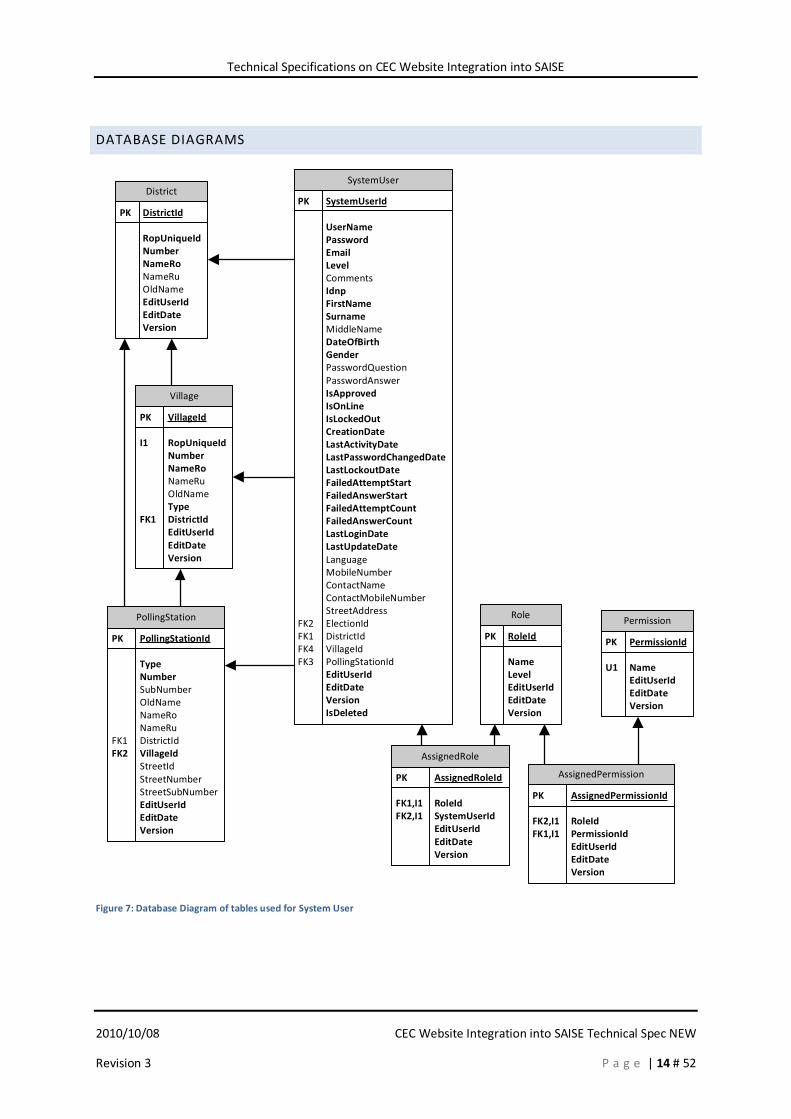
DATABASE DIAGRAMS
SystemUser
PK SystemUserId
UserNamePasswordEmailLevelCommentsIdnpFirstNameSurnameMiddleNameDateOfBirthGenderPasswordQuestionPasswordAnswerIsApprovedIsOnLineIsLockedOutCreationDateLastActivityDateLastPasswordChangedDateLastLockoutDateFailedAttemptStartFailedAnswerStartFailedAttemptCountFailedAnswerCountLastLoginDateLastUpdateDateLanguageMobileNumberContactNameContactMobileNumberStreetAddress
FK2 ElectionIdFK1 DistrictIdFK4 VillageIdFK3 PollingStationId
EditUserIdEditDateVersionIsDeleted
Role
PK RoleId
NameLevelEditUserIdEditDateVersion
Permission
PK PermissionId
U1 NameEditUserIdEditDateVersion
PollingStation
PK PollingStationId
TypeNumberSubNumberOldNameNameRoNameRu
FK1 DistrictIdFK2 VillageId
StreetIdStreetNumberStreetSubNumberEditUserIdEditDateVersion
District
PK DistrictId
RopUniqueIdNumberNameRoNameRuOldNameEditUserIdEditDateVersion
Village
PK VillageId
I1 RopUniqueIdNumberNameRoNameRuOldNameType
FK1 DistrictIdEditUserIdEditDateVersion
AssignedPermission
PK AssignedPermissionId
FK2,I1 RoleIdFK1,I1 PermissionId
EditUserIdEditDateVersion
AssignedRole
PK AssignedRoleId
FK1,I1 RoleIdFK2,I1 SystemUserId
EditUserIdEditDateVersion
Figure 7: Database Diagram of tables used for System User
Technical Specifications on CEC Website Integration into SAISE
2010/10/08 CEC Website Integration into SAISE Technical Spec NEW
Revision 3 P a g e | 15 # 52
BUSINESS OBJECTS

Technical Specifications on CEC Website Integration into SAISE
2010/10/08 CEC Website Integration into SAISE Technical Spec NEW
Revision 3 P a g e | 16 # 52
Figure 8: Business Objects showing properties and Methods
THE LOGIN PAGE

Technical Specifications on CEC Website Integration into SAISE
2010/10/08 CEC Website Integration into SAISE Technical Spec NEW
Revision 3 P a g e | 17 # 52
Figure 9: The Login Page
The User can select a language from the top left corner (G) to change the SAISE into a language morecomfortable for the User. The User can use either the Login button (A) or the Login link (B) to access the loginpage.
The User should type his/her name into the space provided next to User Name (C). This field is not casesensitive. The next step is for the User to type in his Password (D) and click on Login button (E). The Password(D) field is case sensitive. This means that the system can distinguish between capital and small letters, i.e., forexample, if the password is DfeF_asdf, the first and fourth letters must be entered with the Shift key pressedon your keyboard. If the User Name and Password is correctly entered, then the SAISE will log the User in andall the options permitted to the User will be shown.
The SAISE will lock the User’s account if the Password is entered incorrectly after 5 times. The SAISEAdministrator needs to be notified to unlock the User’s account.
Click on Register button (F) if the User has not been registered before. Every action ormodification is loggedagainst the login User.
Technical Specifications on CEC Website Integration into SAISE
2010/10/08 CEC Website Integration into SAISE Technical Spec NEW
Revision 3 P a g e | 18 # 52
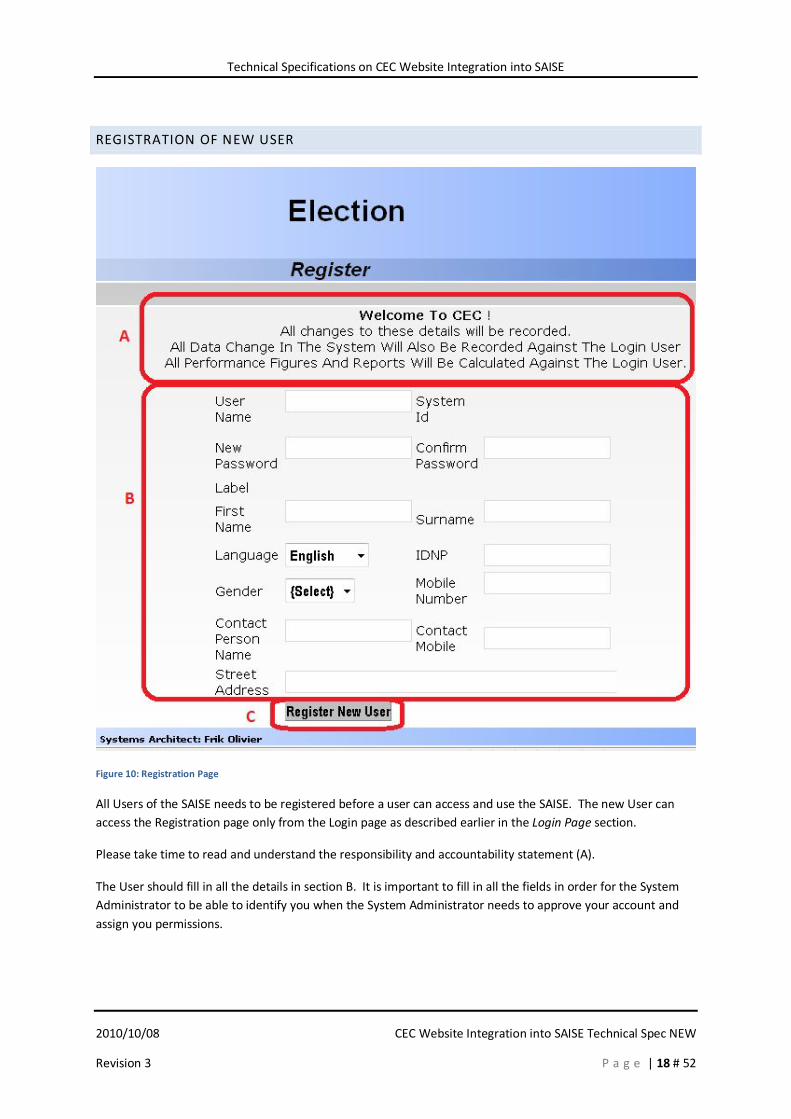
REGISTRATION OF NEW USER
Figure 10: Registration Page
All Users of the SAISE needs to be registered before a user can access and use the SAISE. The new User canaccess the Registration page only from the Login page as described earlier in the Login Page section.
Please take time to read and understand the responsibility and accountability statement (A).
The User should fill in all the details in section B. It is important to fill in all the fields in order for the SystemAdministrator to be able to identify you when the System Administrator needs to approve your account andassign you permissions.

Technical Specifications on CEC Website Integration into SAISE
2010/10/08 CEC Website Integration into SAISE Technical Spec NEW
Revision 3 P a g e | 19 # 52
Figure 11: List of Errors in fields is clearly displayed at the top with red * next to field in question
The User Name will be the name the User uses to Login to SAISE. This can be any name of the User’s choosing.This name should be unique in SAISE and SAISE will notify the User if a duplicate name is detected.
Be careful with the choice of Password. This should be kept secret and should not be easily breakable. SeeRecommendations for selecting a Password later in the manual.
The SAISE will use the language selected by the User as a default language next time the User login.
After successfully registering, the User should contact the SAISE Administrator to approve the User and toassign appropriate permissions to the User. The User will not be able to login before the SAISE Administratorhas performed these functions.
RECOMMENDATIONS FOR SELECTING A PASSWORD
The password is encrypted (scrambled) and stored in encrypted hash format. No one, not even the DatabaseAdministrators will know your password. Please remember your password since SAISE Administrators will notbe able to retrieve your password. Should the User completely forget the login password then the SAISEAdministrator will be able to reset your password agreed by you and the administrator.
Here are a few recommendations on selecting a password:
1. Case Sensitivity – Should contain at least one (1) upper and one (1) lower case character.Example: Fst34#221
2. Alphanumeric Characters – Should contain at least one (1) digit and one (1) letter. It may containspecial characters, but avoid double-quotes, quotes, colons, semicolons, minus signs, etc.Example: Ts2%#54
3. Character String Length – Should be between eight (8) and fourteen (14) characters long.Example: PR3#567YUOP22)
4. Password Expiration – Should be changed every sixty (60) days.5. Password Re-use – Should not be set to any of the five (5) previously-used passwords.6. Lockouts (Duration) – Should remain locked for fifteen (15) minutes or until a SAISE Administrator
manually unlocks the account.7. Lockouts (Access Attempts) – Will be locked after five (5) incorrect attempts.8. Dictionary Words – Should NOT be common words found in a dictionary such as nouns, family, friend,
or computer names, etc.Example: do not use names like GrandmaJo, Rumpelstilskin, or MicrosoftExchange.
Technical Specifications on CEC Website Integration into SAISE
2010/10/08 CEC Website Integration into SAISE Technical Spec NEW
Revision 3 P a g e | 20 # 52
9. Personal Information – Should NOT be based on personal information such as birthdays, addresses,pet names, phone numbers, etc.Example: do not use June272008, BearlockHolmes, or KensingtonGardens77, etc.
10. Word or Number Patterns – Should NOT contain patterns.Example: do not use strings like aaabbb, qwerty, zyxwvuts, 123321, etc.
11. Character String Reversals – Should NOT simply reverse common dictionary phrases or names.Example: do not use strings like nedragrednik, 321namtaB, 10drowssaP, etc.
12. Appended Digits – Should NOT simply append a digit to a dictionary word.Example: secret1, 1secret, Password123, 678Password.
13. Password Secrecy- Must never be shared with anyone (this includes Helpdesk staff, supervisors,spouses, etc.).
14. Weak Characters – Must avoid 'L' "O' '1' '0' '-' etc.15. Password Recall – Must be easy to remember and global to all personal passwords.16. Password Transmission - Must not send via email or other electronic devices.17. Password Storage - Must not be written down or stored online.18. Strong Password Examples
Ratyrpt23% or TmB1w2RmbR? - (This May Be One Way to Remember) or2manyAPPLEPIES2littletime!
19. Password Examples that Fail the System and should not be usedPassword or July251978 or Lassie or 1234567
20. Weak Password Examples that Pass the System but should not be usedPassword123 or ABCJuly251978 or Lassie234 or A1234567
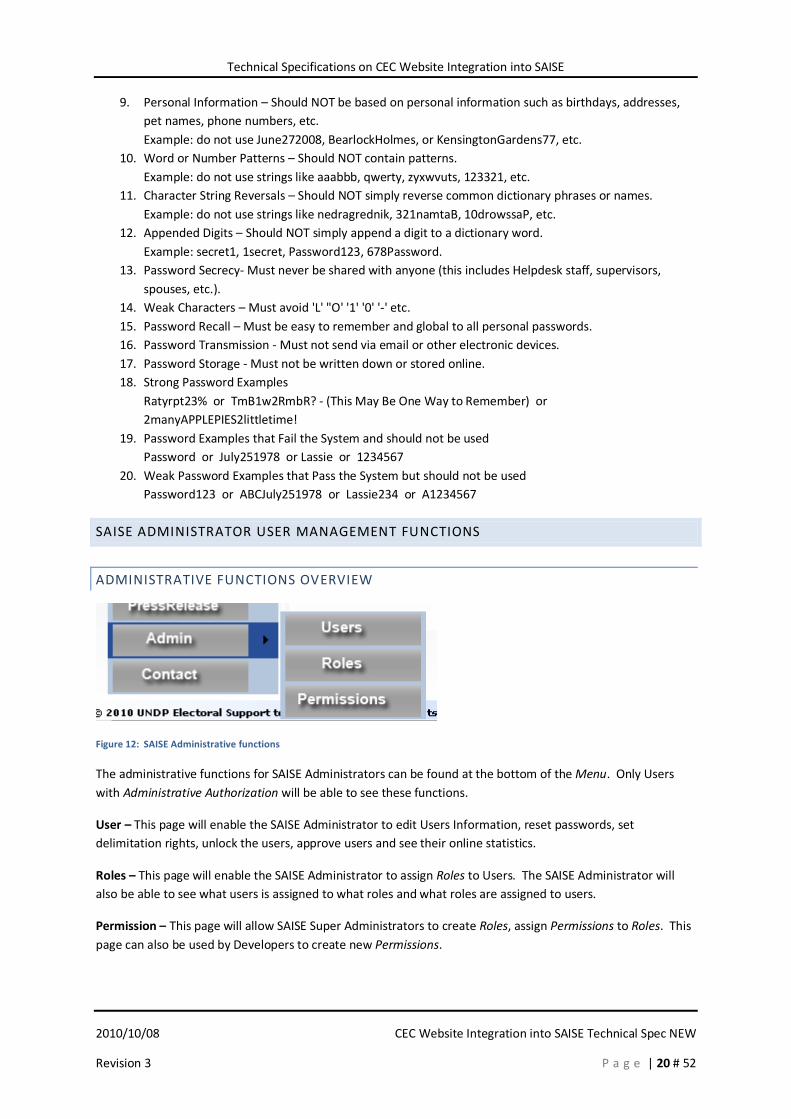
SAISE ADMINISTRATOR USER MANAGEMENT FUNCTIONS
ADMINISTRATIVE FUNCTIONS OVERVIEW
Figure 12: SAISE Administrative functions
The administrative functions for SAISE Administrators can be found at the bottom of the Menu. Only Userswith Administrative Authorization will be able to see these functions.
User – This page will enable the SAISE Administrator to edit Users Information, reset passwords, setdelimitation rights, unlock the users, approve users and see their online statistics.
Roles – This page will enable the SAISE Administrator to assign Roles to Users. The SAISE Administrator willalso be able to see what users is assigned to what roles and what roles are assigned to users.
Permission – This page will allow SAISE Super Administrators to create Roles, assign Permissions to Roles. Thispage can also be used by Developers to create new Permissions.
Technical Specifications on CEC Website Integration into SAISE
2010/10/08 CEC Website Integration into SAISE Technical Spec NEW
Revision 3 P a g e | 21 # 52
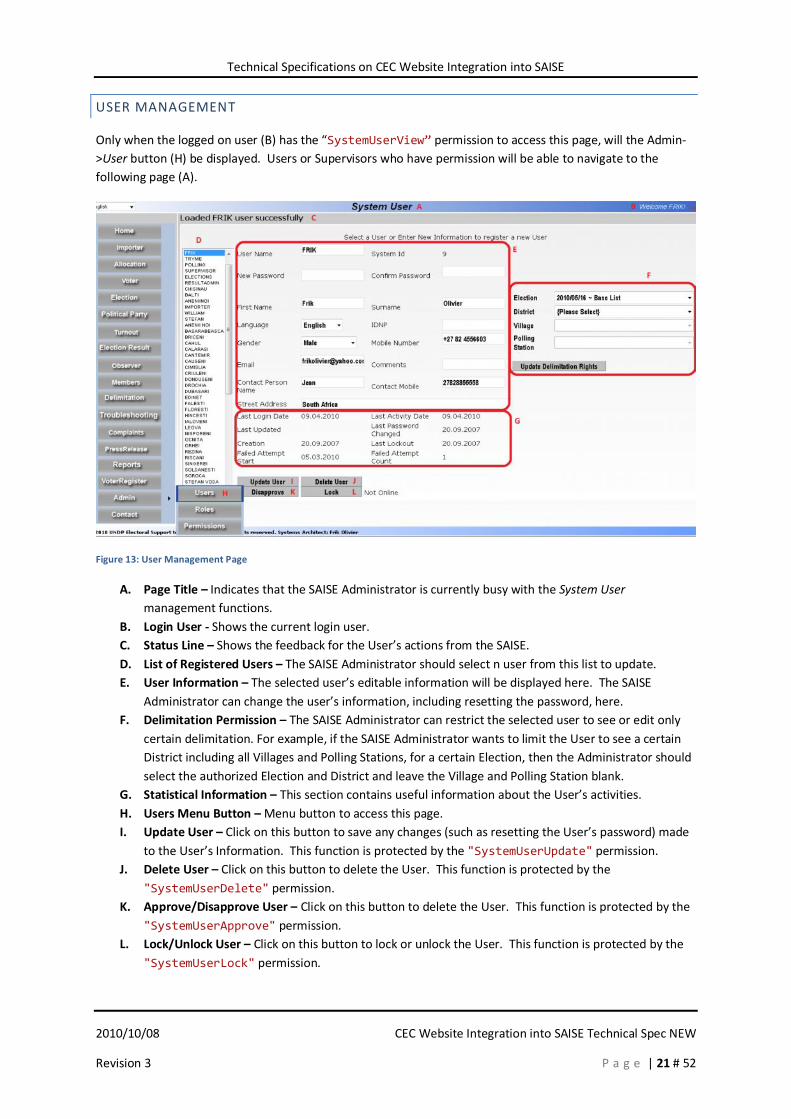
USER MANAGEMENT
Only when the logged on user (B) has the “SystemUserView” permission to access this page, will the Admin->User button (H) be displayed. Users or Supervisors who have permission will be able to navigate to thefollowing page (A).
Figure 13: User Management Page
A. Page Title – Indicates that the SAISE Administrator is currently busy with the System Usermanagement functions.
B. Login User - Shows the current login user.C. Status Line – Shows the feedback for the User’s actions from the SAISE.D. List of Registered Users – The SAISE Administrator should select n user from this list to update.E. User Information – The selected user’s editable information will be displayed here. The SAISE
Administrator can change the user’s information, including resetting the password, here.F. Delimitation Permission – The SAISE Administrator can restrict the selected user to see or edit only
certain delimitation. For example, if the SAISE Administrator wants to limit the User to see a certainDistrict including all Villages and Polling Stations, for a certain Election, then the Administrator shouldselect the authorized Election and District and leave the Village and Polling Station blank.
G. Statistical Information – This section contains useful information about the User’s activities.H. Users Menu Button – Menu button to access this page.I. Update User – Click on this button to save any changes (such as resetting the User’s password) made
to the User’s Information. This function is protected by the "SystemUserUpdate" permission.J. Delete User – Click on this button to delete the User. This function is protected by the
"SystemUserDelete" permission.K. Approve/Disapprove User – Click on this button to delete the User. This function is protected by the
"SystemUserApprove" permission.L. Lock/Unlock User – Click on this button to lock or unlock the User. This function is protected by the
"SystemUserLock" permission.
Technical Specifications on CEC Website Integration into SAISE
2010/10/08 CEC Website Integration into SAISE Technical Spec NEW
Revision 3 P a g e | 22 # 52
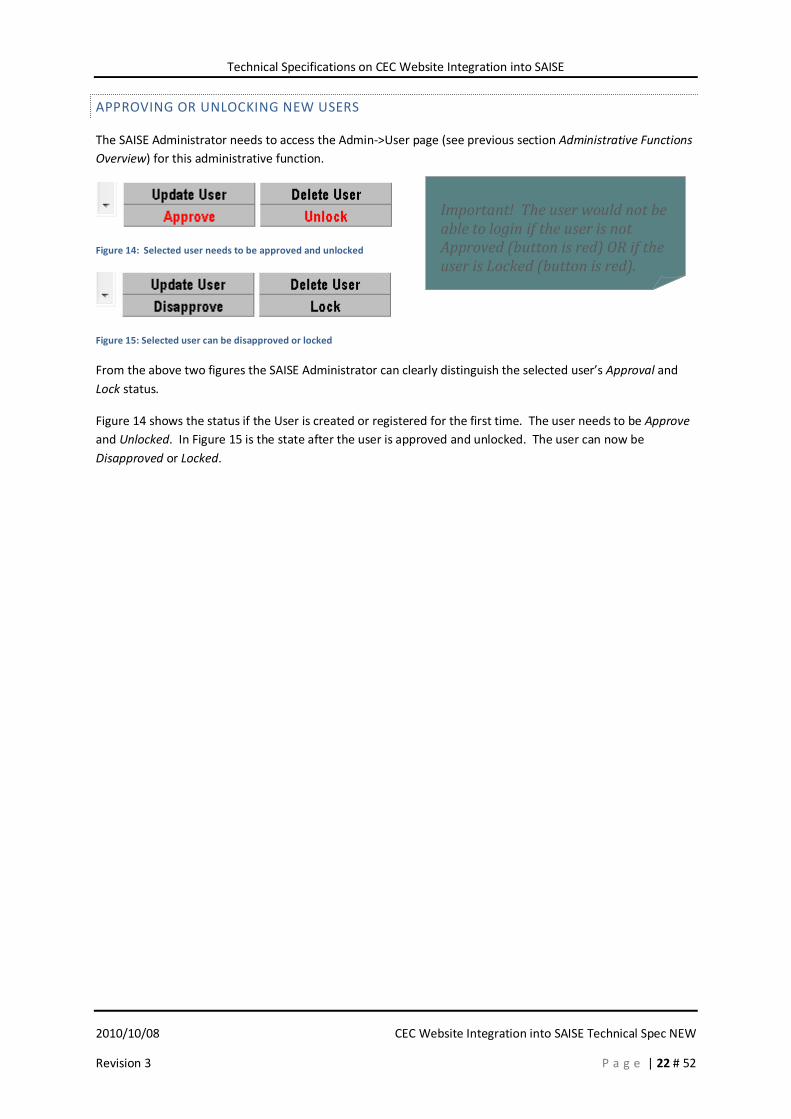
APPROVING OR UNLOCKING NEW USERS
The SAISE Administrator needs to access the Admin->User page (see previous section Administrative FunctionsOverview) for this administrative function.
Figure 14: Selected user needs to be approved and unlocked
Figure 15: Selected user can be disapproved or locked
From the above two figures the SAISE Administrator can clearly distinguish the selected user’s Approval andLock status.
Figure 14 shows the status if the User is created or registered for the first time. The user needs to be Approveand Unlocked. In Figure 15 is the state after the user is approved and unlocked. The user can now beDisapproved or Locked.
Important! The user would not beable to login if the user is notApproved (button is red) OR if theuser is Locked (button is red).

Technical Specifications on CEC Website Integration into SAISE
2010/10/08 CEC Website Integration into SAISE Technical Spec NEW
Revision 3 P a g e | 23 # 52
ROLE MANAGEMENTOnly when the logged on user (B) has the "RoleView" permission to access this page, will the Admin->Rolebutton (K) be displayed. Users or Supervisors who have permission will be able to navigate to the followingpage (A).
Figure 16: Menu button to access Role Management
Figure 17: Role Management Page
A. Page Title – Indicates that the SAISE Administrator is currently busy with the Role managementfunctions.
B. Login User - Shows the current login user.C. Role list – A list of available Roles. All the selected role’s (C) assigned users (F) will be displayed
when a Role is selected. The SAISE Administrator should select the Role (C) AND a User (E) they wantto add or remove Users (E) from.
D. Assigned Roles – List of assigned roles (D) for selected User (E). This function is protected by the"RoleAssign" permission.
Technical Specifications on CEC Website Integration into SAISE
2010/10/08 CEC Website Integration into SAISE Technical Spec NEW
Revision 3 P a g e | 24 # 52
E. User list - A list of available Users. All the selected user’s (E) assigned roles (D) will be displayedwhen a User is selected. The SAISE Administrator should select the Role (C) AND a User (E) if theywant to add or remove Roles (E) from each other.
F. Assigned Users – List of assigned users (F) for selected Role (C).G. Assign Role to User – Both Role (C) and User (E) should be selected. The User and the Role will then
be assigned to each other when clicked on Assign Role to User (G). The SAISE Administrator will seethe Role (C) appear in the Assigned Roles list (D) as well as the User (E) in the Assigned Users list (F).This function is protected by the "RoleAssign" permission.
H. Remove Role from User – Both Assigned Role (D) and User (E) should be selected. The User and theRole will then be removed from each other when clicked on Remove Role from User (H). The SAISEAdministrator will see the Role (C) disappears in the Assigned Roles list (D). This function is protectedby the "RoleRemove" permission.
I. Assign User to Role – Both Role (C) and User (E) should be selected. The User and the Role will thenbe assigned to each other when clicked on Assign User to Role (I). The SAISE Administrator will seethe Role (C) appear in the Assigned Roles list (D) as well as the User (E) in the Assigned Users list (F).
J. Remove User from Role – Both Assigned User (F) and Role (C) should be selected. The User and theRole will then be removed from each other when clicked on Remove User from Role (J). The SAISEAdministrator will see the User (E) disappears in the Assigned User list (F). This function is protectedby the "RoleRemove" permission.

Technical Specifications on CEC Website Integration into SAISE
2010/10/08 CEC Website Integration into SAISE Technical Spec NEW
Revision 3 P a g e | 25 # 52
PERMISSION MANAGEMENTOnly when the logged on user (B) has the "PermissionView" permission to access this page, will the Admin->Permission button (O) be displayed. Users or Supervisors who have permission will be able to navigate to thefollowing page (A).
Figure 18: Menu button to access Permission Management
Figure 19: Permission Management Page
A. Page Title – Indicates that the SAISE Administrator is currently busy with the Permission managementfunctions.
B. Login User - Shows the current login user.

Technical Specifications on CEC Website Integration into SAISE
2010/10/08 CEC Website Integration into SAISE Technical Spec NEW
Revision 3 P a g e | 26 # 52
C. New Role – New Role name to be created.D. Role Level – The visibility level of the Role. Lower level Roles will not be able to see higher level Roles
or Users. This will aid in delegation of Administrators. For example: If Super Administrators want todelegate Administrator rights to lower level administrators, then they can create a Role “LowAdministrator” and assign a lower level access to that Role. When users with the “Low Administrator”login, they will not be able to see the Super Administrator with higher privileges who created theirrole.
E. Create Role – When the SAISE Administrator clicks on this button, they will create the Role (C) withthe Role Level (D). The Role (C) will appear in theRole List (G). This function is protected by the"RoleCreate" permission.
F. Delete Role – The SAISE Administrator should firstselect a Role from the Role List (G). They can thenclick on Delete Role (F) to delete the Role. Thisfunction is protected by the "RoleDelete"permission.
G. Role List – This is a list of Roles available. The Assigned Permissions (I) will be displayed when a Roleis selected from this list.
H. Remove Permission – The SAISE Administrator should select a Role (G) and then select a AssignedPermission (I). The assigned permission will then be removed. This function is protected by the"PermissionRemove" permission.
I. Assigned Permission list – The list of permissions assigned to the selected Role (G). This function isprotected by the "PermissionAssign" permission.
J. Create Permission – Enter the name for the permission to create. This name must be exactly spelled(case sensitive) as it is been used inside the SAISE source code. Only for SAISE Developer use!
K. Create Permission Button – The Permission (J) will be created. This function is protected by the"PermissionCreate" permission. Only for SAISE Developer use!
L. Assign Permission – The selected Permission (N) will be assigned to the selected Role (G). Thisfunction is protected by the "PermissionAssign" permission.
M. Delete Permission – The selected Permission (N) will be deleted. The SAISE will also remove theselected Permission (N) from any role it was assigned to. This function is protected by the"PermissionDelete" permission. Only for SAISE Developer use!
N. Permission list – List of available permissions.
Important! All assignedpermissions and assigned userswill be removed by the SAISEbefore deleting the role itself.
Technical Specifications on CEC Website Integration into SAISE
2010/10/08 CEC Website Integration into SAISE Technical Spec NEW
Revision 3 P a g e | 27 # 52
USAGE IN SOURCE CODE
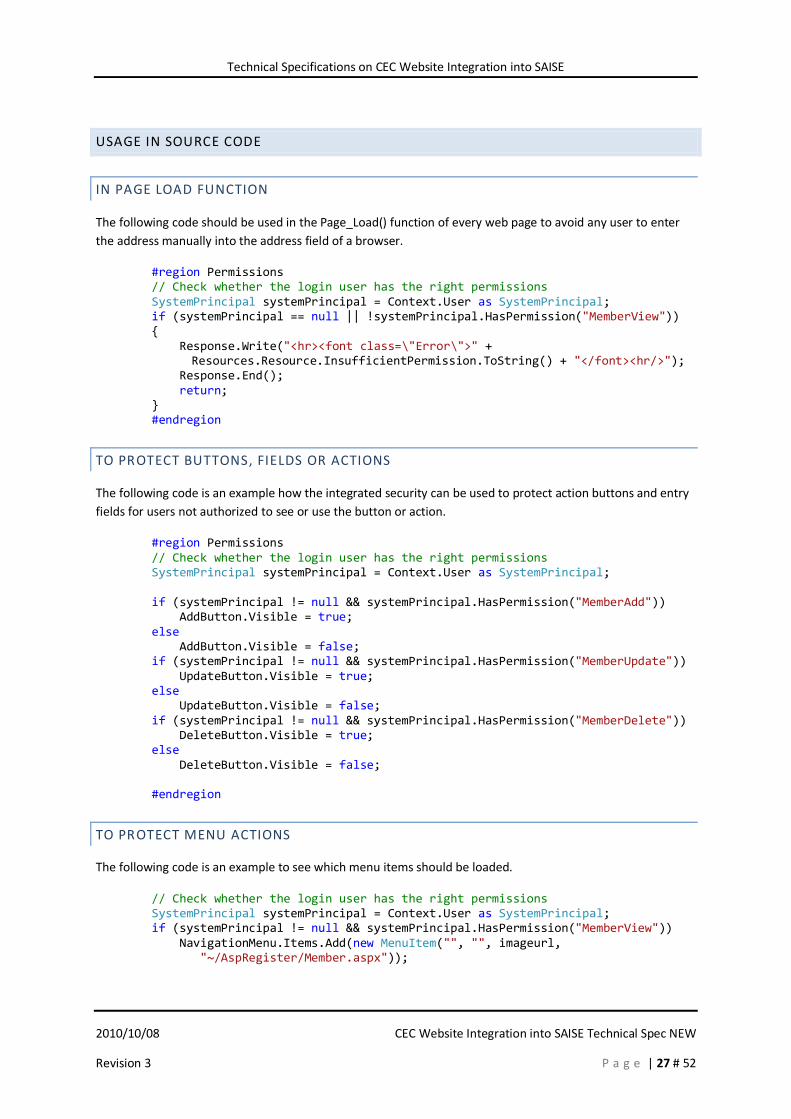
IN PAGE LOAD FUNCTION
The following code should be used in the Page_Load() function of every web page to avoid any user to enterthe address manually into the address field of a browser.
#region Permissions// Check whether the login user has the right permissionsSystemPrincipal systemPrincipal = Context.User as SystemPrincipal;if (systemPrincipal == null || !systemPrincipal.HasPermission("MemberView"))
{ Response.Write("<hr><font class=\"Error\">" +
Resources.Resource.InsufficientPermission.ToString() + "</font><hr/>"); Response.End();
return; } #endregion
TO PROTECT BUTTONS, FIELDS OR ACTIONS
The following code is an example how the integrated security can be used to protect action buttons and entryfields for users not authorized to see or use the button or action.
#region Permissions// Check whether the login user has the right permissionsSystemPrincipal systemPrincipal = Context.User as SystemPrincipal;
if (systemPrincipal != null && systemPrincipal.HasPermission("MemberAdd")) AddButton.Visible = true;
else AddButton.Visible = false;
if (systemPrincipal != null && systemPrincipal.HasPermission("MemberUpdate")) UpdateButton.Visible = true;
else UpdateButton.Visible = false;
if (systemPrincipal != null && systemPrincipal.HasPermission("MemberDelete")) DeleteButton.Visible = true;
else DeleteButton.Visible = false;
#endregion
TO PROTECT MENU ACTIONS
The following code is an example to see which menu items should be loaded.
// Check whether the login user has the right permissionsSystemPrincipal systemPrincipal = Context.User as SystemPrincipal;if (systemPrincipal != null && systemPrincipal.HasPermission("MemberView"))
NavigationMenu.Items.Add(new MenuItem("", "", imageurl,"~/AspRegister/Member.aspx"));
Technical Specifications on CEC Website Integration into SAISE
2010/10/08 CEC Website Integration into SAISE Technical Spec NEW
Revision 3 P a g e | 28 # 52
ELECTION
OVERVIEW
This is an existing module and placed in this specification for completeness and clarity. This should be used inthe integrated CEC Website exactly as it is used in SAISE.
All information related to a specific Election should be stored using the information stored by the ElectionModule. The latest Election Item should be a first level Menu Item with all related materials or informationsuch as Decisions, Meetings, Notes, Voter Turnout and Election Results for that Election on the second levelunder the latest Election Menu Item. The rest of the previous Elections should be shown under the “Archive”Menu Item on the second level with the respective related information on the third level.
The Election Module a very simple module but a core of the SAISE history. All configurations and data will bestored for each Election. All other Modules reference a specific Election.
ELECTION LAW 101
“5. The basic tasks of SAIS "Elections" are: a) Informational assistance in the preparation and conduct of elections; b) establishing immediately, on election day, the rate of participation in voting; c) promptly obtaining preliminary information on the results of voting just after the end of the votingprocedure; d) processing and statistical analysis of the results of conducted elections and referendum.” – Page 4, LAWNo. 101 from 15.05.2008
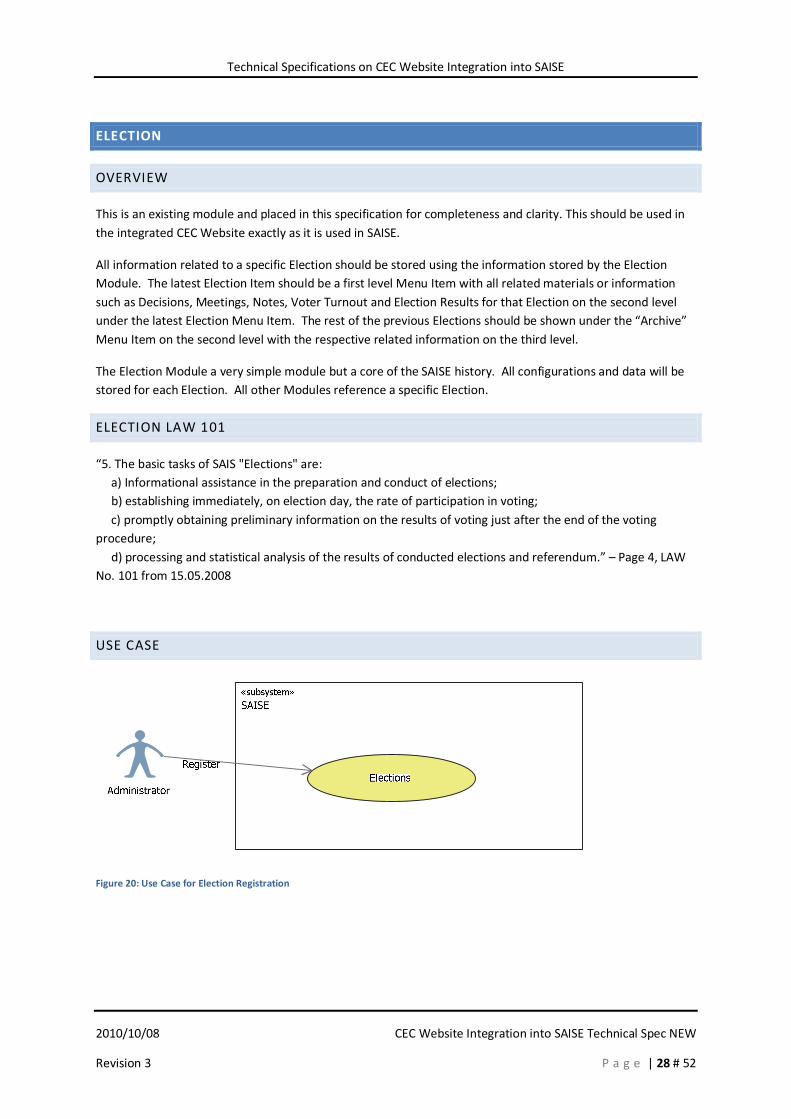
USE CASE
Figure 20: Use Case for Election Registration

Technical Specifications on CEC Website Integration into SAISE
2010/10/08 CEC Website Integration into SAISE Technical Spec NEW
Revision 3 P a g e | 29 # 52
ACTIVITY DIAGRAMS
Figure 21: Activity Diagram for Page Load, View and Update Election
Technical Specifications on CEC Website Integration into SAISE
2010/10/08 CEC Website Integration into SAISE Technical Spec NEW
Revision 3 P a g e | 30 # 52
DATABASE DIAGRAMS

Technical Specifications on CEC Website Integration into SAISE
2010/10/08 CEC Website Integration into SAISE Technical Spec NEW
Revision 3 P a g e | 31 # 52
Figure 22: Database Diagram of tables used for Election and Related tables
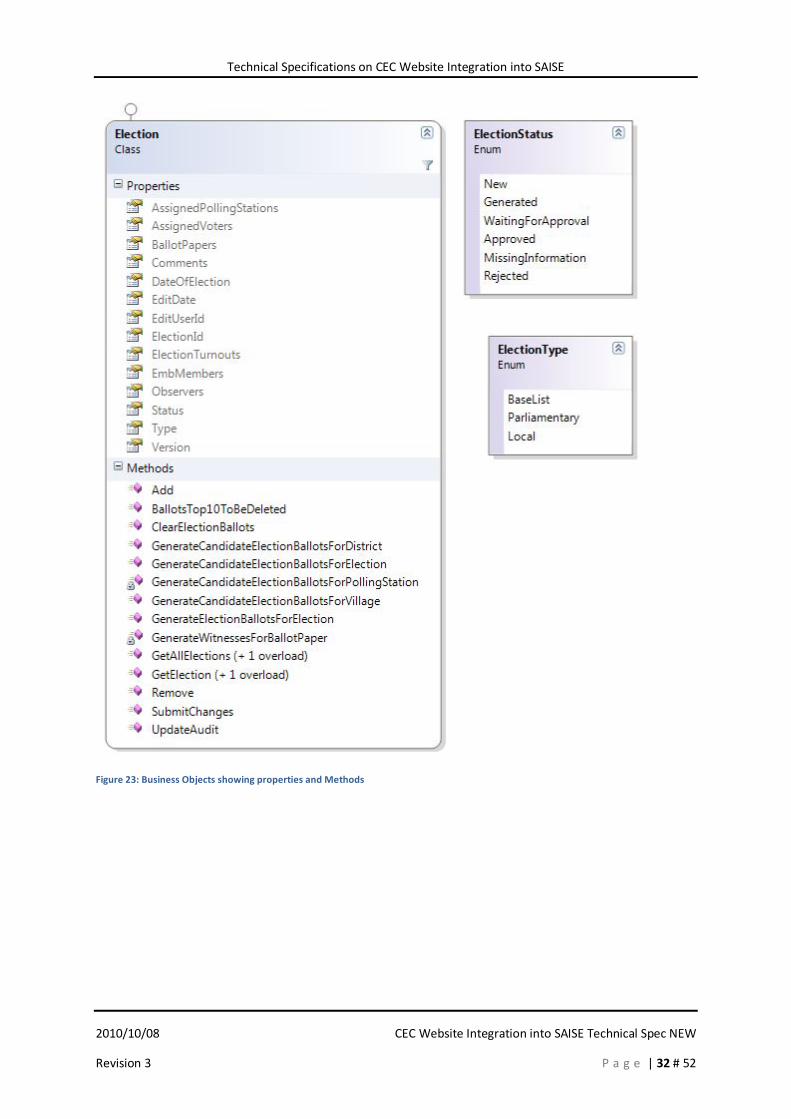
BUSINESS OBJECTS
Technical Specifications on CEC Website Integration into SAISE
2010/10/08 CEC Website Integration into SAISE Technical Spec NEW
Revision 3 P a g e | 32 # 52
Figure 23: Business Objects showing properties and Methods
Technical Specifications on CEC Website Integration into SAISE
2010/10/08 CEC Website Integration into SAISE Technical Spec NEW
Revision 3 P a g e | 33 # 52
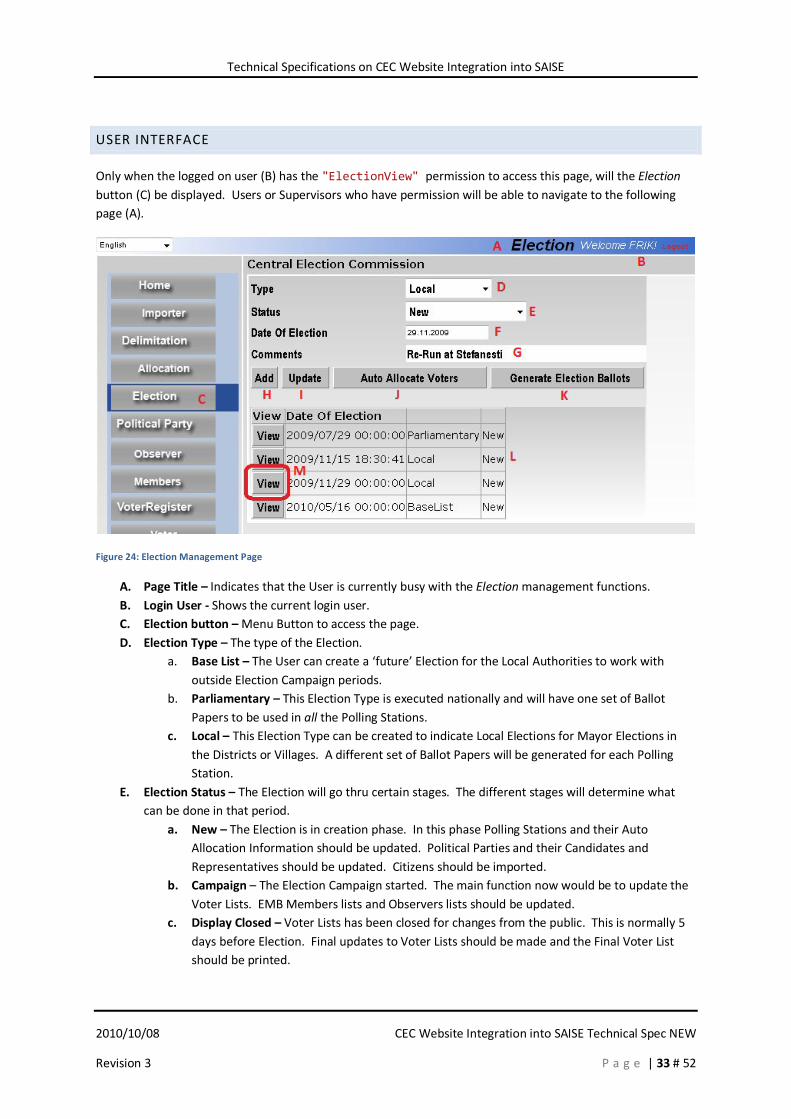
USER INTERFACE
Only when the logged on user (B) has the "ElectionView" permission to access this page, will the Electionbutton (C) be displayed. Users or Supervisors who have permission will be able to navigate to the followingpage (A).
Figure 24: Election Management Page
A. Page Title – Indicates that the User is currently busy with the Election management functions.B. Login User - Shows the current login user.C. Election button – Menu Button to access the page.D. Election Type – The type of the Election.
a. Base List – The User can create a ‘future’ Election for the Local Authorities to work withoutside Election Campaign periods.
b. Parliamentary – This Election Type is executed nationally and will have one set of BallotPapers to be used in all the Polling Stations.
c. Local – This Election Type can be created to indicate Local Elections for Mayor Elections inthe Districts or Villages. A different set of Ballot Papers will be generated for each PollingStation.
E. Election Status – The Election will go thru certain stages. The different stages will determine whatcan be done in that period.
a. New – The Election is in creation phase. In this phase Polling Stations and their AutoAllocation Information should be updated. Political Parties and their Candidates andRepresentatives should be updated. Citizens should be imported.
b. Campaign – The Election Campaign started. The main function now would be to update theVoter Lists. EMB Members lists and Observers lists should be updated.
c. Display Closed – Voter Lists has been closed for changes from the public. This is normally 5days before Election. Final updates to Voter Lists should be made and the Final Voter Listshould be printed.
Technical Specifications on CEC Website Integration into SAISE
2010/10/08 CEC Website Integration into SAISE Technical Spec NEW
Revision 3 P a g e | 34 # 52
d. Election – Election Day functions only. All changes to Register of Voters will be seen asSupplementary list changes.
e. Completed – No changes other than Supplementary updates to the Election relatedinformation can be made.
F. Election Date – Date of the Election. The User may create a future Election for which the date is notknown yet. This will allow Local Authorities to work on the Voter List as if it is a Base List. However,the date should be changed the moment the Election Date is announced.
G. Comments – Any comments related to the Electioncan be stored here.
H. Add Election – This is to create a new Election andadd it to the Election List (L).
I. Update Election – The User should select (M) anElection from the list (L) to make changes. TheUser can click on Update (I) to update the changes.
J. Auto Allocate Voters – This will run the SAISE AutoUpdate function according to the Auto AllocateInformation and the information SAISE could retrieve from the Register of Population.
K. Generate Election Ballots – The SAISE will generate for the selected Election, Election Type and forthe Political Parties and their Candidates Ballot templates. This will set the Ballot order for theElection Result module too.
L. Election List - List of available Elections in the System.M. Election View – The Users should click on the Election they want to view, update or perform Election
Management functions.
Important! The Auto Allocatefunction will overwrite ALLpreviously allocation and localityupdates of Voters for the selectedElection!

Technical Specifications on CEC Website Integration into SAISE
2010/10/08 CEC Website Integration into SAISE Technical Spec NEW
Revision 3 P a g e | 35 # 52
EXISTING DATABASE STRUCTURE USED IN CEC WEBSITE
The current information used in www.cec.md is kept in various formats or databases hosted on the e-Centruservers. CEC Management arranged with e-Centru for the retrieval of all of the data related to the old CECwebsite. Much of the data has been migrated to new database structures inside MS SQL database tableshosted at the CEC Server Room. It is currently unclear how the data is stored at the e-Centru servers and inwhich formats.
All data should be consolidated into the MS SQL database hosted at the CEC Server Room. Below are the datatables and structures created for the CEC Web Site. The tables and structures can be changed by thedeveloper to fit the integration better. One such table “cluster” or group is the User Management whichshould be migrated to the User Management used in SAISE.
Figure 25: Tables currently in use in the MS SQL Database

Technical Specifications on CEC Website Integration into SAISE
2010/10/08 CEC Website Integration into SAISE Technical Spec NEW
Revision 3 P a g e | 36 # 52
LAYOUT AND BRANDING
Layout and Branding is how the content will be displayed and what color schemes would be used, etc. Most ofthe Layout and Branding can be left for RFP, but the main layout and screens should be determined for theProposals to be considered objectively. The proposals should have a free hand to give ideas within theguidelines of this TOR. Preferable should it be a live mock site to display the layout and branding. No live datais needed; only sample or static date would be needed for evaluation.
The proposal should give at least one solution on the layout to indicate:
· Title (With rotating banner as background)
· Menu (horizontal or vertical, vertical can host more items and gives one more real estate on thescreen for words)
· Main information
· CEC Coat of Arms
· Logon· Language selection
Figure 26: Example of Layout

Technical Specifications on CEC Website Integration into SAISE
2010/10/08 CEC Website Integration into SAISE Technical Spec NEW
Revision 3 P a g e | 37 # 52
At least one color scheme should be proposed. Colors should be neutral. No definite connections to PoliticalParties, Religions, Bad-Vibe Colors, etc. It should use colors which blend the CEC Coat of Arms. Colors for thefollowing Items should be defined with Normal, Focused / Selected, Mouse Hover, etc:
· Titles
· Menu
· Buttons· Labels
· Hyperlinks
· Text Input Boxes, Combo Boxes
· Check Boxes, Radio Buttons· Backgrounds of Windows and Controls
One font should be proposed and used throughout the Website.
Below is an example of the CEC Coat of Arms. The official logo in electronic format, can be requested [email protected]
Technical Specifications on CEC Website Integration into SAISE
2010/10/08 CEC Website Integration into SAISE Technical Spec NEW
Revision 3 P a g e | 38 # 52
CONTENT
Content is the information that needs to be displayed on the internet.
The CEC Website should be available in three languages by selecting the language of choice in a drop down list.Languages should be Romanian (default), Russian and English. There should be a disclaimer stating that theRomanian language is the de-facto language and all disputes will refer back to Romanian.
The Main Title should have a rotating banner displaying images from a certain pre-configured folder. Theimages dimensions are normally 1000px X 85px and can be in any picture format such as PNG, BMP, JPG, GIFor TIFF.
A logon button should be on the top left to allow persons to logon to the system. By logging onto the system,the user may or may not see more functions. A user with Menu Administrative rights can add items to themenu, change the order of menu items, edit the menu titles or assign user rights and permissions.
The main (Home Page) will have a summary in the main information region of the last edited items forcategories (or main menu items) which is marked to display summary on Home Page. The number of items tobe displayed on the main page from each category should be configurable.

Technical Specifications on CEC Website Integration into SAISE
2010/10/08 CEC Website Integration into SAISE Technical Spec NEW
Revision 3 P a g e | 39 # 52
The menu system should be loaded from Database Tables and should be configurable by persons withAdministrative rights. The display order should also be configurable. The menu levels are envisage beingmaximum three levels deep, but should not be limited to three. Each Menu Item should have a permissionassign to it and only be displayed if the logon User have the rights to see it.
The current Main Navigation topics or Navigation Menu of the Website are:

Technical Specifications on CEC Website Integration into SAISE
2010/10/08 CEC Website Integration into SAISE Technical Spec NEW
Revision 3 P a g e | 40 # 52

Technical Specifications on CEC Website Integration into SAISE
2010/10/08 CEC Website Integration into SAISE Technical Spec NEW
Revision 3 P a g e | 41 # 52
Technical Specifications on CEC Website Integration into SAISE
2010/10/08 CEC Website Integration into SAISE Technical Spec NEW
Revision 3 P a g e | 42 # 52
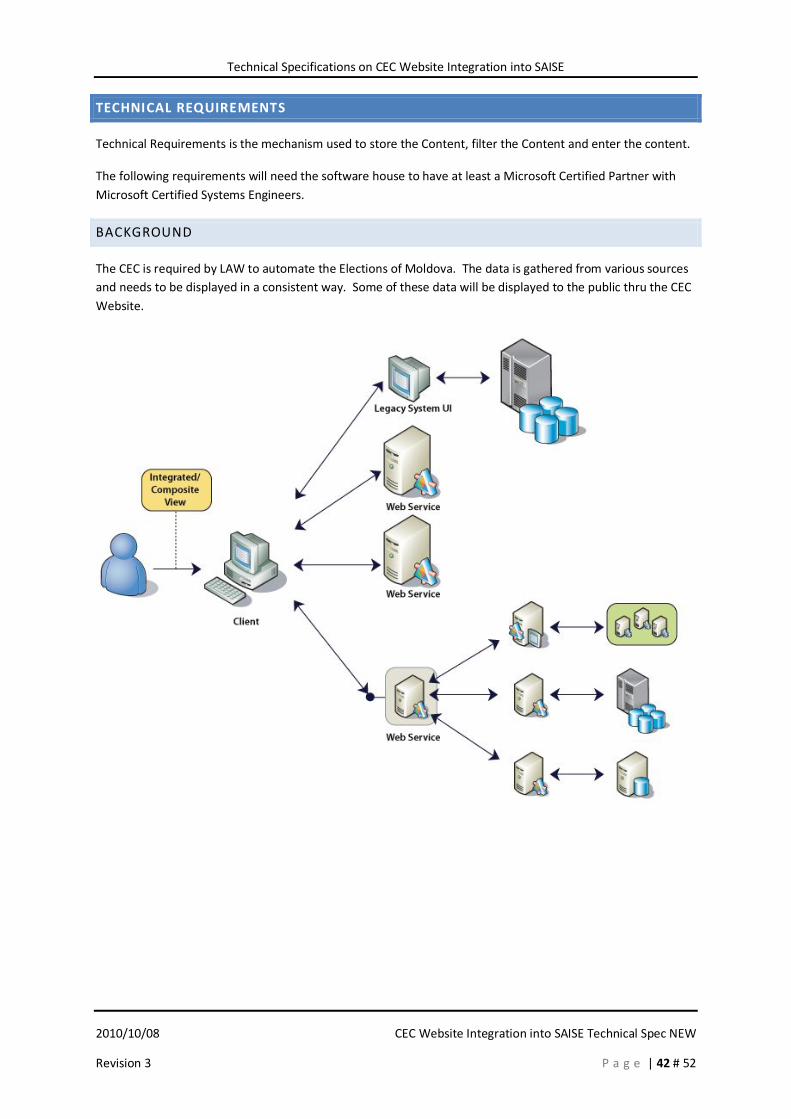
TECHNICAL REQUIREMENTS
Technical Requirements is the mechanism used to store the Content, filter the Content and enter the content.
The following requirements will need the software house to have at least a Microsoft Certified Partner withMicrosoft Certified Systems Engineers.
BACKGROUND
The CEC is required by LAW to automate the Elections of Moldova. The data is gathered from various sourcesand needs to be displayed in a consistent way. Some of these data will be displayed to the public thru the CECWebsite.

Technical Specifications on CEC Website Integration into SAISE
2010/10/08 CEC Website Integration into SAISE Technical Spec NEW
Revision 3 P a g e | 43 # 52
To fit seamlessly into the SAISE, especially with automated Election Results updates, it is recommended thatthe Web Site should be developed as a Module of SAISE. Below is a diagram to understand the overview ofwhere the CEC Website will fit into the bigger picture. The CEC Website will only be one module inside theSAISE.
SAISE Database
VoterUpdate
CEC Website
ResultManagementDelimitation
VoterTurnout

Technical Specifications on CEC Website Integration into SAISE
2010/10/08 CEC Website Integration into SAISE Technical Spec NEW
Revision 3 P a g e | 44 # 52
DESIGN PATTERN
The following describe the required technologies to be used in the development of the Website.
The Website will need to store and display data to and from a Microsoft SQL Database (provided by the CEC).It would then be required to develop the module using an N-Tier Application concept. The Diagram belowshows the N-Tier Concept.
It is required to
· have a clear separation between the responsibilities of designers, developers and databaseadministrators
· maximize the code that can be tested with automation
· share code between pieces of the user interface (UI) that require the same underlying behavior
· separate presentation and business logic from UI logic to make the code easier to understand andmaintain
· allow a user interface designer to easily create or modify the UI for your application; by doing this,developers can focus on the application's logic and structure
· The data needs to be displayed requires some form of conversion or adaptation before it can bedisplayed in the user interface
· The data needs to be displayed will requires some form of validation before it can be updated by theuser interface
There is a clear separation of responsibilities between the
· GUI (Graphical User Interface - Graphics, Screen layouts, colors). Graphic designers can workindependently on the colors and layout without the knowledge of any coding or SoftwareEngineering.
· Business Objects (BO - Business Logic, Software Engineering).
· Database (Microsoft SQL Server - Database, Data).

Technical Specifications on CEC Website Integration into SAISE
2010/10/08 CEC Website Integration into SAISE Technical Spec NEW
Revision 3 P a g e | 45 # 52
MODULAR APPROACH
Modularity is designing a system that is divided into a set of functional units (named modules) that can becomposed into a larger application. A module represents a set of related concerns. It can include a collectionof related components, such as features, views, or business logic, and pieces of infrastructure, such as servicesfor logging or authenticating users. Modules are independent of one another but can communicate with eachother in a loosely coupled fashion.
A composite application exhibits modularity. For example, consider the CEC Website. The user can access avariety of functions, such as searching thru law or meetings, reading news or events, or if authorized, entersthe next event to be displayed to the public and entering a press release from a single user interface (UI).However, behind the scenes, each of these functions is a discrete module. These modules communicate witheach other and with back-end systems such as database servers. Application services integrate componentswithin the different modules and handle the communication with the user. The user sees an integrated viewthat looks like a single application.
Every main Menu Item is actually one small module inside the CEC Website (which is a part of a larger moduleof SAISE). Below diagram some of the Menu Items seen as Modules.
AUTHENTICATION AND SECURITY MEASURES
CEC Database
News
GUI
Event
GUI
Meetings
GUI
Procedures
GUI
Legal
GUI
News
BusinessObject
Event
BusinessObject
Meetings
BusinessObject
Procedures
BusinessObject
Legal
BusinessObject

Technical Specifications on CEC Website Integration into SAISE
2010/10/08 CEC Website Integration into SAISE Technical Spec NEW
Revision 3 P a g e | 46 # 52
It is required that for example the News and Press Release screen, some input functionality should exist for anauthenticated user with the correct permissions, to enter the Press Release Data. More such examples wouldbe the Login Screen, Events Calendar, Organizational chart, Law and Regulations, etc.
Every module or field that needs to input or enter data into the database needs to:
· Authenticate the User
· Ensure that the user has the correct permission
· Implement preventative measures for Denial of Service (DOS) attack mechanisms such as CAPTCHA· Implement preventative measures for SQL Injection techniques
The CEC database and Web Server is part of the security zone. Every transaction to enter data should beauthenticated. The preferred Data Method to use is LINQ to SQL.
Technical Specifications on CEC Website Integration into SAISE
2010/10/08 CEC Website Integration into SAISE Technical Spec NEW
Revision 3 P a g e | 47 # 52
VIEWS LAYOUT (GUI)
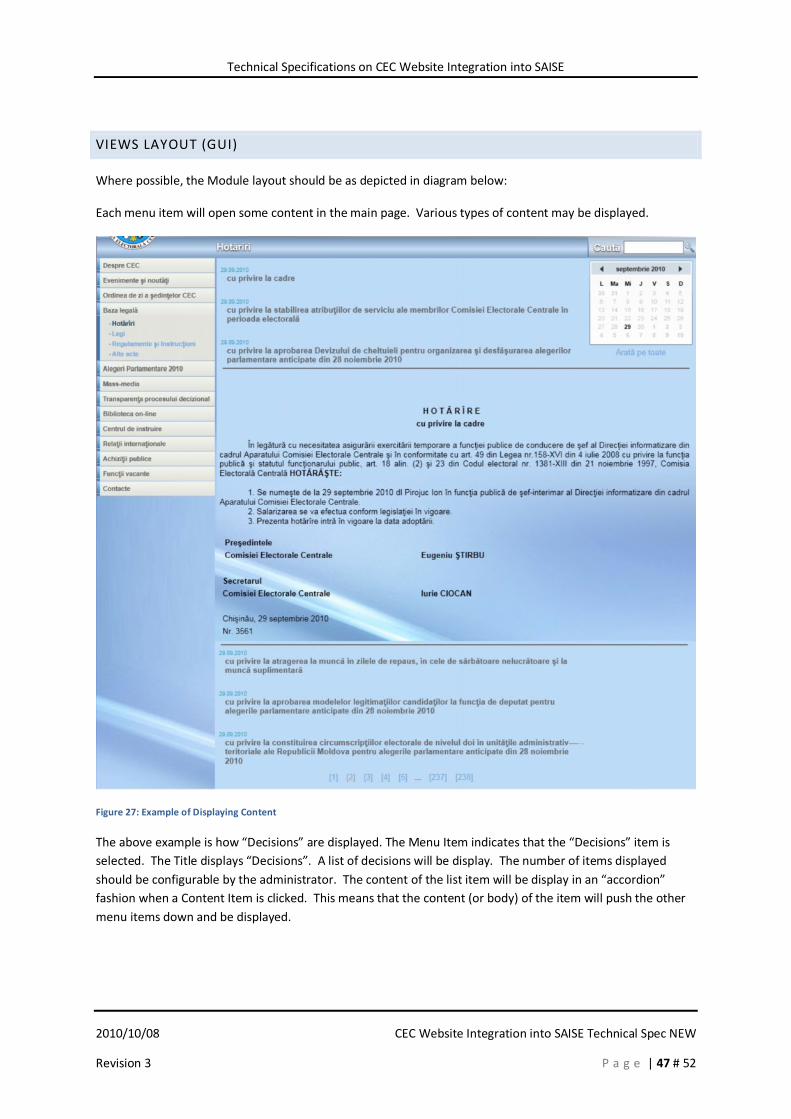
Where possible, the Module layout should be as depicted in diagram below:
Each menu item will open some content in the main page. Various types of content may be displayed.
Figure 27: Example of Displaying Content
The above example is how “Decisions” are displayed. The Menu Item indicates that the “Decisions” item isselected. The Title displays “Decisions”. A list of decisions will be display. The number of items displayedshould be configurable by the administrator. The content of the list item will be display in an “accordion”fashion when a Content Item is clicked. This means that the content (or body) of the item will push the othermenu items down and be displayed.

Technical Specifications on CEC Website Integration into SAISE
2010/10/08 CEC Website Integration into SAISE Technical Spec NEW
Revision 3 P a g e | 48 # 52
There are various types or templates of items. Below are a summary of the template types:
Figure 28: Template types for displaying Content
Every action should have feedback to the user in the Status Line Area. Errors will be reported in the “Error”color specified by CEC.
The search area can be seen as a filter of Grid area. When a user enters a certain search or filter and click onthe ‘Search’ icon or button, the result grid will be showing the resulting search or filter.
The Grid or Information Area will list normally all the information in a “Grid” or “Grid-like” template, such as alist of Events or a list of Law articles. The sort order for each will be defaulted to a pre-determined sort ordersuch as latest date on top or Law in article order, but could be changed by the User.
When the user is authenticated and has the correct permissions, the Data entry zone will be activated and theUser can enter data to be appended to the Data Grid for publishing. It might be required that in certaincircumstances, that the grid should provide to the authenticated user with permissions, a ‘Select’ button of theGrid Items. The selected Grid Item will then be loaded into the Data Entry Zone for editing.
Some modules will not be able to conform to this layout such as the “About” screens.
ADMINISTRATION
Technical Specifications on CEC Website Integration into SAISE
2010/10/08 CEC Website Integration into SAISE Technical Spec NEW
Revision 3 P a g e | 49 # 52
BUSINESS LOGIC (BUSINESS OBJECTS)
All menus, buttons, text, and functionalities should have a permission system and this permission should beable to be allocated to the logon user. Thus some features will only be available to authorized/authenticatedusers.
All database fields should be displayed in the View in the pre-defined grid template and be fully searchable toproduce a filtered result set (if requested).
The Primary Key and the Audit fields EditUser, EditDate and Version should only be used internally and doesnot need to be displayed in the View.
Each of Database tables should have a corresponding ‘Add’, ‘Update’ and ‘Delete’ buttons with the respectivedata fields in the Data Entry Zone of the View and should only be displayed when an Authenticated User hasthe correct permission.
All data entered into the system should be searchable. For example, Law and Regulations should be able tobe able search on one word and return all the Law and Regulations which contain that word.
DATABASE STRUCTURES
The following Menu Items or Sub Modules should have at least the following fields in the database:
· News or Press Releaseso NewsId – Primary Key and Sequenceo DateOfEntry – When the news is entered for publication (displayed after abstract as “ -
dd.MM.yyyy”)o ReferenceNumber – CEC internal reference numbero Title – Heading of the news (displayed in Bold)o Abstract – Short abstract (displayed in cursive)o Article – The news or press release article content (displayed in Website font)o EditUser – Logon User ID who added or changed the current recordo EditDate– Date and Time when record was added or changedo Version – A database triggered sequence keeping track of the changes
· Event Calendaro EventId – Primary Key and Sequenceo DateOfEntry – When the event will happen(ed) (displayed in bold before the Title
“dd.MM.yyyy - “)o ReferenceNumber – CEC internal reference number

Technical Specifications on CEC Website Integration into SAISE
2010/10/08 CEC Website Integration into SAISE Technical Spec NEW
Revision 3 P a g e | 50 # 52
o Title – Heading of the event (displayed in Bold)o Abstract – Short abstract (displayed in cursive)o Event – The event content (displayed in Roman font)o EditUser – Logon User ID who added or changed the current recordo EditDate– Date and Time when record was added or changedo Version – A database triggered sequence keeping track of the changes
· Procedureo ProcedureId – Primary Key and Sequenceo DateOfEntry – When the procedure was published or updated (displayed in bold before the
Title “dd.MM.yyyy - “)o ReferenceNumber – CEC internal reference numbero Title – Heading of the procedure (displayed in Bold)o Abstract – Short abstract (displayed in cursive)o Procedure – The procedure content (displayed in Roman font)o EditUser – Logon User ID who added or changed the current recordo EditDate– Date and Time when record was added or changedo Version – A database triggered sequence keeping track of the changes
· Procedure Stepo ProcedureStepId – Primary Key and Sequenceo ProcedureId – Foreign Key to Procedureo Number – Sequence Number of stepo Description – Short description of stepo EditUser – Logon User ID who added or changed the current recordo EditDate– Date and Time when record was added or changedo Version – A database triggered sequence keeping track of the changes
· Meetingo MeetingId – Primary Key and Sequenceo DateOfMeeting – When the meeting was conducted (displayed after Title as “ -
dd.MM.yyyy”)o ReferenceNumber – CEC internal reference numbero Title – Heading of the meeting(displayed in Bold)o AttendanceList– People who attended the meeting(displayed in cursive)o MinutesOfMeeting – The news or press release article content (displayed in Website font)o EditUser – Logon User ID who added or changed the current recordo EditDate– Date and Time when record was added or changedo Version – A database triggered sequence keeping track of the changes
· Minutes Of Meetingo MinutesOfMeetingId – Primary Key and Sequenceo MeetingId – Foreign Key to Meetingo Description – Short description describing the discussion pointo EditUser – Logon User ID who added or changed the current recordo EditDate– Date and Time when record was added or changedo Version – A database triggered sequence keeping track of the changes
· Attendance to Meetingo MinutesOfMeetingId – Primary Key and Sequenceo MeetingId – Foreign Key to Meetingo Title – Title of Person (Mr., Ms. ,etc)
Technical Specifications on CEC Website Integration into SAISE
2010/10/08 CEC Website Integration into SAISE Technical Spec NEW
Revision 3 P a g e | 51 # 52
o FirstName– First Nameo LastName– Last Nameo EditUser – Logon User ID who added or changed the current recordo EditDate– Date and Time when record was added or changedo Version – A database triggered sequence keeping track of the changes
· Legal / Law Documents (This table needs to adapt and conform to store every title and article of theElection Law, Acts and other legal articles and to be verbatim reconstructed)
o ArticleId – Primary Key and Sequenceo DateOfAcceptance – When the Law was adopted (displayed in bold before the Title
“dd.MM.yyyy - “)o ReferenceNumber – CEC internal reference numbero ArticleNumber – LAW main article number (displayed in front of article)o ArticleSubNumber – LAW article sub number (displayed in front of article, might be more
than one sub number)o Title – Heading of the article (displayed in Bold)o Abstract – Short abstract (displayed in cursive)o Article – The article content (displayed in Roman font)o EditUser – Logon User ID who added or changed the current recordo EditDate– Date and Time when record was added or changedo Version – A database triggered sequence keeping track of the changes
· Frequently Asked Questions (FAQ)o FaqId – Primary Key and Sequenceo DateOfEntry – When the FAQ was entered(displayed in bold before the Title “dd.MM.yyyy -
“)o ReferenceNumber – CEC internal reference numbero Question – Frequently Asked Question(displayed in Bold)o Answer– The answer to the FAQ(displayed in cursive)o EditUser – Logon User ID who added or changed the current recordo EditDate– Date and Time when record was added or changedo Version – A database triggered sequence keeping track of the changes
· Training Centreo Various formats (PDF, DOC, JPG, etc) of documents can be stored as Binary Files in a folder
on the Web Server with hyperlinks to View / Download the document
· Briefing Packso Various formats (PDF, DOC, JPG, etc) of documents can be stored as Binary Files in a folder
on the Web Server with hyperlinks to View / Download the document
Technical Specifications on CEC Website Integration into SAISE
2010/10/08 CEC Website Integration into SAISE Technical Spec NEW
Revision 3 P a g e | 52 # 52
SOURCE CODE
All rights and source code, except well-known libraries such as Microsoft API, should be transferred to the CEC.The full solution with all source code files with full design documents will be transferred to the CEC inElectronic format. The source code must be fully documented.
The CEC reserves the right to further develop the software for use in Moldova, to install it on other and/ormore equipment, and to transfer the rights to other entities within Moldova but not to sell or distributesoftware it outside Moldova except for Moldova Embassies.
All Unit Tests for each module should be transferred to the CEC
CEC shall be entitled to all intellectual property and other proprietary rights including but not limited topatents, copyrights, and trademarks, with regard to products, or documents and other materials which bear adirect relation to or are produced or prepared or collected in consequence of or in the course of the executionof this Contract. At the CEC's request, the Contractor shall take all necessary steps, execute all necessarydocuments and generally assist in securing such proprietary rights and transferring them to CEC in compliancewith the requirements of the applicable law.
Generic software must be delivered as licensed to the CEC.