Module No. 5 Serve and Volley the Ball
19
1 Module No. 5 Serve and Volley the Ball What is this Module All About? This module will help you know and experience the basic skills in volleyball. It will also give you a chance to participate in some drills and lead-up games in volleyball which will hone your skills in playing this team sport. What Do You Expect To Learn? At the end of this module your shall have: 1 explained the significance of team sports 2 traced the origin of volleyball 3 demonstrated the basic skills in volleyball 4 discussed the equipment, players and court used in volleyball 5 defined the terms used in volleyball 6 performed appropriate conditioning exercises 7 participated actively in volleyball lead-up games How Do You Learn From This Module? This module is designed for easy comprehension. To be able to appreciate fully the contents of this module you should do the following: 1. Answer the pre-test to find out how much you know of the lessons to be discussed. 2. Check your answers by using the Key to Correction provided at the back of this module? 3. Read the module carefully and thoroughly. 4. Be sure to approach your teacher for any unclear instructions. 5. Look for a volleyball court which is free from broken glasses. What do you know about volleyball? Do you know who invented this game? How was it called before? Can you enumerate the equipment used in volleyball? How about the basic skills needed? Have you participated in any volley- ball lead-up game?
Transcript of Module No. 5 Serve and Volley the Ball

1
Module No. 5Serve and Volley the Ball
What is this Module All About?
This module will help you know and experience the basic skills in volleyball. It will also give you achance to participate in some drills and lead-up games in volleyball which will hone your skills in playingthis team sport.
What Do You Expect To Learn?
At the end of this module your shall have:1 explained the significance of team sports2 traced the origin of volleyball3 demonstrated the basic skills in volleyball4 discussed the equipment, players and court used in volleyball5 defined the terms used in volleyball6 performed appropriate conditioning exercises7 participated actively in volleyball lead-up games
How Do You Learn From This Module?
This module is designed for easy comprehension. To be able to appreciate fully the contents of thismodule you should do the following:
1. Answer the pre-test to find out how much you know of the lessons to be discussed.2. Check your answers by using the Key to Correction provided at the back of this module?3. Read the module carefully and thoroughly.4. Be sure to approach your teacher for any unclear instructions.5. Look for a volleyball court which is free from broken glasses.
What do you know about volleyball?Do you know who invented this
game? How was it called before?Can you enumerate the equipment
used in volleyball? How about the basic skillsneeded?
Have you participated in any volley-ball lead-up game?
2
Module No. 5Serve and Volley the Ball
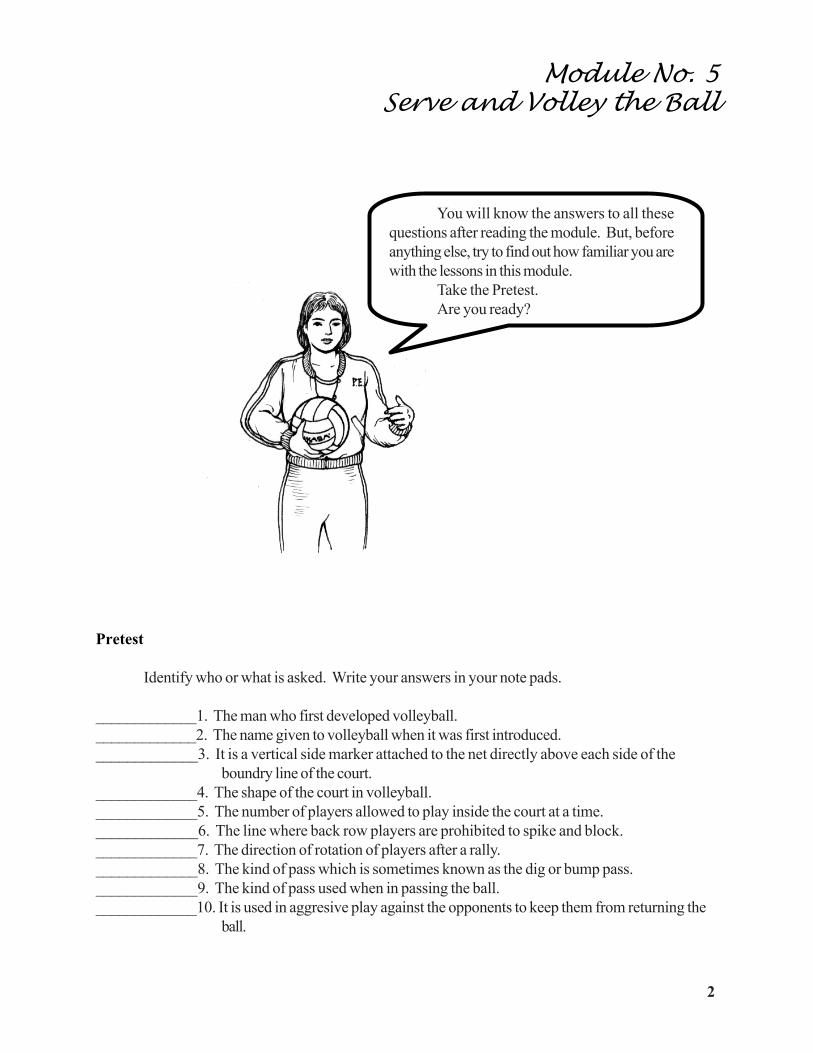
You will know the answers to all thesequestions after reading the module. But, beforeanything else, try to find out how familiar you arewith the lessons in this module.
Take the Pretest.Are you ready?
Pretest
Identify who or what is asked. Write your answers in your note pads.
_____________1. The man who first developed volleyball._____________2. The name given to volleyball when it was first introduced._____________3. It is a vertical side marker attached to the net directly above each side of the
boundry line of the court._____________4. The shape of the court in volleyball._____________5. The number of players allowed to play inside the court at a time._____________6. The line where back row players are prohibited to spike and block._____________7. The direction of rotation of players after a rally._____________8. The kind of pass which is sometimes known as the dig or bump pass._____________9. The kind of pass used when in passing the ball._____________10. It is used in aggresive play against the opponents to keep them from returning the
ball.

3
Lesson -1 Volleyball as Team Sport
Volleyball is a team sport which is played in a court with a high net by two (2) teams with six (6)persons on each team court. It may be played by all male, all female, or mixed teams with net heightadjustments for boys, girls or age-group differences; and using a variety of playing surfaces; wood, rub-berized materials, and or grass.
The basic objective of the game is to keep the ball which is served over the net, from contacting thefloor on your side and to return it so that it contacts the floor on the opponents’ side before they can returnit. The team that fails to return the ball within the specific limits, loses the chance to serve and gives a pointto the team’s opponent.
In the game volleyball, the cooperation of the members of the team is important.
Activity 1
1. Write the word volleyball on the blocks provided for. Do this activity in your notepads.
2. Why is volleyball considered as a team sport? Write your answers in your notepads.
Module No. 5Serve and Volley the Ball
You may proceed to lessons 2, 3 and 4.Then,do the activities on page 2 and 13.

4
Lesson -2 The History of Volleyball
Volleyball was first developed by William G. Morgan. After graduation from Springfield College inMassachusetts in 1895, William G. Morgan took a position as physical director of the Holyoke YoungMen’s Christian Association. The main activity was basketball, a relatively strenuous sport for the busi-nessmen who used the facilities of the gymnasium. Some older men did not like it because of the roughnessof the game.
In 1896 at a YMCA Conference at Springfield College, Mr. Morgan publicized a new game. Anet 6 feet 6 inches was stretched across the gymnasium. The main object of this new game was to hit theball back and forth over the net with the hands. The game was started with a serve. The server wasallowed three “outs” after which the opposite team was permitted to serve. To constitute an out, the ballhad to land out-of-bounds or hit the floor on a second bounce. The game was introduced as “Mintonette”but after watching the game, a faculty member of Springfield College, Dr. Alfred T. Halstead, recom-mended that the name be changed to volleyball. Shortly after the game’s invention, Mr. Morgan drew upspecifications for a special ball.
By 1912, several rule changes had been made. Volleyball became very popular with schools,colleges, playgrounds and the armed forces. In 1929, the United States Volleyball Association was formed.
The game volleyball was introduced in the Philippines by the YMCA in 1910. This sport becamean Olympic sport in1964 during the Tokyo Olympic Games.
Lesson 3 - The Equipment Used in Volleyball and the Playing Area
Volleyball is an inexpensive activity. The player’s equipment is minimal, requiring only rubber-soled shoes and possibly knee pads (individual preference) for hard playing surfaces.
The Ball
The ball is made of leather, 25 to 27 inches in cir-cumference and weighs 260-280 grams, white color wasused for sometime until recently, the combination of white,blue and yellow colors was introduced.
Module No. 5Serve and Volley the Ball

5
The Net
The net is slightly longer than the width of thecourt, 32 feet is a common length, 36 inches in widthfrom top to bottom made up of nylon cord. The netis made of heavy thread so that repeated contact ofthe ball on the net will not destroy the mesh.
Nets should extend at least one foot on eachside of the court (32 feet), have 4-inch-square meshopenings and a flexible cord or cable running througha 2-inch-wide white band at the top.
The Posts or Net Supports
Two posts or net supports are needed in thisgame. The net supports should be located at least19 ½ inches outside the sideline. They should beanchored securely enough to allow the net to besafely stretched tight without any sag below the re-quired height. Supports with easily adjustable set-tings assist in quickly varying net height.
The Antennas
The antennae is a vertical side marker at-tached to the net directly above each side of theboundary line of the court. The antennas extendupward from the net directly above the sideline toassist in determining whether the ball crossed the netwithin the court. It measures one (1) meter abovethe net. A ball contacting the antennae is out of play
Module No. 5Serve and Volley the Ball

6
The Court
The court is a rectangle measuringnine meters wide and nine (9) meters long.It is bounded by two lines, two inches wide.The court is divided into equal halves sepa-rated by a center line and net. A line three(3) meters parallel from the center line iscalled attack line. This line indicates the areawhere back row players are prohibited tospike and block.
Lesson 4 - The Players and Rotation
A team is made up of twelve (12)players but only six (6) players are allowedto play inside the playing court.
There are three front row and threeback row players.
Net
When the ball is not on play, the players must re-main in the proper rotation order, which establishes thesequential service order. Proper rotation order ( 6 on 6)establishes three front row and three back row players.The back row players may not legally enter the front courtattack area to block or attack the ball over the net. Whenthe ball is dead, players may not overlap with a player whois in an adjacent position. “Adjacent” refers to the playerin the corresponding position on the opposite row. (Ex-ample: center back (CB) with center front (CF), plus theteammates next to that player on the same row. (Example:center (CB) with both left back (LB) and right back (RB)players.) The players all rotate one position clockwise fol-lowing a rally.
Module No. 5Serve and Volley the Ball
F CF RF
B CB RB

7
The Server
The player who rotates to the rightback position serves, or if at the start ofthe game is the first server. The serve isinitiated from anywhere behind the end lineof the court. The objective is to serve theball across the net into the opponent’s court.After the ball is served, players can cover anysection of the court.
Module No. 5Serve and Volley the Ball
You may check your answers against theKey to Correction on page 18.
This time, try to be familiar with the differ-ent terminologies in volleyball. These terms aredefined in Lesson 5. Then execute the fundamen-tal skills and techniques in volleyball. Study eachskill carefully and perform it.
Activity 2
After reading Lessons 2, 3 and 4, can you identify the following? Write your answers on your notepad.
____________ 1. The person who developed volleyball?____________ 2. The year when volleyball was publicized at YMCA Conference at Springfield
College.____________ 3. The equipment used in volleyball.____________ 4. The shape of the volleyball court.____________ 5. The number of players allowed to play inside a volleyball court.

8
Module No. 5Serve and Volley the Ball
Lesson 5 - Terminologies
The terms in volleyball have been defined to make it easy for you to understand. Here they are.
ATTACK - any method used to return the ball across the net in an attempt to put theopponents at a disadvantage.
BLOCK - the process of intercepting the ball just before or as it crosses the net. A blockis executed by any front row player.
DIG - an emergency pass, usually used to defend a hard driven attack.
DINK - a soft shot off the fingertips, used to lob the ball over the block.
DRIVE - an attack contacted in the center that attempts to hit the ball off th blocker’shands.
FAULT - an infraction of the rules.
FOREARM PASS - a pass made off the forearms.
FRONT COURT - the playing area in which it is legal to block or attack.
KILL - an attack that cannot be returned directly as a result of that attack.
LOB - a soft attack that is contacted in the back bottom quarter of the ball, causing itto take an upward trajectory.
OVERHEAD PASS - a pass made by contacting the ball above the head with the finger pads.
POINT - a point is scored when the receiving team fails to return the ball legally to theopponent’s court.
ROTATION - the shifting of the players clockwise upon gaining the ball from the opponents.
SERVE - the method of putting the ball in play over the net by striking it with the hand.
SET - the placement of the ball near the net to facilitate attacking.
SETTER - the player assigned to set the ball.
SPIKE - a ball hit its tipspin and a strong downward force into the opponets’ court.
SPIKER - the player assigned to attack the ball.
TOPSPIN - imparting of a forward spin to the ball during the serve, spike or spike roll.

9
Lesson 6 - Fundamental Skills and Techniques
Volleyball comprises five basic skills: forearm pass, overhand pass, serve attack and block. Eachskill uses a variety of techniques that players need as they progress from beginning to advanced levels ofcompetition.
The ball handling skills: the forearm pass and the overhand pass constitute at least two-thirds ofthe ball contact during play. The serve often dominates play and is considered as a crucial skill becausethere are times when a team dominates through good service only. The attack adds offense and power tothe game but can only be utilized when the ball handling skills become accurate and consistent. The blockis used only when the opposing team consistently attacks the ball from a point near or above the net,forcefully driving it downward into one’s court.
The Forearm Pass
The forearm pass also called “pass”. “bump” or“dig” is the most frequently used ball handling skill. It isutilized to pass the serve, play balls below the waist, playhard-driven balls and contact balls located far from theplayer.
Learning Hints
· Assume a stride position, feet are shoulder width apart with the body weight forwardon the inside front half of each foot with the heels slightly off the ground.
· Keep the knees flexed approximately 90 degrees inside the feet and in front of thetoes.
· Keep the upper body in a front-leaning position with waist flexed approximately 90degrees and the shoulders in front of the knees
· Connect the hands by pressing the pads of both thumbs together with the base of thethumbs even and level. Keep the grip relaxed with the hands extended downward.
Module No. 5Serve and Volley the Ball

10
Module No. 5Serve and Volley the Ball
The different ways of clasping the hands together are shown in the illustrations below.
· Reach out your arm in front of your body and rotate elbows inward together thusexposing the fleshy part of the forearm. The arms are parallel with the thigh of theleading leg.
· Contact the ball on the fleshy part of the forearm approximately 2 to 6 inches abovethe wrist. The trajectory angle of the rebound is dependent upon the angle of theforearms. Focus the eyes on the ball until the contact and the rebound.
· Provide force

11
Module No. 5Serve and Volley the Ball
Overhand Pass
The overhand pass is used for accurately passingany ball above the head to a teammate and for the settingtechnique of passing the ball to an attacker with specificheight, trajectory and placement
.· Assume a stride position with the feet al-most shoulder width apart, the body weightis forward on the inside front half of eachfoot with the heels slightly raised.
· Flex the knees in front of the toes with theupper body in a front leaning position withthe waist flexed approximately 90 degreesand the shoulders in front of the knees.
· Raise both arms with the elbows flexed atapproximately chin height and the hands areequally positioned six (6) inches above the forehead with the wrist flexed back.
· Spread fingers and hands into the shape of the approaching ball, thumbs pointing towardthe nose and wrist flexed back.
· Contact the ball on the inside edge of the first digital areas of the thumbs, index, middle andring fingers and allow the ball to almost slide through, with the hands on the side.
Serve
The serve has an expected success rate that is 80 to 90 percent higher than the other skills becausethe server tosses the ball to himself rather than receiving the ball from another player. Equally important isthe fact that the serve is the first opportunity a team has to put the opponent at a disadvantage.
The most commonly used service are the underhand serve, the overhand serve and the side armserve.
To make an underhand serve
· Stand facing the net with the left foot slightlyforward and the weight on the right foot.
· Hold the ball with the left hand with the leftarm across and a little in front of the body andthe ball resting on the pads of the left fingers
· Step left foot forward, transferring the weightto the front foot and at the same time, bring

12
Module No. 5Serve and Volley the Ball
the right arm back in a preparatory motion.· Swing the right hand forward and contact the ball, just below the center. The ball can be
hit with an open hand or with the fist either facing forward or sideward.· Follow through with the arm to ensure a smooth serve.
Note: These directions are for a right-handed serve.
Overhand Serve
· Stand with the left foot in front and the leftside of the body turned somewhat towardthe net with the weight on both feet.
· Hold the ball in the left hand directly in frontof the face.
· Toss the ball straight up shifting the weightto the back foot. The height of the toss isa matter of choice, but from 3 to 5 ft. issuggested.
· Contact the ball with the open palm or withthe fist above the shoulder as the ball dropsthus shifting the weight to the forward footwhich can take a short step forward.
Note: An effective serve is one that has no spin-a floater. The directions are for a right –handed serve.
Sidearm Serve
Like the overhead serve, the sidearm serve ispowerful and difficult to receive. This serve goes over the netinto a downward trajectory.
· Take a forward stride position behind theendline with the left side toward the net.
· Hold the ball with the left hand in front of thebody and over or slightly ahead of the left foot.
· Bring the right arm which should be fully ex-tended to approximately shoulder level andshift weight to the rear foot.
For the left-handed serve, reverse the position and movements.
For the left-handed serve, reverse the position and movements.

13
· Move the right arm forward to make contact with the ball with either the heel of the handor a closed fist.
· Follow through in the direction in which the ball is to travel.
Attack
The attack is used in aggressive play against theopponents to keep them from returning the ball or makinga transition to return it aggressively.
To be able to block, do these steps:
· Stand in stride position with the shoulders parallel with the net, about 6 to 12 inches farwith the knees slightly flexed for quick movement.
· Position the hands between the net and the body at shoulder height with fingers spreadand palms facing the net.
· Flex the knees to a near 100-degree angleand jump off from the floor and thrust thearms straight upward parallel with the net.
· As the hands clear net height, gently pushthem across as far as possible , being carefulnot to touch the net. Position the outsidehand slightly toward the court to deflect theball inward.
· Pike slightly at the waist for balance andpower.
· Withdraw hand gently upon descending andreturn them in front of the body.
· Bend the knees upon floor contact to ab-sorb shock and for balance. Pivot away fromthe net, following the direction of the ball.
Module No. 5Serve and Volley the Ball
· Move quickly to the desired place whenthe setter takes an action for the set.
· Swing both arms backward and bendedknees to gain height in jumping.
· Jump as high as you can and hit the ballforcibly downward with a snap of thewrist.
· Swing the arms downward for followthrough after the contact.

14
Activity 3
1. Were you able to execute the different fundamental skills in volleyball?2. Please check the skills which you think you were able to do with “good” performance?
____________ Forearm Pass____________ Overhand Pass____________ Underhand Serve____________ Overhand Serve____________ Sidearm Serve____________ Attack____________ Block
3. Do you think you need time to practice the above-mentioned skills? Why?
Activity 4
1. Look for a partner and practice the forearm pass. Try to pass the ball back and forth forat least twenty times.
2. Practice the overhand pass with your partner, too.
Activity 5
1. Go to a volleyball court and practice how to spike or attack.2. Follow the steps in blocking on page 13. Practice this skill with a partner on the opposite
court.
How well did you do the different funda-mental skills?
How about using these skills in drills andlead-up games?
Module No. 5Serve and Volley the Ball
15
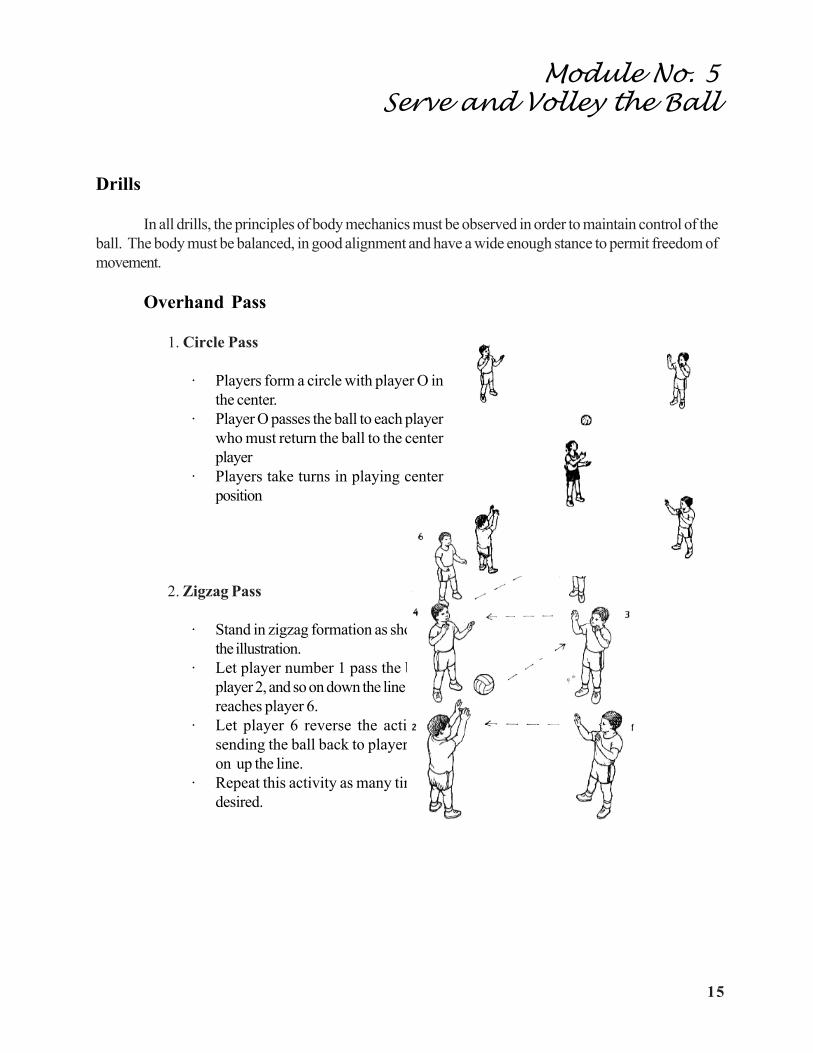
Drills
In all drills, the principles of body mechanics must be observed in order to maintain control of theball. The body must be balanced, in good alignment and have a wide enough stance to permit freedom ofmovement.
Overhand Pass
1. Circle Pass
· Players form a circle with player O inthe center.
· Player O passes the ball to each playerwho must return the ball to the centerplayer
· Players take turns in playing centerposition
2. Zigzag Pass
· Stand in zigzag formation as shown inthe illustration.
· Let player number 1 pass the ball toplayer 2, and so on down the line until itreaches player 6.
· Let player 6 reverse the action bysending the ball back to player 5 andon up the line.
· Repeat this activity as many times asdesired.
Module No. 5Serve and Volley the Ball
16
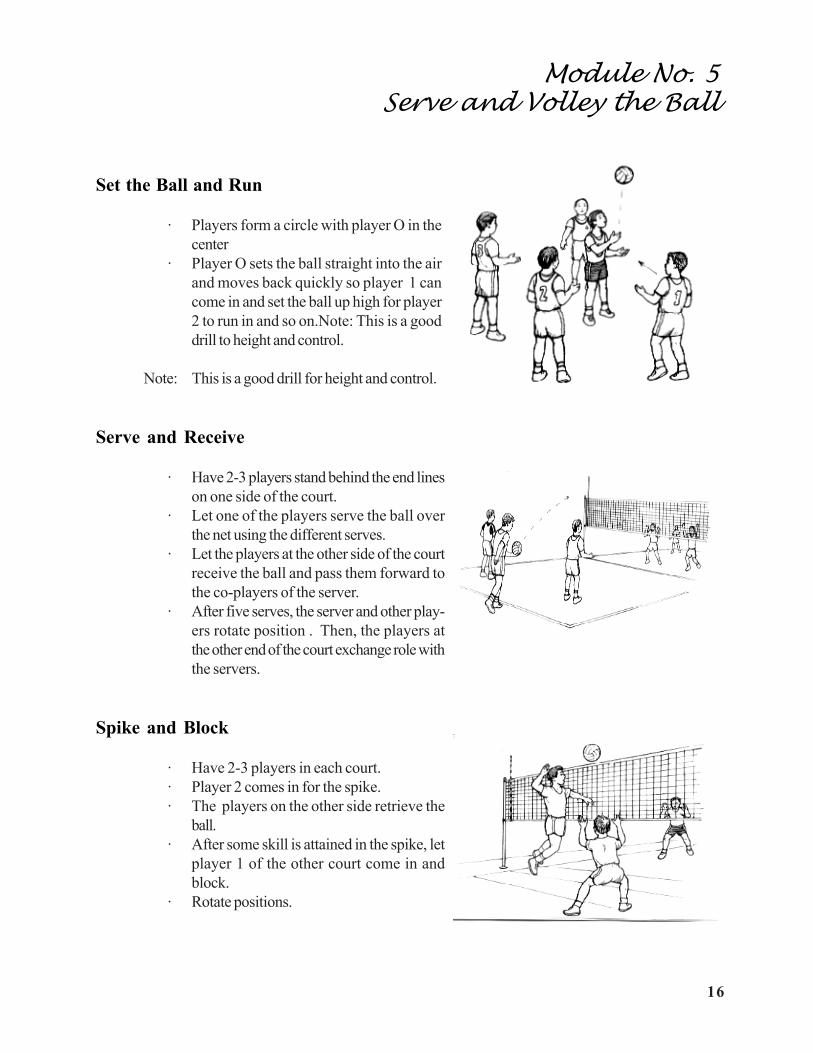
Set the Ball and Run
· Players form a circle with player O in thecenter
· Player O sets the ball straight into the airand moves back quickly so player 1 cancome in and set the ball up high for player2 to run in and so on.Note: This is a gooddrill to height and control.
Note: This is a good drill for height and control.
Serve and Receive
· Have 2-3 players stand behind the end lineson one side of the court.
· Let one of the players serve the ball overthe net using the different serves.
· Let the players at the other side of the courtreceive the ball and pass them forward tothe co-players of the server.
· After five serves, the server and other play-ers rotate position . Then, the players atthe other end of the court exchange role withthe servers.
Spike and Block
· Have 2-3 players in each court.· Player 2 comes in for the spike.· The players on the other side retrieve the
ball.· After some skill is attained in the spike, let
player 1 of the other court come in andblock.
· Rotate positions.
Module No. 5Serve and Volley the Ball

17
Let’s Summarize
Volleyball is a team sport which is played in a court with a high net by two (2) teams with six (6)persons in each team court. The basic objective of the game is tokeep the ball which is served over the net,from contacting the floor on your side and to return it so that it contacts the floor on the opponents’ sidebefore they can return it.
The game was developed by William G. Morgan. It was introduced as “mintonette” but latercalled volleyball.
Module No. 5Serve and Volley the Ball
Did you enjoy the drills and the lead-upgames? Which one did you enjoy most?
Look for some friends and neighbors and letthem join you in doing the drills and lead-up games.

18
Post Test
I. Match the given statement in column A with the words/names/ year in column B. Write the letterof your answer on the blank provided before each number. Do this in your notepads.
______ 1. attack a. It is a process of intercepting the ball over the net.______ 2. block b. It is used in aggressive play against the opponents to keep them from returning the ball.______ 3. antennae c. The original name of volleyball______ 4. 1910 d. The man who invented volleyball______ 5. 1929 e. The vertical side marker attached to the net directly above each side of the boundary line of the court______ 6. forearm pass f. The college where volleyball was publicized at YMCA Conference______ 7. Mintonette g. The year the United States Volleyball Association was formed______ 8. Overhead Pass h. The year the game volleyball was introduced in the Philippines by YMCA______ 9. Serve i. It is sometimes called a “bump” or a “dig pass”______ 10. Springfield College j. It is used for accurately passing any ball above the head.
k. The method of putting the ball in play over the net by striking it with the hand.
II. Practicum1. Given five (5) chances to serve the ball from the service area, how many times can you
serve the ball sucessfully? Use the criteria below in rating yourself:
5 - 100%4 - 90%3 - 80%2 - 70%1 - 60%0 - 50%
Module No. 5Serve and Volley the Ball

19
Module No. 5Serve and Volley the Ball
Key to Correction
Pre Test1. William Morgan2. Mintonette3. Antennae4. Rectangular or rectangle5. Six players6. Attack line or center line7. clockwise8. forearm pass9. overhead pass10. Spike or attack
Activity 1
1.
2. Volleyball is considered as team sports because it is played by a team of six players.
Activity 21. William Morgan2. 18963. volleyball ball4. rectangular5. six players
Post Test1. b2. a3. e4. h5. g6. I7. c8. j9. k10. f
v o l l e y b a l l
II. Practicum5 successful serves - 100%4 successful serves - 90%3 successful serves - 80%2 successful serves - 70%1 successful serve - 60% unsuccesful serve - 50%