Securing Buy-in Step 5: Securing Buy-in. Securing Buy-in Securing Buy-in Our Roadmap.

HS 366 R1/04
MODULE G
SELECTING AND SECURING CHILDRENIN VEHICLE SAFETY RESTRAINT SYSTEMS

HS 366 R1/04 G-1
MODULE G: Selecting and Securing Children in Vehicle SafetyRestraint Systems
Objectives At the completion of this module, the participant will be able to:1. Explain selected aspects of child physical development relative to child passenger
safety.2. Describe the purpose of child passenger restraints.3. List the types of vehicle restraint systems for children.4. Determine the appropriate ages and sizes of children for each restraint system.5. Determine best practice for use of each type of child restraint.6. Define four factors to consider in selecting the appropriate child restraint.7. Determine the appropriate child restraint system, given a hypothetical situation.8. Determine whether or not a child restraint system is acceptable for use.9. List the factors involved in the correct use of child restraints.10. Take apart a child restraint system.11. Reassemble a child restraint system that someone else has taken apart.12. Examine the function of each part of a child restraint system.13. Demonstrate the correct use of each type of child restraint according to best practice.14. Teach parents/caregivers how to correctly use a given child restraint according to best
practice.15. Describe the general guidelines for CRS cleaning and maintenance.16. Determine potential safety hazards presented by aftermarket accessories.17. Determine best practice relative to aftermarket accessories.18. Discuss issues that represent “tough choices.”19. Determine an appropriate response to “tough choice” situations.20. Select an appropriate restraint for children with special health needs such as cerebral
palsy, behavioral problems, and orthopedic devices.Content< Purpose of Child Passenger Restraints< Physical Development of Children Related to Child Passenger Restraint
Use< Child Restraint Systems - Function and Selection of Appropriate Restraints< Best Practice for Correct Use of Child Restraint Systems< Common Dilemmas Relating to Selection and Use of Child Restraint
Systems< Aftermarket AccessoriesLearning ActivitiesInstructor-led presentationHands-on exercise #3: Getting to know seats (parts)Hands-on exercise #4: Identifying the appropriate restraint
Materials NeededModule overheadsFlip chartDemonstration seats & parts & dolls (refer to list in Planning & Logistics module)Aftermarket accessory samples i.e., head roll and padding, safety beltpositioner, mirror

HS 366 R1/04 G-2
Hands-on Exercise Scenario cards

Lesson Plan Notes
HS 366 R1/04 G-3
Selecting and Securing Children inVehicle Safety Restraint Systems

Lesson Plan Notes
HS 366 R1/04 G-4
A. The Need for Child Restraint Systems
1. Child Development Characteristics &CRS Protection
a. The infant‘s head is large andheavy. Neck bones, ligamentsand muscles are not welldeveloped.
b. In a newborn infant, theshoulders are narrow & flexible,so they fit through the birth canal.
c. Child’s pelvis is small androunded. Its shape is not fullydeveloped until puberty. Lapbelt does not stay below the iliacspines reliably in elementary orpreschool aged child.
2. Protection provided by child restraintsystems.
a. Works with a vehicle’s safety beltsystem or LATCH.
b. Protection is based on theprinciples of physics associatedwith crash dynamics.
(1) Prevents ejection andcontact with roads, trees,other vehicles, etc.
(2) Distributes forces to thestrongest parts of the skeleton(the hips, back and shoulders).
(3) Spreads crash forces over abroad area of the body,thereby reducing forces onany particular component.

Lesson Plan Notes
HS 366 R1/04 G-5
(4) Provides a "ride-down"benefit.
(5) Protects head, neck, andspinal cord by preventingcontact with hard surfacesinside the vehicle, with otheroccupant.
c. Must be firmly attached to thevehicle and the child must befirmly secured in the childrestraint system.
d. It is critical that the child safetyseat be used correctly andmaintained in good workingorder.
B. Correct Use of Child Restraints
1. What is Correct Use?
a. Selecting the appropriaterestraint for the child’s age,weight, height, physicaldevelopment, and behavioralneeds.
b. Securing the child properly in therestraint.
c. Installing the restraint properly tothe vehicle in a suitable seatingposition.
d. Using a CRS that meetsappropriate federal standards.
e. CRS functioning correctly.
f. CRS free of recalls.
g. CRS has not been altered.

Lesson Plan Notes
HS 366 R1/04 G-6
h. CRS has not been involved in amoderate or severe crash.
2. Effectiveness of Child Restraints
a. Misuse reduces effectiveness, butthe degree is hard to determinedue to type(s) of misuse, forcesexerted, and speed.
b. Most recent data estimates thatCRSs are:
(1) 71% effective in reducingdeaths for infants inpassenger vehicles.
(2) 54% effective in reducingtoddler deaths.
(3) 69% effective in reducingneed for hospitalization.
c. Children are 37% less likely to befatally injured if riding in the rearseat.
C. “Tough Choices” for parents andrecommendations for “Bestpractice”
1. Tough Choices:
a. May not have clear, concreteanswer.
b. May reflect rapidly changingtechnology or new data.
c. Confront parents with unclearchoices.
- Technicians must be able toexplain concepts andprinciples that underlie the

Lesson Plan Notes
HS 366 R1/04 G-7
sometimes conflictinginstructions and advice.
2. Best Practice:
a. Suggested options that providesafest way to travel for child ofcertain age, size, physicaldevelopment, and behavioralneeds.
b. Best practice may conflict withreal world situations.
CPS Technicians should not makerecommendations againstspecific manufacturersinstructions but they need tounderstand the concepts thatunderlie currentrecommendations in order toprovide all of the informationneeded to enable parents tomake decisions for their child andvehicle circumstances.
D. Child Restraint System Parts & theirFunctions
1. Shell and frame:
a. The shell is usually made of hardplastic, there may also be ametal frame.
b. There may be a reclineadjustment for correct positioningof the child.
2. Seat padding
a. Must be flame retardant. (FMVSSgoverns flammability standards ofseat padding)

Lesson Plan Notes
HS 366 R1/04 G-8
b. The pad should not be replacedwith other materials.
3. Harness slots:
a. Child restraint systems come withone, two, three, or four sets ofslots.
b. Some newer models do notrequire changing slots to adjustheight.
4. Harness and/or shield:
The harnesses keep the child withinthe shell, distribute crash forces, andhelp the child “ride down” the crash.
a. Harness straps must be at least 1½ inches wide and may beconfigured as either shoulderstraps, two upper thigh straps andcrotch strap (five-point harness)OR shoulder straps attached to ashield with integral buckle OR aV-harness on a rear-facing-onlyrestraint.
b. Harnesses fasten between thelegs for proper positioning and toprevent “submarining.”
c. Harness systems may be < A V-harness for many infant-
only seats (forward facingseats do not have V-harnesses)
< A 5-point harness (2 shoulderstraps, 2 upper thigh strapsand a crotch strap)
< Shoulder straps attached to aT-shield
< A tray-shield (swings downover the child*s head)combined with harnesses.

Lesson Plan Notes
HS 366 R1/04 G-9
c. Harness systems may include aT-shield (attached to the shoulderstraps) or a tray-shield (swingsdown over the child*s head).
DELETE C, D, AND E AND REPLACE WITHTHE REWRITTEN C ABOVE
d. Most infant-only seats have a V-harness, some have a five-pointharness. Forward facing seats donot have V-harnesses.
e. A forward-facing CRS may haveonly a shield for upper bodyrestraint.
5. Harness retainer clip or tie:
a. It is usually made of plastic.
b. The retainer clip should bethreaded correctly and placedat armpit level to position theshoulder straps properly.
c. This clip holds the shoulderharnesses together for correctpre-crash positioning.
Note: Not all child restraint systems comewith a retainer clip. CR manufacturersdiffer in design of harness webbing andslots.
6. Harness adjustment mechanism:
a. Recent innovations have madenewer child restraint systemseasier to adjust.
b. Harness hardware can includeALR & ELR retractors, manualadjusters, “A-locks” (adjusterdevice on front of manyconvertibles), metal harnessadjuster slides, or rod/slot systems(a rod is inserted in appropriate

Lesson Plan Notes
HS 366 R1/04 G-10
fabric loops at the end of theharness).
7. Splitter plate
a. This metal plate connects the twoends of the shoulder harnesses toa single piece of webbing usedfor adjustment.
8. Buckles:
a. Child restraint buckles aredesigned with a stiff release todeter very young children fromunbuckling them.
9. Safety belt path(s)
a. Convertible child restraint systemsusually have different belt pathsfor rear-facing andforward-facing positions.
b. Infant-only child restraint systemswith detachable bases havedifferent belt paths dependingon whether or not the base isused.
10. Recline adjustment mechanism
a. The adjuster allows convertiblerestraints to be reclined for rear-facing and semi-reclined orupright for forward-facing use.
11. Level indicator
a. This helps parents and caregiversidentify the manufacturer’srecommended correct angle forrear-facing restraints.

Lesson Plan Notes
HS 366 R1/04 G-11
12. Labels
a. Certification:
(1) NHTSA requires the childrestraint system label to state:“This child restraint systemconforms to all applicableFederal Motor Vehicle SafetyStandards.”
b. Weight and height:
(1) Gives the manufacturer*sguidelines for the size of childthat the child restraint systemwas designed to secure.
c. Installation:
(1) To outline the basicinstallation procedures andposition(s) in vehicle.
d. Manufacturing data:
(1) To include the date ofmanufacture, manufacturer*sname and address, andmodel number of the childrestraint, which is needed toidentify child restraint systemsinvolved in recalls for defectsor lack of compliance.
e. Air bag warning label:
(1) A permanent label must bevisibly affixed on rear-facingor convertible child restraintsystem.
f. FAA certification (optional):
(1) To indicate themanufacturer*s certification

Lesson Plan Notes
HS 366 R1/04 G-12
that the child restraint systemhas passed an inversion testrequired by the FederalAviation Administration (FAA)in addition to otherrequirements of FMVSS 213and may be safely used inaircraft.
13. Instruction book and storage location
a. Both are required. The booklet ormanual to provide completeinformation about the safeoperation of the child restraintsystem, and the storage pocketor other container to encourageusers to keep the booklet handyand refer to it as their child grows.
14. Registration card
a. This comes with every childrestraint and should be returnedto the manufacturer so ownerscan be kept abreast of recalls.
15. Regular locking clip:
a. This is a metal clip used to keepsome safety belts snug duringnormal driving conditions so thatthe child restraint is properlypositioned in the event of a crash(pre-crash positioning).

Lesson Plan Notes
HS 366 R1/04 G-13
16. Lock Offs/Built-in Locking Clips:
a. Some child restraints includespecial belt-locking features forinstallation with certain types ofsafety belts.
b. They serve the same purpose aslocking clips - pre-crashpositioning.
17. Detachable base:
a. Some infant restraints haveseparate bases that can beinstalled in the vehicle and left inplace. The restraint portion canbe removed from the base. Itcan be used as an infant carrier.Some can be used as an infantrestraint without a base.
b. Some of these bases have leveladjustment mechanisms.
18. Carry Handle
a. Some infant restraints have ahandle to easily carry the seat.
19. Shoulder Belt Guide
a. Some belt-positioning boostershave these guides to help withshoulder belt fit.
20. Rebound Control
(1) Controls rebound and avoidspotential head contact incertain crashes.
(2) Some seats use a “specialbar”, others use tethering.

Lesson Plan Notes
HS 366 R1/04 G-14
21. Lower Anchors and Tethers forChildren (LATCH):
a. The tether strap is located in themid to upper back of newerconvertible and forward-facingchild restraints to reduce theamount of forward and lateralmotion of the restraint. In frontalcrash-testing, a tether canreduce head excursion by 4 to 6inches.
Note: A few models allow the tether to beused rear-facing, but most may only beused forward-facing.
b. The lower anchorageattachments are located nearthe CRS belt path(s) and may bemade of flexible webbing or rigidbars.
Hands-on Exercise: “Getting to KnowChild Restraint Systems”
E. Correct Selection of Child Restraints
“What is the “best” child restraintsystem...?”
1. All child restraints which are certifiedto meet federal safety standardsmust perform at a certain level.
2. Technicians should not recommendor condemn specific models, basedon personal familiarity or speculation.

Lesson Plan Notes
HS 366 R1/04 G-15
The best seat fits the child, fits thevehicle, and is used consistently andcorrectly.
3. Technicians should educate parentsaccording to the parent’s specificcircumstances, and refer questions toan appropriate person ororganization when they areunfamiliar with product features. Examples of this approach mayinclude:
a. Instead of . . . “You should get(brand name/model), because itfits the widest variety of children.” Try. . . “If you purchase aconvertible seat, you may wantto be aware of the rear-facingweight limits.”
b. Instead of . . . “That seat doesn’tfit in most cars because of its beltpath.” Try . . . “You may want tofind a seat that has a high beltpath, since your buckle stalks arerigid.”
c. Instead of . . . “I’ve never seenthat feature, so it must be an oldseat.” Try. . . “I’m not familiar withthat product. Let me research itand get back to you.” Or . . .“I’m not sure how that featureshould work. You should contactthe manufacturer.”
4. Factors to consider when selectingrestraints:
a. Safety
(1) Certification labels state“Meets or exceeds allapplicable Federal MotorVehicle Safety Standards.”

Lesson Plan Notes
HS 366 R1/04 G-16
(2) History of seat
(a) Acquiring a used CRS canbe dangerous. Only aseat with a known history,all parts intact andfunctional, and allinstructions availableshould be acquired.
(3) Product life
(a) Vehicle fleet
(b) Age of Child restraint
- Some manufacturerssuggest a life of 5-6years from date ofmanufacture.
- JPMA recommends 6years.
b. The seat should be appropriatefor the child’s age, size, physicaldevelopment, and behavioralneeds.
c. Compatibility
d. Convenience factors
(1) Automatic or one-stepadjustment mechanisms
(2) Infant only seat vs.convertible for an infant
(3) Detachable base options oninfant only seats
(4) Consider NHTSA’s Ease-of-UseRatings
e. Comfort factors

Lesson Plan Notes
HS 366 R1/04 G-17
(1) Selection based on age, size,and needs of child.
(2) Color and type of upholstery
(3) Metal and plastic parts of CRS
f. “My child won’t stay in his carseat...”
(1) Staying buckled-up – a “habitfor life”
(a) Testing limits is a normalstage of development.
(b) Riding buckled-up is anessential habit becausebabies becometeenagers!
F. Types of Restraints for Children
1. Rear-Facing Only Restraints
2. Convertible Restraints
3. Forward-Facing Only
a. Forward-facing only with harnessor shield
b. Combination Child Seat/ Booster
c. Boosters
(1) Belt Positioning Booster (BPB)
(a) Backless(b) High back
(2) Shield Booster

Lesson Plan Notes
HS 366 R1/04 G-18
d. Harness/Vests
e. Integrated Seats
4. Special needs CRS
5. Vehicle Safety Belts
G. Selecting the Correct Type of CRSand Proper Buckling of the Child
1. Rear-facing Only Restraints
a. Used for infants in rear-facingposition only.
b. Birth-5 pounds to 17-22 pounds (onegoes to 35 pounds). Lower andupper weight limit vary (check themanufacturer’s instructions). Manufacturer’s height limits also vary. Unless manufacturer’s instructionsstate otherwise, use only until theinfant’s head is within an inch belowthe top of the shell.
c. Rear-facing position supportsentire head, neck, and back: cradles and moves with childreducing stress to neck and spinalcord in a crash.
d. May have a five-point or V-harness.
e. Some models have detachablebase and can be used with orwithout the base. Others canonly be used with the base.
2. Rear-facing Convertible Restraints
a. Upper limits
Lesson Plan Notes
HS 366 R1/04 G-19
(1) May be used rear-facing forinfants from birth 5 pounds to20 or more pounds.
Note: Most newer convertible seats areapproved for rear-facing use up to 30 or35 pounds and should be considered forinfants whose height and weight haveexceeded the limits of the rear-facingonly seat. (Check manufacturer’sinstructions for upper and lower weightlimits.)
(2) Top of child’s head should bewell contained within shell(unless manufacturer’sinstructions state otherwise,no less than one inch belowtop of shell).
b. Recline
(1) Used in semi-reclined position.
c. Harness
(1) Use harness slots at or belowshoulder level.
(a) The harness needs to holdthe infant down in theseat so he/she does notslide up in a crash andpossibly be ejected.
(2) 5-point harness
(a) Straps that secure at bothshoulders, across upperthighs, and between thelegs.
(b) Can be adjusted to fit avariety of infants andtoddlers snugly andcorrectly.

Lesson Plan Notes
HS 366 R1/04 G-20
(3) Harness/T-shield combination
(a) Secures two shoulderharnesses to “T” shapedshield
(4) Harness/Tray shieldcombination
(a) Secures two shoulderharnesses to broadpadded tray positioned infront of torso and hips
(b) Crotch strap for the trayshield may be separate orintegral with the shield
3. Correctly Securing a Child in a Rear-facing Restraint
a. Proper positioning of infant:
(1) Position infant’s back andbottom flat against CRS seatback.
(2) A rolled cloth may be placedin front of crotch strapbetween child’s legs to keepback against CRS.
(3) Use rolled towels or lightblankets to pad aroundbaby’s head and sides.
b. Harness straps should bethreaded through slots at orbelow shoulder level.
c. Put harness straps over shouldersand buckle at crotch.

Lesson Plan Notes
HS 366 R1/04 G-21
d. Tighten harness straps snugly.
(1) Some models have a metalharness slide adjuster. Thistype of adjuster requires thestrap end to be double-backthreaded.
When it is “Correctly”threaded, it will look like a “C”(if it is still “Open”, it looks likean “O”.)
(2) Some CRSs have metal slideends that must be pulled flushwith slot on seat back.
(3) A snug harness should notallow any slack.
(4) A snug harness should not,however, be so tight as topress into the child’s bodycausing physical discomfort.
(5) NHTSA requires CRSmanufacturers to state in theinstructions: “A snug strapshould not allow any slack. Itlies in a relatively straight linewithout sagging. It does notpress on the child’s flesh orpush the child’s body into anunnatural position.”
e. Place retainer clip at armpit levelto hold straps in place.
f. Use only the harness covers thatthe manufacturer has includedwith the child restraints, or thatthe manufacturer sells separatelyfor the specific child restraint.
Lesson Plan Notes
HS 366 R1/04 G-22
g. Place blankets over and aroundbaby after harness is snug andsecure.
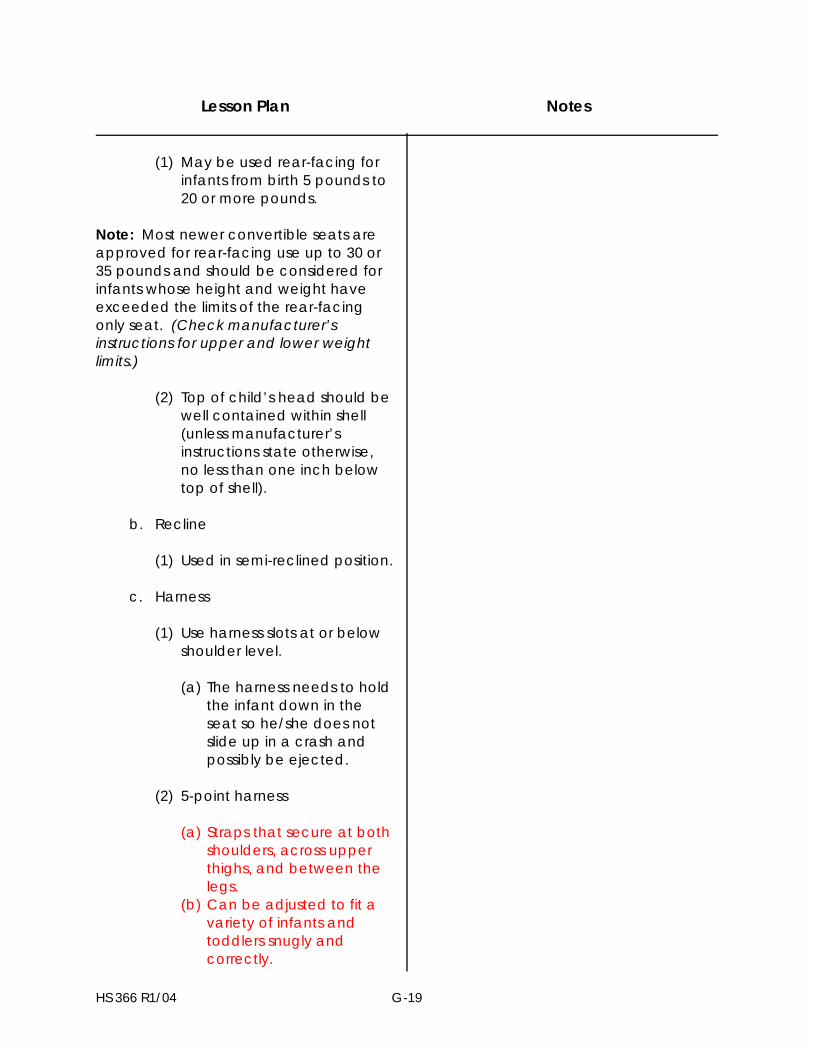
4. Forward-facing Convertible
a. Upper limits for forward facing
(1) Weight limit (usually) 40pounds.
(2) Shoulders should not beabove top harness slots.
(3) Mid-point of the back ofhead is not above top ofshell.
(4) Forward-facing restraintsshould only be used forchildren who are at least oneyear old and who weigh atleast 20 pounds.
b. Upright position
c. Semi-reclined position
d. Harness
(1) For most models, straps mustbe threaded in top slots - alsoshould be at or aboveshoulder level.
(a) Reinforced slots must beused.

Lesson Plan Notes
HS 366 R1/04 G-23
(b) The harness needs to holdthe child back against theshell.
(c) The harness that is belowthe shoulders will allowincreased forward motionand stress on the child’sshoulders.
(2) Five-point harness
(a) Provides snug securementof a wider range of bodysizes.
(3) Harness/shield combination
5. Correctly Securing a Child inForward-facing Convertible
a. Avoid bulky clothing or paddingbehind child’s head or back, orunder buttocks.
b. Child should sit with back andbottom flat against CRS seatback.
c. Harness through proper slots. Putharness straps over shoulders andbuckle at crotch.
d. Tighten harness straps snugly.
e. Place retainer clip at armpit levelto hold straps in place.
f. Place blankets over and aroundchild after harness is snug.
6. Forward-facing Only Restraints

Lesson Plan Notes
HS 366 R1/04 G-24
a. Upper limits.
(1) Weight limit - most are 40pounds, some are between50 and 80 pounds.
(2) Shoulders should not beabove top harness slots.
(3) Mid-point of back of head isnot above top of shell.
(4) Forward-facing restraintsshould only be used forchildren who are at least oneyear old and who weigh atleast 20 pounds.
b. Three types.
(1) Harness only
(a) A 5-point harness orharness/shield is used tosecure the child.
(2) Combination seat
(a) Used with a harness until acertain weight specifiedby the manufacturer.
(b) After a certain weightspecified by themanufacturer, the harnesscan be removed and theseat can be used as abelt-positioning booster.
(3) Shield Only
(a) It looks like a shieldwithout a boosting baseand is designed to fitsnugly on the child’sthighs and abdomen.

Lesson Plan Notes
HS 366 R1/04 G-25
(b) The energy absorbingshield distributes crashforces across the torso.
(c) Width is fixed, so it maynot fit all children in theweight range.
7. Correctly Securing a Child in aForward-facing Only Seat with aHarness.
a. Child should sit with back andbottom flat against CRS seatback.
b. Use harness slots at or aboveshoulders (all are reinforced).
c. Adjust for snug fit - avoid bulkyclothing under harness.
d. Retainer clip at armpit level.
8. Booster Seats
a. Provide transition from CRs withinternal harness to vehicle lapand shoulder belts.
b. Minimum recommended weightranges: 30-40 pounds andmaximum weights are 60-100pounds.
(1) Includes most 4-8 year oldchildren.
c. Recommended minimum andmaximum height limits vary.

Lesson Plan Notes
HS 366 R1/04 G-26
d. There are two types of boosters:
(1) Shield boosters - originallydesigned for vehicles with lapbelts only.
(a) Current models have 40lbs upper weight limit withshield.
(b) Current models haveremovable shield for useas a BPB.
(2) Belt Positioning Boosters (BPB):
(a) MUST be used with avehicle lap and shoulderbelt.
(b) Provides more upperbody restraint than ashield booster.
(c) Some have shoulder beltpositioners.
(d) Cannot be used onairplanes or some schoolbuses because they donot have lap and shoulderbelts.
(e) Two types of BPB

Lesson Plan Notes
HS 366 R1/04 G-27
- Backless BeltPositioning Booster
o With removableshield
o Base only
o Base with atethered harness
- High back BeltPositioning Booster
o Some sold ascombination childseat/ booster.
o Some comewithout harnessand function onlyas belt positioningbooster.
o Many high backboosters have acomfort clip orshoulder beltpositioning strapon the side of theseat back. This willbe discussed laterin this section.
o Provide headrestraint for vehicleseats without builtin head restraints.
o Some models haveremovable backs
9. Correctly Securing a Child in a BeltPositioning Booster Seat

Lesson Plan Notes
HS 366 R1/04 G-28
a. The appropriate BPB that fits achild and the vehicle is one that:
(1) Fits in the seating position flaton the seat, against thevehicle seat back, andbetween the safety beltanchors.
(2) Allows the lap belt to remainsnug low on the hips andacross the upper thighs.
(3) Allows the shoulder belt toremain snug across the chestand collar bone.
(4) Allows the child’s knees tobend comfortably, so correctpositioning is maintained.
(5) Provides head restraint byeither the vehicle or a highback booster.
b. Using the shoulder belt positioner.
(1) Always follow manufacturer’sinstructions.
(2) If the shoulder belt positionerinterferes with the safety beltretracting properly:
(a) And the shoulder belt hasa switchable retractor, itcan be used in the ALRmode, which will eliminatethe potential for slackbeing introduced.
(b) And the shoulder belt fitscorrectly without the useof the positioner, checkthe manufacturer’sinstructions to see if the

Lesson Plan Notes
HS 366 R1/04 G-29
positioner must be used. Ifnot, then the booster canbe used without thepositioner.
(c) And the positioner mustbe used and the retractoris not switchable, and thelap and shoulder beltdoes not fit correctly,contact the manufacturerfor advice. Teach thechild to keep the lap andshoulder belts snug andflat.
(d) And if the problemcannot be solved, theparent/caregiver maywant to try a differentbooster.
c. Vehicles with only a lap belt.
(1) Ride Ryte Booster is an option.
10. Harness/Vests
(1) Vests without tether fitchildren 25-40 lbs.
(2) Use vehicle lap belt.
(3) Some require tether.
(4) Often used on school buses.
11. Integrated Seats

Lesson Plan Notes
HS 366 R1/04 G-30
a. Built into vehicle seat.
b. NOT for rear facing infants.
c. Some use 5-point harness.
d. Some use as BPB.
12. Special Needs Restraint Systems
a. The approach and criteria forchoosing the “best restraint ” issame as with any child.
b. Determination of the need andtype of CRS should be made by ahealth professional.
c. Conventional CRSs may be anappropriate choice.
d. Special needs CRSs generally aremore expensive.
e. May be more difficult to accessand use.
f. CPS Technicians can assist withselection and installation.
g. Sometimes a specially adaptedrestraint is necessary when aconventional child restraint failsto meet all needs. Such systemshave been dynamically tested toensure that they will provideadequate protection. Examplesinclude:
(1) Carrie, Columbia, Gorilla,Modified E-Z-On Vest, TravellerPlus, Snug Seat, and Spelcast
(2) Wheeled mobility devices(wheelchair and tie downsystems) manufactured for

Lesson Plan Notes
HS 366 R1/04 G-31
occupant protection in motorvehicles.
(a) Should only be used iftransfer to a FMVSS-compliant occupantrestraint is not possible.
(b) Wheelchairs that havebeen designed for use inmotor vehicles and havebeen crash tested will belabeled to show theycomply with the voluntarystandard, ANSI-RESNAWC/19 and will statecompliance with SAE RPJ2249.
(c) Use only crashworthy 3-point belt or 5-pointharness to restrainoccupant.
h. There are some generalclassifications of physical and/ordevelopmental needs that mayrequire the use of speciallyadapted restraint systems:
(1) Respiratory or other medicalconditions which may requirea child to lie flat or useadaptive CRSs.
(a) The AAP recommendsthat all infants born before37 weeks gestation bemonitored before theyleave the hospital forbreathing problems orslowing of the heartbeatwhen sitting in a semi-reclined position. Thephysician should indicatewhether the infant should
Lesson Plan Notes
HS 366 R1/04 G-32
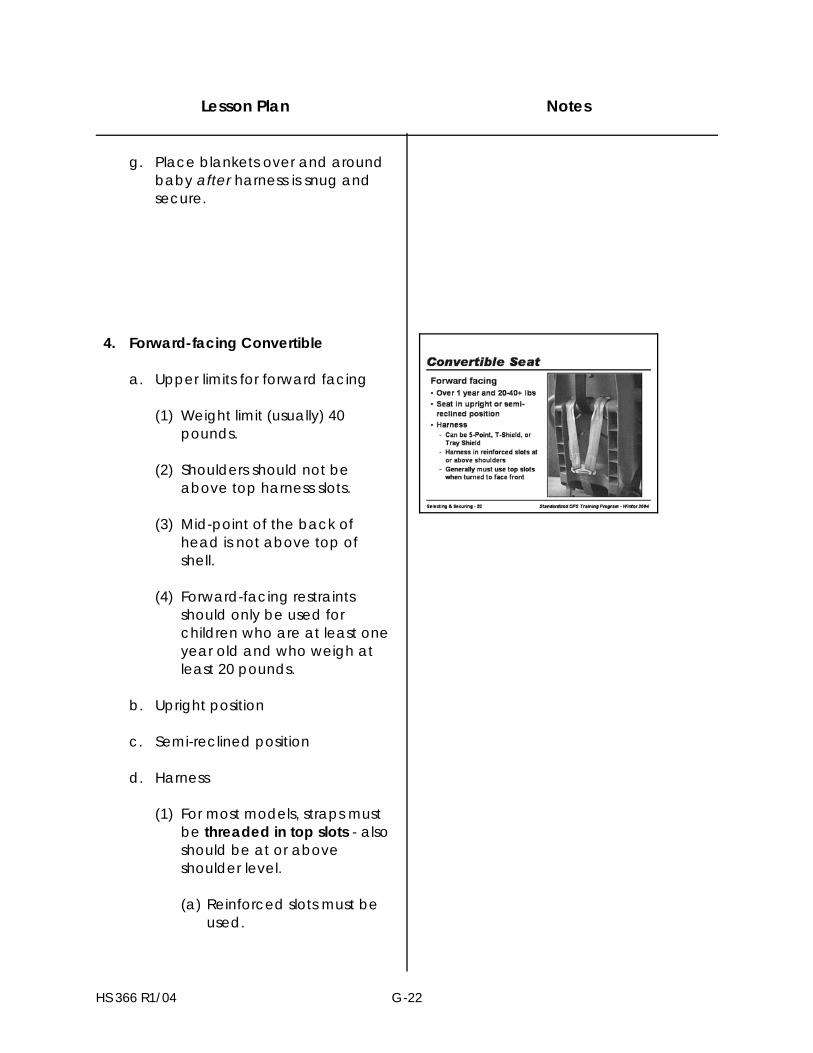
ride prone or supine. (Prone means lying facedownward. Supinemeans lying faceupward.)
(b) Car beds
- Usually for small,premature, ormedically fragileinfants who should rideprone or supine.
- Infant lies flat.
- Use safety belt toanchor the car bedperpendicular todirection of travel.
- Infant’s head placedtoward center ofvehicle, not next tothe door.
- Internal harnesssecures child in carbed.
(c) Certain adaptive restraintsallow older children toride semi-reclined or lyingflat.
- Some convertible/forward-facing CRSscan be semi-reclinedin forward-facingposition.
(d) Tracheostomy - avoidCRSs with shields or trays.
Lesson Plan Notes
HS 366 R1/04 G-33
(e) Apnea monitors andoxygen tanks.
- Certain conditionsmay require specialequipment, such asapnea monitors andoxygen tanks, whichmust be safelysecured separatelyduring transport.
(2) Low birth weight/ prematureinfants
(a) Some very small infants donot have respiratoryproblems, but also requirespecial consideration.
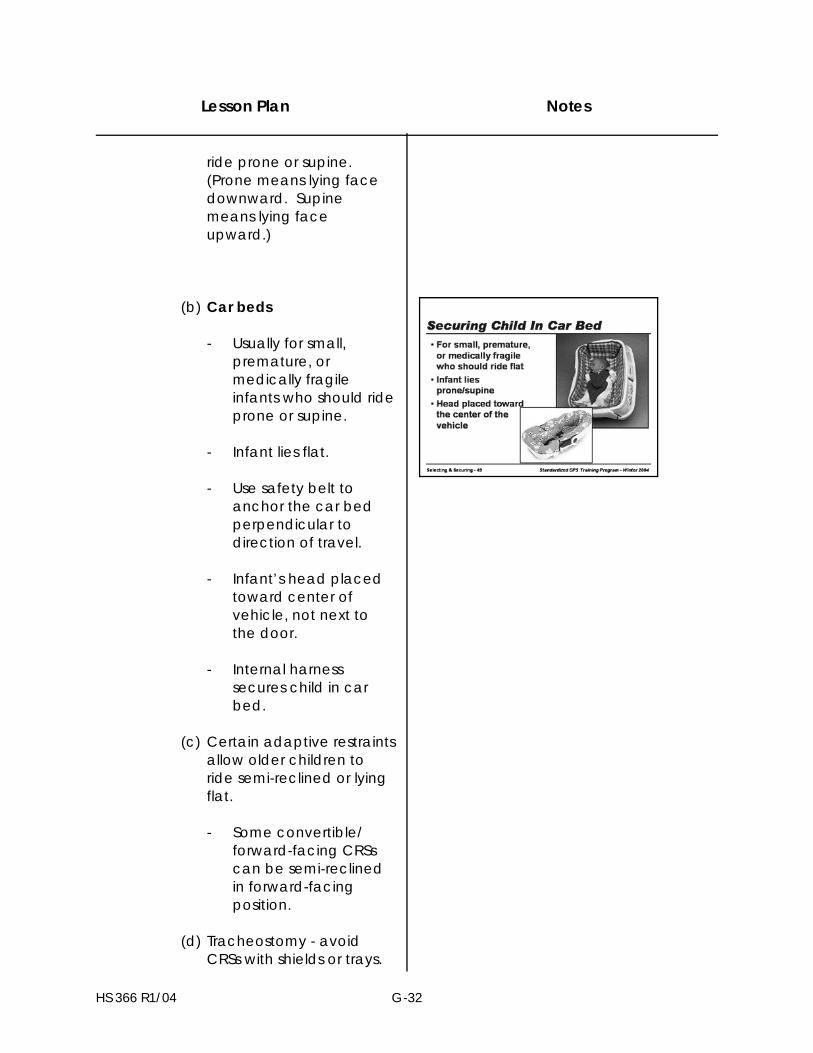
(3) Orthopedic conditions
(a) Orthopedic conditionsmay require certain typesof casting, which cannotbe accommodated byconventional restraints.
(b) Hip spica casts
- Children in hip spicacasts may not fit inmost conventionalchild restraints,because the castshold their legs out at awide angle and theycannot bend at thehips.
- However, someconventional restraintswith low sides (somecombination childseats/ booster with 5-

Lesson Plan Notes
HS 366 R1/04 G-34
point restraint) may beappropriate.
(c) Full body casts or largerchildren in hip spica casts
- Larger children in fullor partial body castscan beaccommodated ifthey fit lengthwise ona bench seat. A vestand leg strap hasbeen designed by E-Z-On products for thissituation
(4) Neuromuscular conditions
(a) Neuromuscular conditions,such as cerebral palsy,may cause some childrento have poor trunk orhead control.
- These children may beable to use aconventional restraintuntil they outgrow it.Larger children mayneed to use vests orother adaptiverestraints that mayrequire top tethers.
(5) Behavioral issues
(a) Behavioral issues maynecessitate the use ofrestraints systems thatcannot be unbuckled bythe child.
- Some vest systemsclose in the back sothe restrained child

Lesson Plan Notes
HS 366 R1/04 G-35
cannot reach theclosures. Vests mayrequire tether anchorsin cars and otherattachment hardwarein buses.
- For information abouta two-day trainingcourse designed toenhance CPSTechnicians’knowledge base andexperience withspecial needs restraintsystems, contact: Automotive Safety ForChildren, Riley Hospitalfor Children, 702Barnhill Drive, Room1603, Indianapolis, IN46202-5225 orwww.preventinjury.org
12. Vehicle Safety Belts
a. Safety belts are designed foradults and older children.
b. Types of vehicle belt systems:
(1) Lap belts are the leasteffective but are far betterthan no restraint.
(a) No upper body restraint.
(b) Prevent ejection.
(c) Poor fit on child and maycause internal injuries.
(2) Lap and shoulder belt systemsare far more protective.
Lesson Plan Notes
HS 366 R1/04 G-36
(a) Reduces upper bodymotion.
(b) Very effective combinedwith BPB.
(c) Rear-seat outboardshoulder belt systems canbe retrofitted into manypre-1990 vehicles.
(d) Poor fit can cause internalinjuries.
c. How the safety belt fits a child isthe only reliable way todetermine if a child is ready forthe vehicle safety belt.
d. Depending on the vehiclerestraint system, belt anchorage,and the seat cushion design,safety belt fit can vary.
(1) To be able to fit a safety beltproperly, a child must:
(a) Be tall enough to sitwithout slouching.
(b) Keep his/her back andbuttocks against thevehicle seat back.
(c) Keep his/her kneescompletely bent over theedge of the vehicle seat.
(d) Keep his/her feet flat onthe floor, and
(e) Be able to staycomfortably seated thisway.

Lesson Plan Notes
HS 366 R1/04 G-37
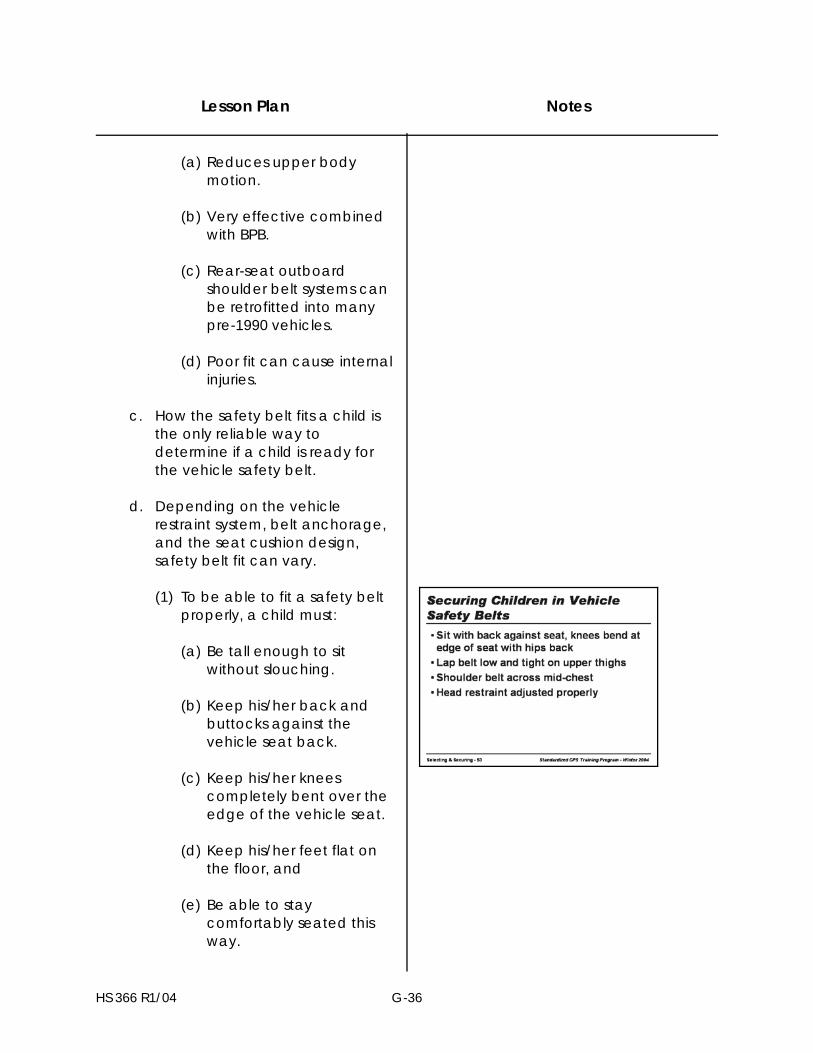
(2) Lap and shoulder belt fit is themost important guideline.
(a) The lap belt should fitbelow the hips and snug,across the upper thighs.
(b) The shoulder belt shouldcross the chest andcenter of the collar bone. It can touch the neck butshould not cross thethroat.
(c) Head restraints should beadjusted properly.
Best practice: All children who haveoutgrown child safety seats should beproperly restrained in booster seats untilthey are at least 8 years old, unless theyare 4'9" tall. Always make sure the childfits the safety belt properly. If the lap andshoulder belts do not fit well, the childshould use a BPB. If under 40 pounds,they should use a forward facing restraintwith an internal harness.
(3) Poorly fitting lap belts (eitherlap only belts or the lapportion of lap and shoulderbelts), especially in the caseof small children, may causebelt-induced internal injuries.
(4) Two passengers should nevershare the same belt.
(a) Serious or fatal injurieswould be caused frompassengers striking eachother and from forces ofill-fitting belt system.

Lesson Plan Notes
HS 366 R1/04 G-38
(b) Occupant capacity of amotor vehicle isdetermined by number ofsafety belts NOT by thecubic feet of the interiorspace.
H. Aftermarket accessories
1. Products for which there are nofederal safety standards.
2. Provide the illusion of added safety.
3. May compromise safety.
4. Safety belt positioning devices maydegrade belt performance. (Refer tofact sheet “Shoulder Belt PositioningDevices: Cautions andRecommendations” in resourcesection of module.)
Note: Positioning devices providedby the vehicle manufacturers are notregulated, but are typically tested bythe manufacturer to verifyperformance.
5. Be very cautious about attachingany accessories to CRS.
6. Attachable toys or trays can bedangerous.
7. It is best to only use the padding andinserts that come with the CRS or thatthe manufacturer sells for use withspecific CRSs. Other acceptablepadding includes:
a. Thin material that does notinterfere with proper harnesscontact and fit.

Lesson Plan Notes
HS 366 R1/04 G-39
b. No thick material behind thechild or under the harness system.
c. No thick material under thechild’s bottom.
I. Second-Hand/Used Seats
1. Used seats can be dangerous whenno history is known.
If you do not know the history,do not use the seat.
a. Guidelines on what to look forwhen assessing suitability of aused CRS:
(1) All labels and instructionspresent.
(2) Should have current FMVSS213 compliance label; if notpresent - do not use.
(3) Determine if the CRS inquestion has been thesubject of a recall or, ifrecalled, that the necessaryrepair work has beencompleted correctly.
(4) All parts are present and ingood condition, includingharness straps, retainer clips,padding, shield, tether straps,and bolts.
(5) Structural integrity (no hairlinemarks in plastic, cracks, looserivets, etc.).

Lesson Plan Notes
HS 366 R1/04 G-40
(6) No evidence of crashinvolvement. (Ask theprevious owner.) If a CRS isinvolved in a moderate orsevere crash it must bereplaced. If not 100% sure -seat should not be used.
(7) Should be no more than 6years old.
(8) Manufacturer still in business.
b. Many communities conduct“Used CRS Bounty Programs” or“Round-ups” to remove unsafeseats from circulation and crushor destroy them.
J. CRS Cleaning and Maintenance
1. Always follow the manufacturer’sinstructions.
a. Not following them, can lead todamage of the child restraintparts.
2. General guidelines:
a. Use only mild soap and water,rinse with clean water.
b. Never use any chemicals such asstarch, bleach, or spray-on“fabric care/ wrinkle-free”products.
c. Do not iron the harness straps.
d. Do not lubricate the buckle.
Hands-on Exercise #4: Identifying theAppropriate Child Restraint.