Module 5 -- Administration and Basic Document Captureclass.kofax.com/KC10/KC10Mod05.pdf · Module 5...
24
Module 5 -- Administration and Basic Document Capture Kofax Technical Training Page 1 Module 5 Administration and Basic Document Capture Slide 2 Module 5 -- Administration and Basic Document Capture Administration and Basic Document Capture Administration and Basic Document Capture • Administration Module • Online Help • Batch class setup • Processing queues • Separation and form identification • Document class setup • Form type setup • Export connector setup • Batch class publishing • Scan module • Creating and processing a batch Slide 3 Module 5 -- Administration and Basic Document Capture Accessing the Administration Module The Administration module is accessed from the Kofax Capture program group
Transcript of Module 5 -- Administration and Basic Document Captureclass.kofax.com/KC10/KC10Mod05.pdf · Module 5...
Module 5 -- Administration and Basic Document Capture
Kofax Technical Training Page 1
Module 5Administration and Basic Document Capture
Slide 2 Module 5 -- Administration and Basic Document Capture
Administration and Basic Document Capture
Administration and Basic Document Capture
• Administration Module
• Online Help
• Batch class setup
• Processing queues
• Separation and form identification
• Document class setup
• Form type setup
• Export connector setup
• Batch class publishing
• Scan module
• Creating and processing a batch
Slide 3 Module 5 -- Administration and Basic Document Capture
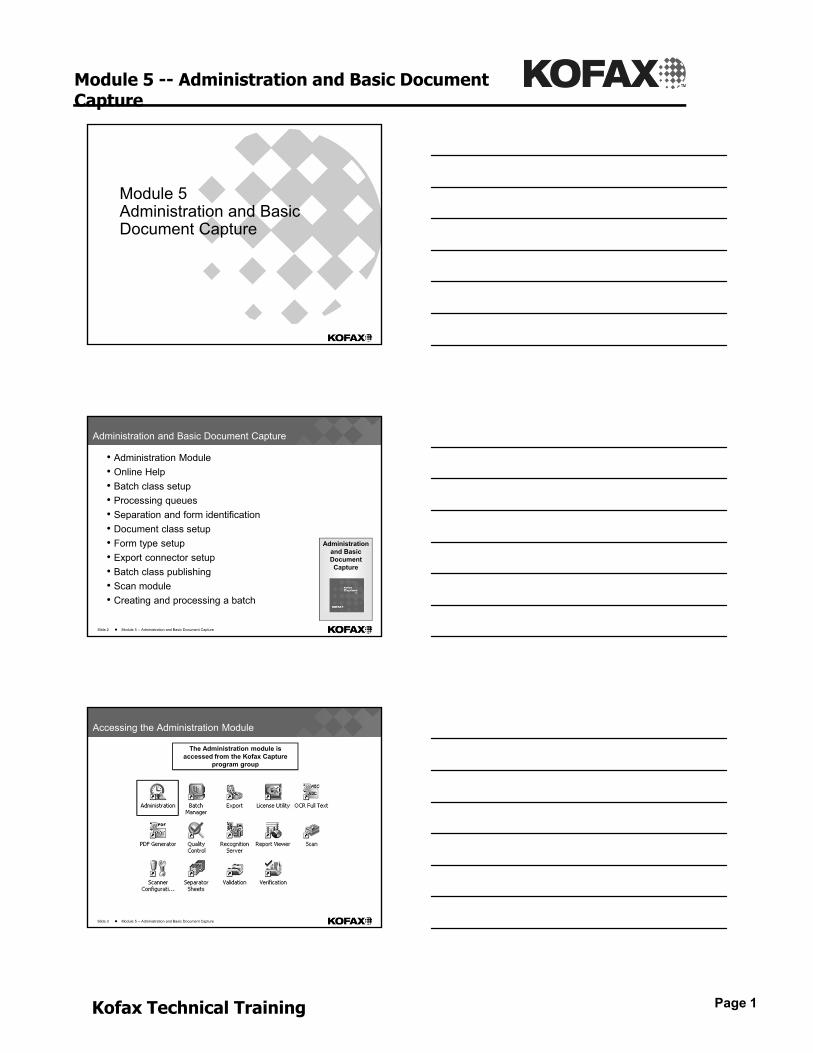
Accessing the Administration Module
The Administration module is accessed from the Kofax Capture
program group
Module 5 -- Administration and Basic Document Capture
Kofax Technical Training Page 2
Slide 4 Module 5 -- Administration and Basic Document Capture
Administration Module
All setup for a Kofax Capture-based solution is done in the Administration
module. This is where all aspects of the Kofax Capture solution are defined: levels
of definition, index fields, separation methodology, image cleanup and
extraction, database validation, scripting…
Slide 5 Module 5 -- Administration and Basic Document Capture
Administration Module Interface
Kofax Button
RibbonQuick Access
Tool Bar
View Panel
Definitions Panel
Source Panel
Title Bar
Zoom Group
Slide 6 Module 5 -- Administration and Basic Document Capture
Customizing the Toolbar
Buttons on the toolbar can be
added or removed

Module 5 -- Administration and Basic Document Capture
Kofax Technical Training Page 3
Slide 7 Module 5 -- Administration and Basic Document Capture
Customizing the Interface
Right mouse click on the Kofax Button to expose view options
Slide 8 Module 5 -- Administration and Basic Document Capture
Kofax Button
Left mouse click on the Kofax Button to expose
the menu items
Slide 9 Module 5 -- Administration and Basic Document Capture
Changing Color Scheme and Language
Left mouse click on [Options] to change
the color scheme and language

Module 5 -- Administration and Basic Document Capture
Kofax Technical Training Page 4
Slide 10 Module 5 -- Administration and Basic Document Capture
Selecting a Language
Select a language from the dropdown
and click [OK]
The <Windows display language> option selects the OS Language. If an OS Language Pack/ Multilingual User Interface is installed and the regional settings are configured it
will use the configured settings.
Slide 11 Module 5 -- Administration and Basic Document Capture
GUI is Localized
Following a system reboot, all Kofax Capture product screens and all Help files will reflect the
selected language.
Slide 12 Module 5 -- Administration and Basic Document Capture
Administration – Home Tab
Copy and paste
Batch class
actions
Document class
actions
Folder class
actions
Form type actions
Rename, remove, delete, and change
properties of objects
Scan controls

Module 5 -- Administration and Basic Document Capture
Kofax Technical Training Page 5
Slide 13 Module 5 -- Administration and Basic Document Capture
Administration – Insert Tab
Create zonesCreate or insert objects (batch class,
document class, folder class, form type, or field type)
Slide 14 Module 5 -- Administration and Basic Document Capture
Administration – View Tab
Set grayscale viewing of
images in the Administration
module for enhanced clarity
Show or hide Definitions Panel or Status Bar and
lock panels in place or restore panel defaults
Zoom settings for documents
and zones
View and zoom controls
Zoom and settings for viewing documents is also available
from the zoom group
Slide 15 Module 5 -- Administration and Basic Document Capture
Administration – Tools Tab
User Tracking and User Profiles
Accessing profiles (KCNS only)
Registration tools for custom
components
Create and access custom
recognition scripts
Define cleanup and
compression profiles
Reserve batch
separation patch
codes and define
separation profiles
Define field type
macro scripts

Module 5 -- Administration and Basic Document Capture
Kofax Technical Training Page 6
Slide 16 Module 5 -- Administration and Basic Document Capture
Administration – Scan Settings Tab
Deskew sample pages
Select a scan
source
Add a scanner
Reset currently selected scan source properties
Edit scan source
settings
Select and load scan profiles
Save or delete scan
profiles
Slide 17 Module 5 -- Administration and Basic Document Capture
Accessing Help and About
Clicking the F1 key from anywhere within Kofax
Capture will also launch context-sensitive Help.
About Kofax CaptureHelp
Slide 18 Module 5 -- Administration and Basic Document Capture
Online Help
A text search function is available.
Topics can be easily searched.

Module 5 -- Administration and Basic Document Capture
Kofax Technical Training Page 7
Slide 19 Module 5 -- Administration and Basic Document Capture
Create a Batch Class
Create a new batch class in one of four methods:1) Click on the New Batch Class icon in the Quick Access
Tool Bar
2) Select “Create Batch Class…” from the Kofax Button
3) Click on “Batch Class” icon on the Insert panel
4) Right mouse click in the Definitions Panel | Batch tab and select “New Batch Class…”
Slide 20 Module 5 -- Administration and Basic Document Capture
Create Batch Class – General Tab
Type in the batch class name and optional
description.
Priorities range from 1 – 10. 1 is the highest priority, and 10 is the
lowest. Priorities determine the order in which batches are
automatically processed through the unattended queues.
The “Image folder” is the default location for single-page, Group IV compressed TIFF files
for batches in progress.
Slide 21 Module 5 -- Administration and Basic Document Capture
Queues Tab
Move queues from the Available
Queues panel to the Selected Queues panel with the [Add]
button.

Module 5 -- Administration and Basic Document Capture
Kofax Technical Training Page 8
Slide 22 Module 5 -- Administration and Basic Document Capture
Accessing Scan Properties
Select the Scan queue to give it focus, then click on [Properties]
Slide 23 Module 5 -- Administration and Basic Document Capture
Scan Properties
Scanner Support connects and uses features built into certain makes and models of scanners
Select capture mode
Select a profile from the drop down list to define permanent
scan-time image cleanup
To review, create, or modify a profile, select [Edit]
Slide 24 Module 5 -- Administration and Basic Document Capture
Endorsing
Endorsing: Imprinting each page with a unique identifier (such as a customer case file) as each
page goes through the scanner.
Text may be added to the endorsement string
Choose “Values” to select System Values for Prefix text
When using a pre-ccd* scanner, “Endorsing enabled” will
duplicate the endorsement on the scanned image
For post-ccd scanners, “Annotation enabled” must be
checked to add the endorsement to the scanned
image
Counters may also be supported.
*ccd = charge-coupled device: Device inside the scanner that reads the dots on the page and converts them into pixels.

Module 5 -- Administration and Basic Document Capture
Kofax Technical Training Page 9
Slide 25 Module 5 -- Administration and Basic Document Capture
Endorsing Details
• The following questions need to be answered when considering endorsing:• Does the scanner have the capabilities to do endorsing
or imprinting?
• Is the endorsement printer unit pre or post-CCD?
• Is the endorsement printer unit intelligent?
• Is the endorsement printer unit movable?
• Is the endorsement printer font re-sizeable?
• Does the scanner have an intelligent counter?
Slide 26 Module 5 -- Administration and Basic Document Capture
Adding the Export Queue
Move the Export queue
into the workflow by
selecting and clicking [Add]
Slide 27 Module 5 -- Administration and Basic Document Capture
Accessing Export Properties
Select the Export queue to give it focus, then click on [Properties]

Module 5 -- Administration and Basic Document Capture
Kofax Technical Training Page 10
Slide 28 Module 5 -- Administration and Basic Document Capture
Export Properties
Using the Batch Export Timing feature, batches may be exported on an
Immediate or Timed basis, allowing batches to be
exported during periods of low network traffic to
lessen the impact of batch export on the network.
Slide 29 Module 5 -- Administration and Basic Document Capture
Export Batch Timing
Select a Start & Stop time for to begin the export
process
Select a Priority Level for Timed
Batches. Timing of batch export is based on the priority level,
effecting batches at and below that
level.
Slide 30 Module 5 -- Administration and Basic Document Capture
Setting Export Properties
Batch Export order options
If selected, then all batch processing
is terminated whenever there is an error and the entire batch is marked as un-
exported
File names option uses the original file name not the
unique name assigned by Kofax

Module 5 -- Administration and Basic Document Capture
Kofax Technical Training Page 11
Slide 31 Module 5 -- Administration and Basic Document Capture
Separation and Form Identification
Let’s look at a definition of “Separation” and “Form Identification”
Kofax Capture offers six separation methods. Five provide fully
automated separation and are easy to setup. Each method can be further customized to fit separation and form
identification requirements.
The first five represent “scan time” separation methods, meaning the batch must be separated by the time it is closed in the Scan module. Kofax page recognition accomplishes separation in the Recognition module.
Slide 32 Module 5 -- Administration and Basic Document Capture
Separation Defined
• Separation sets the boundaries of a document and determines when a new document is created within the batch.
When a batch is scanned or otherwise captured, it is
brought into the system as discrete images.
Document #1}
Discrete images} Document #2}
Document #3}
By the conclusion of processing within the Kofax Capture workflow, all images must become part of a document – no orphaned images
are allowed in the batch.
Slide 33 Module 5 -- Administration and Basic Document Capture
Form Identification (Classification) Defined
• Form Identification (Classification) is the process of matching each separated document with a form type in the batch class.
• With Kofax Capture, a variety of techniques are available to identify forms including: page-level recognition, separator sheets, or form ID zones. (We will learn more about these methods in this course.)
Tri-Spectrum Solutions Northwest Products

Module 5 -- Administration and Basic Document Capture
Kofax Technical Training Page 12
Slide 34 Module 5 -- Administration and Basic Document Capture
Separation & Classification in the Kofax Capture Workflow
Unprocessed Batch}
Separated Documents}Form Identification}Separated and Classified Documents(no orphaned images are allowed)
}
Document Separation}
Slide 35 Module 5 -- Administration and Basic Document Capture
Setting the Separation Method
For our first batch class, we’ll choose the “Kofax manual” Separation and Form
Identification profile.We’ll examine other methods of
document separation later in this course.
Click [OK] when batch class settings are
complete
Slide 36 Module 5 -- Administration and Basic Document Capture
Accessing the Batch Class Properties
To view or change the properties of a batch class once it has been created, right mouse click on the batch class
and select [Properties] or click on the Properties icon in the Home tab
in the ribbon.
Module 5 -- Administration and Basic Document Capture
Kofax Technical Training Page 13
Slide 37 Module 5 -- Administration and Basic Document Capture
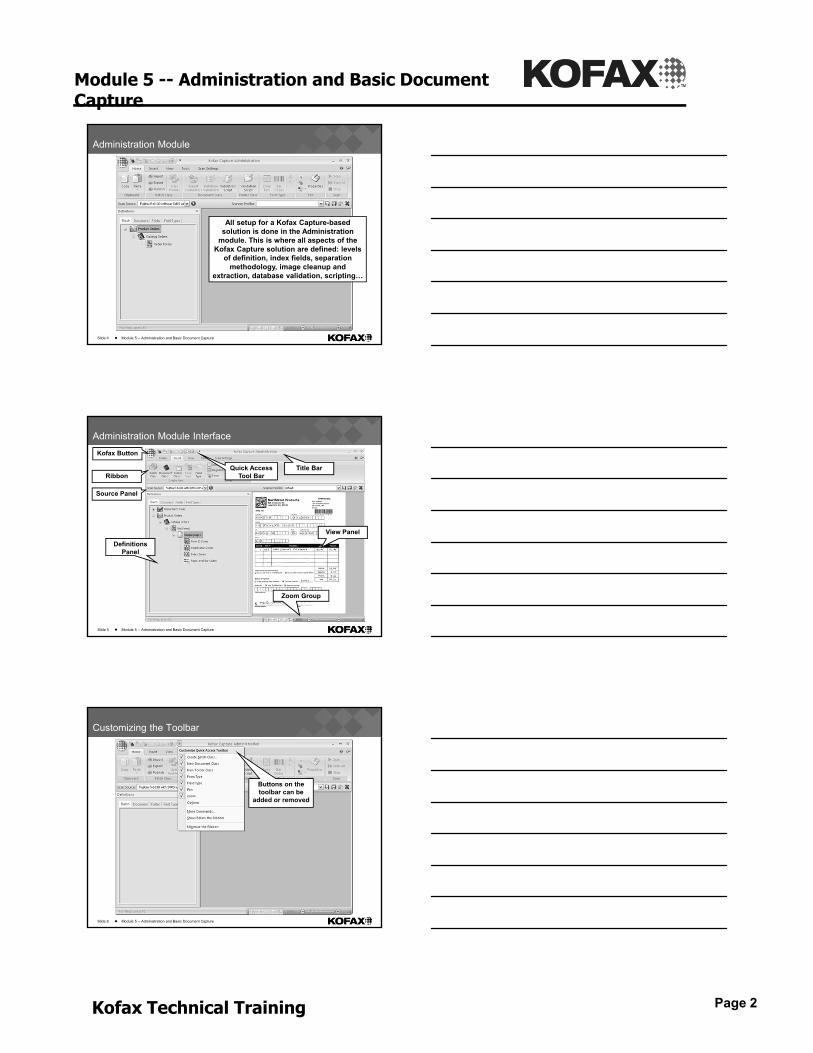
Create a Document Class
Create a new document class in one of four methods:1) Click on the New Document Class icon in the Quick
Access Tool Bar
2) Right mouse click in the Definitions Panel | Document tab and select “New Document Class…”
3) Click on “Document Class” icon on the Insert panel
4) Right mouse click a batch class and select “New Document Class…”
Slide 38 Module 5 -- Administration and Basic Document Capture
Create Document Class – General Tab
Assign a Name and optional Description.
Click [OK] when the document class settings are
complete.
Slide 39 Module 5 -- Administration and Basic Document Capture
Create a Form Type
Remember, every document class must have at least one
form type.
Create a new form type in one of three methods:
1) Click on the New Form Type icon in the Quick Access Tool Bar
2) Click on “Form Type” icon on the Insert panel
3) Right mouse click the document class and select “New Form Type…”

Module 5 -- Administration and Basic Document Capture
Kofax Technical Training Page 14
Slide 40 Module 5 -- Administration and Basic Document Capture
Form Type Properties
Assign a Name and optional Description.
Click [OK] when the form type settings are
complete.
Slide 41 Module 5 -- Administration and Basic Document Capture
Setting Up Export
• As part of the batch class/document class configuration, determining and configuring What will be exported, Where it will be exported, and in What Format the data and documents will be output and saved is required.
• These settings are defined in export connectors which appear as document class attributes.
• Export connectors have two components:
• A user interface available in the Administration module where the export settings are made, and…
• A runtime component that runs when the Export module processes the batch at the conclusion of the Kofax Capture workflow, exporting the documents and data based on the settings.
Slide 42 Module 5 -- Administration and Basic Document Capture
Export Connector Setup
From the Batch tab, right mouse-click on the document class and
select [Export Connectors…] from the context menu or from the
“Export Connectors” icon on the Home panel
REMEMBER: Export connectors are only visible and configurable when the document class is connected to
a batch class.

Module 5 -- Administration and Basic Document Capture
Kofax Technical Training Page 15
Slide 43 Module 5 -- Administration and Basic Document Capture
Selecting an Export Connector
Available export connectors are listed in the left panel. Add the desired connector to the Assigned Export Connectors panel with the [Add] button.
Slide 44 Module 5 -- Administration and Basic Document Capture
Default Storage Folder Location
Set the storage folder where the files are to be stored. A default path is provided:
ServerPath\Kofax\Capture\Export\{Batch Class Name}\{Document Class Name}\{Document ID}
Give the export connector a
name.
Slide 45 Module 5 -- Administration and Basic Document Capture
Index Storage Location and File Name
Specify the path and filename for exporting the data (if different from the default storage location).

Module 5 -- Administration and Basic Document Capture
Kofax Technical Training Page 16
Slide 46 Module 5 -- Administration and Basic Document Capture
Advanced Settings – Image Format
Select the desired file format/compression
format combination to use for the image output.
The images are automatically stored in
the selected format when exported.
Slide 47 Module 5 -- Administration and Basic Document Capture
Save the Export Connector Setup
Click [OK] to save the settings
NOTE: If the export directories or files don’t
already exist on the system, Kofax Capture will create
them at runtime during the export process.
Slide 48 Module 5 -- Administration and Basic Document Capture
Reviewing or Changing an Export Connector
Export connectors can be viewed or modified by selecting the export connector in the Assigned Export Connectors panel and clicking [Setup]

Module 5 -- Administration and Basic Document Capture
Kofax Technical Training Page 17
Slide 49 Module 5 -- Administration and Basic Document Capture
Final Step – Publishing the Batch Class
• At the conclusion of the batch class set up, one final step is required before this batch class can be used in production to process batches: publishing
• Publishing saves batch class definitions and enables users to begin creating batches based on the batch class.
Slide 50 Module 5 -- Administration and Basic Document Capture
Publishing a Batch Class
Publish a batch class in one of three methods:1) Click on “Publish Batch Class…” from the
Kofax Button
2) Click on “Publish” from the Home panel
3) Right mouse click the batch class and select “Publish”
Slide 51 Module 5 -- Administration and Basic Document Capture
Publishing Options
“Validate” examines the integrity of the
batch class and reports warnings and
errors.
“Publish” does an on-the-fly validation and
then continues to publish…as long as there are no errors.
“Disable” pulls a batch class offline. It
becomes unpublished.

Module 5 -- Administration and Basic Document Capture
Kofax Technical Training Page 18
Slide 52 Module 5 -- Administration and Basic Document Capture
Publish Complete
The last published date will be associated
with the batch class
The published status will be
stated
Published batch classes are indicated
with a blue checkmark
Slide 53 Module 5 -- Administration and Basic Document Capture
Applying Batch Class Settings
• Warnings are advisory in nature.
• Errors are more serious and will prevent completion of the publishing event.
• Changes to batch classes will only go into effect in batches created after the instant in time the batch class was last published.
• Batches in-process will not be affected by the changes. Exception is the Batch Class Update feature. (We’ll discuss how to activate this feature later in this course.)
Slide 54 Module 5 -- Administration and Basic Document Capture
Production: The Scan Queue
The first step in production is to open the Scan queue
from the Kofax Capture program group.
When the batch class has been published and ready for use in production, the Administration
module may be closed.
Module 5 -- Administration and Basic Document Capture
Kofax Technical Training Page 19
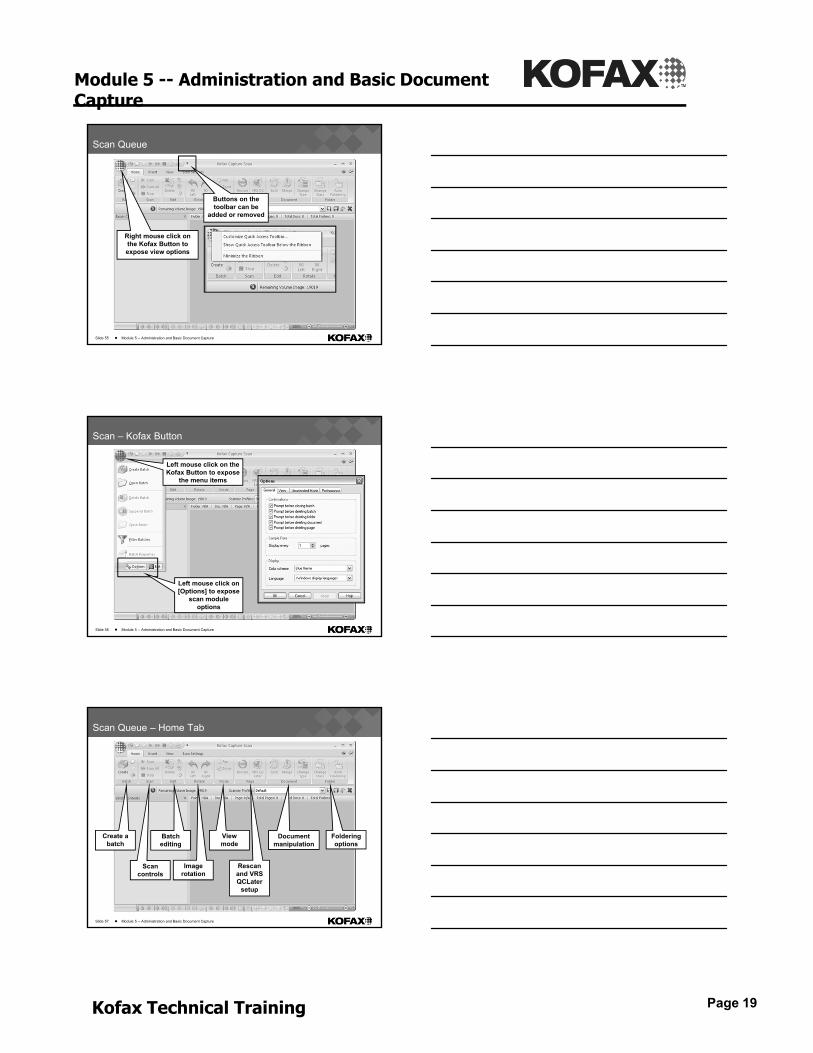
Slide 55 Module 5 -- Administration and Basic Document Capture
Scan Queue
Right mouse click on the Kofax Button to expose view options
Buttons on the toolbar can be
added or removed
Slide 56 Module 5 -- Administration and Basic Document Capture
Scan – Kofax Button
Left mouse click on [Options] to expose
scan module options
Left mouse click on the Kofax Button to expose
the menu items
Slide 57 Module 5 -- Administration and Basic Document Capture
Scan Queue – Home Tab
Create a batch
Scan controls
Document manipulation
Foldering options
Batch editing
Image rotation
View mode
Rescan and VRS QCLater
setup
Module 5 -- Administration and Basic Document Capture
Kofax Technical Training Page 20
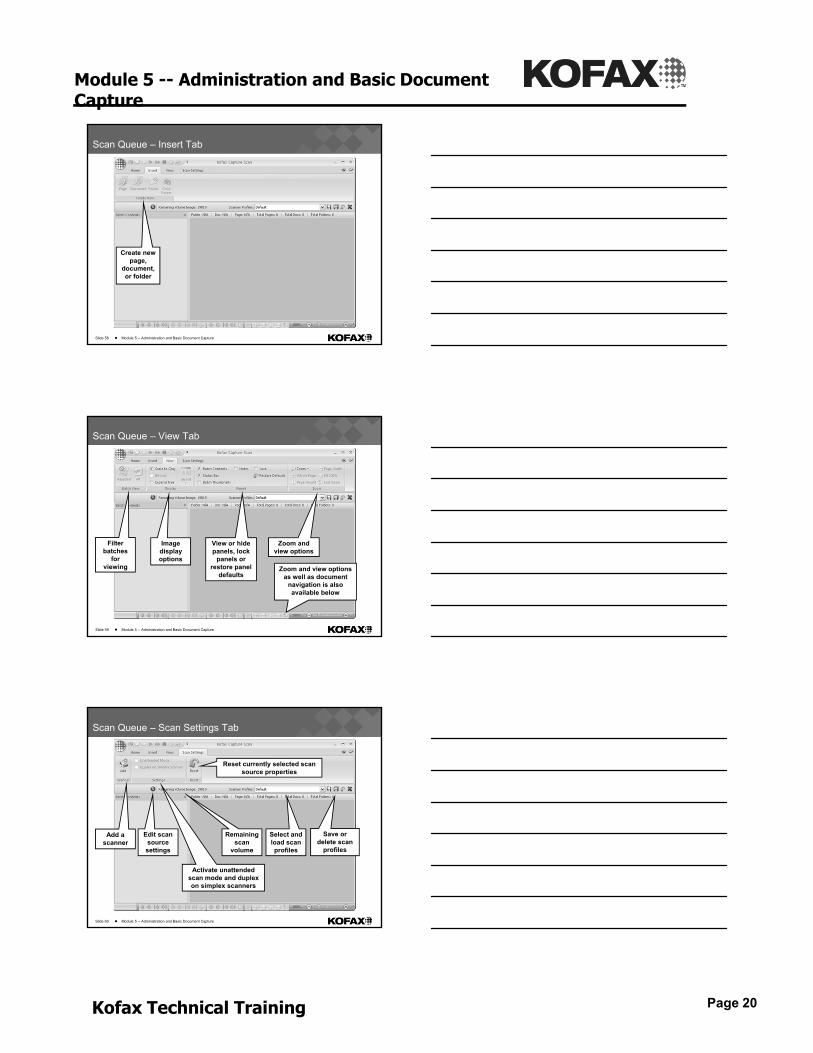
Slide 58 Module 5 -- Administration and Basic Document Capture
Scan Queue – Insert Tab
Create new page,
document, or folder
Slide 59 Module 5 -- Administration and Basic Document Capture
Scan Queue – View Tab
Filter batches
for viewing
Zoom and view options
Image display options
View or hide panels, lock
panels or restore panel
defaultsZoom and view options
as well as document navigation is also available below
Slide 60 Module 5 -- Administration and Basic Document Capture
Scan Queue – Scan Settings Tab
Add a scanner
Activate unattended scan mode and duplex on simplex scanners
Select and load scan profiles
Save or delete scan
profiles
Edit scan source
settings
Reset currently selected scan source properties
Remaining scan
volume

Module 5 -- Administration and Basic Document Capture
Kofax Technical Training Page 21
Slide 61 Module 5 -- Administration and Basic Document Capture
Scan Queue – Enhanced Status Bar
Folder navigation
buttons
Document navigation
buttons
Page navigation
buttons
Single or multi-page
view toggle
buttons
Image fit buttons
Zoom factor slider
Slide 62 Module 5 -- Administration and Basic Document Capture
Creating a Batch
When the Scan module is open, the operator will be prompted to
create a batch.
Optionally, the Scan operator can create a new batch in one of three ways:
1) Click on the Create Batch icon in the Quick Access Tool Bar
2) Select “Create Batch” from the Kofax Button
3) Click on “Create Batch” icon on the Home tab
Slide 63 Module 5 -- Administration and Basic Document Capture
Selecting a Batch Class and Entering the Batch Info
A batch class is selected from the dropdown list of published batch
classes and a batch is created. By default, each new batch is identified by system date and time which may
be replaced with a unique batch name by the operator.
Click [OK] or [Scan] to create the batch and begin
the capture process

Module 5 -- Administration and Basic Document Capture
Kofax Technical Training Page 22
Slide 64 Module 5 -- Administration and Basic Document Capture
Scanning/Importing the Batch
Pages are scanned and appear in the View panel.
The batch appears in the Batch Contents panel as
well.
To initiate scanning or importing, use the Scan
Page or Scan Batch icons
Slide 65 Module 5 -- Administration and Basic Document Capture
Document Separation
Right mouse click on an image, then select [Create
Document]
Because Kofax Capture will not allow any orphaned images (images not part of a
document), and because “Kofax Manual” was selected as the separation method for this batch class, the scanner operator must
manually separate the images into documents
Slide 66 Module 5 -- Administration and Basic Document Capture
Closing the Batch
Pages can be manually dragged and dropped to
move them from one document to another or to rearrange their order
within a document.
Close the batch when scanning is
complete
Module 5 -- Administration and Basic Document Capture
Kofax Technical Training Page 23
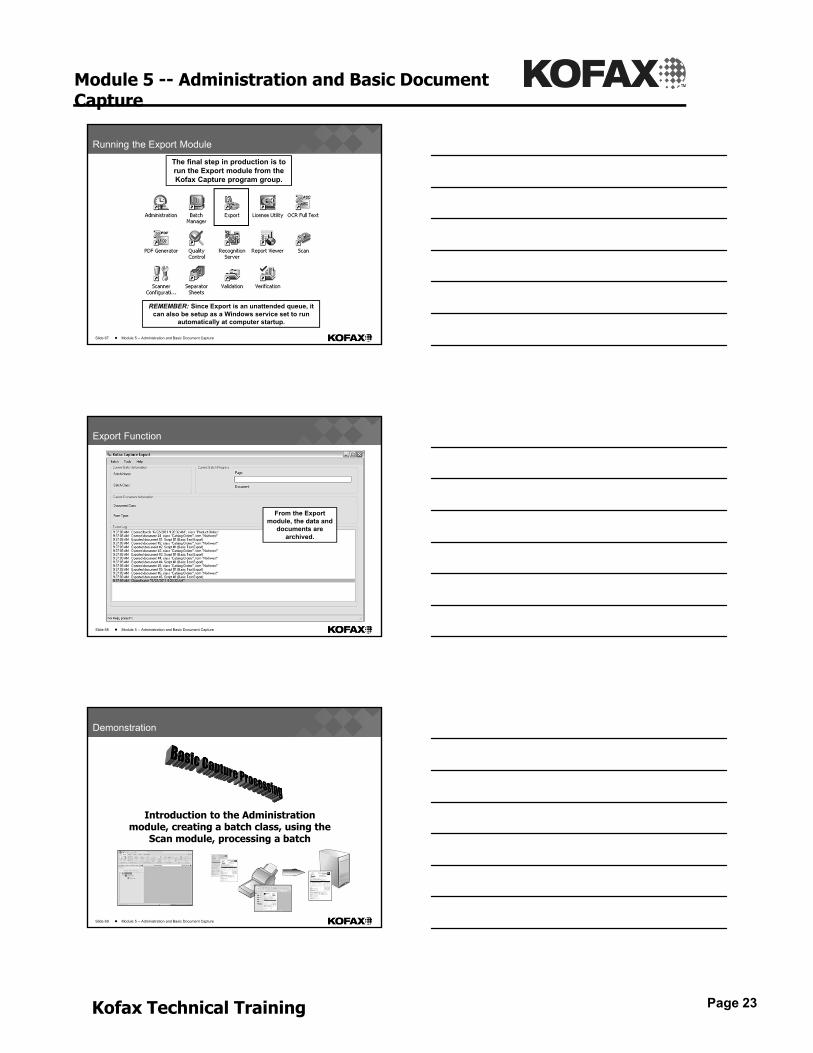
Slide 67 Module 5 -- Administration and Basic Document Capture
Running the Export Module
The final step in production is to run the Export module from the Kofax Capture program group.
REMEMBER: Since Export is an unattended queue, it can also be setup as a Windows service set to run
automatically at computer startup.
Slide 68 Module 5 -- Administration and Basic Document Capture
Export Function
From the Export module, the data and
documents are archived.
Slide 69 Module 5 -- Administration and Basic Document Capture
Demonstration
Introduction to the Administration module, creating a batch class, using the
Scan module, processing a batch

Module 5 -- Administration and Basic Document Capture
Kofax Technical Training Page 24
Slide 70 Module 5 -- Administration and Basic Document Capture
Lab
• Setting up a batch class in the Administration module
• Using the Scan module
• Processing a batch using Kofax Capture
Refer to the Kofax Capture 10 Lab and Reference Guide