
models: 500, 510, 550, 560 -...
58
models: 500, 510, 550, 560 ™ Aviation Quick Reference Guide
Transcript of models: 500, 510, 550, 560 -...

models: 500, 510, 550, 560
™
Aviation Quick Reference Guide


OVERVIEW
GPS NAVIGATION
FLIGHT PLANNING
HAZARD AVOIDANCE
UTILITIES
APPENDIX
INDEX

Copyright © 2009, 2012 Garmin Ltd. or its subsidiaries. All rights reserved.
This manual reflects the operation of System Software version 4.00 or later. Some differences in operation may be observed when comparing the information in this manual to earlier or later software versions.
Garmin International, Inc., 1200 East 151st Street, Olathe, Kansas 66062, U.S.A. Tel: 913/397.8200 Fax: 913/397.8282
Garmin AT, Inc., 2345 Turner Road SE, Salem, OR 97302, U.S.A.Tel: 503/391.3411 Fax 503/364.2138
Garmin (Europe) Ltd, Liberty House, Bulls Copse Road, Hounsdown Business Park, Southampton, SO40 9RB, U.K.Tel: 44/0870.8501241 Fax: 44/0870.8501251
Garmin Corporation, No. 68, Jangshu 2nd Road, Shijr, Taipei County, Taiwan Tel: 886/02.2642.9199 Fax: 886/02.2642.9099
Web Site Address: www.garmin.com
Except as expressly provided herein, no part of this manual may be reproduced, copied, transmitted, disseminated, downloaded or stored in any storage medium, for any purpose without the express written permission of Garmin. Garmin hereby grants permission to download a single copy of this manual and of any revision to this manual onto a hard drive or other electronic storage medium to be viewed for personal use, provided that such electronic or printed copy of this manual or revision must contain the complete text of this copyright notice and provided further that any unauthorized commercial distribution of this manual or any revision hereto is strictly prohibited.
Garmin® and SafeTaxi® are registered trademarks of Garmin Ltd. or its subsidiaries. aera™ is a trademark of Garmin Ltd. or its subsidiaries. These trademarks may not be used without the express permission of Garmin.
Jeppesen® is a registered trademark of Jeppesen, Inc.
XM® is a registered trademark of XM Satellite Radio, Inc.
AC-U-KWIK® is a registered trademark of Penton Business Media, Inc.
August, 2012 190-01117-03 Rev. B Printed in the United States or Taiwan

Part Number Change Summary190-01194-00 Initial release
Rev Date DescriptionA October, 2009 Production Release
B August, 2012 Added GDL 39 Support

Garmin aera 500 Series Quick Reference Guide190-01117-03 Rev. B i
Table of Contents
SECTION 1 OVERVIEW ..................................................................................... 11.1 UNIT OVERVIEW .........................................................................................................11.2 GETTING STARTED .....................................................................................................2
Battery Installation ............................................................................................................... 2Charging the Battery ............................................................................................................ 3Changing Modes .................................................................................................................. 3GPS Receiver Status ............................................................................................................. 3
1.3 OPERATION.................................................................................................................4Basic Navigation Controls ..................................................................................................... 4‘Home’ Screen ...................................................................................................................... 5Selecting a Function ............................................................................................................. 9Scrolling ............................................................................................................................... 9
1.4 ACCESSING SYSTEM FUNCTIONALITY ....................................................................10Option Menus .................................................................................................................... 10Data Entry .......................................................................................................................... 10
1.5 USING MAP DISPLAYS .............................................................................................11Map Panning ..................................................................................................................... 11Map Range ........................................................................................................................ 12Map Overlays ..................................................................................................................... 13
SECTION 2 GPS NAVIGATION ....................................................................... 152.1 FLIGHT DATA ............................................................................................................15
Data Fields ......................................................................................................................... 15Numeric Flight Data ........................................................................................................... 15
2.2 HSI/PANEL.................................................................................................................16Changing the CDI Scale ...................................................................................................... 16Setting the Bug Indicator .................................................................................................... 16Manually Setting a Course .................................................................................................. 16
2.3 VERTICAL NAVIGATION (VNAV) ...............................................................................17Using the VNAV Feature ..................................................................................................... 17
2.4 WAYPOINTS ..............................................................................................................18Nearest Information ........................................................................................................... 19Weather and NOTAM Information ....................................................................................... 19User Waypoints .................................................................................................................. 20
2.5 DIRECT-TO NAVIGATION ..........................................................................................22
SECTION 3 FLIGHT PLANNING ...................................................................... 253.1 FLIGHT PLAN DATA FIELDS ......................................................................................253.2 FLIGHT PLAN CREATION ..........................................................................................253.3 ADDING FLIGHT PLAN WAYPOINTS.........................................................................273.4 FLIGHT PLAN STORAGE ...........................................................................................273.5 FLIGHT PLAN ACTIVATION .......................................................................................283.6 FLIGHT PLAN DELETION ...........................................................................................283.7 APPROACHES............................................................................................................29
Garmin aera 500 Series Quick Reference Guide 190-01117-03 Rev. Bii
Table of Contents
SECTION 4 HAZARD AVOIDANCE .................................................................. 314.1 WEATHER .................................................................................................................31
XM Weather (aera 510 & 560)............................................................................................ 31Data Link Weather (FIS-B) (all models) ................................................................................ 31
4.2 TERRAIN ....................................................................................................................324.3 TRAFFIC ...................................................................................................................33
Traffic Information Service (TIS-A) ....................................................................................... 33Data Link Traffic (GDL 39) ................................................................................................... 34
SECTION 5 UTILITIES ...................................................................................... 375.1 FLIGHT LOG ..............................................................................................................375.2 TRACK LOG ...............................................................................................................375.3 E6B CALCULATOR .....................................................................................................385.4 AIRCRAFT PROFILE ...................................................................................................395.5 WEIGHT & BALANCE ................................................................................................40
SECTION 6 APPENDIX ................................................................................... 41Miscellaneous Message Advisories ...................................................................................... 41Airspace Messages ............................................................................................................. 42Data Field & Numeric Data Options .................................................................................... 43Aural Alerts ........................................................................................................................ 45Loss of GPS Position ........................................................................................................... 45Hazard Display with Loss of GPS Position ............................................................................ 45
INDEX ....................................................................................................................INDEX-1
Garmin aera 500 Series Quick Reference Guide190-01117-03 Rev. B 1
Overview
Overview
GPS N
avigationFlight Planning
Hazard Avoidance
Utilities
Appendix
Index
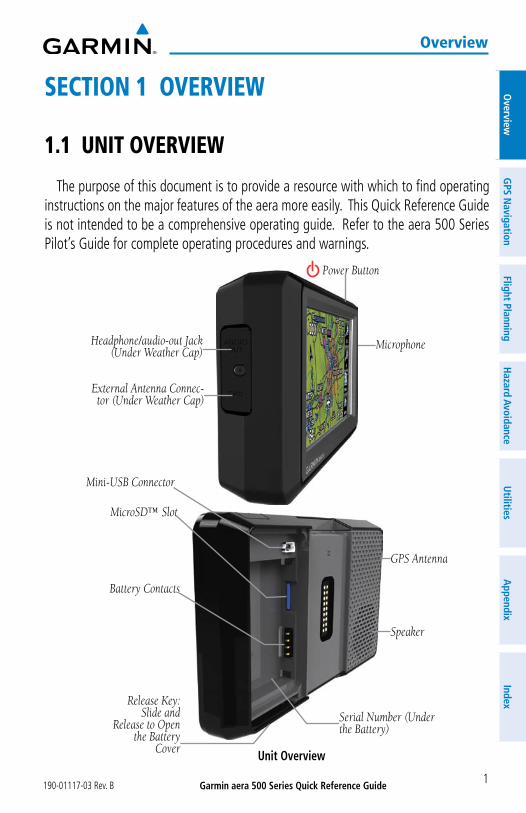
SECTION 1 OVERVIEW
1.1 UNIT OVERVIEW
The purpose of this document is to provide a resource with which to find operating instructions on the major features of the aera more easily. This Quick Reference Guide is not intended to be a comprehensive operating guide. Refer to the aera 500 Series Pilot’s Guide for complete operating procedures and warnings.
Unit Overview
Headphone/audio-out Jack(Under Weather Cap)
External Antenna Connec-tor (Under Weather Cap)
Power Button
Microphone
Release Key: Slide and
Release to Open the Battery
Cover
Serial Number (Under the Battery)
Speaker
GPS Antenna
Mini-USB Connector
MicroSD™ Slot
Battery Contacts

Garmin aera 500 Series Quick Reference Guide 190-01117-03 Rev. B2
Overview
Ove
rvie
wG
PS N
avig
atio
nFl
ight
Pla
nnin
gH
azar
d Av
oida
nce
Util
ities
App
endi
xIn
dex
1.2 GETTING STARTED
BATTERY INSTALLATIONInstalling the battery:1) Locate the lithium-ion battery that came in the product box.
2) Slide the release key until the battery cover on the back of the aera opens up.
3) Remove the battery cover.
4) Locate the metal contacts on the end of the lithium-ion battery.
5) Insert the battery so that the metal contacts on the battery line-up with the metal contacts inside the battery compartment.
6) Slide the top of the battery cover into the groove on the inside of the battery compartment, and press down.
Installing the Battery
Garmin aera 500 Series Quick Reference Guide190-01117-03 Rev. B 3
Overview
Overview
GPS N
avigationFlight Planning
Hazard Avoidance
Utilities
Appendix
Index
CHARGING THE BATTERY
NOTE: While in Charge Mode, the unit draws a current from the aircraft. To avoid discharging the aircraft’s battery, disconnect the external power cable from the unit when not in use for several days.
Charging the unit’s battery using the aircraft's power outlet:1) Mount the aera in the aircraft (refer to Appendix D of the aera 500 Series
Pilot's Guide), and connect the power cable to the aircraft power outlet (cigarette lighter receptacle).
2) Route the power cable so that it does not interfere with aircraft operation. The unit begins charging as soon as external power is applied.
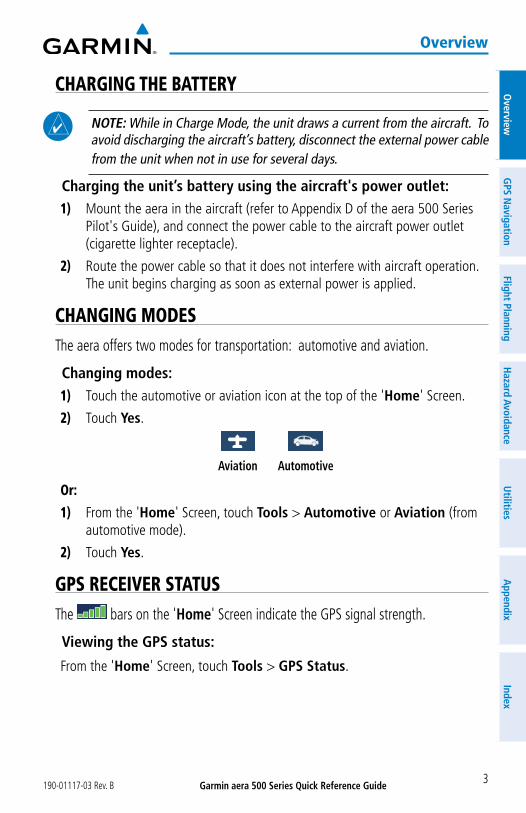
CHANGING MODESThe aera offers two modes for transportation: automotive and aviation.
Changing modes:1) Touch the automotive or aviation icon at the top of the 'Home' Screen.
2) Touch Yes.
AutomotiveAviation
Or:
1) From the 'Home' Screen, touch Tools > Automotive or Aviation (from automotive mode).
2) Touch Yes.
GPS RECEIVER STATUSThe bars on the 'Home' Screen indicate the GPS signal strength.
Viewing the GPS status:
From the 'Home' Screen, touch Tools > GPS Status.

Garmin aera 500 Series Quick Reference Guide 190-01117-03 Rev. B4
Overview
Ove
rvie
wG
PS N
avig
atio
nFl
ight
Pla
nnin
gH
azar
d Av
oida
nce
Util
ities
App
endi
xIn
dex
1.3 OPERATION
BASIC NAVIGATION CONTROLSThe controls on the touchscreen change dynamically depending on the function
displayed.
Touch the following icons to perform the associated function:
Home Returns to the ‘Home’ screen.
Back Displays the previous page; Returns ‘Home’ (touch and hold).
OK Commits a value edited or selected.
Menu Displays the context sensitive option menu.
Menu/ Displays the menu; Displays the Direct-to function (touch and hold).
Up Scrolls up.
Down Scrolls down.
Direct-to Displays the Direct-to function.
Out Zooms out.
In Zooms in.
KEYPAD CONTROLSOK Exits the keypad function and accepts the changes.
BKSP Erases the current data.
Numeric Displays the numeric only keypad.
Alpha Displays the alpha and numeric keypads.
Cancel Cancels a value that has been edited.

Garmin aera 500 Series Quick Reference Guide190-01117-03 Rev. B 5
Overview
Overview
GPS N
avigationFlight Planning
Hazard Avoidance
Utilities
Appendix
Index
‘HOME’ SCREENTouch the icon at any time to access the ‘Home’ Screen.
‘HOME’ SCREEN ICONS
Touch the following icons to perform the associated function:
Map Displays the Navigation Map.
Terrain Displays the Terrain Map.
HSI/Panel Displays the Panel Mode.
Nearest Displays the second-level Nearest Icons.
Traffic Displays Traffic Page.
Active FPL Displays the Active Flight Plan.
WPT Info Displays the Waypoint Information.
Direct To Displays the 'Direct To' function.
Position Displays the aircraft's Present Position.
Weather Displays second-level Weather Icons (aera 510 & 560) or All models with a GDL 39.
XM Radio Displays XM Radio (aera 510 & 560).
Tools Displays second-level Tools Icons.
NEAREST ICONS
From the ‘Home‘ Screen, touch the Nearest Icon to access the second-level Nearest Icons.
Touch the following icons to perform the associated function:
Airport Displays nearest airports.
Airport WX Displays nearest airport weather.
VOR Displays nearest VORs.
Garmin aera 500 Series Quick Reference Guide 190-01117-03 Rev. B6
Overview
Ove
rvie
wG
PS N
avig
atio
nFl
ight
Pla
nnin
gH
azar
d Av
oida
nce
Util
ities
App
endi
xIn
dex
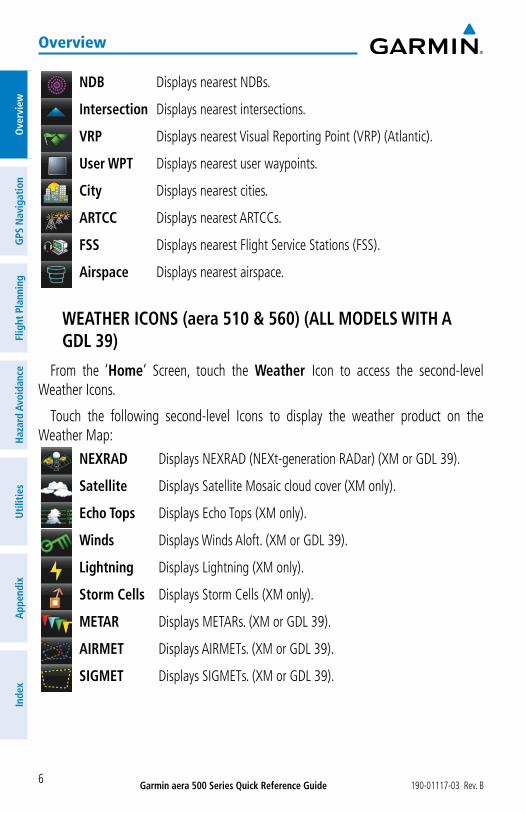
NDB Displays nearest NDBs.
Intersection Displays nearest intersections.
VRP Displays nearest Visual Reporting Point (VRP) (Atlantic).
User WPT Displays nearest user waypoints.
City Displays nearest cities.
ARTCC Displays nearest ARTCCs.
FSS Displays nearest Flight Service Stations (FSS).
Airspace Displays nearest airspace.
WEATHER ICONS (aera 510 & 560) (ALL MODELS WITH A GDL 39)
From the ‘Home‘ Screen, touch the Weather Icon to access the second-level Weather Icons.
Touch the following second-level Icons to display the weather product on the Weather Map:
NEXRAD Displays NEXRAD (NEXt-generation RADar) (XM or GDL 39).
Satellite Displays Satellite Mosaic cloud cover (XM only).
Echo Tops Displays Echo Tops (XM only).
Winds Displays Winds Aloft. (XM or GDL 39).
Lightning Displays Lightning (XM only).
Storm Cells Displays Storm Cells (XM only).
METAR Displays METARs. (XM or GDL 39).
AIRMET Displays AIRMETs. (XM or GDL 39).
SIGMET Displays SIGMETs. (XM or GDL 39).

Garmin aera 500 Series Quick Reference Guide190-01117-03 Rev. B 7
Overview
Overview
GPS N
avigationFlight Planning
Hazard Avoidance
Utilities
Appendix
Index
TFR Displays TFRs (XM or GDL 39).
PIREP Displays PIREPs. (XM or GDL 39).
Freeze Lvl Displays Freezing Levels (XM only)
Turb Fcst Displays the Turbulence Forecast (XM only)
Icing Fcst Displays the Icing Forecast (XM only)
WX Frst Displays Forecast Information (current, 12, 24, 36, & 48).
Pressure Displays Surface Pressure (XM only)
Temps Displays Temperatures Aloft (GDL 39 only).
TOOLS
From the ‘Home‘ Screen, touch the Tools Icon to access the second-level Tools Icons.
Touch the following second-level icons to perform the associated function:
Setup Displays third-level Setup Icons.
User WPT Displays User Waypoints and Proximity Waypoints.
Flight Log Displays Flight Logs.
Track Log Displays Track Logs.
FPL List Displays the Flight Plan List.
VNAV Displays Vertical Navigation.
Profile Displays Aircraft Profiles.
E6B Calc Displays the E6B Calculator.
Weight/Bal Displays the Weight & Balance.
Data Link Displays Data Link Information.
Database Displays database and software version information.
Numbers Displays flight data.

Garmin aera 500 Series Quick Reference Guide 190-01117-03 Rev. B8
Overview
Ove
rvie
wG
PS N
avig
atio
nFl
ight
Pla
nnin
gH
azar
d Av
oida
nce
Util
ities
App
endi
xIn
dex
Automotive Activates automotive mode.
GPS Status Displays GPS status information.
MP3 Displays Music Player.
Audible Displays Audible Books.
Setup IconS
From the ‘Home‘ Screen, touch the Tools > Setup to access the third-level Setup Icons.
Touch the following third-level icons to perform the associated function:
Display Displays backlight intensity/timeout and color mode settings.
Sound Displays sound settings.
Units Displays unit settings.
Date/Time Displays date & time settings.
Map Displays Navigation Map settings.
Position Displays position settings.
Interface Displays interface settings.
Alarms Displays alarm settings.
SUA Alarms Displays Special Use Airspace alarm settings.
Data Link Displays Data Link setup information.
Weather Displays Weather setup information (510 and 560 Models only).
Power Displays power settings

Garmin aera 500 Series Quick Reference Guide190-01117-03 Rev. B 9
Overview
Overview
GPS N
avigationFlight Planning
Hazard Avoidance
Utilities
Appendix
Index
SELECTING A FUNCTION Touch the desired icon. The icon will momentarily turn blue when selected.
Terrain Icon Selected (‘Home’ Screen)
SCROLLINGScrolling up/down on the touchscreen: Touch the Up or Down Arrow Icons (if available).
Or:
If the arrow icons are present, touch and drag your finger up or down.
Scrolling (Weather Icons)
Garmin aera 500 Series Quick Reference Guide 190-01117-03 Rev. B10
Overview
Ove
rvie
wG
PS N
avig
atio
nFl
ight
Pla
nnin
gH
azar
d Av
oida
nce
Util
ities
App
endi
xIn
dex
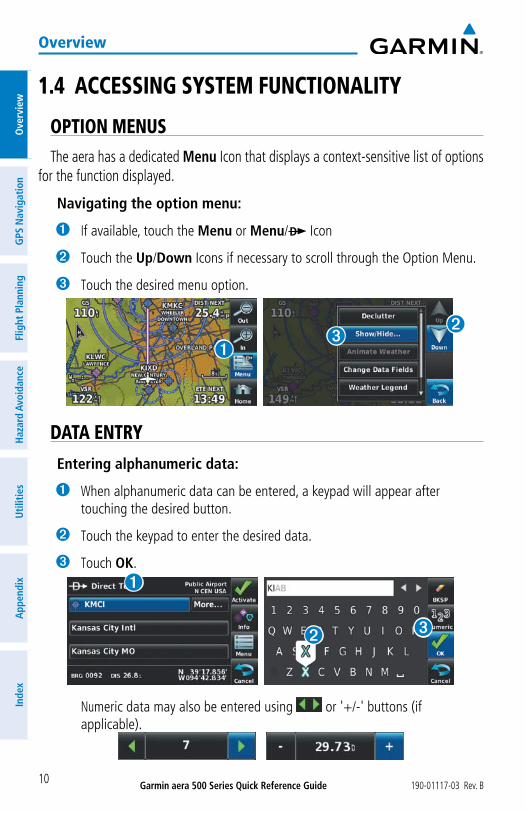
1.4 ACCESSING SYSTEM FUNCTIONALITY
OPTION MENUSThe aera has a dedicated Menu Icon that displays a context-sensitive list of options
for the function displayed.
Navigating the option menu:
➊ If available, touch the Menu or Menu/ Icon
➋ Touch the Up/Down Icons if necessary to scroll through the Option Menu.
➌ Touch the desired menu option.
➊➋
➌
DATA ENTRYEntering alphanumeric data:
➊ When alphanumeric data can be entered, a keypad will appear after touching the desired button.
➋ Touch the keypad to enter the desired data.
➌ Touch OK.
➊
➋ ➌
Numeric data may also be entered using or '+/-' buttons (if applicable).

Garmin aera 500 Series Quick Reference Guide190-01117-03 Rev. B 11
Overview
Overview
GPS N
avigationFlight Planning
Hazard Avoidance
Utilities
Appendix
Index
Entering predetermined data options:
➊ Touch the Data Option Button to display a vertical list of data options (if applicable), or to toggle two data options (i.e., On/Off).
Or:
Touch the buttons to cycle through a horizontal list (if more than two data options are available).
➋ If using the vertical list, touch the desired data option from the list.
➊➋
1.5 USING MAP DISPLAYS
MAP PANNINGActivating the map pointer: While viewing a Map Display, touch anywhere on the map to activate the
map pointer. Touch the Cancel Icon to remove the map pointer.
Panning the map: While viewing a Map Display, touch anywhere on the map and drag. Touch
the Cancel icon to remove the map pointer.
Reviewing information for a map feature:
➊ While viewing a Map Display, touch anywhere on the map to activate the map pointer. When the Map Pointer is over a map feature, the map feature is highlighted, an information box appears on the map, and the highlighted map feature is displayed on the Map Feature Button at the bottom of the screen. If multiple features are present at the Map Pointer position, green arrows will appear on the Map Feature Button.
➋ If necessary, touch the buttons to cycle through the list of map features present at that position.

Garmin aera 500 Series Quick Reference Guide 190-01117-03 Rev. B12
Overview
Ove
rvie
wG
PS N
avig
atio
nFl
ight
Pla
nnin
gH
azar
d Av
oida
nce
Util
ities
App
endi
xIn
dex
➌ Touch the Map Feature Button to review information for the Map Feature.
➍ Touch the Back Icon to return to the map or touch and hold the Menu/ Icon to navigate to the map feature. Touch the Cancel Icon to remove the map pointer.
➊
➋
➍➌
MAP RANGEThere are 23 different map ranges available, from 200 feet to 800 nm. The current
map range is indicated in the lower right. The scale bar represents the map scale. To change the map range on any map, use the Out or In Icons to zoom ‘out’ (increasing), or zoom ‘in‘ (decreasing).

Garmin aera 500 Series Quick Reference Guide190-01117-03 Rev. B 13
Overview
Overview
GPS N
avigationFlight Planning
Hazard Avoidance
Utilities
Appendix
Index
MAP OVERLAYS
The ➊Weather, ➋Topography, ➌Terrain, and ➍Satellite Imagery map overlays can be displayed or removed.
➋
➌
➊
➍
Displaying/removing map overlays:1) From the 'Home' Screen, touch Map > Menu > Show/Hide.
2) Touch the 'Show/Hide' Data Option Button for the desired overlay.
Satellite View only displays satellite imagery at and above the 20nm range. Below the 20nm range, 'no sat view' is displayed below the map range.

Garmin aera 500 Series Quick Reference Guide 190-01117-03 Rev. B14
Overview
Ove
rvie
wG
PS N
avig
atio
nFl
ight
Pla
nnin
gH
azar
d Av
oida
nce
Util
ities
App
endi
xIn
dex
Blank Page

Garmin aera 500 Series Quick Reference Guide190-01117-03 Rev. B 15
GPS Navigation
Overview
GPS N
avigationFlight Planning
Hazard Avoidance
Utilities
Appendix
Index
SECTION 2 GPS NAVIGATION
2.1 FLIGHT DATA
DATA FIELDSChanging the information shown in the data fields:1) From the ‘Home’ Screen, touch the Map Icon.
2) Touch the Menu Icon.
3) Touch the 'Change Data Fields' menu option.
4) Touch the desired Data Field to change. A list of available Data Field Options is displayed.
5) Touch the desired Data Field Option.
6) Touch the OK Icon.
NUMERIC FLIGHT DATAThe numeric flight data can be independently configured by the user.
Accessing numeric flight data: From the 'Home' Screen, touch Numbers.
Changing numeric flight data fields:1) From the 'Home' Screen, touch Numbers.
2) Touch the desired data field to change. The available data fields are displayed.
3) Touch the desired data field.
4) Touch OK.
Restoring default numeric flight data:
From the 'Home' Screen, touch Numbers > Menu > Restore Default.

Garmin aera 500 Series Quick Reference Guide 190-01117-03 Rev. B16
GPS Navigation
Ove
rvie
wG
PS N
avig
atio
nFl
ight
Pla
nnin
gH
azar
d Av
oida
nce
Util
ities
App
endi
xIn
dex
2.2 HSI/PANEL
CHANGING THE CDI SCALEThe CDI scale can be set by touching the In or Out Icons from the HSI/Panel Screen
(if the CDI scale is NOT set to 'Automatic') or from the HSI/Panel option menu.
Changing the CDI scale:1) From the 'Home' Screen, touch HSI/Panel > Menu > Set CDI Scale.
2) Touch the desired CDI Scale (' Automatic', ' 0.25 nm', ' 1.25 nm', or '5.00 nm').
SETTING THE BUG INDICATORThe Bug Indicator can be set from the HSI/Panel option menu.
Setting the Bug Indicator:1) From the 'Home' Screen, touch HSI/Panel > Menu > Set Bug
Indicator.
2) Touch the desired menu option ('User Selected', 'Bearing', 'Course to Steer', or 'Off').
MANUALLY SETTING A COURSEUse the ‘Set OBS and Hold’ menu option to manually set your course to the
destination.
Manually setting a course to the destination waypoint:1) From the ‘Home’ Screen, touch the HSI/Panel or the Active FPL Icon.
2) Touch the Menu Icon
3) Touch the ' Set OBS and Hold' menu option (only available when navigating a Direct To or Flight Plan).
4) Touch the '+' or '-' Buttons to increase/decrease the value
Or:

Garmin aera 500 Series Quick Reference Guide190-01117-03 Rev. B 17
GPS Navigation
Overview
GPS N
avigationFlight Planning
Hazard Avoidance
Utilities
Appendix
Index
Touch the Radial Button to enter the desired radial using the keypad and touch the OK Icon.
Returning to automatic sequencing of route waypoints:1) From the ‘Home’ Screen, touch the HSI/Panel or the Active FPL Icon.
2) Touch the Menu Icon
3) Touch the 'Release Hold' menu option (only available when navigating a Direct To or Flight Plan).
2.3 VERTICAL NAVIGATION (VNAV)
USING THE VNAV FEATUREEnabling/disabling the VNAV indicator:1) From the ‘Home’ Screen, touch the HSI/Panel Icon.
2) Touch the Menu Icon
3) Touch the 'Enable VNAV Indicator' or 'Disable VNAV Indicator' menu option (only available when navigating a Direct To or Flight Plan).
Capturing/cancelling VNAV profile:1) Enter a valid VNAV profile (see 'Configuring a VNAV Profile' below) and
begin navigation.
2) From the ‘Home’ Screen, touch the HSI/Panel Icon.
3) Touch the 'Capture VNAV Profile' or 'Cancel Capture' menu option (only available when navigating a Direct To or Flight Plan).
Configuring a VNAV profile:1) From the 'Home' Screen, touch Tools > VNAV
2) Touch the desired fields ('Profile', 'Altitude', etc) to enter the VNAV profile.
3) Touch and hold the Back Icon to return to the ‘Home’ Screen.
Garmin aera 500 Series Quick Reference Guide 190-01117-03 Rev. B18
GPS Navigation
Ove
rvie
wG
PS N
avig
atio
nFl
ight
Pla
nnin
gH
azar
d Av
oida
nce
Util
ities
App
endi
xIn
dex
2.4 WAYPOINTS
Selecting an airport for review by identifier, facility name, or city:1) From the 'Home' Screen, touch WPT Info > Info Tab (if necessary).
2) Touch the Waypoint Identifier Button.
3) Enter the desired waypoint:
a) Touch the buttons to 'Search by Identifier', 'Search by Facility Name', or 'Search by City' using the keypad.
b) Enter the desired waypoint.
c) Touch the OK Icon.
Or:
a) Touch the buttons to cycle through the waypoint categories ('Flight Plan Waypoints', 'Nearest Airports', or 'Recent Waypoints'.)
b) Touch the desired waypoint from the list.
4) If duplicate entries exist for the entered facility name or location, duplicate waypoints are displayed. Touch the desired waypoint from the list.
Selecting a runway:1) From the 'Home' Screen, touch WPT Info > Runway Tab.
2) Touch the Waypoint Identifier Button.
3) Enter the desired waypoint:
a) Touch the buttons to 'Search by Identifier', 'Search by Facility Name', or 'Search by City' using the keypad.
b) Enter the desired waypoint.
c) Touch the OK Icon.
Or:
a) Touch the buttons to cycle through the waypoint categories ('Flight Plan Waypoints', 'Nearest Airports', or 'Recent Waypoints'.)
b) Touch the desired waypoint from the list.
4) If duplicate entries exist for the entered facility name or location, duplicate waypoints are displayed. Touch the desired waypoint from the list.

Garmin aera 500 Series Quick Reference Guide190-01117-03 Rev. B 19
GPS Navigation
Overview
GPS N
avigationFlight Planning
Hazard Avoidance
Utilities
Appendix
Index
5) If multiple runways exist, touch the Runway Button, and touch the desired runway from the vertical list.
Or:
Touch the buttons to cycle through the runways.
Selecting additional information for a frequency:1) From the 'Home' Screen, touch WPT Info > Freq Tab.
2) Touch the frequency denoted with an *.
NEAREST INFORMATIONViewing nearest information:1) From the ‘Home’ Screen, touch the Nearest Icon to display the second
level Nearest Icons.
2) Touch the desired Nearest Icon (Airport, Airport WX, VOR, NDB, Intersection, User WPT, City, ARTCC, FSS, or Airspace).
3) Touch the desired nearest option from the list for additional information.
Or:
If viewing Nearest ARTCCs or FSSs, touch the buttons to cycle through the list.
4) If desired, touch Menu > Show Map (except for ARTCC, FSS, or Airspace).
5) Touch the Back Icon to return to the second level Nearest Icons.
Or:
Touch the Direct Icon (if applicable), then the Activate Button to navigate Direct-to the selected waypoint.
WEATHER AND NOTAM INFORMATIONViewing airport weather/NOTAM information:1) From the ‘Home’ Screen, touch the WPT Info Icon.
2) Enter the desired waypoint identifier.
3) Touch the WX/NOTAM Tab.
Or:
1) From the ‘Home’ Screen, touch the Nearest > Airport WX.
2) Touch the desired Nearest Airport Weather from the list.

Garmin aera 500 Series Quick Reference Guide 190-01117-03 Rev. B20
GPS Navigation
Ove
rvie
wG
PS N
avig
atio
nFl
ight
Pla
nnin
gH
azar
d Av
oida
nce
Util
ities
App
endi
xIn
dex
Or:
1) From the ‘Home’ Screen, touch the Weather > METAR.
2) Touch the desired METAR flag.
3) Touch the Map Feature Button with the desired identifier displayed (refer to 'Map Panning' in the Overview Section for more information). The weather information is displayed.
Or:
1) From the ‘Home’ Screen, touch the Map Icon.
2) Touch the desired METAR Flag (If the METAR flags are not displayed, adjust the settings from the 'Set Up Map' menu option).
3) Touch the Map Feature Button with the desired identifier displayed (refer to 'Map Panning' in the Overview Section for more information). The weather information is displayed.
USER WAYPOINTSCreating user waypoints:1) To create a new user waypoint at the current location or using the Map
Pointer:
a) From the ‘Home’ Screen, touch Tools > User WPT > Menu.
b) Touch 'Create Waypoint'.
Or:
a) With a map displayed, touch an empty area without any map features.
b) Touch the Map Feature Button.
c) Touch 'Save'.
Or:
a) With a map displayed, touch a map feature.
b) Touch the Menu Icon.
c) Touch 'Create Waypoint'.
Or:
a) From the ‘Home’ Screen, touch the Position Icon.
b) Touch the Mark Waypoint Button.
Garmin aera 500 Series Quick Reference Guide190-01117-03 Rev. B 21
GPS Navigation
Overview
GPS N
avigationFlight Planning
Hazard Avoidance
Utilities
Appendix
Index
2) Enter the desired user waypoint name (up to 10 characters). Refer to the Overview Section on 'Data Entry' for more information.
3) Touch the OK Icon. If changing the User Waypoint settings (symbol, altitude, location, or reference waypoints) continue with Step 4.
4) If desired, touch the Symbol Field to change the symbol that will appear on the map.
a) Touch the desired symbol.
b) Touch the OK Icon.
5) If desired, touch the Altitude Field
a) Enter the desired altitude using the keypad or the +/- buttons. Refer to the Overview Section on 'Data Entry' for more information.
b) Touch the OK Icon.
6) If desired, touch the Location Field.
a) Enter the desired latitude and longitude by touching the left/right arrows to move the cursor, and the up/down arrows to change the value.
b) Touch the OK Icon.
7) If desired, touch the Menu Icon and touch 'Reference Waypoints' to enter a bearing and distance from another waypoint or the bearing from two other waypoint to define a new waypoint location.
a) Touch the Waypoint Field(s) to enter the desired waypoint.
b) Touch the Bearing and/or Distance Fields to enter the desired values.
c) Touch the OK Icon.
8) Touch and hold the Back Icon to return to the 'Home' Screen.
Garmin aera 500 Series Quick Reference Guide 190-01117-03 Rev. B22
GPS Navigation
Ove
rvie
wG
PS N
avig
atio
nFl
ight
Pla
nnin
gH
azar
d Av
oida
nce
Util
ities
App
endi
xIn
dex
2.5 DIRECT-TO NAVIGATION
Entering a waypoint identifier, facility name, or city as a direct-to destination:1) From the ‘Home’ Screen, touch the Direct To Icon.
Or:
Touch and hold the Menu/ Icon (when available).
2) Touch Menu > Resume Navigation.
Or:
a) Touch the 'Search by Identifier', 'Search by Facility Name', or 'Search by City' fields.'.
b) Enter the desired Identifier, Facility Name, or City using the keypad. Refer to the Overview Section on 'Data Entry' for more information.
c) Touch the OK Icon.
Or:
a) Touch 'More...'.
b) Touch the buttons to view 'Flight Plan Waypoints', 'Nearest Airports', or 'Recent Waypoints'.
c) Touch the desired waypoint from the list.
4) Touch the Activate Icon (if necessary).
Selecting a nearby airport as a direct-to destination:1) From the 'Home' Screen, touch Nearest > Airport.
2) Touch the desired nearest airport.
3) Touch and hold the Menu/ Icon.
4) Touch the Activate Icon.
Selecting a waypoint as a direct-to destination using the pointer:1) With a map displayed, activate the map pointer by touching the desired
waypoint. If no airport, NAVAID, or User Waypoint exists at the desired location, a temporary waypoint named 'MAP' is automatically created at the location of the map pointer.
2) Touch and hold the Direct Icon.

Garmin aera 500 Series Quick Reference Guide190-01117-03 Rev. B 23
GPS Navigation
Overview
GPS N
avigationFlight Planning
Hazard Avoidance
Utilities
Appendix
Index
3) Touch the Activate Icon.
Cancelling a direct-to:1) From the ‘Home’ Screen, touch the Direct To Icon.
Or:
From the ‘Home’ Screen, touch the Active FPL Icon.
Or:
Touch and hold the Menu/ Icon (when available).
2) Touch the Menu Icon.
3) Touch 'Stop Navigation'.

Garmin aera 500 Series Quick Reference Guide 190-01117-03 Rev. B24
GPS Navigation
Ove
rvie
wG
PS N
avig
atio
nFl
ight
Pla
nnin
gH
azar
d Av
oida
nce
Util
ities
App
endi
xIn
dex
Blank Page

Garmin aera 500 Series Quick Reference Guide190-01117-03 Rev. B 25
Flight Planning
Overview
GPS N
avigationFlight Planning
Hazard Avoidance
Utilities
Appendix
Index
SECTION 3 FLIGHT PLANNING
3.1 FLIGHT PLAN DATA FIELDS
The Active and Saved Flight Plan Data Fields can be changed by touching the to Data Field Buttons at the top of the flight plan.
Changing the information shown in the flight plan data fields:1) From the ‘Home’ Screen, touch the Active FPL Icon.
Or:
a) From the ‘Home’ Screen, touch Tools > FPL List.
b) Touch the desired Saved Flight Plan from the list. An option menu appears.
c) Touch the 'Review Flight Plan' menu option.
2) Touch the desired Data Field Button at the top of the Flight Plan.
3) Touch the desired Data Field. The currently selected Data Field is outlined blue.
4) Touch the OK Icon.
5) If desired, repeat Steps 2-4 for the remaining Data Field.
3.2 FLIGHT PLAN CREATION
The active flight plan is the flight plan to which the aera is currently providing guidance, and is shown on the navigation maps. Stored flight plans are flight plans available for activation (becomes the active flight plan).
Creating an active flight plan:1) From the ‘Home’ Screen, touch the Active FPL Icon.
2) Touch the 'Touch to add Waypoint' Button.
3) Enter the desired waypoint:
a) Touch the buttons to 'Search by Identifier', 'Search by Facility Name', or 'Search by City' using the keypad.
b) Enter the desired waypoint.

Garmin aera 500 Series Quick Reference Guide 190-01117-03 Rev. B26
Flight Planning
Ove
rvie
wG
PS N
avig
atio
nFl
ight
Pla
nnin
gH
azar
d Av
oida
nce
Util
ities
App
endi
xIn
dex
c) Touch the OK Icon.
Or:
a) Touch the buttons to cycle through the waypoint categories ('Flight Plan Waypoints', 'Nearest Airports', or 'Recent Waypoints'.)
b) Touch the desired waypoint from the list.
4) If duplicate entries exist for the entered facility name or location, duplicate waypoints are displayed. Touch the desired waypoint from the list.
5) Repeat Steps 2-5 to enter each additional waypoint.
Creating a stored flight plan:1) From the ‘Home’ Screen, touch Tools > FPL List > Menu > New Flight
Plan.
2) Touch the 'Touch to add Waypoint' Button.
3) Enter the desired waypoint:
a) Touch the buttons to 'Search by Identifier', 'Search by Facility Name', or 'Search by City' using the keypad.
b) Enter the desired waypoint.
c) Touch the OK Icon.
Or:
a) Touch the buttons to cycle through the waypoint categories ('Flight Plan Waypoints', 'Nearest Airports', or 'Recent Waypoints'.)
b) Touch the desired waypoint from the list.
4) If duplicate entries exist for the entered facility name or location, duplicate waypoints are displayed. Touch the desired waypoint from the list.
5) Repeat Steps 2-5 to enter each additional waypoint.

Garmin aera 500 Series Quick Reference Guide190-01117-03 Rev. B 27
Flight Planning
Overview
GPS N
avigationFlight Planning
Hazard Avoidance
Utilities
Appendix
Index
3.3 ADDING FLIGHT PLAN WAYPOINTS
Adding a waypoint to an active or stored flight plan:1) With an active or saved flight plan displayed, touch the desired point
of insertion. The new waypoint will be added in front of the selected waypoint. An option menu will appear.
2) Touch the 'Insert Waypoint' menu option.
3) Enter the desired waypoint:
a) Touch the buttons to 'Search by Identifier', 'Search by Facility Name', or 'Search by City' using the keypad.
b) Enter the desired waypoint.
c) Touch the OK Icon.
Or:
a) Touch the buttons to cycle through the waypoint categories ('Flight Plan Waypoints', 'Nearest Airports', or 'Recent Waypoints'.)
b) Touch the desired waypoint from the list.
4) If duplicate entries exist for the entered facility name or location, duplicate waypoints are displayed. Touch the desired waypoint from the list.
Loading an approach procedure into a stored flight plan:1) With an active or saved flight plan displayed, touch the Menu Icon
2) Touch the 'Select Approach' menu option. A vertical list of available approaches is displayed.
3) Touch the desired approach. The designated transition waypoints are added to the flight plan.
3.4 FLIGHT PLAN STORAGE
Viewing information about a stored flight plan:1) From the ‘Home’ Screen, touch Tools > FPL List
2) Touch the desired saved flight plan. An option menu is displayed.
3) Touch the 'Review Flight Plan' menu option.

Garmin aera 500 Series Quick Reference Guide 190-01117-03 Rev. B28
Flight Planning
Ove
rvie
wG
PS N
avig
atio
nFl
ight
Pla
nnin
gH
azar
d Av
oida
nce
Util
ities
App
endi
xIn
dex
Storing an active flight plan:1) With the Active Flight Plan displayed, touch the Menu Icon.
2) Touch the 'Save Flight Plan' menu option. A confirmation window appears.
3) Touch Yes. A copy of the flight plan is stored in the next available position in the Flight Plan List.
3.5 FLIGHT PLAN ACTIVATION
Activating a stored flight plan:1) From the ‘Home’ Screen, touch Tools > FPL List
2) Touch the desired saved flight plan. An option menu is displayed.
3) Touch the 'Activate Flight Plan' menu option. A confirmation window appears.
4) Touch Yes.
Activating a Flight Plan Leg:1) From the ‘Home’ Screen, touch the Active FPL Icon.
2) While navigating an active flight plan, touch the desired leg to be activated. An option menu automatically appears.
3) Touch the 'Activate Leg' menu option.
4) Touch Yes.
3.6 FLIGHT PLAN DELETION
Deleting a stored flight plan: With the desired Stored Flight Plan displayed, touch the Menu > Delete
Flight Plan > Yes
Or:
With the Flight Plan List displayed, touch the desired flight plan to delete, and touch Delete Flight Plan > Yes.
Deleting all stored flight plans: From the ‘Home’ Screen, touch Tools > FPL List > Menu > Delete All >
Yes.
Garmin aera 500 Series Quick Reference Guide190-01117-03 Rev. B 29
Flight Planning
Overview
GPS N
avigationFlight Planning
Hazard Avoidance
Utilities
Appendix
Index
3.7 APPROACHES
WARNING: Do not rely solely upon the aera for flight into instrument meteorological conditions (IMC). The approaches provided are for monitoring purposes only. Only the final course segment (final approach fix (FAF) to missed approach point (MAP)) of the published approach is available for monitoring.
An approach can be selected using the Direct-to, Active Flight Plan, and the Saved Flight Plan functions.
Selecting an approach from the active or saved flight plan:1) From the ‘Home’ Screen, touch the Active FPL Icon.
Or:
a) From the ‘Home’ Screen, touch the Tools Icon.
b) Touch the FPL List Icon.
c) Touch the desired Saved Flight Plan from the list. An option menu appears.
d) Touch the 'Review Flight Plan' menu option.
2) With the flight plan displayed, touch the Menu Icon.
3) Touch the 'Select Approach' menu option (only available if the destination airport has a published approach). A vertical list of available approaches is displayed.
4) Touch the desired approach. The 'Vectors to Final?' window appears.
5) Touch 'Yes' or 'No'. The procedure is added to the end of the flight plan. If activating an approach from the Active Flight Plan, the aera immediately begins to provide guidance to the first waypoint in the approach.
Selecting an approach using the Direct To function:1) From the ‘Home’ Screen, touch the Direct To Icon.
2) Touch the Menu Icon.
3) Touch the 'Select Approach' menu option (only available when navigating a flight plan. A vertical list of available approaches is displayed.
4) Touch the desired approach. The 'Vectors to Final?' window appears.
5) Touch 'Yes' or 'No'. The procedure is added to the end of the flight plan. If activating an approach from the Active Flight Plan, the aera immediately begins to provide guidance to the first waypoint in the approach.
Garmin aera 500 Series Quick Reference Guide 190-01117-03 Rev. B30
Flight Planning
Ove
rvie
wG
PS N
avig
atio
nFl
ight
Pla
nnin
gH
azar
d Av
oida
nce
Util
ities
App
endi
xIn
dex
Resuming the Flight Plan after selecting an approach:
Whenever an approach is selected the aera automatically activates the approach. The procedure is added to the end of the flight plan and immediately begins to provide guidance to the first waypoint in the approach. Follow the steps below to resume the flight plan after activating the approach.
1) From the ‘Home’ Screen, touch the Active FPL Icon.
Or:
From the 'Home' Screen, touch the Direct To Icon.
Or:
Touch and hold the Menu/ Icon (when available).
2) With a flight plan and an approach loaded, touch the Menu Icon.
3) Touch the 'Resume Flight Plan' menu option.
Removing an approach:1) From the ‘Home’ Screen, touch the Active FPL Icon.
Or:
a) From the ‘Home’ Screen, touch the Tools Icon.
b) Touch the FPL List Icon.
c) Touch the desired Saved Flight Plan from the list. An option menu appears.
d) Touch the 'Review Flight Plan' menu option.
2) Press the Menu Icon.
3) Touch the 'Remove Approach' menu option (only available if an approach is loaded).
Activating/Cancelling Vectors-to-Final:1) From the ‘Home’ Screen, touch the Active FPL Icon.
2) While navigating an Active Flight Plan (with an approach activated), touch the Menu Icon.
3) Touch the 'Activate Vectors-to-Final' or 'Cancel Vectors-to-Final' menu option.

Garmin aera 500 Series Quick Reference Guide190-01117-03 Rev. B 31
Hazard Avoidance
Overview
GPS N
avigationFlight Planning
Hazard Avoidance
Utilities
Appendix
Index
SECTION 4 HAZARD AVOIDANCE
4.1 WEATHER
Switching Weather Sources:1) Touch the Weather > Menu > Set Up Weather.
2) Use the buttons to cycle through the available weather sources (AUTO, XM, or GDL FIS-B).
XM WEATHER (aera 510 & 560)Viewing XM Weather products on the Navigation Map:1) From the ‘Home’ Screen touch the Map Icon.
2) Touch the Menu Icon.
3) Touch the 'Show/Hide...' menu option.
4) Touch the Weather 'Show/Hide' Button.
Viewing XM Weather products on the Weather Map:1) From the ‘Home’ Screen touch the Weather Icon.
2) Touch the desired second-level Weather Icon.
3) If necessary, touch the buttons to scroll through the list of available altitudes, AIRMET types, or forecast times.
4) Touch the desired weather product to get abbreviated information about the selected weather product (if available).
5) With the desired weather product highlighted, touch the Map Feature Button to get detailed information (if available).
DATA LINK WEATHER (FIS-B) (ALL MODELS)Viewing FIS-B Weather product Status:1) From the Main Menu touch the Tools Icon.
2) Touch Data Link > Menu > FIS-B Weather.
Or:

Garmin aera 500 Series Quick Reference Guide 190-01117-03 Rev. B32
Hazard Avoidance
Ove
rvie
wG
PS N
avig
atio
nFl
ight
Pla
nnin
gH
azar
d Av
oida
nce
Util
ities
App
endi
xIn
dex
1) From the Main Menu touch the Weather Icon.
2) Touch Menu > Information.
Viewing Ground Station Status:1) From the Main Menu touch the Tools Icon.
2) Touch Data Link Menu > Ground Stations.
Or:
1) From the Main Menu touch the Weather Icon.
2) Touch Menu > Information.
3) Touch Menu > Ground Stations.
Viewing FIS-B Weather products on the Navigation Map:1) From the Main Menu touch the Map Icon.
2) Touch the Menu Icon.
3) Touch the 'Show/Hide...' menu option.
4) Touch the Weather 'Show/Hide' Button.
Viewing FIS-B Weather products on the Weather Map:1) From the Main Menu touch the Weather Icon.
2) Touch the desired second-level Weather Icon.
3) If necessary, touch the buttons to scroll through the list of available altitudes, or AIRMET types.
4) Touch the desired weather product to get abbreviated information about the selected weather product (if available).
5) With the desired weather product highlighted, touch the Map Feature Button to get detailed information (if available).
4.2 TERRAIN
Enabling/Disabling Terrain Shading on the Navigation Map:1) From the ‘Home’ Screen touch the Map Icon.
2) Touch the Menu Icon.
a) Touch the 'Show/Hide...' menu option.
b) Touch the Terrain 'Show/Hide' Button to toggle the terrain overlay on/off.

Garmin aera 500 Series Quick Reference Guide190-01117-03 Rev. B 33
Hazard Avoidance
Overview
GPS N
avigationFlight Planning
Hazard Avoidance
Utilities
Appendix
Index
Or:
a) Touch the 'Set Up Map' menu option.
b) Touch the buttons until the 'Map' Category is displayed.
c) Touch the Terrain Shading Field.
d) Touch the On/Off Button.
Enabling/Disabling terrain alerts:1) From the ‘Home’ Screen touch the Terrain Icon.
2) Touch the Menu Icon.
3) Touch the 'Enable Alerts' or 'Disable Alerts' menu option.
4.3 TRAFFIC
TRAFFIC INFORMATION SERVICE (TIS-A)Adjusting TIS audio:1) From the ‘Home’ Screen, touch Tools > Setup > Sound.
2) Touch the TIS Audio On/Off Button to toggle the terrain audio on/off, or
touch the Alerts Icon to mute both TIS and Terrain alerts.
Or:
Touch the Alerts buttons to select an alert volume (0-10).
Adjusting TIS settings on the navigation map:1) From the ‘Home’ Screen, touch Map > Menu > Set Up Map.
2) Touch the buttons to select the Map Category.
3) Touch TIS Traffic.
4) Touch the buttons to select the desired settings ('Off', 'Auto', or range settings).
Displaying TIS information using the map pointer: With traffic displayed on the Navigation Map, touch the desired TIS symbol
on the map. The traffic range and altitude separation is displayed.

Garmin aera 500 Series Quick Reference Guide 190-01117-03 Rev. B34
Hazard Avoidance
Ove
rvie
wG
PS N
avig
atio
nFl
ight
Pla
nnin
gH
azar
d Av
oida
nce
Util
ities
App
endi
xIn
dex
TRAFFIC WARNING WINDOW
When a traffic threat is imminent, the Traffic Warning Window is shown. The Traffic Warning Window shows a small pop-up thumbnail map in the lower left corner. The Range Rings on the pop-up alert are spaced every whole mile/kilometer/nautical mile. Touch the Traffic Warning Window to acknowledge and remove it.
DATA LINK TRAFFIC (GDL 39)Viewing GDL 39 Traffic and Weather Status:1) From the Main Menu touch the Tools Icon.
2) Touch Data Link > Menu > FIS-B Weather.
Or
1) From the Main Menu touch the Weather Icon.
2) Touch Menu > Information.
Or
1) From the Main Menu touch the Traffic Icon.
2) Touch Menu > Info.
Configuring the GDL 39 for a Pressurized or Non-Pressurized Aircraft:1) From the Main Menu touch the Tools Icon.
2) From the Tools menu touch Data Link.
3) Touch Menu > Set Up Data Link.
4) Touch Aircraft Type (Pressurized or Not Pressurized)
Or:
1) From the Main Menu touch the Traffic Icon.
2) Touch Menu > Info > Menu > Set Up Data Link.
3) Touch Aircraft Type (Pressurized or Not Pressurized)
Enabling/disabling traffic data on the Map Page:1) From the Main Menu touch the Map Icon.
2) Touch the Menu Icon.
3) Touch the 'Set Up Map' menu option.

Garmin aera 500 Series Quick Reference Guide190-01117-03 Rev. B 35
Hazard Avoidance
Overview
GPS N
avigationFlight Planning
Hazard Avoidance
Utilities
Appendix
Index
4) Touch the buttons to select the Map Category.
5) Touch Traffic, touch the buttons to select the desired settings ('Off', 'Auto', or range settings).
Displaying Traffic information using the map pointer: With traffic displayed on the Navigation Map, touch the desired Traffic
symbol on the map. The traffic range and altitude separation is displayed.
DEDICATED TRAFFIC PAGE (TRF)
Viewing the Traffic Page:1) From the Main Menu touch the Traffic Icon.
Changing the altitude range:1) On the Traffic Page, select the Menu > Altitude Filter.
2) Select one of the following:
•Unrestricted: All traffic is displayed.
•Normal: Displays non-threat and proximity traffic from 2700 feet above the aircraft to 2700 feet below the aircraft. Typically used during enroute phase of flight.
•Above: Displays non-threat and proximity traffic from 9000 feet above the aircraft to 2700 feet below the aircraft. Typically used during climb phase of flight.
•Below: Displays non-threat and proximity traffic from 2700 feet above the aircraft to 9000 feet below the aircraft. Typically used during descent phase of flight.
TRAFFIC WARNING WINDOW
The Traffic Warning Window is shown, when the GDL 39 issues a traffic advisory (TA). The Traffic Warning Window shows a small pop-up thumbnail map in the lower left corner. The Range Rings on the pop-up alert are spaced every whole mile/kilometer/nautical mile. Touch the Traffic Warning Window to acknowledge and remove it.

Garmin aera 500 Series Quick Reference Guide 190-01117-03 Rev. B36
Hazard Avoidance
Ove
rvie
wG
PS N
avig
atio
nFl
ight
Pla
nnin
gH
azar
d Av
oida
nce
Util
ities
App
endi
xIn
dex
Blank Page

Garmin aera 500 Series Quick Reference Guide190-01117-03 Rev. B 37
Utilities
Overview
GPS N
avigationFlight Planning
Hazard Avoidance
Utilities
Appendix
Index
SECTION 5 UTILITIES
5.1 FLIGHT LOG
Viewing details for a flight:1) From the 'Home' Screen, touch Tools > Flight Log.
2) Touch the desired flight log. Route, date, hours, distance, and the flight path are displayed.
Deleting flight records:1) From the 'Home' Screen, touch Tools > Flight Log.
2) Touch the desired flight log (if applicable).
3) Touch Menu.
4) Touch 'Delete Flight' or 'Delete All'.
5) Touch Yes.
5.2 TRACK LOG
Showing/hiding the track log on the Navigation Map:1) From the 'Home' Screen, touch Map > Menu > Set Up Map.
2) Touch the buttons to display the 'Line' Category.
3) Touch Track Log.
4) Touch the Show/Hide Button.
Changing track log settings:1) From the 'Home' Screen, touch Map > Menu > Set Up Map.
2) Touch the buttons to display the 'Line' Category.
3) Touch Track Record Mode, Track Interval, or Track Color.
4) Touch the buttons to select the desired setting.

Garmin aera 500 Series Quick Reference Guide 190-01117-03 Rev. B38
Utilities
Ove
rvie
wG
PS N
avig
atio
nFl
ight
Pla
nnin
gH
azar
d Av
oida
nce
Util
ities
App
endi
xIn
dex
Clearing the track log:1) From the 'Home' Screen, touch Tools > Track Log.
2) Touch the desired track log (if applicable).
3) Touch Menu.
4) Touch 'Delete Saved Track' or 'Delete All Saved Tracks'.
5) Touch Yes.
Saving a track log:1) From the 'Home' Screen, touch Tools > Track Log > Menu > Save
Active Track.
2) Touch the buttons to select 'Entire Active Track', 'Past 24 Hours', 'Past 7 Days', or 'Specific Dates'.
3) Touch OK.
Editing a track log:1) From the 'Home' Screen, touch Tools > Track Log.
2) Touch the desired track log.
3) Touch desired field to edit (Track Name, Show On Map, or Color).
5.3 E6B CALCULATOR
The E6B Calculator calculates Density Altitude, True Airspeed, Tail Wind, Wind From, and Wind Speed, based on information you enter.
Accessing the E6B calculator: From the 'Home' Screen, touch Tools > E6B Calc.
Calculating true airspeed and density altitude:1) From the 'Home' Screen, touch Tools > E6B Calc, enter the altitude
shown on the altimeter into the ‘Indicated Altitude’ field.
2) Repeat for ‘Calibrated Airspeed’, ‘Baro Pressure’, and ‘Total Air Temperature’ fields. (For Calibrated Airspeed, use the speed shown on the airspeed indicator. Use the current altimeter setting for Baro Pressure. Total Air Temperature is the temperature of the outside air including the heating effect caused by speed. For most aircraft, this is the temperature reading on a standard outside air temperature gauge.) The calculated figures for True Airspeed and Density Altitude are shown in the designated fields.
Garmin aera 500 Series Quick Reference Guide190-01117-03 Rev. B 39
Utilities
Overview
GPS N
avigationFlight Planning
Hazard Avoidance
Utilities
Appendix
Index
Calculating winds aloft:1) From the 'Home' Screen, touch Tools > E6B Calc, calculate or enter the
true airspeed into the ‘True Airspeed’ field.
2) Enter the aircraft heading shown on the directional gyro or compass into the ‘Heading’ field. Tail Wind, Wind From, and Wind Speed are calculated.
NOTE: If True North is selected as the heading reference, a heading referenced to True North must be used to calculate winds accurately.
Restoring E6B calculator defaults: From the 'Home' Screen, touch Tools > E6B Calc > Menu > Restore
Default.
5.4 AIRCRAFT PROFILE
Accessing the aircraft profile: From the 'Home' Screen, touch Tools > Profile
Entering an aircraft profile:1) From the 'Home' Screen, touch Tools > Profile > Menu > New
2) Enter the Aircraft Name using the keypad, and touch OK.
3) Enter the Cruise Speed, Maximum Speed, or Fuel Flow using the +/- buttons or the keypad.
4) Touch Map Symbol.
a) Touch the buttons to cycle through the available symbols.
b) Touch OK.
Selecting a saved aircraft profile:1) From the 'Home' Screen, touch Tools > Profile
2) Touch the Aircraft Name Button to access a vertical list of saved profiles.
3) Touch the desired profile from the list.
Garmin aera 500 Series Quick Reference Guide 190-01117-03 Rev. B40
Utilities
Ove
rvie
wG
PS N
avig
atio
nFl
ight
Pla
nnin
gH
azar
d Av
oida
nce
Util
ities
App
endi
xIn
dex
Renaming a saved aircraft profile:1) From the 'Home' Screen, touch Tools > Profile
2) Touch the Aircraft Name Button to access a vertical list of saved profiles.
3) Touch the desired profile from the list.
4) Touch Menu > Rename
5) Enter the new Aircraft Name using the keypad, and touch OK.
Deleting a saved aircraft profile:1) From the 'Home' Screen, touch Tools > Profile
2) Touch the Aircraft Name Button to access a vertical list of saved profiles.
3) Touch the desired profile from the list.
4) Touch Menu > Delete
5) Touch Yes.
5.5 WEIGHT & BALANCE
To perform weight and balance calculations:1) From the 'Home' Screen, touch Tools > Weight/Bal
2) Touch the fields to enter the desired weights and arms (or “stations”). The calculated moment, weight, and CG figures appear at the bottom of the screen. Keep in mind that the “Aircraft” (empty weight/arm) figures must be entered as a reference to calculate a valid moment, weight, and CG.
3) To empty the aircraft, touch Menu > Empty Aircraft.
NOTE: This information is only for flight planning purposes. Consult the aircraft’s pilot operating handbook for the official weight and balance data.

Garmin aera 500 Series Quick Reference Guide190-01117-03 Rev. B
Appendix
41
Overview
GPS N
avigationFlight Planning
Hazard Avoidance
Utilities
Appendix
Index
SECTION 6 APPENDIX
MISCELLANEOUS MESSAGE ADVISORIES
Message CommentsApproaching Target Altitude Within 200 feet of final VNAV target altitude.Approaching VNAV Profile The aircraft is within one minute of reaching the
initial VNAV decent point.Arriving at XXX The aircraft is nearing the destination.Battery Low The battery needs to be recharged.Can’t Unlock Maps No applicable unlock code for one or more maps
was found. All MapSource maps are not accessible.Check XM Antenna Internal problem with the GXM antenna. Contact
Garmin Product Support.Database Error Internal problem with the system. Contact your
dealer or Garmin Product Support to have the unit repaired.
Fuel Tank A reminder for switching fuel tanks. The reminder message repeats at the specified interval after the beginning of each trip.
Lost Satellite Reception The system is unable to receive satellite signals.Memory Full System memory is full, no further data can be saved.Near Proximity Point You have reached the distance set for a proximity
waypoint.Next DTK XXX The aircraft is nearing a turn in a route.Proximity Memory Full No additional proximity waypoints can be saved.Proximity Radius Overlaps The radius of two proximity waypoints overlap.Route Already Exists A route name that already exists has been entered.Route Memory Full No additional routes can be saved.
Garmin aera 500 Series Quick Reference Guide 190-01117-03 Rev. B
Appendix
42
Ove
rvie
wG
PS N
avig
atio
nFl
ight
Pla
nnin
gH
azar
d Av
oida
nce
Util
ities
App
endi
xIn
dex
MISCELLANEOUS MESSAGE ADVISORIES (CONT.)Message Comments
Route Truncated Uploaded route from another device has more than 300 waypoints.
Route Waypoint Memory Full No additional route waypoints can be saved.Steep Turn Ahead Approaching a turn that requires a bank angle
in excess of 25 degrees to stay on course.Track Already Exists A saved track with the same name already
exists.Track Log Full The track log is full and track recording was
turned off. To record more track points, you need to clear the track log and turn track recording on.
Track Memory Full No more track data can be stored. Delete the old track data to store the new data.
Track Truncated A complete uploaded track will not fit in memory. The oldest track log points have been deleted.
VNAV Cancelled VNAV function has been cancelled due to a change in the active route.
Waypoint Already Exists A waypoint with the same name already exists.Waypoint Memory Full The unit has stored the maximum number of
waypoints.
AIRSPACE MESSAGES
Message CommentsInside Airspace Inside the boundaries of the airspace.Airspace Near and Ahead Within two nautical miles of an airspace and your
current course takes you inside the airspace.Airspace Ahead, Within 10 Minutes
The projected course takes you inside an airspace within the next 10 minutes or less.
Airspace Near, Within 2 nm Within two nautical miles of an airspace but not projected to enter it.

Garmin aera 500 Series Quick Reference Guide190-01117-03 Rev. B
Appendix
43
Overview
GPS N
avigationFlight Planning
Hazard Avoidance
Utilities
Appendix
Index
DATA FIELD & NUMERIC DATA OPTIONS
Data Field/Numeric Data DefinitionAccuracy The current accuracy of the GPS determined
location.Altitude The current altitude in geometric height above
Mean Sea Level (MSL).Bearing The compass direction from the present position
to a destination waypoint.Course to Steer The recommended direction to steer in order
to reduce cross-track error and return to the course line.
Crosstrack Error The distance the aircraft is off a desired course in either direction, left or right.
Desired Track The desired course between the active “from” and “to” waypoints.
Distance (Destination) The distance to the destination waypoint in the Active Flight Plan
Distance (Next) The distance to the next waypoint in the Active Flight Plan.
En Route Safe Altitude The recommended minimum altitude within ten miles left or right of the desired course on a active flight plan or direct-to.
Flight Timer Total time in-flight (HH:MM).Fuel Timer Elapsed time since the Fuel Tank Reminder
Alarm was last issued (HH:MM).Glide Ratio The estimated distance an aircraft will move
forward for any given amount of lost altitude.Ground Speed The velocity that the aircraft is traveling relative
to a ground position.Ground Track The direction of aircraft movement relative to a
ground position.
Garmin aera 500 Series Quick Reference Guide 190-01117-03 Rev. B
Appendix
44
Ove
rvie
wG
PS N
avig
atio
nFl
ight
Pla
nnin
gH
azar
d Av
oida
nce
Util
ities
App
endi
xIn
dex
DATA FIELD & NUMERIC DATA OPTIONS (CONT.)Data Field/Numeric Data Definition
Minimum Safe Altitude Uses Grid MORAs to determine a safe altitude within ten miles of the aircraft’s present position.
Next Waypoint The next waypoint in the flight plan or direct-to route.
Sunrise The time at which the sun rises on this day (current location).
Sunset The time at which the sun sets on this day (current location).
Estimated Time En Route (Destination)
The estimated time it takes to reach the destination waypoint from the present position, based upon current ground speed.
Estimated Time En Route (Next)
The estimated time it takes to reach the next waypoint form the present position, based upon current ground speed.
Estimated Time of Arrival (Destination)
The estimated time at which the aircraft should reach the destination waypoint, based upon current speed and track.
Estimated Time of Arrival (Next)
The estimated time at which the aircraft should reach the next waypoint, based upon current speed and track.
Estimated Time to VNAV The estimated time it takes to reach the VNAV waypoint form the present position, based upon current ground speed.
Time of Day (Local) The current time and date in 12-hour or 24-hour format.
Time (UTC) The current time and date in Universal (UTC) time.Vertical Speed The rate of climb or descent (GPS-derived).Vertical Speed Required The vertical speed necessary to decend/climb from
a current position and altitude to the previously selected VNAV position and altitude, based upon current groundspeed.

Garmin aera 500 Series Quick Reference Guide190-01117-03 Rev. B
Appendix
45
Overview
GPS N
avigationFlight Planning
Hazard Avoidance
Utilities
Appendix
Index
DATA FIELD & NUMERIC DATA OPTIONS (CONT.)Data Field/Numeric Data Definition
Weather (Altimeter) The altimeter setting at the nearest METAR reporting station.
Weather (Dew Point) The dew point at the nearest weather reporting station.
Weather (Rel. Humidity) The relative humidity at the nearest weather reporting station.
Weather (Temperature) The temperature at the nearest weather reporting station.
Weather (Wind) The wind speed and direction at the nearest weather reporting station.
AURAL ALERTSRefer to Hazard Avoidance Section.
LOSS OF GPS POSITIONWhen the aera loses the GPS signal for any reason, the following will occur:
•A blinking red question mark will appear over the airplane icon on the map.
•The ‘Lost Satellite Reception’ message will display.
•Any GPS dependent data fields will not be available.
HAZARD DISPLAY WITH LOSS OF GPS POSITIONIf the Terrain function doesn’t have at least a 3D fix (i.e. altitude unknown),
a Red X will be displayed.
Garmin aera 500 Series Quick Reference Guide 190-01117-03 Rev. B
Appendix
46
Ove
rvie
wG
PS N
avig
atio
nFl
ight
Pla
nnin
gH
azar
d Av
oida
nce
Util
ities
App
endi
xIn
dex
Blank Page
Garmin aera 500 Series Quick Reference Guide190-01117-03 Rev. B
Index
Index-1
Overview
GPS N
avigationFlight Planning
Hazard Avoidance
Utilities
Appendix
Index
A
Airspace Messages 42Approaches 29Aural Alerts 45
B
BatteryCharging 3Installation 2
BKSP 4Bug Indicator 16
C
CDI Scale 16Charging, the battery 3Course, setting 16
D
Data Entry 10Alphanumeric Data 10Predetermined Data Option 11
Data Fields 15, 43Direct-to 4, 22
Cancelling 23
E
E6B Calculator 38
F
Flight PlanActivation 28Adding Waypoints 27Creation 25Data Fields 25Deletion 28Storage 27
G
GPS Navigation 15GPS Receiver Status 3
H
Hazard Display 45‘Home’ Screen 5HSI/Panel 16
K
Keypad 4
L
Loss of GPS Position 45
M
MapOverlays 13Panning 11Range 12
Map FeatureInformation 11
Message Advisories 41Modes
Changing 3
N
Navigation Controls 4Nearest 5, 19Numeric Data Options 43Numeric Flight Data 15
O
Option Menu 10Overlay

Garmin aera 500 Series Quick Reference Guide 190-01117-03 Rev. B
Index
Index-2
Ove
rvie
wG
PS N
avig
atio
nFl
ight
Pla
nnin
gH
azar
d Av
oida
nce
Util
ities
App
endi
xIn
dex
Satellite Imagery 13Terrain 13Topography 13Weather 13
OverlaysDisplaying/removing 13
P
Panel 16
R
Red X 45Runways 18
S
Scrolling 9
T
Terrain 32Tools 7Track Log 37Traffic Information Service (TIS) 33
Symbology 33
U
User WaypointsCreating 20
V
Vectors-to-Final 30Vertical Navigation (VNAV) 17
Profile 17
W
Waypoints 18Weather 19Weight & Balance 40
X
XMWeather 37, 38, 39, 40
Garmin aera 500 Series Quick Reference Guide190-01117-03 Rev. B
Index
Index-3
Overview
GPS N
avigationFlight Planning
Hazard Avoidance
Utilities
Appendix
Index

Garmin International, Inc. 1200 East 151st Street
Olathe, KS 66062, U.S.A. Toll free: 800.800.1020 or
866.739.5687p: 913.397.8200f: 913.397.8282
Garmin AT, Inc.2345 Turner Road SE
Salem, OR 97302, U.S.A.Toll free: 800.525.6726
p: 503.391.3411f: 503.364.2138
Garmin (Europe) LtdLiberty House, Bulls Copse Road
Hounsdown Business ParkSouthampton, SO40 9RB, U.K.
Toll free (within U.K.) 0808.2380000p: 44/0870.8501241f: 44/0870.8501251
Garmin CorporationNo. 68, Jangshu 2nd RoadShijr, Taipei County, Taiwan
p: 886/2.2642.9199f: 886/2.2642.9099
www.garmin.com
190-01117-03 Rev. B© 2009, 2012 Garmin Ltd. or its subsidiaries