Model: MCU002 Remote Control Unit - Furuno USA · 1. Model: MCU002 The Model MCU002 is a compact...
17
Model: MCU002 Remote Control Unit
Transcript of Model: MCU002 Remote Control Unit - Furuno USA · 1. Model: MCU002 The Model MCU002 is a compact...

Model: MCU002Remote Control Unit
Index
1. Model: MCU002
2. Specifications 2-1. Standard Comprising 2-2. Technical Specifications
3. Operations – User Interface 3-1. Getting Started – Model TZT9/14/BB New Version v3.12 3-2. Keys and Functions – Basic Operations 3-3. Showing a Cross Cursor – New with Model TZT9/14/BB v3.12 3-4. Auto Scroll ON or OFF – New with Model TZT9/14/BB v3.12 3-5. Entering a Point – New with Model TZTBB and TZT14 (External Touch Screen Mode) v3.12 3-6. User Interface Auto-Hide “10 Seconds” Recommended 3-7. Limitations and Notes
4. Installing Model MCU002 4-1. Dimensions 4-2. Flush Mounting 4-3. Interconnection
5. Model MCU002 with TZT9/14/BB v3.02 or Earlier
6. Tips – Model TZT9/14/BB with Generic HID Mouse
3
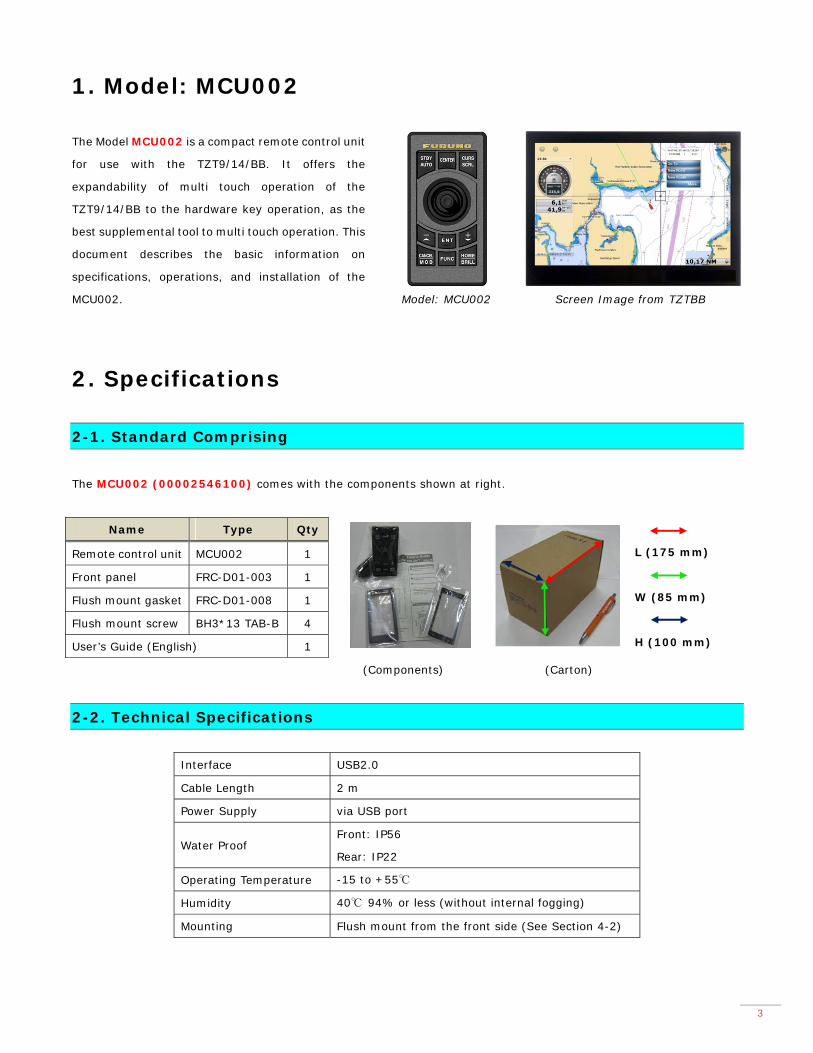
1. Model: MCU002
The Model MCU002 is a compact remote control unit
for use with the TZT9/14/BB. It offers the
expandability of multi touch operation of the
TZT9/14/BB to the hardware key operation, as the
best supplemental tool to multi touch operation. This
document describes the basic information on
specifications, operations, and installation of the
MCU002.
Model: MCU002
Screen Image from TZTBB
2. Specifications
2-1. Standard Comprising
The MCU002 (00002546100) comes with the components shown at right.
(Components) (Carton)
2-2. Technical Specifications
Interface USB2.0
Cable Length 2 m
Power Supply via USB port
Water Proof Front: IP56
Rear: IP22
Operating Temperature -15 to +55℃
Humidity 40℃ 94% or less (without internal fogging)
Mounting Flush mount from the front side (See Section 4-2)
Name Type Qty
L (175 mm)
W (85 mm)
H (100 mm)
Remote control unit MCU002 1
Front panel FRC-D01-003 1
Flush mount gasket FRC-D01-008 1
Flush mount screw BH3*13 TAB-B 4
User’s Guide (English) 1

4
3. Operations – User Interface
3-1. Getting Started – Model TZT9/14/BB New Version v3.12
To fully make use of the MCU002, update the TZT9/14/BB to v3.12, which will be released in May 2014.
3-2. Keys and Functions – Basic Operations
The MCU002 consists of 10 hardware keys to control the TZT9/14/BB as described below.
MCU002 No Keys Descriptions
(1) STBY / AUTO Sets the NAVpilot-700 to STBY or AUTO modes
(2) CENTER Sets the ship in the center of the screen
(3) CURS / SCRL Switches the joystick functions between Cursor and Scroll
(4) Joystick Moves a cursor in 8 directions
(5) - / ▲ (UP) Acts as rotating RotoKey™ clockwise
(6) + / ▼ (DOWN) Acts as rotating RotoKey™ counterclockwise
(7) ENT Acts as pushing RotoKey™
(8) CANCEL & MOB Short presss to cancel
Long press to enter an MOB point
(9) FUNC Acts as Function Gesture
(10) HOME & BRILL Short press to access the Home page
Long press to open the Brilliance control box
(1) STBY / AUTO
This key activates the NAVpilot-700 AUTO and STBY modes. When opening the NAVpilot-700
control window on the TZT9/14/BB, you can activate the AUTO mode from the MCU002 [STBY/AUTO]
key.

5
When the NAVpilot-700 mode is changed between AUTO/NAV and STBY with the MCU002 or touch operations, the
TZT9/14/BB will generate a beep sound with the following notification on the top of the screen.
STBY to AUTO/NAV AUTO/NAV to STBY
The notification of [NAVpilot is engaged.] will appear. The notification of [NAVpilot is disengaged.] will appear.
(2) CENTER
This key sets the own vessel to the center on the screen of Plotter and Radar and cancels echo history of Fish Finder.
(3) CURS / SCRL (CURSOR / SCROLL)
This key switches the joystick functions between cursor and scroll modes. At default the
joystick works to move a cursor. Pressing the [CURS/SCRL] key, the joystick works to scroll the Chart,
Radar, and Fish Finder screen.
Plotter screen – Cursor in motion Plotter screen – Scrolled with joystick

6
(4) Joystick
The joystick can move in eight (8) directions to move a cursor or scroll the screen as shown
above. It also has a “push” function. As an example, if you push the joystick on the Plotter screen,
contextual menus will appear as follows.
(Sample: Plotter screen from TZTBB)
Note:
The joystick has NO “drag” function. For details on limitations
of operations with the MCU002, see Section 3-5.
(5) - / UP (▲)
(6) + / DOWN (▼)
(7) ENT
These three (3) components work as the RotoKey™: [-/▲ (UP)] key as rotating the RotoKey™
clockwise, [+/▼ (DOWN)] key as rotating the RotoKey™ counterclockwise, and [ENT] as pushing the
RotoKey™. The following screenshots from the Plotter page show how to operate these keys.
Press [ENT] to show RotoKey™ menus. Press [-/▲] or [+/▼] to move the RotoKey™ menus and
press [ENT]. In this example, [Overlay] is selected.

7
Press [-/▲] or [+/▼] to zoom in or zoom out the Plotter and Radar screen.
(8) CANCEL & MOB
This key has two (2) functions: Short press to activate the “CANCEL” and long press the “MOB”
functions as shown below.
Short Press for “CANCEL” Long Press for “MOB”
- Closes Home/Menu/Lists/Tides/Catalog pages,
RotoKey™ and contexual menus, and dialog boxes
- Mutes alarm sound
- Ends action such as creating a route and moving a point
Note: No “Undo” function
- Enters an MOB point at the own ship’s position
(9) FUNC (FUNCTION)
This key activates the function set in [Menu] – [General] – [Function Gesture]. In the following
example, the Function Gesture is assigned to [Event]. The [FUNC] key pops up the event window. You
can select an event mark with the [-/▲] or
[+/▼] key and enter it with the [ENT] key,
or place a cursor with the joystick on a
required event mark and push the joystick.
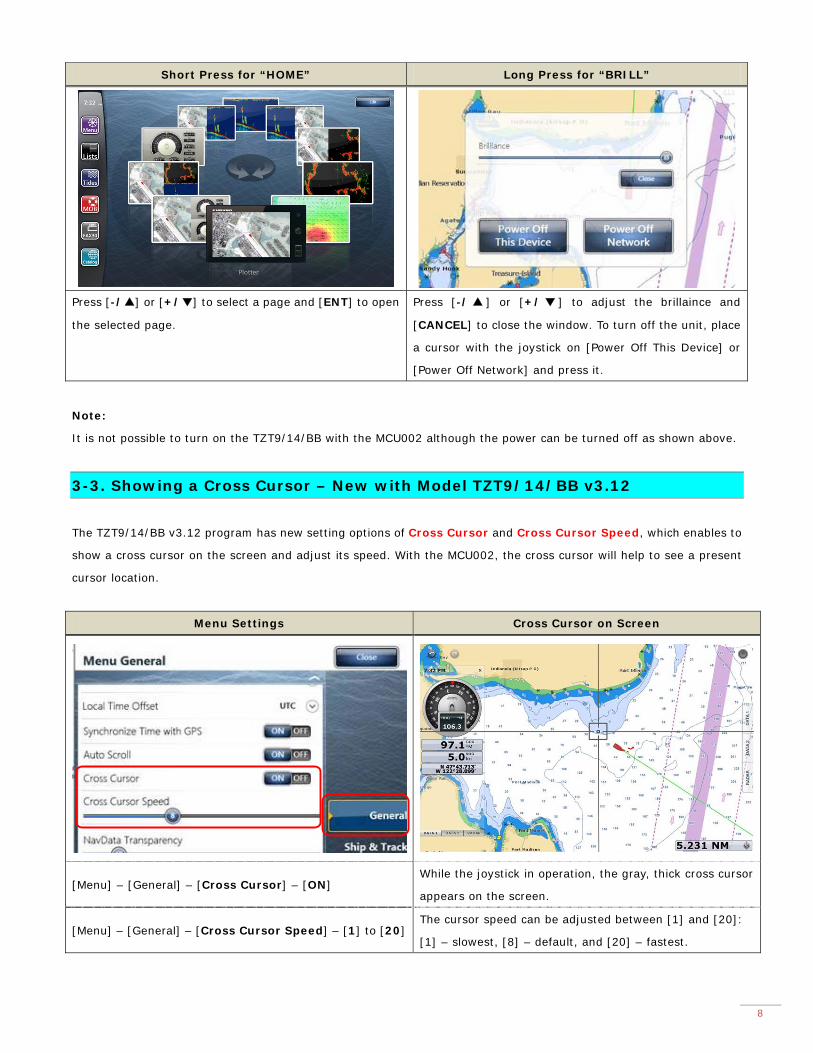
(10) HOME & BRILL
This key has two (2) functions: Short press to activate the “HOME” and long press the “BRILL”
functions. On the Home page and Brilliance window, you can proceed to further settings as follows.
8
Short Press for “HOME” Long Press for “BRILL”
Press [-/▲] or [+/▼] to select a page and [ENT] to open
the selected page.
Press [-/ ▲ ] or [+/ ▼ ] to adjust the brillaince and
[CANCEL] to close the window. To turn off the unit, place
a cursor with the joystick on [Power Off This Device] or
[Power Off Network] and press it.
Note:
It is not possible to turn on the TZT9/14/BB with the MCU002 although the power can be turned off as shown above.
3-3. Showing a Cross Cursor – New with Model TZT9/14/BB v3.12
The TZT9/14/BB v3.12 program has new setting options of Cross Cursor and Cross Cursor Speed, which enables to
show a cross cursor on the screen and adjust its speed. With the MCU002, the cross cursor will help to see a present
cursor location.
Menu Settings Cross Cursor on Screen
[Menu] – [General] – [Cross Cursor] – [ON] While the joystick in operation, the gray, thick cross cursor
appears on the screen.
[Menu] – [General] – [Cross Cursor Speed] – [1] to [20] The cursor speed can be adjusted between [1] and [20]:
[1] – slowest, [8] – default, and [20] – fastest.

9
Cross Cursors on Other Screens
Tips – No cross cursor while touch operations
When the TZT9/14/BB is operated by touch, the cross cursor will not appear. The cross cursor will appear only when
the cursor is in operation with the MCU002 joystick.

10
3-4. Auto Scroll ON or OFF – New with Model TZT9/14/BB v3.12
The TZT9/14/BB v3.12 program has another new setting option of Auto Scroll, which enables to scroll the Plotter, Radar,
and Sounder screen by placing a cursor at the edge of the screen. The following screenshots show the menu settings and
scroll motions.
Menu Settings
[Menu] – [General] – [Auto Scroll] – [ON]
Menu Settings
[Menu] – [General] – [Auto Scroll] – [OFF] (Default)
In this example, a cursor is placed at the left edge of the
Plotter screen, while the chart is automatically scrolled.
(You can see the [Center Vessel] icon.) To stop the scroll
motion, place the cursor away from the edge.
At default, the Auto Scroll mode is set to OFF. When a cursor
is placed at the edge of the screen, the chart is not scrolled.
3-5. Entering a Point – New with Model TZTBB and TZT14 (External Touch Screen Mode) v3.12
Pushing the MCU002 joystick, [New Point] will be highlighted at default on the contextual menus. You can just press
[ENT] to enter the point.
Note:
This specification is for the TZTBB and TZT14 under the External Touch Screen Mode only. With the TZT9 and TZT14

11
without the External Touch Screen Mode, the top one or previously-selected one of the contextual menus will be
highlighted even if the joystick is pushed.
See each screenshot below.
TZTBB and TZT14
(External Touch Screen Mode) Entering a Point
Note on TZT9 and TZT14
(without External Touch Screen Mode)
With the TZT9 and TZT14 without the
External Touch Screen mode, the top one or
previously-selected one of the contextual
menu will be highlighted even if the joystick
is pushed.
[New Point] is always highlighted in
orange.
Just press the [ENT] key to
enter a point.
3-6. User Interface Auto-Hide “10 Seconds” Recommended
In [Menu] – [General], there is a setting option of [User Interface Auto-Hide]. This setting offers the time period
before the popped-up RotoKey™ or contextual menus and window closes. With the MCU002 in use, the setting of “10
seconds” is useful to show the popped up items for a longer time.
Menu Setting Plotter – Contextual Menus
[Menu] – [General] – [User Interface Auto-Hide] – [0’10s] Contextual menus will stay for 10 seconds
12
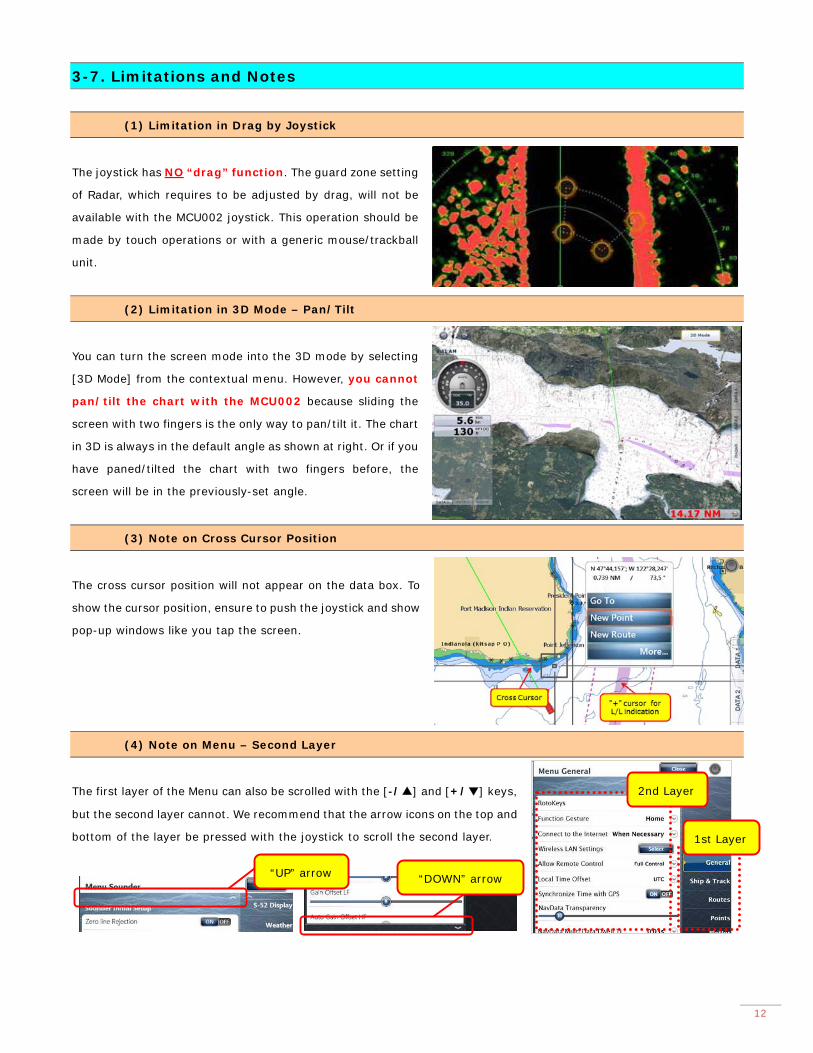
3-7. Limitations and Notes
(1) Limitation in Drag by Joystick
The joystick has NO “drag” function. The guard zone setting
of Radar, which requires to be adjusted by drag, will not be
available with the MCU002 joystick. This operation should be
made by touch operations or with a generic mouse/trackball
unit.
(2) Limitation in 3D Mode – Pan/Tilt
You can turn the screen mode into the 3D mode by selecting
[3D Mode] from the contextual menu. However, you cannot
pan/tilt the chart with the MCU002 because sliding the
screen with two fingers is the only way to pan/tilt it. The chart
in 3D is always in the default angle as shown at right. Or if you
have paned/tilted the chart with two fingers before, the
screen will be in the previously-set angle.
(3) Note on Cross Cursor Position
The cross cursor position will not appear on the data box. To
show the cursor position, ensure to push the joystick and show
pop-up windows like you tap the screen.
(4) Note on Menu – Second Layer
The first layer of the Menu can also be scrolled with the [-/▲] and [+/▼] keys,
but the second layer cannot. We recommend that the arrow icons on the top and
bottom of the layer be pressed with the joystick to scroll the second layer.
2nd Layer
1st Layer
“UP” arrow “DOWN” arrow

13
(5) Note on Virtual Keyboard
To enter characters and numbers with a virtual keyboard, use the joystick: Place
a cursor on a required key and push the joystick.
(6) Note on Active Window
In the split screen mode, even if you place a cursor on a different screen, the
window will not be active. Ensure to press any key such as joystick on the screen
like you tap the screen to activate it.
(7) Note on Power On/Off
It is not possible to turn on the TZT9/14/BB with the MCU002. Ensure to press
the Power key of the TZT9/14/BB. However, the power can be turned off with
the operation of [HOME & BRILL] key and joystick as described in Section 3-1
(10) HOME & BRILL and shown at right

14
4. Installing Model MCU002
4-1. Dimensions

15
4-2. Flush Mounting
The MCU002 can be flush mounted on a console
from the front side as shown in the illustration at
right.
4-3. Interconnection
The MCU002 can be used with the TZT9, TZT14, and TZTBB by USB connection. Connect the MCU002 to the USB port
of the TZT9/14/BB as shown in the following examples.
TZTBB with MCU002 TZT14 with MCU002
TZT9 with MCU002
Notes:
(1) A maximum of two (2) sets of MCU002 can be connected to
one (1) USB port via a USB hub as shown at right.
(2) When there are two (2) sets of MCU002 are connected to one
(1) TZT9/14/BB, we recommend that both MCU002 units
should not be operated simultaneously because it can give a
load on the system.
(Extracted from User Guide)

16
5. Model MCU002 with TZT9/14/BB v3.02 or Earlier
If the MCU002 is used with the TZT9/14/BB v3.02 or earlier program, there will be limitations
as described below.
(1) No gray, thick cross cursor is available because there is no menu option of Cross Cursor.
(2) Only the joystick will work. Other hardware keys will not work because the v3.02 or
earlier programs do not detect these key codes from the MCU002. The [-/▲] and [+/▼] keys
may react but will just scroll the screen upwards and downwards respectively.
6. Tips – Model TZT9/14/BB with Generic HID Mouse
While the TZT9/14/BB is preloaded with an HID driver, a generic HID mouse (USB mouse) or trackball unit with
a wheel can also be used. If the Cross Cursor mode is activated on the TZT9/14/BB v3.12 [Menu] – [General] –
[Cross Cursor], it will be more useful to follow the
cursor motion.
Each mouse/trackball component will work as follows.
Components Functions
(Sample shot: LTSX50
from NSI, Belgium)
1. Wheel
Acts as the RotoKey ™ of TZT9/14:
(1) Rotate to zoom in/out.
(2) Push to show RotoKey ™ items in gold at the right side
of the screen as shown at right.
(3) Select RotoKey ™ items or contexts
2. Left-click Single tap, drag/scroll with trackball
3. Right-click
Acts as Function Gesture:
Right-click to activate the preset function in [Menu] – [General] – [Function
Gesture].
4. Trackball Selects a spot to be tapped, drag/scroll with left-click
--- END ---
3
2
1
4

17
History
Release Date Page Section Descriptions
1st release Apr. 16, 2014 - - -
Rev. 1 May xx, 2014 10 3-4 Descriptions of the Auto Scroll mode are added.
Rev. 1 May xx, 2014 10 3-5 Section numbers are changed after adding the
descriptions of the Auto Scroll mode in Section 3-4. Rev. 1 May xx, 2014 11 3-6
Rev. 1 May xx, 2014 12 3-7