MODEL 2510 & 2510 ECONOMINDER Installation Instructions
36
MODEL 2510 & 2510 ECONOMINDER Service Manual IMPORTANT: Fill in pertinent information on page 3 for future reference. ients wd
Transcript of MODEL 2510 & 2510 ECONOMINDER Installation Instructions

8/8/2019 MODEL 2510 & 2510 ECONOMINDER Installation Instructions
http://slidepdf.com/reader/full/model-2510-2510-econominder-installation-instructions 1/36
MODEL 2510 & 2510 ECONOMINDERService Manual
IMPORTANT: Fill in pertinent information on page 3 for future reference.
nts

8/8/2019 MODEL 2510 & 2510 ECONOMINDER Installation Instructions
http://slidepdf.com/reader/full/model-2510-2510-econominder-installation-instructions 2/36
8/8/2019 MODEL 2510 & 2510 ECONOMINDER Installation Instructions
http://slidepdf.com/reader/full/model-2510-2510-econominder-installation-instructions 3/36
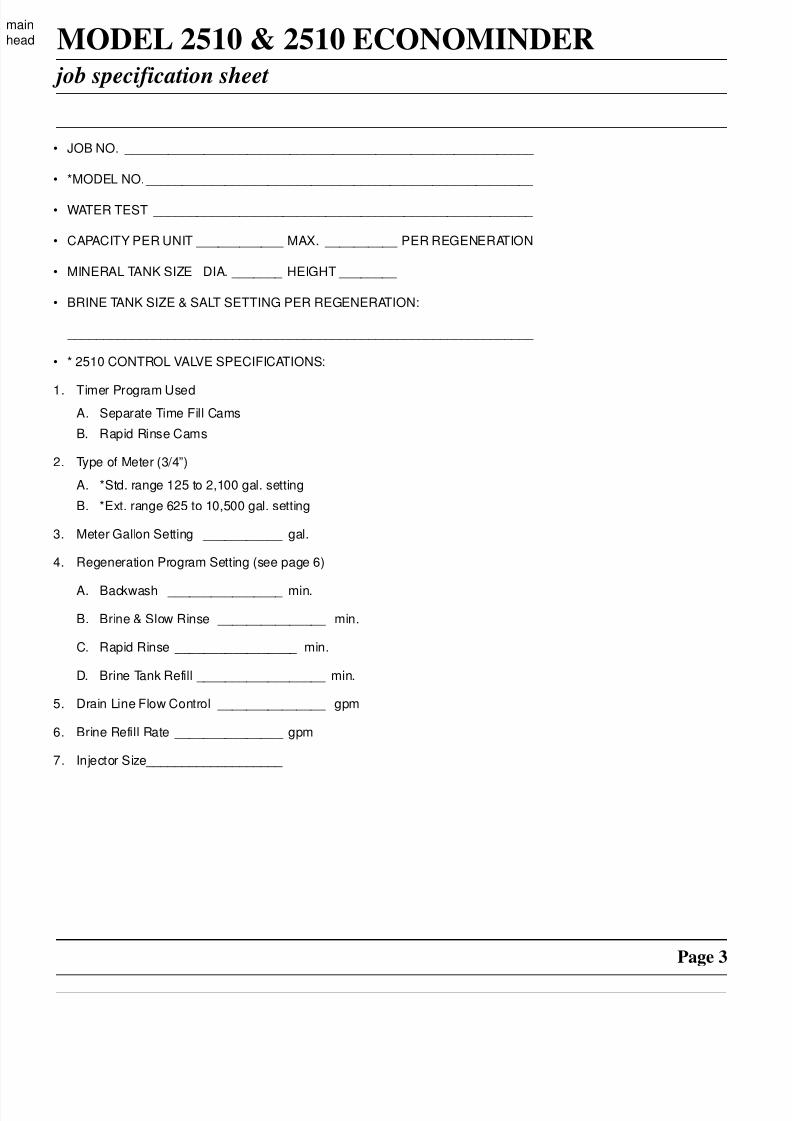
MODEL 2510 & 2510 ECONOMINDER job specification sheet
Page 3
• JOB NO. _________________________________________________________
• *MODEL NO.______________________________________________________
• WATER TEST _____________________________________________________
• CAPACITY PER UNIT ____________ MAX. __________ PER REGENERATION
• MINERAL TANK SIZE DIA. _______ HEIGHT ________
• BRINE TANK SIZE & SALT SETTING PER REGENERATION:
_________________________________________________________________
• * 2510 CONTROL VALVE SPECIFICATIONS:
1. Timer Program UsedA. Separate Time Fill Cams
B. Rapid Rinse Cams
2. Type of Meter (3/4”)
A. *Std. range 125 to 2,100 gal. setting
B. *Ext. range 625 to 10,500 gal. setting
3. Meter Gallon Setting ___________ gal.
4. Regeneration Program Setting (see page 6)
A. Backwash ________________ min.
B. Brine & Slow Rinse _______________ min.
C. Rapid Rinse _________________ min.
D. Brine Tank Refill __________________ min.
5. Drain Line Flow Control _______________ gpm
6. Brine Refill Rate _______________ gpm
7. Injector Size ___________________
d

8/8/2019 MODEL 2510 & 2510 ECONOMINDER Installation Instructions
http://slidepdf.com/reader/full/model-2510-2510-econominder-installation-instructions 4/36
MODEL 2510 & 2510 ECONOMINDERinstallation instructions
Page 4
WATER PRESSURE: A minimum of 20 pounds of water pressure is required for regeneration valve to operateeffectively.
ELECTRICAL FACILITIES: An uninterrupted alternating current (A/C) supply is required. Note: Other voltages are
available. Please make sure your voltage supply is compatible with your unit before installation.
EXISTING PLUMBING: Condition of existing plumbing should be free from lime and iron buildup. Piping that is built upheavily with lime and/or iron should be replaced. If piping is clogged with iron, a separate iron filter unit should be
installed ahead of the water softener.
LOCATION OF SOFTENER AND DRAIN: The softener should be located close to a drain to prevent air breaks and
back flow.
BY-PASS VALVES: Always provide for the installation of a by-pass valve if unit is not equipped with one.
CAUTION: Water pressure is not to exceed 120 p.s.i., water temperature is not to exceed 110°F, and the unit cannot besubjected to freezing conditions.
INSTALLATION INSTRUCTIONS
1. Place the softener tank where you want to install the unit making sure the unit is level and on a firm base.
2. All plumbing should be done in accordance with local plumbing codes. The pipe size for the drain line should be aminimum of 1/2”. Backwash flow rates in excess of 7 gpm or length in excess of 20’ require 3/4” drain line.
3. The 1” distributor tube (1.050 O.D.) should be cut flush with top of each tank.
4. Lubricate the distributor o-ring seal and tank “o” ring seal. Place the main control valve on tank. Note: Only usesilicone lubricant.
5. Solder joints near the drain must be done prior to connecting the Drain Line Flow Control fitting (DLFC). Leave atleast 6” between the DLFC and solder joints when soldering pipes that are connected on the DLFC. Failure to do
this could cause interior damage to the DLFC.
6. Teflon tape is the only sealant to be used on the drain fitting.
7. Make sure that the floor is clean beneath the salt storage tank and that it is level.
8. Place approximately 1” of water above the grid plate. If a grid is not utilized, fill to the top of the air check in the salttank. Do not add salt to the brine tank at this time.
9. On units with a by-pass, place in by-pass position. Turn on the main water supply. Open a cold soft water tapnearby and let run a few minutes or until the system is free from foreign material (usually solder) that may have
resulted from the installation. Once clean, close the water tap.
10. Slowly place the by-pass in service position and let water flow into the mineral tank. When water flow stops, slowly
open a cold water tap nearby and let run until the air is purged from the unit.
11. Plug unit into an electrical outlet. Note: All electrical connections must be connected according to local codes. (Becertain the outlet is uninterrupted).
d
d

8/8/2019 MODEL 2510 & 2510 ECONOMINDER Installation Instructions
http://slidepdf.com/reader/full/model-2510-2510-econominder-installation-instructions 5/36
MODEL 2510 & 2510 ECONOMINDER start-up instructions
Page 5
The water softener should be installed with the inlet, outlet and drain connections made in accordance with themanufacturer’s recommendations and to meet applicable plumbing codes.
1. Remove control box cover.
2. Make “Time of Day” setting and set “Program Wheel”. (See time control instructions). Rotate program wheel
counter clockwise until it stops at regeneration position.
3. Observe regeneration cycle settings. Arrange cycle times as determined in “Item 4” on “Page 2”.
4. Add three inches of water to brine tank.
5. Note: To set the control to the various positions noted below. Turn the manual regeneraton knob slowly in aclockwise direction until the Program Micro Switch lifts on top of the first set of pins. Allow the drive motor to movethe piston to the first regeneration step and stop. Each time the Program Switch position changes, the valve will
advance to the next regeneration step. Always allow the motor to stop before moving to the next set of pins orspaces. (See “Timer Program” instructions).
Control Valve Positions:
a. Service Drive shaft out
b. Backwash Drive shaft in
c. Brine / Slow Rinse Drive shaft 1/2 way out
d. Rapid Rinse Drive shaft 3/4 way out
e. Brine Tank Fill Drive shaft out but brine cam holds brine valve stem in.
6. Position valve to backwash and check to make sure that drain line flow remains steady for ten (10) minutes or untilclear (see above).
7. Position valve to brine / slow rinse position and check to see that the unit is drawing water from brine tank (this stepmay need repeating).
8. Position valve to rapid rinse and check the drain line flow, run for 5 min. or until the water is clear. (Note: Rapidrinse and backwash flow rates should be the same).
9. Position valve to start of brine tank fill cycle. See that water goes into the brine tank at proper rate. Brine valve drivecam will hold valve in at this position to fill the brine tank for the first regeneration.
10. Replace control box cover.
11. Put salt in brine tank (do not use granulated or rock salt).
d®
d 1 / 2

8/8/2019 MODEL 2510 & 2510 ECONOMINDER Installation Instructions
http://slidepdf.com/reader/full/model-2510-2510-econominder-installation-instructions 6/36
MODEL 3200 TIMER timer setting procedure
Page 6
IMPORTANT!
SALT LEVEL MUST ALWAYS BE ABOVE WATER LEVEL IN BRINE TANK.
How To Set Days On Which WaterConditioner Is To Regenerate:
Rotate the skipper wheel until the number “1” is at the red
pointer. Set the days that regeneration is to occur by slidingtabs on the skipper wheel outward to expose trip fingers.Each tab is one day. Finger at red pointer is tonight. Movingclockwise from the red pointer, extend or retract fingers toobtain the desired regeneration schedule.
How To Set The Time Of Day:
Press and hold the red button in to disengage the drive gear.
Turn the large gear until the actual time of day is at the timeof day pointer.
Release the red button to again engage the drive gear.
How To Manually Regenerate Your Water
Conditioner At Any Time:Turn the manual regeneration knob clockwise.
This slight movement of the manual regeneration knobengages the program wheel and starts the regenerationprogram.
The black center knob will make one revolution in thefollowing approximately three hours and stop in the positionshown in the drawing.
Even thought it takes three hours for this center knob tocomplete one revolution, the regeneration cycle of your unitmight be set only one half of this time.
In any event, conditioned water may be drawn after rinse
water stops flowing from the water conditioner drain line.
How to Adjust Regeneration Time:
1. Disconnect the power source.
2. Locate the three screws behind the manual regenerationknob by pushing the red button in and rotating the 24hour dial until each screw appears in the cut out portionof the manual regeneration knob.
3. Loosen each screw slightly to release the pressure onthe time plate from the 24 hour gear.
4. Locate the regeneration time pointer on the inside of the24 hour dial in the cut out.
5. Turn the time plate so the desired regeneration timealigns next to the raised arrow.
6. Push the red button in and rotate the 24 hour dial.Tighten each of the three screws.
7. Push the red button and locate the pointer one moretime to ensure the desired regeneration time is correct.
8. Reset the time of day and restore power to the unit.
3200 ADJUSTABLE REGENERATION TIMER
SERVICEPOSITIONINDICATOR
24 HR. GEARMANUAL REGENERATION KNOB
RED TIMESET BUTTON
SKIPPER WHEEL, 12 DAY(SHOWS EVERY OTHERDAY REGENERATION)
el0ote
err
yeden-
oner
em-
tin-
8/8/2019 MODEL 2510 & 2510 ECONOMINDER Installation Instructions
http://slidepdf.com/reader/full/model-2510-2510-econominder-installation-instructions 7/36
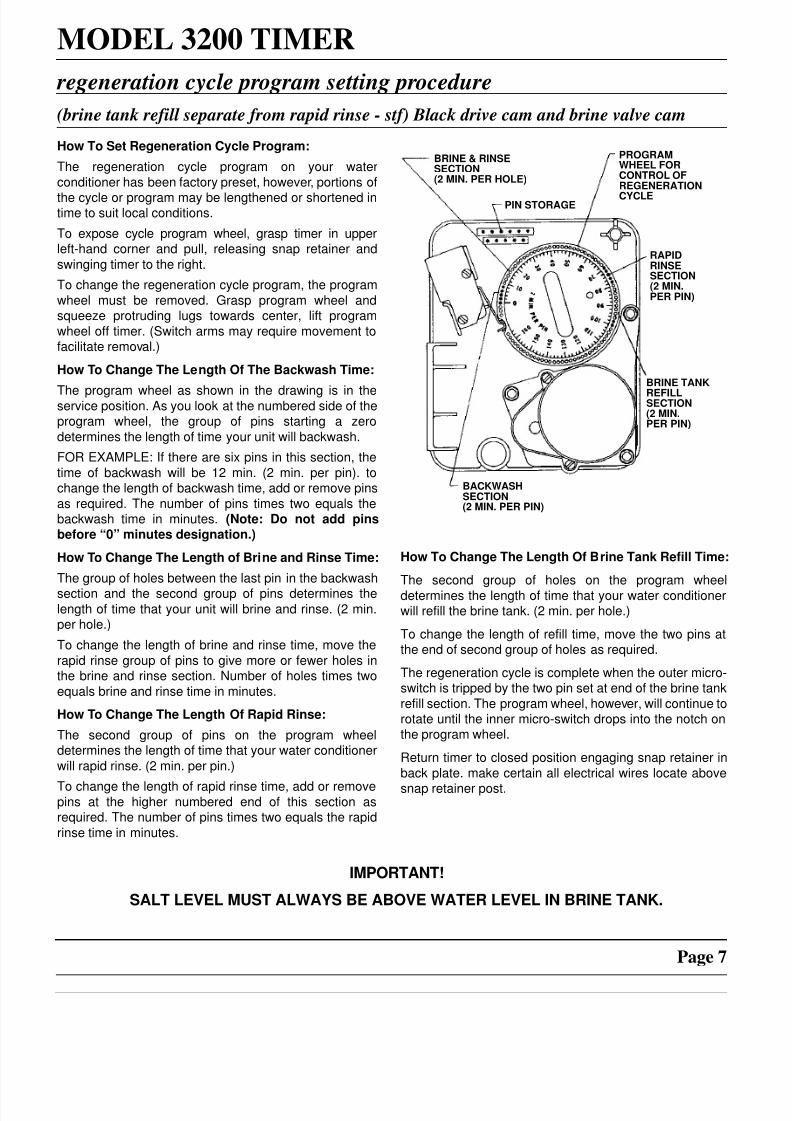
MODEL 3200 TIMER
regeneration cycle program setting procedure
(brine tank refill separate from rapid rinse - stf) Black drive cam and brine valve cam
Page 7
IMPORTANT!
SALT LEVEL MUST ALWAYS BE ABOVE WATER LEVEL IN BRINE TANK.
How To Set Regeneration Cycle Program:
The regeneration cycle program on your water
conditioner has been factory preset, however, portions of
the cycle or program may be lengthened or shortened intime to suit local conditions.
To expose cycle program wheel, grasp timer in upperleft-hand corner and pull, releasing snap retainer and
swinging timer to the right.
To change the regeneration cycle program, the program
wheel must be removed. Grasp program wheel andsqueeze protruding lugs towards center, lift program
wheel off timer. (Switch arms may require movement tofacilitate removal.)
How To Change The Length Of The Backwash Time:
The program wheel as shown in the drawing is in theservice position. As you look at the numbered side of theprogram wheel, the group of pins starting a zero
determines the length of time your unit will backwash.
FOR EXAMPLE: If there are six pins in this section, the
time of backwash will be 12 min. (2 min. per pin). tochange the length of backwash time, add or remove pins
as required. The number of pins times two equals thebackwash time in minutes. (Note: Do not add pinsbefore “0” minutes designation.)
How To Change The Length of Brine and Rinse Time:
The group of holes between the last pin in the backwash
section and the second group of pins determines thelength of time that your unit will brine and rinse. (2 min.per hole.)
To change the length of brine and rinse time, move the
rapid rinse group of pins to give more or fewer holes inthe brine and rinse section. Number of holes times two
equals brine and rinse time in minutes.
How To Change The Length Of Rapid Rinse:
The second group of pins on the program wheeldetermines the length of time that your water conditioner
will rapid rinse. (2 min. per pin.)
To change the length of rapid rinse time, add or removepins at the higher numbered end of this section asrequired. The number of pins times two equals the rapid
rinse time in minutes.
How To Change The Length Of Brine Tank Refill Time:
The second group of holes on the program wheel
determines the length of time that your water conditionerwill refill the brine tank. (2 min. per hole.)
To change the length of refill time, move the two pins atthe end of second group of holes as required.
The regeneration cycle is complete when the outer micro-switch is tripped by the two pin set at end of the brine tank
refill section. The program wheel, however, will continue torotate until the inner micro-switch drops into the notch onthe program wheel.
Return timer to closed position engaging snap retainer in
back plate. make certain all electrical wires locate above
snap retainer post.
BRINE & RINSESECTION(2 MIN. PER HOLE)
PIN STORAGE
PROGRAMWHEEL FORCONTROL OFREGENERATION
CYCLE
RAPIDRINSE
BRINE TANK
REFILLSECTION
BACKWASHSECTION(2 MIN. PER PIN)
SECTION(2 MIN.PER PIN)
(2 MIN.PER PIN)
8/8/2019 MODEL 2510 & 2510 ECONOMINDER Installation Instructions
http://slidepdf.com/reader/full/model-2510-2510-econominder-installation-instructions 8/36
MODEL 3200 TIMER
regeneration cycle program setting procedure
(rapid rinse) White drive cam and brine valve cam
Page 8
IMPORTANT!
SALT LEVEL MUST ALWAYS BE ABOVE WATER LEVEL IN BRINE TANK.
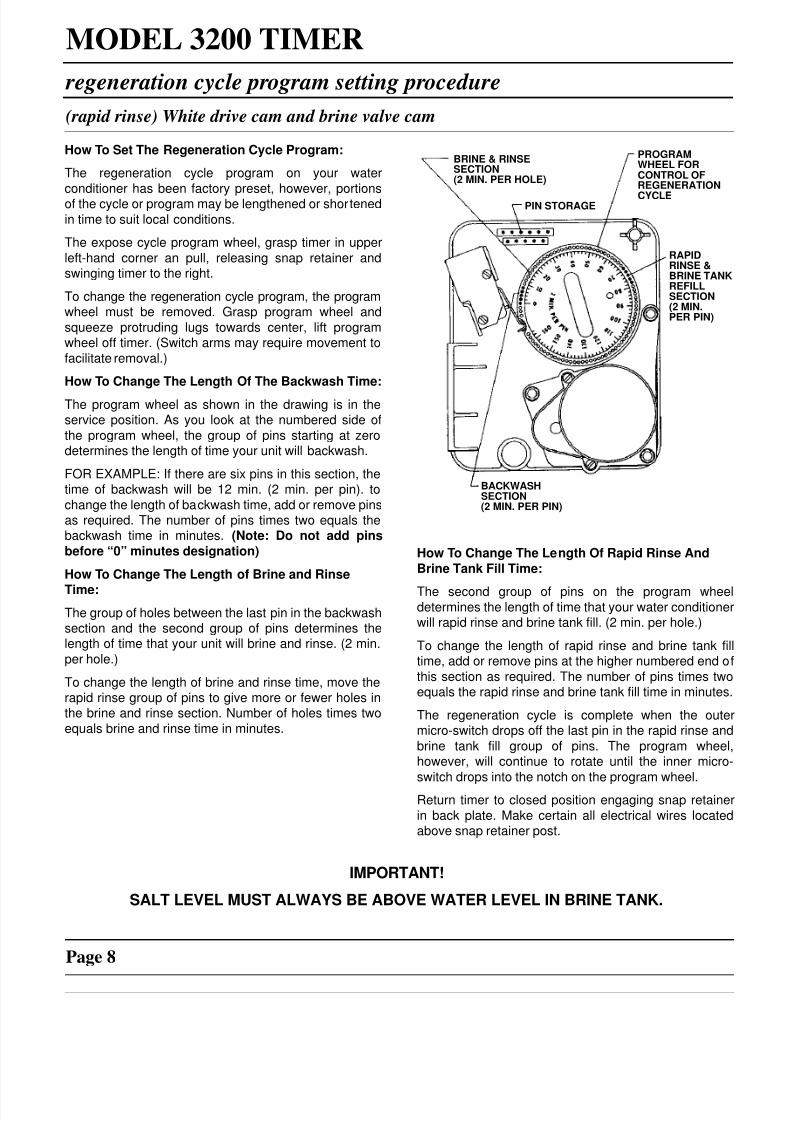
How To Set The Regeneration Cycle Program:
The regeneration cycle program on your water
conditioner has been factory preset, however, portionsof the cycle or program may be lengthened or shortened
in time to suit local conditions.
The expose cycle program wheel, grasp timer in upper
left-hand corner an pull, releasing snap retainer andswinging timer to the right.
To change the regeneration cycle program, the programwheel must be removed. Grasp program wheel and
squeeze protruding lugs towards center, lift programwheel off timer. (Switch arms may require movement to
facilitate removal.)
How To Change The Length Of The Backwash Time:
The program wheel as shown in the drawing is in theservice position. As you look at the numbered side of
the program wheel, the group of pins starting at zerodetermines the length of time your unit will backwash.
FOR EXAMPLE: If there are six pins in this section, thetime of backwash will be 12 min. (2 min. per pin). to
change the length of backwash time, add or remove pinsas required. The number of pins times two equals thebackwash time in minutes. (Note: Do not add pins
before “0” minutes designation)
How To Change The Length of Brine and Rinse
Time:
The group of holes between the last pin in the backwashsection and the second group of pins determines thelength of time that your unit will brine and rinse. (2 min.
per hole.)
To change the length of brine and rinse time, move therapid rinse group of pins to give more or fewer holes inthe brine and rinse section. Number of holes times two
equals brine and rinse time in minutes.
How To Change The Length Of Rapid Rinse And
Brine Tank Fill Time:
The second group of pins on the program wheeldetermines the length of time that your water conditionerwill rapid rinse and brine tank fill. (2 min. per hole.)
To change the length of rapid rinse and brine tank filltime, add or remove pins at the higher numbered end of
this section as required. The number of pins times twoequals the rapid rinse and brine tank fill time in minutes.
The regeneration cycle is complete when the outermicro-switch drops off the last pin in the rapid rinse and
brine tank fill group of pins. The program wheel,however, will continue to rotate until the inner micro-
switch drops into the notch on the program wheel.
Return timer to closed position engaging snap retainer
in back plate. Make certain all electrical wires locatedabove snap retainer post.
RAPIDRINSE &BRINE TANKREFILLSECTION(2 MIN.PER PIN)
BRINE & RINSESECTION(2 MIN. PER HOLE)
PROGRAMWHEEL FORCONTROL OFREGENERATION
CYCLE
BACKWASHSECTION(2 MIN. PER PIN)
PIN STORAGE

8/8/2019 MODEL 2510 & 2510 ECONOMINDER Installation Instructions
http://slidepdf.com/reader/full/model-2510-2510-econominder-installation-instructions 9/36
Notes
Page 9
8/8/2019 MODEL 2510 & 2510 ECONOMINDER Installation Instructions
http://slidepdf.com/reader/full/model-2510-2510-econominder-installation-instructions 10/36
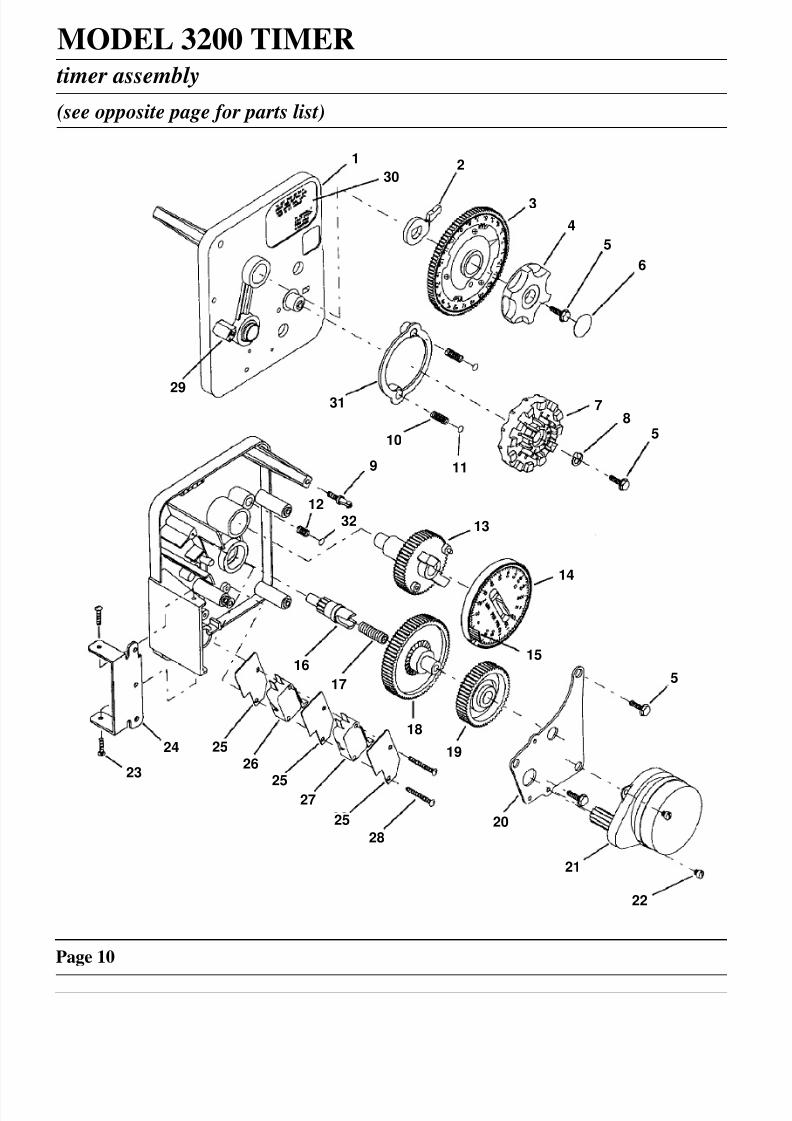
MODEL 3200 TIMER timer assembly
(see opposite page for parts list)
Page 10
1
302
3
4
5
6
78
5
29 31
10
119
13
14
15
5
1232
16
17
18
19
20
21
22
23
24 2526
2527
25
28
8/8/2019 MODEL 2510 & 2510 ECONOMINDER Installation Instructions
http://slidepdf.com/reader/full/model-2510-2510-econominder-installation-instructions 11/36
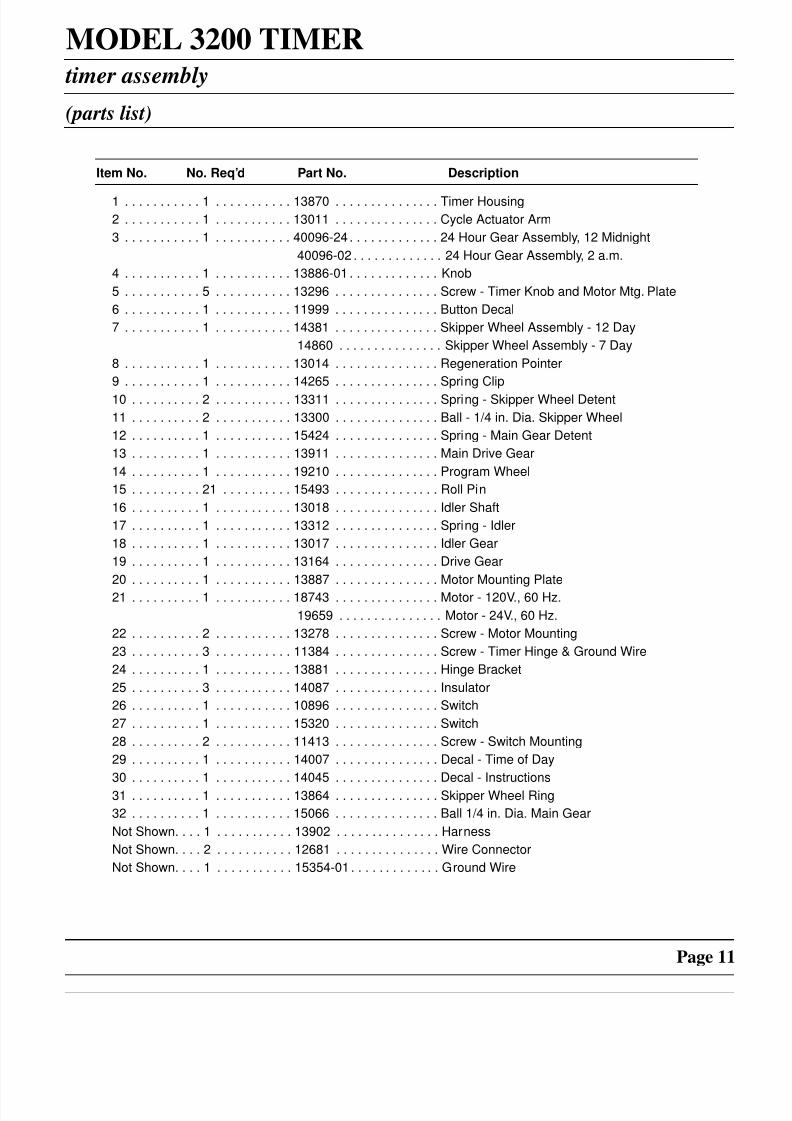
MODEL 3200 TIMER timer assembly
(parts list)
Page 11
Item No. No. Req’d Part No. Description
1 . . . . . . . . . . . 1 . . . . . . . . . . . 13870 . . . . . . . . . . . . . . . Timer Housing
2 . . . . . . . . . . . 1 . . . . . . . . . . . 13011 . . . . . . . . . . . . . . . Cycle Actuator Arm
3 . . . . . . . . . . . 1 . . . . . . . . . . . 40096-24 . . . . . . . . . . . . . 24 Hour Gear Assembly, 12 Midnight
40096-02 . . . . . . . . . . . . . 24 Hour Gear Assembly, 2 a.m.
4 . . . . . . . . . . . 1 . . . . . . . . . . . 13886-01 . . . . . . . . . . . . . Knob
5 . . . . . . . . . . . 5 . . . . . . . . . . . 13296 . . . . . . . . . . . . . . . Screw - Timer Knob and Motor Mtg. Plate
6 . . . . . . . . . . . 1 . . . . . . . . . . . 11999 . . . . . . . . . . . . . . . Button Decal
7 . . . . . . . . . . . 1 . . . . . . . . . . . 14381 . . . . . . . . . . . . . . . Skipper Wheel Assembly - 12 Day
14860 . . . . . . . . . . . . . . . Skipper Wheel Assembly - 7 Day
8 . . . . . . . . . . . 1 . . . . . . . . . . . 13014 . . . . . . . . . . . . . . . Regeneration Pointer
9 . . . . . . . . . . . 1 . . . . . . . . . . . 14265 . . . . . . . . . . . . . . . Spring Clip
10 . . . . . . . . . . 2 . . . . . . . . . . . 13311 . . . . . . . . . . . . . . . Spring - Skipper Wheel Detent
11 . . . . . . . . . . 2 . . . . . . . . . . . 13300 . . . . . . . . . . . . . . . Ball - 1/4 in. Dia. Skipper Wheel
12 . . . . . . . . . . 1 . . . . . . . . . . . 15424 . . . . . . . . . . . . . . . Spring - Main Gear Detent
13 . . . . . . . . . . 1 . . . . . . . . . . . 13911 . . . . . . . . . . . . . . . Main Drive Gear
14 . . . . . . . . . . 1 . . . . . . . . . . . 19210 . . . . . . . . . . . . . . . Program Wheel
15 . . . . . . . . . . 21 . . . . . . . . . . 15493 . . . . . . . . . . . . . . . Roll Pin
16 . . . . . . . . . . 1 . . . . . . . . . . . 13018 . . . . . . . . . . . . . . . Idler Shaft
17 . . . . . . . . . . 1 . . . . . . . . . . . 13312 . . . . . . . . . . . . . . . Spring - Idler
18 . . . . . . . . . . 1 . . . . . . . . . . . 13017 . . . . . . . . . . . . . . . Idler Gear
19 . . . . . . . . . . 1 . . . . . . . . . . . 13164 . . . . . . . . . . . . . . . Drive Gear
20 . . . . . . . . . . 1 . . . . . . . . . . . 13887 . . . . . . . . . . . . . . . Motor Mounting Plate
21 . . . . . . . . . . 1 . . . . . . . . . . . 18743 . . . . . . . . . . . . . . . Motor - 120V., 60 Hz.
19659 . . . . . . . . . . . . . . . Motor - 24V., 60 Hz.
22 . . . . . . . . . . 2 . . . . . . . . . . . 13278 . . . . . . . . . . . . . . . Screw - Motor Mounting
23 . . . . . . . . . . 3 . . . . . . . . . . . 11384 . . . . . . . . . . . . . . . Screw - Timer Hinge & Ground Wire
24 . . . . . . . . . . 1 . . . . . . . . . . . 13881 . . . . . . . . . . . . . . . Hinge Bracket
25 . . . . . . . . . . 3 . . . . . . . . . . . 14087 . . . . . . . . . . . . . . . Insulator
26 . . . . . . . . . . 1 . . . . . . . . . . . 10896 . . . . . . . . . . . . . . . Switch
27 . . . . . . . . . . 1 . . . . . . . . . . . 15320 . . . . . . . . . . . . . . . Switch
28 . . . . . . . . . . 2 . . . . . . . . . . . 11413 . . . . . . . . . . . . . . . Screw - Switch Mounting
29 . . . . . . . . . . 1 . . . . . . . . . . . 14007 . . . . . . . . . . . . . . . Decal - Time of Day
30 . . . . . . . . . . 1 . . . . . . . . . . . 14045 . . . . . . . . . . . . . . . Decal - Instructions
31 . . . . . . . . . . 1 . . . . . . . . . . . 13864 . . . . . . . . . . . . . . . Skipper Wheel Ring
32 . . . . . . . . . . 1 . . . . . . . . . . . 15066 . . . . . . . . . . . . . . . Ball 1/4 in. Dia. Main Gear
Not Shown. . . . 1 . . . . . . . . . . . 13902 . . . . . . . . . . . . . . . Harness
Not Shown. . . . 2 . . . . . . . . . . . 12681 . . . . . . . . . . . . . . . Wire Connector
Not Shown. . . . 1 . . . . . . . . . . . 15354-01 . . . . . . . . . . . . . Ground Wire
8/8/2019 MODEL 2510 & 2510 ECONOMINDER Installation Instructions
http://slidepdf.com/reader/full/model-2510-2510-econominder-installation-instructions 12/36
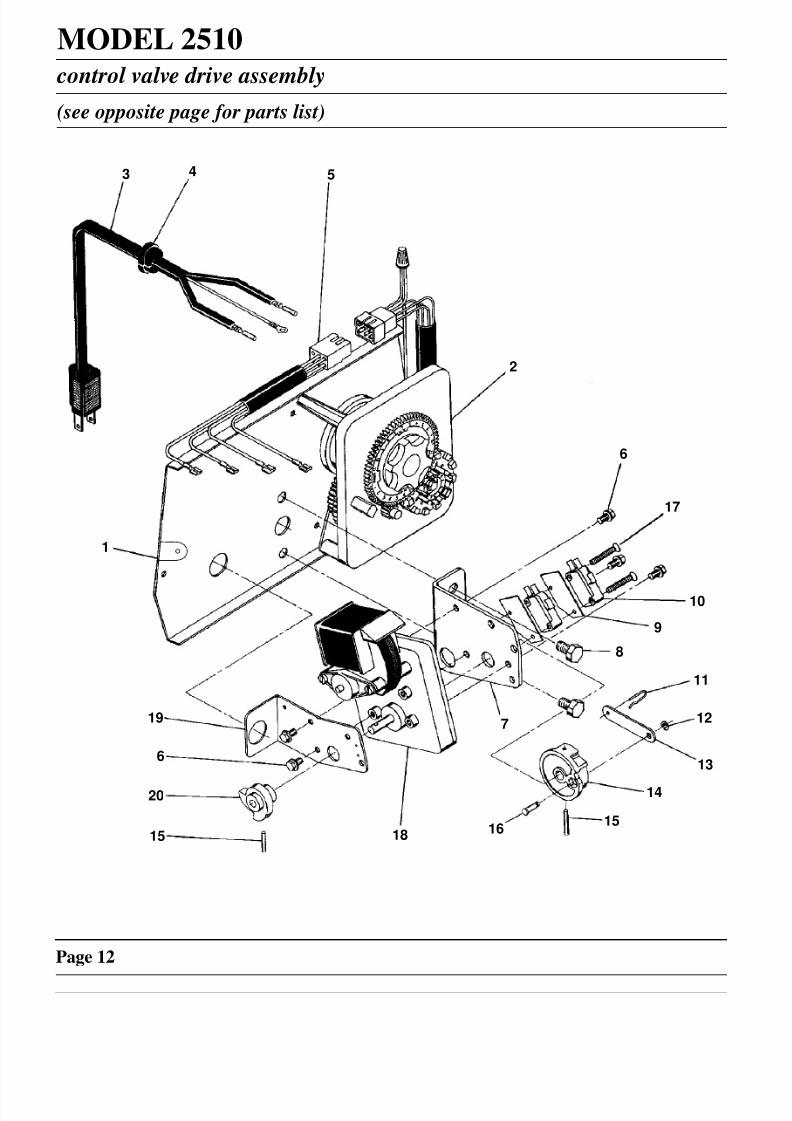
MODEL 2510 control valve drive assembly
(see opposite page for parts list)
Page 12
3 4 5
2
1
19
6
20
15 18 1615
14
13
12
11
6
17
10
9
8
7
8/8/2019 MODEL 2510 & 2510 ECONOMINDER Installation Instructions
http://slidepdf.com/reader/full/model-2510-2510-econominder-installation-instructions 13/36
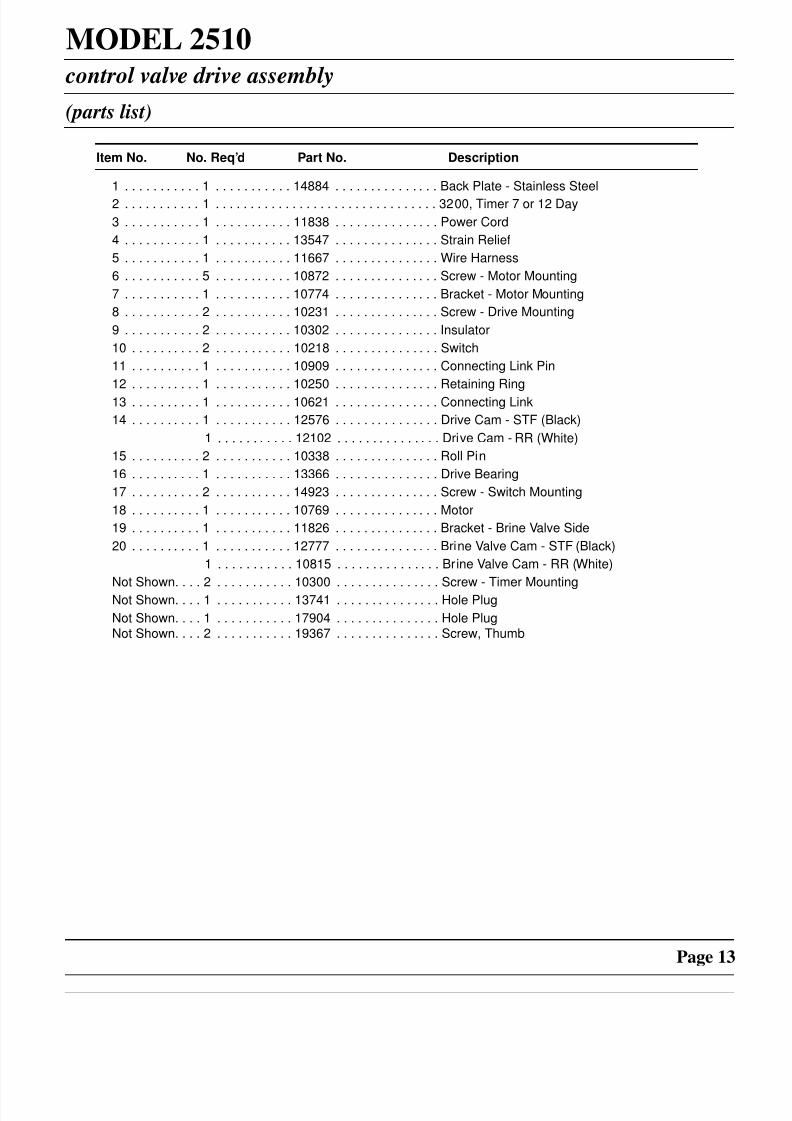
MODEL 2510 control valve drive assembly
(parts list)
Page 13
Item No. No. Req’d Part No. Description
1 . . . . . . . . . . . 1 . . . . . . . . . . . 14884 . . . . . . . . . . . . . . . Back Plate - Stainless Steel
2 . . . . . . . . . . . 1 . . . . . . . . . . . . . . . . . . . . . . . . . . . . . . . . 3200, Timer 7 or 12 Day
3 . . . . . . . . . . . 1 . . . . . . . . . . . 11838 . . . . . . . . . . . . . . . Power Cord
4 . . . . . . . . . . . 1 . . . . . . . . . . . 13547 . . . . . . . . . . . . . . . Strain Relief
5 . . . . . . . . . . . 1 . . . . . . . . . . . 11667 . . . . . . . . . . . . . . . Wire Harness
6 . . . . . . . . . . . 5 . . . . . . . . . . . 10872 . . . . . . . . . . . . . . . Screw - Motor Mounting
7 . . . . . . . . . . . 1 . . . . . . . . . . . 10774 . . . . . . . . . . . . . . . Bracket - Motor Mounting
8 . . . . . . . . . . . 2 . . . . . . . . . . . 10231 . . . . . . . . . . . . . . . Screw - Drive Mounting
9 . . . . . . . . . . . 2 . . . . . . . . . . . 10302 . . . . . . . . . . . . . . . Insulator
10 . . . . . . . . . . 2 . . . . . . . . . . . 10218 . . . . . . . . . . . . . . . Switch
11 . . . . . . . . . . 1 . . . . . . . . . . . 10909 . . . . . . . . . . . . . . . Connecting Link Pin
12 . . . . . . . . . . 1 . . . . . . . . . . . 10250 . . . . . . . . . . . . . . . Retaining Ring
13 . . . . . . . . . . 1 . . . . . . . . . . . 10621 . . . . . . . . . . . . . . . Connecting Link
14 . . . . . . . . . . 1 . . . . . . . . . . . 12576 . . . . . . . . . . . . . . . Drive Cam - STF (Black)
1 . . . . . . . . . . . 12102 . . . . . . . . . . . . . . . Drive Cam - RR (White)
15 . . . . . . . . . . 2 . . . . . . . . . . . 10338 . . . . . . . . . . . . . . . Roll Pin
16 . . . . . . . . . . 1 . . . . . . . . . . . 13366 . . . . . . . . . . . . . . . Drive Bearing
17 . . . . . . . . . . 2 . . . . . . . . . . . 14923 . . . . . . . . . . . . . . . Screw - Switch Mounting
18 . . . . . . . . . . 1 . . . . . . . . . . . 10769 . . . . . . . . . . . . . . . Motor
19 . . . . . . . . . . 1 . . . . . . . . . . . 11826 . . . . . . . . . . . . . . . Bracket - Brine Valve Side
20 . . . . . . . . . . 1 . . . . . . . . . . . 12777 . . . . . . . . . . . . . . . Brine Valve Cam - STF (Black)
1 . . . . . . . . . . . 10815 . . . . . . . . . . . . . . . Brine Valve Cam - RR (White)
Not Shown. . . . 2 . . . . . . . . . . . 10300 . . . . . . . . . . . . . . . Screw - Timer Mounting
Not Shown. . . . 1 . . . . . . . . . . . 13741 . . . . . . . . . . . . . . . Hole Plug
Not Shown. . . . 1 . . . . . . . . . . . 17904 . . . . . . . . . . . . . . . Hole PlugNot Shown. . . . 2 . . . . . . . . . . . 19367 . . . . . . . . . . . . . . . Screw, Thumb
8/8/2019 MODEL 2510 & 2510 ECONOMINDER Installation Instructions
http://slidepdf.com/reader/full/model-2510-2510-econominder-installation-instructions 14/36
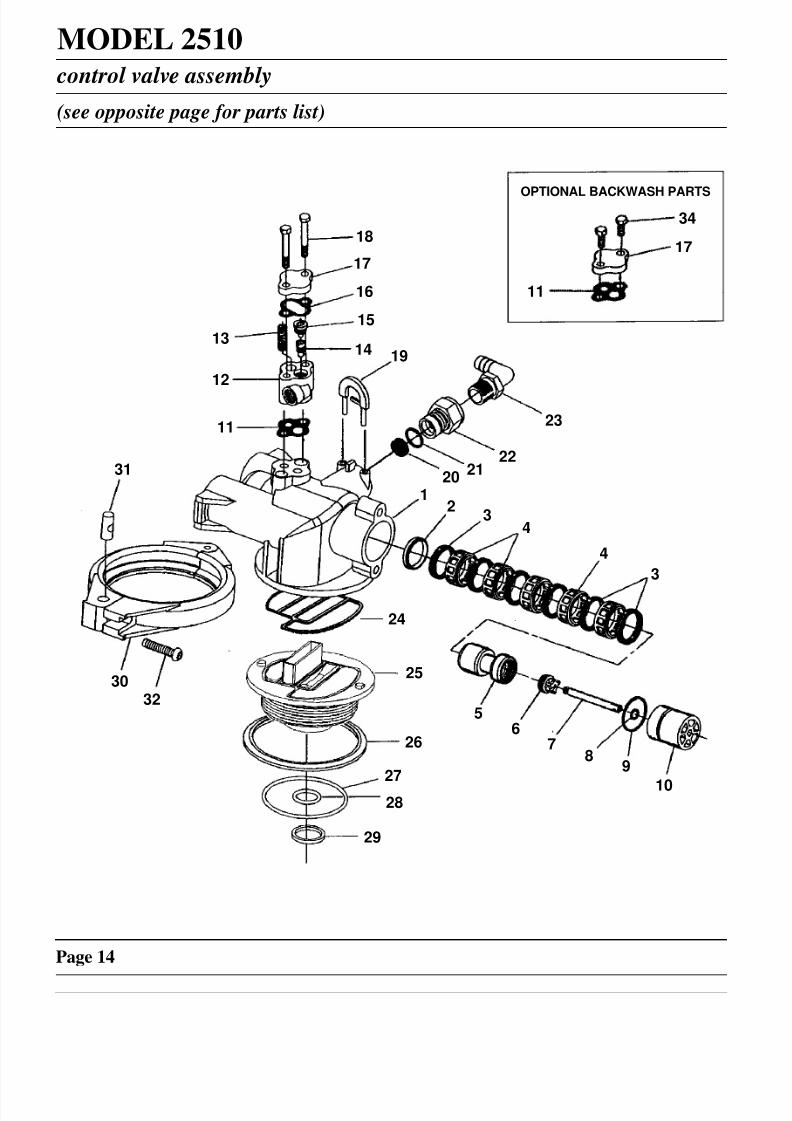
MODEL 2510 control valve assembly
(see opposite page for parts list)
Page 14
12
34
5
4
3
67
89
10
20
11
17
34
2122
23
18
17
16
15
14 1913
12
11
31
3032
24
25
26
27
28
29
OPTIONAL BACKWASH PARTS

8/8/2019 MODEL 2510 & 2510 ECONOMINDER Installation Instructions
http://slidepdf.com/reader/full/model-2510-2510-econominder-installation-instructions 15/36
MODEL 2510 control valve assembly
(parts list)
Page 15
Item No. No. Req’d Part No. Description
1 . . . . . . . . . . . 1 . . . . . . . . . . . 19328 . . . . . . . . . . . . . . . Valve Body
2 . . . . . . . . . . . 1 . . . . . . . . . . . 10757 . . . . . . . . . . . . . . . End Spacer
3 . . . . . . . . . . . 6 . . . . . . . . . . . 10545 . . . . . . . . . . . . . . . Seal Ring
4 . . . . . . . . . . . 5 . . . . . . . . . . . 11451 . . . . . . . . . . . . . . . Spacer
5 . . . . . . . . . . . 1 . . . . . . . . . . . 15168 . . . . . . . . . . . . . . . Piston
6 . . . . . . . . . . . 1 . . . . . . . . . . . 14309 . . . . . . . . . . . . . . . Piston Rod Retainer
7 . . . . . . . . . . . 1 . . . . . . . . . . . 14452 . . . . . . . . . . . . . . . Piston Rod
8 . . . . . . . . . . . 1 . . . . . . . . . . . 10209 . . . . . . . . . . . . . . . Seal Quad Ring
9 . . . . . . . . . . . 1 . . . . . . . . . . . 40078 . . . . . . . . . . . . . . . Seal “O” Ring - End Plug
10 . . . . . . . . . . 1 . . . . . . . . . . . 10598 . . . . . . . . . . . . . . . End Plug Assembly
11 . . . . . . . . . . 1 . . . . . . . . . . . 11475 . . . . . . . . . . . . . . . Injector Body Gasket
12 . . . . . . . . . . 1 . . . . . . . . . . . 17776 . . . . . . . . . . . . . . . Injector Body - Plastic
13 . . . . . . . . . . 1 . . . . . . . . . . . 10227 . . . . . . . . . . . . . . . Injector Screen
14 . . . . . . . . . . 1 . . . . . . . . . . . 10914 . . . . . . . . . . . . . . . Injector Throat (Specify Size)
15 . . . . . . . . . . 1 . . . . . . . . . . . 10913 . . . . . . . . . . . . . . . Injector Nozzle (Specify Size)
16 . . . . . . . . . . 1 . . . . . . . . . . . 10229 . . . . . . . . . . . . . . . Injector Cover Gasket
17 . . . . . . . . . . 1 . . . . . . . . . . . 11893 . . . . . . . . . . . . . . . Injector Cap (Plastic Body)
18 . . . . . . . . . . 2 . . . . . . . . . . . 10692 . . . . . . . . . . . . . . . Injector Body Screw
19 . . . . . . . . . . 1 . . . . . . . . . . . 18312 . . . . . . . . . . . . . . . Drain Retainer
20 . . . . . . . . . . 1 . . . . . . . . . . . . . . . . . . . . . . . . . . . . . . . . Flow Control Washer
(Specify Flow Rate in GPM)
21 . . . . . . . . . . 1 . . . . . . . . . . . 11183 . . . . . . . . . . . . . . . Seal “O” Ring
22 . . . . . . . . . . 1 . . . . . . . . . . . 11385 . . . . . . . . . . . . . . . Flow Control Housing
23 . . . . . . . . . . 1 . . . . . . . . . . . 12338 . . . . . . . . . . . . . . . 1/2 Pipe x 1/2 Hose x 90° Drain Fitting
24 . . . . . . . . . . 1 . . . . . . . . . . . 19936 . . . . . . . . . . . . . . . Base Seal
25 . . . . . . . . . . 1 . . . . . . . . . . . 19322 . . . . . . . . . . . . . . . Adapter Base (2 1/2-8 Thd)
26 . . . . . . . . . . 1 . . . . . . . . . . . 19197 . . . . . . . . . . . . . . . Slip Ring
27 . . . . . . . . . . 1 . . . . . . . . . . . 18303 . . . . . . . . . . . . . . . Tank O-Ring
28 . . . . . . . . . . 1 . . . . . . . . . . . 13304 . . . . . . . . . . . . . . . Distributor O-Ring
29 . . . . . . . . . . 1 . . . . . . . . . . . 13030 . . . . . . . . . . . . . . . Retainer, Distributor Tube O-Ring
30 . . . . . . . . . . 1 . . . . . . . . . . . 60503 . . . . . . . . . . . . . . . Clamp Assembly
31 . . . . . . . . . . 1 . . . . . . . . . . . 19998 . . . . . . . . . . . . . . . Clamp Pivot
32 . . . . . . . . . . 1 . . . . . . . . . . . 40057 . . . . . . . . . . . . . . . Clamp Screw
1 . . . . . . . . . . . 40000 . . . . . . . . . . . . . . . Pin Hinge (not shown)
NOTE: FOR BACKWASH FILTER VALVE - REPLACE ITEMS 12-18
17 . . . . . . . . . . 1 . . . . . . . . . . . 11893 . . . . . . . . . . . . . . . Injector Cap
34 . . . . . . . . . . 2 . . . . . . . . . . . 15137 . . . . . . . . . . . . . . . Screw Flat Cap
11 . . . . . . . . . . 1 . . . . . . . . . . . 11475 . . . . . . . . . . . . . . . Injector Body Gasket
8/8/2019 MODEL 2510 & 2510 ECONOMINDER Installation Instructions
http://slidepdf.com/reader/full/model-2510-2510-econominder-installation-instructions 16/36
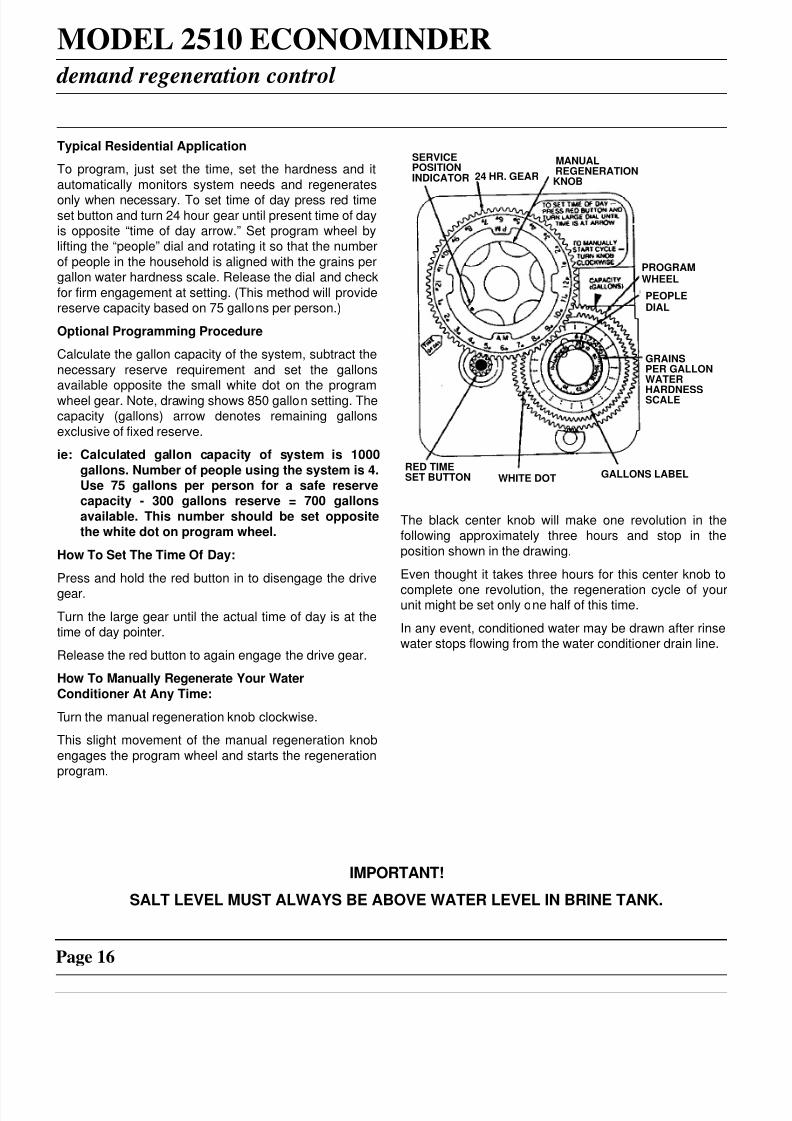
MODEL 2510 ECONOMINDER demand regeneration control
Page 16
IMPORTANT!
SALT LEVEL MUST ALWAYS BE ABOVE WATER LEVEL IN BRINE TANK.
Typical Residential Application
To program, just set the time, set the hardness and it
automatically monitors system needs and regenerates
only when necessary. To set time of day press red timeset button and turn 24 hour gear until present time of dayis opposite “time of day arrow.” Set program wheel bylifting the “people” dial and rotating it so that the number
of people in the household is aligned with the grains pergallon water hardness scale. Release the dial and check
for firm engagement at setting. (This method will providereserve capacity based on 75 gallons per person.)
Optional Programming Procedure
Calculate the gallon capacity of the system, subtract the
necessary reserve requirement and set the gallonsavailable opposite the small white dot on the program
wheel gear. Note, drawing shows 850 gallon setting. Thecapacity (gallons) arrow denotes remaining gallons
exclusive of fixed reserve.
ie: Calculated gallon capacity of system is 1000
gallons. Number of people using the system is 4.Use 75 gallons per person for a safe reservecapacity - 300 gallons reserve = 700 gallons
available. This number should be set oppositethe white dot on program wheel.
How To Set The Time Of Day:
Press and hold the red button in to disengage the drive
gear.
Turn the large gear until the actual time of day is at thetime of day pointer.
Release the red button to again engage the drive gear.
How To Manually Regenerate Your Water
Conditioner At Any Time:
Turn the manual regeneration knob clockwise.
This slight movement of the manual regeneration knob
engages the program wheel and starts the regenerationprogram.
The black center knob will make one revolution in thefollowing approximately three hours and stop in the
position shown in the drawing.
Even thought it takes three hours for this center knob to
complete one revolution, the regeneration cycle of yourunit might be set only one half of this time.
In any event, conditioned water may be drawn after rinsewater stops flowing from the water conditioner drain line.
SERVICEPOSITIONINDICATOR 24 HR. GEAR
MANUAL
KNOB
RED TIMESET BUTTON WHITE DOT GALLONS LABEL
PROGRAMWHEEL
PEOPLEDIAL
GRAINSPER GALLONWATER
HARDNESSSCALE
REGENERATION

8/8/2019 MODEL 2510 & 2510 ECONOMINDER Installation Instructions
http://slidepdf.com/reader/full/model-2510-2510-econominder-installation-instructions 17/36
MODEL 3210 regeneration cycle program setting procedure
Page 17
How to Set The Regeneration Cycle Program:
The regeneration cycle program on your water conditionerhas been factory preset, however, portions of the cycle or
program may be lengthened or shortened in time to suitlocal conditions.
If unit has a meter, disconnect meter cable from meterat this time.
To expose cycle program wheel, grasp timer in upper left-hand corner and pull, releasing snap retainer and swingingtimer to the right. (meter cable must be disconnected)
To change the regeneration cycle program, the programwheel must be removed. Grasp program wheel andsqueeze protruding lugs towards center, lift program wheeloff timer. (Switch arms may require movement to facilitateremoval.)
How To Change The Length Of The Backwash Time:The program wheel as shown in the drawing is in theservice position. As you look at the numbered side of theprogram wheel, the group of pins starting at zerodetermines the length of time your unit will backwash.
FOR EXAMPLE: If there are six pins in this section, thetime of backwash will be 12 min. (2 min. per pin). tochange the length of backwash time, add or remove pinsas required. The number of pins times two equals thebackwash time in minutes.
How To Change The Length of Brine and Rinse Time:
The group of holes between the last pin in the backwash
section and the second group of pins determines thelength of time that your unit will brine and rinse. (2 min. perhole.)
To change the length of brine and rinse time, move therapid rinse group of pins to give more or fewer holes in thebrine and rinse section. Number of holes times two equalsbrine and rinse time in minutes.
How To Change The Length Of Brine Tank Refill Sepa-rate From Rapid Rinse: STF Black Cams
The second group of pins on the program wheeldetermines the length of time that your water conditionerwill rapid rinse. (2 min. per pin.)
To change the length of rapid rinse time, add or removepins at the higher numbered end of this section asrequired. The number of pins times two equals the rapidrinse time in minutes.
How To Change The Length Of Brine Tank Refill Time:
The second group of holes on the program wheeldetermines the length of time that your water conditionerwill refill the brine tank. (2 min. per hole.)
To change the length of refill time, move the two pins atthe end of second group of holes as required.
The regeneration cycle is complete when the outer micro-switch is tripped by the two pinset at end of the brine tankrefill section. The program wheel, however, will continue torotate until the inner micro-switch drops into the notch on
the program wheel.How To Change The Length Of Rapid Rinse And BrineTank Fill Time: RR White Cams
The second group of pins on the program wheeldetermines the length of time that your water conditionerwill rapid rinse and brine tank fill. (2 min. per pin.)
To change the length of rapid rinse and brine tank fill time,add or remove pins at the higher numbered end of thissections as required. The number of pins times two equalsthe rapid rinse and brine tank fill time in minutes.
The regeneration cycle is complete when the outer micro-switch drops off the last pin in the rapid rinse and brine
tank fill group of pins. The program wheel, however, willcontinue to rotate until the inner micro-switch drop into thenotch on the program wheel.
Return timer to closed position engaging snap retainerin back plate. Make certain all electrical wires locateabove snap retainer post and the meter cable slidesthough the backplate and does not bind. Reconnect metercable.
BRINE & RINSESECTION(2 MIN. PER HOLE)
PIN STORAGE
PROGRAMWHEEL FORCONTROL OFREGENERATIONCYCLE
RAPIDRINSESECTION(2 MIN.PER PIN)
BRINE TANKREFILLSECTION(2 MIN.
PER HOLE)SEPERATE TIMEFILL ONLY
BACKWASHSECTION(2 MIN. PER PIN)

8/8/2019 MODEL 2510 & 2510 ECONOMINDER Installation Instructions
http://slidepdf.com/reader/full/model-2510-2510-econominder-installation-instructions 18/36
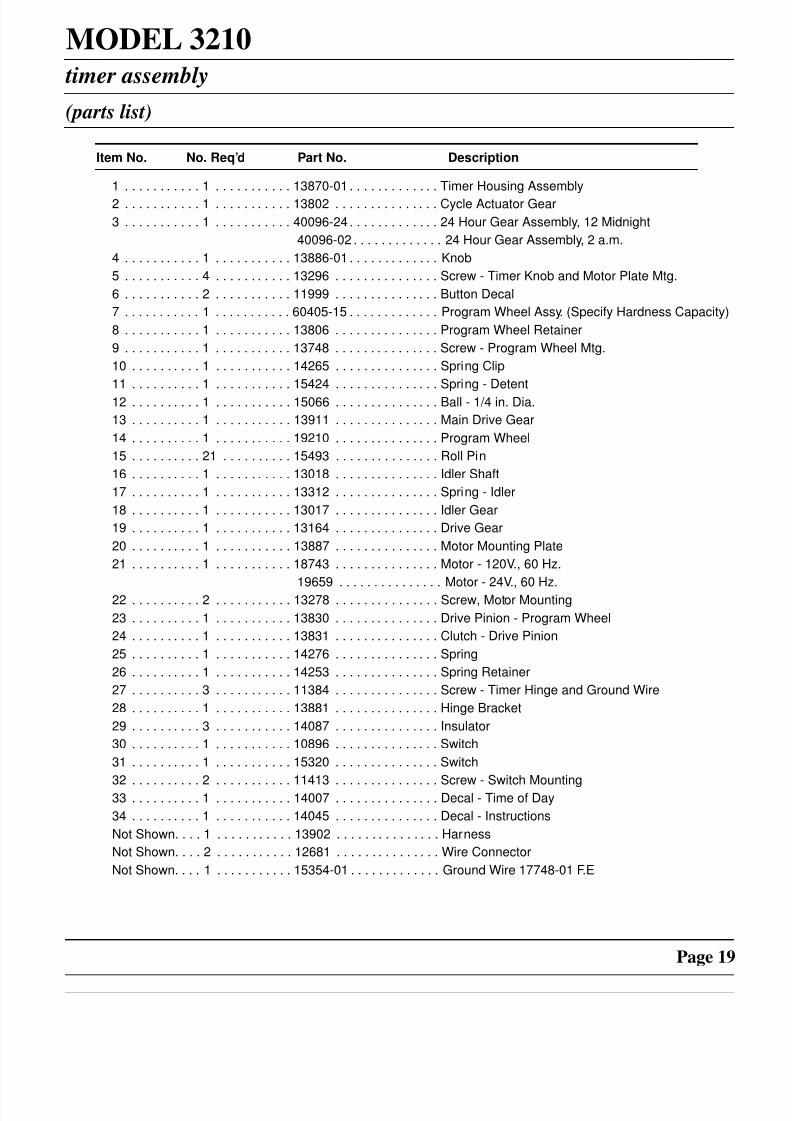
MODEL 3210 timer assembly
(see opposite page for parts list)
Page 18
134
23
4
5
6
337
8
96
1011
1213
1415
520
2122
19
1617
18
2728
2930
3132
2324
25
26
8/8/2019 MODEL 2510 & 2510 ECONOMINDER Installation Instructions
http://slidepdf.com/reader/full/model-2510-2510-econominder-installation-instructions 19/36
MODEL 3210 timer assembly
(parts list)
Page 19
Item No. No. Req’d Part No. Description
1 . . . . . . . . . . . 1 . . . . . . . . . . . 13870-01 . . . . . . . . . . . . . Timer Housing Assembly
2 . . . . . . . . . . . 1 . . . . . . . . . . . 13802 . . . . . . . . . . . . . . . Cycle Actuator Gear
3 . . . . . . . . . . . 1 . . . . . . . . . . . 40096-24 . . . . . . . . . . . . . 24 Hour Gear Assembly, 12 Midnight
40096-02 . . . . . . . . . . . . . 24 Hour Gear Assembly, 2 a.m.
4 . . . . . . . . . . . 1 . . . . . . . . . . . 13886-01 . . . . . . . . . . . . . Knob
5 . . . . . . . . . . . 4 . . . . . . . . . . . 13296 . . . . . . . . . . . . . . . Screw - Timer Knob and Motor Plate Mtg.
6 . . . . . . . . . . . 2 . . . . . . . . . . . 11999 . . . . . . . . . . . . . . . Button Decal
7 . . . . . . . . . . . 1 . . . . . . . . . . . 60405-15 . . . . . . . . . . . . . Program Wheel Assy. (Specify Hardness Capacity)
8 . . . . . . . . . . . 1 . . . . . . . . . . . 13806 . . . . . . . . . . . . . . . Program Wheel Retainer
9 . . . . . . . . . . . 1 . . . . . . . . . . . 13748 . . . . . . . . . . . . . . . Screw - Program Wheel Mtg.
10 . . . . . . . . . . 1 . . . . . . . . . . . 14265 . . . . . . . . . . . . . . . Spring Clip
11 . . . . . . . . . . 1 . . . . . . . . . . . 15424 . . . . . . . . . . . . . . . Spring - Detent
12 . . . . . . . . . . 1 . . . . . . . . . . . 15066 . . . . . . . . . . . . . . . Ball - 1/4 in. Dia.
13 . . . . . . . . . . 1 . . . . . . . . . . . 13911 . . . . . . . . . . . . . . . Main Drive Gear
14 . . . . . . . . . . 1 . . . . . . . . . . . 19210 . . . . . . . . . . . . . . . Program Wheel
15 . . . . . . . . . . 21 . . . . . . . . . . 15493 . . . . . . . . . . . . . . . Roll Pin
16 . . . . . . . . . . 1 . . . . . . . . . . . 13018 . . . . . . . . . . . . . . . Idler Shaft
17 . . . . . . . . . . 1 . . . . . . . . . . . 13312 . . . . . . . . . . . . . . . Spring - Idler
18 . . . . . . . . . . 1 . . . . . . . . . . . 13017 . . . . . . . . . . . . . . . Idler Gear
19 . . . . . . . . . . 1 . . . . . . . . . . . 13164 . . . . . . . . . . . . . . . Drive Gear
20 . . . . . . . . . . 1 . . . . . . . . . . . 13887 . . . . . . . . . . . . . . . Motor Mounting Plate
21 . . . . . . . . . . 1 . . . . . . . . . . . 18743 . . . . . . . . . . . . . . . Motor - 120V., 60 Hz.
19659 . . . . . . . . . . . . . . . Motor - 24V., 60 Hz.
22 . . . . . . . . . . 2 . . . . . . . . . . . 13278 . . . . . . . . . . . . . . . Screw, Motor Mounting
23 . . . . . . . . . . 1 . . . . . . . . . . . 13830 . . . . . . . . . . . . . . . Drive Pinion - Program Wheel
24 . . . . . . . . . . 1 . . . . . . . . . . . 13831 . . . . . . . . . . . . . . . Clutch - Drive Pinion
25 . . . . . . . . . . 1 . . . . . . . . . . . 14276 . . . . . . . . . . . . . . . Spring
26 . . . . . . . . . . 1 . . . . . . . . . . . 14253 . . . . . . . . . . . . . . . Spring Retainer
27 . . . . . . . . . . 3 . . . . . . . . . . . 11384 . . . . . . . . . . . . . . . Screw - Timer Hinge and Ground Wire
28 . . . . . . . . . . 1 . . . . . . . . . . . 13881 . . . . . . . . . . . . . . . Hinge Bracket
29 . . . . . . . . . . 3 . . . . . . . . . . . 14087 . . . . . . . . . . . . . . . Insulator
30 . . . . . . . . . . 1 . . . . . . . . . . . 10896 . . . . . . . . . . . . . . . Switch
31 . . . . . . . . . . 1 . . . . . . . . . . . 15320 . . . . . . . . . . . . . . . Switch
32 . . . . . . . . . . 2 . . . . . . . . . . . 11413 . . . . . . . . . . . . . . . Screw - Switch Mounting33 . . . . . . . . . . 1 . . . . . . . . . . . 14007 . . . . . . . . . . . . . . . Decal - Time of Day
34 . . . . . . . . . . 1 . . . . . . . . . . . 14045 . . . . . . . . . . . . . . . Decal - Instructions
Not Shown. . . . 1 . . . . . . . . . . . 13902 . . . . . . . . . . . . . . . Harness
Not Shown. . . . 2 . . . . . . . . . . . 12681 . . . . . . . . . . . . . . . Wire Connector
Not Shown. . . . 1 . . . . . . . . . . . 15354-01 . . . . . . . . . . . . . Ground Wire 17748-01 F.E
8/8/2019 MODEL 2510 & 2510 ECONOMINDER Installation Instructions
http://slidepdf.com/reader/full/model-2510-2510-econominder-installation-instructions 20/36
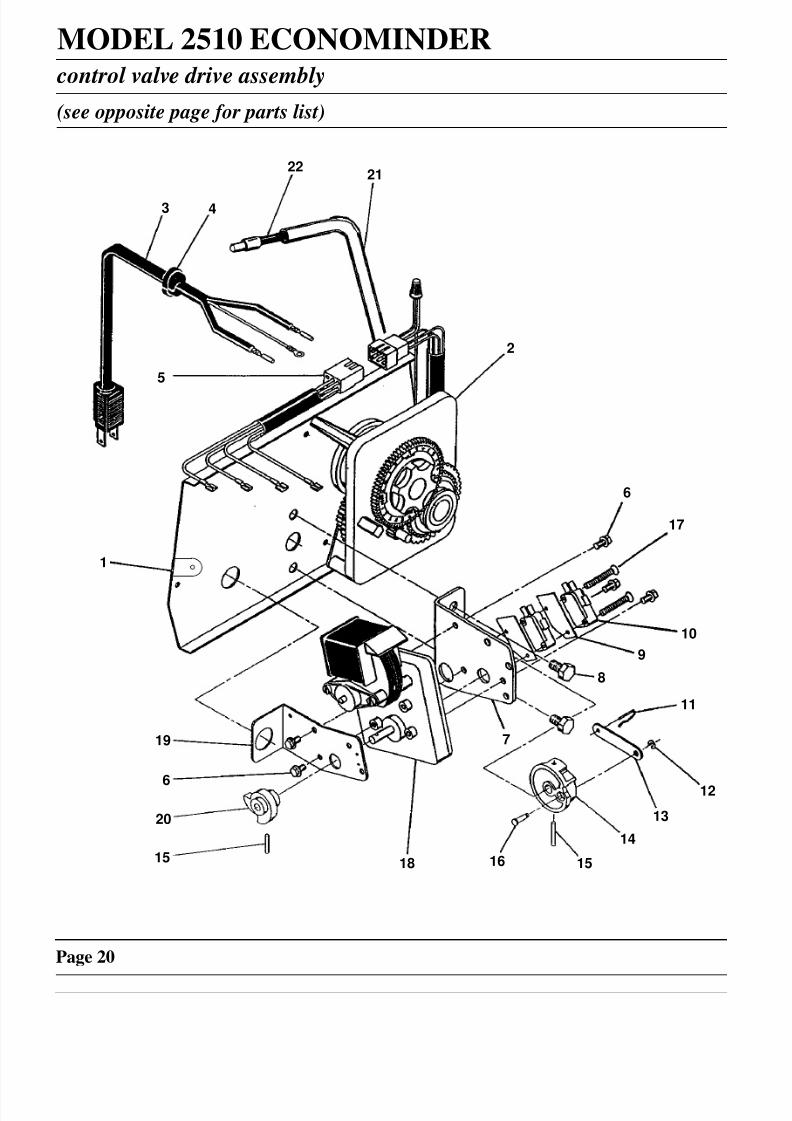
MODEL 2510 ECONOMINDER control valve drive assembly
(see opposite page for parts list)
Page 20
3 4
1
2
5
6
7
8
9
10
11
12
13
14
15 16
17
18
19
20
2122
15
6

8/8/2019 MODEL 2510 & 2510 ECONOMINDER Installation Instructions
http://slidepdf.com/reader/full/model-2510-2510-econominder-installation-instructions 21/36
MODEL 2510 ECONOMINDER control valve drive assembly
(parts list)
Page 21
Item No. No. Req’d Part No. Description
1 . . . . . . . . . . . 1 . . . . . . . . . . . 14884 . . . . . . . . . . . . . . . Back Plate - Stainless Steel
2 . . . . . . . . . . . 1 . . . . . . . . . . . 60306-13 . . . . . . . . . . . . . 3210 Delay Timer, STF, 120V/60
1 . . . . . . . . . . . 60306-03 . . . . . . . . . . . . . 3210 Delay Timer, STF, 120V/60
3 . . . . . . . . . . . 1 . . . . . . . . . . . 11838 . . . . . . . . . . . . . . . Power Cord
4 . . . . . . . . . . . 1 . . . . . . . . . . . 13547 . . . . . . . . . . . . . . . Strain Relief
5 . . . . . . . . . . . 1 . . . . . . . . . . . 11667 . . . . . . . . . . . . . . . Wire Harness
6 . . . . . . . . . . . 5 . . . . . . . . . . . 10872 . . . . . . . . . . . . . . . Screw - Motor Mounting
7 . . . . . . . . . . . 1 . . . . . . . . . . . 10774 . . . . . . . . . . . . . . . Bracket - Motor Mounting
8 . . . . . . . . . . . 2 . . . . . . . . . . . 10231 . . . . . . . . . . . . . . . Screw - Drive Mounting
9 . . . . . . . . . . . 2 . . . . . . . . . . . 10302 . . . . . . . . . . . . . . . Insulator
10 . . . . . . . . . . 2 . . . . . . . . . . . 10218 . . . . . . . . . . . . . . . Switch
11 . . . . . . . . . . 1 . . . . . . . . . . . 10909 . . . . . . . . . . . . . . . Connecting Link Pin
12 . . . . . . . . . . 1 . . . . . . . . . . . 10250 . . . . . . . . . . . . . . . Retaining Ring
13 . . . . . . . . . . 1 . . . . . . . . . . . 10621 . . . . . . . . . . . . . . . Connecting Link
14 . . . . . . . . . . 1 . . . . . . . . . . . 12576 . . . . . . . . . . . . . . . Drive Cam - STF (Black)
1 . . . . . . . . . . . 12102 . . . . . . . . . . . . . . . Drive Cam - RR (White)
15 . . . . . . . . . . 2 . . . . . . . . . . . 10338 . . . . . . . . . . . . . . . Roll Pin
16 . . . . . . . . . . 1 . . . . . . . . . . . 13366 . . . . . . . . . . . . . . . Drive Bearing
17 . . . . . . . . . . 2 . . . . . . . . . . . 14923 . . . . . . . . . . . . . . . Screw - Switch Mounting
18 . . . . . . . . . . 1 . . . . . . . . . . . 10769 . . . . . . . . . . . . . . . Motor
19 . . . . . . . . . . 1 . . . . . . . . . . . 11826 . . . . . . . . . . . . . . . Bracket - Brine Valve Side
20 . . . . . . . . . . 1 . . . . . . . . . . . 12777 . . . . . . . . . . . . . . . Brine Valve Cam - STF (Black) - (shown)
1 . . . . . . . . . . . 10815 . . . . . . . . . . . . . . . Brine Valve Cam - RR (White)
21 . . . . . . . . . . 1 . . . . . . . . . . . 15441 . . . . . . . . . . . . . . . Meter Cable Guide Ass’y
22 . . . . . . . . . . 1 . . . . . . . . . . . 15495 . . . . . . . . . . . . . . . Meter Cable, 13” Std./Ext., Rt. Angle
Not Shown. . . . 2 . . . . . . . . . . . 10300 . . . . . . . . . . . . . . . Screw - Timer Mounting
Not Shown. . . . 1 . . . . . . . . . . . 13741 . . . . . . . . . . . . . . . Hole Plug
Not Shown. . . . 1 . . . . . . . . . . . 17904 . . . . . . . . . . . . . . . Hole Plug
Not Shown. . . . 2 . . . . . . . . . . . 19367 . . . . . . . . . . . . . . . Screw, Thumb

8/8/2019 MODEL 2510 & 2510 ECONOMINDER Installation Instructions
http://slidepdf.com/reader/full/model-2510-2510-econominder-installation-instructions 22/36
MODEL 2510 ECONOMINDER meter assembly
(see opposite page for parts list)
Page 22
1
2
3
4
5
6
7
8
9

8/8/2019 MODEL 2510 & 2510 ECONOMINDER Installation Instructions
http://slidepdf.com/reader/full/model-2510-2510-econominder-installation-instructions 23/36
MODEL 2510 ECONOMINDER meter assembly
(parts list)
Page 23
Item No. No. Req’d Part No. Description
1 . . . . . . . . . . . 4 . . . . . . . . . . . 12473 . . . . . . . . . . . . . . . Screw - Meter Cover Assembly
2 . . . . . . . . . . . 1 . . . . . . . . . . . 15659 . . . . . . . . . . . . . . . Meter Cover Assy. - Ext., Rt. Angle (Not Shown)
1 . . . . . . . . . . . 15452-90 . . . . . . . . . . . . . Meter Cover Assy., Std., Rt. Angle
3 . . . . . . . . . . . 1 . . . . . . . . . . . 13847 . . . . . . . . . . . . . . . “O” Ring - Meter Cover Assembly
4 . . . . . . . . . . . 1 . . . . . . . . . . . 13509 . . . . . . . . . . . . . . . Impeller
5 . . . . . . . . . . . 4 . . . . . . . . . . . 13314 . . . . . . . . . . . . . . . Screw - Adapter Clip
6 . . . . . . . . . . . 4 . . . . . . . . . . . 13255 . . . . . . . . . . . . . . . Adapter Clip
7 . . . . . . . . . . . 1 . . . . . . . . . . . 13821 . . . . . . . . . . . . . . . Meter Body
8 . . . . . . . . . . . 4 . . . . . . . . . . . 13305 . . . . . . . . . . . . . . . “O” Ring - Meter Body
9 . . . . . . . . . . . 1 . . . . . . . . . . . 14613 . . . . . . . . . . . . . . . Flow Straightener
8/8/2019 MODEL 2510 & 2510 ECONOMINDER Installation Instructions
http://slidepdf.com/reader/full/model-2510-2510-econominder-installation-instructions 24/36
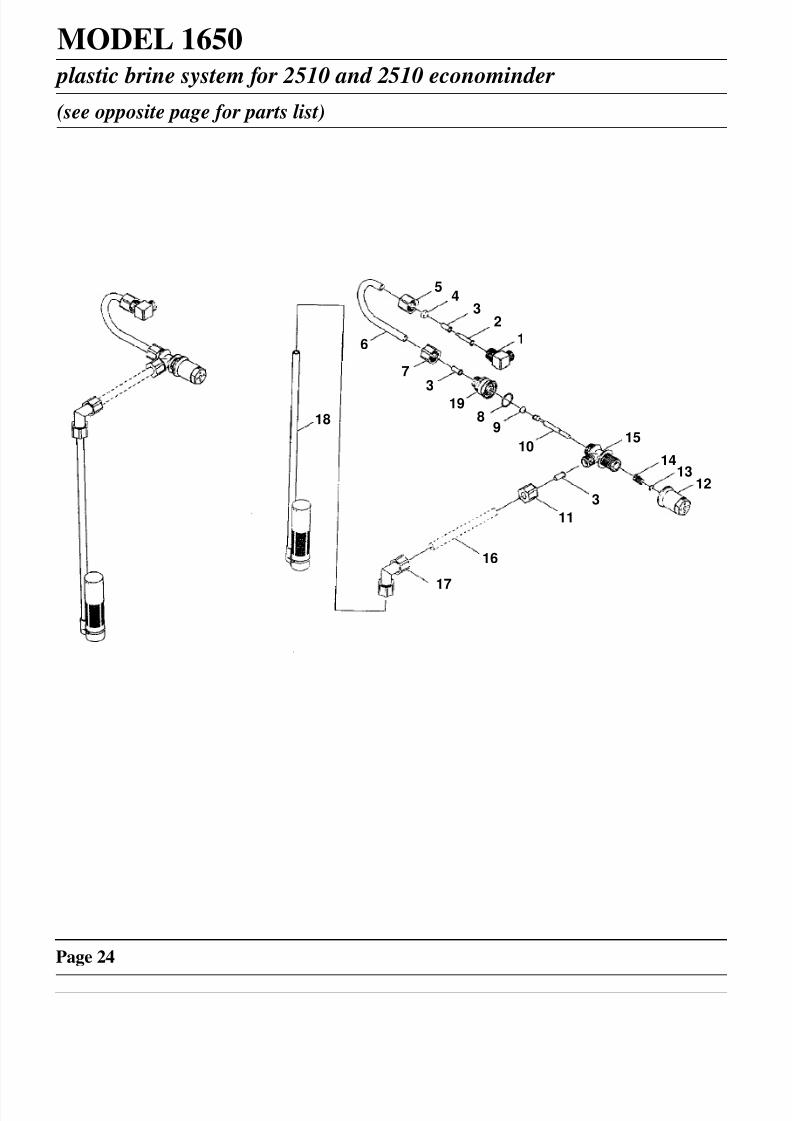
MODEL 1650 plastic brine system for 2510 and 2510 econominder
(see opposite page for parts list)
Page 24
1
23
45
6
7
89
10
11
1213
14
15
16
17
18
3 19
3
8/8/2019 MODEL 2510 & 2510 ECONOMINDER Installation Instructions
http://slidepdf.com/reader/full/model-2510-2510-econominder-installation-instructions 25/36
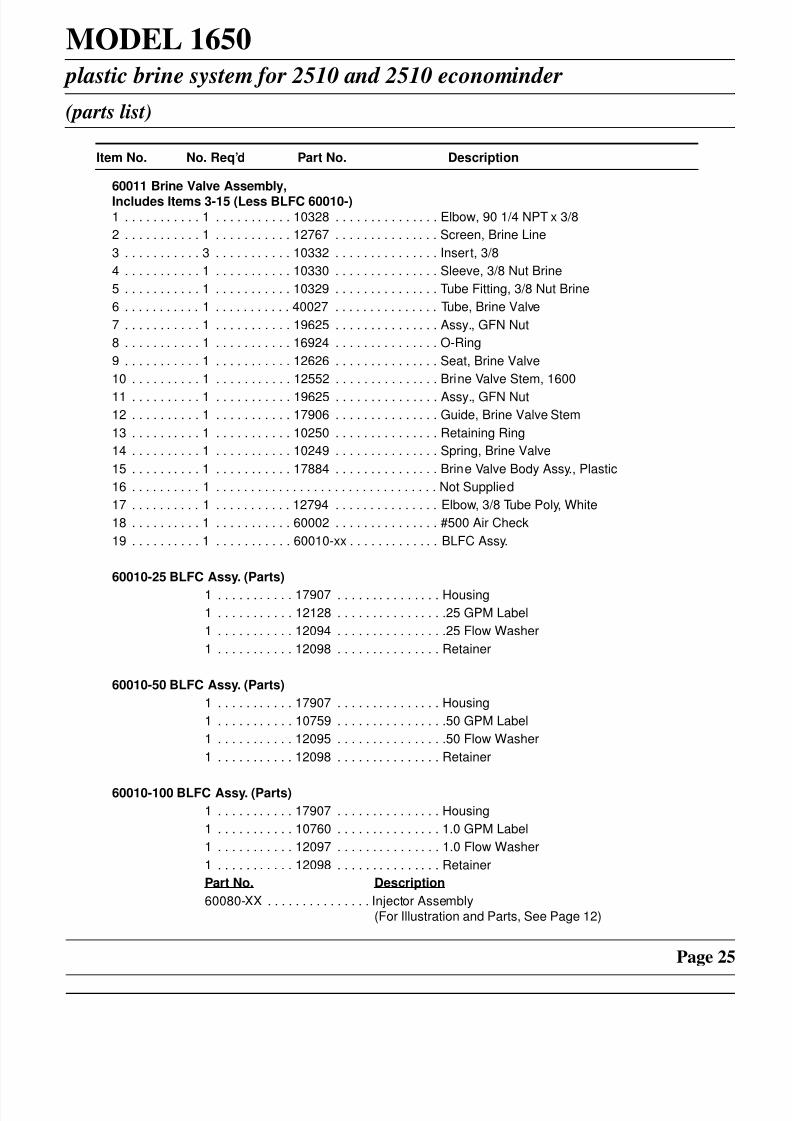
MODEL 1650 plastic brine system for 2510 and 2510 econominder
(parts list)
Page 25
Item No. No. Req’d Part No. Description
60011 Brine Valve Assembly,
Includes Items 3-15 (Less BLFC 60010-)1 . . . . . . . . . . . 1 . . . . . . . . . . . 10328 . . . . . . . . . . . . . . . Elbow, 90 1/4 NPT x 3/8
2 . . . . . . . . . . . 1 . . . . . . . . . . . 12767 . . . . . . . . . . . . . . . Screen, Brine Line
3 . . . . . . . . . . . 3 . . . . . . . . . . . 10332 . . . . . . . . . . . . . . . Insert, 3/8
4 . . . . . . . . . . . 1 . . . . . . . . . . . 10330 . . . . . . . . . . . . . . . Sleeve, 3/8 Nut Brine
5 . . . . . . . . . . . 1 . . . . . . . . . . . 10329 . . . . . . . . . . . . . . . Tube Fitting, 3/8 Nut Brine
6 . . . . . . . . . . . 1 . . . . . . . . . . . 40027 . . . . . . . . . . . . . . . Tube, Brine Valve
7 . . . . . . . . . . . 1 . . . . . . . . . . . 19625 . . . . . . . . . . . . . . . Assy., GFN Nut
8 . . . . . . . . . . . 1 . . . . . . . . . . . 16924 . . . . . . . . . . . . . . . O-Ring
9 . . . . . . . . . . . 1 . . . . . . . . . . . 12626 . . . . . . . . . . . . . . . Seat, Brine Valve
10 . . . . . . . . . . 1 . . . . . . . . . . . 12552 . . . . . . . . . . . . . . . Brine Valve Stem, 1600
11 . . . . . . . . . . 1 . . . . . . . . . . . 19625 . . . . . . . . . . . . . . . Assy., GFN Nut
12 . . . . . . . . . . 1 . . . . . . . . . . . 17906 . . . . . . . . . . . . . . . Guide, Brine Valve Stem
13 . . . . . . . . . . 1 . . . . . . . . . . . 10250 . . . . . . . . . . . . . . . Retaining Ring
14 . . . . . . . . . . 1 . . . . . . . . . . . 10249 . . . . . . . . . . . . . . . Spring, Brine Valve
15 . . . . . . . . . . 1 . . . . . . . . . . . 17884 . . . . . . . . . . . . . . . Brine Valve Body Assy., Plastic
16 . . . . . . . . . . 1 . . . . . . . . . . . . . . . . . . . . . . . . . . . . . . . . Not Supplied
17 . . . . . . . . . . 1 . . . . . . . . . . . 12794 . . . . . . . . . . . . . . . Elbow, 3/8 Tube Poly, White
18 . . . . . . . . . . 1 . . . . . . . . . . . 60002 . . . . . . . . . . . . . . . #500 Air Check
19 . . . . . . . . . . 1 . . . . . . . . . . . 60010-xx . . . . . . . . . . . . . BLFC Assy.
60010-25 BLFC Assy. (Parts)
1 . . . . . . . . . . . 17907 . . . . . . . . . . . . . . . Housing
1 . . . . . . . . . . . 12128 . . . . . . . . . . . . . . . .25 GPM Label
1 . . . . . . . . . . . 12094 . . . . . . . . . . . . . . . .25 Flow Washer
1 . . . . . . . . . . . 12098 . . . . . . . . . . . . . . . Retainer
60010-50 BLFC Assy. (Parts)
1 . . . . . . . . . . . 17907 . . . . . . . . . . . . . . . Housing
1 . . . . . . . . . . . 10759 . . . . . . . . . . . . . . . .50 GPM Label
1 . . . . . . . . . . . 12095 . . . . . . . . . . . . . . . .50 Flow Washer
1 . . . . . . . . . . . 12098 . . . . . . . . . . . . . . . Retainer
60010-100 BLFC Assy. (Parts)
1 . . . . . . . . . . . 17907 . . . . . . . . . . . . . . . Housing
1 . . . . . . . . . . . 10760 . . . . . . . . . . . . . . . 1.0 GPM Label
1 . . . . . . . . . . . 12097 . . . . . . . . . . . . . . . 1.0 Flow Washer
1 . . . . . . . . . . . 12098 . . . . . . . . . . . . . . . Retainer
Part No. Description
60080-XX . . . . . . . . . . . . . . . Injector Assembly(For Illustration and Parts, See Page 12)

8/8/2019 MODEL 2510 & 2510 ECONOMINDER Installation Instructions
http://slidepdf.com/reader/full/model-2510-2510-econominder-installation-instructions 26/36
MODEL 2510
coupling assembly with yoke
Page 26
PARTS LIST
Item No. No. Req’d Part No. Description
1 . . . . . . . . . . . 4. . . . . . . . . . . . 13305. . . . . . . . . . . . . . . . O-Ring, Adapter Coupling
2 . . . . . . . . . . . 2. . . . . . . . . . . . 19228. . . . . . . . . . . . . . . . Adapter Coupling
3 . . . . . . . . . . . 2. . . . . . . . . . . . 13255. . . . . . . . . . . . . . . . Clip, Adapter Coupling
4 . . . . . . . . . . . 2. . . . . . . . . . . . 13314. . . . . . . . . . . . . . . . Screw, Adapter Coupling
5 . . . . . . . . . . . 1. . . . . . . . . . . . 13708. . . . . . . . . . . . . . . . Adapter, 3/4” Yoke NPT
12
3
4
1
5
8/8/2019 MODEL 2510 & 2510 ECONOMINDER Installation Instructions
http://slidepdf.com/reader/full/model-2510-2510-econominder-installation-instructions 27/36
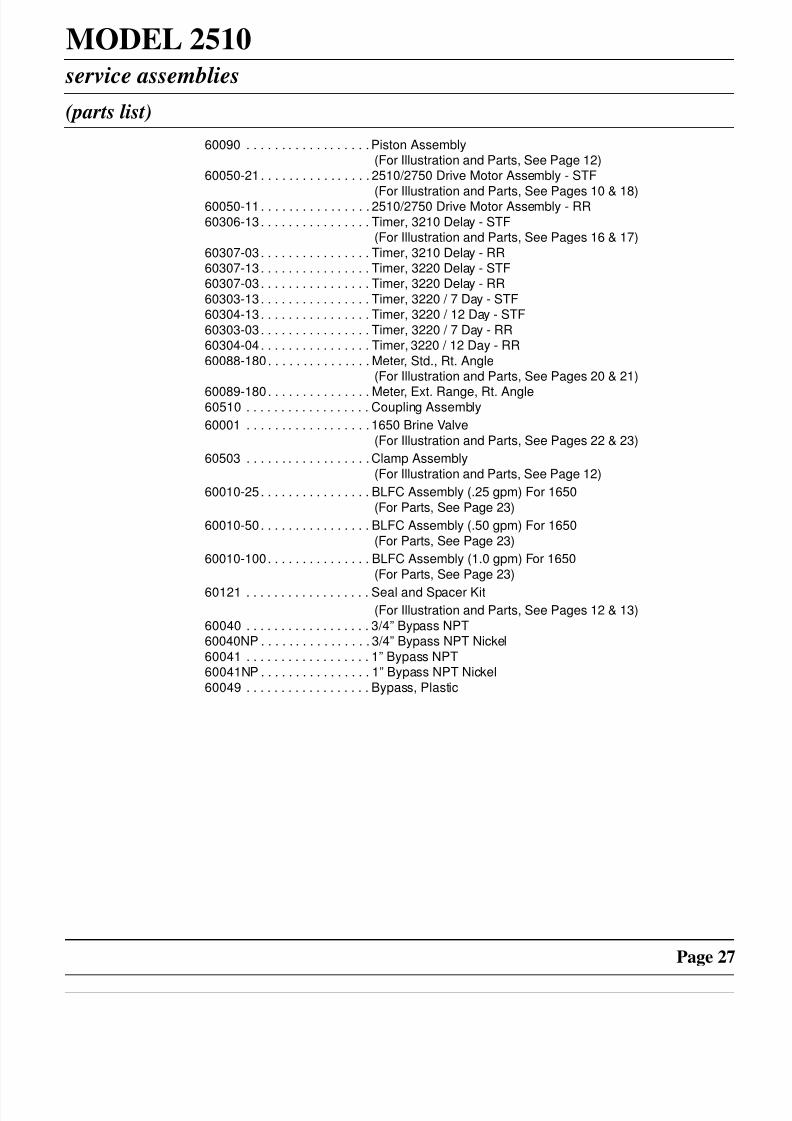
MODEL 2510 service assemblies
(parts list)
Page 27
60090 . . . . . . . . . . . . . . . . . . Piston Assembly(For Illustration and Parts, See Page 12)
60050-21 . . . . . . . . . . . . . . . . 2510/2750 Drive Motor Assembly - STF
(For Illustration and Parts, See Pages 10 & 18)60050-11 . . . . . . . . . . . . . . . . 2510/2750 Drive Motor Assembly - RR
60306-13 . . . . . . . . . . . . . . . . Timer, 3210 Delay - STF(For Illustration and Parts, See Pages 16 & 17)
60307-03 . . . . . . . . . . . . . . . . Timer, 3210 Delay - RR60307-13 . . . . . . . . . . . . . . . . Timer, 3220 Delay - STF60307-03 . . . . . . . . . . . . . . . . Timer, 3220 Delay - RR
60303-13 . . . . . . . . . . . . . . . . Timer, 3220 / 7 Day - STF60304-13 . . . . . . . . . . . . . . . . Timer, 3220 / 12 Day - STF
60303-03 . . . . . . . . . . . . . . . . Timer, 3220 / 7 Day - RR60304-04 . . . . . . . . . . . . . . . . Timer, 3220 / 12 Day - RR
60088-180. . . . . . . . . . . . . . . Meter, Std., Rt. Angle(For Illustration and Parts, See Pages 20 & 21)
60089-180. . . . . . . . . . . . . . . Meter, Ext. Range, Rt. Angle60510 . . . . . . . . . . . . . . . . . . Coupling Assembly
60001 . . . . . . . . . . . . . . . . . . 1650 Brine Valve
(For Illustration and Parts, See Pages 22 & 23)
60503 . . . . . . . . . . . . . . . . . . Clamp Assembly
(For Illustration and Parts, See Page 12)
60010-25 . . . . . . . . . . . . . . . . BLFC Assembly (.25 gpm) For 1650
(For Parts, See Page 23)
60010-50 . . . . . . . . . . . . . . . . BLFC Assembly (.50 gpm) For 1650
(For Parts, See Page 23)
60010-100. . . . . . . . . . . . . . . BLFC Assembly (1.0 gpm) For 1650
(For Parts, See Page 23)
60121 . . . . . . . . . . . . . . . . . . Seal and Spacer Kit
(For Illustration and Parts, See Pages 12 & 13)
60040 . . . . . . . . . . . . . . . . . . 3/4” Bypass NPT60040NP . . . . . . . . . . . . . . . . 3/4” Bypass NPT Nickel
60041 . . . . . . . . . . . . . . . . . . 1” Bypass NPT60041NP . . . . . . . . . . . . . . . . 1” Bypass NPT Nickel
60049 . . . . . . . . . . . . . . . . . . Bypass, Plastic
8/8/2019 MODEL 2510 & 2510 ECONOMINDER Installation Instructions
http://slidepdf.com/reader/full/model-2510-2510-econominder-installation-instructions 28/36
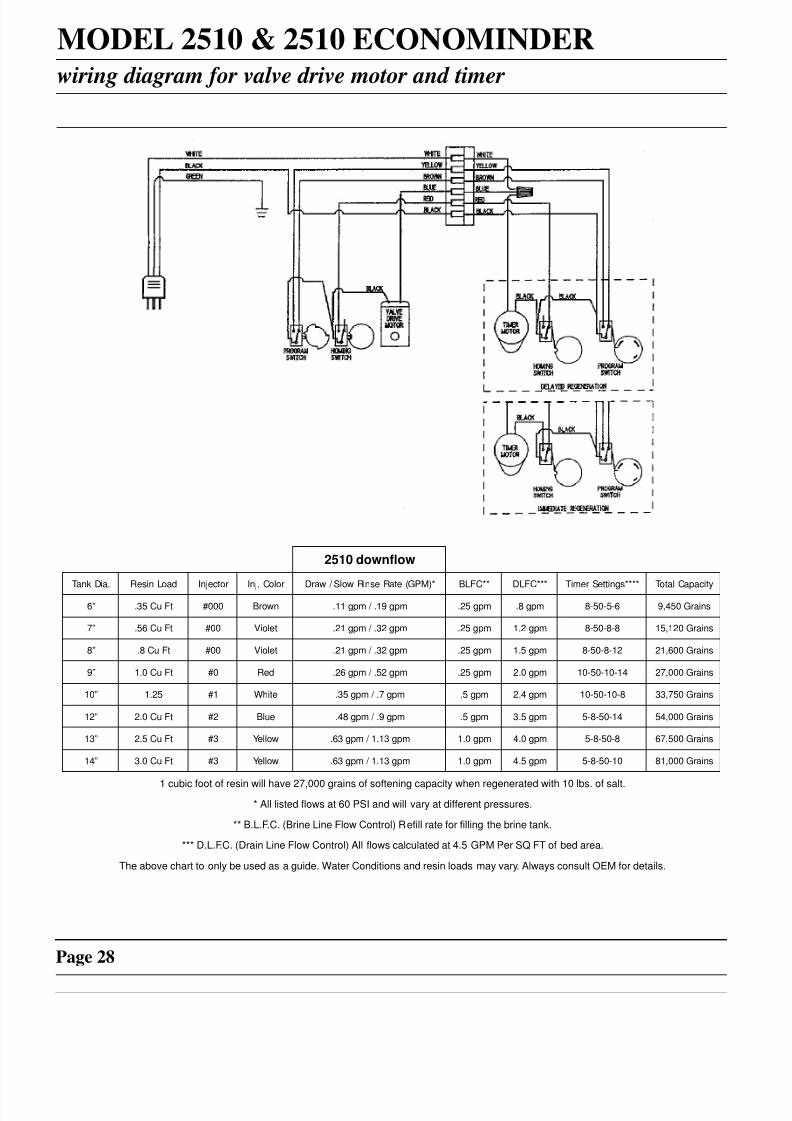
MODEL 2510 & 2510 ECONOMINDERwiring diagram for valve drive motor and timer
Page 28
2510 downflow
Tank Dia. Resin Load Injector Inj. Color Draw / Slow Rinse Rate (GPM)* BLFC** DLFC*** Timer Settings**** Total Capacity
6” .35 Cu Ft #000 Brown .11 gpm / .19 gpm .25 gpm .8 gpm 8-50-5-6 9,450 Grains
7” .56 Cu Ft #00 Violet .21 gpm / .32 gpm .25 gpm 1.2 gpm 8-50-8-8 15,120 Grains
8” .8 Cu Ft #00 Violet .21 gpm / .32 gpm .25 gpm 1.5 gpm 8-50-8-12 21,600 Grains
9” 1.0 Cu Ft #0 Red .26 gpm / .52 gpm .25 gpm 2.0 gpm 10-50-10-14 27,000 Grains
10” 1.25 #1 White .35 gpm / .7 gpm .5 gpm 2.4 gpm 10-50-10-8 33,750 Grains
12” 2.0 Cu Ft #2 Blue .48 gpm / .9 gpm .5 gpm 3.5 gpm 5-8-50-14 54,000 Grains
13” 2.5 Cu Ft #3 Yellow .63 gpm / 1.13 gpm 1.0 gpm 4.0 gpm 5-8-50-8 67,500 Grains
14” 3.0 Cu Ft #3 Yellow .63 gpm / 1.13 gpm 1.0 gpm 4.5 gpm 5-8-50-10 81,000 Grains
1 cubic foot of resin will have 27,000 grains of softening capacity when regenerated with 10 lbs. of salt.
* All listed flows at 60 PSI and will vary at different pressures.
** B.L.F.C. (Brine Line Flow Control) Refill rate for filling the brine tank.
*** D.L.F.C. (Drain Line Flow Control) All flows calculated at 4.5 GPM Per SQ FT of bed area.
The above chart to only be used as a guide. Water Conditions and resin loads may vary. Always consult OEM for details.

8/8/2019 MODEL 2510 & 2510 ECONOMINDER Installation Instructions
http://slidepdf.com/reader/full/model-2510-2510-econominder-installation-instructions 29/36
Notes
Page 29
8/8/2019 MODEL 2510 & 2510 ECONOMINDER Installation Instructions
http://slidepdf.com/reader/full/model-2510-2510-econominder-installation-instructions 30/36
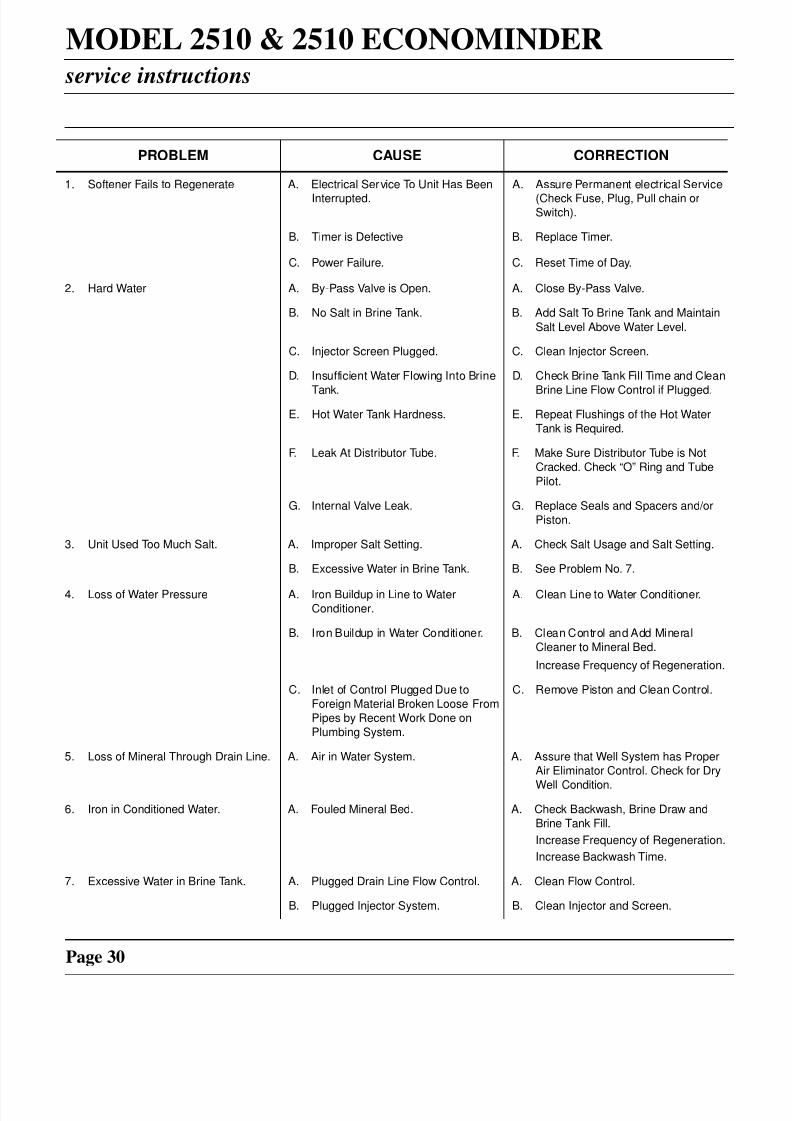
MODEL 2510 & 2510 ECONOMINDER service instructions
Page 30
PROBLEM CAUSE CORRECTION
1. Softener Fails to Regenerate A. Electrical Service To Unit Has Been
Interrupted.
A. Assure Permanent electrical Service
(Check Fuse, Plug, Pull chain orSwitch).
B. Timer is Defective B. Replace Timer.
C. Power Failure. C. Reset Time of Day.
2. Hard Water A. By-Pass Valve is Open. A. Close By-Pass Valve.
B. No Salt in Brine Tank. B. Add Salt To Brine Tank and Maintain
Salt Level Above Water Level.
C. Injector Screen Plugged. C. Clean Injector Screen.
D. Insufficient Water Flowing Into Brine
Tank.
D. Check Brine Tank Fill Time and Clean
Brine Line Flow Control if Plugged.
E. Hot Water Tank Hardness. E. Repeat Flushings of the Hot Water
Tank is Required.
F. Leak At Distributor Tube. F. Make Sure Distributor Tube is Not
Cracked. Check “O” Ring and Tube
Pilot.
G. Internal Valve Leak. G. Replace Seals and Spacers and/or
Piston.
3. Unit Used Too Much Salt. A. Improper Salt Setting. A. Check Salt Usage and Salt Setting.
B. Excessive Water in Brine Tank. B. See Problem No. 7.
4. Loss of Water Pressure A. Iron Buildup in Line to Water
Conditioner.
A. Clean Line to Water Conditioner.
B. Iron Buildup in Water Conditioner. B. Clean Control and Add Mineral
Cleaner to Mineral Bed.
Increase Frequency of Regeneration.
C. Inlet of Control Plugged Due to
Foreign Material Broken Loose From
Pipes by Recent Work Done on
Plumbing System.
C. Remove Piston and Clean Control.
5. Loss of Mineral Through Drain Line. A. Air in Water System. A. Assure that Well System has Proper
Air Eliminator Control. Check for Dry
Well Condition.
6. Iron in Conditioned Water. A. Fouled Mineral Bed. A. Check Backwash, Brine Draw and
Brine Tank Fill.
Increase Frequency of Regeneration.
Increase Backwash Time.
7. Excessive Water in Brine Tank. A. Plugged Drain Line Flow Control. A. Clean Flow Control.
B. Plugged Injector System. B. Clean Injector and Screen.
8/8/2019 MODEL 2510 & 2510 ECONOMINDER Installation Instructions
http://slidepdf.com/reader/full/model-2510-2510-econominder-installation-instructions 31/36
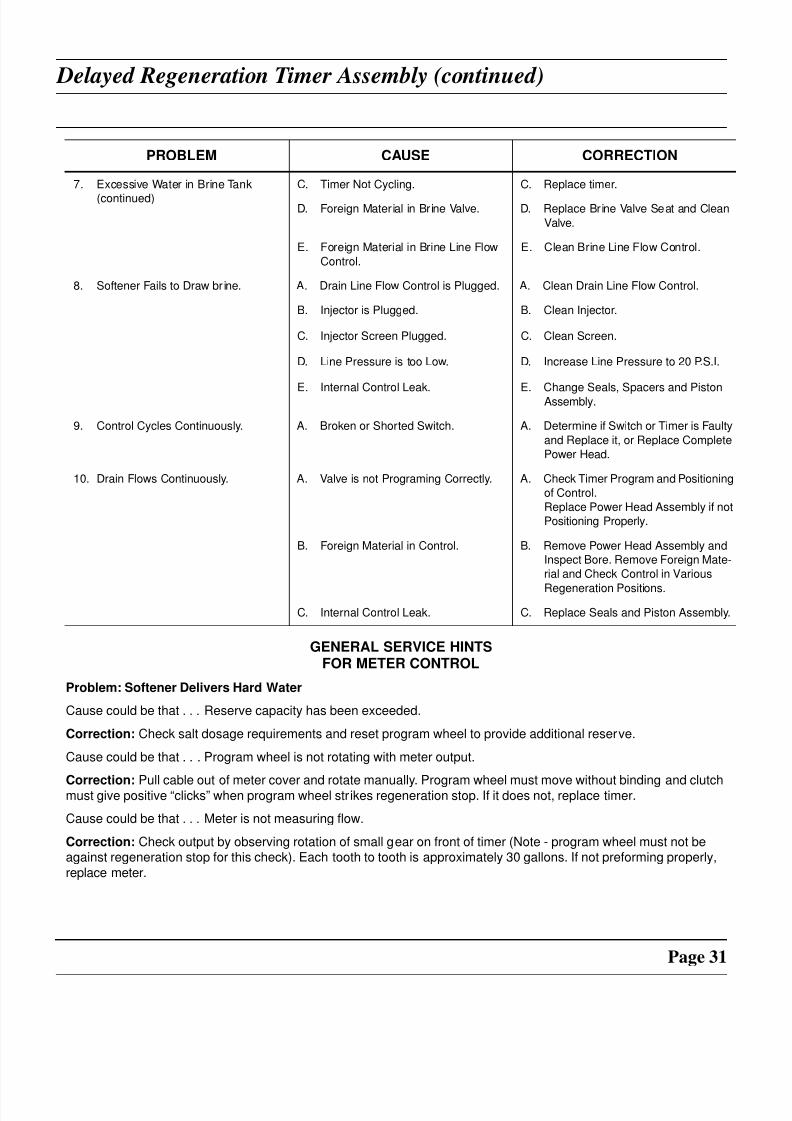
Delayed Regeneration Timer Assembly (continued)
Page 31
GENERAL SERVICE HINTSFOR METER CONTROL
Problem: Softener Delivers Hard Water
Cause could be that . . . Reserve capacity has been exceeded.
Correction: Check salt dosage requirements and reset program wheel to provide additional reserve.
Cause could be that . . . Program wheel is not rotating with meter output.
Correction: Pull cable out of meter cover and rotate manually. Program wheel must move without binding and clutchmust give positive “clicks” when program wheel str ikes regeneration stop. If it does not, replace timer.
Cause could be that . . . Meter is not measuring flow.
Correction: Check output by observing rotation of small gear on front of timer (Note - program wheel must not beagainst regeneration stop for this check). Each tooth to tooth is approximately 30 gallons. If not preforming properly,
replace meter.
7. Excessive Water in Brine Tank
(continued)
C. Timer Not Cycling. C. Replace timer.
D. Foreign Material in Brine Valve. D. Replace Brine Valve Seat and Clean
Valve.
E. Foreign Material in Brine Line Flow
Control.
E. Clean Brine Line Flow Control.
8. Softener Fails to Draw br ine. A. Drain Line Flow Control is Plugged. A. Clean Drain Line Flow Control.
B. Injector is Plugged. B. Clean Injector.
C. Injector Screen Plugged. C. Clean Screen.
D. Line Pressure is too Low. D. Increase Line Pressure to 20 P.S.I.
E. Internal Control Leak. E. Change Seals, Spacers and PistonAssembly.
9. Control Cycles Continuously. A. Broken or Shorted Switch. A. Determine if Switch or Timer is Faulty
and Replace it, or Replace Complete
Power Head.
10. Drain Flows Continuously. A. Valve is not Programing Correctly. A. Check Timer Program and Positioning
of Control.
Replace Power Head Assembly if not
Positioning Properly.
B. Foreign Material in Control. B. Remove Power Head Assembly and
Inspect Bore. Remove Foreign Mate-
rial and Check Control in Various
Regeneration Positions.
C. Internal Control Leak. C. Replace Seals and Piston Assembly.
PROBLEM CAUSE CORRECTION

8/8/2019 MODEL 2510 & 2510 ECONOMINDER Installation Instructions
http://slidepdf.com/reader/full/model-2510-2510-econominder-installation-instructions 32/36
MODEL 2510 & 2510 ECONOMINDER service instructions
Page 32
Tools Used in the Seal and Spacer Replacement
Nut Driver #12664Socket Adapter #16906Socket 7/16” #12665
Seal Hook #12874Puller #13061
Stuffer #11098
All tools are a part of
the Service Repair Kit #60135-2510
ADAPTER
SOCKET
SEAL HOOK
NUT DRIVER
PULLER
STUFFER
8/8/2019 MODEL 2510 & 2510 ECONOMINDER Installation Instructions
http://slidepdf.com/reader/full/model-2510-2510-econominder-installation-instructions 33/36
Delayed Regeneration Timer Assembly (continued)
Page 33
1. Turn off water supply to valve. Next, cycle valve to backwash position, then to service. Now remove electrical plugfrom outlet.
2. Remove control box cover.
3. Disconnect the brine line from the injector housing to the brine valve (if your unit has timed brine tank fill).
4. Remove the two capscrews that hold the back plate to the valve.
5. Grasp the back plate on both sides and slowly pull end plug and piston assembly out of the valve body, (see Fig. 1)and lay aside.
6. Remove the seal first using the wire hook with the finger loop (see Fig.2).
7. The spacer tool (use only for removing the spacers) has three retractable pins, retained by a rubber ring, at oneend; they are retracted or pushed out by pulling or pushing the center button the opposite end.
8. Insert the pin end of the spacer tool into the valve body with the pins retracted (button pulled back). Push the tool
tight against the spacer and push the button in, (see Fig. 3). When the button is pushed in, the pins are pushed outto engage the 1/4 dia. holes in the spacer. Remove the tool from the valve body. The spacer will be on the end. Pullthe center button back, the pins will be retracted and the spacer can be removed from the spacer tool.

8/8/2019 MODEL 2510 & 2510 ECONOMINDER Installation Instructions
http://slidepdf.com/reader/full/model-2510-2510-econominder-installation-instructions 34/36
MODEL 2510 & 2510 ECONOMINDER seal and spacer replacment
Page 34
Figure 1 Removing Power Head And Piston Assembly
Figure 2 Removing Special Tool From Valve Body
After Inserting Seal
INJECTORLINE TO
BRINEVALVE
BRINE VALVE
ASSEMBLY
PISTON
BACK PLATE
SEAL
SEAL
HOOK
INJECTOR
BRINE
TUBE
9. Alternately remove the remaining seals andspacers in accordance with steps No. 6 and 8.
10. The last or end spacer odes not have any holes forthe pins of the spacer tool to engage, therefore if
the end spacer does not come out on the first try, tryagain using the wire hook with the finger loop.
11. To replace seals, spacers and end ring, use specialtool with the brass sleeve on one end. This is a
double-purpose tool., (See Fig. 4). The male endacts as a pilot to hold the spacers as they are
pushed into the valve body and the brass femaleend is used to inser t the seals into the valve body.
12. To restuff a valve body, first take the end ring (theplastic or brass ring without holes), then with your
thumb press the button on the brass sleeve end, thelarge dia. inner portion is now exposed (See Fig. 4).Place the end ring on this pilot with the lip on the
end ring facing the tool, and push the tool into thevalve body bore until it bottoms. While the tool is in
the valve body, take a seal and press it into theinside diameter of the exposed brass female end
(See Fig. 5).
13. Remove the tool, turn it end for end and insert it into
the valve body bore. While holding the large dia. ofthe tool, slide it all the way into the valve body bore
until it bottoms, then push the center button to push
the seal of the tool and leave it in place in the valvebody (See Fig. 6).
14. Remove the tool from the valve body and push the
center on the brass female end to expose the piloton the opposite end. Place a spacer on this end and
insert the spacer and tool into the valve.
8/8/2019 MODEL 2510 & 2510 ECONOMINDER Installation Instructions
http://slidepdf.com/reader/full/model-2510-2510-econominder-installation-instructions 35/36
MODEL 2510 & 2510 ECONOMINDER seal and spacer replacement (continued)
Page 35
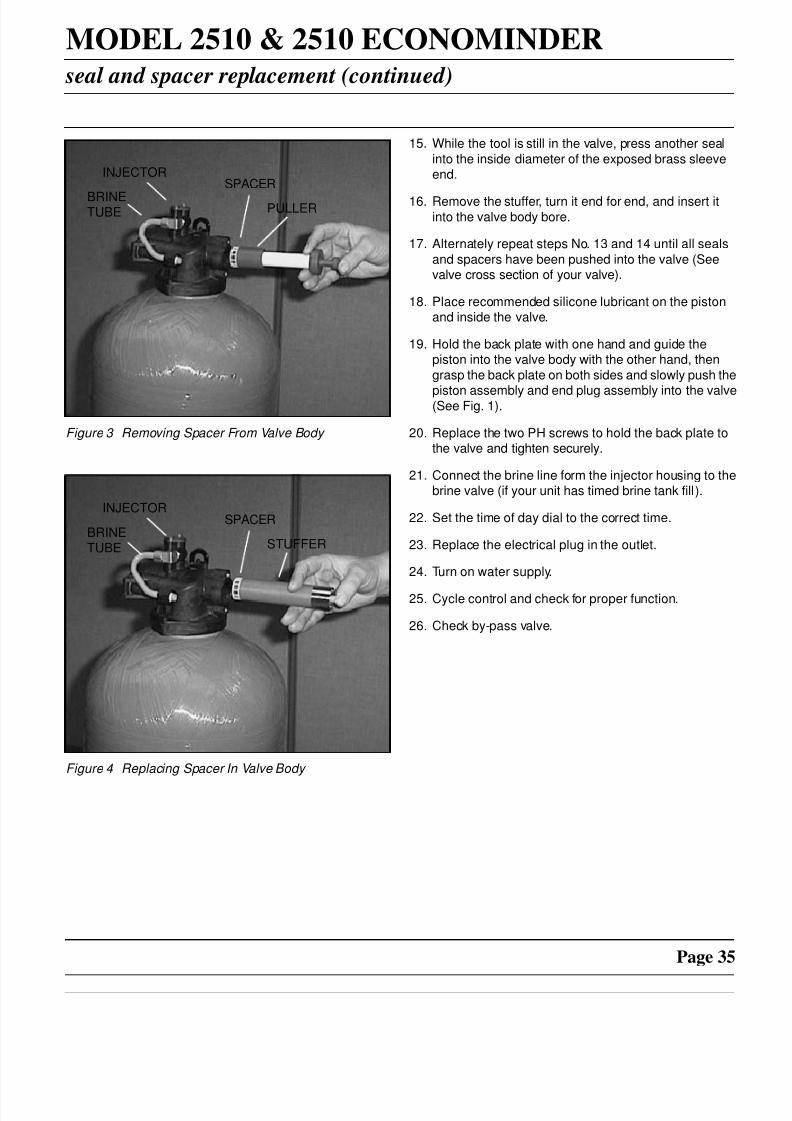
Figure 3 Removing Spacer From Valve Body
Figure 4 Replacing Spacer In Valve Body
PULLER
SPACERINJECTOR
BRINETUBE
BRINETUBE STUFFER
SPACERINJECTOR
15. While the tool is still in the valve, press another seal
into the inside diameter of the exposed brass sleeveend.
16. Remove the stuffer, turn it end for end, and insert itinto the valve body bore.
17. Alternately repeat steps No. 13 and 14 until all seals
and spacers have been pushed into the valve (Seevalve cross section of your valve).
18. Place recommended silicone lubricant on the pistonand inside the valve.
19. Hold the back plate with one hand and guide thepiston into the valve body with the other hand, then
grasp the back plate on both sides and slowly push the
piston assembly and end plug assembly into the valve(See Fig. 1).
20. Replace the two PH screws to hold the back plate tothe valve and tighten securely.
21. Connect the brine line form the injector housing to thebrine valve (if your unit has timed brine tank fill).
22. Set the time of day dial to the correct time.
23. Replace the electrical plug in the outlet.
24. Turn on water supply.
25. Cycle control and check for proper function.
26. Check by-pass valve.

8/8/2019 MODEL 2510 & 2510 ECONOMINDER Installation Instructions
http://slidepdf.com/reader/full/model-2510-2510-econominder-installation-instructions 36/36