Mobile Printer Command Manual - Star Micronics
59
Mobile Printer Command Manual Model : SM-S201, SM-S202 SM-S301, SM-S302 SM-S401, SM-S402 SM-T300, SM-T301, SM-T302 Ver. 1.5
Transcript of Mobile Printer Command Manual - Star Micronics

Mobile Printer
Command Manual
Model : SM-S201, SM-S202 SM-S301, SM-S302 SM-S401, SM-S402
SM-T300, SM-T301, SM-T302
Ver. 1.5

CONTENTS
1. Printer Control Function ..............................................................................................................3
1.1. Print Commands .......................................................................................................................5
1.2. Line Spacing Commands. .........................................................................................................7
1.3. Character Commands................................................................................................................8
1.4. Print Position Commands .......................................................................................................16
1.5. Bit-Image Commands.............................................................................................................26
1.6. Status Commands ...................................................................................................................31
1.7. Barcode Commands................................................................................................................33
1.8. Miscellaneous function commands.........................................................................................43
1.9. Line & box commands............................................................................................................46
1.10. Magnetic Card Reader Commands .......................................................................................47
1.11. Black mark detection commands ..........................................................................................53
1.12. Logo Commands...................................................................................................................54
1.13. Register Initialization Macro Commands ............................................................................55
1.14. Instruction for Auto Power Down mode...............................................................................57
Release History ................................................................................................................................58
2

11.. PPrriinntteerr CCoonnttrrooll FFuunnccttiioonn 11
● Supported Commands List ● Supported Commands List
.. PPrriinntteerr CCoonnttrrooll FFuunnccttiioonn
3
Command Name Function Type Page
HT Horizontal tab Print position 19
LF Print and line feed Print 5
FF Print and return to standard mode Print 6
CAN Cancel print data in page mode Miscellaneous 45
DLE EOT EOT Real-time status transmission Status 32
EOT Exit Magnetic Card Reader Magnetic card reader 48
ESC FF Print data in page mode Print 6
ESC SP Set right-side character spacing Character 8
ESC ! Select print mode Character 10
ESC $ Set absolute print position Print position 16
ESC * Select bit-image mode Bit image 26
ESC - Turn underline mode on/off Character 12
ESC 2 Select default line spacing Line spacing 7
ESC 3 Set line spacing Line spacing 7
ESC @ Initialize printer Miscellaneous 43
ESC D Set horizontal tab positions Print position 19
ESC E Turn emphasized mode on/off Character 13
ESC J Print and feed paper Print 5
ESC L Select page mode Miscellaneous 43
ESC M Set Magnetic Card Reader mode Magnetic card reader 47
ESC O Set print starting position in page mode. Print position 25
ESC P Define the feed distance Black mark 51
ESC R Select an international character set Character 9
ESC S Select standard mode Miscellaneous 44
ESC T Select print direction in page mode Print position 23

Command Name Function Type Page
ESC W Set printing area in page mode Print position 22
ESC X 4 Define user-defined bit-image Bit image 29
ESC X 2 Print user-defined bit-image Bit image 30
ESC Z Print 2D barcode Barcode 38
ESC \ Set relative print position Print position 17
ESC { Turn upside-down printing mode on/off Character 13
ESC a Select justification Print position 18
ESC d Print and feed n lines Print 6
ESC f Print logo stored in the printer memory Logo 54
ESC t Select character code table Character 9
Transmit printer status Status ESC v 31
ESC z ESC y Feed the paper to the feed distance setting
4
Black mark 53
GS ! Select character size Character 14
GS $ Set absolute vertical print position in page mode Print position 24
GS B Turn on/off white/black reverse printing mode Character 15
GS H Select printing position of HRI characters Barcode 37
GS L Set left margin Print position 20
GS W Set printing area width Print position 21
GS Z Select 2D Barcode Barcode 38
GS \ Set relative vertical print position in page mode Print position 25
GS i Print box & line in page mode line & Box 46
GS h Set barcode height Barcode 33
GS k Print barcode Barcode 35
GS w Set barcode width Barcode 34
ESC FS + Register Initialization Macro Macro 55

11..11.. PPrriinntt CCoommmmaannddss 11
..11.. PPrriinntt CCoommmmaannddss
STAR Printer supports the following commands for printing character and advancing
paper.
CCoommmmaanndd NNaamme
5
e
LF Print and line feed
ESC J Print and feed paper
ESC d Print and feed n lines
FF Print and return to standard mode (in page mode)
ESC FF Print data in page mode
LF
[Name] Print and line feed
[Format] ASCII LF
HEX 0A
Decimal 10
[Description] Prints the data in the print buffer and feeds one line based on the
current line spacing.
[Note] This command sets the print position to the beginning of the line.
[Reference] ESC 2, ESC 3
ESC J n
[Name] Print and feed paper.
[Format] ASCII ESC J n
HEX 1B 4A n
Decimal 27 74 n
[Range] 0 ≤ n ≤ 255
[Description] Prints the data in the print buffer and feeds the paper n dots.

6
ESC d n
[Name] Print and feed n lines
[Format] ASCII ESC d n
HEX 1B 64 n
Decimal 27 100 n
[Range] 0 ≤ n ≤ 255
[Description] Prints the data in the print buffer and feeds n lines (text line).
[Note] 1) This command sets the print starting position to the beginning of the line.
2) This command affects the line spacing set by ESC 2 or ESC 3.
[Reference] ESC 2, ESC 3
FF
[Name] Print and return to standard mode in page mode.
[Format] ASCII FF
HEX 0C
Decimal 12
[Description] Prints the data in the print buffer collectively and returns to standard mode.
[Note] 1) The buffer data is deleted after being printed.
2) The printing area set by ESC W is reset to the default setting.
3) This command sets the print position to the beginning of the line.
4) This command is enabled only in page mode.
[Reference] ESC FF, ESC L, ESC S
ESC FF
[Name] Print data in page mode.
[Format] ASCII ESC FF
HEX 1B 0C
Decimal 27 12
[Description] In page mode, prints all buffered data in the printing area collectively.
[Note] This command is enabled only in page mode.
After printing the printer does not clear the buffered data, setting values for
ESC T and ESC W, and the position for buffering.
[Reference] FF, ESC L, ESC S

11..22.. LLiinnee SSppaacciinngg CCoommmmaannddss.. 11
..22.. LLiinnee SSppaacciinngg CCoommmmaannddss..
STAR Printer supports the following commands for setting line spacing.
These commands only set the line spacing; they do not actually advance the paper.
The line spacing set using these commands affects the results of LF and ESC d.
CCoommmmaanndd NNaamme
7
e
ESC 2 Select default line spacing
ESC 3 Set line spacing
ESC 2
[Name] Select default line spacing
[Format] ASCII ESC 2
HEX 1B 32
Decimal 27 50
[Description] Selects 30 dots (approximately 3.75mm) spacing.
[Note] The line spacing can be set independently in standard mode and in page mode.
[Reference] ESC 3
ESC 3 n
[Name] Set line spacing
[Format] ASCII ESC 3 n
HEX 1B 33 n
Decimal 27 51 n
[Range] 0 ≤ n ≤ 255
[Description] Sets the line spacing to n dots.
[Note] The line spacing can be set independently in standard mode and in page mode.
[Reference] ESC 2

11..33.. CChhaarraacctteerr CCoommmmaannddss 11
..33.. CChhaarraacctteerr CCoommmmaannddss
STAR Printer supports the following commands for setting character font and size.
CCoommmmaanndd NNaammee
ESC SP Set right-side character spacing
ESC R Select an international character set
ESC t Select character code table
ESC ! Select print mode
ESC - Turn underline mode on/off
ESC E Turn emphasized mode on/off
ESC { Turn upside-down mode on/off
GS ! Select character size
GS B Turn white/black reverse printing mode on/off
ESC SP n
[Name] Set right-side character spacing.
[Format] ASCII ESC SP n
HEX 1B 20 n
Decimal 27 32 n
[Range] 0 ≤ n ≤ 255
[Description] Sets the character spacing for the right side of the character to n dots.
[Note] 1) The right side character spacing for double-width mode is twice the normal value.
When characters are enlarged, the right side character spacing is also enlarged.
2) This command sets values independently in page or standard mode.
[Default] n = 0
8

[Note] See the ANK FONT character code table (in a separate document)..
ESC R n
[Name] Select an international character set.
[Format] ASCII ESC R n
HEX 1B 52 n
Decimal 27 82 n
[Range] 0 ≤ n ≤ 10
[Description] Selects an international character set n from the following table.
[Default] n = 0
ESC t n
[Name] Select character code table.
[Format] ASCII ESC t n
HEX 1B 74 n
Decimal 27 116 n
[Range] 0 ≤ n ≤ 17
[Description] Selects a code page n from the character code table as follows.
The alphanumeric characters (20H (decimal 32) to 7FH (decimal 127)) are the same for each page.
The extended characters (80H (decimal 128) to FFH (decimal 255)) are different for each page.
[Note] See the ANK FONT character code table (in a separate document)..
[Default] n = 0
n Character set n Character set n Character set
0 U.S.A 5 Sweden 10 Denmark II
1 France 6 Italy
2 Germany 7 Spain
3 U.K 8 Japan
4 Denmark I 9 Norway
9

n Character Code Table
0 Page 0 [ PC437 (USA, Standard Europe) ]
1 Page 1 [ Katakana ]
2 Page 2 [ Multilingual PC858 ]
3 Page 3 [ Portuguese PC860 ]
4 Page 4 [ Canadian-French PC863 ]
5 Page 5 [ Nordic PC865 ]
6 Page 6 [ Slavic (Latin-2) PC852]
7 Page 7 [ Icelandic PC861 ]
8 Page 8 [ Cyrillic Russian PC866 ]
9 Page 9 [ Cyrillic PC855 ]
10 Page 10 [ Turkish (Latin #5) PC857 ]
11 Page 11 [ Israel (Hebrew) PC862 ]
12 Page 12 [ Arabic PC864 ]
13 Page 13 [ Greek PC737 ]
14 Page 14 [ Lithuanian PC772 ]
15 Page 15 [ Lithuanian PC774 ]
16 Page 16 [ Thailand PC874 ]
17 Page 17 [ Windows Latin-1 PC1252 ]
ESC ! n
[Name] Select print mode.
[Format] ASCII ESC ! n
HEX 1B 21 n
Decimal 27 33 n
10
[Range] 0 ≤ n ≤ 255

[Description] Select print mode(s) using n as follows.
[Note] 1) When both double-height and double-width modes are selected, quadruple
size characters are printed.
2) The printer can underline all characters, but can not underline the space set By HT.
3) The thickness of the underline is that selected by ESC -, regardless of the
character size.
4) ESC - can also turn on or off underline mode. However, the setting of the last
received command is effective.
5) GS ! can also select character size. However, the setting of the last received
command is effective.
[Default] n = 0
[Reference] ESC -, ESC E, GS !
Bit Binary Hex Function
xxxx x000 00 Character font A (12 x 24)
xxxx x001 01 Character font B (9 x 24)
xxxx x010 02 Character font C (8 x 16)
xxxx x011 03 Reserved
xxxx x100 04 Reserved
xxxx x101 05 Reserved
xxxx x110 06 Reserved
0 ~ 2
xxxx x111 07 Reserved
xxxx 0xxx 00 Emphasized mode not selected 3
xxxx 1xxx 08 Emphasized mode selected
xxx0 xxxx 00 Double-height mode not selected 4
xxx1 xxxx 10 Double-height mode selected
xx0x xxxx 00 Double-width mode not selected 5
xx1x xxxx 20 Double-width mode selected
x0xx xxxx 00 Reserved 6
x1xx xxxx 40 Reserved
0xxx xxxx 00 Underline mode not selected 7
1xxx xxxx 80
11
Underline mode selected

12
ESC - n
[Name] Turn underline mode on/off
[Format] ASCII ESC - n
HEX 1B 2D n
Decimal 27 45 n
[Range] 0 ≤ n ≤ 2
48 ≤ n ≤ 50
[Description] Turns underline mode on or off, based on the following values of n;
[Notes] 1) The printer can underline all characters (including right-side character spacing),
but cannot underline the space set by HT.
2) The printer cannot underline white/black inverted characters.
3) When underline mode is turned off by setting the value of n to 0 or 48, the
following data is not underlined, and the underline thickness set before the mode is
turned off does not change.
The default underline thickness is 1 dot.
4) Changing the character size does not affect the current underline thickness
5) Underline mode can also be turned on or off by using ESC !.
However, that the last received command is effective.
[Default] n = 0
[Reference] ESC !
n Function
0, 48 Turns off underline mode
1. 49 Turns on underline mode (1 dot thick).
2, 50 Turns on underline mode (2 dot thick)

13
ESC E n
[Name] Turn emphasized mode on/off.
[Format] ASCII ESC E n
HEX 1B 45 n
Decimal 27 69 n
[Range] 0 ≤ n ≤ 255
[Description] Turns emphasized mode on or off.
When the LSB(least significant bit) is 0, emphasized mode is turned off.
When the LSB(least significant bit) is 1, emphasized mode is turned on.
[Note] 1) Only the least significant bit of n is available.
2) This command and ESC ! turn on and off emphasized mode in the same way.
Be careful when this command is used with ESC !.
[Default] n = 0
[Reference] ESC !
ESC { n
[Name] Turn upside-down printing mode on/off.
[Format] ASCII ESC { n
HEX 1B 7B n
Decimal 27 123 n
[Range] 0 ≤ n ≤ 255
[Description] Turns upside-down printing mode on or off
When the LSB is 0, upside-down mode is turned off.
When the LSB is 1, upside-down mode is turned on.
[Note] 1) Only the least significant bit of n is available.
2) This command is enabled only when processed at the beginning of a line in
standard mode.
3) When this command is input in page mode, the printer performs only internal flag
operations.

14
4) This command does not affect printing in page mode.
5) In upside-down printing mode, the printer rotates the line to be printed by 180 degree
and then prints it.
[Default] n = 0
[Example]
GS ! n
[Name] Select character size
[Format] ASCII GS ! n
HEX 1D 21 n
Decimal 29 33 n
[Range] 0 ≤ bit0~2 ≤ 7, 0 ≤ bit4~6≤ 7
[Description] (1 ≤ vertical number of times normal font size ≤ 8,
1 ≤ horizontal number of times normal font size ≤ 8)
Selects the character height using bits 0 to 2 and selects the character width using
bit 4 to 6, as follows;
[Notes] 1) This command is effective for all characters.
2) The bit 3 and bit 7 are ignored.
3) In standard mode, the vertical direction is the paper feed direction, and the
horizontal direction is perpendicular to the paper feed direction.
4) In page mode, vertical and horizontal directions are based on the character
orientation.
5) The ESC ! command can also turn double width and double height modes on or off.
6) When there are characters with different heights in the same line, the
characters are top justified.

[Default] n = 0
[Reference] ESC !
GS B n
[Name] Turn white/black reverse printing mode on/off.
[Format] ASCII GS B n
HEX 1D 42 n
Decimal 29 66 n
[Range] 0 ≤ n ≤ 255
[Description] Turns White/Black reverse printing mode on or off.
[Notes] 1) When the LSB is 0, white/black reverse printing mode is turned off.
2) When the LSB is 1, white/black reverse printing mode is turned on.
3) Only the lowest bit of n is valid.
4) This command is available for built in characters and user defined characters.
5) When white/black reverse printing mode is on, it also applied to character
spacing set by ESC SP.
6) This command does not affect the space between lines.
7) White/black reverse mode has a higher priority than underline mode.
Even if underline mode is on, it is disabled (but not canceled) when white/black
reverse mode is selected.
[Default] n = 0
Hex Decimal Height
00 0 1 (normal)
Hex Decimal Width
00 0 1 (normal)
10 16 2 (double Width)
20 32 3
30 48 4
40 64 5
50 80 6
60 96 7
70 112 8
Character Width Selection
01
15
1 2 (double Height)
02 2 3
03 3 4
04 4 5
05 5 6
06 6 7
07 7 8
Character Height Selection

11..44.. PPrriinntt PPoossiittiioonn CCoommmmaannddss 11
[Reference] ESC \, GS $, GS \ [Reference] ESC \, GS $, GS \
..44.. PPrriinntt PPoossiittiioonn CCoommmmaannddss
STAR Printer supports the following commands for setting the print position
CCoommmmaanndd NNaammee
ESC $ Set absolute print position
ESC \ Set relative print position
ESC a Select justification
HT Horizontal tab
ESC D Set horizontal tab positions
GS L Set left margin
GS W Set printing area width
ESC W Set printing area in page mode
ESC T Select print direction in page mode
GS $ Set absolute vertical print position in page mode
GS \ Set relative vertical print position in page mode
ESC O Set print starting position.
ESC $ nL nH
[Name] Set absolute print position
16
[Format] ASCII ESC $ nL nH
HEX 1B 24 nL nH
Decimal 27 36 nL nH
[Range] 0 ≤ nL ≤ 255
0 ≤ nH ≤ 255
[Description] Set the print starting position based on the beginning of the line.
[Notes] 1) This command moves the print starting position to (nL + nH * 256) dots
from the beginning of the line.
2) Any setting that exceeds the printable area is ignored.
[Reference] ESC \, GS $, GS \

17
ESC \ nL nH
[Name] Set relative print position
[Format] ASCII ESC \ nL nH
HEX 1B 5C nL nH
Decimal 27 92 nL nH
[Range] 0 ≤ nL ≤ 255,
0 ≤ nH ≤ 255
[Description] Set the print starting position based on the current position
[Notes] 1) This command moves the print starting position to (nL + nH * 256) dots
from the current position.
2) Any setting that exceeds the printable are is ignored
3) When pitch N is specified to the right, nL + nH * 256 = N
When pitch N is specified to the left (the negative direction), use the complement
of 65536.
[Reference] ESC $ \, GS $, GS \

18
ESC a n
[Name] Select justification
[Format] ASCII ESC a n
HEX 1B 61 n
Decimal 27 97 n
[Range] 0 ≤ n ≤ 2
48 ≤ n ≤ 50
[Description] Aligns the character data in one line to the specified position.
n selects the type of justification as follows;
[Notes] 1) The command is enabled only when processed at the beginning of the line in
standard mode.
2) If this command is input in page mode, the printer performs only internal
flag operations.
3) This command has no effect in page mode.
4) This command executes justification in the area between the current position
and the end of printing area.
5) This command is available only with text data.
6) When this command is used, HT, ESC $ or ESC \ can not be used.
7) When this command is used, the top of line data has to be text data.
[Default] n = 0
[Example]
n Justification
0, 48 Left justification
1, 49 Center justification
2, 50 Right justification

19
HT
[Name] Horizontal Tab
[Format] ASCII HT
HEX 09
Decimal 9
[Description] Moves the print position to the next horizontal tab position.
[Note] 1) This command is ignored unless the next horizontal tab position has been set.
2) If the next horizontal tab position exceeds the printing area, the printer executes
buffer-full printing of the current line and horizontal tab processing from the
beginning of the next line.
3) Horizontal tab positions are set with ESC D.
4) The default tab positions are every 0 characters.
[Reference] ESC D
ESC D n1…nk NUL
[Name] Set horizontal tab positions.
[Format] ASCII ESC D n1…nk NUL
HEX 1B 44 n1…nk 00
Decimal 27 68 n1…nk 0
[Range] 1 ≤ n ≤ 255, 1 ≤ k ≤ 32
[Description] Set horizontal tab position
[Notes] 1) n specifies the column number from the beginning of the line.
2) k indicates the total number of horizontal tab positions to be set.
3) This command cancels the previous horizontal tab settings.
4) When setting n=8, the print position is moved to column 9 by sending HT.
5) Data exceeding 32 tab positions is processed as normal data.
6) Transmit [n]k in ascending order and place a NUL(00H) at the end.
7) When [n]k is less than or equal to the preceding value [n]k-1, tab setting is
finished and the following data is processed as normal data.
8) ESC D NUL cancels all horizontal tab positions.
[Default] The default tab positions are at intervals of 0 characters.
[Reference] HT

20
GS L nL nH
[Name] Set left margin.
[Format] ASCII GS L nL nH
HEX 1D 4C nL nH
Decimal 29 76 nL nH
[Range] 0 ≤ nL ≤ 255, 0 ≤ nH ≤ 255
[Description] Set the left margin using nL and nH.
[Notes] 1) The left margin is set to (nL + nH *256) dots.
2) In page mode, the printer performs only internal flag operations.
3) This command does not affect printing in page mode.
4) If the setting exceeds the printable area, this command is ignored.
5) If any data in buffer exists the printer prints out the data and then executes this
command.( It’s same as <CR> <GS> L)
[Default] nL = 0, nH = 0
[Reference] GS W

21
GS W nL nH
[Name] Set printing area width
[Format] ASCII GS W nL nH
HEX 1D 57 nL nH
Decimal 29 87 nL nH
[Range] 0 ≤ nL ≤ 255, 0 ≤ nH ≤ 255
[Description] Sets the printing area width to the area specified by nL and nH.
[Notes] 1) The printing area width is set to (nL+nH *256) dots.
2) In page mode, the printer performs only internal flag operations.
3) This command does not affect printing in page mode.
4) If the [left margin + printing area width] exceeds the printable area,
this command is ignored.
5) If any data in buffer exists the printer prints out the data and then executes this
command.( It’s same as <CR> <GS> W )
[Default] 2 inch product : nL = 128, nH = 1
3 inch product : nL = 64, nH = 2
4 inch product : nL = 64, nH = 3
[Reference] GS L

ESC W xL xH yL yH dxL dxH dyL dyH
[Name] Set printing area in page mode
[Format] ASCII ESC W xL xH yL yH dxL dxH dyL dyH
HEX 1B 57 xL xH yL yH dxL dxH dyL dyH
Decimal 27 87 xL xH yL yH dxL dxH dyL dyH
[Range] 0 ≤ xL,xH,yL,yH,dxL,dxH,dyL,dyH ≤255
(except for dxL=dxH=0 or dyL=dyH=0)
[Description] Sets the size and position of the printing area in page mode as follows:
Horizontal starting position (x) = (xL + xH * 256)
Vertical starting position (y) = (yL +yH * 256)
Printing area width (dx) = (dxL + dxH * 256)
Printing area height (dy) = (dyL + dyH * 256)
The printing area is set as shown in the figure below.
[Note] 1) In standard mode, the printer executes only internal flag operation.
2) If the horizontal or vertical starting position is set outside the printable area or
if the printing area width or height is set to 0, this command is ignored.
3) If (x + dx > printable area), the printing area width is set to (printable area - x).
4) If (y + dy > printable area), the printing area height is set to (printable area - y).
[Default] xL = xH = yL = yH = 0
2 inch product : dxL = 128, dxH = 1
3 inch product : dxL = 64, dxH = 2
4 inch product : dxL = 64, dxH = 3
dyL = 96, dyH = 9
[Reference] CAN, ESC L, ESC T
22

ESC T n
[Name] Select print direction in page mode
[Format] ASCII ESC T n
HEX 1B 54 n
Decimal 27 84 n
[Range] 0 ≤ n ≤ 3 or 48 ≤ n ≤51
[Description] Selects the print direction and starting position in page mode.
n specifies the print direction and starting position as follows;
[Notes] 1) In standard mode, the printer executes only internal flag operation.
2) This command sets the direction and starting position in the printing area
set by ESC W.
3) If the starting position is the upper left or lower right of the printing area, data is
buffered in the direction perpendicular to the paper feed direction.
4) If the starting position is the upper right or lower left of the printing area, data is
buffered in the paper feed direction.
[Default] n = 0
[Reference] ESC $, ESC L, ESC W, ESC \, GS $, GS \
n PPrriinntt
Starting position ddiirreeccttiioonn
0,48 Left to right Upper left
(A in the figure)
1,49 Bottom to Lower left
top (B in the figure)
2,50 Right to left Lower right
(C in the figure)
3,51 Top to
bottom
Upper right
(D in the figure)
23

GS $ nL nH
[Name] Set absolute vertical print position in page mode.
[Format] ASCII GS $ nL nH
HEX 1D 24 nL nH
Decimal 29 36 nL nH
[Range] 0 ≤ nL ≤ 255, 0 ≤ nH ≤ 255
[Description] Sets the absolute vertical print starting position for buffered data in page mode.
[Notes] 1) This command sets the absolute print position to (nL+nH * 256) dots.
2) This command is effective only in page mode.
3) If the position exceeds the specified printing area, this command is ignored.
4) This command operates depending on the print starting position set by ESC T.
When the starting position is set to the upper left or lower right, this command sets
the absolute position in the vertical direction.
When the starting position is set to the upper right or lower left, this command sets
the absolute position in the horizontal direction.
[Reference] ESC $, ESC T, ESC W, ESC \, GS \
24

GS \ nL nH
[Name] Set relative vertical print position in page mode
[Format] ASCII GS \ nL nH
HEX 1D 5C nL nH
Decimal 29 92 nL nH
[Range] 0 ≤ nL ≤ 255, 0 ≤ nH ≤ 255
[Description] Sets the relative vertical print starting position from the current position.
[Notes] 1) This command moves the vertical print starting position to (nL + nH * 256) dots
from the current vertical printing position.
2) This command is effective only in page mode.
3) When pitch N is specified to the movement downward; nL + nH * 256 = N
When pitch N is specified to the movement upward (the negative direction), use the
complement of 65536. (nL + nH * 256 = 65536 - N)
4) Any setting that exceeds the specified printing area is ignored.
5) This command operates depending on the print starting position set by ESC T.
When the starting position is set to the upper left or lower right, this command sets
the relative position in the vertical direction.
When the starting position is set to the upper right or lower left, this command sets
the relative position in the horizontal direction.
[Reference] ESC $, ESC T, ESC W, ESC \, GS $,
ESC O xL xH yL yH
[Name] Set print starting position in page mode.
[Format] ASCII ESC O xL xH yL yH
HEX 1B 4F xL xH yL yH
Decimal 27 79 xL xH yL yH
[Description] Set horizontal starting position and vertical starting position in page mode.
Horizontal starting position = xL + xH * 256
Vertical starting position = yL + yH * 256
[Note] This command is effective only in page mode.
25

11..55.. BBiitt--IImmaaggee CCoommmmaannddss 11
..55.. BBiitt--IImmaaggee CCoommmmaannddss
STAR Printer supports the following bit-image command.
CCoommmmaanndd NNaammee
ESC * Select bit image mode
ESC X 4 Define user-defined bit image
ESC * m nL nH d1 dk
[Name] Select bit-image mode.
[Format] ASCII ESC * m nL nH d1…dk
HEX 1B 2A m nL nH d1…dk
Decimal 27 42 m nL nH d1…dk
[Range] m = 0,1,32,33
0 ≤ nL ≤ 255
0 ≤ nH ≤ 3
0 ≤ d ≤ 255
[Description] Selects a bit-image mode using m for the number of dots specified by nL and nH,
as follows:
Vertical direction Horizontal direction
m mode Number
of Dots Dot density Dot density Number of Data
0 8 dot single density 8 68 DPI 102 DPI nL+nH*256
1 8 dot double density 8 68 DPI 203 DPI nL+nH*256
32 24 dot single density 24 203 DPI 102 DPI (nL+nH*256)*3
33 24 dot double density 24 203 DPI 203 DPI (nL+nH*256)*3
26
[Notes] 1) If the values of m is out of the specified range, nL and data following are
processed an normal data.
2) The nL and nH indicate the number of dots of the bit image in the horizontal
direction.
3) The number of dots is calculated by nL + nH * 256.
4) If the bit-image data input exceeds the number of dots to be printed on a line, the
excess data is ignored.
5) d indicates the bit-image data. set a corresponding bit to 1 to print a dot or to 0 to
not print a dot.
6) After printing a bit image, the printer returns to normal data processing mode.
7) This command is not affected by print modes (emphasized, underline,
character size or White/Black reverse printing), except upside-down printing mode.
8) The relationship between the image data and the dots to be printed is as follows;
27

- When 8-dot bit image is selected
- When 24-dot bit image is selected
28

ESC X 4 x y d1…dk
[Name] Define user-defined bit-image
[Format] ASCII ESC X 4 x y d1…dk
HEX 1B 58 34 x y d1…dk
Decimal 27 88 52 x y d1…dk
[Description] ESC X 4 x y d1 ... d(x * y) defines a user-defined bit image using x.
8 dots in the horizontal direction and y dots in the vertical direction.
- Horizontal direction dots = (x * 8)dots
- Vertical direction dots = (y)dots
[Note] There are two methods to print a user-defined bit image using the ESC X 4
command:
1. Send the ESC X 2 command (Recommended)
2. Send one LF command
Note: If the image is triggered by the LF command, a one line gap will
appear between images that are printed continuously
29

[Reference] ESC W, ESC O, FF
ESC X 2 y
[Name] Print user-defined bit-image
[Format] ASCII ESC X 2 y
HEX 1B 58 32 y
Decimal 27 88 50 y
[Range] 1 <= y < = 255
[Description] ESC X 2 command is for printing Bit-Image.
The value of y must be same as the value of y of ESC X 4.
[Note] 1) Defined bit-image can be printed by this command, and if image is continuously
printed by it there will be no gap between images.
2) To perform efficient (high throughput) print, use this command instead of ESC X 4
with LF command.
30

11..66.. SSttaattuuss CCoommmmaannddss 11
..66.. SSttaattuuss CCoommmmaannddss
STAR Printer supports the following status commands.
CCoommmmaanndd NNaammee
ESC v Transmit printer status
DLE EOT EOT Real-time printer status transmission
ESC v
[Name] Transmit printer status
[Format] ASCII ESC v
HEX 1B 76
Decimal 27 118
[Description] Transmits the printer status.
○1 SM-S2xx(SC40N), SM-S4xx(WC40)
These products have only one paper sensor.
Therefore the printer status means paper in or paper out.
Normal status value is 0(30H).
Printer Status
Paper IN Paper OUT
0 (30H) 1 (31H)
31

○2 SM-Txx(i350), SM-S3xx(SWC40)
The SM-Txx(i350) has paper sensor, mark sensor and cover sensor.
The SM-S3xx(SWC40) has paper sensor and mark sensor but cover sensor
is optional.
Normal status value is 0(30H) or 4(34H).
[Reference] DLE EOT EOT
DLE EOT EOT
[Name] Real-time printer status transmission
[Format] ASCII DLE EOT EOT
HEX 10 04 04
Decimal 16 4 4
[Description] Transmits real time printer status.
[Notes] The printer status value is same as ESC v.
[Reference] ESC v
Bit 0 / 1 Status
0 Paper sensor : paper present 0
1 Paper sensor : paper not present
0 Cover sensor : cover closed 1
1 Cover sensor : cover opened
0 Mark sensor : Not used 2
1 Mark sensor : Not used
3 - Not used
4 1 Fixed
5 1 Fixed
6 - Not used
7 - Not used
32

11..77.. BBaarrccooddee CCoommmmaannddss 11
..77.. BBaarrccooddee CCoommmmaannddss
STAR Printer supports the following barcode commands.
CCoommmmaanndd NNaammee
GS h Set barcode height
GS w Set barcode width
GS k Print bar code
GS H Turn Human Readable Interpretation (HRI) characters print mode on/off.
GS h n
[Name] Set barcode height
[Format] ASCII GS h n
HEX 1D 68 n
Decimal 29 104 n
[Range] 0 ≤ n ≤ 255
[Description] Sets the height of a barcode by dot unit.
[Default] n = 60
33

GS w n
[Name] Set barcode width
[Format] ASCII GS w n
HEX 1D 77 n
Decimal 29 119 n
[Range] 1 ≤ n ≤ 8
[Description] Sets the width of a barcode by dot unit.
If the value of n is out of area, this command is ignored.
[Note] This command affects to PDF417 code print.
[Default] n = 2
Binary Level Barcode
n Multi – Level Barcode Module
Thin Element width(mm) Thick Element width(mm)
width(mm)
1 0.125 0.125 0.375 (= 0.125 * 3 )
2 0.25 0.25 0.625 ( = 0.25 * 2.5 )
3 0.375 0.375 1.125 ( = 0.375 * 3 )
4 0.5 0.5 1.25 ( = 0.5 * 2.5 )
5 0.625 0.625 1.875 ( = 0.625 * 3 )
6 0.75 0.75 1.875 ( = 0.75 * 2.5 )
7 0.875 0.875 2.625 ( = 0.875 * 3 )
8 1.0 1.0 2.5 ( = 1.0 * 2.5 )
34

GS k m d1…dk NUL GS k m n d1…dn
[Name] Print barcode
[Format] ASCII GS k m d1…dk NUL
HEX 1D 6B m d1…dk 00
Decimal 29 107 m d1…dk 0
ASCII GS k m n d1…dn
HEX 1D 6B m n d1…dn
Decimal 29 107 m n d1…dn
[Range] 0 ≤ m ≤ 6 (k and d depends on the bar code system used.)
65 ≤ m ≤ 73 (n and d depends on the bar code system used.)
[Description] Selects a barcode system and print the barcode.
Each m specifies a barcode system as follows;
GS k m d1…dk NUL
m Barcode System Range of k Range of d
0 UPC-A 11 ≤ k ≤ 12 48 ≤ d ≤ 57
1 UPC-E 11 ≤ k ≤ 12 48 ≤ d ≤ 57
2 EAN13 11 ≤ k ≤ 13 48 ≤ d ≤ 57
3 EAN8 7 ≤ k ≤ 8 48 ≤ d ≤ 57
4 CODE39 1 ≤ k 48 ≤ d ≤ 57, 65 ≤ d ≤ 90,
d = 32, 36, 37, 43, 45, 46,47
5 ITF 1 ≤ k (even number) 48 ≤ d ≤ 57
6 CODABAR 1 ≤ k 48 ≤ d ≤ 57, 65 ≤ d ≤ 68,
d = 36, 43, 45, 46, 47, 58
35

GS k m n d1…dn
[Notes] 1) The GS k m d1…dk NUL command must be terminated by NUL.
2) In the GS k m n d1…dn command, n is the number of data.
3) When the number of data for ITF barcode is odd, the printer adds 0 (30H)
in front of the first data.
4) Be sure to keep spaces on both right and left sides of a bar code.
Spaces are different depending on the type of the bar code.
5) For the UPC-A, EAN8, and EAN13 barcode systems, if you do not specify
a check digit for the data, the printer will automatically add one.
If you specify a check digit, the barcode will be created with that value,
even if it is incorrect.
[Reference] GS h, GS w, GS H, ESC L, ESC W, ESC FF
m Barcode System Range of k Range of d
65 11 ≤ n ≤ 12 48 ≤ d ≤ 57 UPC-A
66 11 ≤ n ≤ 12 48 ≤ d ≤ 57 UPC-E
67 11 ≤ n ≤ 13 48 ≤ d ≤ 57 EAN13
68 7 ≤ n ≤ 8 48 ≤ d ≤ 57 EAN8
69 1 ≤ n ≤ 255 CODE39 48 ≤ d ≤ 57, 65 ≤ d ≤ 90,
d = 32, 36, 37, 43, 45, 46,47
70 1 ≤ n ≤ 255 (even number) 48 ≤ d ≤ 57 ITF
71 CODABAR 1 ≤ n ≤ 255 48 ≤ d ≤ 57, 65 ≤ d ≤ 68,
d = 36, 43, 45, 46, 47, 58
72 CODE93 1 ≤ n ≤ 255 0 ≤ d ≤ 127
73
0 ≤ d ≤ 127
d=C1H (FNC1)
2 ≤ n ≤ 255 CODE128 d=C2H (FNC2)
d=C3H (FNC3)
d=C4H (FNC4)
36

GS H n
[Name] Turn HRI characters print mode on/off
[Format] ASCII GS H n
HEX 1D 48 n
Decimal 29 72 n
[Range] n = 0, 1, 48 or 49
[Description] Turns HRI characters print mode on or off.
When the LSB(least significant bit) of n is 1, the mode is turned on;
When the LSB is 0, the mode is turned off.
[Note] This command affects to PDF417 code print.
[Default] n = 0
37

]
GS Z n
[Name] Select 2D barcode type
[Format] ASCII GS Z n
HEX 1D 5A n
Decimal 27 90 n
[Range] n=0 : PDF417 (default)
n=1 : DATAMATRIX (ECC200)
n=2 : QR-CODE
ESC Z m n k d d1…dn
[Name] Print 2D barcode
[Format] ASCII ESC Z m n k d d1…dn
HEX 1B 5A m n k d d1…dn
Decimal 27 90 m n k d d1…dn
[Description] PDF417 :
m specifies column number of 2D bar code. (1 ≤ m ≤ 30)
n specifies security level to restore when bar code image is damaged.( 0 ≤ n ≤ 8)
k is used for define horizontal and vertical ratio.( 2 ≤ k ≤ 5)
d is consist of 2 byte. 1st byte is lower number and 2nd byte is upper number.
The size of PDF417 is influenced by barcode width command (GS w n ).
38

39
DATAMATRIX (ECC200) :
m specifies height of the symbol. (0:auto size)
n specifies width of the symbol. (0:auto size)
k specifies module size. (1~8)
d is consist of 2 byte. 1st byte is lower number and 2nd byte is upper number.
When m or n is 0, the printer selects the barcode size automatically.
The auto sized method are recommended.
<< Table for DATAMATRIX (ECC200) size >>
Symbol - size Capacity (bytes)
Row Column Numeric Alpa-numeric Byte (8bit) ECC(%) Remark
10 10 6 3 3 62.5
12 12 10 6 5 58.3
8 18 10 6 5 58.3 rectangular
14 14 16 9 8 55.6
8 32 20 12 10 52.4 rectangular
16 16 24 15 12 50.0
12 26 32 21 16 46.7 rectangular
18 18 36 24 18 43.8
20 20 44 30 22 45.0
12 36 44 30 22 45.0 rectangular
22 22 60 42 30 40.0
16 36 34 45 32 42.9 rectangular
24 24 72 51 36 40.0
26 26 88 63 44 38.9
16 48 98 72 49 36.4 rectangular
32 32 124 90 62 36.7
36 36 172 126 86 32.8
40 40 228 168 114 29.6
44 44 288 213 144 28.0

( continued )
Symbol - size Capacity (bytes)
Row Column Numeric Alpa-numeric Byte (8bit) ECC(%) Remark
48 48 348 258 174 28.1
52 52 408 303 204 29.2
64 64 560 417 280 28.6
72 72 736 549 368 28.1
80 80 912 681 456 29.6
88 88 1152 861 576 28.0
96 96 1392 1041 696 28.1
104 104 1632 1221 816 29.2
120 120 2100 1572 1050 28.0
132 132 2608 1953 1304 27.6
144 144 3116 2334 1558 28.5
Used only square type for auto-sized symbol.
40
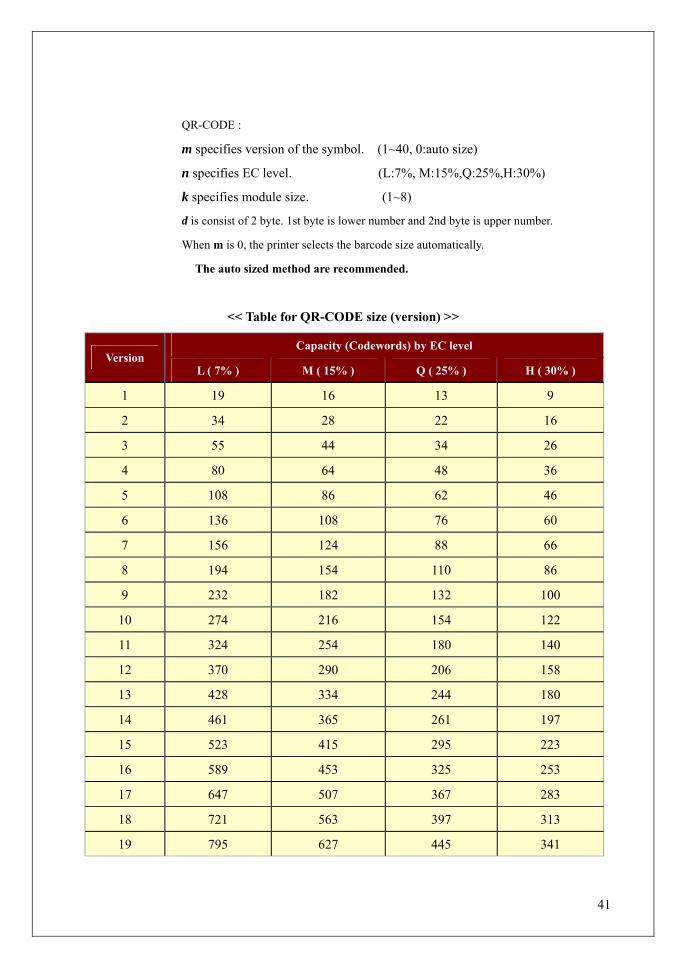
QR-CODE :
m specifies version of the symbol. (1~40, 0:auto size)
n specifies EC level. (L:7%, M:15%,Q:25%,H:30%)
k specifies module size. (1~8)
d is consist of 2 byte. 1st byte is lower number and 2nd byte is upper number.
When m is 0, the printer selects the barcode size automatically.
The auto sized method are recommended.
<< Table for QR-CODE size (version) >>
Capacity (Codewords) by EC level Version
L ( 7% ) M ( 15% ) Q ( 25% ) H ( 30% )
1 19 16 13 9
2 34 28 22 16
3 55 44 34 26
4 80 64 48 36
5 108 86 62 46
6 136 108 76 60
7 156 124 88 66
8 194 154 110 86
9 232 182 132 100
10 274 216 154 122
11 324 254 180 140
12 370 290 206 158
13 428 334 244 180
14 461 365 261 197
15 523 415 295 223
16 589 453 325 253
17 647 507 367 283
18 721 563 397 313
19 795 627 445 341
41

( continued )
Capacity (Codewords) by EC level Version
L ( 7% ) M ( 15% ) Q ( 25% ) H ( 30% )
20 861 669 485 385
21 932 714 512 406
22 1006 782 568 442
23 1094 860 614 464
24 1174 914 664 514
25 1276 1000 718 538
26 1370 1062 754 596
27 1468 1128 808 628
28 1531 1193 871 661
29 1631 1267 911 701
30 1735 1373 985 745
31 1843 1455 1033 793
32 1955 1541 1115 845
33 2071 1631 1171 901
34 2191 1725 1231 961
35 2306 1812 1286 986
36 2434 1914 1354 1054
37 2566 1992 1426 1096
38 2702 2102 1502 1142
39 2812 2216 1582 1222
40 2956 2334 1666 1276
Codewords are calculated by data compression.
The actual data can be more than the codewords.
42

11..88.. MMiisscceellllaanneeoouuss ffuunnccttiioonn ccoommmmaannddss 11
..88.. MMiisscceellllaanneeoouuss ffuunnccttiioonn ccoommmmaannddss
STAR Printer supports the following miscellaneous function commands;
CCoommmmaanndd NNaammee
ESC @ Initialize printer
ESC L Select page mode
ESC S Select standard mode
CAN Cancel print data in page mode
ESC @
[Name] Initialize printer.
[Format] ASCII ESC @
HEX 1B 40
Decimal 27 64
[Description] Clear the data in the print buffer and resets the printer configuration
that is in effect when the power was turned on.
[Notes] The data in the receive buffer is not cleared.
ESC L
[Name] Select page mode
[Format] ASCII ESC L
HEX 1B 4C
Decimal 27 76
[Description] Switche from standard mode to page mode.
[Notes] 1) This command has effective in standard mode.
2) By FF or ESC S, the printer returns to standard mode.
3) This command sets the position to the position specified by ESC T within the
printing area defined by ESC W.
43

4) This command switches the settings for the following commands (in which the
values can be set independently in standard mode and page mode) to those for page
mode;
Set right-side character spacing : ESC SP
Select default line spacing : ESC 2, ESC 3
5) The printer returns to standard mode when power is turned on, the printer is
reset, or ESC @ is used.
[Reference] FF, CAN, ESC FF, ESC S, ESC T, ESC W, GS $, GS \
ESC S
[Name] Select standard mode
[Format] ASCII ESC S
HEX 1B 53
Decimal 27 83
[Description] Switches from page mode to standard mode.
[Note] 1) This command is effective only in page mode.
2) Data buffer in page mode is cleared.
3) This command sets the print position to the beginning of the line.
4) The printing area set by ESC W are initialized.
5) This command switches the settings for the following commands (in which the
values can be set independently in standard mode and page mode) to those for
standard mode;
Set right-side character spacing : ESC SP
Select default line spacing : ESC 2, ESC 3
6) In standard mode, the following commands are enabled only for setting.
Set printing area in page mode : ESC W
Select print direction in page mode : ESC T
7) Standard mode is selected automatically when power is turned on,
the printer is reset, or command ESC @ is used.
[Reference] FF, ESC FF, ESC L
44

CAN
[Name] Cancel print data in page mode
[Format] ASCII CAN
HEX 18
Decimal 24
[Description] In page mode, deletes all data in the current printable area.
[Notes] This command is enable only in page mode.
[Reference] ESC L, ESC W
45

11..99.. LLiinnee && bbooxx ccoommmmaannddss 11
..99.. LLiinnee && bbooxx ccoommmmaannddss
STAR Printer supports the following line & box commands;
CCoommmmaanndd NNaammee
GS i Print line & box in page mode
GS i
[Name] Print line & box in page mode
[Format] ASCII GS i xL xH yL yH n
HEX 1D 69 xL xH yL yH n
Decimal 29 105 xL xH yL yH n
[Description] Print line & box in page mode
Horizontal length : xL + xH * 256 (dots)
Vertical length : yL + yH * 256 (dots)
Line thickness : n (dots)
If the horizontal length is 0, it becomes vertical line
If the vertical length is 0, it becomes horizontal line
[Range] 0 ≤ xL, xH, yL, yH ≤ 255
0 ≤ n ≤ 255
46

11..1100.. MMaaggnneettiicc CCaarrdd RReeaaddeerr CCoommmmaannddss 11
..1100.. MMaaggnneettiicc CCaarrdd RReeaaddeerr CCoommmmaannddss
STAR Printer supports the following magnetic card reader commands;
CCoommmmaanndd NNaammee
ESC M C Set ISO 1 track (2 track) card reader mode
ESC M D Set ISO 2 track (3 track) card reader mode
ESC M E Set ISO 1,2 track (2,3 track) card reader mode
ESC M J Set JIS-II card reader mode
EOT Cancel card reader mode
ESC M C
[Name] Set ISO 1 track (2 track) card reader mode
[Format] ASCII ESC M C
HEX 1B 4D 43
Decimal 27 77 67
[Description] Enable the magnetic card reader mode for 1 track (2 track).
[Note] Upon entering this mode, the printer waits to read card data. After successfully
reading it, the printer sends the data to the host and exits magnetic card reader mode.
ESC M D
[Name] Set ISO 2 track (3 track) card reader mode
[Format] ASCII ESC M D
HEX 1B 4D 44
Decimal 27 77 68
[Description] Enable the magnetic card reader mode for 2 track (3 track).
[Note] Upon entering this mode, the printer waits to read card data. After successfully
reading it, the printer sends the data to the host and exits magnetic card reader mode.
47

ESC M E
[Name] Set ISO 1,2track (2,3 track)card reader mode
[Format] ASCII ESC M E
HEX 1B 4D 45
Decimal 27 77 69
[Description] Enable the magnetic card reader mode for 1,2 track (2,3 track).
[Note] Upon entering this mode, the printer waits to read card data. After successfully
reading it, the printer sends the data to the host and exits magnetic card reader mode.
ESC M J
[Name] Set JIS-II card reader mode
[Format] ASCII ESC M J
HEX 1B 4D 4A
Decimal 27 77 74
[Description] Enable the magnetic card reader mode for JIS-II.
[Note] Upon entering this mode, the printer waits to read card data. After successfully
reading it, the printer sends the data to the host and exits magnetic card reader mode.
EOT
[Name] Cancel card reader mode
[Format] ASCII EOT
HEX 04
Decimal 4
[Description] Cancel and exit the card reader mode .
48

Card specification
The table below summarizes the format of the data stored on each magnetic track.
ISO-1 Track (IATA)
Recording Density 210 BPI
Recording Capacity 79 characters
Data Format Alphanumeric
Data Capacity 76 characters
ISO-2 Track (ABA)
Recording Density 75 BPI
Recording Capacity 40 characters
Data Format Numeric
Data Capacity 37 characters
ISO-3 Track (MINTS)
Recording Density 210 BPI
Recording Capacity 107 characters
Data Format Numeric
Data Capacity 104 characters
JIS-II (JIS)
Recording Density 210 BPI
Recording Capacity 72 characters
Data Format Alphanumeric
Data Capacity 69 characters
49

Magnetic Card Data Transmission Format
< 1 / 2 Track Version >
- Track 1
02H 43H 31H 31H 1CH DATA (76 Characters) 1CH 03H 0DH 0AH
- Track 2
02H 44H 31H 31H 1CH DATA (37 Characters) 03H 0DH 0AH
- Track 1,2
02H 45H 31H 31H 1CH 1CH DATA(76) 1CH DATA(37) 1CH 03H 0DH 0AH
< 2 / 3 Track Version >
- Track 2
02H 43H 31H 31H 1CH DATA (37 Characters) 1CH 03H 0DH 0AH
- Track 3
02H 44H 31H 31H 1CH DATA (104 Characters) 03H 0DH 0AH
- Track 2,3
02H 45H 31H 31H 1CH 1CH DATA(37) 1CH DATA(104) 1CH 03H 0DH 0AH
< JIS-II (JIS) Version >
F2H 4AH 31H 31H 1CH DATA (69 Characters) 1CH F3H 0DH 0AH
50

[Notes for Reading Magnetic Stripes]
[Note 1]
When data written on each track is smaller than its capacity, the unused area will be filled with NUL.
(Example)
If the 20-character data of “12345678901234567890” is written on track 2, the following data will
be received:
31 32 33 34 35 36 37 38 39 30 31 32 33 34 35 36 37 38 39 30 00 00 00 00 00 00 00 00 00 00 00 00
00 00 00 00 00
[Note 2] *Only for the ESC M E command
In the event of reading two tracks with the ESC M E command, 4 patterns of printer status are
shown:
51
Received Data
1BH 4DH 31H 0DH 0AH
SUCCESS
(Reading completed)
SUCCESS
(Reading completed)
SUCCESS
(Reading completed)
FAIL(Retry mode)
1 (2)Track
2 (3)Track
PrinterStatus
Track 1, 2
Track 2, 3
Track 1, 2
Track 2, 3
Track 1, 2
Track 2, 3
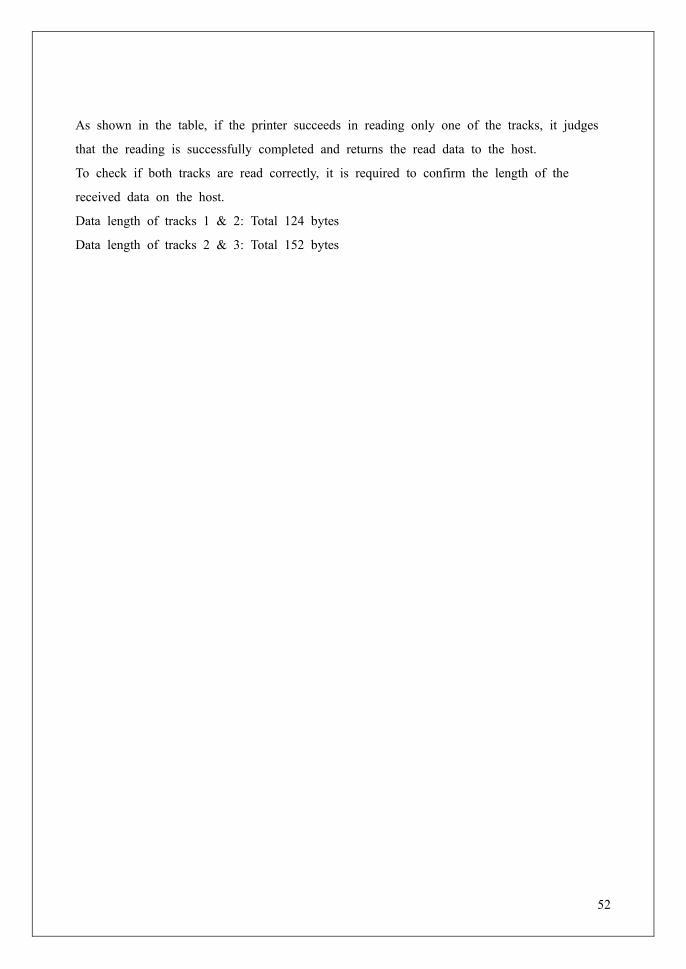
As shown in the table, if the printer succeeds in reading only one of the tracks, it judges
that the reading is successfully completed and returns the read data to the host.
To check if both tracks are read correctly, it is required to confirm the length of the
received data on the host.
Data length of tracks 1 & 2: Total 124 bytes
Data length of tracks 2 & 3: Total 152 bytes
52
11..1111.. BBllaacckk mmaarrkk ddeetteeccttiioonn ccoommmmaannddss 11
..1111.. BBllaacckk mmaarrkk ddeetteeccttiioonn ccoommmmaannddss
STAR Printer supports the following black mark detection commands.
CCoommmmaanndd NNaammee
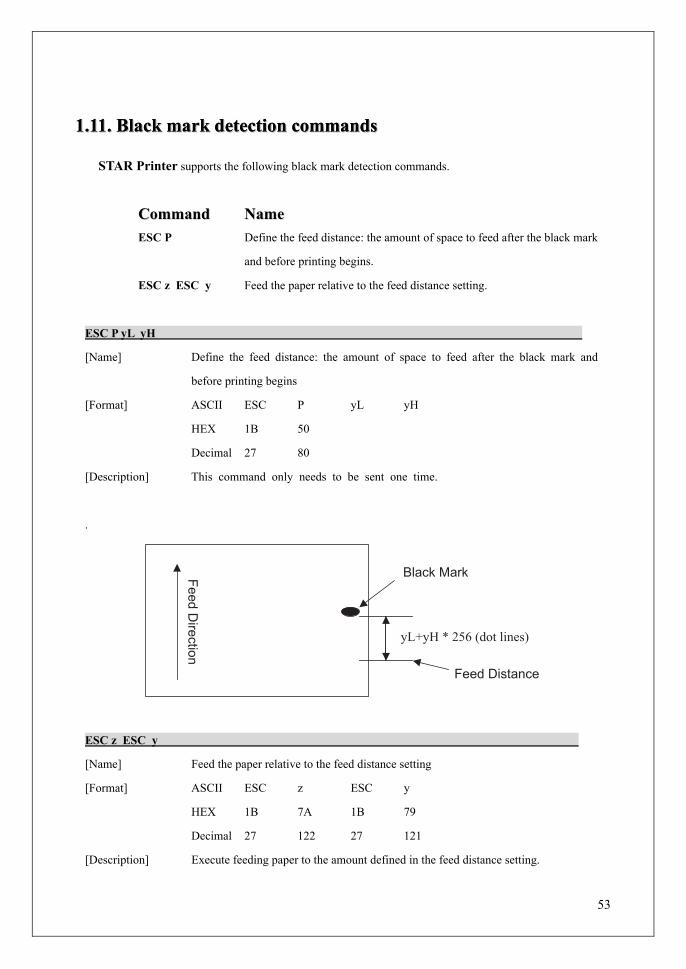
ESC P Define the feed distance: the amount of space to feed after the black mark
and before printing begins.
ESC z ESC y Feed the paper relative to the feed distance setting.
ESC P yL yH
[Name] Define the feed distance: the amount of space to feed after the black mark and
before printing begins
[Format] ASCII ESC P yL yH
HEX 1B 50
Decimal 27 80
[Description] This command only needs to be sent one time.
.
Black Mark
Feed Distance
Feed Direction
yL+yH * 256 (dot lines)
ESC z ESC y
[Name] Feed the paper relative to the feed distance setting
[Format] ASCII ESC z ESC y
HEX 1B 7A 1B 79
Decimal 27 122 27 121
[Description] Execute feeding paper to the amount defined in the feed distance setting.
53

11..1122.. LLooggoo CCoommmmaannddss.. 11
..1122.. LLooggoo CCoommmmaannddss..
STAR Printer supports the following Logo command;
CCoommmmaanndd NNaammee
ESC f Print logo stored in the printer memory
ESC f n
[Name] Print logo stored in the printer memory
[Format] ASCII ESC f n
HEX 1B 66 n
Decimal 27 102 n
[Range] 0 < n < 255 (n = logo number)
[Description] Print logos stored in the printer memory.
[Note] 1) Logos are printed by the following commands:
Logo 1: ESC f 0 FF Logo 2: : ESC f 1 FF
HEX 1B 66 00 0C HEX 1B 66 01 0C
2) The logo must be a 1-bit PCX file and its width must be in multiples
of 8.
3) Use the Star Micronics Utility to download logos to the printer.
4) Depending on the printer model, the total memory size varies.
If the size of the logo file is less than 4K (4096 bytes), a maximum of 60 files (up to
243K bytes) can be downloaded in total. Logos cannot exceed a height of 2400 pixels.
*** Maximum Logo Size of Star Micronics Portable Printers by Width ***
2-Inch: 384 x 2400 pixels 3-Inch: 576 x 2400 pixels 4-Inch: 832 x 2400 pixels
[Reference] ESC L, ESC O , ESC W
54

11..1133.. RReeggiisstteerr IInniittiiaalliizzaattiioonn MMaaccrroo CCoommmmaannddss 11..1133.. RReeggiisstteerr IInniittiiaalliizzaattiioonn MMaaccrroo CCoommmmaannddss
STAR Printer supports the following register macro commands;
CCoommmmaanndd NNaammee
ESC FS + Register initialization macro
ESC FS +
[Name] Register initialization macro
[Format] ASCII ESC FS + m t nL nH d1 d2 … dk
HEX 1B 1C 2B m t nL nH d1 d2 … dk
Decimal 27 102 43 m t nL nH d1 d2 … dk
[Range] m = 1
t = 0
k = (nL+nHx256), 0 ≤ k ≤ 7936
0 ≤ d ≤ 255
[Description] This command registers macro data in the following macro registration regions.
Registration
Region
Registration
Data Type
Registration
Block No.
Size
byte
Details
Registration
Information
Initialization
Macro
0 2 Registration data type 0000h = Initialization macro,
FFFFh = No registration data
2 Registration data count
4 Registration data address
8 (Reserved)
Registration Data 7936 Registration Data
1) m specifies the registration black count.
m = 1 (Fixed): This command is only for the register macro command.
2) t specifies the registration data type.
t = 0 (Fixed): This command is only for the register macro command.
55

56
3) (nL + nH x 256) specifies the data count to be registered.
When (nL + nH x 256) = 0, the initialization macro data specified by t is deleted.
4) d is the initialization macro data to be registered.
5) After the initialization macro data is written to the non-volatile memory, the printer
is reset.
6) If the volume of all initialization macros exceeds the capacity for registration,
it is written to the non-volatile memory up to the data block that exceed the capacity
and the command analysis is ended after that.
7) If there is unprinted data in the line buffer, this command is executed after the print
data in the line buffer is printed.
8) When registering, all of the current initialization macro regions are cleared, so if
previous initialization macro data is necessary, rewrite it.
9) The registered macro is executed when the power is turned on or when the ESC @
command (Initialize printer) is executed.
[Note] Because this command is executed by ESC @ command (Initialize printer), never register the ESC
@ command to the macro registration region.
[Reference] ESC @

11..1144.. IInnssttrruuccttiioonn ffoorr AAuuttoo PPoowweerr DDoowwnn mmooddee
The printer in the Power Down Mode will recover to the Print Ready Mode
when receiving commands or button operations.
However, print data received while shifting from the Power Down Mode to the
print Ready Mode ( for approx. 1 sec. ) is discarded and cannot be printed.
Therefore, if the printer is in the Power Down Mode, please be sure to recover it
to the Print Ready Mode before sending print data.
[ How to Recover to Print Ready Mode & How to Check]
1) Send the Status command(DLE EOT EOT), and Try to re-send it until
receiving the transmission value which is from 30H to 37H.
Or
2) Press the FEED Button or the MODE Button ( the Power Button for
SM-T300 series ) and confirm that the Power lamp ( Green LED) is
turned on.
57

58
RReelleeaassee HHiissttoorryy R
Reelleeaassee HHiissttoorryy
Rev. No. Date (M/D/Y) Contents
Rev.1.0 06/30/2010 New Release
Rev.1.1 07/21/2010 Made minor corrections. (Printer to STAR Printer)
Rev.1.2 11/22/2010 Made minor corrections.
Rev.1.3 05/18/2011 Added black mark commands and Logo command.
Rev.1.4 12/16/2011
Added the note of code page. (Page 9)
Added the note of character size. (Page 14)
Added the note of barcod. (Page 36)
-------------- Firmware Ver. 2.1 and after ------------
Added code page. (Page 9)
Separated ANK FONT Character Code Table
Rev.1.5 08/10/2012
Deleted the note of barcod. (Page 36)
-------------- Firmware Ver. 2.3 and after ------------
Added initialization macro command. (Page 55)

URL:http://www.starmicronics.com/support/