Mobile Point of Sale Information Guide...Retail and Customer Service Operations October 2014 v1.1...
46
Retail and Customer Service Operations October 2014 v1.1 Mobile Point of Sale Information Guide Post Office: mPOS Finance Number: For technical issues contact the mPOS Help Desk at 1-800-USPS-Help
Transcript of Mobile Point of Sale Information Guide...Retail and Customer Service Operations October 2014 v1.1...

Retail and Customer Service Operations October 2014 v1.1
Mobile Point of Sale Information Guide
Post Office:
mPOS Finance Number:
For technical issues contact the mPOS Help Desk at 1-800-USPS-Help

2
Contents
mPOS Overview .................................................................................................................. 3
mPOS Security ..................................................................................................................... 4
mPOS Functionality .......................................................................................................... 6
Back Office ......................................................................................................................... 17
Stamp Booklet Inventory ............................................................................................. 20
Refund and Voids ............................................................................................................ 25
Lobby Processes .............................................................................................................. 29
Identity Proofing Service (IPS) .................................................................................. 33
Frequently Asked Questions (FAQs) ........................................................................ 40
Appendix 1 – Daily Log.................................................................................................. 43
Appendix 2 – POS to mPOS Stamp Transfer Instructions ................................ 44
Appendix 3 – POS Stamps Return Instructions ................................................... 45
Appendix 4– POS Instructions for Processing Refunds..................................... 46
mPOS Information Guide
Table of Contents

3
mPOS Overview
What is mPOS?
mPOS stands for Mobile POS or Mobile Point of Sale device. The mPOS device is an
innovative and practical solution to speed simple transactions in retail lobbies. mPOS
will enable the mPOS user to manage customers in the lobby more efficiently and
quickly take care of simple customer needs. With the mPOS, mPOS users can conduct
quick and easy transactions directly in the lobby, including credit card payment and non-
PIN debit cards. (i.e. debit cards that can be ran as credit card)
mPOS users will be able to:
1. Scan prepaid barcoded packages for acceptance and provide customers with a
choice of an email receipt and/or hardcopy printed receipt.
2. Sell select Forever stamp booklets and retail products such as Ready Post,
greeting cards, and featured retail items.
3. Sell Priority Mail Flat Rate postage
4. Process “Delivered” Mail Pickups and have customers sign right on the mPOS
device.

4
mPOS Security
Requesting Access
The mPOS device will require an Active Directory ACE ID. Users should request access
to mPOS through eAccess.
There are two options for mPOS roles: User Role and Supervisor Role.
User Role: Users with the mPOS Users role can utilize all of the functionality of
the mPOS device EXCEPT initiating a stamp count.
Supervisor Role: Users with the mPOS Supervisors role can initiate stamp
counts; however, they must have the User Role as well. Supervisor Role cannot
be requested without also having the User Role.
Daily Log for Device and Stamp Booklets
Every mPOS office is required to maintain a daily log for tracking the use of the device
and the stamp booklets that are taken to the lobby for sale. This log will be retained at
the office with required quarterly stamp count results, and be available for inspection
upon request.
1. Establish a log for each mPOS device in use at each location.
(sample log in Appendix)
2. The mPOS user who will be operating the mPOS device will sign
the Daily Log with the required information. Postmaster/Manager
or Supervisor will initial the sign-in information provided by user.

5
3. The Daily Log provides space for the date, time of mPOS device
receipt/return, mPOS user’s name, and Postmaster/Manager or
Supervisor initials, as well as number of stamp booklets signed
out/in.
4. When control of the mPOS device and stamps are handed off
from one user to another during the day, both employees will need
to sign out/sign in the Daily Log to indicate possession.
5. The Daily Log will be returned to the Postmaster/Manager or
Supervisor for secure storage or for reassignment to another
Retail Associate.
6. The Daily Log will be securely stored; it will be reviewed on a
weekly basis to ensure no data has been removed or changed.
Operational Security
Users should be trained on how to use the mPOS device and have the appropriate
eAccess roles. Users should have taken LMS Course 10022027, "Protecting Payment
Card Data – Retail Associates Training" (also required every two years for Sales and
Service Associates).
The mPOS user will sign the Daily Log before receiving the mPOS device and stamp
booklets, and when returning the mPOS device for reassignment or storage.
The mPOS user will maintain control of the mPOS device at all times while in use and
should not leave unattended on lobby tables or carts.
mPOS Stamp Handling
mPOS Stamp Booklets are a separate accountability from full service POS stock and
Self Service Kiosk (SSK) and must be kept in a locked security container separate from
all other POS and SSK accountable inventory.
No more than 25 stamp booklets will be carried by the mPOS user at one time.
mPOS users must carry stamps on their person in a closed pouch or money belt
provided. Stamp booklets must not be carried in hand, left loose in vest pockets or set
down on counters.
Stamps must be signed out when they are removed from the locked security container.
The quantity of stamps being issued will be annotated on the manual log at the same
time that the mPOS device is being signed out. At the end of the mPOS user’s shift, the
stamps must be returned to the locked security container, and the quantity returned must
be annotated on the log. When changing mPOS users, each user must sign in and out
of the log to account for the stamps.

6
mPOS Functionality
mPOS Hardware
The mPOS unit consists of three devices – an mPOS device which is an iPod Touch
with the mPOS App along with a receipt printer and a postage label printer.
mPOS Device
To turn on the mPOS, press the “On/Off’ button at the top right hand corner of the mPOS
device.
Note: since the mPOS device is an Apple iPOD device,
messages may be received from Apple to update the iOS
version. Do not install the software update from Apple.
Select “Later”.
Receipt Printer
To turn on the receipt printer hold the “On/Off” button down for five (5) seconds. A green
light will illuminate on the printer to signify the printer is on. The receipt printer will turn
off automatically after idling for sixty (60) minutes due to nonuse. If this happens, turn
the printer back on by using the instructions above.
Label Printer
mPOS Device
Receipt Printer

7
Postage Label Printer
To turn on the label printer, hold the “On/Off” button down for five (5) seconds. A green
light will illuminate on the printer to signify the printer is on. The postage label printer
also has an automatic turn-off after sixty (60) minutes of non-use. To avoid label errors,
ensure that the label printer is turned on prior to sending a request to print a postage
label.
The printer must be calibrated to ensure proper print on the labels and to use the “auto-
peel” function. Calibration must also be performed when re-loading label rolls.
Ordering Consumables
mPOS Receipt paper and labels can be ordered through eBUY2 –
Receipt Paper - PSN 7690-17-000-0666 PSIN O7522MRP PAPER, THERMAL
RECEIPT, DPP-450 PRINTER, 2.25 IN X 50 FT
mPOS Postage Labels - PSN 7690-17-000-0667 PSIN O7522ML LABEL,POSTAGE,
THERMAL, DPP-250 PRINTER, 4 IN X 3 IN

8
Using the mPOS App
Press the “Main” button on the mPOS, located at the center bottom of the device to
proceed.
Press the “Main” button, to turn the device
on. Follow the instructions on the screen
and slide the arrow bar to the right to
access the mPOS main screen, as shown
on the right.
Note: If screen is “locked” enter
passcode 7500 to “unlock”
Select the “mPOS” application icon to
enter the mPOS application.
At the mPOS App login screen, enter your
ACE ID and password. Select the “Sign In”
button to start the mPOS application.
Note: User roles to mPOS are active once
requested and approved through eAccess.

9
The Home Screen has four options:
Prepaid Acceptance – perform an
acceptance scan on prepaid mail
created online by customers using
services such as Click-N-Ship and
eBay.
Product Sales - complete a
customer’s purchase, such as stamp
booklets, by scanning the item and
accepting payment. Also, use this
option for selling Priority Mail Flat rate
postage.
Mail Pickup – scan a mail piece as
delivered as a result of PS Form 3849,
Delivery Notice/Reminder/Receipt.
Back Office - view past transaction,
perform a Product Sale “Void”
transaction, calibrate printer, receive
and ship stock, enter stamp count or
print reports.
10
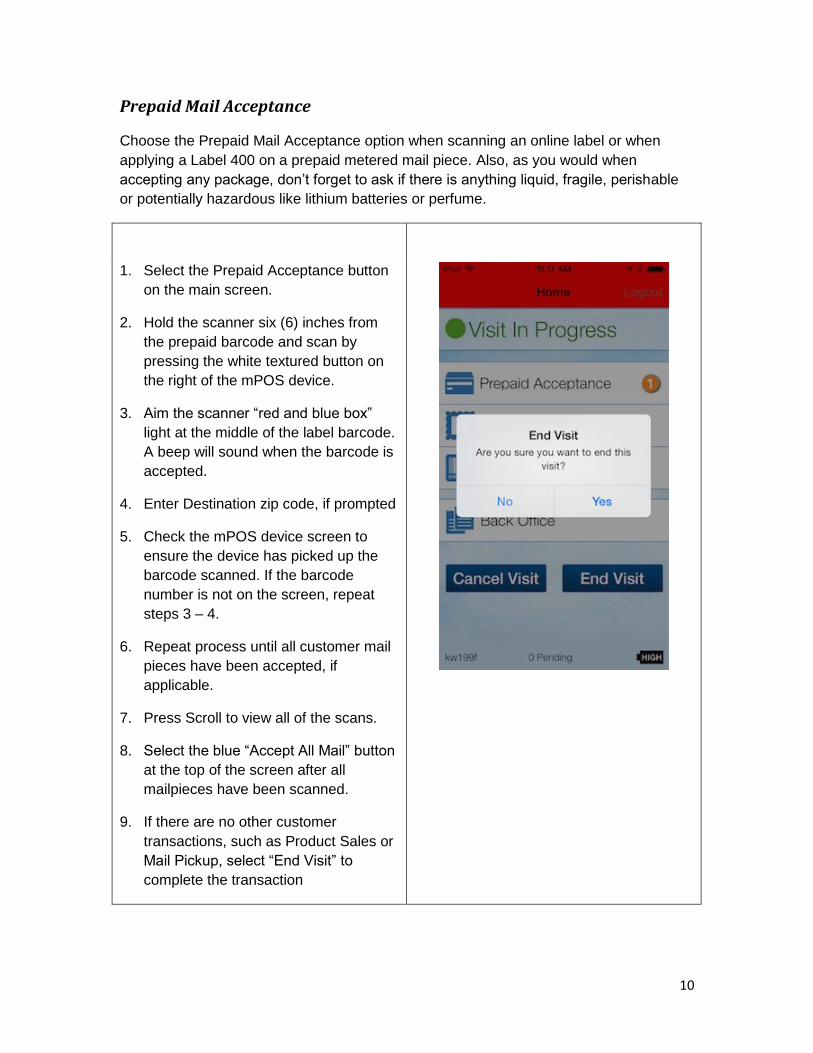
Prepaid Mail Acceptance
Choose the Prepaid Mail Acceptance option when scanning an online label or when
applying a Label 400 on a prepaid metered mail piece. Also, as you would when
accepting any package, don’t forget to ask if there is anything liquid, fragile, perishable
or potentially hazardous like lithium batteries or perfume.
1. Select the Prepaid Acceptance button
on the main screen.
2. Hold the scanner six (6) inches from
the prepaid barcode and scan by
pressing the white textured button on
the right of the mPOS device.
3. Aim the scanner “red and blue box”
light at the middle of the label barcode.
A beep will sound when the barcode is
accepted.
4. Enter Destination zip code, if prompted
5. Check the mPOS device screen to
ensure the device has picked up the
barcode scanned. If the barcode
number is not on the screen, repeat
steps 3 – 4.
6. Repeat process until all customer mail
pieces have been accepted, if
applicable.
7. Press Scroll to view all of the scans.
8. Select the blue “Accept All Mail” button
at the top of the screen after all
mailpieces have been scanned.
9. If there are no other customer
transactions, such as Product Sales or
Mail Pickup, select “End Visit” to
complete the transaction

11
Form 5630 SCAN Forms
If a customer has multiple prepaid mail pieces with a Form 5630 SCAN, the form can be
scanned instead of each individual mail pieces.
Scanning Form 5630 SCAN:
1. Choose Prepaid Acceptance.
2. Scan the barcode on the SCAN form.
3. Answer the “Shipment Complete”
question
a. “Yes” means the actual
Package count matches the
number on the SCAN form
b. “No” answer means that the
count does not agree. Mail is
still dispatched as normal

12
Providing Receipts
After all sales, prepaid mail, and/or mail pickup transactions, the mPOS App will provide
a choice of email and/or hardcopy printed receipt. Duplicate receipts can be reprinted by
going into the back office transaction log, selecting the transaction and choosing ‘print’.
For printed receipts:
1. Select one of the “Print” options.
2. Receipt will automatically print
out of the receipt printer.
3. Retrieve the printed receipt.
4. Hand the printed receipt to the
customer.
NOTE: For customers who request
both an e-mail and print receipt, the
receipt will print automatically while
entering e-mail information.
For email receipts:
1. Request the customer’s email
address.
2. Type the address into the “To”
field using the onscreen
keypad.
3. Select the “Send” button to
transmit.
4. Inform the customer the email
has been sent.
13
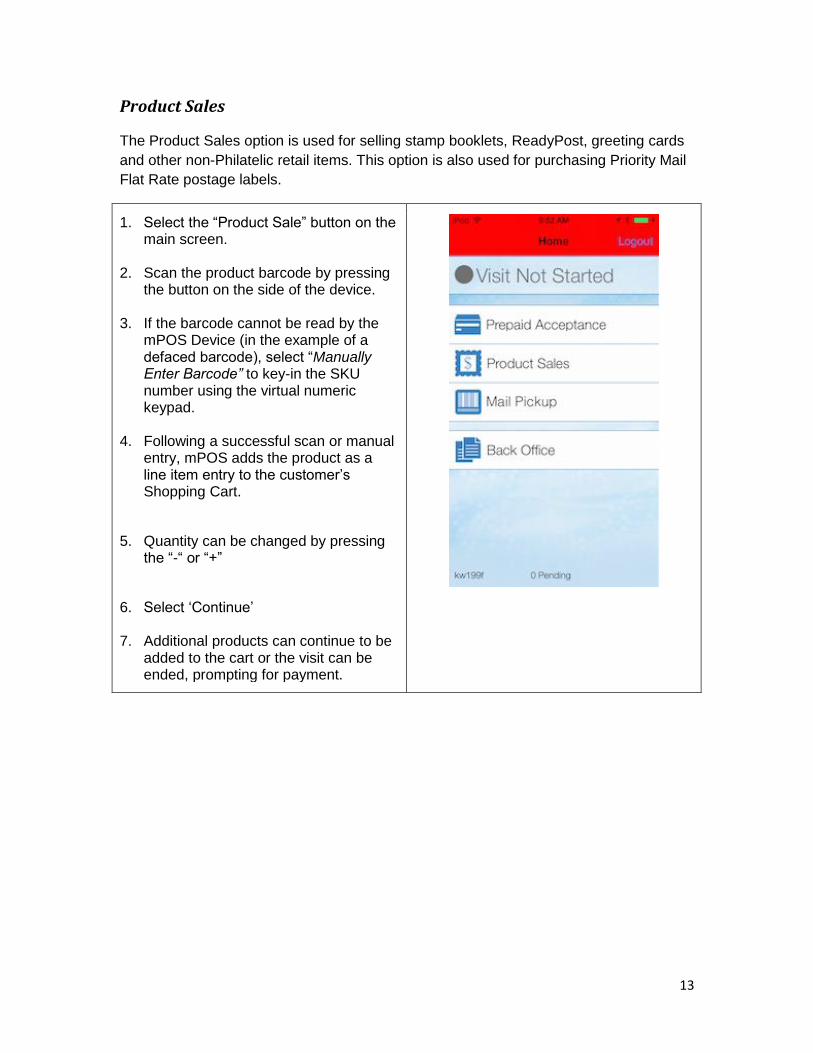
Product Sales
The Product Sales option is used for selling stamp booklets, ReadyPost, greeting cards
and other non-Philatelic retail items. This option is also used for purchasing Priority Mail
Flat Rate postage labels.
1. Select the “Product Sale” button on the main screen.
2. Scan the product barcode by pressing the button on the side of the device.
3. If the barcode cannot be read by the
mPOS Device (in the example of a defaced barcode), select “Manually Enter Barcode” to key-in the SKU number using the virtual numeric keypad.
4. Following a successful scan or manual
entry, mPOS adds the product as a line item entry to the customer’s Shopping Cart.
5. Quantity can be changed by pressing the “-“ or “+”
6. Select ‘Continue’ 7. Additional products can continue to be
added to the cart or the visit can be ended, prompting for payment.

14
Printing Priority Mail Flat Rate Postage Labels
Labels can be printed for Flat Rate Priority boxes or envelopes since they do not need a
weight entered. As you would when accepting any package, don’t forget to ask if there is
anything liquid, fragile, perishable or potentially hazardous like lithium batteries or
perfume.
1. Scan the product barcode on Priority Flat Rate packaging
2. Enter the destination ZIP Code in the pop-up screen.
3. The mPOS Device will display the
Destination Zip Code, calculated Postage Price and Insurance information.
4. Ask the customer if they accept the following terms of the Priority Mail Flat Rate Postage purchase before continuing.
5. If customer accepts terms, select “Accept,” and the postage will automatically print from the mPOS label printer. Note: Ensure label printer is turned on prior to pressing “Accept”.
6. Remove the printed postage from the
printer. If label auto-peel mode is not used, tear from the back of the printer.
7. Place postage on the customer’s mail piece immediately. This is LIVE postage and must be used immediately since this is considered ‘accepted’ for mailing at time of printing.
8. Select the “Continue” button to return
to the Home screen.
9. If there are no more postage labels or merchandise to purchase, select the “End Visit” button at the bottom of the screen.

15
Processing Payment
Currently all purchases can only be paid for with credit card and non-PIN debit cards (i.e.
debit cards that can be ran as a credit card, with a Mastercard or Visa logo). PIN debit
cards, cash or checks are not accepted at mPOS. Similar to POS, purchases over $25
will require a signature. A copy of the signatures and transactions will be printed on the
end of day 1412 so the mPOS user will not have to carry these in the lobby while
conducting business.
1. Hold the customer’s credit card so the
magnetic stripe reader is facing the
user of the device (i.e., lobby assistant)
when swiping.
2. Swipe the credit card on the mPOS
device
3. Enter the last four digits of the
customer’s credit card number for
validation.
4. Check for a signature on the card per
normal card handling procedures.
5. For authorized transactions under $25,
a customer signature is not required. A
“Signature Line” will not display on the
mPOS device.
6. For authorized transactions over $25,
ask the customer to sign, using a finger
or stylus, in the “Signature box”
displayed on the screen of the mPOS
device.
7. Verify that the customer has signed on
the mPOS device and select the
“Complete” button on the screen.
8. Provide the customer a choice of an
email receipt and/or printed receipt.

16
Mail Pickup
Mail Pickup option is used to scan as ‘delivered’ or ‘refused’ left-notice items. Only mail
pieces not requiring money or payment can be scanned on mPOS (i.e. postage due or
C.O.D are ineligible for mPOS and must be processed at the full service counter).
Collect Form 3849 from the customer, verify ID as appropriate, and retrieve the item
from the staging area.
1. Select the “Mail Pickup” button on the
Home screen.
2. Scan the barcode on the mailpiece.
3. If the customer decides not to pick up
the mailpiece, select the icon “ø” to
refuse the mailpiece. Selecting the
check mark icon will change this back
to ‘accept’
4. Select “Continue” or “Next Mail Piece”
a. For mailpieces that require
signature for pickup, the App will
prompt for a signature and printed
name.
b. When prompted, the address must
be entered on the following screen
for applicable services.
c. For Priority Express Mail pieces, an option to ‘Waiver’ will be available if signature is not requested.
d. If applicable, mPOS app prompts for “Age Verification” and signature capture.
5. Repeat steps 2-4 for each customer
pickup item.
6. If there is no merchandise to be
purchased or other transactions, select
the “End Visit” button at the bottom of
the screen.

17
Back Office
The Back Office functions includes reprinting or voiding transactions, printing reports,
inventory functions, calibrating the label printer and for users with Supervisor Role, the
ability to start a credit exam.
Reprinting a Receipt
Reprinting a receipt can only be done on the same day the transaction was conducted.
This option will only allow a hardcopy paper receipt and will not give an option for email
receipt.
1. From the Back Office, select
“Transaction Log”
2. Select the “Customer Visit” from
the “Transaction Log” (sorted by
date and time).
3. Select “Print”
Printer Calibration
The label printer must be calibrated every time a new label roll is inserted and whenever
the postage print is misaligned on the label.
To calibrate the label printer, the printer cannot be in the “auto-peel” mode. “Auto-peel” is
when the front top bar is slid to the back of the printer towards the labels. Activating the
“Auto-Peel” function will result in the postage labels coming off the roll without the liner
backing. It is recommended that the label printer operate in “auto-peel” mode for best
performance.

18
1. Set the printer so it is not in the
“auto-peel” mode by pressing the
two raised knobs on top of the
printer and ensuring the bar is
pushed to the front, away from the
labels.
2. Ensure printer is powered on.
3. Under the “Back Office” function,
select the “Printer Settings” option.
4. Select “Calibrate Label Printer.”
After a few seconds, the printer will
automatically spool blank labels,
and the message “Calibration
Successful” will appear on the
screen.
Diagnostics
When problems with the app or printers occur, the Diagnostics Report can be run and e-
mailed from the mPOS app to assist the Help Desk with identifying the issue. The
Diagnostics Report helps all pertinent device information as well as helps authenticate
the issues the user is facing for better trouble shooting support. Contact the Help Desk
to open a ticket prior to sending the Diagnostics report. The Help Desk will instruct the
user if the Diagnostics report needs to be sent.
1. From the Back Office, select
“Diagnostics”
2. When prompted, select “email” to
send the report to the Help Desk.
Auto-Peel bar

19
Print Reports
Two reports can be printed to show daily activity for the mPOS device. The Preliminary
1412 report will show the daily activity at the time of the printing. The Final end of day
1412 can also be printed from this option for the previous day as well as up to 30 days
retroactive. Closeout is performed automatically every night at 11:40pm so the day’s
Final 1412 will not be available for printing until the next morning.
Preliminary 1412
1. From the Back Office, select “Print
Reports”
2. For Preliminary reports, press
“Preliminary 1412” to view or print
totals anytime during mPOS
working hours.
3. The generated report has “Trial
1412” printed at the top, shows the
consolidated AICs for the mPOS
unit.
Final 1412
1. Each night mPOS will perform an
auto close and capture AIC data for
a final 1412.
2. The first user that logs on the next
business day will be prompted to
turn the printer on so that the 1412
for the previous day can print
automatically. The 1412 should be
filed in a dedicated mPOS folder
with supporting documentation (i.e.
voided labels, PS Form 3533)
3. To print prior day 1412s up to 30
days retroactive, use option “Print
Reports” and End of Day Final
1412”
4. Select the date for the report you
want to print.

20
Stamp Booklet Inventory
Receiving stamps into the mPOS
The mPOS finance number is a separate accountability from the POS. Therefore,
stamps will have to be transferred from POS to the mPOS finance number and then
picked up on the mPOS device. Stamps for mPOS cannot be ordered directly from SFS
Web to be shipped to the mPOS 10 digit finance number. They must be transferred from
the POS inventory. POS instructions for transferring stamps to mPOS can be found in
Appendix 2.
Any mPOS user will be able to accept stamp transfers into the mPOS device. The POS
generated PS 17 with shipment number is needed in order to accept the stock. Verify
stock received with a witness and sign the PS Form 17.
Attach the shipment receipt generated on the mPOS printer to the PS Form 17
generated from POS and file locally.
1. From Back Office select “Stamp
Booklet Inventory”.
2. Select “Receive/Return Stamp
Booklets”
3. Ensure “Receive” is highlighted. Fields
for Shipper Location ID and Shipment
Number should be shown.
4. Enter the shipper location ID
5. Enter the shipment number from POS
generated PS Form 17
6. When correct number of digits has
been entered, select “Next”.
7. Select stamp item number received
and enter quantity

21
8. Confirm quantity received
9. If correct, select “Print Receipt and
Complete”
10. If incorrect, return to previous screen
by selecting ‘back’ and correct.
Return the stock from the mPOS Unit to POS Unit
Any mPOS user will be able to return stamps from the mPOS device to the POS unit.
Record returned stamps on a manual PS Form 17, the mPOS will generate a shipment
receipt. Attach the shipment receipt generated on the mPOS printer and the POS
generated shipment received receipt to the manual PS Form 17 and file locally.
1. From Back Office select “Stamp
Booklet Inventory”.
2. Select “Receive/Return Stamp
Booklets”
3. Select “Return” to change the option.
Destination Location ID field should be
shown. Device Location is default.
4. Enter 10 Digit Finance number of the
destination location (POS office
finance number)
5. Select stamp item number received
6. Enter and confirm quantity received
7. If correct, select “Submit”
8. If incorrect, return to previous screen
by using ‘back’ and correct.

22
Ship to Own is used when making
corrections when stock was picked up
incorrectly, posting to AIC 848
Unit picked up for an incorrect item
number
Unit picked up the wrong amount
that results in an overage
Unit picked up using the incorrect
shipment number
Contact the Accounting Help desk for any
questions on correcting stock shipments.
mPOS Stamp Counts
The Supervisor Role is needed to be able to initiate a credit exam on mPOS. The
Supervisor Role for mPOS must be requested through eAccess.
Credit exams must be conducted by two employees (at least one with mPOS Supervisor
Role) and are required quarterly. Manual PS Form 3294, Cash and Stamp Stock Count
and Summary must be used to record the count. The results will then be entered into the
mPOS device and also recorded on PS Form 3368, Accountability Examination Record.
Both the Supervisor and a designated employee must complete an independent PS
Form 3294.
AIC 221 (overage) or AIC 621 (shortage) will post automatically to the mPOS 1412 when
the credit exam is accepted using the mPOS device
Conducting the count
1. On manual PS Form 3294, obtain the closing balance as reported in AIC 853 on
the mPOS last Unit PS Form 1412, and record the amount in the section Stamp
Credit as reported in AIC 853, under Cash/Stamp Stock Credit Count Summary.
2. Count each item of saleable stock and enter the item number, value, and
quantities in the appropriate blocks on page 2 of PS Form 3294.
3. Multiply the total quantity of each item by its unit value.

23
4. Total all the blocks and enter the results to Total Stamp Stock at bottom right
corner of page 2 on PS Form 3294.
5. Transfer this figure to Total Stamp Stock as Counted (line 2) under Cash/Stamp
Stock Credit Count Summary, on page 1 of the form.
6. Calculate the Difference by subtracting the amount reported for Stamp Credit as
reported in AIC 853 from last eMoves PS Form 1412 (Line 4) from the amount
reported for Total Stamp Stock as Counted (Line 2).
7. Record the Difference on Line 5. A negative amount is a shortage and a positive
amount is an overage.
8. Enter the count results on the mPOS device
1. Navigate to Back Office
2. Select “Credit Exam”
a. This option will be greyed out if
User does not have the
Supervisor Role
3. Print shipment receipt
4. Enter counter 2’s ID
5. Enter counter 2’s password
6. Select the stock to count
7. Enter the count
8. Select continue if count is correct
9. Counter 1 selects “I Agree”
10. Re-enter counter 2 password
11. Counter 2 selects “I agree”

24
12. Counter 1 enters comments if any
13. Counter 2 enters comments if any
14. Select continue
15. Print shipment receipt
After each count, attach the Daily Log with stamp entries from quarter to PS Form 3294,
record results on PS Form 3368, Accountability Examination Record and file paperwork
locally, in a separate folder for mPOS stamp counts.

25
Refund and Voids
Policy
Create a file folder to track all mPOS voids/refunds. Keep records in this file with all
other daily mPOS documents. PS Form 3533 must be completed for the mPOS
void/refund document file. This folder is intended as a tool for management analysis of
refund activity.
mPOS Postage Labels
No cash refunds are allowed, exchange for equivalent value stamps only or
perform credit card reversal.
mPOS postage labels may not be reused, modified or cut.
mPOS postage labels removed from letters and packages will not be accepted.
Exchanges will be at 100% of value.
Obtain label from customer and physically mark it as void.
Complete a PS Form 3533 with signature of the mPOS user and submit and store
with Unit End of Day reports and PS Form 1412.
mPOS labels may not be sold for future use. The printing of the label includes an
Acceptance scan sent to Product Tracking System (PTS). Therefore, the label must be
applied to packages that are ready for mailing and acceptance.

26
mPOS Label Voids/Refunds
This process is used when the mPOS device prints a label and it is damaged, a
customer changes their mind prior to swiping credit card, a credit card is declined, or the
customer decides to cancel mailing following the credit card approval but prior to mPOS
being closed for the day.
The mPOS device will automatically post the postage meter label sale to AIC 119 and
551 after following the steps below on the mPOS:
If the payment has not been made or the card declined:
1. Cancel the label transaction by tapping the Trash can icon on the desired
product row.
If the payment has processed:
1. If the payment has taken place, go in to “Back Office” and the “Transaction
Log”. Locate the transaction to be voided (use the time of transaction if
unsure).
2. Press “Void” to void the transaction. Note: the customer will need to provide
the same credit card used in order to void a transaction.
3. On the “Confirm Void” screen, swipe the customer’s credit card through the
credit card swipe reader on the bottom of the mPOS Device.
4. Enter the last 4 digits of the customer’s credit card number and tap “Submit”.
5. If successful, the mPOS returns the User to the Transaction Log screen and
displays “zero” for all items.
6. Indicate on the customer’s receipt that the item has been refunded/voided,
initial and date. A voided receipt can be printed if desired.
For electronic postage labels for Priority Mail Flat Rate mail pieces (only), mPOS sends
a void transaction to Stamps.com. mPOS returns a Success/Fail message to alert the
user to the completion of the postage void. The mPOS user must remove the electronic
postage label from the customer’s mailpiece and write “VOID” across the label.
Physically take the electronic postage label and apply to a PS Form 3533. Mark or write
void/spoiled across the label. If the label did not print correctly, indicate the intended
amount on the label and reason (i.e. label jam)
At the end of the employee’s mPOS shift, print an mPOS sales report and match the
amount in AIC 551 with the amount of spoiled labels attached to PS Form 3533s to

27
ensure they match for supporting documentation. If they do not match, research must be
conducted and the issue corrected.
File the PS Form 3533 forms with the mPOS sales report attached showing amounts
match, with the daily mPOS paperwork.
Since generated labels will show in PTS, these can be ‘recalled’ by using an IMD
handheld scanner to expunge by scanning as ‘customer recalled’. Scan the barcode and
select “C” Customer Recall on the IMD. This can only be performed if the label exists
and is legible. There is no workaround for labels that did not print or are illegible.
For label refunds after mPOS Final 1412 close out, follow workflow process for
refunds of postage in POS using a PS Form 3533. No Cash Refunds.
Stamp Booklet Exchange
No Cash refunds, exchange for equivalent value stamps only.
Exchanges may only be made at the office where purchased.
Full Service Window POS ONE
The Retail Associate will utilize the Exchange Stamp Products option in the
POS ONE system.
Enter the value of the stamps to be exchanged as a 1-cent “Redeemed
Stamp”.
Attach “Redeemed Stamp” to a sheet of paper and submit at closeout to be
placed in redeemed stock location in retail floor stock.
Enter or scan the item number and quantity of replacement stamps.
Issue the customer the replacement stamps of the same value.
Stamp, Retail or Packaging Product Voids
Prior to tender:
If the customer changes their mind before tendering the credit card, the mPOS user will
void the transaction out of the shopping cart on the mPOS device by:
1. On the Home screen, tap the “Cancel Visit” button.
-- or –
On the Shopping Cart screen, tap the “Trashcan” icon on the desired product row
-- or –
On the Shopping Cart screen, set the quantity for the item to 0.
2. Next, tap “Yes” to confirm the item deletion.

28
After tender:
If the customer changes their mind after the credit card has been approved, the mPOS
user will void the transaction using the follow steps:
1. Go to the Home screen.
2. Tap the “Back Office” button.
3. Select the “Recent Transaction” from the “Transaction Log” (sorted by date and
time).
4. Tap the VOID button for the transaction.
5. On the “Confirm Void” screen, swipe the customer’s credit card through the credit
card swipe reader on the bottom of the mPOS Device.
6. Enter the last 4 digits of the customer’s credit card number and tap Submit.
7. If successful, the mPOS returns the user to the “Transaction Log” Summary
screen and displays “zero” for all items.

29
Lobby Processes
In offices with the mPOS device, the mPOS user should:
Actively engage customers to determine customer needs.
If there is queue for full service counters, first priority is to engage customers in
line to help shorten Wait Time In Line.
If there is no queue for the full service counters, engage customers as they arrive
in the lobby.
Redirect customers with eligible transactions that can be served by a Self
Service Kiosk (SSK), if available.
Screen customers to identify if the customer has only eligible simple transactions that
can be performed on the mPOS:
Stamp Booklet sales
Non-revenue mail pickup with a ps3849
Prepaid mail needing an acceptance scan (excluding customs and Priority
Express items)
Priority Mail Flat Rate postage sales
Readypost or Greeting card sales
Customer must use a credit card or non-PIN debit card
Safeguard mPOS device and keep in the mPOS user’s vest or clipped to belt during
working hours. Safeguard mPOS stamp booklets, utilizing the provided money belt or
closed pouch.
If customers cannot be helped with the mPOS device or directed to the SSK, ask
questions in order to prepare their transaction before they queue, reducing the number
of unprepared customers that reach the counter (refer to Lobby Assistant SOP on Retail
Operations web page for full instructions).
Always ask the customer if there are other products they may be interested in
purchasing, such as stamp booklets or shipping materials for future needs. The mobility
of mPOS allows the mPOS handler to upsell products by introducing new items located
throughout the retail lobby.
Smile and be pleasant, offer assistance by asking questions to determine if the
transaction is mPOS eligible.
“Do you have a credit card that you can use for your business today?” If so, this
could be an mPOS eligible transaction if the entire mailing is mPOS eligible.
Debit cards can be used if they can be scanned as a non-PIN transaction.

30
If the customer does not have anything in their hands, ask if they are purchasing
stamps and if so, ask if the current mPOS booklets on hand are acceptable.
“Are those prepaid packages you would like to drop off for acceptance scans?” If
so, this would be an mPOS eligible transaction.
If the customer has a form 3849 or PO Box notice in their hands ask “Are you
here to pick up mail?” If so, this may be an mPOS eligible transaction, if non-
revenue.
“Are you here to purchase mailing products or greeting cards?” If so, this would
be an mPOS eligible transaction.
If the customer is shipping using a Priority Mail Flat Rate box or envelope,
postage can be purchased using the mPOS device.
If the customer indicates that only part of their visit includes an mPOS eligible
transaction (i.e. Stamp booklet and P.O. Box rental), then allow the customer to conduct
the entire transaction at the full service counter or SSK (if eligible). Assist the next
customer. Do not have the customer conduct split or multiple transactions.
If the transaction is not fully mPOS eligible or the customer chooses to use the full
service counter, the mPOS user can assist with ensuring the customer is prepared with
proper packaging and forms in order to reduce the time spent at the counter.
NOTE: VERY IMPORTANT – Before diverting a customer from the full service line,
it is imperative that the mPOS user:
Asks the customer if they can pay with a credit card or non-PIN debit card.
Ensures the entire transaction is mPOS-eligible.
Ensure that the transaction will meet the minimum one dollar requirement for self
service kiosks.
Product Sales on mPOS
mPOS user should carry between 10-25 stamp booklets in a secure location, either in a
money belt or other pouch secured to the mPOS user. The stamps should not be able to
fall out of a pocket/pouch, if bending over.
The mPOS user can scan the stamp booklets, ReadyPost, greeting card and/or retail
product (excluding AIC 092 Philatelic items) on the mPOS device, then total. The credit
card should be swiped by the mPOS user and the last 4 digits entered.
The device will only prompt for a signature if the total dollar amount is over $25. If so, the
customer is prompted to sign on the device with a finger. The option is given if the
customer chooses a hard copy receipt and/or to have an email receipt, both or neither.

31
The customer will enter their email address if the soft copy option is chosen. The hard
copy receipt will print out (if chosen) and is given to the customer.
The USPS credit card copies are not printed out until the end of the day’s business, at
closeout. The USPS credit card copies should be kept in a secured location with the
mPOS and eMoves 1412 reports, to be retained for the same amount of time as POS
credit cards (currently two years).
Prepaid mail acceptance on mPOS
When a customer presents a prepaid article with online postage, the mPOS handler
should scan the item on mPOS as accepted. A receipt will be generated which will be
handed to the customer. The package should be marked with a line through the postage
with a yellow highlighter to indicate the package has been scanned as accepted to avoid
duplicate scans. The package can be placed in the Self-Service Kiosk parcel drop in the
lobby, or other designated secured location if lobby drop is unavailable. Packages
scanned as accepted on the mPOS device do not need any other acceptance scan and
can be dispatched accordingly.
For prepaid metered Priority Mail articles not generated online, the mPOS handler
should attach a label 400 and scan the label 400 as accepted. A receipt will generate
with the label 400 number which will be given to the customer.
Items requiring a customs form should not be accepted in mPOS since these items need
to be entered into CPMAN. Direct these customers to the full service window.
Priority Express Mail items cannot be accepted in mPOS due to the service commitment
requirements. Direct these customers to the full service window.
Mail Pick-Up for mPOS
If a customer has received a PS Form 3849 notice for mail pick-up or a PO Box notice,
determine if the article is non-revenue and does not require a cash transaction (i.e.
postage due, C.O.D)
The following Mail Pick-Up items can be scanned as delivered using the mPOS:
Priority Mail Express
Tracking numbers
Insured
Certified (requires customer to enter address)
Mail Pick-Up items that cannot be scanned on mPOS:
Collect on Delivery (COD)
Postage Due or BRM
Business Reply Mail
Registered

32
The mPOS user should retrieve the item or contact someone in the back to retrieve
(based on local policy). Once item is retrieved, the item barcode should be scanned. The
customer must sign for accountable items on the mPOS device when the article is
delivered. Customer prints and signs their first initial and last name. For Certified mail
articles, the customer’s address is also required to be entered.
Priority Mail Flat Rate Postage
If a customer has a Priority Mail Flat Rate box or envelope that needs postage, the
mPOS handler can process the article using the mPOS device. Inform the customer that
Priority Mail includes automatic insurance up to $50 and tracking. Ask the customer if
they need additional insurance. If the customer does not want additional insurance,
process on the mPOS if customer is using a credit card or non-PIN debit card. Direct
customers desiring additional insurance to the SSK or full service counter
Once the postage is printed and applied, the mPOS handler must deposit the mail in the
inner lobby parcel drop or other locally designated secure location. The article is
considered ‘accepted’ and should not be left unsecured in the lobby or returned to the
customer. If the customer is not ready to mail the item, the postage will have to be
voided, and placed on a PS Form 3533 to be turned in at the end of the shift.
Priority Mail Flat Rate postage is ‘accepted’ when printed and does not need to be
scanned as accepted again.
Postage cannot be processed on mPOS for non-Flat Rate variable weight items.
Likewise, postage for Flat Rate articles that need additional insurance or any other
special service cannot be printed on the mPOS.
Postage labels should only be printed for items that are ready to be mailed. Do not print
postage for future use since an acceptance scan is generated in PTS when printed. The
postage label printer can be mounted on a cart or counter within easy range for the
mPOS handler. The postage printer should not be left unsecured on a table in the lobby.

33
Identity Proofing Service (IPS)
mPOS devices will have a separate App that can access a new service that will be rolled
out in FY 15. This App may not be available on all mPOS devices initially. Post Offices
will be notified when this becomes available in their locations.
Identity Proofing Service (IPS) In Person Proofing
IPS is a service that allows customers to upgrade their USPS.com accounts to a higher
level of assurance. Customers will first attempt to complete this process remotely from
their personal computer. Customers that are unable to complete the process remotely
will be directed to a retail Post Office to attempt In Person Proofing. To complete this
process in-person, the customer will need to bring:
Confirmation email with barcode
Primary form of identification (photo ID). Acceptable forms of photo ID are:
o State Driver’s License
o State Non-Driver’s ID Card
o Uniformed Service ID Card
o Passport
Secondary form of identification. This is only necessary when the primary form does
not contain a current address or does not contain an address at all. Acceptable forms
of secondary identification documents.
o Lease, Mortgage, or Deed of Trust
o Voter or Vehicle Registration Card
o Home or Vehicle Insurance Policy
Once Post Offices are notified that they will be accepting IPS customers, this list of
locations will be shared with customers needing this service. This service will only be
available on mPOS devices (not POS) initially. Therefore to be able to assist IPS
customers, the mPOS device and a trained employee should always be available during
normal business hours, even if the mPOS is not being used in the lobby.

34
To access the IPS App, the USPS app will
need to be closed out by double clicking on
the home button and swiping up on the
open USPS App screen. The new IPS app
can be opened by selecting the icon.
At the IPS App login screen, enter your
ACE ID and password. Select the “Sign In”
button to start the IPS application.
Note: User roles to IPS are active once
requested and approved through eAccess.

35
If your login is unsuccessful, you will be
presented with this error screen. Make
sure you enter your ACE credentials
correctly and that you are approved for IPS
in eAccess.
Ask the customer to present their
confirmation barcode. Select “Scan
Barcode”. If the barcode is unable to be
read, enter the barcode numbers manually
and select “Submit”.
Note: Try to scan the barcode before
entering the numbers manually. If the scan
is unsuccessful, there will be an option to
return to this screen and manually enter
the barcode numbers.
Scan the photo ID barcode by pressing the
button on the right side of the mPOS
device. Scanning the confirmation barcode
should locate the Customer’s IPS record. If
the scan is unsuccessful select “Enter
Barcode Manually”

36
If the customer’s identity has already been
verified, an error message will indicate that
the proofing even has already occurred. If
the customer believes that they have not
been successfully proofed, select “Retry
Scan” and attempt to scan their barcode.
If the customer is not eligible for an In
Person Proofing, the application will
present an error stating the customer
record is not in the system. Confirm that
the customer attempted remote proofing
but was directed to in person proofing.
Select “Retry Scan” to scan the customer’s
barcode again. If the application still
cannot locate the Proofing Event, request
that the customer generate a new
confirmation email and scan the new
barcode.
If the barcode was successfully scanned,
the Customer’s name should appear in the
“Name” field. Ask to see the Customer’s
photo ID.
Check to make sure the Customer
matches the photo.
Check to make sure the name on the
ID matches the name on the screen.
Check to make sure the photo ID has
not expired.
Select “Next” to scan the photo ID
barcode.

37
Select the form of identification to scan
Scan the photo ID barcode by pressing the
button on the right side of the mPOS
device.
If the address scanned on the photo ID
does not match the address on file, the IPS
application will present an error alerting
you to request a secondary form of ID.
Select the secondary form used to verify
the customer’s address.

38
If the customer does not have a photo ID
with their current address, ask them to
present a secondary form. Select the
secondary form used to verify the
customer’s address.
Note: The address on the secondary form
of ID must match the address in the
system.
Validate that the address on the
customer’s secondary form of ID matches
the address shown on the screen. If the
information on the customer’s form of
identification matches, select “Yes”. If the
information does not match, select “No”.
Validate the customer’s date of birth. If the
information on the customer’s form of
identification matches, select “Yes”. If the
information does not match, select “No”.

39
If the identity validation is successful, the
IPS application will present an Identity
Validation Complete screen. Inform the
customer that the proofing is complete and
that they will receive a confirmation email.
Print the validation proofing confirmation
code by selecting “Print Confirmation
Code”.
If you suspect that the person is attempting
fraudulent identity verification, select
“Suspected Fraud”. No other action is
needed.
To begin new identity verification, select
“New Transaction”.
If you are finished with the IPS application,
select “Sign Out”.

40
Frequently Asked Questions (FAQs)
1. What should I do if the device stops functioning in the middle of a transaction?
Examples of the device not “functioning” include the following:
The barcode scanner has stopped working (i.e. the lights from the barcode
scanner no longer flash when trying to scan).
There is no response from the mPOS app when a selection is made (i.e. buttons
are being pressed, but the app seems “frozen.”)
First, check the device for its battery level. The battery icon indicating its level is located
under the “Logout” button on the app. If the icon shows 0%, the mPOS device must be
charged before continued use. If the battery icon shows a charge of 50% or more,
proceed with the following steps.
To restart mPOS App software: Press the “Home” button at the bottom of the device,
twice. You will see a short screen at the bottom of your window pop up. Hold the
“mPOS” App icon at the bottom of the screen for 2 seconds, until you see the App icon
jiggle. Select the jiggling mPOS App with the red box at the upper left hand corner of the
icon. It should disappear from the pop up box at the bottom of the screen.
Select the “Home” button again to take you to the device Main screen.
If restarting the mPOS App software does not appear to have changed the status of the
device, proceed with restarting the mPOS device, as directed below.
To restart mPOS device hardware: If the steps to restart the mPOS App software do not
work, a hard restart of the device must be performed. Hold the “On/Off” button down for
5 seconds until you see the screen to power off.
Slide the red arrow button, at the top of the screen, to the right to power the device off.
Wait until the screen turns black.
The restart the mPOS device, hold the “On/Off” button down for 5 seconds for the device
to turn on.
2. Who is my point of contact if I have questions about the device or need help
with completing a transaction?
Call 1-800 – USPS – Help for technical issues. At the voice prompt, say “mobile point of
sale” or “mPOS”
For questions on inventory adjustment or stamp counts, call the Accounting Help Desk
at 1(866) 974-2733

41
3. Does the device have to be cradled at the end of the day?
The mPOS device should be cradled when not in use for extended times and at the end
of the business day to keep the battery charged. Cradling does not transmit any
information from the device itself.
4. Where do I store the device when I am not using it?
When the device is not in use or needs to be recharged, the device should be stored in
the charger, in the designated safe location in the back office.
When helping customers with the mPOS device, the device can be temporarily stored in
the mPOS user’s vest or holster. The mPOS device should always be within an arm’s
reach for device security and promptness in responding to customer needs.
5. Can I mount the printer under the parcel slide to avoid carrying it?
No, the printer should not be mounted. The printer should be set on the mPOS user’s
work counter or in the mPOS user’s vest. The printer should always be within an arm’s
reach for device security and promptness in responding to customer needs.
6. Can a customer purchase something from the mPOS user and the window and
complete the sale on the mPOS?
The mPOS user should only assist customers who have complete transactions that can
be completed on the mPOS device. Customers will be inconvenienced if they have to
split their transaction on mPOS and at the retail window. There are no time savings, and
there is a greater chance of confusion sorting out customer orders.
7. What LDC code should be used when performing lobby assistance with the
mPOS device?
Lobby Assistants should use LDC 45 OPN 352 when in the lobby assisting
customers.
8. Will the mPOS transactions earn WOS credit in CSV or RDM?
Historical data is needed to determine proper WOS credit. Since the mPOS
technology is new, this data will be collected 52 weeks after full deployment and
analyzed in order to properly assign credit.
CSV feeds for mPOS data is currently being established in order to allow LDC 45
credit to be earned for mPOS. Development will be complete in FY 15.

42
9. Who should we notify if the item is lost or stolen?
In the event the device or any peripherals are lost or stolen, immediately notify the contacts
below:
1. NOTIFY: USPS Computer Incident Response Team (CIRT) Hotline
Phone: 1-866-877-7247 Outside US: 00-1-919-501-9299 Email: [email protected]
2. NOTIFY: USPS Inspection Service – Local Office where the incident took place.
Phone: 1-877-876-2455 http://www.usps.com/ncsc/locators/find-is.html
3. NOTIFY: . [email protected]

43
Appendix 1 – Daily Log
mPOS Daily Log Location:
Date Time
Out
Time
In
Stamp
Quantity
Out
Stamp
Quantity
In
Total
booklets
sold
Employee
Name
Employee
Signature
Suprv
Initials
Store this log in the safe area with mPOS equipment. Review log daily to insure no information has been
omitted or changed. File with quarterly credit exam results onsite in separate file.

44
Appendix 2 – POS to mPOS Stamp Transfer Instructions NOTE: mPOS is authorized to sell only specific item numbers for stamp booklets.
Contact the District Retail Office or Area Retail Equipment Coordinator for list of
mPOS eligible booklets.
Stock Custodian signs on POS to transfer stock and completes these steps:
1. Access Back Office
2. Select <Inventory Options>
3. Select <Inventory Transfers>
4. Select <Return Stock>
5. Select <Initiate New Return>
6. Scan or key an item number of select authorized items, then press [Enter]
Current Flag booklets
Current select holiday booklets
7. Select <Continue>
8. Key the quantity being shipped, then press [Enter]
9. Select <Continue>
10. Select <External PO / Unit>
Note: When you select <External PO / Unit> the shipment number is
automatically generated by the system.
11. Key the Destination Location ID (mPOS finance number) XXXXXX-750X, then
press [Enter]. (Contact your District Retail Manager if you do not know you
mPOS finance number.
12. Select <Accept This Return & Continue>
13. To complete the return, select <Print and Send Return>
14. The Shipment Acknowledgement and PS Form 17 prints.
15. Select <Continue>
Stamps and POS generated PS Form 17 should be verified and accepted by mPOS
user for entry into mPOS device.

45
Appendix 3 – POS Stamps Return Instructions
Stock Custodian signs on POS to transfer stock:
1. Access Back Office
2. Select <Inventory Options>
3. Select <Inventory Transfers>
4. Select <Return Stock>
5. Select <Initiate New Return>
6. Scan or key an item number of select authorized items, then press [Enter]
Current Flag booklets
Current select holiday booklets
7. Select <Continue>
8. Key the quantity being shipped, then press [Enter]
9. Select <Continue>
10. Select <External PO / Unit>
Note: When you select <External PO / Unit> the shipment number is
automatically generated by the system.
11. Key the Destination Location ID (mPOS finance number) XXXXXX-750X, then
press [Enter].
12. Select <Accept This Return & Continue>
13. To complete the return, select <Print and Send Return>
14. The Shipment Acknowledgement and PS Form 17 prints.
15. Select <Continue>
Stamps and POS generated PS Form 17 should be verified and accepted.

46
Appendix 4– POS Instructions for Processing Refunds Full Service Window POS ONE System process
This requires a 2-Step process: First Step:
a. Select Domestic Mail screen.
b. Scan the item(s) barcode of the replacement stamp(s).
c. Select <Accept>
d. Verify that the amount is the same amount of the mPOS Postage Label
e. [Payment or End of Visit],
Note: Do not issue the stamps to customer until you finalize the Second Step.
Second Step:
a. Press [Clerk Services / Back Office].
b. Select <Money and Accounts>>>>.
c. Select <GL Activity>>>>.
d. Select <GL Adjustments>.
e. Enter AIC 551, select <Accept>
f. Key Amount of the mPOS Postage Label, press [Enter].
g. Select <Accept & Continue to Offset AIC Entry>.
h. Enter Offset AIC 752 for the offset AIC.
i. Select <Accept>
j. Verify that the adjustment is the correct amount. It’s displayed in the
Notebook Area.
k. Select <Yes, accept Adjustments>
l. Print a POS receipt
Attach the POS receipt and the mPOS Postage Label to the completed and signed
(customer & Retail Associate signatures) PS Form 3533. Issue the customer stamps for
the same total value. Submit the PS Form 3533 with receipt and mPOS Postage Label
at closeout.