MMP/DMP · DMP has a digital micrometer head for increased precision and ease of use. ... Advance...
16
Instrumenting scientific ideas WORLD PRECISION INSTRUMENTS MMP/DMP Manual Microsyringe Pumps Serial No._____________________ www.wpiinc.com INSTRUCTION MANUAL 120415
Transcript of MMP/DMP · DMP has a digital micrometer head for increased precision and ease of use. ... Advance...

Instrumenting scientific ideas
WORLD PRECISION INSTRUMENTS
MMP/DMPManual Microsyringe Pumps
Serial No._____________________
www.wpiinc.com
INSTRUCTION MANUAL
120415

Microvolume SyringesSyringes with Luer Fitting (no needle)
Order No. Volume Description O.D. SCALELENGTH
ILS025LT 25 µL ILS 25 µL Gas-tight Luer tip 8.0 mm 60 mmSGE050TLL 50 µL SGE 50 µL Gas-tight Teflon Luer Lock 8.0 mm 60 mmSGE100TLL 100 µL SGE 100 µL Gas-tight Teflon Luer
Lock 8.0 mm 60 mm
SGE250TLL 250 µL SGE 250 µL Gas-tight Teflon Luer Lock 8.0 mm 60 mm
New MMP Kit allows micropipettes to be securely mount ed in micropositioners. This kit contains the injection assembly, which includes: pipette holder, Teflon tubing, luer-to-tubing coupler, gaskets for 1.0mm OD pipette, 1.2mm OD pipette, 1.5mm OD pipette, 1.65mm OD pipette.
MMP Kit
This useful kit includes the means to start, stop, add, divide and control a flow of liquid or gas, with over 200 as sort ed parts such as one-way and three-way stopcocks, manifolds, Y-connectors, in jec tion sites, male and female luer caps, check valves, syringe-activated check valves, slide clamps, roller clamps, and pinch clamps. All (except clamps) have a luer fitting for quick and easy con nect ing and disconnecting. Includes assorted luer fittings for use with flex i ble tubing.
14011 Luer Valve Assortment Kit
Luer Valve Assortment Kit

MMP/DMP
World Precision Instruments i
Copyright © 2015 by World Precision Instruments, Inc. All rights reserved. No part of this publication may be reproduced or translated into any language, in any form, without prior written permission of World Precision Instruments, Inc.
CONTENTSABOUT THIS MANUAL ................................................................................................................... 1INTRODUCTION .............................................................................................................................. 2
Parts List ...................................................................................................................................... 2Unpacking ................................................................................................................................... 3
OPERATING INSTRUCTIONS ......................................................................................................... 4Injection Fluid Filling ................................................................................................................. 4Improving Performance .......................................................................................................... 5
Shortening the Teflon Tubing ........................................................................................... 6Removing Air from the Pipette Coupling Tube ............................................................ 6Removing the Stopcock ..................................................................................................... 6
Determination of Total Volume Pumped ............................................................................ 7ACCESSORIES................................................................................................................................... 7
Syringes for MMP/DMP ........................................................................................................... 7Replacement Parts ................................................................................................................... 7
SPECIFICATIONS .............................................................................................................................. 8DECLARATION OF CONFORMITY ..............................................................................................10WARRANTY .....................................................................................................................................11
Claims and Returns ................................................................................................................11Repairs .......................................................................................................................................11

ii World Precision Instruments
pipette holderTeflon tubing
luer-to-tubing coupler
4-way stopcock
male luer connector
side female luer connector
with syringe attached
female luer connector
syringe mount bracket
syringe mount

MMP/DMP
World Precision Instruments 1
ABOUT THIS MANUALThe following symbols are used in this guide:
This symbol indicates a CAUTION. Cautions warn against actions that can cause damage to equipment. Please read these carefully.
This symbol indicates a WARNING. Warnings alert you to actions that can cause personal injury or pose a physical threat. Please read these carefully.
NOTES and TIPS contain helpful information.
pipette
syringe piston mount bracket
syringe piston mount screw
non-rotating micrometer spindle
micrometer
micrometer mount screw
adjustable micrometer mount
Fig. 1—MMP Manual Microsyringe Pump is shown fully assembled.

2 World Precision Instruments
Fig. 2—On the DMP the micrometer has a digital display
INTRODUCTIONThe MMP is a convenient tool for precise manual injection of fluid using glass pipettes or similar injection devices. DMP has a digital micrometer head for increased precision and ease of use. The design allows visual feedback of flow at the pipette tip and can also be used as a manual micro syringe pump for perfusion or withdrawal of liquids. The resolution of the injection volume can be continuously varied from 10nL to the microliter range, depending on the syringe volume used. Either oil or air can be used as the transfer media to assist in the injection of fluid.
The non-rotating micrometer head has a resolution of 10µm per division and advances 500µm per full revolution. The entire frame body of the injector is constructed with polished stainless steel for stability and durability. The piston of the micrometer can be slid across the rail to the syringe’s plunger position. Small diameter PTFE tubing is used to improve the accuracy and solution compatibility. The unique design of the pipette holder can securely hold any pipette with an outer diameter of between 1.0mm and 1.5mm. The necessary accessories for removing air and filling the syringe and tubing with liquid are included. The system comes complete with a 100µL gas tight syringe. However, other syringe sizes are available on request.
Parts ListAfter unpacking, verify that there is no visible damage to the sensor. Verify that all items are included:(1) Stainless steel stand with micrometer(1) 100µL gas-tight SGE syringe (#SGE100TLL)(1) 4-way stopcock (#14057-10)(1) 10mL plastic syringe (#3744-10)(1) Injection assembly (pipette holder, Teflon tubing, luer-to-tubing coupler, gasket for 1.0mm OD pipette)(1) Extra gasket for 1.0mm OD pipette (Green Silicone) (1) Extra gasket for 1.2mm OD pipette (Black Silicone) (1) Extra gasket for 1.5mm OD pipette (Blue Silicone)

MMP/DMP
World Precision Instruments 3
(1) Extra gasket for 1.65mm OD pipette (Red Silicone) (1) Digital Micrometer Head (model DMP only), packed separately to reduce risk
of damage during shipment. To install, slide it all the way onto the hole in the adjustable micrometer mount, then attach the syringe piston mount bracket as shown in Fig. 1. Tighten the screws on the side of the syringe bracket and micrometer mount with the tool provided.
(1) Instruction Manual
Fig. 3—Fluid injection components
UnpackingUpon receipt of this instrument, make a thorough inspection of the contents and check for possible damage. Missing cartons or obvious damage to cartons should be noted on the delivery receipt before signing. Concealed damage should be reported at once to the carrier and an inspection requested. Please read the section entitled “Claims and Returns” on page 11 of this manual. Please contact WPI Customer Service if any parts are missing at 941.371.1003 or [email protected].
Returns: Do not return any goods to WPI without obtaining prior approval (RMA # required) and instructions from WPI’s Returns Department. Goods returned (unauthorized) by collect freight may be refused. If a return shipment is necessary, use the original container, if possible. If the original container is not available, use a suitable substitute that is rigid and of adequate size. Wrap the instrument in paper or plastic surrounded with at least 100mm (four inches) of shock absorbing material. For further details, please read the section entitled “Claims and Returns” on page 11 of this manual.
Teflon tubingmale luer connector4-way stopcockside female luer connector
microsyringe
10 mL plastic syringe
female luer connector
4 World Precision Instruments
OPERATING INSTRUCTIONS
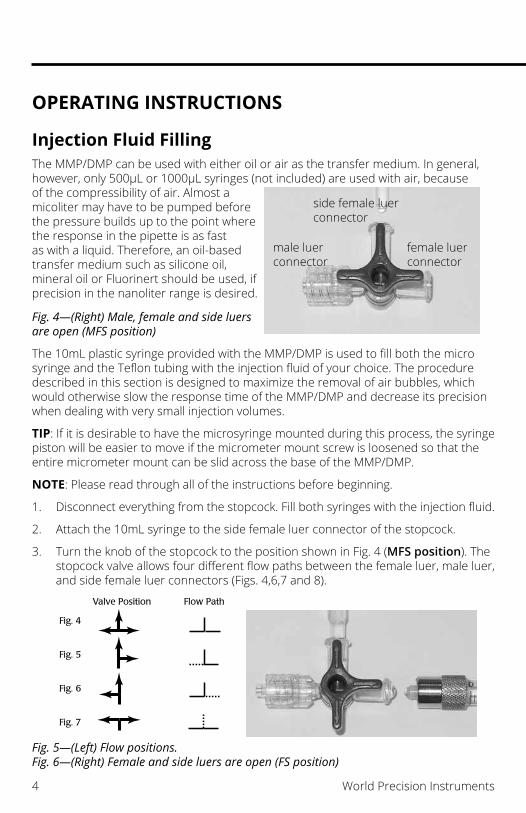
Injection Fluid FillingThe MMP/DMP can be used with either oil or air as the transfer medium. In general, however, only 500µL or 1000µL syringes (not included) are used with air, because of the compressibility of air. Almost a micoliter may have to be pumped before the pressure builds up to the point where the response in the pipette is as fast as with a liquid. Therefore, an oil-based transfer medium such as silicone oil, mineral oil or Fluorinert should be used, if precision in the nanoliter range is desired.
Fig. 4—(Right) Male, female and side luers are open (MFS position)
The 10mL plastic syringe provided with the MMP/DMP is used to fill both the micro syringe and the Teflon tubing with the injection fluid of your choice. The procedure described in this section is designed to maximize the removal of air bubbles, which would otherwise slow the response time of the MMP/DMP and decrease its precision when dealing with very small injection volumes.
TIP: If it is desirable to have the microsyringe mounted during this process, the syringe piston will be easier to move if the micrometer mount screw is loosened so that the entire micrometer mount can be slid across the base of the MMP/DMP.
NOTE: Please read through all of the instructions before beginning.
1. Disconnect everything from the stopcock. Fill both syringes with the injection fluid.
2. Attach the 10mL syringe to the side female luer connector of the stopcock.
3. Turn the knob of the stopcock to the position shown in Fig. 4 (MFS position). The stopcock valve allows four different flow paths between the female luer, male luer, and side female luer connectors (Figs. 4,6,7 and 8).
Fig. 4
Fig. 7
Fig. 6
Fig. 5
Valve Position Flow Path
Fig. 5—(Left) Flow positions.Fig. 6—(Right) Female and side luers are open (FS position)
male luer connector
side female luer connector
female luer connector

MMP/DMP
World Precision Instruments 5
Fig. 7—Female and side luers are open (MS position)
Fig. 8—Male and female luers are open (MF position)
For each step in the filling process, make sure the luer tips are filled with the fluid before connecting them so that bubble formation is minimized.
4. Advance the piston of the large plastic syringe until the open ends of the stopcock are at least partially full (Fig. 8). This displaces trapped air within the valve of the stopcock. Then turn it clockwise to the position shown in Fig. 4 so that the male luer connector is blocked off (FS position) and attach the micro syringe.
If there are any bubbles between the micro syringe and stopcock they can be expelled into the Teflon tubing after turning the knob to the MF position (Fig. 8). Then, turn it back to the FS position so that it can be refilled with the 10mL syringe. This procedure may have to be repeated with the smaller micro syringe sizes. Once a bubble free connection is established with the micro syringe, put the stopcock knob in the MS position (Fig. 7), attach the Teflon tubing and pipette, and advance the piston of the plastic syringe until all air is expelled.
Turn the knob to the MF position so that the micro syringe is connected exclusively to the Teflon tubing as shown in Fig. 8. If any bubbles enter the system around the stopcock during use, expel them directly into the plastic 10mL syringe.
Improving PerformanceFor most cases, the precision obtained from following the steps in the previous section is adequate. If more precision is required, it may be desirable to try the following techniques and modifications.

6 World Precision Instruments
CAUTION: Pipette holder and luer-to-tubing couplers are very small and may be easily misplaced.
Shortening the Teflon TubingIn general, the MMP will work better if the Teflon tubing is as short as is convenient for a given application. Although the tubing is very stiff, it still may expand and contract slightly from the pressure generated by the micro syringe. In addition, the higher pressure needed to push the injection fluid through a longer tube increases the chance that air will slip through one of the seals. In order to shorten the tubing, one of the ends must be exposed so that it can be cut. The easiest way to do this is to unscrew the end cap of the luer-to-tubing coupler (Fig. 7).
Female LuerConnector
End CapGasket
TeflonTubing
Fig. 9—Fig. 7—Luer to tubing coupler parts
Removing Air from the Pipette Coupling TubeSince the pipette coupling tube must accommodate both the Teflon tubing and a range of pipette sizes, there will generally be enough dead volume outside the main fluid passage for air to get trapped in. If the pipette holder is taken apart (Fig. 8), a bubble-free connection can be achieved when each end of the coupling tube is filled with injection fluid before it is re-assembled. As the ends of the Teflon tubing and pipette are slipped into the coupling tube, make sure they meet in the middle so that dead volume is minimized and the risk of bubble formation is reduced.
Removing the StopcockThe stopcock contains a lot of dead volume. The MMP/DMP can be used without it, though this will make it more difficult to set up, and there is no easy way to remove bubbles that form during use. However, it might improve performance slightly for some applications.
Pipette Holder BodyGasketEnd Cap Gasket
Pipette Coupling Tube
TeflonTubing
GlassPipette
Fig. 10—Fig. 8—Pipette holder parts
First, load the Teflon tubing directly with the 10mL syringe. Continue to eject fluid out

MMP/DMP
World Precision Instruments 7
of the syringe as it is being separated from the tubing so that the female luer to tubing coupler remains full. Attach the tubing to the micro syringe with both luer connectors completely filled with injection fluid so that no air is introduced into the system. Since even small bubbles will make more difference than the presence of the stopcock, this step should be performed very carefully and re-tried, if necessary. Finally, be sure to remove trapped air from the pipette coupling tube and the micro syringe itself.
Determination of Total Volume PumpedThe micrometer head advances 10µm/division and 500µm/turn. First, measure the total travel distance of the syringe with calipers. Divide the total volume by the measured value. Multiply this figure by the constants above to get nL per division and per turn.
Example: The SGE 100µL gas tight luer lock syringe (WPI# SGE0100TLL) is 60mm from the “0µL” mark to the “100µL” mark.
(100µL/60mm) • (1mm/1000µm) • (1000nL/µL) = 1.6667nL/micron(1.6667nL/µm) • (10µm/division) = 16.667nL/division(1.6667nL/µm) • (500µm/turn) = 833.33nL/turn
ACCESSORIESMMP-KIT Injection Assembly Parts Kit — contains injection assembly
(pipette holder, Teflon tubing, luer-to-tubing coupler, gaskets for 1.0mm OD pipette, 1.2mm OD pipette, 1.5mm OD pipette, 1.65mm OD pipette)
14057-10 4-Way Stopcock, Luer Lock
Syringes for MMP/DMPWPI P/N Description nL/div. nL/turnILS025LT ILS 25µL Gas-tight Luer tip 4.1666 208.33SGE050TLL SGE 50µL Gas-tight Teflon Luer Lock 8.3333 416.66SGE100TLL SGE 100µL Gas-tight Teflon Luer Lock 16.6666 833.33SGE250TLL SGE 250µL Gas-tight Teflon Luer Lock 41.6666 2083.33SGE500TLL SGE 500µL Gas-tight Teflon Luer Lock 83.3333 4166.66SGE1000TLL SGE 1000µL Gas-tight Teflon Luer Lock 166.6666 8333.33
Replacement Parts75122-110 PicoNozzle gasket green 1.0mm, pkg. of 1075122-210 PicoNozzle gasket black 1.2mm, pkg. of 1075122-310 PicoNozzle gasket red 1.5mm, pkg. of 1075122-410 PicoNozzle gasket clear 1.65mm, pkg. of 10
NOTE: The colors described here may be different than those supplied in the MMP KIT, and they are subject to change without notice.

8 World Precision Instruments
SPECIFICATIONSTravel Distance ........................................................................................................................ 25mmAdvances per Revolution ..................................................................................................... 0.5mmMinimum Injection Volume .........................................................~10nL/div. for 100µL syringeSyringe Size .....................................................................10µL to 1mL gas tight luer tip syringe ..................................................................................................................... from SGE and HamiltonTubing ...................................................................................1.5m of PTFE tubing with 0.5mm IDPipette Holder Fits ............................................................................. 1.0 to 1.65mm OD pipette
MMP/DMP
World Precision Instruments 9
10 World Precision Instruments
DECLARATION OF CONFORMITY

MMP/DMP
World Precision Instruments 11
* Electrodes, batteries and other consumable parts are warranted for 30 days only from the date on which the customer receives these items.
WARRANTYWPI (World Precision Instruments, Inc.) warrants to the original purchaser that this equipment, including its components and parts, shall be free from defects in material and workmanship for a period of 30 days* from the date of receipt. WPI’s obligation under this warranty shall be limited to repair or replacement, at WPI’s option, of the equipment or defective components or parts upon receipt thereof f.o.b. WPI, Sarasota, Florida U.S.A. Return of a repaired instrument shall be f.o.b. Sarasota.
The above warranty is contingent upon normal usage and does not cover products which have been modified without WPI’s approval or which have been subjected to unusual physical or electrical stress or on which the original identification marks have been removed or altered. The above warranty will not apply if adjustment, repair or parts replacement is required because of accident, neglect, misuse, failure of electric power, air conditioning, humidity control, or causes other than normal and ordinary usage.
To the extent that any of its equipment is furnished by a manufacturer other than WPI, the foregoing warranty shall be applicable only to the extent of the warranty furnished by such other manufacturer. This warranty will not apply to appearance terms, such as knobs, handles, dials or the like.
WPI makes no warranty of any kind, express or implied or statutory, including without limitation any warranties of merchantability and/or fitness for a particular purpose. WPI shall not be liable for any damages, whether direct, indirect, special or consequential arising from a failure of this product to operate in the manner desired by the user. WPI shall not be liable for any damage to data or property that may be caused directly or indirectly by use of this product.
Claims and ReturnsInspect all shipments upon receipt. Missing cartons or obvious damage to cartons should be noted on the delivery receipt before signing. Concealed loss or damage should be reported at once to the carrier and an inspection requested. All claims for shortage or damage must be made within ten (10) days after receipt of shipment. Claims for lost shipments must be made within thirty (30) days of receipt of invoice or other notification of shipment. Please save damaged or pilfered cartons until claim is settled. In some instances, photographic documentation may be required. Some items are time-sensitive; WPI assumes no extended warranty or any liability for use beyond the date specified on the container
Do not return any goods to us without obtaining prior approval and instructions from our Returns Department. Goods returned (unauthorized) by collect freight may be refused. Goods accepted for restocking will be exchanged or credited to your WPI account. Goods returned which were ordered by customers in error are subject to a 25% restocking charge. Equipment which was built as a special order cannot be returned.
RepairsContact our Customer Service Department for assistance in the repair of apparatus. Do not return goods until instructions have been received. Returned items must be securely packed to prevent further damage in transit. The Customer is responsible for paying shipping expenses, including adequate insurance on all items returned for repairs. Identification of the item(s) by model number, name, as well as complete description of the difficulties experienced should be written on the repair purchase order and on a tag attached to the item.

USAInternational Trade Center, 175 Sarasota Center Blvd., Sarasota FL 34240-9258
Tel: 941-371-1003 • Fax: 941-377-5428 • E-mail: [email protected]
1 Hunting Gate, Hitchin, Hertfordshire SG4 0TJ Tel: 44 (0)1462 424700 • Fax: 44 (0)1462 424701 • E-mail: [email protected]
GermanyZossener Str. 55, 10961 Berlin
Tel: 030-6188845 • Fax: 030-6188670 • E-mail: [email protected] & Hong Kong
WPI Shanghai Trading Co., Ltd.Rm 29a, No8 Dongfang Rd., Pudong District, Shanghai, 200120 PR China
Tel: +86 21 6888 5517 • E-mail:[email protected]
Av. Conselheiro Nébias, 756 sala 2611, Santos-CEP: 11045-002, São Paulo Brazil • Tel: (013) 406-29703 • E-mail: [email protected]
Internetwww.wpiinc.com • www.wpi-europe.com • www.wpiinc.cn