MMCCMB2107 Controller and Memory Board (CMB2107) User’s Manual
58
The M•CORE name and logo and the OnCE name are trademarks of Motorola, Inc. © Motorola, Inc. 2000; ALL RIGHTS RESERVED Motorola reserves the right to make changes without further notice to any products herein to improve reliability, function or design. Motorola does not assume any liability arising out of the application or use of any product or circuit described herein; neither does it convey any license under its patent rights nor the rights of others. Motorola products are not designed, intended, or authorized for use as components in systems intended for surgical implant into the body, or other applications intended to support or sustain life, or for any other application in which the failure of the Motorola product could create a situation where personal injury or death may occur. Should Buyer purchase or use Motorola products for any such unintended or unauthorized application, Buyer shall indemnify and hold Motorola and its officers, employees, subsidiaries, affiliates, and distributors harmless against all claims, costs, damages, and expenses, and reasonable attorney fees arising out of, directly or indirectly, any claim of personal injury or death associated with such unintended or unauthorized use, even if such claim alleges that Motorola was negligent regarding the design or manufacture of the part. Motorola and the Motorola logo are registered trademarks of Motorola, Inc. Motorola, Inc. is an Equal Opportunity/Affirmative Action Employer. MMCCMB2107 Controller and Memory Board (CMB2107) User’s Manual
Transcript of MMCCMB2107 Controller and Memory Board (CMB2107) User’s Manual

MMCCMB2107 Controller
and Memory Board (CMB2107)
User’s Manual
The M•CORE name and logo and the OnCE name are trademarks of Motorola, Inc.
© Motorola, Inc. 2000; ALL RIGHTS RESERVED
Motorola reserves the right to make changes without further notice to any products herein to improve reliability, functionor design. Motorola does not assume any liability arising out of the application or use of any product or circuit describedherein; neither does it convey any license under its patent rights nor the rights of others. Motorola products are notdesigned, intended, or authorized for use as components in systems intended for surgical implant into the body, or otherapplications intended to support or sustain life, or for any other application in which the failure of the Motorola productcould create a situation where personal injury or death may occur. Should Buyer purchase or use Motorola products forany such unintended or unauthorized application, Buyer shall indemnify and hold Motorola and its officers, employees,subsidiaries, affiliates, and distributors harmless against all claims, costs, damages, and expenses, and reasonableattorney fees arising out of, directly or indirectly, any claim of personal injury or death associated with such unintendedor unauthorized use, even if such claim alleges that Motorola was negligent regarding the design or manufacture of thepart. Motorola and the Motorola logo are registered trademarks of Motorola, Inc. Motorola, Inc. is an EqualOpportunity/Affirmative Action Employer.
CAUTION: ESD ProtectionM•CORE development systems include open-construction printed circuit boards that contain static-sensitive components. These boards are subject to damage from electrostatic discharge (ESD). To prevent such damage, you must use static-safe work surfaces and grounding straps, as defined in ANSI/EOS/ESD S6.1 and ANSI/EOS/ESD S4.1. All handling of these boards must be in accordance with ANSI/EAI 625.
MOTOROLA MMCCMB2107UM/D2 User’s Manual

Contents
Section 1 Introduction
1.1 CMB2107 Features . . . . . . . . . . . . . . . . . . . . . . . . . . . . . . . . . . . . . . . . . . . . . . 9
1.2 System and User Requirements . . . . . . . . . . . . . . . . . . . . . . . . . . . . . . . . . . . 10
1.3 CMB2107 Layout . . . . . . . . . . . . . . . . . . . . . . . . . . . . . . . . . . . . . . . . . . . . . . 10
Section 2 Configuration
2.1 Configuring Board Components . . . . . . . . . . . . . . . . . . . . . . . . . . . . . . . . . . . 13
2.1.1 Setting the User Option Switches (S1, S2) . . . . . . . . . . . . . . . . . . . . . . . . 16
2.1.2 Using the Power Headers (J28, J37, J38, J39, J48) . . . . . . . . . . . . . . . . . . 18
2.2 Making Computer System Connections . . . . . . . . . . . . . . . . . . . . . . . . . . . . . 18
2.3 Performing the CMB2107 Selftest . . . . . . . . . . . . . . . . . . . . . . . . . . . . . . . . . 19
2.4 Memory Maps. . . . . . . . . . . . . . . . . . . . . . . . . . . . . . . . . . . . . . . . . . . . . . . . . 21
2.5 Chip Select 1 Emulation . . . . . . . . . . . . . . . . . . . . . . . . . . . . . . . . . . . . . . . . . 23
2.6 Memory Mapped I/O Operation . . . . . . . . . . . . . . . . . . . . . . . . . . . . . . . . . . . 24
2.7 Using the Prototyping Area . . . . . . . . . . . . . . . . . . . . . . . . . . . . . . . . . . . . . . 25
Section 3 Operation
3.1 Debugging Embedded Code . . . . . . . . . . . . . . . . . . . . . . . . . . . . . . . . . . . . . . 27
3.1.1 Using the Picobug Monitor . . . . . . . . . . . . . . . . . . . . . . . . . . . . . . . . . . . . 27
3.1.2 Picobug Sample Session . . . . . . . . . . . . . . . . . . . . . . . . . . . . . . . . . . . . . . 29
3.1.3 Using the GNU Source-Level Debugger . . . . . . . . . . . . . . . . . . . . . . . . . . 32
3.2 Using the SysDS Loader. . . . . . . . . . . . . . . . . . . . . . . . . . . . . . . . . . . . . . . . . 32
Section 4 Connector Information
4.1 MAPI Connectors (P1/J1, P2/J2, P3/J3, P4/J4) . . . . . . . . . . . . . . . . . . . . . . . 37
4.2 OnCE Connector (J7) . . . . . . . . . . . . . . . . . . . . . . . . . . . . . . . . . . . . . . . . . . . 46
4.3 Logic Analyzer Connectors (J5, J17, J18) . . . . . . . . . . . . . . . . . . . . . . . . . . . 47
4.4 RS232 Connectors (J57, J58) . . . . . . . . . . . . . . . . . . . . . . . . . . . . . . . . . . . . . 50
4.5 SRAM External Standby Power Connector (J36) . . . . . . . . . . . . . . . . . . . . . 51
4.6 Prototyping Connector Sites (J51, J52, J53). . . . . . . . . . . . . . . . . . . . . . . . . . 51
MMCCMB2107UM/DUser’s Manual
3

Index . . . . . . . . . . . . . . . . . . . . . . . . . . . . . . . . . . . . . . . . . . . . . . . . . . . . . . . . . . . . 55
MMCCMB2107UM/DUser’s Manual
4
Figures
1-1 MMCCMB2107 Controller and Memory Board . . . . . . . . . . . . . . . . . . . . . . 11
2-1 MMIO Register. . . . . . . . . . . . . . . . . . . . . . . . . . . . . . . . . . . . . . . . . . . . . . . . 24
3-1 SysDS Loader Main Screen . . . . . . . . . . . . . . . . . . . . . . . . . . . . . . . . . . . . . . 33
3-2 Upload To File Dialog Box . . . . . . . . . . . . . . . . . . . . . . . . . . . . . . . . . . . . . . 34
3-3 Display Flash/Ram Display . . . . . . . . . . . . . . . . . . . . . . . . . . . . . . . . . . . . . . 35
4-1 MAPI Connector P1/J1 Pin Assignments . . . . . . . . . . . . . . . . . . . . . . . . . . . . 38
4-2 MAPI Connector P2/J2 Pin Assignments . . . . . . . . . . . . . . . . . . . . . . . . . . . . 40
4-3 MAPI Connector P3/J3 Pin Assignments . . . . . . . . . . . . . . . . . . . . . . . . . . . . 42
4-4 MAPI Connector P4/J4 Pin Assignments . . . . . . . . . . . . . . . . . . . . . . . . . . . . 44
4-5 OnCE Connector J7 Pin Assignments . . . . . . . . . . . . . . . . . . . . . . . . . . . . . . 46
4-6 Logic Analyzer Connector J5 (A) Pin Assignments. . . . . . . . . . . . . . . . . . . . 47
4-7 Logic Analyzer Connector J17 (D) Pin Assignments. . . . . . . . . . . . . . . . . . . 48
4-8 Logic Analyzer Connector J18 (C) Pin Assignments . . . . . . . . . . . . . . . . . . . 49
4-9 Connector Location J51 Pin Assignments . . . . . . . . . . . . . . . . . . . . . . . . . . . 51
4-10 Connector Location J52 Pin Assignments . . . . . . . . . . . . . . . . . . . . . . . . . . . 52
4-11 Connector Location J53 Pin Assignments . . . . . . . . . . . . . . . . . . . . . . . . . . . 53
MMCCMM2107UM/DUser’s Manual
5

MMCCMM2107UM/DUser’s Manual
6

Tables
1-1 MMCCMB2107 Controller and Memory Board Specifications . . . . . . . . . . 12
2-1 Component Configuration Settings . . . . . . . . . . . . . . . . . . . . . . . . . . . . . . . . 13
2-2 User Options Switch Settings . . . . . . . . . . . . . . . . . . . . . . . . . . . . . . . . . . . . . 17
2-3 CMB2107 Selftest LED Sequence . . . . . . . . . . . . . . . . . . . . . . . . . . . . . . . . . 20
2-4 CMB2107 Default Memory Map (Swap 02/20 subswitch ON) . . . . . . . . . . . 21
2-5 Joint CMB2107/MPFB1200 Memory Map . . . . . . . . . . . . . . . . . . . . . . . . . . 22
2-6 CMB2107 Alternate Memory Map (Swap 02/20 subswitch OFF). . . . . . . . . 23
3-1 Picobug Commands . . . . . . . . . . . . . . . . . . . . . . . . . . . . . . . . . . . . . . . . . . . . 28
4-1 MAPI Connector P1/J1 Signal Descriptions . . . . . . . . . . . . . . . . . . . . . . . . . 39
4-2 MAPI Connector P2/J2 Signal Descriptions . . . . . . . . . . . . . . . . . . . . . . . . . 41
4-3 MAPI Connector P3/J3 Signal Descriptions . . . . . . . . . . . . . . . . . . . . . . . . . 43
4-4 MAPI Connector P4/J4 Signal Descriptions . . . . . . . . . . . . . . . . . . . . . . . . . 45
4-5 OnCE Connector J7 Signal Descriptions . . . . . . . . . . . . . . . . . . . . . . . . . . . . 46
4-6 Logic Analyzer Connector J5 (A) Signal Descriptions . . . . . . . . . . . . . . . . . 47
4-7 Logic Analyzer Connector J17 (D) Signal Descriptions . . . . . . . . . . . . . . . . 48
4-8 Logic Analyzer Connector J18 (C) Signal Descriptions . . . . . . . . . . . . . . . . 49
4-9 RS232 Connector J57, J58 Pin Assignments . . . . . . . . . . . . . . . . . . . . . . . . . 50
4-10 Connector Location J51 Signal Descriptions . . . . . . . . . . . . . . . . . . . . . . . . . 52
4-11 Connector Location J52 Signal Descriptions . . . . . . . . . . . . . . . . . . . . . . . . . 52
4-12 Connector Location J53 Signal Descriptions . . . . . . . . . . . . . . . . . . . . . . . . . 53
MMCCMB2107UM/DUser’s Manual
7

MMCCMB2107UM/DUser’s Manual
8

CMB2107 Features
Section 1 Introduction
This user’s manual explains connection, configuration, and operation information for the MMCCMB2107 Controller and Memory Board (CMB2107), a development tool of Motorola’s M•CORE™ family. The CMB2107 lets you develop code to be embedded in an MMC2107 microcontroller unit.
As a standalone tool, the CMB2107 uses an RS232 connection to your computer. This connection lets you use Motorola’s M•CORE System Development Software (SysDS), the GNU source-level debugger, or the Metrowerks MetroTRK debug software. The SysDS consists of a loader, the Picobug monitor, and a built-in selftest. The CMB2107 also has a OnCE™ connector, enabling you to use a debugging application that requires one.
Optionally, you may use the CMB2107 with a different emulator product, such as the Motorola Embedded Background Debug Interface (EBDI), or the Metrowerks CodeWarrior® integrated development environment.
Motorola's SysDS loader lets you download your code into the CMB2107's SRAM (for execution) or FLASH memory (for execution or for storage in non-volatile memory).
The CMB2107 will combine easily with other, optional development boards from Motorola, such as the MPFB1200 Platform Board. Such an optional board expands CMB2107 capacity, enhances CMB2107 performance, or adds to CMB2107 features.
1.1 CMB2107 Features
The CMB2107 features:
• 144-pin, quad flat pack MMC2107 resident MCU.
• 2 megabytes FLASH memory.
• 2 megabytes FSRAM (fast static RAM), configurable for 16- or 32-bit operations.
• Xilinx complex programmable logic device (CPLD).
• Power supply that converts line power to 12-volt input power.
• Two RS232 serial communication ports.
• OnCE connector.
• Four user-accessible LEDs.
• Two DIP switches for system configuration and firmware selection.
• User prototyping (breadboard) area.
MMCCMB2107UM/DUser’s Manual
9

Introduction
• A modular, all-purpose interface (MAPI) 400 connector ring, on the top and bottom of the CMB2107, for easy connection to other, compatible development boards.
• Three 38-pin Mictor logic analyzer connectors.
• Motorola's System Development Software (SysDS).
• Metrowerks MetroTRK debug software
• GNU source-level debugger (from the Free Software Foundation).
• Metrowerks CodeWarrior® IDE (30-day trial version)
• Sites for optional, user-installed prototyping connectors.
1.2 System and User Requirements
You need an IBM PC or compatible computer, running the Windows 95 or WindowsNT (version 4.0) operating system. The computer requires a Pentium (or equivalent) microprocessor, 16 megabytes of RAM, 50 megabytes of free hard-disk space, an SVGA color monitor, and an RS232 serial-communications port. To use the Picobug debug monitor, you also need Hyperterminal or a comparable terminal-emulation program.
To get the most from your CMB2107, you should be an experienced C or M•CORE assembly programmer.
The power supply that comes with your CMB2107 converts line power to the input power that the CMB2107 needs: 12 volts at a minimum of 0.5 amperes.
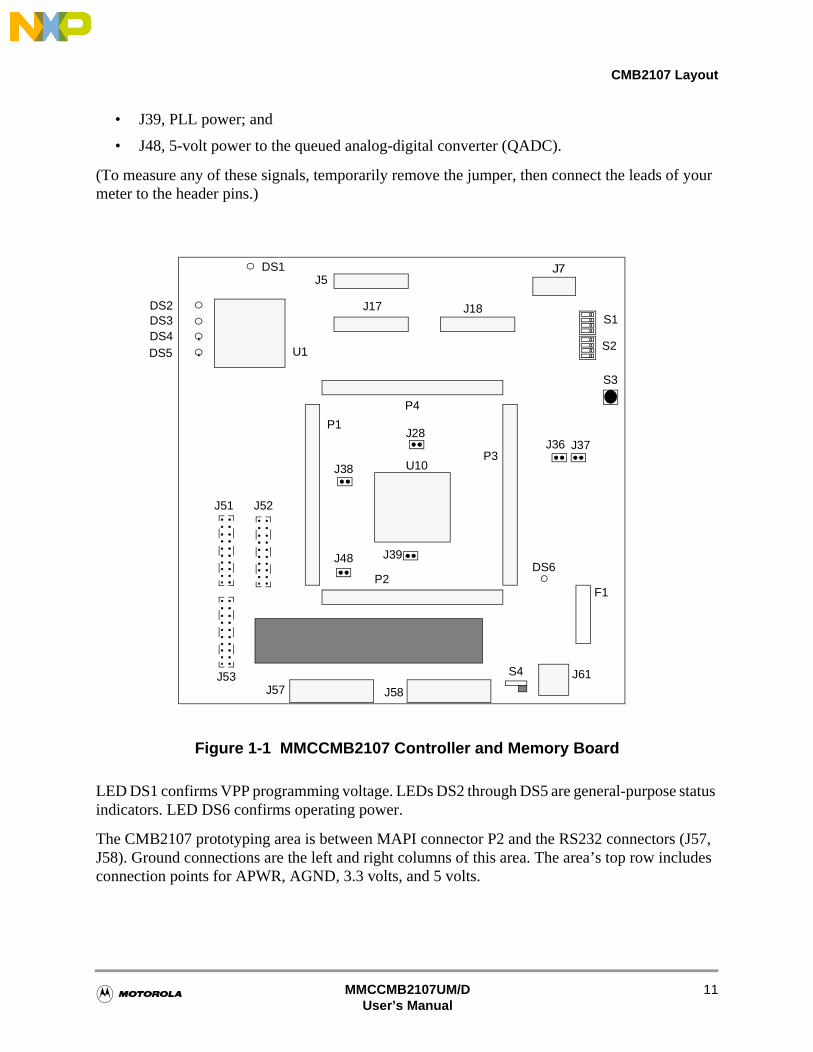
1.3 CMB2107 Layout
Figure 1-1 shows the layout of the CMB2107. Connectors P1 through P4, on the top of the board, are the MAPI I/O and interrupt connectors. (The corresponding MAPI connectors on the bottom of the CMB2107 are J1 through J4). Connector J7 is the OnCE connector. Connectors J5, J17, and J18 are the logic analyzer connectors. Connector J36 is for external standby power for internal SRAM. Connector J57 is the port B RS232 serial connector; connector J58 is the port A RS232 serial connector. Connector J61 is the connector for 12-volt input power.
Switches S1 and S2 configure several aspects of memory organization and access. Switch S3 is the reset switch. Switch S4 is the power switch.
Several two-pin jumper headers are convenient measurement points for various power signals:
• J28, 3-volt power to the resident MCU (at location U10);
• J37, standby power for internal SRAM;
• J38, power for internal FLASH;
MMCCMB2107UM/DUser’s Manual
10
CMB2107 Layout
• J39, PLL power; and
• J48, 5-volt power to the queued analog-digital converter (QADC).
(To measure any of these signals, temporarily remove the jumper, then connect the leads of your meter to the header pins.)
Figure 1-1 MMCCMB2107 Controller and Memory Board
LED DS1 confirms VPP programming voltage. LEDs DS2 through DS5 are general-purpose status indicators. LED DS6 confirms operating power.
The CMB2107 prototyping area is between MAPI connector P2 and the RS232 connectors (J57, J58). Ground connections are the left and right columns of this area. The area’s top row includes connection points for APWR, AGND, 3.3 volts, and 5 volts.
P1
P4
P2
P3
J7
F1
U10
J5
J17 J18
S2
S3
J61
J58J57
S4
DS1
DS6
DS2
DS4S1
J28
J38
J48 J39
J36 J37
J51 J52
J53
U1
DS3
DS5
MMCCMB2107UM/DUser’s Manual
11

Introduction
Note the three groups of eyelets at the lower left of the CMB2107: sites J51, J52, and J53. Although the factory does not populate these sites, you may access many signals at these sites. If you desire, you could install your own connectors at these sites. (The connectors must be 2-by-10-pin connectors, with pins at 0.1-inch centers, such as the Berg 69192-620.)
Location F1 is for the CMB2107 fuse.
The resident MCU, at location U10, is an MMC2107 device, in a 144-pin QFP package. The CPLD is at location U1.
Table 1-1 lists CMB2107 specifications.
Table 1-1 MMCCMB2107 Controller and Memory Board Specifications
Characteristic SpecificationsMCU extension I/O port HCMOS compatible
Operating temperature 0° to 40° CStorage temperature -40° to +85° CRelative humidity 0 to 90% (non-condensing)
Reference clock crystal frequency 8 megahertz
External clock 32 or 16 megahertz, depending on board settings
Power requirements 12 volts dc, at a minimum 0.5 amperes, provided from a separate power source
Dimensions 6.9 x 8.2 inches (175 x 208 mm)
MMCCMB2107UM/DUser’s Manual
12

Configuring Board Components
Section 2 Configuration
This chapter explains how to configure your CMB2107, and how to hook it up to your computer system.
2.1 Configuring Board Components
Table 2-1 is a summary of configuration settings; subsections 2.1.1 and 2.1.2 give additional information.
Table 2-1 Component Configuration Settings
Component Position EffectUser Options Switch S1, Boot Ex/In Subswitch
Configures booting from chip-select-0 memory; disables internal FLASH.
Factory setting.
In master mode, configures booting from internal-FLASH memory.In emulation mode, configures booting from chip-select-1 memory.
User Options Switch S1, Data 32/16 Subswitch
Configures a 32-bit external data bus.
Factory setting.
Configures a 16-bit external data bus. (MPU data lines 15—0 become general purpose I/O.)
User Options Switch S1, Swap 02/20 Subswitch
Configures chip-select-0 control of external FLASH, chip-select-2 control of external SRAM.
Factory setting.
Configures chip-select-2 control of external FLASH, chip-select-0 control of external SRAM.
BOOT EX/IN 5 4
ON
BOOT EX/IN 5 4
ON
DATA 32/165 4
ON
DATA 32/165 4
ON
SWAP 02/2018
ON
SWAP 02/2018
ON
MMCCMB2107UM/DUser’s Manual
13

Configuration
User Options Switches S1 and S2, M0 and M1 Subswitches
Configures master mode.
Factory setting.
Configures emulation mode; disables internal FLASH emulation on chip select 1.
Configures single-chip mode.
Configures emulation mode; enables internal FLASH emulation on chip select 1.
User Option Switch S2, USR0 — USR2 Subswitches
Specifies built-in selftest firmware module to be run out of reset.
Specifies Picobug monitor firmware module to be run out of reset.
Factory setting.
Specifies Programmer firmware module to be run out of reset.
Specifies MetroTRK firmware module to be run out of reset.
Table 2-1 Component Configuration Settings (Continued)
Component Position Effect
M1 5 4
M0 8 1ON
M1 5 4
M0 8 1ON
M1 5 4
M0 8 1ON
M1 5 4
M0 8 1ON
1
USR0
8
5 4
USR1
USR2
ON
1
USR0
8
5 4
USR1
USR2
ON
1
USR0
8
5 4
USR1
USR2ON
1
USR0
8
5 4
USR1
USR2ON
MMCCMB2107UM/DUser’s Manual
14

Configuring Board Components
User Option Switch S2, USR0 — USR2 Subswitches (continued)
Specifies user code to be run out of reset.
Reset Switch, S3 Push to reset all board components.
Power Switch, S4 Turns power OFF.
Factory setting.
Turns power ON.
Power Headers: MCU 3V (J28), internal RAM standby (J37), internal chip FLASH voltage (J38), PLL synchronization (J39), analog voltage (J48)
Connects specified power signal.
Factory setting
(Leave Jumper Installed during normal use.)
Measures current of specified power signal.
Table 2-1 Component Configuration Settings (Continued)
Component Position Effect
1
USR0
8
5 4
USR1
USR2ON
ON OFF
ON OFF
MMCCMB2107UM/DUser’s Manual
15

Configuration
2.1.1 Setting the User Option Switches (S1, S2)
Switches S1 and S2 configure several aspects of board initialization and operation, including operation mode and the firmware module to be run out of reset. The diagram below shows the factory configuration:
• 32-bit, external data bus;
• Chip select 0 control of boot memory and external FLASH;
• Disabling of internal FLASH;
• Chip select 2 control of SRAM;
• Master mode; and
• Picobug firmware module to be run out of reset.
For a different configuration, reset the S1 and S2 subswitches per Table 2-2.
NOTE: Changes you make to settings of the Boot Ex/In, Data 32/16, Swap 02/20, M0, or M1 subswitches do not take effect until the next reset or powerup of your CMB2107.
S1
5
ON
4
18U
SE
R O
PT
ION
S
5
ON
4
18USR2
M0
SWAP 02/20
DATA 32/16
BOOT EX/IN
M1
USR0
USR1S2
MMCCMB2107UM/DUser’s Manual
16

Configuring Board Components
.Table 2-2 User Options Switch Settings
Functionality Selection Subswitch SettingsBoot Memory Configures booting from
chip-select-0 memory; disables
internal FLASH.1
NOTES:1. Factory setting.
BOOT EX/IN2
2. A new setting of this subswitch takes effect upon reset or powerup.
ON
Master mode: configures booting from internal-FLASH memory.Emulation mode: configures booting from chip-select-1 memory.
BOOT EX/IN2 OFF
Data Bus Size 32-bit.1 DATA 32/162 ON
16-bit. (MPU data lines 15—0 become general purpose I/O.)
DATA 32/162 OFF
FLASH/SRAM Chip Select Configuration
Chip-select-0 control of external FLASH, chip-select-2 control of
external SRAM.1
SWAP 02/202 ON
Chip-select-2 control of external FLASH, chip-select-0 control of external SRAM.
SWAP 02/202 OFF
MCU Operating Mode Master.1 M02
M12
ONON
Emulation: disables FLASH emulation on CS1.
M02
M12
ONOFF
Single Chip. M02
M12
OFFON
Emulation, enables FLASH emulation on CS1.
M02
M12
OFFOFF
Firmware Module Built-in Selftest. USR0USR1USR2
OFFOFFOFF
Picobug Monitor.1 USR0USR1USR2
OFFONOFF
Programmer. USR0USR1USR2
ONOFFOFF
MetroTRK. USR0USR1USR2
ONONOFF
User Code. USR0USR1USR2
ONONON
MMCCMB2107UM/DUser’s Manual
17

Configuration
2.1.2 Using the Power Headers (J28, J37, J38, J39, J48)
Your CMB2107 has these power headers:
• J28 — 3-volt power to the U10 resident MCU,
• J37 — standby power for internal SRAM of the U10 resident MCU,
• J38 — power for internal FLASH of the U10 resident MCU,
• J39 — PLL power, and
• J48 — 5-volt power to the queued analog-digital converter (QADC).
During normal use of your CMB2107, leave the jumpers in all of these headers.
To measure any of these signals:
1. Make sure that CMB2107 power is OFF.
2. Remove the jumper from the corresponding power header.
3. Connect meter leads to the header pins.
4. Turn ON CMB2107 power and read the voltage from the meter.
5. Turn OFF CMB2107 power.
6. Disconnect the meter leads.
7. Install the jumper in the power header.
2.2 Making Computer System Connections
When you have configured your CMB2107, you are ready to connect it to your computer system:
1. Make sure that power is disconnected.
2. For RS232 communication directly with your host computer, connect an RS232 cable between CMB2107 connector J58 (port A) and the appropriate serial port of your computer.
3. Alternatively, if you will use an EBDI with your CMB2107, connect an appropriate 14-lead cable between CMB2107 connector J7 and the EBDI. Then use an appropriate cable to connect the EBDI to your host computer. (Using an EBDI means that you do not need to use CMB2107 connector J58 at all. However, a target board could communicate through connector J58.)
4. Optional: If your code, running in a target board, supports RS232 communication with the CMB2107, you can connect a second RS232 cable between the target board and CMB2107 connector J57 (port B).
MMCCMB2107UM/DUser’s Manual
18

Performing the CMB2107 Selftest
5. Optional: You may use the CMB2107 with an MPFB1200 platform board. To do so, you must connect the boards via their MAPI rings. Hold the CMB2107 directly above the other board. Turn the CMB2107 so that the right-triangle silk screen markings line up. Then press the CMB2107 down onto the other board. CMB2107 connectors J1 through J4, on the bottom of the board, must connect with the corresponding MAPI connectors P1 through P4, on the top of the other board.
6. Optional: You may use a logic analyzer with the CMB2107. If you do, connect appropriate cables to any of the logic analyzer connectors: J5, J17, or J18. Such a cable must terminate with a compatible Mictor connector. Section 4 includes pin assignments and cable descriptions for the logic analyzer connectors. (Note the Tektronix-pattern pin numbering.)
7. If you are using the CMB2107 as a standalone tool, connect your 12-volt power supply to line power and to CMB2107 connector J61. Use switch S4 to turn on power: LED DS6 lights to confirm that the CMB2107 is powered.
Should the LED DS6 not light, you may need to replace the fuse at location F1, next to power connector J61. (Use a BUS GMA-1.5A fuse, or compatible.)
8. If you did connect the CMB2107 to a platform board, apply power to the platform board per its instructions. CMB2107 LED DS6 lights to confirm that the CMB2107 receives power from the platform board. (As for step 6, should the LEDs not light, you may need to replace the platform-board fuse.)
9. This completes system connections: you are ready to perform a selftest, per the instructions of subsection 2.3, below. You are ready to begin debugging or other development activities, per the instructions of Chapter 3.
2.3 Performing the CMB2107 Selftest
Once you have configured your CMB2107, you can perform a selftest of its components.
1. Make sure that CMB2107 power is turned off or disconnected. Power LED DS6 should be out.
2. Set switch S2 for the built-in selftest: USR0, USR1, and USR2 subswitches all OFF.
3. Turn on power. LED DS6 comes on to confirm power, and the CMB2107 begins its selftest.
MMCCMB2107UM/DUser’s Manual
19
Configuration
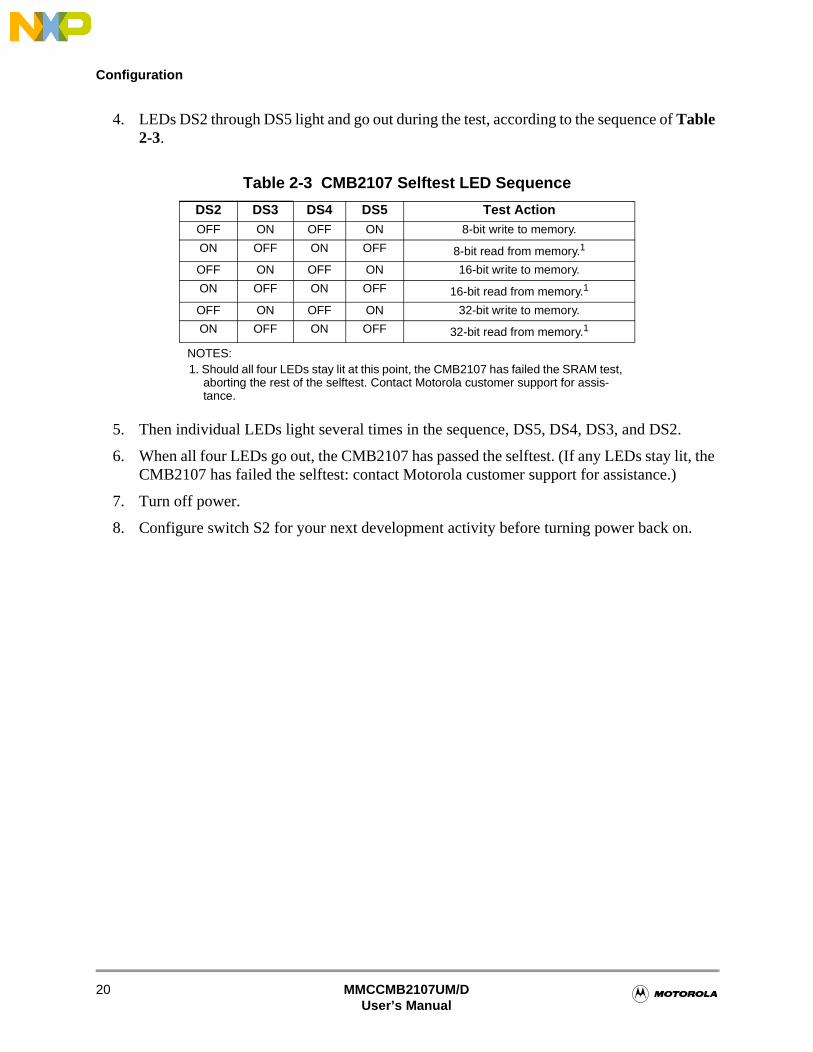
4. LEDs DS2 through DS5 light and go out during the test, according to the sequence of Table 2-3.
5. Then individual LEDs light several times in the sequence, DS5, DS4, DS3, and DS2.
6. When all four LEDs go out, the CMB2107 has passed the selftest. (If any LEDs stay lit, the CMB2107 has failed the selftest: contact Motorola customer support for assistance.)
7. Turn off power.
8. Configure switch S2 for your next development activity before turning power back on.
Table 2-3 CMB2107 Selftest LED Sequence
DS2 DS3 DS4 DS5 Test ActionOFF ON OFF ON 8-bit write to memory.
ON OFF ON OFF 8-bit read from memory.1
NOTES:1. Should all four LEDs stay lit at this point, the CMB2107 has failed the SRAM test,
aborting the rest of the selftest. Contact Motorola customer support for assis-tance.
OFF ON OFF ON 16-bit write to memory.
ON OFF ON OFF 16-bit read from memory.1
OFF ON OFF ON 32-bit write to memory.
ON OFF ON OFF 32-bit read from memory.1
MMCCMB2107UM/DUser’s Manual
20

Memory Maps
2.4 Memory Maps
Table 2-4 is the default memory map (Swap 02/20 subswitch is ON).
Table 2-4 CMB2107 Default Memory Map (Swap 02/20 subswitch ON)
Address Range Sub Range Memory ResourceRelated
Chip Select0x8000_0000
0x801F_FFFF
CMB FLASH(2 megabytes)
System
CS0
0x8000_0000
0x8001_FFFF
System Software(128 kilobytesSectors 0—3)
0x8002_0000
0x801F_FFFF
User Code(1920 kilobytesSectors 4 — 18)
0x8020_0000
0x807F_FFFF
User address space (6 megabytes)
0x8100_0000
0x811F_FFFF
CMB SRAM
(2 megabytes)1
NOTES:1. If you use the CMB2107 with an MPFB1200 platform board, and if platform-board
SRAM is associated with the same chip select as CMB2107 SRAM, the MMIO function uses the last four bytes of CMB SRAM.
CS2
0x8100_0000
0x8100_BFFF
Reserved for System Software
(41 kilobytes)
0x8100_C000
0x811F_FFFF
User Code(2007 kilobytes)
0x8120_0000
0x817F_FFFB
User address space
(6 megabytes)1
0x817F_FFFCMMIO read-only byte (reads
in USR0, USR1, USR2 subswitch settings.)
0x817F_FFFD
MMIO write-only byte (controls LEDs and internal
FLASH programming voltage)
MMCCMB2107UM/DUser’s Manual
21

Configuration
Table 2-5 is the combined memory map for a CMB2107 and an MPFB1200 platform board, each with factory settings. (This yields eight megabytes each of FLASH memory and SRAM.) Note that CMB2107 factory settings configure master mode: this platform board map also is valid for CMB2107 emulation mode, with chip-select 1 internal FLASH emulation disabled.
The CMB2107 Data 32/16 subswitch must be ON for this MPFB1200 memory map to be valid, but the CMB2107 Boot Ex/In subswitch has no effect on the map.
Table 2-5 Joint CMB2107/MPFB1200 Memory Map
Address Range Use SizeChip
Select0x8000_0000
0x801F_FFFF
CMB2107 FLASH 2 megabytes CS0
0x8020_0000
0x807F_FFFF
MPFB1200 FLASH 6 megabytes CS0
0x8080_0000
0x809F_FFFF
[Unused]
0x80A0_0000
0x80FF_FFFF
MPFB1200 SRAM1
NOTES:1. For the alternate MPFB SRAM address range 0x8120_0000 through
0x817F_FFFB, use the MPFB main SRAM jumper header (W2) to select CS2.
6 megabytes CS1
0x8100_0000
0x811F_FFFF
CMB2107 SRAM 2 megabyte CS2
0x8120_0000
0x817F_FFFF
[Unused]
0x8180_0000
0x8180_0FFF
MPFB1200 Peripherals 4 kilobytes CS3
0x8180_1000
0x818F_FFFF
MPFB1200 User Space D 1 megabyte (almost)
CS3
MMCCMB2107UM/DUser’s Manual
22

Chip Select 1 Emulation
Table 2-6 is the CMB2107 memory map if the Swap 02/20 subswitch is OFF.
.
NOTE: Using the alternate memory map means that you cannot use the Motorola system software, which is FLASH based. For debugging in the alternate memory map, you must use an EBDI or other product that communicates through the OnCE interface.
2.5 Chip Select 1 Emulation
Chip select 1 emulation pertains to three cases of M1, M0, and Swap 02/20 subswitch settings.
Case I: M1 OFF, M0 OFF, Swap 02/20 ON. These subswitch settings configure emulation mode. MCU memory range 0x0000_0000 — 0x0001_FFFF, under chip-select-1 control, gets mapped to CMB2107 SRAM. Chip select 2 provides access to the same physical memory, but at CMB2107 addresses 0x8102_0000 — 0x8103_FFFF. Motorola system software programs chip select 1 for one wait state, making its operation much like FLASH operation.
NOTE: Chip-select-1 emulation is not an exact simulation of FLASH operation, which has no wait states. Actual FLASH operation is slightly faster than chip-select-1 emulation.
Table 2-6 CMB2107 Alternate Memory Map (Swap 02/20 subswitch OFF)
Address Range Memory ResourceRelated
Chip Select0x8000_0000
0x801F_FFFF
CMB SRAM(2 megabytes)
CS0
0x8020_0000
0x807F_FFFB
User address space (6 megabytes)
0x807F_FFFCMMIO read-only byte (reads
in USR0, USR1, USR2 subswitch settings.)
0x807F_FFFD
MMIO write-only byte (controls LEDs and internal
FLASH programming voltage)
0x8100_0000
0x811F_FFFF
CMB FLASH(2 megabytes)
CS2]
0x8120_0000
0x817F_FFFF
User address space(6 megabytes)
MMCCMB2107UM/DUser’s Manual
23
Configuration
Case II: M1 OFF, M0 OFF, Swap 02/20 OFF. These subswitch settings also configure emulation mode. MCU memory range 0x0000_0000 — 0x0001_FFFF, under chip-select-1 control, gets mapped to CMB2107 FLASH. Chip select 2 provides access to the same physical memory, but at CMB2107 addresses 0x8102_0000 — 0x8103_FFFF. For debugging in this configuration, you must use an EBDI or other product that communicates through the OnCE interface. (Motorola system software does not support this configuration.)
Case III: M1 OFF, M0 ON, Swap 02/20 ON. These subswitch settings also configure emulation mode. Chip select 1 does not specify any CMB2107 memory. Motorola system software disables chip-select-1 emulation, and programs chip select 1 for three wait states. In this configuration, your code can use chip select 1 to specify platform-board or other user-defined memory.
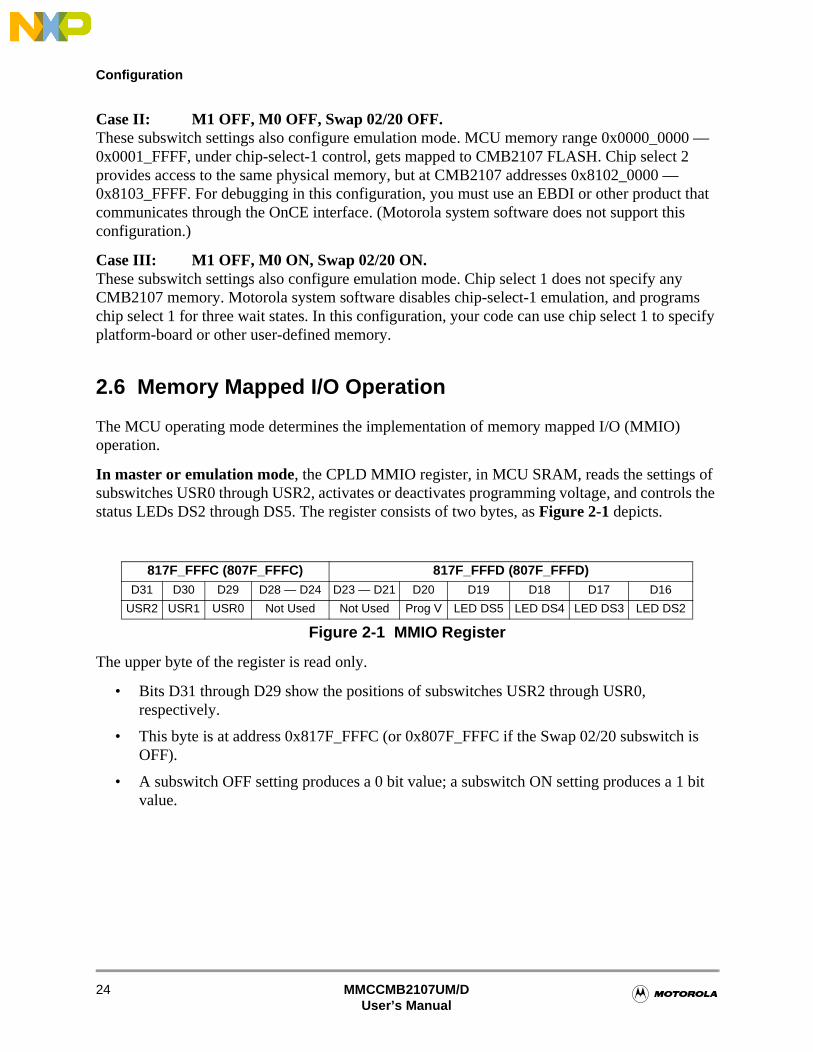
2.6 Memory Mapped I/O Operation
The MCU operating mode determines the implementation of memory mapped I/O (MMIO) operation.
In master or emulation mode, the CPLD MMIO register, in MCU SRAM, reads the settings of subswitches USR0 through USR2, activates or deactivates programming voltage, and controls the status LEDs DS2 through DS5. The register consists of two bytes, as Figure 2-1 depicts.
The upper byte of the register is read only.
• Bits D31 through D29 show the positions of subswitches USR2 through USR0, respectively.
• This byte is at address 0x817F_FFFC (or 0x807F_FFFC if the Swap 02/20 subswitch is OFF).
• A subswitch OFF setting produces a 0 bit value; a subswitch ON setting produces a 1 bit value.
817F_FFFC (807F_FFFC) 817F_FFFD (807F_FFFD)D31 D30 D29 D28 — D24 D23 — D21 D20 D19 D18 D17 D16
USR2 USR1 USR0 Not Used Not Used Prog V LED DS5 LED DS4 LED DS3 LED DS2
Figure 2-1 MMIO Register
MMCCMB2107UM/DUser’s Manual
24

Using the Prototyping Area
The lower byte of the register is write only, cleared by a reset.
• Bit D20 set enables a write or erasure of FLASH (that is, applies 5 volts to the supply pin.). Bit D20 clear disables a write or erasure of FLASH.
• Bits D19 through D16 control status LEDs DS5 through DS2, respectively: set bits turn ON the corresponding LEDs, clear bits turn OFF the corresponding LEDs.
• This byte is at address 0x817F_FFFD (or 0x807F_FFFD if the swap 02/20 subswitch is OFF).
In single chip mode, Port H controls USR subswitch and status LED functionality.
• Port H bit 7 must be configured as a low output.
• Port H bits 6 though 4 read the settings of subswitches USR2 through USR0, respectively.
• Port H bits 3 through 0 control status LEDs DS5 through DS2, respectively: set bits turn ON the corresponding LEDs, clear bits turn OFF the corresponding LEDs.
• Single chip mode does not support Prog V control.
2.7 Using the Prototyping Area
The CMB2107 prototyping area lets you add your own components to the board. Merely insert the component’s feet through holes in the board, then solder the feet in place to hold the component in position. Run appropriate leads from the new component to board power and ground locations.
Note the connection points of the prototyping area:
• Ground — columns on either side,
• Analog power — three points at the upper left corner,
• Analog ground — three points of the top row,
• 3.3 volt power — three points of the top row, and
• 5-volt power — three points at the upper right corner.
Near the prototyping area are the three prototyping connector sites, J51, J52, and J53. Chapter 4 includes pin assignments and signal descriptions for these connector sites.
MMCCMB2107UM/DUser’s Manual
25

Configuration
MMCCMB2107UM/DUser’s Manual
26

Debugging Embedded Code
Section 3 Operation
This chapter explains how to begin using debugging tools available for your MMCCMB2107 Controller and Memory Board, as well as how to use Motorola’s SysDS Loader.
3.1 Debugging Embedded Code
With your CMB2107, you may use the Picobug monitor as standalone software. Optionally, you may use the GNU source-level debugger with the Picobug monitor. Another debugging option is the Metrowerks MetroTRK debugger. Other firms may produce still additional software to run, test, and modify the code you develop for embedding in an MMC2107 MCU.
3.1.1 Using the Picobug Monitor
The Picobug monitor comes burned into the external FLASH memory devices of your CMB2107. Before you start the Picobug monitor, make sure that you have an RS232 connection between CMB2107 connector J58 and a serial port of your computer.
To start the monitor, for use as a standalone debugger:
1. Make sure that power is not applied to your CMB2107.
2. Activate Hyperterminal or a comparable terminal-emulation program. (If you use a different terminal-emulation program, you must make corresponding changes in the commands and menu selections of these instructions, and in the instructions of paragraph 3.1.2.)
3. Select File > Properties, to open a properties dialog box.
4. Click on the Configure button of the dialog box. This opens a configuration dialog box.
5. Use the configuration dialog box to set the communications properties: 19200 baud, 8 data bits, no parity, 1 stop bit, and no flow control. Also specify the correct communications port (for example, COM1). Click the OK button of the dialog box.
6. Set switch S2 for the Picobug monitor: USR0 and USR2 subswitches OFF, USR1 subswitch ON.
7. Apply power to the CMB2107 and press the enter key. The Picobug monitor starts automatically, displaying the command prompt: picobug>.
To use the Picobug monitor, merely enter commands at the prompt. Table 3-1 explains these commands. To see a list of these commands on your computer screen, enter a question mark or the extra command he at the command prompt.
MMCCMB2107UM/DUser’s Manual
27

Operation
.Table 3-1 Picobug Commands
Command Explanationbr [address] Breakpoint:
• With optional address value, sets a new breakpoint at that address.• Without any address value, lists all current breakpoints.
g [address] Go:• With optional address value, starts code execution from that address.• Without any address value, starts code execution from the current program-counter value.In either case, execution stops when it arrives at a breakpoint.
gr Go to Return:Executes code from the current program-counter value to the return address of the calling routine. (Should execution arrive at a breakpoint before encountering the return address, execution stops at the breakpoint.)
gt address Go to Address:Executes code from the current program-counter value to the specified address value. (Should execution arrive at a breakpoint before encountering the specified address, execution stops at the breakpoint.)
he HelpDisplays available commands, identical to the ? command.
lo [address] Download:• With optional address value, downloads a binary image to that address in SRAM.• Without any address value, downloads to SRAM an S-record text file.
md [address1 [address2]] [;size]
Memory Display:• With optional address1 and address2 values, displays memory contents between the addresses.• With optional address1 value, displays contents of 16 memory bytes.• With no address value, defaults to the last address viewed.• The optional size value specifies the format: b (bytes, the default), h (half words), w (words), or i (instructions).
mds [address] Memory Display 256:• With optional address value, displays contents of 256 memory bytes, starting at that address.• With no address value, displays contents of 256 memory bytes, starting from the last address viewed.
mm [address [value]] [;size]
Modify Memory:• With optional address and value parameter values, assigns that value to the address location.• With optional address value but no value parameter value, prompts for a value for the address location, then prompts for a new value for the next location. To stop modification, enter a period instead of a new value.• With no optional address value, prompts for a value for the last address viewed, then prompts for a new value for the next location. To stop modification, enter a period instead of a new value.• The optional size value, specifies the format: b (bytes, the default), h (half words), w (words), or i (instructions).
nobr [address] No Breakpoint:• With optional address value, removes the breakpoint from that address.• Without any address value, removes all the breakpoints.
MMCCMB2107UM/DUser’s Manual
28
Debugging Embedded Code
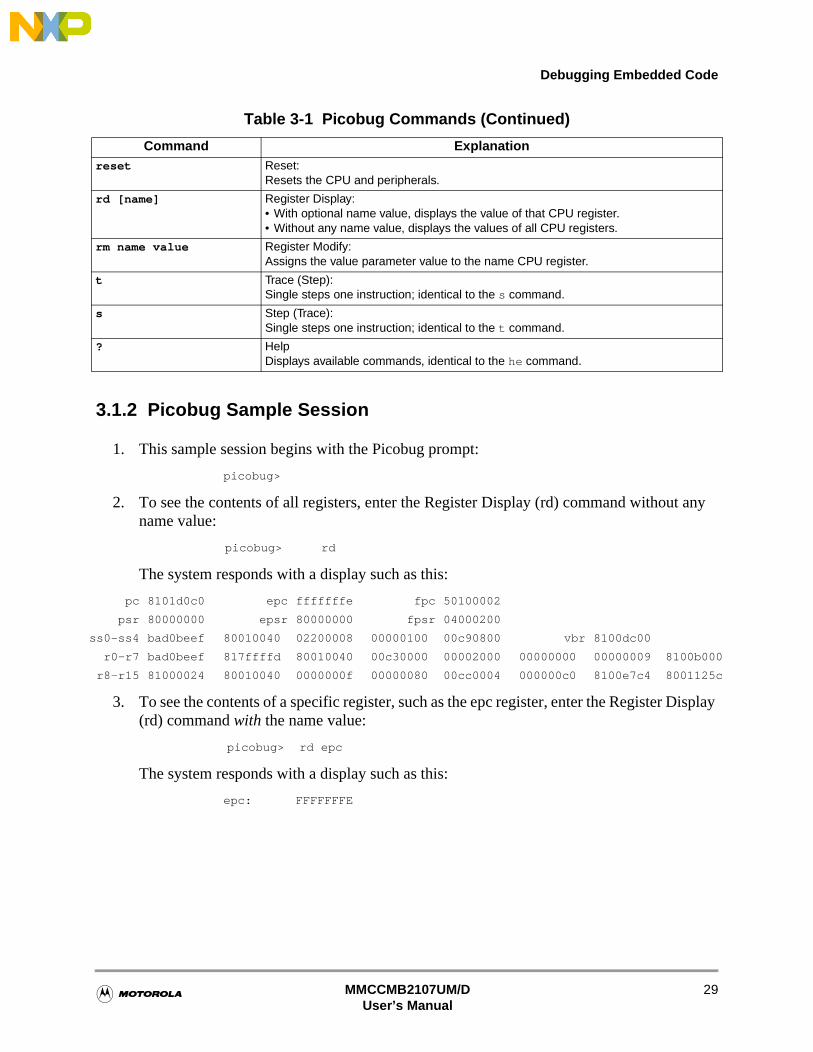
3.1.2 Picobug Sample Session
1. This sample session begins with the Picobug prompt:
2. To see the contents of all registers, enter the Register Display (rd) command without any name value:
The system responds with a display such as this:
3. To see the contents of a specific register, such as the epc register, enter the Register Display (rd) command with the name value:
The system responds with a display such as this:
reset Reset:Resets the CPU and peripherals.
rd [name] Register Display:• With optional name value, displays the value of that CPU register.• Without any name value, displays the values of all CPU registers.
rm name value Register Modify:Assigns the value parameter value to the name CPU register.
t Trace (Step):Single steps one instruction; identical to the s command.
s Step (Trace):Single steps one instruction; identical to the t command.
? HelpDisplays available commands, identical to the he command.
picobug>
picobug> rd
pc 8101d0c0 epc fffffffe fpc 50100002
psr 80000000 epsr 80000000 fpsr 04000200
ss0-ss4 bad0beef 80010040 02200008 00000100 00c90800 vbr 8100dc00
r0-r7 bad0beef 817ffffd 80010040 00c30000 00002000 00000000 00000009 8100b000
r8-r15 81000024 80010040 0000000f 00000080 00cc0004 000000c0 8100e7c4 8001125c
picobug> rd epc
epc: FFFFFFFE
Table 3-1 Picobug Commands (Continued)
Command Explanation
MMCCMB2107UM/DUser’s Manual
29

Operation
4. To see the contents of a specific memory location, enter the Memory Display (md) command with the location address. An optional size value (in this case w, for word) may be part of the command:
The system responds with a display such as this:
5. To see the contents of a memory range, enter the Memory Display (md) command with the beginning and ending addresses. An optional size value (in this case b, for byte) may be part of the command:
The system responds with a display such as this:
6. To download into SRAM a program executable, in S-record format, enter the Download (lo) command without any address value:
The system waits for you to send the program executable file. To do so, open the Transfer menu and select Send Text File. This opens a file-select dialog box. Use this dialog box to specify the appropriate S-record file, then click on the Open button. As soon as the download is complete (this may take several minutes), a confirmation message appears, followed by the Picobug prompt:
7. To see the new contents of registers, enter the Register Display (rd) command again, without any name value:
The system responds with an updated display, which shows that the pc register value reflects the start of the program just downloaded:
picobug> md 0x8101d000 ; w
8101D000: 710B1210
picobug> md 0x8101d000 0x8101d016 ; b
8101D000: 71 0B 12 10 7F 0B 00 00 24 70 9F 00 8F 00 20 70 q.......$p....p
8101D010: 00 CF 00 00 24 70 9F
picobug> lo
Done downloading. The target PC is set to 8101d000.
picobug>
picobug> rd
pc 8101d000 epc fffffffe fpc 50100002
psr 80000000 epsr 80000000 fpsr 04000200
ss0-ss4 bad0beef 80010040 02200008 00000100 00c90800 vbr 8100dc00
r0-r7 bad0beef 817ffffd 80010040 00c30000 00002000 00000000 00000009 8100b000
r8-r15 81000024 80010040 0000000f 00000080 00cc0004 000000c0 8100e7c4 8001125c
MMCCMB2107UM/DUser’s Manual
30

Debugging Embedded Code
8
8. To set a breakpoint at address 0x8101d11e, enter this address as part of the Breakpoint (br) command:
The Picobug prompt reappears, confirming that the system set the breakpoint:
9. To see the list of breakpoints, enter the Breakpoint (br) command without any address value:
The system responds with the addresses of breakpoints, in this case only the breakpoint set in step 8:
10. To start program execution, enter the Go (g) command:
In this instance, the breakpoint set during step 8 stops code execution. The system responds with this new display of register values:
11. To remove all breakpoints, enter the No Breakpoint (nobr) command, without any address value:
The Picobug prompt reappears, confirming that the system has removed the breakpoints:
12. To see the list of breakpoints again, once more enter the Breakpoint (br) command without any address value:
As there are no longer any breakpoints, the system responds with the Picobug prompt:
13. To continue with this example session, enter another appropriate command. For example, to resume program execution, enter the Go (g) command.
picobug> br 0x8101d11e
picobug>
picobug> br
8101D11E
picobug> g
At breakpoint!!
pc 8101d11e epc 8101d11e fpc 50100002
psr 80000100 epsr 80000100 fpsr 04000200
ss0-ss4 bad0beef 80010040 02200008 00000100 00c90800 vbr 8100dc00
r0-r7 8101efd8 8101f000 00000000 00000001 00002000 00000000 00000001 817ffffd
r8-r15 8101efd8 80010040 0000000f 00000080 00cc0004 000000c0 8100e7c4 8101d056
101D11E: B607 stb r6, (r7)
picobug> nobr
picobug>
picobug> br
picobug>
MMCCMB2107UM/DUser’s Manual
31

Operation
14. To end your Picobug session, remove power from the CMB and close the terminal-emulation program.
3.1.3 Using the GNU Source-Level Debugger
The GNU source-level debugger is on the CD-ROM that comes with your CMB2107. This GNU software works with the Picobug monitor to provide source-level debugging for your code.
The CMB2107 software release guide gives the instructions for loading the GNU software, and for making any connections different from standalone Picobug connections.
3.2 Using the SysDS Loader
The Motorola SysDS Loader lets you program code into FLASH memory, upload FLASH contents to a PC file, verify that FLASH contents match those of a download file, display memory contents, erase FLASH memory, erase a sector of FLASH memory, or blank check a sector of FLASH memory.
NOTEs: 1. SysDS Loader functionality is the same for both communication connections: either host computer port directly to CMB2107 RS232 connector J58, or host-computer port to an EBDI then to the CMB2107 OnCE connector J7.
2. For the first action of an SysDS Loader session (downloading, verifying, displaying, erasing, or blank checking), the software may download algorithm file programmer2107.rec before carrying out the action.
(If the software cannot find the algorithm file, an appropriate error message identifies the file. Click on the message’s OK button to bring up a file-select dialog box, then use this dialog box to specify the location of the algorithm file. If necessary, recopy the file from the transmittal CD-ROM. Click on the OK button to resume your SysDS Loader action.)
Follow these steps to use the SysDS Loader:
1. If you have not already installed the SysDS Loader onto your computer hard disk, do so. The CMB2107 product release guide includes installation instructions.
2. If the Hyperterminal emulation program is running, stop the program. (The SysDS Loader needs the same computer serial port that Hyperterminal uses.)
3. Set switch S2 for the Programmer: USR0 subswitch ON, USR1 and USR2 subswitches OFF.
4. Press switch S3 to reset the CMB2107.
MMCCMB2107UM/DUser’s Manual
32

Using the SysDS Loader
5. Start the SysDS Loader. The main screen (Figure 3-1) appears.
Figure 3-1 SysDS Loader Main Screen
6. Go to the File name field.
• If you know the full pathname of the file to be programmed, enter the pathname in this field.
• If you do not know the full pathname of the file to be programmed, click on the Browse button. This brings up a standard file-select dialog box: select the file and click on the OK button. This returns you to the main screen, entering the pathname in the File name field.
• (If your only action for this Loader session will be uploading FLASH contents, you may leave the File name field blank.)
NOTE: The Restore System Software button of the main screen updates FLASH sectors 0 through 3 with the software in your hard-drive directory \Motorola\Loader\MMC2107. Should a factory update replace the software in this directory, return CMB2107 switches to their factory settings, follow steps 1 through 4, above, then click on the Restore System Software button.
MMCCMB2107UM/DUser’s Manual
33

Operation
7. Use the FLASH area to configure the FLASH type, bus width, and size. (To program CMFR FLASH, make sure to specify that value in the FLASH type field.)
The value in the Base Address field is automatic. (However, you may select the optional value <CUSTOM>, which brings up the Custom Address dialog box. Enter an appropriate address, then click on the dialog box OK button to return to the main screen.)
8. In the Communications area, use the Port field to specify the PC serial port, and use the Speed field to specify the communications rate. (The default rate is 19200 baud.)
9. To program FLASH memory, click on the Download button. As the software downloads the file you specified, a progress message appears in a Status dialog box. A Download successful message appears at the end of downloading: you are ready to use the code in FLASH memory.
The error message Unable to Validate Flash configuration indicates some problem with the programming. A likely such problem is that the chip select base address does not correspond to the configured chip select. Correct the problem, then click again on the Download button.
10. To upload FLASH memory contents to a file in your PC, click on the Upload button. This brings up the Upload To File dialog box, Figure 3-2:
Figure 3-2 Upload To File Dialog Box
• Enter the name of the destination file. Optionally, click on the Browse button, to select a file via a standard file-select dialog box.
• The Start Address field indicates the start of CMB2107 FLASH memory or RAM. The default address value corresponds to the value of the SYSTEM field of the main screen, but you may enter a different address, if appropriate.
• Enter the appropriate value in the End Address field. (The system automatically determines the value for the Size in Bytes field.
• The Size in Bytes field value corresponds to the value of the Size field of the main screen. (If appropriate, you may enter a different value.)
MMCCMB2107UM/DUser’s Manual
34

Using the SysDS Loader
• The default Mode field value is Byte.
• When the Upload To File dialog box shows appropriate values, click on the Save button. A progress message appears during uploading.
11. To verify that the contents of Flash memory match the selected download file, click on the Verify button. A progress message appears as verification begins. A Verify successful message appears at the end of verification.
• If verification fails, an error message specifies the location that did not have the expected contents.
• To recover from a verification failure, try downloading Flash again, to replace the selected download file.
12. To view the contents of Flash memory, click on the Display button. This brings up the Display Flash/Ram display (Figure 3-3).
Figure 3-3 Display Flash/Ram Display
• The Address field shows the first address of the value display. One way to change the display is to enter a different address in this field.
• Another way to change the value display is to use the scroll bars.
• Use the Mode field to specify byte, half-word, or word values in the display.
• When you are done viewing the display, click on the Close button to return to the main screen.
13. To erase FLASH memory, click on the Erase FLASH button. The SysDS Loader erases all contents of the FLASH memory except for the sectors that contain system software.
MMCCMB2107UM/DUser’s Manual
35

Operation
14. To erase a sector of FLASH memory, click on the Erase Sector button. This brings up the Flash Sector Number dialog box. Enter the number of the sector to be erased (4 or greater), then click on the OK button.
You may not erase FLASH sectors 0 through 3, which contain system software.
15. To verify that a FLASH sector is blank, click on the Blank Check button. This brings up a dialog box that asks for a sector number. Enter the number of the sector to be blank checked, then click on the OK button.
A message tells you the results of the blank check. (If the sector is not blank, you can erase the sector or try a different sector.)
16. To end your SysDS Loader session, merely close the main screen.
MMCCMB2107UM/DUser’s Manual
36

MAPI Connectors (P1/J1, P2/J2, P3/J3, P4/J4)
Section 4 Connector Information
This chapter consists of pin assignments and signal descriptions for CMB2107 connectors.
4.1 MAPI Connectors (P1/J1, P2/J2, P3/J3, P4/J4)
Connectors P1 through P4, all 2-by-50-pin connectors, are the CMB2107 MAPI connectors. (Connectors J1 through J4, on the bottom of the CMB2107, have the same pin assignments.) The diagram below shows the orientation of the CMB2107 MAPI connectors. Figure 4-1 through Figure 4-4, and Table 4-1 through Table 4-4, give the pin assignments and signal descriptions for these connectors.
1100
100
1
1001
100P4
P1
1
P3
P2
MMCCMB2107UM/DUser’s Manual
37

Connector Information
Figure 4-1 MAPI Connector P1/J1 Pin Assignments
P1/J1PTJ1[100] 100 • • 99 VDD3VPTJ1[98] 98 • • 97 PTJ1[97]PTJ1[96] 96 • • 95 PTJ1[95]PTJ1[94] 94 • • 93 PTJ1[93]GND 92 • • 91 PTJ1[91]VDD5V 90 • • 89 GNDPTJ1[88] 88 • • 87 PTJ1[87]PTJ1[86] 86 • • 85 PTJ1[85]PTJ1[84] 84 • • 83 PTJ1[83]PTJ1[82] 82 • • 81 PTJ1[81]PTJ1[80] 80 • • 79 PTJ1[79]PTJ1[78] 78 • • 77 PTJ1[77]PTJ1[76] 76 • • 75 PTJ1[75]GND 74 • • 73 DEVSP_B[0]PTJ1[72] 72 • • 71 GNDPTJ1[70] 70 • • 69 PTJ1[69]INT_B[6] 68 • • 67 INT_B[7]INT_B[4] 66 • • 65 INT_B[5]INT_B[2] 64 • • 63 INT_B[3]INT_B[0] 62 • • 61 INT_B[1]VDD3V 60 • • 59 VDD3VIDVDD (MID0) 58 • • 57 ICOC2[3]ICOC2[2] 56 • • 55 ICOC2[1]ICOC1[3] 54 • • 53 ICOC2[0]GND (MID1) 52 • • 51 ICOC1[2]ICOC1[1] 50 • • 49 ICOC1[0]SCK 48 • • 47 PTJ1[47]GND 46 • • 45 PTJ1[45]MOSI 44 • • 43 PTJ1[43]MISO 42 • • 41 GNDGND (MID2) 40 • • 39 PTJ1[39]SS_B 38 • • 37 PTJ1[37]PTJ1[36] 36 • • 35 PTJ1[35]IDVDD (MID3) 34 • • 33 PTJ1[33]PTJ1[32] 32 • • 31 PTJ1[31]PTJ1[30] 30 • • 29 PTJ1[29]GND 28 • • 27 PTJ1[27]GND1 26 • • 25 GND1PTJ1[24] 24 • • 23 PTJ1[23]PTJ1[22] 22 • • 21 PTJ1[21]PTJ1[20] 20 • • 19 PTJ1[19]PTJ1[18] 18 • • 17 PTJ1[17]PTJ1[16] 16 • • 15 PTJ1[15]PTJ1[14] 14 • • 13 PTJ1[13]GND1 12 • • 11 PTJ1[11]AGND 10 • • 9 PTJ1[9]AGND 8 • • 7 PTJ1[7]AGND 6 • • 5 MAPIVRHAGND 4 • • 3 MAPIVRLAGND 2 • • 1 PQA[0]
MMCCMB2107UM/DUser’s Manual
38

MAPI Connectors (P1/J1, P2/J2, P3/J3, P4/J4)
Table 4-1 MAPI Connector P1/J1 Signal Descriptions
Pin Mnemonic Signal100, 98 — 93, 91, 88 — 75, 72, 70, 69, 47, 45, 43, 39, 37 — 35, 33 — 29, 27, 24 — 13, 11, 9,
7
PTJ1[x] Pass through.
99, 60, 59, VDD3V +3.3-volt power
92, 89, 74, 71, 46, 41, 28
GND GROUND
90 VDD5V +5-volt power.
73 DEVSP_B[0] DEVELOPMENT SPACE (line 0) — Active-low signal indicating that the current memory cycle is addressing on-board devices.
68 — 61 INT_B[7] — INT_B[0]
(not in exact order)
EXTERNAL INTERRUPT (lines 7—0) — Active-low lines for external interrupts or general-purpose I/O. In addition, certain lines can show processor core signal states:• INT_B[7:6]: states of TSIZ[1:0] signals, provided that the chip configuration register (CCR) SZEN bit is set.• INT_B[5:2]: states of PSTAT[3:0] signals, provided that the CCR PSTEN bit is set.
58, 34 IDVDD (MID0, MID3)
IDENTIFICATION POWER — Special 3-volt power signals (MID0, MID3) for the identification code signals.
57 — 55, 53 ICOC2[3] — ICOC2[0]
TIMER 2 INPUT CAPTURE OUTPUT CAPTURE (lines 3—0) — Signals for internal timer channel 2.
54, 51 — 49 ICOC1[3] — ICOC1[0]
TIMER 1 INPUT CAPTURE OUTPUT CAPTURE (lines 3—0) — Signals for internal timer channel 1.
52, 40 GND (MID1, MID2)
GROUND. Optionally, MID (identification code) lines 1 and 2 — signals that identify the host processor board.
48 SCK SERIAL CLOCK — Synchronization signal for master-slave communication: an output if SPI is configured as master, an input if SPI is configured as slave.
44 MOSI MASTER OUT/SLAVE IN — If SPI is enabled, the data master-out/slave-in signal. If SPI is disabled, a general-purpose port E I/O signal.
42 MISO MASTER IN/SLAVE OUT — If SPI is enabled, the data master-in/slave-out signal. If SPI is disabled, a general-purpose port E I/O signal.
38 SS_B SLAVE SELECT — Active-low slave select signal, in slave mode. In master mode, a peripheral chip-select signal.
26, 25, 12 GND1 GROUND — Connection to the GROUND 1 plane.
10, 8, 6, 4, 2 AGND ANALOG GROUND — Analog ground connection for the analog-digital converter.
5 MAPIVRH MAPI VOLTAGE REFERENCE HIGH — High reference for voltage supplied via the MAPI ring.
3 MAPIVRL MAPI VOLTAGE REFERENCE LOW — Low reference for voltage supplied via the MAPI ring.
1 PQA[0] A ANALOG INPUT (line 0) — A analog input to the QADC, also usable for general-purpose digital I/O.
MMCCMB2107UM/DUser’s Manual
39

Connector Information
Figure 4-2 MAPI Connector P2/J2 Pin Assignments
P2/J2PTJ2[100] 100 • • 99 GND3PTJ2[98] 98 • • 97 PTJ2[97]PTJ2[96] 96 • • 95 PTJ2[95]PTJ2[94] 94 • • 93 PTJ2[93]PTJ2[92] 92 • • 91 PTJ2[91]PTJ2[90] 90 • • 89 PTJ2[89]PTJ2[88] 88 • • 87 PTJ2[87]GND3 86 • • 85 GND3GND 84 • • 83 GNDVDD3V 82 • • 81 PTJ2[81]PTJ2[80] 80 • • 79 VDD5VPTJ2[78] 78 • • 77 PTJ2[77]PTJ2[76] 76 • • 75 PTJ2[75]PTJ2[74] 74 • • 73 PTJ2[73]PTJ2[72] 72 • • 71 PTJ2[71]SCI2_IN 70 • • 69 SCI2_OUTPTJ2[68] 68 • • 67 PTJ2[67]SCI1_IN 66 • • 65 SCI1_OUTGND 64 • • 63 GNDVDD3V 62 • • 61 PTJ2[61]PTJ2[60] 60 • • 59 PTJ2[59]PTJ2[58] 58 • • 57 PTJ2[57]PTJ2[56] 56 • • 55 PTJ2[55]PTJ2[54] 54 • • 53 PTJ2[53]PTJ2[52] 52 • • 51 PTJ2[51]PTJ2[50] 50 • • 49 PTJ2[49]PTJ2[48] 48 • • 47 PTJ2[47]GND 46 • • 45 VDD5VVDD3V 44 • • 43 GNDPTJ2[42] 42 • • 41 PTJ2[41]PTJ2[40] 40 • • 39 PTJ2[39]PTJ2[38] 38 • • 37 PTJ2[37]PTJ2[36] 36 • • 35 PTJ2[35]PTJ2[34] 34 • • 33 PTJ2[33]PTJ2[32] 32 • • 31 SDCPSPTJ2[30] 30 • • 29 VDD5VPTJ2[28] 28 • • 27 PTJ2[27]PTJ2[26] 26 • • 25 PTJ2[25]PTJ2[24] 24 • • 23 PTJ2[23]PTJ2[22] 22 • • 21 PTJ2[21]VDD3V 20 • • 19 PTJ2[19]GND 18 • • 17 GNDAGND 16 • • 15 AGNDPQB[3] 14 • • 13 AGNDPQB[2] 12 • • 11 AGNDPQB[1] 10 • • 9 AGNDPQB[0] 8 • • 7 AGNDPQA[4] 6 • • 5 AGNDPQA[3] 4 • • 3 AGNDPQA[1] 2 • • 1 AGND
MMCCMB2107UM/DUser’s Manual
40

MAPI Connectors (P1/J1, P2/J2, P3/J3, P4/J4)
Table 4-2 MAPI Connector P2/J2 Signal Descriptions
Pin Mnemonic Signal100, 98 — 87, 81, 80, 78 — 71, 68, 67, 61 — 47, 42—32, 30, 28 — 21, 19
PTJ2[x] Pass through.
99, 86, 85, GND3 GROUND — Connection to the GROUND 3 plane.
84, 83, 64, 63, 46, 43, 18, 17
GND GROUND
82, 62, 44, 20 VDD3V +3.3-volt power
79, 45, 29 VDD5V +5-volt power.
70, 65 SCI2_IN, SCI1_IN SCI INPUT — Serial communications interface (SCI) input lines 2 and 1, otherwise available for general-purpose I/O use. (These lines also are known as RXDB and RXDA.)
69, 65 SCI2_OUT, SCI1_OUT
SCI OUTPUT — Serial communications interface (SCI) output lines 2 and 1, otherwise available for general-purpose I/O use. (These lines also are known as TXDB and TXDA.)
31 SDCPS SHUT DOWN CMB POWER SUPPLY — Input signal. If low, disables the CMB on-board power supply.
16, 15, 13, 11, 9, 7, 5, 3, 1
AGND ANALOG GROUND — Analog ground connection for the analog-digital converter.
14, 12, 10, 8 PQB[3] — PQB[0] B ANALOG INPUTS (lines 3—0) — B analog inputs to the QADC, also usable as general-purpose digital inputs.
6, 4, 2 PQA[4], PQA[3], PQA[1]
A ANALOG INPUTS (lines 4, 3, 1) — A analog inputs to the QADC, also usable for general-purpose digital I/O.
MMCCMB2107UM/DUser’s Manual
41

Connector Information
Figure 4-3 MAPI Connector P3/J3 Pin Assignments
P3/J3VDD3V 100 • • 99 VDD3VPTJ3[98] 98 • • 97 GNDPTJ3[96] 96 • • 95 GNDPTJ3[94] 94 • • 93 EXTALPTJ3[92] 92 • • 91 GNDPTJ3[90] 90 • • 89 PTJ3[89]PTJ3[88] 88 • • 87 ONCE_TRST_BPTJ3[86] 86 • • 85 ONCE_TCLKONCE_DE_B 84 • • 83 ONCE_TMSONCE_TDI 82 • • 81 GNDONCE_TDO 80 • • 79 RSTOUT_BVSTBY 78 • • 77 RESET_BIDVDD 76 • • 75 SHS_BVDD5V 74 • • 73 PTJ3[73]PTJ3[72] 72 • • 71 PTJ3[71]PTJ3[70] 70 • • 69 PTJ3[69]GND 68 • • 67 PTJ3[67]TC[2] 66 • • 65 GNDTC[1] 64 • • 63 GND (MID9)TC[0] 62 • • 61 GND (MID8)VDD3V 60 • • 59 VDD3VPTJ3[58] 58 • • 57 PTJ3[57]PTJ3[56] 56 • • 55 GND (MID4)PTJ3[54] 54 • • 53 PTJ3[53]PTJ3[52] 52 • • 51 PTJ3[51]PTJ3[50] 50 • • 49 GND 9MID5)PTJ3[48] 48 • • 47 PTJ3[47]PTJ3[46] 46 • • 45 PTJ3[45]PTJ3[44] 44 • • 43 GNDPTJ3[42] 42 • • 41 PTJ3[41]PTJ3[40] 40 • • 39 PTJ3[39]PTJ3[38] 38 • • 37 IDVDD (MID6)PTJ3[36] 36 • • 35 PTJ3[35]PTJ3[34] 34 • • 33 PTJ3[33]PTJ3[32] 32 • • 31 GND (MID7)PTJ3[30] 30 • • 29 PTJ3[29]PTJ3[28] 28 • • 27 PTJ3[27]PTJ3[26] 26 • • 25 GNDGND4 24 • • 23 GND4PTJ3[22] 22 • • 21 PTJ3[21]PTJ3[20] 20 • • 19 PTJ3[19]PTJ3[18] 18 • • 17 PTJ3[17]PTJ3[16] 16 • • 15 PTJ3[15]PTJ3[14] 14 • • 13 PTJ3[13]PTJ3[12] 12 • • 11 PTJ3[11]PTJ3[10] 10 • • 9 GND4PTJ3[8] 8 • • 7 GND3PTJ3[6] 6 • • 5 PTJ3[5]PTJ3[4] 4 • • 3 PTJ3[3]PTJ3[2] 2 • • 1 GND3
MMCCMB2107UM/DUser’s Manual
42
MAPI Connectors (P1/J1, P2/J2, P3/J3, P4/J4)
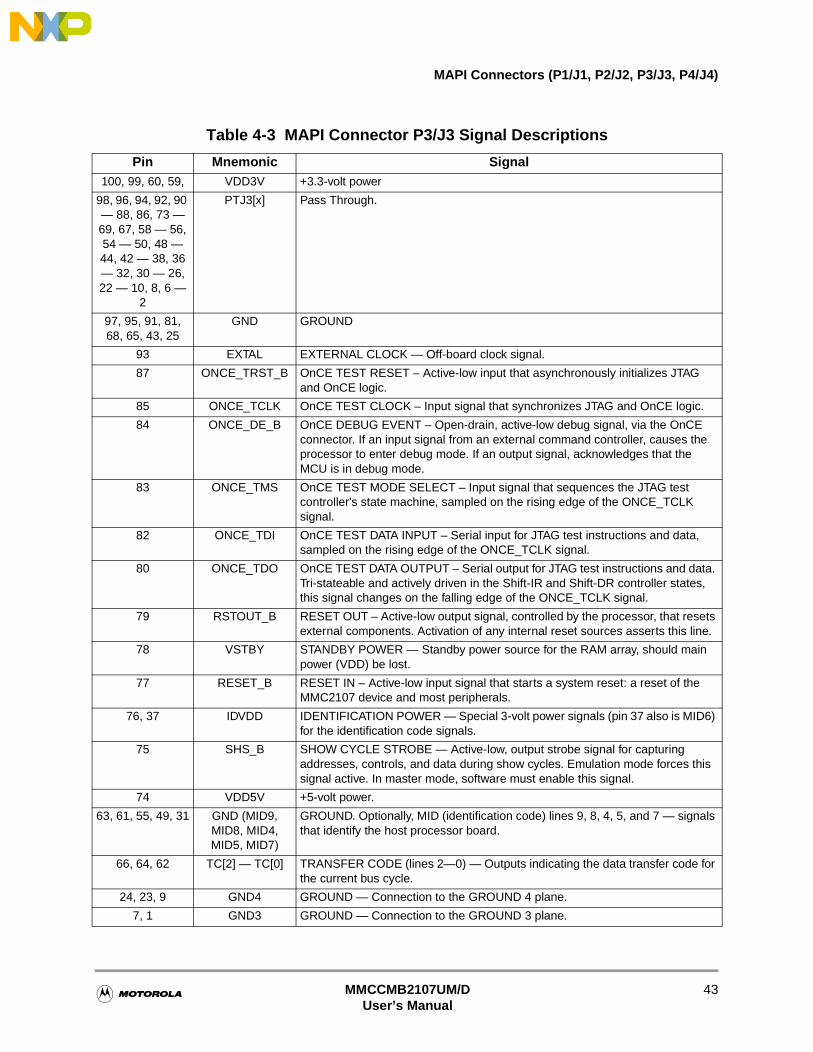
Table 4-3 MAPI Connector P3/J3 Signal Descriptions
Pin Mnemonic Signal100, 99, 60, 59, VDD3V +3.3-volt power
98, 96, 94, 92, 90 — 88, 86, 73 — 69, 67, 58 — 56, 54 — 50, 48 — 44, 42 — 38, 36 — 32, 30 — 26, 22 — 10, 8, 6 —
2
PTJ3[x] Pass Through.
97, 95, 91, 81, 68, 65, 43, 25
GND GROUND
93 EXTAL EXTERNAL CLOCK — Off-board clock signal.
87 ONCE_TRST_B OnCE TEST RESET – Active-low input that asynchronously initializes JTAG and OnCE logic.
85 ONCE_TCLK OnCE TEST CLOCK – Input signal that synchronizes JTAG and OnCE logic.
84 ONCE_DE_B OnCE DEBUG EVENT – Open-drain, active-low debug signal, via the OnCE connector. If an input signal from an external command controller, causes the processor to enter debug mode. If an output signal, acknowledges that the MCU is in debug mode.
83 ONCE_TMS OnCE TEST MODE SELECT – Input signal that sequences the JTAG test controller's state machine, sampled on the rising edge of the ONCE_TCLK signal.
82 ONCE_TDI OnCE TEST DATA INPUT – Serial input for JTAG test instructions and data, sampled on the rising edge of the ONCE_TCLK signal.
80 ONCE_TDO OnCE TEST DATA OUTPUT – Serial output for JTAG test instructions and data. Tri-stateable and actively driven in the Shift-IR and Shift-DR controller states, this signal changes on the falling edge of the ONCE_TCLK signal.
79 RSTOUT_B RESET OUT – Active-low output signal, controlled by the processor, that resets external components. Activation of any internal reset sources asserts this line.
78 VSTBY STANDBY POWER — Standby power source for the RAM array, should main power (VDD) be lost.
77 RESET_B RESET IN – Active-low input signal that starts a system reset: a reset of the MMC2107 device and most peripherals.
76, 37 IDVDD IDENTIFICATION POWER — Special 3-volt power signals (pin 37 also is MID6) for the identification code signals.
75 SHS_B SHOW CYCLE STROBE — Active-low, output strobe signal for capturing addresses, controls, and data during show cycles. Emulation mode forces this signal active. In master mode, software must enable this signal.
74 VDD5V +5-volt power.
63, 61, 55, 49, 31 GND (MID9, MID8, MID4, MID5, MID7)
GROUND. Optionally, MID (identification code) lines 9, 8, 4, 5, and 7 — signals that identify the host processor board.
66, 64, 62 TC[2] — TC[0] TRANSFER CODE (lines 2—0) — Outputs indicating the data transfer code for the current bus cycle.
24, 23, 9 GND4 GROUND — Connection to the GROUND 4 plane.
7, 1 GND3 GROUND — Connection to the GROUND 3 plane.
MMCCMB2107UM/DUser’s Manual
43
Connector Information
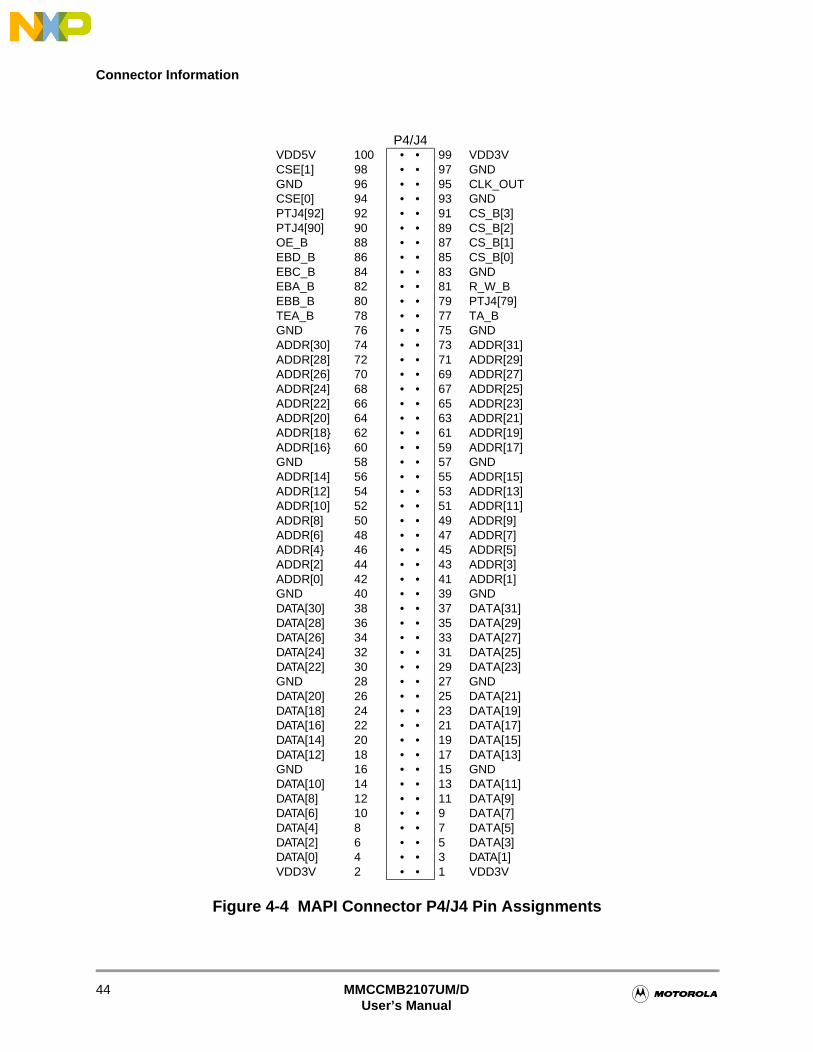
Figure 4-4 MAPI Connector P4/J4 Pin Assignments
P4/J4VDD5V 100 • • 99 VDD3VCSE[1] 98 • • 97 GNDGND 96 • • 95 CLK_OUTCSE[0] 94 • • 93 GNDPTJ4[92] 92 • • 91 CS_B[3]PTJ4[90] 90 • • 89 CS_B[2]OE_B 88 • • 87 CS_B[1]EBD_B 86 • • 85 CS_B[0]EBC_B 84 • • 83 GNDEBA_B 82 • • 81 R_W_BEBB_B 80 • • 79 PTJ4[79]TEA_B 78 • • 77 TA_BGND 76 • • 75 GNDADDR[30] 74 • • 73 ADDR[31]ADDR[28] 72 • • 71 ADDR[29]ADDR[26] 70 • • 69 ADDR[27]ADDR[24] 68 • • 67 ADDR[25]ADDR[22] 66 • • 65 ADDR[23]ADDR[20] 64 • • 63 ADDR[21]ADDR[18} 62 • • 61 ADDR[19]ADDR[16} 60 • • 59 ADDR[17]GND 58 • • 57 GNDADDR[14] 56 • • 55 ADDR[15]ADDR[12] 54 • • 53 ADDR[13]ADDR[10] 52 • • 51 ADDR[11]ADDR[8] 50 • • 49 ADDR[9]ADDR[6] 48 • • 47 ADDR[7]ADDR[4} 46 • • 45 ADDR[5]ADDR[2] 44 • • 43 ADDR[3]ADDR[0] 42 • • 41 ADDR[1]GND 40 • • 39 GNDDATA[30] 38 • • 37 DATA[31]DATA[28] 36 • • 35 DATA[29]DATA[26] 34 • • 33 DATA[27]DATA[24] 32 • • 31 DATA[25]DATA[22] 30 • • 29 DATA[23]GND 28 • • 27 GNDDATA[20] 26 • • 25 DATA[21]DATA[18] 24 • • 23 DATA[19]DATA[16] 22 • • 21 DATA[17]DATA[14] 20 • • 19 DATA[15]DATA[12] 18 • • 17 DATA[13]GND 16 • • 15 GNDDATA[10] 14 • • 13 DATA[11]DATA[8] 12 • • 11 DATA[9]DATA[6] 10 • • 9 DATA[7]DATA[4] 8 • • 7 DATA[5]DATA[2] 6 • • 5 DATA[3]DATA[0] 4 • • 3 DATA[1]VDD3V 2 • • 1 VDD3V
MMCCMB2107UM/DUser’s Manual
44

MAPI Connectors (P1/J1, P2/J2, P3/J3, P4/J4)
Table 4-4 MAPI Connector P4/J4 Signal Descriptions
Pin Mnemonic Signal100 VDD5V +5-volt power.
99, 2, 1 VDD3V +3.3-volt power.
98, 94 CSE1, CSE0 EMULATION CHIP SELECTS (lines 1, 0) — Emulation-mode output chip-select signals.
97, 96, 93, 83, 76, 75, 58, 57, 40, 39, 28, 27,
16, 15
GND GROUND
95 CLK_OUT CLOCK OUTPUT — System clock output.
92, 90, 79 PTJ4[x] Pass Through
91, 89, 87, 85 CS_B[3] — CS_B[0]
CHIP SELECTS (lines 3—0) — Active-low output lines that provide chip selects to external devices.
88 OE_b OUTPUT ENABLE — Active-low output that indicates that a bus access is a read access; enables slave devices to drive the data bus.
86, 84, 82, 80 EBD_B, EBC_B, EBA_B, EBB_B
ENABLE BYTES D, C, A, B — Active-low outputs active during an operation to corresponding data bits (D31-D24 for enable byte D, D23-D16 for enable byte C, D15-D8 for enable byte A, D7-D0 for enable byte B).
81 R_W_B READ/WRITE ENABLE — Active-low signal indicating that the current bus access is a write access. Otherwise, the current bus access is a read access.
78 TEA_B TRANSFER ERROR ACKNOWLEDGE — Active-low input that indicating that a bus transfer error has occurred.
77 TA_B TRANSFER ACKNOWLEDGE — Active-low input indicating completion of a data transfer, for either a read or a write cycle.
74 — 59, 56—41 ADDR[31] — ADDR[0]
(not in exact order)
ADDRESS BUS (lines 31—0) — Output lines for addressing external devices. These lines change state only during external-memory accesses.
38—29, 26—17, 14—3
DATA[31] — DATA[0]
(not in exact order)
DATA BUS (lines 31–0) — Bi-directional data lines for accessing external memory. A hardware reset or no external-bus activity hods these lines in their previous logic state.
MMCCMB2107UM/DUser’s Manual
45
Connector Information
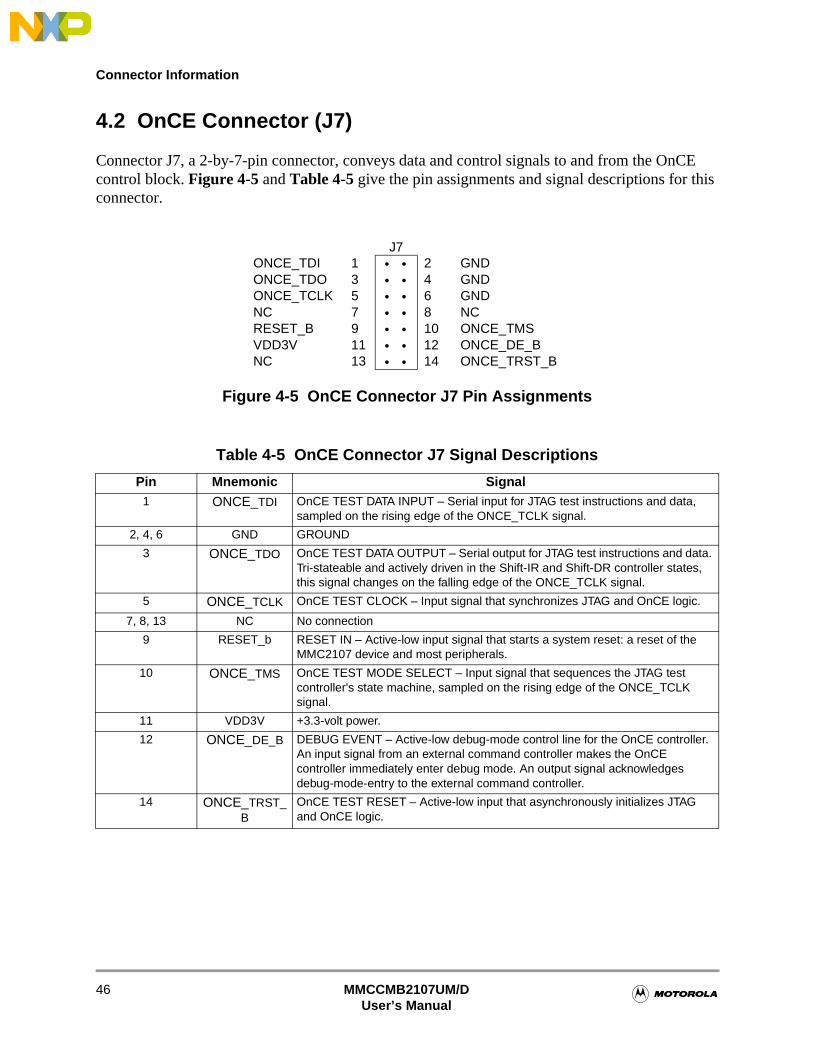
4.2 OnCE Connector (J7)
Connector J7, a 2-by-7-pin connector, conveys data and control signals to and from the OnCE control block. Figure 4-5 and Table 4-5 give the pin assignments and signal descriptions for this connector.
Figure 4-5 OnCE Connector J7 Pin Assignments
J7ONCE_TDI 1 • • 2 GNDONCE_TDO 3 • • 4 GNDONCE_TCLK 5 • • 6 GNDNC 7 • • 8 NCRESET_B 9 • • 10 ONCE_TMSVDD3V 11 • • 12 ONCE_DE_BNC 13 • • 14 ONCE_TRST_B
Table 4-5 OnCE Connector J7 Signal Descriptions
Pin Mnemonic Signal1 ONCE_TDI OnCE TEST DATA INPUT – Serial input for JTAG test instructions and data,
sampled on the rising edge of the ONCE_TCLK signal.
2, 4, 6 GND GROUND
3 ONCE_TDO OnCE TEST DATA OUTPUT – Serial output for JTAG test instructions and data. Tri-stateable and actively driven in the Shift-IR and Shift-DR controller states, this signal changes on the falling edge of the ONCE_TCLK signal.
5 ONCE_TCLK OnCE TEST CLOCK – Input signal that synchronizes JTAG and OnCE logic.
7, 8, 13 NC No connection
9 RESET_b RESET IN – Active-low input signal that starts a system reset: a reset of the MMC2107 device and most peripherals.
10 ONCE_TMS OnCE TEST MODE SELECT – Input signal that sequences the JTAG test controller's state machine, sampled on the rising edge of the ONCE_TCLK signal.
11 VDD3V +3.3-volt power.
12 ONCE_DE_B DEBUG EVENT – Active-low debug-mode control line for the OnCE controller. An input signal from an external command controller makes the OnCE controller immediately enter debug mode. An output signal acknowledges debug-mode-entry to the external command controller.
14 ONCE_TRST_B
OnCE TEST RESET – Active-low input that asynchronously initializes JTAG and OnCE logic.
MMCCMB2107UM/DUser’s Manual
46

Logic Analyzer Connectors (J5, J17, J18)
4.3 Logic Analyzer Connectors (J5, J17, J18)
Connectors J5, J17, and J18, all 2-by-19-pin Mictor connectors, are the logic analyzer connectors. Figure 4-6 through Figure 4-8 give the pin assignments for these connectors. Table 4-6 through Table 4-8 give the signal descriptions for these connectors. (Note that these figures and tables follow the Techtronics pin-numbering pattern.)
Figure 4-6 Logic Analyzer Connector J5 (A) Pin Assignments
J5NC 1 • • 38 NCNC 2 • • 37 NCCLK_OUT 3 • • 36 R_W_BCS_B[0] 4 • • 35 ADDR[15]CS_B[1] 5 • • 34 ADDR[14]CS_B[2] 6 • • 33 ADDR[13]CS_B[3] 7 • • 32 ADDR[12]CSE0 8 • • 31 ADDR[11]CSE1 9 • • 30 ADDR[10]ADDR[25] 10 • • 29 ADDR[9]ADDR[24] 11 • • 28 ADDR[8]ADDR[23] 12 • • 27 ADDR[7]ADDR[22] 13 • • 26 ADDR[6]ADDR[21] 14 • • 25 ADDR[5]ADDR[20] 15 • • 24 ADDR[4]ADDR[19] 16 • • 23 ADDR[3]ADDR[18] 17 • • 22 ADDR[2]ADDR[17] 18 • • 21 ADDR[1]ADDR[16] 19 • • 20 ADDR[0]
Table 4-6 Logic Analyzer Connector J5 (A) Signal Descriptions
Pin Mnemonic Signal1, 2, 37, 38 NC No connection
3 CLK_OUT CLOCK OUTPUT — System clock output.
4 — 7 CS_B[0] — CS_B[3] CHIP SELECTS (lines 0—3) — Active-low output lines that provide chip selects to external devices.
8, 9 CSE0, CSE1 EMULATION CHIP SELECTS (lines 0, 1) — Emulation-mode output chip-select signals.
10 — 35 ADDR[25] — ADDR[0]
(not in exact order)
ADDRESS BUS (lines 25—0) – Output lines for addressing external devices. These lines change state only during external-memory accesses.Exception: Pins 10 — 12 (ADDR[25] — ADDR[23]) always have the value 0.
36 R_W_b READ/WRITE ENABLE – Active-low signal indicating that the current bus access is a write access. Otherwise, the current bus access is a read access.
MMCCMB2107UM/DUser’s Manual
47

Connector Information
Figure 4-7 Logic Analyzer Connector J17 (D) Pin Assignments
J17NC 1 • • 38 NCNC 2 • • 37 NCTA_B 3 • • 36 SHS_BDATA[31] 4 • • 35 DATA[15]DATA[30] 5 • • 34 DATA[14]DATA[29] 6 • • 33 DATA[13]DATA[28] 7 • • 32 DATA[12]DATA[27] 8 • • 31 DATA[11]DATA[26] 9 • • 30 DATA[10]DATA[25] 10 • • 29 DATA[9]DATA[24] 11 • • 28 DATA[8]DATA[23] 12 • • 27 DATA[7]DATA[22] 13 • • 26 DATA[6]DATA[21] 14 • • 25 DATA[5]DATA[20] 15 • • 24 DATA[4]DATA[19] 16 • • 23 DATA[3]DATA[18] 17 • • 22 DATA[2]DATA[17] 18 • • 21 DATA[1]DATA[16] 19 • • 20 DATA[0]
Table 4-7 Logic Analyzer Connector J17 (D) Signal Descriptions
Pin Mnemonic Signal1, 2, 37, 38 NC No connection
3 TA_B TRANSFER ACKNOWLEDGE — Active-low input indicating completion of a data transfer, for either a read or a write cycle.
4—35 DATA[31] — DATA[0](not in exact order)
DATA BUS — Bi-directional data lines 31—0, for accessing external memory.
36 SHS_B SHOW CYCLE STROBE — Active-low, output strobe signal for capturing addresses, controls, and data during show cycles. Emulation mode forces this signal active. In master mode, software must enable this signal.
MMCCMB2107UM/DUser’s Manual
48

Logic Analyzer Connectors (J5, J17, J18)
Figure 4-8 Logic Analyzer Connector J18 (C) Pin Assignments
J18NC 1 • • 38 NCNC 2 • • 37 NCOE_B 3 • • 36 TEA_BJ7P4 4 • • 35 J7P35TC[2] 5 • • 34 INT_B[0]TC[1] 6 • • 33 INT_B[1]TC[0] 7 • • 32 DEVSP_B[0]INT_B[7] 8 • • 31 J7P31INT_B[6] 9 • • 30 J7P30J7P10 10 • • 29 RSTOUT_BJ7P11 11 • • 28 J7P28INT_B[5] 12 • • 27 EBA_BINT_B[4] 13 • • 26 EBB_BINT_B[3] 14 • • 25 EBC_BINT_B[2] 15 • • 24 EBD_BRESET_B 16 • • 23 EBY_BJ7P17 17 • • 22 EBX_BJ7P18 18 • • 21 EBW_BJ7P19 19 • • 20 EBV_B
Table 4-8 Logic Analyzer Connector J18 (C) Signal Descriptions
Pin Mnemonic Signal1, 2, 37, 38 NC No connection
3 OE_B OUTPUT ENABLE — Active-low output that indicates that a bus access is a read access; enables slave devices to drive the data bus.
4, 10, 11, 17 — 19, 28, 30, 31, 35
J7P[x] MICTOR PINS — Open pins of this Mictor connector, pins that may be used to connect other system signals to a logic analyzer.
5 — 7 TC[2] — TC[0] TRANSFER CODE (lines 2—0) — Outputs indicating the data transfer code for the current bus cycle.
8, 9, 12 — 15, 33, 34
INT_B[7] — INT_B[0]
EXTERNAL INTERRUPT (lines 7—0) — Active-low lines for external interrupts or general-purpose I/O. In addition, certain lines can show processor core signal states:• INT_B[7:6]: states of TSIZ[1:0] signals, provided that the chip configuration register (CCR) SZEN bit is set.• INT_B[5:2]: states of PSTAT[3:0] signals, provided that the CCR PSTEN bit is set.
16 RESET_B RESET IN – Active-low input signal that starts a system reset: a reset of the MMC2107 device and most peripherals.
20 — 23 EBV_B — EBY_B
ENABLE BYTES V—Y — CPLD general enable bytes for control of on-board SRAM. (Enable byte V: bits MD7—MD0, enable byte W: bits MD15—8, enable byte X: MD23—MD16, enable byte Y: bits MD31—MD24.)
MMCCMB2107UM/DUser’s Manual
49

Connector Information
4.4 RS232 Connectors (J57, J58)
Connectors J57 and J58, the RS232 connectors, have DCE format. The diagram below shows the pin numbering of these connectors. Table 4-9 lists the pin assignments and signal directions for these connectors.
NOTE: Connector J57 is for channel B, and connector J58 is for channel A. Accordingly, the respective pin 1 assignments can be thought of as CDB and
24 — 27 EBD_B — EBA_B
ENABLE BYTES D—A — Active-low outputs active during an operation to corresponding data bits (D31-D24 for enable byte D, D23-D16 for enable byte C, D15-D8 for enable byte B, D7-D0 for enable byte A).
29 RSTOUT_B RESET OUT – Active-low output signal, controlled by the processor, that resets external components. Activation of any internal reset sources asserts this line.
32 DEVSP_B[0] DEVELOPMENT SPACE 0 — Active-low signal indicating that the current memory cycle is addressing on-board devices.
36 TEA_B TRANSFER ERROR ACKNOWLEDGE — Active-low input that indicating that a bus transfer error has occurred.
Table 4-9 RS232 Connector J57, J58 Pin Assignments
Pin Signal Signal Direction1 CD
Carrier DetectOut — hard wired active (positive)
2 TXD (SCI_OUT)Transmitted Data
Out
3 RXD (SCI_IN)Received Data
In
4, 7 No connection —
5 GROUND —
6 DSRData Set Ready
Out — hard wired active (positive)
8 RTSRequest to Send
Out — hard wired active (positive)
9 RIRing Indicator
In — hard wired inactive (negative)
Table 4-8 Logic Analyzer Connector J18 (C) Signal Descriptions (Continued)
Pin Mnemonic Signal
9 6
15
MMCCMB2107UM/DUser’s Manual
50

SRAM External Standby Power Connector (J36)
CDA. Similarly, the respective pin 2 assignments can be thought of as TXDB and TXDA, and so forth.
Also note that TXD signals are designated SCI_OUT for other connectors: TXDB is SCI2_OUT; TXDA is SCI1_OUT. RXD signals are designated SCI_IN for other connectors: RXDB is SCI2_IN; RXDA is SCI1_IN.
4.5 SRAM External Standby Power Connector (J36)
Connector J36 is for internal SRAM standby external power. If you do not connect such external power, internal SRAM does not retain data when you turn off board power.
.
Standby external power must be provided by a user-supplied power supply. The MMC2107 chip manual explains the correct voltage (VSTBY) level.
4.6 Prototyping Connector Sites (J51, J52, J53)
Board locations J51 through J53 are available for optional, user installation of Berg 69192-620 2-by-10-pin headers for wire wrapping, probing, or cabling to external prototype circuits. Figure 4-9 and Table 4-10 give the pin assignments and signal descriptions for such a connector installed at location J51. Figure 4-10 and Table 4-11 give the pin assignments and signal descriptions for such a connector installed at location J52. Figure 4-11 and Table 4-12 give the pin assignments and signal descriptions for such a connector installed at location J53.
Figure 4-9 Connector Location J51 Pin Assignments
J51GND 20 • • 19 VDD3VGND 18 • • 17 INT_B[0]GND 16 • • 15 INT_B[1]GND 14 • • 13 INT_B[2]GND 12 • • 11 INT_B[3]GND 10 • • 9 INT_B[4]GND 8 • • 7 INT_B[5]GND 6 • • 5 INT_B[6]GND 4 • • 3 INT_B[7]GND 2 • • 1 VDD3V
1 (POSITIVE)
J36
2(GND)
MMCCMB2107UM/DUser’s Manual
51

Connector Information
Figure 4-10 Connector Location J52 Pin Assignments
Table 4-10 Connector Location J51 Signal Descriptions
Pin Mnemonic Signal20, 18, 16, 14,
12, 10, 8, 6, 4, 2GND GROUND
19, 1, 19 VDD3V OPERATING VOLTAGE – Transmission line for +3.3-volt MCU operating power.
17, 15, 13, 11, 9, 7, 5, 3
INT_B[0] — INT_B[7]
EXTERNAL INTERRUPT (lines 0—7) — Active-low lines for external interrupts or general-purpose I/O. In addition, certain lines can show processor core signal states:• INT_B[7:6]: states of TSIZ[1:0] signals, provided that the chip configuration register (CCR) SZEN bit is set.• INT_B[5:2]: states of PSTAT[3:0] signals, provided that the CCR PSTEN bit is set.
J52AGND 20 • • 19 VRHAGND 18 • • 17 VRLAGND 16 • • 15 PQA[0]AGND 14 • • 13 PQA[1]AGND 12 • • 11 PQA[3]AGND 10 • • 9 PQA[4]AGND 8 • • 7 PQB[0]AGND 6 • • 5 PQB[1]AGND 4 • • 3 PQB[2]AGND 2 • • 1 PQB[3]
Table 4-11 Connector Location J52 Signal Descriptions
Pin Mnemonic Signal20, 18, 16, 14,
12, 10, 8, 6, 4, 2AGND ANALOG GROUND — Analog ground connection for the analog-digital
converter.
19 VRH VOLTAGE REFERENCE HIGH — High reference for the QADC.
17 VRL VOLTAGE REFERENCE LOW — Low reference for the QADC.
15, 13, 11, 9 PQA[0], PQA[1], PQA[3], PQA[4]
A ANALOG INPUTS (lines 0, 1, 3, 4) — A analog inputs to the QADC, also usable for general-purpose digital I/O.
7, 5, 3, 1 PQB[0] — PQB[3]
B ANALOG INPUTS (lines 0—3) — B analog inputs to the QADC, also usable as general-purpose digital inputs.
MMCCMB2107UM/DUser’s Manual
52

Prototyping Connector Sites (J51, J52, J53)
Figure 4-11 Connector Location J53 Pin Assignments
J53GND 20 • • 19 ICOC1[0]ICOC1[1] 18 • • 17 ICOC1[2]ICOC1[3] 16 • • 15 ICOC2[0]ICOC2[1] 14 • • 13 ICOC2[2]ICOC2[3] 12 • • 11 RSTOUT_BRESET_B 10 • • 9 SCKSS_B 8 • • 7 MISOMOSI 6 • • 5 SCI1_INSCI1_OUT 4 • • 3 SCI2_INSCI2_OUT 2 • • 1 VDD3V
Table 4-12 Connector Location J53 Signal Descriptions
Pin Mnemonic Signal20 GND GROUND
19 — 16 ICOC1[0] — ICOC1[3]
TIMER 1 INPUT CAPTURE OUTPUT CAPTURE (lines 0—3) — Signals for internal timer channel 1.
15 — 12 ICOC2[0] — ICOC2[3]
TIMER 2 INPUT CAPTURE OUTPUT CAPTURE (lines 0—3) — Signals for internal timer channel 2.
11 RSTOUT_B RESET OUT – Active-low output signal, controlled by the processor, that resets external components. Activation of any internal reset sources asserts this line.
10 RESET_B RESET IN – Active-low input signal that starts a system reset: a reset of the MMC2107 device and most peripherals.
9 SCK SERIAL CLOCK — If SPI is enabled, the serial clock signal. If SPI is disabled, a general-purpose port E I/O signal.
8 SS_B SLAVE SELECT — Active-low slave select signal, in slave mode. In master mode, a peripheral chip-select signal.
7 MISO MASTER IN/SLAVE OUT — If SPI is enabled, the data master-in/slave-out signal. If SPI is disabled, a general-purpose port E I/O signal.
6 MOSI MASTER OUT/SLAVE IN — If SPI is enabled, the data master-out/slave-in signal. If SPI is disabled, a general-purpose port E I/O signal.
5, 3 SCI1_IN, SCI2_IN
SCI INPUT — Serial communications interface (SCI) input lines 1 and 2, otherwise available for general-purpose I/O use. (These lines also are known as RXDA and RXDB.)
4, 2 SCI1_OUT, SCI2_OUT
SCI OUTPUT — Serial communications interface (SCI) output lines 1 and 2, otherwise available for general-purpose I/O use. (These lines also are known as TXDA and TXDB.)
1 VDD3V OPERATING VOLTAGE – Transmission line for +3.3-volt MCU operating power.
MMCCMB2107UM/DUser’s Manual
53

Connector Information
MMCCMB2107UM/DUser’s Manual
54

Index
C
chip select 1 emulation 23, 24CMB2103
layout 10–12specifications 12
CMFR FLASH 34components, configuring 13–18computer system connections 18, 19configuration 13–25configuration switches (S3, S4) 16configuration table 13–15configuring components 13–18connections, computer system 18, 19connector information 37–53connector pin assignments
connector site J51 51connector site J52 52connector site J53 53logic analyzer connector J17 48logic analyzer connector J18 49logic analyzer connector J5 47MAPI connectors P1/J1-P4/J4 40, 42, 44OnCE connector J7 46
connector pn assignmentsRS232 connectors J57, J58 50
connector signal descriptionsconnector site J51 52connector site J52 52connector site J53 53logic analyzer connector J17 48logic analyzer connector J18 49logic analyzer connector J5 47MAPI connectors P1/J1-P4/J4 39, 41, 43, 45OnCE connector J7 46RS232 connectors J57, J58 50
D
debugging embedded code 27–32
E
emulation, chip select 1 23, 24eyelet areas 23, 24, 25
F
features 9, 10
G
GNU source-level debugger 32
I
introduction 9–12
L
layout 10–12logic analyzer connectors 47–50
M
MAPI connectors 37–45memory mapped I/O 24, 25memory maps 21–23
O
OnCE connector 46operation 27–36
P
Picobug monitorcommands 28, 29sample session 29–32using 27–32
pin assignmentsconnector site J51 51connector site J52 52connector site J53 53logic analyzer connector J17 48logic analyzer connector J18 49logic analyzer connector J5 47MAPI connectors P1/J1-P4/J4 40, 42, 44OnCE connector J7 46RS232 connectors J57, J58 50
prototyping areas 25prototyping connector sites 51–53
R
requirements, system/user 10
MMCCMB2107UM/D MOTOROLA
User’s Manual 55
S
selftest 19, 20setting components
configuration switches (S3, S4) 16signal descriptions
connector site J51 52connector site J52 52connector site J53 53logic analyzer connector J17 48logic analyzer connector J18 49logic analyzer connector J5 47MAPI connectors P1/J1-P4/J4 39, 41, 43, 45OnCE connector J7 46RS232 connectors J27, J28 50
specifications 12SRAM external standby power connector J36 51SysDS Loader
using 32–36SysDS loader
steps 32–36system requirements 10
U
user requirements 10
MOTOROLA MMCCMB2107UM/D
56 User’s Manual
Revision History
Revision Number Date Author Summary of Changes
Original July 2000 MTC DDOC Original document.
MMCCMB2107UM/D MOTOROLA
User’s Manual 57

Revision History
MOTOROLA MMCCMB2107UM/D
58 User’s Manual