MISCELLANEOUS - Fossil · - 1 - MISCELLANEOUS Water Resistance See caseback for water resistance...
25
- 1 - MISCELLANEOUS Water Resistance See caseback for water resistance rating for traditional watches and Hybrid Smartwatches. For Display Smartwatches visit fossilgroup.com/water for water resistance information. The water resistance rating provides guidelines for appropriate water-related exposure to avoid damage to internal watch components. Please see chart for recommended usage guidelines. In order to ensure water does not enter the watch and cause damage to it, please follow the instructions listed below: • Do not adjust the crown while the timepiece is in contact with water. • Ensure the crown is in the closed position before contact with water. For timepieces with screw-down crowns, ensure the crown is completely tightened before contact with water. • For timepieces with pusher-enabled functionality, do not engage the function underwater. • Exposure to extreme atmopheres is not recommended (i.e. hot water, saunas or steam rooms). • Avoid exposure to water moving with force (i.e. water running from a faucet, ocean waves or waterfalls). • Avoid long exposure to salt water. After contact with salt water, rinse watch under tap water if rated 5ATM or higher and wipe dry with a soft cloth. RECOMMENDATIONS FOR WATER-RELATED USE INDICATION SPLASH RESISTANT SUBMERSIBLE SHALLOW DIVING SCUBA DIVING (Hand Washing) (Swimming) (Snorkeling) (Not Deep Sea) (NONE) 3 ATM • 3 BAR • 30 Meters 5 ATM • 5 BAR • 50 Meters 10 ATM • 10 BAR • 100 Meters 20 ATM • 20 BAR • 200 Meters
Transcript of MISCELLANEOUS - Fossil · - 1 - MISCELLANEOUS Water Resistance See caseback for water resistance...

- 1 -
MISCELLANEOUS
Water Resistance
See caseback for water resistance rating for traditional watches and Hybrid Smartwatches. For Display Smartwatches visit fossilgroup.com/water for water resistance information.
The water resistance rating provides guidelines for appropriate water-related exposure to avoid damage to internal watch components. Please see chart for recommended usage guidelines.
In order to ensure water does not enter the watch and cause damage to it, please follow the instructions listed below:• Do not adjust the crown while the timepiece is in contact with water.• Ensure the crown is in the closed position before contact with water. For timepieces with screw-down crowns, ensure the
crown is completely tightened before contact with water.• For timepieces with pusher-enabled functionality, do not engage the function underwater.• Exposure to extreme atmopheres is not recommended (i.e. hot water, saunas or steam rooms).• Avoid exposure to water moving with force (i.e. water running from a faucet, ocean waves or waterfalls).• Avoid long exposure to salt water. After contact with salt water, rinse watch under tap water if rated 5ATM or higher and wipe
dry with a soft cloth.
RECOMMENDATIONS FOR WATER-RELATED USE
INDICATION
SPLASH RESISTANT SUBMERSIBLE SHALLOW DIVING SCUBA DIVING
(Hand Washing) (Swimming) (Snorkeling) (Not Deep Sea)
(NONE)
3 ATM • 3 BAR • 30 Meters
5 ATM • 5 BAR • 50 Meters
10 ATM • 10 BAR • 100 Meters
20 ATM • 20 BAR • 200 Meters
- 2 -
1 2
This is English for United States.
ANALOG ENGLISH
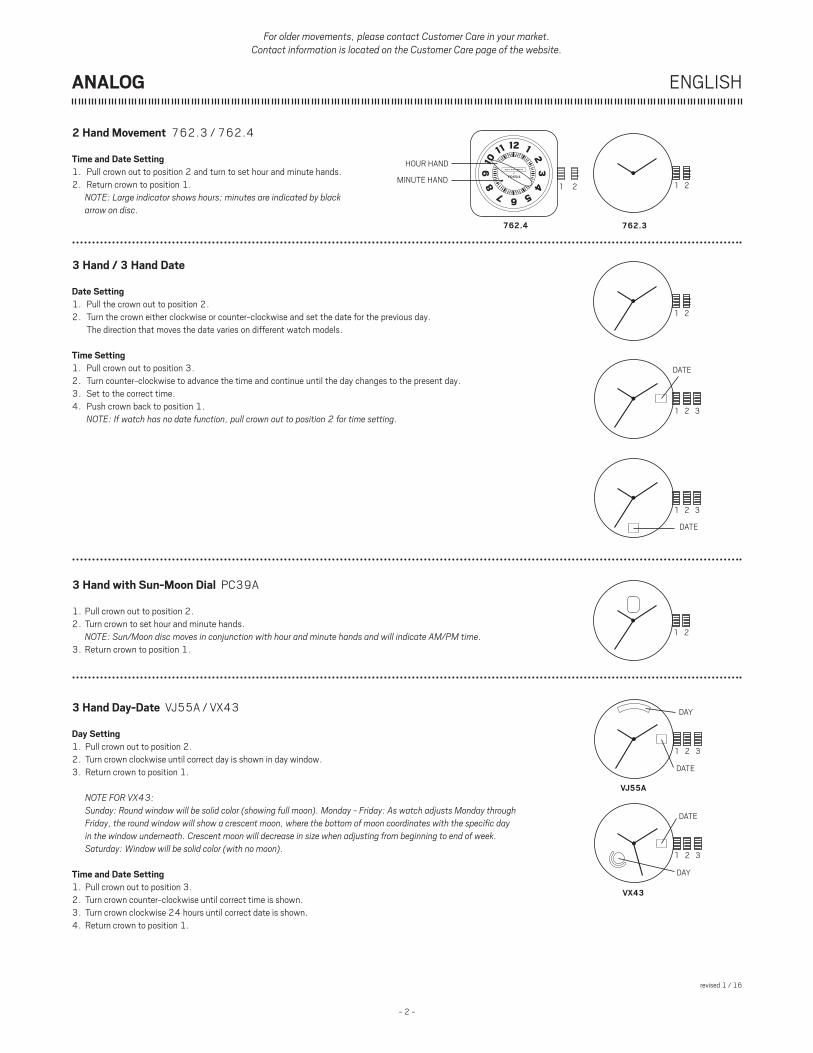
3 Hand / 3 Hand Date
Date Setting1. Pull the crown out to position 2.2. Turn the crown either clockwise or counter-clockwise and set the date for the previous day. The direction that moves the date varies on different watch models.
Time Setting1. Pull crown out to position 3.2. Turn counter-clockwise to advance the time and continue until the day changes to the present day.3. Set to the correct time.4. Push crown back to position 1. NOTE: If watch has no date function, pull crown out to position 2 for time setting.
1 2
1 2
1 2 3
DATE
1 2 3
DATE
For older movements, please contact Customer Care in your market. Contact information is located on the Customer Care page of the website.
3 Hand with Sun-Moon Dial PC39A
1. Pull crown out to position 2.2. Turn crown to set hour and minute hands. NOTE: Sun/Moon disc moves in conjunction with hour and minute hands and will indicate AM/PM time.3. Return crown to position 1.
1 2
HOUR HAND
MINUTE HAND
2 Hand Movement 762.3 / 762.4
Time and Date Setting1. Pull crown out to position 2 and turn to set hour and minute hands.2. Return crown to position 1. NOTE: Large indicator shows hours; minutes are indicated by black
arrow on disc.
revised 1 / 16
1 2 3
1 2 3
3 Hand Day-Date VJ55A / VX43
Day Setting1. Pull crown out to position 2.2. Turn crown clockwise until correct day is shown in day window.3. Return crown to position 1.
NOTE FOR VX43: Sunday: Round window will be solid color (showing full moon). Monday - Friday: As watch adjusts Monday through Friday, the round window will show a crescent moon, where the bottom of moon coordinates with the specific day in the window underneath. Crescent moon will decrease in size when adjusting from beginning to end of week. Saturday: Window will be solid color (with no moon).
Time and Date Setting1. Pull crown out to position 3.2. Turn crown counter-clockwise until correct time is shown.3. Turn crown clockwise 24 hours until correct date is shown.4. Return crown to position 1.
VJ55A
VX43
762.3762.4
DATE
DATE
DAY
DAY
- 3 -
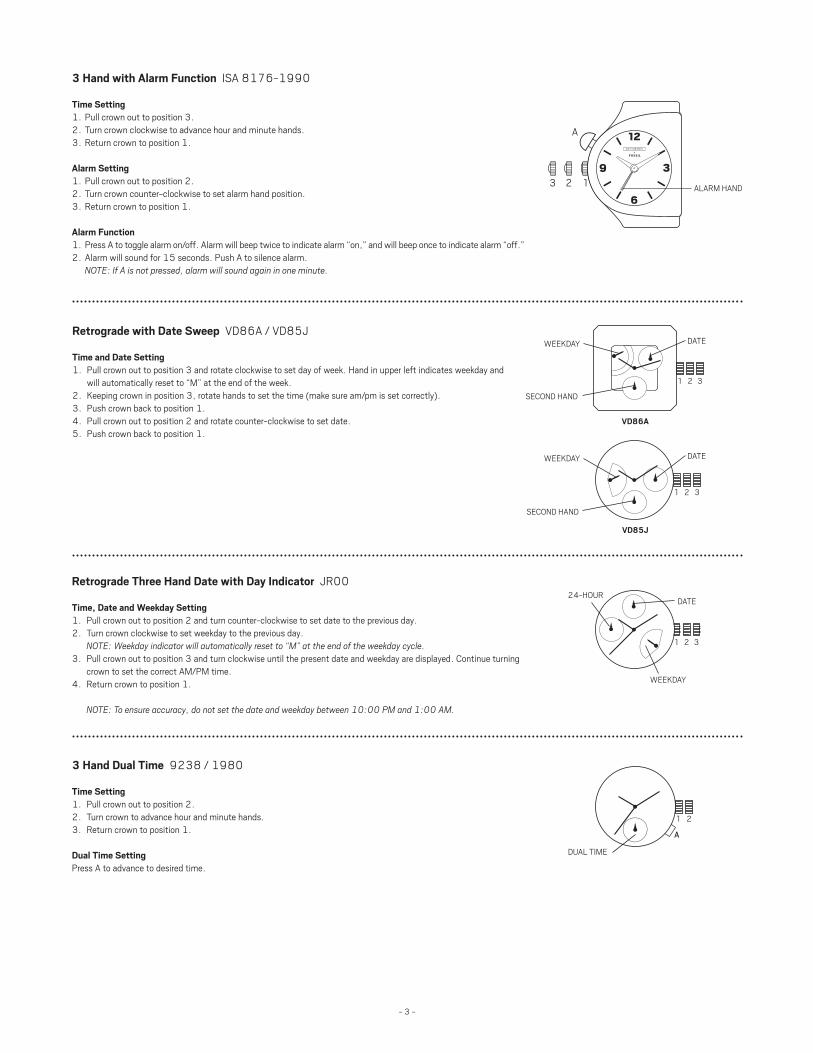
3 Hand Dual Time 9238 / 1980
Time Setting1. Pull crown out to position 2.2. Turn crown to advance hour and minute hands.3. Return crown to position 1.
Dual Time SettingPress A to advance to desired time.
Retrograde with Date Sweep VD86A / VD85J
Time and Date Setting1. Pull crown out to position 3 and rotate clockwise to set day of week. Hand in upper left indicates weekday and
will automatically reset to “M” at the end of the week.2. Keeping crown in position 3, rotate hands to set the time (make sure am/pm is set correctly).3. Push crown back to position 1.4. Pull crown out to position 2 and rotate counter-clockwise to set date.5. Push crown back to position 1.
1 2 3
1 2 3
VD86A
VD85J
WEEKDAY
WEEKDAY
DATE
DATE
SECOND HAND
SECOND HAND
Retrograde Three Hand Date with Day Indicator JR00
Time, Date and Weekday Setting1. Pull crown out to position 2 and turn counter-clockwise to set date to the previous day.2. Turn crown clockwise to set weekday to the previous day. NOTE: Weekday indicator will automatically reset to “M” at the end of the weekday cycle.3. Pull crown out to position 3 and turn clockwise until the present date and weekday are displayed. Continue turning
crown to set the correct AM/PM time.4. Return crown to position 1.
NOTE: To ensure accuracy, do not set the date and weekday between 10:00 PM and 1:00 AM.
1 2 3
WEEKDAY
DATE24-HOUR
3 Hand with Alarm Function ISA 8176-1990
Time Setting1. Pull crown out to position 3.2. Turn crown clockwise to advance hour and minute hands.3. Return crown to position 1.
Alarm Setting1. Pull crown out to position 2.2. Turn crown counter-clockwise to set alarm hand position.3. Return crown to position 1.
Alarm Function1. Press A to toggle alarm on/off. Alarm will beep twice to indicate alarm “on,” and will beep once to indicate alarm “off.”2. Alarm will sound for 15 seconds. Push A to silence alarm. NOTE: If A is not pressed, alarm will sound again in one minute.
123
A
ALARM HAND
DUAL TIME
- 4 -
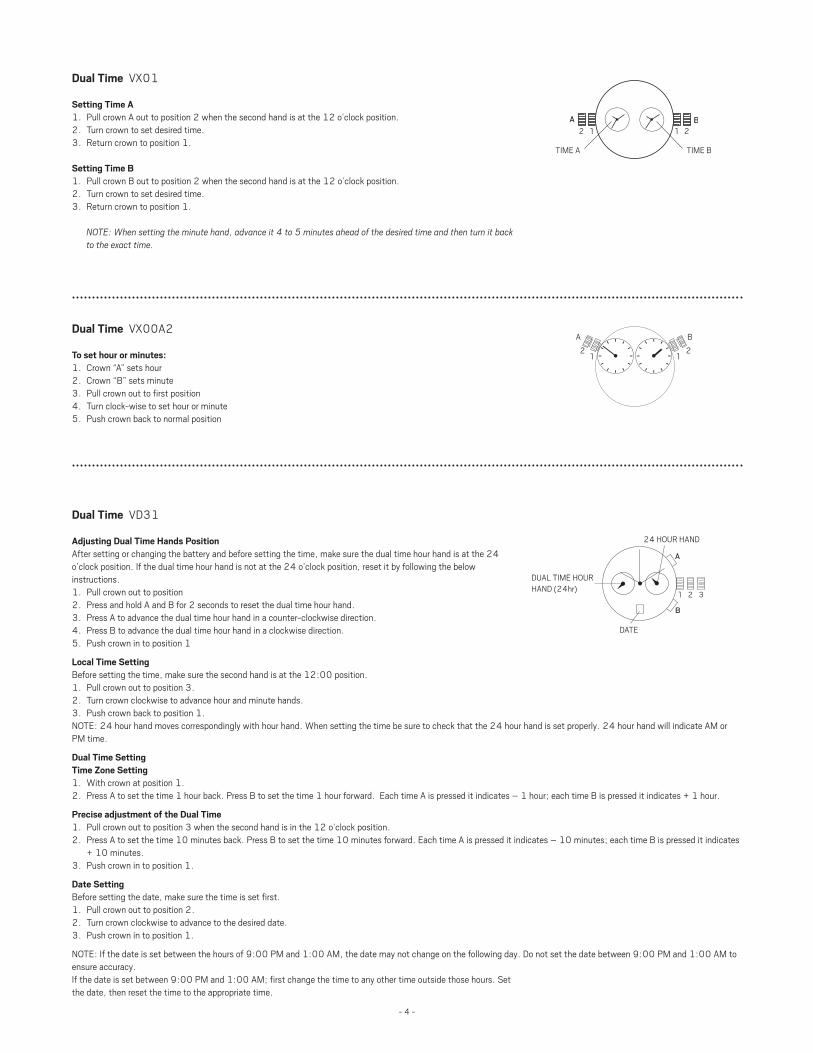
Dual Time VX01
Setting Time A1. Pull crown A out to position 2 when the second hand is at the 12 o’clock position.2. Turn crown to set desired time.3. Return crown to position 1.
Setting Time B1. Pull crown B out to position 2 when the second hand is at the 12 o’clock position.2. Turn crown to set desired time.3. Return crown to position 1.
NOTE: When setting the minute hand, advance it 4 to 5 minutes ahead of the desired time and then turn it back to the exact time.
Dual Time VX00A2
To set hour or minutes:1. Crown “A” sets hour 2. Crown “B” sets minute3. Pull crown out to first position 4. Turn clock-wise to set hour or minute5. Push crown back to normal position
1122
A B
TIME A TIME B
Dual Time VD31
Adjusting Dual Time Hands PositionAfter setting or changing the battery and before setting the time, make sure the dual time hour hand is at the 24o’clock position. If the dual time hour hand is not at the 24 o’clock position, reset it by following the belowinstructions. 1. Pull crown out to position 2. Press and hold A and B for 2 seconds to reset the dual time hour hand. 3. Press A to advance the dual time hour hand in a counter-clockwise direction.4. Press B to advance the dual time hour hand in a clockwise direction.5. Push crown in to position 1
Local Time SettingBefore setting the time, make sure the second hand is at the 12:00 position.1. Pull crown out to position 3.2. Turn crown clockwise to advance hour and minute hands.3. Push crown back to position 1.NOTE: 24 hour hand moves correspondingly with hour hand. When setting the time be sure to check that the 24 hour hand is set properly. 24 hour hand will indicate AM or PM time.
Dual Time SettingTime Zone Setting1. With crown at position 1.2. Press A to set the time 1 hour back. Press B to set the time 1 hour forward. Each time A is pressed it indicates – 1 hour; each time B is pressed it indicates + 1 hour.
Precise adjustment of the Dual Time1. Pull crown out to position 3 when the second hand is in the 12 o’clock position. 2. Press A to set the time 10 minutes back. Press B to set the time 10 minutes forward. Each time A is pressed it indicates – 10 minutes; each time B is pressed it indicates + 10 minutes.3. Push crown in to position 1.
Date SettingBefore setting the date, make sure the time is set first.1. Pull crown out to position 2.2. Turn crown clockwise to advance to the desired date.3. Push crown in to position 1.
NOTE: If the date is set between the hours of 9:00 PM and 1:00 AM, the date may not change on the following day. Do not set the date between 9:00 PM and 1:00 AM to ensure accuracy. If the date is set between 9:00 PM and 1:00 AM; first change the time to any other time outside those hours. Setthe date, then reset the time to the appropriate time.
1 2 3
A
B
DATE
24 HOUR HAND
DUAL TIME HOURHAND (24hr)
- 5 -
ANALOG - DIGITAL
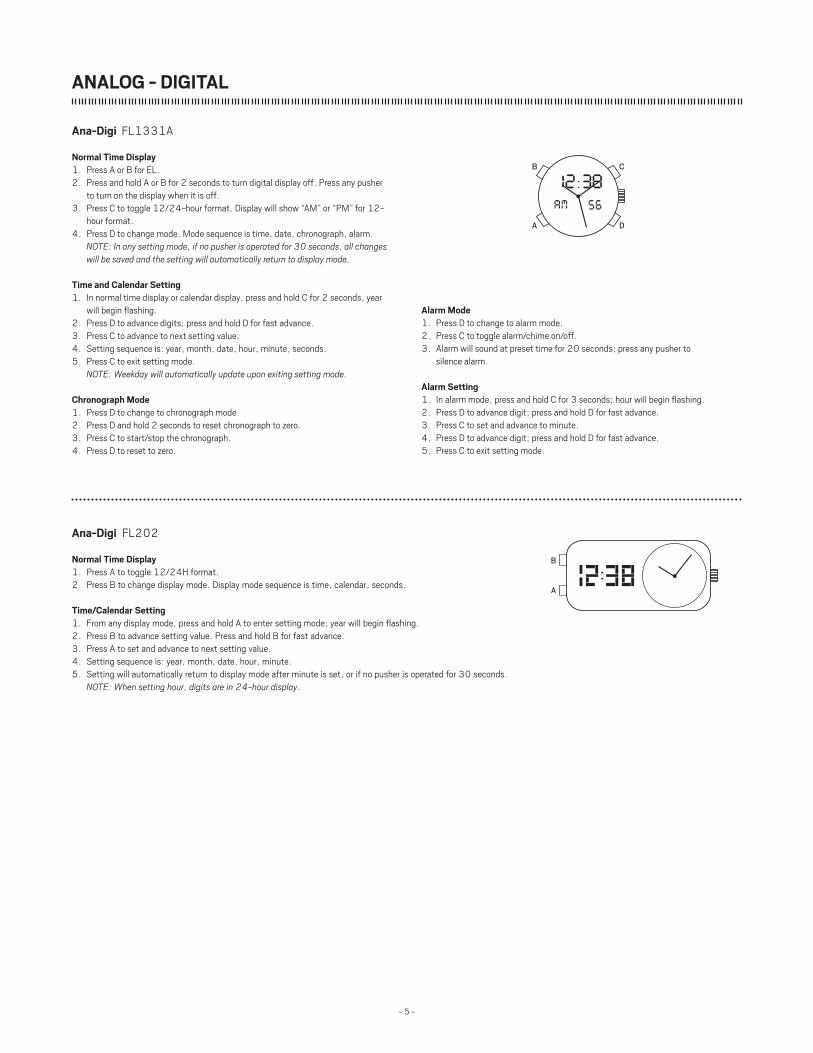
Ana-Digi FL1331A
Normal Time Display1. Press A or B for EL.2. Press and hold A or B for 2 seconds to turn digital display off. Press any pusher
to turn on the display when it is off.3. Press C to toggle 12/24-hour format. Display will show “AM” or “PM” for 12-
hour format.4. Press D to change mode. Mode sequence is time, date, chronograph, alarm. NOTE: In any setting mode, if no pusher is operated for 30 seconds, all changes
will be saved and the setting will automatically return to display mode.
Time and Calendar Setting1. In normal time display or calendar display, press and hold C for 2 seconds, year
will begin flashing.2. Press D to advance digits; press and hold D for fast advance.3. Press C to advance to next setting value.4. Setting sequence is: year, month, date, hour, minute, seconds.5. Press C to exit setting mode. NOTE: Weekday will automatically update upon exiting setting mode.
Chronograph Mode1. Press D to change to chronograph mode.2. Press D and hold 2 seconds to reset chronograph to zero.3. Press C to start/stop the chronograph.4. Press D to reset to zero.
C
D
B
A
Alarm Mode1. Press D to change to alarm mode.2. Press C to toggle alarm/chime on/off.3. Alarm will sound at preset time for 20 seconds; press any pusher to
silence alarm.
Alarm Setting1. In alarm mode, press and hold C for 3 seconds; hour will begin flashing.2. Press D to advance digit; press and hold D for fast advance.3. Press C to set and advance to minute.4. Press D to advance digit; press and hold D for fast advance.5. Press C to exit setting mode.
Ana-Digi FL202
Normal Time Display1. Press A to toggle 12/24H format.2. Press B to change display mode. Display mode sequence is time, calendar, seconds.
Time/Calendar Setting1. From any display mode, press and hold A to enter setting mode; year will begin flashing.2. Press B to advance setting value. Press and hold B for fast advance.3. Press A to set and advance to next setting value.4. Setting sequence is: year, month, date, hour, minute.5. Setting will automatically return to display mode after minute is set, or if no pusher is operated for 30 seconds. NOTE: When setting hour, digits are in 24-hour display.
A
B
- 6 -
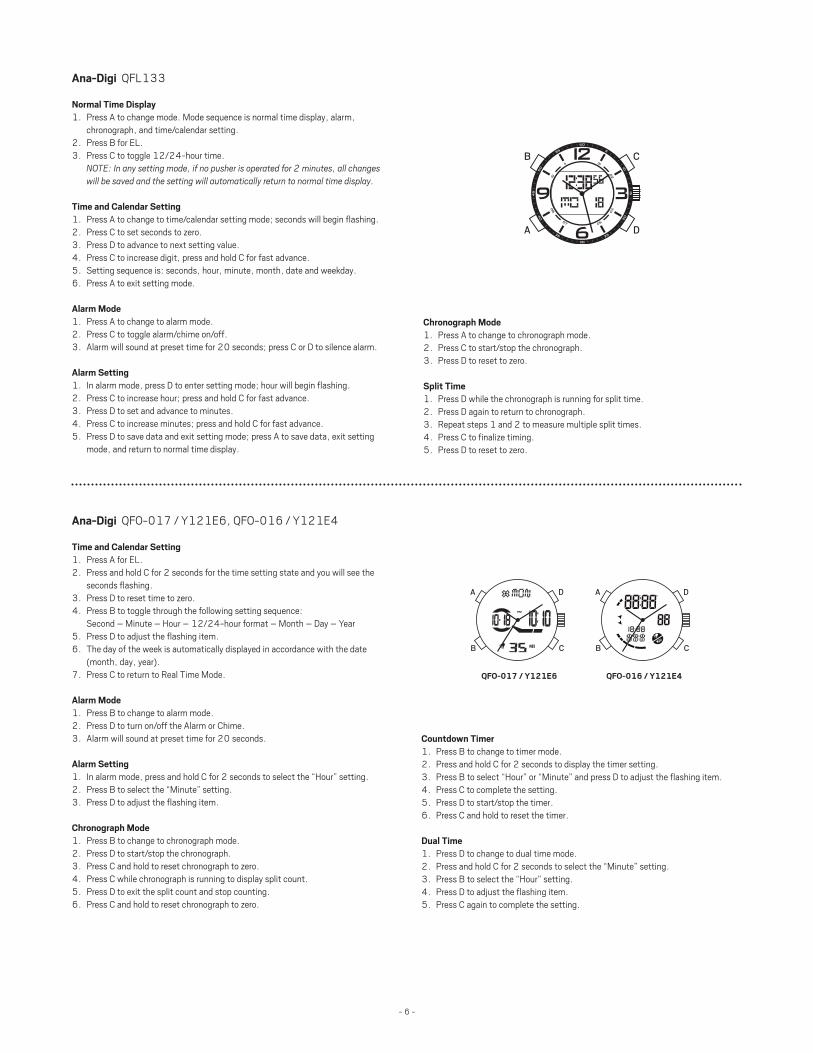
Ana-Digi QFL133
Normal Time Display1. Press A to change mode. Mode sequence is normal time display, alarm,
chronograph, and time/calendar setting.2. Press B for EL.3. Press C to toggle 12/24-hour time. NOTE: In any setting mode, if no pusher is operated for 2 minutes, all changes
will be saved and the setting will automatically return to normal time display.
Time and Calendar Setting1. Press A to change to time/calendar setting mode; seconds will begin flashing.2. Press C to set seconds to zero.3. Press D to advance to next setting value.4. Press C to increase digit, press and hold C for fast advance.5. Setting sequence is: seconds, hour, minute, month, date and weekday.6. Press A to exit setting mode.
Alarm Mode1. Press A to change to alarm mode.2. Press C to toggle alarm/chime on/off.3. Alarm will sound at preset time for 20 seconds; press C or D to silence alarm.
Alarm Setting1. In alarm mode, press D to enter setting mode; hour will begin flashing.2. Press C to increase hour; press and hold C for fast advance.3. Press D to set and advance to minutes.4. Press C to increase minutes; press and hold C for fast advance.5. Press D to save data and exit setting mode; press A to save data, exit setting
mode, and return to normal time display.
C
D
B
A
Ana-Digi QFO-017 / Y121E6, QFO-016 / Y121E4
Time and Calendar Setting1. Press A for EL.2. Press and hold C for 2 seconds for the time setting state and you will see the
seconds flashing.3. Press D to reset time to zero.4. Press B to toggle through the following setting sequence:
Second – Minute – Hour – 12/24-hour format – Month – Day – Year5. Press D to adjust the flashing item.6. The day of the week is automatically displayed in accordance with the date
(month, day, year).7. Press C to return to Real Time Mode.
Alarm Mode1. Press B to change to alarm mode.2. Press D to turn on/off the Alarm or Chime.3. Alarm will sound at preset time for 20 seconds.
Alarm Setting1. In alarm mode, press and hold C for 2 seconds to select the “Hour” setting.2. Press B to select the “Minute” setting.3. Press D to adjust the flashing item.
Chronograph Mode1. Press B to change to chronograph mode.2. Press D to start/stop the chronograph.3. Press C and hold to reset chronograph to zero.4. Press C while chronograph is running to display split count.5. Press D to exit the split count and stop counting.6. Press C and hold to reset chronograph to zero.
D
C
A
B
D
C
A
B
Countdown Timer1. Press B to change to timer mode.2. Press and hold C for 2 seconds to display the timer setting.3. Press B to select “Hour” or “Minute” and press D to adjust the flashing item.4. Press C to complete the setting.5. Press D to start/stop the timer.6. Press C and hold to reset the timer.
Dual Time1. Press D to change to dual time mode.2. Press and hold C for 2 seconds to select the “Minute” setting.3. Press B to select the “Hour” setting.4. Press D to adjust the flashing item.5. Press C again to complete the setting.
Chronograph Mode1. Press A to change to chronograph mode.2. Press C to start/stop the chronograph.3. Press D to reset to zero.
Split Time1. Press D while the chronograph is running for split time.2. Press D again to return to chronograph.3. Repeat steps 1 and 2 to measure multiple split times.4. Press C to finalize timing.5. Press D to reset to zero.
QFO-017 / Y121E6 QFO-016 / Y121E4
- 7 -
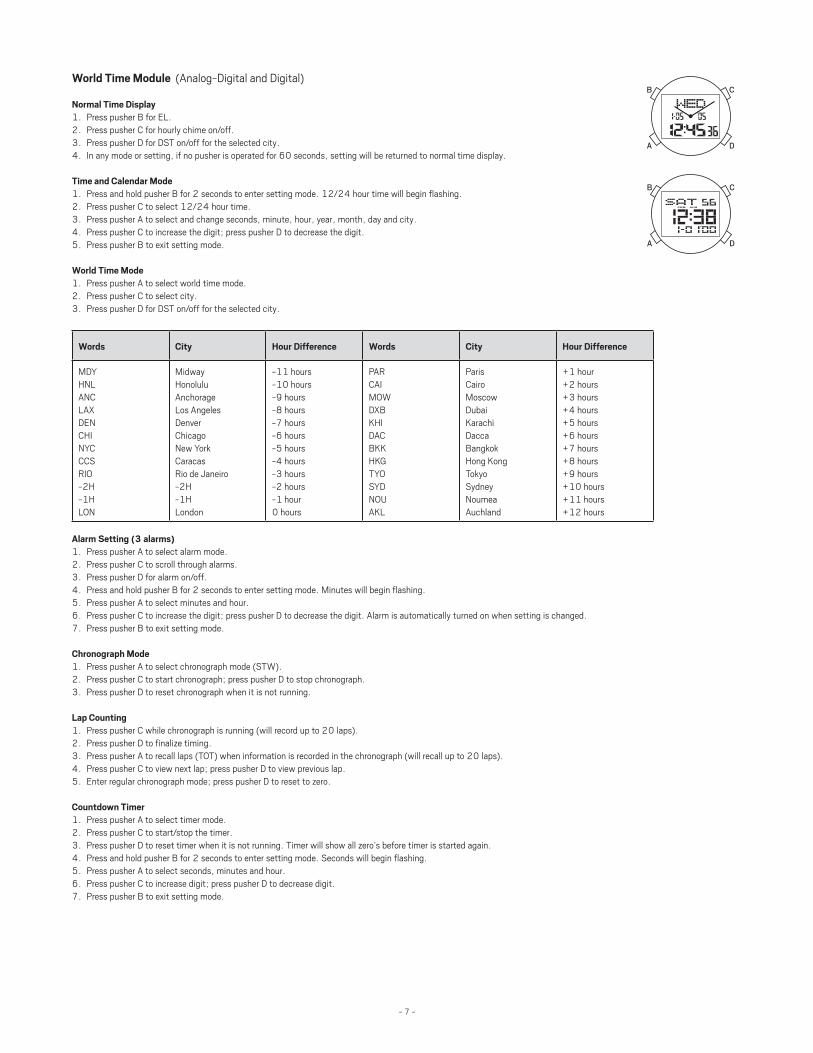
World Time Module (Analog-Digital and Digital)
Normal Time Display1. Press pusher B for EL.2. Press pusher C for hourly chime on/off.3. Press pusher D for DST on/off for the selected city.4. In any mode or setting, if no pusher is operated for 60 seconds, setting will be returned to normal time display.
Time and Calendar Mode1. Press and hold pusher B for 2 seconds to enter setting mode. 12/24 hour time will begin flashing.2. Press pusher C to select 12/24 hour time.3. Press pusher A to select and change seconds, minute, hour, year, month, day and city.4. Press pusher C to increase the digit; press pusher D to decrease the digit.5. Press pusher B to exit setting mode.
World Time Mode1. Press pusher A to select world time mode.2. Press pusher C to select city.3. Press pusher D for DST on/off for the selected city.
Words City Hour Difference Words City Hour Difference
MDYHNLANCLAXDENCHINYCCCSRIO-2H-1HLON
MidwayHonoluluAnchorageLos AngelesDenverChicagoNew YorkCaracasRio de Janeiro-2H-1HLondon
-11 hours-10 hours-9 hours-8 hours-7 hours-6 hours-5 hours-4 hours-3 hours-2 hours-1 hour0 hours
PARCAIMOWDXBKHIDACBKKHKGTYOSYDNOUAKL
ParisCairoMoscowDubaiKarachiDaccaBangkokHong KongTokyoSydneyNoumeaAuchland
+1 hour+2 hours+3 hours+4 hours+5 hours+6 hours+7 hours+8 hours+9 hours+10 hours+11 hours+12 hours
Alarm Setting (3 alarms)1. Press pusher A to select alarm mode.2. Press pusher C to scroll through alarms.3. Press pusher D for alarm on/off.4. Press and hold pusher B for 2 seconds to enter setting mode. Minutes will begin flashing.5. Press pusher A to select minutes and hour.6. Press pusher C to increase the digit; press pusher D to decrease the digit. Alarm is automatically turned on when setting is changed.7. Press pusher B to exit setting mode.
Chronograph Mode1. Press pusher A to select chronograph mode (STW).2. Press pusher C to start chronograph; press pusher D to stop chronograph.3. Press pusher D to reset chronograph when it is not running.
Lap Counting1. Press pusher C while chronograph is running (will record up to 20 laps).2. Press pusher D to finalize timing.3. Press pusher A to recall laps (TOT) when information is recorded in the chronograph (will recall up to 20 laps).4. Press pusher C to view next lap; press pusher D to view previous lap.5. Enter regular chronograph mode; press pusher D to reset to zero.
Countdown Timer1. Press pusher A to select timer mode.2. Press pusher C to start/stop the timer.3. Press pusher D to reset timer when it is not running. Timer will show all zero’s before timer is started again.4. Press and hold pusher B for 2 seconds to enter setting mode. Seconds will begin flashing.5. Press pusher A to select seconds, minutes and hour.6. Press pusher C to increase digit; press pusher D to decrease digit.7. Press pusher B to exit setting mode.
A
B
D
C
A
B
D
C
A
B
D
C
A
B
D
C
- 8 -
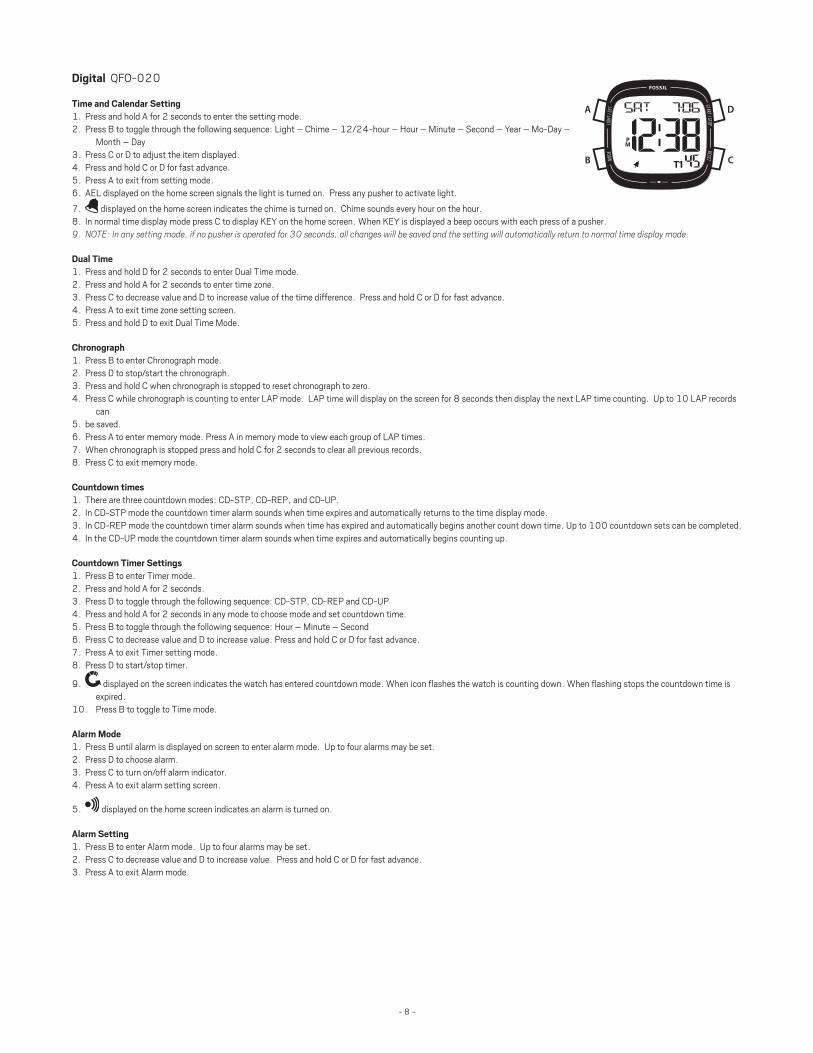
Digital QFO-020
Time and Calendar Setting1. Press and hold A for 2 seconds to enter the setting mode. 2. Press B to toggle through the following sequence: Light – Chime – 12/24-hour – Hour – Minute – Second – Year – Mo-Day –
Month – Day 3. Press C or D to adjust the item displayed.4. Press and hold C or D for fast advance.5. Press A to exit from setting mode.6. AEL displayed on the home screen signals the light is turned on. Press any pusher to activate light.
7. displayed on the home screen indicates the chime is turned on. Chime sounds every hour on the hour.8. In normal time display mode press C to display KEY on the home screen. When KEY is displayed a beep occurs with each press of a pusher.9. NOTE:Inanysettingmode,ifnopusherisoperatedfor30seconds,allchangeswillbesavedandthesettingwillautomaticallyreturntonormaltimedisplaymode.
Dual Time1. Press and hold D for 2 seconds to enter Dual Time mode.2. Press and hold A for 2 seconds to enter time zone.3. Press C to decrease value and D to increase value of the time difference. Press and hold C or D for fast advance.4. Press A to exit time zone setting screen.5. Press and hold D to exit Dual Time Mode.
Chronograph1. Press B to enter Chronograph mode. 2. Press D to stop/start the chronograph. 3. Press and hold C when chronograph is stopped to reset chronograph to zero.4. Press C while chronograph is counting to enter LAP mode. LAP time will display on the screen for 8 seconds then display the next LAP time counting. Up to 10 LAP records
can5. be saved.6. Press A to enter memory mode. Press A in memory mode to view each group of LAP times.7. When chronograph is stopped press and hold C for 2 seconds to clear all previous records.8. Press C to exit memory mode.
Countdown times1. There are three countdown modes: CD-STP, CD-REP, and CD-UP.2. In CD-STP mode the countdown timer alarm sounds when time expires and automatically returns to the time display mode.3. In CD-REP mode the countdown timer alarm sounds when time has expired and automatically begins another count down time. Up to 100 countdown sets can be completed.4. In the CD-UP mode the countdown timer alarm sounds when time expires and automatically begins counting up.
Countdown Timer Settings1. Press B to enter Timer mode.2. Press and hold A for 2 seconds. 3. Press D to toggle through the following sequence: CD-STP, CD-REP and CD-UP 4. Press and hold A for 2 seconds in any mode to choose mode and set countdown time. 5. Press B to toggle through the following sequence: Hour – Minute – Second6. Press C to decrease value and D to increase value. Press and hold C or D for fast advance.7. Press A to exit Timer setting mode.8. Press D to start/stop timer.
9. displayed on the screen indicates the watch has entered countdown mode. When icon flashes the watch is counting down. When flashing stops the countdown time is expired.
10. Press B to toggle to Time mode.
Alarm Mode1. Press B until alarm is displayed on screen to enter alarm mode. Up to four alarms may be set.2. Press D to choose alarm.3. Press C to turn on/off alarm indicator. 4. Press A to exit alarm setting screen.
5. displayed on the home screen indicates an alarm is turned on.
Alarm Setting 1. Press B to enter Alarm mode. Up to four alarms may be set.2. Press C to decrease value and D to increase value. Press and hold C or D for fast advance.3. Press A to exit Alarm mode.
A
B
D
C
- 9 -
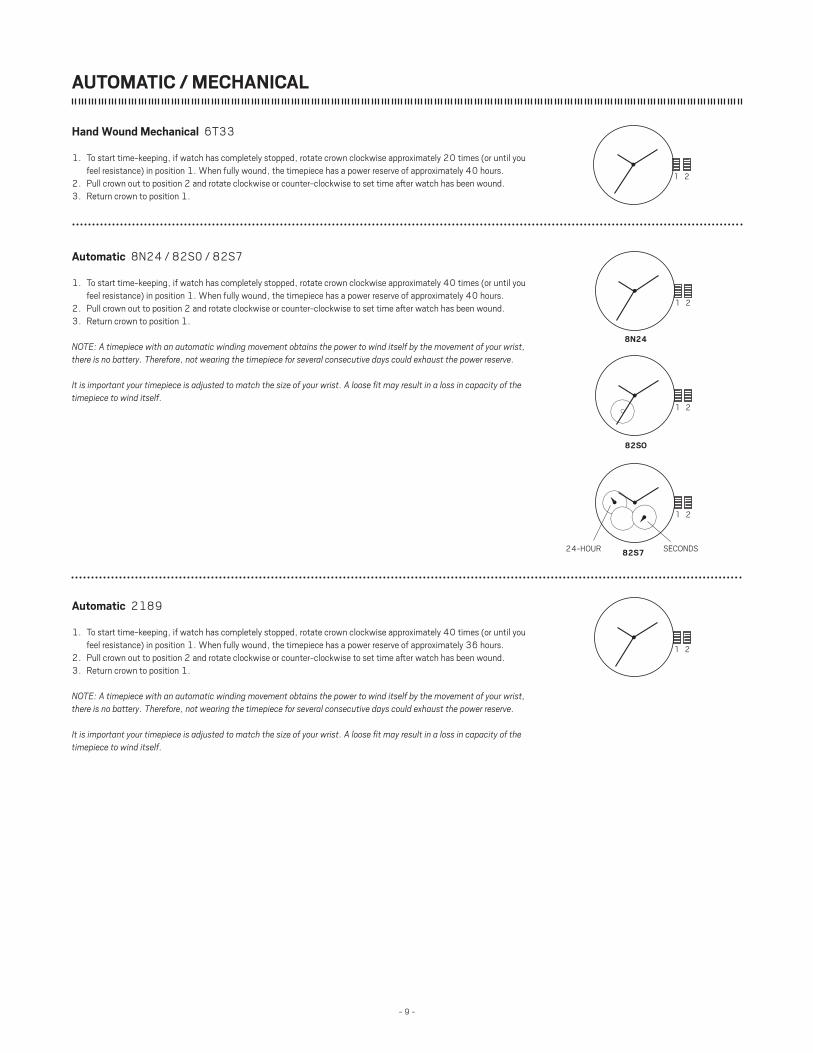
AUTOMATIC / MECHANICAL
Hand Wound Mechanical 6T33
1. To start time-keeping, if watch has completely stopped, rotate crown clockwise approximately 20 times (or until you feel resistance) in position 1. When fully wound, the timepiece has a power reserve of approximately 40 hours.
2. Pull crown out to position 2 and rotate clockwise or counter-clockwise to set time after watch has been wound.3. Return crown to position 1.
1 2
Automatic 8N24 / 82S0 / 82S7
1. To start time-keeping, if watch has completely stopped, rotate crown clockwise approximately 40 times (or until you feel resistance) in position 1. When fully wound, the timepiece has a power reserve of approximately 40 hours.
2. Pull crown out to position 2 and rotate clockwise or counter-clockwise to set time after watch has been wound.3. Return crown to position 1.
NOTE: A timepiece with an automatic winding movement obtains the power to wind itself by the movement of your wrist, there is no battery. Therefore, not wearing the timepiece for several consecutive days could exhaust the power reserve.
It is important your timepiece is adjusted to match the size of your wrist. A loose fit may result in a loss in capacity of the timepiece to wind itself.
Automatic 2189
1. To start time-keeping, if watch has completely stopped, rotate crown clockwise approximately 40 times (or until you feel resistance) in position 1. When fully wound, the timepiece has a power reserve of approximately 36 hours.
2. Pull crown out to position 2 and rotate clockwise or counter-clockwise to set time after watch has been wound.3. Return crown to position 1.
NOTE: A timepiece with an automatic winding movement obtains the power to wind itself by the movement of your wrist, there is no battery. Therefore, not wearing the timepiece for several consecutive days could exhaust the power reserve.
It is important your timepiece is adjusted to match the size of your wrist. A loose fit may result in a loss in capacity of the timepiece to wind itself.
1 2
82SO
1 2
8N24
1 2
82S724-HOUR SECONDS

- 10 -
Automatic TY2714
1. To start time-keeping, rotate the crown clockwise in position 1 until power reserve hand moves from “-” (low reserve) to “+” (full reserve).
2. Pull crown out to position 2 and rotate to set time. Return crown to position 1.3. Press A to set date. Each press of pusher A will advance the date by one increment. NOTE: Do not set date and week between 10 PM and 4 AM (22 o’clock and 4 o’clock). Doing so could
damage the movement’s accuracy.
1 2
A
DATE
MINUTE HAND
SECOND HAND
HOUR HAND
POWER RESERVE
1 2
B
CA
DATE
MONTH
24-HOUR HAND
WEEKDAY
Automatic TY2876
1. To start time-keeping, if watch has completely stopped, rotate crown clockwise approximately 50 times (or until you feel resistance) in position 1. When fully wound, the timepiece has a power reserve of approximately 40 hours.
2. Pull crown out to position 2 and rotate clockwise or counter-clockwise to set time after watch has been wound. 24-hour hand moves with hour and minute hands. Use 24-hour hand to set correct AM/PM time.
3. Return crown to position 1.4. Press A to adjust weekday. Each press of pusher A will advance the weekday by one increment.5. Press B to adjust month. Each press of pusher B will advance the month by one increment.6. Press C to adjust date. Each press of pusher C will advance the date by one increment.
NOTE: A timepiece with an automatic winding movement obtains the power to wind itself by the movement of your wrist, there is no battery. Therefore, not wearing the timepiece for several consecutive days could exhaust the power reserve.
It is important your timepiece is adjusted to the size of your wrist. A loose fit any result in a loss in capacity of the timepiece to wind itself.
Do not set date between 10 PM and 2 AM (22 o’clock and 2 o’clock). Doing so could damage the movement’s accuracy.
Automatic TY2809 / TY2723 / TY2542 / NH38
1. To start time-keeping, if watch has completely stopped, rotate crown clockwise approximately 50 times (or until you feel resistance) in position 1. When fully wound, the timepiece has a power reserve of approximately 36 hours.
2. Pull crown out to position 2 and rotate clockwise or counter-clockwise to set time after watch has been wound.3. Return crown to position 1.
NOTE: A timepiece with an automatic winding movement obtains the power to wind itself by the movement of your wrist, there is no battery. Therefore, not wearing the timepiece for several consecutive days could exhaust the power reserve.
It is important your timepiece is adjusted to match the size of your wrist. A loose fit may result in a loss in capacity of the timepiece to wind itself.
1 2
SECONDS
TY2723
1 2
POWER RESERVE
SECONDS
TY2542
1 2
TY2809
1 2
NH38
- 11 -
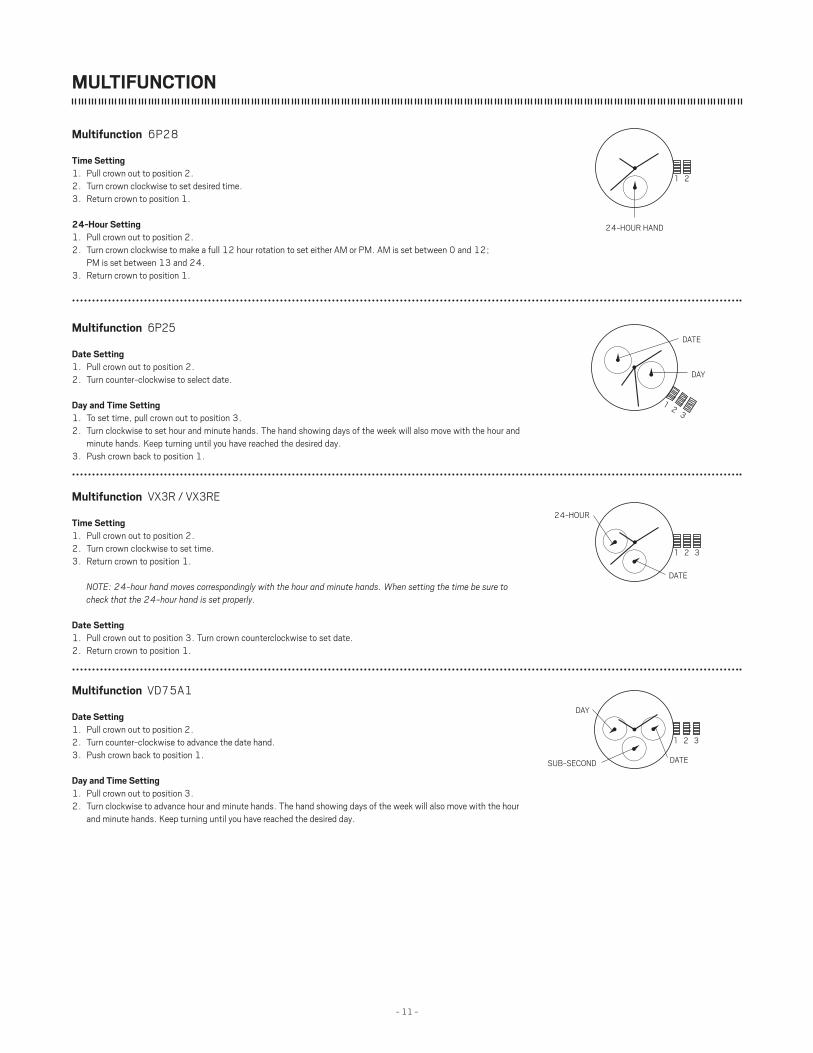
Multifunction 6P25
Date Setting1. Pull crown out to position 2.2. Turn counter-clockwise to select date.
Day and Time Setting1. To set time, pull crown out to position 3.2. Turn clockwise to set hour and minute hands. The hand showing days of the week will also move with the hour and
minute hands. Keep turning until you have reached the desired day.3. Push crown back to position 1.
1 23
DAY
DATE
1 2
24-HOUR HAND
MULTIFUNCTION
Multifunction VX3R / VX3RE
Time Setting1. Pull crown out to position 2.2. Turn crown clockwise to set time.3. Return crown to position 1.
NOTE: 24-hour hand moves correspondingly with the hour and minute hands. When setting the time be sure to check that the 24-hour hand is set properly.
Date Setting1. Pull crown out to position 3. Turn crown counterclockwise to set date.2. Return crown to position 1.
1 2 3
24-HOUR
DATE
Multifunction VD75A1
Date Setting1. Pull crown out to position 2.2. Turn counter-clockwise to advance the date hand.3. Push crown back to position 1.
Day and Time Setting1. Pull crown out to position 3.2. Turn clockwise to advance hour and minute hands. The hand showing days of the week will also move with the hour
and minute hands. Keep turning until you have reached the desired day.
1 2 3
DAY
SUB-SECOND DATE
Multifunction 6P28
Time Setting1. Pull crown out to position 2.2. Turn crown clockwise to set desired time.3. Return crown to position 1.
24-Hour Setting1. Pull crown out to position 2.2. Turn crown clockwise to make a full 12 hour rotation to set either AM or PM. AM is set between 0 and 12;
PM is set between 13 and 24.3. Return crown to position 1.

- 12 -
Multifunction VX3JE / VX3JA / VX3LE
Date Setting1. Pull crown out to position 2.2. Turn counter-clockwise to advance the date hand.3. Push crown back to position 1.
Day and Time Setting1. Pull crown out to position 3.2. Turn clockwise to advance hour and minute hands. The hand showing days of the week will also move with the hour and minute hands. Keep turning until you have
reached the desired day.
24-Hour Sub-Dial SettingThe movement of the 24-hour hand corresponds to the hour and minute hands. When setting the time be sure to check that the 24-hour hand is set properly.
1 2 3
24-HOUR
DAY
DATE
Multifunction JP25
Date/Time Setting1. Pull crown out to position 2.2. Turn crown clockwise to set date and time.3. Return crown to position 1. NOTE: If the date is set between the hours of around 9:00 PM and 1:00 AM, the date may not change
on the following day.
Day Setting1. Pull crown out to position 3.2. Turn crown clockwise to set day.3. Return crown to position 1.
Dual Time Setting1. Press A to set dual time hand forward in 15 minute increments.2. Press B to set dual time hand backward in 15 minute increments. NOTE: Dual time hand can be advanced rapidly by continuously pressing A or B.
1 2 3
A
BDUAL TIME
DAY
DATE
24-HOUR
Multifunction 6P27 / 6P29 / 6P77 / 6P79 / VX3NE / VX7J
Date Setting1. Pull crown out to position 2.2. Turn clockwise to advance the date hand.3. Push crown back to position 1.
Day and Time Setting1. Pull crown out to position 3.2. Turn clockwise to advance hour and minute hands. The hand showing days of the week will also move with the hour and minute hands. Keep turning until you have
reached the desired day.
24-Hour Sub-Dial SettingThe 24-hour hand moves correspondingly with the hour and minute hands. When setting the time be sure to check that the 24-hour hand is set properly.
1 2 3
DATE
24-HOURDAY
VX3NE
1 2 3
24-HOUR
DAYDATE
6P27 / 6P77
1 2 3
6P29 / 6P79
DATE24-HOUR
DAY
VX7J
1 2 3
DATE DAY
24 HEURES
JOUR

- 13 -
Multi-Time Zone 505.24H
Time / Calendar Setting1. Pull RED crown B (at 4:00 position) out to position 2.2. Turn crown clockwise to set to previous day’s date.3. Pull crown out to position 3.4. Turn crown counter-clockwise until date changes to today’s date; set correct AM or PM time.5. Return crown to position 1. NOTE: Second time zone hand will move in conjunction with hour and minute hands. Set hour and minute hands
before setting second time zone.
Second Time Zone Setting1. Pull RED crown B (at 4:00 position) out to position 2.2. Turn crown counter-clockwise to set second time zone.3. Return crown to position 1. NOTE: Second time zone hand is read in military time, indicated on the bezel.
Third Time Zone Reading1. Turn crown A clockwise or counter-clockwise to match current hour with current city time zone.2. For third time zone reading, locate the city indicating the new time zone. Each increment (to the right) indicates
+1 hour; each decrement (to the left) indicates -1 hour.
B1 2
3
A
SECOND TIME ZONE HAND
Multifunction with Alarm 8176-1990
Time and Date Setting1. Pull crown out to position 2 and turn clockwise to set date to the previous day.2. Pull crown out to position 3 and turn clockwise until the present date is displayed. Continue turning crown to set the
correct AM/PM time.3. Return crown to position 1. NOTE: To ensure accuracy, do not set the date between 9:00 PM and 12:30 AM.
Second Time Zone Setting1. Pull crown out to position 2.2. Press A to set second time zone. NOTE: Second time zone is read in military time, indicated on the outer portion of the dial.
Alarm Function1. Press B to toggle alarm on/off. Alarm beeps twice to indicate alarm “on,” and beeps once to indicate alarm “off.”2. Alarm will sound for 15 seconds. Push B to silence alarm. NOTE: If B is not pressed, alarm will sound again in one minute, and will automatically change to alarm “off” setting.
Alarm Setting1. Pull crown out to position 2 and turn counter-clockwise to set alarm indicator.2. Return crown to position 1.
A
B
1 2 3
ALARM HAND
SECOND HAND
SECOND TIME ZONE HAND
DATE
NOTE: Alarm hand is a different color from the other watch hands.
Two Eye Multifunction VD32A
Time and 24-Hour Setting1. Pull crown out to position 2.2. Turn crown to set hour and minute hands. Note: The 24-hour hand moves with the hour and minute hands.3. Continue turning crown clockwise to set either AM or PM. Note, AM is set between 0 and 12; PM is set between 13 and 24.4. Push crown in to position 1.
Dual Time 24-Hour Setting1. Pull crown out to position 2.2. Press A to move hand counter clockwise; Press B to move hand clockwise. Each press of A or B will move the dual time 24-hour hand in ten-minute increments.3. Push crown in to position 1. Note: When crown is in position 1, push A or B to move the dual time 24-hour hand in 1-hour increments.
1 2
A
B
24 HOUR HAND
DUAL TIME HOUR HAND
- 14 -
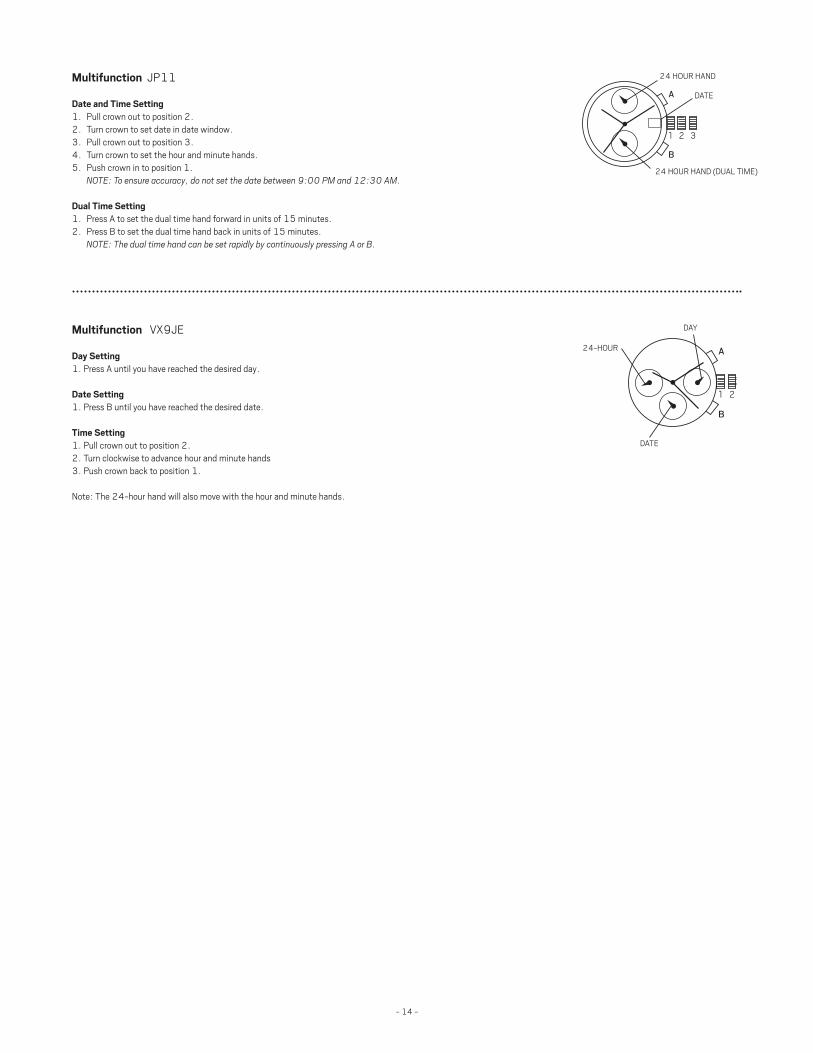
Multifunction JP11
Date and Time Setting1. Pull crown out to position 2.2. Turn crown to set date in date window.3. Pull crown out to position 3.4. Turn crown to set the hour and minute hands.5. Push crown in to position 1. NOTE: To ensure accuracy, do not set the date between 9:00 PM and 12:30 AM.
Dual Time Setting1. Press A to set the dual time hand forward in units of 15 minutes.2. Press B to set the dual time hand back in units of 15 minutes. NOTE: The dual time hand can be set rapidly by continuously pressing A or B.
1 2 3
A
B
24 HOUR HAND
24 HOUR HAND (DUAL TIME)
DATE
Multifunction VX9JE
Day Setting1. Press A until you have reached the desired day.
Date Setting1. Press B until you have reached the desired date.
Time Setting1. Pull crown out to position 2.2. Turn clockwise to advance hour and minute hands3. Push crown back to position 1.
Note: The 24-hour hand will also move with the hour and minute hands.
1 2
A
B
DATE
24-HOUR
DAY
- 15 -
CHRONOGRAPH
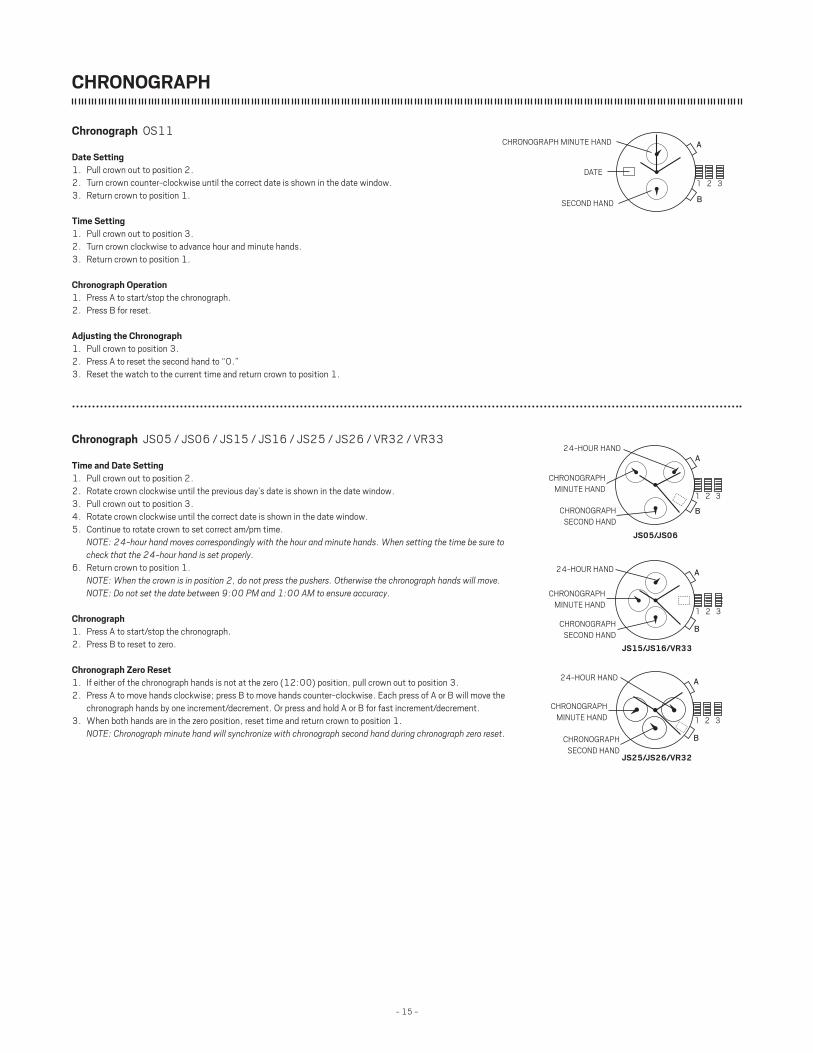
Chronograph OS11
Date Setting1. Pull crown out to position 2.2. Turn crown counter-clockwise until the correct date is shown in the date window.3. Return crown to position 1.
Time Setting1. Pull crown out to position 3.2. Turn crown clockwise to advance hour and minute hands.3. Return crown to position 1.
Chronograph Operation1. Press A to start/stop the chronograph.2. Press B for reset.
Adjusting the Chronograph1. Pull crown to position 3.2. Press A to reset the second hand to “0.”3. Reset the watch to the current time and return crown to position 1.
1 2 3
A
B
DATE
CHRONOGRAPH MINUTE HAND
SECOND HAND
Chronograph JS05 / JS06 / JS15 / JS16 / JS25 / JS26 / VR32 / VR33
Time and Date Setting1. Pull crown out to position 2.2. Rotate crown clockwise until the previous day’s date is shown in the date window.3. Pull crown out to position 3.4. Rotate crown clockwise until the correct date is shown in the date window.5. Continue to rotate crown to set correct am/pm time. NOTE: 24-hour hand moves correspondingly with the hour and minute hands. When setting the time be sure to
check that the 24-hour hand is set properly.6. Return crown to position 1. NOTE: When the crown is in position 2, do not press the pushers. Otherwise the chronograph hands will move. NOTE: Do not set the date between 9:00 PM and 1:00 AM to ensure accuracy.
Chronograph1. Press A to start/stop the chronograph.2. Press B to reset to zero.
Chronograph Zero Reset1. If either of the chronograph hands is not at the zero (12:00) position, pull crown out to position 3.2. Press A to move hands clockwise; press B to move hands counter-clockwise. Each press of A or B will move the
chronograph hands by one increment/decrement. Or press and hold A or B for fast increment/decrement.3. When both hands are in the zero position, reset time and return crown to position 1. NOTE: Chronograph minute hand will synchronize with chronograph second hand during chronograph zero reset.
CHRONOGRAPH SECOND HAND
CHRONOGRAPH MINUTE HAND
24-HOUR HAND
B
A
1 2 3
JS15/JS16/VR33
CHRONOGRAPH SECOND HAND
CHRONOGRAPH MINUTE HAND
24-HOUR HAND
B
A
1 2 3
JS05/JS06
CHRONOGRAPH SECOND HAND
CHRONOGRAPH MINUTE HAND
24-HOUR HAND
B
A
1 2 3
JS25/JS26/VR32
- 16 -
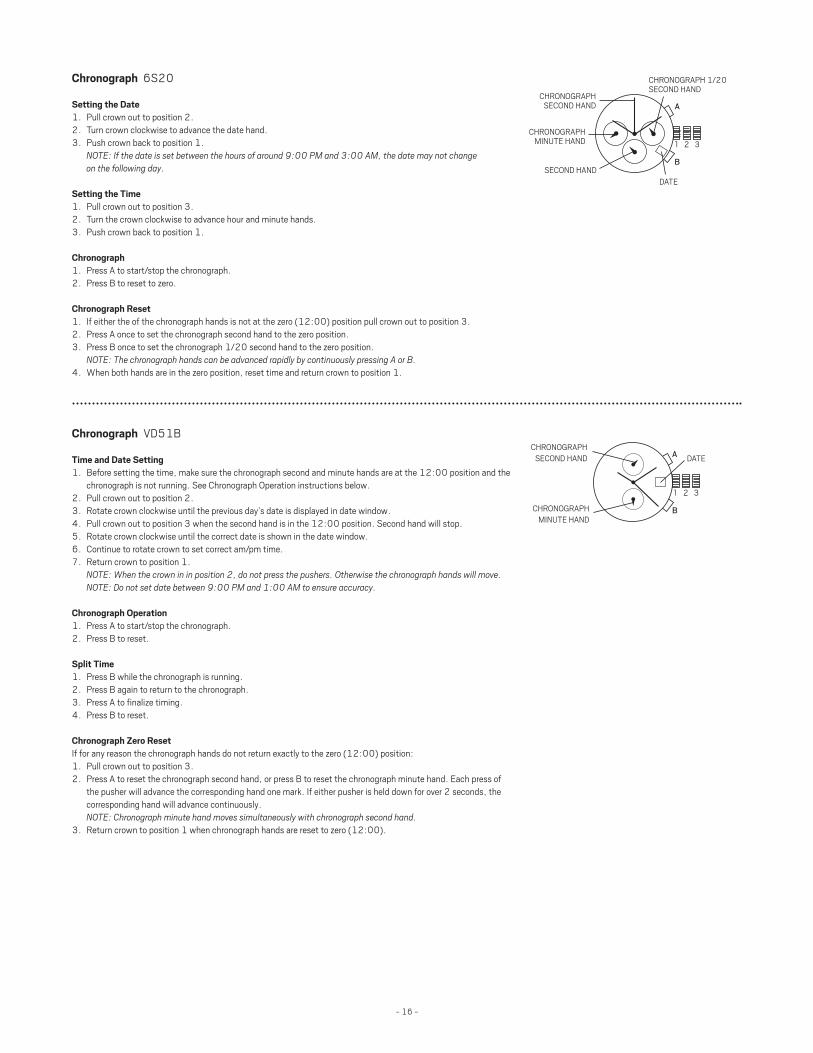
Chronograph VD51B
Time and Date Setting1. Before setting the time, make sure the chronograph second and minute hands are at the 12:00 position and the
chronograph is not running. See Chronograph Operation instructions below.2. Pull crown out to position 2.3. Rotate crown clockwise until the previous day’s date is displayed in date window.4. Pull crown out to position 3 when the second hand is in the 12:00 position. Second hand will stop.5. Rotate crown clockwise until the correct date is shown in the date window.6. Continue to rotate crown to set correct am/pm time.7. Return crown to position 1. NOTE: When the crown in in position 2, do not press the pushers. Otherwise the chronograph hands will move. NOTE: Do not set date between 9:00 PM and 1:00 AM to ensure accuracy.
Chronograph Operation1. Press A to start/stop the chronograph.2. Press B to reset.
Split Time1. Press B while the chronograph is running.2. Press B again to return to the chronograph.3. Press A to finalize timing.4. Press B to reset.
Chronograph Zero ResetIf for any reason the chronograph hands do not return exactly to the zero (12:00) position:1. Pull crown out to position 3. 2. Press A to reset the chronograph second hand, or press B to reset the chronograph minute hand. Each press of
the pusher will advance the corresponding hand one mark. If either pusher is held down for over 2 seconds, the corresponding hand will advance continuously.
NOTE: Chronograph minute hand moves simultaneously with chronograph second hand.3. Return crown to position 1 when chronograph hands are reset to zero (12:00).
1 2 3
A
B
CHRONOGRAPH SECOND HAND
CHRONOGRAPH MINUTE HAND
DATE
Chronograph 6S20
Setting the Date1. Pull crown out to position 2.2. Turn crown clockwise to advance the date hand.3. Push crown back to position 1. NOTE: If the date is set between the hours of around 9:00 PM and 3:00 AM, the date may not change
on the following day.
Setting the Time1. Pull crown out to position 3.2. Turn the crown clockwise to advance hour and minute hands.3. Push crown back to position 1.
Chronograph1. Press A to start/stop the chronograph.2. Press B to reset to zero.
Chronograph Reset1. If either the of the chronograph hands is not at the zero (12:00) position pull crown out to position 3.2. Press A once to set the chronograph second hand to the zero position.3. Press B once to set the chronograph 1/20 second hand to the zero position. NOTE: The chronograph hands can be advanced rapidly by continuously pressing A or B.4. When both hands are in the zero position, reset time and return crown to position 1.
1 2 3
A
B
CHRONOGRAPH SECOND HAND
CHRONOGRAPH 1/20 SECOND HAND
SECOND HAND
CHRONOGRAPH MINUTE HAND
DATE

- 17 -
Chronograph VK61 / VK64
Time and Date Setting1. Pull crown out to position 2 and turn clockwise to set date to the previous day.2. Pull crown out to position 3 and turn clockwise until the present date is displayed. Continue turning crown
to set the correct AM/PM time. NOTE: 24-hour hand (VK64 model only) moves in conjunction with minute/hour hands and indicates
AM/PM time.3. Return crown to position 1. NOTE: To ensure accuracy, do not set the date and weekday between 9:00 PM and 3:00 AM.
Chronograph Function1. Press A to start/stop the chronograph.2. Press B to reset to zero. NOTE: After 1 hour of continuous running, the chronograph will automatically stop.
A
B
1 2 3
DATECHRONOGRAPH
MINUTE HAND
CHRONOGRAPH 1/5 SECOND HAND
SECOND HANDVK61
A
B
1 2 3
24-HOUR HAND
DATE
CHRONOGRAPH MINUTE HAND
CHRONOGRAPH 1/5 SECOND HAND
VK64
Chronograph VK63
Time Setting1. Pull crown out to position 3.2. Turn crown to set desired time (make sure AM/PM is set correctly).3. Return crown to position 1.
Date Setting1. Pull crown out to position 2.2. Turn crown clockwise to set date.3. Return crown to position 1. NOTE: Do not set date between 9:00 PM and 3:00 AM, otherwise day may not change properly. If necessary,
first change the time, set date, and then reset to correct time.
Chronograph Operation1. Press A to start/stop chronograph.2. Press B to reset.
Resetting After Battery Change1. Pull crown out to position 3.2. Press B for 2 seconds and then release.3. The small second hand should move at 2 second intervals for 10 seconds as a demonstration.4. Return crown to position 1.
1 2 3
A
B
24-HOUR HAND
DATE
CHRONOGRAPH MINUTE HAND
CHRONOGRAPH SECOND HAND
SECOND HAND
Chronograph Stopwatch JS10
Time Setting1. Pull crown out to position 2.2. Turn crown to set desired time.3. Return crown to position 1.
Using Stopwatch1. Press A to start/stop stopwatch and control split time.2. Press B to reset stopwatch. NOTE: This stopwatch is able to measure and display time in 1/10 second up to a maximum of 30 minutes.
Stopwatch will stop automatically after running continuously for 30 minutes.
Resetting Stopwatch1. Pull crown out to position 2.2. Press A once to set chronograph second hand to zero position.3. Once hands have returned to zero, reset to desired time.4. Return crown to position 1. NOTE: This procedure should only be performed when chronograph second hand does not to return to zero position.
1 2
A
B
CHRONOGRAPH MINUTE HAND
SECOND HAND
CHRONOGRAPH SECOND HAND
24-HOUR HAND
- 18 -
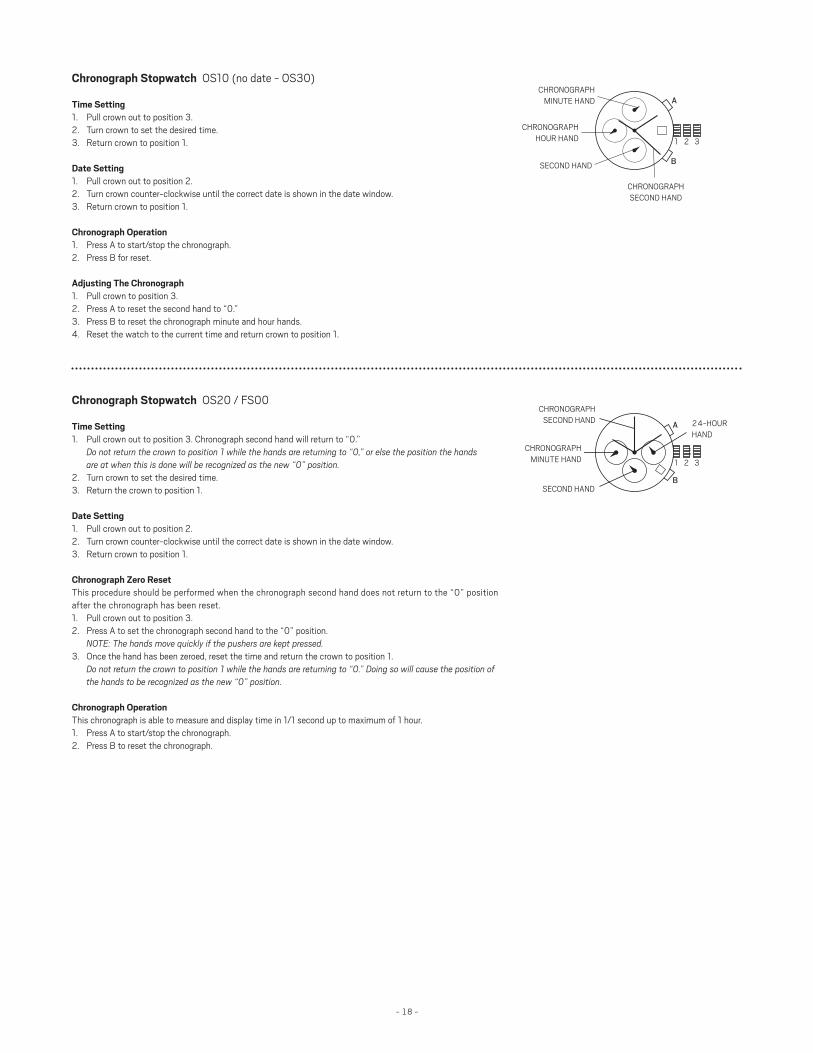
Chronograph Stopwatch OS20 / FS00
Time Setting1. Pull crown out to position 3. Chronograph second hand will return to “0.” Do not return the crown to position 1 while the hands are returning to “0,” or else the position the hands
are at when this is done will be recognized as the new “0” position.2. Turn crown to set the desired time.3. Return the crown to position 1.
Date Setting1. Pull crown out to position 2.2. Turn crown counter-clockwise until the correct date is shown in the date window.3. Return crown to position 1.
Chronograph Zero ResetThis procedure should be performed when the chronograph second hand does not return to the “0” position after the chronograph has been reset.1. Pull crown out to position 3.2. Press A to set the chronograph second hand to the “0” position. NOTE: The hands move quickly if the pushers are kept pressed.3. Once the hand has been zeroed, reset the time and return the crown to position 1. Do not return the crown to position 1 while the hands are returning to “0.” Doing so will cause the position of
the hands to be recognized as the new “0” position.
Chronograph OperationThis chronograph is able to measure and display time in 1/1 second up to maximum of 1 hour.1. Press A to start/stop the chronograph.2. Press B to reset the chronograph.
CHRONOGRAPH MINUTE HAND
CHRONOGRAPH SECOND HAND
SECOND HAND
24-HOUR HAND
B
A
1 2 3
CHRONOGRAPH MINUTE HAND
CHRONOGRAPH SECOND HAND
SECOND HAND B
A
1 2 3
Chronograph Stopwatch OS10 (no date - OS30)
Time Setting1. Pull crown out to position 3.2. Turn crown to set the desired time.3. Return crown to position 1.
Date Setting1. Pull crown out to position 2.2. Turn crown counter-clockwise until the correct date is shown in the date window.3. Return crown to position 1.
Chronograph Operation1. Press A to start/stop the chronograph.2. Press B for reset.
Adjusting The Chronograph1. Pull crown to position 3.2. Press A to reset the second hand to “0.”3. Press B to reset the chronograph minute and hour hands.4. Reset the watch to the current time and return crown to position 1.
CHRONOGRAPH HOUR HAND
- 19 -
Chronograph Stopwatch VD55 (with date - VD57)
Time Setting1. Pull crown out to position 3.2. Set time by turning the crown clockwise.3. Push back to position 1 to start the watch.
Using the Stopwatch1. Press A to start/stop the stopwatch.2. Press B to control the split time and reset.
Stopwatch Hand Adjustment1. Pull crown out to position 3.2. Press A to reset the stopwatch 1/10 second hand to the “0” position.3. Press B to reset the second and minute hands. The hands only move clockwise.4. With each press of A or B, the hands move one position. They move quickly if the buttons are kept pressed.
NOTE: If the stopwatch hands function improperly, pull out crown and press A and B at the same time for over 2 seconds. When the buttons are released, the stopwatch second and 1/10 second hands will spin around and return to “0.” This will indicate that the internal circuit has been reset.
Date Setting (On some models only)1. Pull crown out to position 2.2. Turn clockwise until desired date appears in window.3. Push crown back to position 1.
B
A
1 2 3
CHRONOGRAPH MINUTE HAND
CHRONOGRAPH SECOND HAND
CHRONOGRAPH 1/10 SECOND HAND
Chronograph Stopwatch VD54 (with date - VD53)
Time and Date Setting1. Before setting the time, make sure the chronograph is stopped and set to zero (12:00) position.2. Pull crown out to position 2.3. Turn crown clockwise until the previous day’s date is displayed.4. Pull crown out to position 3 when the second hand is at the 12:00 position.5. Turn crown to set time.
NOTE: 24-hour hand moves correspondingly with the hour and minute hands. When setting the time be sure to check that the 24-hour hand is set properly.
6. Return crown to position 1.NOTE: When the crown is in position 2, do not press the pushers. Otherwise the chronograph hands will move.
Chronograph1. Press A to start/stop the chronograph.2. Press B to reset to zero.
Split Time1. Press B while the chronograph is running.2. Press B again to return to the chronograph.3. Press A to finalize timing.4. Press B to reset.
Chronograph Zero Reset1. If either of the chronograph hands is not at the zero (12:00) position, pull crown out to position 3.2. Press A to move hands clockwise; press B to move hands counter-clockwise.3. Return crown to position 1.
A
B
1 2 3
24-HOUR HANDCHRONOGRAPH
MINUTE HAND
CHRONOGRAPH SECOND HAND

- 20 -
Chronograph Stopwatch YM91
Time and Date Setting1. Pull crown out to position 2.2. Turn the crown to set desired time.3. Return crown to position 1.
Using the Stopwatch1. Press A to start/stop the chronograph.2. Press B to reset.
Stopwatch Hand Adjustment1. Pull crown out to position 2.2. Press left pusher for 2 seconds to turn stopwatch minute hand fully around and be able to set in correct
position. Press right pusher repeatedly to set it to “0” position.3. Press left pusher for 2 seconds to fully turn stopwatch 1/5-second hand and be able to set in correct position.
Press right pusher repeatedly to set it to “0” position.4. Return crown to position 1.
HOUR HAND
CHRONOGRAPH MINUTE HAND
30 MINUTE COUNTER
MINUTE HAND
DATE
CHRONOGRAPH SECOND HAND
CHRONOGRAPH 1/5 SECOND HAND
SECOND HAND
SECOND HAND
MINUTE HAND
DATECOUNTDOWN AND
CHRONOGRAPH MINUTE HAND
12
BA
B
A
1 2 3
Chronograph Cal 8171/202
Time Setting1. Pull crown out to position 3.2. Turn crown to set the desired time.3. Return crown to position 1.
Date Setting1. Pull crown out to position 2.2. Turn crown counter-clockwise until the correct date is shown in the date window.3. Return crown to position 1.
Chronograph Operation1. Press A to start/stop the chronograph.2. Press B to use split time/reset the chronograph.
Calibration1. To calibrate movement after battery exchange, pull crown out to position 2.2. To reset minutes, press B.3. To reset seconds, press A.4. Return crown to position 1.
Chronograph 8270B
Time Setting1. Pull crown out to position 2.2. Turn the crown counter-clockwise and set the date for the previous day.3. Pull crown out to position 3.4. Turn the crown counter-clockwise to advance the time and continue until the day changes to
the present day.5. Set to correct time.6. Return crown to position 1.
Countdown Timer and Chronograph Setting1. Press and hold B for 1 second. Beep indicates setting mode.2. Press B to adjust the countdown length. 10 minute maximum.3. Press A to start the countdown timer. The Central Hand counts down the minutes and the
10 hour sub-eye counts down the seconds. When the countdown timer reaches zero the chronograph is activated.
4. Press A to stop or pause chronograph.5. Press B to reset the countdown timer and chronograph.
1 2 3
COUNTDOWN SECOND AND CHRONOGRAPH HOURS
COUNTDOWN INDICATOR RING
HOUR HAND
- 21 -
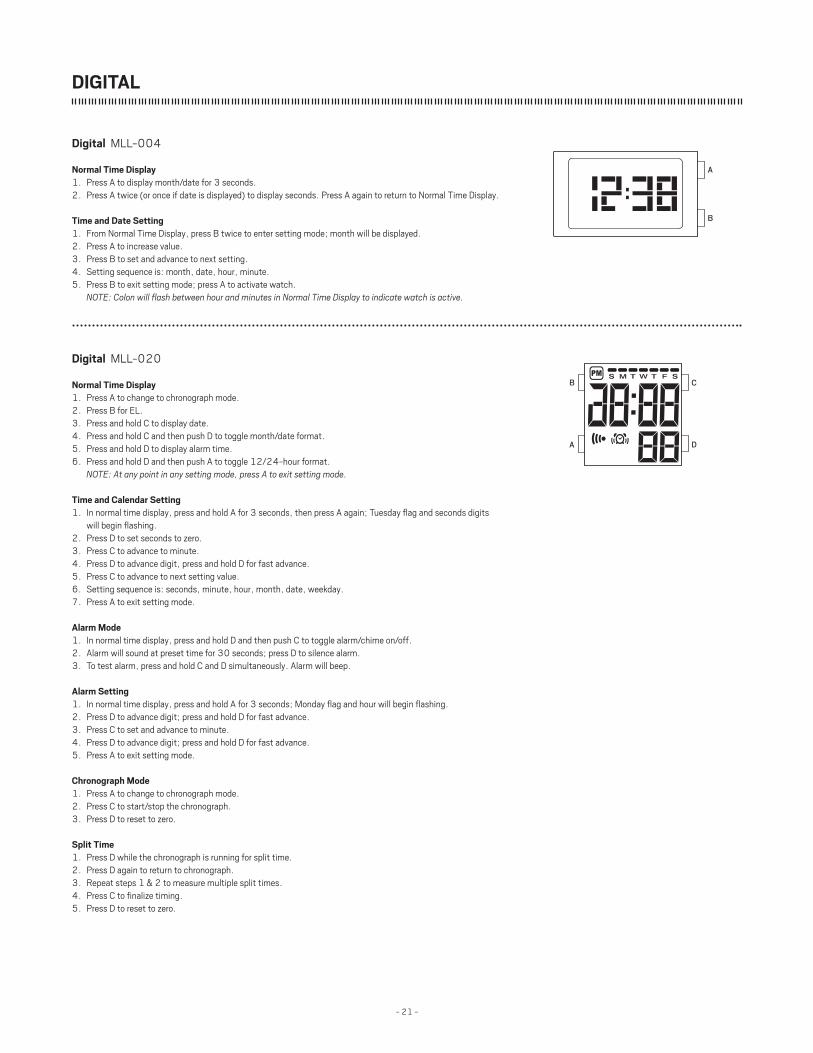
Digital MLL-004
Normal Time Display1. Press A to display month/date for 3 seconds.2. Press A twice (or once if date is displayed) to display seconds. Press A again to return to Normal Time Display.
Time and Date Setting1. From Normal Time Display, press B twice to enter setting mode; month will be displayed.2. Press A to increase value.3. Press B to set and advance to next setting.4. Setting sequence is: month, date, hour, minute.5. Press B to exit setting mode; press A to activate watch. NOTE: Colon will flash between hour and minutes in Normal Time Display to indicate watch is active.
A
B
Digital MLL-020
Normal Time Display1. Press A to change to chronograph mode.2. Press B for EL.3. Press and hold C to display date.4. Press and hold C and then push D to toggle month/date format.5. Press and hold D to display alarm time.6. Press and hold D and then push A to toggle 12/24-hour format. NOTE: At any point in any setting mode, press A to exit setting mode.
Time and Calendar Setting1. In normal time display, press and hold A for 3 seconds, then press A again; Tuesday flag and seconds digits
will begin flashing.2. Press D to set seconds to zero.3. Press C to advance to minute.4. Press D to advance digit, press and hold D for fast advance.5. Press C to advance to next setting value.6. Setting sequence is: seconds, minute, hour, month, date, weekday.7. Press A to exit setting mode.
Alarm Mode1. In normal time display, press and hold D and then push C to toggle alarm/chime on/off.2. Alarm will sound at preset time for 30 seconds; press D to silence alarm.3. To test alarm, press and hold C and D simultaneously. Alarm will beep.
Alarm Setting1. In normal time display, press and hold A for 3 seconds; Monday flag and hour will begin flashing.2. Press D to advance digit; press and hold D for fast advance.3. Press C to set and advance to minute.4. Press D to advance digit; press and hold D for fast advance.5. Press A to exit setting mode.
Chronograph Mode1. Press A to change to chronograph mode.2. Press C to start/stop the chronograph.3. Press D to reset to zero.
Split Time1. Press D while the chronograph is running for split time.2. Press D again to return to chronograph.3. Repeat steps 1 & 2 to measure multiple split times.4. Press C to finalize timing.5. Press D to reset to zero.
DA
CB
DIGITAL
- 22 -
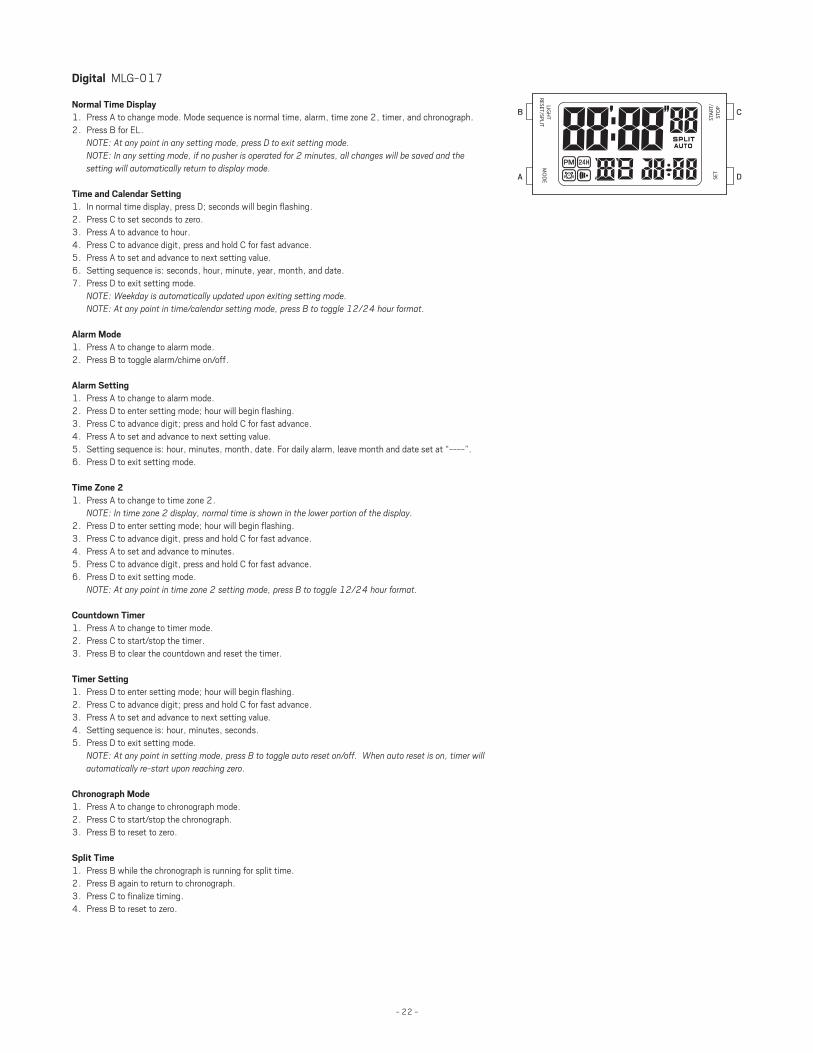
Digital MLG-017
Normal Time Display1. Press A to change mode. Mode sequence is normal time, alarm, time zone 2, timer, and chronograph.2. Press B for EL. NOTE: At any point in any setting mode, press D to exit setting mode. NOTE: In any setting mode, if no pusher is operated for 2 minutes, all changes will be saved and the
setting will automatically return to display mode.
Time and Calendar Setting1. In normal time display, press D; seconds will begin flashing.2. Press C to set seconds to zero.3. Press A to advance to hour.4. Press C to advance digit, press and hold C for fast advance.5. Press A to set and advance to next setting value.6. Setting sequence is: seconds, hour, minute, year, month, and date.7. Press D to exit setting mode. NOTE: Weekday is automatically updated upon exiting setting mode. NOTE: At any point in time/calendar setting mode, press B to toggle 12/24 hour format.
Alarm Mode1. Press A to change to alarm mode.2. Press B to toggle alarm/chime on/off.
Alarm Setting1. Press A to change to alarm mode.2. Press D to enter setting mode; hour will begin flashing.3. Press C to advance digit; press and hold C for fast advance.4. Press A to set and advance to next setting value.5. Setting sequence is: hour, minutes, month, date. For daily alarm, leave month and date set at “----”.6. Press D to exit setting mode.
Time Zone 21. Press A to change to time zone 2. NOTE: In time zone 2 display, normal time is shown in the lower portion of the display.2. Press D to enter setting mode; hour will begin flashing.3. Press C to advance digit, press and hold C for fast advance.4. Press A to set and advance to minutes.5. Press C to advance digit, press and hold C for fast advance.6. Press D to exit setting mode. NOTE: At any point in time zone 2 setting mode, press B to toggle 12/24 hour format.
Countdown Timer1. Press A to change to timer mode.2. Press C to start/stop the timer.3. Press B to clear the countdown and reset the timer.
Timer Setting1. Press D to enter setting mode; hour will begin flashing.2. Press C to advance digit; press and hold C for fast advance.3. Press A to set and advance to next setting value.4. Setting sequence is: hour, minutes, seconds.5. Press D to exit setting mode. NOTE: At any point in setting mode, press B to toggle auto reset on/off. When auto reset is on, timer will
automatically re-start upon reaching zero.
Chronograph Mode1. Press A to change to chronograph mode.2. Press C to start/stop the chronograph.3. Press B to reset to zero.
Split Time1. Press B while the chronograph is running for split time.2. Press B again to return to chronograph.3. Press C to finalize timing.4. Press B to reset to zero.
D
C
A
B
- 23 -
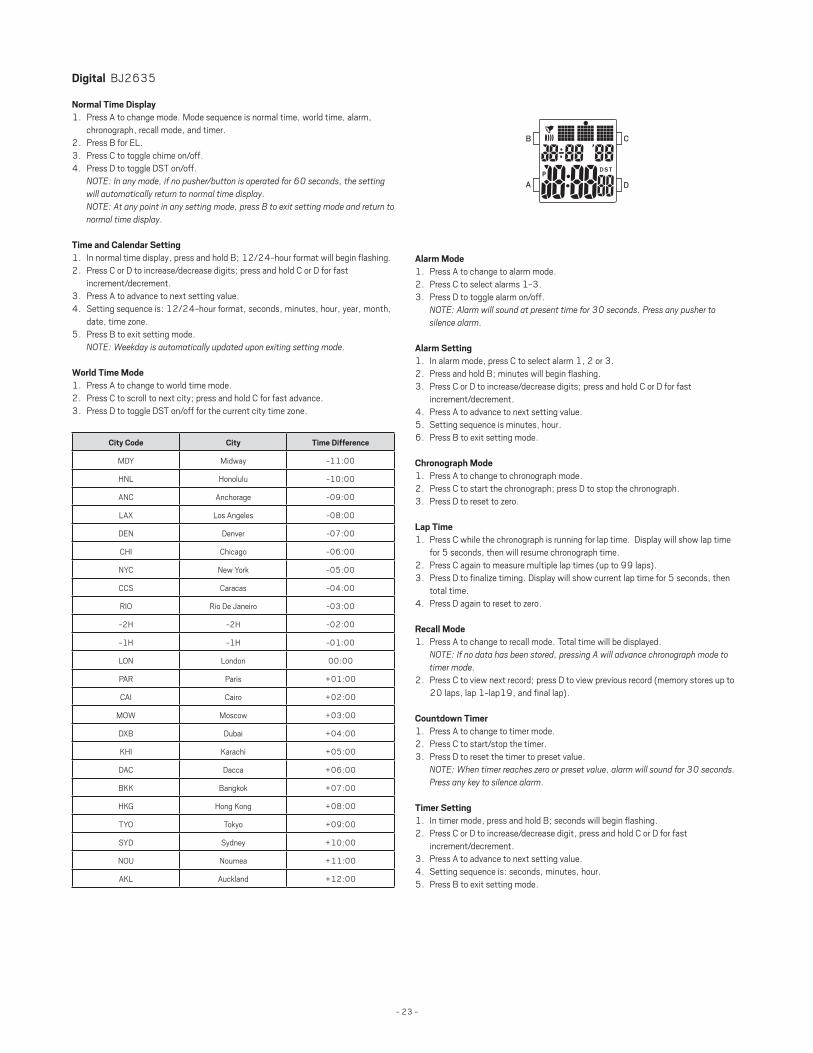
Digital BJ2635
Normal Time Display1. Press A to change mode. Mode sequence is normal time, world time, alarm,
chronograph, recall mode, and timer.2. Press B for EL.3. Press C to toggle chime on/off.4. Press D to toggle DST on/off. NOTE: In any mode, if no pusher/button is operated for 60 seconds, the setting
will automatically return to normal time display. NOTE: At any point in any setting mode, press B to exit setting mode and return to
normal time display.
Time and Calendar Setting1. In normal time display, press and hold B; 12/24-hour format will begin flashing.2. Press C or D to increase/decrease digits; press and hold C or D for fast
increment/decrement.3. Press A to advance to next setting value.4. Setting sequence is: 12/24-hour format, seconds, minutes, hour, year, month,
date, time zone.5. Press B to exit setting mode. NOTE: Weekday is automatically updated upon exiting setting mode.
World Time Mode1. Press A to change to world time mode.2. Press C to scroll to next city; press and hold C for fast advance.3. Press D to toggle DST on/off for the current city time zone.
City Code City Time Difference
MDY Midway -11:00
HNL Honolulu -10:00
ANC Anchorage -09:00
LAX Los Angeles -08:00
DEN Denver -07:00
CHI Chicago -06:00
NYC New York -05:00
CCS Caracas -04:00
RIO Rio De Janeiro -03:00
-2H -2H -02:00
-1H -1H -01:00
LON London 00:00
PAR Paris +01:00
CAI Cairo +02:00
MOW Moscow +03:00
DXB Dubai +04:00
KHI Karachi +05:00
DAC Dacca +06:00
BKK Bangkok +07:00
HKG Hong Kong +08:00
TYO Tokyo +09:00
SYD Sydney +10:00
NOU Noumea +11:00
AKL Auckland +12:00
B
A
C
D
Alarm Mode1. Press A to change to alarm mode.2. Press C to select alarms 1-3.3. Press D to toggle alarm on/off. NOTE: Alarm will sound at present time for 30 seconds. Press any pusher to
silence alarm.
Alarm Setting1. In alarm mode, press C to select alarm 1, 2 or 3.2. Press and hold B; minutes will begin flashing.3. Press C or D to increase/decrease digits; press and hold C or D for fast
increment/decrement.4. Press A to advance to next setting value.5. Setting sequence is minutes, hour.6. Press B to exit setting mode.
Chronograph Mode1. Press A to change to chronograph mode.2. Press C to start the chronograph; press D to stop the chronograph.3. Press D to reset to zero.
Lap Time1. Press C while the chronograph is running for lap time. Display will show lap time
for 5 seconds, then will resume chronograph time.2. Press C again to measure multiple lap times (up to 99 laps).3. Press D to finalize timing. Display will show current lap time for 5 seconds, then
total time.4. Press D again to reset to zero.
Recall Mode1. Press A to change to recall mode. Total time will be displayed. NOTE: If no data has been stored, pressing A will advance chronograph mode to
timer mode.2. Press C to view next record; press D to view previous record (memory stores up to
20 laps, lap 1-lap19, and final lap).
Countdown Timer1. Press A to change to timer mode.2. Press C to start/stop the timer.3. Press D to reset the timer to preset value. NOTE: When timer reaches zero or preset value, alarm will sound for 30 seconds.
Press any key to silence alarm.
Timer Setting1. In timer mode, press and hold B; seconds will begin flashing.2. Press C or D to increase/decrease digit, press and hold C or D for fast
increment/decrement.3. Press A to advance to next setting value.4. Setting sequence is: seconds, minutes, hour.5. Press B to exit setting mode.

- 24 -
Ten Half Digit Digital FL145 / FL186
Normal Time Display1. Press A to change mode.2. Press B for EL.3. Press C to toggle 12/24 hour format.4. Press D to stop alarm sound.
Time/Calendar Setting1. From normal time display, press A three times to enter setting mode. Seconds will begin flashing.2. Press C to reset seconds to zero.3. Press D to set and advance to next setting value.4. Press C to increase digit; press and hold C for fast advance. Press D to set each setting value.5. Setting sequence is: seconds, hour, minutes, month, date, day of week.6. Press A to exit setting mode.
Alarm Setting1. Press A to change to alarm mode (AL).2. Press and hold C for alarm sound testing.3. Press C to toggle alarm/chime on/off.4. Press D to enter setting mode; hour will begin flashing.5. Press C to advance digit; press and hold C for fast advance.6. Press D to set hour and minutes.7. Setting will automatically exit setting mode mode after minutes are set.
Chronograph Mode1. Press A to change to chronograph mode (ST).2. Press C to start/stop chronograph.3. Press D to reset chronograph when it is not running.
Split Time1. Press D while the chronograph is running.2. Press D again to return to the chronograph.3. Press C to finalize timing.4. Press D to reset to zero.
A
B
D
C
Digital FO-001
Normal Time DisplayPress A to change display. Display sequence is normal time, date, seconds.
Time and Calendar Setting1. In normal time display, press B twice; month will begin flashing.2. Press A to increase digits.3. Press B to advance to next setting value.4. Setting sequence is: month, date, hour, and minute.5. Press B to exit setting mode. NOTE: At any point in setting mode, press A to exit setting mode and return to normal time display.
B
A
Scrolling Tic
Time Setting1. Pull crown out to position 2.2. Turn crown to set the desired time.3. Return crown to position 1.
Display OptionsPress A to alternate between different display choices.
Display shows the seconds from “01” to “60” in various display options.
1 2
A
- 25 -
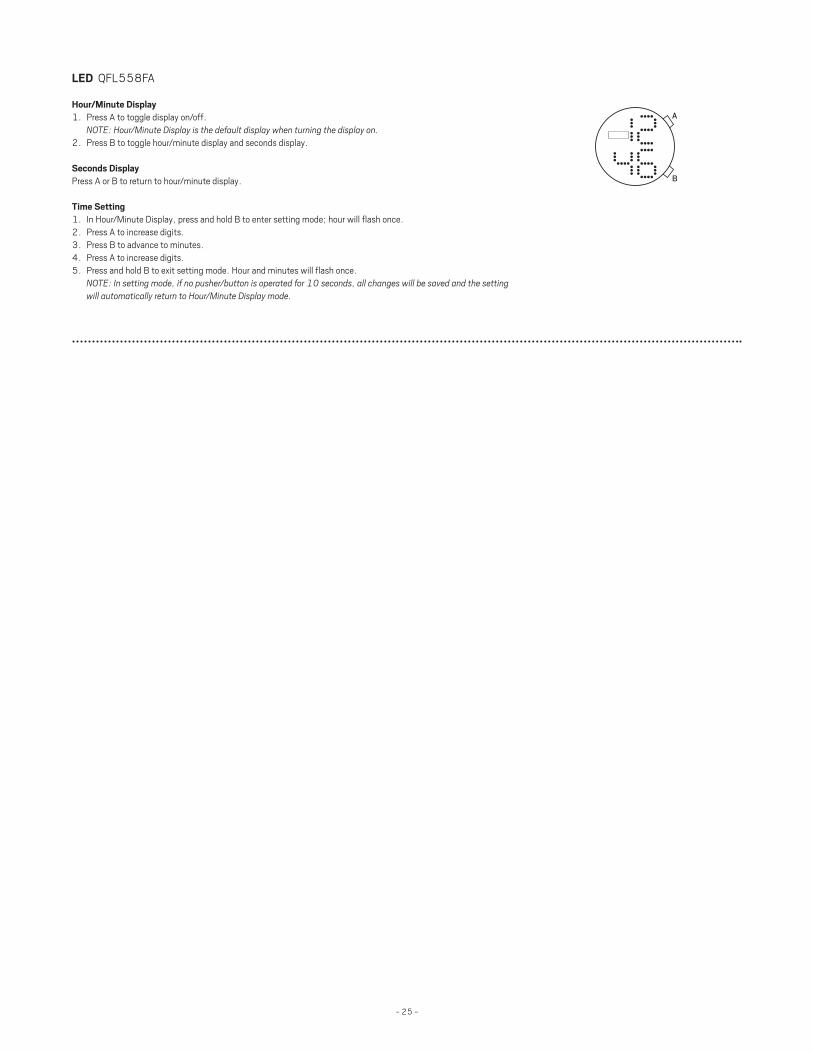
LED QFL558FA
Hour/Minute Display1. Press A to toggle display on/off. NOTE: Hour/Minute Display is the default display when turning the display on.2. Press B to toggle hour/minute display and seconds display.
Seconds DisplayPress A or B to return to hour/minute display.
Time Setting1. In Hour/Minute Display, press and hold B to enter setting mode; hour will flash once.2. Press A to increase digits.3. Press B to advance to minutes.4. Press A to increase digits.5. Press and hold B to exit setting mode. Hour and minutes will flash once. NOTE: In setting mode, if no pusher/button is operated for 10 seconds, all changes will be saved and the setting
will automatically return to Hour/Minute Display mode.
B
A