
Ming Ji Intelligent Body Temperature Detection and ...
31
Ming Ji Intelligent Body Temperature Detection and Analysis System - Mini User Manual
Transcript of Ming Ji Intelligent Body Temperature Detection and ...

Ming Ji Intelligent Body Temperature Detection and
Analysis System - Mini
User Manual

All rights reserved.
No part of this document may be copied, reproduced, or transmitted in any form or by
any means without the written permission of the Company.
Note:
The products, services, or features purchased are subject to the company's commercial
contract and its terms and conditions, and all or some of the products, services, or
features described in this document may not be within the scope of the purchase or use.
Unless otherwise agreed in the contract, the Company does not make any
representations or warranties, express or implied, regarding the contents of this
document.
This document may be updated from time to time as a result of product upgrades or
other reasons. Unless otherwise agreed, this document is provided as a guide only, and
all statements, information, and recommendations in this document shall not constitute
any express or implied warranty of any kind.

Table of Contents 1. Site Survey ....................................................................................................................................................3
2. Installation .....................................................................................................................................................4
2.1 Packing List ............................................................................................................................................4
2.2 Device Installation ................................................................................................................................5
2.2.1 Preparation before Installation ..............................................................................................5
2.2.2 Device Installation ...................................................................................................................5
3. Tuning .............................................................................................................................................................9
3.1 Laptop Configuration ...........................................................................................................................9
3.2 Login ..................................................................................................................................................... 12
3.3 Tuning ................................................................................................................................................... 13
4. Software Functions ................................................................................................................................... 16
4.1 Live Preview ....................................................................................................................................... 16
4.2 History Search .................................................................................................................................... 17
4.2.1 Historical Alarm .................................................................................................................... 17
4.2.2 Image Capture History ......................................................................................................... 18
4.3 System Configurations ...................................................................................................................... 18
4.3.1 Network Services .................................................................................................................. 18
4.3.2 Camera Management ............................................................................................................ 19
4.4 Firmware Configurations ................................................................................................................. 20
4.5 Algorithm Configurations ................................................................................................................ 22
4.6 Library Management ......................................................................................................................... 23
4.6.1 Face Library ............................................................................................................................ 23
4.6.2 List of Failure ......................................................................................................................... 26
4.7 Device Management .......................................................................................................................... 27
4.7.1 Log Management ................................................................................................................... 27
4.7.2 User Management ................................................................................................................. 27
4.7.3 Timed Restart ......................................................................................................................... 28
4.7.4 Device Management ............................................................................................................. 28
5. Troubleshooting ......................................................................................................................................... 30
5.1 Abnormal Notification Summary ................................................................................................... 30

1. Site Survey
Ming Ji Mini is a temperature measurement device suitable that requires semi-
coordination for indoor environments. The temperature measurement results can be
optimized if the personnel stand in front of the camera for 0.5 seconds. To ensure the
best use of the equipment, the following instructions should be followed when the
equipment is installed:
1) Set the height of the camera, raise the tripod to the maximum height, and the pitch
angle is less than 15°. It is not suitable to set the camera to below-human height.
2) It is required that the visible light channel has sufficient illumination, and avoid the
effects of backlighting / strong reflection / strong light change / blocking / high
temperature interference.
3) The installation area needs to be relatively isolated and stable from the
surroundings. Avoid outdoor or outdoor communication scenarios. The product is not
suitable for environments with strong airflow, electromagnetic interference, or
vibration.
4) The optimal ambient temperature of the device is 0-40°C.

2. Installation
After receiving the package, please check against the following list to make sure
everything is in the box.
2.1 Packing List
Ming Ji Mini Packing List
S/N Product Model Amount Unit
1 Video Analysis
Host MegBox-B2R-411-CW (INT) 1 Piece
2 Quality
Certificate 1 Piece
3 Warranty Card 1 Piece
4 Antenna 1 Piece
5 220V Power
Cord 1 Piece
6 Dual-light
Camera MegEye-TC1V-72DW-X3617 (INT) 1 Piece
7 Blackbody Meg-HT-02-01 1 Piece
8 Ethernet Cord 2 Piece
9 Camera Power
Cord 1 Piece
10 Power Adapter 2 Piece
11 Screw Driver 1 Piece
12 Packing Box 1 Piece
13 Device Inner
Lining 1 Set
14 Tripod 1 Piece
After confirming that having received the complete equipment, follow the steps below
to install the equipment.

2.2 Device Installation
2.2.1 Preparation before Installation
After completing site survey, user need to confirm the equipment installation position.
The installation diagram is shown below:
2.2.2 Device Installation
Device installation includes three parts: blackbody and dual-light camera assembly,
camera and tripod assembly, and equipment connection.
1) Dual-light camera and blackbody assembly
Fix the black body structure with the camera's fixed screw hole, and use the provided

screwdriver set to secure the position, as shown in the figure below:
Note: Please do not fully tighten first, tighten after setting the blackbody’s position.
Black body installation direction
The first method is recommended for deployment. The system has been configured
with the blackbody box by default. No additional effort required.
If using the second method, user needs to refer to the dual-light alignment steps in 4.5

to configure the blackbody position.
2) Assembly of dual-light camera and tripod
Step 1: Fix the tripod adapter to the camera
Step 2: Fix the camera to the tripod
3) Equipment connection
Video analysis host port description

Dual-light camera port description
Connection Description
Step 1: Use Ethernet cable to connect the visible light camera to the video analysis
host. Note that the camera’s RJ45 port is connected to the LAN port of the video
analysis host.

Step 2: Connect the infrared camera data port to the video analysis host via USB
extension cable
Step 3: Power up the camera using the power supply. After the power is turned on, the
indicator light will be on.
Step 4: Use 220V power supply to power up the video analysis host. After powered
on, the indicator light will be on.
Step 5: Use your own laptop to connect to the WAN port of the video analysis host.
Use the software.
Step 6: Note that the external Bluetooth antenna of the host must be connected
3. Tuning
3.1 Laptop Configuration
Open the laptop’s control panel and click on Network and Sharing Center as shown
below:

Click the Network and Sharing Center button to enter the following interface:
Click the Change Adaptor Settings button to enter the following interface:

Right-click the local connection and click the Properties button to enter the following
interface:
Double-click Internet Protocol Version 4 (TCP IPV4) to enter the following interface:
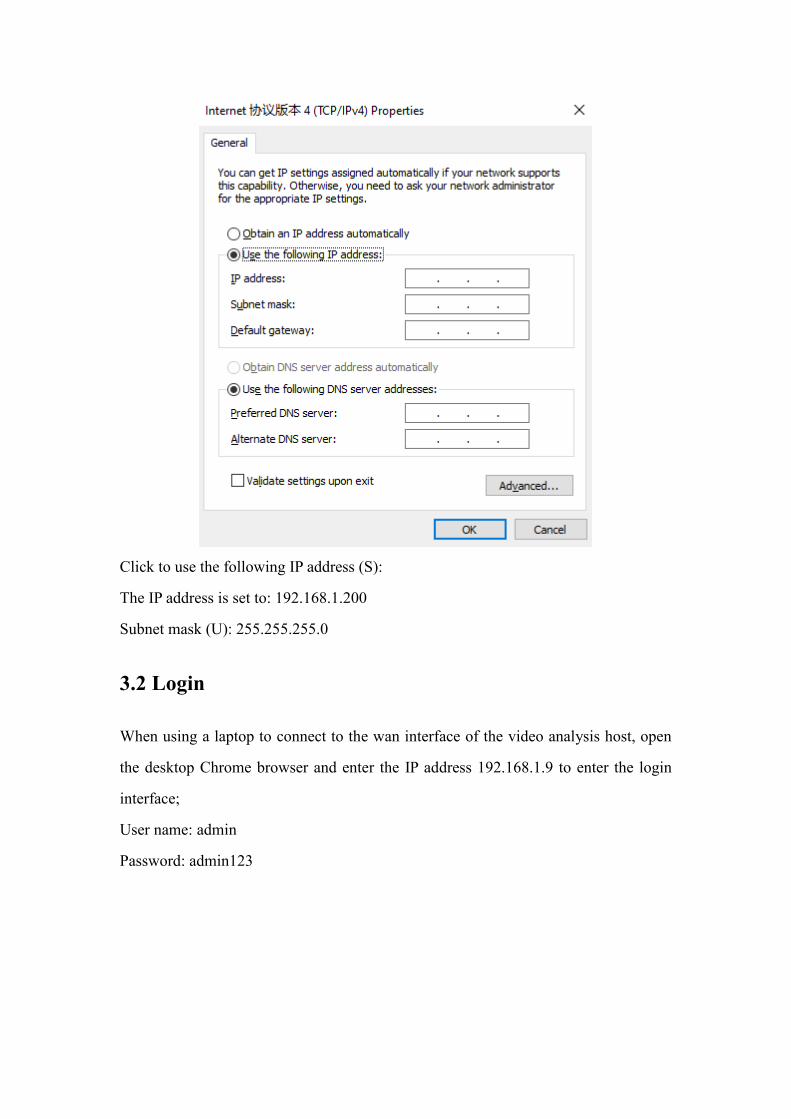
Click to use the following IP address (S):
The IP address is set to: 192.168.1.200
Subnet mask (U): 255.255.255.0
3.2 Login
When using a laptop to connect to the wan interface of the video analysis host, open
the desktop Chrome browser and enter the IP address 192.168.1.9 to enter the login
interface;
User name: admin
Password: admin123

After entering your username and password, click the login button to enter the
homepage
3.3 Tuning
By default, all tuning has been configured before leaving the factory. After the
equipment is installed on the site, only the blackbody fine-tuning is required.

With reference to the infrared light area, the blackbody preferred position (green box)
has been configured at the factory, and the blackbody should be manually rotated to
ensure that the it appears in the region.
The black body box needs to be completely covered by the black body. The blackbody can
be blocked by hand, which has temperature, to assist in locating and changing the position
of the blackbody. As shown below

Explanation:
In the marked area of the green box, the white dotted rectangle is the blackbody’s
preferred location.
Can use mouse to change the dimensions of the white box
After tuning the blackbody, user can stand in front of the camera and verify the
temperature measurement. When the displayed temperature is normal, it proves that the
system has been correctly set up.

4. Software Functions
4.1 Live Preview
Real-time statistics of today's traffic
Real-time statistics on the number of alarms, including: high body temperature
alarm, whitelist alarm, and no mask alarm
Real-time snapshot display
Real-time alarm display

4.2 History Search
4.2.1 Historical Alarm
Alarm record filtering
Filter criteria: time, name, remark and alarm type, alarm types include: face
recognition, high body temperature abnormality, no mask warning.
Export: click the export button to export the alarm records in a compressed file.
The size of each compressed file is less than 4GB.
Clear record: click the clear record button to clear the historical alarm.
View details: click an alarm record to view the details of the alarm record.

4.2.2 Image Capture History
Export snapshot records: click the export button to export the captured records in
the form of a compressed file. The size of each compressed file is less than 4GB.
Retrieve snapshot records: click the time at the top of the page, the calendar will
pop up for user to select time period, and then click the OK button.
Clear record: click the clear record button to clear all snapshot records
View details: click a snapshot record to view the details of the snapshot record
4.3 System Configurations
4.3.1 Network Services
General configuration
Video analysis box IP address configuration: support DHCP and static IP settings.
Click the save configuration button to complete IP address configuration. The default
factory IP address is 192.168.1.9

HTTPS Certificate import
Drag certificate into this area and the HTTPS certificate will be imported
automatically.
4.3.2 Camera Management
Click the edit button to enter the camera editing interface. The camera
configuration has been set by default at the factory, please do not change it if
there is no special need.

Click the drop-down button of the face database to select the face database to be
under surveillance. The management of the face database is in the base database
management interface.
4.4 Firmware Configurations
Note that it is already configured by default at the factory. If there is no special need,
please do not change it.
1) General configuration
Body temperature alert on and off
Body temperature warning threshold setting, default value is 37.3
No mask alarm on and off
Click the restore default button to restore the default configuration
Click the confirm modification button to save the modified content

2) Bluetooth settings
Current address: displays the current MAC address of the Bluetooth device. For
example, A4: C1: 38: CE: CD: 6D
Update address: Enter the Bluetooth mac address to be updated
Click to confirm the modification and save the updated Bluetooth mac address
3) Advanced settings
Panoramic image quality: default at 20
Visible light resolution decay frame: default 25
IR alignment delay (ms): default at 600
4) Watermark settings
Text description: enter the name of the watermark
Font size: 20
Transparency: 0.4
Rendering angle: 10

Rendering width: 400
Rendering height: 200
4.5 Algorithm Configurations
Note that it is already configured by default at the factory. If there is no special need,
please do not change it.
1) General settings
Capture mode: full capture mode
Push mode: background and snapshot
Pushing strategy: timed pushing
Graph push interval (seconds): 1
Number of pushed pictures: 20
Area of interest: default factory configuration already set
Region of interest setting method

2) Dual-light alignment
Note that it is already configured by default at the factory. If there is no special need,
please do not change it.
4.6 Library Management
4.6.1 Face Library
1) Face library management
Click the face library management button to enter the face library management
interface. Display a list of currently existing face libraries.

Click the new library button to create a new library. Enter the library name, alarm
threshold and remark information. Threshold recommendation: 90 for comparison
without wearing mask and 66.5 for comparison for people wearing masks.
2) Batch import
Batch import example: name photos with person’s name
Supports ZIP \ TAR format, the size should not exceed 1GB, and the quantity
should not exceed 50k
Supports PNG, JPG and BMP images, and the size of a single image must not
exceed 4MB
Click the select library drop-down box, select the library to be imported, drag the
compressed file into this area, and click the save button.
Note: the same person can only exist in one library, and two libraries cannot be
imported at the same time
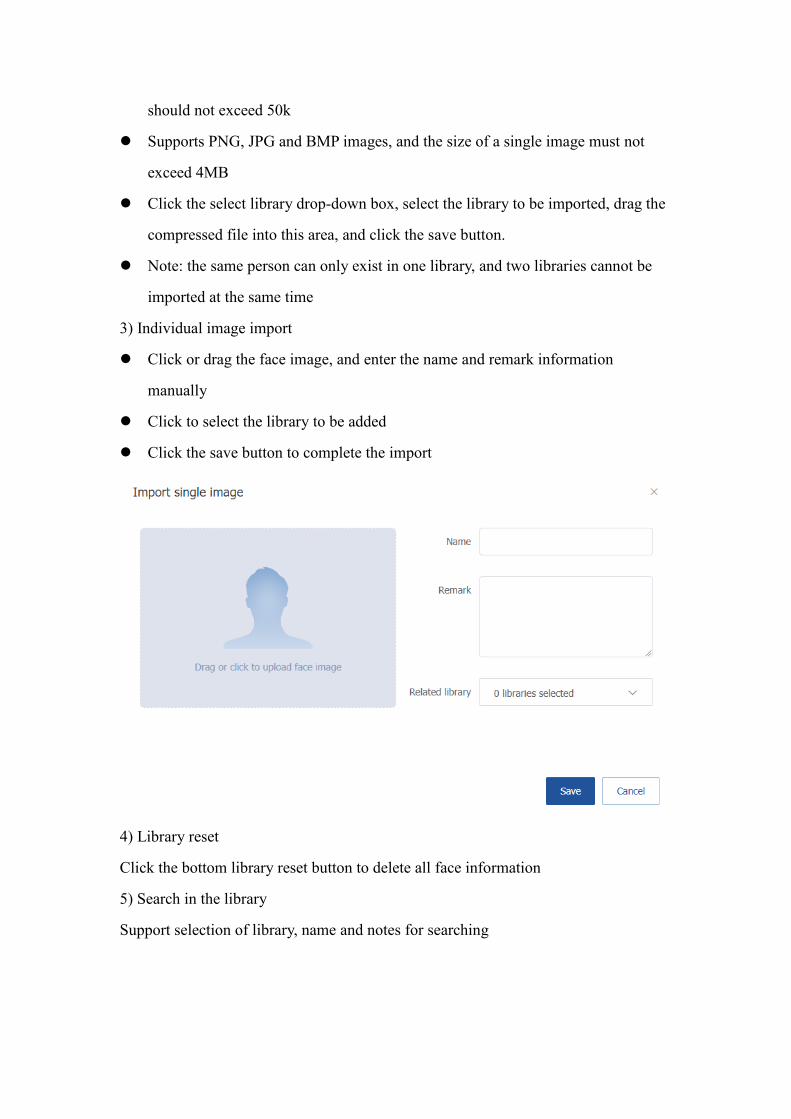
3) Individual image import
Click or drag the face image, and enter the name and remark information
manually
Click to select the library to be added
Click the save button to complete the import
4) Library reset
Click the bottom library reset button to delete all face information
5) Search in the library
Support selection of library, name and notes for searching

4.6.2 List of Failure
Display a list of face that failed to be imported, including: name, picture, cause of
error, remarks, creation time and operation. Supports single deletion, batch
deletion and clear all
Click the batch delete button and select the failed information to be deleted. User
can delete multiple pieces of failed portrait information
Click clear all to delete all failed portrait information at once
Supports selecting library, name or remarks for searching

4.7 Device Management
4.7.1 Log Management
Click the log management button, select the type of log to be exported, and click
the confirm and modify button to query the log
Click the download log button to download the log
4.7.2 User Management
Change password
Manually enter the old password, new password, and confirm new password, and
click the confirm and modify button to complete the password modification
The default password of the system is admin123
Online user monitoring
Monitor the time and IP address of the currently logged in user

4.7.3 Timed Restart
Click the enable button, select the restart date and time, and click the save
configuration button to create a scheduled device restart schedule.
4.7.4 Device Management
1) Local upgrade

Click the device restart button, the device will restart automatically
Click the restore factory settings button to restore all configurations to the default
factory configuration. Please use this feature with caution
Local upgrade, drag the obtained upgrade package into this area, and the device
will complete the software upgrade by itself
2) Device maintenance
View the operation information of the current device
3) Version information
View the software version, firmware version, algorithm version, and algorithm model
of the current device.
5. Troubleshooting
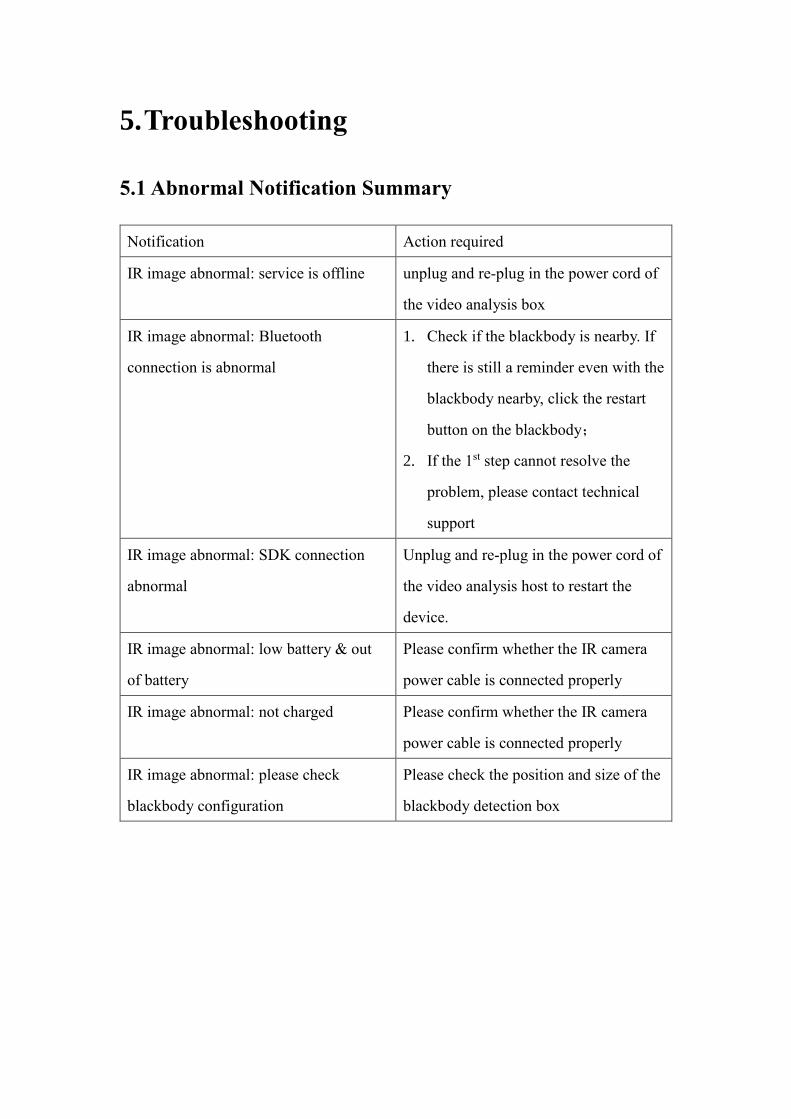
5.1 Abnormal Notification Summary
Notification Action required
IR image abnormal: service is offline unplug and re-plug in the power cord of
the video analysis box
IR image abnormal: Bluetooth
connection is abnormal
1. Check if the blackbody is nearby. If
there is still a reminder even with the
blackbody nearby, click the restart
button on the blackbody;
2. If the 1st step cannot resolve the
problem, please contact technical
support
IR image abnormal: SDK connection
abnormal
Unplug and re-plug in the power cord of
the video analysis host to restart the
device.
IR image abnormal: low battery & out
of battery
Please confirm whether the IR camera
power cable is connected properly
IR image abnormal: not charged Please confirm whether the IR camera
power cable is connected properly
IR image abnormal: please check
blackbody configuration
Please check the position and size of the
blackbody detection box


![vwihgurU jI kw Kwlsw vwihgurU jI kI Piqh ]](https://static.fdocuments.us/doc/165x107/628c210ce8e1862abc3f3353/vwihguru-ji-kw-kwlsw-vwihguru-ji-ki-piqh-.jpg)


