MiMa Draft Toolkit - MiMa - Mathematics in the Making · MiMa Draft Toolkit November 2014 . 2 The...
49
MiMa Mathematics in the Making Project n. 539872-LLP- 1-2013– 1-IT-COMENIUS-CMP MiMa Draft Toolkit November 2014
Transcript of MiMa Draft Toolkit - MiMa - Mathematics in the Making · MiMa Draft Toolkit November 2014 . 2 The...
MiMa Mathematics in the Making Project n. 539872-LLP- 1-2013– 1-IT-COMENIUS-CMP
MiMa Draft Toolkit
November 2014
2
The Guidelines for the Implementation for the MiMa methodology, available
separately, highlight the aims of the MiMa - Mathematics in the Making project, the
reasons for "hands-on", practical activities and the fact that such activities give time
to the learners for mathematical thinking and reflection. This Toolkit brings together
in one place the activities for the MiMa project designed to support the achievement
of the project aims and all the necessary materials for the implementation of the
activities.
Activity Source Page
A mathematical football Università degli Studi di Perugia 3
Experiments with dice Mathematikum 7
Exploring cuboids Eotvos Lorand University 11
Frieze patterns Universidade Nova de Lisboa 15
Logic mazes Sheffield Hallam University 19
Making a maths trail Sheffield Hallam University 23
Many colourful triangles Mathematikum 27
Mathematics of the beehive Università degli Studi di Perugia 31
Modelling the solar system Universidade Nova de Lisboa 35
Sundials Eotvos Lorand University 39
How to make an exhibition Mathematikum 43
Each section contains a full and detailed description of the activity; a statement of
the learning intentions for the activity and any required prior learning; suggestions for
how the activity can be organised and anticipated time needed; and a full list of the
practical and other resources needed.
Within the document, there are internal MiMa hyper-links to supplementary materials.
These include some outlines of relevant mathematics, templates to copy and
additional images and instructions. There are also hyper-links to MiMa video clips
related to each activity and also to external sites.
The final section of the Toolkit details how to plan for the final exhibition of the
children's mathematics which is a core part of the MiMa methodology.
November 2014
Introduction
3
Description
The children will explore which Platonic solids are possible. They will then make a
number of cardboard models which will allow them to uncover the structure of a
football as the truncation of an icosahedron. To understand the activity better you
can watch a video clip.
Learning intentions
awareness and understanding of side and vertex related to polygons
awareness and understanding of face, edge and vertex related to polyhedra
names of simple polygons and polyhedra
the basic properties of the five Platonic solids
Previous learning
No specific prior learning. The children will need a reasonable level of manual skills
in order to cut, fold and glue the models.
Resources required
Copies of the nets of icosahedron (mono-coloured), icosahedron (bicoloured in order
to show the pyramids to be removed), truncated icosahedron and pentagonal
pyramid on 200g/m2 coloured cardboard
Rulers, safety scissors, clothes pegs
Vinyl glue and duct tape
Something to score the folds, for example, pens that have run out of ink
Multiple copies of rigid triangles, squares, pentagons and other polygons as available
from, for example, http://www.polydron.co.uk/downloads/polydron-catalogue-
2014.pdf or http://www.atm.org.uk/Shop/Primary-Education/Primary-Education-
Practical-Resources/
Iron washers and tiny flat magnets
Organisation
The children will work around a table in groups of about six. Each one will work on a
piece of the puzzle, but they will discuss and interact during the work. Some pieces
are easier than others. The big ones are perhaps harder, so should be made by
those having the most developed fine motor skills.
Time needed
The amount of needed time largely depends on the age and the level of fine motor
skills of the children but should take approximately five lessons.
A mathematical football
4
Suggested plan for teaching
Finding the Platonic solids (2 lessons)
Give each group of about six children 25 to 30 triangles, squares, pentagons and
other polygons as available. The children should work in pairs to support the
practical work and in the larger group to check and share results.
Ask the children to make as many different polyhedra as they can that
use just one type of polygon per solid
have every vertex of the solid the same.
They will find just five solids that fit both parts of the definition. It is likely that many
will initially make the triangular dipyramid until they are asked to study the vertices
carefully and notice that they are not all the same.
When the children have found them all, ask them to count and record the numbers of
faces, vertices and edges of each solid. What do they notice? Discuss the result -
faces plus vertices equals edges plus 2 (Euler’s Formula) - and name the Platonic
solids. How do the names relate to the solids, if at all? For example, octahedron
uses the ancient Greek words for eight and face.
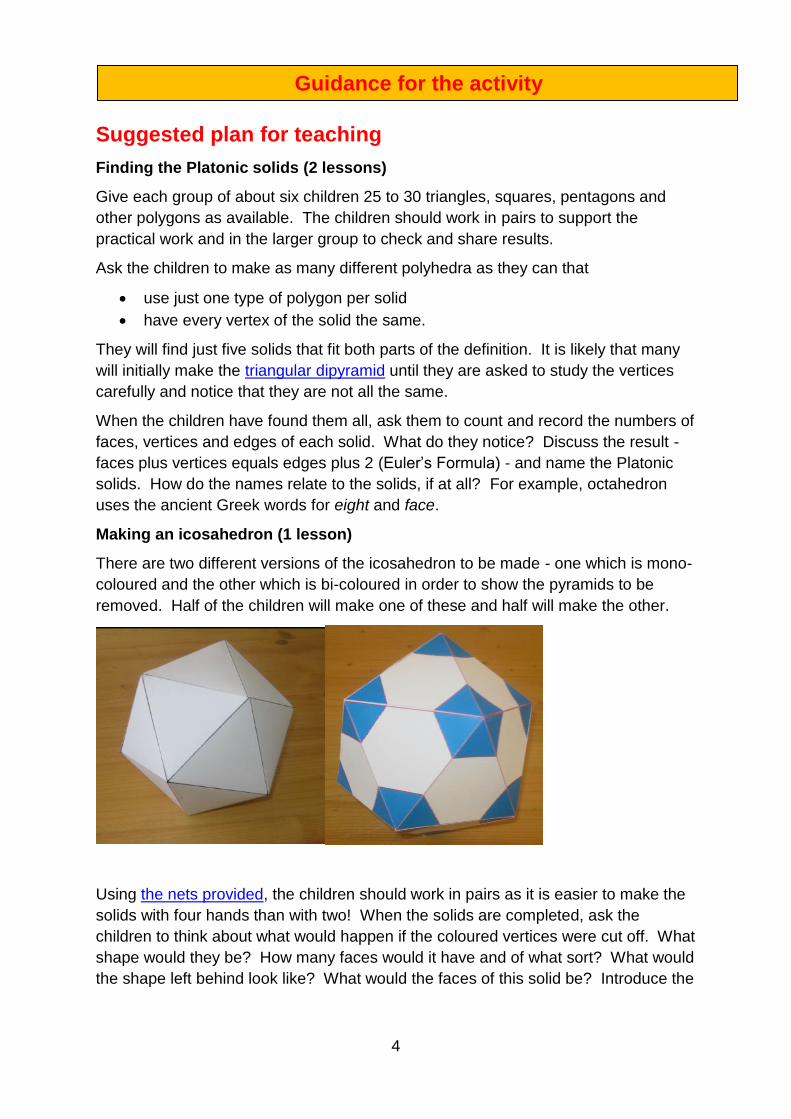
Making an icosahedron (1 lesson)
There are two different versions of the icosahedron to be made - one which is mono-
coloured and the other which is bi-coloured in order to show the pyramids to be
removed. Half of the children will make one of these and half will make the other.
Using the nets provided, the children should work in pairs as it is easier to make the
solids with four hands than with two! When the solids are completed, ask the
children to think about what would happen if the coloured vertices were cut off. What
shape would they be? How many faces would it have and of what sort? What would
the shape left behind look like? What would the faces of this solid be? Introduce the
Guidance for the activity
5
word “truncation” and explain what it means. Explain that they are going to make a
working model of this truncation next time.
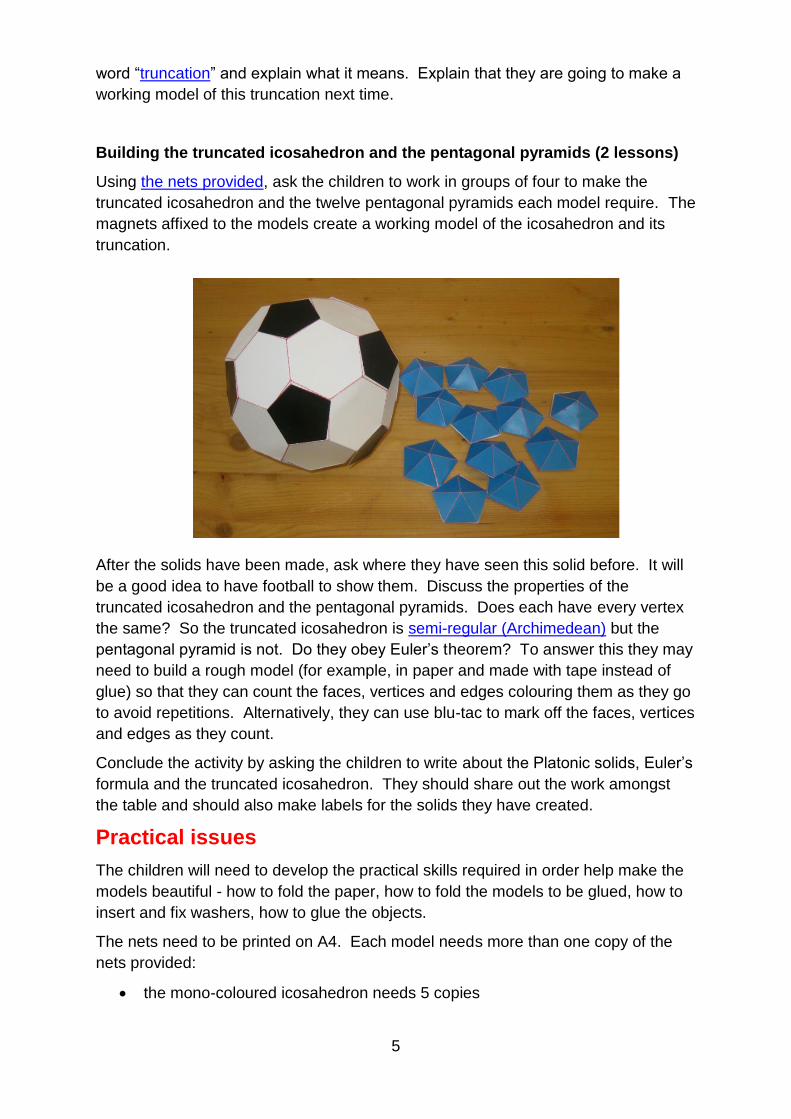
Building the truncated icosahedron and the pentagonal pyramids (2 lessons)
Using the nets provided, ask the children to work in groups of four to make the
truncated icosahedron and the twelve pentagonal pyramids each model require. The
magnets affixed to the models create a working model of the icosahedron and its
truncation.
After the solids have been made, ask where they have seen this solid before. It will
be a good idea to have football to show them. Discuss the properties of the
truncated icosahedron and the pentagonal pyramids. Does each have every vertex
the same? So the truncated icosahedron is semi-regular (Archimedean) but the
pentagonal pyramid is not. Do they obey Euler’s theorem? To answer this they may
need to build a rough model (for example, in paper and made with tape instead of
glue) so that they can count the faces, vertices and edges colouring them as they go
to avoid repetitions. Alternatively, they can use blu-tac to mark off the faces, vertices
and edges as they count.
Conclude the activity by asking the children to write about the Platonic solids, Euler’s
formula and the truncated icosahedron. They should share out the work amongst
the table and should also make labels for the solids they have created.
Practical issues
The children will need to develop the practical skills required in order help make the
models beautiful - how to fold the paper, how to fold the models to be glued, how to
insert and fix washers, how to glue the objects.
The nets need to be printed on A4. Each model needs more than one copy of the
nets provided:
the mono-coloured icosahedron needs 5 copies
6
the bicoloured icosahedron needs 5 copies
the football needs 5 copies of the lateral parts and 2 copies of the top and
bottom parts
the pyramids need 6 copies.
Making the solids requires a number of steps. The mono- and bi-coloured
icosahedra are obtained by first gluing the 5 parts of them as shown in the pictures
and then assembling them. The remaining pictures show how to glue together the
parts for the football. First the magnets are affixed on the inside surface of the nets.
Then the five lateral parts are assembled. Finally the top and bottom are added.
The 12 pyramids are now just straightforward job.
The exhibition
The objects made can be exhibited and explained. The children’s writing will explain
the various activities, show what they have learnt and act as guides to the objects
displayed. If copies of the templates are available, those visiting the exhibition can
also experiment with making the solids
Cross curricular links
The link with the football provides a way to encourage the idea of searching for the
mathematical aspects of the things around us.
Extending the learning
A deeper understanding of the Archimedean polyhedra is possible, for instance trying
to figure out what happens by cutting appropriate pyramids from the vertices of a
cube or of a tetrahedron.
Euler's formula can be checked for each one of these models, too.
Other resources
For more ambitious makers, here is a book to help them make an Ycocedron
Abscisus Vacuus as the one drawn by Leonardo da Vinci.
http://www.edizionicorsare.it/illustrati/leonardo.html
7
Description
Through several different interactive and activity-oriented experiments with regular and special dice, the children gain experiences with the mathematical concept of probability. The focus is on the development of a non-regular dice and a board game, which will be presented to interested visitors in the final exhibition. To understand the
activity better you can watch a video clip.
Learning intentions
to accomplish a fundamental awareness of probability
to know the features of a regular dice
to be able to use terms like “always”, “rarely”, “never” in the context of probabilities
to be able to use the terms “probable” and “improbable” correctly
to develop a first understanding for the “law of large numbers”
to know that the probability of some incidents is not very obvious/intuitive
Previous learning
The great advantage of this activity is its low threshold. It is necessary for the children to have a solid understanding of small numbers (e.g. 2<5).
Resources required
A range of dice: regular dice, large size if possible, blank dice, loaded dice, “non-regular” dice, e.g. one which has 2, 3, 4, 5, 6, 6. A3 paper and card Counters Material for crafting the board games (crepe paper, various pens and colours, pictures, stickers, foam rubber and the prepared game board …)
Organisation
Parts of the unit take place as a class (e.g. the start of the topic). In other phases the children work with a partner or in groups of up to four children at group tables.
Time needed
The project covers approximately seven lessons.
Experiments with dice
8
Suggested plan for teaching
Experiments with regular dice (2 lessons)
The “clown“-experiment
The features of a clown (hat, bow-tie, eyes, nose, mouth, curls) are allocated to the numbers 1 to 6 of a dice. The children throw a dice and the feature of the rolled number is drawn on the board or worksheet. It is a good idea to model the game initially with the whole class.
The children work in pairs, recording each time their total throws. When each pair has played several games, working again with the whole class, collect the results together in a frequency table. Discuss with the children what they notice. For example, there is a high probability that one needs more than six throws before a clown has all his features drawn. Discuss any outliers.
The features of regular dice
Place a large dice on a table and ask the children: which number of the dice is not visible? What is the total of the numbers that can be seen? Repeat once or twice. Then put the dice where you cannot see it and ask one of the children to roll it. Ask for the number on the top and, as if by magic, give the total.
The children work in fours at their tables to try to work out how you can do this. They should discover that the total is always 14 plus the number on the top. Ask them to work out why this happens. Extend the activity by asking the children to build a tower of two or more dice and find a quick way to get the total. Again, ask for explanations. Can they work out the total for a tower of 100 dice?
Getting to know irregular/special dice (2 lessons)
Dicing with loaded dice
Have the children working in fours. Give the group three ordinary dice and one loaded dice. Children roll their own dice and record the number. By comparing results, can they tell which one is loaded? Roughly how many throws did they need before a pattern began to emerge? The children will learn that the regular form and the evenly distributed weight of the regular dice is important for rolling all numbers equally frequently in the long term. They will also begin to develop a feel for the irregularity of experimental probability and the need for a large number of trials.
Non-transitive dice
Have the children working in fours. Give each group a pair of two different Efron dice - red and blue or blue and purple or purple and green or green and blue). The children play against each other in pairs. Each pair throws their dice: the pair with the higher number wins. They have about 100 throws. They will find that red wins against green, green wins against blue, blue wins against purple and purple wins against red!
Have a two way entry table for two regular dice ready prepared. Discuss the table with the class, showing that, in the long term, neither dice would beat the other. Give each group a two way entry table for their pair of dice and ask them to mark each square with the colour of the dice that would be higher. Discuss with the class what
Guidance for the activity
9
they observe by comparing all the tables. They will get to know that different ways of labelling a dice impacts on possible incidents and probabilities.
Developing own dice and board games (3 lessons)
In this activity, board games, optionally with non-regular dice, will be designed. In small groups of three to four children, the children develop a board game (with game instructions, a board and at least one dice). To support the children, the teacher will provide a template of a board game. The aim is then for each small group to design a game with forfeits, a good luck square, shortcuts and so on.
Before the children start with this creative mathematical task, the teacher discusses with the children several factors which might have an impact on the game. Firstly, the teacher should work out with the children from a mathematical point of view what is the optimum distance between two forfeits or good luck squares so that a player does not hit them too often or too seldom. Furthermore it should be clarified that the forfeits and good luck squares should influence the game, for example, by choosing instructions like “go three squares forward” or “throw the dice again”. Finally the children should know that they will test the game to find out whether it takes too much, too little or the right amount of time to finish. They will be using the experiences of this test to revise their game.
Following the class discussion, the groups work independently to design and produce a rough draft of their game. The teacher will advise the children and help them test and rethink their ideas in order to develop games with intriguing outcomes.
Once the game has been tried, tested and amended a high quality version of the game can be produced for the exhibition.
Optionally, in groups with high achievers, the designing of the game can be extended by playing the games with non-regular dice instead of normal ones. An additional task for the children could be to design an appropriate special dice for their own games.
Practical issues
The children will design a board when developing their game. The basis for this should be the template for the board game, which the children design on a mathematical and a creative level. For this the children will need tools like a ruler, a pair of compasses, colours and so on. To encourage the children’s creativity, they should be offered a great variety of colours and materials (like crepe paper, coloured paper, sticker, pictures …).
The exhibition
The different dice and games offer a rich opportunity for an interactive and activity-based exhibition. At the end of the project the developed games will be displayed with the children in charge of their games. They can offer to compete against visitors in a game of the visitors' choice.
10
Also the Efron dice can be used. Every visitor could have the task to choose one of the dice. One of the supervising children could then offer to compete against the visitor in a dice game and then to ask the visitor if they think the game has been fair.
To increase the appeal of the exhibition it may be a good idea if possible to organize special events. For example there could be at least one gaming afternoon organized during the time of the exhibition. To organize a game tournament would also be possible.
Cross curricular links
Apart from the children’s mathematical skills, this project also promotes abilities from other domains - artistic, linguistic and fine motor skills.
A cross curricular link to arts and handicraft lessons is established when the children design and make the boards for the games. Here, the children’s artistic skills are promoted.
The writing of the game instructions gives the children the chance to exercise the precise formulation and verbalizing of the game procedure. Hence the project establishes a link to language lessons.
Creating an attractive board game will also require the children to exercise and develop their fine motor skills.
Extending the learning
After the children have experimented with regular and special six-sided dice, the shape of the dice can be changed. The more complex shapes of Platonic solids, which change the probabilities of the incidents fundamentally, can be used.
The children can be asked to design their own set of non-transitive dice and to justify their design.
Other resources
Further information about sets of non-transitive dice can be found at http://mathworld.wolfram.com/EfronsDice.html.
11
Description
In this activity, the children will explore direction and movement in 3-D by exploring
cuboids and their 2-D representations. They will transfer 3-D understanding of the
directions up and down, forward and back, right and left to 2-D plane images of a
skeleton cuboid using a simple piece of software. They will also explore nets of
cuboids. To understand the activity better you can watch a video clip.
Learning intentions
to improve spacial perception
to explore 2-D representations of 3-D objects
to deepen awareness of the properties of cuboids
to learn about nets of cuboids
Previous learning
Cuboids are present in everyday life everywhere, for example, as buildings, boxes,
items in the home. Little formal prior knowledge is required beyond basic plane
geometry.
Resources required
A cuboid box is needed, as big as the children, which is decorated to make a large
lion cuboid
Puppet
Exploring cuboids software
Projector which will show the software plus computers for pair work
One and two centimetre squared paper and 200g/m2 cardboard marked on one side
with centimetre squares
Old cardboard boxes, enough for one between four students
Scissors, glue
Organisation
The whole class can work together with the large cuboid lion, perhaps in the
playground. The software is best introduced in a whole class session followed by pair
work with a computer. The children can work in small groups of four for other parts of
the activity.
Time needed
The project will probably take four lessons. If access to computers is limited, this
part of the activity can take place over a few days.
Exploring cuboids
12
Suggested plan for teaching
Making lion cuboids (2 lessons)
Begin by exploring the large lion cuboid. The decoration makes it easy to see when
the orientation of the cuboid changes. Discuss with the class that pairs of opposite
faces have to be the same size.
Give each group of four an old cardboard box, for example, a cereal box. Ask then to
predict the flat shape that could be folded to make it. Once they have all agreed
allow them to cut along the edges and unfold their shape. Compare the different nets
that have emerged from the different groups. Discuss which arrangement of the
faces they find easiest to visualise folding back up again to make the box. Again,
draw their attention to the fact that pairs of opposite sides are the same.
Using the one centimetre squared paper, the children explore how to make a net to
make their own lion cuboid. The video clip for this activity shows some ways this
might be done. Working out where they need to colour the cuboid with, for example,
face and tail will support them in developing visualisation skills. Once they are happy
with their design, they transfer it to the 200g/m2 card, decorate the card and make
their own lion cuboid.
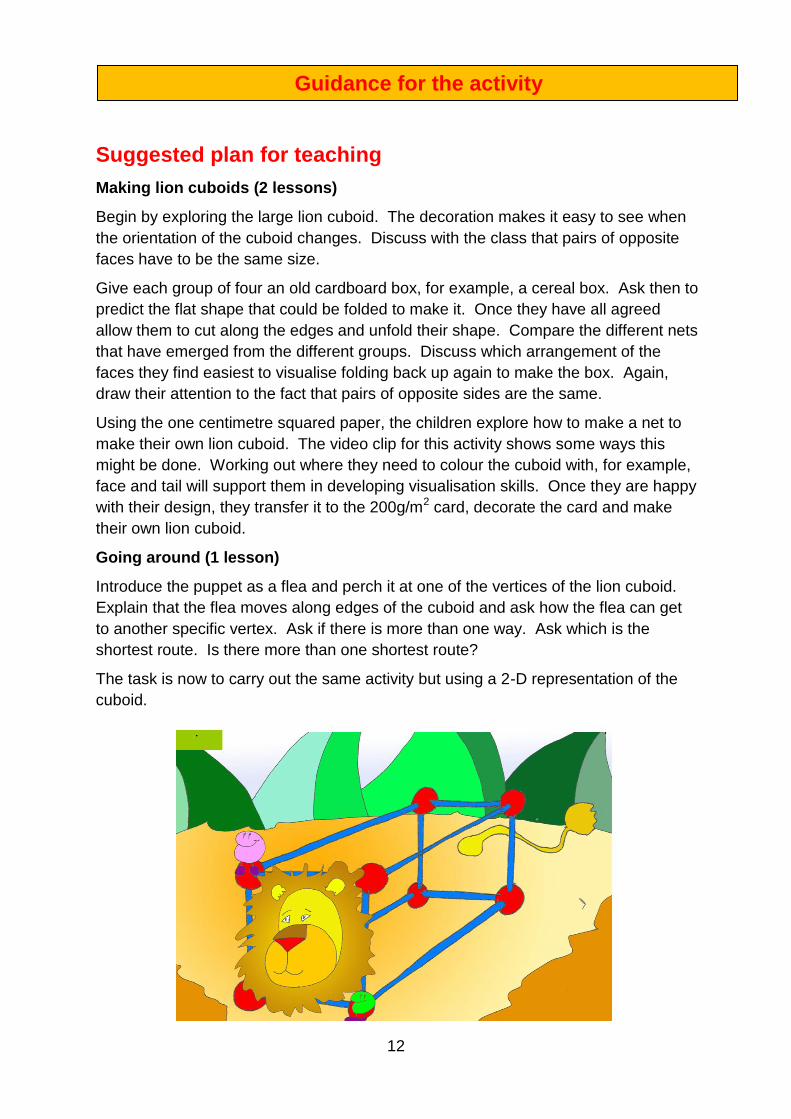
Going around (1 lesson)
Introduce the puppet as a flea and perch it at one of the vertices of the lion cuboid.
Explain that the flea moves along edges of the cuboid and ask how the flea can get
to another specific vertex. Ask if there is more than one way. Ask which is the
shortest route. Is there more than one shortest route?
The task is now to carry out the same activity but using a 2-D representation of the
cuboid.
Guidance for the activity
13
Demonstrate the software to the whole class. Use Programme 1 to show the flea
moving to adjacent vertices and illustrating the associated arrow images. Now
introduce Programme 2 (bontovics.hu/letolt/o2_e_10.exe). Again, the flea can only move
along the edges of the lion cuboid. The class discuss together what could be the
correct full list of jumps to take the green flea to the purple flea. Is there more than
one solution? What is the shortest route for the green flea to get to the purple flea?
The class predicts the full set of instructions before testing their solution. Each time,
before testing the chosen solution, ask if there are other routes of the same length or
other longer routes. Follow this whole class activity by the children working in pairs
using Programme 2 independently.
A significant extension to the learning can be provided by the children creating
puzzles for one another. Working in pairs with their own lion polyhedra, each pair
chooses a start vertex and a finish vertex and works out the required set of
instructions for the flea. They then give just the set of instructions to another pair
who have to work out where the green flea started from and where the purple flea
must be waiting. Is there only one solution for any set of instructions?
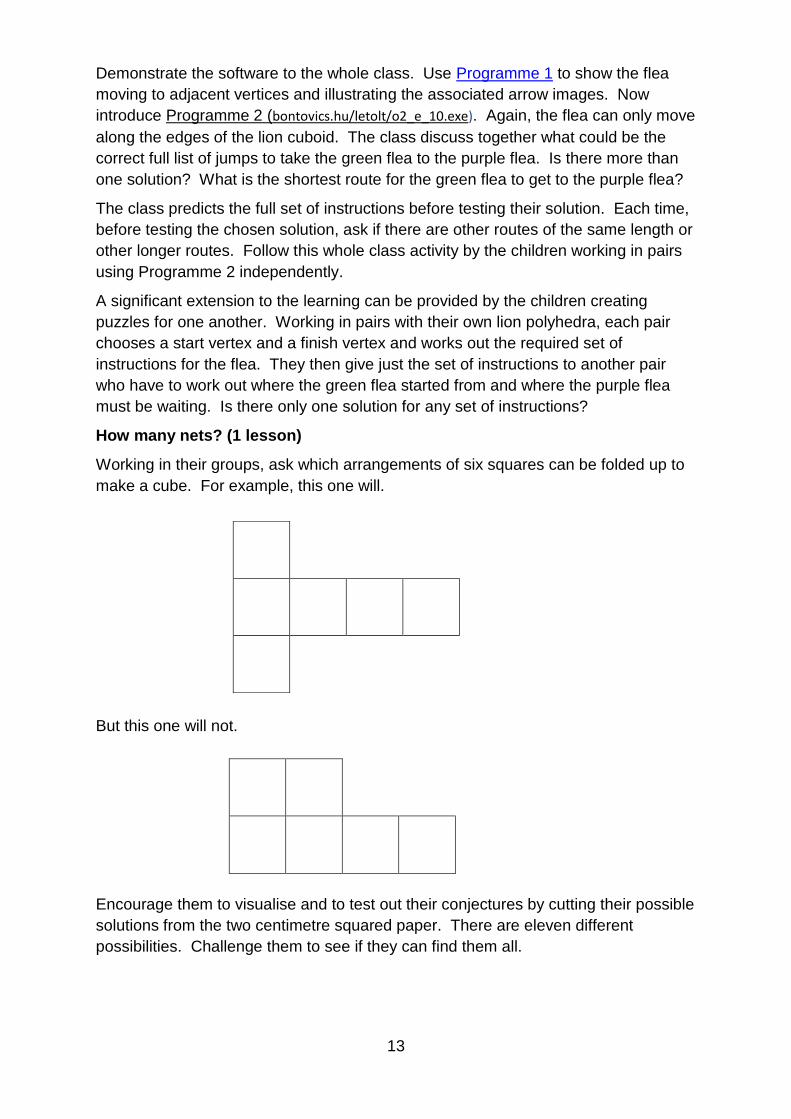
How many nets? (1 lesson)
Working in their groups, ask which arrangements of six squares can be folded up to
make a cube. For example, this one will.
But this one will not.
Encourage them to visualise and to test out their conjectures by cutting their possible
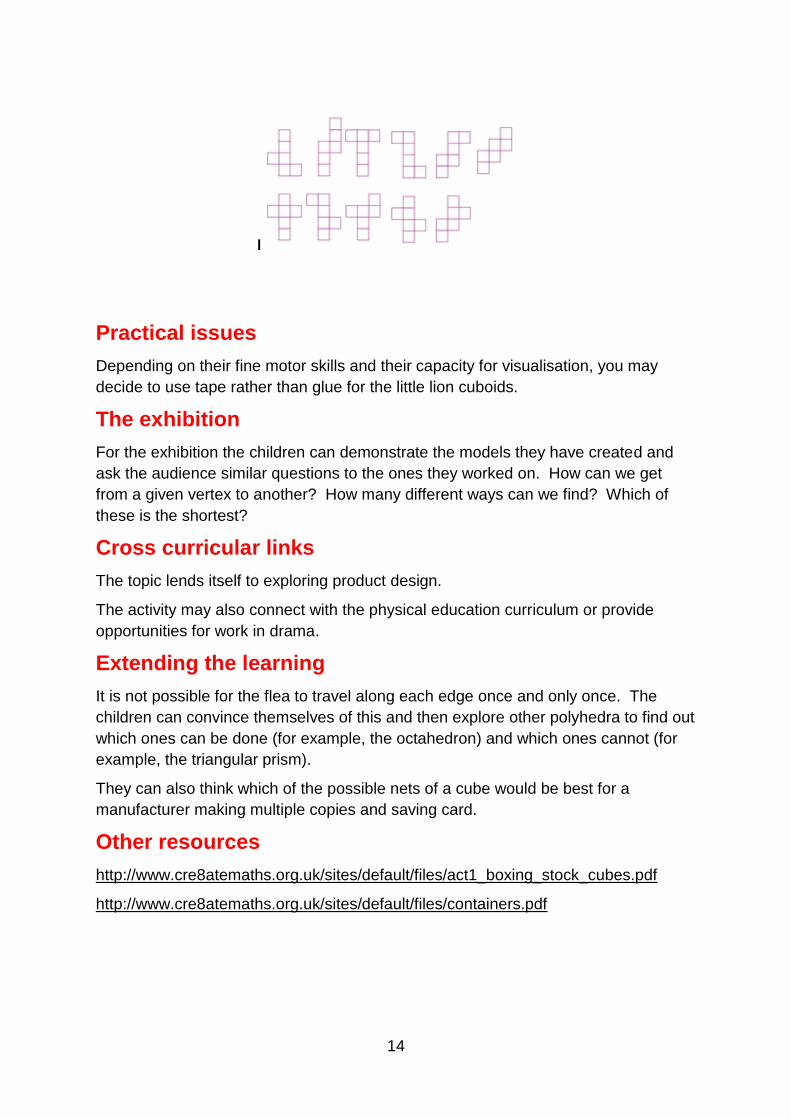
solutions from the two centimetre squared paper. There are eleven different
possibilities. Challenge them to see if they can find them all.
14
Practical issues
Depending on their fine motor skills and their capacity for visualisation, you may
decide to use tape rather than glue for the little lion cuboids.
The exhibition
For the exhibition the children can demonstrate the models they have created and
ask the audience similar questions to the ones they worked on. How can we get
from a given vertex to another? How many different ways can we find? Which of
these is the shortest?
Cross curricular links
The topic lends itself to exploring product design.
The activity may also connect with the physical education curriculum or provide
opportunities for work in drama.
Extending the learning
It is not possible for the flea to travel along each edge once and only once. The
children can convince themselves of this and then explore other polyhedra to find out
which ones can be done (for example, the octahedron) and which ones cannot (for
example, the triangular prism).
They can also think which of the possible nets of a cube would be best for a
manufacturer making multiple copies and saving card.
Other resources
http://www.cre8atemaths.org.uk/sites/default/files/act1_boxing_stock_cubes.pdf
http://www.cre8atemaths.org.uk/sites/default/files/containers.pdf
15
Description
This activity promotes the learning of the symmetries (isometric operations) of rotation, translation, reflection and glide reflection while constructing a frieze. Children will explore the composition of these operations so that seven different types of frieze will be built. If some of these ideas are unfamiliar, the mathematics of friezes can be explored. To understand the activity better you can watch a video clip.
Learning intentions
the ideas of reflection in a line and rotation about a point - a turn (complete rotation), half turn, quarter of turn and parallelism
the concept of isometry, direct and inverse (a transformation that leaves the shape itself unchanged)
the composition of isometric operations (for example, verify that the composition of two non-parallel reflections is equivalent to a rotation)
creating the 7 different friezes
Previous learning
The children will need to be able to measure the distance between two points.
Resources required
Modelling material such as play dough, modelling clay or clay, thread, ruler, set square
A selection of cookie cutters and rolling pins
Organization
Working groups of 4 children, so that each member exploits a given isometric operation and its composition. Each group also produces one of the friezes with a given pattern.
Time needed
The project will take approximately four lessons.
Frieze patterns

16
Suggested plan for teaching
This 4 step activity enables children to explore isometries while constructing a frieze.
Making the design (1 lesson)
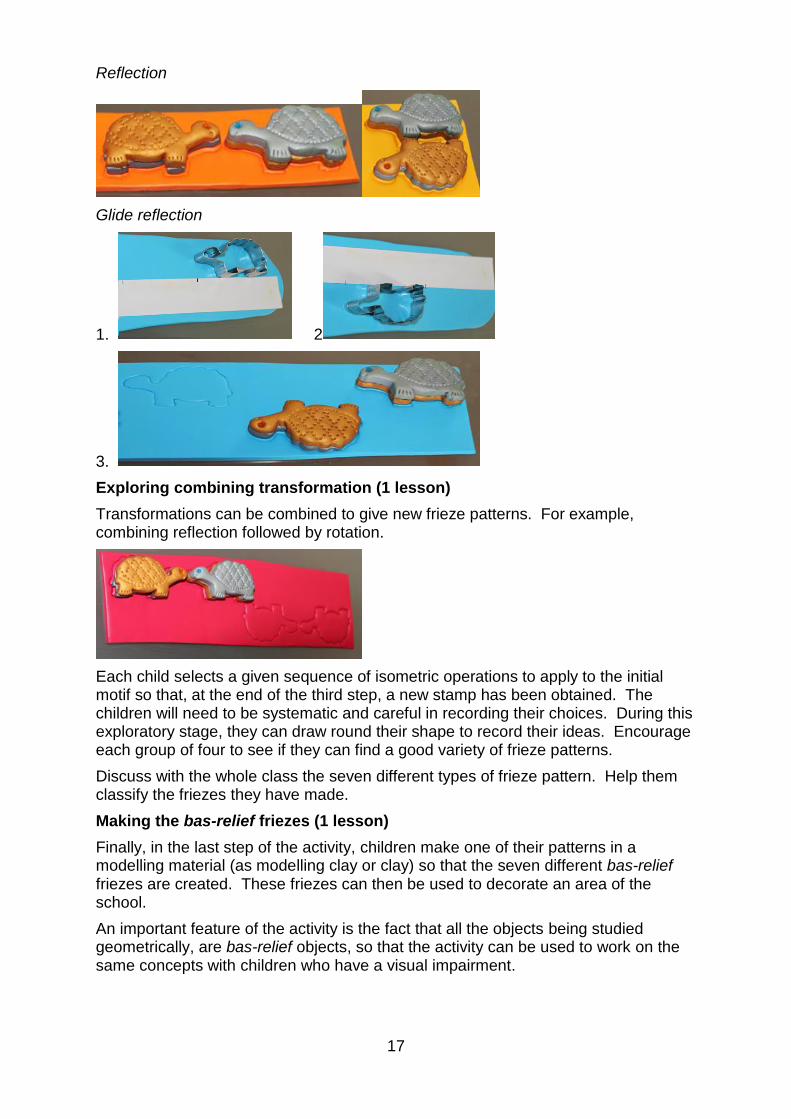
There are various ways to make these friezes. One way is shown here. As a first step, the children will produce a small and asymmetric design using a modelling material such as clay or modelling clay and a cookie cutter. Each child will need to make two copies of the design which are mirror images of each other. For example,
They will then need to press the two designs together to make a two-sided shape.
They will need to make two copies of this two-sided shape.
Exploring the basic isometries (1 lesson)
Once the object produced is consistent enough, it is used as a stamp in a modelling material such as play dough or modelling clay, so that children may explore the four basic isometric operations in a plane: translation, rotation, reflection and glide reflection.
Translation
Rotation
Guidance for the activity
17
Reflection
Glide reflection
1. 2
3.
Exploring combining transformation (1 lesson)
Transformations can be combined to give new frieze patterns. For example, combining reflection followed by rotation.
Each child selects a given sequence of isometric operations to apply to the initial motif so that, at the end of the third step, a new stamp has been obtained. The children will need to be systematic and careful in recording their choices. During this exploratory stage, they can draw round their shape to record their ideas. Encourage each group of four to see if they can find a good variety of frieze patterns.
Discuss with the whole class the seven different types of frieze pattern. Help them classify the friezes they have made.
Making the bas-relief friezes (1 lesson)
Finally, in the last step of the activity, children make one of their patterns in a modelling material (as modelling clay or clay) so that the seven different bas-relief friezes are created. These friezes can then be used to decorate an area of the school.
An important feature of the activity is the fact that all the objects being studied geometrically, are bas-relief objects, so that the activity can be used to work on the same concepts with children who have a visual impairment.
18
Practical issues
The seven frieze patterns made in this way can be painted or decorated as desired.
The exhibition
For the exhibition, all the children's friezes can be displayed. The children can explain how their designs were made. It will also be possible to have some strips of modelling material (plus a rolling pin) and cookie cutters available with which visitors can experiment.
Cross curricular links
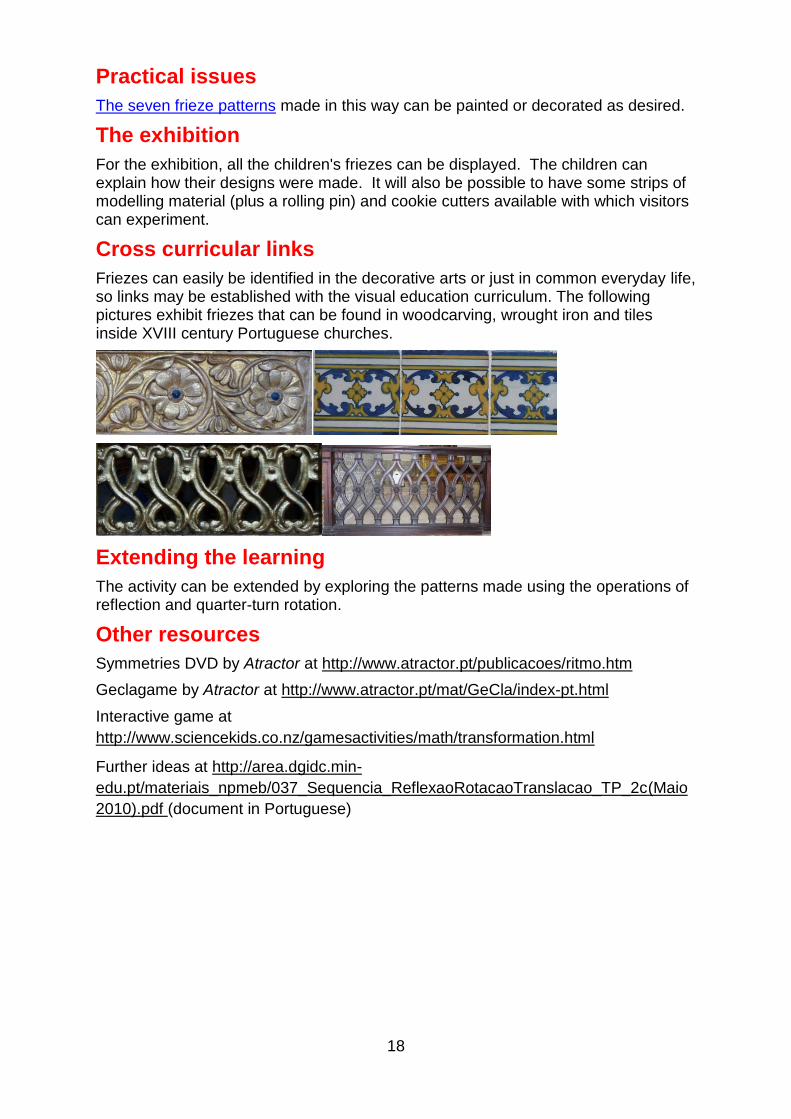
Friezes can easily be identified in the decorative arts or just in common everyday life, so links may be established with the visual education curriculum. The following pictures exhibit friezes that can be found in woodcarving, wrought iron and tiles inside XVIII century Portuguese churches.
Extending the learning
The activity can be extended by exploring the patterns made using the operations of reflection and quarter-turn rotation.
Other resources
Symmetries DVD by Atractor at http://www.atractor.pt/publicacoes/ritmo.htm
Geclagame by Atractor at http://www.atractor.pt/mat/GeCla/index-pt.html
Interactive game at
http://www.sciencekids.co.nz/gamesactivities/math/transformation.html
Further ideas at http://area.dgidc.min-
edu.pt/materiais_npmeb/037_Sequencia_ReflexaoRotacaoTranslacao_TP_2c(Maio
2010).pdf (document in Portuguese)
19
Description
This activity involves designing logic mazes. Initially this can be done as a classroom based activity using either a spreadsheet or more practically using paper/card or other suitable materials. The eventual aim is to design and make at least one large scale one for the playground or another suitable venue. To understand the activity better you can watch a video clip.
Learning intentions
In this activity children may encounter
transformations – symmetry, rotation and translation
logic
measuring
number sequences
modulo arithmetic
counting
scaling
visualisation
Previous learning
Prerequisites for this activity are the ideas of simple counting, multiplication, horizontal, vertical and diagonal, measuring of length and of 900.The children will also need to be familiar with the idea of working with rectangular and possibly triangular grids or hexagonal grids.
Resources required
Blank rectangular grids on paper (approximately 10x10 on A4 square works well)
Pencils, rubbers, scissors, pencils/markers of different colours, coloured chalk
Computers, one for each pair of children, with internet access
Duct tape or masking tape
Metre rulers, measuring tapes, angle measurers/set squares
Optional: numbers on A4 square card, punched file pockets
Organisation
For the introductory activity, the whole class will work together initially followed by pair work at a computer. Later the children will work in pairs or individually with groups of six at a table. At times, the whole class will work together.
Time needed
This activity will take about five lessons.
Logic Mazes
20
Suggested plan for teaching
Exploring logic mazes (1 lesson)
The children are introduced to the idea that mazes can operate using different rules and that they can determine the rules.
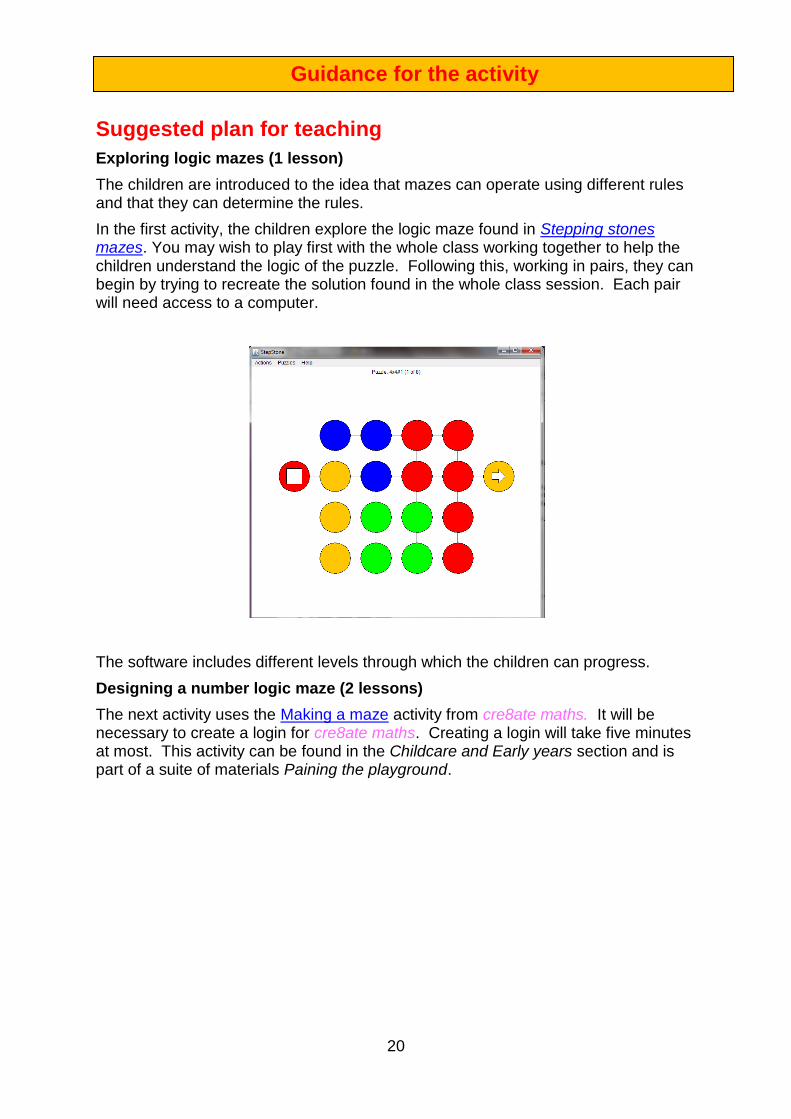
In the first activity, the children explore the logic maze found in Stepping stones mazes. You may wish to play first with the whole class working together to help the children understand the logic of the puzzle. Following this, working in pairs, they can begin by trying to recreate the solution found in the whole class session. Each pair will need access to a computer.
The software includes different levels through which the children can progress.
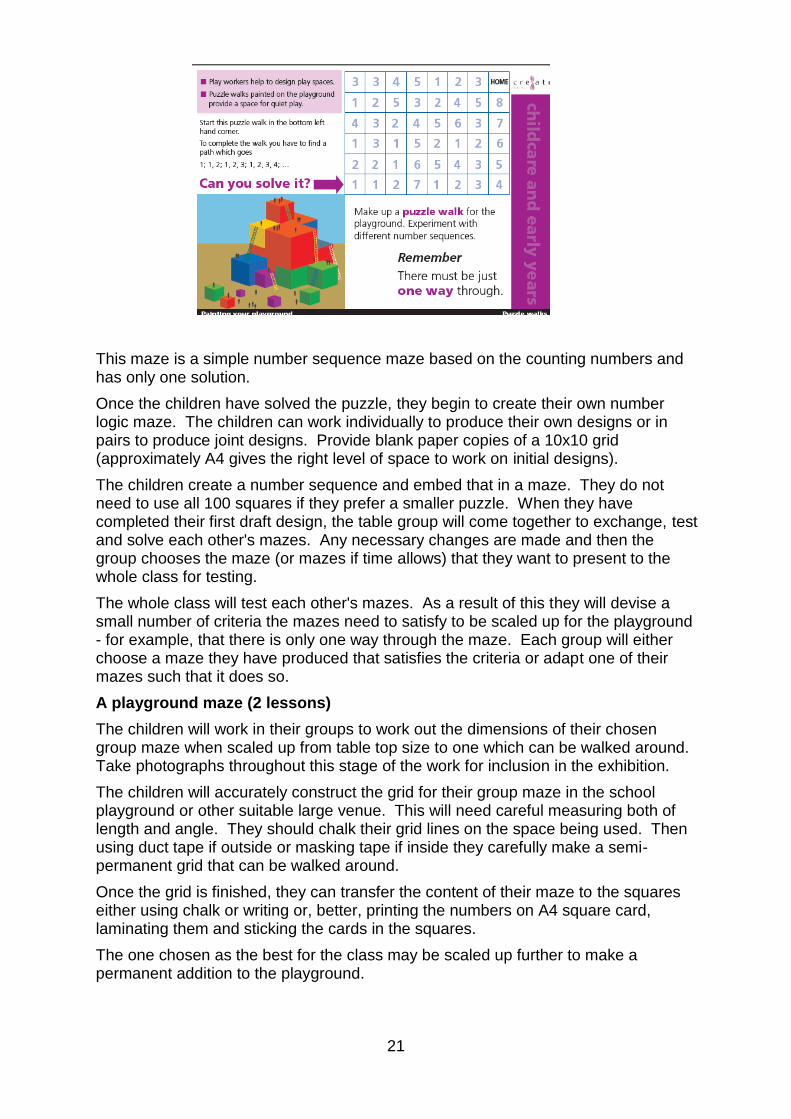
Designing a number logic maze (2 lessons)
The next activity uses the Making a maze activity from cre8ate maths. It will be necessary to create a login for cre8ate maths. Creating a login will take five minutes at most. This activity can be found in the Childcare and Early years section and is part of a suite of materials Paining the playground.
Guidance for the activity
21
This maze is a simple number sequence maze based on the counting numbers and has only one solution.
Once the children have solved the puzzle, they begin to create their own number logic maze. The children can work individually to produce their own designs or in pairs to produce joint designs. Provide blank paper copies of a 10x10 grid (approximately A4 gives the right level of space to work on initial designs).
The children create a number sequence and embed that in a maze. They do not need to use all 100 squares if they prefer a smaller puzzle. When they have completed their first draft design, the table group will come together to exchange, test and solve each other's mazes. Any necessary changes are made and then the group chooses the maze (or mazes if time allows) that they want to present to the whole class for testing.
The whole class will test each other's mazes. As a result of this they will devise a small number of criteria the mazes need to satisfy to be scaled up for the playground - for example, that there is only one way through the maze. Each group will either choose a maze they have produced that satisfies the criteria or adapt one of their mazes such that it does so.
A playground maze (2 lessons)
The children will work in their groups to work out the dimensions of their chosen group maze when scaled up from table top size to one which can be walked around. Take photographs throughout this stage of the work for inclusion in the exhibition.
The children will accurately construct the grid for their group maze in the school playground or other suitable large venue. This will need careful measuring both of length and angle. They should chalk their grid lines on the space being used. Then using duct tape if outside or masking tape if inside they carefully make a semi-permanent grid that can be walked around.
Once the grid is finished, they can transfer the content of their maze to the squares either using chalk or writing or, better, printing the numbers on A4 square card, laminating them and sticking the cards in the squares.
The one chosen as the best for the class may be scaled up further to make a permanent addition to the playground.
22
Practical issues
Depending on the level of skill of the children, some may need adult help with handling the duct tape.
The exhibition
For the exhibition, each pair can produce a neat copy of their maze on card. The large mazes can be recreated in the exhibition and the photographs displayed of the children at work.
Cross curricular links
The history of mazes can be studied and the Greek myth of Theseus and the Minotaur told.
Extending the learning
The learning can be extended if the children create their number sequences according to more complex rules. An example of this might be incorporating rules using modulo arithmetic. Using hexagonal and isometric grids might also be possible.
It may also be possible for the children to construct mazes that have multiple rules each of which must be followed at the same time, for example, by incorporating colour or shapes or other special features into the design.
Other resources
http://nrich.maths.org/2474/index
http://www.math.sunysb.edu/~tony/mazes/index.html
http://www.mazemaker.com/
23
Description
Through this activity children apply their existing knowledge and extend it, exploring mathematics in their own local area. They will produce a mathematics trail together with supporting resources aimed at encouraging others to explore the mathematics around them. To understand the activity better you can watch a video clip.
Learning intentions
use number, shape, measure and data in context to generate and solve problems
explore the history of mathematics
use coordinates, direction and scale in interpreting maps
Previous learning
There are no fixed pre-requisites though it is expected that children will already have some experience of designing mathematical problems and of using maps and plans.
Resources required
Maps and plans of local areas, for example, the school site, local park, town or shopping centre, woodland
Cameras
Local information including any existing maths trails
Access to books and internet to research mathematics in local area
Clipboards
Organisation
Children will work in pairs to explore a pre-determined part of the mapped area and to develop questions. They will work in groups of four to review, refine and make the final selection of questions for the trail. Part of this activity will involve children working outside, either in the school grounds or in the local area. The whole class will work together on the final trail.
Time needed
This activity will take about 8 lessons.
Making a maths trail
24
Suggested plan for teaching
Getting started (2 lessons)
Begin with an introductory discussion with the whole class. What is a maths trail? What is its purpose? What experiences (if any) do the children have? If possible, explore an existing maths trail at or near to the school. This could be a short trail within the school grounds, designed to give children experience of different types of question. See Meaningful maths trails and A city centre maths trail for examples of maths trails. Those without access to a nearby maths trail can explore using the Internet, perhaps beginning with the mathematics of tiling on the maths in the city website. Analyse the experience - what did the children enjoy? Why? What mathematics did they use? What challenged them the most? What surprised them? Agree the aims for their own maths trail. For example, will it be a trail for children of the same age in another class or a partner school?
Designing the trail (2 lessons)
The children look together at a map or plan of the maths trail area, beginning to discuss what mathematics they may see and allocating small areas to small groups of four. In pairs or small groups, children explore a part of the mapped area, taking photographs of possible prompts for questions and locating the sites of these prompts on the map or plan. From these images they discuss ideas, develop problems and work on solutions.
Encourage the children to develop problems drawn from a range of topics (number, measures, geometry, data handling) and requiring a variety of responses (for example, calculate, estimate, draw or sketch, explain, describe…).
Trialling and revising the questions (2 lessons)
Each pair of children exchanges questions with another pair, working on the problems and answering the questions by using the photographs and providing feedback. Pairs make any necessary revisions to their questions and solutions. You will need to check these with them to eliminate any errors before the final trail with its solutions is created. The groups of four then agree the selection of problems for inclusion in final trail.
Examples of types of questions:
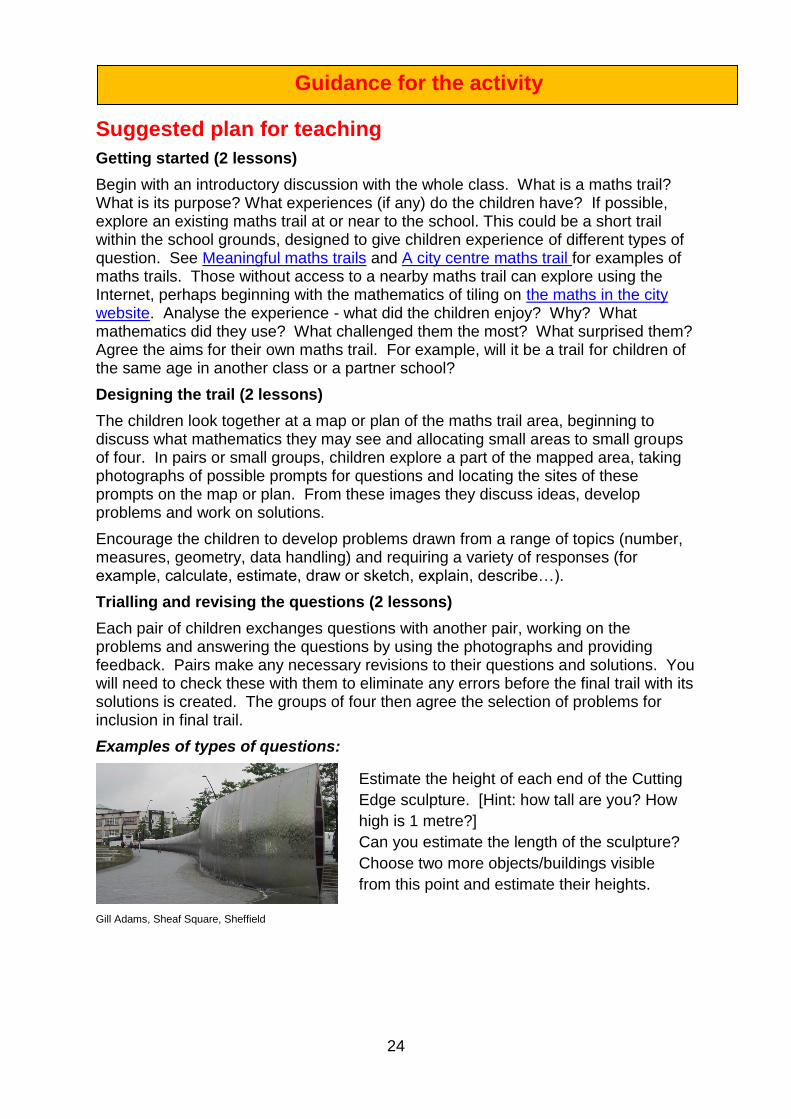
Gill Adams, Sheaf Square, Sheffield
Guidance for the activity
Estimate the height of each end of the Cutting
Edge sculpture. [Hint: how tall are you? How
high is 1 metre?]
Can you estimate the length of the sculpture?
Choose two more objects/buildings visible
from this point and estimate their heights.

25
Below is part of the sculpture Rain in the Sheffield Peace Gardens. What shape
are the parts?
There are nine balls. If the balls were all the same size how many more would
you need to stack them in a triangular pyramid?
How many would you need for the next biggest pyramid? http://www.shu.ac.uk/_assets/pdf/MEC-maths-trail.pdf
ppppppppp
Gill Adams, Sheffield City Centre bus stop
Gill Adams, Sheffield Station
Gill Adams, Peace Gardens, Sheffield
Preparing the exhibition (1 or 2 lessons)
The exhibition can include a display of the final trail including a large poster-size map, photographs, problems and an A3 or A4 map for distribution. Prepare copies of the trail for visitors to take away. You may wish to adapt several problems to the exhibition venue so that visitors can try out part of a trail. The children can explain their particular questions and how they found their solutions.
Practical issues
You will need to follow local guidance on organising your visit to the trail site. An alternative may be to design a trail in the school grounds.
Which of the bus numbers are prime?
What other types of number can you see?
Write down all the factors of 35.
Which of the two-digit numbers has the
greatest number of factors?
Here is one of the roses on the
station building. How many lines of
symmetry does it have?
Find and sketch a different rose,
marking in the lines of symmetry.
26
The exhibition
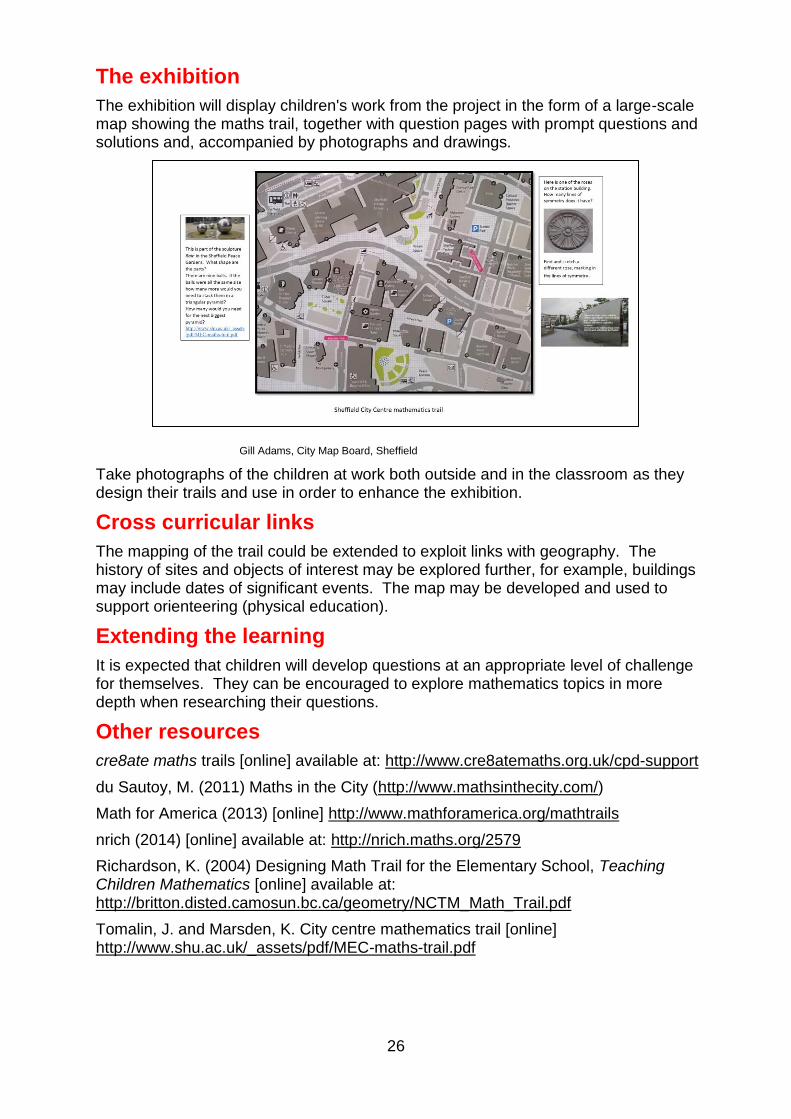
The exhibition will display children's work from the project in the form of a large-scale map showing the maths trail, together with question pages with prompt questions and solutions and, accompanied by photographs and drawings.
Gill Adams, City Map Board, Sheffield
Take photographs of the children at work both outside and in the classroom as they design their trails and use in order to enhance the exhibition.
Cross curricular links
The mapping of the trail could be extended to exploit links with geography. The history of sites and objects of interest may be explored further, for example, buildings may include dates of significant events. The map may be developed and used to support orienteering (physical education).
Extending the learning
It is expected that children will develop questions at an appropriate level of challenge for themselves. They can be encouraged to explore mathematics topics in more depth when researching their questions.
Other resources
cre8ate maths trails [online] available at: http://www.cre8atemaths.org.uk/cpd-support
du Sautoy, M. (2011) Maths in the City (http://www.mathsinthecity.com/)
Math for America (2013) [online] http://www.mathforamerica.org/mathtrails
nrich (2014) [online] available at: http://nrich.maths.org/2579
Richardson, K. (2004) Designing Math Trail for the Elementary School, Teaching Children Mathematics [online] available at: http://britton.disted.camosun.bc.ca/geometry/NCTM_Math_Trail.pdf
Tomalin, J. and Marsden, K. City centre mathematics trail [online] http://www.shu.ac.uk/_assets/pdf/MEC-maths-trail.pdf
27
Description
The project Many colourful triangles concerns the equilateral triangle. First, an equilateral triangle is produced in a very simple way by folding paper. Then, by placing several triangles next to each other, new shapes, patterns and tilings are formed, the features of which are explored and analysed by the children. To understand the activity better you can watch a video clip.
Learning intentions
Getting to know the characteristics of equilateral triangles
Learning / deepening the children’s knowledge about mathematical terms: edge, vertex, angle, area
Creating equilateral shaped triangles with simple material
Developing shapes using equilateral triangles
Getting to know the features of the triangle, trapezium, parallelogram, rhombus and regular hexagon
Creating and analysing patterns and tilings
Previous learning
For this project there is no mathematical previous knowledge required. For the making of the triangles the children need certain motor abilities such as being able of folding neatly.
Resources required
Coloured paper, A4 and A5 plus a few large sheets of paper for recording
Isometric paper, A5
Colours (crayons, felt tips), scissors, glue
A large number of identical cardboard equilateral triangles of side length about 5cm in two or three colours
Organisation
Depending on the respective phase of the project the organisation is different. The children work on the subject together with all the children in class as well as with a partner, in small groups or alone.
Time needed
The whole project takes about five lessons.
Many colourful triangles
28
Suggested plan for teaching
Getting started (1 lesson)
During this phase the children bring together their knowledge about mathematical shapes. They name different shapes and items. At the end of this phase they know about the differences between triangle shapes.
Before the lesson begins, ask the children to search for triangular shaped objects in their environment (in the classroom, in the school yard, on the street or at home). They can bring objects or drawings or photographs or descriptions. They may think of street signs or food or architecture or ...
Which mathematical shapes do the children know?
The children sit in a circle around several different shapes (triangles, rhombus, parallelogram, regular hexagon, trapezium and other shapes) which are placed in the middle. They talk about which shapes they already know and which features they can name and what the differences are.
To focus on the oral description of the shapes, the teacher can pass around a small bag with an item (e.g. a triangle or a circular disc) which the children have to describe by feeling its shape with their hands. The other children have to guess the shape of the item from the description. The game can be continued by groups of children at their tables.
What is triangular?
The children come back together to share their triangular shaped objects in the sitting circle. Together with the teacher, the children try to find a reason why these things have a triangular shape.
What kinds of triangles exist?
Talking about the different items brought into the sitting circle the children think about how they can categorize the triangles. What are the similarities and differences? Can they find a classification for the shapes?
Encourage the children to learn to name the following parts of a triangle: edge, vertex, angle, area, perimeter.
At the end, the children should know that there are different types of triangle: equilateral, isosceles, obtuse-angled, acute-angled and right angled. They will not need to learn all these terms at this stage but it will serve as a first encounter with the different triangle shapes they will come across in later classes. In this project the emphasis is on the equilateral triangle.
Save the triangular shaped objects the children have brought (take photographs of any that need to be returned) and combine them in a display.
Making an equilateral triangle (1 lesson)
At first, the characteristics of equilateral triangle will be repeated from the last lesson and discussed. Then the equilateral triangles are made (for a detailed description of how to make the triangles see here) from brightly coloured sheets of A5 paper. In order to make a regular pattern, the children will need to make a number of triangles – encourage them to make their folds as accurate as they can.
Guidance for the activity
29
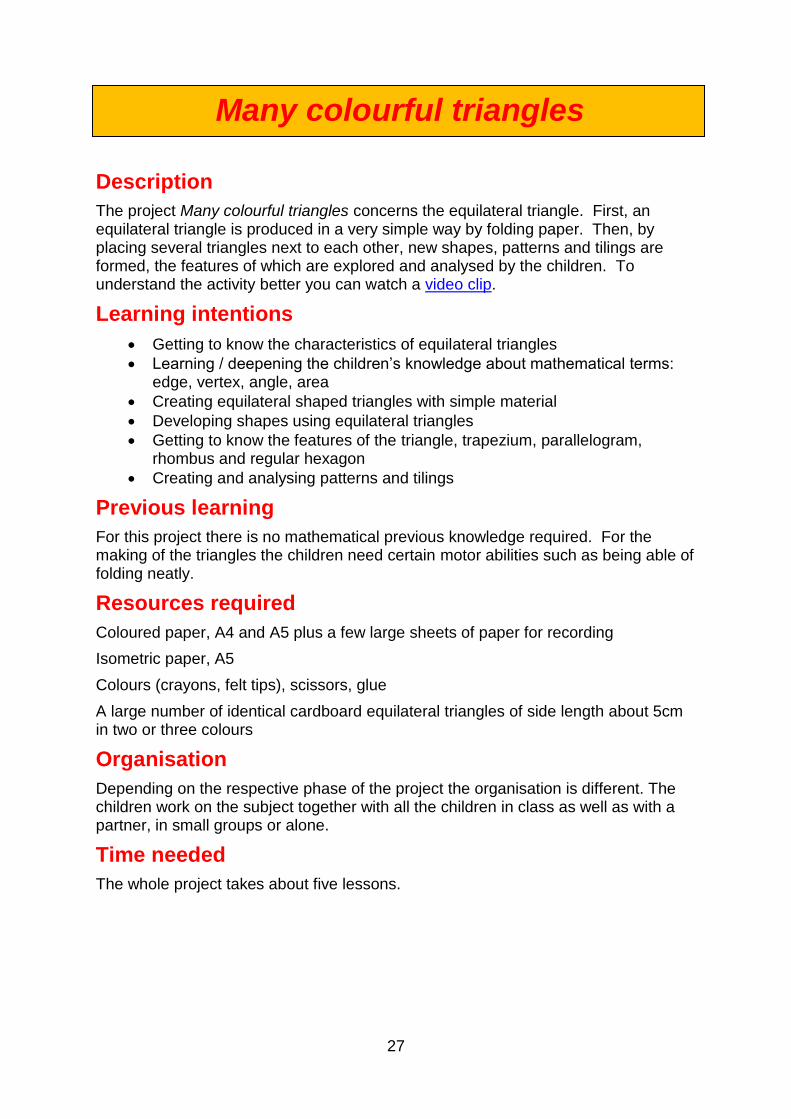
After having made the triangles, the children work together in groups of four to six children and think about which shapes they can build from the triangles (for example, a trapezium, a bigger triangle, a regular hexagon).
The results can be recorded on a large sheet of paper by drawing round the triangles.
Making and describing pictures and patterns from triangles (1 lesson)
This game is played in pairs. Every child needs a small number of equilateral triangles. In pairs the children sit opposite each other at tables with a “wall” (a school bag for example) between them. One of the two arranges a pattern with the triangles on the table and describes to their partner how they are positioned. For this description the child uses terms like “edge”, “vertex”, “angle” and “area”. The partner listens carefully and places the triangles as described. When he or she has done so, the patterns are compared.
The activity can be repeated several times. The difficulty can be increased by using more triangles. When they have finished the game, each pair chooses a couple of designs and names and records them by drawing round the triangles.
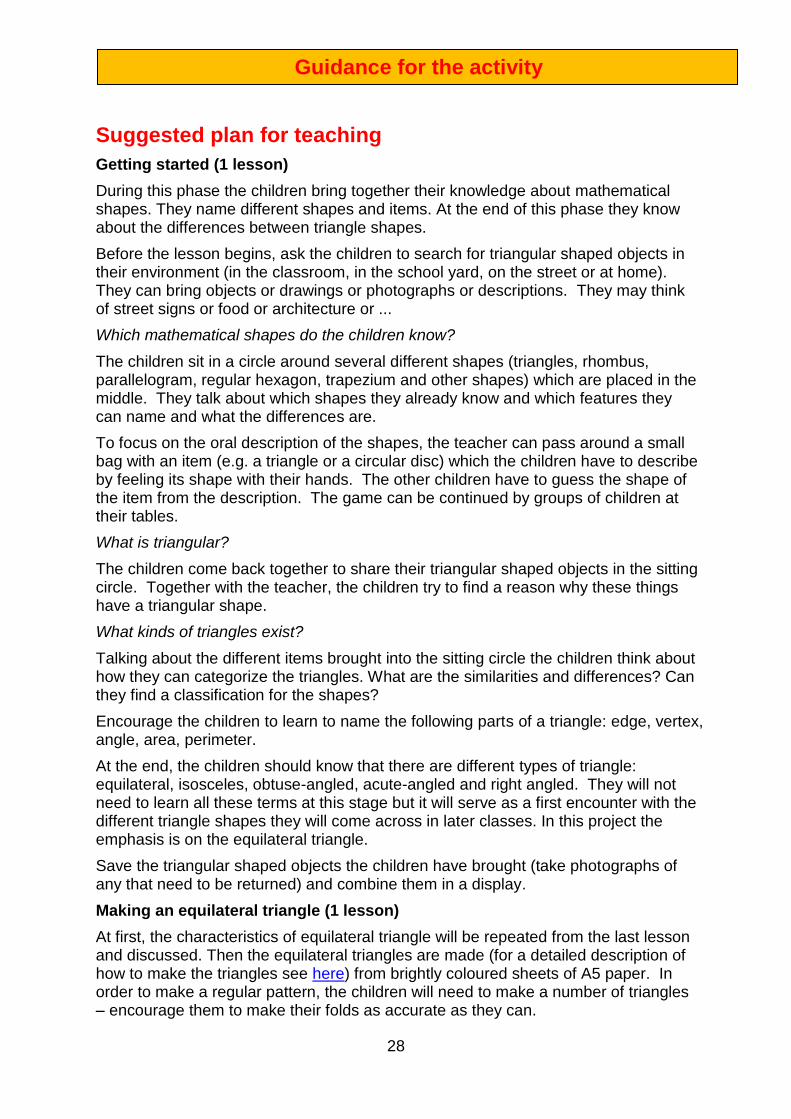
Tiling with triangles (1 lesson)
The teacher shows the children pictures of tilings made from simple mathematical shapes. Through analysing the pictures, the children work out the characteristics of patterns with the teacher – that they are regular and repeating so you would know how to continue them.
You may also want to work with the children on the question: which regular polygons tile? They can discover that only equilateral triangles, squares and regular hexagons tile because their interior angles divide 3600 exactly whereas, for example, the interior angles of regular pentagons and octagons do not.
The children need equilateral triangles (at least 20, the more the better) in two or three different colours. Ask them to experiment with different regular repeating ways of arranging the triangles to make an attractive tiling.
Once they have chosen one that they are pleased with, give the children large pieces of paper so that they can stick their tiling onto it to show it in the exhibition. Alternatively, they may prefer to copy their colourful design onto isometric paper. You may also like to make one big class tiling using the paper triangles from the first lesson.
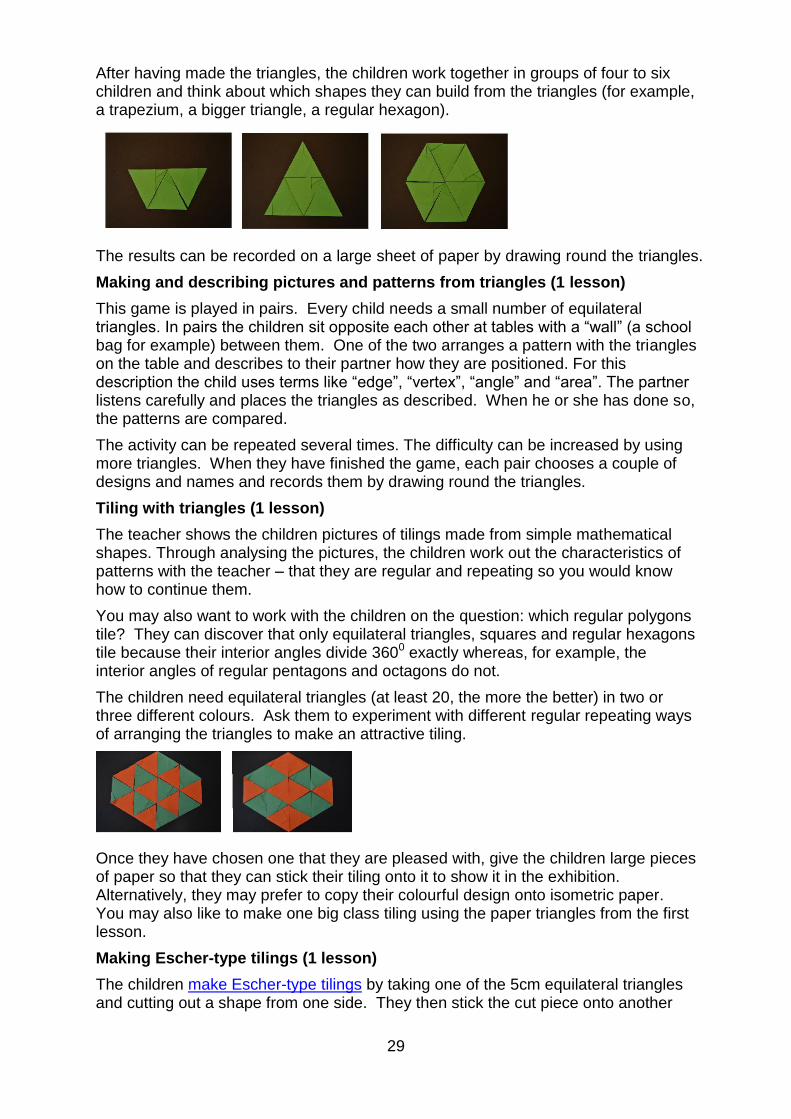
Making Escher-type tilings (1 lesson)
The children make Escher-type tilings by taking one of the 5cm equilateral triangles and cutting out a shape from one side. They then stick the cut piece onto another
30
edge of the triangle. They can use their new shape to create attractive Escher-type tilings.
First create a template by drawing round the new shape onto a fresh piece of card and cutting it out. Then draw round the template several times on coloured paper to make copies of the tile. Arrange the tiling pattern and stick onto card.
Practical issues
For the practical issues of how to make the triangles and tilings please see the instructions in the Toolkit.
The exhibition
Several things created during the activity will contribute to the exhibition – the triangular objects brought from home, the recorded shapes made from equilateral triangles, the pictures and patterns and the beautiful tilings made by the children. The large tiling, made by all children together, as well as smaller tilings, designed and made individually by the single children, can be exhibited. When showing the visitors around, the children can explain their work and what they have learnt about how equilateral triangles and how they fit together.
Have the coloured cardboard triangles available and colours and A5 isometric paper and encourage the visitors to make their own tiling patterns.
Cross curricular links
The designing and making of the triangles has an artistic nature and can therefore well be linked to art lessons. In connection with this project, mosaics can be analysed and discussed and their role in Islamic culture explored. Works of art by the famous artist M. C. Escher can be explored, appreciated and discussed.
Extending the learning
Further learning content can be tilings with other mathematical shapes like squares or regular hexagons. What Escher-type tilings are possible now? Or what tiling patterns can be made with more than one shape?
Other resources
http://www.mcescher.com/gallery/symmetry/
31
Description
The children will make various cardboard models that allow them to discover the relationship between the cube, the rhombic dodecahedron and the shape of the cells of a beehive. To understand the activity better you can watch a video clip.
Learning intentions
the regularities and symmetries of some 2- and 3-dimensional shapes
awareness that there are mathematical reasons behind many biological facts
Previous learning
Terminology and concepts about polygons, pyramids, cube.
Resources required
Copies (in heavy cardboard - 200g/m2) of the nets of objects to be made - cube, pyramid, rhombic dodecahedron and beehive cell. The cardboard should be colourful.
Safety scissors, vinyl glue, rulers, clothes pegs, multi-purpose tack
Something to score the folds, for example, pens that have run out
Several identical hexagonal prisms
Organisation
The children will work in small groups around a table. Each one will work on a piece of the puzzle, but they will discuss and interact during the work.
Time needed
The time needed will depend on the skills of the children. It will probably take approximately four lessons. After having made the first model at school, the children may enjoy continuing to make some more at home. This should be encouraged since the packing puzzles become more fun and clearer mathematically when there are many pieces with which to play.
Mathematics of the beehive
32
Suggested plan for teaching
Cubes and pyramids (1 lesson)
Give each group the template for one cube and six pyramids. They share out the work and also help one another - sometimes two pairs of hands are better than one when model building.
Once they have finished, ask them what they notice. It should be clear that the six pyramids can be fitted together to make a cube identical to the one they have just made. Introduce the word "volume" and discuss with the children why we know the cube must have six times greater volume than the individual pyramids. Some will be ready to grapple with the formulas for their volumes and to understand the connections between them.
volume of cube = length x breadth x height = area of the base x height
volume of these pyramids = ⅓ area of base x height
The rhombic dodecahedron (1 lesson)
Begin the lesson by introducing the name of the rhombic dodecahedron. Many children love learning long words. Help them practice the sound by chanting together. Tell them you will explain more about the name later.
Show them that the cube and pyramids they made in the previous lesson can be reassembled to make a new shape - the rhombic dodecahedron. You may want to make a demonstration puzzle to show them or use a video to show the how the six pyramids surrounding a cube produce the rhombic dodecahedron:
Give each pair of children the template for the rhombic dodecahedron. They help each other build the solid.
Once the solids are made, the class comes together. Ask them the name of the shape of the faces and point out that this is in the name of the shape. Ask them to count the faces. Tell them that Greek word for twelve is dodeca. In Greek the word hedron means base or seat - we have borrowed the word to mean the face of a solid. Draw their attention to the fact that there are two different types of vertices - some at which three rhombuses come together and some at which four come together.
Then, and, one by one, they connect their rhombic dodecahedra together (affix them gently with multi-purpose tack if needed) discovering that they pack, that is, they fill 3-D space without leaving any gaps.
Building a beehive (2 lessons)
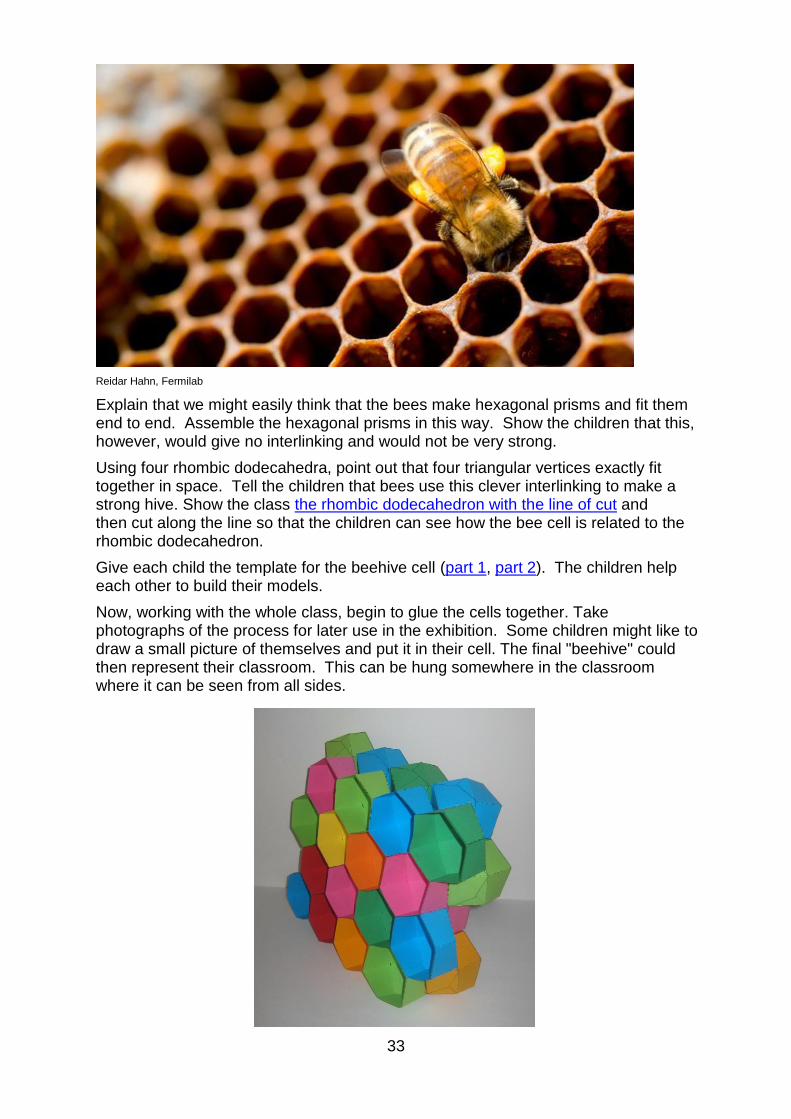
Show the children an image of the cross-section of a beehive.
Guidance for the activity
33
Reidar Hahn, Fermilab
Explain that we might easily think that the bees make hexagonal prisms and fit them end to end. Assemble the hexagonal prisms in this way. Show the children that this, however, would give no interlinking and would not be very strong.
Using four rhombic dodecahedra, point out that four triangular vertices exactly fit together in space. Tell the children that bees use this clever interlinking to make a strong hive. Show the class the rhombic dodecahedron with the line of cut and then cut along the line so that the children can see how the bee cell is related to the rhombic dodecahedron.
Give each child the template for the beehive cell (part 1, part 2). The children help each other to build their models.
Now, working with the whole class, begin to glue the cells together. Take photographs of the process for later use in the exhibition. Some children might like to draw a small picture of themselves and put it in their cell. The final "beehive" could then represent their classroom. This can be hung somewhere in the classroom where it can be seen from all sides.
34
Practical issues
A basic “how to fold and glue the paper” is offered in the video clip: just cut the model, press and score the lines to be folded and then fold and glue the model. Do not try to glue everything in a single step: it may be necessary to glue a part, perhaps to hold it for a while, by hands or, better, by pegs... and only continue after a while
The exhibition
The puzzles, in their natural order, are ready to be shown and explained to the public. Moreover, things can be arranged in such a way the visitor can play with the puzzle, or even try to add a “personal” cell to the beehive.
The children can also write as few sentences (4/5 lines each) to be used as taglines for the objects.
Having photographs showing the assembling of the beehive will enhance the visual quality of the exhibition.
Cross curricular links
The children can search for information about bees and their products.
Extending the learning
Make a similar puzzle with three pyramids having a square base of a given length with the height of the same length and the upper vertex exactly over a vertex of the base. These can also be assembled to become a cube. Children can be asked to use dynamic geometry software (for example, GeoGebra or Cabri) to draw the nets for this puzzle.
Other resources
http://www.cutoutfoldup.com/943-beehive-cells.php
35
Description
Children will replicate the inner solar system in their playground based on a scale of 1 391 900 000:1 or 1.391 x 10⁹:1. The model of the sun will have a diameter of approximately 1m. The scaled model of the sun, the earth and the other inner planets will be made in three dimensions and will be placed in their correct orbits to the same scale. If extended to include the outer planets, the children will also need to use some public facilities in the school neighbourhood (such as a coffee-shop or a garden). To understand the activity better you can watch a video clip.
Learning intentions
the experience of “big numbers” and an initial sense of large scale differences
measurement in 2D and 3D and relations between measures
constructing spheres
understanding how to read and interpret charts, maps and plans
Previous learning
The concepts of circumference, sphere, radius, diameter and distance are all necessary.
Resources required
Chalk, card circles 1m diameter, 0.8m diameter, 0.5m diameter, 0.1m diameter and others if so desired
Surveying tape measures
1m giant balloon for the model of the sun, papier mâché
Modelling clay for the models of the inner planets
A map or a chart of the school playground and surrounding region
Organisation
All the activities can be developed in small groups (3 or 4 children) or larger groups. Sometimes the whole class will work together and the possible locations for the planets should be discussed with the whole class.
Time needed
The activity will take three lessons if confined to the inner solar system. It will take several more if the model is extended to include the outer planets too.
Modelling the solar system
36
Suggested plan for teaching
Experiencing scale and proportion (1 lesson)
Ideally in the playground but otherwise in a large space inside, the children will conduct an experiment. Pin a card circle diameter 1m on a vertical wall with the centre roughly at the children's eye height. Draw a chalk line, as long as possible, at right angles to the wall. Take the 0.8m diameter circle and ask a pair of children to stand somewhere on the line and hold it up parallel to the 1m circle and with the centre more or less in line. Ask another child (the marker) to walk back from the circle until it just completely covers the 1m circle. Two other pairs measure the distance from the marker to the wall and from the 0.8 circle to the wall. What do they notice? The distances should be in the ration of 5:4.
Move the 0.8 circle to another place on the chalk line and repeat - different children can take turns measuring and being the marker. They should find that though the distances are different the ratio is always the same.
Now produce the 0.5m diameter circle. Working in groups of four, ask them to predict where, for a particular placing of the 0.8m circle, this 0.5m circle would just cover both of the other circles. Share answers and ask the groups to justify their thoughts. Then test out their conjectures using the 0.5m circle and a marker. The activity can be extended and clarified by working with a 0.1m circle in the same way as before.
Building the planet models (1 lesson)
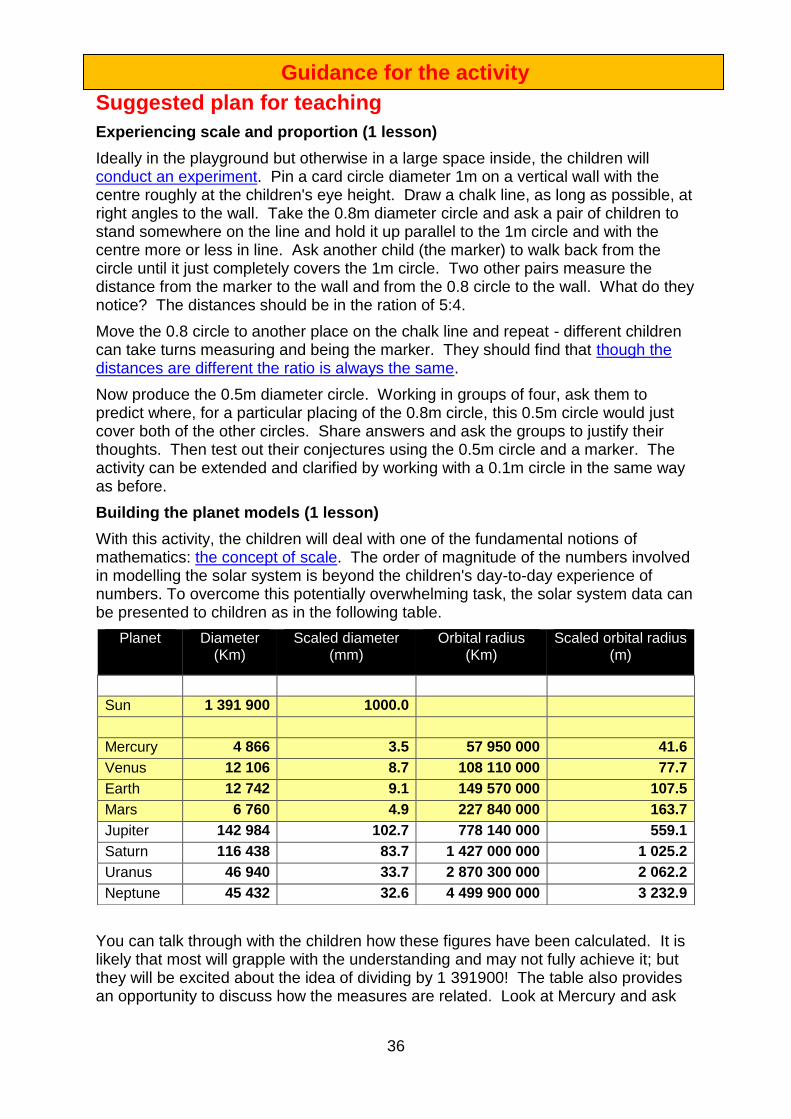
With this activity, the children will deal with one of the fundamental notions of mathematics: the concept of scale. The order of magnitude of the numbers involved in modelling the solar system is beyond the children's day-to-day experience of numbers. To overcome this potentially overwhelming task, the solar system data can be presented to children as in the following table.
You can talk through with the children how these figures have been calculated. It is likely that most will grapple with the understanding and may not fully achieve it; but they will be excited about the idea of dividing by 1 391900! The table also provides an opportunity to discuss how the measures are related. Look at Mercury and ask
Planet Diameter (Km)
Scaled diameter (mm)
Orbital radius (Km)
Scaled orbital radius (m)
Sun 1 391 900 1000.0
Mercury 4 866 3.5 57 950 000 41.6
Venus 12 106 8.7 108 110 000 77.7
Earth 12 742 9.1 149 570 000 107.5
Mars 6 760 4.9 227 840 000 163.7
Jupiter 142 984 102.7 778 140 000 559.1
Saturn 116 438 83.7 1 427 000 000 1 025.2
Uranus 46 940 33.7 2 870 300 000 2 062.2
Neptune 45 432 32.6 4 499 900 000 3 232.9
Guidance for the activity
37
the children to show 3.5mm approximately between their fingers. Ask them to pace out 41m and draw out in discussion how small the planets are compared with the distances between them.
Explain that they are going to build a model of the inner solar system to the given scale. You may decide to make the balloon model of the sun beforehand in which case the children can move straight to creating four spheres in modelling clay to represent the inner planets.
Creating the solar system (1 lesson)
Take the model sun to the playground. Let the children experiment to find out where to place the sun in order to be able to place the inner planets. If you have a very big space, they may be able to place the sun in the middle but it will probably be necessary to place the sun quite near to one of the corners and only include part of the orbit of, at least, the Earth and Mars.
Using a local map, discuss with the children some places where the outer planets could be put in the neighbourhood to reflect their distances from the sun. Use distances that are familiar to them - the distance to a local shop or the distance to their homes and so on - to help them develop a good sense of how far, for example, 2062m is.
Practical issues
To add strength, you may want to cover your balloon model of the sun with papier mâché.
The exhibition
Take photographs throughout the project to enhance the exhibition. If the exhibition hall is large, it may be possible to include at least part of the model solar system. Otherwise, the children can explain their model using the photographs. It should be possible to replicate the activity covered in the first lesson with the children explaining to the visitors the patterns in the numbers observed.
Cross curricular links
The activity also connects with the science curriculum see Other resources for ideas.
Extending the learning
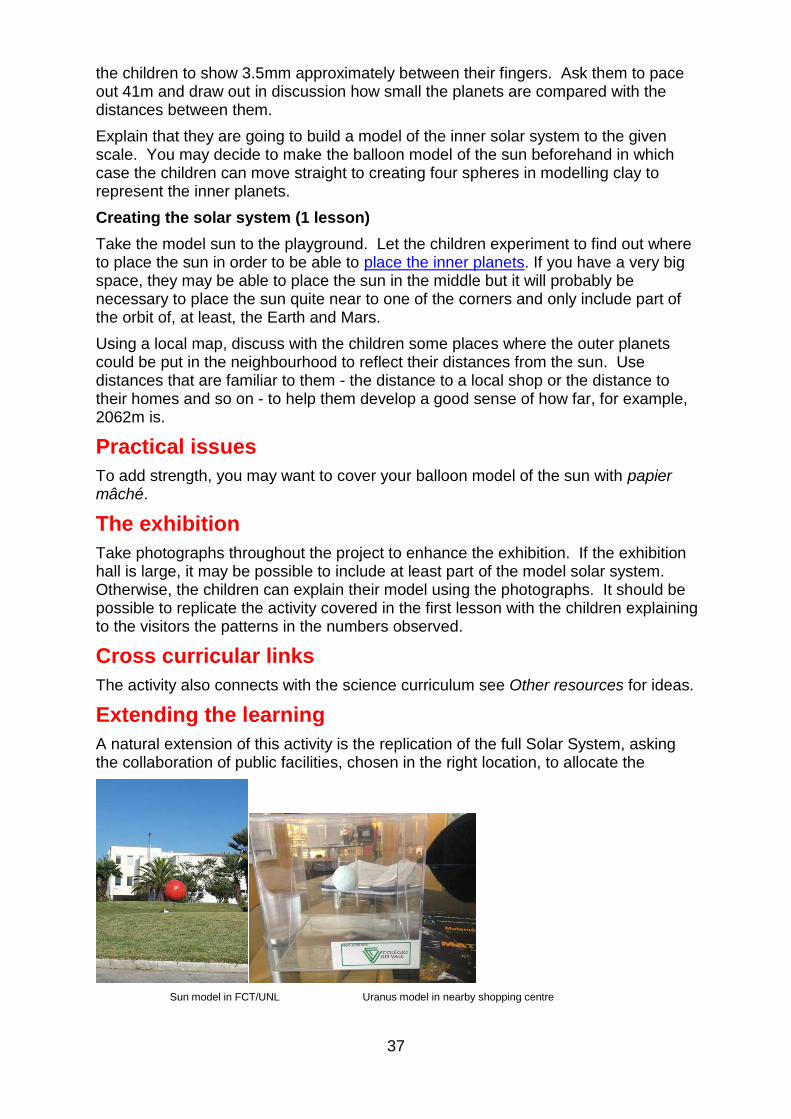
A natural extension of this activity is the replication of the full Solar System, asking the collaboration of public facilities, chosen in the right location, to allocate the
Sun model in FCT/UNL Uranus model in nearby shopping centre
38
remaining planets. The example above shows a 1m sun in the middle of a roundabout with a scaled model of Uranus on the information desk at a nearby shopping centre.
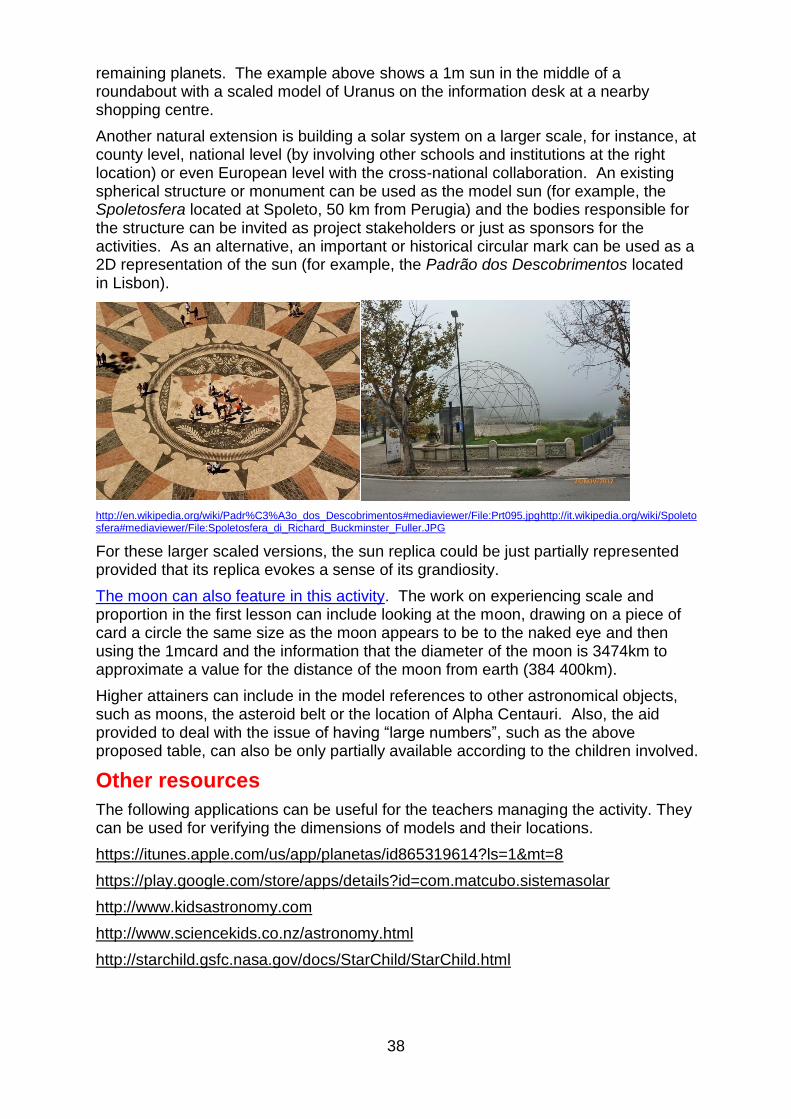
Another natural extension is building a solar system on a larger scale, for instance, at county level, national level (by involving other schools and institutions at the right location) or even European level with the cross-national collaboration. An existing spherical structure or monument can be used as the model sun (for example, the Spoletosfera located at Spoleto, 50 km from Perugia) and the bodies responsible for the structure can be invited as project stakeholders or just as sponsors for the activities. As an alternative, an important or historical circular mark can be used as a 2D representation of the sun (for example, the Padrão dos Descobrimentos located in Lisbon).
http://en.wikipedia.org/wiki/Padr%C3%A3o_dos_Descobrimentos#mediaviewer/File:Prt095.jpghttp://it.wikipedia.org/wiki/Spoletosfera#mediaviewer/File:Spoletosfera_di_Richard_Buckminster_Fuller.JPG
For these larger scaled versions, the sun replica could be just partially represented provided that its replica evokes a sense of its grandiosity.
The moon can also feature in this activity. The work on experiencing scale and proportion in the first lesson can include looking at the moon, drawing on a piece of card a circle the same size as the moon appears to be to the naked eye and then using the 1mcard and the information that the diameter of the moon is 3474km to approximate a value for the distance of the moon from earth (384 400km).
Higher attainers can include in the model references to other astronomical objects, such as moons, the asteroid belt or the location of Alpha Centauri. Also, the aid provided to deal with the issue of having “large numbers”, such as the above proposed table, can also be only partially available according to the children involved.
Other resources
The following applications can be useful for the teachers managing the activity. They can be used for verifying the dimensions of models and their locations.
https://itunes.apple.com/us/app/planetas/id865319614?ls=1&mt=8
https://play.google.com/store/apps/details?id=com.matcubo.sistemasolar
http://www.kidsastronomy.com
http://www.sciencekids.co.nz/astronomy.html
http://starchild.gsfc.nasa.gov/docs/StarChild/StarChild.html
39
Description
The children will make two simple sundials: a horizontal one based on a rectangle and calibrated by them and a raised one which is pre-calibrated and based on the compass. They may then research and design a sundial of their own. To understand the activity better you can watch a video clip.
Learning intentions
measurement of time and length
introduction to latitude and the compass
observation and understanding of the position, movement and length of the shadows
Previous learning
The children will need to be able to tell the time and have a first idea about the points of the compass.
Resources required
Card
Rulers, scissors, pens, glue, pencils, hole-punch, setsquares
A clock, a compass, a globe, an angle poise lamp and an atlas
Copies of the Northern Hemisphere Sundial template on 200g/m2 card
Organisation
Whole class, pair and individual work
Time needed
The project will take about four lessons but the calibration of the rectangular sundial will need to take place over two days (or more if more convenient).
Sundials
40
Suggested plan for teaching
Making a horizontal sundial (1 lesson)
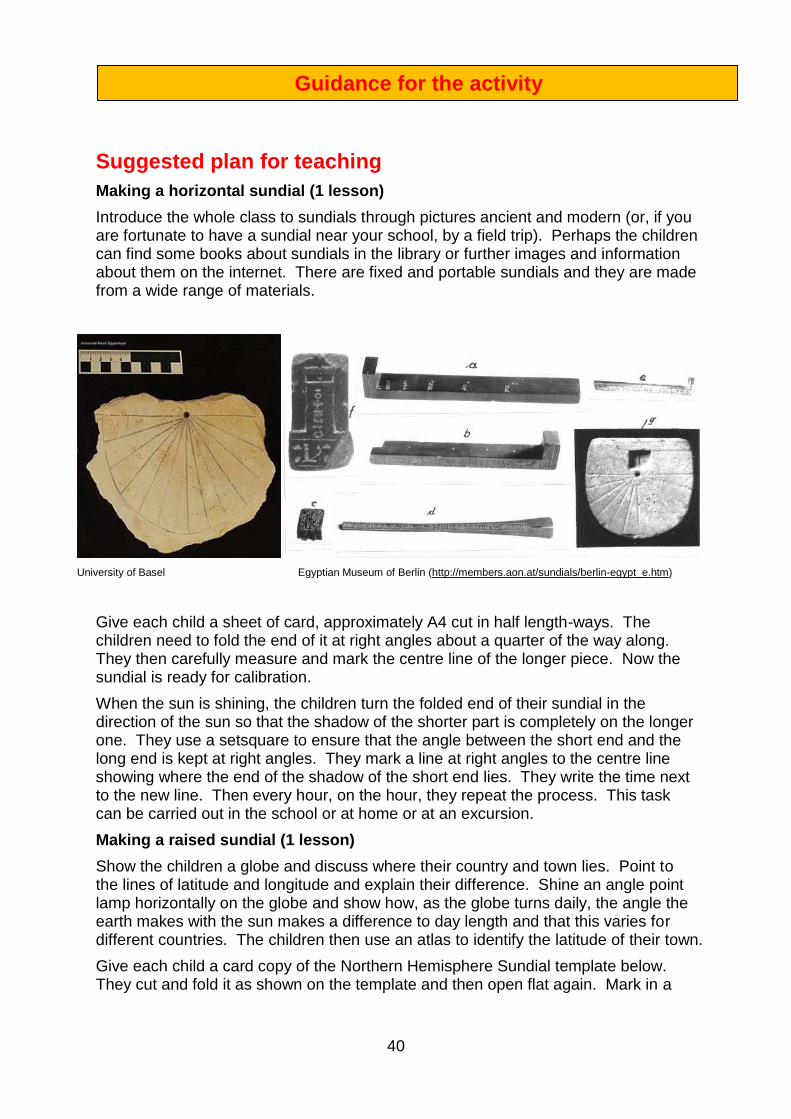
Introduce the whole class to sundials through pictures ancient and modern (or, if you are fortunate to have a sundial near your school, by a field trip). Perhaps the children can find some books about sundials in the library or further images and information about them on the internet. There are fixed and portable sundials and they are made from a wide range of materials.
University of Basel Egyptian Museum of Berlin (http://members.aon.at/sundials/berlin-egypt_e.htm)
Give each child a sheet of card, approximately A4 cut in half length-ways. The children need to fold the end of it at right angles about a quarter of the way along. They then carefully measure and mark the centre line of the longer piece. Now the sundial is ready for calibration.
When the sun is shining, the children turn the folded end of their sundial in the direction of the sun so that the shadow of the shorter part is completely on the longer one. They use a setsquare to ensure that the angle between the short end and the long end is kept at right angles. They mark a line at right angles to the centre line showing where the end of the shadow of the short end lies. They write the time next to the new line. Then every hour, on the hour, they repeat the process. This task can be carried out in the school or at home or at an excursion.
Making a raised sundial (1 lesson)
Show the children a globe and discuss where their country and town lies. Point to the lines of latitude and longitude and explain their difference. Shine an angle point lamp horizontally on the globe and show how, as the globe turns daily, the angle the earth makes with the sun makes a difference to day length and that this varies for different countries. The children then use an atlas to identify the latitude of their town.
Give each child a card copy of the Northern Hemisphere Sundial template below. They cut and fold it as shown on the template and then open flat again. Mark in a
Guidance for the activity

41
fold line on the flaps for the latitude of their town. Fold along this line outside, crease, and then fold again with the line on the inside of the fold.
http://d366w3m5tf0813.cloudfront.net/wp-content/uploads/sundial_n.pdf
Tape the card together as shown below.
http://d366w3m5tf0813.cloudfront.net/wp-content/uploads/sundial_n.pdf
Punch out the small circle at the top centre and insert a pencil as shown. Use the
compass to find true north and turn the sundial so that it faces in that direction.
Once both sundials are complete, the children can compare their performance over several days.
42
Designing a sundial (2 lessons)
There are many other designs of sundial. The children can explore through the library and the internet a range of possibilities and they can write about what they have found out. They can then make a poster displaying their accounts and accompanying them with photographs, sketches or photocopied images of the different sundials they have found.
They can then build a sundial of their own design from scratch. They may like to make historical connections in their design, for example, by decorating it with Egyptian numbers which children may find interesting.
Practical issues
You may prefer to make the hole using a hole-punch before giving the template to the children as some may find this operation difficult to do neatly.
The exhibition
At the exhibition, children can take their sundials and explain how they work. They can also display the posters showing their research.
Cross curricular links
There are clear cross curricular with geography and science. For further background about the planets and the sun, see, for example http://www.physicalgeography.net/fundamentals/6h.html
Extending the learning
This can form part of a project in which the children graph day length over an extended period of time.
Other resources
http://en.wikipedia.org/wiki/Sundial
Dava Sobel: Longitude: The True Story of a Lone Genius Who Solved the Greatest Scientific Problem of His Time (1995)
43
A. Before the exhibition
Exhibits. The most important aspect of an exhibition is the exhibits. Even when one
is only “organizing” an exhibition it is extremely important to know and select the
exhibits.
Kind of exhibits:
(a) Exhibits which are pictures to be fixed on a wall.
These exhibits very much influence the “image” of the exhibition, because they can
be seen clearly when entering the exhibition.
Are the pictures prepared to be hung on a wall? Do they need a frame? Can one
glue them at a wooden wall?
Are the walls prepared for the pictures? Is it allowed to put something on / in the wall
– or must one provide partition walls?
(b) Exhibits on a table
These can be objects or experiments. These exhibits usually cannot be recognized
from a distance. The danger is that from a visual point of view one sees only tables.
So one has to provide some “attraction”. This can be light, panels – or simply and
best – visitors who are “already there” and have fun.
Mathematical exhibits typically fall in this category (including must computer exhibits).
(c) “Stand alone”-exhibits
There might be also exhibits, which are so big that they stand on the floor. These
provide special requirements:
- They must stand very stable. - Also, these exhibits may be very attractive. Children may want to climb on it or
to put something on it.
(d) “Exhibits” which are a performance
These exhibits cover also exhibits which are outdoor (mathematical trail) and/or
consist of several locally separated parts.
How to make an exhibition
44
In the case of a MiMa exhibition we are dealing with (physical) exhibits made by
children. Some of these exhibits might be fragile and/or not perfectly done.
- You might try to fix them. Do this in a way so that the original is respected. - Also these exhibits should be shown.
Also, there might be “exhibits”, for instance games, which work only when shown by
the children. Try to make a place which works for the children as well as for the
visitors. Think of tables, chairs, spare paper, paper baskets and so on.
Number and arrangement of exhibits
Two conflicting strategies.
1. The visitors’ point of view. From this viewpoint selection of exhibits with high quality is desirable. As an average visitor, I want to see good (interesting, stimulating, …) exhibits, and I want to see them only once (not 20 copies of the same object).
2. The point of view of the artists (in our case, the participating teachers and children). They typically want to show everything they have made.
Here one has to find a good balance.
Also the amount of exhibits must correspond to the size of the exhibition space.
Keep in mind that there must also be space left for the visitors. (Typically, an
exhibition without visitors must look “empty” in order that (many) visitors feel
comfortable.)
In case of a MiMa exhibition we recommend to show basically all exhibits. This way
one does not only show the amount of work which has been done (which is a value
in itself), but also the appreciation of each single work: it becomes visible that each
child has contributed something to the exhibition.
Arrange the exhibits in a reasonable order. If many groups bring in their own exhibits
(as in the MiMa case) it could be a good idea to give each group an “island” for their
exhibits. Think of a good arrangement of these islands. Possible arguments:
- The visitor should already see something attractive at the entrance - Similar islands may stay together - Schools (teachers) who know each other may stay together. - If there are special effects (noise, …) the respective island should be at a
special position.
Labels
Each exhibit (or group of exhibits) may have a label. This is composed of the title of
the exhibit, the maker (artist, school), and possibly a very short description. It could
45
be a good exercise for the children to write these labels.
The labels are then fixed next to the exhibits.
In the case of a MiMa exhibition it might be that the children make the labels or that
there is no label necessary (because everything is explained by the children). Take
into consideration to produce for each school a bigger label (banner), which indicates
the place, where the school presents the exhibits. Also this banner could be a gift for
the respective school.
B. The Exhibition
The date.
Select the right date and period of the exhibition.
- The artists (teachers, children, …) should be able to participate. In particular they should be able to participate in the opening. In many cases this will mean that the exhibition is on (starts on) a Saturday.
- Look for competing events. Avoid putting your exhibition at the same time. - When the date is fixed, communicate the date to the representatives you want
to see at the opening (politicians, colleagues, headmasters, …)
The opening
The opening of the exhibition is important for several reasons.
- You have a chance to invite important people to the opening. If they come, you have a chance that the press will come and report on the exhibition. If it works, this is an extremely efficient way of publicity.
- You can thank the artists. In the MiMa case there are of course the children who have done the work. But the teachers played a crucial role and probably worked much more than they were obliged to. There might be sponsors (you have got the exhibition hall free of charge, …) So, make sure that you thank all in an appropriate way. (For instance: The respective persons come on stage and get applause, the teachers come individually on stage. Think of giving them a “certificate” (= nice piece of paper). There are almost no costs, but it is a good acknowledgement and makes good photos).
- Will you provide something to drink and eat (no alcohol if children are involved)?
- Plan carefully who is speaking when and how long. Make sure that the speakers know this and know the auditorium. Personal opinion: Short contributions are good. (Of course, if someone really important is speaking, you cannot restrict him or her 100 per cent …)
- In case of a MiMa exhibition, keep in mind that many children are present (and their parents). They typically did not come to hear speeches, but to show and see the objects. In other words: Keep it short.
46
Assembling the exhibition
This is a critical phase, which needs to be prepared carefully.
You have made a plan where the exhibits should be placed. You have
communicated to the schools how much space, how many tables, … they will have.
Be clear on this. You have asked them, who needs a socket for a computer or has
any other special technical requirement.
Make sure that
- Everybody knows when he or she has to arrive (not earlier!) - All the supporting material (tables, panels, current, …) is ready. - You have somebody who knows the exhibition hall and can help in all
unexpected cases (doors do not open, there is no light, the room is still full with other stuff, …)
- Show the groups of children their places. Then it should be the responsibility of the teacher to assemble the partial exhibition concerning his class.
- There will be all kinds of demands: “We need more tables”, “we forgot our extension cable”, ”we need glue”, “due to some reason we can bring our stuff only tomorrow”, … Have enough patience, friendliness and capacity to deal with all requirements of such kind.
Guards / explainers
Usually in an exhibition one needs people who look after the exhibits. In the case of
a mathematical exhibition, one typically has no “guards” but ”explainers”. These
could be the children who made the objects. They would explain how they made it
and what is mathematically interesting (“what they have learned”).
The teachers play an important role here. They train the children how to explain the
exhibits.
Also make sure that there are persons who are ready to clean the place. It could
happen that a glass falls down etc.
It is very important (in particular if you expect many visitors) that there is a kind of
“manager”. This is a person who has no specific duty, but looking around, “seeing”
critical situations and making decisions. Those situations could be
- An important person enters the room and nobody is welcoming him or her - At a certain point there is a shortage of collaborators - A visitor has an accident … - The organizer of the exhibition wants to thank somebody by giving flowers etc.
47
Publicity
For many reasons it is important to work for publicity. First of all, it is an
acknowledgement of the work done. Also, it serves as getting more visitors. But one
should also keep in mind that one can spend lots of money without great effect.
- Use your network and the networks of the artists (in the MiMa case, schools). Talk about the exhibition with your friends, in former times, you would have written letters. Show the exhibition (with pictures!) on your web page and your Facebook profile.
- If possible, get any press reports before the opening. For this it would be ideal to have (good) photos. Give the press some numbers: How many children, how many pictures etc. Also the European aspect might be useful. The press could report on the “making of” of the exhibition.
- Print leaflets and distribute them. Think carefully, where you will distribute them (schools, education centers, waiting rooms,…)
- Print Posters to be distributed in schools and shops. In my opinion posters are useful only as an additional means.
- Advertisements. Probably reasonable only in very special cases, because it is extremely expensive and you cannot control the effect.
If you can afford it, let a professional photographer take photos which you own and
can send to the press. Newspapers love good (and a little bit unusual) photos and
are willing to publish them. So, you can make your own press release during or after
the exhibition and send it to newspapers.
C. After the exhibition
The end comes very fast and usually unexpected.
Make sure that there are enough people to reassemble the exhibition.
- The exhibits should be taken home by the artists (children, …) by the end of the exhibition (not earlier!). Most likely not all exhibits are taken away right at the end of the exhibition. So, someone has to take care of it. Communicate to the teachers and/or children before where and when the exhibits can be fetched.
- The tables, chairs, … have to be taken away. - Think of cleaning the exhibition hall.
Collect press material and send it to people you want to impress (sponsors, …)

48
D. Catastrophes and unexpected happenings
Experience shows that everything can happen. Some of the easier accidents are
- Pictures falling down - Too many visitors - No visitors
There might also occur “real” accidents, such as: A child falls down, hurts
himself/herself with scissors and so on.
Make sure that there is a first-aid kid ready and that the responsible people know
where to find it.

49
This project has been funded with support from the European Commission. This publication reflects the views only of the author, and the Commission cannot be held responsible for any use which may be made of the information contained therein. Project n. 539872-LLP- 1-2013– 1-IT-COMENIUS-CMP