Millennium Small Animal Anesthesia...
24
Eagle Eye Anesthesia 800-760-6976 eagleeyeanesthesia.com 11233 St. Johns Industrial Pkwy S. Suites 1 and 2 Jacksonville, FL 32246 800-760-6976 or 904-739-4721 www.eagleeyeanesthesia.com Millennium Small Animal Anesthesia Machine Operation Manual Rev. 1/16
Transcript of Millennium Small Animal Anesthesia...
Eagle Eye Anesthesia 800-760-6976 eagleeyeanesthesia.com
11233 St. Johns Industrial Pkwy S. Suites 1 and 2
Jacksonville, FL 32246 800-760-6976 or 904-739-4721
www.eagleeyeanesthesia.com
Millennium Small Animal Anesthesia Machine
Operation Manual
Rev. 1/16

2
Eagle Eye Anesthesia 800-760-6976 eagleeyeanesthesia.com
Product Information (Keep for your records)
Machine / Model: Serial Number: Date of Purchase: Vaporizer ( if applicable): Model: Serial Number: Accessory Items:
Notes

3
Eagle Eye Anesthesia 800-760-6976 eagleeyeanesthesia.com
Table of Contents
Mission Statement / Description of Product 4
A Message from the President 5
Examination of Shipping Carton and Damaged Contents 6
Assembly Instructions for the Millennium Anesthesia Machine 7
Parts and Features Diagrams Generation I 8
Parts and Features Diagrams Generation II 9
Component Identification 10-12
Functional Tests 13-15
Operation 16
Precautions 17
Maintenance 18
Troubleshooting Guide 19-20
Warranty 21
Notes 22-23
4
Eagle Eye Anesthesia 800-760-6976 eagleeyeanesthesia.com
Mission Statement / Description of Product
The Millennium Anesthesia Machine
The Millennium Anesthesia Machine is a small animal gas anesthesia machine which incorporates an
oxygen flowmeter, a circle rebreathing system for carbon dioxide absorption, and attachment points for
non-rebreathing circuit use. Isoflurane, or sevoflurane, vaporizers are available to provide anesthesia
to the patient.
Mission Statement
To design and deliver high-impact enduring anesthetic machine product and service solutions to the
veterinary community. To dedicate all of our efforts to every client and their staff’s success by building
trust and personal accountability in all relationships.

5
Eagle Eye Anesthesia 800-760-6976 eagleeyeanesthesia.com
A Message from the President
Dear Customer, Congratulations and thank you for purchasing a Millennium Anesthesia Machine. This is the first veterinary anesthesia machine to utilize modern design components in the past 50 years. The quality of our products allows us to offer a great warranty: Your new Millennium comes with a 10 year warranty. And, if we provide yearly service, we will extend the warranty for another 5 years! We couldn't offer such a long warranty unless we paid strict attention to detail and used the highest quality materials and components available. "If you're not going to have problems, why not offer a long warranty?" We'll also come to your office - call and ask for details. This owner's manual should answer the vast majority of questions you have. If not, call us. We have multiple phone lines with real people answering them. We do have an answering machine to cover calls if all lines are busy or for afterhours assistance, but no "press I, press 2, or press 3" nonsense. Ken De Cray
6
Eagle Eye Anesthesia 800-760-6976 eagleeyeanesthesia.com
Examination of Shipping Carton and Damaged Contents
Upon delivery please examine shipping carton for signs of external damage. If carton is damaged externally, and contents also have been damaged, you must save all packaging for examination by the delivering carrier's representative. If contents are damaged, you must contact the delivering carrier and make an immediate claim for damages. The Sender (Eagle Eye Anesthesia) is not allowed by the carrier to report the damages or file a claim on your behalf. Damages will be examined by the carrier's representative at your location. Immediately after contacting the delivering carrier, call us, Eagle Eye Anesthesia Inc., at 800-739-4721. Although we cannot be held responsible for damage in transit, we will gladly assist in the preparation of any claim. We also will make an immediate effort to repair, or replace, the damaged merchandise.
7
Eagle Eye Anesthesia 800-760-6976 eagleeyeanesthesia.com
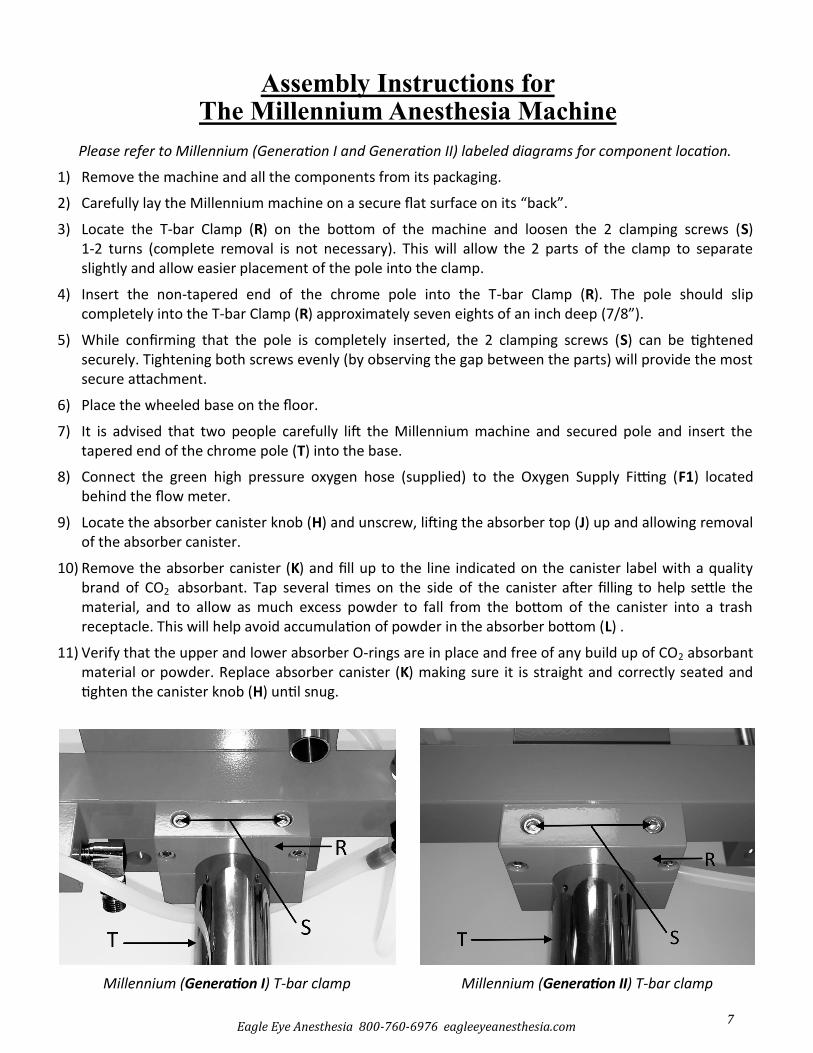
Assembly Instructions for The Millennium Anesthesia Machine
Please refer to Millennium (Generation I and Generation II) labeled diagrams for component location.
1) Remove the machine and all the components from its packaging.
2) Carefully lay the Millennium machine on a secure flat surface on its “back”.
3) Locate the T-bar Clamp (R) on the bottom of the machine and loosen the 2 clamping screws (S) 1-2 turns (complete removal is not necessary). This will allow the 2 parts of the clamp to separate slightly and allow easier placement of the pole into the clamp.
4) Insert the non-tapered end of the chrome pole into the T-bar Clamp (R). The pole should slip completely into the T-bar Clamp (R) approximately seven eights of an inch deep (7/8”).
5) While confirming that the pole is completely inserted, the 2 clamping screws (S) can be tightened securely. Tightening both screws evenly (by observing the gap between the parts) will provide the most secure attachment.
6) Place the wheeled base on the floor.
7) It is advised that two people carefully lift the Millennium machine and secured pole and insert the tapered end of the chrome pole (T) into the base.
8) Connect the green high pressure oxygen hose (supplied) to the Oxygen Supply Fitting (F1) located behind the flow meter.
9) Locate the absorber canister knob (H) and unscrew, lifting the absorber top (J) up and allowing removal of the absorber canister.
10) Remove the absorber canister (K) and fill up to the line indicated on the canister label with a quality brand of CO2 absorbant. Tap several times on the side of the canister after filling to help settle the material, and to allow as much excess powder to fall from the bottom of the canister into a trash receptacle. This will help avoid accumulation of powder in the absorber bottom (L) .
11) Verify that the upper and lower absorber O-rings are in place and free of any build up of CO2 absorbant material or powder. Replace absorber canister (K) making sure it is straight and correctly seated and tighten the canister knob (H) until snug.
Millennium (Generation I) T-bar clamp Millennium (Generation II) T-bar clamp
8
Eagle Eye Anesthesia 800-760-6976 eagleeyeanesthesia.com
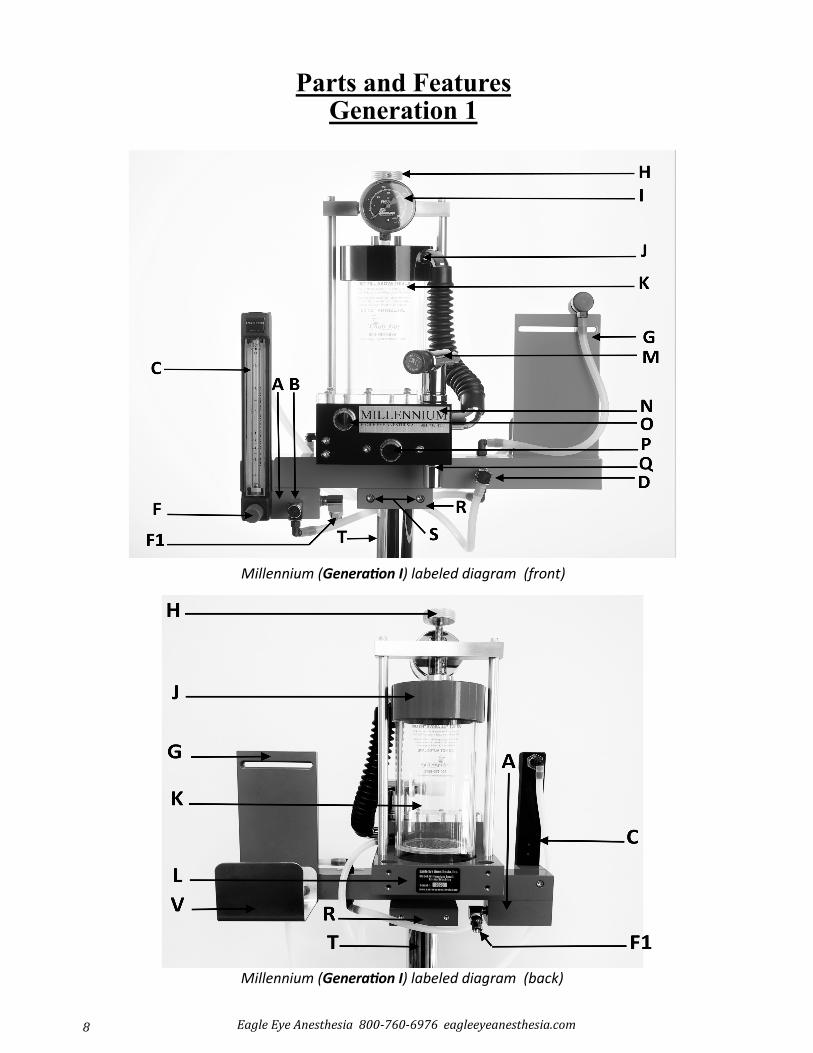
Parts and Features Generation 1
Millennium (Generation I) labeled diagram (front)
Millennium (Generation I) labeled diagram (back)

9
Eagle Eye Anesthesia 800-760-6976 eagleeyeanesthesia.com
Parts and Features Generation 2
Millennium (Generation II) labeled diagram (front)
Millennium (Generation II) labeled diagram (front)
10
Eagle Eye Anesthesia 800-760-6976 eagleeyeanesthesia.com
Refer to Millennium labeled diagrams for component location.
A) Oxygen Flow Plate (Generation 2)- A structural mounting plate on which the flow meter, oxygen
flush valve, common gas outlet and common gas outlet manifold are attached.
A) Oxygen Flow Block (Generation 1)- A structural mounting block onto which the flow meter, oxygen
flush valve and Oxygen Supply Fittings are attached.
B) Oxygen Flush Valve - When pressed, the valve will provide oxygen directly to the breathing system
(bypassing the vaporizer). The valve has been modified to provide a lower or higher rate of delivery
dependent on the amount of pressure applied to the valve button.
C) Flowmeter - Regulates the volume of oxygen going into the anesthesia machine. Flowmeter markings
indicate flow rate in liters per minute (0-4 LPM) and is measured at the center of the ball. The needle
valve controls the flow of oxygen through the flow meter. Turning the needle valve knob
counterclockwise opens the valve and increases the flow. Turning the needle valve clockwise closes the
valve and decreases the flow. NOTE: The needle valve incorporates a stopping mechanism to prevent
over tightening which may damage the valve. Damage caused by over tightening is NOT covered by
warranty. TIGHTEN ONLY UNTIL BALL HITS BOTTOM AND STOPS MOVING.
D) Common Gas Outlet (CGO) - The CGO is an outlet which combines the oxygen and anesthetic from
the flowmeter and vaporizer (and also oxygen from the flush valve when depressed). This combination
of gas can then be routed to either the absorber / rebreathing system or the non-rebreathing circuit. It
is comprised of two fittings: one female mini quick connect and one male mini quick connect. There are
three functions to the common gas outlet:
Allows a secure connection from the Millennium to a non-rebreathing circuit. (Note: Two extra mini
male quick connects are provided to be used on your pre-existing non-rebreathing circuits that you
may want to use with the Millennium.)
Allows a secure connection from the Millennium to the absorber in order to utilize the full
rebreathing system.
Allows the oxygen flush to be used on either the non-rebreathing circuit or the rebreathing system.
Component Identification

11
Eagle Eye Anesthesia 800-760-6976 eagleeyeanesthesia.com
E) Common Gas Outlet Manifold (back) (Generation 2 only) - This block mounts to the back of the Oxygen
Flow plate and routes the gas from the vaporizer along with the oxygen from the flush valve through to
the common gas outlet.
F) Needle Valve Assembly— The needle valve assembly precisely controls the oxygen flow as part of the
flow meter. Turning the needle valve knob counterclockwise opens the valve and increases the flow.
Turning the needle valve clockwise decreases the flow and closes the valve . The needle valve incorporates
a stopping mechanism at the closed position to prevent overtightening. Overtightening can damage the
needle valve. Damage caused by over tightening is NOT covered by warranty. It is recommended to: CLOSE
THE VALVE ONLY UNTIL BALL HITS THE BOTTOM AND STOPS MOVING.
F1) Oxygen Supply Fitting (Generation 2) (Back) - The oxygen supply hose connects to the fitting behind
the flow meter. This connection uses a DISS fitting (Diameter Indexed Safety System). This system prevents
any other gas fitting other than oxygen to be connected.
F1) Oxygen Supply Fitting (Generation 1) - The oxygen supply hose connects to the fitting on the side of
the Oxygen Flow Block. This connection uses a DISS fitting (Diameter Indexed Safety System). This system
prevents any other gas fitting other than oxygen to be connected.
G) Vaporizer Bracket - The vaporizer bracket is pre-drilled to mount most precision vaporizers to the
Millennium machine securely.
H) Absorber Canister Knob - Knob located on the top of the machine. When turned counterclockwise, it
will lift the canister top allowing removal of absorber canister for filling. Turning clockwise lowers the
canister top and provides equal pressure and sealing of canister O-rings. Tighten until snug.
I) Manometer (Pressure Gauge) - Indicates the current operating pressure within the breathing system.
The Manometer has a range of 0 - 60 cmH2O (0- 45 mmHg).
J) Absorber Top - The top of the absorber assembly has a self centering bevel providing even pressure
distribution when tightened and a recessed groove to retain the upper absorber O-ring.
K) Absorber Canister and O-rings - Container used for holding CO2 absorbent. Absorbent material removes
CO2 from the expired gases before they are recycled back to the patient. Upper and lower O-rings assure a
positive leak-free seal provided they are kept free of residual absorbent material and powder.
Component Identification (Continued)
12
Eagle Eye Anesthesia 800-760-6976 eagleeyeanesthesia.com
Component Identification (Continued)
L) Absorber Bottom (Back) - The bottom of the absorber assembly has a recess for the lower absorber
O-ring as well as two syringe holders which double as mounting points for various accessories.
M) Pressure Relief (Pop-off / Scavenging) Valve - The pressure relief valve controls the pressure within
the breathing system. It is also the exit point for the exhausted gasses that will flow to the scavenging
system. The pressure relief valve manually adjusts the breathing system pressure to the desired level for
particular patient/procedure requirements. Turning the knob in a counterclockwise direction opens the
valve and decreases the pressure in the rebreathing system, while turning in a clockwise direction closes
the valve and increases the pressure in the rebreathing system. A fully opened valve will maintain
approximately 1-4 cmH2O pressure within the breathing system.
N) Check Valve Assembly - This assembly houses the Inhalation and exhalation check valves (one-way
valves), provides mounting for the breathing circuit nozzles, bag bushing and pressure relief (pop-off /
scavenging) valve. Inhalation Valve - One way valve which controls the direction of the fresh gas mixture,
recycled gases, and pure oxygen (flush valve) from the absorber to the patient. Exhalation Valve - One
way valve which controls the direction of expired gases from the patient to the absorber.
O) Inhalation Nozzle - Attachment point for re-breathing circuit.
P) Exhalation Nozzle - Attachment point for re-breathing circuit.
Q) Bag Bushing - The bag bushing is the attachment point for the breathing / reservoir bag. It is located
beneath the check valve block and made of stainless steel.
R) T-bar Clamp - A solid aluminum clamp on the bottom of the Millennium which secures the machine to
the mounting pole by tightening the T-bar Clamping screws.
S) T-bar Clamping Screws - Two (2) screws located on the front face of the clamp which provide a secure
means of fastening the Millennium to the mounting pole.
T) Chrome Pole - 1-3/4 inch diameter chromed steel pole which is attached to the wheeled base and
mounts the Millennium machine.
U) Check Valve Cover - Clear acrylic cover over check valves to allow visual inspection/observation.
Laser engraved to indicate the “Inhale” and “Exhale” nozzle locations.
V) Hose Holder - Stainless steel U-shaped bracket designed to hold coiled oxygen hose or breathing
circuits.

13
Eagle Eye Anesthesia 800-760-6976 eagleeyeanesthesia.com
Functional Tests
Checking for leaks
It is recommended that before each use, a pressure test or "leak check" is performed on the machine to confirm that the machine is leak free and also ensure that the waste gases have a patent way through your evacuation system. 1) Confirm that your oxygen supply is connected and turned on.
2) Confirm that a breathing circuit and breathing bag are securely in place.
3) Close the Pressure Relief (Pop-off / Scavenging) Valve.
4) Occlude the end of the breathing circuit with your palm or thumb.
5) Turn on the oxygen flow meter until the bag fills and the manometer reads 30cmH2O.
6) Once the manometer indicates 30 cmH2O, turn off the flow meter.
7) If the pressure remains constant with the flow meter turned off, your machine, breathing circuit and bag can be considered leak-free.
8) Open the Pressure Relief (Pop-off / Scavenging) Valve to its usual setting.
9) Gently squeeze the bag (while still covering the end of the breathing circuit) to ensure there is a patent exhaust route from the machine to your scavenging system.
10) The machine, breathing circuit and breathing bag are now ready for use.
11) If the manometer pressure drops, either the machine, the breathing circuit or breathing bag has a leak.
12) Determine the amount of leakage by slowly turning the flow meter back on and pressurizing the system back up to 30cm H2O as indicated on the manometer.
13) Once the manometer indicates 30cmH2O, slowly turn down the flow meter just enough to maintain a constant reading of 30cmH2O. The flow rate needed to maintain a constant reading is the amount of the leak.
14) If the manometer indicates increasing pressure with the flow meter turned off, see: Functional Tests / Checking the Oxygen Flush ; Checking the Flowmeter and Needle Valve.
14
Eagle Eye Anesthesia 800-760-6976 eagleeyeanesthesia.com
Functional Tests
Checking for leaks (continued)
If there is a leak, check the following. Large leaks may sometimes be detected by feel or listening while in a quiet location. Potential areas for leaks: Absorber canister is not seated correctly within the absorber bottom recess and unable to seal
properly. The absorber canister knob may not be fully tightened. Confirm knob is tightened sufficiently. The breathing circuit and bag. Check the bag and breathing circuit by swapping a different breathing
circuit and/or bag and retesting. Swapping one at a time is recommended. The O-rings at the top and bottom of the absorber canister may have accumulation of absorbent
particles and /or powder. Removing the upper and lower absorber O-rings and wiping with a damp paper towel will remove particles and powder.
The vaporizer inlet and outlet fittings may be loose. Press on completely or make sure they are tight. Glass cleaner spray or soapy water may help detect leaking areas, as a leak will form bubbles when
the machine is under pressure. Spray potential areas (upper / lower absorber O-rings, vaporizer inlet/outlet fittings) and retest machine looking and listening for leaks.
Once the leak has been identified and corrected, retest machine. Open the Pressure Relief (Pop-off / Scavenging) Valve to its usual setting. Gently squeeze the bag (while still covering the end of the breathing circuit) to ensure there is a pa-
tent exhaust route from the machine to your scavenging system. The pressure indicated on the ma-nometer should not exceed 4 cmH2O while gently evacuating the bag.
The machine, breathing circuit and breathing bag are now ready for use.
15
Eagle Eye Anesthesia 800-760-6976 eagleeyeanesthesia.com
Functional Tests
Checking the Inhalation and Exhalation Valves
Observe the movement of inhalation and exhalation valves during patient respirations. As patient inhales, inhalation valve should lift while exhalation valve stays closed (seated). As patient exhales, exhalation valve should lift while inhalation valve stays closed (seated). At rest, (patient not actively breathing) both valves should be closed.
Checking the Pressure Relief (Pop-off / Scavenging) Valve
With oxygen supply turned on (50 PSI recommended operating pressure), rotate needle valve counter-clockwise to confirm smooth movement of the indicator ball within the flow tube as well as through the full range of the flow meter. When turned clockwise to the stopping point, valve should close completely and ball should rest at bottom of the flow tube. If flow is not completely shut off, the ball may hover above the bottom of the flow tube or move slightly while resting. Needle valve may need adjustment.
Checking the Flowmeter and Needle Valve
Perform a pressure test on the machine to determine that there are no leaks present, and there is a patent exhaust route to the scavenging system. Once completed, you can now test the function of the Pressure Relief (Pop-off / Scavenging) Valve .
1) Confirm that a breathing circuit and breathing bag are securely in place.
2) Confirm that the Pressure Relief (Pop-off / Scavenging) Valve is fully open and occlude the end of the breathing circuit with your palm or thumb.
3) Turn on the oxygen flow meter to 4 LPM and observe the manometer for any movement during this test.
4) Once the bag fills, the manometer should increase 1-4 cmH2O from its resting state (usually 0). The valve is designed to maintain 1-4 cmH2O within the rebreathing system and patient when machine is in use.
5) If the pressure rises above 4 cmH2O, remove scavenging hose and retest to determine if valve or scavenging hose is providing increased resistance.
Checking the Oxygen Flush Valve
The oxygen flush valve is designed to remain closed when not in use. Testing involves removing the far end of the flush valve hose from its attachment point, placing the end into a small cup of water, and look for any bubbles coming from the hose. There should be no oxygen / bubbling coming from the hose. Dry the end of the hose well and return to its attachment point.
16
Eagle Eye Anesthesia 800-760-6976 eagleeyeanesthesia.com
Operation
Fill CO2 absorbent canister with CO2 absorbent material, to approximately 3/4" from the top. After filling, hold the canister over a trash receptacle and tap on the side of the canister to allow small particles and powder to be discarded.
Connect the oxygen supply hose (50-55 PSI required) to the oxygen supply attachment DISS fitting.
Connect scavenging hose to either an active or passive scavenging system.
Connect appropriate type and size breathing circuit and bag for patient.
Open Pressure Relief (Pop-off / Scavenging) Valve fully.
Fill vaporizer with appropriate anesthetic.
Adjust oxygen flowmeter to the desired flow rates to meet or exceed the physiologic needs of the patient.
Adjust vaporizer dial to desired percentage of anesthetic agent.
If needed, adjust Pressure Relief (Pop-off / Scavenging) Valve to the desired breathing system operating pressure determined by monitoring the manometer gauge.
During anesthesia, monitor the patient, along with the breathing bag, inhalation and exhalation valves, and pressure manometer gauge. Make necessary corrections in flow rate, vaporizer setting, and pressure relief valve as required, to insure adequate depth of anesthesia.
For guidelines on induction and anesthesia techniques, specific species physiologic requirements, etc. please refer to any of the many veterinary anesthesia textbooks currently available.
17
Eagle Eye Anesthesia 800-760-6976 eagleeyeanesthesia.com
Precautions
Confirm that the oxygen supply exceeds what will be needed for the planned procedures as well as potential unforeseen emergency situations.
Confirm that the oxygen supply is turned on.
Confirm that the vaporizer has been filled with anesthetic.
Insure that CO2 absorbent material in canister is changed frequently. Follow directions as stated on the absorbent package, or as a general rule, change CO2 absorbent every 8 hours of anesthetic use. Do NOT rely on color change as the determining factor as to when to replace CO2 absorbent material.
CO2 absorbent material should be change at least monthly, more often if the machine is used for more than 8 hours.
Occasionally used machines (machines that are used less than 8 hours in a month) should have the CO2 absorbent changed monthly or keep machine empty and fill CO2 absorbent prior to use.
Perform a leak check prior to each anesthetic procedure.
Never invert or tilt the vaporizer while it contains anesthetic liquid.
Set the oxygen flow rate on the flowmeter so that the breathing bag never fully collapses during a patient inspiration.
18
Eagle Eye Anesthesia 800-760-6976 eagleeyeanesthesia.com
The following routine maintenance procedures should be followed to insure long lasting and trouble-free service from your Millennium Anesthesia Machine.
Perform a pressure test prior to each procedure. Perform functional tests periodically to insure proper operation. Change CO2 absorbent every 8 hours of use. Replace entire contents of absorber canister at each
change. Do not rely on color change of absorbent to determine when to change. Prevent the buildup of absorber particles and powder by cleaning the absorber bottom with a vacu-
um, removing the upper and lower absorber O-rings and wiping down with a damp cloth or paper towel each time you change the CO2 absorbent.
Inspect machine, connections, rubber / silicone parts for signs of looseness, damage or wear. Remove breathing circuit and breathing bag at the end of the day. Damp dust the exterior of the machine or clean with a soft cloth. If deep cleaning is needed, only use water with liquid soap, dilute mixture of chlorhexidine, or glass
cleaner. Other cleaning agents or harsh chemicals can damage the finish and will void the warranty. Do not allow cleaning agents to infiltrate into sensitive areas (Vaporizer, Oxygen Flush Valve, Flow
Meter). When needed, disinfect with a dilute mixture of chlorhexidine solution (1 tablespoon per 0.5 gallon of
water). Avoid contact with corrosive liquids such as saline solutions and other IV fluids which are detrimental
to metal components. These fluids can cause severe corrosion and can render components inoperable and will void the warranty.
Turn off gas supply at the end of the day.
Maintenance
19
Eagle Eye Anesthesia 800-760-6976 eagleeyeanesthesia.com
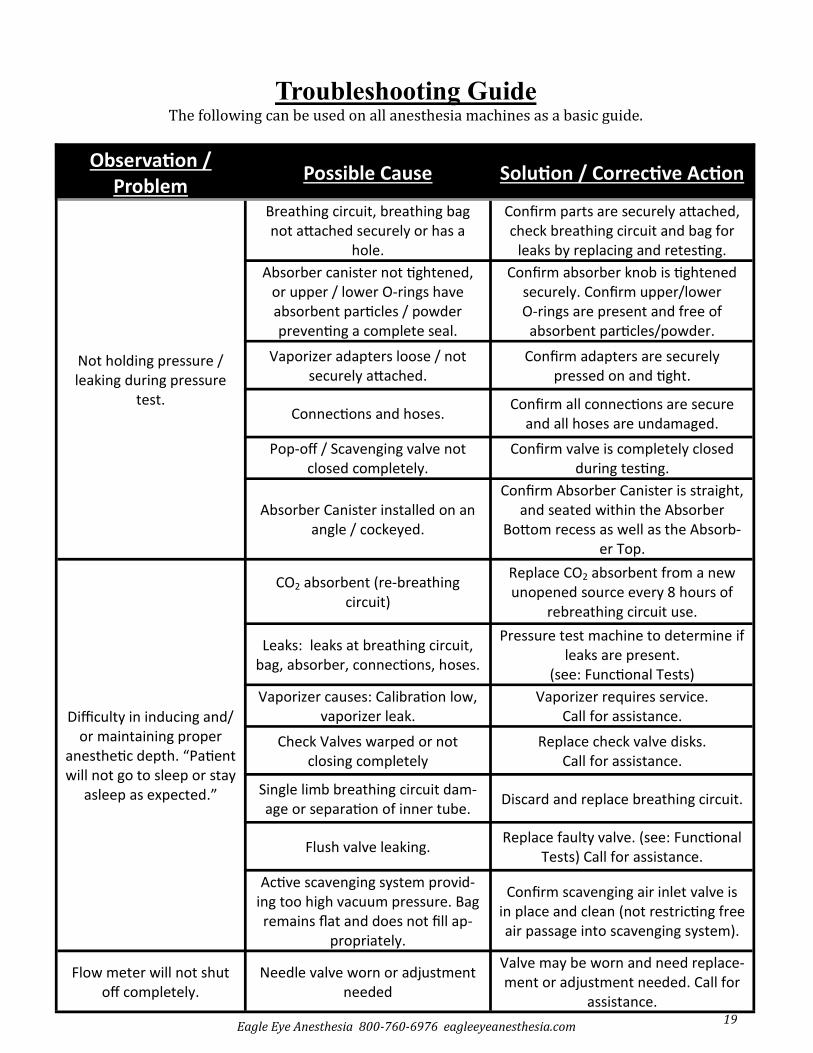
Observation / Problem
Possible Cause Solution / Corrective Action
Not holding pressure / leaking during pressure
test.
Breathing circuit, breathing bag not attached securely or has a
hole.
Confirm parts are securely attached, check breathing circuit and bag for
leaks by replacing and retesting.
Absorber canister not tightened, or upper / lower O-rings have absorbent particles / powder preventing a complete seal.
Confirm absorber knob is tightened securely. Confirm upper/lower O-rings are present and free of
absorbent particles/powder.
Vaporizer adapters loose / not securely attached.
Confirm adapters are securely pressed on and tight.
Connections and hoses. Confirm all connections are secure
and all hoses are undamaged.
Pop-off / Scavenging valve not closed completely.
Confirm valve is completely closed during testing.
Absorber Canister installed on an angle / cockeyed.
Confirm Absorber Canister is straight, and seated within the Absorber
Bottom recess as well as the Absorb-er Top.
Difficulty in inducing and/or maintaining proper
anesthetic depth. “Patient will not go to sleep or stay
asleep as expected.”
CO2 absorbent (re-breathing circuit)
Replace CO2 absorbent from a new unopened source every 8 hours of
rebreathing circuit use.
Leaks: leaks at breathing circuit, bag, absorber, connections, hoses.
Pressure test machine to determine if leaks are present.
(see: Functional Tests)
Vaporizer causes: Calibration low, vaporizer leak.
Vaporizer requires service. Call for assistance.
Check Valves warped or not closing completely
Replace check valve disks. Call for assistance.
Single limb breathing circuit dam-age or separation of inner tube.
Discard and replace breathing circuit.
Flush valve leaking. Replace faulty valve. (see: Functional
Tests) Call for assistance.
Active scavenging system provid-ing too high vacuum pressure. Bag remains flat and does not fill ap-
propriately.
Confirm scavenging air inlet valve is in place and clean (not restricting free air passage into scavenging system).
Flow meter will not shut off completely.
Needle valve worn or adjustment needed
Valve may be worn and need replace-ment or adjustment needed. Call for
assistance.
Troubleshooting Guide The following can be used on all anesthesia machines as a basic guide.

20
Eagle Eye Anesthesia 800-760-6976 eagleeyeanesthesia.com
Observation / Problem
Possible Cause Solution / Corrective Action
Oxygen flush valve will not shut off completely.
Faulty valve. Replace Faulty valve.
Call for assistance.
Moisture / condensation observed in breathing
circuit, exhalation check valve and / or absorber
canister.
Moisture comes from the patent’s exhale and condenses on the
internal surfaces of the machine. Larger patients (or multiple patients in a row) and lower
ambient room temperature are factors which can increase
condensation. The larger the patient and the
cooler the ambient temperature, the more condensation will
develop.
Removing the breathing circuits and breathing bag from the machine at the conclusion of surgery will allow
the machine to air out and evaporate the condensation over night. Severe
cases may be caused by a pool of moisture retained in the check valve that should be manually dried. Once dried and nightly removal of compo-nents are employed, the accumula-tion of condensation should lessen.
Troubleshooting Guide (Continued)

21
Eagle Eye Anesthesia 800-760-6976 eagleeyeanesthesia.com
Product Warranty
This warranty is given in place of all other warranties, expressed or implied, of merchantability, fitness for a particular purpose or otherwise. No statement or claim about the product by any employee, agent, representative or dealer of Eagle Eye Anesthesia, Inc. (“Eagle Eye”) shall constitute a warranty by Eagle Eye Anesthesia, Inc. or give rise to any liability or obligation of Eagle Eye Anesthesia, Inc. Millennium Warranty Eagle Eye warrants to the original purchaser of new Millennium anesthesia machine(s) those products and components manufactured by Eagle Eye (except for components listed in “Items of Exclusion” noted below), to be free from defects in workmanship and materials under normal interior use and service, and with recommended maintenance and upkeep, for a period of ten (10) years measured from the date of delivery to the original user. For purchasers whose business lies within an area where Eagle Eye offers annual on-site maintenance service, this warranty may be extended one year at a time up to fifteen (15) years from the delivery date if the original purchaser employs Eagle Eye to perform annual on-site maintenance service on said anesthesia machine(s) prior to the end of the 11th, 12th, 13th, 14th and 15th years of ownership as measured from the date of delivery. Annual maintenance must be performed consecutively in years eleven (11) through fifteen (15) for warranty to be extended. In the event that customer does not employ Eagle Eye to provide annual maintenance of purchased equipment in any of the years eleven (11) through fifteen (15), measured from the date of purchase, this warranty will expire at the end of the last year that Eagle Eye performed annual maintenance on said equipment. Eagle Eye’s obligation under this warranty is, at its discretion, limited to the repair or one-time replacement of defective parts or products which are reported to Eagle Eye by the customer within the valid warranty period and are determined to be defective upon examination by Eagle Eye. Charges to ship defective merchandise to Eagle Eye Anesthesia, Inc. are not reimbursable nor will be credited. Charges to ship replacement parts for those determined to be defective will be paid for by Eagle Eye Anesthesia, Inc. Items of Exclusion: The following parts and components are further limited to a one time replacement during the warranty period: needle valve assembly, needle valve knob, flow meter cover. Any accessory item manufactured by Eagle Eye that is delivered with the original purchase and delivery of a new Millennium anesthesia machine and attaches to the ma-chine is warranted for one (1) year from the date of delivery to the original purchaser, excluding items not manufac-tured by Eagle Eye, breathing circuits, scavenge equipment or any item deemed to be disposable. Eagle Eye shall not be liable for any damage, injury or loss arising out of the use of the product, whether as a result of a defect in the product or otherwise. Eagle Eye shall not be liable for nor does the warranty cover product that is defective or damaged as a result of (1) misuse, abuse, negligence, misapplication or freight damage; (2) product repaired, altered or modified by persons outside the employment of Eagle Eye; (3) or product not installed or employed in strict compliance with applicable codes and ordinances. This warranty shall be void for any product on which the serial number has been altered, defaced or removed. Under no circumstances shall Eagle Eye Anesthesia, Inc. be liable for incidental or consequential damages as those terms are defined in the uniform commercial code.
22
Eagle Eye Anesthesia 800-760-6976 eagleeyeanesthesia.com
Notes

23
Eagle Eye Anesthesia 800-760-6976 eagleeyeanesthesia.com
Notes

24
Eagle Eye Anesthesia 800-760-6976 eagleeyeanesthesia.com


![ANGOL 4.1.ppt [Kompatibilitási mód] - kisallatsebeszet.hu · Anesthesia of risk patients inin small animal practice small animal practice ANESTHESIA ANESTHESIA 4.1 4.1 20122012](https://static.fdocuments.us/doc/165x107/5e768eb5d90f8f60f057345b/angol-41ppt-kompatibilitsi-md-anesthesia-of-risk-patients-inin-small-animal.jpg)