Migrating vSphere Workloads! - WordPress.com · Please refer to VMware@SoftLayer CookBook: Basic...
40
A VMware@SoftLayer CookBook v0.1c Mar4, 2014 Migrating vSphere Workloads Summary This document is part of a series of VMware@SoftLayer CookBooks. They are intended to enable vSphere administrators with key information to deploy VMware vSphere environments within SoftLayer. VMware@SoftLayer refers to capabilities of SoftLayer to provide VMware vSphere infrastructures in a Hybrid Cloud fashion. This document assumes a vSphere implementation has been deployed in a SoftLayer DataCenter and will present scenarios to allow a vSphere administrator the ability to migrate Workloads (VMs) into VMware@SoftLayer. Please refer to VMware@SoftLayer CookBook: Basic vSphere Architecture for more information on deploying VMware vSphere at SoftLayer Note: This document is intended for experienced vSphere Administrators. Some topics covered will consider that the reader has basic deployment skills to Install and Administer VMware vSphere ESX, vCenter 4.x & 5.x, as well as VMware Migration Tools (OVFTOOL, vCC, SRM, etc..) Note: This document is NOT intended to provide enablement on basic Operating System Tasks within VM Guest Operating Systems. Note: This Document will focus on Architecture and components to Migrate VMs and VM Templates into SoftLayer. It will not cover Metro vMotion, nor will it cover Advanced Network Design concepts to recover Guest Network Services. For More information on those topics refer to VMware on SoftLayer CookBook: BCDR (Coming Q1 2014). Author(s) & Contributor(s) (IBM) Merlin Glynn, [email protected] Robert Kellenberger Shane B. Mcelligott Daniel de Araujo (VMware) Coby Litvinsky Dave Rollins Geoff Wing Page of 1 40
Transcript of Migrating vSphere Workloads! - WordPress.com · Please refer to VMware@SoftLayer CookBook: Basic...
A VMware@SoftLayer CookBook!v0.1c Mar4, 2014!!Migrating vSphere Workloads!!Summary!!This document is part of a series of VMware@SoftLayer CookBooks. They are intended to enable vSphere administrators with key information to deploy VMware vSphere environments within SoftLayer. VMware@SoftLayer refers to capabilities of SoftLayer to provide VMware vSphere infrastructures in a Hybrid Cloud fashion. This document assumes a vSphere implementation has been deployed in a SoftLayer DataCenter and will present scenarios to allow a vSphere administrator the ability to migrate Workloads (VMs) into VMware@SoftLayer. Please refer to VMware@SoftLayer CookBook: Basic vSphere Architecture for more information on deploying VMware vSphere at SoftLayer!!Note: This document is intended for experienced vSphere Administrators. Some topics covered will consider that the reader has basic deployment skills to Install and Administer VMware vSphere ESX, vCenter 4.x & 5.x, as well as VMware Migration Tools (OVFTOOL, vCC, SRM, etc..)!!Note: This document is NOT intended to provide enablement on basic Operating System Tasks within VM Guest Operating Systems.!!Note: This Document will focus on Architecture and components to Migrate VMs and VM Templates into SoftLayer. It will not cover Metro vMotion, nor will it cover Advanced Network Design concepts to recover Guest Network Services. For More information on those topics refer to VMware on SoftLayer CookBook: BCDR (Coming Q1 2014).!!!!Author(s) & Contributor(s)!!(IBM) !Merlin Glynn, [email protected]!Robert Kellenberger!Shane B. Mcelligott!Daniel de Araujo!!!(VMware)!Coby Litvinsky!Dave Rollins!Geoff Wing!!
Page � of �1 40
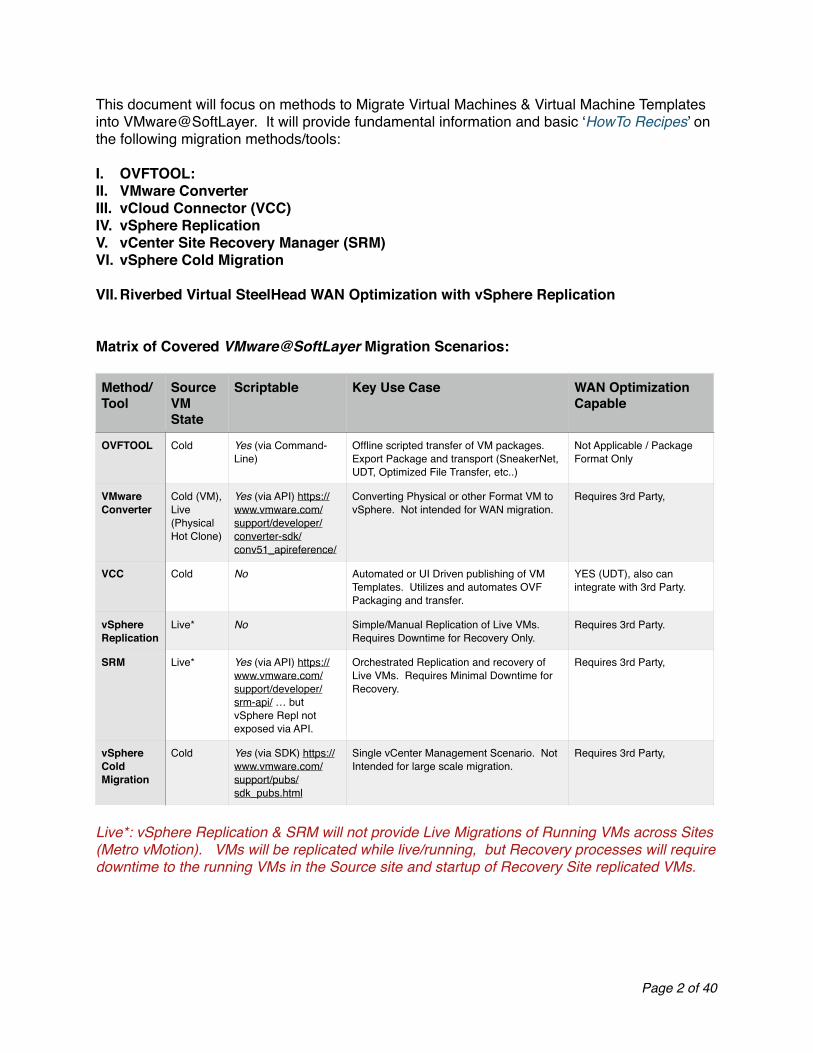
This document will focus on methods to Migrate Virtual Machines & Virtual Machine Templates into VMware@SoftLayer. It will provide fundamental information and basic ‘HowTo Recipes’ on the following migration methods/tools:!!I. OVFTOOL: !II. VMware Converter!III. vCloud Connector (VCC)!IV. vSphere Replication!V. vCenter Site Recovery Manager (SRM)!VI. vSphere Cold Migration!!VII.Riverbed Virtual SteelHead WAN Optimization with vSphere Replication!!!Matrix of Covered VMware@SoftLayer Migration Scenarios:!!
!Live*: vSphere Replication & SRM will not provide Live Migrations of Running VMs across Sites (Metro vMotion). VMs will be replicated while live/running, but Recovery processes will require downtime to the running VMs in the Source site and startup of Recovery Site replicated VMs.
Method/Tool
Source VM State
Scriptable Key Use Case WAN Optimization Capable
OVFTOOL Cold Yes (via Command-Line)
Offline scripted transfer of VM packages. Export Package and transport (SneakerNet, UDT, Optimized File Transfer, etc..)
Not Applicable / Package Format Only
VMware Converter
Cold (VM), Live (Physical Hot Clone)
Yes (via API) https://www.vmware.com/support/developer/converter-sdk/conv51_apireference/
Converting Physical or other Format VM to vSphere. Not intended for WAN migration.
Requires 3rd Party,
VCC Cold No Automated or UI Driven publishing of VM Templates. Utilizes and automates OVF Packaging and transfer.
YES (UDT), also can integrate with 3rd Party.
vSphere Replication
Live* No Simple/Manual Replication of Live VMs. Requires Downtime for Recovery Only.
Requires 3rd Party.
SRM Live* Yes (via API) https://www.vmware.com/support/developer/srm-api/ … but vSphere Repl not exposed via API.
Orchestrated Replication and recovery of Live VMs. Requires Minimal Downtime for Recovery.
Requires 3rd Party,
vSphere Cold Migration
Cold Yes (via SDK) https://www.vmware.com/support/pubs/sdk_pubs.html
Single vCenter Management Scenario. Not Intended for large scale migration.
Requires 3rd Party,
Page � of �2 40
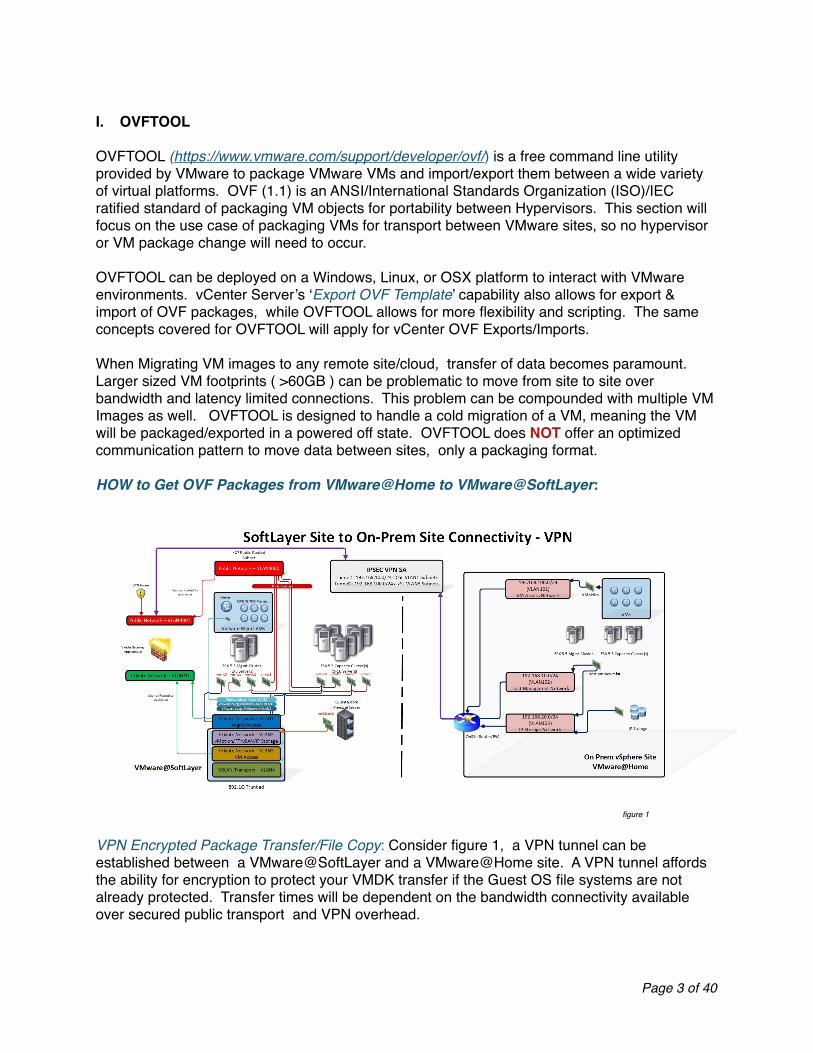
!I. OVFTOOL!!OVFTOOL (https://www.vmware.com/support/developer/ovf/) is a free command line utility provided by VMware to package VMware VMs and import/export them between a wide variety of virtual platforms. OVF (1.1) is an ANSI/International Standards Organization (ISO)/IEC ratified standard of packaging VM objects for portability between Hypervisors. This section will focus on the use case of packaging VMs for transport between VMware sites, so no hypervisor or VM package change will need to occur.!!OVFTOOL can be deployed on a Windows, Linux, or OSX platform to interact with VMware environments. vCenter Server’s ‘Export OVF Template’ capability also allows for export & import of OVF packages, while OVFTOOL allows for more flexibility and scripting. The same concepts covered for OVFTOOL will apply for vCenter OVF Exports/Imports.!!When Migrating VM images to any remote site/cloud, transfer of data becomes paramount. Larger sized VM footprints ( >60GB ) can be problematic to move from site to site over bandwidth and latency limited connections. This problem can be compounded with multiple VM Images as well. OVFTOOL is designed to handle a cold migration of a VM, meaning the VM will be packaged/exported in a powered off state. OVFTOOL does NOT offer an optimized communication pattern to move data between sites, only a packaging format.!!HOW to Get OVF Packages from VMware@Home to VMware@SoftLayer:!!
! ! ! ! ! ! ! ! ! ! ! figure 1!!VPN Encrypted Package Transfer/File Copy: Consider figure 1, a VPN tunnel can be established between a VMware@SoftLayer and a VMware@Home site. A VPN tunnel affords the ability for encryption to protect your VMDK transfer if the Guest OS file systems are not already protected. Transfer times will be dependent on the bandwidth connectivity available over secured public transport and VPN overhead.!!!
Page � of �3 40
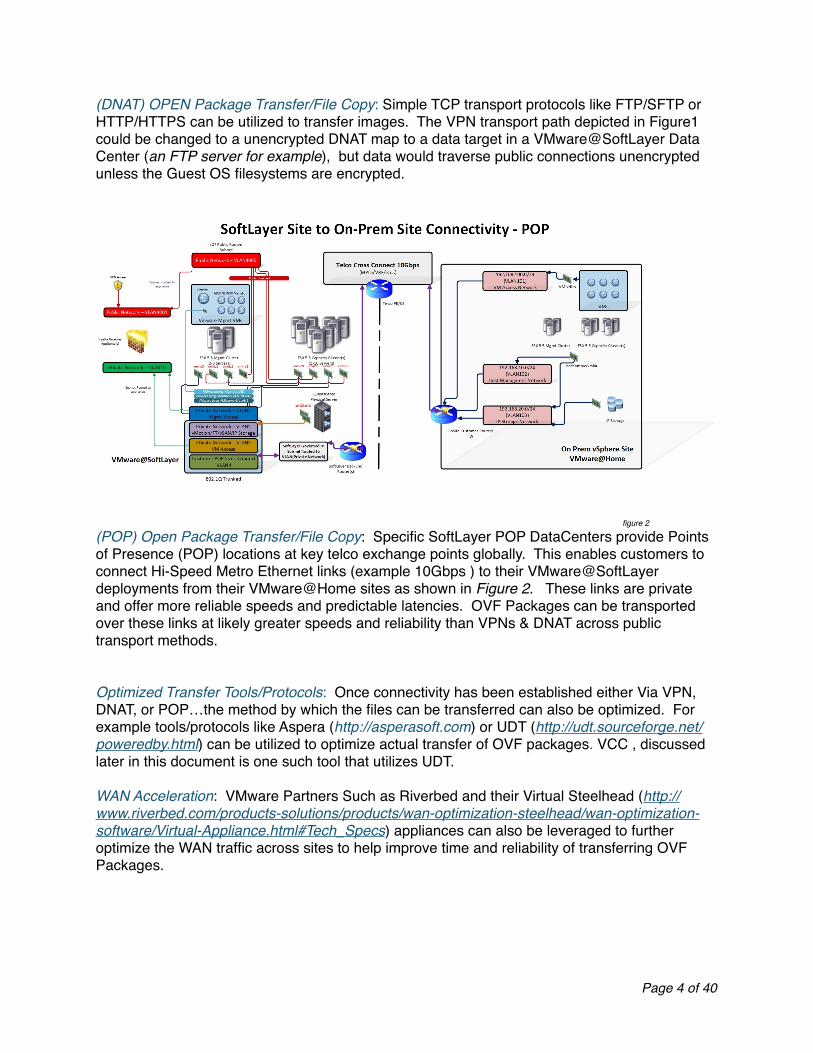
(DNAT) OPEN Package Transfer/File Copy: Simple TCP transport protocols like FTP/SFTP or HTTP/HTTPS can be utilized to transfer images. The VPN transport path depicted in Figure1 could be changed to a unencrypted DNAT map to a data target in a VMware@SoftLayer Data Center (an FTP server for example), but data would traverse public connections unencrypted unless the Guest OS filesystems are encrypted. !
!! ! ! ! ! ! ! ! ! ! ! figure 2!
(POP) Open Package Transfer/File Copy: Specific SoftLayer POP DataCenters provide Points of Presence (POP) locations at key telco exchange points globally. This enables customers to connect Hi-Speed Metro Ethernet links (example 10Gbps ) to their VMware@SoftLayer deployments from their VMware@Home sites as shown in Figure 2. These links are private and offer more reliable speeds and predictable latencies. OVF Packages can be transported over these links at likely greater speeds and reliability than VPNs & DNAT across public transport methods. !!!Optimized Transfer Tools/Protocols: Once connectivity has been established either Via VPN, DNAT, or POP…the method by which the files can be transferred can also be optimized. For example tools/protocols like Aspera (http://asperasoft.com) or UDT (http://udt.sourceforge.net/poweredby.html) can be utilized to optimize actual transfer of OVF packages. VCC , discussed later in this document is one such tool that utilizes UDT.!!WAN Acceleration: VMware Partners Such as Riverbed and their Virtual Steelhead (http://www.riverbed.com/products-solutions/products/wan-optimization-steelhead/wan-optimization-software/Virtual-Appliance.html#Tech_Specs) appliances can also be leveraged to further optimize the WAN traffic across sites to help improve time and reliability of transferring OVF Packages.!!!
Page � of �4 40

OVFTOOL Command Line Examples:!!Export a Powered on VM from vCenter to File System Target OVA File:!!ovftool —powerOffSource vi://[username]:[passwd]@[vcenter-on-prem-ip-or-fqdn]/[DataCenterName]/vm/[VM Folder]/[vm name] myexport.ova !!Import an File System OVA File to a Target vCenter:!!ovftool —datastore=[target datastore] —network=[Target PortGroup] —vmFolder=[target vm folder] myimport.ova vi://[username]:[passwd]@[vcenter-on-prem-ip-or-fqdn]/[DataCenterName]/host/[ClusterName]/[Host] !Note: An OVA is a TAR package of the various files included in a OVF Package, exported/imported as a single file.!!Note: “” (Double Quotes) may need to be utilized when passing variables with spaces in most shells.!!OVFTOOL also supports import/export directly between vCenter, ESX Hosts, vCloud Director, and various other VMware products. For more information on its capabilities please reference https://www.vmware.com/support/developer/ovf/ovf350/ovftool-350-userguide.pdf.!!
Page � of �5 40
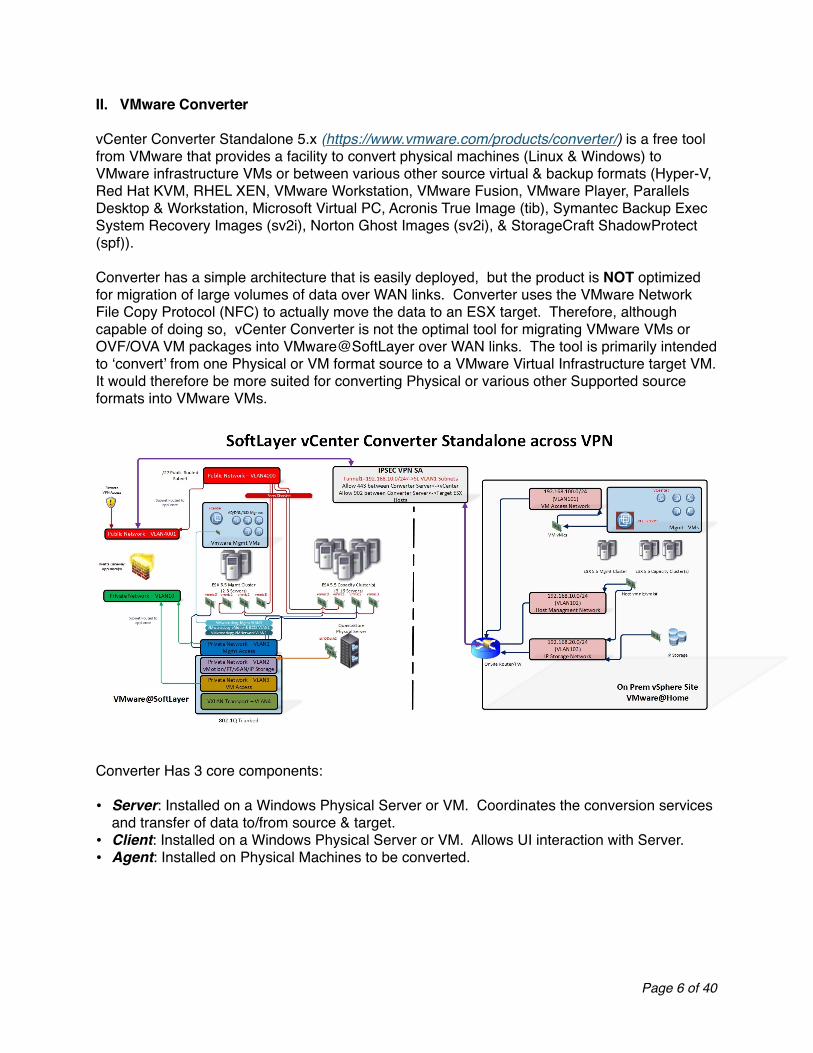
II. VMware Converter!!vCenter Converter Standalone 5.x (https://www.vmware.com/products/converter/) is a free tool from VMware that provides a facility to convert physical machines (Linux & Windows) to VMware infrastructure VMs or between various other source virtual & backup formats (Hyper-V, Red Hat KVM, RHEL XEN, VMware Workstation, VMware Fusion, VMware Player, Parallels Desktop & Workstation, Microsoft Virtual PC, Acronis True Image (tib), Symantec Backup Exec System Recovery Images (sv2i), Norton Ghost Images (sv2i), & StorageCraft ShadowProtect (spf)).!!Converter has a simple architecture that is easily deployed, but the product is NOT optimized for migration of large volumes of data over WAN links. Converter uses the VMware Network File Copy Protocol (NFC) to actually move the data to an ESX target. Therefore, although capable of doing so, vCenter Converter is not the optimal tool for migrating VMware VMs or OVF/OVA VM packages into VMware@SoftLayer over WAN links. The tool is primarily intended to ‘convert’ from one Physical or VM format source to a VMware Virtual Infrastructure target VM. It would therefore be more suited for converting Physical or various other Supported source formats into VMware VMs.!
!Converter Has 3 core components:!!• Server: Installed on a Windows Physical Server or VM. Coordinates the conversion services
and transfer of data to/from source & target.!• Client: Installed on a Windows Physical Server or VM. Allows UI interaction with Server.!• Agent: Installed on Physical Machines to be converted. !!!
Page � of �6 40
Converter VMware@SoftLayer Recipe:!!Converter, if so desired, can be leveraged to migrate a VM or VM template from VMware@Home to VMware@SoftLayer, but the transfer will not be optimized in any way unless 3rd Party WAN acceleration components are deployed. To accomplish this:!!1. Deploy vCenter Converter Standalone 5.5: Download the Converter exe install package,
install it on to a Windows Instance at VMware@Home. Install both the Client & Server components on the same Windows instance. https://www.vmware.com/pdf/convsa_55_guide.pdf && https://www.vmware.com/products/converter/!
2. Create VPN Tunnel: to allow the vCenter Converter Server at VMware@Home to communicate with the vCenter instance and Target ESX Hosts at VMware@Softlayer. This Step can also be accomplished by DNAT & Firewall rules for the vCenter Instance or a Customer dedicated POP Cross Connect. A VPN tunnel will be utilized here for added security and lower cost as well as simplicity. Refer to Section III vCloud Connector, Step 4 of this document for more details on How to setup a simple IPSEC VPN with Vyatta Gateway Appliances.!!
You must allow the following communication paths with VPN or POP access:!
!!
Communication Source
Communication Target TCP/UDP Port Usage
Converter Server VMware@Home vCenter TCP 443 Authentication & Inventory Collection
Converter Server VMware@Home Hosts TCP 902 Data Transfer
Converter Server VMware@SoftLayer vCenter TCP 443 Authentication & Inventory Collection
Converter Server VMware@SoftLayer Hosts TCP 902 Data Transfer
Converter Client VMware@Home Converter Server
TCP 443 (Can be Changed @ Install)
Client Interaction
Page � of �7 40
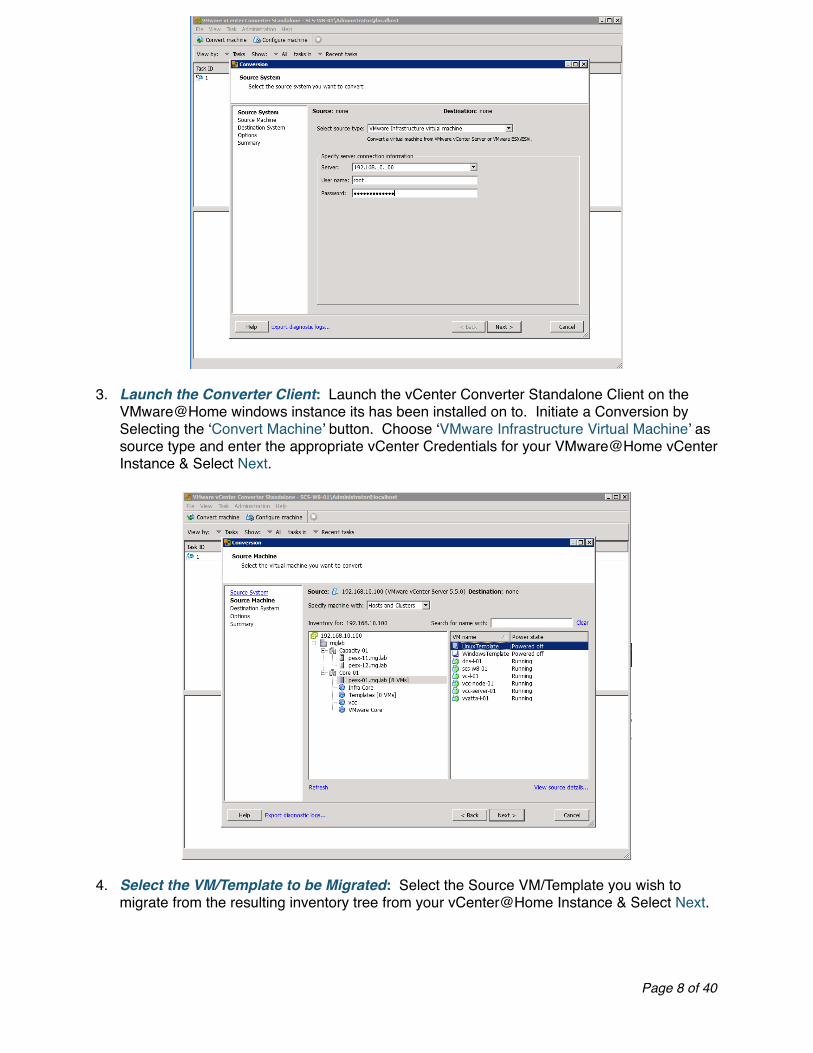
3. Launch the Converter Client: Launch the vCenter Converter Standalone Client on the VMware@Home windows instance its has been installed on to. Initiate a Conversion by Selecting the ‘Convert Machine’ button. Choose ‘VMware Infrastructure Virtual Machine’ as source type and enter the appropriate vCenter Credentials for your VMware@Home vCenter Instance & Select Next.!
4. Select the VM/Template to be Migrated: Select the Source VM/Template you wish to migrate from the resulting inventory tree from your vCenter@Home Instance & Select Next.
Page � of �8 40
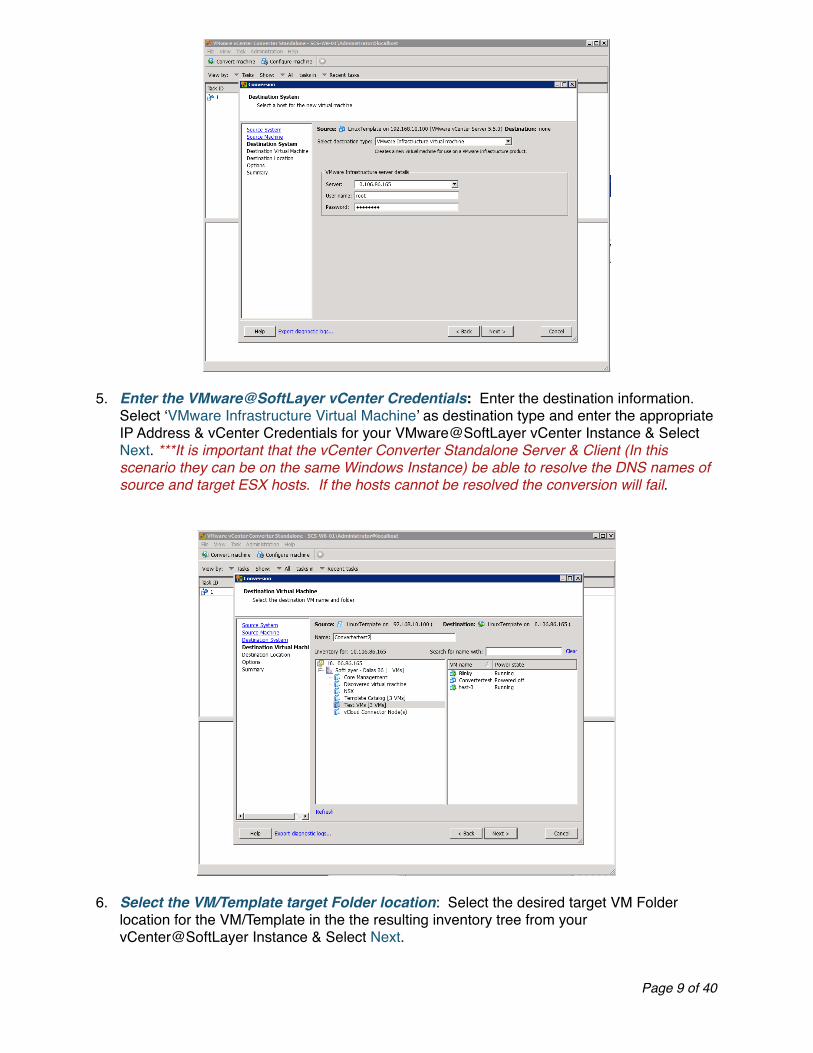
5. Enter the VMware@SoftLayer vCenter Credentials: Enter the destination information. Select ‘VMware Infrastructure Virtual Machine’ as destination type and enter the appropriate IP Address & vCenter Credentials for your VMware@SoftLayer vCenter Instance & Select Next. ***It is important that the vCenter Converter Standalone Server & Client (In this scenario they can be on the same Windows Instance) be able to resolve the DNS names of source and target ESX hosts. If the hosts cannot be resolved the conversion will fail.!
!
6. Select the VM/Template target Folder location: Select the desired target VM Folder location for the VM/Template in the the resulting inventory tree from your vCenter@SoftLayer Instance & Select Next.!
Page � of �9 40
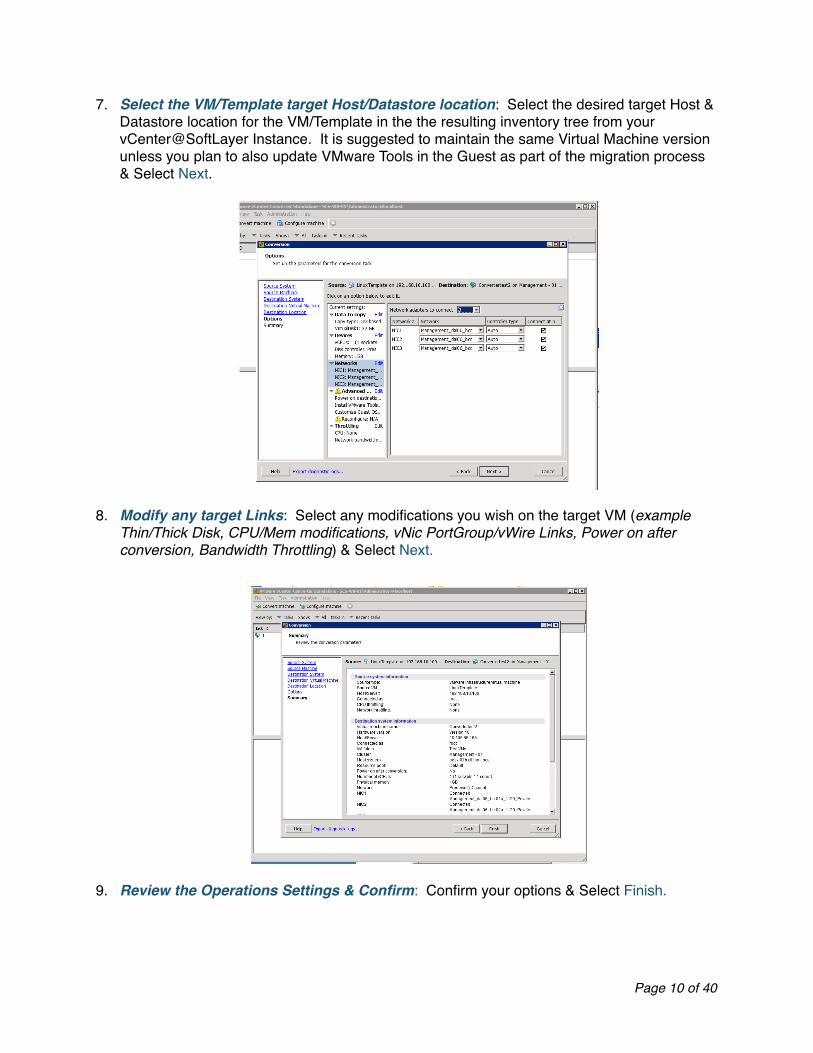
7. Select the VM/Template target Host/Datastore location: Select the desired target Host & Datastore location for the VM/Template in the the resulting inventory tree from your vCenter@SoftLayer Instance. It is suggested to maintain the same Virtual Machine version unless you plan to also update VMware Tools in the Guest as part of the migration process & Select Next.!
8. Modify any target Links: Select any modifications you wish on the target VM (example Thin/Thick Disk, CPU/Mem modifications, vNic PortGroup/vWire Links, Power on after conversion, Bandwidth Throttling) & Select Next.!
9. Review the Operations Settings & Confirm: Confirm your options & Select Finish.
Page � of �10 40
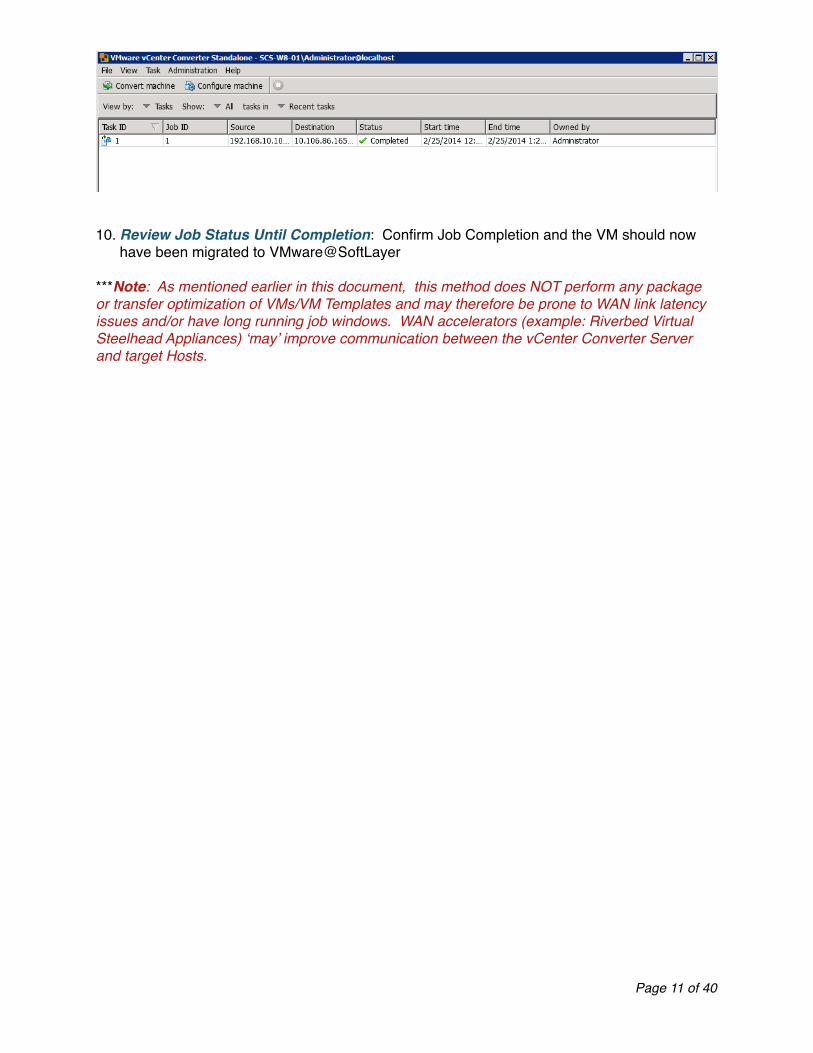
!10. Review Job Status Until Completion: Confirm Job Completion and the VM should now
have been migrated to VMware@SoftLayer!!***Note: As mentioned earlier in this document, this method does NOT perform any package or transfer optimization of VMs/VM Templates and may therefore be prone to WAN link latency issues and/or have long running job windows. WAN accelerators (example: Riverbed Virtual Steelhead Appliances) ‘may’ improve communication between the vCenter Converter Server and target Hosts.!!!
Page � of �11 40
III. vCC (vCloud Connector)!! http://www.vmware.com/products/vcloud-connector/ &&! http://pubs.vmware.com/hybridcloud-26/index.jsp is a free tool provided by VMware that provides vSphere administrators with a single console to manage migration of VMs and VM templates between Private and Public Clouds (vSphere & vCloud Director Based). This tool was previously available in two editions, Basic and Advanced, with a cost associated with the Advanced edition. In the latest release of vCC v2.6, these two editions have been converged as on free product.!!vCC offers ‘Stretch Deploy’ or ‘Datacenter Extension’ of Customer networks via an IPSEC Site to Site Layer 2 VPN capability. This capability requires vCloud Director as well as vCloud Networking & Security.!!Other Features that Make vCloud Connector a Valuable Migration Tool for VMware@SoftLayer:!!• Link VM Migration Services to Multiple Clouds/Sites (Private or Public)!• Publish/Synchronize VM Templates from one master site to many Clouds (SL Sites & Non SL)
at set intervals!• GUI driven Interface integrated with vSphere Traditional C Client.!• HTTPS or UDT encrypted transfer protocols.!• Can be optimized with WAN acceleration/optimization Technologies.!• Copy validation pre-checks to avoid failures in transit or post arrival at target over WAN.!!vCloud Connector can be deployed to link vSphere & vCloud Director deployments between VMware@Home & VMware@SoftLayer as well as with other VMware Powered Clouds (http://vcloudproviders.vmware.com/vcloud_ecosystem). This section will reference a simple vSphere to vSphere deployment to migrate VMs from VMware@Home to VMware@SoftLayer.!
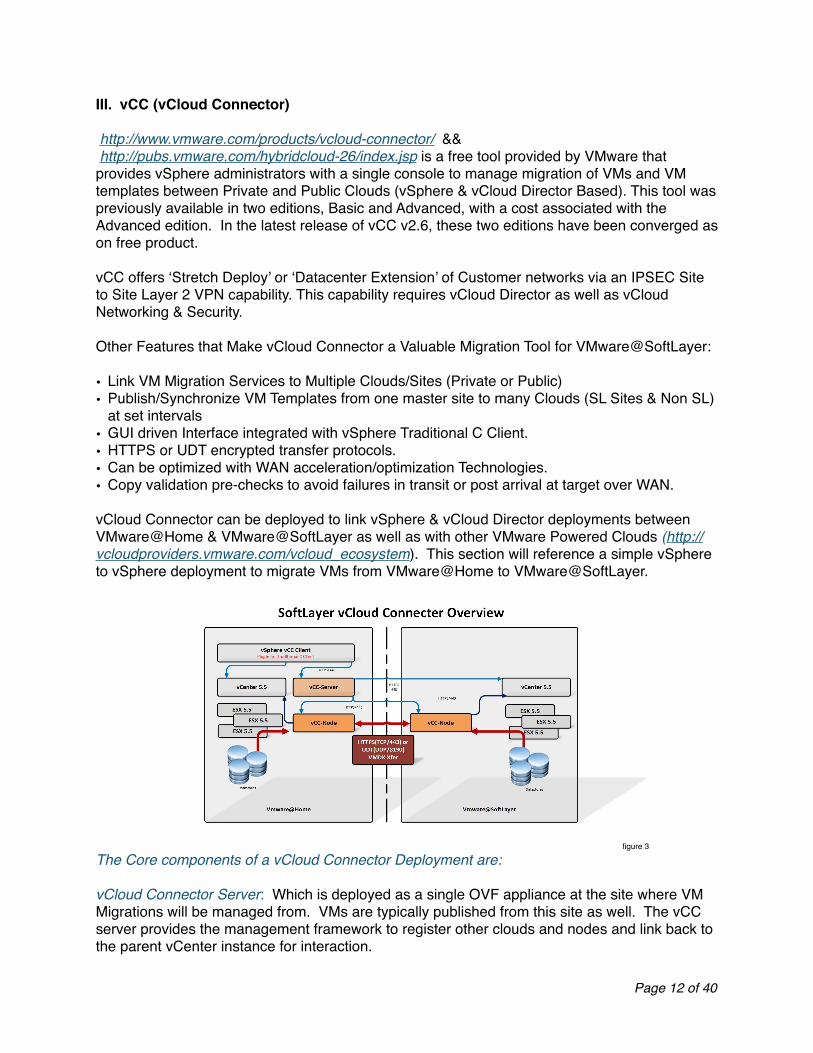
! ! ! ! ! ! ! ! ! ! ! figure 3!
The Core components of a vCloud Connector Deployment are:!!vCloud Connector Server: Which is deployed as a single OVF appliance at the site where VM Migrations will be managed from. VMs are typically published from this site as well. The vCC server provides the management framework to register other clouds and nodes and link back to the parent vCenter instance for interaction.
Page � of �12 40
There are some scenarios where multiple vCC Server nodes (1 per VMware@Home site/vCenter Instance ) may be required. Reference http://pubs.vmware.com/hybridcloud-26/index.jsp#com.vmware.vcc.install.doc_26/GUID-2CC81DDE-DB36-4AFC-9E58-0DC24CA6B5D2.html for more information.!!The vCC Server will require:!!
• TCP 443 access to the Primary vCenter server where the vCC Plugin will be accessed!• TCP 443 access to target vCenter/vCloud Director Instances (Does Traverse NAT)!• TCP 443 access to local and target nodes (Does Traverse NAT)!!
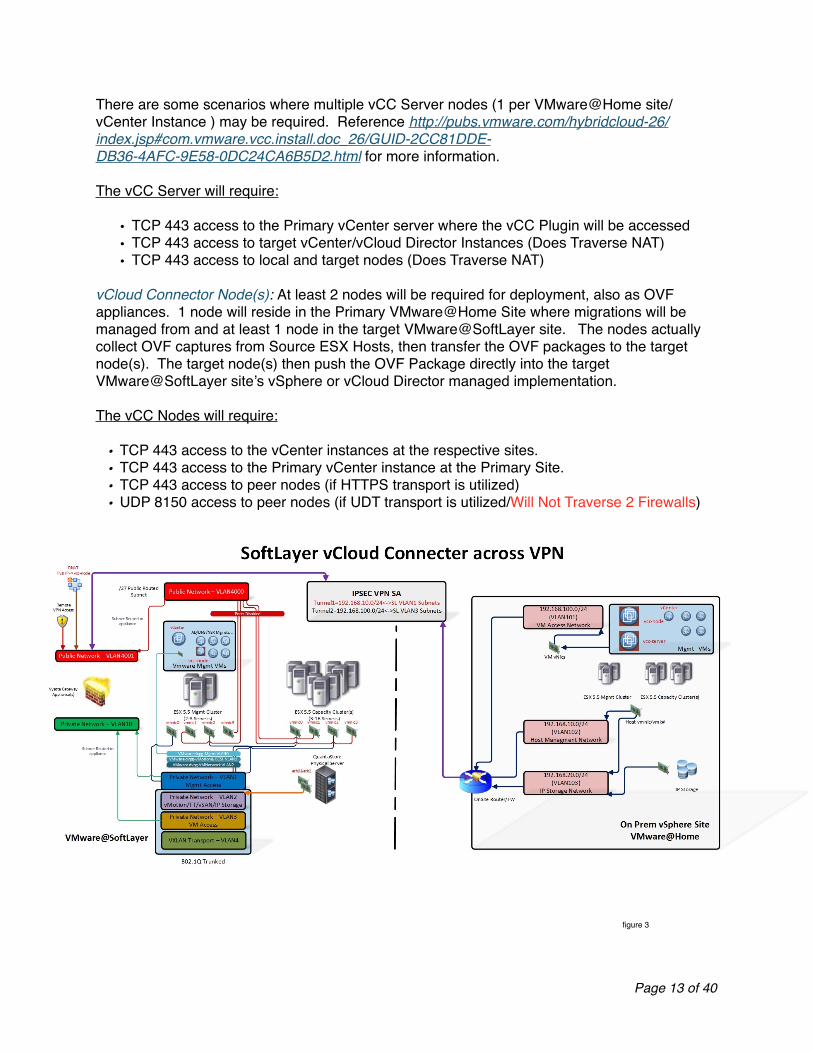
vCloud Connector Node(s): At least 2 nodes will be required for deployment, also as OVF appliances. 1 node will reside in the Primary VMware@Home Site where migrations will be managed from and at least 1 node in the target VMware@SoftLayer site. The nodes actually collect OVF captures from Source ESX Hosts, then transfer the OVF packages to the target node(s). The target node(s) then push the OVF Package directly into the target VMware@SoftLayer site’s vSphere or vCloud Director managed implementation.!!The vCC Nodes will require:!!
• TCP 443 access to the vCenter instances at the respective sites.!• TCP 443 access to the Primary vCenter instance at the Primary Site.!• TCP 443 access to peer nodes (if HTTPS transport is utilized)!• UDP 8150 access to peer nodes (if UDT transport is utilized/Will Not Traverse 2 Firewalls)!
!!! ! ! ! ! ! ! ! ! ! ! figure 3!!
Page � of �13 40
vCloud Connector @ SoftLayer Architecture & Connectivity Requirements:!!A suggested Basic vCloud Connector @ SoftLayer Architecture would include a requirement for the following (Figure 3):!!• Deploy 1 vCC Server Appliance + 1 VCC Node Appliance at VMware@Home!• Deploy 1 vCC Node at VMware@SoftLayer!• Create an IPSEC Tunnel to allow vCC Server at VMware@Home to poll inventory from
vCenter instance at VMware@SoftLayer!• Create DNAT & Firewall Rules to allow VMware@SoftLayer’s vCC Node Instance to
communicate with the peer Node at VMware@Home. Alternatively, the vCC Node traffic can also utilize the VPN, but will always be SSL encrypted as well.!!
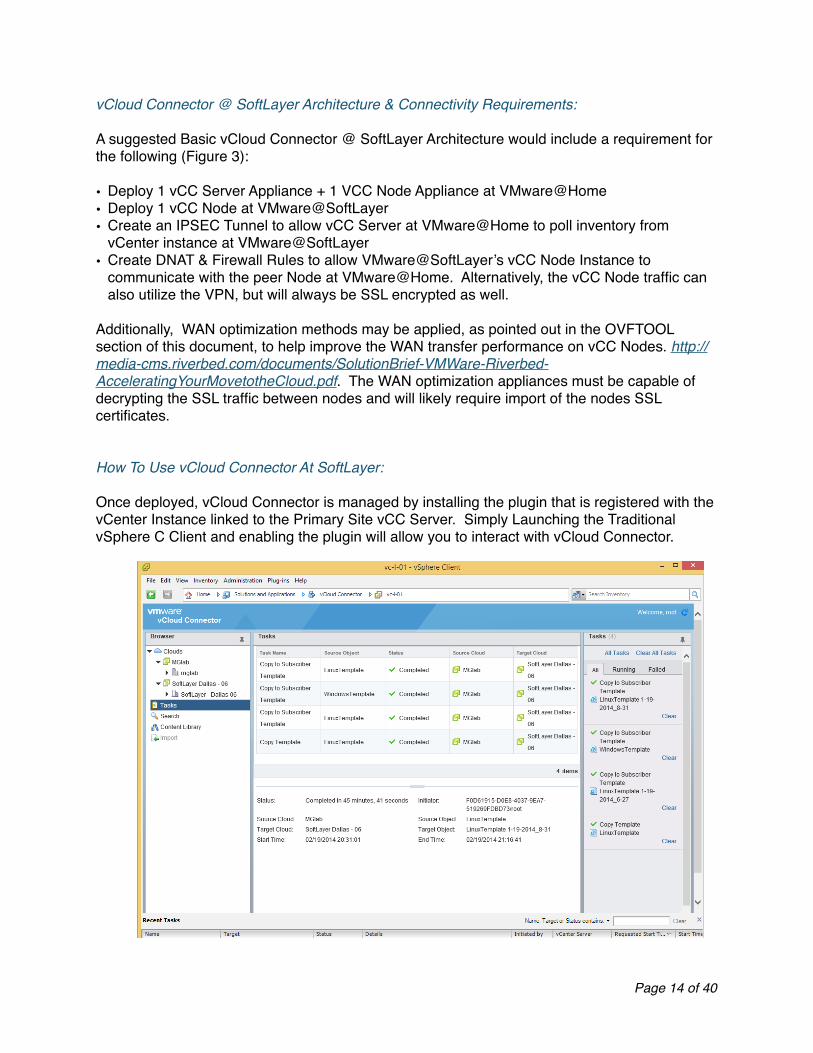
Additionally, WAN optimization methods may be applied, as pointed out in the OVFTOOL section of this document, to help improve the WAN transfer performance on vCC Nodes. http://media-cms.riverbed.com/documents/SolutionBrief-VMWare-Riverbed-AcceleratingYourMovetotheCloud.pdf. The WAN optimization appliances must be capable of decrypting the SSL traffic between nodes and will likely require import of the nodes SSL certificates.!!!How To Use vCloud Connector At SoftLayer:!!Once deployed, vCloud Connector is managed by installing the plugin that is registered with the vCenter Instance linked to the Primary Site vCC Server. Simply Launching the Traditional vSphere C Client and enabling the plugin will allow you to interact with vCloud Connector.!
Page � of �14 40
VCC@SoftLayer Recipe:!!1. Deploy VCC Server OVA at VMware@Home: https://my.vmware.com/web/vmware/details?
downloadGroup=VCC26-GA&productId=351 && http://pubs.vmware.com/hybridcloud-26/index.jsp#com.vmware.vcc.install.doc_26/GUID-6F863D34-4ED6-4E17-8C04-3A7687352DA4.html. Follow Instructions to ‘Install vCloud Connector Server in vSphere’ then Configure. Track the IP address you assign as you will require its Subnet for VPN Tunnel Rules back to VMware@SoftLayer.!
2. Deploy VCC Node OVA at VMware@Home: http://pubs.vmware.com/hybridcloud-26/index.jsp#com.vmware.vcc.install.doc_26/GUID-6F863D34-4ED6-4E17-8C04-3A7687352DA4.html. Follow Instructions to ‘Install vCloud Connector Node in vSphere’ then Configure. Ensure that the vCC Node deployed at VMware@Home can NAT outbound for HTTPS(TCP443) or UDT(UDP8150) Traffic.!
3. Deploy VCC Node OVA at VMware@Softlayer: http://pubs.vmware.com/hybridcloud-26/index.jsp#com.vmware.vcc.install.doc_26/GUID-6F863D34-4ED6-4E17-8C04-3A7687352DA4.html. Follow Instructions to ‘Install vCloud Connector Node in vSphere’ then Configure. Track Private IP Address Assigned for SNAT/DNAT & Firewall Rules.!
4. Create VPN Tunnel: Required to allow the vCC Server at VMware@Home to communicate with the vCenter instance at VMware@Softlayer. This Step can also be accomplished by DNAT & Firewall rules for the vCenter Instance. A VPN tunnel will be utilized here for added security. This step assumes you have a VMware@SoftLayer Site with Vyatta Gateway devices as described in VMware@SoftLayer CookBook: Basic vSphere Architecture.!!
Note: This Recipe will assume a Vyatta Router/Firewall Gateway at both VMware@Home & VMware@SoftLayer. IPSEC Tunnels can be established between Vyatta & various other vendor security devices (example Cisco, Juniper, etc)…http://www.vyatta.org/documentation/tips-tricks!!Vyatta Config Steps for IPSEC Site-to-Site VPN (VMware@Home Side)!!configure set vpn ipsec-interfaces interface [public ethernet or bonding interface] set vpn ipsec ike-group IKE-GROUP1 proposal 1 set vpn ipsec ike-group IKE-GROUP1 proposal 1 encryption aes256 set vpn ipsec ike-group IKE-GROUP1 proposal 1 sha1 set vpn ipsec ike-group IKE-GROUP1 lifetime 86400 set vpn ipsec esp-group ESP-GROUP1 proposal 1 set vpn ipsec esp-group ESP-GROUP1 proposal 1 encryption 3des set vpn ipsec esp-group ESP-GROUP1 proposal 1 hash md5 set vpn ipsec esp-group ESP-GROUP1 compression disable set vpn ipsec esp-group ESP-GROUP1 lifetime 3600 set vpn ipsec esp-group ESP-GROUP1 mode tunnel set vpn ipsec esp-group ESP-GROUP1 pfs enable edit vpn ipsec site-to-site peer [public ip of VMware@Softlayer Vyatta] set authentication mode pre-shared-secret set authentication pre-shared-secret S0ME!#S3Cr3T set ike-group IKE-GROUP1 set default-esp-group ESP-GROUP1 set local-address [public ip of VMware@Home Vyatta] set tunnel 1 local prefix [Subnet of VCC Server at VMware@Home] set tunnel 1 remote prefix [Subnet of vCenter instance at VMware@Softlayer] commit save
Page � of �15 40
!Traffic bound for the IPSEC tunnel must be excluded from any existing SNAT rules…!!set nat source rule # source address [Subnet of VCC Server at VMware@Home] set nat source rule # destination address [Subnet of vCenter instance at VMware@Softlayer] set nat source rule # exclude set nat source rule # outbound-interface [public ethernet or bonding interface] set nat source rule # translation address masquerade commit save !Traffic bound for the IPSEC tunnel must be allowed, this sample config will utilize zone policy and allow all traffic between the Tunnel Subnets and assumes zone(s) PUBLIC & PRIVATE have been linked to public and private interfaces on the Vyatta. Be aware that other rules will likely need to exist to allow other traffic. This sample is intended to demonstrate the concept of allowing traffic thru the firewall with zone Policy.!!set firewall name SL2HOME default-action drop set firewall name SL2HOME rule 10 action accept set firewall name SL2HOME rule 10 protocol all set firewall name SL2HOME rule 10 source [Subnet of VCC Server at VMware@Home] set firewall name SL2HOME rule 10 destination [Subnet of vCenter instance at VMware@Softlayer] set firewall name HOME2SL default-action drop set firewall name HOME2SL rule 10 action accept set firewall name HOME2SL rule 10 protocol all set firewall name HOME2SL rule 10 destination [Subnet of VCC Server at VMware@Home] set firewall name HOME2SL rule 10 source [Subnet of vCenter instance at VMware@Softlayer] commit set zone-policy zone PRIVATE from PUB firewall name SL2HOME set zone-policy zone PUB from PRIVATE firewall name HOME2SL commit save !!Vyatta Config Steps for IPSEC Site-to-Site VPN (VMware@Softlayer Side)!!configure set vpn ipsec-interfaces interface [public ethernet or bonding interface] set vpn ipsec ike-group IKE-GROUP1 proposal 1 set vpn ipsec ike-group IKE-GROUP1 proposal 1 encryption aes256 set vpn ipsec ike-group IKE-GROUP1 proposal 1 sha1 set vpn ipsec ike-group IKE-GROUP1 lifetime 86400 set vpn ipsec esp-group ESP-GROUP1 proposal 1 set vpn ipsec esp-group ESP-GROUP1 proposal 1 encryption 3des set vpn ipsec esp-group ESP-GROUP1 proposal 1 hash md5 set vpn ipsec esp-group ESP-GROUP1 compression disable set vpn ipsec esp-group ESP-GROUP1 lifetime 3600 set vpn ipsec esp-group ESP-GROUP1 mode tunnel set vpn ipsec esp-group ESP-GROUP1 pfs enable
Page � of �16 40
edit vpn ipsec site-to-site peer [public ip of VMware@Home Vyatta] set authentication mode pre-shared-secret set authentication pre-shared-secret S0ME!#S3Cr3T set ike-group IKE-GROUP1 set default-esp-group ESP-GROUP1 set local-address [public ip of VMware@SoftLayer Vyatta] set tunnel 1 remote prefix [Subnet of VCC Server at VMware@Home] set tunnel 1 local prefix [Subnet of vCenter instance at VMware@Softlayer] commit save !Traffic bound for the IPSEC tunnel must be excluded from any existing SNAT rules…!!set nat source rule # destination address [Subnet of VCC Server at VMware@Home] set nat source rule # source address [Subnet of vCenter instance at VMware@Softlayer] set nat source rule # exclude set nat source rule # outbound-interface [public ethernet or bonding interface] set nat source rule # translation address masquerade commit save !Traffic bound for the IPSEC tunnel must be Allowed, this sample config will utilize zone policy and allow all traffic between the Tunnel Subnets and assumes zone(s) PUBLIC & PRIVATE have been linked to public and private interfaces on the Vyatta. Be aware that other rules will likely need to exist to allow other traffic. This sample is intended to demonstrate the concept of allowing traffic thru the firewall with zone Policy.!!set firewall name SL2HOME default-action drop set firewall name SL2HOME rule 10 action accept set firewall name SL2HOME rule 10 protocol all set firewall name SL2HOME rule 10 source [Subnet of VCC Server at VMware@Home] set firewall name SL2HOME rule 10 destination [Subnet of vCenter instance at VMware@Softlayer] set firewall name HOME2SL default-action drop set firewall name HOME2SL rule 10 action accept set firewall name HOME2SL rule 10 protocol all set firewall name HOME2SL rule 10 destination [Subnet of VCC Server at VMware@Home] set firewall name HOME2SL rule 10 source [Subnet of vCenter instance at VMware@Softlayer] commit set zone-policy zone PRIVATE from PUB firewall name HOME2SL set zone-policy zone PUB from PRIVATE firewall name SL2HOME commit save !!
Page � of �17 40
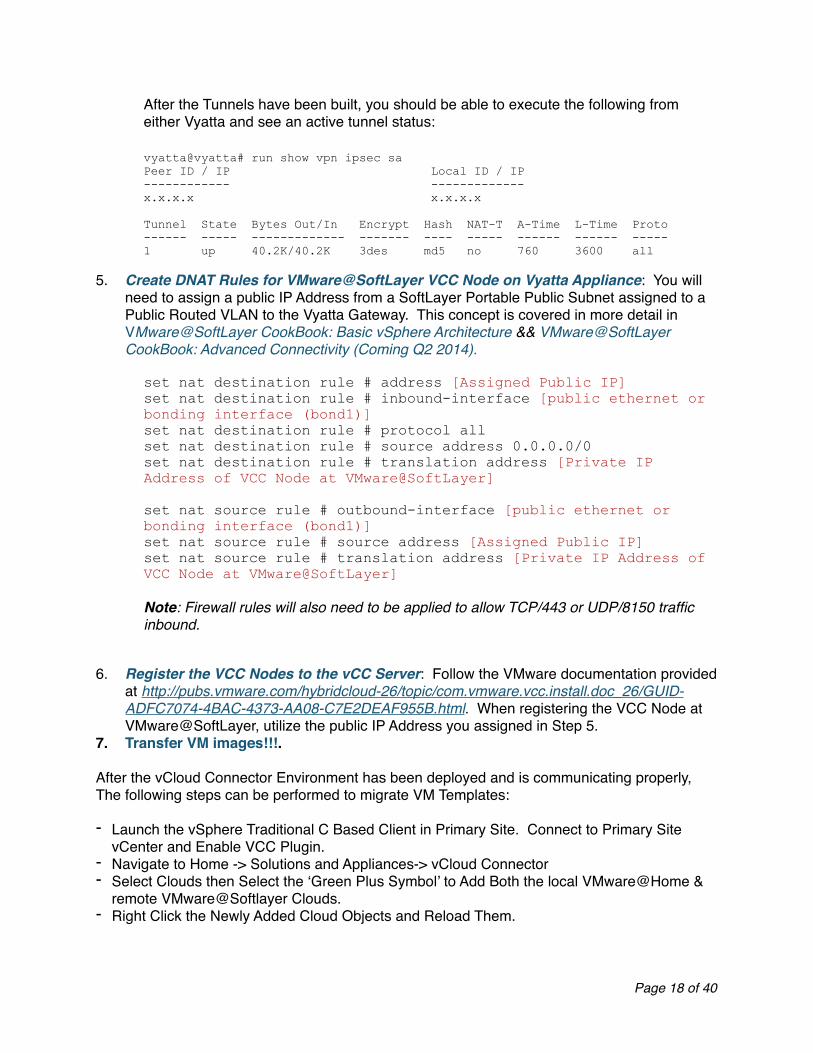
After the Tunnels have been built, you should be able to execute the following from either Vyatta and see an active tunnel status:!!
! vyatta@vyatta# run show vpn ipsec sa Peer ID / IP Local ID / IP ------------ ------------- x.x.x.x x.x.x.x ! Tunnel State Bytes Out/In Encrypt Hash NAT-T A-Time L-Time Proto ------ ----- ------------- ------- ---- ----- ------ ------ ----- 1 up 40.2K/40.2K 3des md5 no 760 3600 all !5. Create DNAT Rules for VMware@SoftLayer VCC Node on Vyatta Appliance: You will
need to assign a public IP Address from a SoftLayer Portable Public Subnet assigned to a Public Routed VLAN to the Vyatta Gateway. This concept is covered in more detail in VMware@SoftLayer CookBook: Basic vSphere Architecture && VMware@SoftLayer CookBook: Advanced Connectivity (Coming Q2 2014).!!
set nat destination rule # address [Assigned Public IP] set nat destination rule # inbound-interface [public ethernet or bonding interface (bond1)] set nat destination rule # protocol all set nat destination rule # source address 0.0.0.0/0 set nat destination rule # translation address [Private IP Address of VCC Node at VMware@SoftLayer] !set nat source rule # outbound-interface [public ethernet or bonding interface (bond1)] set nat source rule # source address [Assigned Public IP] set nat source rule # translation address [Private IP Address of VCC Node at VMware@SoftLayer] !Note: Firewall rules will also need to be applied to allow TCP/443 or UDP/8150 traffic inbound.!! !
6. Register the VCC Nodes to the vCC Server: Follow the VMware documentation provided at http://pubs.vmware.com/hybridcloud-26/topic/com.vmware.vcc.install.doc_26/GUID-ADFC7074-4BAC-4373-AA08-C7E2DEAF955B.html. When registering the VCC Node at VMware@SoftLayer, utilize the public IP Address you assigned in Step 5.!
7. Transfer VM images!!!.!!After the vCloud Connector Environment has been deployed and is communicating properly, The following steps can be performed to migrate VM Templates:!!- Launch the vSphere Traditional C Based Client in Primary Site. Connect to Primary Site
vCenter and Enable VCC Plugin.!- Navigate to Home -> Solutions and Appliances-> vCloud Connector!- Select Clouds then Select the ‘Green Plus Symbol’ to Add Both the local VMware@Home &
remote VMware@Softlayer Clouds.!- Right Click the Newly Added Cloud Objects and Reload Them.!!
Page � of �18 40

You should now be able to select existing VM templates and select the Action Icon to initiate VM Migration processes between the clouds.!!For more information on advanced VCC concepts such as:!!• Utilizing UDT Transfers!• Leveraging Riverbed to Reduce Migration Times!• VM Template Content/Catalog Publishing (Timed Catalog Synchronization)!!!Please Refer to:!!http://pubs.vmware.com/hybridcloud-26/index.jsp &&!http://media-cms.riverbed.com/documents/SolutionBrief-VMWare-Riverbed-AcceleratingYourMovetotheCloud.pdf!!
Page � of �19 40
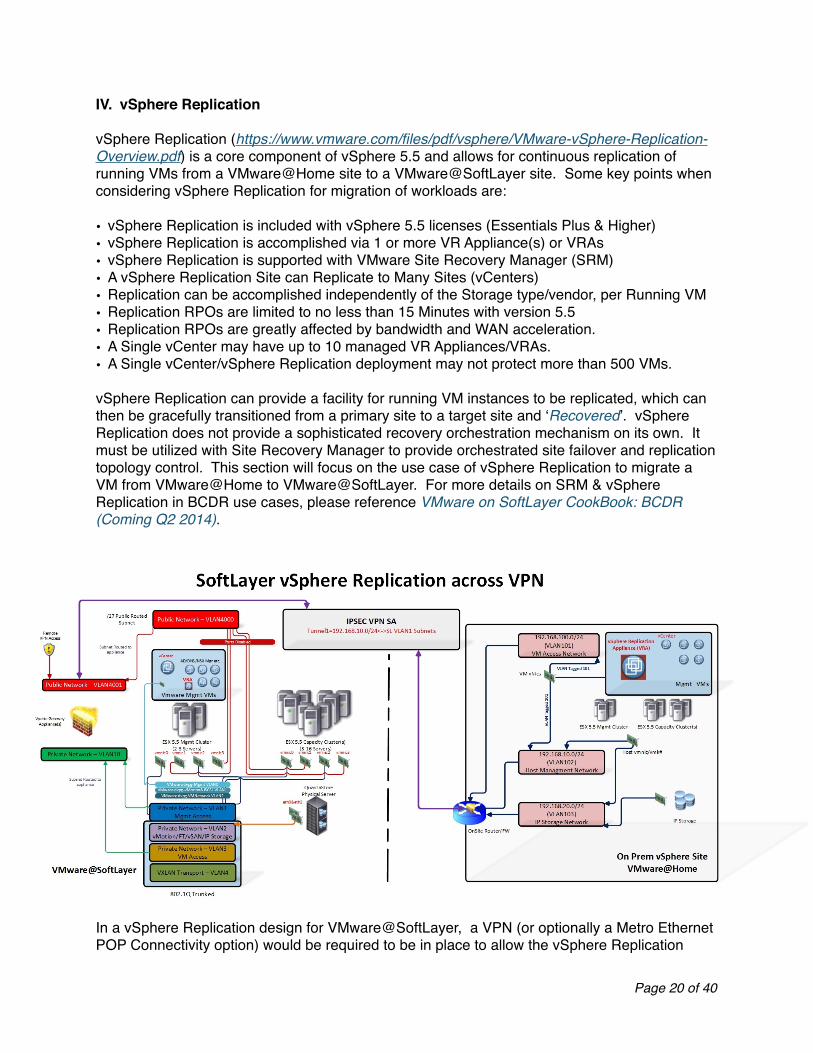
IV. vSphere Replication!!vSphere Replication (https://www.vmware.com/files/pdf/vsphere/VMware-vSphere-Replication-Overview.pdf) is a core component of vSphere 5.5 and allows for continuous replication of running VMs from a VMware@Home site to a VMware@SoftLayer site. Some key points when considering vSphere Replication for migration of workloads are:!!• vSphere Replication is included with vSphere 5.5 licenses (Essentials Plus & Higher)!• vSphere Replication is accomplished via 1 or more VR Appliance(s) or VRAs!• vSphere Replication is supported with VMware Site Recovery Manager (SRM)!• A vSphere Replication Site can Replicate to Many Sites (vCenters) !• Replication can be accomplished independently of the Storage type/vendor, per Running VM!• Replication RPOs are limited to no less than 15 Minutes with version 5.5!• Replication RPOs are greatly affected by bandwidth and WAN acceleration.!• A Single vCenter may have up to 10 managed VR Appliances/VRAs.!• A Single vCenter/vSphere Replication deployment may not protect more than 500 VMs.!!vSphere Replication can provide a facility for running VM instances to be replicated, which can then be gracefully transitioned from a primary site to a target site and ‘Recovered’. vSphere Replication does not provide a sophisticated recovery orchestration mechanism on its own. It must be utilized with Site Recovery Manager to provide orchestrated site failover and replication topology control. This section will focus on the use case of vSphere Replication to migrate a VM from VMware@Home to VMware@SoftLayer. For more details on SRM & vSphere Replication in BCDR use cases, please reference VMware on SoftLayer CookBook: BCDR (Coming Q2 2014).!!
In a vSphere Replication design for VMware@SoftLayer, a VPN (or optionally a Metro Ethernet POP Connectivity option) would be required to be in place to allow the vSphere Replication
Page � of �20 40
components to interact with each other. A detailed listing of these communication paths that would be required to be allowed in the VPN tunnel can be found here:!http://kb.vmware.com/selfservice/microsites/search.do?language=en_US&cmd=displayKC&externalId=1009562 . !!By default, the ongoing replication traffic between Protected VMDKs from their ESX hosts to their target VRA (vSphere Replication Appliance(s)) is NOT optimized. WAN optimization techniques can be utilized to help achieve target RPO’s and reliable migration times with vSphere Replication. WAN Optimization of vSphere Replication with Riverbed Virtual Steelhead appliances is covered in more detail later in this document.!!!!vSphere Replication@SoftLayer Recipe:!!1. Deploy Replication Appliance OVA at VMware@Home: https://my.vmware.com/web/
vmware/details?downloadGroup=VR550_GA&productId=353&rPId=5009. Deploy a single appliance, up to 10 can be deployed and managed by a single vCenter. Utilize the embedded database. After deploy, open the Configuration Page at https://[appliance_IP]:5480 default credentials admin/vmware. Ensure the hostname and TCPIP configuration is accurate.!
2. Deploy Replication Appliance OVA at VMware@Softlayer: https://my.vmware.com/web/vmware/details?downloadGroup=VR550_GA&productId=353&rPId=5009. Deploy a single appliance, up to 10 can be deployed and managed by a single vCenter. Utilize the embedded database. After deploy, open the Configuration Page at https://[appliance_IP]:5480 default credentials admin/vmware. Ensure the hostname and TCPIP configuration is accurate.!
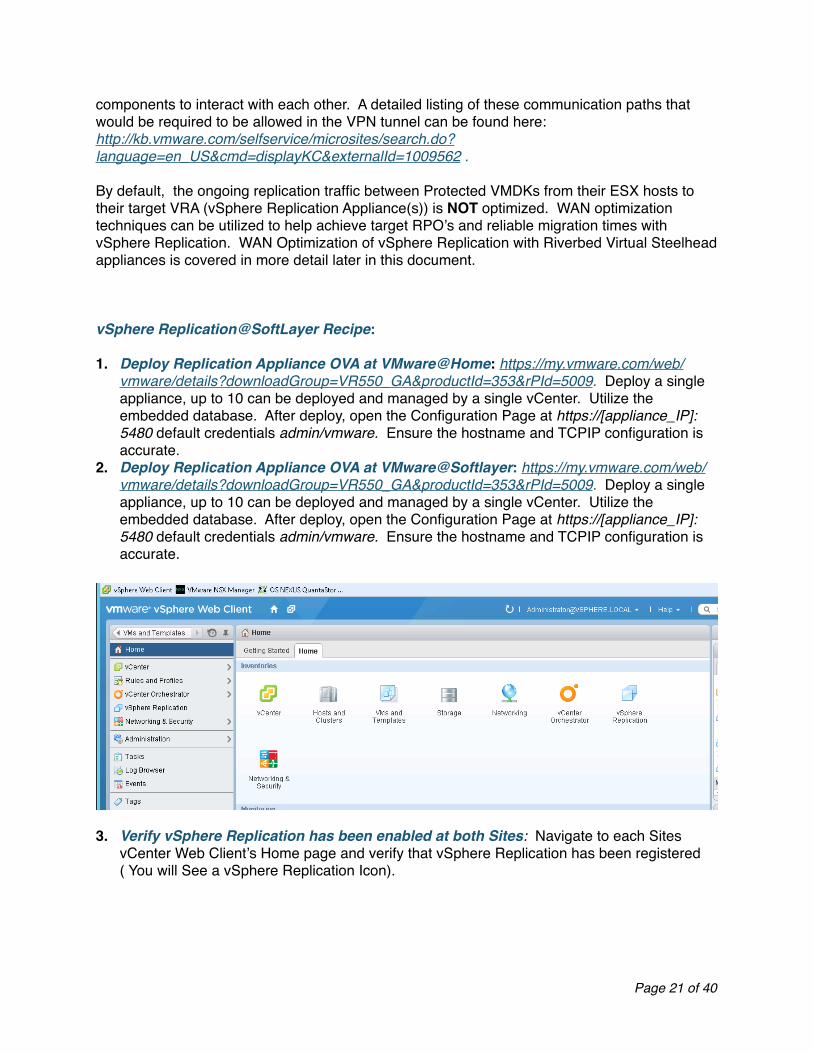
3. Verify vSphere Replication has been enabled at both Sites: Navigate to each Sites vCenter Web Client’s Home page and verify that vSphere Replication has been registered ( You will See a vSphere Replication Icon).
Page � of �21 40
4. Verify the VPN SA is running and allowing the required communication paths: Refer to http://kb.vmware.com/selfservice/microsites/search.do?language=en_US&cmd=displayKC&externalId=1009562 . and verify that the VPN tunnel is up and allowing the required communication paths. For more information on Setting up Site to Site IPSEC VPN tunnels with Vyatta Gateway Appliances see section III vCC (vCloud Connector) of this document.!
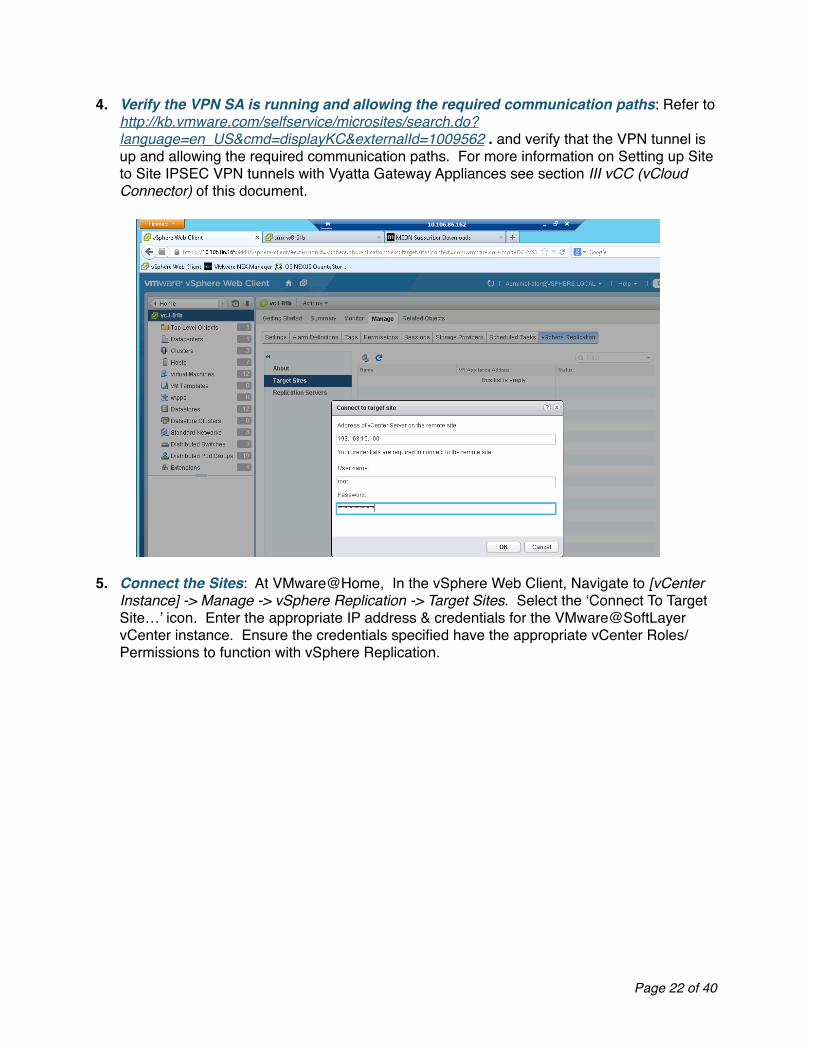
5. Connect the Sites: At VMware@Home, In the vSphere Web Client, Navigate to [vCenter Instance] -> Manage -> vSphere Replication -> Target Sites. Select the ‘Connect To Target Site…’ icon. Enter the appropriate IP address & credentials for the VMware@SoftLayer vCenter instance. Ensure the credentials specified have the appropriate vCenter Roles/Permissions to function with vSphere Replication.
Page � of �22 40
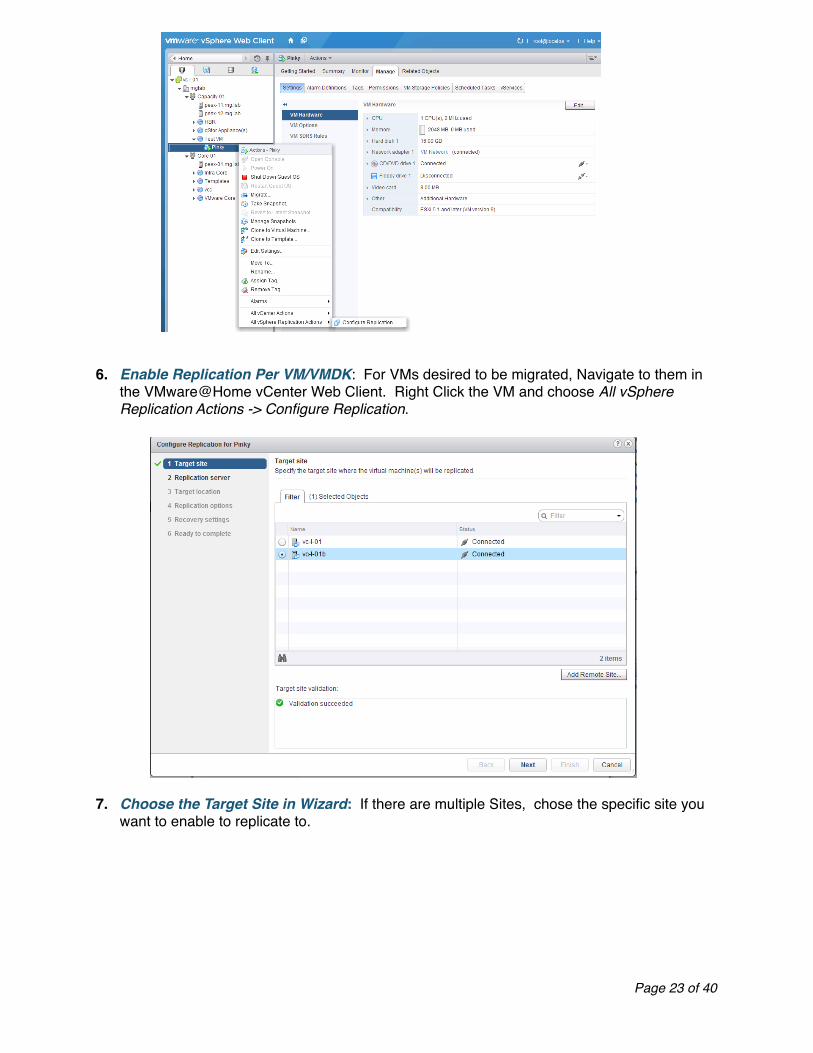
!6. Enable Replication Per VM/VMDK: For VMs desired to be migrated, Navigate to them in
the VMware@Home vCenter Web Client. Right Click the VM and choose All vSphere Replication Actions -> Configure Replication.!
7. Choose the Target Site in Wizard: If there are multiple Sites, chose the specific site you want to enable to replicate to.
Page � of �23 40
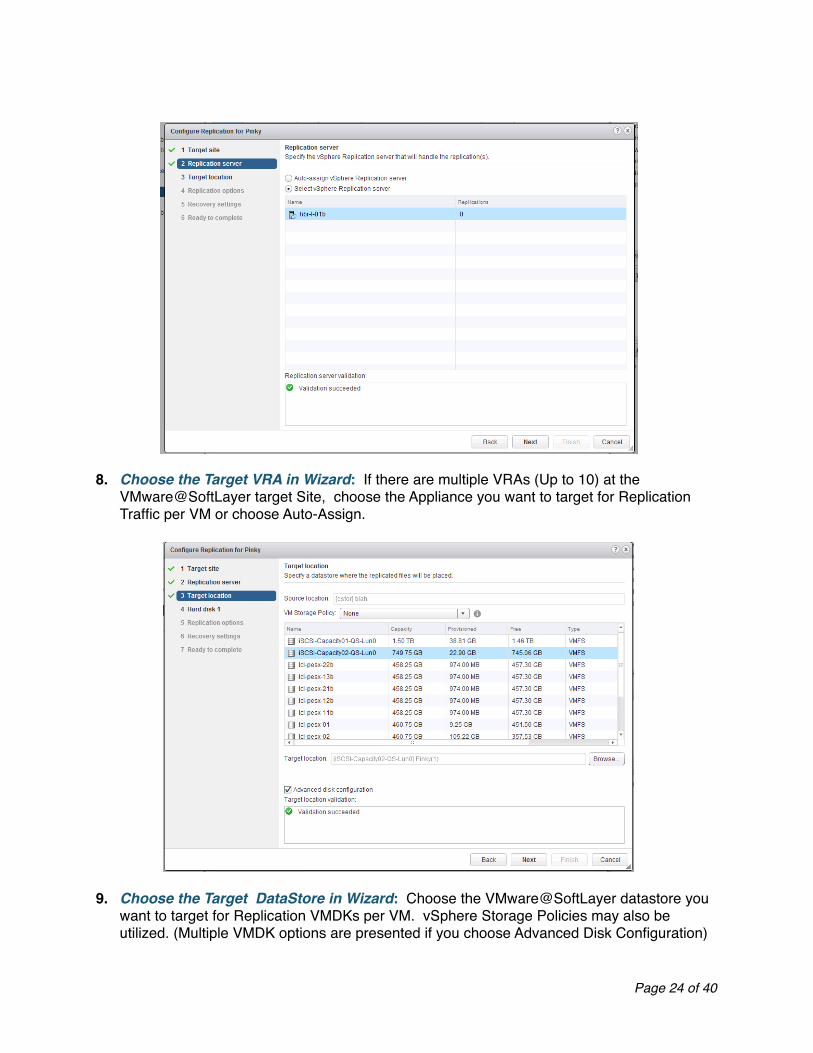
8. Choose the Target VRA in Wizard: If there are multiple VRAs (Up to 10) at the VMware@SoftLayer target Site, choose the Appliance you want to target for Replication Traffic per VM or choose Auto-Assign.!
9. Choose the Target DataStore in Wizard: Choose the VMware@SoftLayer datastore you want to target for Replication VMDKs per VM. vSphere Storage Policies may also be utilized. (Multiple VMDK options are presented if you choose Advanced Disk Configuration)!
Page � of �24 40
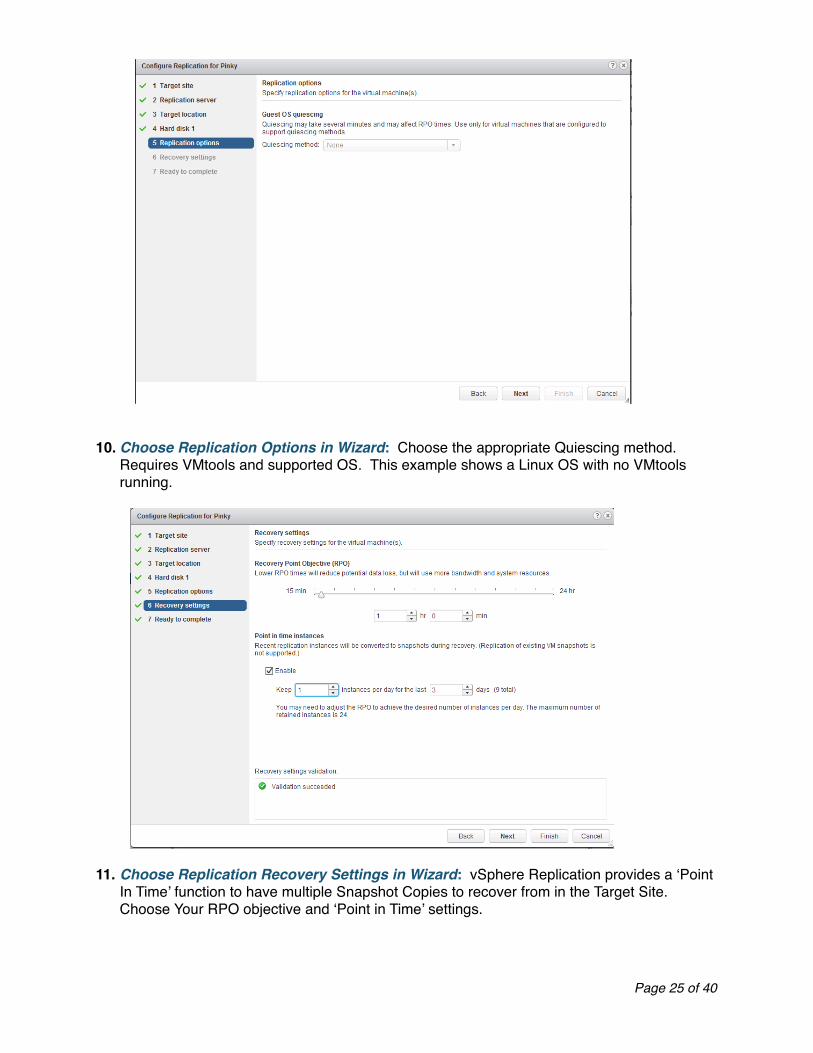
!10. Choose Replication Options in Wizard: Choose the appropriate Quiescing method.
Requires VMtools and supported OS. This example shows a Linux OS with no VMtools running.!
11. Choose Replication Recovery Settings in Wizard: vSphere Replication provides a ‘Point In Time’ function to have multiple Snapshot Copies to recover from in the Target Site. Choose Your RPO objective and ‘Point in Time’ settings.
Page � of �25 40
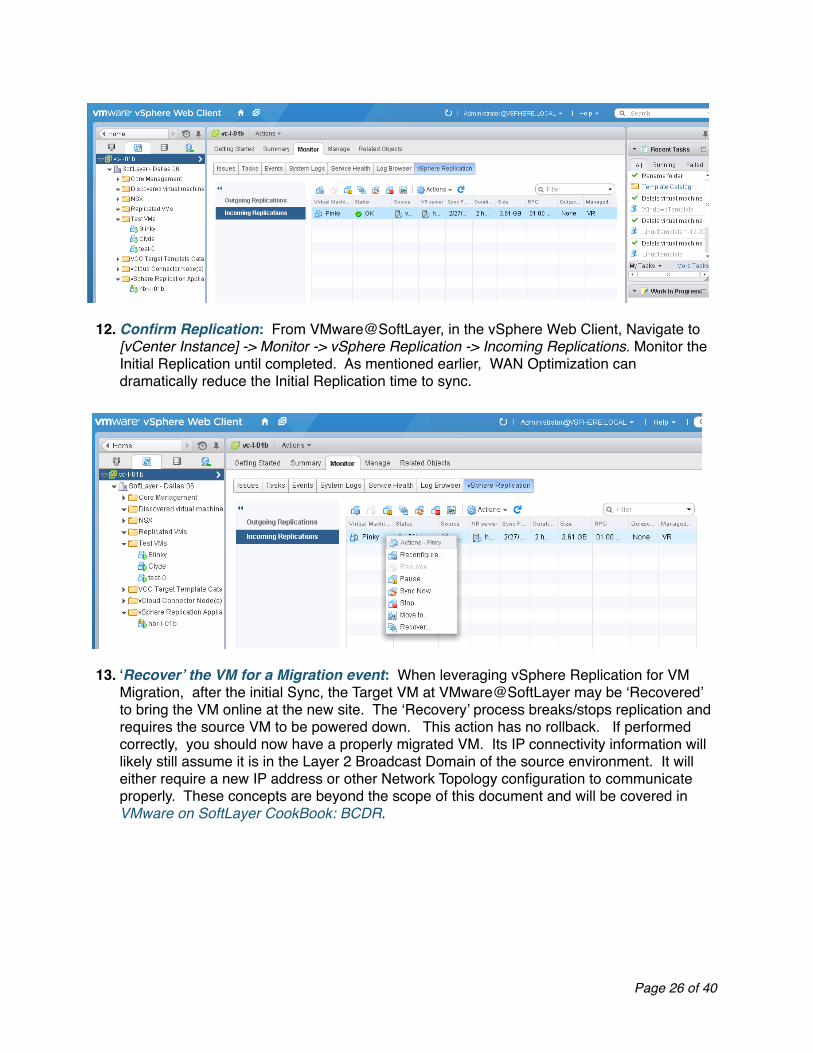
12. Confirm Replication: From VMware@SoftLayer, in the vSphere Web Client, Navigate to [vCenter Instance] -> Monitor -> vSphere Replication -> Incoming Replications. Monitor the Initial Replication until completed. As mentioned earlier, WAN Optimization can dramatically reduce the Initial Replication time to sync.!
13. ‘Recover’ the VM for a Migration event: When leveraging vSphere Replication for VM Migration, after the initial Sync, the Target VM at VMware@SoftLayer may be ‘Recovered’ to bring the VM online at the new site. The ‘Recovery’ process breaks/stops replication and requires the source VM to be powered down. This action has no rollback. If performed correctly, you should now have a properly migrated VM. Its IP connectivity information will likely still assume it is in the Layer 2 Broadcast Domain of the source environment. It will either require a new IP address or other Network Topology configuration to communicate properly. These concepts are beyond the scope of this document and will be covered in VMware on SoftLayer CookBook: BCDR.
Page � of �26 40
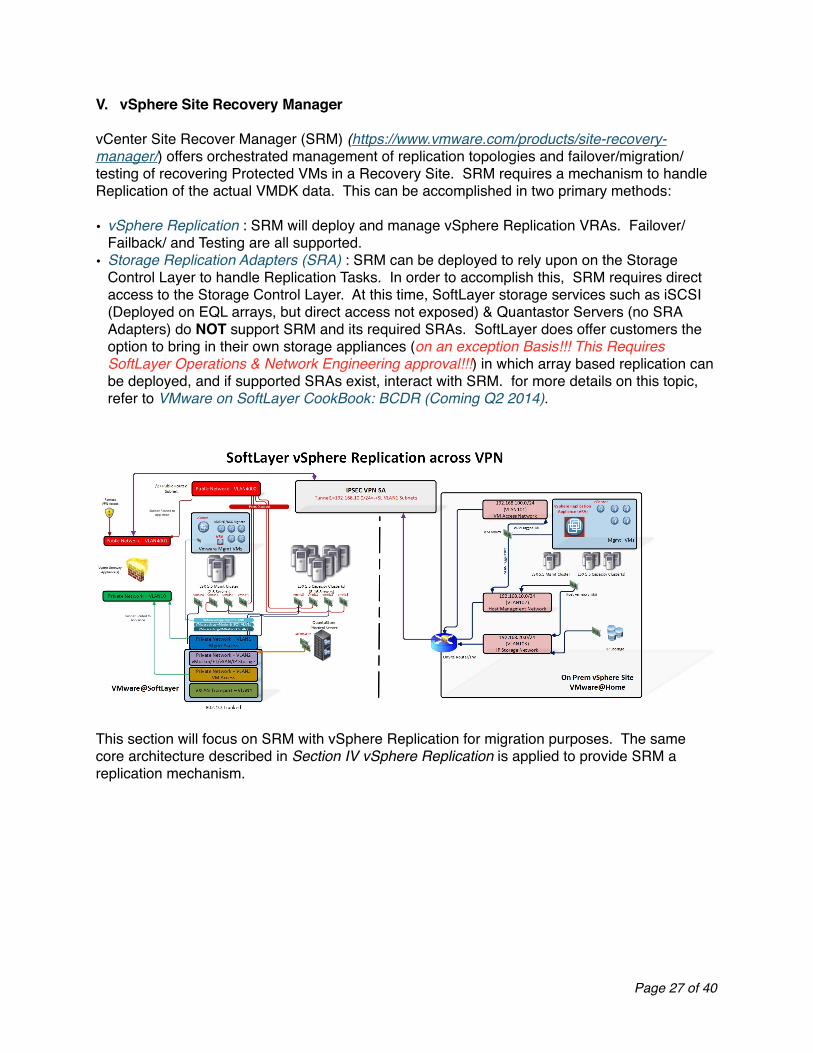
V. vSphere Site Recovery Manager!!vCenter Site Recover Manager (SRM) (https://www.vmware.com/products/site-recovery-manager/) offers orchestrated management of replication topologies and failover/migration/testing of recovering Protected VMs in a Recovery Site. SRM requires a mechanism to handle Replication of the actual VMDK data. This can be accomplished in two primary methods:!!• vSphere Replication : SRM will deploy and manage vSphere Replication VRAs. Failover/
Failback/ and Testing are all supported.!• Storage Replication Adapters (SRA) : SRM can be deployed to rely upon on the Storage
Control Layer to handle Replication Tasks. In order to accomplish this, SRM requires direct access to the Storage Control Layer. At this time, SoftLayer storage services such as iSCSI (Deployed on EQL arrays, but direct access not exposed) & Quantastor Servers (no SRA Adapters) do NOT support SRM and its required SRAs. SoftLayer does offer customers the option to bring in their own storage appliances (on an exception Basis!!! This Requires SoftLayer Operations & Network Engineering approval!!!) in which array based replication can be deployed, and if supported SRAs exist, interact with SRM. for more details on this topic, refer to VMware on SoftLayer CookBook: BCDR (Coming Q2 2014).!
!
This section will focus on SRM with vSphere Replication for migration purposes. The same core architecture described in Section IV vSphere Replication is applied to provide SRM a replication mechanism. !!
Page � of �27 40
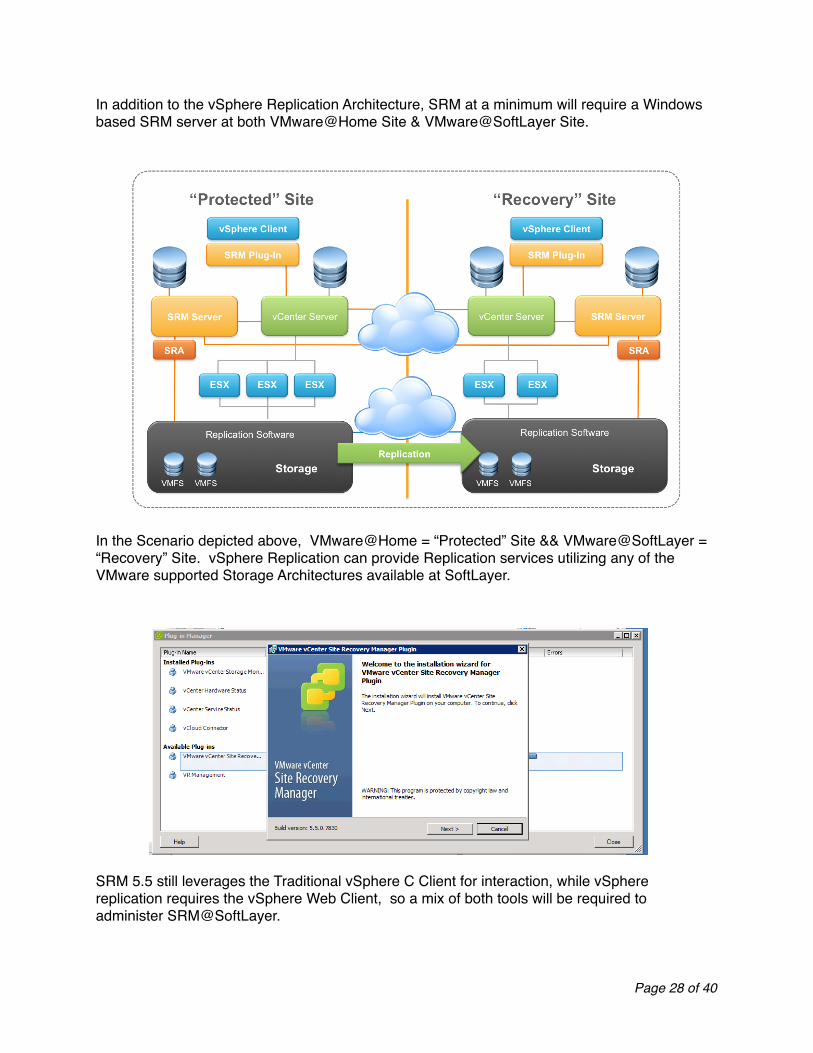
In addition to the vSphere Replication Architecture, SRM at a minimum will require a Windows based SRM server at both VMware@Home Site & VMware@SoftLayer Site.!!
In the Scenario depicted above, VMware@Home = “Protected” Site && VMware@SoftLayer = “Recovery” Site. vSphere Replication can provide Replication services utilizing any of the VMware supported Storage Architectures available at SoftLayer.!!
SRM 5.5 still leverages the Traditional vSphere C Client for interaction, while vSphere replication requires the vSphere Web Client, so a mix of both tools will be required to administer SRM@SoftLayer. !!
Page � of �28 40
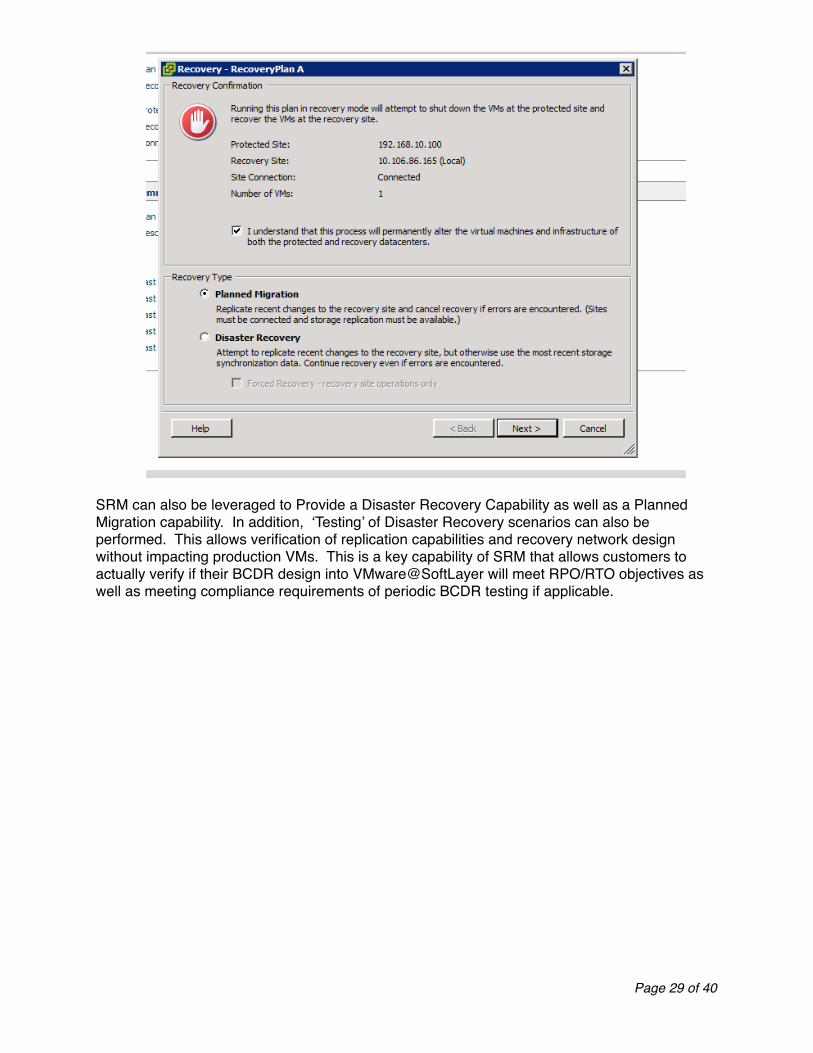
SRM can also be leveraged to Provide a Disaster Recovery Capability as well as a Planned Migration capability. In addition, ‘Testing’ of Disaster Recovery scenarios can also be performed. This allows verification of replication capabilities and recovery network design without impacting production VMs. This is a key capability of SRM that allows customers to actually verify if their BCDR design into VMware@SoftLayer will meet RPO/RTO objectives as well as meeting compliance requirements of periodic BCDR testing if applicable.
Page � of �29 40
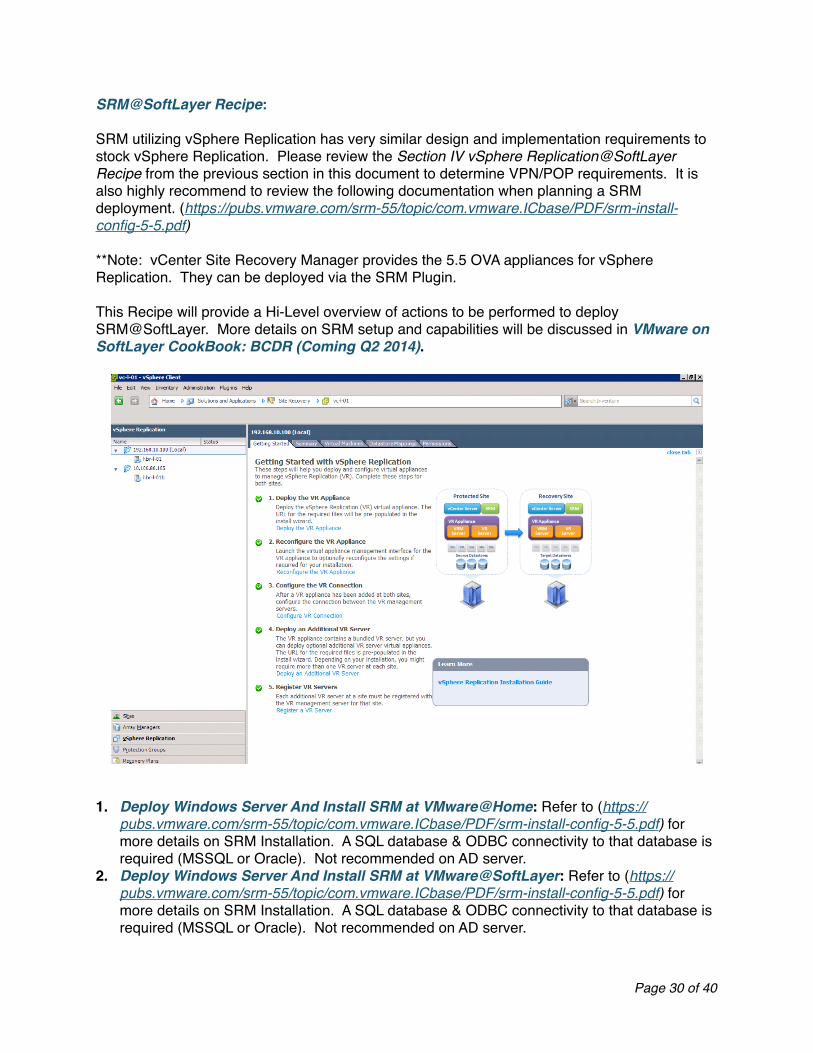
SRM@SoftLayer Recipe:!!SRM utilizing vSphere Replication has very similar design and implementation requirements to stock vSphere Replication. Please review the Section IV vSphere Replication@SoftLayer Recipe from the previous section in this document to determine VPN/POP requirements. It is also highly recommend to review the following documentation when planning a SRM deployment. (https://pubs.vmware.com/srm-55/topic/com.vmware.ICbase/PDF/srm-install-config-5-5.pdf)!!**Note: vCenter Site Recovery Manager provides the 5.5 OVA appliances for vSphere Replication. They can be deployed via the SRM Plugin.!!This Recipe will provide a Hi-Level overview of actions to be performed to deploy SRM@SoftLayer. More details on SRM setup and capabilities will be discussed in VMware on SoftLayer CookBook: BCDR (Coming Q2 2014).!
!1. Deploy Windows Server And Install SRM at VMware@Home: Refer to (https://
pubs.vmware.com/srm-55/topic/com.vmware.ICbase/PDF/srm-install-config-5-5.pdf) for more details on SRM Installation. A SQL database & ODBC connectivity to that database is required (MSSQL or Oracle). Not recommended on AD server.!
2. Deploy Windows Server And Install SRM at VMware@SoftLayer: Refer to (https://pubs.vmware.com/srm-55/topic/com.vmware.ICbase/PDF/srm-install-config-5-5.pdf) for more details on SRM Installation. A SQL database & ODBC connectivity to that database is required (MSSQL or Oracle). Not recommended on AD server.!
Page � of �30 40
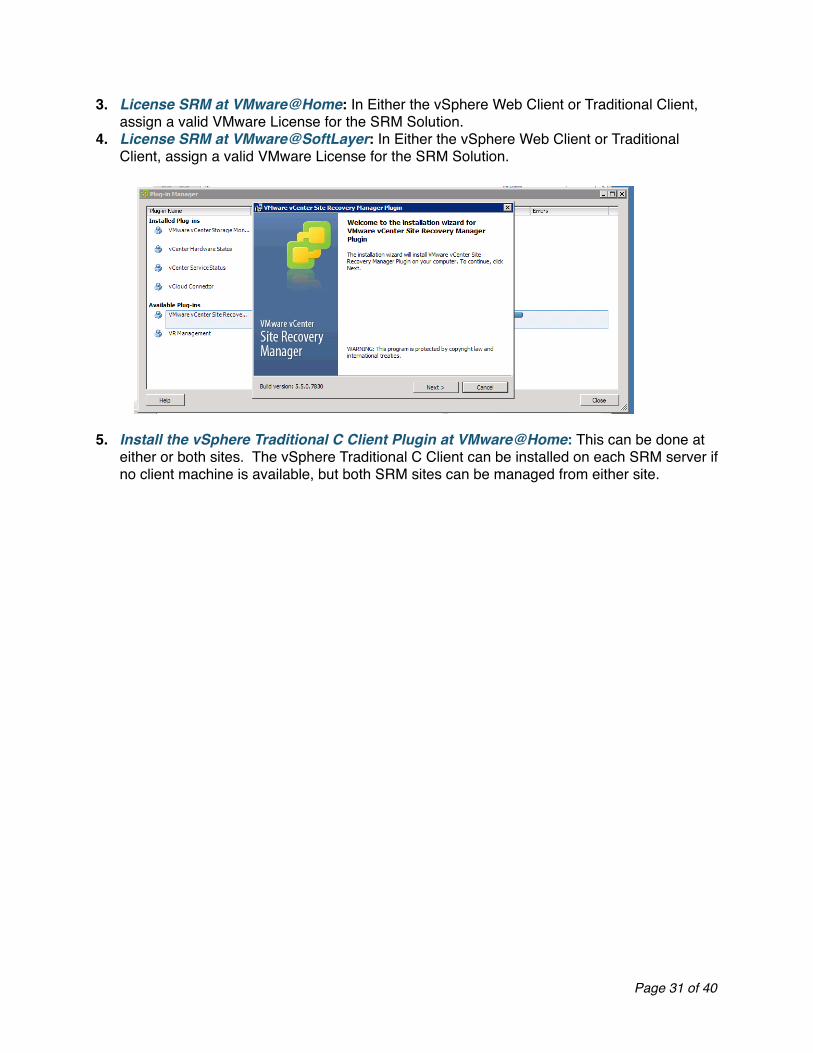
3. License SRM at VMware@Home: In Either the vSphere Web Client or Traditional Client, assign a valid VMware License for the SRM Solution.!
4. License SRM at VMware@SoftLayer: In Either the vSphere Web Client or Traditional Client, assign a valid VMware License for the SRM Solution.!
5. Install the vSphere Traditional C Client Plugin at VMware@Home: This can be done at either or both sites. The vSphere Traditional C Client can be installed on each SRM server if no client machine is available, but both SRM sites can be managed from either site.
Page � of �31 40
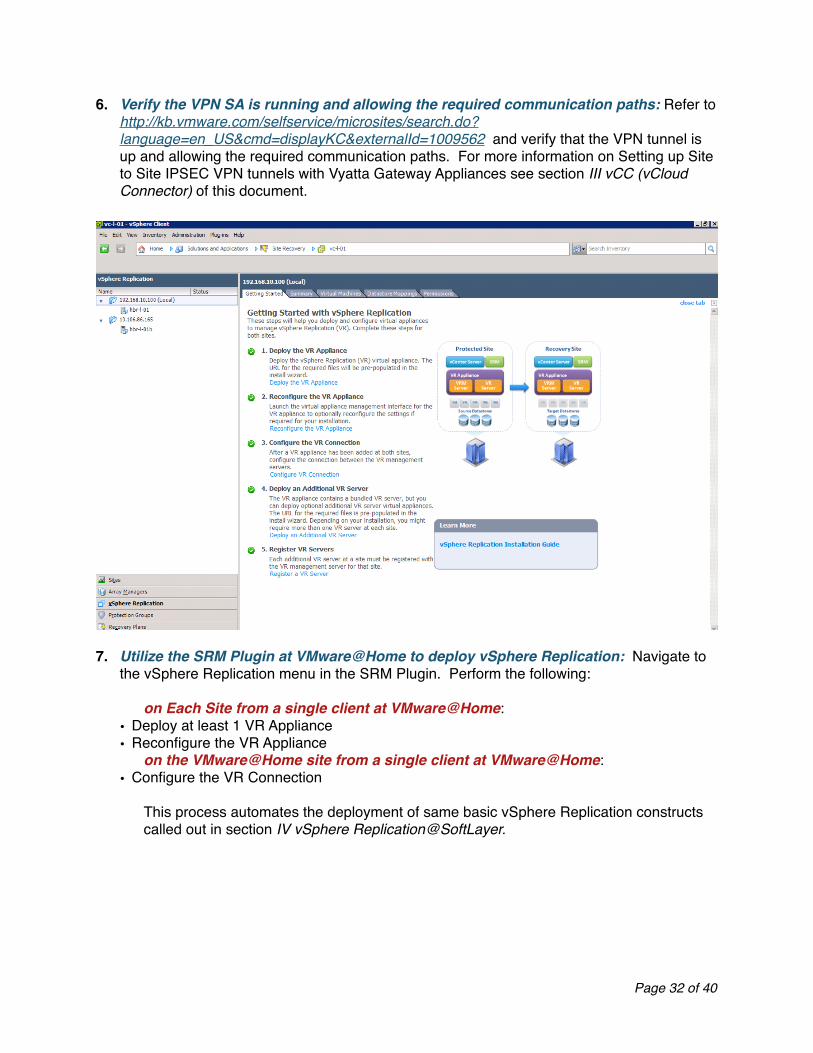
6. Verify the VPN SA is running and allowing the required communication paths: Refer to http://kb.vmware.com/selfservice/microsites/search.do?language=en_US&cmd=displayKC&externalId=1009562 and verify that the VPN tunnel is up and allowing the required communication paths. For more information on Setting up Site to Site IPSEC VPN tunnels with Vyatta Gateway Appliances see section III vCC (vCloud Connector) of this document.!
7. Utilize the SRM Plugin at VMware@Home to deploy vSphere Replication: Navigate to the vSphere Replication menu in the SRM Plugin. Perform the following:!!
! on Each Site from a single client at VMware@Home:!• Deploy at least 1 VR Appliance!• Reconfigure the VR Appliance!
! on the VMware@Home site from a single client at VMware@Home:!• Configure the VR Connection!
! !This process automates the deployment of same basic vSphere Replication constructs called out in section IV vSphere Replication@SoftLayer.!!
Page � of �32 40
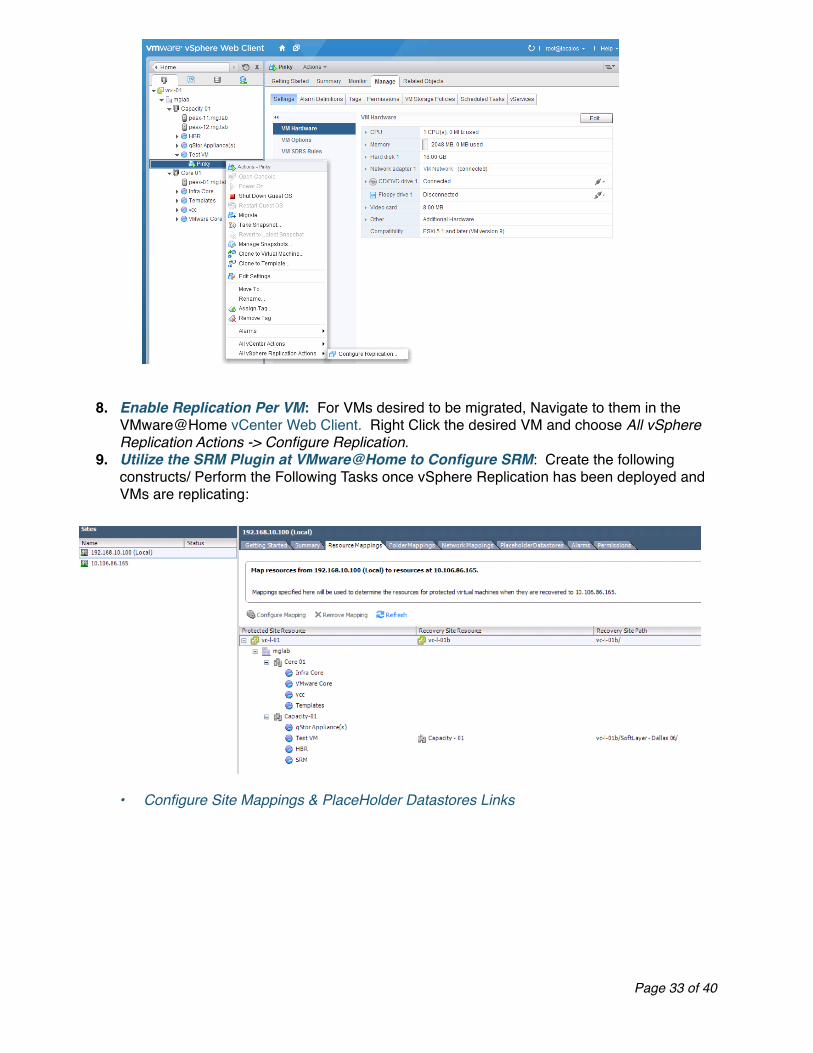
!8. Enable Replication Per VM: For VMs desired to be migrated, Navigate to them in the
VMware@Home vCenter Web Client. Right Click the desired VM and choose All vSphere Replication Actions -> Configure Replication.!
9. Utilize the SRM Plugin at VMware@Home to Configure SRM: Create the following constructs/ Perform the Following Tasks once vSphere Replication has been deployed and VMs are replicating:!
• Configure Site Mappings & PlaceHolder Datastores Links !!
Page � of �33 40
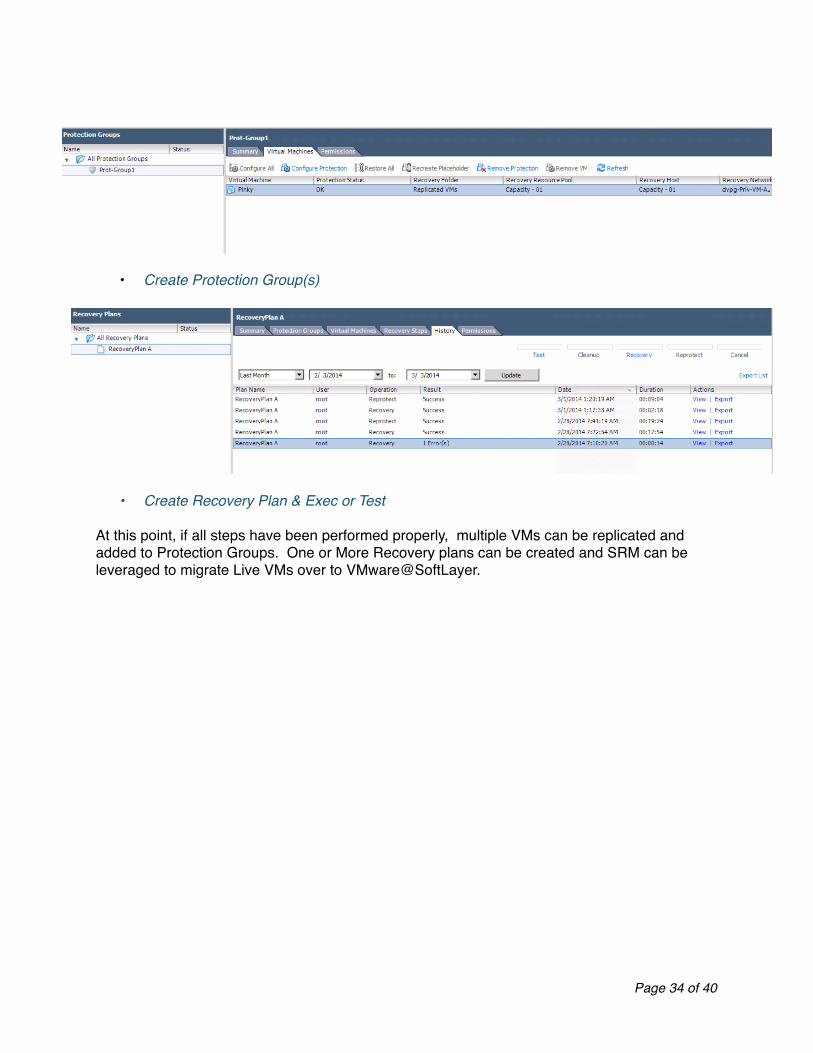
• Create Protection Group(s)!
• Create Recovery Plan & Exec or Test!!At this point, if all steps have been performed properly, multiple VMs can be replicated and added to Protection Groups. One or More Recovery plans can be created and SRM can be leveraged to migrate Live VMs over to VMware@SoftLayer.!!
Page � of �34 40
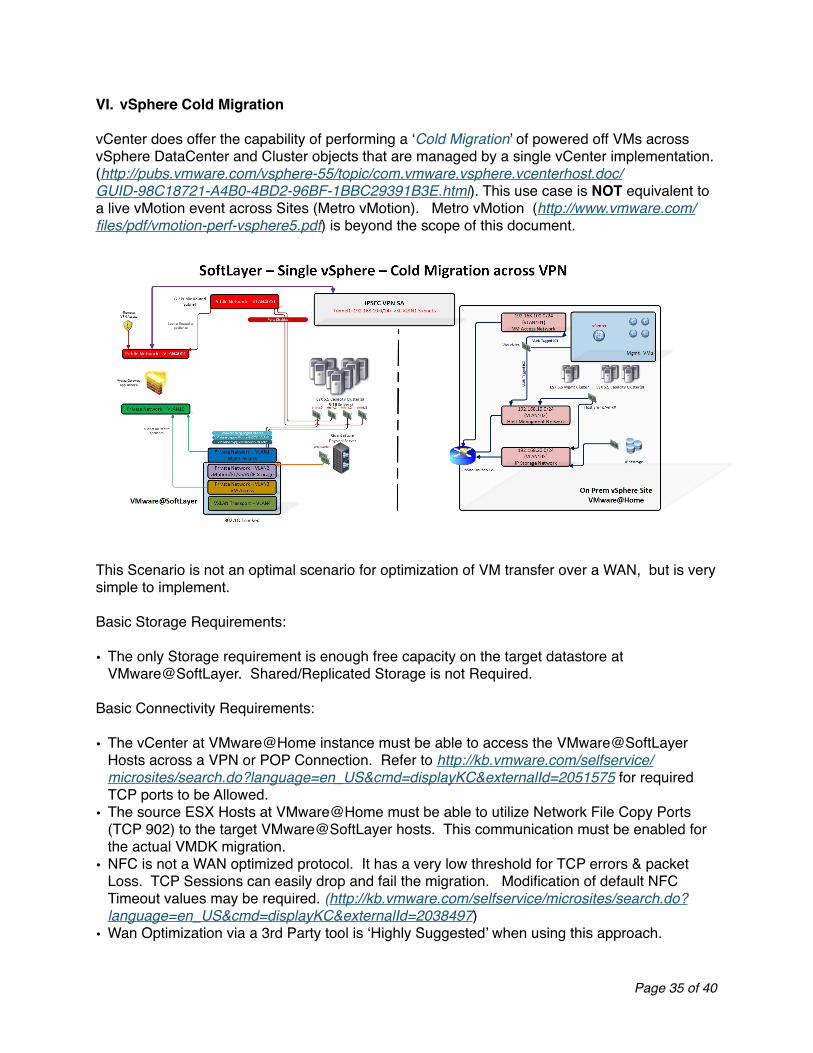
VI. vSphere Cold Migration!!vCenter does offer the capability of performing a ‘Cold Migration’ of powered off VMs across vSphere DataCenter and Cluster objects that are managed by a single vCenter implementation. (http://pubs.vmware.com/vsphere-55/topic/com.vmware.vsphere.vcenterhost.doc/GUID-98C18721-A4B0-4BD2-96BF-1BBC29391B3E.html). This use case is NOT equivalent to a live vMotion event across Sites (Metro vMotion). Metro vMotion (http://www.vmware.com/files/pdf/vmotion-perf-vsphere5.pdf) is beyond the scope of this document.!
!This Scenario is not an optimal scenario for optimization of VM transfer over a WAN, but is very simple to implement. !!Basic Storage Requirements:!!• The only Storage requirement is enough free capacity on the target datastore at
VMware@SoftLayer. Shared/Replicated Storage is not Required.!!Basic Connectivity Requirements:!!• The vCenter at VMware@Home instance must be able to access the VMware@SoftLayer
Hosts across a VPN or POP Connection. Refer to http://kb.vmware.com/selfservice/microsites/search.do?language=en_US&cmd=displayKC&externalId=2051575 for required TCP ports to be Allowed.!
• The source ESX Hosts at VMware@Home must be able to utilize Network File Copy Ports (TCP 902) to the target VMware@SoftLayer hosts. This communication must be enabled for the actual VMDK migration.!
• NFC is not a WAN optimized protocol. It has a very low threshold for TCP errors & packet Loss. TCP Sessions can easily drop and fail the migration. Modification of default NFC Timeout values may be required. (http://kb.vmware.com/selfservice/microsites/search.do?language=en_US&cmd=displayKC&externalId=2038497)!
• Wan Optimization via a 3rd Party tool is ‘Highly Suggested’ when using this approach.
Page � of �35 40
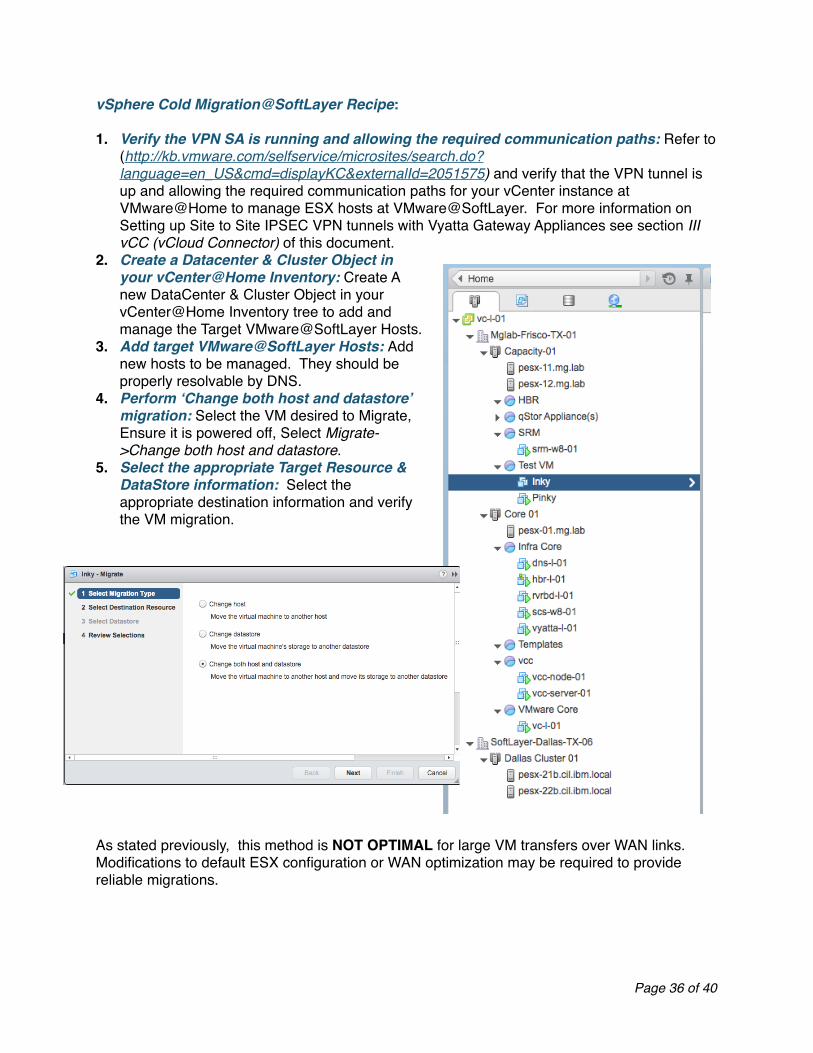
vSphere Cold Migration@SoftLayer Recipe:!!1. Verify the VPN SA is running and allowing the required communication paths: Refer to
(http://kb.vmware.com/selfservice/microsites/search.do?language=en_US&cmd=displayKC&externalId=2051575) and verify that the VPN tunnel is up and allowing the required communication paths for your vCenter instance at VMware@Home to manage ESX hosts at VMware@SoftLayer. For more information on Setting up Site to Site IPSEC VPN tunnels with Vyatta Gateway Appliances see section III vCC (vCloud Connector) of this document.!
2. Create a Datacenter & Cluster Object in your vCenter@Home Inventory: Create A new DataCenter & Cluster Object in your vCenter@Home Inventory tree to add and manage the Target VMware@SoftLayer Hosts.!
3. Add target VMware@SoftLayer Hosts: Add new hosts to be managed. They should be properly resolvable by DNS.!
4. Perform ‘Change both host and datastore’ migration: Select the VM desired to Migrate, Ensure it is powered off, Select Migrate->Change both host and datastore.!
5. Select the appropriate Target Resource & DataStore information: Select the appropriate destination information and verify the VM migration.!
!
!!As stated previously, this method is NOT OPTIMAL for large VM transfers over WAN links. Modifications to default ESX configuration or WAN optimization may be required to provide reliable migrations.
Page � of �36 40
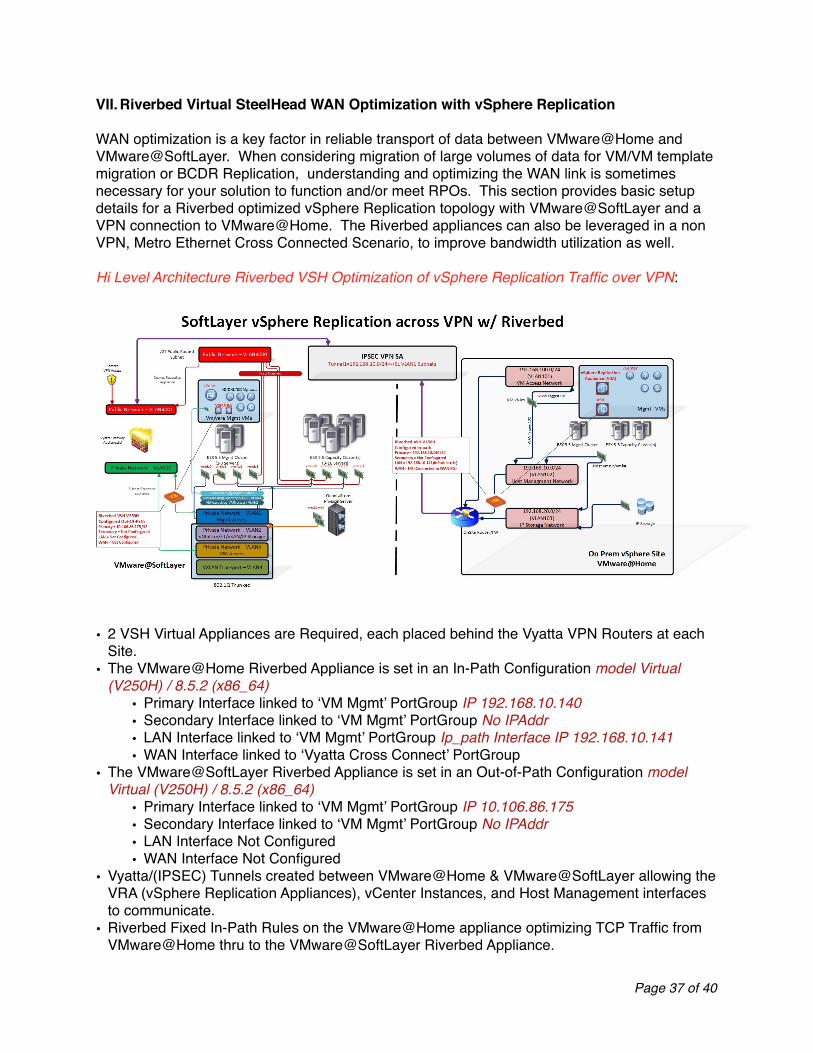
VII.Riverbed Virtual SteelHead WAN Optimization with vSphere Replication!!WAN optimization is a key factor in reliable transport of data between VMware@Home and VMware@SoftLayer. When considering migration of large volumes of data for VM/VM template migration or BCDR Replication, understanding and optimizing the WAN link is sometimes necessary for your solution to function and/or meet RPOs. This section provides basic setup details for a Riverbed optimized vSphere Replication topology with VMware@SoftLayer and a VPN connection to VMware@Home. The Riverbed appliances can also be leveraged in a non VPN, Metro Ethernet Cross Connected Scenario, to improve bandwidth utilization as well.!!Hi Level Architecture Riverbed VSH Optimization of vSphere Replication Traffic over VPN:!
!• 2 VSH Virtual Appliances are Required, each placed behind the Vyatta VPN Routers at each
Site.!• The VMware@Home Riverbed Appliance is set in an In-Path Configuration model Virtual
(V250H) / 8.5.2 (x86_64)!• Primary Interface linked to ‘VM Mgmt’ PortGroup IP 192.168.10.140!• Secondary Interface linked to ‘VM Mgmt’ PortGroup No IPAddr!• LAN Interface linked to ‘VM Mgmt’ PortGroup Ip_path Interface IP 192.168.10.141!• WAN Interface linked to ‘Vyatta Cross Connect’ PortGroup!
• The VMware@SoftLayer Riverbed Appliance is set in an Out-of-Path Configuration model Virtual (V250H) / 8.5.2 (x86_64)!
• Primary Interface linked to ‘VM Mgmt’ PortGroup IP 10.106.86.175!• Secondary Interface linked to ‘VM Mgmt’ PortGroup No IPAddr!• LAN Interface Not Configured!• WAN Interface Not Configured!
• Vyatta/(IPSEC) Tunnels created between VMware@Home & VMware@SoftLayer allowing the VRA (vSphere Replication Appliances), vCenter Instances, and Host Management interfaces to communicate.!
• Riverbed Fixed In-Path Rules on the VMware@Home appliance optimizing TCP Traffic from VMware@Home thru to the VMware@SoftLayer Riverbed Appliance.!
Page � of �37 40
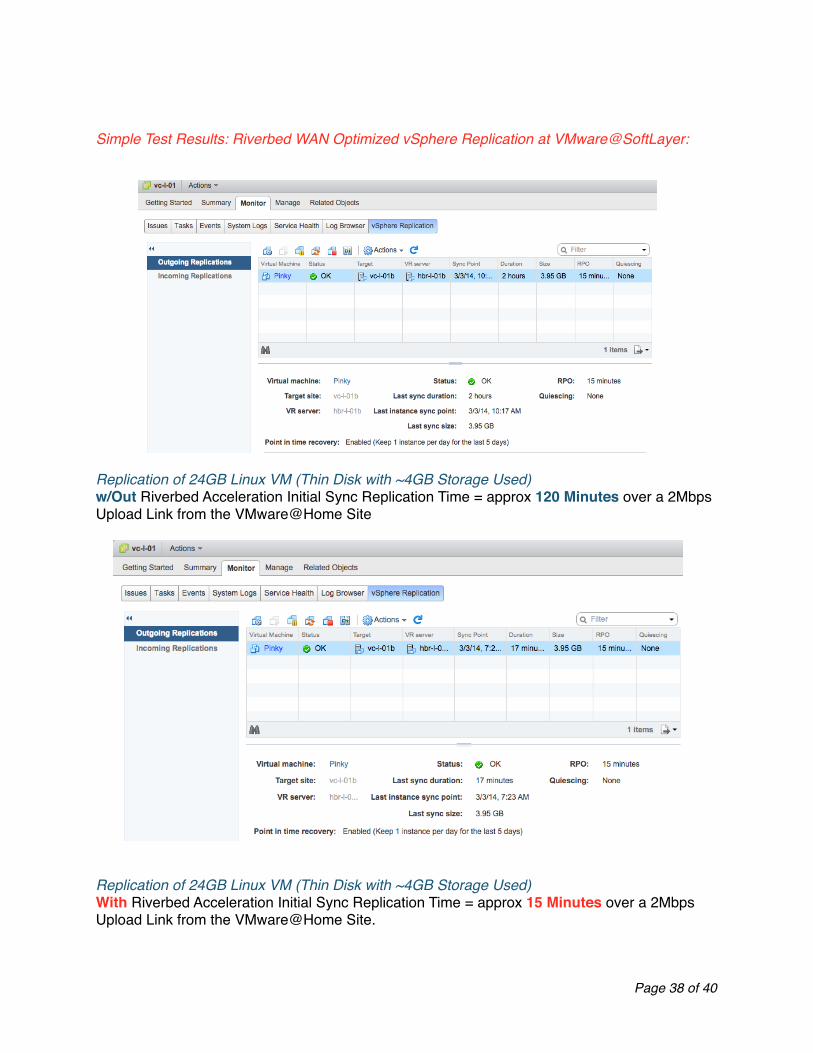
!!Simple Test Results: Riverbed WAN Optimized vSphere Replication at VMware@SoftLayer:!
Replication of 24GB Linux VM (Thin Disk with ~4GB Storage Used)!w/Out Riverbed Acceleration Initial Sync Replication Time = approx 120 Minutes over a 2Mbps Upload Link from the VMware@Home Site!
!Replication of 24GB Linux VM (Thin Disk with ~4GB Storage Used)!With Riverbed Acceleration Initial Sync Replication Time = approx 15 Minutes over a 2Mbps Upload Link from the VMware@Home Site. !
Page � of �38 40
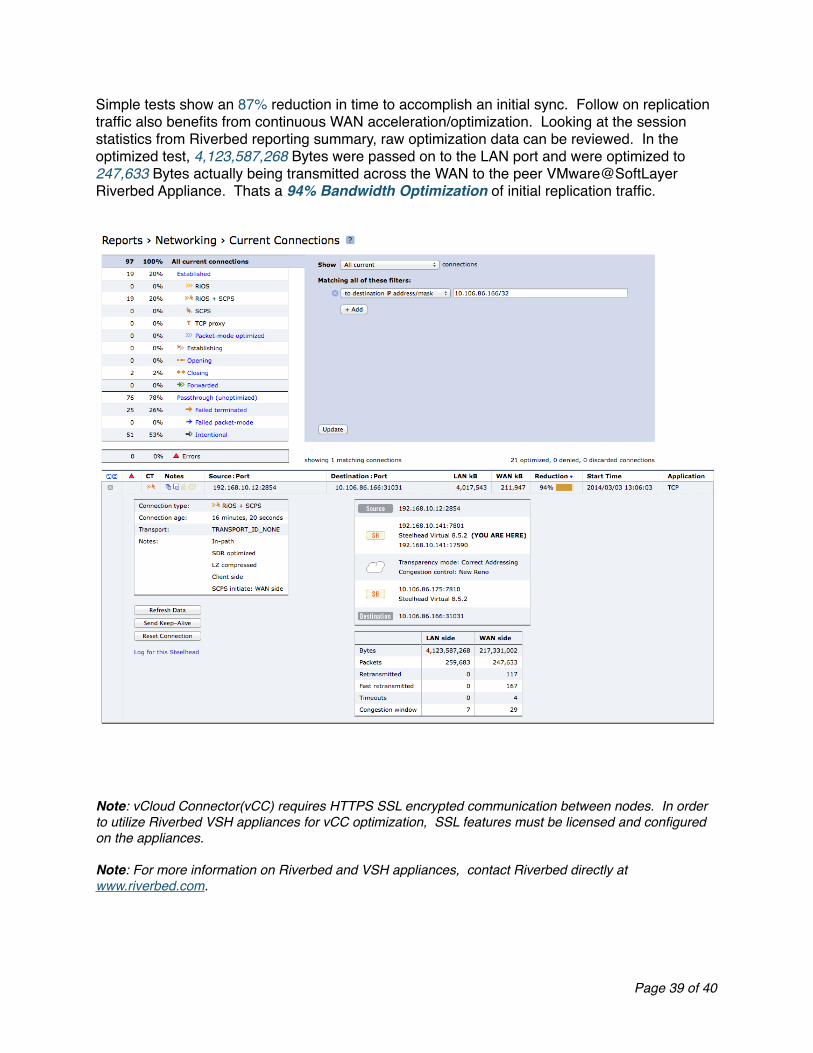
Simple tests show an 87% reduction in time to accomplish an initial sync. Follow on replication traffic also benefits from continuous WAN acceleration/optimization. Looking at the session statistics from Riverbed reporting summary, raw optimization data can be reviewed. In the optimized test, 4,123,587,268 Bytes were passed on to the LAN port and were optimized to 247,633 Bytes actually being transmitted across the WAN to the peer VMware@SoftLayer Riverbed Appliance. Thats a 94% Bandwidth Optimization of initial replication traffic.!
!!!Note: vCloud Connector(vCC) requires HTTPS SSL encrypted communication between nodes. In order to utilize Riverbed VSH appliances for vCC optimization, SSL features must be licensed and configured on the appliances.!!Note: For more information on Riverbed and VSH appliances, contact Riverbed directly at www.riverbed.com.!!!!
Page � of �39 40
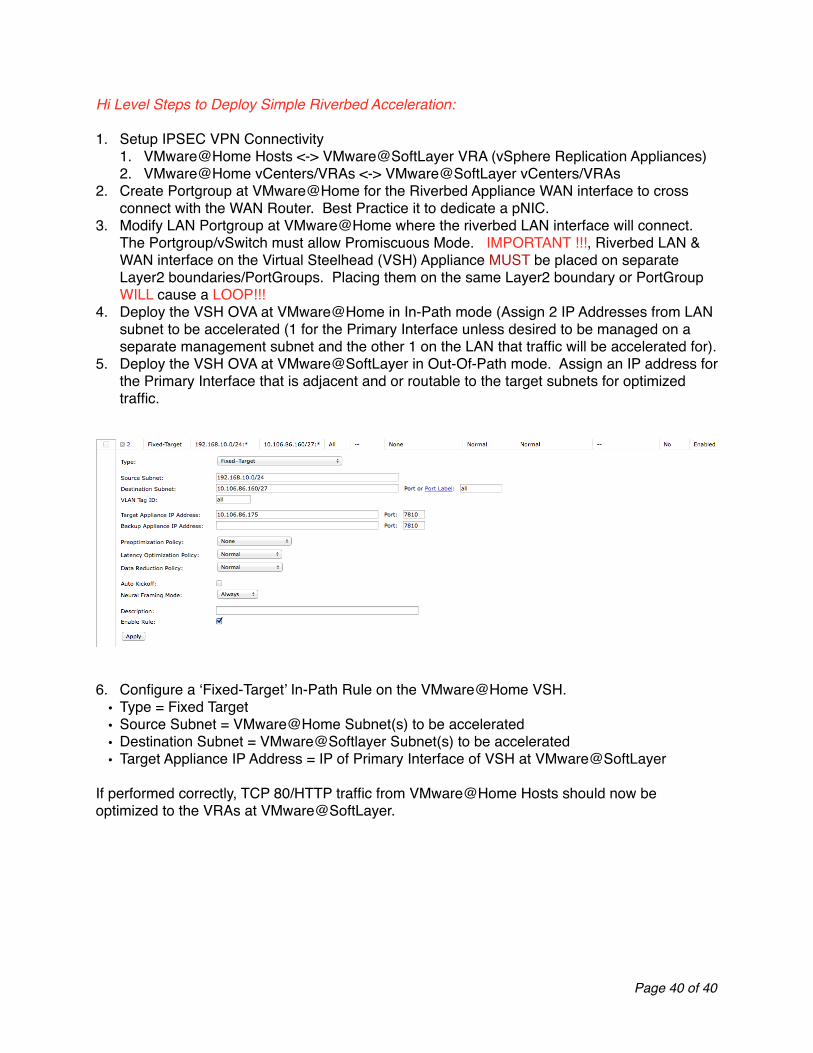
Hi Level Steps to Deploy Simple Riverbed Acceleration:!!1. Setup IPSEC VPN Connectivity!
1. VMware@Home Hosts <-> VMware@SoftLayer VRA (vSphere Replication Appliances)!2. VMware@Home vCenters/VRAs <-> VMware@SoftLayer vCenters/VRAs!
2. Create Portgroup at VMware@Home for the Riverbed Appliance WAN interface to cross connect with the WAN Router. Best Practice it to dedicate a pNIC.!
3. Modify LAN Portgroup at VMware@Home where the riverbed LAN interface will connect. The Portgroup/vSwitch must allow Promiscuous Mode. IMPORTANT !!!, Riverbed LAN & WAN interface on the Virtual Steelhead (VSH) Appliance MUST be placed on separate Layer2 boundaries/PortGroups. Placing them on the same Layer2 boundary or PortGroup WILL cause a LOOP!!!!
4. Deploy the VSH OVA at VMware@Home in In-Path mode (Assign 2 IP Addresses from LAN subnet to be accelerated (1 for the Primary Interface unless desired to be managed on a separate management subnet and the other 1 on the LAN that traffic will be accelerated for).!
5. Deploy the VSH OVA at VMware@SoftLayer in Out-Of-Path mode. Assign an IP address for the Primary Interface that is adjacent and or routable to the target subnets for optimized traffic.!
!6. Configure a ‘Fixed-Target’ In-Path Rule on the VMware@Home VSH.!
• Type = Fixed Target!• Source Subnet = VMware@Home Subnet(s) to be accelerated!• Destination Subnet = VMware@Softlayer Subnet(s) to be accelerated!• Target Appliance IP Address = IP of Primary Interface of VSH at VMware@SoftLayer!!
If performed correctly, TCP 80/HTTP traffic from VMware@Home Hosts should now be optimized to the VRAs at VMware@SoftLayer.
Page � of �40 40