Microwave Oven Owner's Manual - Whirlpool...
24
Microwave Oven Owner's Manual Electric Microwave Keep instructions for future reference. Be sure manual stays with oven. Contents Important Safety Instructions ................................................................2-4 Installation ................................................................................................5 Other Helpful Information ......................................................................6-7 Cooking Utensils ......................................................................................8 Feature Diagram ......................................................................................9 Control Panel ...........................................................................................9 Operating Instructions .......................................................................10-17 Fresh Vegetable Chart ...........................................................................18 Using Sensor Cook ................................................................................19 Care and Cleaning .................................................................................20 Troubleshooting ......................................................................................21 Warranty .................................................................................................24 A/03/02 © 2002 Maytag Appliance Sales Co. Part No.8112P201-60 3828W5A2446 Installer: Please leave this manual with this appliance. Consumer: Please read and keep this manual for future reference. Keep sales receipt and/or cancelled check as proof of purchase. If you have questions, write us (include your model number and phone number) or call: Maytag Appliances Sales Company Attn: CAIR ® Center P.O. Box 2370 Cleveland, TN 37320-2370 1-800-688-9900 U.S.A. 1-800-688-2002 Canada 1-800-688-2080 (U.S.A. TTY for hearing or speech impaired) (Mon.-Fri., 8 am-8 pm Eastern Time) Internet: http://www.maytag.com In our continuing effort to im- prove the quality and perfor- mance of our appliances, it may be necessary to make changes to the appliance with- out revising this guide. Model Number Serial Number Date of Purchase
Transcript of Microwave Oven Owner's Manual - Whirlpool...
Microwave OvenOwner's Manual
Electric MicrowaveKeep instructions for future reference. Be sure manual stays with oven.
ContentsImportant Safety Instructions ................................................................2-4
Installation ................................................................................................5
Other Helpful Information......................................................................6-7
Cooking Utensils ......................................................................................8
Feature Diagram ......................................................................................9
Control Panel ...........................................................................................9
Operating Instructions.......................................................................10-17
Fresh Vegetable Chart ...........................................................................18
Using Sensor Cook ................................................................................19
Care and Cleaning .................................................................................20
Troubleshooting......................................................................................21
Warranty .................................................................................................24
A/03/02 ©2002 Maytag Appliance Sales Co. Part No.8112P201-603828W5A2446
Installer: Please leave this manualwith this appliance.
Consumer: Please read and keepthis manual for future reference.Keep sales receipt and/or cancelledcheck as proof of purchase.
If you have questions, write us(include your model number andphone number) or call:
Maytag Appliances Sales CompanyAttn: CAIR® CenterP.O. Box 2370Cleveland, TN 37320-23701-800-688-9900 U.S.A.1-800-688-2002 Canada1-800-688-2080 (U.S.A. TTY forhearing or speech impaired)(Mon.-Fri., 8 am-8 pm Eastern Time)Internet: http://www.maytag.com
In our continuing effort to im-prove the quality and perfor-mance of our appliances, itmay be necessary to makechanges to the appliance with-out revising this guide.
Model Number
Serial Number
Date of Purchase

2
IMPORTANT SAFETY INSTRUCTIONS
What You Need to Know About Safety InstructionsWarning and Important Safety In-structions appearing in this manualare not meant to cover all possibleconditions and situations that mayoccur. Common sense, caution, andcare must be exercised wheninstalling, maintaining, or operatingmicrowave.
Always contact your dealer, distribu-tor, service agent, or manufacturerabout problems or conditions you donot understand.
Recognize Safety Symbols, Words, Labels
DANGERDANGER— Immediate hazards which WILL result in severe personal injury or
death.
WARNINGWARNING— Hazards or unsafe practices which COULD result in severe per-
sonal injury or death.
CAUTIONCAUTION— Hazards or unsafe practices which COULD result in minor per-
sonal injury.
3
IMPORTANT SAFETY INSTRUCTIONS
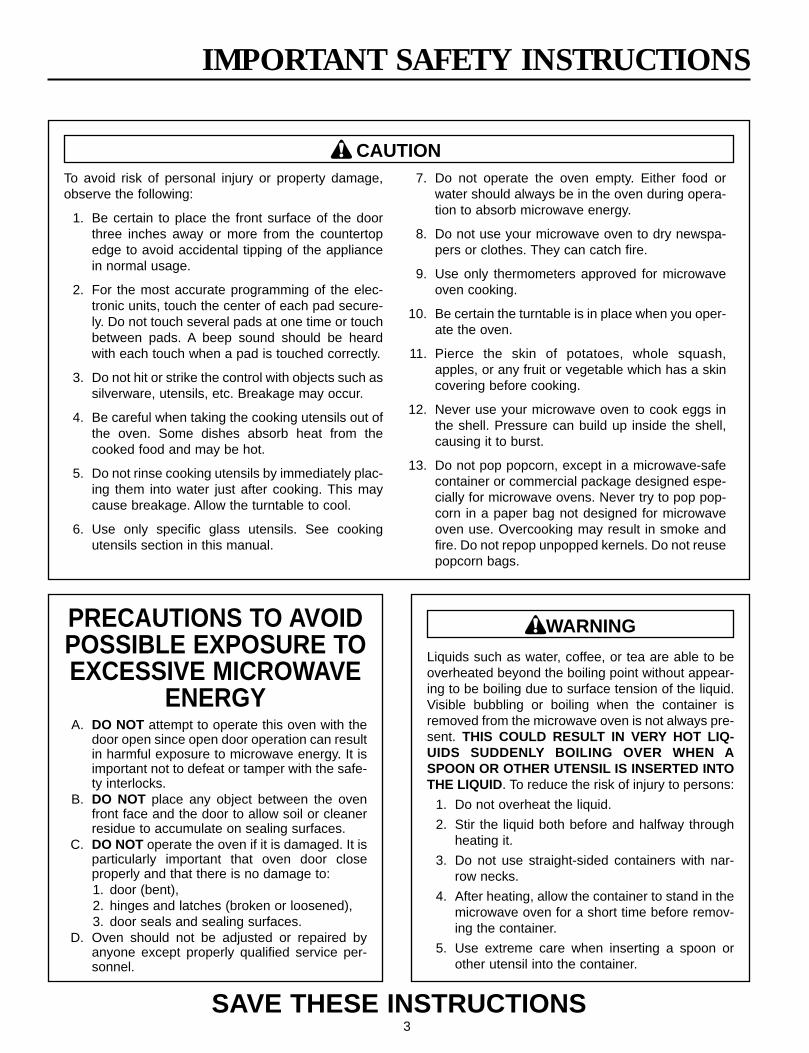
PRECAUTIONS TO AVOIDPOSSIBLE EXPOSURE TOEXCESSIVE MICROWAVE
ENERGYA. DO NOT attempt to operate this oven with the
door open since open door operation can resultin harmful exposure to microwave energy. It isimportant not to defeat or tamper with the safe-ty interlocks.
B. DO NOT place any object between the ovenfront face and the door to allow soil or cleanerresidue to accumulate on sealing surfaces.
C. DO NOT operate the oven if it is damaged. It isparticularly important that oven door closeproperly and that there is no damage to:1. door (bent),2. hinges and latches (broken or loosened),3. door seals and sealing surfaces.
D. Oven should not be adjusted or repaired byanyone except properly qualified service per-sonnel.
SAVE THESE INSTRUCTIONS
To avoid risk of personal injury or property damage,observe the following:
1. Be certain to place the front surface of the doorthree inches away or more from the countertopedge to avoid accidental tipping of the appliancein normal usage.
2. For the most accurate programming of the elec-tronic units, touch the center of each pad secure-ly. Do not touch several pads at one time or touchbetween pads. A beep sound should be heardwith each touch when a pad is touched correctly.
3. Do not hit or strike the control with objects such assilverware, utensils, etc. Breakage may occur.
4. Be careful when taking the cooking utensils out ofthe oven. Some dishes absorb heat from thecooked food and may be hot.
5. Do not rinse cooking utensils by immediately plac-ing them into water just after cooking. This maycause breakage. Allow the turntable to cool.
6. Use only specific glass utensils. See cookingutensils section in this manual.
7. Do not operate the oven empty. Either food orwater should always be in the oven during opera-tion to absorb microwave energy.
8. Do not use your microwave oven to dry newspa-pers or clothes. They can catch fire.
9. Use only thermometers approved for microwaveoven cooking.
10. Be certain the turntable is in place when you oper-ate the oven.
11. Pierce the skin of potatoes, whole squash,apples, or any fruit or vegetable which has a skincovering before cooking.
12. Never use your microwave oven to cook eggs inthe shell. Pressure can build up inside the shell,causing it to burst.
13. Do not pop popcorn, except in a microwave-safecontainer or commercial package designed espe-cially for microwave ovens. Never try to pop pop-corn in a paper bag not designed for microwaveoven use. Overcooking may result in smoke andfire. Do not repop unpopped kernels. Do not reusepopcorn bags.
CAUTION
Liquids such as water, coffee, or tea are able to beoverheated beyond the boiling point without appear-ing to be boiling due to surface tension of the liquid.Visible bubbling or boiling when the container isremoved from the microwave oven is not always pre-sent. THIS COULD RESULT IN VERY HOT LIQ-UIDS SUDDENLY BOILING OVER WHEN ASPOON OR OTHER UTENSIL IS INSERTED INTOTHE LIQUID. To reduce the risk of injury to persons:
1. Do not overheat the liquid.
2. Stir the liquid both before and halfway throughheating it.
3. Do not use straight-sided containers with nar-row necks.
4. After heating, allow the container to stand in themicrowave oven for a short time before remov-ing the container.
5. Use extreme care when inserting a spoon orother utensil into the container.
WARNING
4
IMPORTANT SAFETY INSTRUCTIONS
SAVE THESE INSTRUCTIONS
Recognize this symbol as a SAFETY message
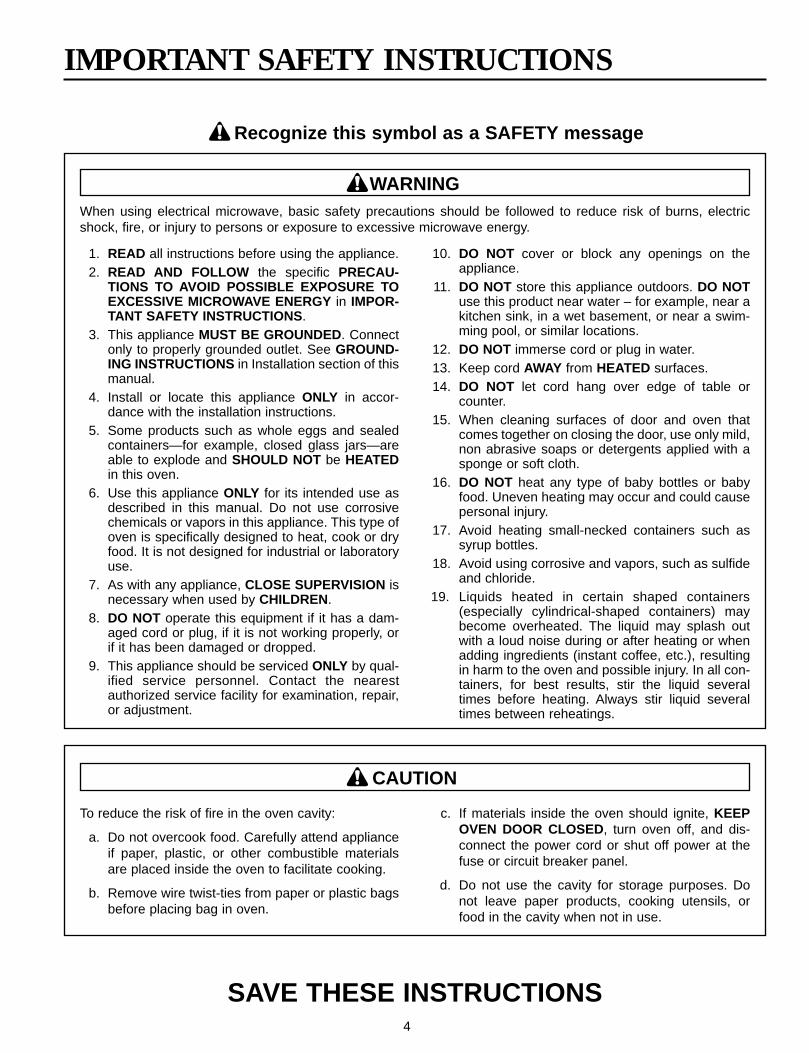
When using electrical microwave, basic safety precautions should be followed to reduce risk of burns, electricshock, fire, or injury to persons or exposure to excessive microwave energy.
WARNING
1. READ all instructions before using the appliance.2. READ AND FOLLOW the specific PRECAU-
TIONS TO AVOID POSSIBLE EXPOSURE TOEXCESSIVE MICROWAVE ENERGY in IMPOR-TANT SAFETY INSTRUCTIONS .
3. This appliance MUST BE GROUNDED. Connectonly to properly grounded outlet. See GROUND-ING INSTRUCTIONS in Installation section of thismanual.
4. Install or locate this appliance ONLY in accor-dance with the installation instructions.
5. Some products such as whole eggs and sealedcontainers—for example, closed glass jars—areable to explode and SHOULD NOT be HEATEDin this oven.
6. Use this appliance ONLY for its intended use asdescribed in this manual. Do not use corrosivechemicals or vapors in this appliance. This type ofoven is specifically designed to heat, cook or dryfood. It is not designed for industrial or laboratoryuse.
7. As with any appliance, CLOSE SUPERVISION isnecessary when used by CHILDREN.
8. DO NOT operate this equipment if it has a dam-aged cord or plug, if it is not working properly, orif it has been damaged or dropped.
9. This appliance should be serviced ONLY by qual-ified service personnel. Contact the nearestauthorized service facility for examination, repair,or adjustment.
10. DO NOT cover or block any openings on theappliance.
11. DO NOT store this appliance outdoors. DO NOTuse this product near water – for example, near akitchen sink, in a wet basement, or near a swim-ming pool, or similar locations.
12. DO NOT immerse cord or plug in water.13. Keep cord AWAY from HEATED surfaces.14. DO NOT let cord hang over edge of table or
counter.15. When cleaning surfaces of door and oven that
comes together on closing the door, use only mild,non abrasive soaps or detergents applied with asponge or soft cloth.
16. DO NOT heat any type of baby bottles or babyfood. Uneven heating may occur and could causepersonal injury.
17. Avoid heating small-necked containers such assyrup bottles.
18. Avoid using corrosive and vapors, such as sulfideand chloride.
19. Liquids heated in certain shaped containers(especially cylindrical-shaped containers) maybecome overheated. The liquid may splash outwith a loud noise during or after heating or whenadding ingredients (instant coffee, etc.), resultingin harm to the oven and possible injury. In all con-tainers, for best results, stir the liquid severaltimes before heating. Always stir liquid severaltimes between reheatings.
CAUTION
To reduce the risk of fire in the oven cavity:
a. Do not overcook food. Carefully attend applianceif paper, plastic, or other combustible materialsare placed inside the oven to facilitate cooking.
b. Remove wire twist-ties from paper or plastic bagsbefore placing bag in oven.
c. If materials inside the oven should ignite, KEEPOVEN DOOR CLOSED, turn oven off, and dis-connect the power cord or shut off power at thefuse or circuit breaker panel.
d. Do not use the cavity for storage purposes. Donot leave paper products, cooking utensils, orfood in the cavity when not in use.
5
Installation
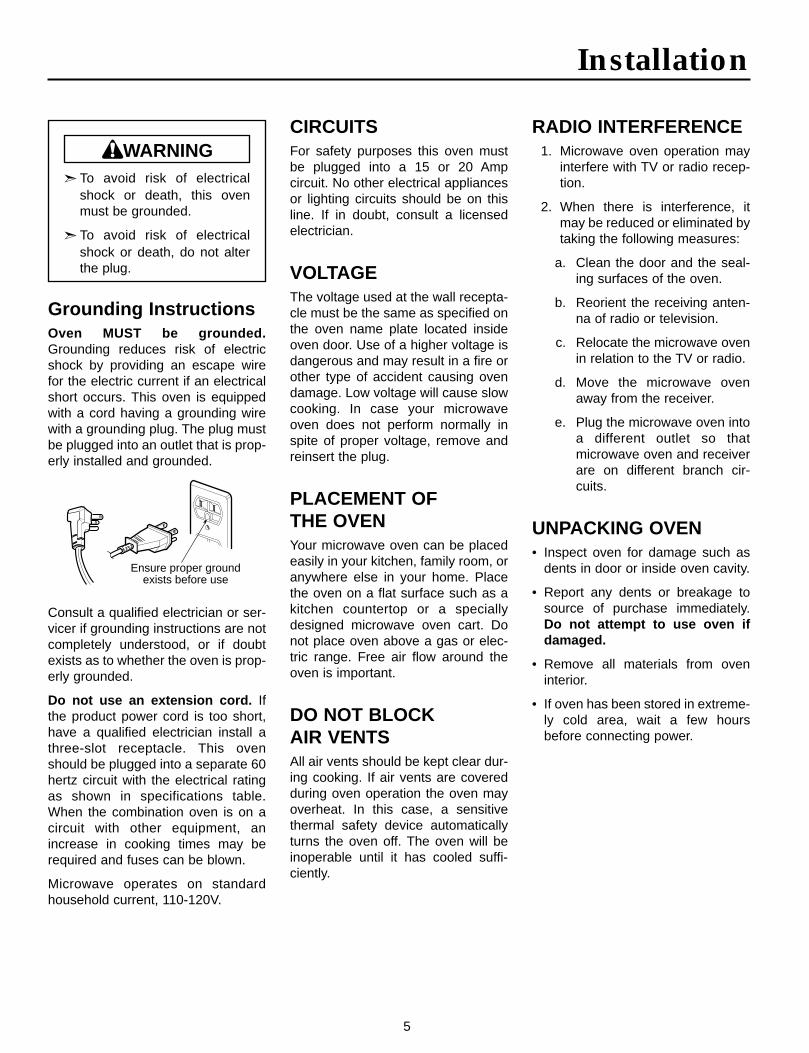
➣ To avoid risk of electricalshock or death, this ovenmust be grounded.
➣ To avoid risk of electricalshock or death, do not alterthe plug.
WARNING
Grounding InstructionsOven MUST be grounded.Grounding reduces risk of electricshock by providing an escape wirefor the electric current if an electricalshort occurs. This oven is equippedwith a cord having a grounding wirewith a grounding plug. The plug mustbe plugged into an outlet that is prop-erly installed and grounded.
Consult a qualified electrician or ser-vicer if grounding instructions are notcompletely understood, or if doubtexists as to whether the oven is prop-erly grounded.
Do not use an extension cord. Ifthe product power cord is too short,have a qualified electrician install athree-slot receptacle. This ovenshould be plugged into a separate 60hertz circuit with the electrical ratingas shown in specifications table.When the combination oven is on acircuit with other equipment, anincrease in cooking times may berequired and fuses can be blown.
Microwave operates on standardhousehold current, 110-120V.
CIRCUITSFor safety purposes this oven mustbe plugged into a 15 or 20 Ampcircuit. No other electrical appliancesor lighting circuits should be on thisline. If in doubt, consult a licensedelectrician.
VOLTAGEThe voltage used at the wall recepta-cle must be the same as specified onthe oven name plate located insideoven door. Use of a higher voltage isdangerous and may result in a fire orother type of accident causing ovendamage. Low voltage will cause slowcooking. In case your microwaveoven does not perform normally inspite of proper voltage, remove andreinsert the plug.
PLACEMENT OF THE OVENYour microwave oven can be placedeasily in your kitchen, family room, oranywhere else in your home. Placethe oven on a flat surface such as akitchen countertop or a speciallydesigned microwave oven cart. Donot place oven above a gas or elec-tric range. Free air flow around theoven is important.
DO NOT BLOCK AIR VENTSAll air vents should be kept clear dur-ing cooking. If air vents are coveredduring oven operation the oven mayoverheat. In this case, a sensitivethermal safety device automaticallyturns the oven off. The oven will beinoperable until it has cooled suffi-ciently.
RADIO INTERFERENCE1. Microwave oven operation may
interfere with TV or radio recep-tion.
2. When there is interference, itmay be reduced or eliminated bytaking the following measures:
a. Clean the door and the seal-ing surfaces of the oven.
b. Reorient the receiving anten-na of radio or television.
c. Relocate the microwave ovenin relation to the TV or radio.
d. Move the microwave ovenaway from the receiver.
e. Plug the microwave oven intoa different outlet so thatmicrowave oven and receiverare on different branch cir-cuits.
UNPACKING OVEN• Inspect oven for damage such as
dents in door or inside oven cavity.
• Report any dents or breakage tosource of purchase immediately.Do not attempt to use oven ifdamaged.
• Remove all materials from oveninterior.
• If oven has been stored in extreme-ly cold area, wait a few hoursbefore connecting power.
Ensure proper groundexists before use
6
Other Helpful Information
GETTING THE BESTRESULTS FROM YOURMICROWAVE OVENKeep an eye on things. Theinstructions in this book havebeen formulated with great care,but your success in preparing fooddepends, of course, on how muchattention you pay to the food as itcooks. Always watch your food whileit cooks. Your microwave oven isequipped with a light that turns onautomatically when the oven is inoperation so that you can see insideand check the progress of yourrecipe. Directions given in recipes toelevate, stir, and the like should bethought of as the minimum steps rec-ommended. If the food seems to becooking unevenly, simply make thenecessary adjustments you thinkappropriate to correct the problem.
Factors affecting cooking times.Many factors affect cooking times.The temperature of ingredients usedin a recipe makes a big difference incooking times. For example, a cakemade with ice-cold butter, milk, andeggs will take considerably longer tobake than one made with ingredientsthat are at room temperature. All ofthe recipes in this book give a rangeof cooking times. In general, you willfind that the food remains under-cooked at the lower end of the timerange, and you may sometimes wantto cook your food beyond the maxi-mum time given, according to per-sonal preference. The governing phi-losophy of this book is that it is bestfor a recipe to be conservative in giv-ing cooking times. While under-cooked food may always be cookeda bit more, overcooked food is ruinedfor good. Some of the recipes, partic-ularly those for bread, cakes, andcustard, recommend that food beremoved from the oven when theyare slightly undercooked. This is nota mistake. When allowed to stand,usually covered, these foods will con-tinue to cook outside of the oven asthe heat trapped within the outer por-
tions of the foods gradually travelsinward. If the foods are left in theoven until they are cooked all the waythrough, the outer portions willbecome overcooked or even burned.
As you gain experience in using yourmicrowave oven, you will becomeincreasingly skillful in estimating bothcooking and standing times for vari-ous foods.
SPECIAL TECHNIQUESIN MICROWAVECOOKINGBrowning: Meats and poultry thatare cooked fifteen minutes or longerwill brown lightly in their own fat.Foods that are cooked for a shorterperiod of time may be brushed with abrowning sauce to achieve an appe-tizing color. The most commonlyused browning sauces areWorcestershire sauce, soy sauce,and barbecue sauce. Since relativelysmall amounts of browning saucesare added to foods, the original flavorof recipes is not altered.
Covering: A cover traps heat andsteam and causes food to cook morequickly. You may either use a lid ormicrowave cling-film with a cornerfolded back to prevent splitting.
Covering with waxed paper:Waxed paper effectively preventsspattering and helps food retainsome heat. Since it makes a loosercover than a lid or cling-film, it allowsthe food to dry out slightly.
Wrapping in waxed paper or papertowel: Sandwiches and many otherfoods containing prebaked breadshould be wrapped prior tomicrowaving to prevent drying out.
Arranging and spacing: Individualfoods such as baked potatoes, smallcakes, and hors d’oeuvres will heatmore evenly if placed in the oven andequal distance apart, preferably in acircular pattern. Never stack foods ontop of one another.
Stirring: Stirring is one of the mostimportant of all microwaving tech-niques. In conventional cooking,foods are stirred for the purpose ofblending. Microwaved foods, howev-er, are stirred in order to spread andredistribute heat. Always stir from theoutside towards the center as theoutside food heats first.
Turning over: Large, tall foods suchas roasts and whole chickens shouldbe turned so that the top and bottomwill cook evenly. It is also a good ideato turn cutup chicken and chops.
Placing thicker portions near theedge : Since microwaves are attract-ed to the outside portion of foods, itmakes sense to place thicker por-tions of meat, poultry and fish to theouter edge of the baking dish. Thisway, thicker portions will receive themost microwave energy and thefoods will cook evenly.
Elevating: Thick or dense foods areoften elevated so that microwavescan be absorbed by the undersideand center of the foods.
Piercing: Foods enclosed in a shell,skin, or membrane are likely to burstin the oven unless they are piercedprior to cooking. Such foods includeboth yolks and whites of eggs, clamsand oysters, and many whole veg-etables and fruits.
Testing if cooked: Because foodscook so quickly in a microwave oven,it is necessary to test food frequently.Some foods are left in the microwaveuntil completely cooked, but mostfoods, including meats and poultry,are removed from the oven while stillslightly undercooked and allowed tofinish cooking during standing time.The internal temperature of foods willrise between 5° F (3° C) and 15° F(8° C) during standing time.
7
Standing time: Foods are oftenallowed to stand for 3 to 10 minutesafter being removed from themicrowave oven. Usually the foodsare covered during standing time toretain heat unless they are supposedto be dry in texture (some cakes andbiscuits, for example). Standingallows foods to finish cooking andalso helps flavors to blend and devel-op.
HOW FOODCHARACTERISTICSAFFECT MICROWAVECOOKINGDensity of foods: Light, porous foodlike cakes and breads cook morequickly than heavy, dense foods suchas roasts and casseroles. You musttake care when microwaving porousfoods that the outer edges do notbecome dry and brittle.
Height of foods: The upper portionof tall foods, particularly roasts, willcook more quickly than the lower por-tion. Therefore, it is wise to turn tallfoods during cooking, sometimesseveral times.
Moisture content of foods: Sincethe heat generated from microwavestends to evaporate moisture, relative-ly dry foods such as roasts and somevegetables should either be sprinkledwith water prior to cooking or coveredto retain moisture.
Bone and fat content of foods:Bones conduct heat and fat cooksmore quickly than meat. Therefore,care must be taken when cookingbony or fatty cuts of meat that themeats do not cook unevenly and donot become overcooked.
NOTE: It is a common misconceptionthat microwaves cook food from theinside out. This comes from heatingfilled pastries with a high sugar con-tent, like jelly doughnuts. The pastryis cool but the filling is very hot! If youcook a chicken or a roast, you’ll seethe outside is cooked first.
Shape of foods: Microwaves pene-trate only about 1 inch (2.5cm) intofoods; the interior portion of thickfoods is cooked as the heat generat-ed on the outside travels inward. Inother words, only the outer edge ofany food is actually cooked bymicrowave energy; the rest is cookedby conduction.
It follows then that the worst possibleshape for a food that is to bemicrowaved is a thick cube. The cor-ners will burn long before the centeris even warm. Round, thin, and ringshaped foods cook most successful-ly in the microwave.
Quantity of foods: The number ofmicrowaves in your oven remainsconstant regardless of how muchfood is being cooked. Therefore, themore food you place in the oven, thelonger the cooking time. Rememberto decrease cooking times by at leastone-third when halving a recipe.
8
Cooking Utensils
To avoid risk of personal injury or property damage, do not use stoneware, aluminum foil, metal utensils, or metaltrimmed utensils in the oven.
CAUTION
MICROWAVE-SAFEUTENSILSNever use metal or metal-trimmedutensils in your microwave oven:Microwaves cannot penetrate metal.They will bounce off any metal objectin the oven and cause arcing, analarming phenomenon that resem-bles lightning. Most heat-resistantnon-metallic cooking utensils aresafe for use in your microwave oven.However, some may contain materi-als that render them unsuitable asmicrowave cookware. If you haveany doubts about a particular utensil,there is a simple way to find out if itcan be used in your microwave oven.
Testing utensils for microwaveuse: Place the utensil in questionnext to a glass bowl filled with waterin the microwave oven. Microwave atpower HIGH for 1 minute. If the waterheats up but the utensil remains coolto the touch, the utensil ismicrowave-safe. However, if thewater does not change temperaturebut the utensil becomes warm,microwaves are being absorbed bythe utensil and it is not safe for use inthe microwave oven. You probablyhave many items on hand in yourkitchen that can be used as cookingequipment in your microwave oven.
Just read through the followingchecklist.
1. Dinner plates: Many kinds ofdinnerware are microwave-safe.If in doubt, consult the manu-facturer's literature or performthe microwave test, above.
2. Glassware: Glassware that isheat-resistant is microwave-safe. This includes all brands ofoventempered glass cookware.However, do not use delicateglassware, such as tumblers orwine glasses, as these mightshatter as the food warms.
3. Paper: Paper plates and con-tainers are convenient andsafe to use in your microwaveoven, provided the cookingtime is short and foods to becooked are low in fat andmoisture. Paper towels are alsovery useful for wrapping foodsand for lining baking trays inwhich greasy foods, such asbacon, are cooked. In general,avoid colored paper products asthe color may run.
4. Plastic storage containers:These can be used to hold foodsthat are to be quickly reheated.However, they should not beused to hold foods that will needconsiderable time in the oven ashot foods will eventually warp ormelt plastic containers.
5. Plastic cooking bags: Theseare microwave-safe providedthey are specially made forcooking. However, be sure tomake a slit in the bag so thatsteam can escape. Never useordinary plastic bags for cookingin your microwave oven, as theywill melt and rupture.
6. Plastic microwave cookware:A variety of shapes and sizes ofmicrowave cookware is avail-able. For the most part, you canprobably cook with items youalready have on hand ratherthan investing in new kitchenequipment.
7. Pottery, stoneware, andceramic: Containers made ofthese materials are usually finefor use in your microwave oven,but they should be tested to besure.
9
Feature Diagram
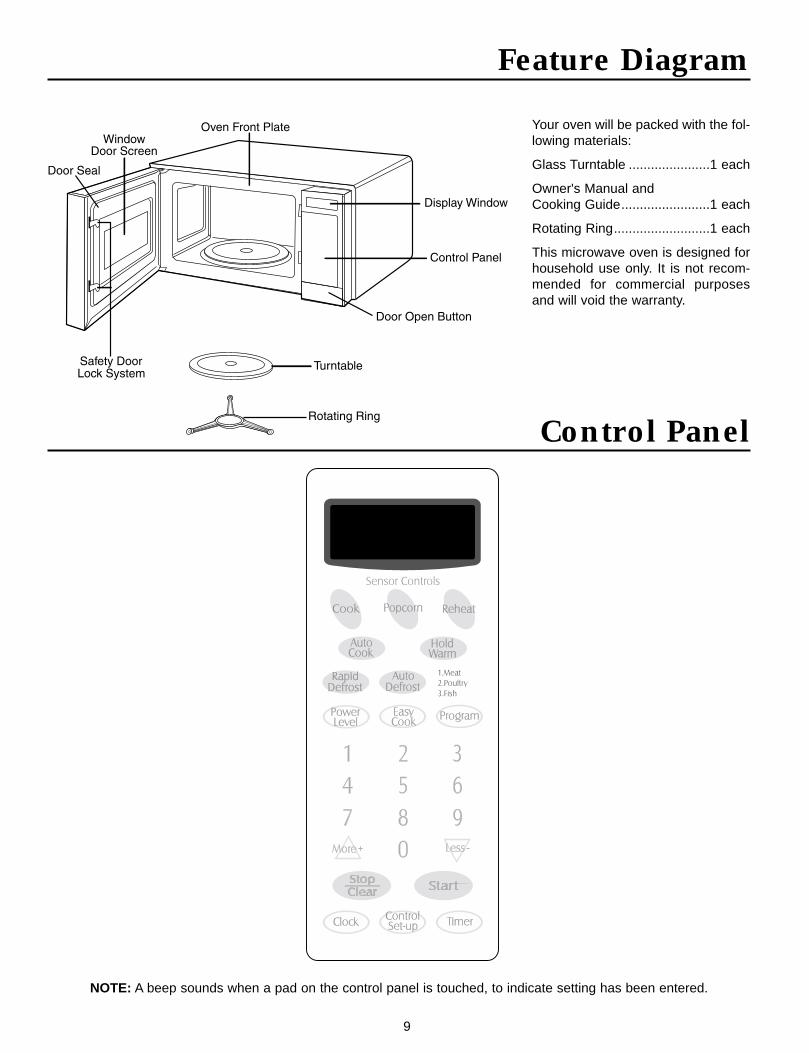
Your oven will be packed with the fol-lowing materials:
Glass Turntable ......................1 each
Owner's Manual andCooking Guide........................1 each
Rotating Ring..........................1 each
This microwave oven is designed forhousehold use only. It is not recom-mended for commercial purposesand will void the warranty.
Control Panel
NOTE: A beep sounds when a pad on the control panel is touched, to indicate setting has been entered.
10
Operating Instructions
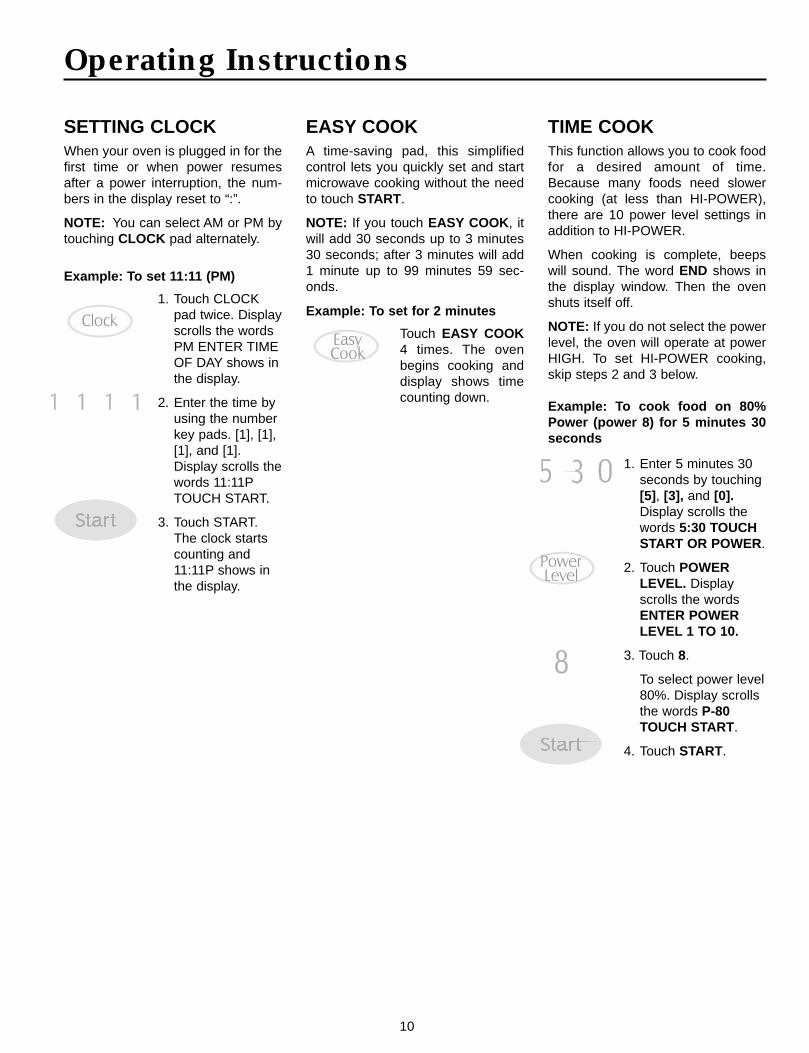
SETTING CLOCKWhen your oven is plugged in for thefirst time or when power resumesafter a power interruption, the num-bers in the display reset to “:”.
NOTE: You can select AM or PM bytouching CLOCK pad alternately.
EASY COOKA time-saving pad, this simplifiedcontrol lets you quickly set and startmicrowave cooking without the needto touch START.
NOTE: If you touch EASY COOK , itwill add 30 seconds up to 3 minutes30 seconds; after 3 minutes will add1 minute up to 99 minutes 59 sec-onds.
TIME COOKThis function allows you to cook foodfor a desired amount of time.Because many foods need slowercooking (at less than HI-POWER),there are 10 power level settings inaddition to HI-POWER.
When cooking is complete, beepswill sound. The word END shows inthe display window. Then the ovenshuts itself off.
NOTE: If you do not select the powerlevel, the oven will operate at powerHIGH. To set HI-POWER cooking,skip steps 2 and 3 below.
Example: To cook food on 80%Power (power 8) for 5 minutes 30seconds
Example: To set 11:11 (PM)
1. Touch CLOCKpad twice. Displayscrolls the wordsPM ENTER TIMEOF DAY shows inthe display.
2. Enter the time byusing the numberkey pads. [1], [1],[1], and [1].Display scrolls thewords 11:11PTOUCH START.
3. Touch START.The clock startscounting and11:11P shows inthe display.
Example: To set for 2 minutes
Touch EASY COOK4 times. The ovenbegins cooking anddisplay shows timecounting down.
1. Enter 5 minutes 30seconds by touching[5] , [3], and [0].Display scrolls thewords 5:30 TOUCHSTART OR POWER.
2. Touch POWERLEVEL. Displayscrolls the wordsENTER POWERLEVEL 1 TO 10.
3. Touch 8.
To select power level80%. Display scrollsthe words P-80TOUCH START.
4. Touch START.
11
MULTI-STAGE TIME COOKFor Multi-Stage cooking, touch PROGRAM and repeat Time Cook steps 1-3 onprevious page before touching the START pad.
Auto Defrost can be programmed before the first stage to defrost first and thencook.
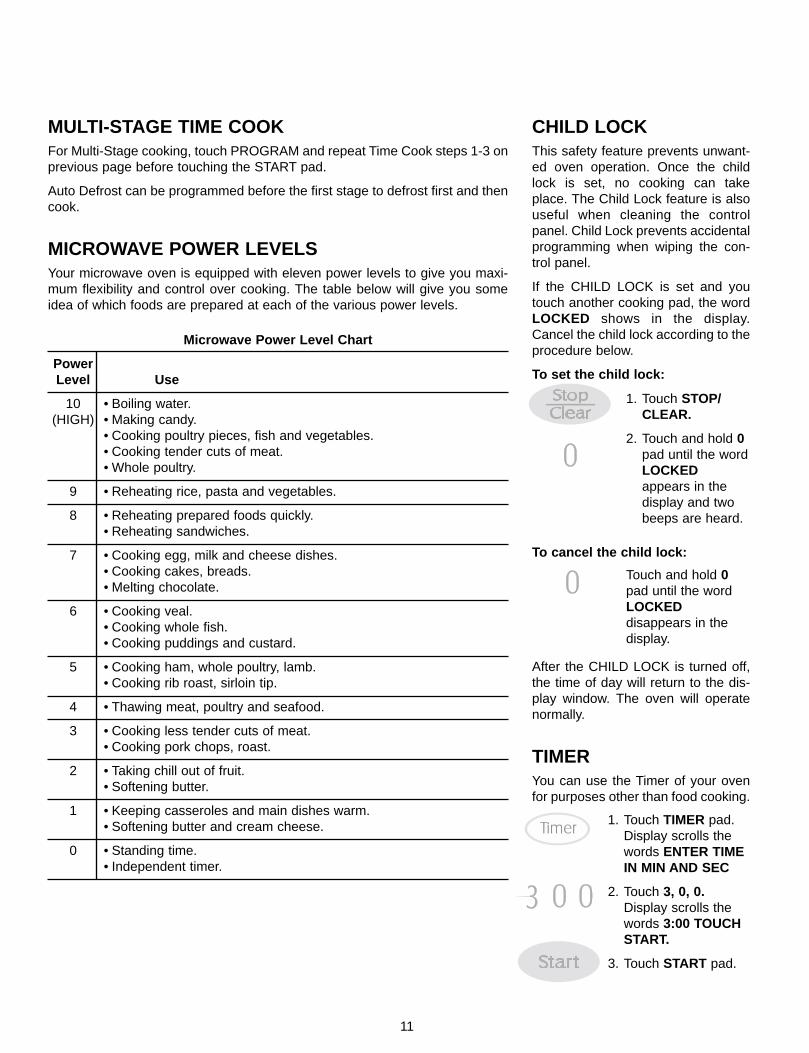
MICROWAVE POWER LEVELSYour microwave oven is equipped with eleven power levels to give you maxi-mum flexibility and control over cooking. The table below will give you someidea of which foods are prepared at each of the various power levels.
CHILD LOCKThis safety feature prevents unwant-ed oven operation. Once the childlock is set, no cooking can takeplace. The Child Lock feature is alsouseful when cleaning the controlpanel. Child Lock prevents accidentalprogramming when wiping the con-trol panel.
If the CHILD LOCK is set and youtouch another cooking pad, the wordLOCKED shows in the display.Cancel the child lock according to theprocedure below.
To set the child lock:
After the CHILD LOCK is turned off,the time of day will return to the dis-play window. The oven will operatenormally.
TIMERYou can use the Timer of your ovenfor purposes other than food cooking.
PowerLevel Use
10 • Boiling water.(HIGH) • Making candy.
• Cooking poultry pieces, fish and vegetables.• Cooking tender cuts of meat.• Whole poultry.
9 • Reheating rice, pasta and vegetables.
8 • Reheating prepared foods quickly.• Reheating sandwiches.
7 • Cooking egg, milk and cheese dishes.• Cooking cakes, breads.• Melting chocolate.
6 • Cooking veal.• Cooking whole fish.• Cooking puddings and custard.
5 • Cooking ham, whole poultry, lamb.• Cooking rib roast, sirloin tip.
4 • Thawing meat, poultry and seafood.
3 • Cooking less tender cuts of meat.• Cooking pork chops, roast.
2 • Taking chill out of fruit.• Softening butter.
1 • Keeping casseroles and main dishes warm.• Softening butter and cream cheese.
0 • Standing time.• Independent timer.
Microwave Power Level Chart
1. Touch STOP/CLEAR.
2. Touch and hold 0pad until the wordLOCKEDappears in thedisplay and twobeeps are heard.
To cancel the child lock:
Touch and hold 0pad until the wordLOCKEDdisappears in thedisplay.
1. Touch TIMER pad.Display scrolls thewords ENTER TIMEIN MIN AND SEC
2. Touch 3, 0, 0.Display scrolls thewords 3:00 TOUCHSTART.
3. Touch START pad.

12
Operating Instructions (cont’d)
CONTROL SET-UP FUNCTION CHARTNO FUNCTION CHOICE REMARKS
1 SOUND ON / OFF Sound On or Sound Off All of the key sound and End of Cook sound on or off.
2 CLOCK ON / OFF Clock On or Clock Off When clock is off nothing displays when oven is not in use.
3 SCROLL SPEED Slow, Normal, or Fast Controls speed of message that scrolls across display.
4 LBS. / KG Lbs. or Kg Set control to LBS. or KG for Auto Cook and Auto defrostfeatures.
NOTE: When the power cord is first plugged in, the default settings are Sound ON, Clock ON, Normal Speed and LBS.
CONTROL SET-UPCONTROL SET-UP allows you to set the oven for your preferences.
You can select SOUND ON/OFF, CLOCK ON/OFF, SCROLL SPEED and LBS/KG.
Example 1: To turn off Sound of beeper.
1. Touch CONTROL SET-UP. Four modes show in the display repeatedly.
2. Touch 1. Display scrolls the words SOUND ON TOUCH 1 OFF TOUCH 2.
3. Touch 2. Display scrolls the words SOUND OFF. The current time will be displayed.
NOTE: To turn beep sound back on, repeat steps 1 - 2 then touch number 1.
Example 2: To select kg unit.
1. Touch CONTROL SET-UP. Four modes show in the display continuously.
2. Touch 4.Display scrolls the words LBS TOUCH 1 KG TOUCH 2 .
3. Touch 2.Display scrolls the words KG. The current time will be displayed.
NOTE: To select LBS., repeat steps 1-2 then, touch number 1.
13
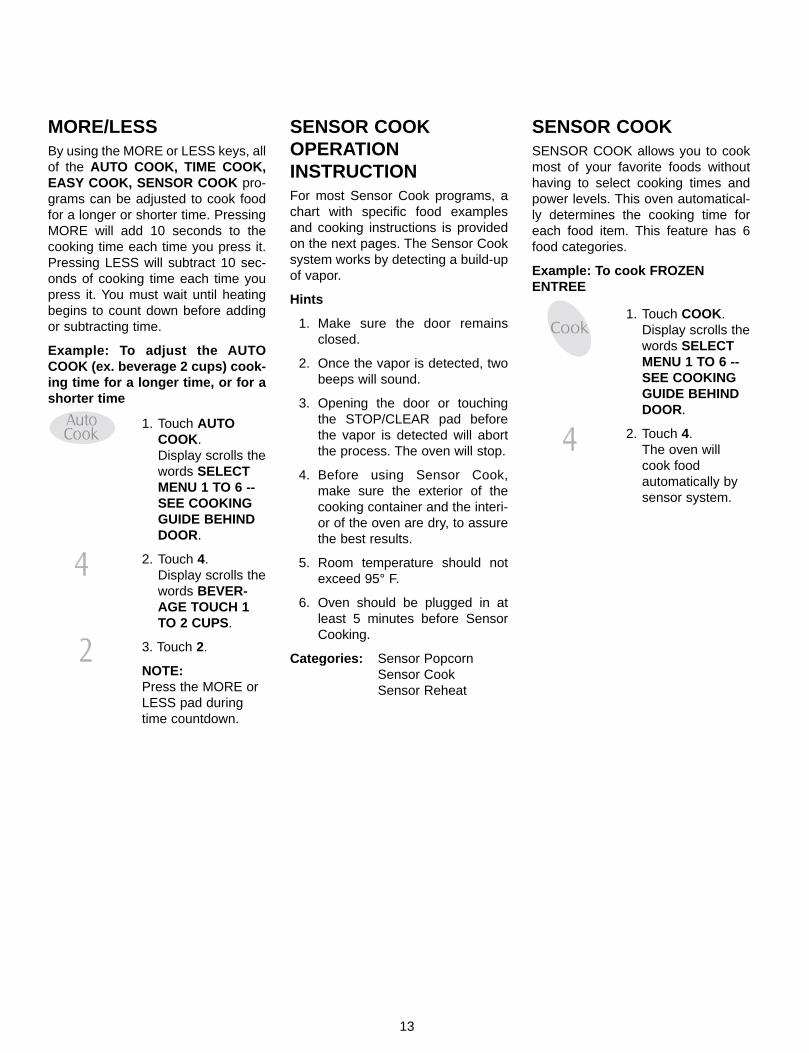
MORE/LESSBy using the MORE or LESS keys, allof the AUTO COOK, TIME COOK,EASY COOK, SENSOR COOK pro-grams can be adjusted to cook foodfor a longer or shorter time. PressingMORE will add 10 seconds to thecooking time each time you press it.Pressing LESS will subtract 10 sec-onds of cooking time each time youpress it. You must wait until heatingbegins to count down before addingor subtracting time.
Example: To adjust the AUTOCOOK (ex. beverage 2 cups) cook-ing time for a longer time, or for ashorter time
1. Touch AUTOCOOK.Display scrolls thewords SELECTMENU 1 TO 6 --SEE COOKINGGUIDE BEHINDDOOR.
2. Touch 4.Display scrolls thewords BEVER-AGE TOUCH 1TO 2 CUPS.
3. Touch 2.
NOTE:Press the MORE orLESS pad duringtime countdown.
1. Touch COOK.Display scrolls thewords SELECTMENU 1 TO 6 --SEE COOKINGGUIDE BEHINDDOOR.
2. Touch 4.The oven willcook foodautomatically bysensor system.
SENSOR COOKOPERATIONINSTRUCTIONFor most Sensor Cook programs, achart with specific food examplesand cooking instructions is providedon the next pages. The Sensor Cooksystem works by detecting a build-upof vapor.
Hints
1. Make sure the door remainsclosed.
2. Once the vapor is detected, twobeeps will sound.
3. Opening the door or touchingthe STOP/CLEAR pad beforethe vapor is detected will abortthe process. The oven will stop.
4. Before using Sensor Cook,make sure the exterior of thecooking container and the interi-or of the oven are dry, to assurethe best results.
5. Room temperature should notexceed 95° F.
6. Oven should be plugged in atleast 5 minutes before SensorCooking.
Categories: Sensor PopcornSensor CookSensor Reheat
SENSOR COOKSENSOR COOK allows you to cookmost of your favorite foods withouthaving to select cooking times andpower levels. This oven automatical-ly determines the cooking time foreach food item. This feature has 6food categories.
Example: To cook FROZENENTREE
14
Operating Instructions (cont’d)
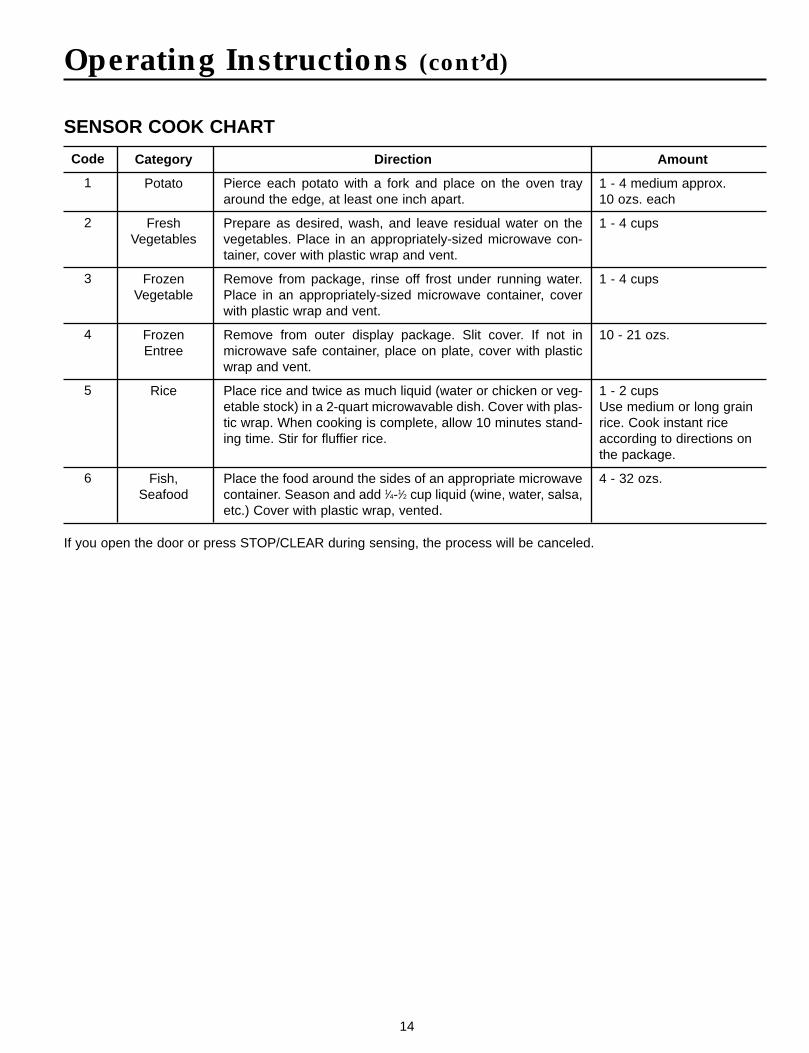
SENSOR COOK CHART
Code
1
2
3
4
5
6
Category
Potato
FreshVegetables
Frozen Vegetable
FrozenEntree
Rice
Fish,Seafood
Direction
Pierce each potato with a fork and place on the oven trayaround the edge, at least one inch apart.
Prepare as desired, wash, and leave residual water on thevegetables. Place in an appropriately-sized microwave con-tainer, cover with plastic wrap and vent.
Remove from package, rinse off frost under running water.Place in an appropriately-sized microwave container, coverwith plastic wrap and vent.
Remove from outer display package. Slit cover. If not inmicrowave safe container, place on plate, cover with plasticwrap and vent.
Place rice and twice as much liquid (water or chicken or veg-etable stock) in a 2-quart microwavable dish. Cover with plas-tic wrap. When cooking is complete, allow 10 minutes stand-ing time. Stir for fluffier rice.
Place the food around the sides of an appropriate microwavecontainer. Season and add 1⁄4-1⁄2 cup liquid (wine, water, salsa,etc.) Cover with plastic wrap, vented.
Amount
1 - 4 medium approx. 10 ozs. each
1 - 4 cups
1 - 4 cups
10 - 21 ozs.
1 - 2 cups Use medium or long grainrice. Cook instant riceaccording to directions onthe package.
4 - 32 ozs.
If you open the door or press STOP/CLEAR during sensing, the process will be canceled.
15
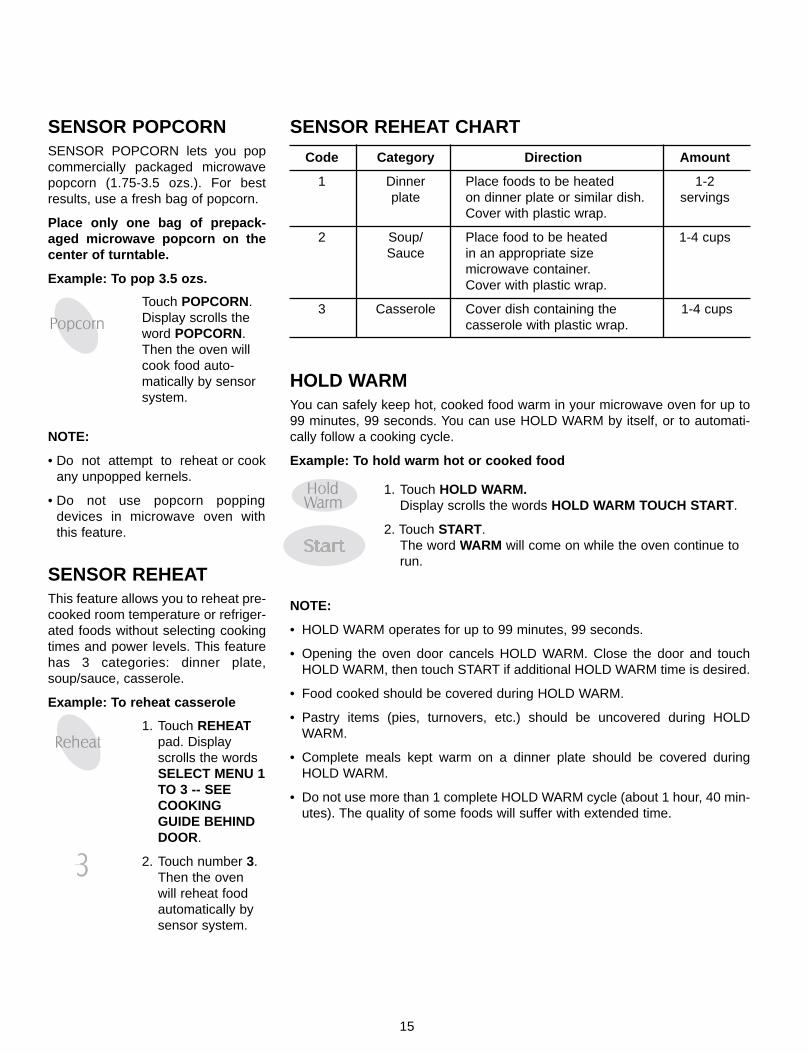
HOLD WARM You can safely keep hot, cooked food warm in your microwave oven for up to99 minutes, 99 seconds. You can use HOLD WARM by itself, or to automati-cally follow a cooking cycle.
Example: To hold warm hot or cooked food
SENSOR POPCORNSENSOR POPCORN lets you popcommercially packaged microwavepopcorn (1.75-3.5 ozs.). For bestresults, use a fresh bag of popcorn.
Place only one bag of prepack-aged microwave popcorn on thecenter of turntable.
Example: To pop 3.5 ozs.
Touch POPCORN.Display scrolls theword POPCORN.Then the oven willcook food auto-matically by sensorsystem.
NOTE:
• Do not attempt to reheat or cookany unpopped kernels.
• Do not use popcorn poppingdevices in microwave oven withthis feature.
SENSOR REHEATThis feature allows you to reheat pre-cooked room temperature or refriger-ated foods without selecting cookingtimes and power levels. This featurehas 3 categories: dinner plate,soup/sauce, casserole.
Example: To reheat casserole
1. Touch REHEATpad. Displayscrolls the wordsSELECT MENU 1TO 3 -- SEECOOKINGGUIDE BEHINDDOOR.
2. Touch number 3.Then the ovenwill reheat foodautomatically bysensor system.
SENSOR REHEAT CHART
Code Category Direction Amount
1 Dinner Place foods to be heated 1-2plate on dinner plate or similar dish. servings
Cover with plastic wrap.
2 Soup/ Place food to be heated 1-4 cupsSauce in an appropriate size
microwave container.Cover with plastic wrap.
3 Casserole Cover dish containing the 1-4 cupscasserole with plastic wrap.
NOTE:
• HOLD WARM operates for up to 99 minutes, 99 seconds.
• Opening the oven door cancels HOLD WARM. Close the door and touchHOLD WARM, then touch START if additional HOLD WARM time is desired.
• Food cooked should be covered during HOLD WARM.
• Pastry items (pies, turnovers, etc.) should be uncovered during HOLDWARM.
• Complete meals kept warm on a dinner plate should be covered duringHOLD WARM.
• Do not use more than 1 complete HOLD WARM cycle (about 1 hour, 40 min-utes). The quality of some foods will suffer with extended time.
1. Touch HOLD WARM.Display scrolls the words HOLD WARM TOUCH START .
2. Touch START.The word WARM will come on while the oven continue torun.
16
Operating Instructions (cont’d)
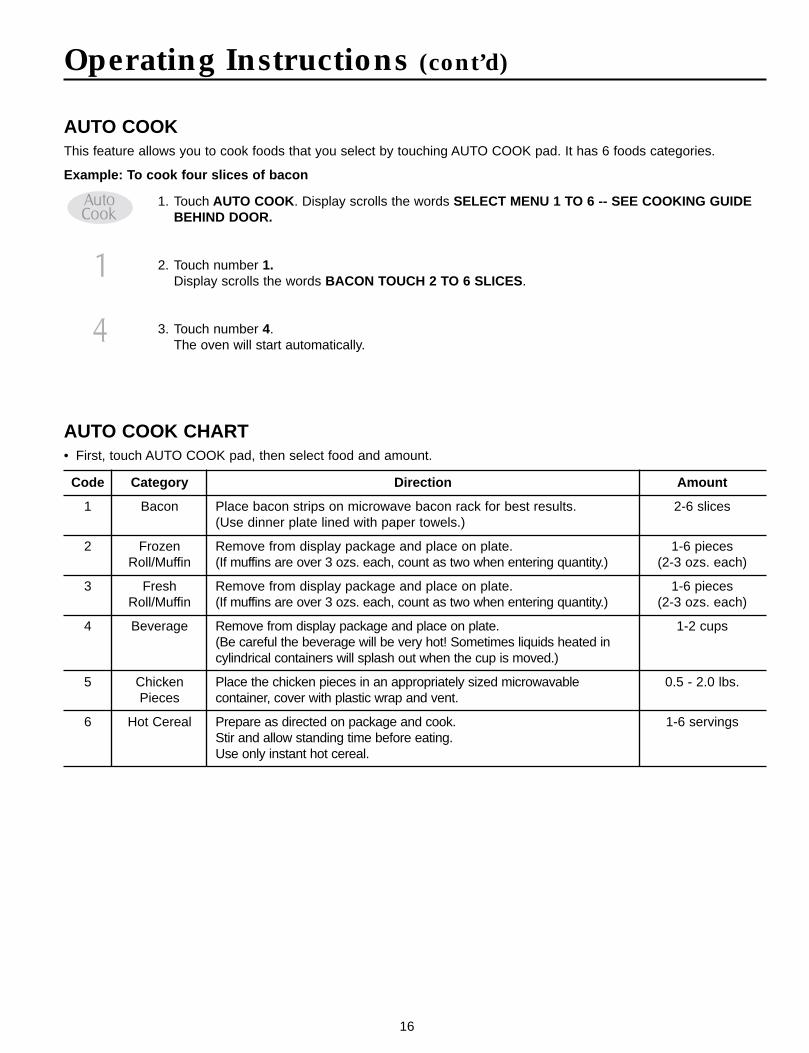
Code
1
2
3
4
5
6
Category
Bacon
FrozenRoll/Muffin
FreshRoll/Muffin
Beverage
ChickenPieces
Hot Cereal
Direction
Place bacon strips on microwave bacon rack for best results.(Use dinner plate lined with paper towels.)
Remove from display package and place on plate.(If muffins are over 3 ozs. each, count as two when entering quantity.)
Remove from display package and place on plate.(If muffins are over 3 ozs. each, count as two when entering quantity.)
Remove from display package and place on plate.(Be careful the beverage will be very hot! Sometimes liquids heated incylindrical containers will splash out when the cup is moved.)
Place the chicken pieces in an appropriately sized microwavablecontainer, cover with plastic wrap and vent.
Prepare as directed on package and cook.Stir and allow standing time before eating.Use only instant hot cereal.
Amount
2-6 slices
1-6 pieces(2-3 ozs. each)
1-6 pieces(2-3 ozs. each)
1-2 cups
0.5 - 2.0 lbs.
1-6 servings
AUTO COOKThis feature allows you to cook foods that you select by touching AUTO COOK pad. It has 6 foods categories.
Example: To cook four slices of bacon
1. Touch AUTO COOK . Display scrolls the words SELECT MENU 1 TO 6 -- SEE COOKING GUIDEBEHIND DOOR.
2. Touch number 1.Display scrolls the words BACON TOUCH 2 TO 6 SLICES .
3. Touch number 4. The oven will start automatically.
AUTO COOK CHART• First, touch AUTO COOK pad, then select food and amount.
17
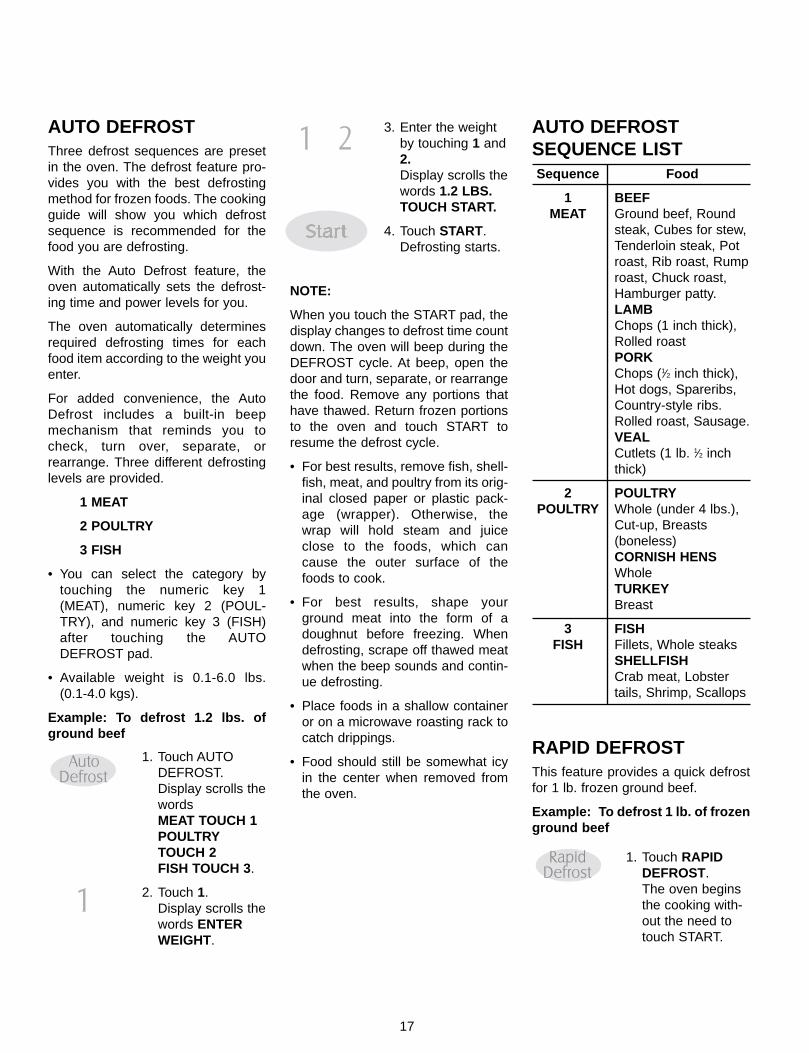
1. Touch AUTODEFROST.Display scrolls thewords MEAT TOUCH 1POULTRYTOUCH 2 FISH TOUCH 3.
2. Touch 1.Display scrolls thewords ENTERWEIGHT.
AUTO DEFROSTThree defrost sequences are presetin the oven. The defrost feature pro-vides you with the best defrostingmethod for frozen foods. The cookingguide will show you which defrostsequence is recommended for thefood you are defrosting.
With the Auto Defrost feature, theoven automatically sets the defrost-ing time and power levels for you.
The oven automatically determinesrequired defrosting times for eachfood item according to the weight youenter.
For added convenience, the AutoDefrost includes a built-in beepmechanism that reminds you tocheck, turn over, separate, orrearrange. Three different defrostinglevels are provided.
1 MEAT
2 POULTRY
3 FISH
• You can select the category bytouching the numeric key 1(MEAT), numeric key 2 (POUL-TRY), and numeric key 3 (FISH)after touching the AUTODEFROST pad.
• Available weight is 0.1-6.0 lbs.(0.1-4.0 kgs).
Example: To defrost 1.2 lbs. ofground beef
3. Enter the weightby touching 1 and2.Display scrolls thewords 1.2 LBS.TOUCH START.
4. Touch START.Defrosting starts.
NOTE:
When you touch the START pad, thedisplay changes to defrost time countdown. The oven will beep during theDEFROST cycle. At beep, open thedoor and turn, separate, or rearrangethe food. Remove any portions thathave thawed. Return frozen portionsto the oven and touch START toresume the defrost cycle.
• For best results, remove fish, shell-fish, meat, and poultry from its orig-inal closed paper or plastic pack-age (wrapper). Otherwise, thewrap will hold steam and juiceclose to the foods, which cancause the outer surface of thefoods to cook.
• For best results, shape yourground meat into the form of adoughnut before freezing. Whendefrosting, scrape off thawed meatwhen the beep sounds and contin-ue defrosting.
• Place foods in a shallow containeror on a microwave roasting rack tocatch drippings.
• Food should still be somewhat icyin the center when removed fromthe oven.
RAPID DEFROSTThis feature provides a quick defrostfor 1 lb. frozen ground beef.
Example: To defrost 1 lb. of frozenground beef
AUTO DEFROSTSEQUENCE LIST
Food
BEEFGround beef, Roundsteak, Cubes for stew,Tenderloin steak, Potroast, Rib roast, Rumproast, Chuck roast,Hamburger patty.LAMBChops (1 inch thick),Rolled roastPORKChops (1⁄2 inch thick),Hot dogs, Spareribs,Country-style ribs.Rolled roast, Sausage.VEALCutlets (1 lb. 1⁄2 inchthick)
POULTRYWhole (under 4 lbs.),Cut-up, Breasts (boneless)CORNISH HENSWholeTURKEYBreast
FISHFillets, Whole steaksSHELLFISHCrab meat, Lobstertails, Shrimp, Scallops
Sequence
1MEAT
2POULTRY
3FISH
1. Touch RAPIDDEFROST.The oven beginsthe cooking with-out the need totouch START.
18
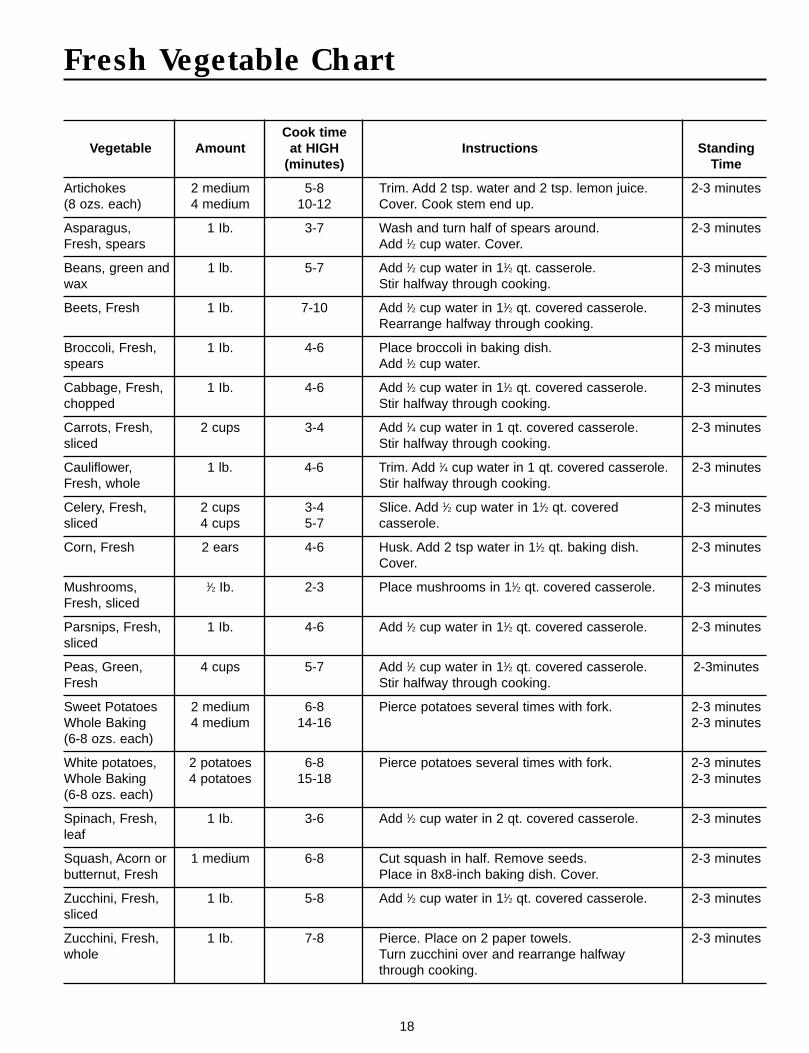
Fresh Vegetable Chart
Cook timeVegetable Amount at HIGH Instructions Standing
(minutes) Time
Artichokes 2 medium 5-8 Trim. Add 2 tsp. water and 2 tsp. lemon juice. 2-3 minutes(8 ozs. each) 4 medium 10-12 Cover. Cook stem end up.
Asparagus, 1 Ib. 3-7 Wash and turn half of spears around. 2-3 minutesFresh, spears Add 1⁄2 cup water. Cover.
Beans, green and 1 lb. 5-7 Add 1⁄2 cup water in 11⁄2 qt. casserole. 2-3 minuteswax Stir halfway through cooking.
Beets, Fresh 1 Ib. 7-10 Add 1⁄2 cup water in 11⁄2 qt. covered casserole. 2-3 minutesRearrange halfway through cooking.
Broccoli, Fresh, 1 Ib. 4-6 Place broccoli in baking dish. 2-3 minutesspears Add 1⁄2 cup water.
Cabbage, Fresh, 1 Ib. 4-6 Add 1⁄2 cup water in 11⁄2 qt. covered casserole. 2-3 minuteschopped Stir halfway through cooking.
Carrots, Fresh, 2 cups 3-4 Add 1⁄4 cup water in 1 qt. covered casserole. 2-3 minutessliced Stir halfway through cooking.
Cauliflower, 1 lb. 4-6 Trim. Add 1⁄4 cup water in 1 qt. covered casserole. 2-3 minutesFresh, whole Stir halfway through cooking.
Celery, Fresh, 2 cups 3-4 Slice. Add 1⁄2 cup water in 11⁄2 qt. covered 2-3 minutessliced 4 cups 5-7 casserole.
Corn, Fresh 2 ears 4-6 Husk. Add 2 tsp water in 11⁄2 qt. baking dish. 2-3 minutesCover.
Mushrooms, 1⁄2 Ib. 2-3 Place mushrooms in 11⁄2 qt. covered casserole. 2-3 minutesFresh, sliced
Parsnips, Fresh, 1 Ib. 4-6 Add 1⁄2 cup water in 11⁄2 qt. covered casserole. 2-3 minutessliced
Peas, Green, 4 cups 5-7 Add 1⁄2 cup water in 11⁄2 qt. covered casserole. 2-3minutesFresh Stir halfway through cooking.
Sweet Potatoes 2 medium 6-8 Pierce potatoes several times with fork. 2-3 minutesWhole Baking 4 medium 14-16 2-3 minutes(6-8 ozs. each)
White potatoes, 2 potatoes 6-8 Pierce potatoes several times with fork. 2-3 minutesWhole Baking 4 potatoes 15-18 2-3 minutes(6-8 ozs. each)
Spinach, Fresh, 1 Ib. 3-6 Add 1⁄2 cup water in 2 qt. covered casserole. 2-3 minutesleaf
Squash, Acorn or 1 medium 6-8 Cut squash in half. Remove seeds. 2-3 minutesbutternut, Fresh Place in 8x8-inch baking dish. Cover.
Zucchini, Fresh, 1 Ib. 5-8 Add 1⁄2 cup water in 11⁄2 qt. covered casserole. 2-3 minutessliced
Zucchini, Fresh, 1 Ib. 7-8 Pierce. Place on 2 paper towels. 2-3 minuteswhole Turn zucchini over and rearrange halfway
through cooking.
19
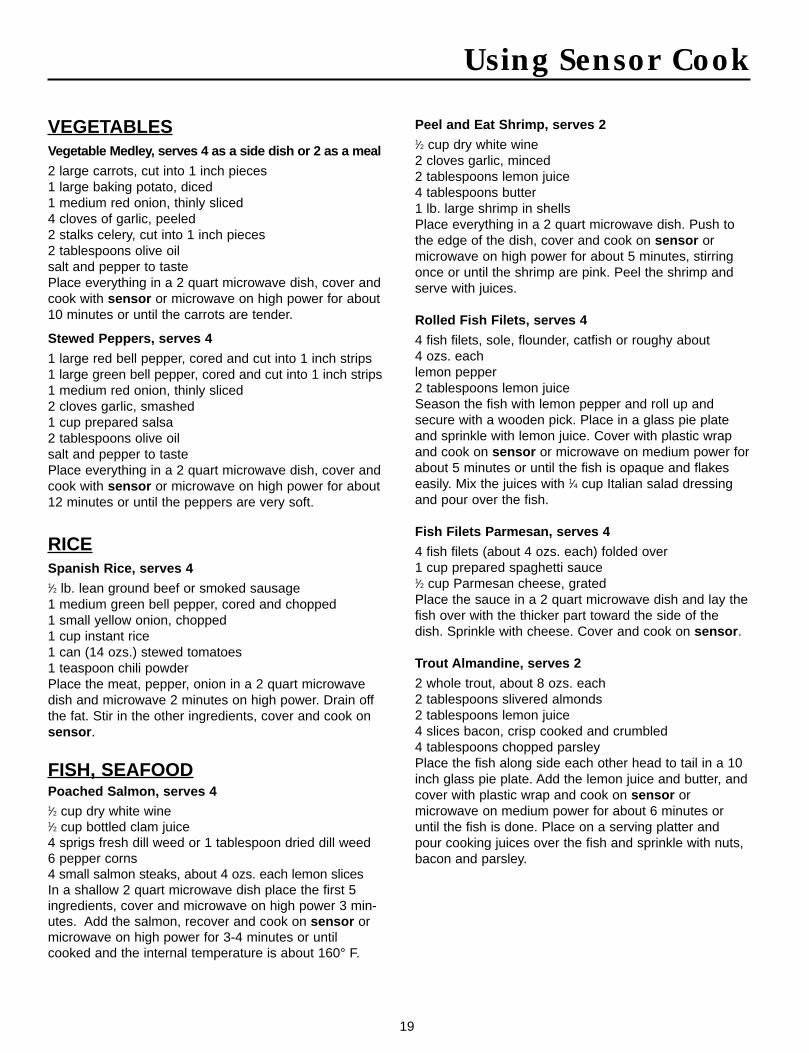
Using Sensor Cook
VEGETABLESVegetable Medley, serves 4 as a side dish or 2 as a meal
2 large carrots, cut into 1 inch pieces1 large baking potato, diced1 medium red onion, thinly sliced4 cloves of garlic, peeled2 stalks celery, cut into 1 inch pieces2 tablespoons olive oilsalt and pepper to tastePlace everything in a 2 quart microwave dish, cover andcook with sensor or microwave on high power for about10 minutes or until the carrots are tender.
Stewed Peppers, serves 4
1 large red bell pepper, cored and cut into 1 inch strips1 large green bell pepper, cored and cut into 1 inch strips1 medium red onion, thinly sliced2 cloves garlic, smashed1 cup prepared salsa2 tablespoons olive oilsalt and pepper to tastePlace everything in a 2 quart microwave dish, cover andcook with sensor or microwave on high power for about12 minutes or until the peppers are very soft.
RICESpanish Rice, serves 41⁄2 lb. lean ground beef or smoked sausage1 medium green bell pepper, cored and chopped1 small yellow onion, chopped1 cup instant rice1 can (14 ozs.) stewed tomatoes1 teaspoon chili powderPlace the meat, pepper, onion in a 2 quart microwavedish and microwave 2 minutes on high power. Drain offthe fat. Stir in the other ingredients, cover and cook onsensor .
FISH, SEAFOODPoached Salmon, serves 41⁄2 cup dry white wine1⁄2 cup bottled clam juice4 sprigs fresh dill weed or 1 tablespoon dried dill weed6 pepper corns4 small salmon steaks, about 4 ozs. each lemon slicesIn a shallow 2 quart microwave dish place the first 5ingredients, cover and microwave on high power 3 min-utes. Add the salmon, recover and cook on sensor ormicrowave on high power for 3-4 minutes or untilcooked and the internal temperature is about 160° F.
Peel and Eat Shrimp, serves 21⁄2 cup dry white wine2 cloves garlic, minced2 tablespoons lemon juice4 tablespoons butter1 lb. large shrimp in shellsPlace everything in a 2 quart microwave dish. Push tothe edge of the dish, cover and cook on sensor ormicrowave on high power for about 5 minutes, stirringonce or until the shrimp are pink. Peel the shrimp andserve with juices.
Rolled Fish Filets, serves 4
4 fish filets, sole, flounder, catfish or roughy about 4 ozs. eachlemon pepper2 tablespoons lemon juiceSeason the fish with lemon pepper and roll up andsecure with a wooden pick. Place in a glass pie plateand sprinkle with lemon juice. Cover with plastic wrapand cook on sensor or microwave on medium power forabout 5 minutes or until the fish is opaque and flakeseasily. Mix the juices with 1⁄4 cup Italian salad dressingand pour over the fish.
Fish Filets Parmesan, serves 4
4 fish filets (about 4 ozs. each) folded over1 cup prepared spaghetti sauce1⁄2 cup Parmesan cheese, gratedPlace the sauce in a 2 quart microwave dish and lay thefish over with the thicker part toward the side of thedish. Sprinkle with cheese. Cover and cook on sensor .
Trout Almandine, serves 2
2 whole trout, about 8 ozs. each2 tablespoons slivered almonds2 tablespoons lemon juice4 slices bacon, crisp cooked and crumbled4 tablespoons chopped parsleyPlace the fish along side each other head to tail in a 10inch glass pie plate. Add the lemon juice and butter, andcover with plastic wrap and cook on sensor ormicrowave on medium power for about 6 minutes oruntil the fish is done. Place on a serving platter andpour cooking juices over the fish and sprinkle with nuts,bacon and parsley.
20
Care and Cleaning
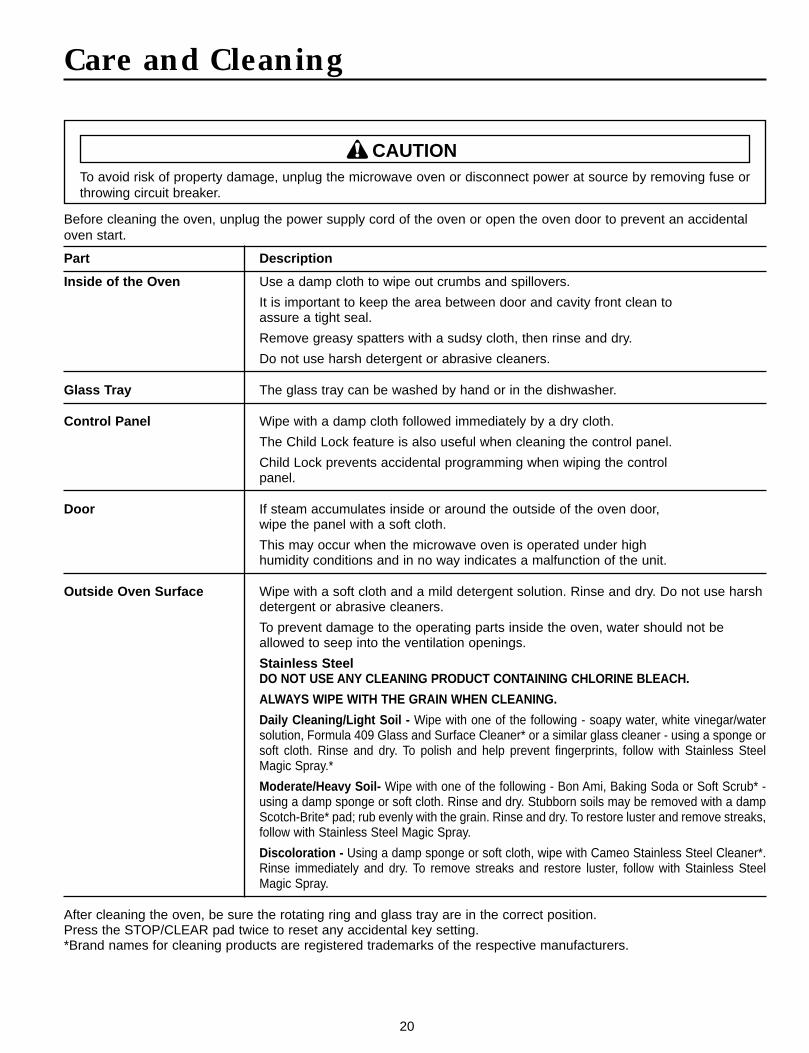
To avoid risk of property damage, unplug the microwave oven or disconnect power at source by removing fuse orthrowing circuit breaker.
CAUTION
Before cleaning the oven, unplug the power supply cord of the oven or open the oven door to prevent an accidentaloven start.
Part Description
Inside of the Oven Use a damp cloth to wipe out crumbs and spillovers.
It is important to keep the area between door and cavity front clean to assure a tight seal.
Remove greasy spatters with a sudsy cloth, then rinse and dry.
Do not use harsh detergent or abrasive cleaners.
Glass Tray The glass tray can be washed by hand or in the dishwasher.
Control Panel Wipe with a damp cloth followed immediately by a dry cloth.
The Child Lock feature is also useful when cleaning the control panel.
Child Lock prevents accidental programming when wiping the control panel.
Door If steam accumulates inside or around the outside of the oven door, wipe the panel with a soft cloth.
This may occur when the microwave oven is operated under high humidity conditions and in no way indicates a malfunction of the unit.
Outside Oven Surface Wipe with a soft cloth and a mild detergent solution. Rinse and dry. Do not use harshdetergent or abrasive cleaners.
To prevent damage to the operating parts inside the oven, water should not beallowed to seep into the ventilation openings.
Stainless SteelDO NOT USE ANY CLEANING PRODUCT CONTAINING CHLORINE BLEACH.
ALWAYS WIPE WITH THE GRAIN WHEN CLEANING.
Daily Cleaning/Light Soil - Wipe with one of the following - soapy water, white vinegar/watersolution, Formula 409 Glass and Surface Cleaner* or a similar glass cleaner - using a sponge orsoft cloth. Rinse and dry. To polish and help prevent fingerprints, follow with Stainless SteelMagic Spray.*
Moderate/Heavy Soil- Wipe with one of the following - Bon Ami, Baking Soda or Soft Scrub* -using a damp sponge or soft cloth. Rinse and dry. Stubborn soils may be removed with a dampScotch-Brite* pad; rub evenly with the grain. Rinse and dry. To restore luster and remove streaks,follow with Stainless Steel Magic Spray.
Discoloration - Using a damp sponge or soft cloth, wipe with Cameo Stainless Steel Cleaner*.Rinse immediately and dry. To remove streaks and restore luster, follow with Stainless SteelMagic Spray.
After cleaning the oven, be sure the rotating ring and glass tray are in the correct position.Press the STOP/CLEAR pad twice to reset any accidental key setting.*Brand names for cleaning products are registered trademarks of the respective manufacturers.
21
Troubleshooting
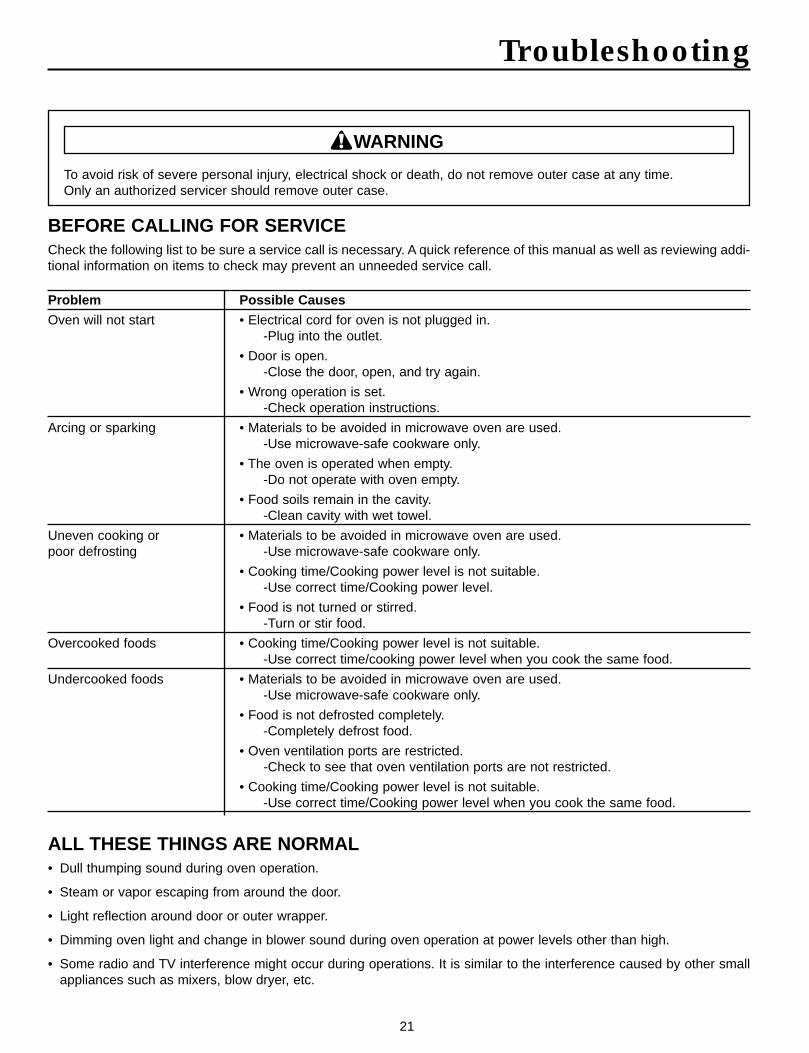
To avoid risk of severe personal injury, electrical shock or death, do not remove outer case at any time.Only an authorized servicer should remove outer case.
WARNING
BEFORE CALLING FOR SERVICECheck the following list to be sure a service call is necessary. A quick reference of this manual as well as reviewing addi-tional information on items to check may prevent an unneeded service call.
ALL THESE THINGS ARE NORMAL• Dull thumping sound during oven operation.
• Steam or vapor escaping from around the door.
• Light reflection around door or outer wrapper.
• Dimming oven light and change in blower sound during oven operation at power levels other than high.
• Some radio and TV interference might occur during operations. It is similar to the interference caused by other smallappliances such as mixers, blow dryer, etc.
Problem Possible Causes
Oven will not start • Electrical cord for oven is not plugged in.-Plug into the outlet.
• Door is open.-Close the door, open, and try again.
• Wrong operation is set.-Check operation instructions.
Arcing or sparking • Materials to be avoided in microwave oven are used.-Use microwave-safe cookware only.
• The oven is operated when empty.-Do not operate with oven empty.
• Food soils remain in the cavity.-Clean cavity with wet towel.
Uneven cooking or • Materials to be avoided in microwave oven are used.poor defrosting -Use microwave-safe cookware only.
• Cooking time/Cooking power level is not suitable.-Use correct time/Cooking power level.
• Food is not turned or stirred.-Turn or stir food.
Overcooked foods • Cooking time/Cooking power level is not suitable.-Use correct time/cooking power level when you cook the same food.
Undercooked foods • Materials to be avoided in microwave oven are used.-Use microwave-safe cookware only.
• Food is not defrosted completely.-Completely defrost food.
• Oven ventilation ports are restricted.-Check to see that oven ventilation ports are not restricted.
• Cooking time/Cooking power level is not suitable.-Use correct time/Cooking power level when you cook the same food.

22
Notes

23
Notes
24
A/03/02 ©2002 Maytag Appliance Sales Co. Part No.8112P201-60Printed in China 03/02 3828W5A2446
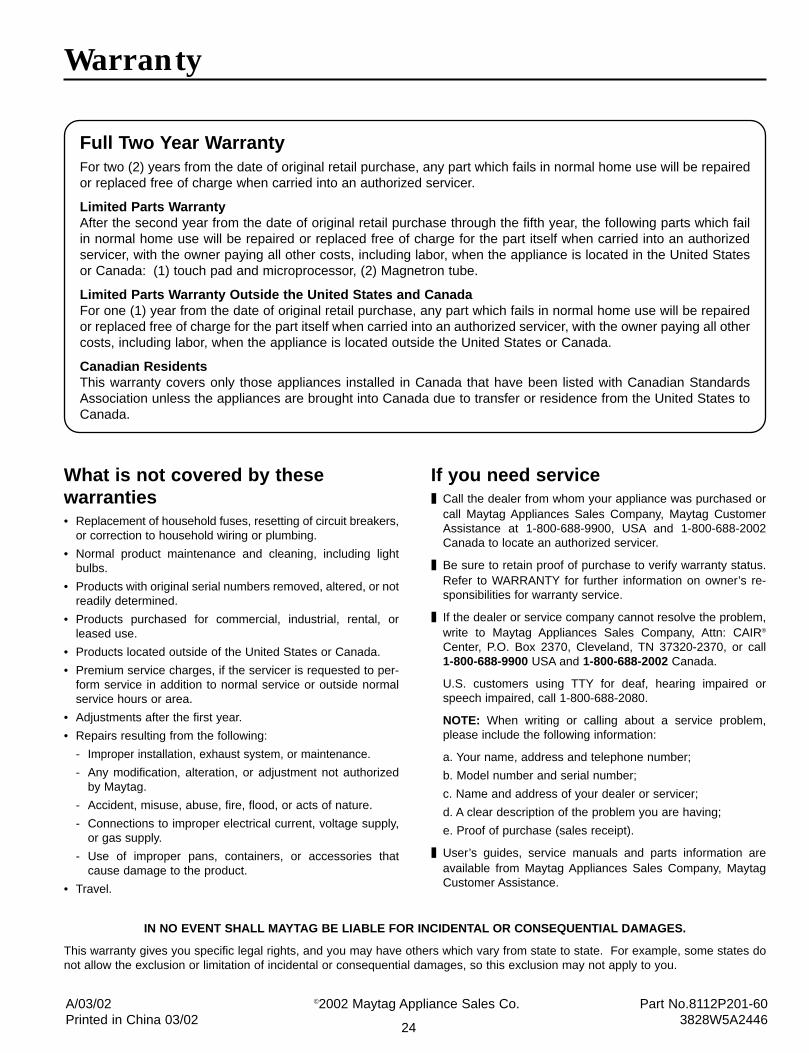
Warranty
IN NO EVENT SHALL MAYTAG BE LIABLE FOR INCIDENTAL OR CONSEQUENTIAL DAMAGES.
This warranty gives you specific legal rights, and you may have others which vary from state to state. For example, some states donot allow the exclusion or limitation of incidental or consequential damages, so this exclusion may not apply to you.
Full Two Year WarrantyFor two (2) years from the date of original retail purchase, any part which fails in normal home use will be repairedor replaced free of charge when carried into an authorized servicer.
Limited Parts WarrantyAfter the second year from the date of original retail purchase through the fifth year, the following parts which failin normal home use will be repaired or replaced free of charge for the part itself when carried into an authorizedservicer, with the owner paying all other costs, including labor, when the appliance is located in the United Statesor Canada: (1) touch pad and microprocessor, (2) Magnetron tube.
Limited Parts Warranty Outside the United States and CanadaFor one (1) year from the date of original retail purchase, any part which fails in normal home use will be repairedor replaced free of charge for the part itself when carried into an authorized servicer, with the owner paying all othercosts, including labor, when the appliance is located outside the United States or Canada.
Canadian ResidentsThis warranty covers only those appliances installed in Canada that have been listed with Canadian StandardsAssociation unless the appliances are brought into Canada due to transfer or residence from the United States toCanada.
What is not covered by thesewarranties• Replacement of household fuses, resetting of circuit breakers,
or correction to household wiring or plumbing.
• Normal product maintenance and cleaning, including lightbulbs.
• Products with original serial numbers removed, altered, or notreadily determined.
• Products purchased for commercial, industrial, rental, orleased use.
• Products located outside of the United States or Canada.
• Premium service charges, if the servicer is requested to per-form service in addition to normal service or outside normalservice hours or area.
• Adjustments after the first year.
• Repairs resulting from the following:
- Improper installation, exhaust system, or maintenance.
- Any modification, alteration, or adjustment not authorizedby Maytag.
- Accident, misuse, abuse, fire, flood, or acts of nature.
- Connections to improper electrical current, voltage supply,or gas supply.
- Use of improper pans, containers, or accessories thatcause damage to the product.
• Travel.
If you need service❚ Call the dealer from whom your appliance was purchased or
call Maytag Appliances Sales Company, Maytag CustomerAssistance at 1-800-688-9900, USA and 1-800-688-2002Canada to locate an authorized servicer.
❚ Be sure to retain proof of purchase to verify warranty status.Refer to WARRANTY for further information on owner’s re-sponsibilities for warranty service.
❚ If the dealer or service company cannot resolve the problem,write to Maytag Appliances Sales Company, Attn: CAIR®
Center, P.O. Box 2370, Cleveland, TN 37320-2370, or call 1-800-688-9900 USA and 1-800-688-2002 Canada.
U.S. customers using TTY for deaf, hearing impaired orspeech impaired, call 1-800-688-2080.
NOTE: When writing or calling about a service problem,please include the following information:
a. Your name, address and telephone number;
b. Model number and serial number;
c. Name and address of your dealer or servicer;
d. A clear description of the problem you are having;
e. Proof of purchase (sales receipt).
❚ User’s guides, service manuals and parts information areavailable from Maytag Appliances Sales Company, MaytagCustomer Assistance.